
A Plague Tale Requiem has 21 Souvenir Locations. Finding all Souvenirs unlocks the Immortal memories trophy and achievement. They are conversations triggered by interacting with certain objects, from completing minigames, and by simply walking on hidden side paths.
None of the Souvenirs are missable. You can still get all of them via Chapter Select after the story or in New Game+. Everything is carried over into New Game+. You can keep track of them in the Codex and via the Collectible Counter in Chapter Select. They all have unique names so it’s easy to figure out which ones you still need.
» For All-in-One Collectible Guide including all other types see: A Plague Tale Requiem All-in-One Collectible Guide.

Chapter 1: Under a New Sun
NO SOUVENIRS IN THIS CHAPTER!
Chapter 2: Newcomers
Souvenir #1: Best player
Sub-Chapter: Arrival in the town
Objective: Walk to the House
From the start of the chapter head straight, keep going up the path until Amicia says “The house with the weather vane, that’s ours!”. Then you enter a big tent at the market square. A woman in a blue dress stops you to offer hairstyling services, after talking to her take the path to her right, then talk to the lady selling flowers outside the tent. After Hugo finishes talking to the flower lady, go left, then take the next right to find a man offering a pot-throwing minigame. Finish the minigame by throwing pots at the bottom of the stacked paper cubes so that they collapse. Then the man will announce you were the best player of the day and you get the Souvenir.

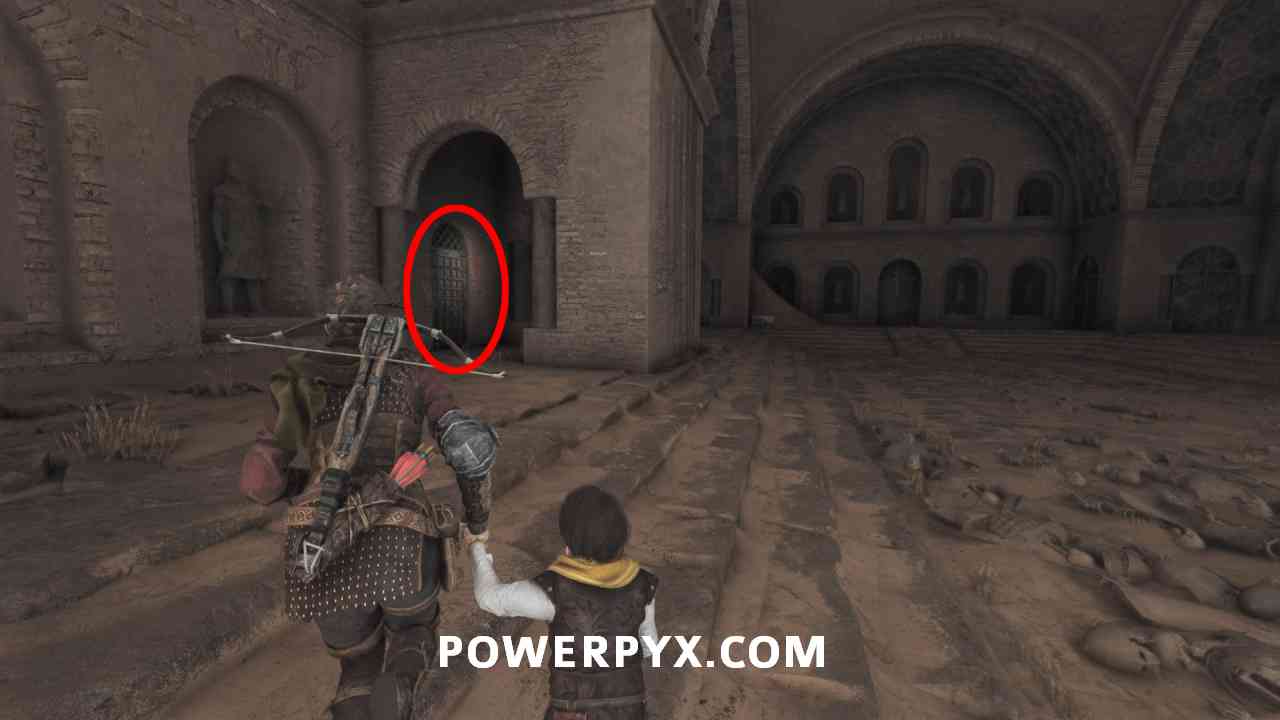
Souvenir #2: Be at peace
Sub-Chapter: Confrontation in the stands
Objective: Follow the Order’s Symbols
After an enemy encounter where you see the 1st archer in the game, you will be prompted to open the skills menu to proceed. Then the next room you enter is a cellar with lots of flies and dead bodies and Lucas says “What is this place? A hospital?”. Here, go up the right staircase to find a dying woman upstairs, interact with her for the Souvenir.

Chapter 3: A Burden of Blood
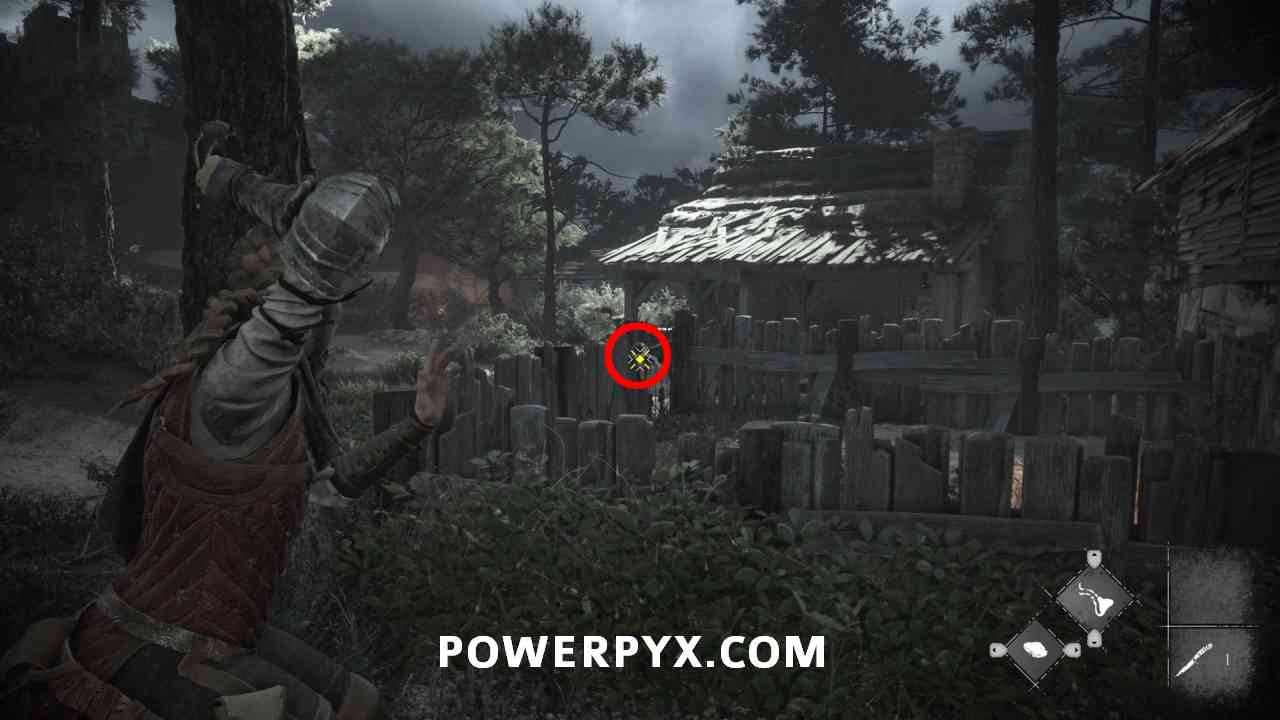
Souvenir #3: A Grave
Sub-Chapter: The gate
Objective: Reach the herbalist’s forest
After leaving the city you come to a little wooden area. Where you find the first workbench there’s a fenced garden on the right. Shoot the garden gate from the right side using the slingshot. Now enter the garden and interact with the grave to get the Souvenir.
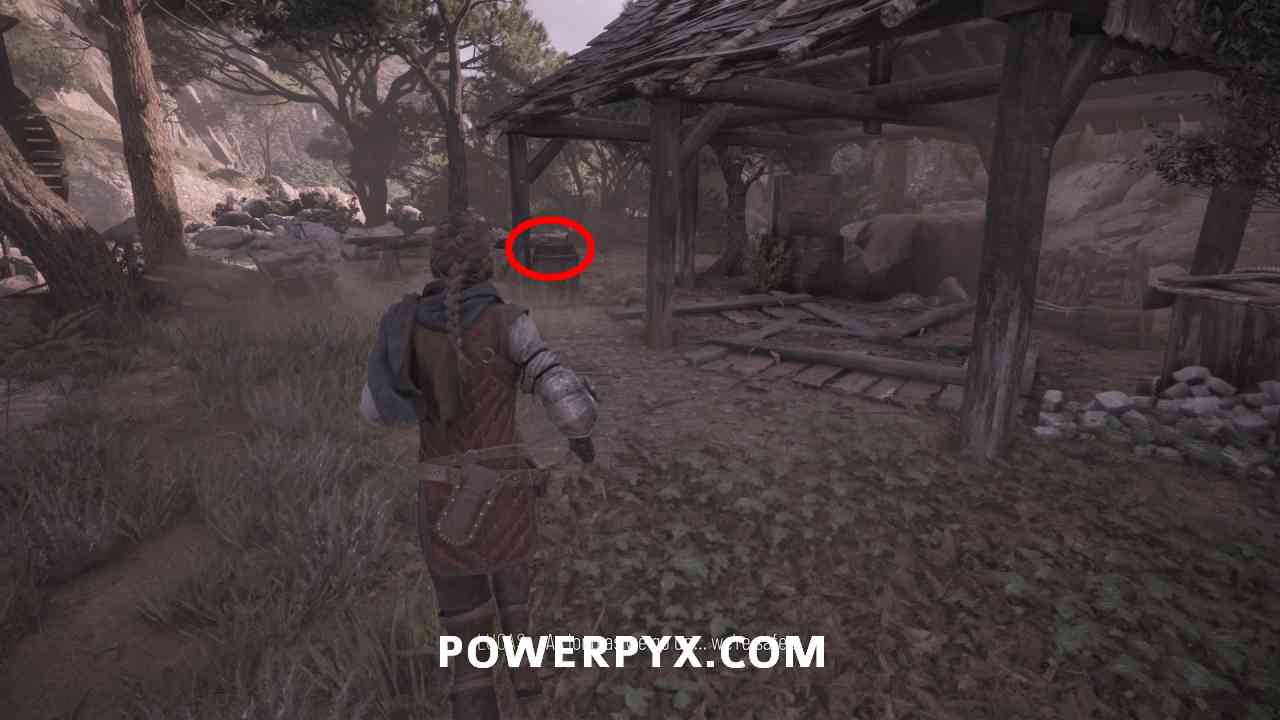
Souvenir #4: Our home
Sub-Chapter: The Warehouse
Objective: Escape the fort
Inside the warehouse, after getting back your sling, go up the ladder again and turn to the left. Shoot down the hatch and cross it. Now just pick up the map.

Chapter 4: Protector’s Duty (1 Hugo’s Herbarium, 2 Souvenirs)
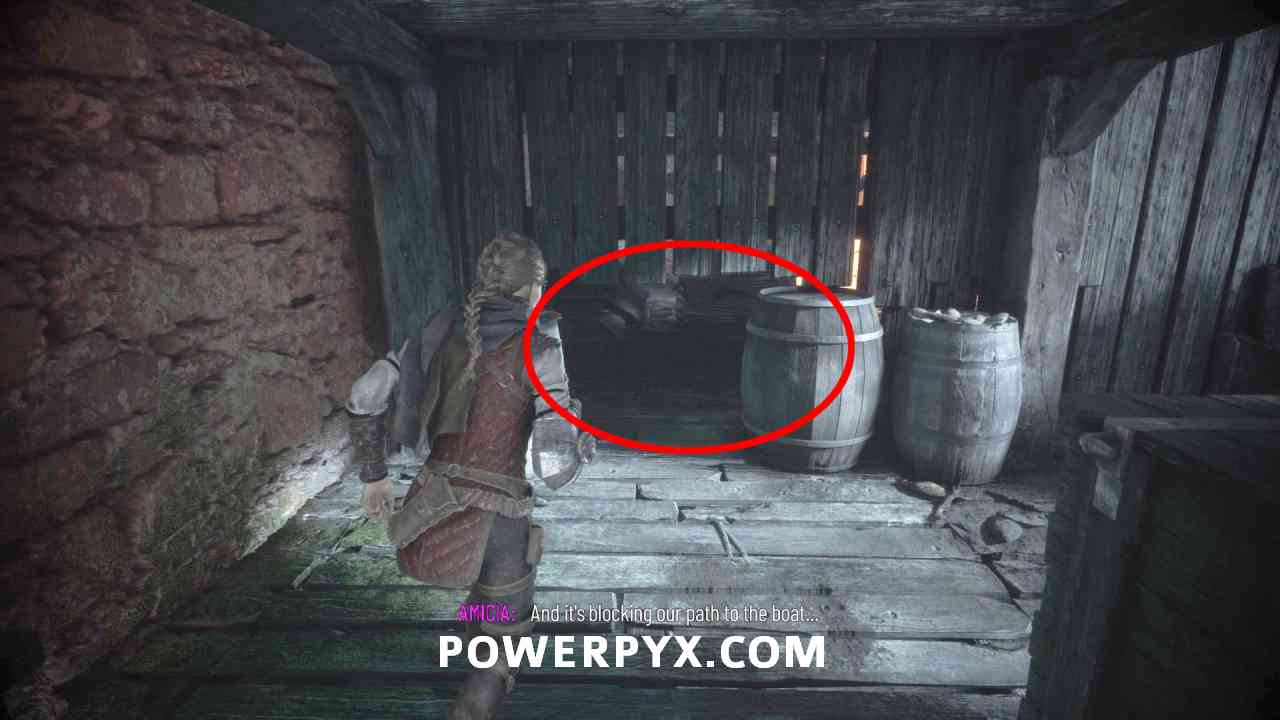
Souvenir #5: Silk treasure
Sub-Chapter: Night Work
Objective: Reach the order’s boat
Once you reach the harbor/docks area, you can only go in one direction to advance. Always keep going straight, you’ll squeeze between some boxes, then go up a ladder, then keep going straight. DON’T INTERACT WITH THE HATCH THAT HAS A  /
/  PROMPT! Go straight until the very end of the path, there’s a hole in the wall, crouch under it. Behind it is a crate you can move to the wall across from it to climb up, leading to a balcony. There you find the silk, interact with it. If you’ve reached an enemy encounter you’ve gone too far, in this case quit to main menu and replay the sub-chapter.


Souvenir #6: A grain of sand
Sub-Chapter: The Tar Workshop
Objective: Reach the order’s boat
After exiting the tar workshop, continue along the scripted path until you see a coffin blocking up a crack you can squeeze through. Don’t squeeze through just yet. Instead, look at the fallen structure opposite it and you should spot a chain you can destroy with your sling. Destroying the chain opens up a path leading you to the Souvenir’s location. At the end of a jetty you can look towards the castle and press / to trigger a conversation.


Chapter 5: In Our Wake
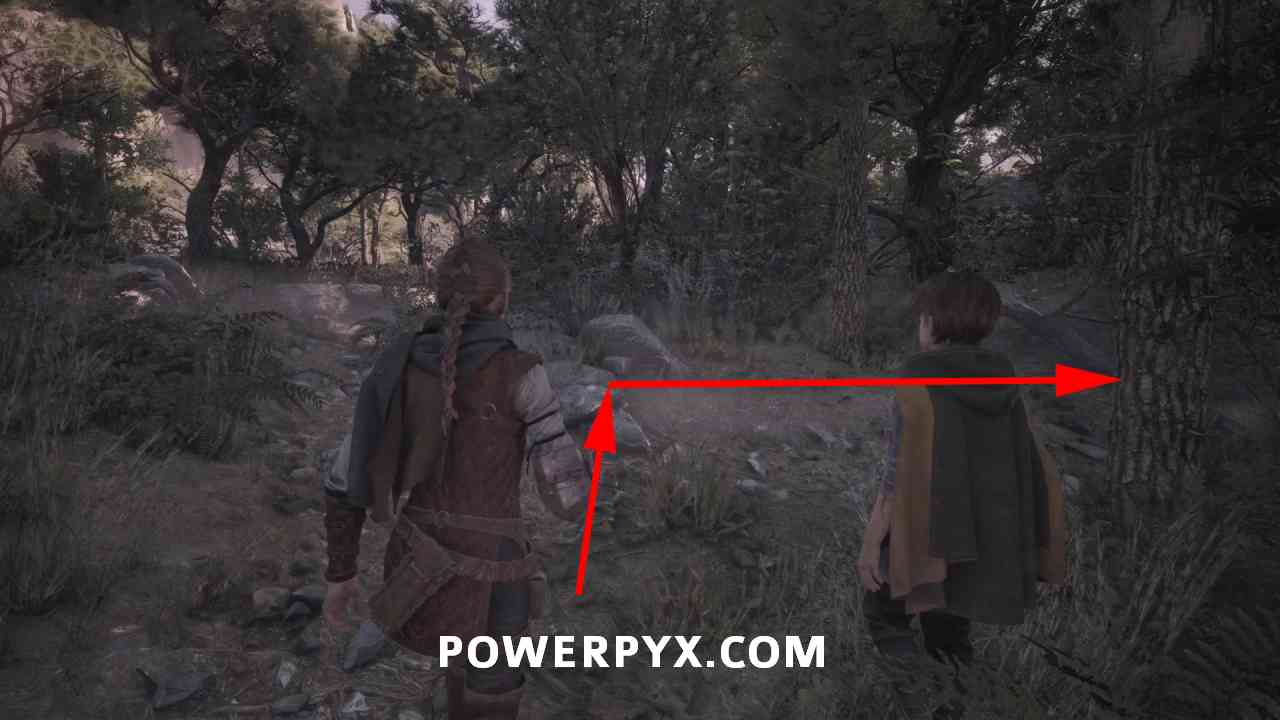
Souvenir #7: The stag’s roar
Sub-Chapter: On the river
Objective: Find a way to reach the boat
After exiting the boat, follow the only path forward uphill into the forest. In the forest, when the path splits up take the right path. Just walk along this side path and you’ll hear a stag bellowing, Lucas and Amicia will have a conversation about it which gives you this Souvenir. There’s nothing to interact with, simply walking on the side path is enough. If you reach a tree branch in front of a crevice you can interact with, you have gone too far and must backtrack to find the side path.

Souvenir #8: Huuuugooooo!
Sub-chapter: On the River
Objective: Cross the construction site
While crossing the rat-infested area, after reuniting with Lucas, don’t continue just yet towards the braziers (where the story wants you to use fire sticks to advance). Instead, if you look behind and above you, you should see a ladder behind held by a chain. Destroy the chain and then keep climbing up. At the top, approach the braided fence and together with Lucas you’ll be able to holler at Hugo.


Chapter 6: Leaving all Behind
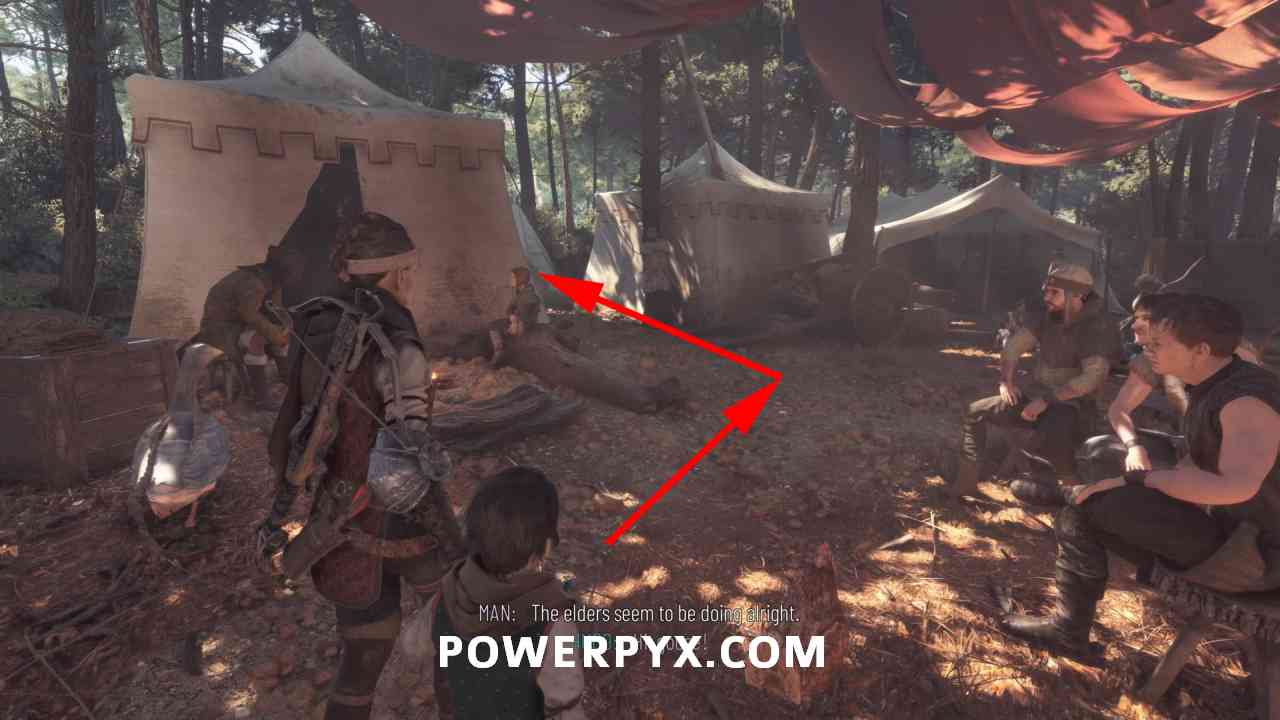
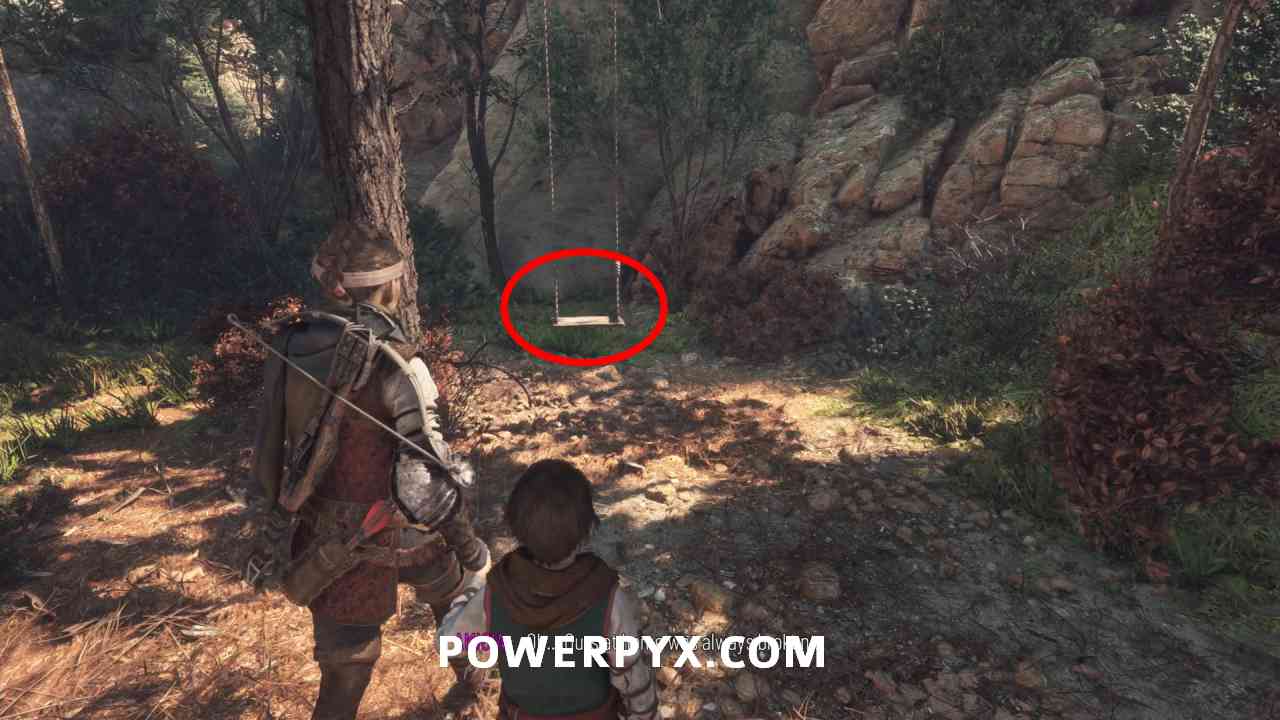
Souvenir #9: Imagine you’re flying!
Sub-Chapter: A pilgrim road
Objective: Ask for the way to the coast
When you arrive at the camp where a woman greets you, go along the left side, there’s a side path between the tents that leads to a swing. Interact with the swing. Hugo will push you on the swing for a little while, the Souvenir unlocks after that.
Souvenir #10: Which colour do you want?
Sub-Chapter: Call of the rats
Objective: Find a way out of the building
In the room where you will learn a new ability to defeat enemies. Then the room gets infested with rats. Light the fire sources by shooting them with Ignifer slightshot, throw a fire pot to jump down the ledge, then grab the torch to get upstairs past the rats. In the next room is a workbench, climb the ladder next to it, then crouch through a hole in the wall upstairs, then drop into the small room below. Hugo will offer to change your bandage. Interact with him to get this collectible.


Chapter 7: Felons
Souvenir #11: The Survivor
Sub-Chapter: Passage in the caves
Objective: Find the smuggler’s hideout
After exiting the rat-infested cave, you will come outside to another beach with a workbench on the left. Past the workbench you can climb the cliffs on the left, leading to a shipwreck above the workbench. Inspect it to trigger the Souvenir.

Souvenir #12: The first men
Sub-Chapter: The fishing village
Objective: Reach Sophia’s boat
After the enemy encounter at the beach, you will have to push a coffin aside to squeeze through a gap to enter the next area. Here, before the next beach encounter, turn left and climb up the ledges, leading into a cave. Take the torch from the right side of the cave, walk to the end of the cave. There’s a cave painting on the wall, inspect it for this Souvenir.


Chapter 8: A Sea of Promises
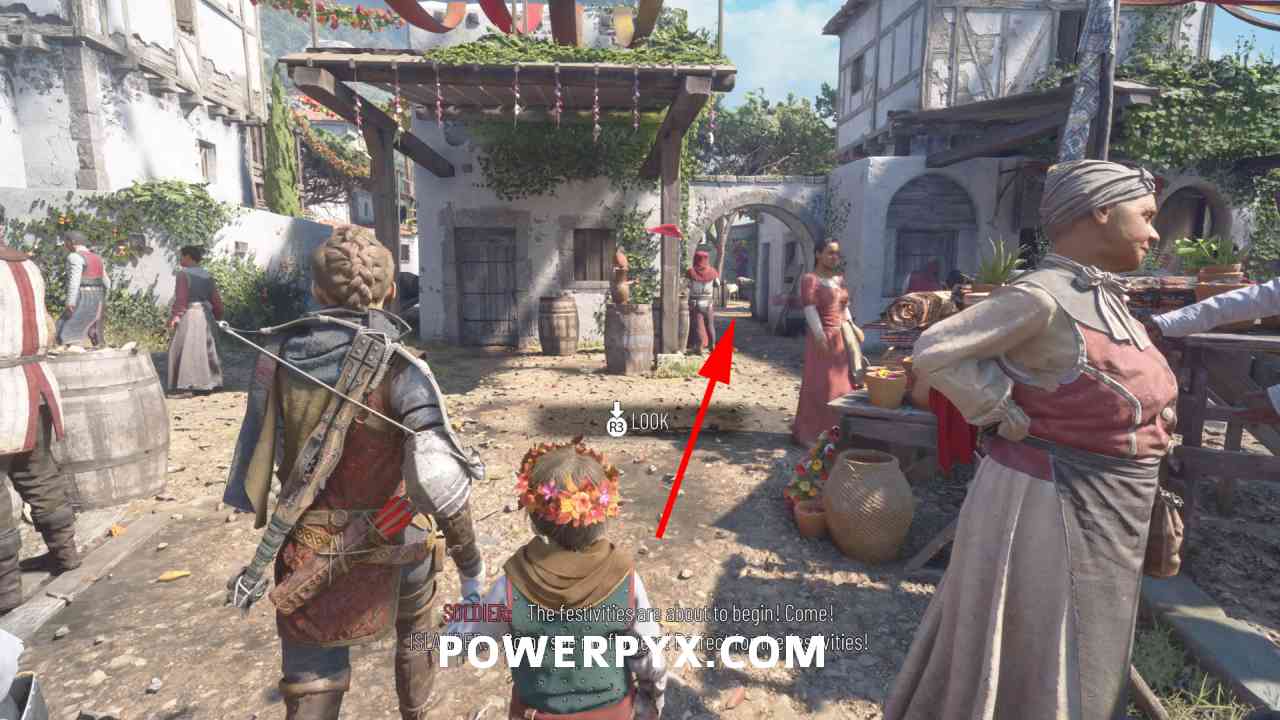
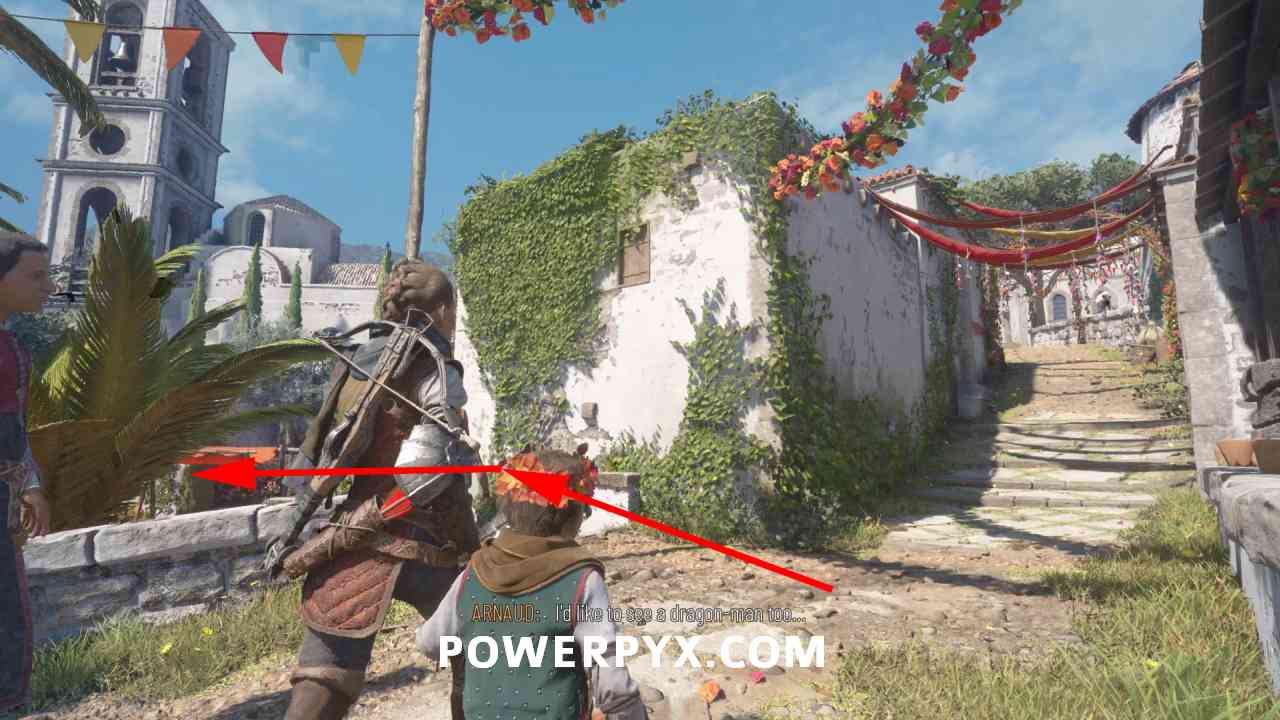
Souvenir #13: Silent Lucinda
Sub-Chapter: Celebration of the brighter days
Objective: Look around for information about the island
After exiting the ship shortly after the start of the chapter, you will reach a market square. Go to the 2nd alley/archway on the right side. Go through this 2nd archway to find some goats in the alley. Interact with them for this Souvenir.
Souvenir #14: Flower crown
Sub-Chapter: Celebration of the brighter days
Objective: Look around for information about the island
From the previous Souvenir, go to the exit of the market (normal story path, can only go one way), then at the first opportunity go down the first staircase on the left (instead of heading straight). There you find a little market stall with a vendor offering a pot throwing minigame, that’s the “Crowns game” required for the “Perfect Throw” trophy / achievement. You must throw all 4 pots through the hanging “crowns” AND hit the colored tarp behind each (from left to right: 1) Yellow > 2) Purple with Green > 3) Orange > 4) Brown). If you hit the wall behind the crowns, but not the colored tarp, it may not unlock the trophy correctly. After finishing the minigame you also earn the Souvenir.

Chapter 9: Tales and Revelations
Souvenir #15: A thousand more years
Sub-Chapter: Exploration
Objective: Follow the bird statues
You will leave the castle and meet Sofia again, and as part of the story you will have to follow bird statues. After finding the 1st bird statue (story-related), follow the path to its right straight on until the very end (not the downhill path, but the one going towards houses). Follow the path in a straight line until the end (don’t take a left turn). Go through the backyard of a house, it leads to a river at the edge of the map. There’s a tree upriver at the end of the path. Interact with the tree for the Souvenir conversation.

Souvenir #16: Nice screeching
Sub-Chapter: Exploration
Objective: Follow the bird statues
From where you entered the big open free-roam area, there’s a ruined tower in the back left corner of the area, close to the big mountain. It’s the only tower there, you can see it easily when running around. To enter the tower, shoot the door lock through the window, then climb to the very top of the tower. There you get a / button prompt when overlooking the area to trigger a conversation.

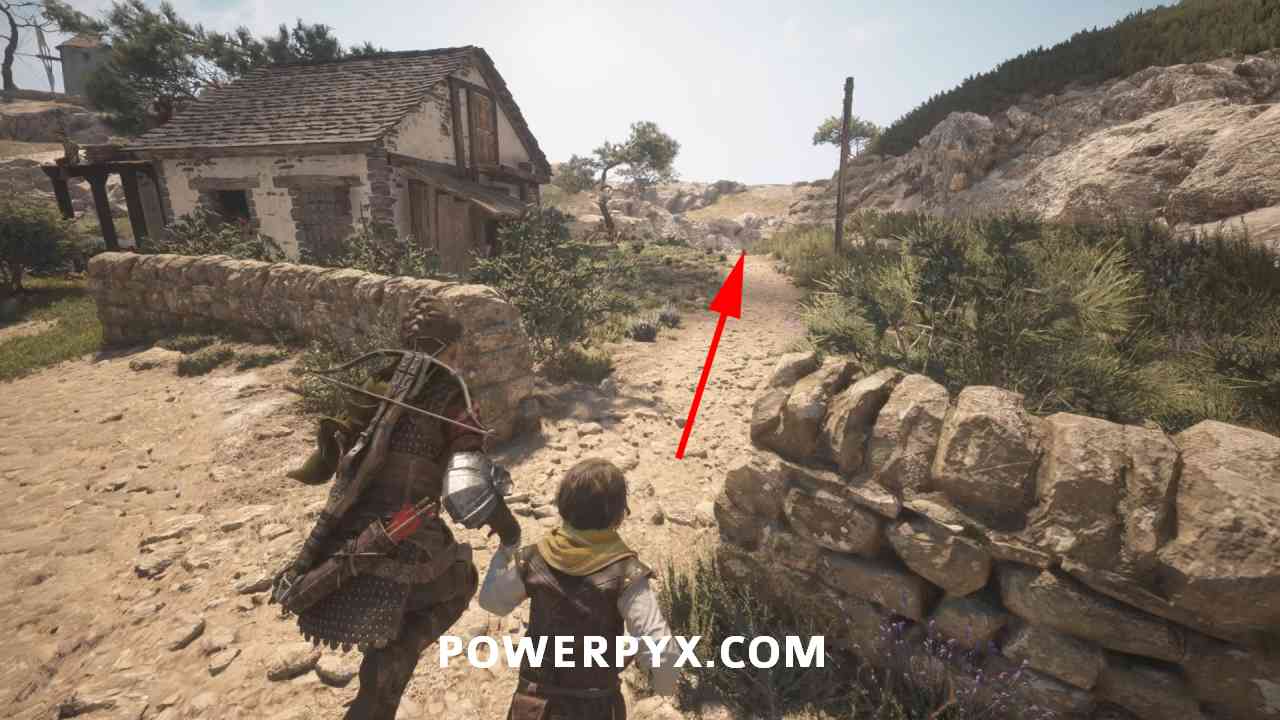
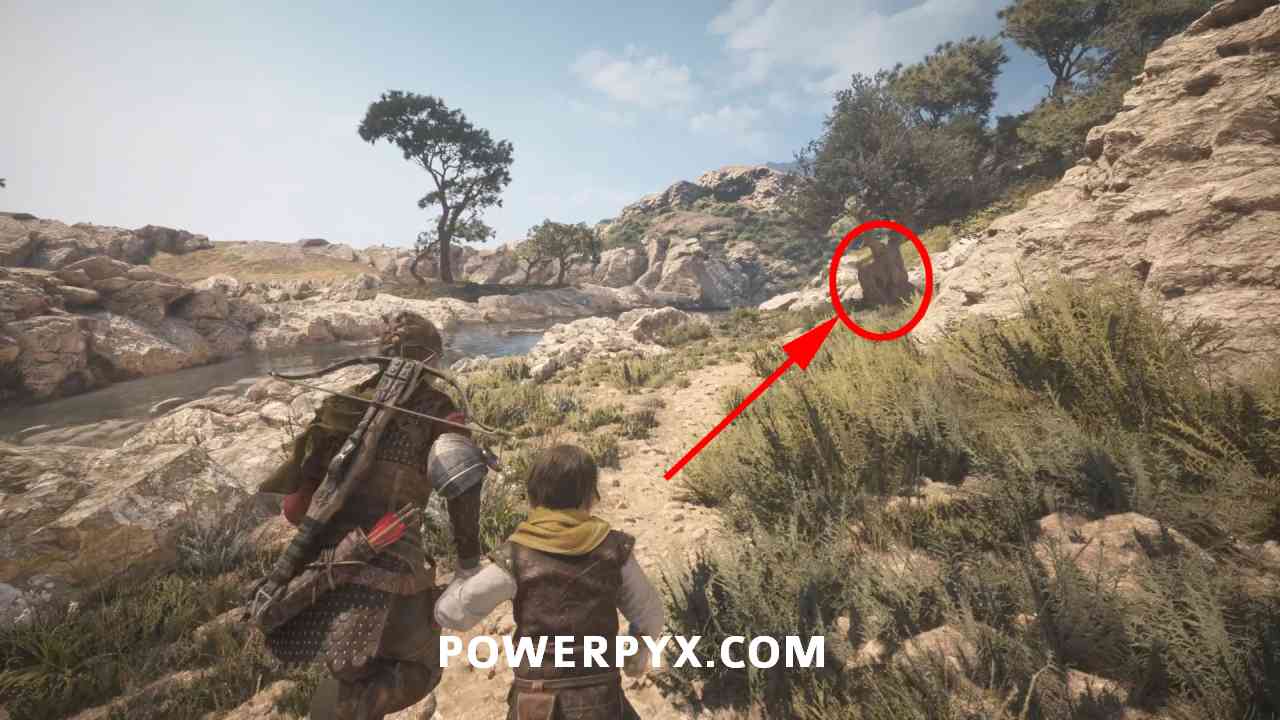
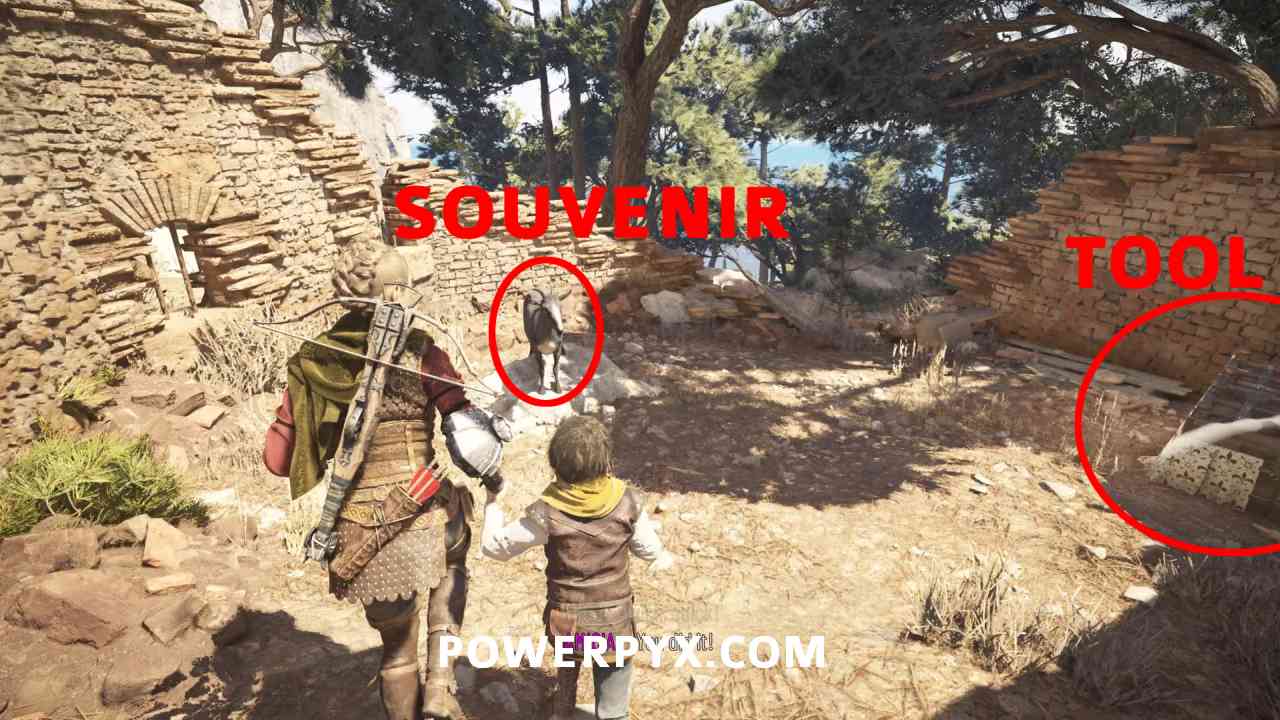
Souvenir #17: Tramontane
Sub-Chapter: On the mountain
Objective: Find a way around the checkpoint
Once you left the big open area with the previous collectibles, you will on a path to the mountain. After a little walk you will reach a checkpoint blocked by some goats, you now have to turn to the left climb up the little mountain/hill and follow the path, you will come across a broken building, inside that building is a goat. Behind that building is a grass that needs to be burned, now let hugo crawl in and he will open the door. You can now interact with the chest with the tool inside and then interact with the goat, the goat will now be free and you will get the souvenir.


Chapter 10: Bloodline
Souvenir #18: A rag doll
Sub-Chapter: Approaching the fort
Objective: Reach the fort
After you open a door by smashing a chandelier against it, there will be a cutscene, after that Hugo will run across a field. Go talk to him, then enter the ruins next to him. Immediately after entering, turn left and use your grappling hook to open a wall. Climb up the wall, immediately turn right to find a tree, interacting with it gives the Souvenir.

Chapter 11: The Cradle of Centuries
Souvenir #19: The Chateau d’Ombrage
Sub-Chapter: Defence system
Objective: Explore the underground area
After you blew up a wall with a wagon full of explosives, you will reach a big open chamber with burning carts you can push. Take the cart on the right, push it halfway in the direction of the bridge. When you reach a big rock, push the cart to the right until it can go no further. You will see a chest. Use Sophia’s prism crystal (aim at brazier and  + /
+ /  + ), then jump down the ledge left of the chest to find the Souvenir on a table. (To get back to the cart you need to use Pyrite or throw an Ignifer pot).


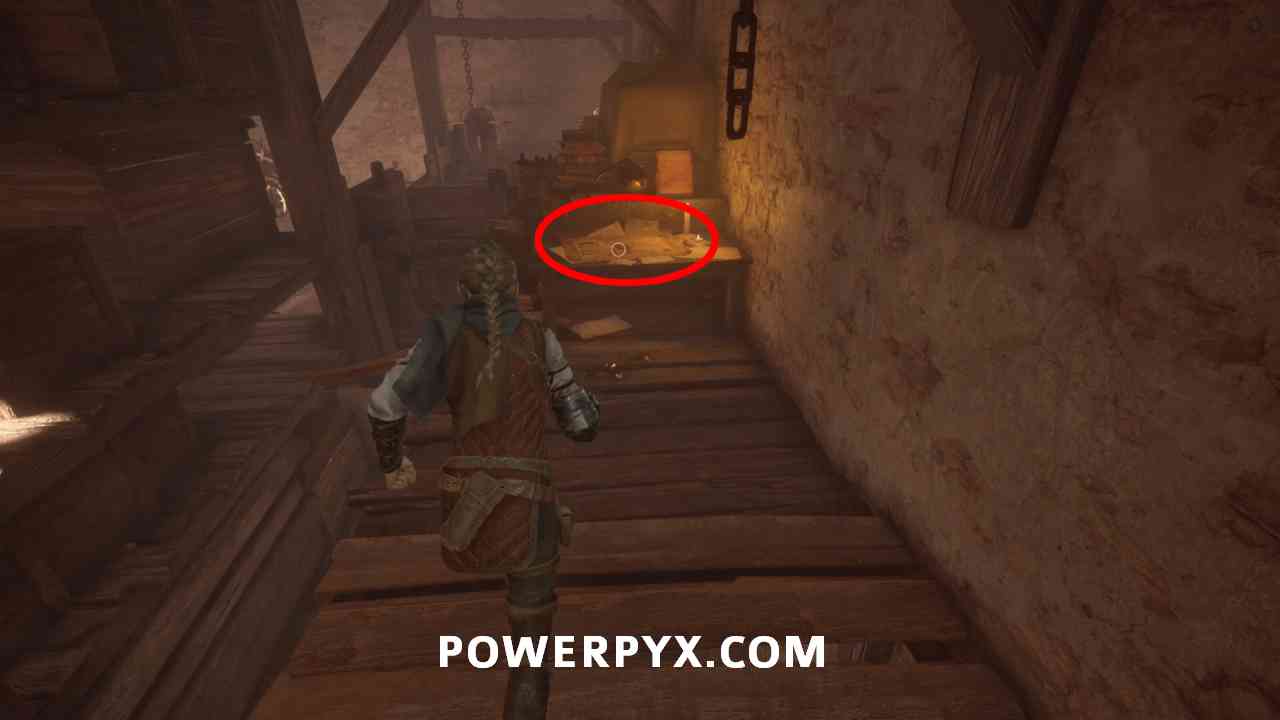
Souvenir #20: His toys…
Sub-Chapter: Aelia
Objective: Open the gate
After you passed the bridge in the big open room where you pushed the carts, a cutscene will start. After the cutscene you will be in front of a big closed gate. Turn around, to your left side along the wall is a small door with a red flag, but it’s also closed. Let Hugo crawl into the little hole next to the door and he will open it. The souvenir is on a table in that room.
Chapter 12: The Life We Deserve
NO SOUVENIRS IN THIS CHAPTER!
Chapter 13: Nothing Left
Souvenir #21: A mess
Sub-Chapter: Grief
Objective: Find a way to the surface
Shortly after the start of the chapter you will be stuck in a room and Amicia tells Lucas to look after Hugo while she looks for a path forward. On the right side you can shoot your sling through a hole in the metal bars to hit the lock of a door. Go through the door. Behind it is a cart, pull it towards you. Go back out the door and enter the corridor that the cart was blocking. Jump over the little fence, then immediately turn to your right to find another cart you can pull towards you. Behind is a little hole you can crouch through, the last Souvenir in the game is there on a table. It’s just before you have to use your grappling hook to pull down a bigger cart from above. After this you should earn the Immortal memories trophy / achievement if you didn’t miss any.

Chapter 14: Healing our Wounds
NO SOUVENIRS IN THIS CHAPTER!
Chapter 15: Dying Sun
NO SOUVENIRS IN THIS CHAPTER!
Chapter 16: King Hugo
NO SOUVENIRS IN THIS CHAPTER!
Chapter 17: Legacy of De Rune Family
NO SOUVENIRS IN THIS CHAPTER!
That’s all of the Souvenirs in A Plague Tale Requiem. For all other Collectibles see A Plague Tale Requiem Collectibles Guide.
Leave a Reply