
Hammerlocked is the 11th main story mission in Borderlands 3 (BL3). This walkthrough will guide you through all objectives of the Hammerlocked Main Quest.
Hammerlocked is unlocked when you complete Beneath the Meridian.
Planet: Sanctuary
Area: Sanctuary
Quest Giver: Lilith/Wainwraight
Requirement: Complete Beneath the Meridian
Recommended Level: 22
Reward: 4080$ / 14291XP / Cold Shoulder unique weapon (Sniper Rifle)
Mission Info: You’ve opened the Promethea Vault, but at great cost. It’s more important than ever to open the Vauts before the Calypsos grow more powerful. The next Vault is on Eden-6. Lilith’s friend Sir Hammerlock might be able to help, if he weren’t in a spot of bother.
Objectives:
- Navigate to Eden-6
- Use Drop Pod
- Meet Wainwright
- Kill COV enemies
- Meet Wainwright
- Enter Knotty Peak lodge
- Go to The Anvil
- Open Gate
- Meet “Meatslab”
- Clear yard of COV
- Kill reinforcements
- Talk to Brick
- Follow Brick
- Kill attackers
- Follow Brick
- Defeat ambush attackers
- Meet “Crunk Bunny”
- Talk to Tina
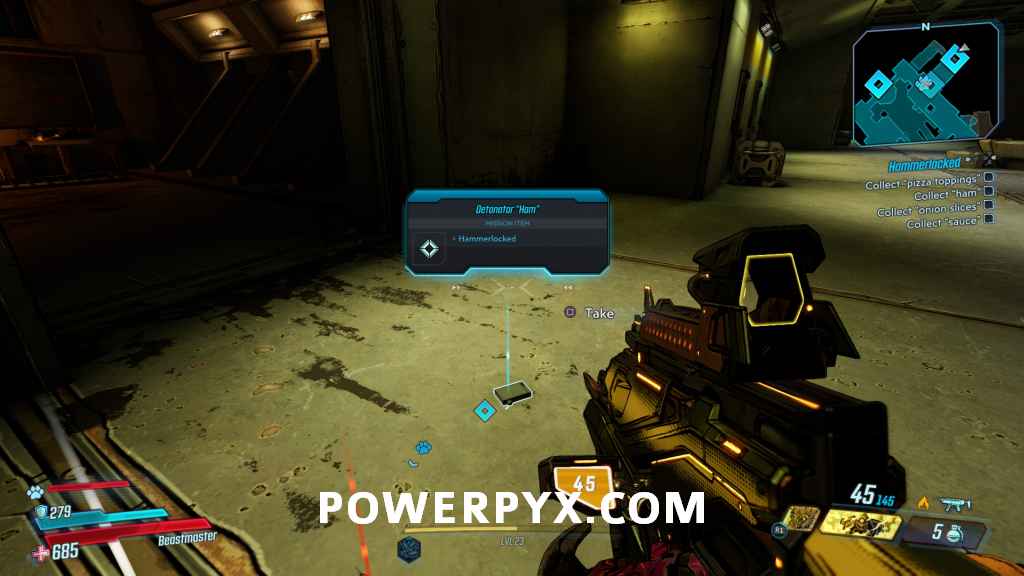
- Collect “pizza toppings”
- Collect “ham”
- Collect “onion slices”
- Collect “sauce”
- Return “toppings” to Tina
- Take pizza bomb
- Deliver “pizza”
- Detonate pizza bomb
- Rescue Hammerlock
- Kill Warden
- Free Hammerlock
- Talk to Hammerlock
Starting Location: Hammerlocked
Navigate to Eden-6
After a bit of banter with Wainwright after trying to contact Hammerlock, you’ll be instructed to navigate to the planet Eden-6, do so now.

Use Drop Pod
Head on down to your trusty drop pod to get down to the planet’s surface.

Meet Wainwright
Now that you’re down on the surface of Eden-6, head toward the objective. Grab yourself a vehicle of your choice at the Catch-a-Ride station, then continue forward.
You will reach a point where you will need to exit your vehicle to continue. Get out and climb the ledge, then make your way forward through the COV enemies to progress.
Kill COV Enemies

When you get closer to the objective you’ll be tasked with taking out all the COV in the area. Do so, and you’ll get a nice introduction to Wainwright.
Meet Wainwright

Head up into the mansion to properly meet Wainwright, speak to him to progress.
Enter Knotty Peak Lodge
Follow Wainwright inside, and he’ll explain a bit about the situation you’re in.
Go to The Anvil
After grabbing whatever you need in the mansion, head down the marked elevator. Grab a technical (you need one to get through the blocked gate ahead) then head following the markers until until you reach the entrance to The Anvil.

Open Gate
Wainwright says something seems up, so you should head forward to open the gate to the next area. Once you advance towards the buildings a bunch of enemies will spawn, which you should deal with. Kill them all, then head up the platforms to the gate activation switch.

Meet “Meatslab”

Meatslab, or Brick as you might know him, is a Vault Hunter from times past. You’ll get a quick introduction after activating the gate switch.
Clear Yard of COV
With Brick now in tow, clear out the area of all of the COV bandits.
Kill Reinforcements
Once you’re up in front of the bandit hideout, you’ll have to kill the reinforcements that the bandit leader sends at you to try and fend you off. Nothing too strenuous with Brick in tow.
Talk to Brick
Once all the COV area dead, head over and speak to Brick.

Follow Brick
Brick has you follow him, so that you can go meet their demolitions expect, “Crunk Bunny”.
Kill Attackers
Once inside you’ll find more COV enemies to take out. Brick will help you deal with them.
Follow Brick
Once all the enemies are dealt with, keep following Brick.
Defeat Ambush Attackers
In the next open area, you’ll be attacked by a number if COV enemeis again. Take them out to continue forward. Once all the enemies are dead head up to where Brick is and he’ll open a door for y0u to continue forward.
Meet “Crunk Bunny”

Tina is now no longer tiny, but still pretty crazy.
Talk to Tina
Head over and speak to her.
Collect “Pizza Toppings”
Tina needs you to get some “ingredients” so that she can make some “pizza” to free Hammerlock. Head out to collect the “ingredients” for her. You’ll be directed to enter a sort of prison area, where you’ll have to fight a large number of bandits once you enter. After you kill the majority of the enemies inside, Tina will direct you to the individual “ingredient” locations”
Collect “Ham”
Head upstairs, and an enemy will come out of one of the doors. Kill him and he’ll drop the “ham” that Tina needs.
Collect “Onion Slices”
Head in the door behind where the ham dropping enemy spawned, then take a left in the air duct. Grab whatever you find on your way, then pick up the “onion slices” off the shelf.

Collect “Sauce”
Forward out of this room, then down into the next, hit the button on the generator. Go back down to the bottom floor, then head into the now open elevator shaft.

In the lower room, search all of the marked boxes to see if there’s any “sauce” in them. In the last one, you should find what you’re looking for.

Return “Toppings” to Tina
Head back to the upper level and speak to Tina to give her the “toppings”. You’ll have to fight through some more enemies in the courtyard to get back to her, but it shouldn’t be anything you can’t deal with.

Take Pizza Bomb
Tina makes you a pizza bomb out of all the “ingredients” you gave her, grateful accept it from her waiting hands.

Deliver “Pizza”
Take the “pizza” over to the location marked on your map. Some bandits might get in the way of your delivery, but you can take them out without worrying about your precious pie cargo.
Clear Bridge

Mordecai is here to give you some overwatch while you make your way forward with your “pizza” delivery. Take out all the enemies in your way while progressing forward. Once they’re all dealt with, head over and place your “pizza” on the door to complete your delivery.

Detonate Pizza Bomb
Give yourself a bit of room, then shoot your “pizza” to set it off.
Rescue Hammerlock
When you’re ready, head down into the hole to travel to the boss area for this mission, and to meet Hammerlock.

Kill Warden
The Warden is the boss fight for this mission, and is who is holding Hammerlock hostage. This fight doesn’t have anything too out of the ordinary from a normal fight, aside from when the Warden puts a shield up that makes him immune to attacks for a short period. When this happens just head around the arena and take out any other regular enemies that have spawned, then resume attacking the Warden as normal. Once the first bar of it’s health is gone it will start actively chasing you down, so try to avoid it while dishing out damage when you can.
When you drop it’s health down all the way, it will regain one health bar and turn into the Super Raging Warden. This isn’t much different than the previous phase, just keep avoiding it’s attacks and pumping whatever you can into it. It will then turn into Mega Raging Warden, and again do the same thing over again.
Finally once you get it to no health one last time, it will die and you will get your loot-splosion from its corpse.
Free Hammerlock
Above the boss arena, you should see a cage with a red orb above it. Shoot it to release Hammerlock from his prison.

Talk to Hammerlock
Head over and speak to Hammerlock now that he is free from his imprisonment to complete the mission and receive your reward.

This finishes Hammerlocked main mission in Borderlands 3. Now the next quest Lair of the Harpy becomes available.
Next Up: Lair of the Harpy
For all other Mission Walkthroughs, check out our complete Borderlands 3 Walkthrough.
Putzbeard says
Would just like to point out that mega raging warden isn’t even his final form. He then changes into ultimate raging warden and godly warden after that. Might be even more transformations after, but this is how far I got.
P_moT says
yeah that was annoying lmfao, also had to kill him at Godly XD
deepdown says
I just kept running & sliding then turning back and hitting him, as long as you don’t get cornered he’s quite easy. His sidekicks don’t take much shooting either but I tried to keep at least one alive with low health to hit for a second wind chance.
TheRealMeridian says
At the end of Beneath the Meridian you have the option to talk to Ava. Do it and you will receive Maya’s Corrosive weapon. It makes the warden ALOT easier. Just be sure to reload when the warden is at 15% health and burst him down. When his HP gets below 10% he will actively seek a sidekick and kill it. THAT gives him those annoying never ending regens.