
Bugsnax has 100 Bugsnax Locations (different types of Snax). Catching all 100 unique species of Bugsnax unlocks the Got To Catch Them All trophy or achievement. You can keep track of them in the Bugapedia (Bugpedia) where it will show you how many you found in each region. This makes it easy to keep track of your progress. This guide shows you the full Bugapedia with all Snax Locations in the same order as in-game. This also includes all 4 Legendary Bugsnax.
Important Notes:
- Not all Bugsnax can be caught from the start (especially in the Prologue until you’ve reached Snaxburg), some require certain gear, others are locked behind missions
- Some Bugsnax only appear at a certain time of day or under certain weather conditions
- There are often more solutions than just the one written below. Sometimes Snax stun each other or cancel out each others freezing / burning effects, making it possible to grab them quickly in between.
- It is always a good idea to press
 to scan your surroundings with the binoculars. Sometimes this reveals things you haven’t spotted on your own. Additionally, highlighting a Snax path with
  shows its regular route, which is super helpful to place the Trap and Tripwire.
 - The areas below are ordered how you actually visit them chronologically. The in-game-Bugapedia somehow switched up regions 1 & 2.
- (Missables Warning: In the unpatched version, two Snax were missable (#75 – Bombino & #99 – Baby Cakelegs). Just make sure you are on the latest version and this should be no issue. To be extra sure, just pick them up when you first encounter them.)
- There is still free roam after the story so you can go around to complete your Bugapedia.
Here is a quick breakdown on how many Bugsnax each area has. Click on the Name to jump to the corresponding section:
- Flavor Falls: 13
- Garden Grove: 9
- Simmering Springs: 12
- Boiling Bay: 15
- Scorched Gorge: 12
- Sizzlin’ Sands: 15
- Sugarpine Woods: 10
- Frosted Peak: 14
Flavor Falls
Bugsnax #1 – Strabby
- Location: Walking around the middle section. Will be your first encounter early on.
- Spawn Time: Any time and weather.
- How to Catch: Hides when you get too close. Can be lured into the trap with Chocolate.


Bugsnax #2 – Pinkle
- Location: Walking around the middle section or standing still inside the lower cave.
- Spawn Time: Any time and weather.
- How to Catch: Place the Tripwire over its walking path and collect it when stunned


Bugsnax #3 – Rootle
- Location: On the side leading towards Garden Grove
- Spawn Time: 6 PM to 4 AM
- How to Catch: It will burrow in the ground, if you get too close. Place your trap right next to it and immediately close it, once it comes to the surface again.


Bugsnax #4 – White Rootle
- Location: On the side leading towards Garden Grove
- Spawn Time: 6 AM to 4 PM
- How to Catch: It will burrow in the ground, if you get too close. Place your trap right next to it and immediately close it, once it comes to the surface again.


Bugsnax #5 – Green Lollive
- Location: Flying around the whole perimeter
- Spawn Time: Any time and weather.
- How to Catch: Place a Tripwire


Bugsnax #6 – Inchwrap
- Location: On upper ridge or the lower cave filled with water
- Spawn Time: Any time and weather.
- How to Catch: Lure with Ranch Dressing to a stony surface, so it will stun itself when trying to burrow down again


Bugsnax #7 – Sandopede
- Location: Walking around the whole perimeter (the front or back section of the Snak)
- Spawn Time: Any time and weather.
- How to Catch: Easiest done by using the Tripwire


Bugsnax #8 – Sub Sandopede
- Location: Walking around the whole perimeter (the middle sections of the Snak)
- Spawn Time: Any time and weather.
- How to Catch: Easiest done by using the Tripwire


Bugsnax #9 – Ruby Peelbug
- Location: Hidden in the hole cutting through the ridge in the middle
- Spawn Time: Any time and weather.
- How to Catch: Use your Buggy Ball do drive it out on the other side


Bugsnax #10 – Caramel Poptick
- Location: Inside the lower cave filled with water
- Spawn Time: When it’s raining. Check your Map for a weather forecast (came with Patch 1.04) and be ready to head over in time.
- How to Catch: Ideally get rid of the Inchwrap first, because it will always knock over the trap. Place the trap again and close it, once a Poptick jumps through. A bit luck-based, because it doesn’t really respond well to bait


Bugsnax #11 – Twisty Snakpod
- Location: Hanging around various places; like next to map transition to Garden Grove
- Spawn Time: Any time and weather.
- How to Catch: Simply pick it up


Bugsnax #12 – Wee Mewon
- Location: In a large chamber on the other side of the small bridge
- Spawn Time: Only in and after side mission “Throw Down”.
- How to Catch: Simply place trap and let them walk in. Can be lured with chocolate, but they will come towards you anyhow.


Legendary Bugsnax #13 – Mama Mewon
- Location: In a large chamber on the other side of the small bridge
- Spawn Time: Only in side mission “Throw Down”.
- How to Catch: Place your trap under the hanging stalactites and catch some Wee Mewons. This will make her rage and storm in that area, stopped and stunned by the frog statues. Use this time to grapple down the stalactites and hurt her. Needs to be repeated a few times.


Garden Grove
Bugsnax #14 – Bunger
- Location: Lower section, near the creek
- Spawn Time: Any time and weather.
- How to Catch: Lure both Bungers together with Ketchup and let them stun each other by headbutting
- Info: Needed for
 Combo Meal, alongside with Dr Sodie & Fryder


Bugsnax #15 – Fryder
- Location: Hanging in the little cave
- Spawn Time: Any time and weather.
- How to Catch: Place your trap and shoot it with Ketchup to make them crawl down
- Info: Needed for Combo Meal, alongside with Bunger & Dr Sodie

Bugsnax #16 – Shishkabug
- Location: Lower section near the creek. Will permanently hide, if too close (can be pushed out again by a Bunger who itself is lured with Ketchup)
- Spawn Time: Any time and weather.
- How to Catch: Try to approach it carefully and place the trap without spooking it. If it happens, however, position the trap between the current bush and the next one it could run off to. Then lure a Bunger with Ketchup and try to close the trap while the Bug is running between the two hiding spots.


Bugsnax #17 – Sweetiefly
- Location: Flying around the lower area.
- Spawn Time: 4 AM to 4 PM, when it’s sunny
- How to Catch: Place a Tripwire, e.g. across one of its resting spots


Bugsnax #18 – White Strabby
- Location: Upper section, across the pen
- Spawn Time: Any time and weather.
- How to Catch: Simply place the trap and wait for it to come out of hiding again


Bugsnax #19 – Dr Sodie
- Location: Swimming through the creek
- Spawn Time: Any time and weather.
- How to Catch: Place the trap in its path
- Info: Needed for Combo Meal, alongside with Bunger & Fryder


Bugsnax #20 – Weenyworm
- Location: At the pen in the upper section
- Spawn Time: Any time and weather.
- How to Catch: Simply place the trap; can additionally be lured with Ketchup


Bugsnax #21 – Cobhopper
- Location: Jumping between the trees
- Spawn Time: Any time and weather.
- How to Catch: Place a Tripwire in its path


Bugsnax #22 – Crispy Snakpod
- Location: Several, like in Beffica’s cave
- Spawn Time: Any time and weather.
- How to Catch: Simply pick up or grapple
- Info: all five spots for
 Grab Bag are shown in the Trophy Guide


Simmering Springs
Bugsnax #23 – Kweeble
- Location: Most of them are close to the water
- Spawn Time: Any time and weather.
- How to Catch: Place a trap in its walking path


Bugsnax #24 – Crapple
- Location: In and near the sea
- Spawn Time: Any time and weather.
- How to Catch: Place a trap in its path


Bugsnax #25 – Pineantula
- Location: Usually burrowed in the sand
- Spawn Time: Any time and weather.
- How to Catch: shoot its revealed top piece with chocolate and lure a Crapple to it. The Crab will dig it up and throw it away, stunning the Pinapple, making for an easy grab


Bugsnax #26 – Orange Peelbug
- Location: In hollow tree trunk or the hole cutting through the middle plateau
- Spawn Time: Any time or weather
- How to Catch: Use your Buggy Ball to drive it out and catch it with the trap


Bugsnax #27 – Razzby
- Location: Close to the water
- Spawn Time: Any time or weather
- How to Catch: Simply place a trap in its path. When it’s scared and runs off, it will come out again soon, if you’re not too close


Bugsnax #28 – Green Grapeskeeto
- Location: Flying close to the water
- Spawn Time: 4 PM to 4 AM
- How to Catch: Tripwire, from the outer rocks to a palmtree


Bugsnax #29 – Snaquiri
- Location: Middle Plateau and the sea
- Spawn Time: Any time and weather.
- How to Catch: Best done by placing a Tripwire across its jumping-path


Bugsnax #30 – Tropicabug
- Location: In the upper sections
- Spawn Time: Any time or weather
- How to Catch: Is permanently spooked, if you get to close. Carefully place the trap nearby and lure with Chocolate.


Bugsnax #31 – Lovely Sweetiefly
- Location: Several places, like the entrance area
- Spawn Time: 4 AM to 4 PM, when it’s not raining
- How to Catch: Best by Tripwire in the section where it goes to sleep/rest for a while, as there is not much else around to tension the wire over its flying route

Bugsnax #32 – Baja Tacroach
- Location: Next to the trangle you can ring
- Spawn Time: 6 PM to 4 AM
- How to Catch: Place trap and lure with Cheese Sauce


Bugsnax #33 – Waffstackarak
- Location: Coming out of the sea
- Spawn Time: After playing the hanging triangle between 4 AM and 11 AM
- How to Catch: Best done by Tripwire. Scan its route ( + ) and tension it along its way


Bugsnax #34 – Grumpy Snackpod
- Location: In a pond to the right when entering the area
- Spawn Time: Any time and weather.
- How to Catch: Simply pick up


Boiling Bay
Bugsnax #35 – Green Crapple
- Location: In the water
- Spawn Time: Any time or weather
- How to Catch: Place a trap in its path


Bugsnax #36 – Grapeskeeto
- Location: Close to the Cave Entrance
- Spawn Time: 4 PM to 4 AM
- How to Catch: Span Tripwire between trees/poles/rocks


Bugsnax #37 – Golden Kweeble
- Location: Most of them are close to the water
- Spawn Time: Any time and weather.
- How to Catch: Place a trap in its walking path


Bugsnax #38 – Greater Cocomite
- Location: Palmtrees
- Spawn Time: Any time you crack open a coconut, preferrably by throwing it into the lava (this is the greater half of the coconut with two straws)
- How to Catch: Span Tripwire and pick it up while stunned


Bugsnax #39 – Lesser Cocomite
- Location: Palmtrees
- Spawn Time: Any time you crack open a coconut, preferrably by throwing it into the lava (this is the smaller half of the coconut with one straw)
- How to Catch: Span Tripwire and pick it up while stunned


Bugsnax #40 – La Sodieux
- Location: In the water
- Spawn Time: Any time and weather
- How to Catch: Place trap in its path


Bugsnax #41 – Noodler
- Location: In the lava section inside the cave
- Spawn Time: Any time and weather
- How to Catch: Needs to be stunned and cooled down. For the latter part, you ideally want to lure a Paletoss Popsicle in there. If it gets in contact with the Noodler, the burning effect wears off and it can be picked up.


Bugsnax #42 – Paletoss
- Location: All over
- Spawn Time: Any time or weather
- How to Catch: Needs to get in contact with fire or lava to heat up; then stunned by Tripwire to be able to pick it up
- Info: Created by thawing a Paletoss Grande


Bugsnax #43 – Paletoss Grande
- Location: All over
- Spawn Time: Any time or weather
- How to Catch: Needs to get in contact with fire or lava to heat up; then stunned by Tripwire to be able to pick it up
- Info: When it thaws, it explodes into two regular Paletoss


Bugsnax #44 – Red Banopper
- Location: Jumping between several trees
- Spawn Time: Any time or weather
- How to Catch: Span Tripwire between trees or other solid objects nearby


Bugsnax #45 – Flamin’ Cheepoof
- Location: Inside the lava cave
- Spawn Time: Any time or weather
- How to Catch: Ideally you want to get rid of the Noodlers first, as they charge against your Lunchpad & Trap. This is best done with the Popsicles to cancel their flaming effect (works for the Noodlers as well as for the Cheepoof itself). Place your Lunchpad with a Trap on top and aim for the Cheepoof and that will fall on solid ground and not the lava. Otherwise the Popsicles can’t cool it down. Will surely take a few tries to get it. You can also try to get a good angle with the Tripwire so that it will also fall down onto solid ground, so the Popsicles can go there without loosing their freeze-effect.


Bugsnax #46 – Sherbie
- Location: On the small peninsula at the end of the area
- Spawn Time: Any time or weather
- How to Catch: Place your Tripwire inside the lava-stream and aim it at the Stones where the burrowed Sherbie will come to the surface. This way, it will get stunned and heated at the same time.


Bugsnax #47 – Fruity Snakpod
- Location: Several; like the shipwreck
- Spawn Time: Any time and weather
- How to Catch: Simply pick up or grapple


Bugsnax #48 – Minimaki
- Location: In the sea
- Spawn Time: Only during side mission “Dance with the Dragon”
- How to Catch: Place a Tripwire between the poles to make Megamaki fall into smaller pieces – Minimaki – and pick them up, to weaken him.


Legendary Bugsnax #49 – Megamaki
- Location: In the sea
- Spawn Time: Only during side mission “Dance with the Dragon”
- How to Catch: Place a Tripwire between the poles to make Megamaki fall into smaller pieces – Minimaki – and pick them up, to weaken him. Needs to be repeated until only his head is left, which then can be picked up.


Scorched Gorge
Bugsnax #50 – BBQ Bunger
- Location: On the Plateau in the middle of the area
- Spawn Time: Any time or weather
- How to Catch: Span a Tripwire over its path


Bugsnax #51 – Sweet Fryder
- Location: Plateau next to the Windmill
- Spawn Time: Any time and weather
- How to Catch: Best by Tripwire, becaue the Windmill will knock over the Trap


Bugsnax #52 – Ribblepede
- Location: On walls in the shade, like houses
- Spawn Time: Any time or weather
- How to Catch: If hanging low enough, you can place a trap next to them and immediately catch them inside. Lured down with Hot Sauce otherwise.


Bugsnax #53 – Poptick
- Location: Close to both map transitions
- Spawn Time: Any time or weather
- How to Catch: Initally, they are to small to catch. They need to get in contact with fire to pop. Best done by shooting them with Hot Sauce, because the nearby Scorpenios hate it and will shoot them. When Poptick is at the correct size it can be simply caught with a trap in its path.


Bugsnax #54 – Spuddy
- Location: All around
- Spawn Time: Any time or weather
- How to Catch: Stun with a Tripwire and pick it up. Or make two Spuddies stun each other.


Bugsnax #55 – Scorpenyo
- Location: On walls near both area-exits
- Spawn Time: Any time or weather
- How to Catch: The one in the far area (under the bridge to Sizzlin’ Sands) is easier, as it has a water source close by, which is needed to cool him down. Aim your Tripwire from a solid ground quite close to him and when he falls down he might even go directly into the little stream of water and is ready to pick up.


Bugsnax #56 – Shy Weenyworm
- Location: In a side room next to the Windmill, which needs to be opened by a charging Spuddy, so it cracks the brittle wall
- Spawn Time: Any time and weather
- How to Catch: Place a trap in its path


Bugsnax #57 – Cheepoof
- Location: Flying through the Gorge
- Spawn Time: 6 AM to 4 PM
- How to Catch: Place a Trap on your Lunchpad and aim it at the flying Cheepoof (blue arc indicates a hit), closing the Trap mid-air


Bugsnax #58 – White Cheepoof
- Location: Flying through the Gorge
- Spawn Time: 6 PM to 4 AM
- How to Catch: Place a Trap on your Lunchpad and aim it at the flying Cheepoof (blue arc indicates a hit), closing the Trap mid-air


Bugsnax #59 – Crystal Sweetiefly
- Location: Several, like the entrance area
- Spawn Time: 4 AM to 4 PM
- How to Catch: Place a Tripwire through its flying path or to its resting spot


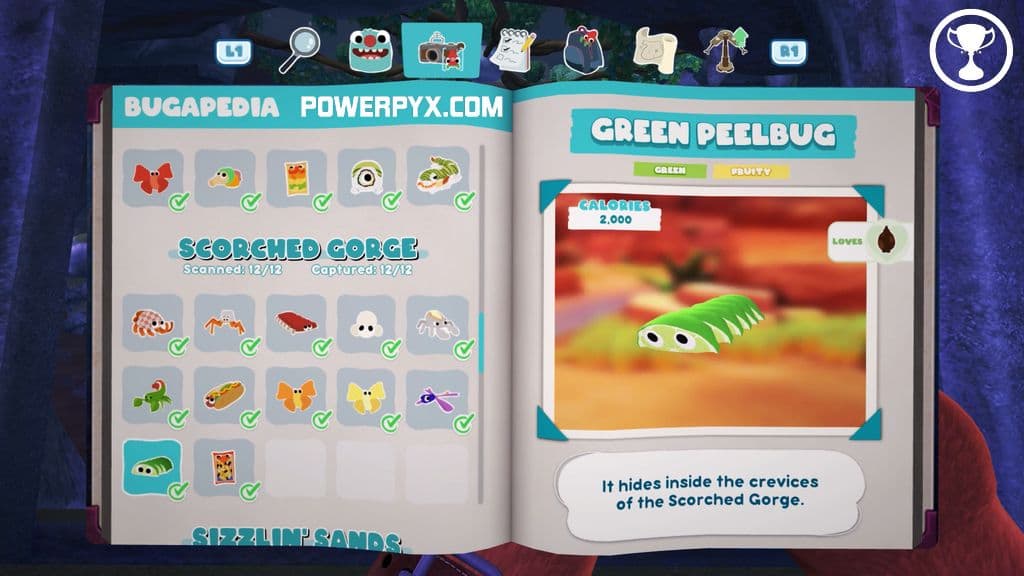
Bugsnax #60 – Green Peelbug
- Location: Inside of little holes, like the room with the Weenyworms
- Spawn Time: Any time or weather
- How to Catch: Guide your Buggy Ball through the hole, forcing it outside; using trap or Tripwire on the other side

Bugsnax #61 – Puffy Snakpod
- Location: Several, like on top of a rock column, seen from the plateau
- Spawn Time: Any time or weather
- How to Catch: Grab or grapple


Sizzlin’ Sands
Bugsnax #62 – Tacroach
- Location: Where a Preying Picantis will explode, like the oasis
- Spawn Time: Any time or weather
- How to Catch: Tripwire or trap with lure
- Info: Is revealed by cooling of a Preying Picantis, until it explodes into its pieces/ingredients


Bugsnax #63 – Preying Picantis
- Location: On top of some smaller rock formations
- Spawn Time: Any time or weather
- How to Catch: Make it follow you to the oasis to start cooling off and then into a Tripwire to stun itself
- Info: When cooled off, it will explode into a Cheepoof, an Incherrito and two Tacroaches


Bugsnax #64 – Black Lollive
- Location: Close to the oasis
- Spawn Time: Any time or weather
- How to Catch: The one flying around the oasis has a very low spot on its route where it will simply fly into the trap’s perimeter.


Bugsnax #65 – Loaded Spuddy
- Location: All around
- Spawn Time: Any time or weather
- How to Catch: Needs to be stunned by either the Tripwire or by headbutting another Spuddy


Bugsnax #66 – Buffalocust
- Location: Flying around the small section of palmtrees
- Spawn Time: Any time or weather
- How to Catch: Lure down to the ground with Ranch Dressing and make it stun itself on a Tripwire


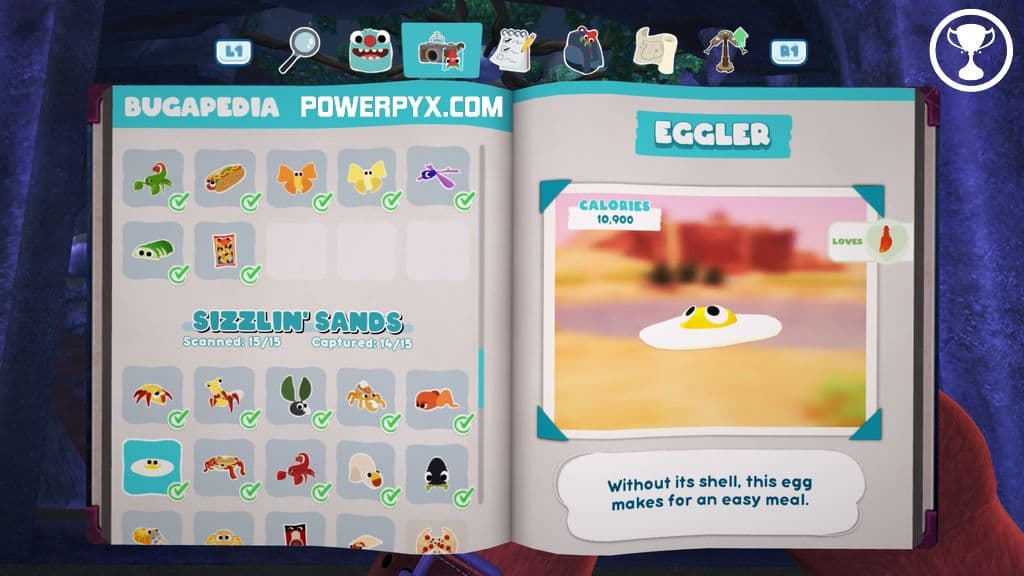
Bugsnax #67 – Eggler
- Location: On the pyramid or in Sheldas tent
- Spawn Time: Any time or weather
- How to Catch: First, you need to crack open the egg by either throwing it at a flaming Snak or in the path of a charging one. When the Eggler comes out, you can catch regularly by the trap or Tripwire

Bugsnax #68 – Flapjackarak
- Location: All over
- Spawn Time: 5 AM to 6 PM
- How to Catch: Spanning a Tripwire across its path


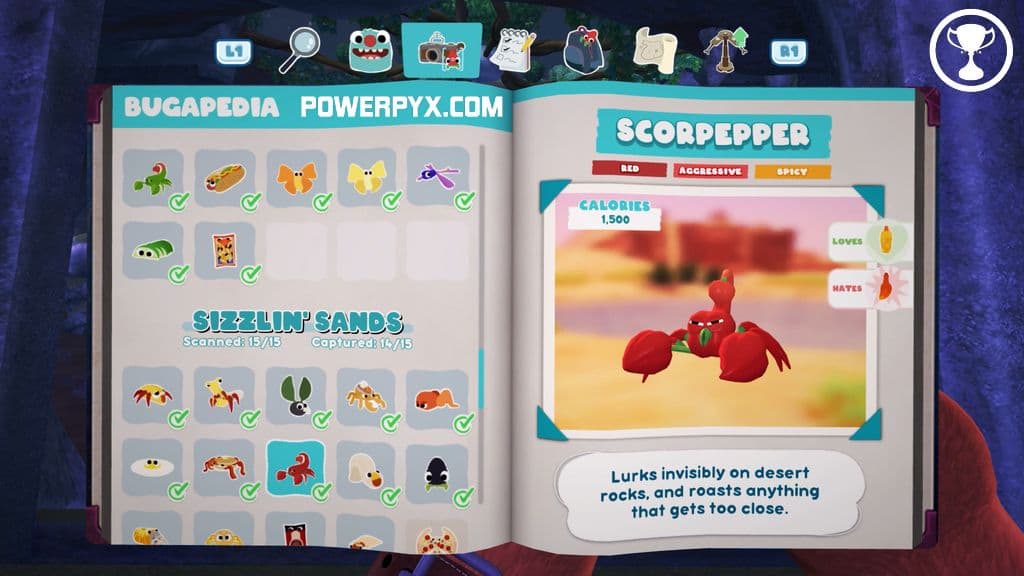
Bugsnax #69 – Scorpepper
- Location: Large Boulder
- Spawn Time: Any time and weather
- How to Catch: Lure down with Cheese Sauce to the oasis to cool off, then stun with Tripwire

Bugsnax #70 – Incherrito
- Location: By making a Preying Picantis explode or in the Underground cave system (hole in the ground close to the pyramid; needs to be opened once by a Buffalocust lured with Ranch Dressing)
- Spawn Time: Any time or weather
- How to Catch: Spanning a Tripwire over some of the rocky sections it has to crawl over and can’t burrow under


Bugsnax #71 – Black Razzby
- Location: Underground cave system (hole in the ground close to the pyramid; needs to be opened once by a Buffalocust lured with Ranch Dressing)
- Spawn Time: Any time or weather
- How to Catch: Place the trap nearby and optionally lure with Chocolate


Bugsnax #72 – Sodie D
- Location: In the oasis
- Spawn Time: Any time or weather
- How to Catch: Place trap in its path


Bugsnax #73 – Cheezer
- Location: Running all around the oasis
- Spawn Time: Any time or weather
- How to Catch: Span a Tripwire across his regular path


Bugsnax #74 – Meaty Snakpod
- Location: Several; e.g. a column in front of the pyramid
- Spawn Time: Any time or weather
- How to Catch: Simply pick up or grapple


Missable Bugsnax #75 – Bombino
- Location: Around the Pyramid
- Spawn Time: In or after side mission “A Slice of Heaven” by Cromdo! (But not a mandatory pickup, in contrast to the Mothza Supreme)
- How to Catch: When it explodes, it lies around stunned and can be picked up


Legendary Bugsnax #76 – Mothza Supreme
- Location: Around the Pyramid
- Spawn Time: Only during the side mission “A Slice of Heaven” by Cromdo
- How to Catch: You need to place an exploding Bombino on the middle platform of the pyramid and your Lunchpad in its place afterwards. Put more Bombinos on it and aim for the Mothza (blue arc will hit, if it is stationary for a moment). When it falls down, quickly go down and grapple the pizza slicer to cut it down. Needs to be repeated several times, until it is just a tiny slice.


Sugarpine Woods
Bugsnax #77 – Kwookie
- Location: Running all over
- Spawn Time: Any time or weather
- How to Catch: Place a Tripwire along his path


Bugsnax #78 – Charmallow
- Location: Close to bodies of water
- Spawn Time: 4 PM to 4 AM
- How to Catch: Needs to be cooled down and stunned – placing a Tripwire over the water will do both these things


Bugsnax #79 – Cinnasnail
- Location: Rocks or plateaus on the edge of the area
- Spawn Time: Any time or weather
- How to Catch: Placing a Tripwire and grappling the stunned Snail or luring with Chocolate in a Trap


Bugsnax #80 – Hunnabee
- Location: Flying close to the lower treelines
- Spawn Time: 5 AM to 6 PM
- How to Catch: Tripwire or Lunchpad with Trap on top


Bugsnax #81 – Sprinklepede
- Location: On the Watchtower
- Spawn Time: Any time and weather
- How to Catch: When lured down with chocolate, it will start rolling all over the map. Place a Tripwire in its path and collect it, once stunned


Bugsnax #82 – Yellow Peelbug
- Location: Inside of holes, like opposite of the house
- Spawn Time: Any time or weather
- How to Catch: Use the Buggy Ball to drive him out and use Trap or Tripwire on the other side


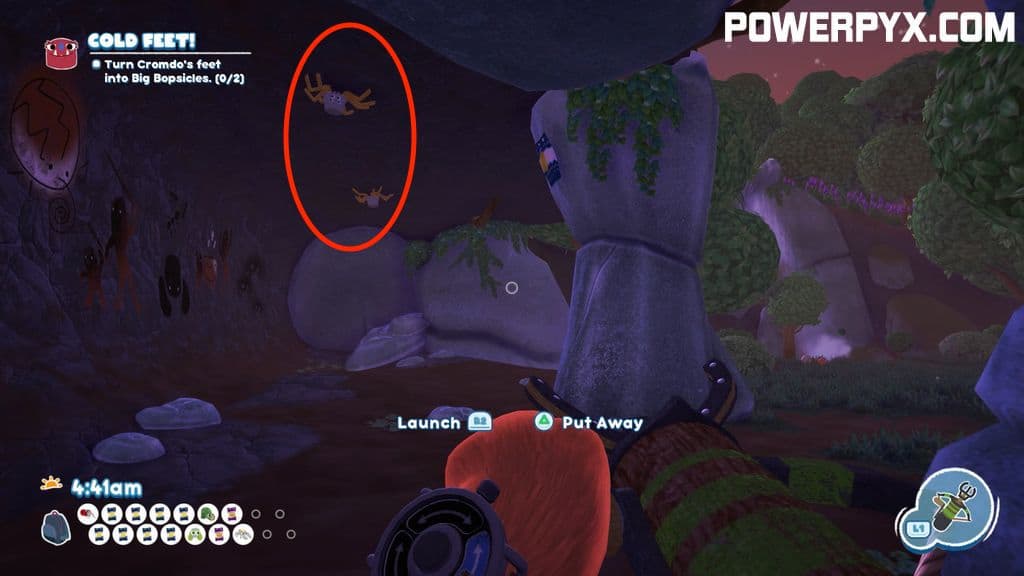
Bugsnax #83 – Bopsicle
- Location: All over
- Spawn Time: Any time or weather
- How to Catch: Needs to be cooled off. When created from y Big Bopsicle it can be immediately picked up
- Info: Created by fully thawing a Big Bopsicle


Bugsnax #84 – Big Bopsicle
- Location: All over
- Spawn Time: Any time or weather
- How to Catch: Needs to be cooled off and stunned. Place a Tripwire over one of the bodies of water and let him chase after you to achieve both things at the same time
- Info: When it thaws, it explodes into two regular Bopsicles


Bugsnax #85 – Rainbow Sweetiefly
- Location: Lower treelines or Basketball court to the side
- Spawn Time: 4 AM to 4 PM, when it’s not raining
- How to Catch: Place a Tripwire and grab or grapple (if far away)


Bugsnax #86 – Nutty Snakpod
- Location: Several; like behind the brittle wall at the lower level
- Spawn Time: Any time or weather
- How to Catch: Simply grab or grapple


Frosted Peak
Bugsnax #87 – Banopper
- Location: Jumping between trees
- Spawn Time: Any time or weather
- How to Catch: Place Tripwire between the jumping path
- Info: Created from an exploded Scoopy Banoopy. Needed for Sundae Best, alongside with Scoopy & Cheery


Bugsnax #88 – Scoopy
- Location: Lower section of the mountain, left of entrance
- Spawn Time: Any time and weather
- How to Catch: Needs to be heated and stunned. Best done by luring a Stewdler from inside the mountain to him (Buggy Ball + Hot Sauce on it)
- Info: Created from an exploded Scoopy Banoopy. Needed for Sundae Best, alongside with Banopper & Cheery


Bugsnax #89 – Cheery
- Location: Lower section of the mountain
- Spawn Time: Any time and weather
- How to Catch: Place a trap on its walking path
- Info: Created from an exploded Scoopy Banoopy. Needed for Sundae Best, alongside with Scoopy & Banopper


Bugsnax #90 – Scoopy Banoopy
- Location: Lower section of the mountain
- Spawn Time: Any time and weather
- How to Catch: Needs to be heated and stunned. Place a Tripwire at the trees near the entrance and let it follow you into the campfire, then into the wire.
- Info: When it fully thaws, it explodes into two Banoppers, a Scoopy & a Cheery; one of each is needed for Sundae Best


Bugsnax #91 – Aggroll
- Location: Inside the lower level of the mountain, frozen in an iceblock to the right
- Spawn Time: Any time or weather
- How to Catch: Melt the iceblock with your Tripwire placed in the torch to reveal it. Place a regular Tripwire to stun and grab it


Bugsnax #92 – Chippie
- Location: Running around and through the mountain
- Spawn Time: Any time and weather
- How to Catch: Place a Tripwire over its walking path


Bugsnax #93 – Chillynilly
- Location: Several around and inside the mountain
- Spawn Time: 4 PM to 4 AM
- How to Catch: Best combined with the burning Stewdler on the upper inside level of the mountain, as they cancel out each others effects and both get stunned. Lure it with Chocolate to and onto the Stewdler.


Bugsnax #94 – Flutterjam
- Location: Flying around the mountain
- Spawn Time: 4 AM to 4 PM
- How to Catch: Shoot with Peanut Butter to make it fall down


Bugsnax #95 – Mt Sodie
- Location: Swimming in the pond at the bottom of the mountain
- Spawn Time: Any time and weather
- How to Catch: Place a Tripwire across the pond


Bugsnax #96 – Stewdler
- Location: Inside the mountain
- Spawn Time: Any time and weather
- How to Catch: Best combined with the flying freezing Chillynilly on the upper inside level of the mountain, as they cancel out each others effects and both get stunned. Lure the Chillynilly with Chocolate to and onto the Stewdler.


Bugsnax #97 – Melty Snakpod
- Location: Several, like the outside of the tent on the top of the mountain
- Spawn Time: Any time and weather
- How to Catch: Simply grab or grapple


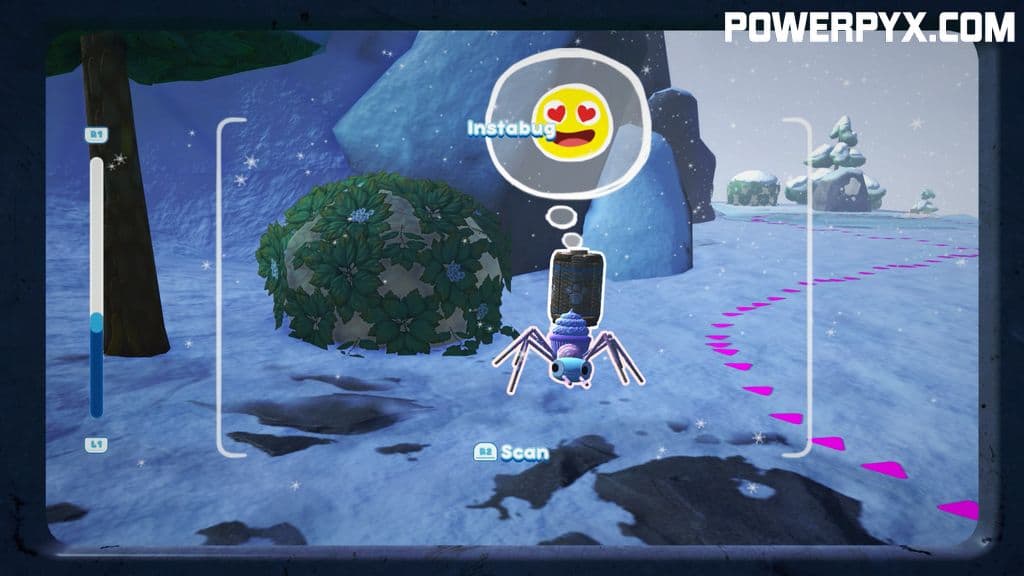
Bugsnax #98 – Instabug
- Location: Inside the bushes
- Spawn Time: Any time or weather
- How to Catch: You need to get relatively close and pull out your camera to make it leave its hiding spot. Needs some good timing with closing your trap, as it will go back to hiding quickly

Missable Bugsnax #99 – Baby Cakelegs
- Location: Inside of the mountain
- Spawn Time: In or after the side mission “Cake Boss!” by Snorpy! (But not a mandatory pickup, in contrast to Daddy Cakelegs)
- How to Catch: Trap or Tripwire both work equally


Legendary Bugsnax #100 – Daddy Cakelegs
- Location: Inside of the mountain
- Spawn Time: Only during the side mission “Cake Boss!” by Snorpy.
- How to Catch: You need to place your Tripwire to burning surfaces and aim (blue arc) for his candles to make him angry and relocate. Needs to be repeated twice more


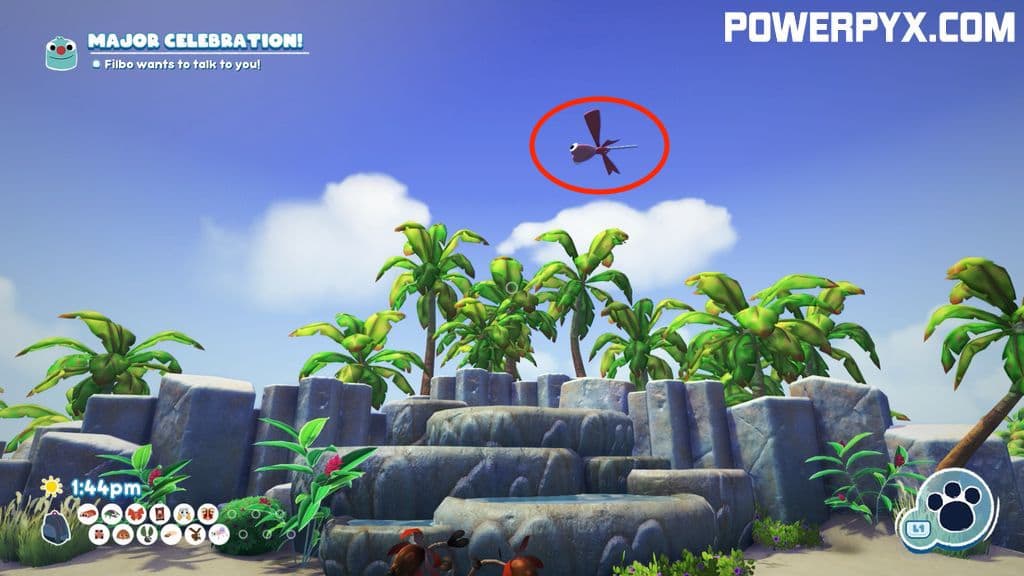
That’s all of the Bugsnax Locations and the full Bugapedia complete. After getting them all you will earn the Got To Catch Them All trophy or achievement.
Ruffio says
I cannot find Puffy Snakpod in Scorched Gorge anywhere. I tried the location shown in your image but it’s not there for me. Is there a requirement for story progress or something?
dalailama1989 says
Not from what I remember, but I can’t rule it out 100%.
There is another one in the narrow gorge cutting through the whole map, hanging on the wall. Blends in well with the red walls of the canyon.
Ruffio says
I checked both spots and as soon as the bridge was fixed, both were there. Seems like it might be after bridge was fixed.
dalailama1989 says
This could very well be tied to mission progress. It takes some time for the Snakpods to be revealed in the different areas.
Ruffio says
FYI Flutterjam can just be hit with peanut butter and it just falls to the ground for net capture. No need for trip wires.
Lavitz says
Bugsnag #10 If you sleep till 5am and open your map , you see the weather forecast for the day. Its not so much try and error.
dalailama1989 says
This was just patched in with version 1.04 and is already mentioned above 🙂
Was a bit annoying without the forecast, but now it is quite clear.