
Chippin’ In is a Side Job in Cyberpunk 2077 (CP77). This walkthrough will guide you through all steps of the Chippin’ In Side Quest.
Area: Watson (Little China)
Quest Giver: Johnny/Rogue
Requirement: Complete Main Job “Tapeworm”
Reward: Replica of Johnny’s Samurai Jacket, Malorian Arms 3516 (Johnny’s Revolver), Porsche 911 (Johnny’s car)
Mission Info: This is it, Rogue’s in for the kill – she’s ready to stop running from her past and catch Smasher. And when we catch the bastard, I wanna be the one to pull the trigger. But for now – you’re in charge. Happy hunting!
Objectives:
- Go to the Afterlife
- Talk to Johnny
- A Cool Metal Fire
- Talk to Rogue
- Talk to Johnny
- Wait a day for Rogue to call
- Meet Rogue at the Afterlife
- Talk to Rogue
- Follow Rogue
- Take the gift from the trunk
- Get in Rogue’s car
- Follow Rogue
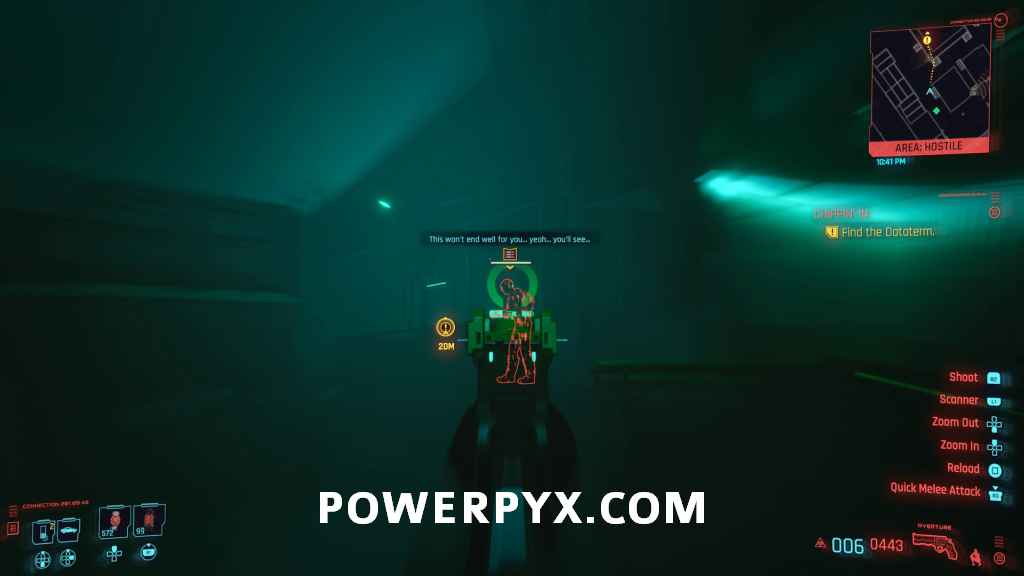
- Find the Dataterm
- Check the Dataterm
- Look for Smasher on the Ebunike
- Defeat Grayson
- Take Johnny’s gun
- Question Grayson about Smasher
- Talk to Rogue
- Lower the crane
- Open the container
- Remove the canvas cover
- Get in Johnny’s Porsche
- Drive to the oil fields
- Find Johnny’s grave
- Talk to Johnny
Starting Location: Chippin’ In
 |
 |
Go to the Afterlife
When you are ready to start this job, go to the Afterlife and head into the bar.
Talk to Johnny
Just inside the bar, speak to Johnny and agree to take the pills.

A Cool Metal Fire
The next sequence is what the game considers to be the Side Job “A Cool Metal Fire”. You can choose whichever interactions you want or don’t want during it, the outcome is the same.
Talk to Rogue
When you wake up, you will be in a hotel talking to Rogue.

She fills you in on some of the info Johnny managed to find out while he was in control, then heads out and says she’ll call you later.
Talk to Johnny
You will have a short conversation with Johnny (choices here don’t matter), then can leave the hotel.

Wait a day for Rogue to call
Alternate between driving 100 meters and skipping time 24 hours until Rogue calls. She’s supposed to call after 24h but it can take some players a bit longer.
Meet Rogue at the Afterlife
Now you need to go meet her at the Afterlife to continue.
Talk to Rogue
Go over near Rogue’s normal spot in the bar, then speak to her and Weyland. You can select the optional dialogue if you want, but he won’t come with you.

Follow Rogue
Follow Rogue out of the bar up to her car.
Take the gift from the trunk
Rogue has got a gift for you now, a replica of Johnny’s Samurai jacket for you to keep.

This counts towards the Breathtaking trophy / achievement.
Get in Rogue’s car
Get in Rogue’s car to continue. She’ll drive to the location and you will have some dialogue along the way (choices don’t matter). You can skip the rest of the drive once the dialogue is finished. At the location, you will have some extra dialogue.

You can go through the set of optional dialogue if you want, then select “OK. We can start.” to continue. If it’s not night, then the game will skip time forward to nighttime before you get to work.
Follow Rogue
For this first section you can just followRogue and don’t need to deal with any enemies. She will walk down the left of the area and climb up some boxes, then ask you to open a gate to continue through.
Find the Dataterm
Now you have the choice for what path you want to take in this area. The easier way is to just hug the left wall of the area, following it around in a loop. In the area with the cars there will be one camera you should watch for, then one enemy in the middle you can leave or take out.
 |
 |
If you then continue moving through the left in the building there will be one enemy inside you can take out.

Continuing along the left there should be one enemy leaning on the railing of the building you are supposed to go into, and that will be the last one in your way outside.
In the marked building there will be one more enemy to deal with.

Check the Dataterm
In the corner room of this building, you can interact with the computer to collect the info you need. The message you specifically need to look at is the one titled “Ebunike”.
 |
 |
Look for Smasher on the Ebunike
You can now head out the door to the right and start moving towards the ship. There will be two enemies in the railyard area just between the building you are in and the ship, which you can take out.
 |
 |
Go up onto the ship and start making your way to the front.
Defeat Grayson
Once you reach the open area near the front of the ship you will automatically be put in combat, and there will be one enemy with a gun to the left stairs, and a melee one that runs down the right stairs.
 |
 |
Make your way up the stairs to find Grayson at the top, who isn’t considered a boss so should just go down like the other normal enemies.

Take Johnny’s gun
Go up to Grayson and you will have two dialogue options, either one leads to automatically picking up the gun.

Whichever you pick doesn’t matter, but you now obtain Johnny’s gun which is another item that counts towards the Breathtaking trophy / achievement. It’s highly advised to keep this gun in your inventory until you get the Breathtaking trophy / achievement. Unlike Johnny’s clothing items it could be accidentally dropped or disassembled (there are reports of players getting the trophy regardless, but better to be safe with this stuff!).
Question Grayson about Smasher
You will now be interrogating Grayson for information.

IMPORTANT: Dialogue during this part doesn’t matter EXCEPT FOR the last options where you pick between:
- [Draw weapon] Don’t want anything from you
- [Put weapon away] Got lucky today. > Pick this one.

You want to pick the second option here because Grayson then gives you a key to get into a container where you obtain Johnny’s car. This does NOT count as one of Johnny Collectible for the Breathtaking trophy / achievement. It’s also not needed for the Autojock trophy / achievement (only cars you buy count for it, optional side quest cars aren’t needed). It’s still cool to have Johnny’s Iconic Porsche 911 so don’t miss out on this.
Technically, if you were to shoot Grayson here, you could still loot his body for the key to the container. But in this scenario you don’t get the waypoints / objectives to unlock the car container and would have to figure this part out yourself, which only complicates things. So do the smart thing here and let the guy live.
Talk to Rogue
After Grayson is dealt with, speak to Rogue choosing whatever option you want, then listen to Johnny.
Lower the crane
Assuming you got the access card off Grayson, you will have an objective to go to a nearby platform and lower a crane with a container on it.

Open the container
Drop down and interact with the door on the container to open it.
Remove the canvas cover
Interact with the cover to pull it off the vehicle, revealing Johnny’s car – his iconic Porsche 911.

Get in Johnny’s Porsche
The car is now yours to keep and can be summoned at any time (hold  to switch what car to call).
Drive to the oil fields
There will be a new location marked on your map, drive there.
Find Johnny’s grave
Walk over to the marked location.
Talk to Johnny
Interact with the rubble to sit down and start talking with Johnny.

IMPORTANT: This is one of the single most important dialogues in the game. It determines whether you can unlock the Secret Ending, Rogue’s “The Sun Ending“, and getting Rogue’s next quest “Blistering Love” (needed to complete her questline). Make sure you follow the below dialogue choices EXACTLY. By doing this you will become friends with Johnny. Failing to do so could make you miss out on several trophies and achievements! For example, if you tell Johnny he’s a “Raging A-hole” and keep being mean to him, it would completely void Rogue’s next quest and you’d miss all trophies and Endings tied to her!
You’ll know you did it right when the last dialogue you get is “Yeah, I’ll call Rogue” and her next quest “Blistering Love” triggers immediately after.
- “[Inscribe Johnny’s Initials] Let’s do something about that.”
- “The Guy who Saved My Life” –> this seems to be the first actual trigger for the secret ending, VERY IMPORTANT
- “Nah, fucked that up too” –> this seems to be the second actual trigger for the secret ending that is mandatory
- “What do you want from me?”
- “OK. But as second chances go, this is your last.”
- “You were a real dick in the beginning”
- “When you said you let down your friends…”
- “Smasher biz really got to her.”
- “Yeah, I’ll call Rogue.”
If you made a wrong choice by mistake, reload your previous autosave immediately and redo the conversation!
As long as you got the outcome that triggers the next quest “Blistering Love” you won’t miss any trophies or achievements. So in case you already completed this quest previously and made different choices, don’t panic, as long as you complete her questline you’re all set. Just for the Secret Ending (not needed for trophies / achievements) you must have picked these very specific dialogues.
This finishes Chippin’ In side quest job in Cyberpunk 2077 (CP77). Now you can access Rogue’s next quest “Blistering Love“.
For all other Quest Walkthroughs, check out the complete Cyberpunk 2077 Walkthrough.
daarken66 says
Johnny disappeared from Afterlife for me after I walked out on him after he asked me to take the pills (I wanted to show the city to a friend), as has the quest marker, anybody else encountered the issue? Or happened to resolve it? Cheers!
VampireHorde says
Just be aware that during the tattoo sequence with the fat guy, he changes the cyberware for your hand without telling you by puttting the Johnny tattoo in its place. You have to go to the menu and swap out the Johnny tattoo to whatever cyberware you had. It took me a while after the mission to figure out why my smart weapons weren’t targeting enemies properly and that was why.
xtcrefugee says
Yeah that caught me out too, I went to check my weapons during a gig I did right after and found my DPS with smart weapons had dropped to almost half of what it was before. The ripper who gave you the tattoo even has some flavor dialogue about it too.
Nao says
Just FYI, following the conversation instructions brought me to 40% sync with Johnny, and triggered Blistering Love. However, I also tried alternative conversation lines (even trying to be as rude as possible and as nice as possible), and none were able to get me above 30%, but they _all_ triggered Blistering Love. So, the question is whether or not you can actually go through Blistering Love and yet be unable to do the secret ending. I don’t know.
FWIW, I find it strange that you can only increase sync by being mean to him (“fucked that up too”). I felt bad for him. Nice scene, though.
Eric Klien says
“So, the question is whether or not you can actually go through Blistering Love and yet be unable to do the secret ending.”
Yes, you can. If you don’t do the second actual trigger then you don’t get the secret ending but you still get Blistering Love.
Mathew Falconer says
Is this a joke? Are you really not going to talk about Adam smasher’s room on the boat?