
This guide covers all important story choices in Cyberpunk 2077 (CP77) that have lasting effects. There are more choices than this, but anything not listed here only has short term effects (such as changing the next line of dialogue). The choices listed here are the ones that can “come back to haunt you”. These can change an objective, who lives and dies, which boss fights you get, who turns hostile on you, and even how a mission ends.
Before we start, it’s important to know what types of choices there are and how they work:
- Most dialogues (98%) have no impact on the story whatsoever. The vast majority of dialogue only changes the next line of dialogue and that’s it.
- Only a very small subset of dialogues (around 2% of all dialogues) actually have any impact whatsoever. These are the choices pointed out in this guide.
- You will always end up on the same linear story path with the same objectives and missions no matter what. Even if you go for the choices in this guide or not won’t change what missions you get. The game is much more linear than it seems.
- One trophy / achievement is easy to miss – for “The Devil” trophy / achievement you must save Takemura in Main Quest “Search and Destroy“. Only if he’s alive you can get his trophy during The Devil Ending (if he’s dead you can still get the same Ending but the trophy only unlocks if he’s alive).
- For the “Secret Ending” (not needed for any trophy or achievement) you need to pick certain dialogues during Side Job “Chippin’ In”. This is detailed further in the Endings Guide. Here we will focus on the Story Choices and not the side content.
- All other Endings are decided by one set of Dialogues during the final mission. Anything you do (or don’t do) during the story leading up to the ending is completely inconsequential. Other than those warnings above there are no “wrong” choices.
Related Guides:
- Cyberpunk 2077 Endings Guide (All Endings) – a detailed breakdown of all endings and how they are triggered during the last mission
- Cyberpunk 2077 Romance Guide (All Romances) – see who can be romanced and what dialogues to pick during their side quests
- Cyberpunk 2077 Walkthrough (All Missions) – if you get stuck or would like to see all dialogues for any given mission
Story Mission Choices
The Streetkid / The Nomad / The Corpo-Rat
Your first decision is which lifepath to choose. This only affects what Prologue (first mission) you get and some lines of dialogue throughout the game (which don’t change any outcomes). After the Prologue all 3 lifepaths end up on the same story path. You can do all trophies, achievements, romances, endings and main missions regardless of your lifepath. It doesn’t matter. There is no advantage to either of them, so no class is better than the other. However, there is some exclusive side content for each lifepath, but these are only some side jobs. Pick whatever feels right!
Practice Makes Perfect
No important choices. Just a tutorial.
The Rescue
No important choices. Nothing you do here changes the outcome of this mission or of future mission.
The Ripperdoc
No important choices. Nothing you do here changes the outcome of this mission or of future mission.
The Ride
No important choices. Nothing you do here changes the outcome of this mission or of future mission.
The Pickup
The Pickup is the most complex mission in the game with the most paths and endings! The below flowchart shows the general paths and how they lead to all different The Pickup Endings.
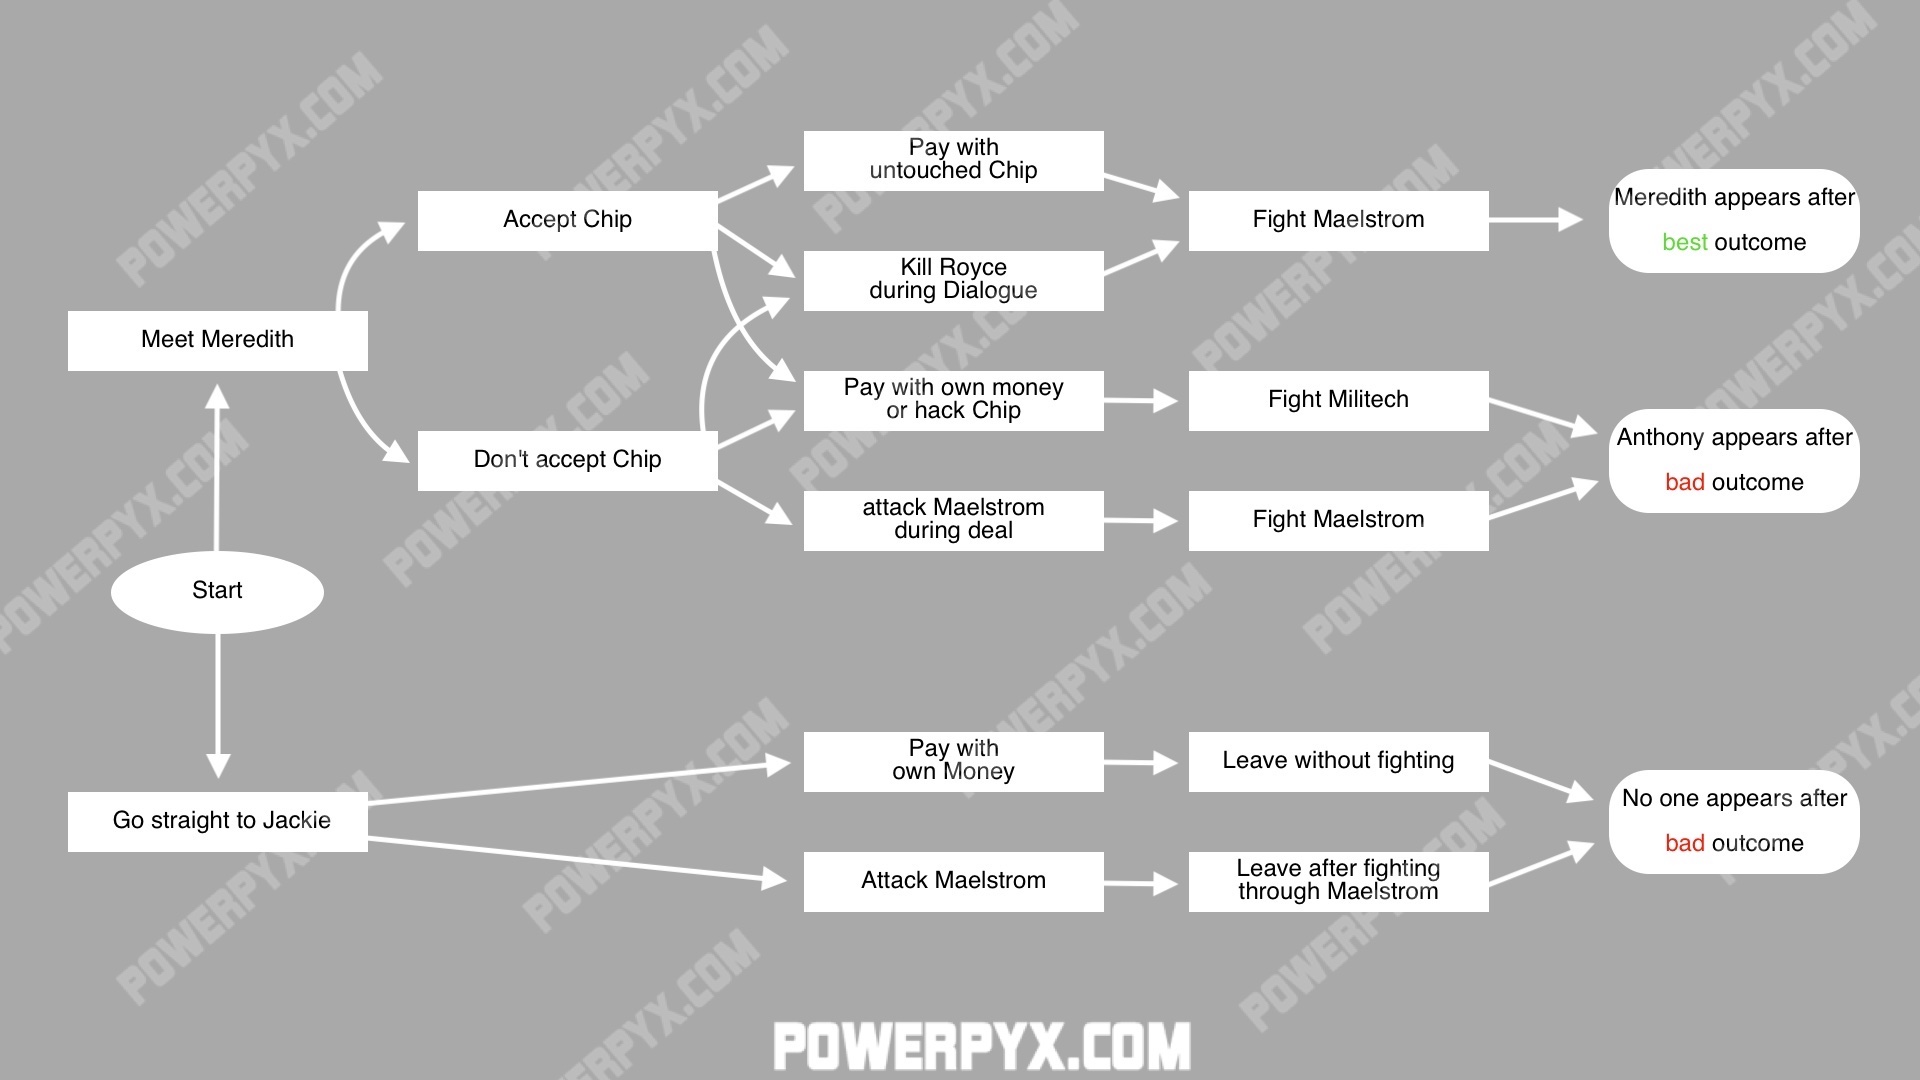
- If you talk to Meredith Stout (Optional) and accept her Credit Chip:
- Use the Chip to pay the Maelstroms – the money chip is infected with a virus that causes the Malestroms to attack you. This leads to a violent outcome (can loot Royce’s weapon). Meredith prevails over Gilchrist > leads to Meredith Stout Romance
- During the Dialogue with the Maelstroms you can still choose to not use the chip and attack them right away / take down Royce. This leads to a violent outcome (can loot Royce’s weapon). Meredith prevails over Gilchrist > leads to Meredith Stout Romance
- If you talk to Meredith Stout (optional) and do NOT accept her Credit Chip:
- If you don’t have the chip, then during the Dialogue with the Maelstroms you can choose to pay them €$10,000. This leads to a peaceful outcome. Gilchrist prevails over Stout > voids the Meredith Stout romance (worst outcome and you lose a lot of money)
- If you don’t have the chip, then during the Dialogue with the Maelstroms you can choose to take down Royce. This leads to a violent outcome (can also loot Royce’s weapon). Meredith prevails over Gilchrist > leads to Meredith Stout Romance
- If you ignore the optional objective to talk to Meredith Stout:
- Either attack the Maelstroms (best outcome > leads to Meredith Stout Romance)
- Or pay with your own money (€$10,000, leads to Gilchrist prevailing over Stout and voids her romance, worst outcome)
Special Lifepath Choices:
- If you play as a Corpo, you can tell Meredith Stout during the optional task that you know the Chip is infected.
- When talking to the Maelstroms you can either warn Royce that the Chip is infected > leads to Gilchrist prevailing over Stout > voids Meredith Stout Romance (bad outcome)
- Or you can crack the Chip (via Inventory) before going to the Maelstroms > leads to Gilchrist prevailing over Stout > voids Meredith Stout Romance (bad outcome)
The Information
No important choices. This is just a Braindance tutorial.
The Heist
After pulling off the Heist and escaping by car you can choose what to do with Jackie.
- “Take him home, to his family” > unlocks an exclusive Side Job “Heroes” (best choice to unlock this extra content)
- “Take him to Vik” > during one of the Endings (‘The Devil’) you will get an extra scene with Jackie
Other choices in this mission have no impact.
Love Like Fire
No important choices. Nothing you do here changes the outcome of this mission or of future mission.
Playing For Time
No important choices. Nothing you do here changes the outcome of this mission or of future mission.
Automatic Love
When interrogating Woodman in the office of the brothel you can either solve it peacefully or violently. If you let Woodman live he can make another appearance in Judy’s side job “Ex-Factor“, however it doesn’t matter for any main- or side quest progression if you kill him or not (just some extra dialogue if he lives).
- To get a peaceful outcome (more complicated) – in this case Hellman lets you escape via the elevator and you won’t trigger combat:
- If you have a corporate background: “You see only Tyger Claws. Got no idea who’s behind them” > “Girl I’m lookin’ for is linked to Arasaka”
- If you have a sufficient Intelligence Level: you can go to the control room and read the files on the computer / or investigate booth 11 for clues. Then talk to Hellman and choose “Looks like you’ve got a Netrunner problem. I can help” > “Tit for tat – only if you help me”.
- Violent outcome (easier, and he drops his weapon which is actually the better choice)
- Pick any of the other choices not listed under the peaceful outcome. It will trigger a small boss fight against Hellman in his office. Defeat him and loot his weapon. Then you must fight your way out of the sex club and there are quite a lot of enemies here. This is the most likely scenario most players will experience.
The Space In Between
- When waiting inside the clinic, there are a few ways to enter. None of them have lasting effects, however.
- Skip time to wait your turn
- Force open the door (requires 7 Body Attribute)
- Enter through the window in waiting area, then you need sufficient Tech Attribute to open a secret path
- Hack the computer to change the appointments to bump you up the line
- Talk to people in waiting area to let you skip ahead of them
- When you interrogate “Fingers” (the Ripperdoc), you can choose to harm him or not. It’s better to not physically harm him (recommended). If you beat him up then he won’t be available as a Ripperdoc anymore! Not too big of a deal if this happens (you don’t need him for any trophies or achievements) but he is potentially missable as a Ripperdoc if you harm him.
Disasterpiece
In this mission you will have to buy a legendary XBD Braindance shard from a dealer. Which way you find the dealer doesn’t matter. The easiest option is to follow the main objective and talk to the sex shop owner who will point you in the right direction. Alternative paths here are to connect to the dark net via one of the terminals in Jig-Jig Street and hack the login page of the “Pleasures of Night City” website, or you call Wakako over the phone. All paths lead to the same dealer and you will need to buy the Braindance from him regardless. What you do here has no impact.
Double Life
No important choices. Nothing you do here changes the outcome of this mission or of future mission.
M’Ap Tann Pèlen
No important choices. Nothing you do here changes the outcome of this mission or of future mission.
I Walk The Line
After the Sasquatch Boss Fight you enter a Cinema. There will be a NetWatch Agent in the projector room. There are 2 choices here which determine whether or not the Voodoo Boys turn hostile on you later in mission “Transmission”:
- “OK, fine” > you side with the NetWatch Agent > he doesn’t die > Voodoo Boys turn hostile on you during “Transmission” (results in Placide Boss Fight)
- “[Incapacitate Agent] Convo’s going nowhere” > The NetWatch Agent dies > you can leave the chapel peacefully during “Transmission” (you can still attack them manually there if you like)
Never Fade Away
No important choices. Nothing you do here changes the outcome of this mission or of future mission.
Transmission
No important choices.
However, how this mission plays out is decided by your choice in “I Walk the Line”. If you sided the NetWatch Agent, then the Voodoo Boys will be hostile and you must fight Placide in a Boss Battle. If you took down the NetWatch Agent, then you can leave the Chapel peacefully, or still attack the Voodoo Boys manually to engage in combat with them.
Ghost Town
After getting Panam’s car back, there will be 4 yellow dialogues to choose from. This decides whether to help her take revenge on Nash or not.
- Pick “OK, So where’s the hideout”. –> she will thank you here for your help and you go to a bonus section at an enemy base (recommended choice)
It’s recommended to do this extra step and agree to help her, this will result in an extra combat encounter at an enemy hideout. This is also recommended to get started with the Panam Romance (may not be absolutely needed but it’s what has been tested and confirmed to work). If you don’t help her take revenge on Nash she will be displeased.
Later at the bar with Panam you can make some dialogues to get one room with her for the night, or refuse and not spend the night with her.
- The following is recommended: “[Drink] To your ride” > “Maybe we get just one room?”. > “Next exactly what I meant” –> this is the flirty option and she will agree to sleep in the same room with you, but only to save money. Just sleep in the separate bed next to her, there is nothing more you can do here. This is recommended to advance the Panam Romance.
Of course if you refuse, then you can skip spending the night with her altogether. Story-wise it makes no change.
Lightning Breaks
No important choices. Nothing you do here changes the outcome of this mission or of future mission.
Life During Wartime
- Recommended Choices for Panam Romance (these don’t have any impact on the mission, but if you want to romance Panam later this is what has been tested and confirmed):
- In the car say “Stay in the car. You’re hurt, Won’t be too much help out there anyway.” –> you are being protective of Panam
- After you rescue Mitch: “I gotta get Hellman, will you help?” > “I’ll help you settle the score with Kang Tao”. –> shows her you want to help
- After you found Hellman and the Nomads arrive outside: “It really wasn’t Panam’s fault” (timed event) –> shows your loyalty to Panam
Down on the Street
No important choices. Nothing you do here changes the outcome of this mission or of future mission.
Gimme Danger
You can become friends with Goro Takemura in this mission.
- After breaking into the security room you must go over your plan with Takemura. When he asks whether you will join him, select “Might as well” > “Stand and Start Recon” (don’t pick “Not this time” if you want to befriend him).
- After scouting the compound, to befriend Takemura you can pick the following: “Thought they’d all disappeared from the city” > “Nope, just a cat” > “Believe in ghosts?” > “Where’d you grow up?” > “Growin’ up in Chiba-11” > “What’d they need kids for?” > “All you had to do was kill Arasaka’s enemies” > “I’m not judging you” > “Let’s just drop it” > “Never too late” > “You got no idea how I feel” > “Where are they holding it?”
This isn’t anything important for story purposes, just a little side thing you can do.
Play It Safe
After defeating Oda (boss fight), Takemura will call you and ask to let him live (don’t shoot the already-defeated Oda on the floor). If you don’t shoot his defeated body then he can show up later again during an ending. If you kill him he’s gone for good. Just results in a small potential extra appearance of this character, nothing important that influences any missions or objectives.
Search and Destroy

Very important – easy to miss: During Main Mission “Search and Destroy” you have to save Takemura to get the ‘Devil’ trophy or achievement. This is very easy to miss because there is no objective for it and no indication that Takemura can be saved at all. You will go into a building, knock on the door 4 times, talk to Takemura and Hanako. After that police storms the building and you get separated from Takemura. Some enemies will now spawn in the building. Instead of following the objective out of the building, you’ll have to turn left at the first possible point and crouch under some rubble, then head upstairs to find Takemura holed up in a room with enemies. Defeat the enemies and escort Takemura out of the building. In the cutscene when leaping out of the building’s exit door Takemura has to show up. Then you have done everything right and can get the trophy. While you can still get ‘The Devil’ Ending if you left Takemura behind to die, it only unlocks this trophy / achievement specifically if he is alive. Goro Takemura will then show up during the Epilogue. If Takemura wasn’t saved then Hellman can show up in the Epilogue instead.
By far one of the most important and easiest-to-miss side requirements in the game.
Tapeworm
No important choices. Nothing you do here changes the outcome of this mission or of future mission.
Nocturne Op55N1
After Misty walks you to a balcony, you will talk to Johnny. All Story Endings are decided here by this one dialogue.
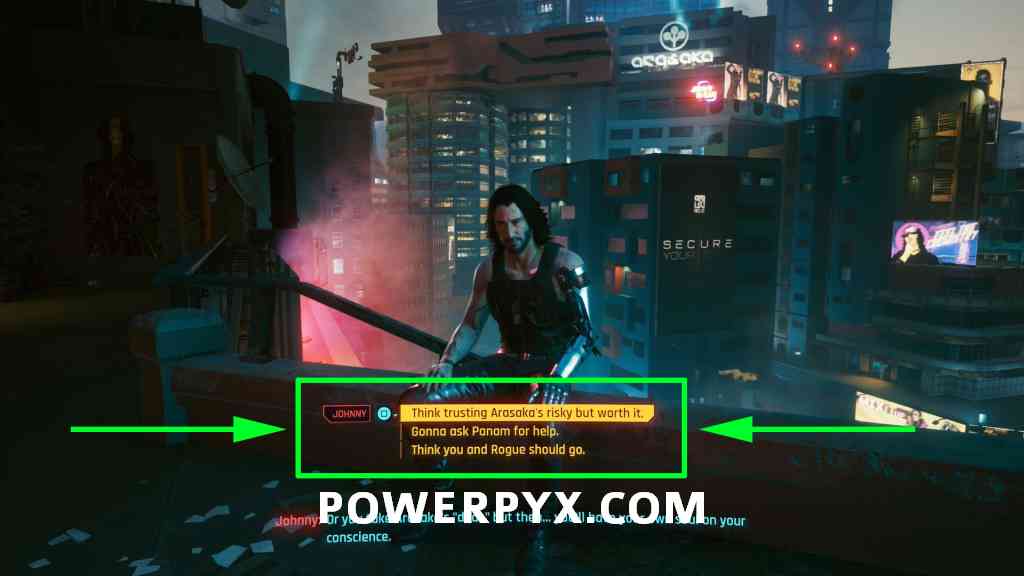
For a full guide on how all the Endings and Epilogues can unfold, refer to the complete Cyberpunk 2077 Endings Guide (All Endings).
Furthermore, Cyberpunk 2077 also has some Side Jobs with important choices. These choices mainly have to do with who you can romance. Each Romance is tied to Side Quests and specific choices must be made during those quests.
For all Romances, their required Side Quests and Dialogues refer to this guide:
» Cyberpunk 2077 Romances Guide (All Romances)
For everything else to do with 100% Completion in Cyberpunk 2077, refer to the complete Cyberpunk 2077 Wiki & Strategy Guide.
Q says
What’s the extra scene in the devil ending if you send him to Vik? If it’s just the quick one during the dream, I got it from also sending him to his family and not Vik.
Cypher says
The Space In Between
Do not beat this guy he is the only doc sells epic Fortified Ankles. If you beat him you will lost your chance to get new and modified jump.
Snake2410 says
Pretty sure you can still knock him out with the last dialogue option though. I did that and he still sold to me. Make sure to have a back up save though, because it’s possible it may have just glitched for me.
Jon says
The Pick-up:
You’re missing a path here, and arguably it’s the best.
Meet Meredith > (Corpo) Tell her you know chip is bugged > Take Chip anyways > Debug Chip > Shoot Royce during deal and keep money for yourself > fight maelstrom > Meredith wins.
Neverzen says
I had a different ending for the Pickup- I skipped calling Millitech, shot Royce at the deal and freed Brick. It’s just me and Jackie outside after. Seems like the best ending for an anti-Corp playthrough. Never hear from Stout or the other dude.
Neverzen says
Oooo. I almost forgot. There is a side gig where you tear up a Tyger Claw boss in a brain dance club- who is notorious. If you do that before the Woodman mission you can tell him you killed that guy and he backs down.
Franz says
I must’ve done something wrong. I took the chip from Meredith, killed Royce during the convo but Gilchrist showed up. Bummer.
Zektor says
Gilcrest shows up if you take down Royce using the body attribute option during the conversation. A bug I assume. If you skip that and use the later option that anyone can use to take him down during the conversation, then Meridith shows up correctly.