
The Information is the 6th main story mission in Cyberpunk 2077 (CP77). This walkthrough will guide you through all objectives, paths, dialogues, choices and endings of The Information Main Job.
Area: Watson > Little China
Quest Giver: Dex
Requirement: Complete The Ride
Reward: Kogane No Yume Titanium BD Wreath
Mission Info: Either Evelyn Parker’s got the best intel in town, the biggest pile of scratch, or the brightest goddamn lucky star twinkling over her at night. Fuck, maybe she got all three. Still, good thing Dex sent you to that meet. You clean up better. Anyway, this goes down right, she’ll be a nice new contact for us. And you know the deal – won’t get anywhere without contacts in Night City. So don’t fuck it up, man0.
Evelyn knows more than she’s willing to spill. Only question is whether she thinks we’re worthy of her trust… that’s where you come in. Chick’s gotta be seriously well-connected to have the kind fo intel we need for this op. Make sure to squeeze every last drop out of her, V. And remember – major league’s just around the corner.
Objectives:
- Talk to the bouncers
- Sit at the bar and ask about Evelyn
- Follow Evelyn to the VIP room
- Enter the VIP room
- Sit
- Talk to Evelyn
- Follwo Evelyn
- Talk to Judy
- Sit
- Look at Judy
- Follow Judy’s instructions
- Unpause the recording and watch the scene
- Rewind to the beginning
- Fast forward
- Play the recording until you spot the gun
- Scan and inspect the gun
- Switch to the audio layer
- Scan the audio source and listen
- Switch to the visual layer
- Fast forward to where the customer is hit
- Scan and inspect the hurt customer
- Fast forward to where the robber is shot
- Rewind until the CCTV screen appears
- Scan the CCTV screen
- Exit the braindance
- Talk to Judy and Evelyn
- Examine the braindance in Analysis Mode to find the Relic
- Scan the apartment’s security systems [Optional]
- Watch the whole recording from Evelyn’s point of view [Optional]
- In the audio layer, scan Yorinobu’s phone as he talks
- Listen in on Yorinobu
- In the visual layer, scan Yorinobu’s datapad while it’s turned on
- Scan for thermal clues to find the Relic
- Exit the braindance when you’re ready
- Talk to Evelyn
- Leave Judy’s workshop
- Call Dex
Starting Location: The Information
 |
 |
Go to Lizzie’s Bar between 6:00 PM and 6:00 AM
To properly start this mission you need to show up at Lizzie’s bar between the specified hours. If you show up in the other 12 hours you just can’t come inside. If you need you can advance time in the menu (in the bottom left corner of the menu select “Skip Time”).
Talk to the bouncers
When you arrive at Lizzie’s Bar at the correct time, go up and talk to the two bouncers outside.

Dialogue:
- Sure. I’m in.
- Braindance? What’s good?
- Fuck yes. > These two options show up if you pick the second option.
- Another time. > Walk away from the conversation without entering.
- Hey > If you come up again this puts you back with the above two options.
Once you agree about going in, head inside.
Sit at the bar and ask about Evelyn
You can explore around if you want, there are some random items to pick up throughout the bar (nothing game-changing, mostly consumables). When you’re ready to continue, go take a seat at the bar.

Dialogue:
- Looking for Evelyn. > Choose this to proceed with the mission.
- $ What can I get here? > Open shop inventory, bartender sells a bunch of drinks.
- [Get up] Better get goin’. > Get up from bar.
- Lizzie still work here? > Optional, dialogue about the bar name.
- Name’s V. > All three outcomes are the same.
- Answer the question.
- 4 COOL: A big tipper.
After that dialogue, Evelyn comes up to meet you.

- Why didn’t you come over sooner? > Both options have the same outcome
- [Drink] Mmm. My tequila of choice.
- And? Like what you see? > All three options have the same outcome. This specific option only appears if you select the first option instead of drinking.
- Let’s talk shop, the contract.
- 4 REFLEXES: Why meet here?
- [Stand] > End conversation
Follow Evelyn to the VIP Room
Head out into the hall, following Evelyn to one of the room on the right.
Enter the VIP Room
Head into the now open door beside Eveyln.
Sit
Sit on the couch inside the room
Talk to Evelyn
Inside you’ll have some more conversation with Evelyn.

Dialogue:
- Don’t know him well. haven’t worked together long enough. > All four options have the same outcome.
- Let’s just cut to the chase.
- 4 COOL: I’m the best.
- 4 REFLEXES: You don’t care what Dex thinks.
- Let’s talk about biz.
- The other kind? Elaborate, please. > Optional.
- Just started working with him. > All three options have the same outcome.
- Lets get down to biz.
- 4 COOL: What, you writing Dex’s bio?
- Nope. Outta my price range. > Both have the same outcome.
- Never had the opportunity.
- Let’s see what’s up your sleeve.
- Yorinobu’s got an army around him, I bet. > Optional
- Seriously, HE’S my target? Yorinobu Arasaka? > Optional
- Where does Yorinobu keep the relic?
- So what’s Yorinobu slated to get in return? > Optional
- NetWatch? Something doesn’t add up. > Optional
- [Stand] OK. What’s next?
- Yori Arasaka – what else do you know? > Optional
- What’s on this relic? > Optional
Follow Evelyn
Once you’re finished with the conversation, follow Evelyn downstairs. On the way down, you’ll get some more dialogue.
Dialogue:
- So you know Yoribobu personally? > Both options have the same outcome.
- No, no objections.
Talk to Judy
Follow Evelyn all the way downstairs where you will meet Judy. Judy is one of the potential romantic interests for the game, but only if your V has a feminine voice and body type. Nothing in this mission is a factor towards that though, so don’t worry too much about answers to the dialogue here.

- Hey, Judy. > All three options have the same outcome.
- Got quite the setup here.
- 6 TECHNICAL ABILITY: Not bad. This hardware’s top-shelf.
- Think I can take it.
- No, never.
- What’s so raw about it?
Sit
Sit in the chair when you’re ready to proceed.

Dialogue:
- Ok, profile away.
- A what profile? > Optional
Look at Judy
To proceed, look directly at Judy sitting at her desk.
Dialogue:
- Am I gonna have to calibrate each time? > Timed choice, both options have the same outcome.
- You do this often?
- [Start BD] OK, let’s do it.
- What’d you choose> > Optional
You’ll see the initial braindance scene, then be back talking to Judy.
- That was… too much. > Both options have the same outcome
- Could’ve warned me…
Follow Judy’s instructions
Now you’ll be in the main braindance tutorial, where you go over all the options for investigating in the editor mode. In this first section, you’re basically following the prompts to see the different signals and how to look for things within the braindance environment. Below we’ll go over how to solve the Braindance.

Unpause the recording and watch the scene
Press  /
/  to unpause and let the braindance run at normal speed.
Rewind to the beginning
Hold  /
/  to rewind the braindance, the longer you hold the faster the rewind will move.
Fast forward
Same idea for fast forward while holding  /
/  .
.
Reset the recording
Press  /
/  to reset back to the start of the braindance recording.
Play the recording until you spot the gun
Fast forward or let the recording play until the gangster on the right pulls out the gun again.
Scan and inspect the gun
Once the gun is pulled out, move your reticle over top of the gun to scan it.

Switch to the audio layer
In the braindance you can switch between recorded layers to find different points of interest. Press  /
/  to do this.
Scan the audio source and listen
Audio sources are shown by a green circular wave visual. Look at either the vent to the right or the entrance to the store to scan one of them.

Switch to the visual layer
When you’re ready to continue, press / to switch back to the visual layer of the recording.
Fast forward to where the customer is hit
Hold / to move the recording forward to the prompted point.
Scan and inspect the hurt customer
Move your reticle over the customer to the right to scan them after they have been hit.

Fast forward to where the robber is shot
Keep fast-forwarding more until right near the end of the braindance where the robber was shot while walking out of the doorway.
Rewind until the CCTV screen appears
Hold rewind until the braindance host is back near the camera so have the CCTV in range.
Scan the CCTV screen
When back in range, scan the display yon the right side of the counter.

Exit the braindance
You can look around more if you want, then when you’re done press  /
/  to exit out of the braindance.
Talk to Judy and Evelyn
Once you’re out of the braindance, you’ll have some more dialogue with Judy and Evelyn before proceeding.
Dialogue:
- You can trust T-Bug. > Timed choice, all three options lead to the same outcome.
- Relax, Judy. Everything’ll be fine.
- Evelyn?
- [Call T-Bug]
- Doesn’t matter. You ready? > Both options lead to the same outcome.
- Judy and Evelyn.
Examine the braindance in Analysis Mode to find the Relic
Now you are into the main objective for this chapter, looking over Evelyn’s braindance and finding out info about the relic. This section has a number of optional objectives you can look through
Scan the apartment’s security systems [Optional]
If you want to scan for it, the two points of the security system you need to scan are the keypads right beside the elevator Evelyn walks in, and the turret in the ceiling that will appear about 2/3 of the way through the braindance.
 |
 |
Watch the whole recording from Evelyn’s point of view [Optional]
The first time watching the braindance you can view it the entire way through if you want, but you don’t gain anything specific for doing so.
In the audio layer, scan Yorinobu’s phone as he talks
Once Evelyn reaches the main area, you get this objective. In editing mode you can start scanning the phone Yorinobu is talking into once the call on the main screen goes away.
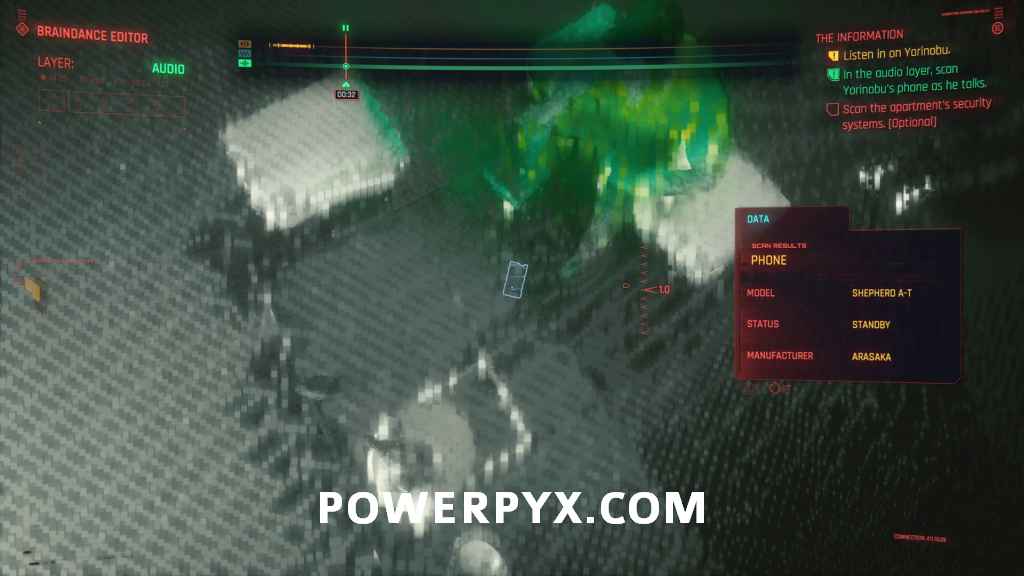
Listen in on Yorinobu
Listen to the audio from the phone call until you get another objective, T-Bug will automatically stop the playback at the required point.
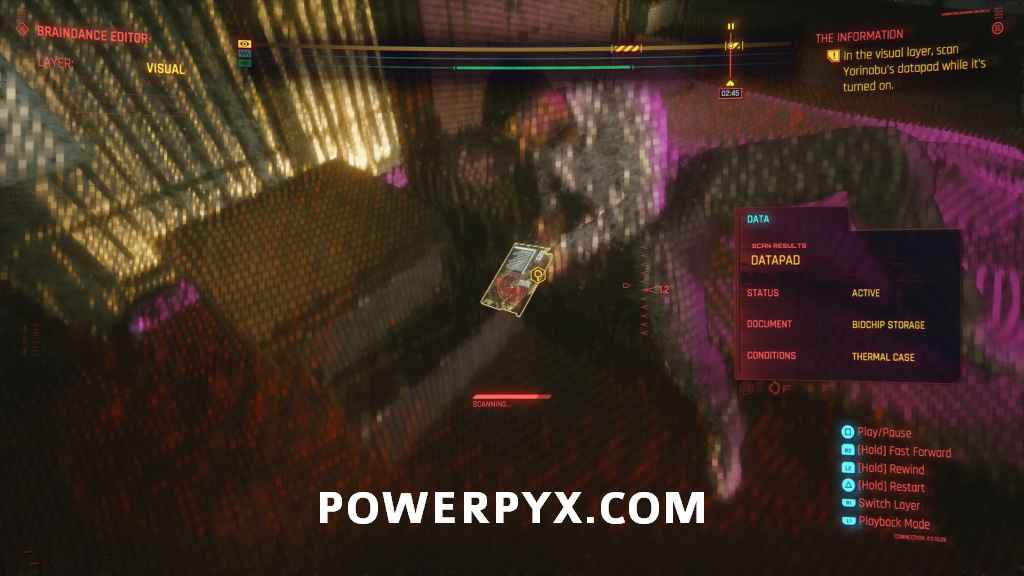
In the visual layer, scan Yorinobu’s datapad while it’s turned on
Switch to the visual layer and keep watching the playback. After a while Yorinobu will go into the bedroom area while Evelyn comes over. Watch the datapad that he pulls out while on the side of the bed and scan that.
Scan for thermal clues to find the relic
Switch to the new thermal layer that you have access to, then rewind to when Evelyn is near the bar. Check the left corner of the room behind the screen to find a hidden safe in the floor, which is recognized as where the relic would be hidden.

Exit the braindance when you’re ready
You can look around more if you want for the optional objectives, and exit the braindance when you’re ready to proceed.
Dialogue:
- We really needed that recording, Judy. > Timed choice, both outcomes are the same.
- Relax – everything’s under control. > Timed choice
- [Stand]
Talk to Evelyn
Go over to Evelyn near the door, then follow after her.
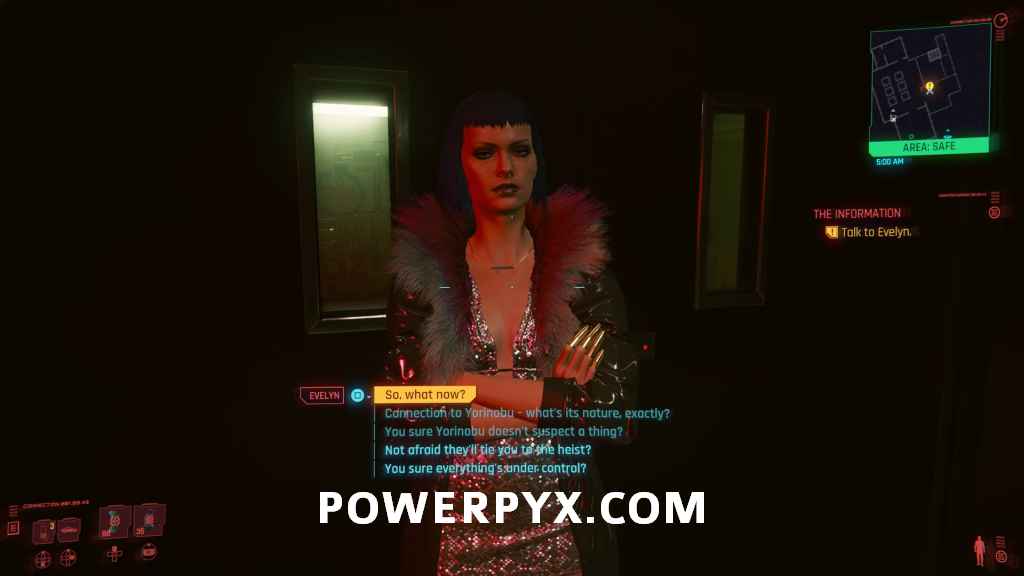
- So, what now?
- Connection to Yorinobu – what’s it’s nature, exactly? > All four choices are optional
- You sure Yorinobu doesn’t’ suspect a thing?
- Not afraid they’ll tie you to the hesit?
- You sure everything’s under control?
- I’ll think about it. > Both options have the same outcome, don’t impact future events.
- No way, Dex trusts me.
- I’m not about to fuck over Dex. > Option if you pick “No way” dialogue.
- You wanna haze our fixer? > Optional
- I’m not about to fuck over Dex. > Option if you pick “No way” dialogue.
Leave Judy’s workshop
Head up the stairs and out of Judy’s workshop.
Call Dex
You will automatically call Dex now, and this mission will be complete.
This finishes The Information main quest in Cyberpunk 2077 (CP77). Now if you have finished the other unlocked quest The Pickup, the next quest The Heist becomes available.
For all other Quest Walkthroughs, check out the complete Cyberpunk 2077 Walkthrough.
Leave a Reply