
Spy Game is a Story Quest (Main Mission) in Dying Light 2. This walkthrough will guide you through all objectives of the Spy Game Story Mission.
Region: The Wharf
Quest Giver: Juan
Requirement: Complete The Shoe, agreed to help Juan in Welcome on Board and therefore complete the quest Cathedral, give the antenna to Juan in Broadcast
Reward: 3000 Combat XP, 3000 Parkour XP, Ice Pick Claws weapon
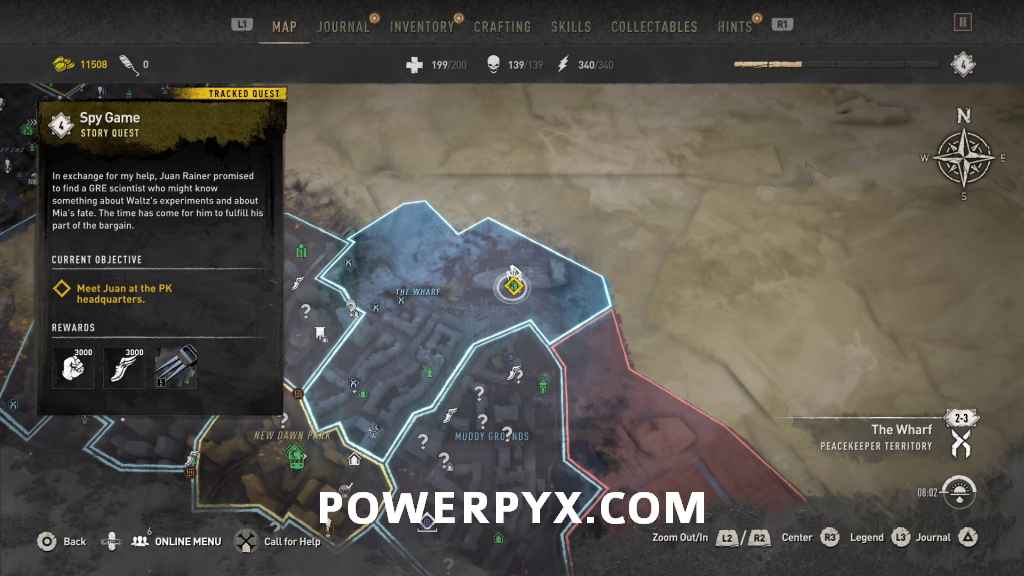
Mission Info: In exchange for my help, Juan Rainer promised to find a GRE scientist who might know something about Waltz’s experiments and about Mia’s fate. The time has come for him to fulfill his part of the bargain.
Objectives:
- Meet Juan at the PK headquarters
- Find out what Matt is doing with the UV lamps
- Find another way to the platforms
- Follow the train
- Leave the metro station
- Open the hatch into the metro tunnels
- Follow the signal
- Climb the skyscraper to the antenna
- Activate the antenna
- Set the proper frequency
- Catch the train
- Find the crates
- Don’t kill the Peacekeepers
- Avoid being detected
- Check the crates
- Don’t kill the Peacekeepers
- Avoid being detected
- Survey the area around the station
- Don’t kill the Peacekeepers
- Avoid being detected
- Report to Juan
Starting Location: Spy Game
 |
 |
Meet Juan at the PK headquarters
Head back to the lower area of the PK headquarters to meet up with Juan again.

Juan wants you to spy on what the Peacekeepers are doing and figure out where half of the UV lamps have gone.
Find out what Matt is doing with the UV lamps
Juan wants you to check in the metro beside the fortress.
 |
 |
You can reach the location by fast traveling to the fortress location, which will take you directly into the metro. Turn to the right out of the safe room and interact with the Peacekeepers standing in front of the gate.

Find another way to the platforms
They won’t let you in, so you need to find another way into the metro. Continue to farther down the hallway from the safe room and you can see the other gate is sitting half open and you can crouch underneath.
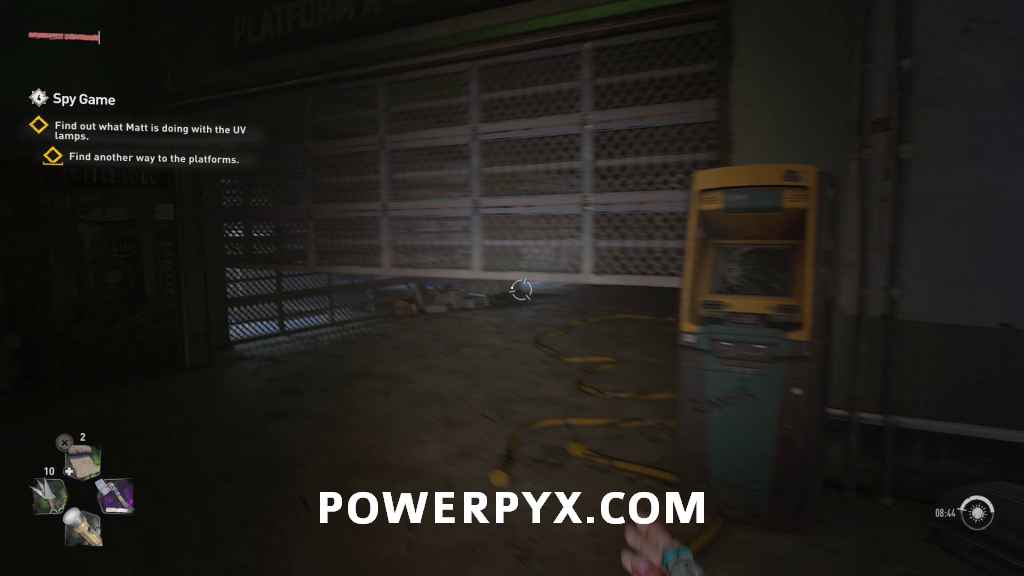
Go through the door immediately to the right.

Then go through the vent on the other side of the room and climb into the vent.

Continue through the vent until you drop into another room, then open the nearby door to enter the station.
Leave the metro station
You can now follow the objective out of the metro and back to the city.
Follow the train
You now need to follow the objective marker moving underground to follow along with the train.

It will move a short distance away, then stop underneath a hatch.

Open the hatch into the metro tunnels
Interact with the hatch and some infected will appear from the noise.

Deal with the infected, then interact with the hatch again.

Follow the signal
The train is moving again and you need to keep following the signal. You can use the air current coming out of the hatch to get into the air with your Paraglider.

Keep following along with the objective marker until you lose track of it.
Climb the skyscraper to the antenna
You now need to climb the nearby tower and activate the antenna to regain the signal.
 |
 |
To reach the top of the building you will be climbing a number of platforms running along the outside. To start, you can get onto the building using a winch on the north side.

Continue up and around the building using the platforms, bars, and your grappling hook. When you reach the first point you can enter the building on the east side make sure you enter and grab the inhibitors from the crate in the second room.

Continue further you will reach a large balcony. You need to go inside the building now and go into the elevator and climb to the top to continue farther.

Continue through the building and then back outside to continue climbing.

Activate the antenna
When you reach the top there is a Nightrunners Hideout, along with a tape that you can grab.
Tape – Journal of a Nightrunner #6

You can then start climbing the antenna. To start, climb up the rotating posts on the leftmost pillar.

You can then use your grapple to reach the next pillar, take the wire over, then climb another set of rotating posts.

Finally, you can swing across another grapple point, then climb another set of posts to reach the top.

Set the proper frequency
After activating the antenna, interact with the box to the left to set the frequency.

Catch the train
You can now jump off the objective towards the tower, continuing to follow the train.

If you glide down far enough there will be air currents that you can use to stay on your glider and push yourself along farther.

The train will reach the Metro: Downtown Court location, and you can go inside and continue downstairs to continue.

After some scenes, Aiden will automatically get onto the train and it will leave.
Find the crates
Now in a new station, you need to make your way through to find the crates the UV lights were in.
Don’t kill the Peacekeepers / Avoid being detected
This is one of the few missions in the game where you aren’t allowed to be spotted at all or kill any enemies, so make sure to use your Survivor Sense to spot where the enemies are and where they are moving to.
To avoid the first enemy you want to go back into the train car through the farther door, then interact with the door in the train to move to the next car.

Continue to the end of the second car, watching for the PK that walks back and forth on the outside of the train. Once they move back towards where you started from, you need to continue down the side of the car where you can then find a vent to crawl through.
 |
 |
In the next room, there is tall grass you can hide in, and watch for the PK in the middle who walks back and forth on the other side of the escalator. The ones to the left and right don’t move at all. Your goal here is to stay on this floor and walk around to the backside of the escalator to the lit up area.
 |
 |
Check the crates
Interact with the closed crate in front of the piles of boxes.

Survey the area around the station
You then need to walk around back near to where you came into this room, and there is a door you can go through to get outside.

Jack Matt will appear and question you on why you’re here, you can answer however you want.

Report to Juan
After Jack Matt leaves you will automatically report back to Juan over the radio. To get back to the city you will need to fast travel to one of the unlocked points, as you are currently stuck on the outside of the car factory area.
This finishes Spy Game story quest in Dying Light 2 Stay Human.
For all other Main Quests and Side Quests, check out the complete Dying Light 2 Walkthrough.
David Johnston says
At the downtown court bit where you are supposed to get on the train, the gates are locked. How on earth do you get to the train? You gloss over that part a bit.
Simon O'Hara says
I know mate I’m having the same trouble watched the YouTube and you just walk through the gate but it’s not working for me