
Far Cry 6: Lost Between Worlds Trophy Roadmap
- Estimated trophy difficulty: 2.5/10
- Approximate amount of time to 100%: 3-4 Hours
- Offline Trophies: 11 (2
 , 9
, 9 )
) - Online Trophies: 0
- Number of missable trophies: None, you can replay all the Rifts
- Glitched trophies: Nothing Yet
- Does difficulty affect trophies?: No, you can play on Explorer Difficulty to make it easier
- Minimum Playthroughs: At least 5 playthroughs of the new mode
- PS4/PS5 Autopop & Save Transfer: (Currently Unknown)
- PS4/PS5 Crossbuy: Yes
- Free-Roam / Level Select after Story?: Yes, you can still replay the mode after finishing it
- Release Date: December 06, 2022
 , 9
, 9 )
)Introduction
Welcome to the Far Cry 6: Lost Between Worlds DLC Trophy Guide! In this new mode you will have to finish challenges in order to unlock 5 Vessel Shards and finally escape the protocol. No matter which path you choose on the map, you will always have to finish a total of 5 challenges to finish a run of this DLC.
Step 1: The first run
During your first run there is no possibility of choosing the route you want to take. You will be forced to take the Purple Route each time. Do this and you will unlock the Fractal Bomb which allows for some shortcuts, as well as the opportunity to actually choose your own path in following runs.
Step 2: Collecting 5 Vessel Shards and getting to know each level
Play through each level at least once and obtain all the shards choosing different paths. Each Shard unlocks gear at the end, some of which is very useful for the Speedrun Trophy. After getting all 5 Shards defeat the boss and reload the DLC to once again appear in the hub area. On your way through each area also make sure to unlock all the miscellaneous trophies.
Step 3: Speedrun
Once everything else is done, go for the 15 minute speedrun. You can use all the gear you unlocked to make this easier.
Far Cry 6: Lost Between Worlds Trophy Guide
All Far Cry 6 Trophy Guides:
Far Cry 6 Main Game Trophy Guide & Roadmap
Vaas Insanity DLC Trophy Guide & Roadmap
Pagan Control DLC Trophy Guide & Roadmap
Lost Between Worlds DLC Trophy Guide & Roadmap
 |
Back Home Escape the Encasement with Fai’s help |
|
| After collecting all 5 shards you will be transported to a new area where you will have to defeat the Dunia Vessel, once you do the trophy will unlock. | ||
 |
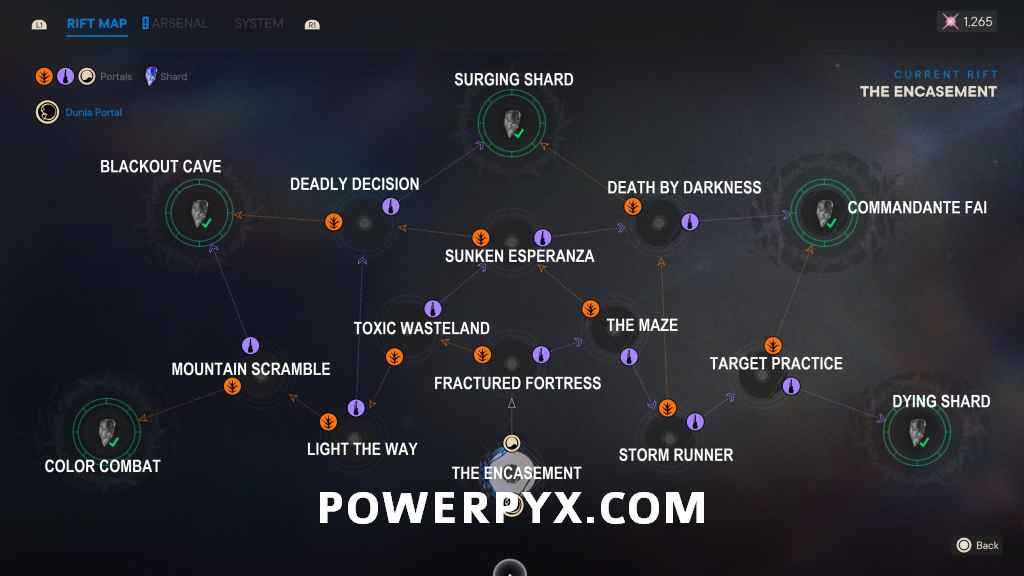
Intergalactic Mechanic Collect all 5 Vessel Shards |
|
| Reach the end of each path to unlock all the Shards. Make sure to follow the map to know which portal takes you to which area. | ||
 |
Refracted Yara Enter the portal and complete Fractured Fortress |
|
| Automatically unlocked during your first run of the DLC. | ||
 |
Now You’re Riftin’ Complete 5 consecutive rifts without using glints to respawn |
|
| When you die, Fai can revive you using the Rifts you have collected. Simply said: don’t die until the trophy unlocks. Play on Explorer Difficulty to make it easier. | ||
 |
Flawless Clarity Complete a run in Lost Between Worlds in 15 minutes |
|
| The easiest way to obtain this trophy is by finishing each Vessel Shard first to obtain all the gear in the DLC. Grappling Hook and the Shoes you unlock for finishing Surging Shard make the trophy a whole lot easier. Surging Shard is the one you want to get in 15 minutes.
Your path should be as follows:
|
||
 |
Into the Void Take out 25 Defense Units with gadgets |
|
Gadgets are the items you can use with  . At the start of each run you will be able to grab a gadget from a chest just before the first Rifts. Replenish your ammo at the ammo crates should you run out of Gadgets. You can basically use any gadget for that except for the Healing Syringe. . At the start of each run you will be able to grab a gadget from a chest just before the first Rifts. Replenish your ammo at the ammo crates should you run out of Gadgets. You can basically use any gadget for that except for the Healing Syringe. |
||
 |
Mighty Minotaur Take out 10 Defense Units with melee attacks in one run of The Maze |
|
Use your melee attacks with  to kill 10 enemies in the level The Maze. to kill 10 enemies in the level The Maze. |
||
 |
Yaran National Scuba Team Swim to a depth of 185 meters in Sunken Esperanza |
|
| In Sunken Esperanza you will navigate through long diving sections. This trophy is not obtainable during the first diving section so don’t bother searching for it there. Once you get out of the water and reach a room with enemies, check the opposite corner of the room to find another diving spot there. Follow the path there until you reach the inside of a sunken church. Swim through the door to the left of the altar and from there outside. Once outside keep swimming down into the darkness until the trophy unlocks. | ||
 |
Sun Striker Take out 20 Defense Units in one run of Death by Darkness |
|
| In Death by Darkness you have to kill enemies in order for the sun to stay up. Just follow the path and kill every enemy you see. There are more than 20 enemies in this level. | ||
 |
Demolitions Expert Blow up 30 Defense Units as Fai in Comandante Fai |
|
| In Commandante Fai for each enemy encounter you will be able to take control of Fai. The time will stop and you will be able to navigate the camera from birds-view and place bombs next to the enemies. Always try to place bombs next to at least 2 enemies. Depending on the enemy encounter you can sometimes place 3, 4 or 5 bombs so make sure to kill as many enemies as you can with each one. The last section of this level will let you use Fai multiple times so you can get a bunch of kills. There are more than 30 enemies in this level and you can unlock the trophy before the last enemies in the last area appear. | ||
 |
Crystal Crusader Complete Color Combat without Dani’s health falling to a critical level |
|
In Color Combat you can use a shield that will be the same color as your ammo. Red protects you from red stuff, blue from blue stuff. Playing on explorer difficulty makes this trophy extremely easy and you don’t really have to bother with switching the shield back and forth at all. Just kill the enemies and follow the path to the end. Should you be around half health just heal by holding  to not fall to critical level. to not fall to critical level. |
||
 to reach the
 Far Cry 6 Trophy Guides:
Far Cry 6 Main Game Trophy Guide & Roadmap
Vaas Insanity DLC Trophy Guide & Roadmap
Pagan Control DLC Trophy Guide & Roadmap
Lost Between Worlds DLC Trophy Guide & Roadmap
Kira says
A quick question for the 15 minute trophy can you pause the game to stop the timer?
PowerPyx says
It doesn’t show the timer so not quite sure on this.
But anyway, you can do it in about 12 minutes, the time for it is lenient. If you keep it for last you’ll know the DLC pretty well already and there’s no need to pause.
CurtisJL93 says
Yes, you can pause because I did a few times.
Toalha Nerd says
Thanks ✌️, FF 7 reunium please
CurtisJL93 says
For the Demolitions Expert trophy, the kills stack. I didn’t kill 30 in my first run, and the trophy popped after I killed all 7 enemies in the first sequence of my second run.
littlejay says
I killed myself to retry and got it in the first area.
Th3finalgamer says
Any update on the auto pop