
Chapter 16: The Belly of the Beast is the 16th story mission in Final Fantasy 7 (VII) Remake. This walkthrough will guide you through all objectives of The Belly of the Beast Main Mission.
The Belly of the Beast starts when you complete The Day Midgar Stood Still.
Area: Sector 0 – Shinra Electric Power Company
Requirement: Complete Chapter 15: The Day Midgar Stood Still
Objectives:
- Infiltration
- Bust Out of the Garage
- Shinra Building Intel
- Acquiring the Keycard
- Reach for the Skyview Hall
- Use the Elevator
- Use the Emergency Stairwell
- Playing the Tourist
- A Helping Hand
- Reconnaissance
- Operation: Save Aerith
Infiltration
The current plan for the group is to sneak into the main Shinra building through the parking garage. Continue along the path until you reach a split leading left down some stairs or forward to a vending machine. At the split, there is one chest that contains 2 Hi-Potions, and the one by the vending machine contains a Turbo-Ether. Grab these and use the vending machine if you need, then go back down the stairs at the split in the path.

Proceed over the bridge and the crew will automatically jump on top of a truck to get inside. Inside Barret will fall off, and you’ll need to deal with a group of Elite Security Officers before continuing.
Bust Out of the Garage
Follow the path through the garage and pass through the first gate. You’ll need to deal with another couple Elite Security Officers, then a pair of 3-C SOLDIER Operatives. Proceed through the second gate, after which you will find four more Elite Security Officers and three guard dogs. In this room before proceeding, go to the North side to find a chest that contains a Molotov Cocktail.

Proceed under the door to the next area. Here you will have a large group of enemies that will likely attack you all at once: three Guard Dogs, three Elite Riot Officers, and two 3-C SOLDIER Operators. Make good use of any abilities you have that can deal group damage like Triple Slash or Blade Burst to hit as many of the enemies at once as you can, as they swarm quickly towards you.
Before leaving the garage, go to the North-East corner of this section to find a chest that contains 2 Mega-Potions.

Head out of the garage and up the stairs into the next area.
Shinra Building Intel
In the building lobby before going to the objective, head around the front to the South-West corner to find a chest by a planter, that will contain a Moogle Medal.

Head over to the reception booth by Tifa and Barret, then follow them up the stairs to the second level, then inspect the door at the North wall.
Acquiring the Keycard
Tifa opts to try jumping across the lights to get into the reception booth. Follow the lights around to the front, and when jumping off the third one she will fall to the lower area. Down here before progressing go to the East side down the smaller corridor to find a chest that contains 2,000 gil.

Go to the middle of the area and then hop up onto the car that’s beside the bike. From here you can then travel over the purple lit sculptures over to the pillar with a ladder on it.

Don’t climb the ladder yet though. You will likely automatically grab the above lighting frame when walking by it. Travel to the end of this one, then take the second one from the platform to get over to a purple chest, which will contain Purple Pain, Tifa’s final weapon.

Head back and this time climb up the ladder. From here you can follow the path along the lighting frames in a linear fashion. At the top of the next ladder, you will be able to jump onto the platform lights again. After the fourth one Tifa will make it to the hanging lights, and to get off those you need to hit  with the correct timing to swing farther.

Reach for the Skyview Hall
The group learns they need to get to Skyview Hall to reach the lab, so head back up the stairs. Before using the keycard on the door in the middle (which has the objective marker on it), make a little detour to the door on the right, leading into the Exhibition Hall. In there you find a chest with a new armor Iron Maiden.


After this go back to the middle door (objective marker) and open it to advance.
Use the Elevator/Use the Emergency Stairwell
Here you get the choice between taking the elevator or taking the stairs up to the 59th floor. For story purposes whichever you choose doesn’t matter, you will just get some different character dialogue depending on which you pick, and if you pick elevator you’ll get in two easy fights on the way up. Neither route has any items to pick up so basically just choose which you would rather do in the current playthrough.
In the Skyview Lounge, go interact with the hologram receptionist to continue.
Playing the Tourist
After the keycard is updated, head through either door then up the escalator at the back of the room to continue. Proceed through the 60th floor at your own pace, you can look at as much or as little as you want. When finished continue up to the 61st floor where you enter the theater and will get a long cutscene about the history of the planet. When it’s finished, continue back out of the theater.
A Helping Hand
You will be lead up to the 62nd floor, where you can then proceed through a door to meet someone. You will get an updated keycard, then need to head to the 63rd floor. In the library, if you speak to Hart you can pay him 10,000 gil to give you info on the person you need to meet, which you should do. The info you get isn’t that important, but he also gives you an EKG Cannon, which is Barret’s final weapon. Before leaving the library you should also run around to the North side of the ring to find a chest that will contain 3,000 gil.
 |
 |
Go down to the bottom floor of the library, then out the main doors to get back to the escalator room. Head up one floor to get to the 63rd, then through the door to the South to get to the area you need to search in.
Continue South and you will reach the cafeteria area, where your contact is. You can search around if you want on the lower floor, or just head upstairs immediately to the second level. Before talking to the man in front of the combat simulator, go to the South-East corner of the floor where you can find a bench and a Jukebox. Interact with this Jukebox to receive disc 31. Scarlet’s Theme. If you collected every disc up to this point, picking up this one will earn you the trophy Disc Jockey for collecting all music discs.

You can also stop at the nearby shop, where you can purchase any shop weapons you might have missed up to this point, or purchases new high-level armor pieces.
When you want to continue, speak to the man in front of the combat simulator. This is your contact, but before he gives you the card he wants you to prove to him you’re not going to mess up by beating a challenge in the combat simulator. When you’re ready to participate, head inside and interact with the pillar in the middle of the room.
Three-Person Team vs. Mayor Is Best
This combat challenge starts with you fighting two Cutters, so before you start it would be best to put Elemental Materia along with Lightning on your weapon for an easier time. Note you also can’t use items during this fight, so be sure you have Cure and potentially Raise on at least a character or two.
When you finish the encounter go back outside and speak to the contact again, who will then give you the new keycard and suggests a course of action for you to take. At this point, you gain some new challenges that you can do in the simulator for extra rewards. If you want to do them you can only do them right now before progressing but can come back in chapter select after finishing the game and work on them.
Reconnaissance
When you are all ready to continue with the story, head back out to the escalator room and up to the 64th floor. Use the keycard to get into the main Conference Area. Go to the South-East corner of the floor to find the men’s bathroom, then go inside and head to the furthest stall to find the air duct.

Proceed through the vent towards the objective. At the second split go left first where you can pick up an HP Up Materia.

Operation: Save Aerith
After the cutscene head out of the bathroom, then go out to the elevator room to find Hojo. You automatically be through the lab door, then can head up the stairs. At the top, you can find a bench and vending machine to use, as well as a chest that contains 2 Antidotes. In the same hallway opposite the bench and vending machine, there is another chest that contains 2 Celeris.
 |
 |
Continue down the hallway, and when you get to the room with the tanks of green fluid there is one more chest on the right that contains 2 Remedies. After grabbing it, continue up the stairs after Hojo.

Boss Fight: Specimen H01512
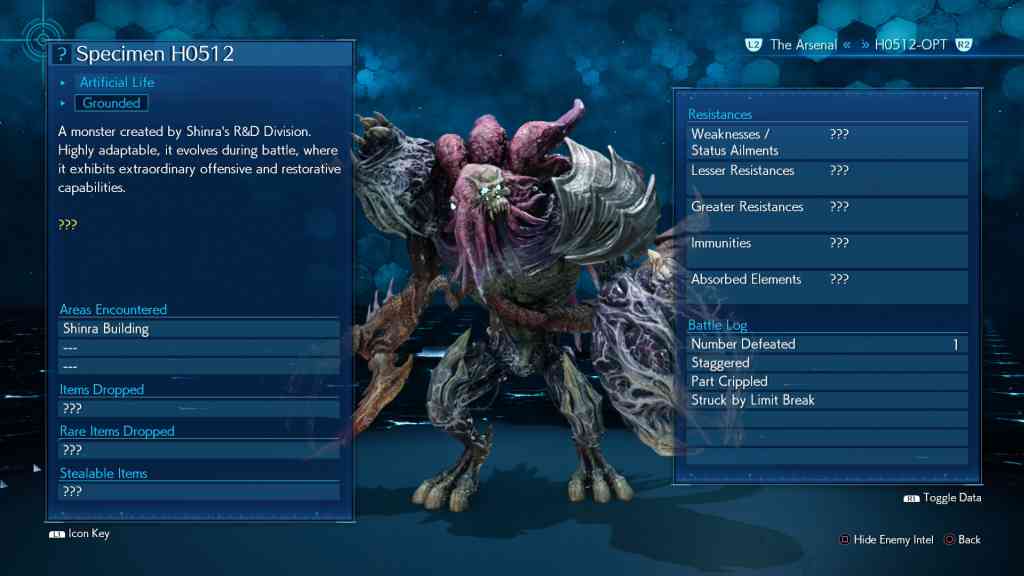

This is a really easy boss battle, which is a good thing because they’re about to get a lot tougher. Specimen H0512 is strong but moves slowly so you can damage it from distance with Barret without having to worry about being interrupted, or you can use the pincer movement with Cloud and Tifa up close. Use Punisher Mode, then dodge around him and hit him from behind with your abilities! You should be targeting the Left Claw first as knocking that out will Pressure him and go a long way to putting him in Stagger.
The main things you need to watch out for are its minions, the little cockroach-type things with one eyeball. Make those your priority otherwise they’ll niggle at you. Triple Slash them to oblivion and get back to working on Specimen.
Luckily, the more health it loses, the more aggressive it gets. It’ll start swinging for you more frequently, which works perfectly if you’re in Punisher Mode. Counterattack it to death, chipping in with Maximum Fury and Starshower from Barret and Tifa, remembering to always go for the Claw first if it’s out, then the main body. Keep this up and as long as you remember to wipe out the minions instantly as they’re spawned, this will be one of your easiest fights in a long time. Hit, dodge behind him, hit again, win.
Hard Difficulty Tips: There’s nothing else to add on Hard Mode except it might be best to put your Magnify-Cure on Barret since he’s the only character who won’t be up close and susceptible to Specimen’s physical attacks. As long as you kill the minions fast, Barret will barely take damage.
After the enemy is defeated, head over to the elevator and press the button beside to ride it up. After a cutscene, you’ll need to deal with a group six various security officers. After defeating them and freeing Aerith, you’ll need to deal with two new enemies called Armoured Shock Troopers. These are Shinra Troops in suits of robotic armor, so are weak to Lightning instead of fire. When you deal enough damage to the suit of armor the pilot will eject from it, causing it to explode and damaging you if you are near. You then need to defeat the Enhanced Shock Trooper that skates around the area.
 |
 |
When both enemies are defeated, follow Aerith up the stairs out of the room. After the cutscene, walk to the end of the hallway, then the chapter will end.
This finishes Chapter 16: The Belly of the Beast in Final Fantasy VII Remake. Now the mission Deliverance from Chaos starts.
Next Up: Chapter 17: Deliverence from Chaos
For all other Mission Walkthroughs, check out our complete Final Fantasy 7 (VII) Walkthrough.
Colm says
When you get the first key card you can access the exhibition hall before going up the stairs/elevator to get an Iron Maiden armor item.
Colton41891 says
Can confirm, just got it.
Maxx says
I was just about to suggest this as I am playing right now. Good find!
PowerPyx says
This has been updated in the walkthrough, thank you! =)
Cassandra says
Just to let you know, I encountered a bug when you press triangle to interact with the first vent while Cloud and Tifa are in the air duct. I couldn’t exit with circle button, so I had to go into title menu and start all over again from checkpoint save. It’s best to avoid any “interactions” and just go to the objective point until it’s fixed with a update.
Randy says
I encountered same thing. I thought it was just the first one, so I skipped it and got hung up on second as well
Paul says
I’m pretty well read, but this is the first time I’ve encountered the work niggle. I asked my wife, she said it was familiar, but not sure what it meant. Thanks for broadening my reading horizons lol.
Matt says
Got absolutely obliterated by H01512. You failed to mention a few things.
Things not mentioned:
– Can set slow and poison with one attack
– The little guys can all explode as a group with almost no warning, for considerable damage, in a wide AOE if enough go at the same time
– Regenerates claw almost instantly
– Triple slash strategy requires hard edge or similar