
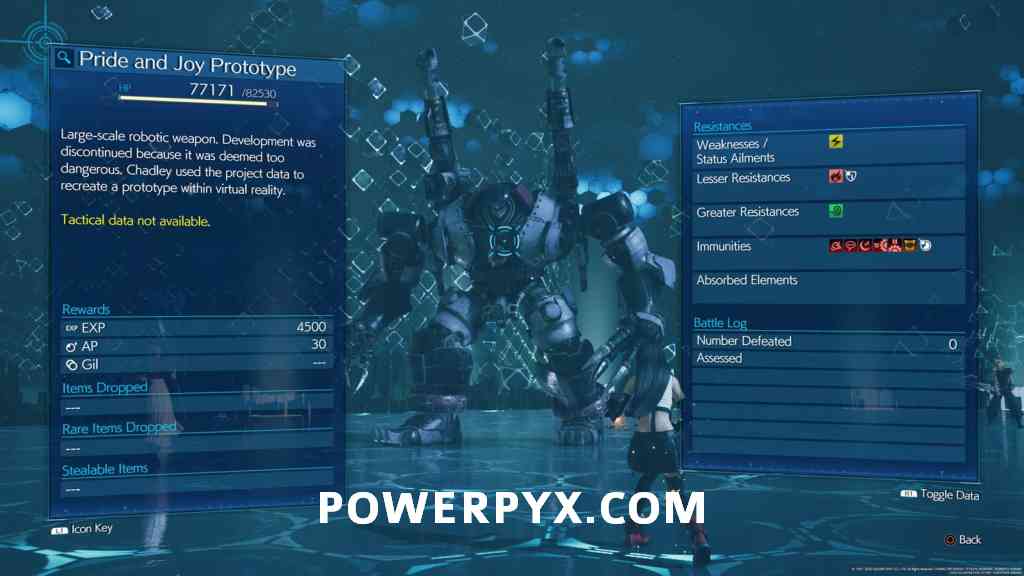
Pride and Joy Prototype is the superboss in Final Fantasy VII Remake. Defeating it unlocks the Ultimate Weapon trophy. This guide will show you where to find it and how to defeat it.
Pride and Joy Prototype – Location:
You can fight it in the Shinra Combat Simulator in Chapter 17 but it is only unlocked after completing all Corneo Colosseum challenges in Chapter 9/14 and 13 Shinra Combat Simulator challenges in Chapter 17. It is only playable on Hard Difficulty! On lower difficulties it’s unavailable.
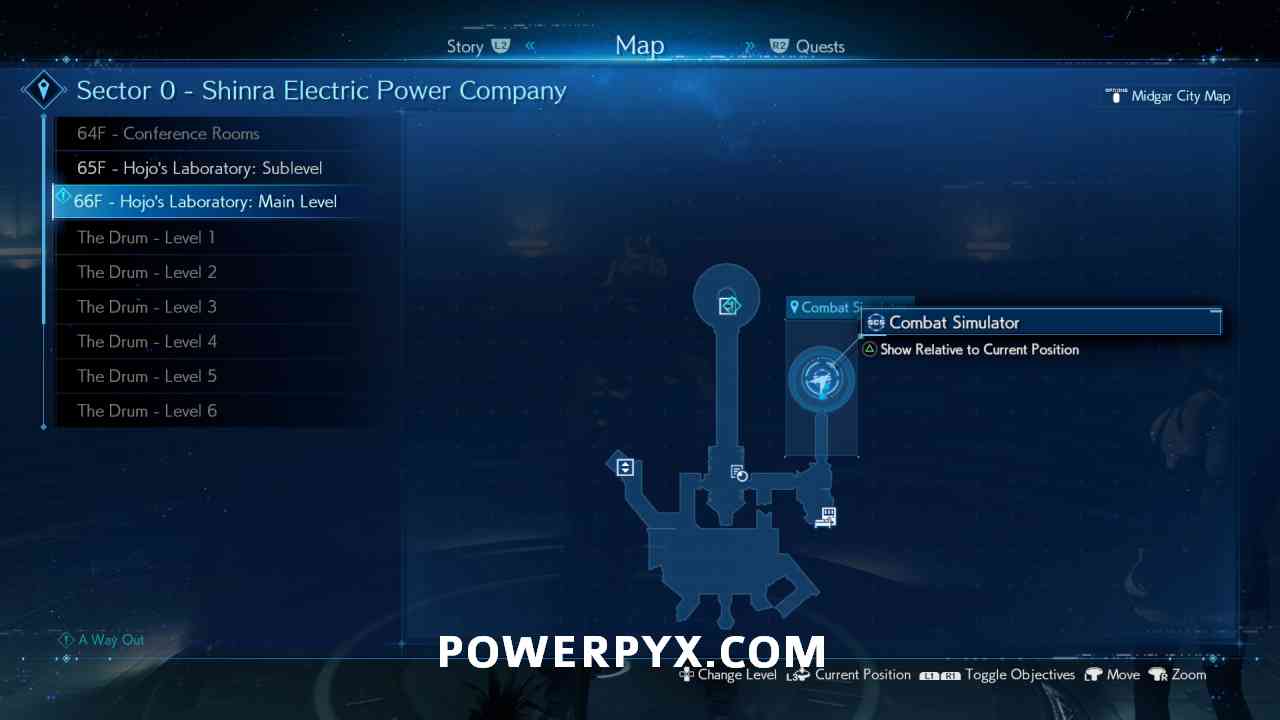
In Chapter Selection, pick Chapter 17 (on Hard Difficulty) and proceed a couple of minutes into it to get a cutscene with Chadley where he’ll tell you he has new hard-only challenges for you. It’s in the corridor immediately after the first enemy encounter in this chapter (Objective: A Way Out / Area: 66F Hojo’s Laboratory: Main Level), see location image below:
If you’re missing the Aerith solo challenge in the Corneo Colosseum then reload Chapter 9 and accept the challenge IMMEDIATELY after defeating Hell House. This is the only time in the game that Aerith is available at the Colosseum. If you proceed too far, she will leave the party.
The Pride and Joy fight takes place in the 5th round of the 14th and final challenge, ‘Three-Person Team vs. Top Secrets’. In a slightly bizarre twist, Pride and Joy is arguably the easiest of the 5 rounds, it’s the journey to that fight which is the hard part. You have to face Shiva, Fat Chocobo, Leviathan, Bahamut (who summons Ifrit to aid him at half health) and then Pride and Joy. The 4th fight in particular is easily the hardest fight in the entire game. Luckily, your HP and MP are healed 50% between every round.
Pride and Joy Prototype – Recommended Loadout:
Useful Links for all Item Locations:
A team of Cloud, Tifa and Aerith is highly recommended. A dedicated healer is essential (Aerith), whilst Cloud goes without saying and Tifa is great for increasing Stagger %, especially since the summons have the longest Stagger time of any enemy.
Cloud:
Weapon (Twin Stinger): Healing, Time, Barrier, MP Up, HP Up x2
Armour (Chain Bangle): Elemental-Ice, Revival, Steadfast Block
Accessory: Headband
Tifa:
Weapon (Sonic Strikers): Healing, MP Up, HP Up x2, Time, Barrier
Armour (Cog Bangle): Elemental-Ice, Revival
Accessory: Headband
Aerith:
Weapon (Reinforced Staff): Magic Up x2, MP Up x2, HP Up x2,
Armour (Rune Armlet): Magnify-Healing, Revival
Accessory: Circlet (alternatively: Healing Carcanet)
Make sure two characters have Elemental Materia linked to Ice Materia on their armor and Cloud & Tifa have a Headband equipped to prevent against Sleep. This is purely for the Shiva fight as she uses Sleep a lot and all of her attacks use Ice. This way, you never need to heal and can focus on attacking her to whittle down her health as she likes to heal frequently. If you spend half the fight asleep or trying to heal, you’ll never get anywhere. It’s best to leave the Circlet on Aerith for increase MP and Magic (which also increases healing). Magnify Materia linked to Healing Materia is the best option to heal your entire party. The Magnify Materia causes your spell to heal everyone in the party and not just one. Assign it to Aerith as she’s the best healer.
Pride and Joy Prototype – Strategy:
For all of these battles, the basic strategy remains the same. Just wail away on the enemies with Cloud and Tifa, using Focused Thrust and Starshower to build the Stagger bar, and once it activates use Tifa’s  attacks and True Strike to build the Stagger % whilst Cloud uses his strongest abilities like Blade Burst or Triple Slash. Aerith should always heal with Magnify-Cure as soon as a character goes below half health and she can chip away at the enemy’s HP if you’re well-healed. She’s particularly useful for attacking during the Leviathan fight once it takes to the air and circles the arena as Cloud and Tifa really struggle against aerial enemies.
The 4th round is the truly hard part. Bahamut alone is a lethal enough foe, never mind summoning Ifrit to join him once he hits half health. The problem is his use of Megaflare, which will instantly deal 9999 damage to all 3 characters. There are only a few ways to survive this: Stagger him before he counts down from 5 (unlikely), have the Reprieve ability from the Level 6 weapon cores which will leave you on 1HP, or cast Manawall (Barrier Materia) which halves all damage taken (5000 instead of 9999 damage). Luckily, he has a short cooldown period after unleashing Megaflare so it gives you enough time for a Curaga.
It’s worth saving Cloud and Tifa’s Limit Breaks for Ifrit when he spawns. He can be a real menace and quickly turn the tide against you if you’re not careful, so taking him out is the top priority; Bahamut can wait. Luckily, he has fairly low HP, so one Ascension or Dolphin Flurry can wipe out half his HP bar, or kill him entirely if you’ve saved up both. Bahamut will then start counting down to another Megaflare, but he should be running fairly low on HP by this point and you should kill him with the tried and tested tactics before this happens.
After getting through all this, Pride and Joy is a relief and actually quite easy. Similar to Malboro, the best bet is to get behind its legs and just keep attacking it to build the Stagger bar. It will intermittently expel jets of fire which will damage you, but not badly. Its most annoying attack is Catch, where it grabs one of your characters, leaving them unable to move, and eventually uses Brutal Tackle to slam them to the ground and instantly kill them. The only way to stop it is to attack its hand long enough so that it drops the character.
What makes this fight easy is that all of its attacks are close range, except Beam Cannon. Therefore, you can keep Aerith out of the way and healing regularly while Cloud and Tifa pound it with physical attacks up close. Even if one of them goes down, she can Raise from afar with very little chance of being interrupted (make sure you have Revival Materia on all 3 characters, you can buy more of it from the vending machine outside the Combat Simulator).
Once it goes down, you will be rewarded with the Gotterdammerung, the best Accessory in the game. This grants you a Limit Break at the start of every fight and fills the Limit Gauge gradually during battle (usually 1-2 minutes). This trivializes battles against normal enemies and significantly helps with the remaining bosses on hard difficulty.

Upon finishing the round against Pride and Joy you’ll earn the Ultimate Weapon gold trophy. Congrats!
B says
Where do you get the second Magic UP?
PowerPyx says
I have a dedicated Materia Guide for that (linked at top of this guide here). Chapter 7 & Chapter 14.
Wrinkletink says
Specifically it’s a reward for unlocking pro pull ups in the wall market gym.
Darth_Krid says
You can buy Magic Ups from Materia stores in the later game, not sure exactly when but at least Chapter 14 onwards.
Legs says
You mention here ‘Make sure you have 2 x elemental – ice but there’s only one obtainable?
Darth_Krid says
There are 2 Elemental Materia.
Materia #20: Elemental Materia
Chapter 6 / Objective: Three Sun Lamps Down / Area: Plate Mid-Level (Section H – Sun Lamp 3) – Same place where you found the above Materia, line up the walkway and cross over to the other site. There’s a purple discovery objective marked on the map where this Elemental Materia is at.
Materia #55: Elemental Materia
Chapter 14 / Objective: Over the Wall / Area: Urban Advancement District – Complete ALL Side Quests and a unique item will spawn “Letter from the Guardian Angel”. It’s in plain sight just before going Over the Wall at the end of Chapter 14 (after returning from Sewers). It’s a letter on the floor with a blue sparkle around it. If it’s not there it’s because you haven’t done all side quests. It gives you this materia upon picking it up.
Obviously the Ice you can buy almost anywhere.
Gabriele says
How do you have aerith or the simulation fights? At that moment pf the story it is not available for me
Matthew says
Once you get Chapter Select you can load up Chapter 17, progress just a bit, and you will find a brand new Chadley before the elevator with his own combat simulator. You will have access to Aerith here.
Gabriele says
Thank you
jelosago says
I noticed Tifa equipped with 4 hp up. I tried equipping the 3rd and 4th HP UP and the HP doesn’t change at all.
PowerPyx says
You can only get maximum 100% health boost from HP Up Materia. So if you have 2 maxed out HP-Ups that give 50% each, adding any more won’t make a difference. The maximum HP you can have is 9999, it cannot increase any more after that.
Brenza says
Correct me if I’m wrong but isn’t it in chapter 16? 17 is where you’re in hojos lab
PowerPyx says
There are two combat simulators. The one in Chapter 17 is different from the one in Chapter 16. If you did all Colosseum Challenges, then Chadley shows up in Chapter 17 and brings you to a hidden room where the Shinra Combat Simulator is.
Matthew says
Powerpyx maybe this isn’t the place to request this but I would love to see a guide and thoughts on what builds to go with on weapons with a priority list of abilities for those that don’t have all the SP yet. Could just be for the four suggested weapons you have for each character, Twin Stinger, Sonic Gloves, Reinforced Staff, and Light Machine Gun. No one on the internet seems to be making any guides on this specific topic yet.
Amber says
Aeriths planet limit break appears to do little against mega flare. Saw cloud with it on and still took 99% health (with reprieve).
Alf says
Yeah, that’d be because Aeriths limit break only lowers physical damage taken, unfortunately it ha sno effect on magic based damage.
Markus says
hmm i use german edition, but in my combat simulator i get on every fight in hard mode 50% HP back but only 30% MP back.
On normal oder easy mode is 50 50.
Jules says
Every time I use Planet Protector Megaflare still wipes out my party, this has happened 3 times already so I don’t think it works against that attack.
Alf says
Planet protector only lowers physical damage, not magic damage.
Jonathan Ulichney says
Need Mana Wall
Snack says
Rather than going Elemental – Ice, to make the already easy Shiva fight easier, I would recommend going Elemental – Fire to make Ifrit actually heal you during the Bahamut fight. It is also quite nice to have against P&J’s flame thrower.
This also leaves 2 Limit Breaks to be used on Bahamut, since Ifrit can be entirely ignored.
Note that Shiva can also be stopped, as well as poisoned, contrary to Bahamut.
J says
Absolutely. It also gives you fire to take out said shiva fight.
Teharistocrat says
Came here to thank you for the suggestion! I beat Bahamut thanks to this strat on a last ditch limit break after Megaflare hit us. With Ifrit completely nullified he couldn’t take away the last hit point leftover from Reprieve on my only character left standing.
This is the way to go!
Shnookums says
100% you should use elemental fire over ice. I forgot to put up manaward before mega flare but reprieve saved two of my characters. While I was resurrecting the third ifrit was nice enough to throw me some heals. Shiva is not a big enough problem to use elemental ice on.
Pedagog says
Thanks for the tip. Had success on first attempt with similar setup to above. Used elemental ice on tifa and mained her for shiva fight, and used elemental fire on cloud and mained him for bahamut/ifrit and pride and joy fight (for ground fire). Splitting the elements was the best of both worlds and since they focus the player controlled character I could keep them on the immune one. Recommend only using manawall on countdown of 2 or 1. Mine was on too early and dropped off just before megaflare!
Jonathan Ulichney says
Recommend casting STOP and spamming Firaga but definitely recommend the Fire on the Armor for the last 2 fights
Matt Willis says
Thanks. With this guide I completed the boss on my first attempt!
Sanban013 says
You forgot the Carbuncle(for the ones who have dlc) Materia. Summon him after Bahamut counts to “one”.
Leviathan absorbs fire, so using fire vs Shiva will come back to bite you, can go with Poison with one character, leaving more materia slots to use for MP up/Magic UP. Poison only works with Shiva and Chocobo.
Use Soul Drain with Aerith to repentish your MP. put Lightning on her, because when Leviathan starts hovering you cant reach him, only with magic and/or Aerith.
Prayer on every character helps a lot too, leaving your MP for Revival/Barrier.
Aeriths Arcane Wind is a must, doubles the Magic Cast with no extra cost.
For materia i used basically this for every character. Since you only have 2 elemental, i subbed with poison. Died first time to Shiva, and on second run beat all of them in next run( would have not of i didnt have Carbuncle)
Elemental-Lightning, Magic-Healing, Revival-MpUp
HP+-HP+, SteadfastBlock-Prayer.
Kougeru says
I’m not even getting my limit breaks before Ifrit comes out
kyle says
ok i have one elemental materia level 2 with barret on ice+elemental defense. he takes out shiva. all characters have revive, healing and high level HP up materia level 4 or 5. I have the second elemental maxed out with cloud on fire+elemental defense for ifrit. ifrits attacks will heal cloud. and i have aerith with magic up and lightning magic for the final boss. also aerith has a max magnify+barrier so she can Manawall the entire party. all have second level limit breaks. I used cloud on punisher to stagger fat chocobo. the bomb monsters heal cloud and focused thrust in punish mode adds a lot to stagger. I used barret to attack leviathan s head and aerith can manawall before tidal wave. cloud can take out ifrit and bahamut. guard in punisher mode will counter attack most of bahamuts attacks. you can level up your materia easily if you do the Shinra trainer on chapter 17 with 2 person vers. high flyers. give cloud magnify+fire and he can take out large groups easily with ap up paired with whatever materia you want to level. you can do that on easy mode and its the same amount of ap. ok now i finally reached the final boss round 5 but I am taking a break now lol. wish me luck!!
Dante says
How would an elemental+fire on armor with the rest being the same setup work out for the challenge. To try to avoid a difficult battle against bahamut?
PowerPyx says
Elemental+Fire on armor would be good for Bahamut/Ifrit (Round 4) and against Pride and Joy (Round 5 – but this one’s easy enough).
It’s personal preference really. Either ice or fire are both great options on armor 🙂
HS2005 says
I have finished Hard and obtained all of the manuscripts even so I could not go past Shiva. I could not imagine that using this guide all of the bosses were suddenly that easy. Even Bahamut along with ifrit was not that hard. Longest (but not hardest) fight was Leviathan though. Thank you!
Juju Dredd says
Don’t you also need an assess materia to get the full enemy analysis list?
Tony says
PowerPyx
I have completed all Corneos challenges, intel quests, and all shinra simulations.
But i cannot start the 14th simulation for the pride and joy. I just get a “????” marked, but it doesn’t allow me to access it.
I choose chapter 17 on hard mode, but still the same. Do i need to playthrough the whole game on hard mode and finish to release the pride and joy boss?
BodyChipper says
Finally got back around to my hard playthrough and with these tips I was able to get through this challenge on my first attempt. This guide is spot on about saving your limit breaks for Ifrit, he dies in two just like the guide says. Pride and Joy is fairly simple, and Aerith is surprisingly good at taking out his legs from a distance with normal attacks from her staff.
Granted, I had reprieve on all 3 characters and also had all the relevant materia maxed, but I don’t feel like I’m that good at this game. If I can do it, so can you. I only have the final two chapters to complete and I’ve got the plat!
Robbie says
Hi all, I am having a hard time trying to figure out how to unlock challenge # 14 on chapter 17 which is the pride and joy trophy. It is still showing ??? even though I finished the challenges including Corneo’s colosseum. Finished all the 13 challenges and went back to chapter 9 and chapter 13 and did the missing challenges in easy and finished each chapter just like what PP said. My question is do i need to beat Corneo’s challenges in hard mode on chapter 9 and 14 or it doesn’t matter? I’ve been searching around for answers but couldn’t find one and im so close on throwing the towel and move on to another game. Any help or suggestions would be great.