
Forspoken Trophy Roadmap
- Estimated trophy difficulty: 3/10
- Approximate amount of time to platinum: 40-60 Hours (40 Hours on Easy with Accessibility Settings Enabled and doing only trophy-relevant tasks, 60 Hours on higher difficulties and including non-trophy collectibles)
- Offline Trophies: 54 (1
 , 2
, 2 , 7
, 7 , 44
, 44 )
) - Online Trophies: 0
- Number of missable trophies: 0 – However, 2 Equipment Pieces are missable during the story from sub-events (see Roadmap Step 1). Kit and Caboodle trophy description says these aren’t needed for the trophy but personally I collected them. To be safe it’s recommended getting the 2 extra equipment, this is explained in Step 1.
- Glitched trophies: 0
- Does difficulty affect trophies?: No, can do everything on Easy and enable all accessibility features. In Gameplay Settings you can make it even easier by enabling Auto-Evasion, Auto-Use Health Flasks, Very Fast Stamina Recovery, Significantly Decreased Damage Received, Extended Enemy Knockdown TIme etc.
- Minimum Playthroughs: 1
- PS4/PS5 Crossbuy, Autopop & Save Transfer: No, game is PS5 only. There is no PS4 version.
- Free-Roam / Chapter Select after Story?: Free Roam = Yes, Chapter Select = No. There is still Free-Roam after the story, you can go back everywhere. All Collectibles are still available after the story.
- Supports Manual Saves?: Yes, 10 Manual Save Slots & 1 Autosave Slot
- Release Date: January 24, 2023
 , 2
, 2 , 7
, 7 , 44
, 44 )
)Introduction
Welcome to the Forspoken Trophy Guide! Forspoken is an open world game that features parkour and spellcasting combat. The trophies are quite easy, there is nothing difficulty-related, everything is doable on the lowest difficulty and all accessibility settings can be enabled. The story consists of 12 Chapters, afterward you can still free roam. The trophy-related side quests also become available after the story. The only trophy-relevant quests during the story are Cat Chases for obtaining the 9 Poppets, but these all respawn after the story if you missed them. If you do the bare minimum and rush through it quickly, you get platinum in about 40 hours. Playing on Normal difficulty, most players will need 50 hours+. A lot of that time will be spent on the “Collectibles”. Unlike other games these aren’t just items you pick up, rather they are a variety of tasks and enemy encounters. The difficulty can be changed at any time so if you want you can reduce it for collectibles after the story to speed this up. Certain collectibles are gated behind skills learned later in the story so you won’t always have access to everything on the first visit. Not all Collectibles are needed, most notably you can skip Mutants and the majority of Legendary Chests, Villages, Fortresses, Caves, Ruins, Traces, Guilds.
Step 1: Story, Side Quests (“Detours”), Events [8-15 Hours]
The first step is to finish the story. This opens up the full map and unlocks new skills that you need to reach many collectibles.
- It’s recommended to follow the Side Quest Guide along the way. During the story do the
 Detours (Side Quests) and
  Events marked by yellow icons on the map, in the hub city Cipal where the chapters start (from Chapter 3 onward). These give you archive entries towards the 80% archive completion. Some of these become unavailable with story progress so do them whenever you see them. It’s okay if you missed any as you only need 80% archives (can compensate for it by doing more Points of Interest) and most come from other activities like points of interest, equipment, enemies, and crafting resources. You can still get 80% even if you ignored all quests and events but you will have an easier time if you did do them.
 - All trophy-relevant side quests spawn after the story. If you missed any Cat Chase (needed for the 9 Poppets) they all respawn after the story. So don’t worry if you missed a cat.
- Remember, if you get stuck at any point you can hold
 to be shown the way to the nearest objective or map marker.
 - Some areas/collectibles are unreachable on the first visit. After the story you can go everywhere. If you can’t reach a collectible you are missing the required ability from story progress.
- Pick up any mana you find, looks like blue pools of light (need 3200 mana total to buy all spells)
- 2 Missable Equipment Pieces: Chapter 7 Side Quest “Sila’s Pact” & Chapter 10 Event in Cipal Archives “Talk to Johedy”. The trophy description for Kit and Caboodle says equipment from sub-events is NOT needed so missing these *shouldn’t* affect the trophy. Personally, I got both equipment pieces and the trophy unlocked fine for me. As a precaution, it’s recommended you get them, as that’s what has been tested and confirmed to unlock the trophy, just to be safe! If you miss these I can’t 100% confirm if the trophy would still unlock. Both are included in the Side Quest Guide.
Feel free to already grab whatever Collectibles you can access. They all get marked as yellow icons when unfogging the map.
Step 2: Collectibles & 80% Archive Completion [20-30 Hours]
Many Collectibles are gated behind endgame abilities. Now that you’ve beaten the story you can reach all collectibles. They all get marked when unfogging the map. Pressing on ![]() Belfries reveals more of the map. Collectible Progress is tracked in the PS5 trophy tracker and also on the in-game map, in the top right corner when scrolling over an area. The ones you haven’t done will show a purple mark over the map icon, the ones you have done will be fully golden.
Belfries reveals more of the map. Collectible Progress is tracked in the PS5 trophy tracker and also on the in-game map, in the top right corner when scrolling over an area. The ones you haven’t done will show a purple mark over the map icon, the ones you have done will be fully golden.
The best approach is to collect all trophy-relevant collectibles region by region to reduce the amount of backtracking. Refer to the Forspoken Collectible Guide.
It has maps for each region, and also guides by collectible type if you prefer that.
Of the following Collectibles you need ALL (230 total):
 4 Abominations
 20 Tanta’s Familiars (Familiar Statues)
 20 Flashbacks (Monuments to Wisdom)
 12 Founts of Blessing
 54 Monuments (*50/54 are enough for trophies)
 50 Photo Spots
- 70 Equipment Pieces (25 Cloaks, 15 Necklaces, 30 Nails)
Of the following types you only need enough to reach 100 Points of Interest. After getting all Equipment you should have around 70/100 already, so 30 more will suffice, ideally pick ones that give archive entries if you still need 80% Archive Completion:
 25 Caves
 26 Cognoscents’ Guilds
 21 Fortresses
 13 Locked Labyrinths
 8 Relics of the Tantas
 2 Bridges
 36 Ruins (Ruined Villages)
 4 Tanta Gates (3 story-related)
 11 Traces
 39 Villages
The following do NOT count towards any trophies:
 48 Belfries – can press to reveal more of the map
 47 Pilgrim’s Refuges – acts as fast travel and crafting station
 39 Mutants – can be ignored
- Legendary Chests (purple dots) – you only need enough to get 64 Old Coins to buy the Sewing Kit from Curiosity Shop to craft Frey’s original equipment
Step 3: Spellcraft Challenges / Miscellaneous Cleanup [3-5 Hours]
All you may have left is Spellcraft Challenges. After the story you will have access to all 4 skill trees. 12 Spells come from the Founts of Blessing Collectibles. The other Spells cost 3200 Mana total. After unlocking a Spell you start the Spellcraft Challenge for it by interacting with the bookshelf in a Pilgrim’s Refuge. Then do the shown task, when it’s done open the Magic Menu to level up the spell, do this for all 105 spells.
Refer to Forspoken All Spellcraft Challenges Guide.
Useful Tips, Tricks and Guides:
- Forspoken – All Collectible Locations (by Region)
- Forspoken – All Side Quests (Detours) Locations
- Forspoken – All Equipment Locations
- Forspoken – All Founts of Blessing Locations
- Forspoken – All Abomination Locations
- Forspoken – All Photo Spot Locations
- Forspoken – All Flashback Locations
- Forspoken – All Tanta’s Familiars Locations
- Forspoken – All Monument Locations
- Forspoken – How to Enter The Forbidden Meadow
- Forspoken – All Spellcraft Challenges Guide
Forspoken Trophy Guide
 |
Forspoken Earn every single trophy. |
|
| Earn all other trophies in Forspoken to unlock Platinum (DLC not required). | ||
 |
Attachments Acquire a mysterious golden bracelet. |
|
| Automatic story-related trophy, cannot be missed. Unlocks at the end of Chapter 1. | ||
 |
Stuck Journey through a beautiful yet deadly other world. |
|
| Automatic story-related trophy, cannot be missed. Unlocks at the end of Chapter 2. | ||
 |
The Interloper Swear vengeance on a deadly foe. |
|
| Automatic story-related trophy, cannot be missed. Unlocks at the end of Chapter 3. | ||
 |
What Must Be Done Survive a nightmarish ordeal. |
|
| Automatic story-related trophy, cannot be missed. Unlocks at the end of Chapter 4. | ||
 |
Might and Main Emerge victorious from a showdown in a great fortress. |
|
| Automatic story-related trophy, cannot be missed. Unlocks at the end of Chapter 5. | ||
 |
Damned If You Do… Taste the sweetness of peace and the bitterness of disaster. |
|
| Automatic story-related trophy, cannot be missed. Unlocks at the end of Chapter 6. | ||
 |
The Hue of Blue Submit yourself to otherworldly justice. |
|
| Automatic story-related trophy, cannot be missed. Unlocks at the end of Chapter 7. | ||
 |
The Truth Will Out Emerge victorious from a trial to end all trials. |
|
| Automatic story-related trophy, cannot be missed. Unlocks at the end of Chapter 8. | ||
 |
Breaking Point Learn a hard truth, and accept a harder one. |
|
| Automatic story-related trophy, cannot be missed. Unlocks at the end of Chapter 9. | ||
 |
None the Wiser Emerge victorious from a conflict in a twisted reality. |
|
| Automatic story-related trophy, cannot be missed. Unlocks at the end of Chapter 10. | ||
 |
Forspoken Hold the fate of a world in your hands. |
|
| Automatic story-related trophy, cannot be missed. Unlocks at the end of Chapter 11 and when you are presented with making a choice to step through the left portal or right portal, choose the LEFT portal. If you choose the right portal the story will end right there but when you hit “Continue” in the title screen it puts you back before the portals so that you can choose the other one. That’s why it’s not missable, even if you chose the right portal first you will always be put back before your choice until you choose the left portal which unlocks this trophy. | ||
 |
Awakening Lay waste to a great evil for the sake of humankind. |
|
| Automatic story-related trophy, cannot be missed. Unlocks at the end of Chapter 12. This is the last story trophy for finishing the entire story. There are 12 chapters total. | ||
 |
Rebirth See to the needs of the people of Cipal. |
|
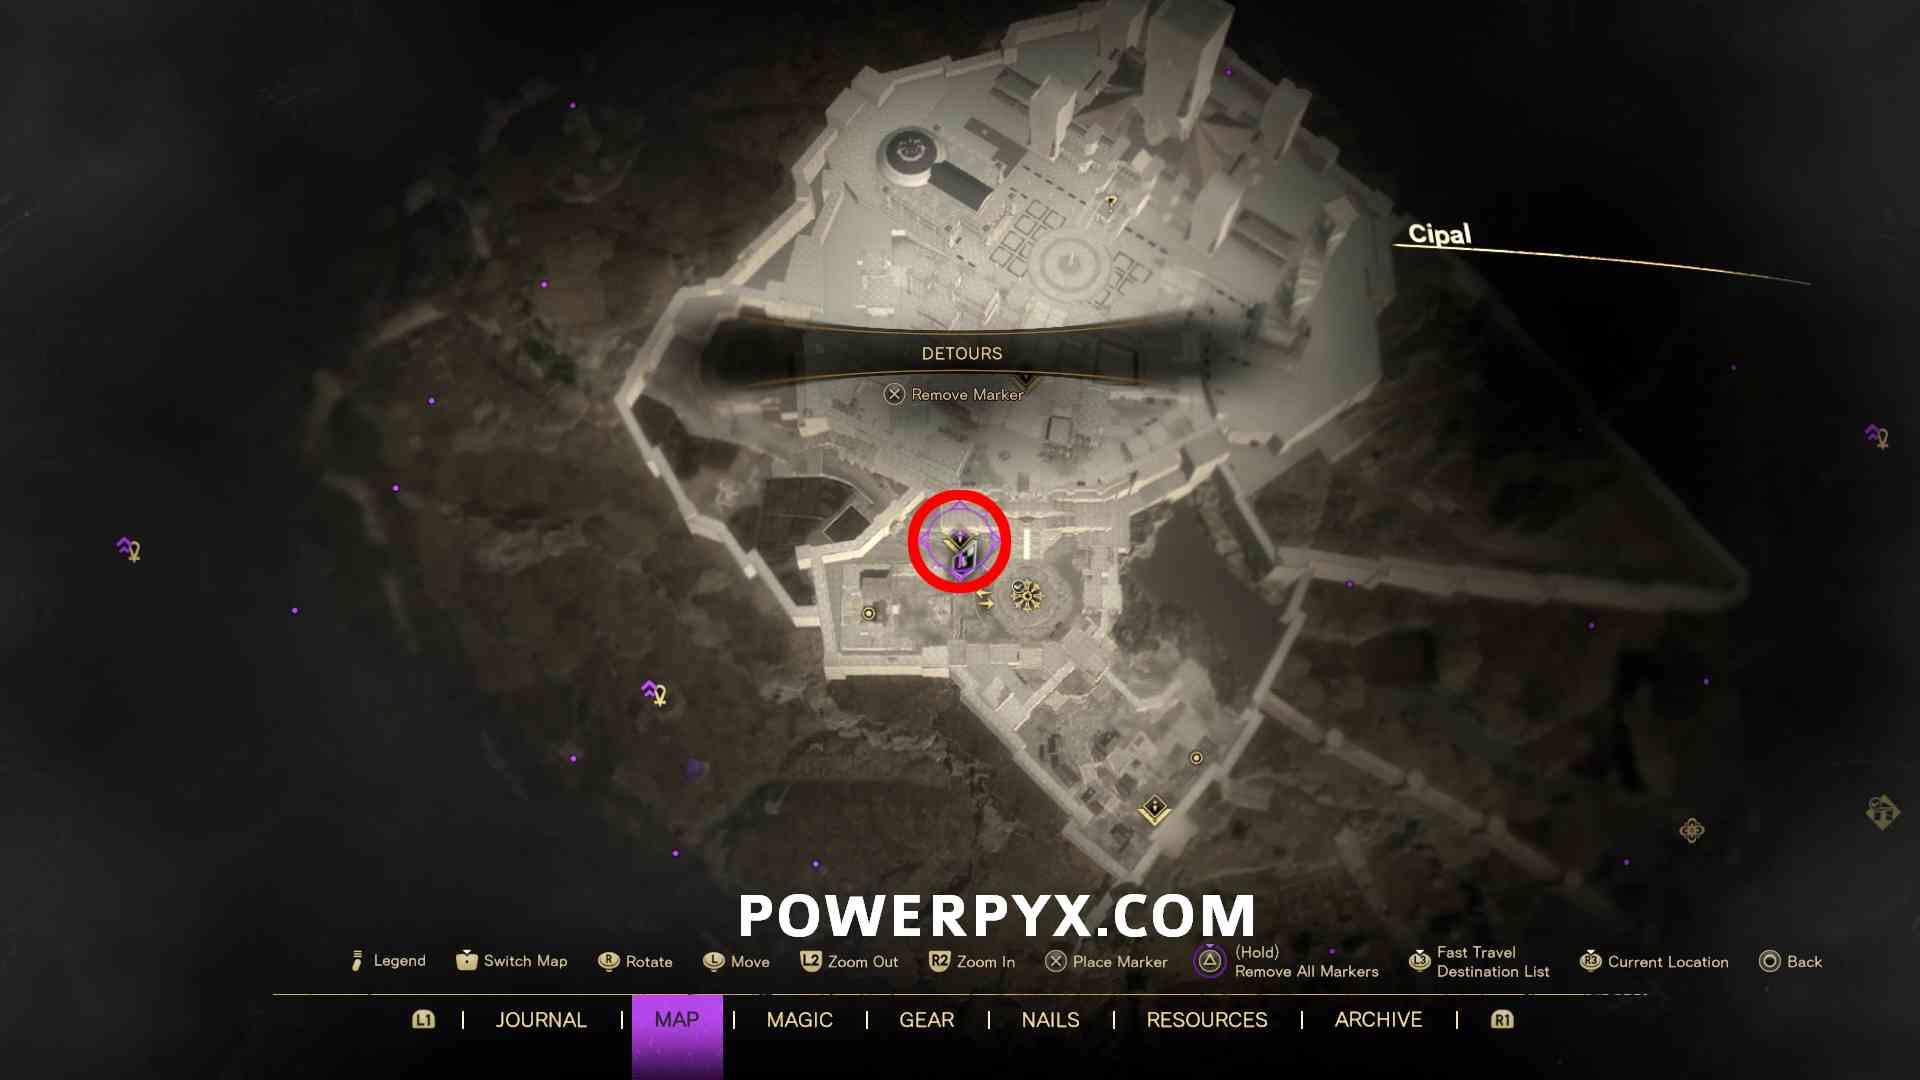
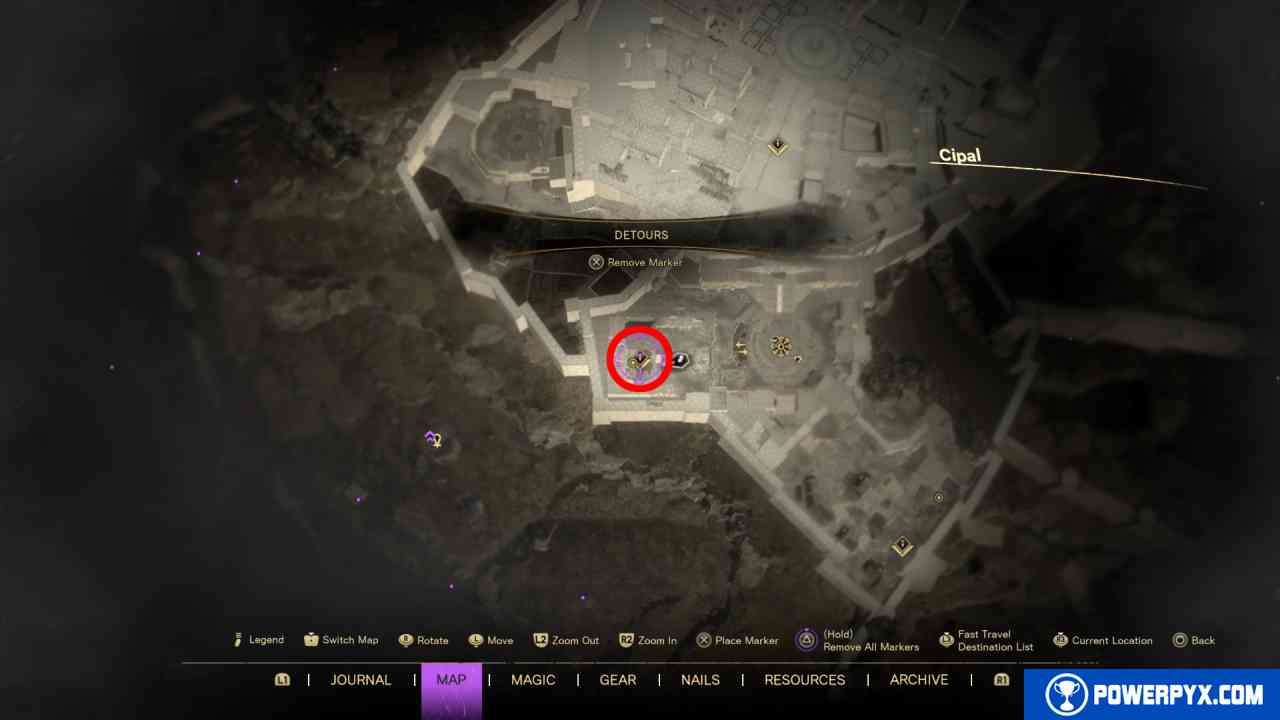
| Reward for completing Detour “Cipal Reborn”.
First you must have finished the story (all 12 Chapters). After the story the game asks you to make a save, do this and in the title screen click “Continue”. After the story it now spawns new Detours (Side Quests). In Cipal, talk to Pilo in the lower city. He gives you the quest “Cipal Reborn”. See the starting point below:
Simply complete this quest, the trophy unlocks at the end. You will need to help 3 people (get cat food, find flowers, find bench parts). All objectives are marked on the map and you can hold |
||
 |
Promises Make a promise to someone very special. |
|
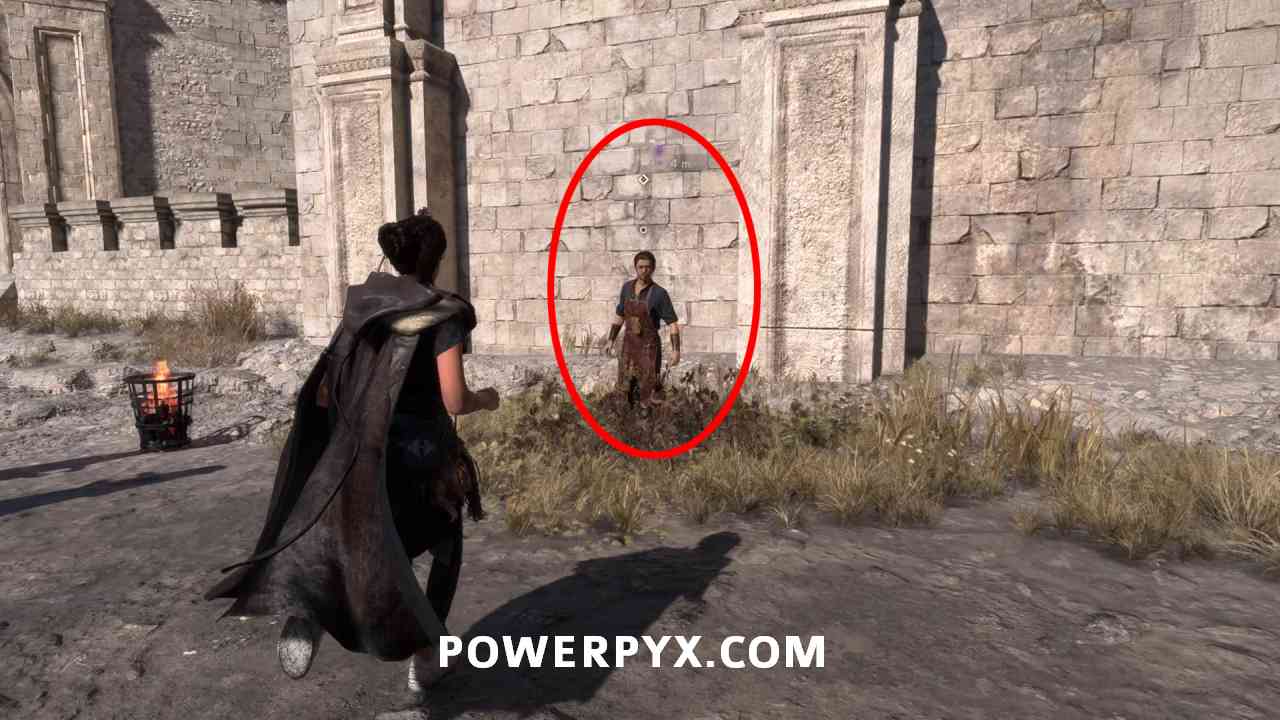
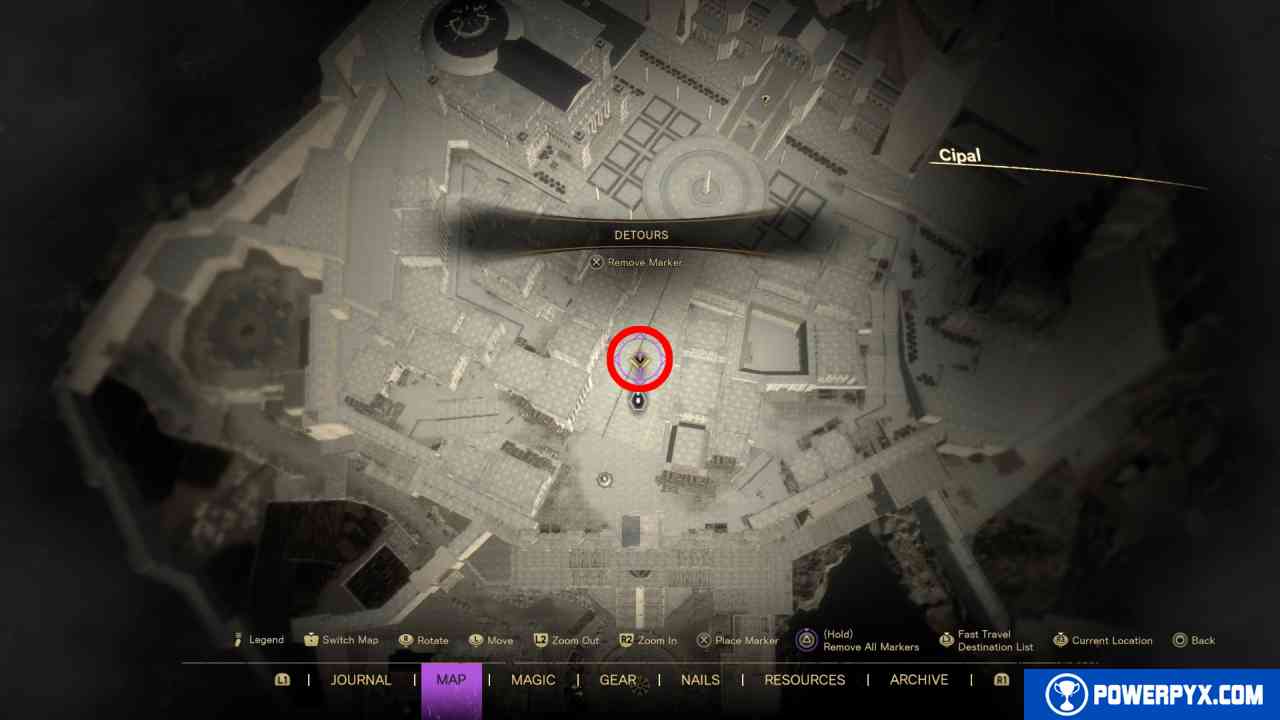
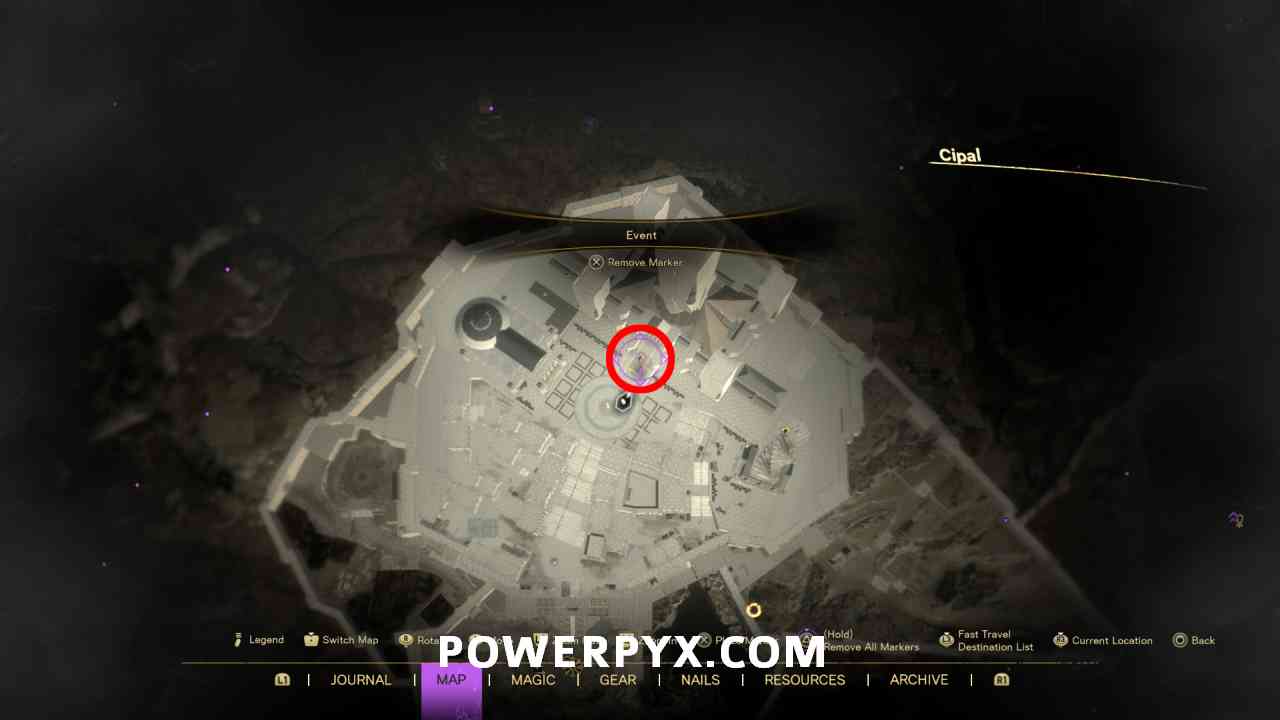
| Reward for completing Detour “Lost Lullabies”.
First you must have finished the story (all 12 Chapters). After finishing Chapter 12 it will ask if you want to create a save, do this and then click “Continue” in the title screen to keep playing. Talk to Johedy in the upper city of Cipal, she’s on the stairs in the middle:
All objectives will be marked, you can press |
||
 |
Moves Earn the praise of the mighty Pilo with your dancing. |
|
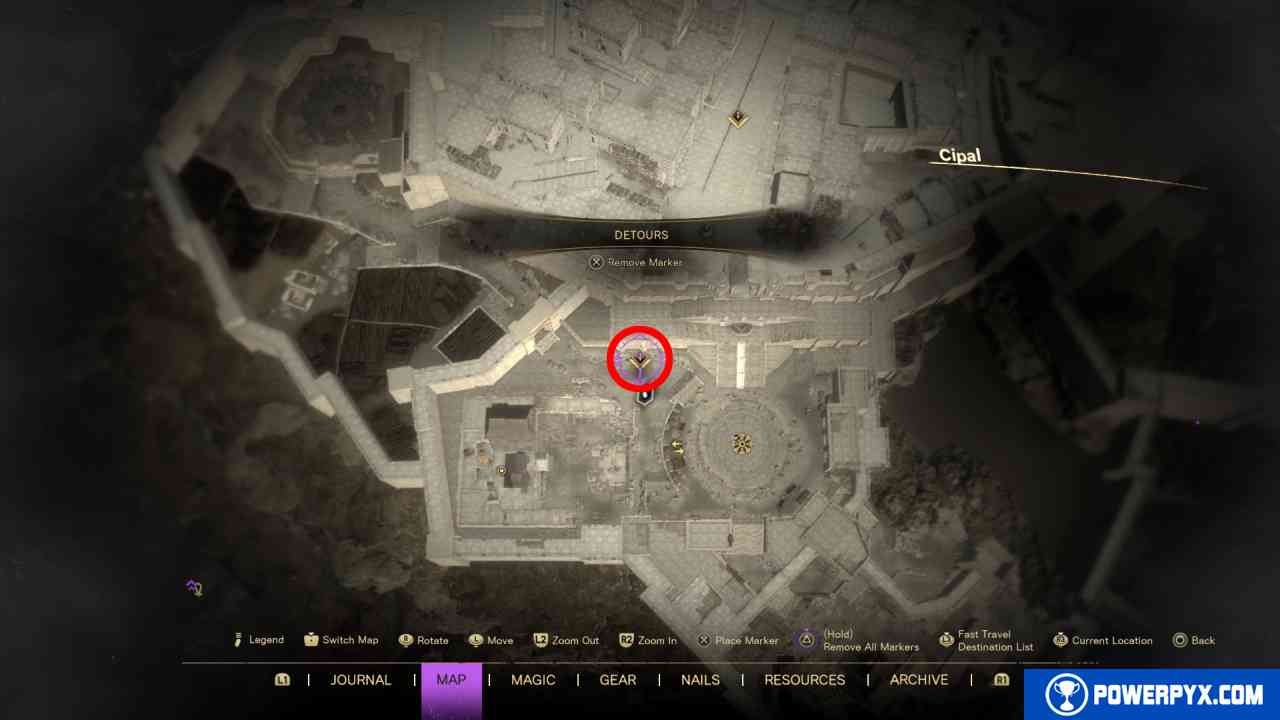
| Reward for completing 3 Detours after the story “Cipal Reborn” > “Dancing in Cipal: Encore” > “Dancing in Cipal: Finale”
First you must have finished the story (all 12 Chapters). After finishing Chapter 12 it will ask if you want to create a save, do this and then click “Continue” in the title screen to keep playing. Talk to Pilo in the lower city to start “Cipal Reborn”. You must help 3 people (get cat food, find flowers, find bench parts). All objectives will be marked on the map, you can hold
After this quest you can talk to Pilo in the Cipal Tavern to start “Dancing in Cipal: Encore”. After doing that you can talk to him again in the same spot for “Dancing in Cipal: Finale”:
Choose to dance with him and press all buttons that show on the screen. If you fail a button you can retry the dance from the start as often as you need. The button sequence is the same each time so you can memorize it. After finishing the pressing all buttons in the second dance it unlocks the trophy. |
||
 |
Remembrance Say a complete set of remembrances to the departed. |
|
| The Remembrances are the Prayers you can say at the northernmost point of Cipal, the capital where you go between chapters. It will be marked as an event with a yellow “?” icon on the map. When you go there, you will get a list of people you can pray for. There are 4 people total. The first 3 are automatic from story progress, the 4th is from a post-story side quest.
Where to say the Prayers:
Prayer Unlock Requirements:
|
||
 |
A Roaring Trade Trade poppets for all available items. |
|
| There are 9 Poppets, they are rewards from the 9 “Chasing Cat” Detours (Side Quests). Each “Chasing Cat” quest gives 1 Poppet. All of them start in Cipal and are marked on the map by For all 9 Chasing Cat Detours refer to: Forspoken All Detours (Side Quests) Locations After doing all 9 Cat Chases, you can trade the Poppets for 4 Items with the merchant in the center of Cipal, see the location below:
|
||
 |
Outdoorsperson Set up camp. |
|
The game teaches you how to build camps during Chapter 3 of the story before heading back to Cipal. You can build camps by collecting firewood and holding  at a suitable site that has enough space. You should get it automatically during Chapter 3. at a suitable site that has enough space. You should get it automatically during Chapter 3.
Afterward you can still build camps at any time (must be outside Cipal) by holding |
||
 |
Pilgrimage: Initiate Visit your first monument. |
|
| » Forspoken All Collectible Locations (recommended, covers all collectible types region by region to reduce backtracking) » Forspoken All Monument Locations (for specifically just the Monuments) |
||
 |
Pilgrimage: Novice Visit twenty monuments. |
|
| » Forspoken All Collectible Locations (recommended, covers all collectible types region by region to reduce backtracking) » Forspoken All Monument Locations (for specifically just the Monuments) |
||
 |
Pilgrimage: Adept Visit fifty monuments. |
|
» Forspoken All Collectible Locations (recommended, covers all collectible types region by region to reduce backtracking) |
||
 |
Explorer: Seeker Visit ten points of interest. |
|
| » Forspoken All Collectible Locations | ||
 |
Explorer: Pathfinder Visit fifty points of interest. |
|
| » Forspoken All Collectible Locations | ||
 |
Explorer: Trailblazer Visit one hundred points of interest. |
|
| » Forspoken All Collectible Locations
As “Points of Interest” the game only counts certain types of yellow map markers (Collectibles). It doesn’t count the types that give other trophies (except Abominations which count). You can keep track via the PS5’s built-in trophy tracker. There are a lot more than 100 of them, they get revealed when unfogging the map. The best approach is to clear all collectibles region by region and combine it with the other collectible types to reduce backtracking around the map. The following DO count:
The following do NOT count:
|
||
 |
Unlocked Potential Spend mana to learn a spell for the first time. |
|
| Automatic story-related trophy, cannot be missed. You are forced to buy your first spell during Chapter 2 of the story. | ||
 |
Realized Potential Learn all the spells that can possibly be learned. |
|
This trophy is specifically for buying all Spells that cost Mana. The 12 Spells from Founts of Blessing are not needed for this. There are 4 Spell Trees. It costs Mana to buy Spells. The fastest way to get Mana is by picking up the blue Mana Wells around the map, you can scan for them by holding . The highest density of them is found throughout Praenost region. You also get some Mana from leveling up and a little bit from some Collectibles.
= 3200 Mana total Note: There are 3 trophies for unlocking spells that all sound similar, but each with slightly different unlock requirements – |
||
 |
Call of the Fount: Baptized Acquire magical powers for the first time at a Fount of Blessing. |
|
| » Forspoken All Collectible Locations (recommended, covers all collectible types region by region to reduce backtracking) » Forspoken All Founts of Blessing Locations (for specifically just the Founts) |
||
 |
Call of the Fount: Beatified Acquire the magical powers available from all the Founts of Blessing. |
|
» Forspoken All Collectible Locations (recommended, covers all collectible types region by region to reduce backtracking) |
||
 |
Paragon Learn every spell. |
|
This trophy is specifically for buying all Spells that cost Mana + also getting all 12 Spells from Founts of Blessing. There are 4 Spell Trees. It costs Mana to buy Spells. The fastest way to get Mana is by picking up the blue Mana Wells around the map, you can scan for them by holding . The highest density of them is found throughout Praenost region. You also get some Mana from leveling up and a little bit from some Collectibles.
= 3200 Mana total Note: There are 3 trophies for unlocking spells that all sound similar, but each with slightly different unlock requirements – |
||
 |
Tinkerer Craft an item for the first time. |
|
| You will be introduced to crafting during Chapter 3 of the story. You can find workbenches in “Refuges”, the fast-travel hideouts where you can sleep in the bed. Craft any item, for example crafting a Healing Draught (“health flask”) will suffice. | ||
 |
Craftsperson Craft a healing item and two of Frey’s original pieces of equipment. |
|
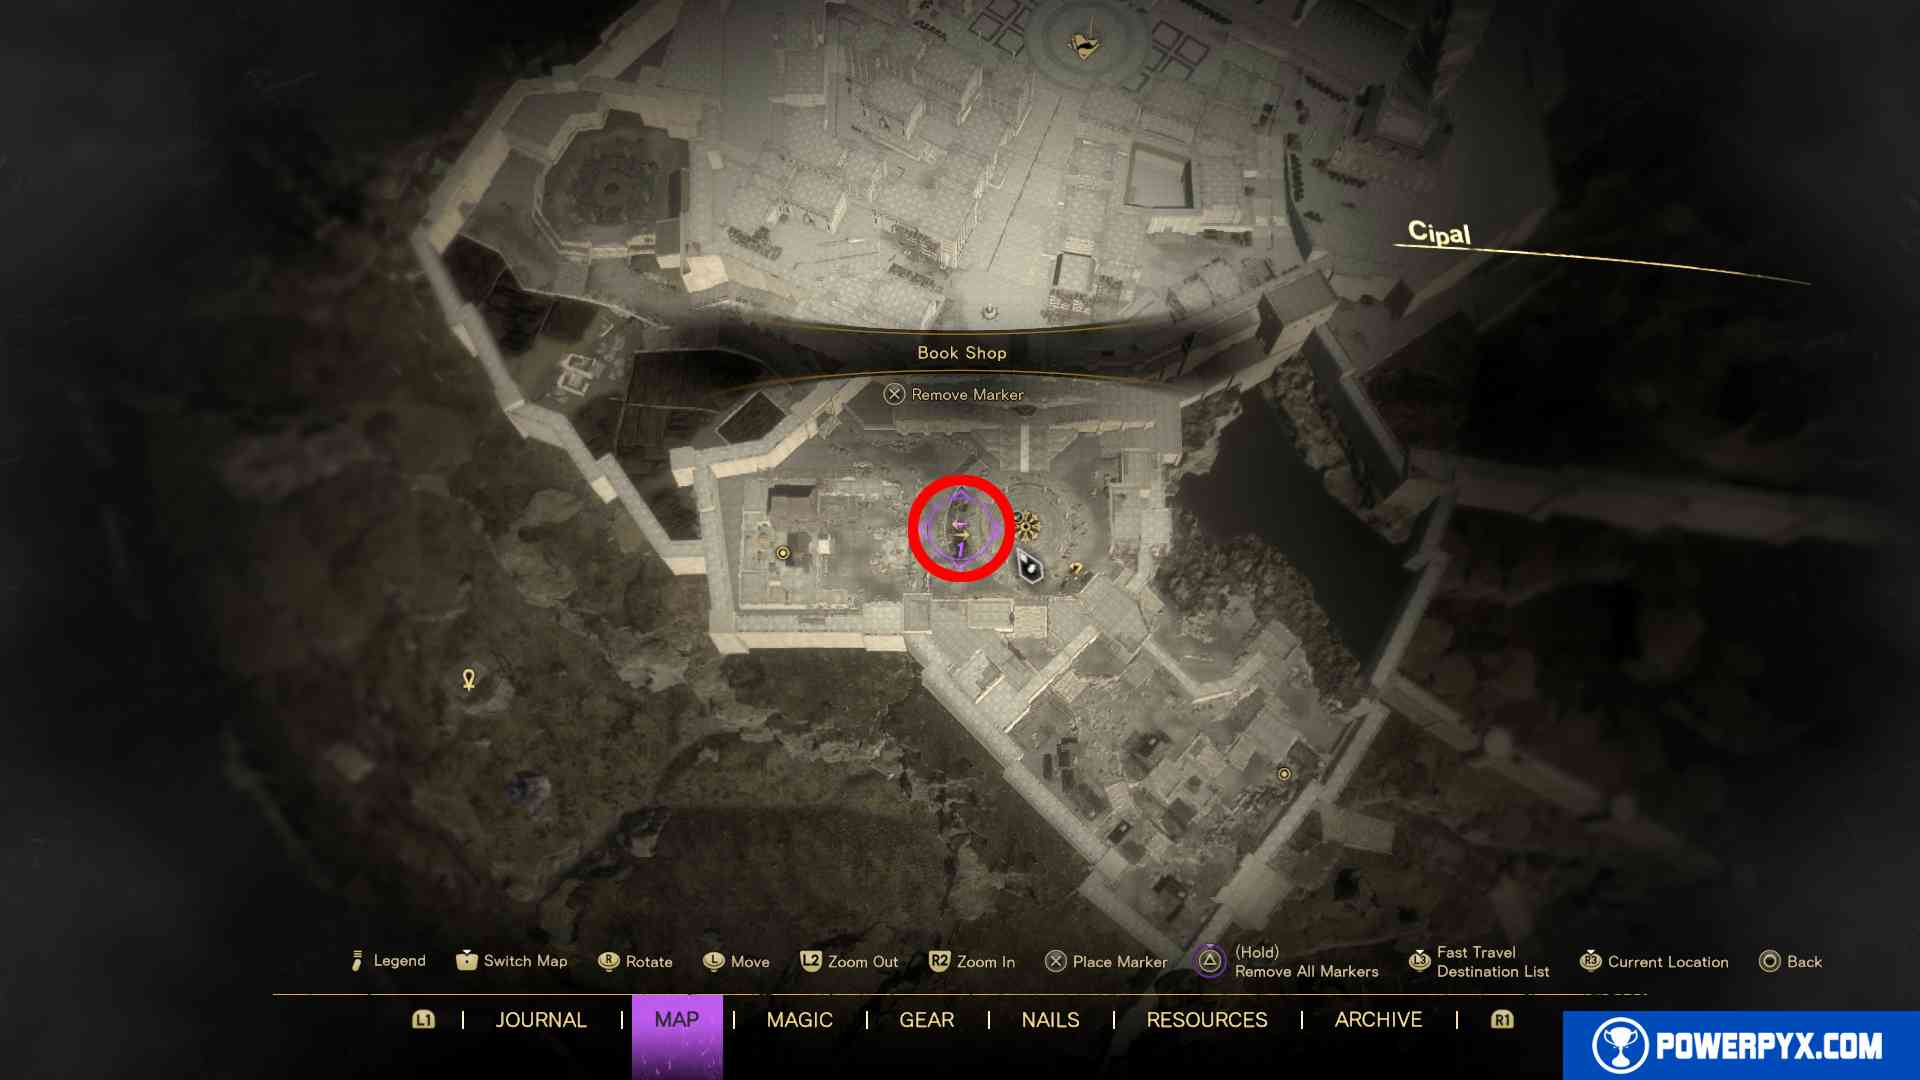
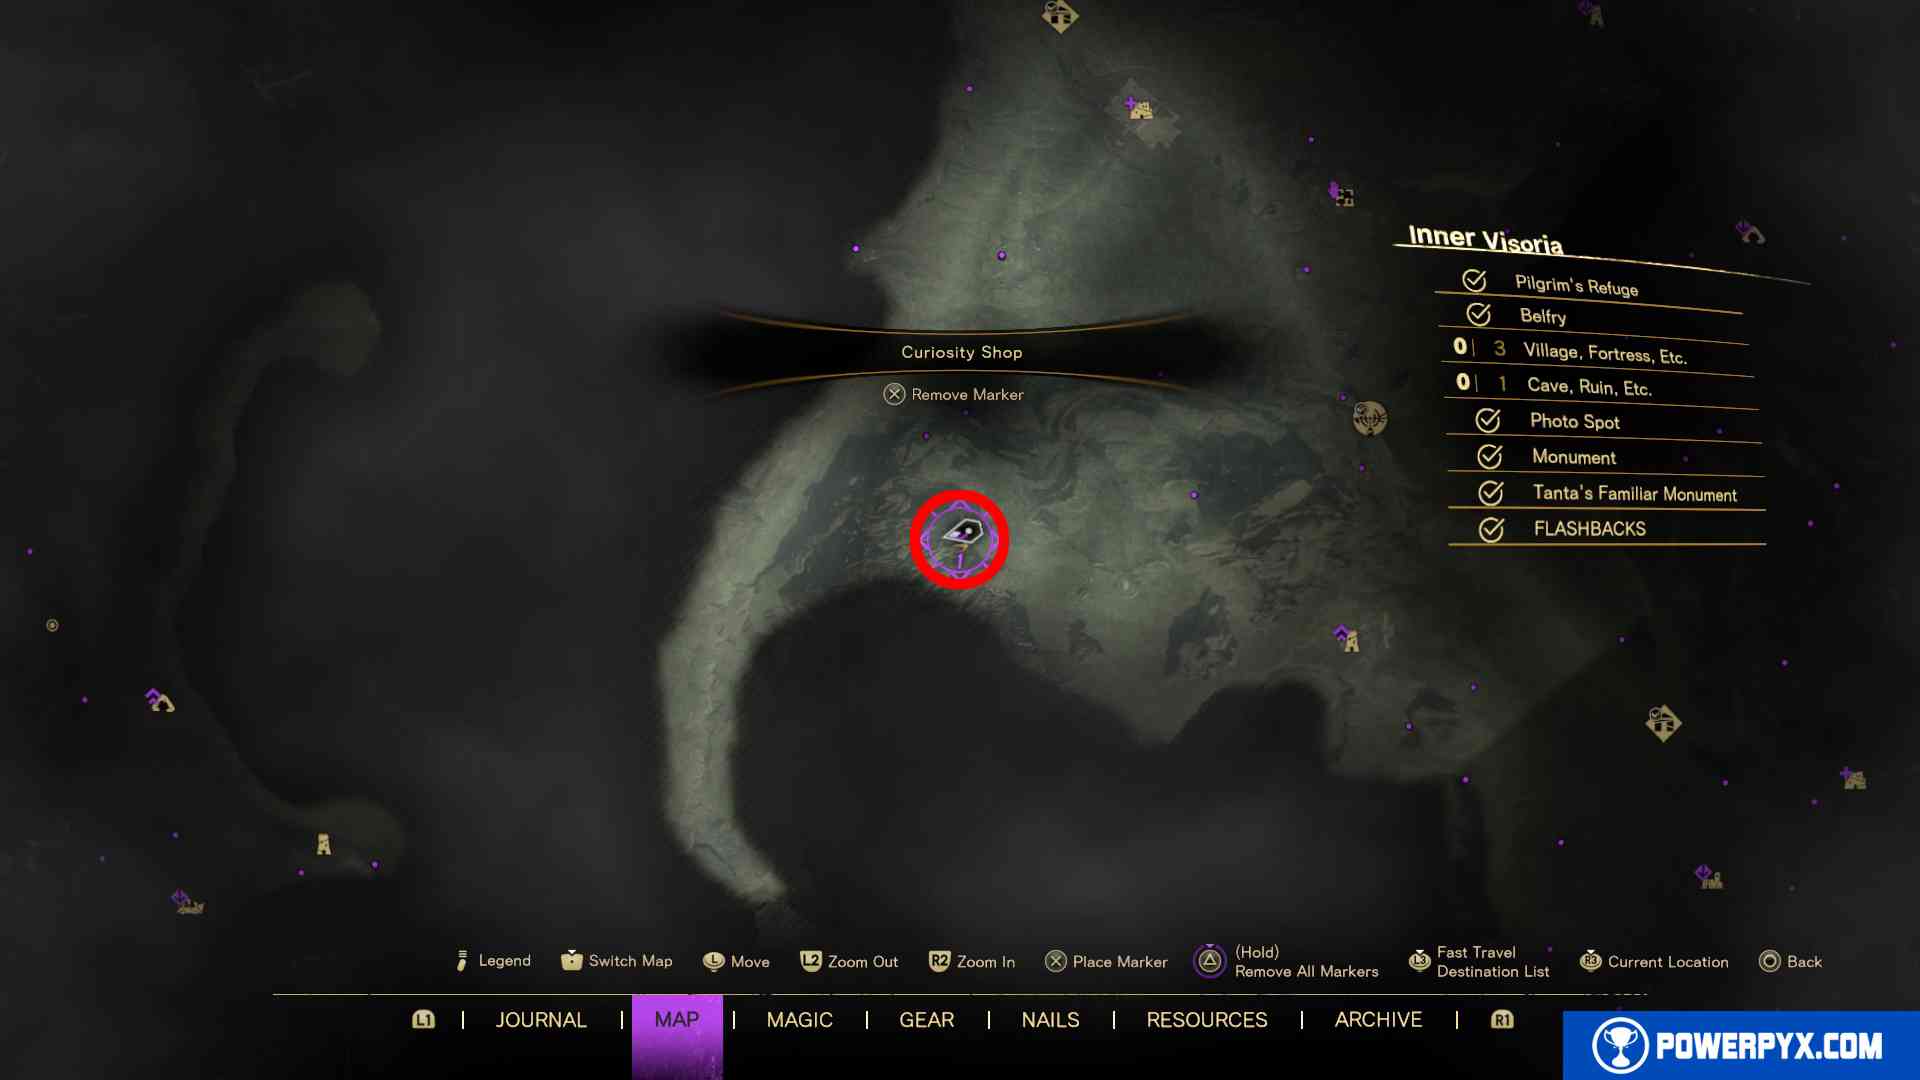
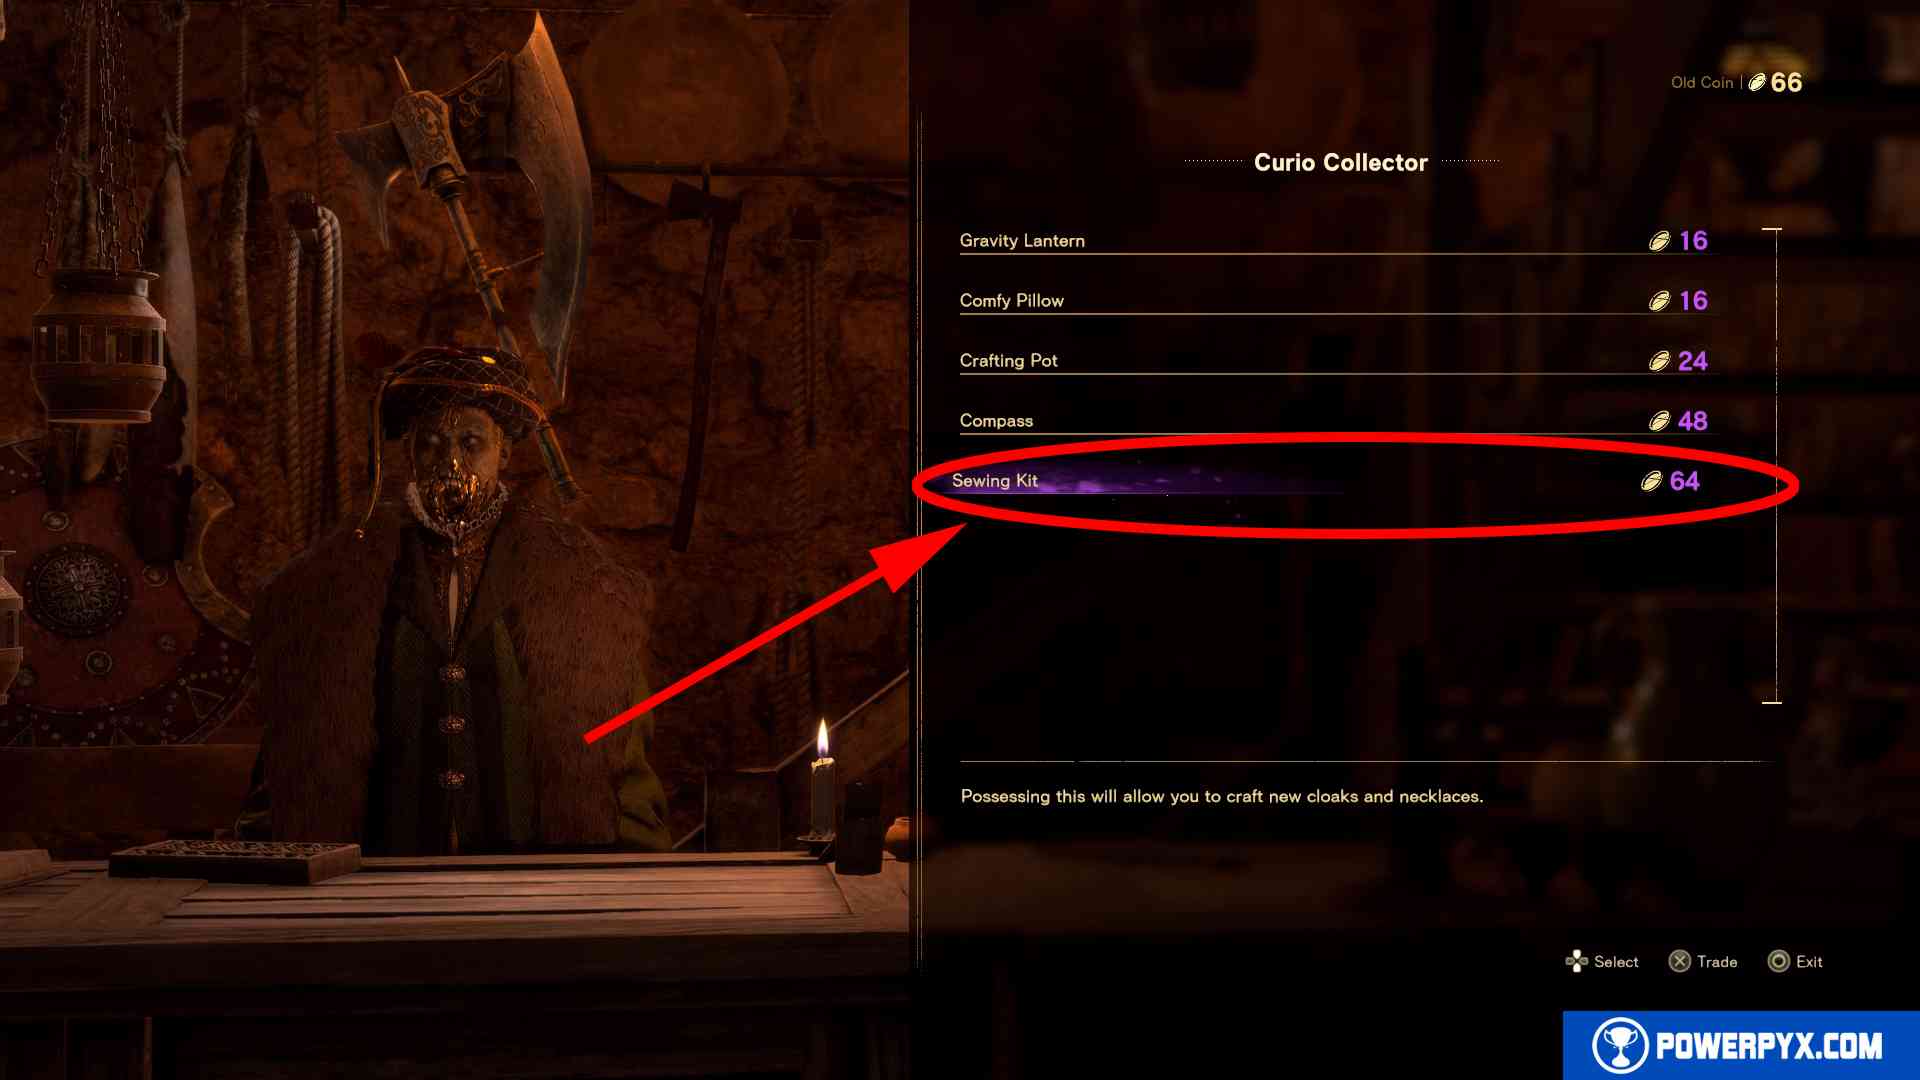
| Step 1: To unlock Frey’s original equipment for crafting you must first buy the “Sewing Kit” from the Curiosity Shop in Visoria > Inner Visoria. In the early game you won’t have the necessary abilities to reach it. Go there after the story. You can buy the Sewing Kit for 64 Old Coins. You get Old Coins from Treasure Chests, marked by purple dots on the map. Not every Treasure Chest contains Coins, but the ones that do will vary between 1-5 Coins per Chest. They all get marked when unfogging the map. Below is the location of the Curiosity Shop:
Step 2: Fast travel to any Refuge, access the workbench, click “Craft”. The Sewing Kit unlocked 2 new pieces of craftable equipment: Cloak “Unbroken” & Necklace “Home Sweet Hell”. Craft these 2 and also craft 1 Health Draught (the Health Draught can be skipped if you already crafted one earlier in the game). Each equipment costs 3 Fluteblossoms, 3 Bumbershoot, 3 Lucid Garlands. So in total 6 of each resource to craft both.
After crafting these equipment pieces the trophy will unlock. |
||
 |
Kit and Caboodle Acquire every piece of equipment (except those only obtainable via sub-quests). |
|
| » Forspoken All Equipment Locations | ||
 |
Hop, Step, Jump Perform five Shimmies in a row. |
|
First, you must unlock the “Shimmy” Magic. In the Magic menu you can see it in the top left of Frey’s skill tree. To unlock it you must complete the Mulberry Fount in Praenost: The Citadel (in the south-east of the world map). You can simply hover over the Shimmy skill in the Magic menu and press Touchpad  to switch to the location. to switch to the location.
Here is the location:
After getting the skill you perform it by holding Do this successfully 5 times in a row without failing any shimmy. If you don’t do it correctly it resets the counter and you must do 5 again. Do it where you have a lot of space, ideally where the environment is relatively flat. |
||
 |
Hell of a Run Perform magic parkour for twenty seconds continuously. |
|
The “Magic Parkour” is automatically unlocked during Chapter 2 of the story (after first Bear boss). You can then use it by holding down  to run quickly. Simply hold down and keep running for 20 seconds straight. You can simply run in circles until the trophy pops. to run quickly. Simply hold down and keep running for 20 seconds straight. You can simply run in circles until the trophy pops. |
||
 |
Endless Runner Travel a total of 100 km (62 mi) using magic parkour. |
|
| Magic Parkour is activated by holding . This will make you run faster. It’s your main method of traversal so you will be using this a lot. 100 Kilometers may sound like a lot, but this will come naturally while going for all other trophies. It will happen naturally while working on the collectible trophies. You can keep track via the PS5 trophy tracker. |
||
 |
I Can Fly! Use Float to stay airborne for ten seconds. |
|

Step 1: Finish Chapter 8 of the story to unlock Prav’s Magic set. Open the Magic Menu and scroll to Prav’s skill tree, in the bottom right is the “Glide” skill. Press Touchpad on it, this marks the “Lilac Fount” that you must visit to unlock the spell. You can’t reach it right away, the earliest you reach this region is Chapter 11. After the story you can fast travel back there to free-roam around the region. Step 2: After the story fast travel back to Visoria. From “Visorian Plateau” (the name is shown in the top right of the map screen) you need to head south to “Inner Visoria”. Then you enter a long tunnel to southernmost point of the map to reach the Lilac Fount. Jump into the Fount to unlock the “Glide” spell. Step 3: Go to any Refuge (hideout with a bed) and interact with the bookshelf. Accept the spell challenge for the Glide spell. Complete the challenge by gliding for 5 seconds. You do this by jumping off a cliff and holding Step 4: After completing the challenge open the Magic Menu and click Step 5: Jump off a cliff and hold |
||
 |
Leapfrogger Jump over enemies a total of ten times. |
|
| During Chapter 2 of the story you automatically unlock the “Magic Parkour” spell. It allows you to hold to run quickly. Run towards enemies while holding down to leap over them. You can do this on the same enemy 10 times in a row, they don’t need to be 10 different enemies. Do this 10 times until the trophy unlocks. |
||
 |
Tit for Tat Perform ten precision counters. |
|
Precision Counters can be performed by letting an enemy attack you, then for a brief moment you see a white glow around Frey, press  when the enemy hits you to shoot a white projectile at them. If you just mash the button repeatedly you will only cause a small explosion that pushes enemies back. For the trophy it only counts when you get the timing right and Frey shoots the counter-projectile. when the enemy hits you to shoot a white projectile at them. If you just mash the button repeatedly you will only cause a small explosion that pushes enemies back. For the trophy it only counts when you get the timing right and Frey shoots the counter-projectile.
You can easily do it against groups of Breakzombies. Stand in front of them, wait for one to attack, then press Important: You must have auto-dodge disabled or else Frey will automatically dodge all incoming attacks and you won’t have a chance to counter! You can turn auto-dodge off under |
||
 |
No Mercy Perform thirty Killer Blows. |
|
| “Killer Blows” are performed when you managed to knock down and stun an enemy by dealing massive damage, then it will show a dagger-icon on the enemy and you can press for a powerful finisher. Do this 30 times total. You need to be close enough to the downed enemy for the button prompt to work.
This should happen naturally over time. A quick strategy is to use Sila’s Magic (unlocked after Chapter 5) and equip the “Arc Slice” with |
||
 |
Knock ‘Em Dead Finish three or more enemies with a single blast of Surge Magic. |
|
“Surge Magic” is performed by pressing  + +  but it needs to be charged up first. Check the bottom right of the screen during battle and look at the top-middle icon. As you attack enemies this will slowly charge. When the icon is fully charged you can activate it. In the image below it’s circled red. but it needs to be charged up first. Check the bottom right of the screen during battle and look at the top-middle icon. As you attack enemies this will slowly charge. When the icon is fully charged you can activate it. In the image below it’s circled red.
Now simply get 3 weak enemies close together. Simply run in circles around them. Then face them and press |
||
 |
Help Me Out Here Use the Disperse spell three times in a single battle. |
|
The “Disperse” spell is available from the start. Press  to open the Support-Spell wheel and select the “Disperse” spell on the left. Use it 3 times during 1 single enemy encounter. This is most easily done during boss fights. Use it, then run in circles around the enemy, wait for it to recharge and use it 2 more times. The trophy pops immediately after the third activation in the same fight. If you leave battle the counter resets and you must do it again 3 times in a row. This spell has a fairly long cooldown and it automatically attacks and damages enemies. Smaller enemy groups will die too fast, that’s why it’s best done on bosses. For example, you could do this during the first bear miniboss in Chapter 2 near the start of the game, but it also works fine anywhere else. to open the Support-Spell wheel and select the “Disperse” spell on the left. Use it 3 times during 1 single enemy encounter. This is most easily done during boss fights. Use it, then run in circles around the enemy, wait for it to recharge and use it 2 more times. The trophy pops immediately after the third activation in the same fight. If you leave battle the counter resets and you must do it again 3 times in a row. This spell has a fairly long cooldown and it automatically attacks and damages enemies. Smaller enemy groups will die too fast, that’s why it’s best done on bosses. For example, you could do this during the first bear miniboss in Chapter 2 near the start of the game, but it also works fine anywhere else. |
||
 |
Wildfire Defeat an enemy bound by the Tangled status effect with Sila’s magic. |
|
| First, you must have finished Chapter 5 of the story. At the end of Chapter 5 you will unlock a new magic skill set called “Sila’s Magic”. This is the spell set that uses a fire sword to attack.
You can now switch between your spell sets by pressing To start, select Frey’s Magic (your starting magic that uses ranged projectiles). Press This is best done on weak enemies that die quickly. For example, the zombies in the north-east of the map, just east outside the capital “Cipal” (early story area). Alternatively, you can weaken an enemy first so that it dies in 1 hit after using the Bind spell. |
||
 |
Shocker Electrocute three enemies at once. |
|
| First, you must unlock Ola’s magic as part of Chapter 11. It’s an unmissable story reward near the end of Chapter 11. This is the spell set that uses electricity and shoots green darts.
You can now switch between your spell sets by pressing To start, select Ola’s Magic. Hit enemies until your Surge attack is filled up (during combat it’s the middle icon in the bottom right corner). This fills up a little with each hit you land. When it’s filled up you can press
|
||
 |
From Every Angle Use all four types of Tanta magic in a single battle. |
|
To unlock all four Tanta magic types you must first reach Chapter 11 in the story. You unlock more magic sets automatically throughout the story, they are all unmissable story rewards:
You can switch between these magic “skill trees” by pressing |
||
 |
Through the Eyes of Another: Empath Complete your first flashback challenge at a Monument to Wisdom. |
|
| » Forspoken All Collectible Locations (recommended, covers all collectible types region by region to reduce backtracking) » Forspoken All Flashback Challenge Locations (Monuments to Wisdom) (for specifically just the Flashbacks) |
||
 |
Through the Eyes of Another: Seer Complete flashback challenges at ten Monuments to Wisdom. |
|
| » Forspoken All Collectible Locations (recommended, covers all collectible types region by region to reduce backtracking) » Forspoken All Flashback Challenge Locations (Monuments to Wisdom) (for specifically just the Flashbacks) |
||
 |
Through the Eyes of Another: Visionary Complete all the flashback challenges at the Monuments to Wisdom. |
|
» Forspoken All Collectible Locations (recommended, covers all collectible types region by region to reduce backtracking) |
||
 |
Cat Person Befriend all the Tantas’ familiars. |
|
» Forspoken All Collectible Locations (recommended, covers all collectible types region by region to reduce backtracking) |
||
 |
Happy Snapper Show pictures taken at all the photo spots to the children. |
|
» Forspoken All Collectible Locations (recommended, covers all collectible types region by region to reduce backtracking) |
||
 |
Above and Beyond Upgrade all your spells. |
|
| For this you must do all 105 Spellcraft Challenges, which you can accept from the bookshelf inside any |
||
 |
Abominizer Defeat all four abominations. |
|
Note: in some cases the trophy may not unlock after defeating the 4th abomination, but a workaround is to defeat them again, all 4 abominations respawn after defeating them. |
||
 |
Archivist Unlock 80% of the Archive. |
|
Archive Entries are added whenever you encounter something new. There are 580 Archive Entries but you only need 464 (80%), meaning you can skip 116 entries. You can keep track via the PS5 trophy tracker. The individual entries can also be viewed in the “Archive” Menu.
If you did the majority of Side Quests and Events during the story, you will naturally get this while working on the collectible cleanup. If you ignored all of the Side Quests and Events you can still reach 80% (it’s not missable), but you will have to do more of the Points of Interest (yellow map markers) that give “Archive Entry” as a reward. Many of these give 2 or more entries. So you can easily compensate for any missed story entries by doing a few extra collectibles. In other words: as you gain game completion you will automatically get these entries along the way, don’t worry about it, just do the collectibles that you need for other trophies anyway. |
||
 |
Barely There Hide for ten whole seconds—so long that people will forget you were there. |
|
| First, you must have finished the story. You unlock Ola’s Magic skill tree in Chapter 11. After finishing Chapter 12 (story end), the game asks you to make a manual save. Do this, then it boots you to the title screen and you must press “Continue” to start Chapter 13 which is basically the endgame to clean up side tasks.
Now open Ola’s Magic skill tree, scroll over the spell “Suppression” and press Touchpad
You can get there after the story by fast-travelling to Avoalet > Samum Coast: Western Refuge (or other fast travel points in the region if you unlocked them earlier). At Samum Coast you must surf across the lake from west to east. At the east end of the lake you find another fast travel point “Samum Coast: Eastern Refuge”. Follow the grassy area behind it until the very end, you get to a path leading uphill. Reach the top of the mountain, from there you can reach the Fount. Jump in and it will unlock the “Suppression” spell in Ola’s skill tree. Now go find a group of enemies. Kill the enemies and leave only 1 alive. If you keep multiple enemies alive the trophy may not work in some cases. The safest option is to leave specifically just 1 single enemy alive. Then activate the “Suppression” spell (
|
||


 AFTER you hear Frey’s feet touch the ground. Don’t press the button before landing. You must press it with a delay AFTER having landed. You can also look for the golden sparks around Frey after she landed, that’s when you need to press
  > Settings > Gameplay Balance > Auto-Evasion = OFF.
 . Then hold down
 /
/  or holding
  /
/  .
.

Irwynn says
Oh my. 50 regions to explore. Is this double sized GoW Ragnarok?
PowerPyx says
In terms of purse size that sounds about right, but most of it is empty space and parts of the map can’t be explored at all (canyons that act as dividers between regions). You can also run much faster than in GOW so while it seems big you can actually get around pretty quick, especially with fast travel.
Dreamcrawler says
Great Guide. Thank you.
Will there be a Wiki for Forspoken?
NHC2000 says
Thanks for the guide, super ultra complete as usual!. I have one question, in regards of the cat chases, after the story they respawn but with in icon on the map or you have to remember where they are located?
PowerPyx says
They will respawn with the icon on the map. They are marked again 🙂
I had missed one in Chapter 3 and one in Chapter 4 but could do them after the story and they still gave the poppets.
Bila says
Thank you for the guide!
PowerPyx, what is your opinion about the game? I have a pre order but its receiving mix reception for critics.
Sophie says
Can’t wait to get more into this, loving it so far. Got a random question, any plans for you or the other guys to do any PSVR2 trophy guides? Horizon call of the mountain etc? Cheers 🙂
xCRAZYBIGGYx says
I beat all 4 abominations and didn’t get the trophy….again a trophy bugged….
this is a really bad game…..
xCRAZYBIGGYx says
I got it, I had to kill an abomination aigain wich respawned on one of the other 3 locations.
PowerPyx says
Thanks, will add a tip about that!
Adrian Gomez says
Does this game have NG+?
PowerPyx says
Currently no.
Bryan says
Above and Beyond unlocks when you upgrade all your spells. Cheers to the platinum unlock fellas.
PowerPyx says
You can’t upgrade Tempest Lv. 2 Spell. That’s the issue why it’s unobtainable.
Chilops says
I have a bug for : Craftsperson
I bought the sewing kit, but I don’t unlock the equipments on the workbench 🙁
PowerPyx says
Did you check in the “Craft” and not “Upgrade” section at the workbench? It would be at the bottom of the list when scrolling down.
What is your total game progress? Have you finished the story yet? Did all side quests?
Maybe there is an extra hidden requirement that the game never mentions. For me it unlocked immediately after buying sewing kit and no other requirement was ever shown. As far as I can tell buying Sewing Kit should be the only requirement so this could be a bug in your case.
I had finished the story and did all post-story side quests by that point. Buying sewing kit was one of the very last things I did. I had also traded in all 9 poppets, finished most of the trophy-relevant collectibles and got all other equipment except nails. Only things I had not done by that point were Spellcraft Challenges, Nail Designs, and non-trophy collectibles, everything else was 100% complete.
It could also be a bug. If you can confirm your progress that will help to narrow down what/if anything could be a secondary requirement. If you still unlock it please let me know what triggered it. (and if anyone else here reading this could check if it unlocks immediately when buying sewing kit, earliest opportunity in chapter 11, let me know, then it’s probably just buggy).
Chilops says
I looked carefully in the “craft”, where there is the potion and I don’t have the cape or the necklace.
I restarted my game and reloaded a previous save to buy the kit again, and still nothing.
I finished the game, I did all the side quests but not the events in Cipal.
I am far from 100%, I did not make the monuments, nor the photos, nor the aberrations. I don’t have the 80% in the archives yet.
PowerPyx says
Apparently it was just a wrong in-game translation in the English version and is obtainable.
In Japanese version it states the requirement correctly that for Tempest Lv. 2 challenge you must kill the last enemy WHILE AT LOW HEALTH (cracks must appear on the screen). It’s obtainable when doing it that way. But I hope they still fix the English in-game description with a patch.
PowerPyx says
Update on Above and Beyond: The issue with Tempest Lv. 2 spellcraft challenge has been solved. The in-game requirement description for it is wrong. The correct requirement is to defeat the last enemy in battle with Tempest Lv. 2 WHILE HAVING CRITICAL HEALTH.
See Forspoken Spellcraft Guide. So the trophy is obtainable, you just need to do something else than what the games says. This is probably a translation error from the Japanese game version to English version.
Cocka says
Played the game for a couple of hours.
It’s the weirdest game ever.
Like i have no idea what i am doing, yeah i understand the story ( Hello Shade voice), but otherwise going to a mark I have a hard time grasping what to do, a lot of places are unavailable because the heroine cant fly jump upwards or wall run, enemy encounters are basically press r2 a lot of times and l2, i have a hard time grasping the controls, i had a much better time playing souls game rather than this one. Have no idea why you ned EXP, just to get points to upgrade spells or there are other need?
If we’re talking AAA projects its the worst for me since Ghostwire, like how this game costs on the same level as GOW or Elden ring etc puzzles my mind.
Really close to dropping.
Kiriko says
Good guide! Thank you!
4ipuxa says
Played for some time.
I have a question about the guide.
It says you need 3200 MANA to buy all spells, my question is
how much of it will come naturally, levels,locations, blue pools in the path?
PowerPyx says
I got around 2600 naturally while doing all other trophies then farmed the rest in Praenost. You could get it way earlier but I was specifically testing doing the “bare minimum” to check for missables and collected only the mana on my path, without specifically going out of my way to collect it. Farming the rest took maybe 30 minutes.
Alex says
Hi! I have a problem with Seeker Dart and his 3rd challenge (Lv. 3: Attack downed enemies (0/20)). I’m currently level 55, and no one of my attacks knock enemies anymore. Do you know any trick or something to knock at this time of the game without killing the enemy? I’m running out of ideas with this one.
Thanks in advance.
WickedMatrix says
Use charge to knock down deers
Marty says
Play on a higher difficulty
Cocka says
Charge attack or shield shot. Also Prime.
Won’t work on weak enemies with low hp because you’ll just defeat them.
Maybe do monuments.
abbas dante says
i got “Kit and Caboodle” without 2 side quest Necklace. thanks for the Amazing Guide .
GrumpyButNice says
I can also confirm that the two side quest are NOT needed for “kit & caboodle”
4ipuxa says
Got the platinum just now.
Sure as hell didnt feel like 3/10 id say at least 4.5/10.
The plat in itself was exhausting. I thought Core Crisis with 300 missions was bad, but this was
boooooring, it felt like a huge relief to be done with it.
A couple advices to save up time if you want to get to plat as fast as possible
* dont worry about Mana, i had around 1.5k after buying all spells.
* dont rush with Archive collectibles, there are a lot of them, and its not that hard to get them.
* make a checklist on Equipment pieces.
* old coins are important but i had 25 left at the end of the game, looks like there are almost always chest with coins in a Labyrinth.
* dont waste time on locations that dont give progress towards platinum.
xthekrakenx says
A tip for anyone having problems with the Spoof Spell Challenge.
You have to have spell charged by holding L2 or R2 then hold Circle. If you don’t have a spell charged it doesn’t work. The flavor text for the spell challenge makes it sounds like you have to hold Circle first, but that is incorrect. Hope this helps some people out.
Sylwah says
For “No Mercy” I have used Sila’s “Charge” to knock over enemies. It took ~10 minutes to get the 15 killer blows I had left. If you find yourself outright killing them, just change the gear to something you did not advance.
Cheese says
Is it possible to still get “kit and kaboodle” if you missed the equipment in chapter 7?
Silvia says
I reached 82% (382/464), a didn’t unlock the trophy, Anyone can help me?
Thanks
Andrew says
Hello,
I am currently playing and planning to platinum (Thanks for this guide!) and I just picked up the last fount spell, which completed all spells. I’m not sure why but the paragon trophy did not pop, only the all fount spells trophy did. Did anyone else have this issue/possible glitch?
GrumpyButNice says
You will get one more spell during the final chapter / boss fights. Should pop after that.
Alan says
Not sure if you’ll see this at this point or if it will apply, but I’m currently playing this on the Xbox Store version and I’ve reached Chapter 13. Problem is, Cuff will no longer block or do killer blows. I have auto-dodge turned off, so I just take damage until I die. I have one single thing left to do for the achievements, Tempest Level 2 challenge. Without Cuff blocking, I can’t get into “defenseless” mode to complete this.
Does anyone know why Cuff is broken? I can still use him to scan and the compass works, but block and killer blows have been disabled somehow. I don’t think it’s a menu setting (I put them all to default with no luck). I’ve changed my cape, necklace, and nails to ensure that wasn’t the problem as well.
Hopefully someone has an idea as I really don’t want to play through the game again.
Twicesays says
I need help with the Paragon Trophy, I already have all spells you can buy with mana and the 12 lilac fountains and have their respective trophies as well but this one it’s not working
Any suggestions?
Twicesays says
Already beat the game fyi
Camboggia75 says
Hey guys, is this platinum hard or particularly tricky at any point? Is getting the platinum hard? Thanks everyone!
Ben says
It’s not hard, you can play on easy with auto dodge and set it so you practically no damage when you do get hit, so combat can be trivial if you want it to be, No trophy is missable either. Whatever you don’t get done during the main game can still be done in the free roam post game. Only thing to note though is there are ALOT of collectables in the open world.