
The 100% Completion List in Like a Dragon: Ishin covers the checklist-style objectives the series typically requires related to minigames or collecting things. There are a couple of tough minigames, though they’ll be the least of your worries due to the huge time sink required for the Equipment category as you are required to make one of every possible weapon and armor item, along with setting every seal at least once in a weapon or armor item. Due to the big amount of crafting items this will be covered in a separate guide from the rest of the completion list.
Completing all tasks is required for Halfway There  and Taskmaster
  . Note that there is some overlap with objectives in the Diligence Record, such as things related to Another Life. To be efficient you should do the completion requirements for these first, then do the grinding required for Diligence Record completion.
Category Select:
- Substories
- Minigames
- Another Life
- Meals
- Heat Actions
- Equipment
- Masters
- Wanted Men
- Battle Dungeons
- Arena
Substories
Complete all Substories in Fushimi/Rakugai/Rakunai/Mukurogai/Gion and elsewhere.
The completion for substories just requires completing all possible substories, with the individual entries corresponding with each location as they are divided in the Substories menu.
» Like a Dragon: Ishin! Substory Guide
Minigames
The Minigames section of the completion list covers the traditional minigame aspects, with the rhythm, gambling, and courtesan minigames. Note for all “gambling” games the requirement counts cumulatively at all times, regardless of losses, so you don’t need to worry about leaving the table between wins to save your progress. There are also no cheat items in this game, so you need to complete all minigame requirements through normal play.
Singing – Awarded “Preferred Performer” or higher on all songs.
Singing is played at Utamaruya in Fushini, so it’s available very early in the game. It won’t be any sort of surprises if you’ve played prior games in the series, as it’s just Karaoke. This version of the game includes 7 songs (2 more than the original release) and you need to hit Preferred Performer on all of them which is for scoring over a 90 rating at the end. Outside of Ichizu Samurai (Truehearted Samurai) none of the songs are particularly difficult. Ichizu may take a couple of tries if you’re not good at rhythm games, but it’s nothing crazy overall. It’s also recommended that while working on this you back out of the minigame in between each song so that you can raise the Bond rank with the owner.
Note for the songs that give a choice of difficulty you need to select “Passionate Backup”. “Casual Backup” caps your score at 90 so you can’t reach the Preferred Performer rank.
Buyo Dance – Awarded “First Class” or higher on all songs and difficulties.
Buyo Dance is played at Nichibuza in Rakunai. This is the harder of the two rhythm games, based around a strange UI for the Dpad and face buttons that can take a bit to get used to, but looks worse than it really is. There are three songs, each with four difficulties, and you need to get “First Class” or “Buyo God” rank on each of them. The lowest difficulty only uses the Dpad, then everything above that uses both the Dpad and face buttons.
Most of the difficulties are pretty reasonable and don’t throw anything crazy at you as long as you keep in mind that the way the note patterns works is typically only doing one side of the controller at a time. The only time this doesn’t apply is near the ends of the songs on Geisha difficulty (especially on Heartbeat), where they toss in some quick back and forth, but if you do well through the song up to that point it shouldn’t be a huge deal if you get tripped up at the ending. Remember to use your Showstopper with  when it is available, and keep in mind that the analog stick action is always the same for that song.
Pitching in at the Udon Shop – Awarded “Divine” rank.
The Udon Shop minigame is played at Umai Udon in Fushimi. Earning “Divine” rank requires earning about 5 Ryo total in one session, which isn’t hard if you’re just cheesing the game. You can pause the game when all the prompts are shown, pausing the minigame but still allowing you to see what they are. Note them down in some way and then unpause and quickly do the inputs. Repeat as long as needed.
Courtesan Games – Won every Courtesan Game on every difficulty.
Courtesan Games are a set of 3 minigames that are played at Yamabuki in Gion, based around interacting with the courtesan Anna. They are a drinking minigame, rock paper scissors, and a game that is basically a shoot em up. The first time you are at the brothel you need to complete all 3 on the default difficulty in one go, then when you come back you can select the individual minigames and play the higher difficulties. Note that playing these costs 1 ryo per try, so if you’ve already completed the bond with Anna you might want to save before entering and reload if you lose so that you aren’t losing a ton of money.
Note that there is a 4th difficulty on Sensual Healing, but it isn’t required for completion and you don’t get anything useful by completing it.
Sake Showdown – This is a minigame based around drinking sake, where you need to not spill sake on yourself before Anna drinks too much and spills it on herself. Hit  to lower the bowl, and
  to raise it. The higher you are to the top of the bar the faster you drink, meaning there’s less time for Anna’s drunk gauge to lower again. In each bowl you drink there will be more sake you need to drink that round, so you want to try and be quick if possible to avoid needing extra rounds. When drinking you don’t want to hit the button too many times in the drink direction, as there is a bit of delay. A good method is to tap a couple of times to kick the needle upwards, then tap when the meter starts blinking to kick it back down. On Asura difficulty you’ll likely need to go through 4 rounds to complete the minigame.

Rock, Paper, Scissors – Exactly as stated, you’re playing a game of Rock, Paper, Scissors with Anna, best of 5 to win. One trick is that you have 3 instantly of a third eye ability, which slows down time right before when you need to select your move, allowing you to see what Anna is doing. On lower difficulties, this isn’t really needed because she basically just holds her hand in the position she is going the whole round, but is necessary for Asura difficulty because she’ll try to fake you out right at the end. The best method is to play normally without using third eye until you have two round wins, then use third eye to win the final 3 rounds. The trick is though that she can basically just fake you out before the final swing and change her hand, so this still isn’t a surefire thing. Note also that this isn’t explained in-game, but if you tie in a round you have about a second to change your hand because you go again immediately until someone wins, it doesn’t count the round as a draw. If this occurs Anna will always change what hand she did to beat the one you just threw, so make sure not to leave your hand the same.

Sensual Healing – Sensual Healing is basically a schmup, where you are shooting away the thoughts in Ryoma’s head (that’s why all the “enemies” are words). This is the hardest overall minigame completion in the game, and is somewhat worse than in the original game due to the words now being larger with the translation in the game. One of the main things to keep in mind with this is that the pattern in the minigame is always the same when you replay it, so for Asura you want to try and remember where it slows and speeds up, and use the slow sections to charge up your beam and clear/attack the heart, while just making sure to avoid the obstacles when it speeds up. Also make sure to use your bomb to clear when needed, you’re better using the bomb than losing a life, as you only get one bomb per life, so if you lose a life with a bomb you just lose the bomb as well. All 3 levels of the minigame on Asura are basically just the moving back and forth pattern, with the final level also adding in a big obstacle that comes down slowly from the center of the screen.

Chicken Races – Earned 10000 points or more in total.
Chicken Races are bet on at the Chicken Racing building in Rakugai. 10000 points in this is a laughably low amount overall considering how much you’ll probably end up playing the minigame for tags to trade for items at the Gambling Den. You can check out Cocksure in the trophy guide for an explanation on an exploit to win chicken race bets every time.
» Like a Dragon: Ishin! Trophy Guide & Roadmap
Cee-lo – Earned 7500 points or more in total.
Cee-lo is played at the Gambling Den in Rakugai. This is the first of two dice games in the gambling den. Cee-lo involves each player throwing three dice into a bowl, hoping to match two of the dice, with the third dice then counting how many points they get, or rolling specific special hands. You really don’t need to know anything past that basic information, because more often than not you’ll likely win from the other players specifically losing in various ways. If they don’t make a pair at all, roll a specific hand, or toss the dice out of the bowl (which can happen to you too, but it’s just entirely random) you automatically win based on your bet. Because of this you basically just want to always bet 200. There’s no difficulty selection in this mode, but since the max bet starts at 200 it goes a bit quicker.
Cho-han – Earned 7500 points or more in total.
Cho-han is played at the Gambling Den in Rakugai. This is the second of two dice games in the gambling den. Cho-han involves a dealer rolling a pair of dice, then players betting on the result. The base bet is just whether the two dice add up to an even or odd number, and this is what all the NPC players are betting on. There’s no difficulty selection but you are able to bet more the more you play, and get access to other betting options if you want to use them, such as betting on the number on the dice or the difference between them. You don’t need to do these if you don’t want to, you can just stick with betting on even or odd. You can somewhat base you bet off the other players, as they go on streaks and are highlighted in the player list when they do, but it’s still technically just a coin flip at all times.
Oicho-kabu – Earned 7500 points or more in total.
Oicho-kabu is played at the Gambling Den in Rakugai. This game is somewhat similar to War, where you are dealt cards and can choose to take a third to get yourself as close to 9 as possible, and then face the dealer or all other players when you are the dealer, and the person with the better hand wins tags based on what they bet. The game is for the most part almost entirely luck, so the best way to earn tags is just betting max at all times. There isn’t an increase in what you can bet based on how much you win in each session, and the dealer just cycles through all player.
When you are dealer you don’t pick cards or bet, you are dealt two cards first, then can take a third after the other players have been dealt all their cards. You then pick what order you want to showdown the other players in (though you face them all so it doesn’t really matter), then you win based on the player’s bets. When choosing whether to take the third card I went with the general rule of not if my total was 7, 8, or 9, but taking a third if it was below that. If you get two of the same cards or two 10s in a row you should take the third to either try for Three of a Kind or Ten-Ten-One, but this isn’t very common.
When you are not dealer the order of which player picks from the four placed cards cycles between players. When making the choice you’d want to go for 4 or 10 first, otherwise as low or high as possible. Taking a third card applies the same as the dealer.
Whether you are dealer or player you’re more often to get screwed over by RNG than not, but betting max and moving to the higher-difficulty games when possible will make this go relatively quick. Intermediate increases the max bet to 500 per round, so it speeds up quite a bit once you move to the next level.
Koi-koi – Earned 7500 points or more in total.
Koi-koi is played at the Gambling Den in Rakugai. It is somewhat similar to Rummy, where you take cards from the table to try and match with ones in your hand, or if you can’t match anything on that turn place one on the table in the middle. Points are based on the types of hands you make, then the amount of tags you win or lose is based on that at the end of the game multiplied by what you decided for the wager amount at the start of the game.
Since this is largely luck to an extent you should play on the highest difficulty possible as they become available up to Advanced (the AI in Master does pull out random unfair stuff so it’s potentially not worth it unless you’ve played a few Yakuza games before and know what you’re doing). You start out with only the lowest level available, then more are unlocked as you play more games. When you actually get in game go into “Change Settings” and then set the Wager to the higher amount available. Leave everything else the same, but you can turn Hand Guide on and the game will prompt you on which hands you or the other player are close to. In game, if you press  the game will show you a list of all hands that you can potentially still make based on what’s not been picked up by the other player. The main thing you want to go for to end games quickly are the Cherry Blossom Viewing and Moon Viewing hands, which only take two cards and are worth five points each. These are both made using the Sake Cup with Chrysanthemum card, then either the Moon over Pampas or Curtain with Sakura cards (you can view these hands in the game rules and it shows the card images). Always try for these cards if they show up, and if they’ve not been picked up try not to use or place down your hill, sakura, or chrysanthemum cards if you have any so you can snag them if they’re drawn. If those aren’t available you’d next want to be aiming for the animal or ribbon cards, then lastly the plain flower or junk cards. When placing cards down if you have no matches you’d want to waste your plain flower cards first unless you don’t have any to put down.
When you make a hand you can “Call Koi” to keep playing the current round, but it’s not recommended you do that unless you just have a junk hand and think you can pick up more without the other player making something themselves, which would then let them end the round and not give you any points. If you get something like the Viewing hands for 5 points just immediately end the round to bank them, the winner of the game is based on who has more points after 3 rounds, so the 5 from either of those is a large boost over the other player.
Poker – Earned 10000 points or more in total.
Poker is played at the Gambling Den in Rakugai. You can play a number of different versions of poker if you have a preferred one you know how to play, but if not it’s just recommended you play Texas Hold Em. The AI in this game seems to never actually want to fold, which means you can’t bluff them for wins, but if you get a decent hand you can just continually raise and you’ll normally get a couple of the opponents sticking with you the whole way. If you’ve grinded some tags from Chicken Races already and don’t want to try playing properly you can just continually raise regardless of what you get. If you win a couple of hands with everyone raising with you this should complete or nearly complete the requirement.
Mahjong – Earned 35000 points in a single match.
Mahjong is played at the Mahjong Spot located in Mukurogai. If you’ve played other Yakuza games you might be dreading Mahjong, especially as this game has no cheat items, but the completion requirement this time isn’t too bad. You need to finish a game with 35,000 pts before end-of-match bonuses, so this basically means that the total shown above your hand needs to be at 35,000 when the game ends. You start at 25,000 at the start of the game, so this requirement is basically to get one decent hand and don’t walk into rons from the other players.
The game includes some basics and a guide for a number of hands at the end of the Rules you can check during gameplay by pausing. If you’re a beginner you probably want to stick to aiming for easy-to-spot ones like all triples, full straight, or seven pairs. Some other tips:
- Unless you end up with multiple of the same Wind or Dragon cards at the start of a round you almost always want to discard them first. Getting 3 Dragons or a 3 of the Round (East) or your seat Wind (the one shown beside Ryoma’s face) counts as a point, but only really matters if you’re also making a full hand.
- If you’re a beginner, don’t ever call Chi, Pon, or Kan when the game offers. Open hands are generally harder to make if you don’t know specifically how to make them, so you’re better off always declining these unless you’re prompted for Ron or Tsumo.
- Mash whenever it’s your turn. This brings up the menu if you have Riichi available, which you can stumble into sometimes without realizing it. You’re then shown the option for which tile to use it off of, with the potential tiles that can complete your hand shown on the top right. Select the option that has the most potential matches.
- If another player calls Riichi, start watching for what tiles get discarded and what is already discarded. If you’re not close to making a hand your goal is basically not to get your tile stolen to complete the other player’s hand, which would mean you lose the most points for the round. If you can discard a tile that another player has discarded since the Riichi call then that’s generally always safe to discard. If you have a tile that the 3 others have already been discarded then it’s also a pretty safe discard.
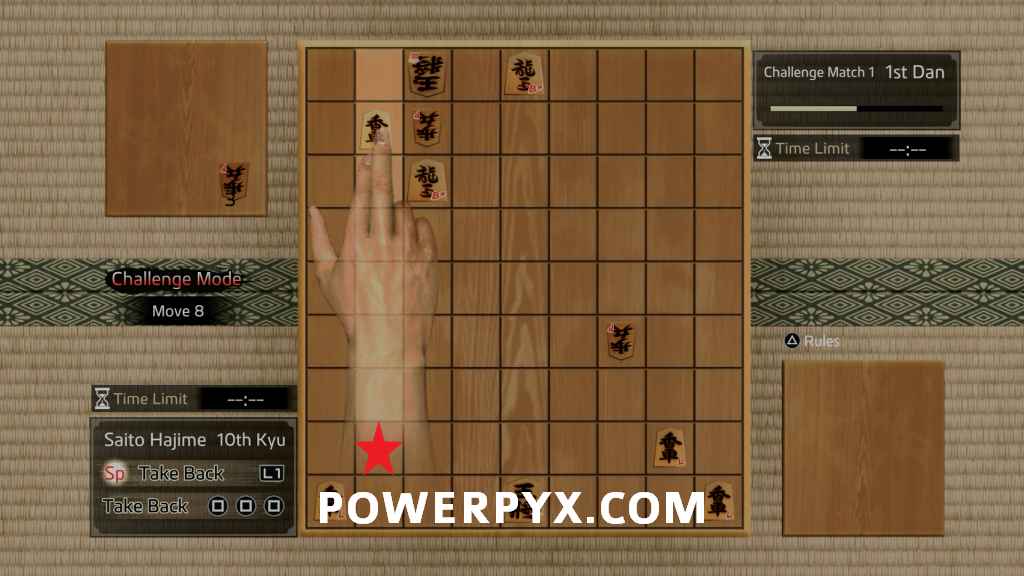
Shogi – Won 3 times or more in total.
Shogi is played at the Shogi Parlor in Rakunai. Shogi is similar to chess, in that you have pieces with different jobs and the goal is to checkmate the opponent. For this requirement you don’t need to play real games, you can just play Challenge Match 1 three times, which has a set 4 step solution you can just repeat to win. In the below images, the red star is the starting point for the piece, and the hand silhouette is holding the piece in the spot it needs to be placed. Note when the step says to promote the pieces, as this is required to win.
1. Promote the piece

2. Promote the piece

3.

4. Promote the piece
Another Life
The Another Life section of the completion list covers everything specifically related to the Another Life portion of the game, along with fishing. Most of the requirements are just for harvesting/cooking/fishing/etc each thing once, so you should make sure to complete these requirements before completing all of the grinding for Diligence Record completion.
Farming
The Farming section requires growing one of each possible plant in your garden. To make all plants available you need to purchase all of the “Green Thumb” items from the Virtue exchange for a total of 20,200 Virtue. You’ll want to purchase all of the Farm upgrades eventually, but the “Green Thumb” ones are what is specifically required to make the other plants available. You can speed up grow speed by using Fertilizer, going in and out of the house to allow you to use more.
Fishing
The Fishing section requires catching one of every type of fishing. You can check out the fishing guide for the full list of all fish and where they can be caught.
Like a Dragon: Ishin! Fishing Guide
Cooking
The Cooking section requires cooking one of every type of food in your house. You can make a couple to start, but to make most of the rest available you need to purchase Typical Kitchen Upgrade, Home Cook’s Kitchen Upgrade, and True Chef’s Kitchen Upgrade at the Virtue exchange for a total of 2800 Virtue. The one recipe you need to learn elsewhere is Revolutionary Croquettes, which you learned after completing Bond with Revolutionary Chef: Like a Dragon: Ishin! Diligence Record Guide
You can purchase the Cooking Success Rate upgrades as well, but whether you make the normal or improved version of dishes doesn’t matter and both count for completion.
Trade
The Trade section just requires you to make a total of 100 Ryo or more through trade orders at your house. You should be able to make this much while working on the required 200 individual orders for Diligence Record completion. Initial orders don’t make much money, but once you get to later ones in the list some start returning 1 ryo or more. Once you cycle through all types of one order the list starts again with an increased amount paid for each order.
Pets
The Pets section requires adopting and then interacting with all 6 possible pets. To be able to adopt the pets you first need to purchase the Cat Bed and Dog House upgrades from the Virtue Exchange for a total of 15,000 Virtue. You can then adopt the pets and have them live at your house (dogs outside, cats inside) after completing specific Substories and Bonds.
The required substories are 16, 17, 28, 36, 54, and 55. The required Bonds available after are the 6 at the bottom of the Friendships section.
» Like a Dragon: Ishin! Substory Guide
Like a Dragon: Ishin! Diligence Record Guide
Haruka’s Trust
The Haruka’s Trust section requires you to see the 4 special interactions you can have with Haruka after reaching certain trust levels. You need to raise her trust all the way to see the final scene, so you will be able to see all of these eventually. The scenes are triggered by interacting with:
- The bath (the door inside the house)
- The fire in the middle of the room
- The futon in the corner
- The gate to leave back to Fushimi (this is the final one available at max trust)
Meals
The Meals section of the completion list requires you to order every food item from every restaurant in the game. There isn’t a limit on how much you can eat in this game, aside from some restaurants that only allow you to order one drink item per interaction, so if you want to make tracking this easier you can just purchase every possible item in one go the first time you interact with a restaurant, assuming you have the money for it. Note though that you need to eat at restaurants 200 times total for Diligence Record requirements, so if you want to save yourself some time later you could just repeatedly order 1 item per interaction instead of all at once to eat up some of that requirement.
Fushimi
- Umai Udon
- Hanako
- Daruma Eatery
- Fukufuku Pub
Rakugai
- Uji Tea Parlor – After raising the Bond with Uji Tea Parlor Girl new items become available on the menu
- Shady Bar
- Creepy Bar
Rakunai
- Watami
- Shippoku Momokawa
- Hanamaru Udon – Final item requires completing Bond with Hanamaru Udon Owner
- Sushi Zanmai
- Fuji Soba
- Kamatora
Mukurogai
- Paradise
Gion
- Kitchen Aoba
- Kasuga
Mibu
- Otake Tea Parlor
Heat Actions
The Heat Action section of the completion list requires performing each unique Heat Action for each style once. Some are related to items in the environment (mostly in Brawler style) whereas most are related to unlockable abilities, so you will want to complete the initial orb map for each of the styles along with unlocking all Revelations to have most of the actions available. You can find info about all the heat actions by going into the abilities menu and then hitting  to view abilities. All “general” heat actions listed under Brawler in the completion list are in the specific Heat Actions section, whereas the style-specific ones are under their style headings.
Brawler
Everything in this first section of the Brawler completion list is the “general” heat actions, ones you don’t need to unlock to perform.
- Essence of Wall Smashing – Grab an enemy and walk near any full-height wall
- Essence of Face Crushing – Grab an enemy and go near a low wall, an easy spot is beside the well in Rakugai.
- Essence of Finishing Kick – Near an enemy’s head while they are face down on the ground. You can get an enemy face down by grabbing them and kicking them away with
- Essence of Finishing Stomp – Near an enemy’s head while they are face up on the ground. You can get an enemy face up by grabbing them and throwing them with
- Essence of Beatdown – The heat action available while holding a one-handed item. One-handed items are specifically things like the sickle, small one-handed tools. You should be able to find one near a cart close to the well in Rakugai.
- Essence of Crushing – The heat action available while holding a two-handed item. Most things you can pick up like chairs are considered two-handed items, and this is the action you perform where you can punch them after breaking the item.
- Essence of Gravity – The heat action available while holding large objects, such as tables or charcoal bundles. This is the action where you smash the item over the enemy with no follow up action.
- Essence of Swinging – With an enemy on the ground, stand near their feet to swing them around, hitting other enemies near you.
- Essence of Throwing – Grab an enemy and walk near a body of water (for example the river north of Mukurogai or on the bridge to Gion) and interact to throw them off the ledge.
- Essence of Staff – The heat action available while holding a long weapon. These are most easily found as the Long Lumber items that appear along walls all over the place.
- Essence of Lagoon – The heat action available while standing near a ledge or water in any style other than Brawler.
- Essence of Umeboshi – When you have an Umeboshi in your inventory (can be purchased at Don Quijote) the prompt will be available while near an enemy while not locked on.
- Essence of Carrying Pole – A carrying pole is the two crates on a stick that you see some of the peddlers walking around with in Rakunai. They can be found near some buildings, and you get this prompt in combat while standing near them. If you need a spot where one appears is directly west of Ebisu Pawn Rakunai.
- Essence of Scalding – When near a building that has a teapot. A number of them along Shijo Street in Rakunai have this, but there is for sure one at the building immediately west of Shogoin Yatsuhashi.
Everything after this second section in the Brawler list is the abilities associated with the Brawler skill tree unlocks.
- Essence of Mikan – When you have an Orange in your inventory (can be purchased at Don Quijote) the prompt will be available while near an enemy while not locked on.
- Essence of Reverse Throw – While parrying (
 when an enemy attacks) the prompt for this will appear immediately after.
 - Essence of Mighty Strikes – Grab an enemy and this will be the prompt available.
- Essence of Grounding Strikes – During the animation for Mighty Strikes a second prompt will be available for this action, where you slam the enemy into the ground.
- Essence of Dragon Strikes – During the animation for Mighty Strikes a prompt to move
 in a circle will be available for this action where you swing the enemy around, hitting ones nearby.
 - Essence of Mercurial Fortune – Grab an enemy and then wait for them to break out of the grab and this prompt will appear.
- Essence of Shot Stopper – When near an enemy with a firearm, this prompt will be available. Can be a handgun or a long gun.
- Essence of Swordless Reversal – When near an enemy with a sword, this prompt will appear right before they attack you.
- Essence of Grand Bruising – First trigger War Cry Counter by parrying an enemy (War Cry Counter is when you parry and are invulnerable for a short period after) then lock onto another enemy with for this prompt. The enemy needs to be not near you.
- Essence of Empty Hands – Similar to Swordless Reversal, but when an enemy using something other than a sword attacks you.
Swordsman
- Essence of Finishing Stab – The prompt available near any downed enemy.
- Heavy Sword: Fly Swatter – While wielding an odachi, this will be available with an enemy near a wall.
- Heavy Sword: Monkeyplay – While wielding an odachi, this will be available right before an enemy attacks you with a sword.
- Heavy Sword: Windmill – While wielding an odachi, this will be available when you have 3 enemies in close proximity.
- Essence of Single Cuts – While locked onto an enemy with , hit to dodge towards them and this prompt will be available.
- Essence of Swirling Cuts – During the animation for Single Cuts, a second prompt will be available for this action.
- Essence of the Skewering Cuts – During the animation for Single Cuts, a prompt to move in a circle will be available for this action.
- Essence of Pinning Slash – This prompt is available near an enemy close to a wall.
- Essence of Scintillant Lead – When an enemy is shooting at you from a distance this prompt will be available.
- Ash from Withered Branches – When a melee enemy is attacking you from behind this prompt will be available. You can trigger this by just facing away from an enemy and waiting for them to attack you.
- Gleaming Scythe – First Fair Weather, which is triggered by guarding with , then hitting right when an enemy attack hits to push them away. During the push animation, this prompt will be available.
- Leaping Maelstrom – While running toward a group of at least 3 enemies this prompt will be available.
- Essence of Mincemeat – When breaking an enemy’s guard from attacking them a bunch this prompt will be available.
Gunman
- Essence of Finishing Shots – The prompt available near any downed enemy.
- Essence of Oh-Be-Joyful – While running towards an enemy this prompt will be available.
- Essence of Shoving Shot – Grab an enemy and this will be the available heat action.
- Essence of Wall Plastering – While near an enemy close to a wall this prompt will be available.
- Essence of Fanning Shots – During the animation for Shoving Shot, a second prompt will be available for this action.
- Essence of Old Scratch – Lock onto an enemy with , then dodge towards them with and hit to push them. The prompt for this will be available right after hitting an enemy with the push.
- Essence of the Three-Legged Mare – With at least 3 enemies in front of you, hold to lock on and this prompt will be available.
- Essence of Hornswoggling – When an enemy with a sword is attacking you from behind this prompt will be available.
- Essence of Gravedigging – When lying on the ground with an enemy nearby this prompt will be available.
- Essence of Lobbing Shot – During the animation for Shoving Shot, a prompt to move in a circle will be available for this action.
- Essence of Fireworks – While wielding a cannon and having a Firework Ball in your inventory this prompt is available. Note that the Firework Ball appears in the material section. If you don’t have any you can purchase them from the Mysterious Merchant.
Wild Dancer
- Essence of Finishing – The prompt available near any downed enemy.
- Essence of Stature – When near an enemy with a sword, this prompt will appear right before they attack you.
- Essence of Cornering – While near an enemy close to a wall this prompt will be available.
- Rain of Steel and Fire – Lock onto an enemy with and this prompt will be available.
- Squall of Steel and Fire – During the animation for Rain of Steel and Fire, a second prompt will be available for this action.
- Typhoon of Steel and Fire – During the animation for Rain of Steel and Fire, a prompt to move in a circle will be available for this action.
- Dance of Mourning – Pressing to evade near an enemy wielding a sword and this prompt will be available. They don’t need to be attacking, but this can be finicky to trigger.
- Majestic Dispersal – While near 4 enemies, hold to lock on and this prompt will be available.
- The Bloody Wheel – First hit twice to do the first two attacks of Phoenix Frenzy, then this prompt will be available.
- Mirage of Shimmering Heat – When an enemy with a sword is attacking you from behind this prompt will be available.
- Essence of Winged Flight – When running toward a distant enemy this prompt will be available.
- Luxury of Splendor – When near an enemy while you have your Heat Guage at level 5 or higher this prompt will be available.
Equipment
The equipment section of the completion list requires smithing one of every possible weapon and armor, along with attaching every possible seal to an item once. This is the longest part of the grind in this game and involves an extended amount of time replaying the Battle Dungeons for materials drops and cash to complete all smithing requirements.
» Like a Dragon: Ishin! Smithing Guide
Masters
The Masters section of the completion list covers the completion of the training session with each of the 3 combat masters, along with the extra requirements associated with Scarecrow Chateau and Cannon Coaching.
Professor Juubei
Professor Juubei is the owner of the Scarecrow Chateau, located in Rakugai.
NOTE: There are reports of the progress within the Scarecrow Chateau being reset for unknown reasons. Because of this, it is recommended you try and do the entire thing in one go. This is much easier if you leave this until later once you’ve got the grinding setup for Dungeons ready and you can blast through most of the rooms with little effort.

The Scarecrow Chateau is basically just a series of training room where you need to destroy Scarecrow enemies as quickly as possible to get a high score. The lower-level completion requirements make it seem like you don’t need to do everything, but the final requirement is getting 3 Stars on every single room so you’re better just aiming for this at all times. If you leave this until later it is quick easy, as the Scarecrows are a set level, so you being higher level and with better equipment means you mow through them much faster. The only ones likely to cause any trouble at that point are the Brawler-required rooms as you don’t have a lot of time for them. For rooms that allow you to use any style, you can just use Gunman for 90% of them, switching to Wild Dancer in some cases if the enemies are grouped together in a more meleeable way.
Professor Shinbei
Professor Shinbei is the runner of Cannon Coaching, located on the riverbank in Mukurogai.

Cannon Coaching is Ishin’s version of a baseball minigame. If you’ve played Yakuza 0 or any of the older games it’s similar to that version of baseball, where you just swing at the time the ball crosses the strike zone and don’t need to aim like the newer version of baseball. Unlike the other games, though there isn’t really a trick to this like watching for Ryoma to stop moving, you just have to judge based on where the cannonball is on your screen. It’s pretty lenient, so this may just take a couple of tries to work out the timing.
For completion, you need to get Gold rank on each of the three difficulties using both Swordsman and Gunman. Swordsman functions like typical baseball, whereas with Gunman you are automatically aiming into the air with a reticule on your screen and need to shoot when the cannonballs are in the middle of the reticle. There are a lot more cannonballs fired in Gunman, so keep in mind the rhythm off the shots and you should be good. For both weapons once you get to the higher levels the cannon will make a different noise when there is a shot that is going to go very fast, so keep an ear out for those. There is an extra Bonus difficulty you unlock after completing the first three on both weapons, but this only awards extra crafting materials so you don’t need to do them at all.
William Bradley
William Bradley is the trainer for Gunman and is located at Unyuan in Rakugai.

To first meet him walk in the area and you’ll be attacked by some men, then invited inside after. You can do almost all of William’s training in one go, you don’t need to leave or anything in between. For the final part of the training you’ll need to leave the area of the hideout, then return later and one of the men will stop you out front. Head inside and speak to William again for the final session.
Komaki Munumitsu
Komaki is the trainer for Brawler style and is located at Komaki Dojo in Fushimi.

To first meet them walk out front and talk to the man you saw arguing, then leave and come back to enter. Komaki teaches Brawler abilities, an most really aren’t useful because of how bad Brawler is in this game. Between each training session, he wants you to go fight groups of enemies, going 1 > 3 > 5 etc between each session. If you want to know how many he wants in between you can talk to him immediately after the training session and he’ll tell you how many more fights he wants you to do. For the final session, you’ll fight Komaki one on one. This can be tough if you try to do it early in the game, so might be worth leaving until later when you’ve leveled up quite a bit and can just use a bunch of heat actions on him to finish the fight.
Ginryu
Ginryu is the trainer for both Swordsman and Wild Dancer and is located at Ginryu Dojo in Rakunai.

You’ll be prompted to enter by men outside the dojo, then can go inside and speak with Ginryu for both types of training. He has one level of each that you can do each time, back to back. To proceed to the next levels of training you need to show him increase rarity levels of swords, all the way up to Gold rank, so this may take a bit to do if you’re not engaging with smithing until the end of the game, though you can get away with creating a gold rarity sword early (like the Shiranui > Okanehira). In between specific sessions, he’ll ask you to beat an opponent to prove your prowess, requiring you to get a specific grade in the battle to continue. You can normally just choose to do it in Wild Dancer style and then shoot the opponent to beat them. You’ll basically be guaranteed the required rank as long as you don’t get hit. When you reach the final fight you face Ginryu and need to get above “sharp” rank, but the same strategy applies.
Wanted Men
The Wanted Men section of the completion list just requires completing each of the Wanted Men missions. You can check out the Wanted Men guide for how to trigger these and how to complete each mission.
» Like a Dragon: Ishin! Wanted Men Missions Guide
Battle Dungeons
The Battle Dungeons section of the completion list just requires completing all 40 of the dungeons once each. You need to complete all prior ones in each section to beat the final Dungeon, so you will complete this section while working on the trophies for completing each dungeon: Bandit Rustler , Bandit Wrangler , and Sanada Takedown
Arena
The Arena section of the completion list just requires defeating each of the possible opponents in the arena. There are 5 opponents in each of the arena tournaments, and you have to beat all 5 opponents to win, so this basically means you just have to complete each of the arena tournaments once without losing. You don’t need to touch the 100 Man Brawl at all, and in this version of the game you aren’t required to grind the arena for any items, so just completing each tournament is good enough.
The first 6 tournaments are available right when you enter the arena, but the final tournament isn’t available until you do the following:
- Complete all training with Ginryu
- Complete all training with Komaki
- Complete all Wanted Men Missions
Once you have done those 3 things the final tournament becomes available and you can fight the final set of 5 enemies.
Related Like a Dragon: Ishin Guides:
- Substories Guide
- Diligence Records
- Memoirs Locations
- Wanted Men Missions
- Amon Location & Boss Guide
- Fishing Guide
- Completion List Guide
- Smithing Guide
Kakate says
“Essence of Empty Hands – Similar to Swordless Reversal, but needs to” is incomplete
Gage says
Thank you for pointing that out! Fixed now.
PatBoy04 says
Any updates on the crafting/smithing guide? Awesome guide btw!
PowerPyx says
It’s coming soon 🙂
BigMax007 says
Can you also add the rewards for maxing out each completion list section? The ones I got are Pot detector (headgear) from Another Life, Furinkazan (purple breasplate) from Meals and White Dragon spear (special purple weapon) from Wanted Men. Thank you for the guide btw!
Marcus says
Great guide as always, but I cannot even begin to express how badly needed the smithing guide is!
My hair has turned white from the grind in this game and now I have to collect all the seals as well.
Aaaaaaahhh!!! ?
Leon says
For Essence of Carrying Pole and Scalding, I found the best way to find the teapot and carrying pole was the Uji Tea Parlor. There is a carrying pole just in front of the tea shop.
Zackx says
Hey, i enhance kiwami seals twice for each sphere and square. But the completion list are not ticked. Means not complete, any idea why?