
There are 6 Palico Skills (Gadgets) in Monster Hunter World. Your Palico can have an active skill to support you in combat. This guide will explain to you how to unlock all Palico skills, what they are and how to change them.
How to Change Palico Gadget Skill
Go to your room in Astera and talk to your Palico there. Alternatively, during a quest/expedition enter the tent at a campsite. Either way, choose the option “Change Palico Equipment” and then the second item from the bottom is your Palico’s active skill (or gadget as it’s also referred to).
By default you have only the Vigorwasp Spray but now you’ll learn how to get all the others!
How to Level Up Palico Skills
Your Palico’s gadget proficiency automatically levels up at the end of quests. Just have your Palico with you and make sure he has the skill equipped, then it will increase automatically bit by bit.
At first it’s only a passive skill, your Palico will sometimes use it to assist you. At level 5 you earn the right to actively request your Palico to use his skill. At level 10 (the maximum) you get a second additional skill! After level 10 the proficiency no longer goes up, that’s the maximum.
Note: All of the skills must be obtained in free-roam Expeditions. You cannot do any of these while on a quest. You must also bring your Palico with you at all times, it is needed to communicate with other tribes.
Palico Skills Video Guide

Palico Skill #1: Vigorwasp Spray
A gadget that uses Vigorwasp honey to recover a hunter’s health. The amount healed grows with proficiency.
This is unlocked automatically from the beginning of the game.
At level 5 you can actively request a Vigorwasp at any time of your choosing. At level 10 a Vigorwasp Station can also be prepared, which spawns one Vigorwasp in a fixed position to consume at a later time (good to plant before engaging a monster).
Palico Skill #2 (Ancient Forest Map): Flashfly Cage
A bugtrapper insect cage used to stop monsters in their tracks. Its effectiveness varies with the type of insect inside, and the duration increases with proficiency.
Unlocks by befriending the Bugtrappers Grimalkyne Clan in Ancient Forest. Normally, you’d have to collect their green “Doodles” (they are like monster tracks) around the map to unlock their location. But you can simply go to the location of the screenshot below (green circle), atop the big tree. There will be a small cat up there that you must chase after. Do so, talk to it afterwards, and they will give you the new Palico Gadget skill right away.

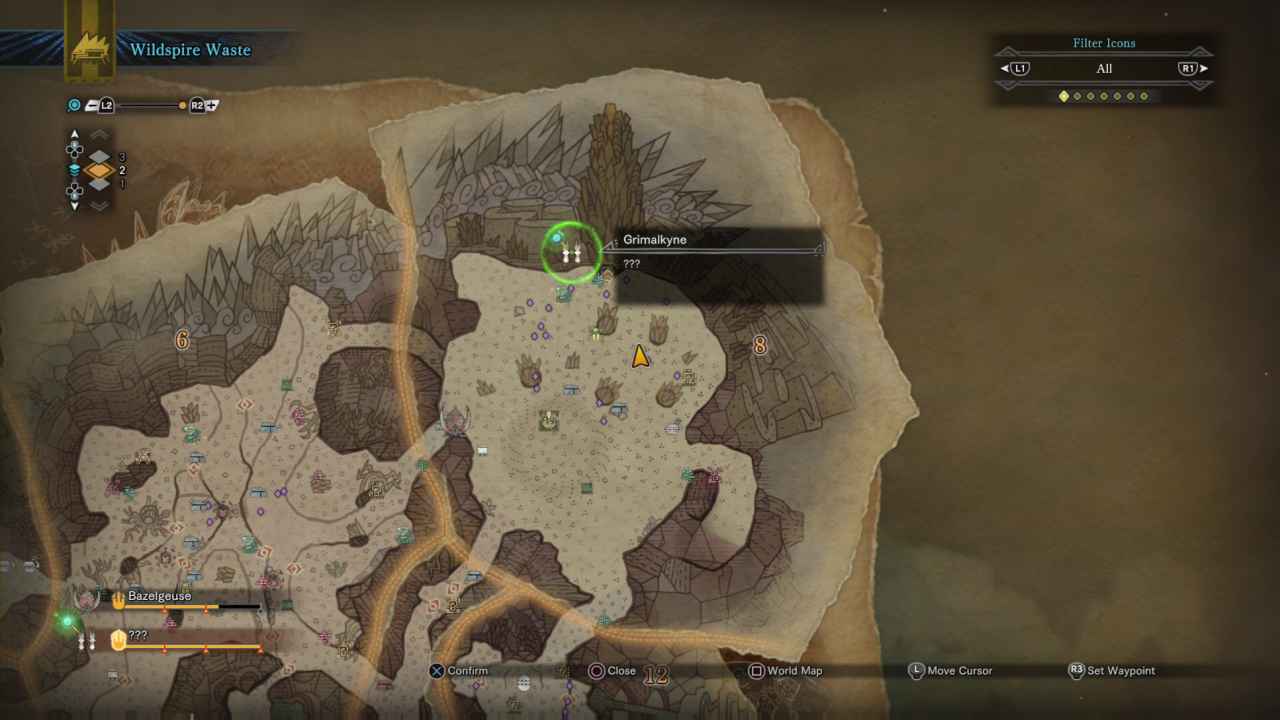
Palico Skill #3 (Wildspire Waste Map): Shieldspire
A massive protector shield used to defend against attacks. It can also be used to provoke monsters, drawing their attention. Guard effectiveness increases with Proficiency.
Unlocks by befriending the Protectors Grimalkyne Clan in Wildspire Waste. Again, you can either collect the Doodles around the map or simply go to the location circled in the map below. Talk to the cat in the cave. He will give you a new critical bounty “Cultural Exchange: Wildspire Waste”. You must capture 3 Protectors to complete it. They’re marked on the map with an icon called “Protectors” when you hover over it. Use the map filter “Traps/Environmental” so they are easier to see. Wear the Ghillie Mantle so they don’t see you coming and capture them using the capture net. Return to the Grimalkyne in the cave to complete the quest and unlock the Shieldspire Palico Gadget.
Palico Skill #4 (Coral Highlands): Coral Orchestra
An instrument of Trouper make, able to yield a variety of effects. Its melodies boost attack, defense, or status resistances. Those effects increase with Proficiency.
Unlocks by befriending the Troupers Grimalkyne Clan in Coral Highlands. Same as before, collect Doodles around the map or go to location from the screenshot below (red circle this time). There you will encounter 3 cats riding on Shamos Monsters. They will attack you and you have to defeat them. After defeating them, the scoutflies will guide you to their cave (or simply recheck the map for the Grimalkyne icon). Go to their cave and talk to the cat there. From there you receive a new quest “Troubled Troupers” which requires you to hunt 2 Tzitzi-Ya-Ku. The quest can be accepted at the quest board in Astera or by talking to the handler at a camp. It’s just important that you manually select it. Next go kill the two monsters (or capture them, whatever you prefer). After the quest finishes it instantly puts you back into the Grimalkyne camp and they give you the Coral Orchestra skill for your Palico!

Palico Skill #5 (Rotten Vale): Plunderblade
An invention of the Plunderers that snatches items from monsters when attacking. The quantity of stolen items increases with Proficiency.
Unlocks by befriending the Plunderers Grimalkyne Clan in Rotten Vale. It’s a nice passive skill that increases how much loot monsters give you. It’s perfect when you have to farm something specific for a weapon upgrade and greatly increases the odds of getting more/multiple drops. Please note you must progress the story until you can get to the lower levels of Rotten Vale! So it won’t work right away when you first visit the Rotten Vale. Before you go here, open the world map and make sure it says “Field Researchers: Lynian Researcher” on the right side under the area’s monsters. If there’s a Lynian Researcher, go to the location from the screenshot (he’s also marked via a green dot on the in-game map). If he’s not there, fast travel to another map and come back later. Talk to the researcher and he’ll tell you an Odogaron occassionally comes by and that he’s waiting for it to drop off some food to lure out the hungry Grimalkyne cats. Just wait next to the researcher until the Odogaron comes back to its nest and drops off a Legiana corpse (could take 10 minutes or so). Now a Grimalkyne will spawn in the middle of the Odogaron’s nest. When it sees you it will run away until it hides on top of some rocks. After following the cat to the rocks, plant some Raw Meat on the floor (obtained from carving Apceros) and hide behind the corner where it can’t see you. A few Grimalkyne will come out of hiding and thank you for the food, thus handing you the Plunderblade Palico skill gadget.

Palico Skill #6 (Elder’s Recess): Meowlotov Cocktail
Throws a Gajalaka-style bomb that deals damage. Combines with the Palico slinger to allow for sustained fire. Blast strength increases with Proficiency.
Unlocks by befriending the Gajalanke Grimalkyne Clan in Elder’s Recess. This quest is actually started from Astera, by talking to the Lynian Researcher standing in front of the Ecological Research Center. Before he gives you the quest you must have done the following:
- Gotten all other 5 Palico Skills/Gadgets
- Reached Elder’s Recess

Now the Lynian Researcher will give you a new critical bounty called “Cultural Exchange: Gajalaka Linguistics”. You have to collect 10 Gajalaka Tracks to complete it. They are found only in high-rank maps (6 stars+). They are mostly found where Gajalakas are nearby (the small fluffy red wookies with masks). So head on an expedition and take a close look around the map. They are like monster tracks, some green glowing slime you must interact with (the in-game term for them is “Gajalaka Doodles”). Unfortunately, you cannot farm one spot over and over. They do not respawn so you must find 10 unique ones but there are far more than that. If you have trouble finding them, check this guide: Monster Hunter World Gajalaka Doodle Locations.
After collecting 10 Gajalaka Doodles, bring them back to the Lynian Researcher in Astera to complete the bounty.
Now you receive a follow-up bounty “Cultural Exchange: Gajalaka Linguistics II”. It requires you to discover the Gajalaka settlement. Head over to Elder’s Recess and make sure it’s night. It only works at night, not at day!!! Talk to the Lynian Researcher there (see screenshot with red circle).

The Lynian Researcher tells you to sneak into the Gajalak’s camp undetected as to not stir up trouble. The easiest option is to put on the Ghillie Mantle (you got it automatically earlier in the game, you can add it to your equipment at camp). With the Ghillie Mantle nobody can see you. So just run past everyone to reach the end of the camp. Talk to their leader and he will give you the last Palico skill!
Palico Skill #7 (Hoarfrost Reach): Tailraider Signal
This is only available if you have the Iceborne Expansion. See » How to Unlock Tailraider Signal Skill.
Byzan says
Pity it’s bugged, got the quest any everything but nothing happens when I reach the settlement undetected with the mantle on
Helpful says
Byzan, you have to go in as far in as you can go and crawl through any openings you can crawl through while having the mantle on at night. It took me a few tries to figure it out but I wasn’t crawling through all the holes undetected. Hope this helps.
Apex_Kitty says
Did you manage to do it? I’m experiencing the same issue.. I go in undetected with the ghillie mantle on and cant enter the tunnel either. yes it’s at night, yes the gajalakas are there dancing, no I can’t go into the hole.
donkeypuncher4000 says
A lot of people seem to think this is a bug. the problem is that it has to be at night and you have to have your palico with you or else the cut-scene won’t trigger. You need the feyline with you to translate.
Devilyoda says
You have to wait in the bushes till a small cut scene focuses on the hole behind the last two guards
anthony rivera says
lmao how dumb.. its bugged because you went there and just stood at the camp and did nothing while you were supposed to enter the small hole to finish the quest? Your brain is bugged kid
Your Mum says
Watch out guys, keyboard warrior alert. Fuck off you virgin.
Master says
Thanks i got it now! i appreciate this post