
In New Super Lucky’s Tale (PS4 / Xbox One), Pages are the main Collectibles. Each level in the game has up to 4 Pages. You need to obtain them all in order to unlock the Platinum trophy. One Page is obtained by collecting 300 coins, one by finishing the level, one is found in a Hidden Location and one is obtained after collecting the L-U-C-K-Y letters in the level. This Collectibles Guide lists all of the L-U-C-K-Y letters and Hidden Pages locations. L-U-C-K-Y letters are usually found in the wild or spawn after completing a mini challenge within the level. Hidden Pages are accessible after entering specific foxholes or flipping certain switches within the level and completing their mini challenge. Completing the mini challenge will make the Hidden Page appear. After picking up a collectible, there’s no need to pick it up again if you die. They are saved automatically, even if you replay the levels. This means that if you have picked every letter but one, you can just focus on the one you miss on your reruns (especially on the run-through levels). None of the Collectibles are missable because all levels can be replayed as often as you like.
World: Sky Castle
Heavy Heads
- L: after crossing the main gate of the level, burrow and crawl under the nearby cage.

- U: after crossing the main gate of the level, head right and tail-whip the gong. It’ll reveal a hidden platform with the letter on top.

- C: after crossing the main gate of the level, head left, then left again. You should see a mushroom you can jump on. Jump on the cage, then the white balloons, and finally into the letter.

- K: after crossing the main gate of the level, go left past the bell. Jump on the mushroom to get to the ledge with the letter.

- Y: after crossing the main gate of the level, head all the way to the right, jump on the mushroom to reach an above area. Tail-whip the door to reveal the letter.

- Hidden Page Location: after crossing the main gate of the level, head all the way to the right. By a wall is a golden orb. Grab it and carry it to the statue. It’ll reveal the Hidden Page Location.


Aqueducts
- L: when you start the level, head left and stomp on the switches to reveal the letter.

- U: at some point you’ll come across two platforms with a skull icon that can turn into traps. Next to them is a hidden location behind which is the letter. Use the pictures below for reference.


- C: continue through the level. You’ll find this letter hovering under a red bird.

- Hidden Page Location: next to two switches as you progress through the level.


- K: after a while you’ll come across Master Mittens, appearing and disappearing amidst some balls of fire. Try to catch her and after a while the letter will spawn.

- Y: towards the end of the level, by some skull platforms, is a foxhole. Jump into it to get to a secret area where the letter awaits you.


Go Fetch
- L: shortly after the beginning of the level, you will most likely walk straight into it.

- U: on a platform with some coins that goes up and down. Hard to miss.

- C: under some rotating platforms on the second floor.

- K: when being chased by the flame, on the right.

- Hidden Page Location: when going topside, climb the tower surrounded by fireballs, then head right. Jump on the mushroom to get to the foxhole.

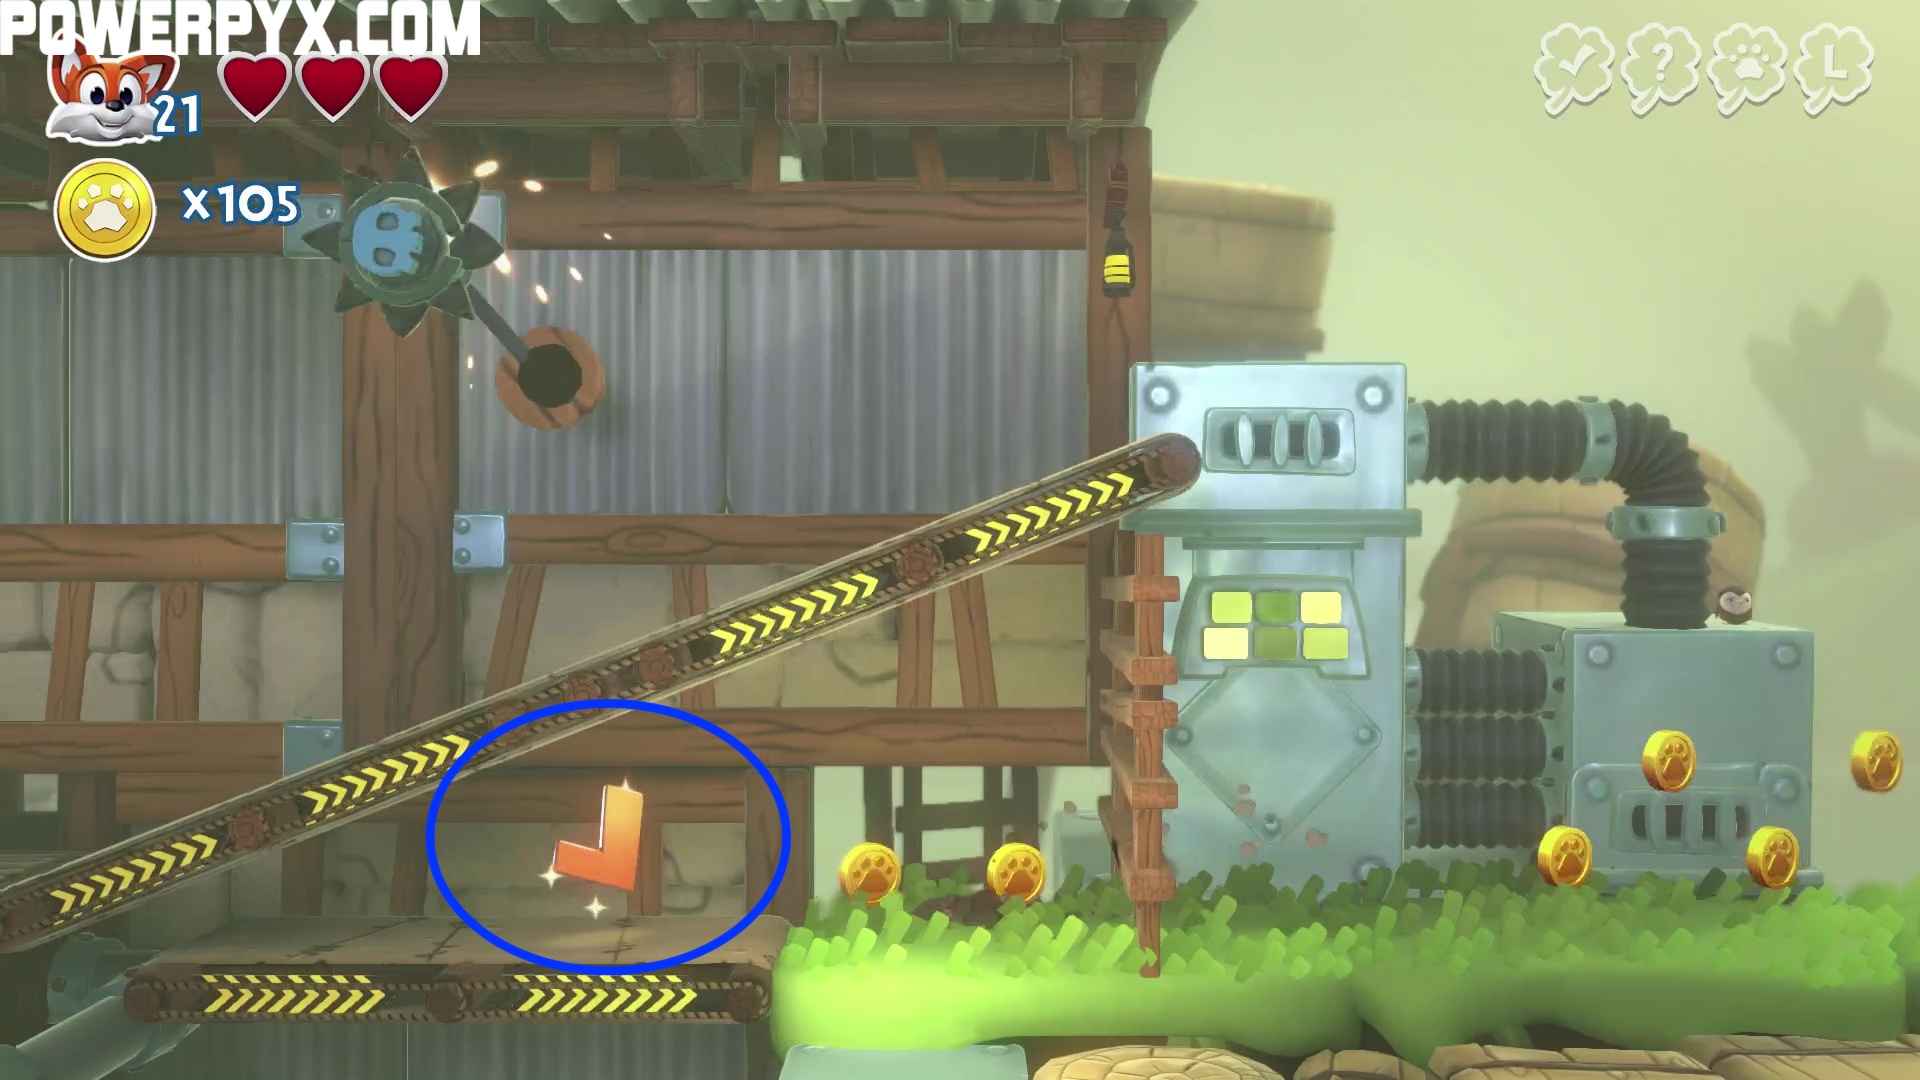
- Y: when going topside, climb the tower surrounded by fireballs, then head left. Now use the pictures below for reference to know exactly where you need to jump to find the letter.


Dungeon Run
This level works a bit differently than the others. Since you’re running on a straight line and cannot stop, you might miss some Collectibles. If this is the case, you can either kill yourself and start the level over (no checkpoints in this kind of levels) or as soon as the level ends, press  to start over. When you replay the level, you can just focus on the Collectibles you’ve missed and ignore the ones you’ve already picked.
- L: immediately after start, after jumping off of a mushroom.

- U: after jumping off of a mushroom, mid-air.

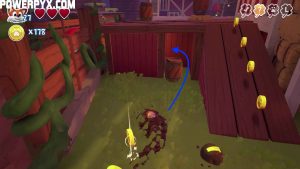
- C: use the mushroom (blue arrow) to get to a higher platform with two red birds on top. The letter sits between them.


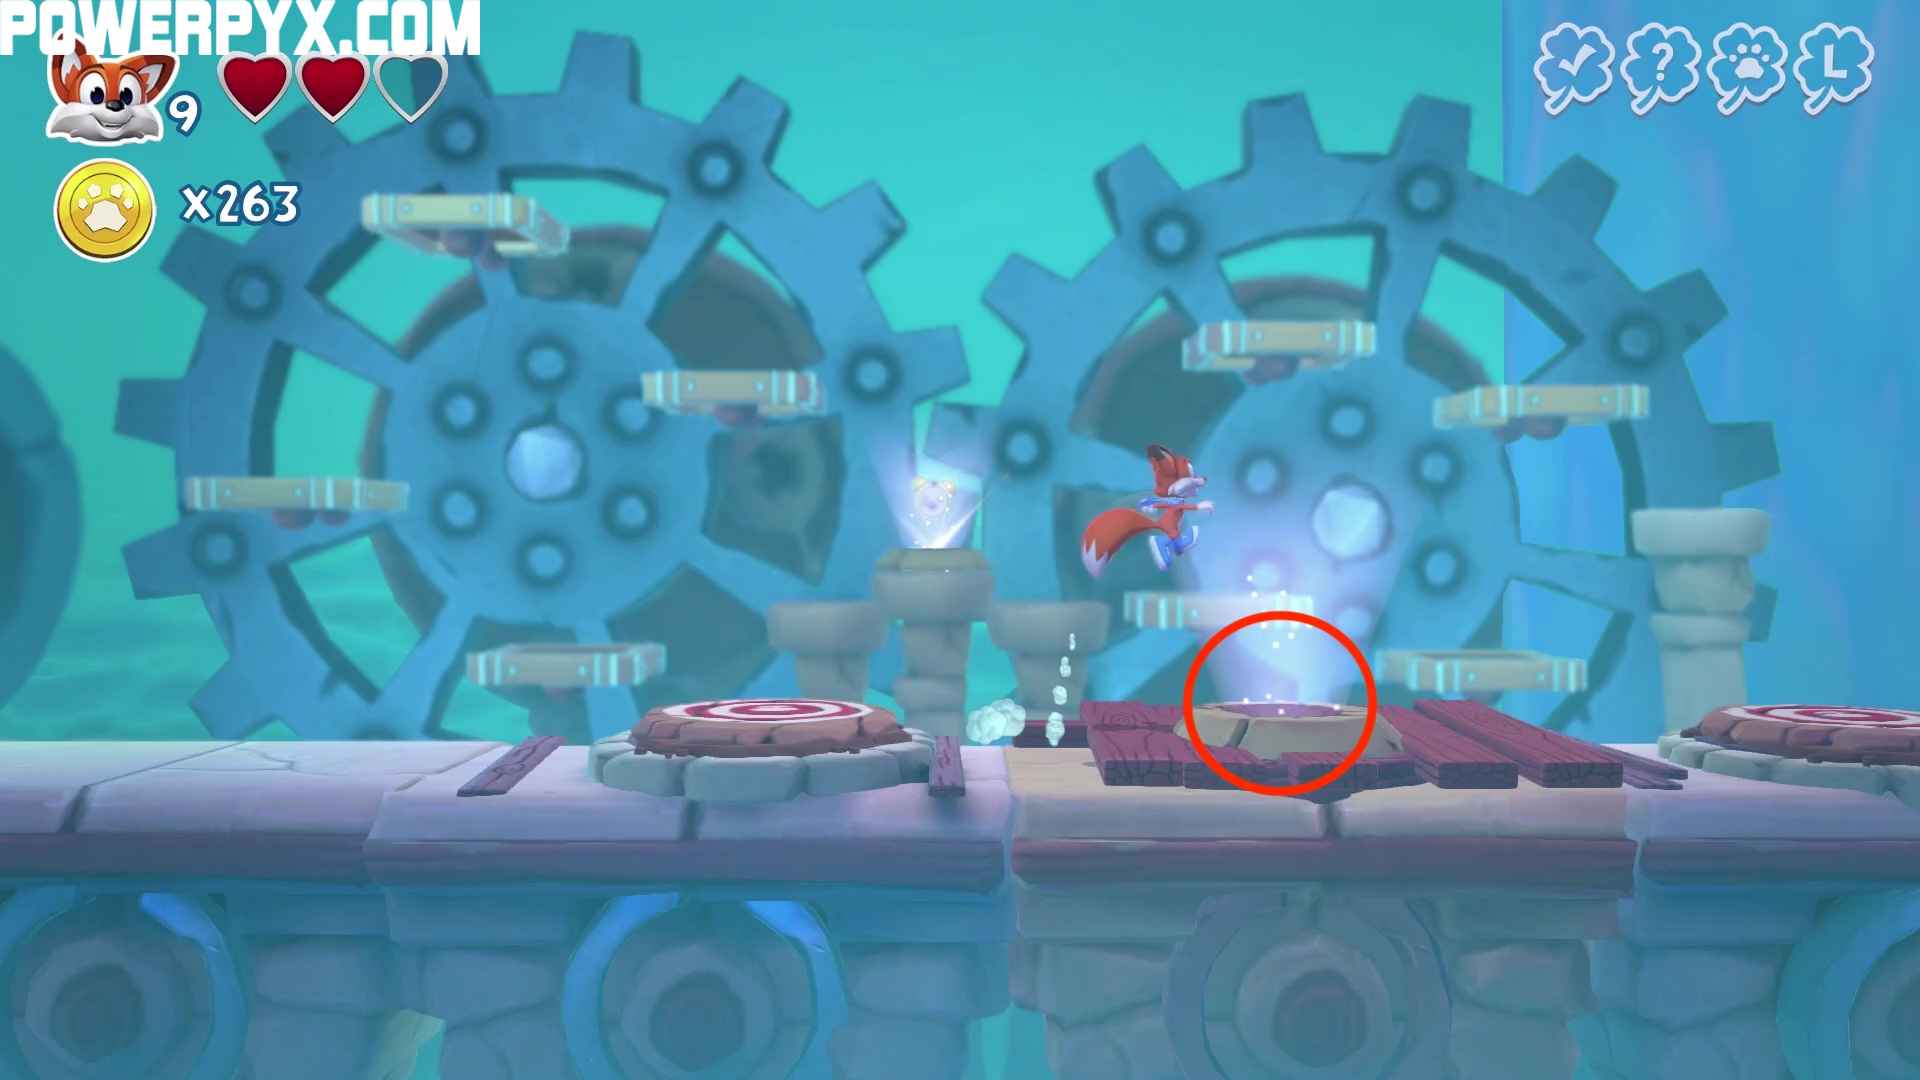
- Hidden Page Location: shortly after letter “C” you’ll see three birds flying mid-air. Jump on them to reach a platform with mushrooms which will shoot you directly into the Hidden Page.

- K: immediately after the Hidden Page, hovering between two red birds.

- Y: immediately after the previous letter, choose the lower path.


World: Veggie Village
Piggy Peril
- L: under a conveyer belt. You need to burrow under the fence to reach it.

- U: on an above platform, after a red windmill. Hard to miss.

- Hidden Page Location: flip the switch to reveal the Hidden Page.

- C: remove the wind wheel and enter the foxhole shown in the picture below and complete the timed challenge to make the letter appear.


- K: after a while you’ll come across three rotating excavators. Go past the first one, but stop in front of the second, then wait. The letter will appear as the excavators keep rotating.

- Y: towards the end of the level you’ll find another foxhole. Jump into it and then keep jumping into the different foxhole you see in the new section until you can collect this letter.


Egg Roll
- L: one of the chickens you need to put back into the pen is on top of a barn roof. Here is also a gong that you can tail-whip to reveal this letter.


- U: round up all of the chickens and this letter will then spawn.

- C: collect all the hidden eggs in one of the minigames in the level and place them in the nests. One egg is sitting on a hay bale, one is under the barn, and the third one is on top of the barn roof.

- K: approach all the chicks until the start following you (heart icon) and then bring them back to their mama. The letter will then spawn.

- Y: in the area where the eggs roll.

- Hidden Page Location: at the end of the level, on top of the barn roof.


Ripe Rollers
- L: at the start of the level, head left. The letter is above the wooden wheel.

- U: head-bash on the flower shown below to drop the jumping berry and then use it to fly into the letter.


- C: head-bash into the wooden beam shown below to reveal the location of the letter.


- K: immediately after the previous letter, complete successfully the timed challenge to reveal the letter.


- Hidden Page Location: near letter “K” is the foxhole to the Hidden Page Location. Here, complete the timed challenge to reveal it.


- Y: towards the end of the lever, flip the switch to reveal the letter.


Harvest Festival
- Hidden Page Location: at the start of the level, jump on the mushroom to get to a clock for a timed challenge. Complete it to reveal the Hidden Page.


- L: left of the stage, behind a building are some carrots. Burrow and crawl through them to reveal the letter.


- U: in the first area with the tractors, head left under the fence. The letter floats mid-air among some coins.


- C: in a hidden area, after sneaking past the tractors, underneath the platform where you need to talk to the musician.

- K: in the second area, where you need to collect fireflies, on a building. Hard to miss as you’ll need to get up here for the fireflies.

- Y: in the third area that opens up after rescuing the second musician, flip the switch to reveal a hidden alcove with the letter inside.


Pungent Paths
- L: from the starting point of the maze, precisely in the right-hand corner. To make it accessible, flip the nearby switch and crawl under the bars.

- U: from the start point of the maze, on the right-hand side is a mushroom. Jump on it to reveal another mushroom. Jump on the new mushroom to reveal yet another one. Keep jumping on the new mushrooms until the letter appears.


- C: after making it past the fireballs, activate the timed challenge and collect the colourful coins to reveal the letter.


- K: north of the starting point of the maze is a rotating trap. Collect all the coins around it to reveal the letter.


- Y: behind the giant onion (level end) is a small corridor, at whose end is the letter.

- Hidden Page Location: near the rotating trap is a switch you need to flip to access the foxhole.


World: Wrestful Retreat
Ladder Match of the Mind
- L: above a bird, immediately after the start of the level.

- U: hidden behind a crate.

- Hidden Page Location: hidden behind some crates. Enter the foxhole, finish the timed challenge and collect the Hidden Page.


- C: after jumping on some yellow star pads, on the left, by a moving platform.

- K: collect the two coins found by some rotating platforms to reveal the letter.


- Y: towards the end of the level, where you need to flip several switches to reveal the path. One of these reveals a hidden platform with the letter.


Melon Madness
- L: at the start of the level, head all the way to the left to find this hidden among some crates.

- U: shortly after the level start, you’ll come to an area with some switches. Use the switches to lower the platform and access the letter.

- Hidden Page Location: this foxhole is hidden between some crates. Collect all the coins to reveal the Hidden Page.


- C: as you progress through the level, you’ll find a clock. Complete the timed challenge to reveal this letter.


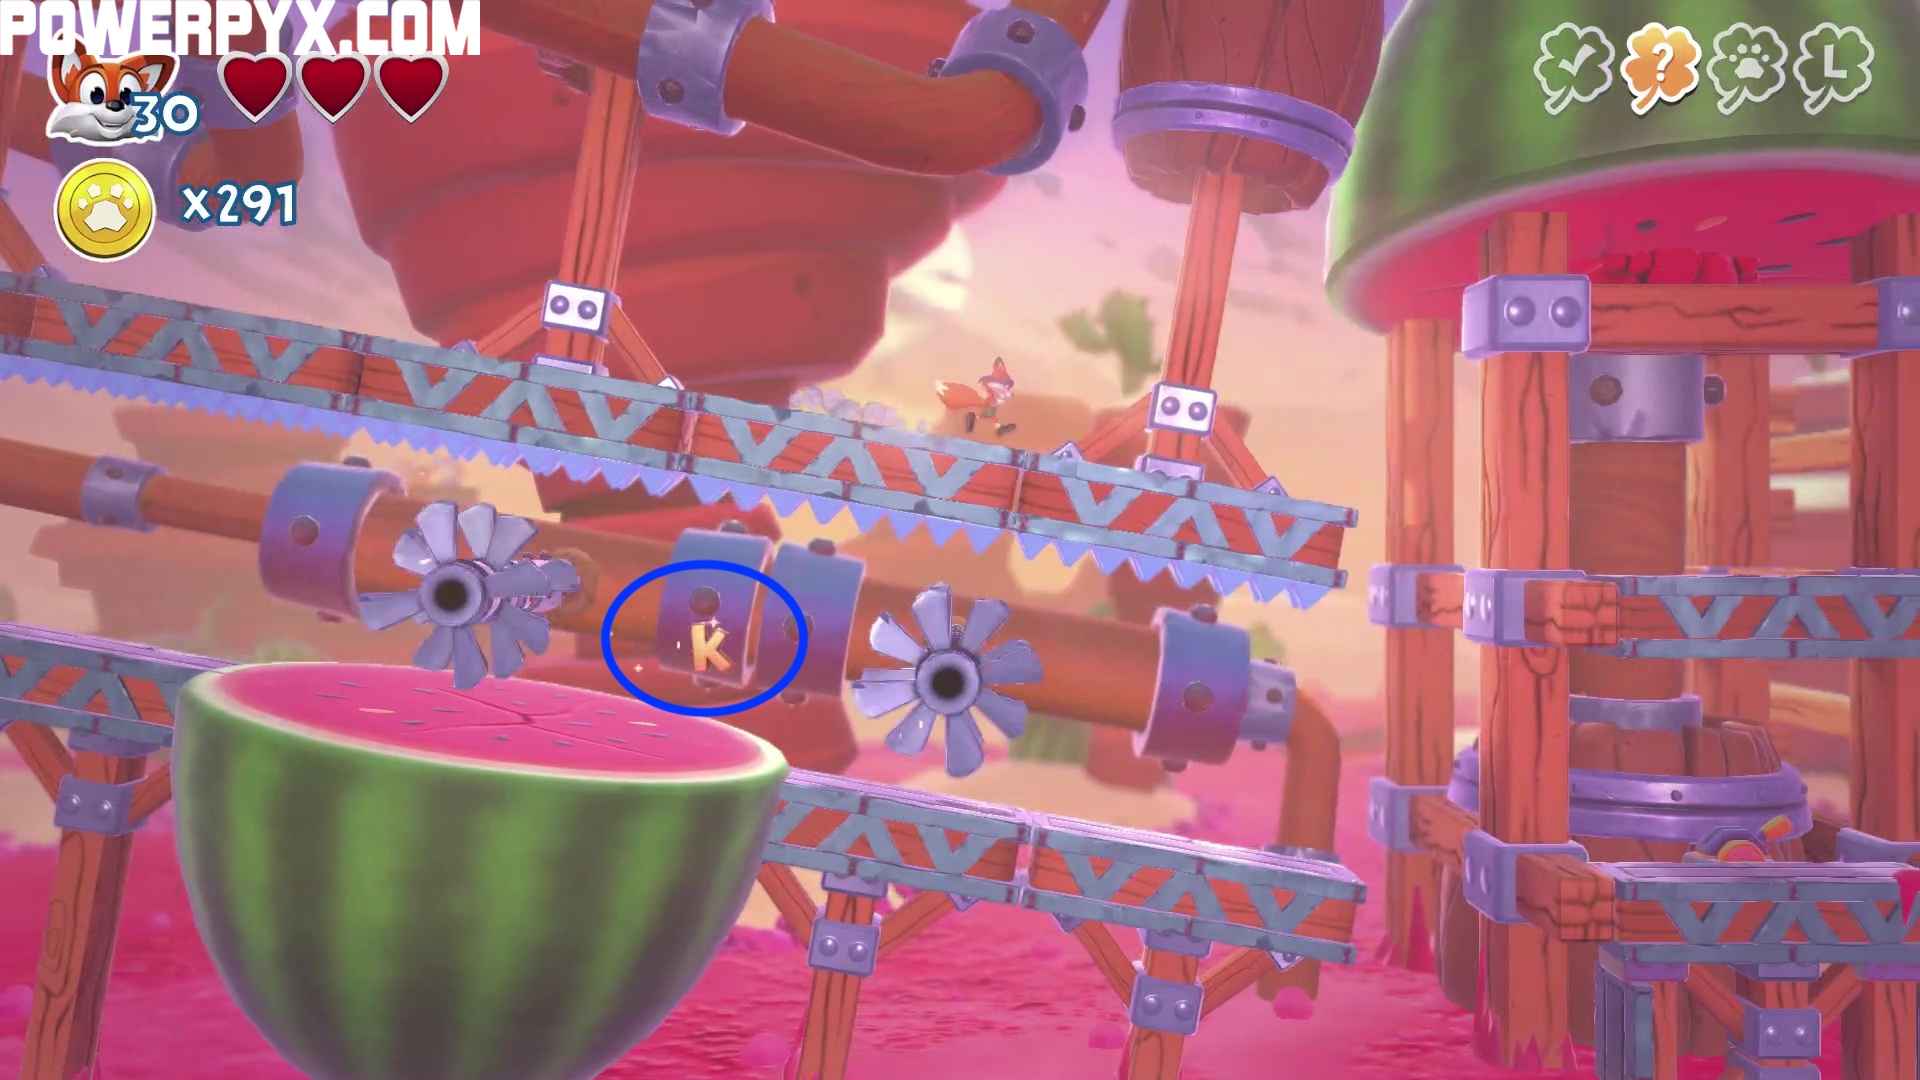
- K: this letter sits on a watermelon and between two rolling traps. Use momentum to burrow and crawl through the watermelon and reach the letter.

- Y: at the end of the level, you’ll have to balance yourself out on a rolling watermelon. As you reach the final platform, you should see this letter coming out of the watermelon juice. It’s easier to collect it and die than collect it and climb back up on the watermelon.


Peaceful Place
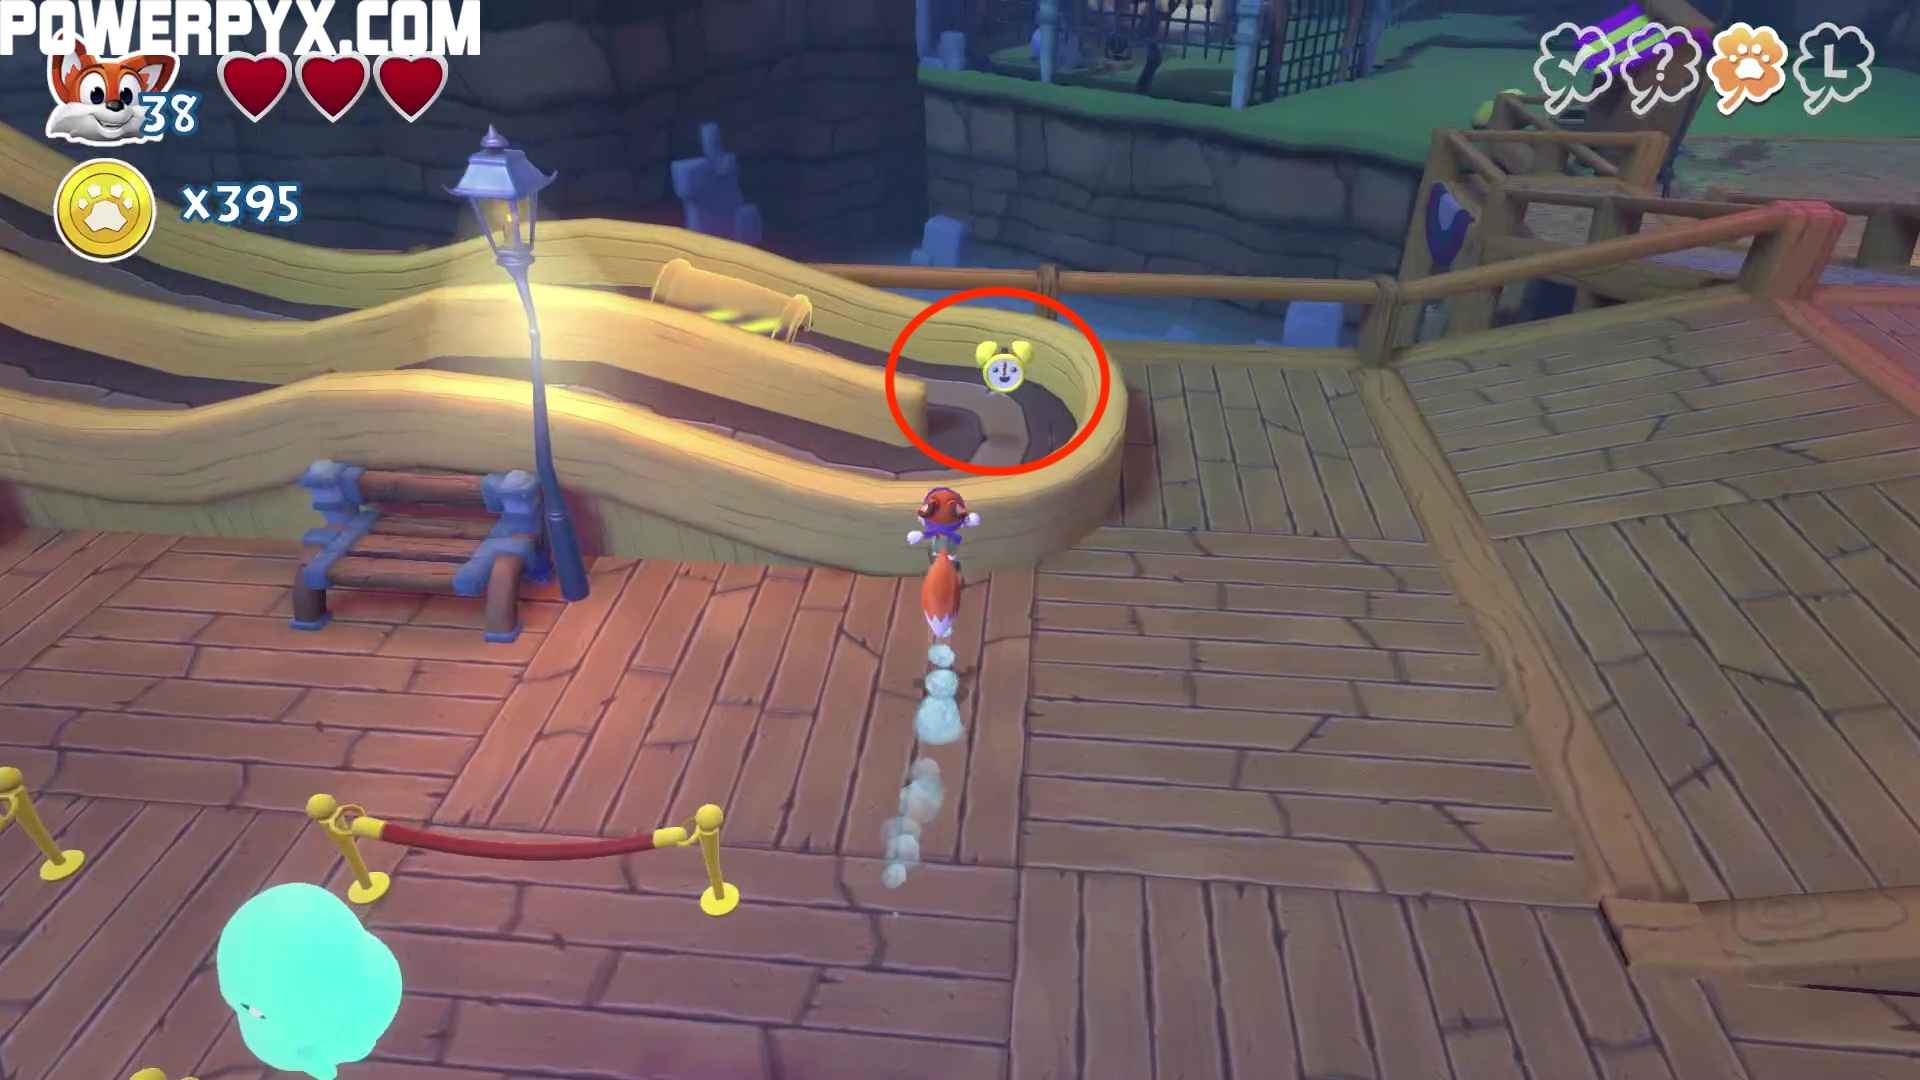
- L: shortly after the start of the level, you’ll come across a clock. Successfully complete the timed challenge to reveal the letter.


- U: immediately after collecting the previous letter, you should see a flower. Above the flower, on a wooden ledge is the letter.

- Hidden Page Location: after crossing the bridge with the spiky roller, head left to find the foxhole to the Hidden Page Location.

- C: after crossing the bridge with the spiky roller, head right and use the platform and the jumping balloon to reach the letter’s location.

- K: after opening up the gate and crossing the skeleton bridge, head right and successfully complete the timed challenge to reveal this letter.


- Y: after opening up the gate and crossing the skeleton bridge, head left and follow the path to find this letter.


Crawl, Walk, Run
This level works a bit differently than the others. Since you’re running on a straight line and cannot stop, you might miss some Collectibles. If this is the case, you can either kill yourself and start the level over (no checkpoints in this kind of levels) or as soon as the level ends, press to start over. When you replay the level, you can just focus on the Collectibles you’ve missed and ignore the ones you’ve already picked.
- L: immediately after the level start, higher path.

- U: shortly after the previous letter, higher path.

- C: between a trap.

- Hidden Page Location: tail-whip the gong in the picture below to reveal a path that leads to the Hidden Page.


- K: to access this letter you need to flip the switch immediately before it.

- Y: among some traps. To access this letter, you need to flip the switch that’s right before the traps.


8-Fold Path
- L: at the start of the level, go right to access an area with a yellow star pad. Grab the coin above it to reveal a trail of moving coins. Collect them all to reveal the letter.


- U: as you make it through the level, you’ll come across a yellow bird. Jump on it to eliminate it. This will spawn another yellow bird. Continue eliminating the bird until it stops spawning to reveal the letter.


- C: from the previous letter, continue on the intended path, but keep your left. At some point, you should get to a small island with some coins buried in the ground. Burrow and crawl through them to collet them and reveal the letter.


- Hidden Page Location: opposite here, all the way to the right, is an island with three purple flowers atop it. Kill the flowers to reveal the foxhole that leads you to the Hidden Page.

- K: progress through the final area of the level and you should see this letter on top of a pillar.

- Y: at the very end of the level are some platforms with lots of coins above them. Collect all of the coins to reveal the letter.


World: Gilly Island
Trapped in Paradise
- L: from the level start, go north-west. You should see a clock for a timed challenge between some platforms. First, activate the switch and then the timed challenge. Collect all the colourful coins to reveal this letter.

- U: from the level start, go all the way to the right. The letter is sitting on a platform, by a turquoise NPC.

- C: from the level start, go south-west. The letter is sitting on platform near a mushroom.

- K: from the level start, head east. At the very end, you should see some wooden platforms. The letter is hanging mid-air among them.

- Y: near the location of letter “K” are some bathroom stalls you can crawl under. In one of these is the letter.


- Hidden Page Location: in the middle of the level, by a palm tree.


Securing the Talent
- L: from the level start, head right. This letter is sitting on a platform. To reach it step on the lower platform to cause the whole structure to crumble and make the letter accessible.

- U: above the start area, slightly to the left, are some bamboo platforms. On top of one is a clock for a timed challenge. Complete the timed challenge to reveal a chest, then burrow and crawl to it to unearth the letter.


- C: from L’s location, continue on until you see an anchor. Tail-whip the anchor to reveal the letter.


- K: after completing the baby octopuses challenge, you’ll be able to reach a small island with some speakers, otherwise inaccessible. Behind the island, on a red, floating pad is the letter.

- Y: on a violet pillar, on your way to the foxhole that gives you access to the Yeti challenge.

- Hidden Page Location: there’s a secret alcove behind a waterfall. The waterfall is literally behind the first set of speaker you will have likely destroyed.


Three Cannon Salute
- L: complete the timed challenge at the level start.


- U: have the ship hit the explosive barrels to open up the path to the letter.

- C: burrow and crawl to the letter sitting under a beach umbrella.

- K: have the ship hit the explosive barrels to lower the platform and easily access this letter.

- Hidden Page Location: enter the foxhole and complete the challenge to reveal the Hidden Page.

- Y: complete the timed challenge at the end of the level, before the boss.


World: Hauntingham
Carnival Court
This level works differently that the other open-world ones. Here you have to complete a series of mini games that will award you tickets. The tickets can then be used to redeem prizes, some of which are Collectibles. So, in order to have full access to all Collectibles, take care of the mini games first, and then use your tickets to grab what you need for your 100%.
- L: to get this letter you need at least 1 ticket. The cage with the letter is at the level start.

- U: this letter can only be picked after collecting the plush toy from one of the cages at the level start. To collect the toy, you need 1 ticket. After collecting it, you’ll be able to ride the ferris wheel. Right of the ferris wheel, past some balloons, is the letter.

- Hidden Page Location: opposite letter “U”, all the way to the left.

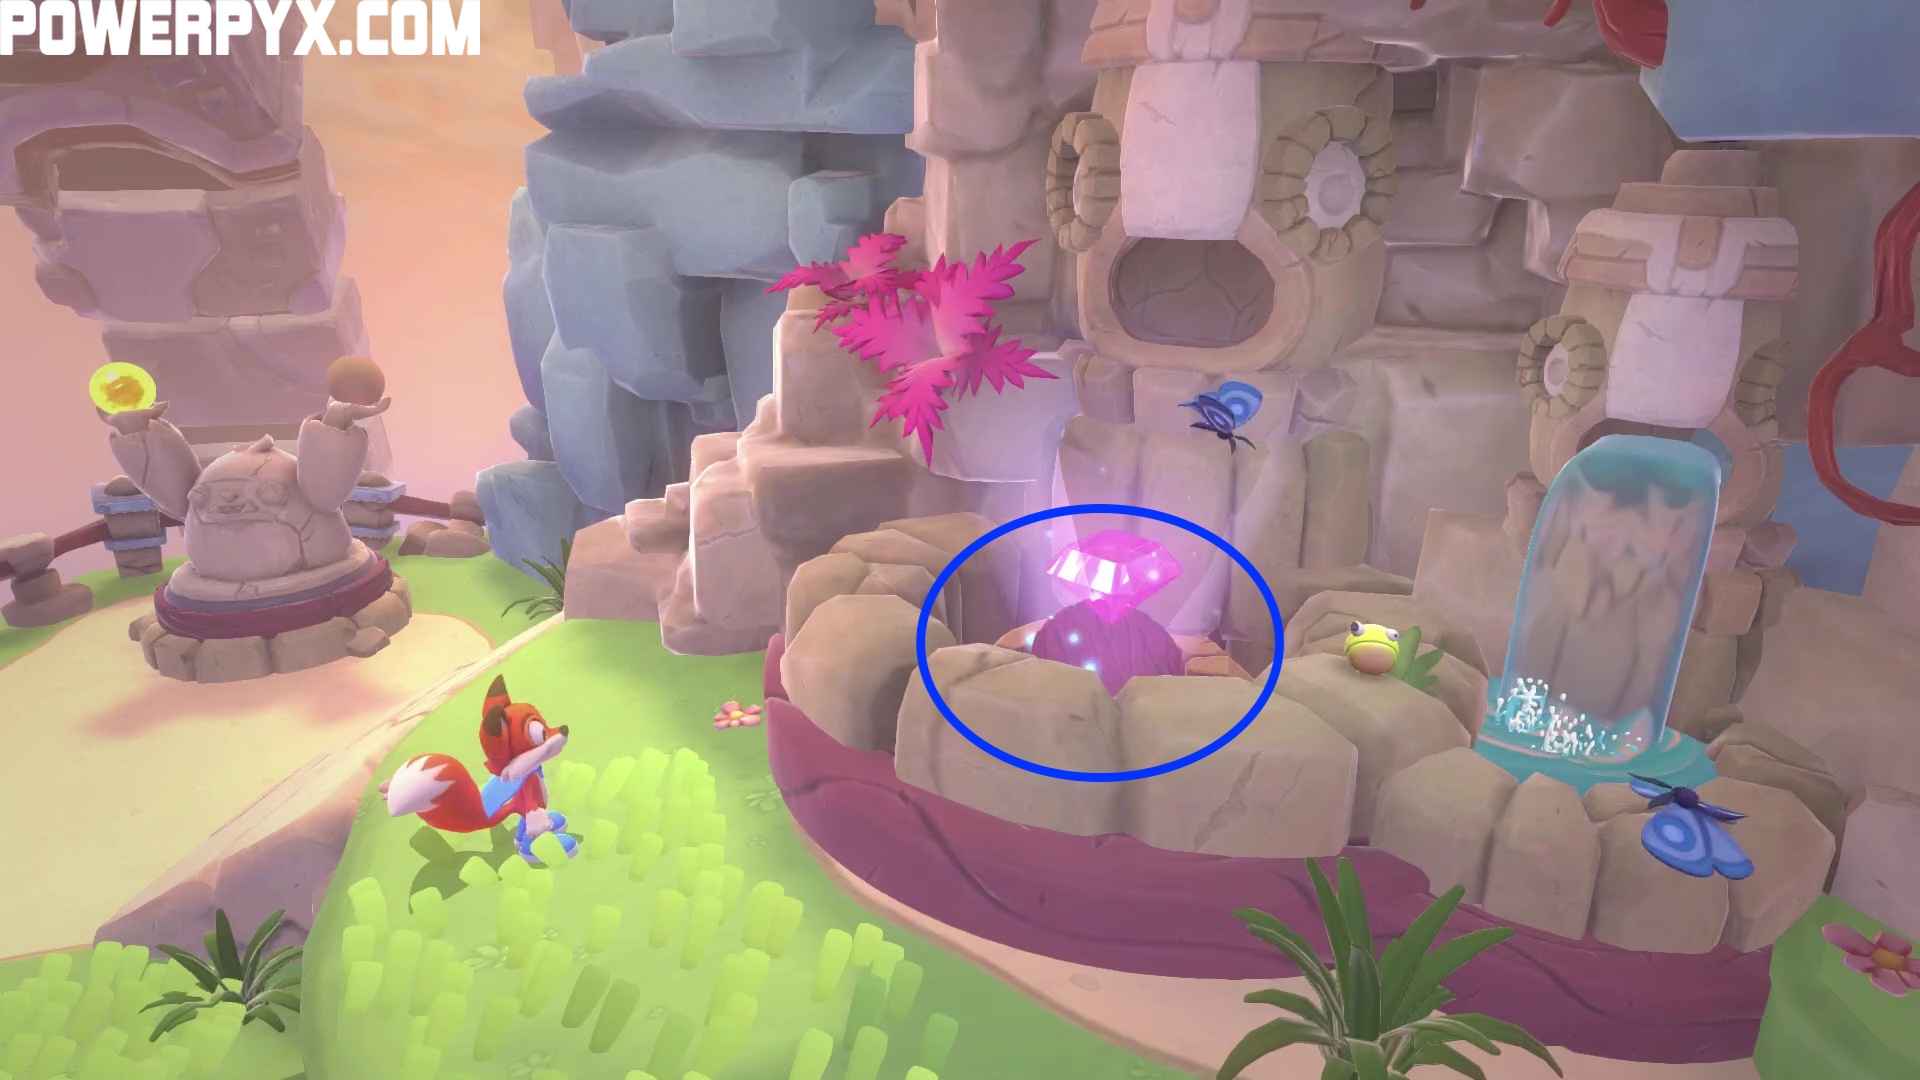
- C: at the level start, burrow and crawl to the grave with the sparkles.

- K: finish the timed challenge found opposite some of the challenge stands.


- Y: opposite the psychic is a high striker. On its right are some white balloons that can be used to go to the back of it. Here is also the letter.


Terror Train
- L: hidden behind some bars. Use the picture below for reference.

- U: hidden behind some bars is a switch. Activate to reveal a ladder and the letter.


- C: hidden behind some bars. Use the picture below for reference.

- Hidden Page Location: midway through the level, you should see a switch. Activate it to reveal the Hidden Page.

- K: shortly after the Hidden Page location, you should be attacked by some pink ghosts. Defeat them all and then wait for the background train to leave. It’ll drop the letter.

- Y: nigh unmissable, at the very end of the level.


Grave Awakening
- L: after the initial cutscene, go left to find some rolling logs in the water. Use the logs to reach a mushroom that gives you access to the letter.

- U: after crossing the second bridge, go right. Grab a lantern and make your way through the area. The letter sits mid-air.

- K: after crossing the second bridge, go left. Grab a lantern and make your way through the area. The letter sits in a small alcove on the left.

- Hidden Page Location: from the previous letter’s location, continue on and head left for a secret ledge. Here, burrow and crawl to the crave to reveal the Hidden Page.

- C: from here, go the opposite way (as if you were going right from K’s location). The letter sits on a platform in the middle of the water.

- Y: in the same area as the fluorescent mushroom is a clock for a timed challenge. Complete the challenge to reveal the letter.


Dungeon Crawl
This level works a bit differently than the others. Since you’re running on a straight line and cannot stop, you might miss some Collectibles. If this is the case, you can either kill yourself and start the level over (no checkpoints in this kind of levels) or as soon as the level ends, press to start over. When you replay the level, you can just focus on the Collectibles you’ve missed and ignore the ones you’ve already picked.
- L: shortly after the level start, jump on the bees to get to it.

- Hidden Page Location: activate the gong in the picture below to reveal a downhill path to the Hidden Page.


- U: jump on the bees to get to it.

- C: jump on the bees to get to it.

- K: activate the gong in the picture below to reveal a downhill path to this letter.


- Y: activate the gong in the picture below to reveal an uphill path to this letter.


These are all the Collectibles in New Super Lucky’s Tale.
Max says
You should mention for World: Veggie Village and the letter C, that you need to remove the wind wheel in order to make the fox hole appear… Thanks. 🙂
FranciRoosters says
The Worlds have no letters. Which level in Veggie Village are you referring to exactly?
Max says
Oh sorry, I meant the Level Piggy Peril in Veggie Village!
FranciRoosters says
You’re right. Thank your for making the guide better.
Max says
World: Hauntingham
Level: Grave Awakening
Wrong direction:
K: after crossing the second bridge, go right. Grab a lantern and make your way through the area. The letter sits in a small alcove on the left.
-> This is on the LEFT of the second bridge, not right.
FranciRoosters says
You’re correct. Thank you for making the guide better.
Max says
No problem – thank you for the great guides! ? They make the games more enjoyable. ?
Zac says
What about the hotdogs for the clothing items in Foxington?
Tom says
Have you done a guide for all fox holes in the worlds and not the levels? As you need them for pages too.
FranciRoosters says
No, we don’t have a guide for that for the simple reason that those foxholes are very easy to find as the worlds in which you find them are relatively small.
Lee says
World: Gilly Island
Trapped in Paradise
From the level start head WEST, not east. Other than that it seams pretty legit.
So thank you for this amazing guide, It helped me a lot!!!
FranciRoosters says
Thank you for reading it!
Cassy says
World: Wrestful Retreat
Level: Melon Madness
Letter Y
If you stand on the watermelon it will start to sink, the Y will roll around to the right and you can jump to grab it as you exit. No need to die!