
Onimusha: Warlords Trophy Roadmap
- Estimated trophy difficulty: 3/10
- Approximate amount of time to platinum: 7-10 Hours
- Offline Trophies: 56 (1
 , 2
, 2 , 5
, 5 , 48
, 48 )
) - Online Trophies: 0
- Number of missable trophies: 26+
- Glitched trophies: None
- Does difficulty affect trophies?: Yes (Blunt Sword, Sharp Mind, The Ultimate Champion, None for Me, Thanks and Pro-nimusha)
- Minimum Playthroughs: 2
 , 2
, 2 , 5
, 5 , 48
, 48 )
)Introduction
Welcome to the Onimusha: Warlords Trophy Guide! This is a PS4 remaster of the PS2 version that released back in 2001. You should do your first playthrough on Normal Difficulty without buying any upgrades and without using Healing Items. Also be sure to get the collectibles out of the way on the first run. There are a total of 80 Collectibles spread across categories: 6 Number Puzzles, 4 Decoder Boxes, 5 Power Jewels, 5 Magic Jewels, 8 Maps, 20 Fluorite, 32 Files. Then on the next playthrough you can focus on the Speed Run + S-Rank on Ultimate difficulty.
Step 1: 100% Collectibles, No Upgrades & No Healing Items Normal Difficulty Playthrough
Play through the game on Normal Difficulty at your own pace collecting all the collectibles and earning as many trophies as you can while not using any healing items or upgrading any of your weapons. It’s recommended to make a save before Marcellus’s Final Form and not doing the Dark Realm. Finish the game on an alternate save slot while using medicine but not upgrading, reload the save before Marcellus, finish the game after upgrading the weapons but not using medicine. Now reload your save one final time and complete the Dark Realm while using Medicine and fully upgraded weapons and finish the game one more time with 20 Fluorite. This way you can cut down on the number of playthroughs and get most trophies in a single run!
Step 2: Oni Spirits Mini Games
Complete the Oni Spirits minigames to unlock the Ultimate Difficulty. See trophy “Ogre Savior” for more information how to access these mini games.
Step 3: Ultimate Difficulty Playthrough, S-Rank (Speedrun)
You should focus completely on the S-Rank here. You can patch any holes in any trophies you may have missed but remember you are under time constraints. You must finish the game in under 3 hours. See trophy “Pro-nimusha” for the S-Rank requirements and tips.
Useful Tips, Tricks and Guides:
- Onimusha Warlords All Number Puzzle Locations & Solutions
- Onimusha Warlords All Decoder Box Locations & Solutions
- Onimusha Warlords All Power Jewels Locations (Maximum Vitality)
- Onimusha Warlords All Magic Jewels Locations (Maximum Magic)
- Onimusha Warlords All Fluorite Locations
- Onimusha Warlords All Map Locations (Never Lost Trophy)
- Onimusha Warlords All File Locations (Walking Encyclopedia)
Onimusha: Warlords Trophy Guide
 |
The True Onimusha Collect all trophies. |
 |
| Earn all other trophies in Onimusha Warlords to unlock Platinum. | ||
 |
Your Soul is Mine Use the gauntlet to absorb demon souls. |
 |
This is essentially a story related trophy. You aren’t going to get very far into the game before you are given the Gauntlet that gives you your abilities. This gauntlet will allow you to absorb souls by pressing and holding  after defeating any enemy and the orbs float in the air. The first group of enemies that you defeat will yield EXP orbs which you want to collect. Upon collecting these souls the trophy will pop. after defeating any enemy and the orbs float in the air. The first group of enemies that you defeat will yield EXP orbs which you want to collect. Upon collecting these souls the trophy will pop. |
||
 |
Lightning Strikes Obtain the Shiden. |
|
| This is a story related trophy and cannot be missed. For this trophy you will need to progress through the game until you enter the Underground Temple. Once inside the temple head to the left and follow the corridor until you come to an opening with vases lined up on the left and right walls leading to a shrine. In the shrine will be a blue gem looking item. Interact with the shrine and you will take the Lightning ability Shiden out of the shrine and obtain this trophy. | ||
 |
Raging Flames Obtain the Kouen. |
|
| This is a story related trophy and cannot be missed. After the cutscene with Guildenstern where he orders Reynaldo (his created Genma) to attack you slice him down using thunder. On the stand at the end of the room Guildenstern was on is a red gem looking item, that is the Kouen. Collect it after the fight and you will obtain this trophy. | ||
 |
A Storm is Coming Obtain the Arashi. |
|
| This is a story related trophy and cannot be missed. After defeating Marcellus you will get a cutscene and regain control of Samanosuke on the roof. Immediately next to Samanosuke is a green orb on the rooftop, that orb is the Arashi. Collect the Arashi and you will receive this trophy. For help with Marcellus please refer to the Slaying in the Moonlight trophy. | ||
 |
Vengeance Defeat Osric. |
|
| This is a story related trophy and cannot be missed. Osric is the demon beast that you encounter in the beginning of the game who takes Yuki after you save her the first time. You won’t encounter Osric until you used the Rope Ladder to descend into the Drained Moat. Once in the Dried Moat follow it along until you get to the shrine and go through the door next to the shrine, this is where Osric is. He isn’t an overly difficult fight but he hits hard so be sure to block all the attacks you can. His downward strike can’t be blocked but all of his other attacks can. Attack and use magic as often as you can to get every bit of damage in as possible. Keep attacking and he will eventually start charging, this is when you know he is just about done. Avoid his charges by continuously moving and keep attacking when its safe. Once defeated you will obtain this trophy. | ||
 |
Slaying in the Moonlight Defeat Marcellus. |
|
| This is a story related trophy and cannot be missed. Marcellus is waiting for you to fight him at the top of the abandoned keep. To get to her progress through the abandoned keep until you get to the point where you have to insert the L. Crest Piece with the R. Crest Piece to open the door by the ladder in the abandoned keep. After seeing the cutscene featuring Tokichiro Kinoshita again you will control Samanosuke in a room with one of the walls blown out. Continue forward to the right and through to the next room. You will get ambushed through a wall by a Genma revealing a path forward up a set of stairs. Head upstairs and outside and continue around the top landing until you get to a door that isn’t locked behind green plasma. Head straight ahead and cut the blinders to the right of the room revealing a narrow hallway with a Magic Mirror in it. Use the mirror if you wish and head down the narrow corridor leading to a ladder. Ascend the ladder to reach the rooftops where you confront Marcellus. Marcellus is the wielder of the Arashi so he harnesses the power of Wind and has a shield. All of Marcellus’s attacks can be blocked during his first phase so be smart about blocking and attacking during Marcellus’ cooldown times. Once you deal enough damage his shield will break. The second phase of the fight is pretty much the same as the first phase only this time he will try to push you to break your guard using the hand that held the shield before. Keep your distance and let him lunge at you with attacks while you guard and you should be alright. Attack when you see openings and when he is defeated a cutscene will play and you will obtain this trophy. | ||
 |
There Can Be Only One Defeat Stylado. |
|
| This is a story related trophy and cannot be missed. Stylado is the Doppleganger you come face to face with when you complete the portion of the game as Kaede. Stylado blocks a lot of your attacks and uses a dark magic to block your magic attacks. He is very easy to defeat however. Using Kouen simply block with your Enryuu until Stylado jumps back. When he stops attacking and jumps back it means he is going to wind up his magic attack. Hit your magic attack right away and it will interrupt Stylado’s magic attack. Keep blocking and if you run out of magic to counter with simply block Stylado’s magic attacks and when they hit the wall they will explode into magic orbs you can absorb. Repeat this over and over until he is defeated to obtain this trophy and progress in the game. | ||
 |
Axe-ecutioner Defeat Barabazuu. |
|
| *Missable*
Barabazuu is located in the West Area and can be fought using Samanosuke. This is not a mandatory fight so be sure not to miss it. When you get to the part in West Area with Samanosuke where you use a level 3 Kouen to open a door opposite the Magic Mirror you are ready to obtain this Fluorite. Head through that door and you will see a treasure chest on the floor that contains medicine. Right next to that chest tied to the fence with rope is a shielded cart. Proceeding to the next room is where the fight will occur so make sure you are ready. Barabazuu is a giant ax-wielding ogre accompanied by 3 smaller ax-wielding ogres. The key in this fight is to keep moving and block any attacks that are aimed left to right. The attacks going straight up and down are actually unblockable and will stagger you leaving you open for everyone to hit you. Your best friend in this fight will be your magic. Take out the smaller ogres before attempting to focus on Barabazuu. Once the smaller ogres are defeated simply keep skirting around Barabazuu and don’t get too greedy with attacks. Once defeated you will obtain the trophy. |
||
 |
Pest Exterminator Defeat Hecuba. |
|
| This is a story related trophy and cannot be missed. Hecuba is the giant woman / genma / flying bug where you get the Great Bow as Samanosuke in the East Area. For this encounter you will have very limited space. Hecuba will come in and take swipes at you or try to sting you like a bee while she has the crab looking genma coming after you on the ground. The best way to handle this fight is to corner yourself into the corner and wait for Hecuba to get within range and hit a magic attack. When your weapon runs out of magic switch to another and do the same. It would be advisable that you wait for as many of the crab genma to be near you when you unleash your magic in order to spawn orbs to refill your magic. Hecuba’s swipe attack also damages the other genma so use that to your advantage also. Hecuba has a lot of health but after hitting her with a dozen or so magic attacks she will succumb. Upon her defeat you will receive this trophy. | ||
 |
Elite Demon Slayer Defeat Marcellus’s final form. |
|
| This is a story related trophy and cannot be missed. You get access the Marcellus a second time at the end of the game once you head through the Evil Door using the Evil Plate. Once you get through you need to use the Great Bow and Great Arrow to access the room. Once inside the room the fight will begin after a short cutscene. Marcellus is much faster and much stronger this time. He has a lateral swing that creates a dark magic vortex pushing you back, a normal lateral swing followed up by another, a downward magic bash and a shield thrust to break your footing. The best way to handle this fight is to continually skirt around him using your Arashi Magic with Shippuu. Continue attacking him and replenish magic by attacking his shield until his shield disappears.
Once he gets rid of his shield its time for the final phase of the encounter with him. He will replace his shield with another sword and become much more aggressive here. For this portion of the fight you are going to want to be selective with how many swings you take at Marcellus. Don’t get greedy and when Marcellus backs up far away he will wait a moment and lunge forward with a slice. If you guard at the moment of impact you will parry him and if you attack right away you will Critical Strike him. His health will take longer to whittle away in this portion of the fight since there is no way to regenerate blue orbs to refill your magic. If you are comfortable parrying him that is the fastest way to take him down but if not rely heavily on your block and attack with Enryuu for heavier damage when you have a window for a few hits. Continue chipping away at his health until he is defeated. Upon his defeat you will receive this trophy. |
||
 |
Save the Princess Defeat Fortinbras. |
|
| This is story related and cannot be missed. Fortinbras is the final boss of the game. Once you beat Marcellus you can obtain the Bishamon Sword in the magic mirror room and just past that there is a spiral walkway headed down to Fortinbras. Fortinbras has a very large health pool but most of his attacks can be telegraphed. Fortinbras’ attacks include creating electric orbs that create a lightning attack down to the ground, a swipe with his hand that pushes you back and usually followed up a claw jab, fire breath, laser beam, and a swipe grapple that will lead to a fire breath attack while grappled.
To block his attacks simply dodge and weave through the lightning magic attacks (these can be spotted where they will be placed before the attack goes off), block his swipe and jabs, hide in the back left or right corner while he is breathing fire, side step using To damage Fortinbras you need to attack the eye on top of his head, in order to get him to lower his head however you will have to continue to attack his body. Be weary of his attacks and don’t stay close to him for too long or you run the risk of him grabbing you. Continue to attack him and dodge his attacks until the cutscene plays signifying Fortiinbras is defeated and this trophy is earned. |
||
 |
The Silent Thinker Solve the crest puzzle. |
|
| This is a story related trophy and cannot be missed. You will get access to the part you need to complete for this trophy at the end of the “Abandoned Keep”. You will get to a part where you need to swap control of Samanosuke and Kaede to get through several puzzles including one with pulling levers to progress through gates and one with floor switches opening spike pits in the floor. After those two puzzles Samanosuke will get trapped in a room with water filling his small chamber. You will control Kaede and have to complete a shuffling plates puzzle on the wall. Shift the plates around to make the plates line up like this:
Once the plates have lined up as such the door to Samanosuke’s chamber will open setting him free and you will obtain this trophy. |
||
 |
Keep to Yourself Enter the abandoned keep. |
|
| This is a story related trophy and cannot be missed. You will get access to the keep once you have defeated Osric and obtained the Kouen. Head back to the courtyard in the South Area and head through the northernmost door that was locked with the red plasma. You can now proceed through that using Kouen. Once inside you will pop this trophy, Welcome to the abandoned keep. | ||
 |
Occult Unsealed Unseal the path to the Keep Underground. |
|
| This is a story related trophy and cannot be missed. After defeating Marcellus and obtaining Arashi head back to the very beginning of the abandoned keep and head through the door that was immediately to your left when you first came into the Abandoned Keep. Head through the corridor until you get to the door with the blue plasma locking the door with 2 locks. In order to get through the door you will need Shiden equipped and your orb needs to be enhanced to level 2 or higher. Head through the door and continue past the next room into a room with a shrine that has three orbs on pedestals. Equip each orb one by one and interact with the shrine using each to unlock the stairway. Once unlocked all the way descend down the stairs and you will unlock this trophy. | ||
 |
Wish I Had This Sooner! Obtain the Sacred Knife. |
|
| This is a story related trophy and cannot be missed. In West Area as Kaede once you use the Silver and Gold plates to open the door leading into the burning building go through the door which will lead to a small room with a set of steps, head up those steps. In the next room there will be another large box. Interact with it to start this puzzle. The solution to the puzzle is to spin the center set of four, the left set of four twice and then the right set of four twice. Once the box opens you will receive the Sacred Knife and this trophy. | ||
 |
Glimmering Waters Use the Decorated Sword to enter the East Area. |
|
| This is a story related trophy and cannot be missed. In the West Area you will fight Barabazuu and couple other Ogres. Defeat them and laying on the floor will be the Decorated Sword. Pick up the sword and head to the South Area courtyard. Run towards the front of the courtyard and a man will scream he needs help and two scorpion genma will burst through a wall. Defeat the scorpions and head through the hole int he wall they just created. Insert the sword into the stone to pass through. Once headed through you will receive this trophy. | ||
 |
When Worlds Collide Open the gate to the Demon World. |
|
| This is a story related trophy and cannot be missed. Once you have taken down Hecuba return to the abandoned keep and go through the door requiring you to insert the Evil Plate. Use the Great Bow and Great Arrow to destroy the barrier blocking your access to the Demon World. | ||
 |
Just Halfway Complete the first half of the Dark Realm. |
|
| *Missable*
You will get this trophy on the way to finishing the Dark Realm. Please refer to the A Survivor to the End trophy for details on obtaining this trophy. |
||
 |
A Survivor to the End Complete the second half of the Dark Realm. |
 |
| *Missable*
The first time you have access to the Dark Realm is after defeating Doppelganger. For this trophy you are going to need to complete levels 11 – 20 of the Dark Realm. In order to get to the Dark Realm you are going to have to speak to one of the two Moth Men. Once in the Dark Realm you will need to clear floors of enemies to make your way down to the bottom. You will need to be prepared to face a gauntlet but making sure your weapons are maxed out, your health and magic bars are maxed out and you have a bunch of medicine to take with you. Here is a list of each level, what genma appear on the level and what you get as a reward for completing the floor (Some playthroughs show different items on different levels but all the items will show up and Bishamon Ocarina is still on the final floor): – Floor 1:
– Floor 2:
– Floor 3:
– Floor 4:
– Floor 5:
– Floor 6:
– Floor 7:
– Floor 8:
– Floor 9:
– Floor 10:
– Floor 11:
– Floor 12:
– Floor 13:
– Floor 14:
– Floor 15:
– Floor 16:
– Floor 17:
– Floor 18:
– Floor 19:
– Floor 20:
Once all 20 Floors have been cleared you will receive this trophy. |
||
 |
Blunt Sword, Sharp Mind Complete the game on Normal without enhancing swords or using Jewels. |
 |
| *Missable*
For this trophy you are going to have to play the game from start to finish without enhancing any swords or using your jewels to enhance your health and magic bars. I don’t recommend trying the Dark Realm on the playthrough you are attempting this trophy. Save often and don’t forget to change your armor as you get better stuff. Progress through the game slowly and learn how your opponents attack. Once you complete the game without having used any enhancements to your swords, health bar or magic bar you will receive this trophy. The end of the game will require you to be able to sustain longer fights so learn how to strafe while holding |
||
 |
The Ultimate Champion Complete the game on Ultimate difficulty. |
|
| In order to unlock Ultimate Difficulty you will need to first collect 20 Fluorite in a single playthrough and complete the game to unlock Oni Spirits and then complete all 12 levels of Oni Spirits. Ultimate Difficulty is recommended for your ‘S’ Rank plathrough. You will start with the Bishamon Sword, have infinite magic and the difficulty isn’t even ramped up from Normal. Once you complete the game for the first time on ultimate Difficulty you will receive this trophy. | ||
 |
None for Me, Thanks Complete the game on Normal without using herbs or medicine. |
|
| *Missable*
For this trophy you are going to have to play the game from start to finish without healing up with items. The best way to go about this trophy is to simply save often and farm yellow orbs as you take damage. I don’t recommend trying the Dark Realm on the playthrough you are attempting this trophy. The only really hard parts of this are the Marcellus and Fortinbras fights but both can be managed with smart blocking and frequent saves. After defeating Fortinbras and seeing your overall game rank you will receive this trophy if you haven’t used any form of items to heal (besides the Talisman). |
||
 |
Speed Demon Complete the game in less than 3 hours. |
|
| *Missable*
For this trophy you are going to have to complete the game in 3 hours or less which is completely doable. Completing the game in under 3 hours is one of the requirements of an ‘S’ rank. Therefore, this is best combined with your S-Rank playthrough. For more information on shaving down time please refer to the Pro-nimusha trophy. |
||
 |
Pro-nimusha Complete the game and get an S Rank. |
|
For this trophy you will have to complete the game on Normal or Ultimate Difficulty within certain parameters. The parameters are as follows:
The best way to go about this trophy is to do so on Ultimate Difficulty. The game isn’t much harder but you won’t be forced to upgrade orbs or equip specific weapons to open specific locks which is because you will start the game with the Bishamon Sword. Play through the game and quickly make haste about killing the everything in your path and run past anything as Kaede that you can skip as Kaede won’t have an advantage against enemies. Continue through till you are ready to take on Marcellus final form and before using the Great Bow and Great Arrow simply save your game in the Keep where the first Moth Man was and check your play time. Marcellus and Fortinbras should take no more than 15 minutes and that’s generous, so make 4-5 runs through the Dark Realm to ensure you have the souls collected and genma defeated. Use an alternate save before heading through the end of the game in case you miss one of the requirements. Defeat Marcellus and Fortinbras abusing the fact you will have unlimited magic. Once you complete the game at the end if the ranking is ‘S’ you will receive this trophy. |
||
 |
Ogre Savior Complete all stages of Oni Spirits. |
|
| In order to unlock the Oni Spirits mini games you must complete the game with 20 Fluorite. Please refer to All for One, One for Fluorite for details on where to find the Fluorite throughout the game. Once you have unlocked Oni Spirits you can access the mini game from the Main Menu of the game by selecting ‘Extras’ under ‘Load Game’. Oni Spirits is a mini game and a really difficult one at that. The object of the game is to destroy vases (which contain spirits) before the enemies have the opportunity to destroy them. During the time you are trying to destroy these vases you will continually lose health. At the beginning it states how many spirits and vases are in the level. Each spirit is a vase so if it says you need to destroy 5 vases and there are 5 spirits it means you need to destroy all 5 vases. There are a total of 12 levels you need to complete for this trophy, every level ends when either all vases are destroyed or Samanosuke runs out of health on that level. If you have destroyed the required amount of vases on the level and then ran out of health before destroying the remaining vases you will still able to proceed. Should you fail at any point in completing the requirements you will have to start over from the beginning. Here is a walkthrough on how you should handle each level:
Level 1:
Level 2:
Level 3:
Level 4:
Level 5:
Level 6:
Level 7:
Level 8:
Level 9:
Level 10:
Level 11:
Level 12:
Once you have completed all 12 levels you will be awarded with this trophy. Be sure to save at the end so Ultimate Mode will become playable. |
||
 |
Sight Beyond Sight Obtain the Vision Staff. |
|
| *Missable*
Once you get a hold of Samanosuke again head into the West Area through the Red Door you unlocked with Kaede. Proceed until you get to the house with the blue plasma on the door with three locks on it. You will need Shiden equipped and leveled up to level three. Head inside this house and look to Samanosuke’s right and you will see a silver statue on a counter. Right below the statue is a treasure chest. This item is inside the treasure chest, open it for the item and this trophy. |
||
 |
Near, Far, Wherever You Are Obtain all long-range weapons. |
|
| *Missable*
For this trophy you are going to need to collect both long ranged weapons for Samanosuke. The two long ranged weapons are the Bow and the Matchlock. Here is where you obtain each of these weapons:
Once you have collected both of these weapons you will obtain this trophy. |
||
 |
Armor Collector Obtain all armor for Samanosuke. |
|
| *Missable*
For this trophy you are going to have to collect all three pieces of Samanosuke’s armor. Here is a list of where to find each of his armor sets.
Once you have obtained all three piece of armor you will receive this trophy. |
||
 |
Demons Die Now Obtain the Bishamon Sword. |
|
| *Missable*
For this trophy you are going to need to complete the Dark Realm and obtain the Bishamon Ocarina on the 20th floor. Once you have the Bishamon Ocarina continue through the story until you defeat Marcellus Final Form. In the room immediately following the fight with Marcellus there is a gate door near the magic orb well in the center of the room. Simply stand right outside the door and play the Bishamon Ocarina. The door will open and the Bishamon Sword is in the wall in the north side. Simply walk up to the wall and a cutscene will play and the sword will be yours as well as this trophy.
|
||
 |
Walking Encyclopedia Collect all files. |
|
| *Missable*
» Onimusha Warlords All File Locations (Walking Encyclopedia) |
||
 |
Never Lost Collect all maps. |
|
| *Missable* | ||
 |
All for One, One for Fluorite Collect all Fluorite. |
|
| *Missable* | ||
 |
Panda-monium Unlock Samanosuke’s alternate outfit. |
|
| *Missable*
In order to unlock Samanosuke’s alternate outfit you are going to have to complete the game while having collected at least 10 Fluorite. After the credits have rolled and the game grades your playthrough you will receive this trophy as long as you have 10 or more Fluorite. Please refer to All for One, One for Fluorite for details on where to find the Fluorite throughout the game. |
||
 |
Scantily-Clad Jutsu Unlock Kaede’s alternate outfit. |
|
| *Missable*
In order to unlock Kaede’s alternate outfit you are going to need to complete the game on Normal or Ultimate difficulty with a final ranking of ‘S’. In order to find out how to complete the game with an ‘S’ ranking please see Pro-nimusha for more information. |
||
 |
Enhance! Enhance equipment at Magic Mirror. |
|
| For this trophy all you have to do is invest souls into any Sword, Orb, Arrow or Herb. To do this head to any Magic Mirror (Orange dot on the map, also where you save your game) and choose the middle option “Enhance”. It will give you a menu for which items you can enhance. Enhancing uses EXP you collect from the enemies (Red souls). Be careful not to lock yourself out of the Blunt Sword, Sharp Mind trophy if you are going for that one. | ||
 |
Gaunt and Done It Enhance the gauntlet to maximum. |
|
Enhancing the gauntlet will come naturally over time. In order to max out the gauntlet you will need to absorb souls. There are three stages of the gauntlet and they are as follows:
When you have collected 50,000 total souls (you can track this from the pause menu) simply go to any magic mirror and select the “Enhance” option. When you select this option the gauntlet automatically enhances to its highest possible level. Once you have enhanced the gauntlet to Level 3 you will receive this trophy. |
||
 |
Max Swords Enhance all swords to maximum. |
|
In order to obtain this trophy you are required to enhance all of your swords to MAX at a Magic Mirror. There are only 3 swords in the game and they are Raizan the Blue Thunder Sword, Enryuu the Red Fire Sword and Shippuu the Green Wind Sword. You cannot complete this until you have obtained Arashi. The items you can enhance in this game all take EXP to enhance so choose wisely which ones you want to enhance earlier in the game. Here are the costs to level each orb up:
Once all three swords are MAXed out you will receive this trophy. |
||
 |
Max Orbs Enhance all orbs to maximum. |
|
In order to obtain this trophy you are required to enhance all of your orbs to MAX at a Magic Mirror. There are only 3 orbs in the game and they are Shiden the Blue Thunder Orb, Kouen the Red Fire Orb and Arashi the Green Wind Orb. You cannot complete this until you have obtained Arashi. The items you can enhance in this game all take EXP to enhance so choose wisely which ones you want to enhance earlier in the game. Here are the costs to level each orb up:
Once all three orbs are MAXed out you will receive this trophy. |
||
 |
Demonic Vitality Use Power Jewels to increase Vitality to maximum. |
|
| *Missable*
» Onimusha Warlords All Power Jewels Locations (Maximum Vitality) |
||
 |
Magic Overload Use Magic Jewels to increase Magic Power to maximum. |
|
| *Missable*
» Onimusha Warlords All Magic Jewels Locations (Maximum Magic) |
||
 |
All in a Day’s Work Save a soldier under attack by demons. |
|
| *Missable*
Once you reach the large courtyard in the South Area location where the Northern most door is blocked by a purple plasma there will be a bigger horned demon carrying a battle axe. Once you defeat the battle ax demon head through the door behind him and you will enter a courtyard with a few demons attacking a soldier. Defeat the three demons before the soldier is defeated by the demons to unlock this trophy. |
||
 |
Deadly Strike Use a Special Attack to kill a demon. |
|
For this trophy you need to complete a Special Attack to attack a demon. The easiest way to Special Attack a demon is to Parry it in an attack. You can parry a demon’s hit with  and if you strike with and if you strike with  + +  when the attack being blocked it creates a small flash of light. Then you will counter-attack with a thrusting sword swipe. Once accomplished this trophy will pop. when the attack being blocked it creates a small flash of light. Then you will counter-attack with a thrusting sword swipe. Once accomplished this trophy will pop. |
||
 |
Secret Ninja Skills Strike a demon with Kaede’s Special Attack. |
|
| *Missable*
For this trophy you are going to need to Special Attack on a genma using Kaede. Kaede’s attacks are similar to Samanosuke’s only she is much more nimble. The best way to special attack an enemy is to hold |
||
 |
One Chance Strike Marcellus’s final form with a Deflect Critical attack. |
|
| *Missable*
You get access to Marcellus a second time at the end of the game once you head through the Evil Door using the Evil Plate. Once you get through you need to use the Great Bow and Great Arrow to access the room. During the fight, the first part will show Marcellus wielding a shield. Attack him until the shield shatters and this is his final form. Once the fight starts block incoming attacks and wait for Marcellus to back up far away and pause. When he does this he is going to follow up with a lunge towards you and slash you. You need to block at the moment of impact with your top parry his attack. Once his attack is parried you will need to instantly attack with |
||
 |
See You Next Fall Defeat a demon by knocking it down the waterfall. |
|
| *Missable*
After using the Decorated Sword to enter the East Area, head along the path and over the bridge to the door that is locked behind a 2 lock green plasma. Open the door and head down the first hallway on the left. At the end of this hallway is a scroll on the wall. Collect the scroll and head through the door. Continue straight along that path until you get to the door on your left. Head through it and pass through the door with the three green locks using a maxed out Arashi. Pass by the creek through the next two doors until you arrive at a waterfall. What you want to do for this trophy is lure one or both of the enemies onto the rope bridge. Once there is an enemy on the rope bridge cut the ropes to knock the bridge down. If there was an enemy on the bridge when you did this you will receive this trophy. |
||
 |
Road Kill Kill a demon with a battering ram. |
|
| When you get to the part in West Area with Samanosuke where you use a level 3 Kouen to open a door opposite the Magic Mirror you are ready to obtain this trophy. Head through that door and you will see a treasure chest on the floor that contains bullets. Right next to that chest tied to the fence with rope is a shielded cart. There should be genma below and if there is, cut the rope to the cart and it will free fall plowing through the genma below. Once it makes contact with at least one genma you will receive this trophy. | ||
 |
Mano A Mano Win a power struggle with a demon. |
|
| For this trophy it is easiest to get into and win a Power Struggle against the Red Knights. The opportunity to get into a Power Struggle with one of these knights is when they drape their sword across their chest to block. Attacking while their sword is across their chest will initiate the struggle, you and the genma will lock up and you will need to repeatedly press and to push towards the knight. If you lose the struggle you will get attacked right away and if you draw the struggle you will get pushed back and attacked right away. If you win the struggle you will not only throw the enemy over your shoulder but you will also get this trophy.
If you are nearing the end of the game and still have not received this trophy head to the Moth Man and enter the Dark Realm and head down to the fourth floor where there are four Red Knights that spawn on that floor. You will have a few opportunities on this floor. If your swords are defeating the enemies too quickly consider equipping your default sword. |
||
 |
Luck? Yeah, Right. Solve all number puzzles. |
|
| *Missable* | ||
 |
Decrypter, Table for One Solve all decoder boxes. |
|
| *Missable* | ||
 |
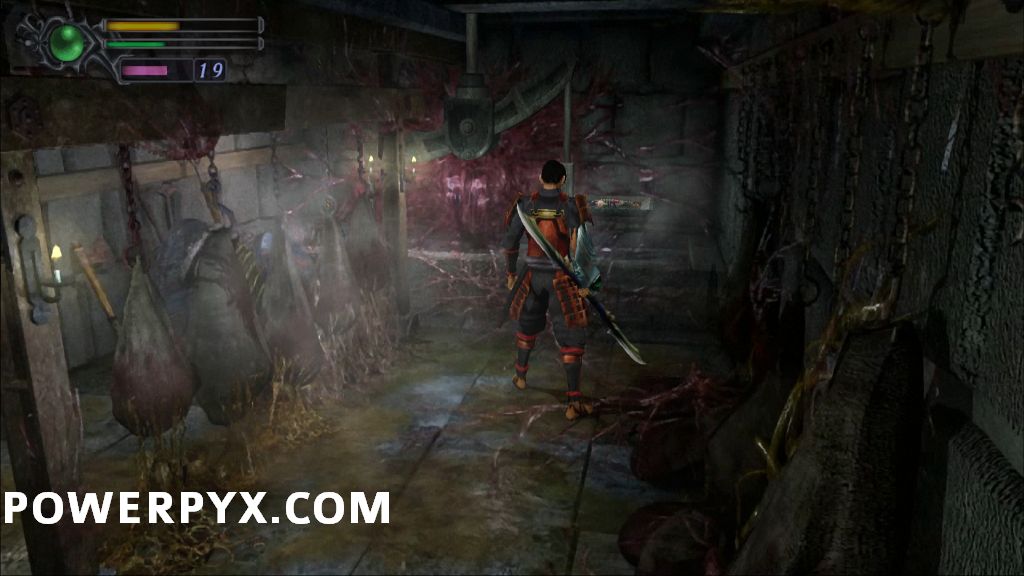
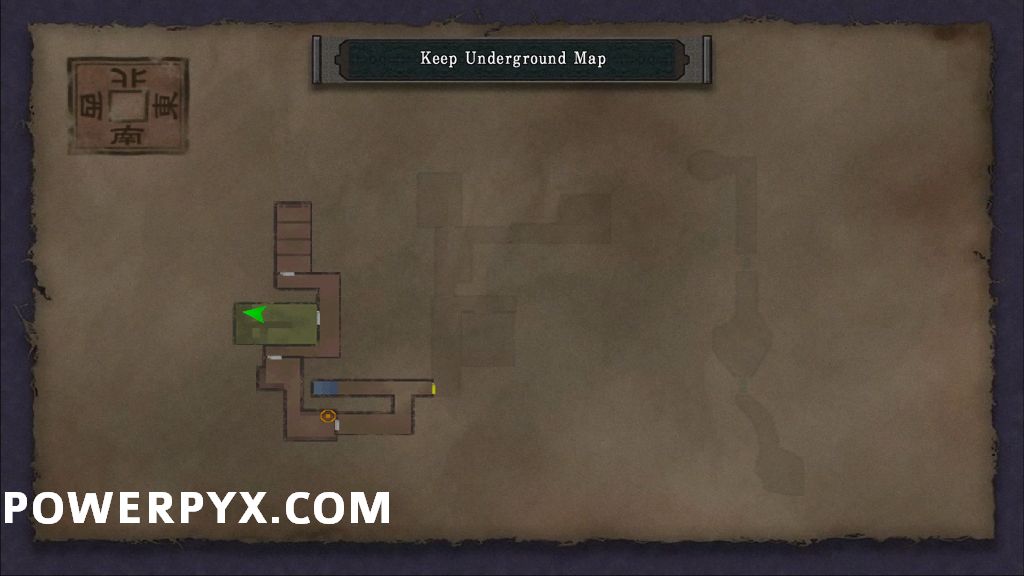
Soul Whisperer Obtain the Rosary of Communication. |
|
| *Missable*
You will obtain this trophy in the area “Keep Underground”. Once you have entered the Keep Underground continue forward through the tentacles and defeat the genma. Head into the next corridor and go through the door midway through the corridor. Once inside head to the backside of the hanging meat bags and you will be able to interact with a rope mechanism holding a weight up. Attack the rope to destroy it and let the weights fall. Once the weights fall it will reveal a necklace on the other side of the meat bags hanging. Run to the other side and collect the necklace and you will receive this trophy.
|
||
 |
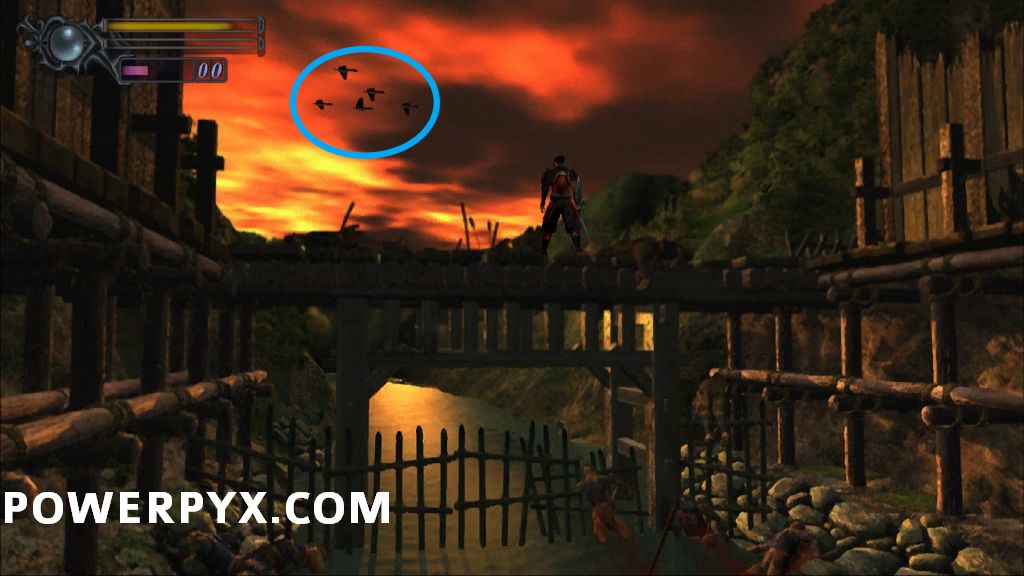
Fall’s Flight Spot the flock of wild geese at dusk. |
|
| *Missable*
At the very beginning of the game right after you receive the Gauntlet proceed through the door leading forward. In the next area there will be a small group of Oda Warriors attacking samurai just past a small bridge. Defeat the Oda Warriors and head into the house and you will get locked in by one of the samurai with four more Oda Warriors. After defeating them and leaving the building and speaking with the samurai head back to the bridge you crossed and position yourself on the bridge facing the sunset and hold |
||
 |
Undying Summer Find the beetle on the tree trunk. |
|
| *Missable*
At the very beginning of the game right after you receive the Gauntlet proceed through the door leading forward. In the next area there will be a small group of Oda Warriors attacking samurai just past a small bridge. Defeat the Oda Warriors and head into the house and you will get locked in by one of the samurai with four more Oda Warriors. After defeating them and leaving the building and speaking with the samurai head into the forest and take out the enemies. Once they are defeated head into the cave but don’t go down the hole yet. Instead start working your way back out of the cave and once in the forest head towards the camera until you are near the closest tree on the left to the camera and hold
|
||
 |
All Lives Big and Small Absorb souls from carp. |
|
| You get access to this trophy for the first time in East Area. Use the Decorated Sword to open this area up and head through until you get to the bell tower that has a level 3 green plasma lock on the door at the bottom. You will need your Arashi at level 3 to open to the door. Once through the door you will be on a river bank and the water will come up on land enough for you to walk inside the water. Defeat the enemies in this area and stand in the water and you will notice 3 carp swimming in the river and going close to the path. Simply press and hold while standing near the carp and eventually one will let out a yellow orb for you to collect. Collecting that orb will trigger this trophy to unlock. |
||
 |
Bamboo-zled! Cut down bamboo in the bamboo forest. |
|
| For this trophy you are going to have to cut down bamboo in a specific place. The first time you are able to get to the bamboo forest is during the portion of the game you can control Kaede. Once you get control of Kaede you will obtain the Red Key and need to proceed to the West Area. To get there simply leave the abandoned keep and head West. Continue straight until you get to the door that requires the red key. Follow the paths until you get to the door locked by blue plasma and proceed past it and around the corner. Head straight through the door ahead and there will be a few genma attacking a soldier. You can save him or just head through the door on the bottom layer of the area. Once through the door you are in the Bamboo Forest and there are likely to be enemies that spawn. If you are fighting the enemies you are bound to accidentally cut down bamboo but if there are no enemies just go to the edge of the walkable areas and attack towards the forest. Once a couple bamboo have been cut down you will receive this trophy. | ||
 |
Two to Tango Speak to the first and second old moth man. |
|
For this trophy you will have to find and speak to both the old moth men in the game. The first one is in the Keep. He is located in the beginning of the area in the same room you get the Keep Map and has the Magic Mirror. Simply approach the southern wall of the room and the old moth man will descend from the ceiling. Interact with him using  and he will recognize you spoke with him and ascend back up into the rafters. and he will recognize you spoke with him and ascend back up into the rafters.
The first time you can speak to the second moth man is the first time you use Kaede. Once you get control of Kaede you will obtain the Red Key and need to proceed to the West Area. To get there simply leave the Abandoned Keep and head west. Continue straight until you get to the door that requires the red key. Follow the paths until you get to the door locked by blue plasma and proceed past it and around the corner. Before heading towards the following door you will see a well on the side with a ladder leading down. Head down the ladder and head straight to the dead end and the old moth man will descend in front of you. Speak to him and even though he won’t speak to you as Kaede you will receive this trophy. |
||


Ernie says
Wait, it requires multiple beats, including ultimate difficulty, speedrunning it for S Rank, and it is only rated 3/10. I’m starting to feel I’m not as skillful for these ratings to apply to me anymore lol
Tolinos says
I used to be a veteran at Onimusha games,and this looks easy as suggested,however,new players should study very carefully all enemies patterns,use the old style lock on and dodge left right and keep calm.
It takes practice
I m on my second playthrough as I didn’t even read the guide and got speed trophy without even noticing XD
Lost a couple fluorite and one map though,so I will start as a panda samurai warrior and get the rest before trying oni mini game,as I have never played those particularly before.
Khalid Amber says
Hi dear Power,
If I watch the cut seens will the timer for S rank still working or will stop like when I press the PS button?
JWolfos says
I haven’t chanced it, honestly, so I did my second playthrough polishing off whatever trophies I couldn’t collect. Or unlocking Oni Spirits. Which can leave you in tears but the reward is Ultimate mode.
TTG says
So can you grab and use the Bishamon sword for Fortinbras is you’re doing the no upgrades playthrough? Will using it lose ANY trophies?
Stephen White says
No it will not
Brandon says
Can we get a video of all the collectibles in order of when they appear? I know you’ve done them before in the past. Also I thought some collectibles were locked behind doors that require you to level up swords so idk how I’m going to do an all collectible run while not upgrading swords
Yoda says
Upgrade the orbs. NOT the swords.
JWolfos says
You need to do two separate runs minimum. One upgrading everything. Another only upgrading your orbs. But it could take you a couple runs if you don’t master the Issun ability. You can work on your Onimusha skills in Onimusha 3: Demon Siege. They have a practice more beneficial to all players including us veterans to the series.
MisterX867@hotmail.com says
I cannot get the mano a mano trophy no matter what buttons I mash
JWolfos says
You wanna mash triangle and square at once repeatedly.
Dragak says
Ive tried this many many times Always losing No matter what. eventually get in a struggle next to the savepoint where u go to the dark realm. I turned up pressing all off my buttons including triggers L2 R2 All on Dpad All square, triangle, circle, x, Rattling in combat. And it worked out. Only 2 trophies left For not upgrading and No medicine, i cant believe this is rated 3/10 I dont think Because of those 2 trophies i get platinum. BeCause they are annoying.. If somebody want to do it for me. I dont think so >???
JWolfos says
Don’t press square and triangle. MASH them. Meaning pressing over and over swiftly like the boulder sequence in Resident Evil 4. You can choose which direction to toss them using the analog stick. But don’t mash any other buttons beside square and triangle. They will not help you, Dragak.
Thomas says
I followed the guide for oni spirits step by step but I never have enough magic to use shippuu on stage 12.
I managed to do it when it only used shippuu once on stage 8 rather than the twice you recommended, I’m not sure if I was making a mistake elsewhere but there didn’t same to be an opportunity to refill the magic
Other than that this is a fantastic guide that is getting me to the platinum
Ruhlaxes says
The man with the bugs wont appear for me? I cant get past the barred door to go to the east area? Please help!
JWolfos says
You can watch me beat the game on my channel on twitch. I streamed it. It’s around three hours and you can get about an hour in because I kept in the cutscenes. It may help.
Msazzzzz says
The trophy magic overload is glitched for me! I did used all the magic stones but did not unlock.
Dragak says
Same thing for Gaunt and Done It trophy Collected 56.000 souls 50.000 is required, No unlock. Glitched!! I liked this game back in the day, i dont like the frustration parts of it though… they should updates it to make it modern. Impossible trophies added for “Normal” gamers…
JWolfos says
There are a couple of them that are hidden or maybe you forgot one in your inventory. Double check with a checklist from the PS2 FAQ’s of their locations of the Oni boxes.
JWolfos says
For Gaunt and Done It you have to see the gauntlet get golden. And you actually need 55,000+ would to get it golden. So basically go to an enhancement mirror, see the gauntlet turn gold, trophy pops.
Talal says
is it possible to get Blunt Sword, Sharp Mind and None for Me, Thanks
on Ultimate or not ?
i find it hard to get it on normal but on ultimate i have bishamon on me it should be easy
Talal says
i have tested it . its not working it has to be on normal
JWolfos says
Nah, you gotta get em on another run through. I’ve gone through the game and done it and they didn’t pop for me.
Dragak says
These Will be the 2 hardest trophies to get imho. .. has to be played on normal.
Annoying trophies ! First of all you have to master everything like a robot and Know the game very Well like you played it 100 times like a game alcoholic or so. Just crazy .. they just had to left a chance to normal gamers who liked the game and see it back after 18 years. Like me, lol i’m up to 88% now i think i’m done. No master samurai fights with crappy swordds. Hopefully there Will be another way to get plat…
JWolfos says
Dragak, if you master the flash step move, or Issun as it’s more known in the game, you’ll be fine with non-upgraded swords. Everything when you get an Issun is usually a one hit KO except for bosses. But magic is your best friend for that and well timed dodges. I’ve stated it previously but you could easily play Onimusha 3: Demon Siege off of like maybe an emulator or something. They have a training mode there where you can practice these abilities. Even veterans to the series like myself have spent hours honing their skills in that game.
Sezin says
I thought platinum would be hard as it has tonnes of collectables, even had a thought of giving up getting platinum, but gradually managed to find most items easily not even looking at the guide. Most troublesome items for me was to cut the “hanging paper” from the wall to get the maps. ie. 1 at the place where you are able to go down twice in the building, and another one was at the east, rightmost room before going into the big door. I managed to achieve platinum within a day.
Dragak says
Trophies
None for me
Blunt sword, Sharp mind
Any tips? How did you do this in One day ?
Sezin says
For those 2 trophies, I just followed the guide, save the game before going into the final room, finished once with healings and reloaded and refinished once enhancing all, for the speedrun and S Rank, it took me 1:59 to complete, with 3 times going to Dark Realm for required souls and 600 enemies.
Dragak says
Yes fortunately i figured that out myself and got plat that way, yesterday Its not hard If your being clever. Be sure to make the save and the separate save after the marcellus, defeat the fortinbras with medicines. Come back to old save Make your swords strong Defeat the two without medicine. I would recommend 3-4 playthroughs then you know everything ……..
AupRrov says
If I accidentally upgrade any of my swords and vitality but quit or die and reload my previous saved game before I upgraded them, will I still be locked out of the Blunt Sword, Sharp Mind trophy and None For Me, Thanks trophies?
Dragak says
Ofc it Will work reverting back to old save.
These 2 trophies: None for me and Blunt sword, Sharp mind.
I need every tip on How to get these!
JWolfos says
Two separate run throughs, Dragak, one using medical supplies constantly but not upgrading swords or health, and the other one upgrading everything except for using healing items.
PVor says
If I accidentally upgraded any of my swords and vitality, but either quit or died and reloaded my previous saved state before I upgraded them would I still be locked out of the Blunt Sword, Sharp Mind trophy?
JWolfos says
Nah, you’d be fine.
ZombieLover84 says
If you all are having trouble with the roadmap, which is only two Playthroughs, do 3 instead. The game isn’t that long (I mean 3-5 hours at most if you know what you are doing, or less), so it isn’t much of a time sink for an extra go.
Do one Playthrough upgrading nothing, but using medical supplies. This should help you get through the tough parts without issue while using the normal sword. Wear the better armor as soon as you get them, as they are not apart of the trophy.
Then do another Playthrough upgrading everything, without using healing items. You’ll feel op and should be familiar enough with the game that you shouldn’t need any healing items, just the orbs from killing things.
Also, save. There is no reason not to save every time you pass by a Magic Mirror. There is no trophy related to saving.
Baconbap88 says
Make you sure that you make regular separate save files if doing no heal/ no upgrade on the same run. I was in a tough spot against the doppleganger, my health was down to one hit going into the fight and he doesn’t drop tallow orbs until he dies. When you switch characters, their health does not reset.
allen c blaise says
3 outta 10 my ass