
Rainbow Six Extraction Trophy Roadmap
- Estimated trophy difficulty: 6/10
- Approximate amount of time to platinum: 50+ hours (skill/group dependent)
- Offline Trophies: 0 (Game is online only)
- Online Trophies: 43 (1
 , 3
, 3 , 13
, 13 , 26
, 26 )
) - Number of missable trophies: 0
- Glitched trophies: Nothing Yet
- Does difficulty affect trophies?: Must play at least 5 total Assignments or Crisis Incursions to 30,000 XP and 1 Maelstrom to 55,000 XP, must play Solo to interact with Points of Interest
- Minimum Playthroughs: At least 20 total completed Objectives in each of the 4 regions, but likely many more
- PS4/PS5 Autopop & Save Transfer: Progression is transferred, but trophies are tracked locally so need to be redone on each version (see note below roadmap)
- PS4/PS5 Crossbuy: Yes
- Free-Roam / Level Select after Story?: Yes, can replay missions as much as you want
- Release Date: January 20, 2022
 , 3
, 3 , 13
, 13 , 26
, 26 )
)Introduction
Welcome to the Rainbow Six Extraction Trophy Guide! Extraction is a spinoff of Rainbox Six Siege, similar to the event mode Outbreak that appeared in Siege in 2018, so if you have played Siege you will feel right at home as the controls and gameplay are effectively the same setup overall. Extraction tasks you with entering different environments with a team of up to 2 other players to complete a set of objectives, fighting against the alien Archaean threat.
In contrast to Siege, Extraction is co-operative (or solo) PvE gameplay. The game is fairly well balanced around solo play, so even players who don’t want to spend time searching for friends to play with all the time or don’t want to play with matchmade players all the time can still get a lot out of the game, though the two highest difficulty modes (Assignments and Maelstrom Protocol) do require playing with other players, be they friends or through matchmaking.
The platinum overall isn’t too bad by recent co-op release standards. Most requirements are for general progression of optional objectives and leveling, which can be worked through just fine solo or with friends. The game is very open-ended once you unlock the regions and you can play in whichever you want at your leisure, without being locked into very long play sessions. Only a couple trophies really require playing on high difficulty missions, but by the time you reach the point of working on those you should be very well versed in which Operators you like playing as and how to complete objectives effectively.
Step 1: Play and Learn the Basics
When you start the game up you are pushed into doing a tutorial showing how objectives work. You can back out and skip this if you like, but it is a very helpful introduction into how general gameplay specific to Extraction works as well as some of the different objectives. Once finished you are basically free to start playing how you like. As you complete incursions and earn XP you increase your Progression Milestone level, which is how you unlock access to the other regions as well as other operators and REACT Tech. Keep playing the game to learn the basics and unlock more options in the progression milestones.
Step 2: Research Objectives and Points of Interest
Once you got accustomed to general gameplay, your main focus should be working through the Research Objectives in each area, along with getting the trophies related to Points of Interest while you’re starting out. Doing the PoIs early is a better idea just so you can move around and learn the maps a bit as you’re starting out, because they provide nothing for gameplay otherwise, and once you get better you’ll want to work through the maps quicker without stopping to stare at the environment. Research objectives give lots of XP towards your Milestone levels, allowing you to more quickly unlock the rest of the available REACT Tech and further modes.
YOU MUST BE PLAYING SOLO TO INTERACT WITH POINTS OF INTEREST! Currently, the game is set up so the prompt does not appear when playing with other people, only when playing solo does the interact prompt appear.
See the below guide for Points of Interest Locations:
Step 3: Grinding, Harder Tasks, Cleanup
After a while, the game is more or less just grinding, playing the same maps over and over to earn more XP and get better. Some Research objectives will require playing on higher Threat Levels to spawn certain enemies, so you will want to keep leveling up your Operators and rotating through to see who you will want to use for the hardest tasks and to work towards leveling all Operators to level 10. The two actual hardest requirements are completing 5 Assignments with 30,000 XP and completing any Incursion with 55,000 XP (the hardest task in the game, will almost certainly need to be done on Maelstrom), so it’s very possible those will be the last things you will need for earning the platinum.
About Save Transfer and Auto-pop
Rainbow Six Extraction does have shared leveling and unlock progression between the game versions with your Ubisoft Connect account, but unfortunately, trophy progress and game settings are only saved locally. This means that you won’t need to do the longest requirements over again when switching platforms, such as leveling all Operators to 10 and completing all Research objectives and only need to redo the trigger action for the trophies related to those, but all trophies related to things like killing enemies or interacting with Points of Interest need to be redone from scratch. If you wanted to try and save some time you could swap which system you play on after finishing most of these trophies on the first system, then you are working on the requirements on the other system while still working on the longest requirements such as Research Objectives and Operator leveling.
Rainbow Six Extraction Trophy Guide
 |
Platinum Performance Complete all other Trophies. |
|
| Earn all other trophies in Rainbox Six Extraction to earn the platinum! | ||
 |
Slap Fight Hit 3 enemies with melee attacks. |
|
Simply stated, hit any three enemies with melee attacks using  . Normal melee attacks don’t do a lot of damage but are useful for knocking back enemies like Grunts if they are chasing you. . Normal melee attacks don’t do a lot of damage but are useful for knocking back enemies like Grunts if they are chasing you. |
||
 |
Vertigo Stun 100 enemies. |
|
| Enemies can be stunned through various means, such as Ela’s GRZMOT Mine ability or the Stun Grenade that can be equipped by any Operator. When thrown at enemies they become stunned for a short period, allowing you to deal damage for a limited time or get in close and perform and melee takedown without them fighting back. Stun any 100 enemies to earn this trophy. | ||
 |
Boom Kill 50 enemies with explosives or abilities. |
|
| A handful of Operators have abilities that directly deal damage to enemies, but not many are actually meant for killing enemies specifically, so you are more likely to get this done using explosive REACT Tech. The Operators with abilities that can directly damage enemies are: Hibana, Sledge, Jager, Fuze, Smoke, Tachanka, Capitao, and Gridlock. The explosive REACT Tech you can use to kill enemies are: Impact Grenade (though it doesn’t deal much damage), Claymore, Fragmentation Grenade, and Nitro Cell. Kill a total of 50 enemies with any of these means to earn this trophy. | ||
 |
Eagle Eye Scan 50 enemies with REACT Tech. |
|
| Some Operator abilities and equipable REACT Tech will temporarily highlight enemies and objectives in an area for a short period of time. The Operators with abilities that can scan enemies are: Alibi and Lion. The explosive REACT Tech that can scan enemies are: Scan Mine and Scan Grenade. Scan a total of 50 enemies with any of these means to earn this trophy. | ||
 |
Stayin’ Alive Revive 3 allies. |
|
| When downed, players can go into a DBNO (Down-but-not-out) state, allowing them to be revived. This trophy also counts if using a self revive either while playing as Doc or with the Revive Kit REACT Tech under the Gear slot. Revive other players or yourself three times to earn this trophy. | ||
 |
Keep ‘Em Comin’ Kill 5 different enemies in a single incursion. |
|
| This trophy is earned for killing 5 different types of enemies in a single incursion. You will almost certainly get this without trying eventually, as things like Blinding Spores and Nests also counts as enemy kills when destroyed, so this is very easy even on the lowest difficulty by killing Grunts, Spikers, Breachers, Bloaters, Nests, and Blinding spores. | ||
 |
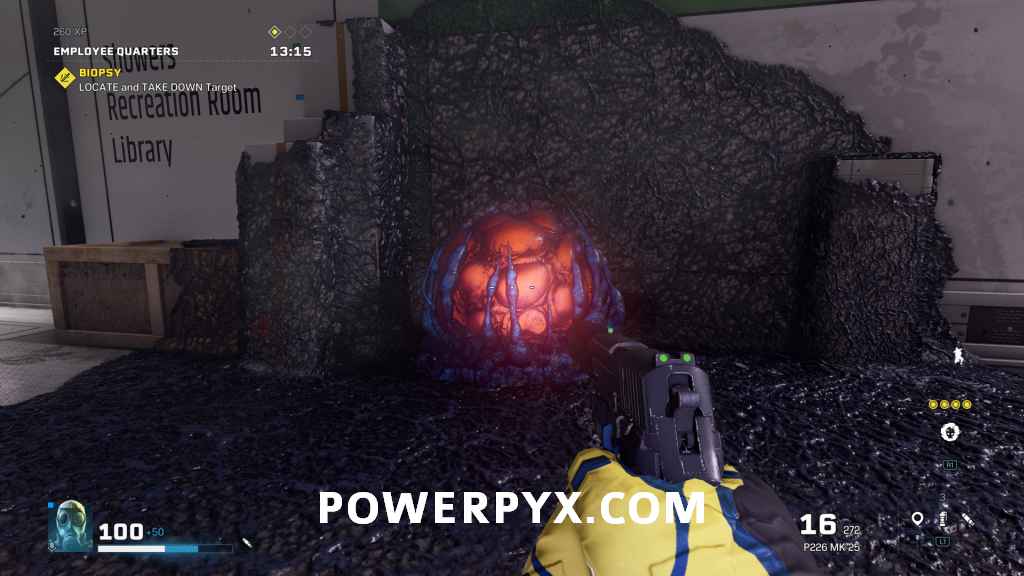
Dissected Take down 50 Nests. |
|
| Nest are found in every area of every incursion, and are what more Archaeans will spawn from when awoken by an enemy raising an alarm. They can be destroyed by being shot or blown up, but for this trophy you specifically need to perform melee takedowns on them, which is done by going close to them and pressing for a takedown animation where you destroy them and also clear an area of Sprawl around them. Take down a total of 50 Nests to earn this trophy.
|
||
 |
Defused Take down 50 Breachers or Bloaters. |
|
| Breachers and Bloaters are the two crawling enemies with red or green sacks on their back respectively. When shot their sacks explode, with Breachers causing an explosion around them, and Bloaters releasing a large gas cloud. If you perform a melee take down though then the sac doesn’t explode, so other enemies don’t hear them exploding and come investigate. For trophies you specifically need to use take downs to kill 50 total of these enemies. You can perform take downs by sneaking behind them, but this can be difficult as these enemies generally move around quite a bit and don’t stay put for very long. It is much easier to perform take downs on them by first using a Stun Grenade on them, which then allows you to run up and perform a take down on them from whatever direction. Kill a total of 50 with take downs to earn this trophy.
|
||
 |
Eeeeeeeew Kill 75 Sludges with explosives. |
|
| Sludges are a type of enemy you can sometimes find attached to ceilings inside buildings. They look like a glowing red goo puddle, and will chase you around if you get close and alert them. If shot they will drop from the ceiling onto the ground, then when shot further will split into 3 smaller Sludges, which can then be killed. For this trophy, you need to kill a total of 75 of these enemies specifically using Explosives. The best way to do this overall is by having Fragmentation Grenades equipped and hope you have some spawn during an incursion. If you do, first shot them down, then continue shooting them until they split into 3, then kill the 3 with an explosive, as that still counts as 3 kills, whereas if you kill the larger Sludge with an explosive it’ll die immediately and only count as one.
If you are struggling to have Sludges appear during incursions it is possible to have a mutation appear on higher difficulties where a Sludge will spawn after killing an enemy, so you could continually start and extra from Crisis incursions until you have this mutation appear, then just kill weaker enemies in the areas to spawn Sludges. |
||
 |
Clear ‘Em Out Eliminate 100 Grunts. |
|
| Grunts are the most common type of enemy you will encounter, which are human in shape and attack you with blades on their arms. Shooting them in the head is an instant kill, so this is the easiest way to deal with them in most situations. Kill a total of 100 Grunts to earn this trophy.
|
||
 |
Don’t Talk to Rangers Kill 150 Tormentors and Spikers. |
|
| Spikers are one of the next most common type of enemy, and look the same as Grunts except they have larger arms. They attack by shooting spikes at you from range while holding their other arm in front of their head to block their weak point. Tormentors are also ranged enemies, but they will only appear on Cautious Threat Level or higher. These are slightly taller and skinnier than Spikers, and attack by shooting slower explosive projectiles at you while hiding in the ground to move around and avoid you. You can shoot their projectiles to destroy them, and their head is still their weak point, but they can take much more damage than Spikers. Kill a combined total of 150 of these two types of enemies to earn this trophy.
|
||
 |
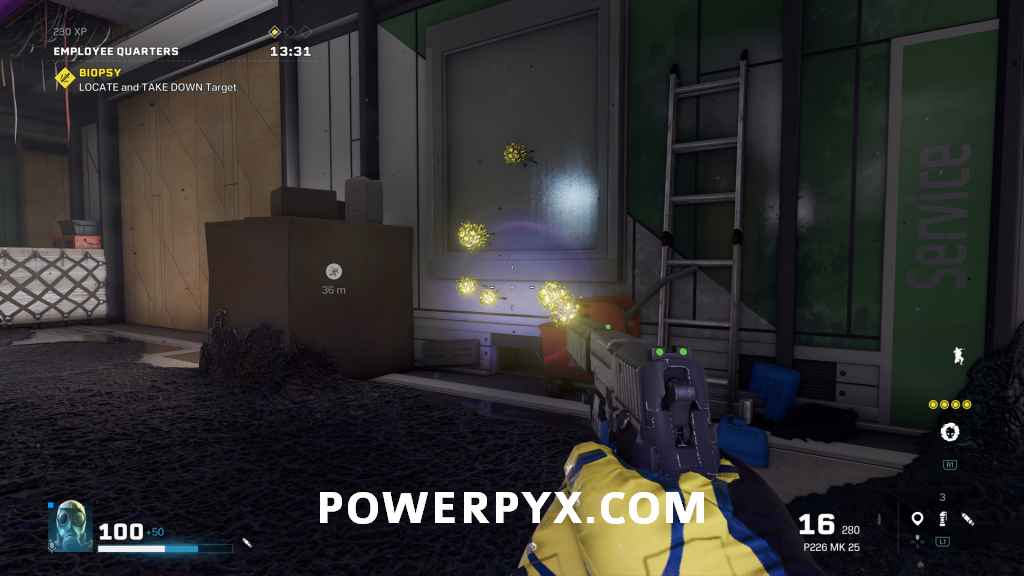
Tidying Up Kill 30 Blinding Spores. |
|
| Blinding Spores are a special type of “enemy” that you will sometimes see stuck to walls. They look like a group of yellow/green balls that will stick to you if you go near them, then after a while will explode into damage and blinding gas if not removed by another player or REACT Tech. While still stuck to surfaces though they can be shot and destroyed, rendering them harmless. Kill a total of 30 Blinding Spores to earn this trophy.
|
||
 |
No Hugs Kill 50 Rooters without being caught by them. |
|
| Rooters are a type of enemy that walks around on all fours, and when attacking you will send a wave out on the ground, which if hits you will stop you in place and gradually damage you until you shoot the Rooter to cause it to release you. You need to kill 50 Rooters without this occurring before you kill them to earn this trophy. They have a lot more armor than most other small enemies, so can take a lot of damage unless you shoot them in the back of the neck, which is their weak point.
|
||
 |
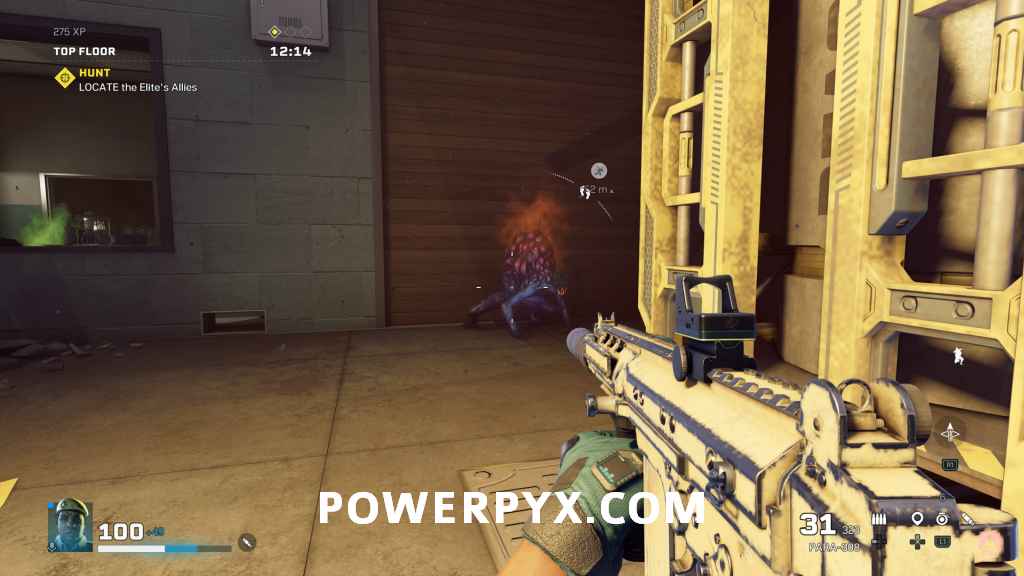
Defeated Kill 5 Smashers with a Takedown. |
|
| Smashers are a large heavily armor type of enemy, that outside of Elite Capture area objectives you will only possibly run until in Cautious Threat Level or above allowing you to kill them. Shooting them anywhere except their large weak point on their back doesn’t do a lot of damage, but they can still be killed quickly with a take down from behind. They can also be stunned with REACT Tech such as the Stun Grenade like most other enemies, allowing for quick and easy take downs. Kill a total of 5 Smashers with take downs to earn this trophy. | ||
 |
Regicide Kill 10 Apexes. |
|
| Apexes are the least common type of Archaean overall, typically only appearing in higher threat level missions. They work similarly to Tormentors where they can shoot projectiles at you while moving around, with these projectiles also temporarily obscuring your vision if they hit you. They can also spawn more Archaeans while fighting you to cause you an even worse time. Kill a total of 10 of these enemies to earn this trophy. | ||
 |
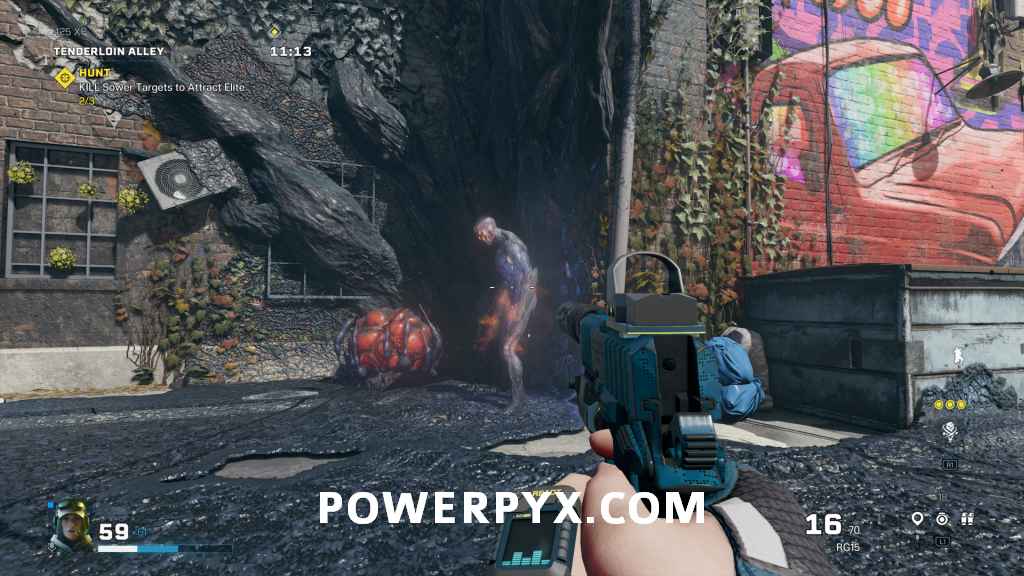
Reaper Kill 30 Sowers. |
|
| Sowers are another type of enemy that walks on all fours, but more close in size to Breachers and Bloaters. These enemies will continually walk around areas placing red mines on the ground. When walked near these mines explode in a similar manner to a Stun Grenade, blinding you for a short period and alerting enemies to the location. They can be shot and destroyed without issue like Blinding Spores. Sowers are more heavily armored like Rooters, but their weak point is directly on their stomach, which is harder to hit aside from they are looking directly at you. Kill a total of 30 Sowers to earn this trophy. | ||
 |
Adrenaline Kill an enemy while prone. |
|
| Simply stated, kill any one enemy while prone (lying down on the ground). Most easily done by lying down and shooting an unalert Grunt or Spiker. You are required to do this for a Research Study in New York City so you will need to do it eventually whether you regularly use prone or not. | ||
 |
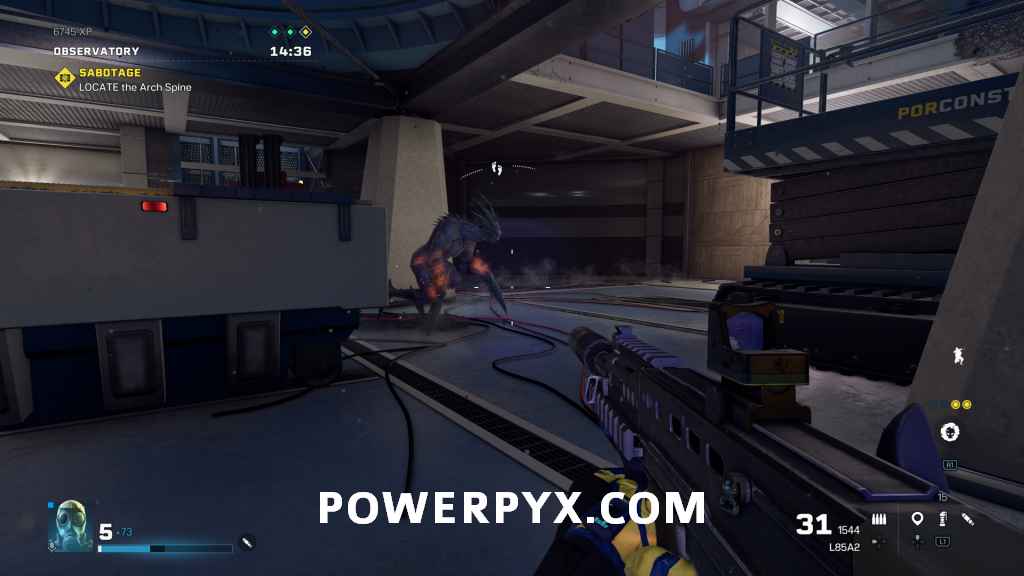
Dark Reflection Kill a Protean. |
|
| Proteans are a special type of enemy that are only found in areas with the Singularity objective as the final area objective. In these areas, you need to find the Singularly, which is a large round portal that you need to enter for the actual objective, which is to kill the Protean inside.
Proteans are basically boss enemies, which are actually Archaean versions of some of the Rainbox 6 Operators. They vaguely resemble the shape of the Operator they are emulating and will shoot at you with ranged weapons, along with performing other special actions. The basic premise of most of the fights is fighting the Protean on its own for one of its health bar segments, sometimes after removing a shield bar, then it will perform some sort of special action such as summoning a wave of other Archaeans or splitting into a number of copies to attack you. Survive the special wave, then repeat the prior action of destroying the shield and/or health bar, until you kill the Protean which automatically ends the current incursion. You can only have the Singularity objective appear when playing on Cautious Threat Level or higher, so these fights can be difficult. It’s recommended you try these with higher-level operators who have more offensive abilities, along with trying to go into the fight with as much REACH Tech as you can. There will always be a bunch of Ammunition and Health Boxes in the fight area, so those are less of an issue but REACT Tech items such as the Stun Grenade can be very helpful if you have quite a few of them going into the fight. |
||
 |
Welcome Home Rescue 1 of your Operators. |
|
| If you die in an Incursion, your Operator is considered MIA and needs to be rescued from that same area again. This occurs when you receive the MIA Operator objective the next time you play this area, and you need to rescue your Operator from the Archaean Tree that appears. If you fail to rescue the Operator they are returned to your roster, but lose some earned XP (if below level 10 where XP is locked).
When performing the rescue, there are 3 tubes that connect from nodes around the area to the Tree. As you are pulling out your Operator, the bar on the tree drains but will be replenished by the red energy that comes down the tubes connecting to the tree. You need to shoot these red energy balls to stop the Tree from regaining energy and absorbing your Operator. You can also shoot the nodes the tubes are coming from when they are glowing red, which destroys the tubes and stops the Tree from regaining energy. Once you successfully place the Operator in the REACT pod and complete the mission you will earn this trophy. |
||
 |
Unscathed Extract from an incursion at 80% health or above after completing all Objectives |
|
| For this trophy, you need to finish an incursion after successfully finishing the objectives in each of the 3 areas while having over 80% of your normal health. When starting incursions at full health, operators have 100% normal (white) health and 50% bonus (green) health. Normal health cannot be regained during incursions, only bonus health can, and for this trophy you need to successfully finish the incursion with 80% or more of normal health, regardless of remaining bonus health. You can continually grab health packs during incursions to increase your bonus health, up to an extra 100% (200% total), though this will slowly go back down over time even if not being damaged. | ||
 |
Big City Calling Complete 20 Objectives in New York. |
|
| New York is the first region you have access to, which contains the areas Monolith Gardens, Liberty Island, and Police Station. Complete a total of 20 objectives during incursions in New York to earn this trophy. | ||
 |
Fresco Bound Complete 20 Objectives in San Francisco. |
|
| San Franciso is the second region you have access to at Progression level 4, which contains the areas Tenderloin, Enterprise Space Foundation, and Apollo Casino & Resort. Complete a total of 20 objectives during incursions in San Franciso to earn this trophy. | ||
 |
To the North Complete 20 Objectives in Alaska. |
|
| Alaska is the third region you have access to at Progression level 7, which contains the areas Eurydice Valley, Orpheus Research Center and Nome. Complete a total of 20 objectives during incursions in Alaska to earn this trophy. | ||
 |
Consequential Complete 20 Objectives in Truth or Consequences. |
|
| Truth or Consequences is the fourth and final region you have access to at Progression level 11, which contains the areas Sierra County Hospital, Downtown, and Dam. Complete a total of 20 objectives during incursions in Truth or Consequences to earn this trophy. | ||
 |
Unflinching Complete 15 Objectives in the third Sub-Zone or further without falling DBNO. |
|
| This trophy requires you to complete a total of 15 objectives in the third Sub-zone of a location, regardless of region, without getting into DBNO state. It doesn’t matter what location, Threat Level, or objective you earn this on, so you can run through incursions on the lowest difficulty if you don’t manage to earn this during the normal progression of levels. | ||
 |
To Do Complete 5 different Objectives. |
|
| This trophy is awarded for completing any 5 different types of objectives during incursions. There are a total of 9 types of objectives you can complete, so once you have completed any 5 of the objectives once each you will earn this trophy. | ||
 |
High Score Earn a score of 55,000 XP in a single incursion. |
|
| This trophy is awarded for earning a total of 55,000 XP after completing a single incursion. This basically requires you play Maelstrom Protocol mode to earn this, which is the “ranked” mode for the game, where you and two other players (you cannot play this solo, but there is matchmaking) continually play through an incursion that doesn’t end after 3 sub zones, trying to reach higher and higher XP totals to earn extra cosmetic rewards.
Playing through Maelstrom each sub-zone increases the difficulty over the last, with more XP awarded in each zone you progress through. The overall setup for Maelstrom changes each week, but then is the same for the entire week, so if you need to do multiple playthroughs you should know more each time you play through that week about what to watch out for. Reach 55,000 XP can be done at about sub-zone 6. Once you reach that total you can extract and earn the trophy. |
||
 |
Specialist Earn at least 30000 XP on 5 Assignment or Crisis incursions |
|
| This trophy is earned for completing any 5 Assignments or Crisis incursions while earning at least 30,000 XP by the end. Assignments are a weekly special modes that have specific modifiers on them and are always set to the highest threat level, and require you playing with other players, through matchmaking or with friends.
Because of Assignments being set to the highest difficulty, you gain a large XP increase while playing them, so as long as you are completing them with doing as all possible objectives you are very likely to earn this through normal runs of Assignments. Crisis incursions are likely another type of time mode that aren’t currently available, so this trophy needs to be done playing Assignments at the moment. |
||
 |
Mission Probable Extract from an incursion with all Objectives completed and no one MIA. |
|
| This trophy is awarded for completing an incursion after completing the objective in each of the three areas without any playing going MIA, which means totally dying out and not being revived from DBNO. Like Unflinching this can be done on any threat level, so you can run through an incursion on the lowest threat level and get this quickly if you somehow don’t manage to do it normally. | ||
 |
Out With the Boys Complete all Objectives in an incursion with only male Operators. |
|
| This trophy is awarded for completing any incursion with all 3 objectives completed with all players in the incursion playing as male Operators. This counts while playing solo as well, it doesn’t require more than one player in the game with the same gender Operator.
The male Operators are:
|
||
 |
Girl’s Night Complete all Objectives in an incursion with only female Operators. |
|
| This trophy is awarded for completing any incursion with all 3 objectives completed with all players in the incursion playing as female Operators. This counts while playing solo as well, it doesn’t require more than one player in the game with the same gender Operator.
The female Operators are:
|
||
 |
Bigger Kahuna Complete all Objectives and extract from 5 incursions with a Level 10 Operator. |
|
| This trophy is awarded for completing 5 incursions with all 3 objectives completed with an Operator who has reached level 10. Reaching level 10 with an operator requires a total of 140,000 XP, which then locks them at level 10 so they can’t lose any XP if they go MIA in an incursion and then aren’t successfully rescued. This can be done on any Threat Level, so if you don’t earn this through normal gameplay you can run through 5 incursions quickly on Moderate Threat Level to earn this. | ||
 |
Curiouser Interact with a Point of Interest. |
|
| This trophy is awarded for interacting with any single Point of Interest in any Area of any Region.
See |
||
 |
Fieldwork Interact with 5 Points of Interest in each Region. |
|
| This trophy is awarded for interacting with any 5 Points of Interest in each Region.
See |
||
 |
Encyclopedia Interact with 100 Points of Interest. |
|
| Points of Interest are basically as close to this game has to collectibles, though they aren’t tracked and don’t count towards anything, they only give some extra environmental storytelling info about the game world and lore. You cannot track in-game how many you have interacted with, nor can you actually know what the PoIs are until you are standing directly beside one and can see the interact prompt for them.
YOU MUST BE PLAYING SOLO TO INTERACT WITH POINTS OF INTEREST! Currently, the game is set up so the prompt does not appear when playing with other people, only when playing solo does the interact prompt appear. They are normally unique locations in the environment, such as Archaean structures, REACT equipment, or posters on walls typically within the airlocks between areas. They will never be on destructible walls or items, so if you are looking for any on your own you can avoid looking for them in spots like those. The following pages include Points of Interest for each of the 4 regions. As there isn’t a way to know how many Points of Interest there are in each location there are more than are included with each page, but this guide provides a total of 131 Points of Interest to interact with, which is more than each to earn the 3 trophies related to the Points of Interest. They only need to be interacted with one time to start the voice line related to them, then you can move on from them. |
||
 |
It’s All Connected Read each Region’s final Study Description. |
|
| Study Descriptions are extra bits of lore that you gain access to after completing a Research Study objective. For more information on how they work see Major Flex.
For this trophy, you need to read the final Study Description in each of the 4 regions, which is unlocked automatically for you when you complete the prior sets of 3 objectives. Then just go into the Studies mean and read each of the Final Report descriptions to earn this trophy. |
||
 |
Major Flex Extract from an incursion after completing all Research Studies. |
|
| Research Studies are sets of extra objectives you can complete in each of the regions that give extra Codex entries, cosmetic items, and XP towards your Milestone progression. They are made available in each region in sets of 3, with completing the set of three being required to make the next set of 3 available. Completing all Research Studies in all 4 regions, then successfully extracting in an incursion after will award this trophy.
Most Research Study objectives are fairly self-explanatory. Kill certain enemies certain ways, earn XP, extract from incursions or complete objectives. Some will require luck in getting enemy spawns (such as ones that require killing Sludges) or playing on higher difficulties (killing Smashers). For any of the kill enemy requirements, they are counted as completed as soon as the requirement is finished in an incursion, so if you are only going into an incursion to try and kill specific enemies you can extract as soon as the requirement is complete even if you haven’t actually completed any objectives and the requirement is still counted. Similarly, if you are trying to get specific enemy types to spawn you can just restart incursions by extracting immediately then restarting them from the post-match menu to get new incursion setups. Note that you do also have to do the Tutorial objectives (VR Training) for the trophy. If you skipped them at the start they can still be played through the VR Training option on the region selection screen. |
||
 |
Not Afraid of Goo Destroy Sprawl with the REACT Laser in an incursion. |
|
| The REACT Laser is a special type of REACT Tech that you are able to unlock at Progression Milestone 25. Once unlocked it is automatically equipped on all guns like the UV Light, allowing you to switch between the two. When used it allows you to dissolve Sprawl much more easily than shooting it repeatedly like you will have had to do prior. Do this any one time to earn this trophy. | ||
 |
Gun Nut Equip 15 Weapon Attachments. |
|
| Weapon attachments are automatically unlocked on a weapon when it is unlocked, you don’t need to specifically do anything to unlock them. Because of this the trophy requirement effectively just means swapping to 15 weapon attachments in the Operators menu. You can do this on the same gun just by swapping back and forth between attachments until the trophy unlocks. | ||
 |
Charmed Equip a Legendary Charm |
|
| Charms are a cosmetic item that you can put on to your weapons when unlocked. They have 4 rarities, with Legendary (orange) being the highest. Legendary Charms are either obtained through (unknown) requirements, through a specific research study, or purchased through the shop for premium currency.
You are guaranteed to get the “Smashing Succes” Legendary Charm while working through Research Studies. It is earned by completing the “Smasher Vulnerability” Research Study in the Truth or Consequences region, which is completed in the third set of studies and is for Killing or Assisting in killing a Smasher with the weak point on its back. Once you have completed this and earned the charm (or obtained one through other means) equip it on any gun to earn this trophy. |
||
 |
Spiffy Equip a Uniform on 9 different Operators. |
|
| Operators are equipped with a Uniform by default, so this trophy is actually for changing the Uniform on any 9 Operators to something that isn’t the “React Standard Issue” uniform. Uniforms are unlocked through Milestone Progression for all Operators at once, as well as through leveling to specific levels for just that Operator. | ||
 |
Proud Papa Equip Headgear on 18 different Level 10 Operators. |
|
| Just like Uniforms, Headgear is equipped on all Operators by default, so this actually wants you to change the Headgear on all 18 Operators to something other than “React Standard Issue” after you have level all Operators to Level 10, which is the longest overall grind in the game. You start with only 9 of the Operators unlocked, and unlock the others in groups of 3 up through Progression Milestone 17. You will absolutely have reached this point before you are anywhere close to having them all at Level 10, so that’s not something you need to specifically worry about.
Operators require 145,000 XP to reach level 10, at which point they become locked to level 10 and can’t lose any XP if they aren’t rescued from MIA in an incursion. You can check your overall general progression to having all Operators at level 10 by looking at the Operators Advancement Levels bar in the Progression menu. |
||


Harley says
I’ve looked at so many of the points of interest in the New York map and I’m not getting any interact prompt for any of them, possible bug ?
Gage says
Are you seeing the magnifying glass show up when you are nead the PoI? The spot where the interact prompt shows up can be really finicky and you have to be really close to the correct spot.
OverHyped says
Does Major Flex also requires all complete codex? Because I have 100% in all regions , tried to extract multiple times, no tropgy
Gage says
Have you gone through the menu and made sure to “unlock” the research info on all of the completed objectives?
OverHyped says
Yes every single one.. Then tried extracting again. No trophy.
Gage says
Did you do the tutorial requirements too? Wouldn’t think the Codex would be required when it’s not specifically “Research Objectives”, but the tutorial objectives are laid out the same as the regional objectives. And show 100% on the menu when you do them.
Asim Siddiqui says
I have killed the Alibi protean but the trophy for killing a protean did not unlock for me.
DAVID says
I HAVE KILLED 3 PROTEANS AND STILL NO TROPHY
Luminus says
It says “ALL RESEARCH STUDIES”…..are you level 25 yet? If not…thats the problem…..you need to be 25 because the LASER is the last Study…..greetz
OverHyped says
Tutorials were the problem yeah, I didnt see them all the way down in right corner. Thanks ;)
jerry says
HI,powerpyx thanks so lot for your guides.But i seems to have a bug trophy
For the specialist trophy which ask you for 5 incursion for 30K exp. I did it on highest threat level solo (complete all target) for 7 times the trophy still not pop,is this coop require or have to do in assghitment
Info says
I believe you need to do the assignment game mode.
“Crisis” threat level is not available at the moment.
I read that these are events that run for a while. But at the moment there is none with the threat level “crisis”.
I don’t know why the guide says that you can do normal incursions, because you can only set the threat level to “critical”.
Info says
Forget what I said about the threat level.
This has nothing to do with the threat level.
You have to do assignments or crisis events for the trophy, but there is no crisis event running at the moment. So the only possibility is currently “Assigments”.
Gage says
That’s me reading bad, and thinking the whole tine that said Crisis instead of Critical. I’ve updated the description now.
Nikki_boagreis says
Samething, i’ve killied the Alibi protean and the trophy didn’t pop
Bob says
Hello,
Just so you know I typically like your guides and you do a great job.
However the specialist trophy on here is not what you mentioned at all. It can not be unlocked by doing solo missions on the highest difficulty.
Wasted like 10 hours. I am going to try beating 5 assignments and go from there. Please update guide to save others of frustration. Thank you.
Gage says
I have updated that now, I spent over a week reading the menu wrong and thinking the highest threat level was called Crisis and not Critical. :V
Ryan says
A way to get “high score” trophy really easy probably much easier than the guides method is to do the high density mission “kick the anthill”,play as fuze and use 1 or 2 charges on each area.Ive gotten between 55k and 60k with ease like this sometimes the charge kills the whole nest without firing a shot!
Ryan says
Ok so if anybody wants a super easy way to do the studies for kill x number of enemies in a row with stealth it can be done on the shutdown objective by farming the same node as they grow back every minute.I got the study for 10 in “truth or consequences” by proning near one and shot it 10 times while just waiting for it to grow back 10 times.Make sure your gun is semi auto mode and you got suppressor on.