
Spare Parts is the 19th chapter in Detroit Become Human. This walkthrough will guide you through all the choices of the Spare Parts level for 100% completion.
Triggers automatically after completing the Russian Roulette Chapter.
100% Flowchart:
Here’s a quick overview of the 100% complete flowchart for “Spare Parts”.

Checkpoint: Hunting for Parts
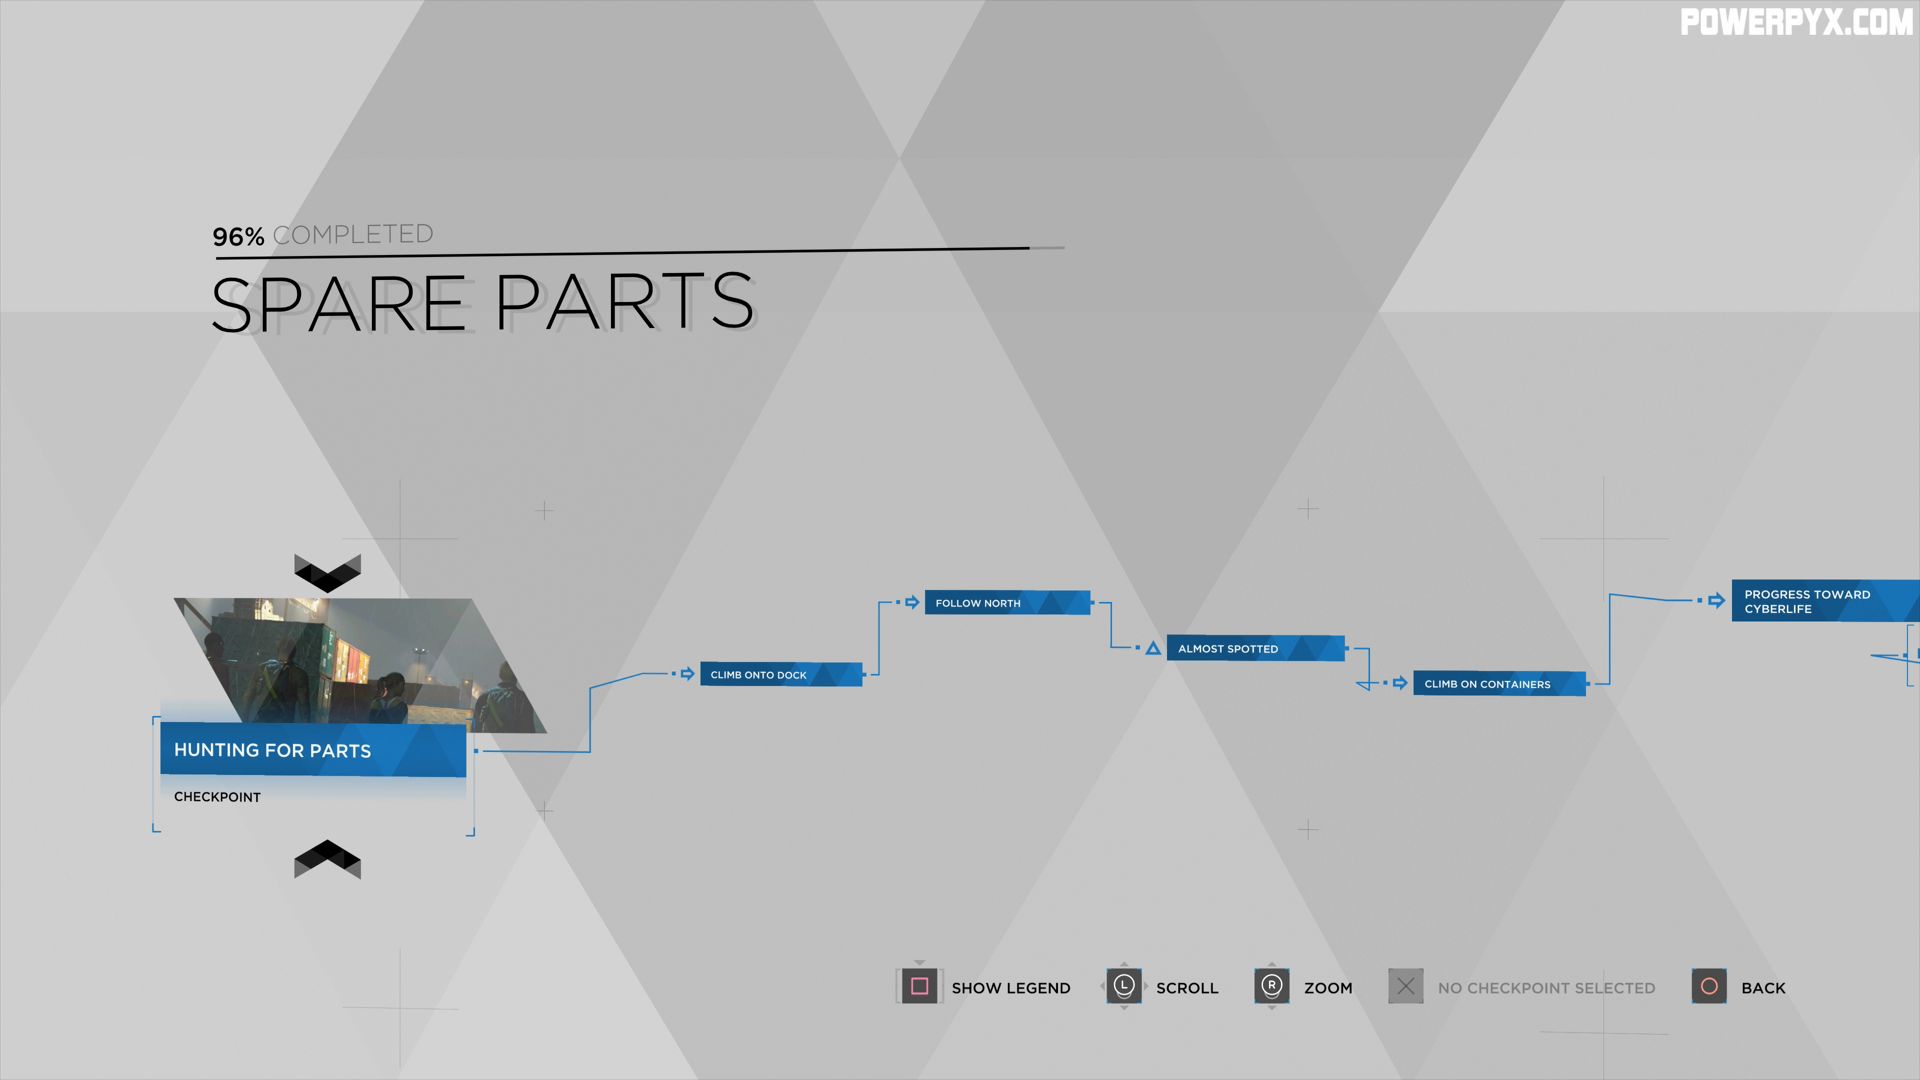
- Climb onto Dock: Happens automatically at the start of the chapter.
- Follow North: Just follow after North, unmissable.
- Almost Spotted: There’s a section with two guards standing on the far left. North and the rest of the crew cross over to the other side first. Markus must move left to the two guards to complete this task. Then North will tell him to get back to the group.
- Climb the Containers: Keep following your crew and this task completes on its own.
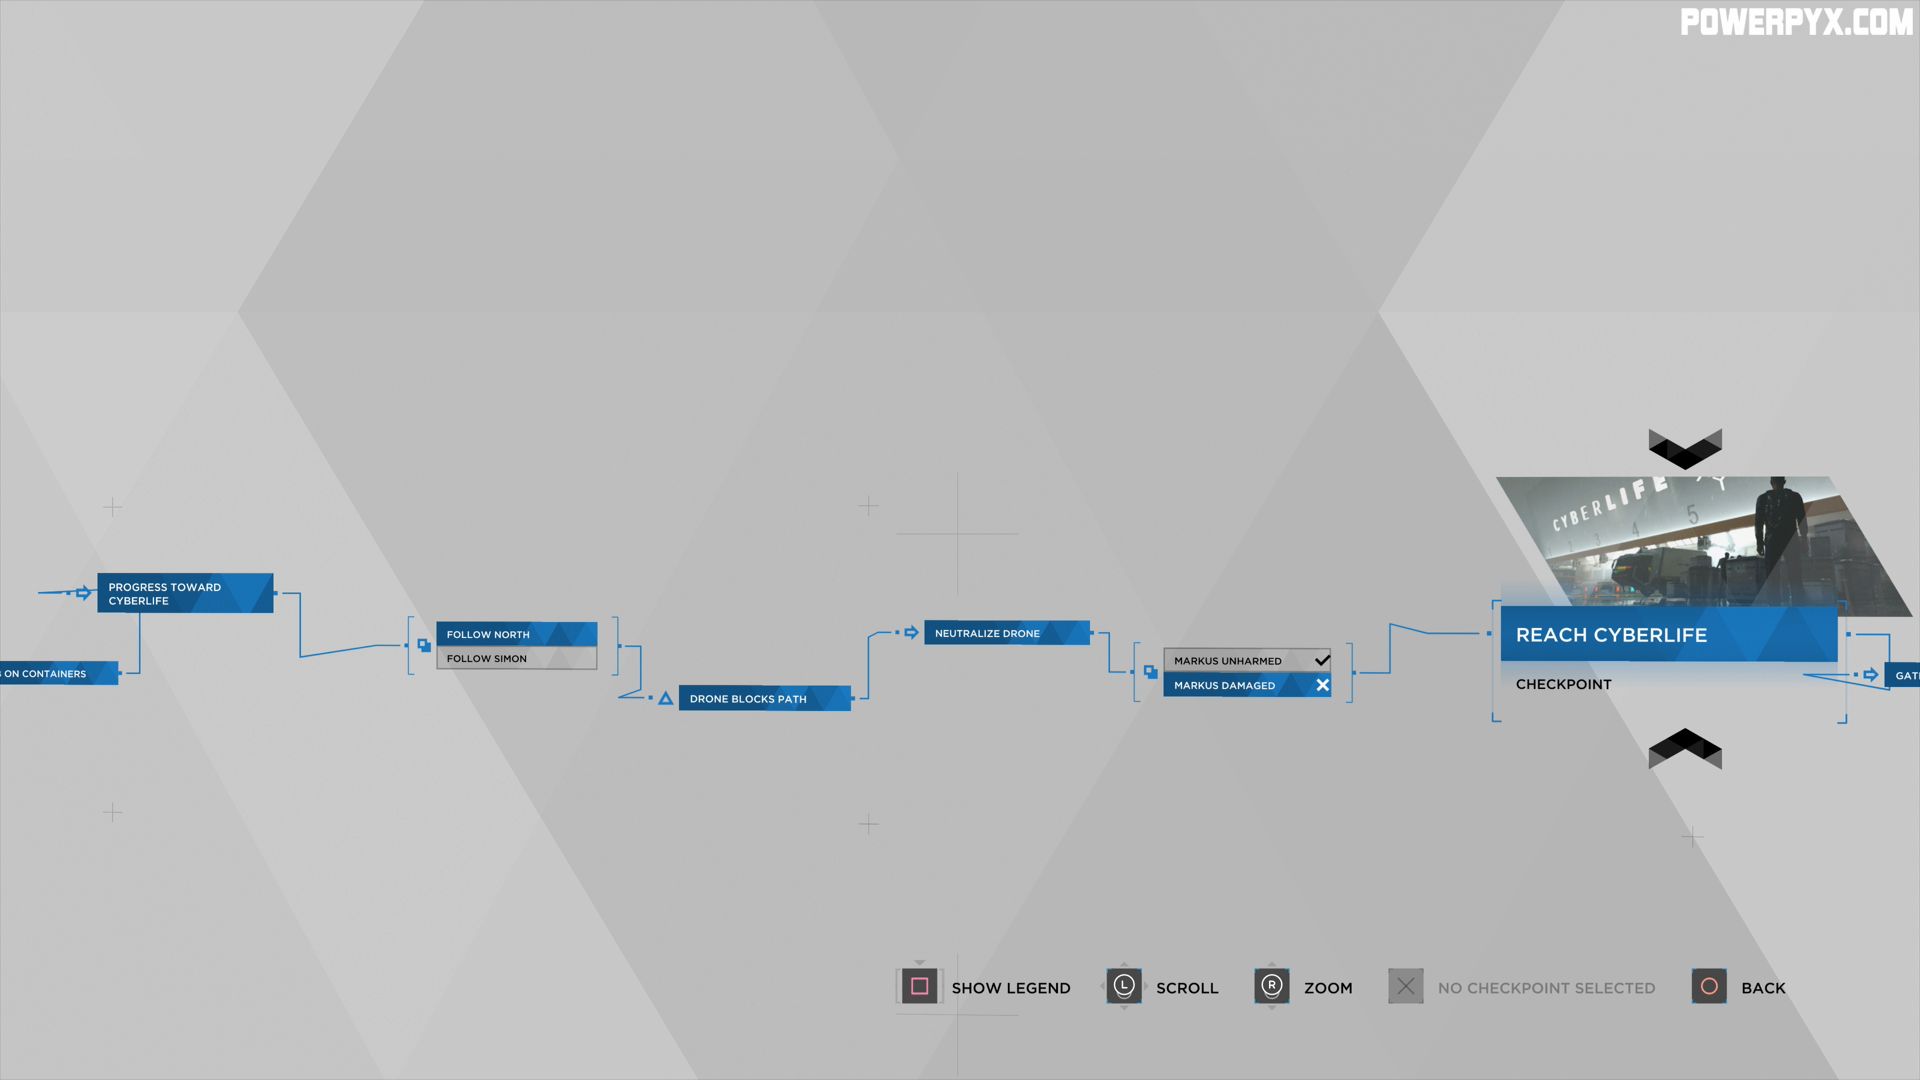
- Progress Toward CyberLife: After jumping over some containers you have two choices. North will call you to follow her. You can either do that and jump on the crane with her or you can follow Simon and jump over the rest of the containers.
- Follow North: You went after North (crane).
- Follow Simon: You went after Simon (jumped over containers).
- Drone Blocks Path: There’s an unmissable part in which a drone spawns. Markus has to preconstruct a climbing path to jump on top of the drone to destroy it.
- Neutralize Drone: In neutralizing the drone you have two possible outcomes, listed below.
- Markus Unharmed: Quickly press the shown button and Markus will destroy the drone unharmed.
- Markus Damaged: Fail to press any buttons while jumping on the drone to complete this task.
Checkpoint: Reach CyberLife
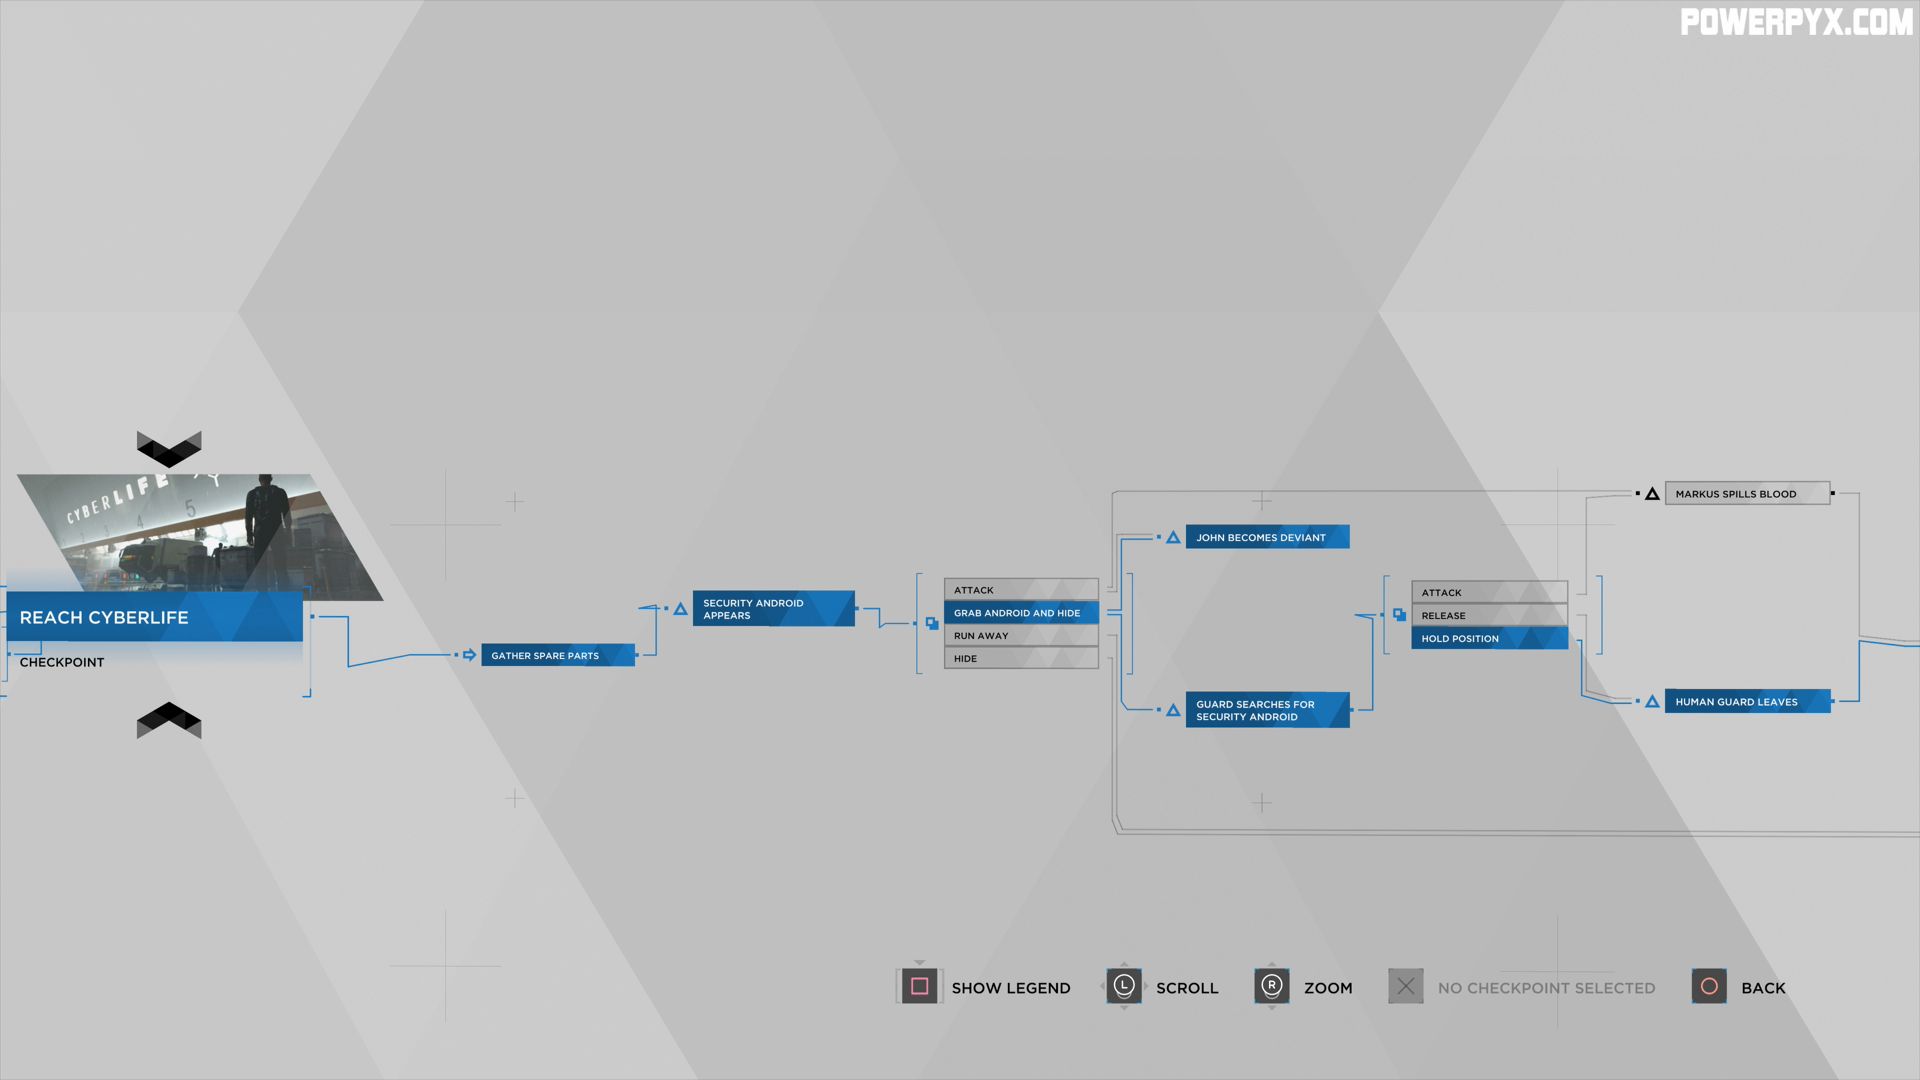
- Gather Spare Parts: You now reach the CyberLife storage area. As part of the story (unmissable) you must open a container to get spare parts from it.
- Security Android Appears: Also unmissable, a security guard will show up when you search through the container. A second security guard also arrives. You must choose what to do with him, although the “Grab Android and Hide” option is the best choice as it results in the most possibilities.
- Attack: This is going to kill the guard.
- Grab Android and Hide: (Recommended) This will grab the first guard. It results in the most follow-up objectives and is therefore the best pick for completion (and nobody has to get hurt).
- Run Away: (Worst Choice) Doing this will end the mission early and gets you low reputation with Jericho and your crew.
- Hide: You can hide but the second security guard will see you and it ends in the team running away and ending the mission early.
- John Becomes Deviant: Regardless of your above choice, John (first security guy) turns deviant and will help you. If for example and grab and hide him, he won’t make a sound. When you let him go he will even tell his supervisor all is good.
- Guard Searches for Security Android: This objective only triggers if you chose “Grab Android and Hide” as listed above. Then the second security guy will walk around and look for his buddy. You have multiple choices again. Either way John remains deviant and will be your ally.
- Attack: Kills the second security guard.
- Release: Let John go and he will tell the second guard all is good.
- Hold Position: Stay hidden with John.
- Markus Spills Blood: If you chose the “Attack” option in any of the points above you will get this result (Markus and his crew killed the second security guard).
- Human Guard Leaves: This is a result of making the second guard go away without raising suspicion. Best option is to Grab Android and Hide > Release. Then the android guard tells the human guard to go away.
Checkpoint: Resume Search

- Find Crate of Androids: After getting more parts, climb up the platform to the big box that contains more androids. You have two options.
- Free Androids: (Recommended) The best option is to free the androids as it boosts your reputation with the whole crew North▲, Jericho▲, Josh▲, Simon▲
- Leave Androids: You can also leave the androids be, no benefit from this though.
- John wants to Join: John, the security guard who stood by you asks to take him with you. North will argue that he’s a danger. Markus has to make a choice. If you take him with you he will tell you about a truck full of spare parts for Jericho. Getting this truck will very greatly boost reputation with the whole crew. This is a great thing to do. John will sacrifice himself for Markus later in “Chapter: Freedom March”. On the other hand, if you Refuse to take John with you he won’t tell you about the truck full of parts and some of the next flowchart steps won’t trigger. However, leaving him behind is beneficial if you want to cut this playthrough short (e.g. for “I’ll Be Back” trophy) to let Markus die during the Freedom March later on.
- Accept: Choose to take John with you. He will now tell you about a truck full of parts. Josh ▲, Simon ▼
- Refuse: Do not take him with you. He won’t tell you about the spare parts and the mission ends sooner.
- John Mentions Key: If you accepted to let John join you he will give you the location of a key needed for the truck full of parts.
- Accept: Agree to go get the key. This is needed for some follow-up flowchart steps.
- Refuse: Do not go for the key and the mission ends sooner.
Checkpoint: Control Room

- Enter Room: If Markus let John join the crew and accepted to go after the key this objective will trigger. Enter the control room.
- Find Key: Press
 to locate the key inside the guard house.
- Threaten Guards: To do this, grab the gun in the case behind the guards.
- Kill Guards: During the fight with the guards, press all button prompts until you are done chocking the small guard (when you have to press
 repeatedly). After chocking the guard stop pressing any buttons. Then the big guard points a gun at Markus. Markus pushed the small guard into the big one and then uses his own weapon to kill him. (*Credit to Duke for submitting a comment about this)
- Markus Spills Blood: This is the result of killing the guards, automatic if you do the above. (*Credit to Duke for submitting a comment about this)
- Incapacitate Guards: Win the fight against the guards after threatening them with the gun.
- Trigger Alarm: Don’t press any buttons during the guard fight and they will ring the alarm.
- Kill Guards: During the fight with the guards, press all button prompts until you are done chocking the small guard (when you have to press
- Lure Guards: To do this you have got to look out the window in the back of the guard house with (do not use gun). Markus will see some barrels outside that can be used to make noise.
- Avoid Guards: Go outside to the Barrels and kick one barrel so it makes noise. The guards will investigate. Now get back inside through the window and pick the key from the console. Get back outside through the window before the guards come back. Do not be seen by the guards during this!
- Fail to Avoid Guards: Intentionally get yourself caught. To do this, wait for the guards to come back inside and they will spot (or stand where they can see you from outside). You can also do it during the Blackout, just let the guards see you when investigating the room.
- Create Blackout: The third option inside the guard house is to look at the server by the door ( ). Then you can pick up a screwdriver near the gun case and use it on the server to cause a blackout.
- Threaten Guards: To do this, grab the gun in the case behind the guards.
- Markus Gets Spotted: Do neither of the 3 options described above. Walk straight into the two guards and they will spot you and ring the alarm.
If Markus Successfully Stole the Key:
- Steal Key: If you either threatened, distracted or caused a blackout you can steal the key in the guard house.
- Leave with Truck: Bring back the key to your group and use it on the door of the truck. Then start driving away. This is the best outcome to the mission and gives a huge reputation boost with all characters. North▲▲▲, Jericho▲▲▲, Josh▲, Simon▲▲▲
If Markus was caught at any stage during the chapter and caused an Alarm:
- Alarm Sounds: The alarm was triggered at any stage in the mission. Be it in the guardhouse or earlier when you investigated the boxes for spare parts.
- Run to Fence: Run towards the fence after alarm was triggered.
- Dogs Maul John: If you accepted John to come with you he will get attacked by Dogs. If you leave John behind he gets killed by the dogs.
- Sustain Damage Reaching the Fence: Wait and do nothing. The guard dogs will catch up to Markus and hurt him. Alternatively, you can go back to save John and mess up the button sequence.
- Back to Jericho: You successfully jumped over the fence and left for Jericho.
Endings
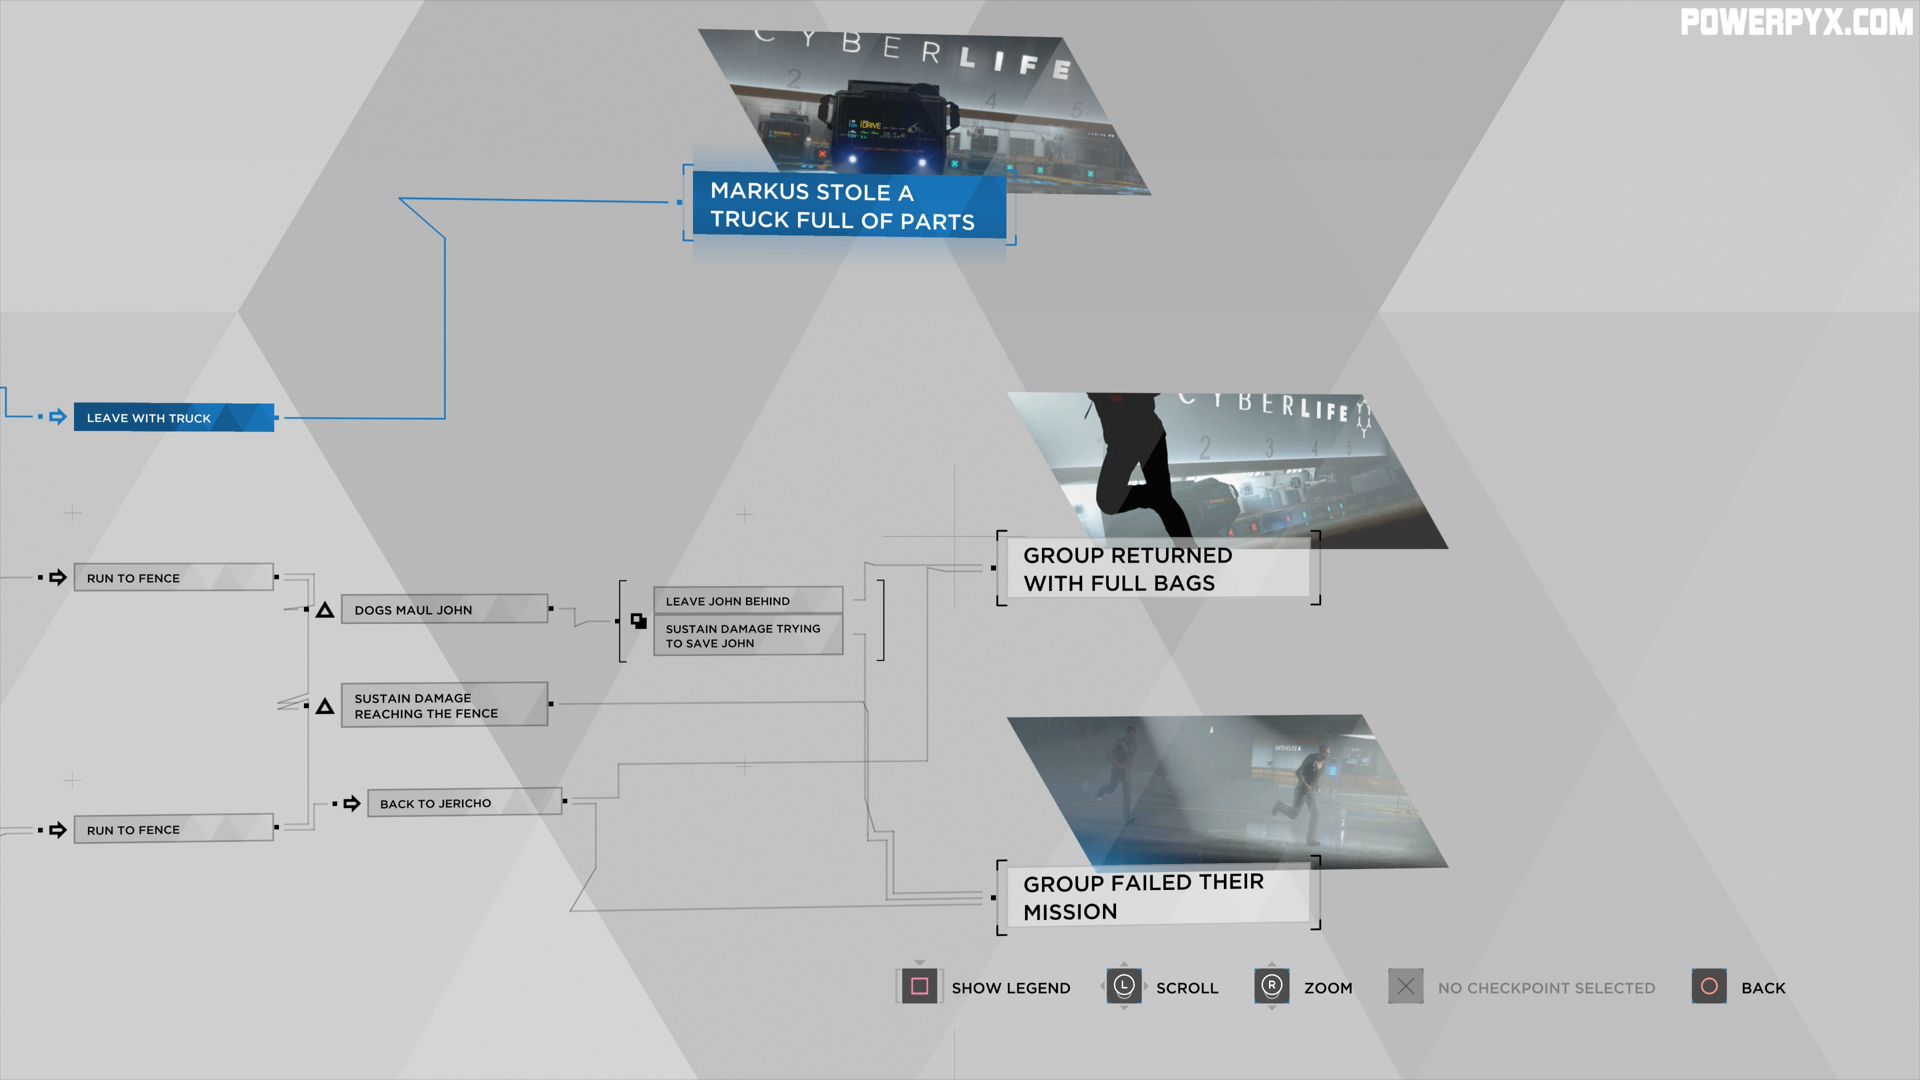
- Markus Stole A Truck Full of Parts: You allowed John to join you so he gives you info about the truck. Then you go the key from the guard house and used it on the truck to drive away.
- Group Returned with Full Bags: You got rid of the second security guard that comes around while you’re stealing from the boxes. Then you can loot another box and put the contents in your bag before you leave.
- Group Failed Their Mission: You did not get enough parts or had to leave everything behind. When the second security guard comes simply pick the “Run Away” option.
All done! This concludes the Spare Parts Chapter.
Up Next: The Eden Club
For more Walkthroughs, check out the complete Detroit Become Human Walkthrough.
Duke says
threaten the Gaurds with the gun and let the fight ensue, semi fight them fail enough prompts not allowing them to hit the alarm. The scene ends with the fat black gaurd pointing a gun at Markus fail the prompt here and Markus kills the gaurd in the same fashion Kara kills Todd by accident. It fills the missing links in he chart with ‘kill guard’ and ‘Markus spills blood’
PowerPyx says
Awesome, thank you very much! I will try again. I did a few tries but must have won or lost too many button prompts. You’ll be credited of course.
Update: it worked! Updated in the guide now. What I did was to win the button sequences up until chocking the guard with and after (successfully) chocking him, I stopped pressing any buttons.
M says
Its my first playthroug, and I want to replay the last chapter I played because I dont like the way it ends so I chose a checkpoint to replay but I got a message saying that “previous checkpoints will be replaced?”, will it affect the choices before this checkpoint or does it only affect whats next?, because I only want to change whats going to happen after this checkpoint I want everything before it to remain the same
Roselace39 says
don’t know if you figured it out but just in case someone else wants to know, it only replaces what you did in the sense that if you picked triangle the first time and you replay, it’ll replace that first choice with whatever you choose this time. then you can see how the rest plays out later. but it doesn’t affect previous chapters, only what you’re currently replaying and the future (if applicable).
Lyspaere says
When the Android security guard found the group, I tried just hiding & it reported the group to the human guards
Roselace39 says
me too. i grabbed the guy and hid the first time and since this site said hiding is ok i did it this time around. dumb guard ratted us out too! i wonder how to get him not to, if you even could.
Daniel says
The first “hide” option needs to be updated as a bad decision as well because if you hide, John reports you and you have to run.
Lee Gpiee says
he never did that when I just did it tho?
Mrmystery99 says
Some of this needs to be changed because it’s not accurate. The hide action results in failure, not success.
PowerPyx says
You are right, I must have mixed up the “Hide” option with “Grab Android and Hide”. I replayed and after chosing Hide the 2nd guy saw me and then team ran away.
It’s fixed now, thanks for pointing that out 🙂
M83 says
Under “almost spotted” at the beginning of the guide Connor is referenced. It should be Markus.
Zakuro says
I accepted John to be part of our tribe. I got the guards to the trigger the alarm. I ran towards the fence but I always get mauled by dogs. John always dies. There’s no other option for me here and I’m missing two unlockable nodes!
zakuro says
I wasn’t making it to the fence in time. Problem solved.
Alice says
I wasn’t given the option to “run away”. I was only given the option to hide, grab android and hide, or attack. What conditions need to be met for me to be able to pick the option “run away” off in the distance where the dogs are?
Alice says
The game needed to be on a harder difficulty instead of the easier one as I had been playing on. I am leaving this comment here in case others have issues completing this mission and unlocking that node for “run away” during those other options.
CharmedAnt says
Thank you, i was wondering why that option wasn’t showing for me. I usually prefer to play for stories, not button mashing skill.
Twithc says
If you damage Markus while taking down the drone you will lose respect with North, Josh, Simon and Jericho.
Tsunoba says
I somehow seem to have avoided the guards and failed to avoid the guards in the same playthrough. They sound like mutually exclusive options, but apparently they’re not?
CharmedAnt says
No matter what I do, I get no button sequence for when the dog attacks. So no matter what you do, if this holds for everyone, you can’t save John if you run. I tried on both difficulty settings as well.
Icy says
In the `Accept` choice of `John wants to Join`, you actually forgot to include it deteriorates your relation with North (`North ▼`).
By the way your guides are actually so good, thanks !
Joel says
North and Simon small opinion raise when you accept to get key from office. Josh small opinion fall.