
The Stratford Tower is the 23rd chapter in Detroit Become Human. This walkthrough will guide you through all the choices and endings of The Stratford Tower level for 100% completion.
Triggers automatically after completing The Bridge Chapter.
Flowchart 100% Complete:
Here’s a quick overview of the 100% complete flowchart for “The Stratford Tower”:

Checkpoint: Alone in Ferndale
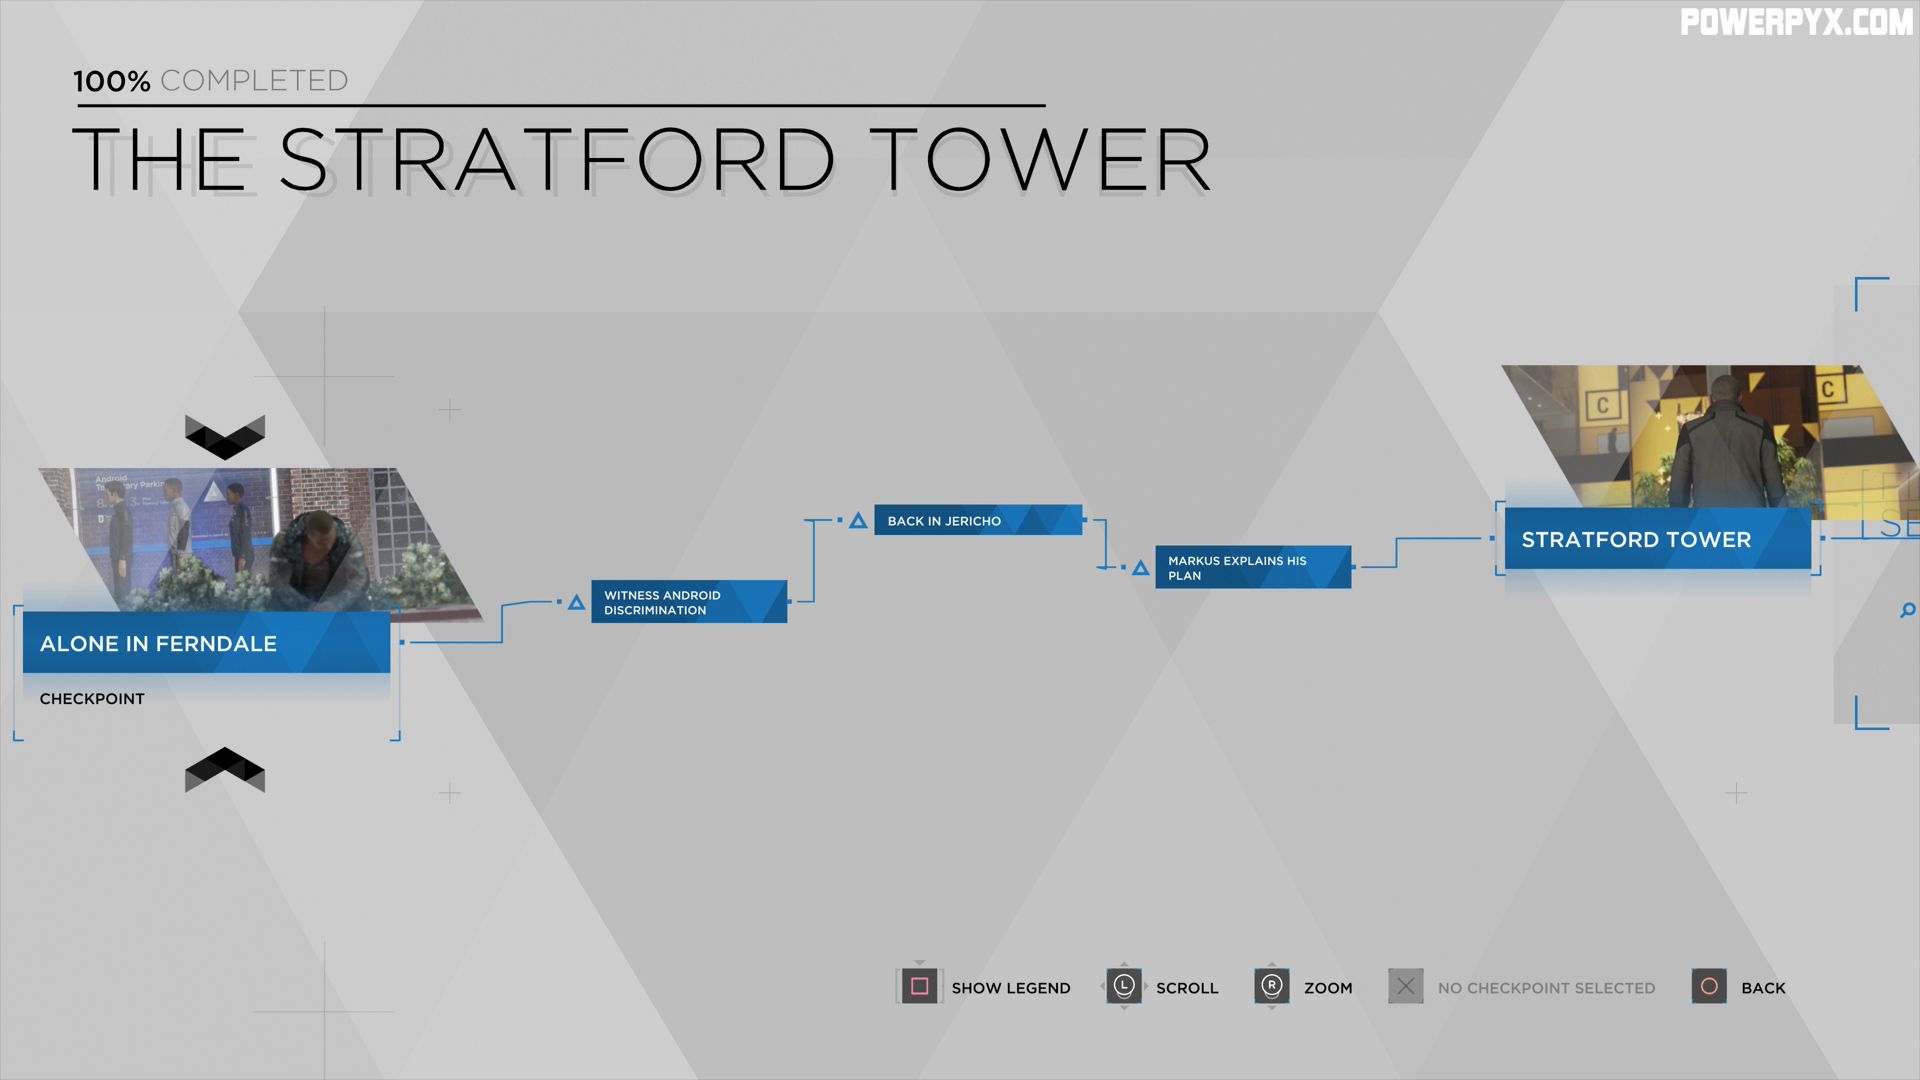
- Witness Android Discrimination: Completes automatically during cutscene.
- Back in Jericho: Completes automatically during cutscene.
- Markus Explains his Plan: Completes automatically during cutscene.
Checkpoint: Stratford Tower

- Talk to Android Receptionist: Talk to the android on the right side behind the front desk.
- Analyze Superior’s Desk: At the left side of the front desk sits the supervisor. Analyze all clues on and around her. This will give you 3 options to lure her away from her work place.
- Call Supervisor: After analyzing the supervisor, press
 to call her.
- Pose as Fireman: Choosing this dialogue will tell her that her house is on fire and she will leave.
- Pose as Teacher: This option tells her that her kid got sick at school and she will leave to go pick up her child.
- Pose as Parking Attendant: This tells her that someone crashed into her car and she leaves to check out the damage.
- Supervisor Leaves: Regardless of your choice she leaves.
- Call Supervisor: After analyzing the supervisor, press
- Talk to Unsupervised Android Receptionist: Main Objective, marked and unmissable.
- Convert Receptionist: Main Objective, marked and unmissable.
- Pass Security: Main Objective, marked and unmissable.
- Take Elevator: Main Objective, marked and unmissable.
Checkpoint: At Floor 47

- Read “G.I. Android” (Magazine No. 38): Found at floor 47 after taking the elevator up from the lobby. Sitting on a counter in the restaurant area (you can grab it before putting on the uniform in the bathroom).
- Read “Woman in Trouble” (Magazine No. 06): Same as Magazine No. 38 (check both covers).
- Retrieve Package: Main Objective, marked and unmissable.
- Acquire Maintenance Badge: Main Objective, marked and unmissable.
- Take Cart: Main Objective, marked and unmissable.
- Let North In: Main Objective, marked and unmissable.
- Security Blocks Server Room: Main Objective, marked and unmissable. To get rid of the guards you have two options. Press
 to find the next two tasks more easily.
- Hack Robot: You can hack the robot that drives around the other side of the area (near elevators). This distracts the guards to check what’s wrong with the robot.
- Hack Dispenser: Or you can hack the dispenser in the cafeteria just at the end of the hallway where the guards are standing.
- Security Distracted: Main Objective, unmissable. The result of distracting the guards with the above two options.
- Enter Server Room: Main Objective, marked and unmissable.
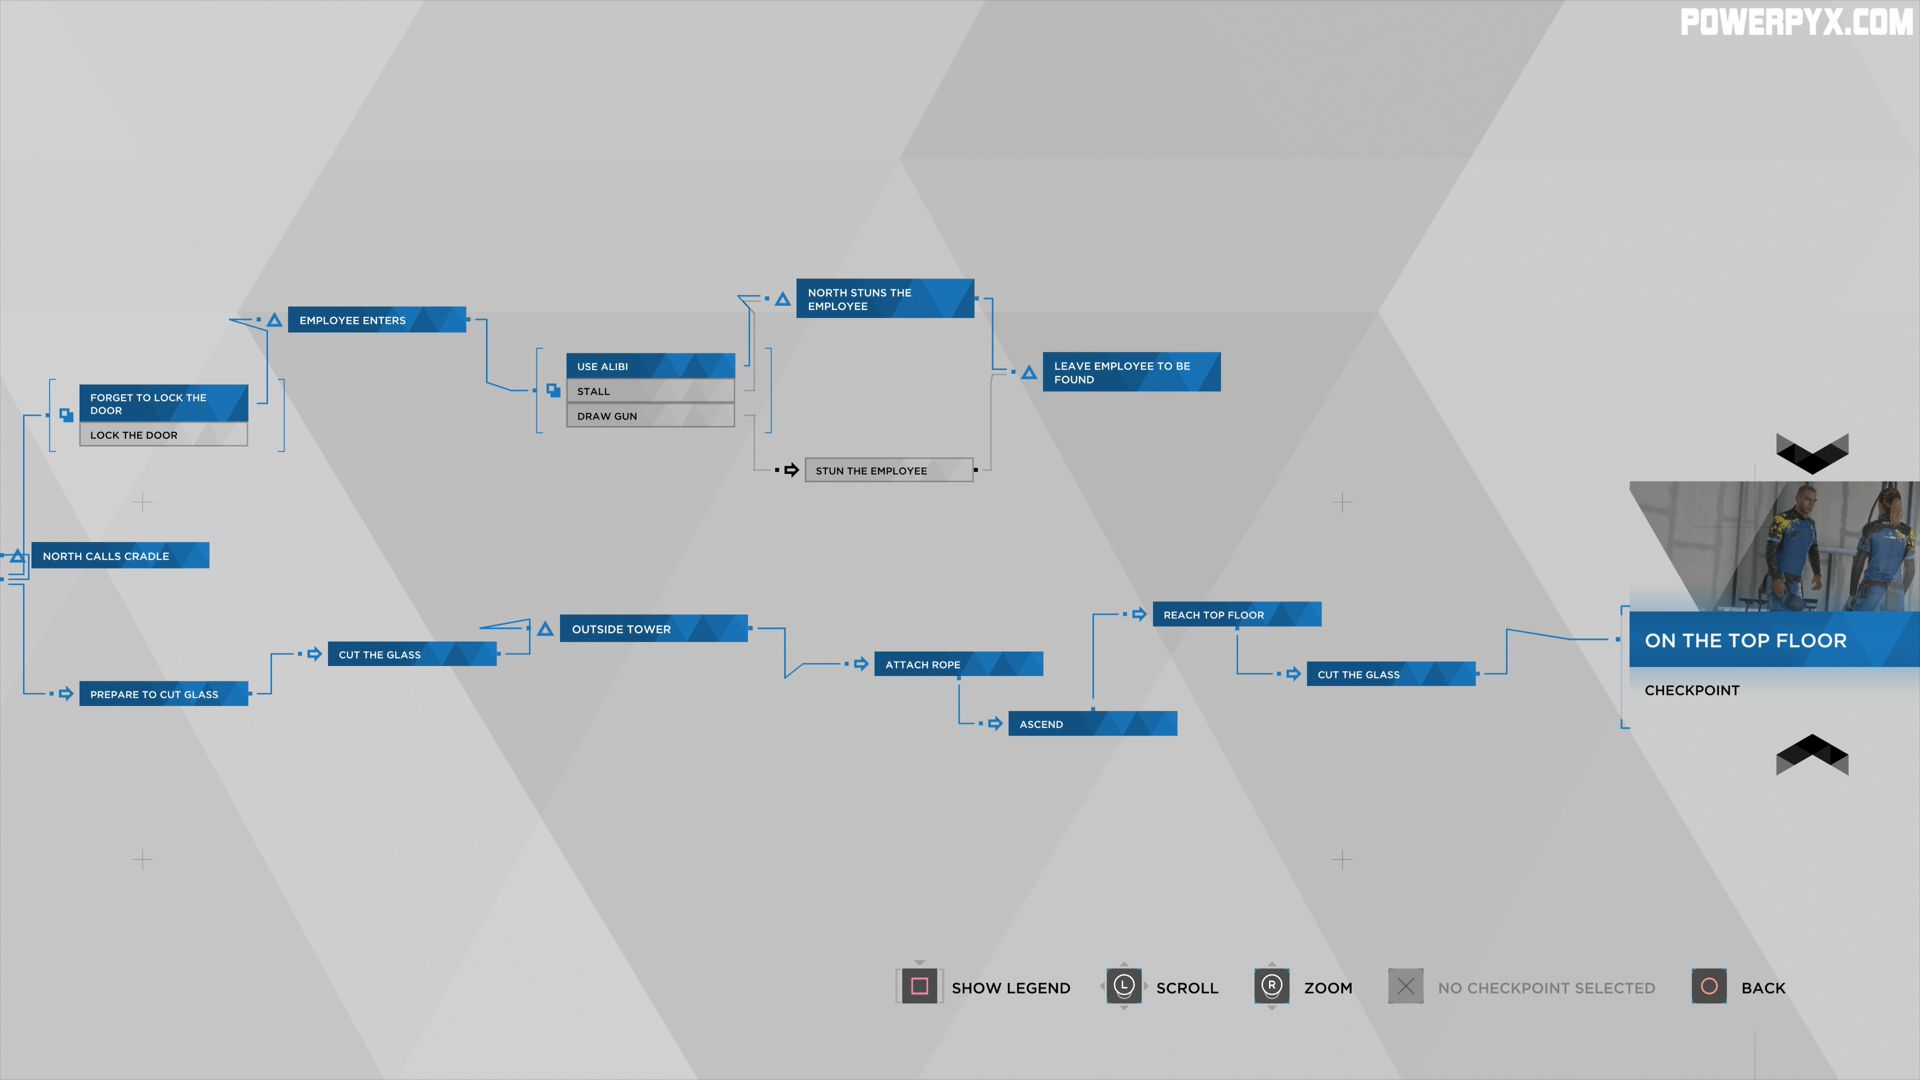
- Forget to Lock the Door: For the next few tasks you are not allowed to lock the door of the server room. Just keep walking and unpack the bags, use the window cutter on the window.
- Employee Enters: When you plant the window cutter an employee comes in. There are now 3 dialogue choices with different outcomes.
- Use Alibi: Pick the ALIBI dialogue.
- North Stuns the Employee: The employee is suspicious and North automatically knocks him out before he rings the alarm.
- Stall: Pick the STALL dialogue.
- Draw Gun: Pick DRAW GUN dialogue.
- Stun the Employee: After choosing the DRAW GUN option you will knock out the guy.
- –> Leave Employee to be found: Leave the guard where he is and cut through the window to continue the mission.
- Stun the Employee: After choosing the DRAW GUN option you will knock out the guy.
- Use Alibi: Pick the ALIBI dialogue.
- Employee Enters: When you plant the window cutter an employee comes in. There are now 3 dialogue choices with different outcomes.
- Lock the Door: This is the second path you can take in the server room by locking the door behind you. Then the employee does not come in at all.
- North Calls Cradle: Happens automatically, unmissable.
- Prepare to Cut Glass: Happens automatically, unmissable.
- Cut the Glass: Happens automatically, unmissable.
- Outside Tower: Happens automatically, unmissable.
- Attach Rope: Happens automatically, unmissable.
- Ascend: Happens automatically, unmissable.
- Reach Top Floor: Happens automatically, unmissable.
- Cut the Glass: Happens automatically, unmissable.
- Forget to Lock the Door: For the next few tasks you are not allowed to lock the door of the server room. Just keep walking and unpack the bags, use the window cutter on the window.
Checkpoint: On the Top Floor
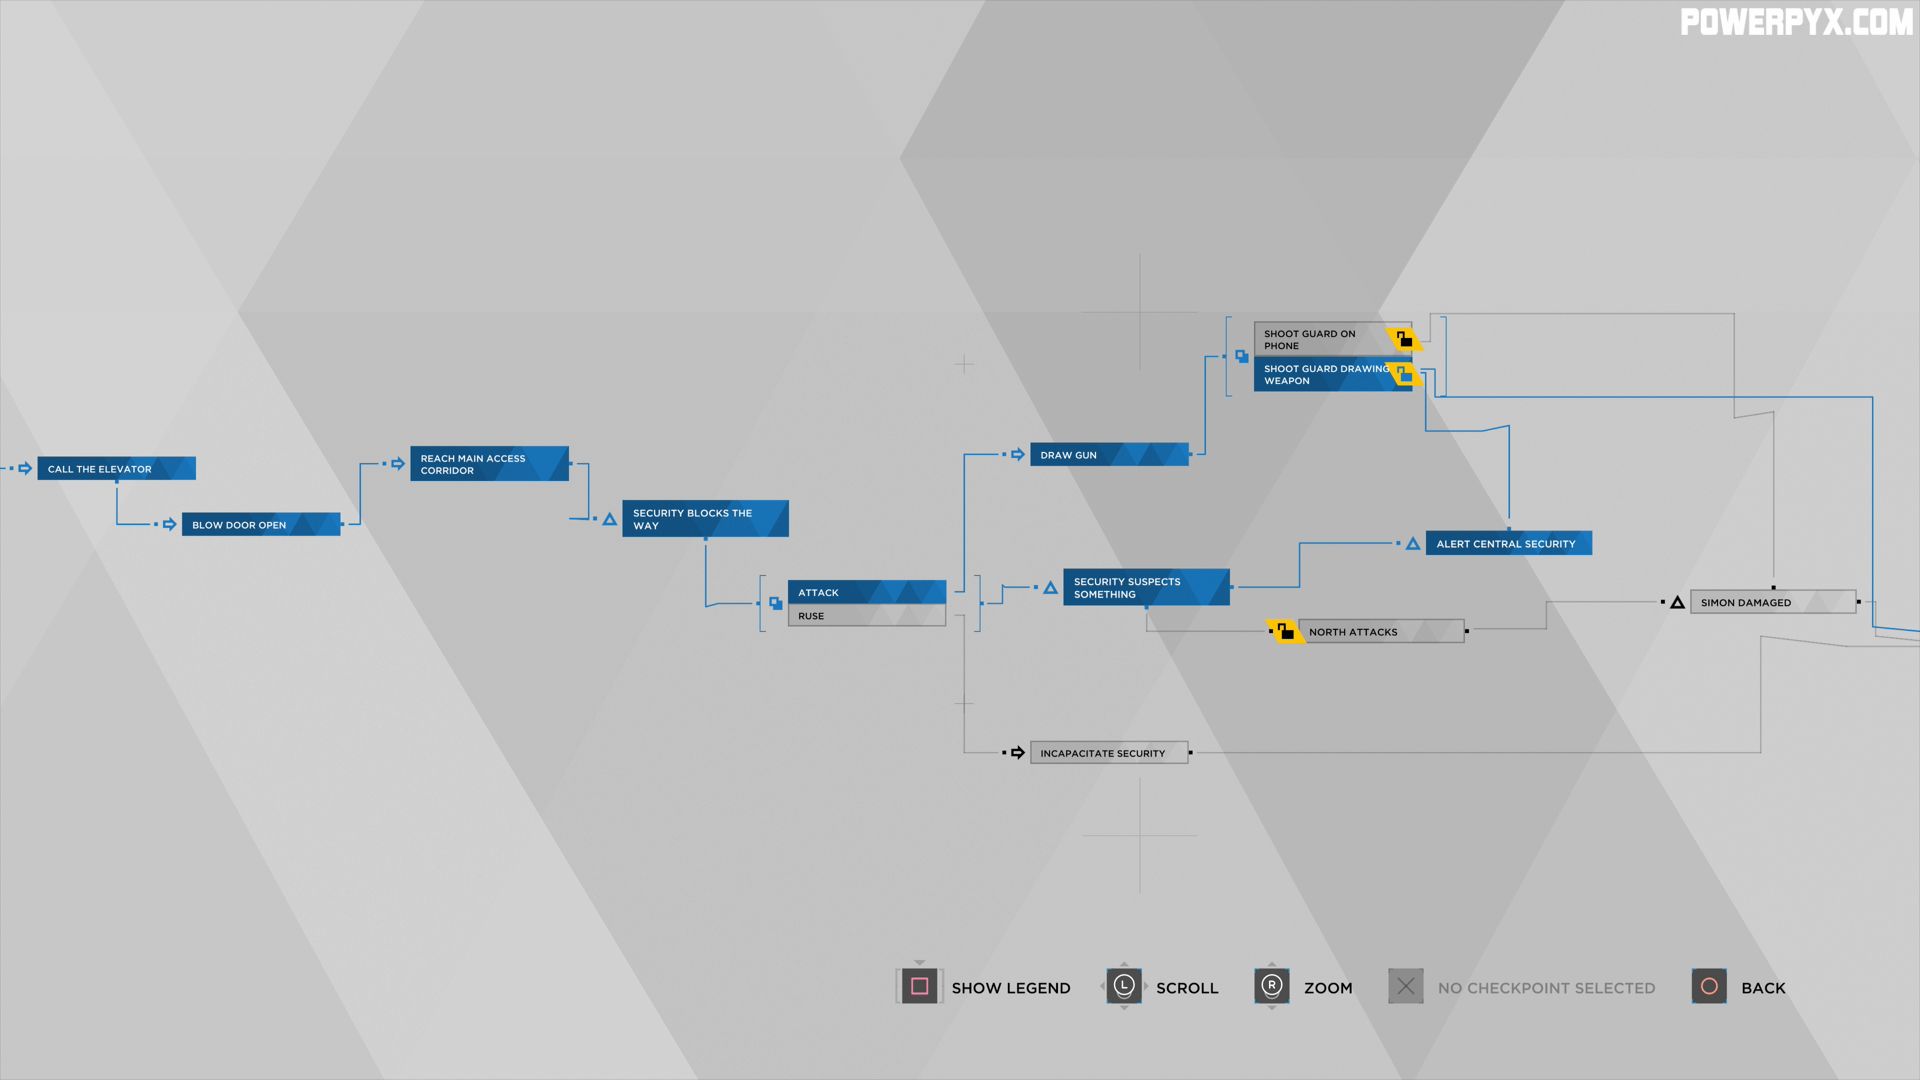
- Call the Elevator: Happens automatically, unmissable.
- Blow Door Open: Happens automatically, unmissable.
- Reach Main Access Corridor: Happens automatically, unmissable.
- Security Blocks the Way: Happens automatically, unmissable. When you encounter the two guards at the security desk you have two choices.
- Attack: Pick the option ASSAULT.
- Draw Gun: As you walk towards the guards draw your gun with the displayed button prompt.
- Shoot Guard on Phone [CROSS CHAPTER IMPACT]: Shoot the guard on the left side with
 . Shooting him results in Simon being shot by the other guy.
 - Shoot Guard Drawing Weapon [CROSS CHAPTER IMPACT]: Shoot the guard on the right side with
 . Shoot him results in Simon not being shot.
 - Alert Central Security: Happens when the guy at the phone gets a chance to call for backup (don’t do anything or shoot the other guy)
- Shoot Guard on Phone [CROSS CHAPTER IMPACT]: Shoot the guard on the left side with
- Security Suspects Something: If you picked the ASSAULT option, don’t do anything as you move towards the guards, don’t draw your gun.
- North Attacks [CROSS CHAPTER IMPACT]: If you picked the ASSAULT option, don’t do anything as you move towards the guards, don’t draw your gun.
- Simon Damaged: Happens if you picked the ASSAULT option and shot the guard on phone. Then the guard drawing his weapon will shoot Simon (but it is not fatal, he’s just hurt and can go on).
- Draw Gun: As you walk towards the guards draw your gun with the displayed button prompt.
- Ruse: This is the non-violent solution. Pick
 RUSE and draw your gun to intimidate the guards.
- Incapacitate Security: Press
 to knock them out.
- Incapacitate Security: Press
- Attack: Pick the option
Checkpoint: In the Broadcast Room


- Ring to Enter: Happens automatically, unmissable.
- North and Josh Threaten the Operator: Happens automatically, unmissable.
- Operator Tries to Escape: Happens automatically, unmissable.
- Shoot Operator [CROSS CHAPTER IMPACT]: When the operator tries to escape, choose SHOOT. Results in him not calling for backup. However, it drastically decreases public opinion about androids. It’s also worth noting that this guy does not count for the “SURVIVORS” trophy (everyone is alive at end of game). You are allowed to shoot him, it doesn’t void the trophy.
- Don’t Shoot Operator: Choose SPARE when the operator runs away. This is the pacifist option – not shooting him will result in backups arriving soon. It’s the option I recommend.
- Deal with Android Operators: Markus has to point his gun at them to tell them to go away.
- Prepare to Broadcast: The broadcast is an automatic story part. During it you can pick different dialogues as listed below:
- Begin Calmly
- Begin Determinedly
- Demand Recognition
- Demand End of Slavery
- Demand Equal Rights
- Demand Free Speech
- Demand Justice
- Demand End to Segregation
- Demand Right to Work
- Demand Universal Suffrage
- Demand Right to Own Property
- Demand Means of Reproduction
- Demand Territory
- End Peacefully
- End Determinedly
- SWAT Storms the Room: After the speech, if you chose SPARE when the operator ran away, a SWAT team will shoot up the room.
- Simon Damaged: A result of the SWAT arriving.
- Leave Simon: You are given a chance to either save Simon or run away to the roof. For this you must leave Simon to be killed by SWAT.
- Simon is killed: You left Simon to die by the hands of the SWAT, did all the above points.
- Try to Save Simon: Instead of leaving Simon when the SWAT storms the room, choose to Save him.
- Fail to save Simon: When you go to save Simon, don’t press any button. Then the SWAT shoots him anyway.
- Simon Saved: When you go to save Simon, quickly press the display button to bring him to the roof with you.
- Leave Broadcast Room: Escape without raising an alarm during this mission.
Checkpoint: On the Roof
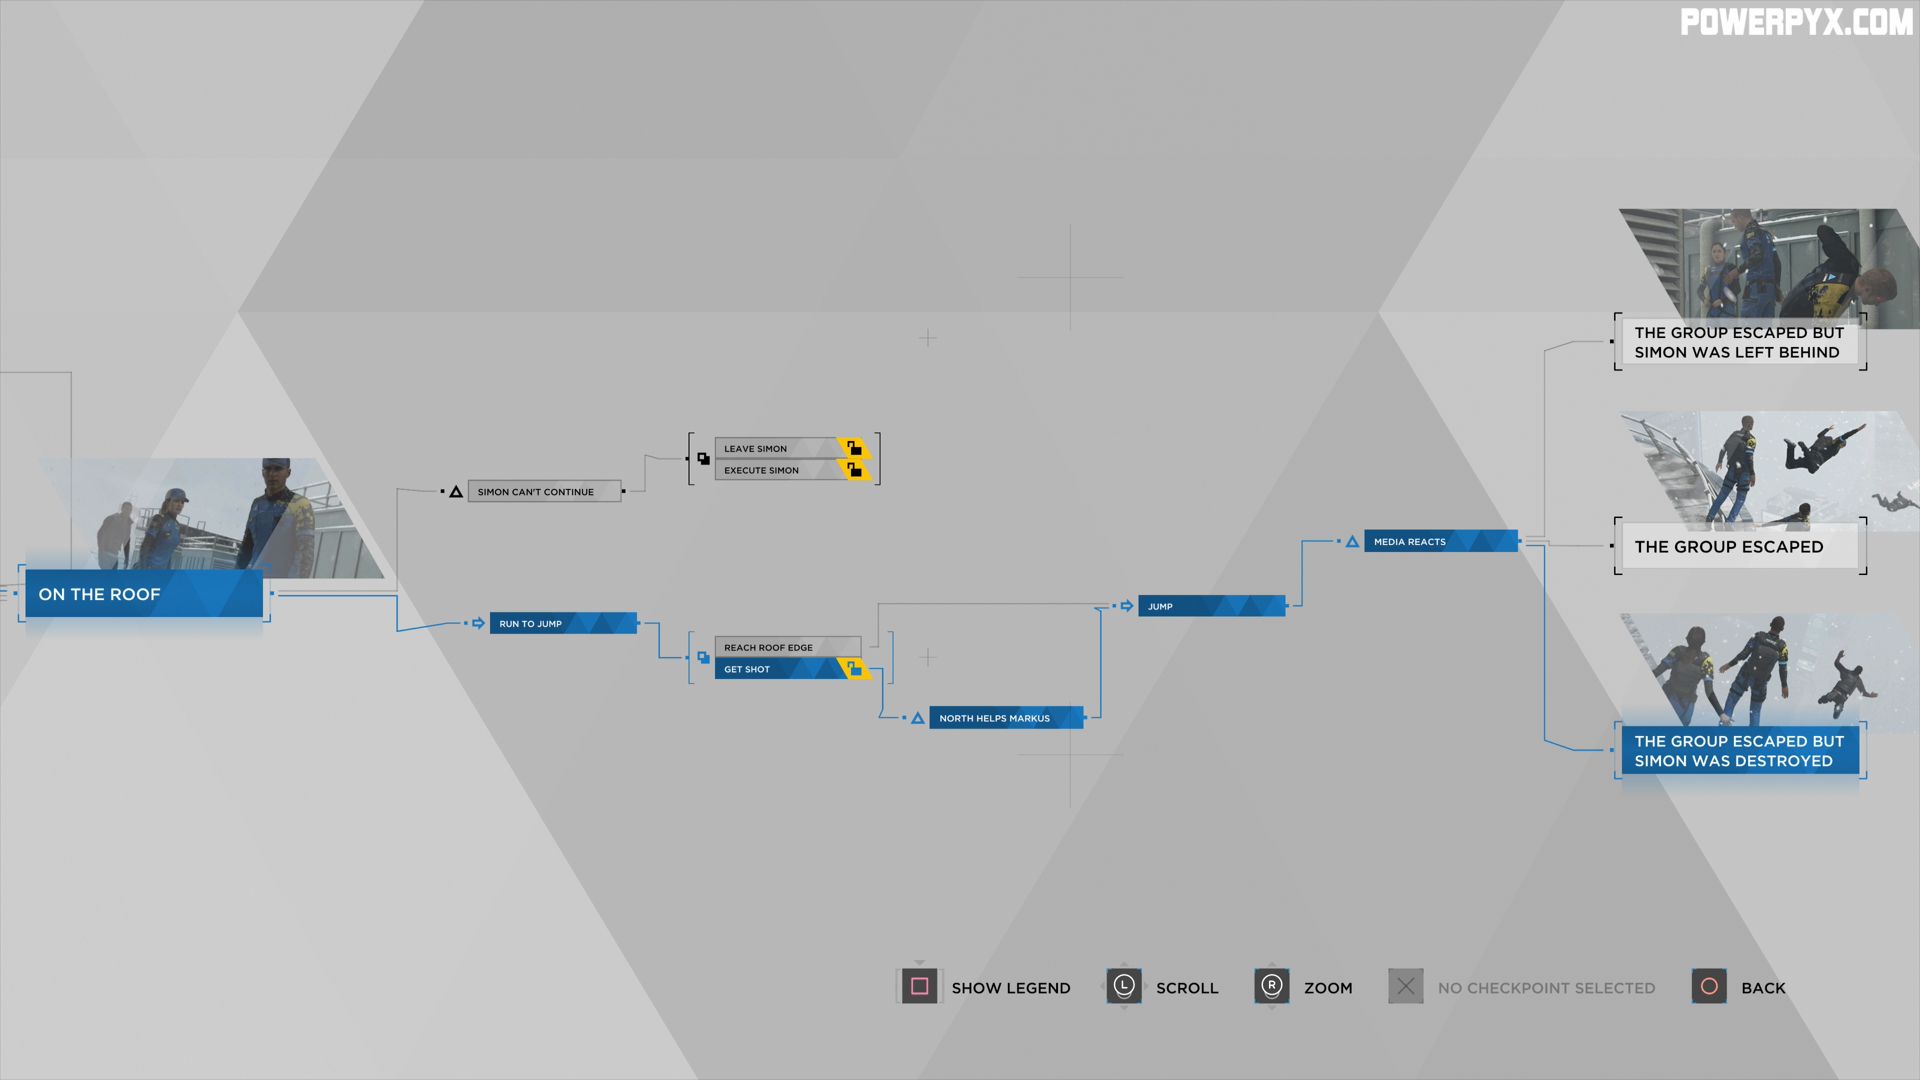
- Simon Can’t Continue: Triggers if Simon was wounded during the mission. Either you chose the ASSAULT option at the security desk and shot the guy on phone or you SPARED the operator and the SWAT shot Simon. You must bring him to the roof with you (if SWAT comes, choose to save him).
- Leave Simon [CROSS CHAPTER IMPACT]: Choose to leave Simon behind but leave him alive. He will hide from the police. In the next chapter ‘Public Enemy’ Connor can either find Simon or ignore him. If Connor ignores Simon, he will rejoin Markus and the group later and won’t die.
- Execute Simon [CROSS CHAPTER IMPACT]: You can kill Simon, but this is not a good choice. It will lock you out from a bunch of stuff in the future.
- Run to Jump: On the roof run towards the edge when the SWAT breaks the door.
- Reach Roof Edge: You ran towards the edge and jumped.
- Get Shot [CROSS CHAPTER IMPACT]: Instead of running towards the edge just stand still and don’t press any buttons.
- North Helps Markus: Instead of running towards the edge just stand still and don’t press any buttons. North will save Markus.
- Jump: Automatically at end of mission.
- Media Reacts: Automatically at end of mission. Depending on your demands and kill count, the news will report different things. If nobody was killed and you chose the calm start & peaceful ending, Public Opinion will go up.
Endings
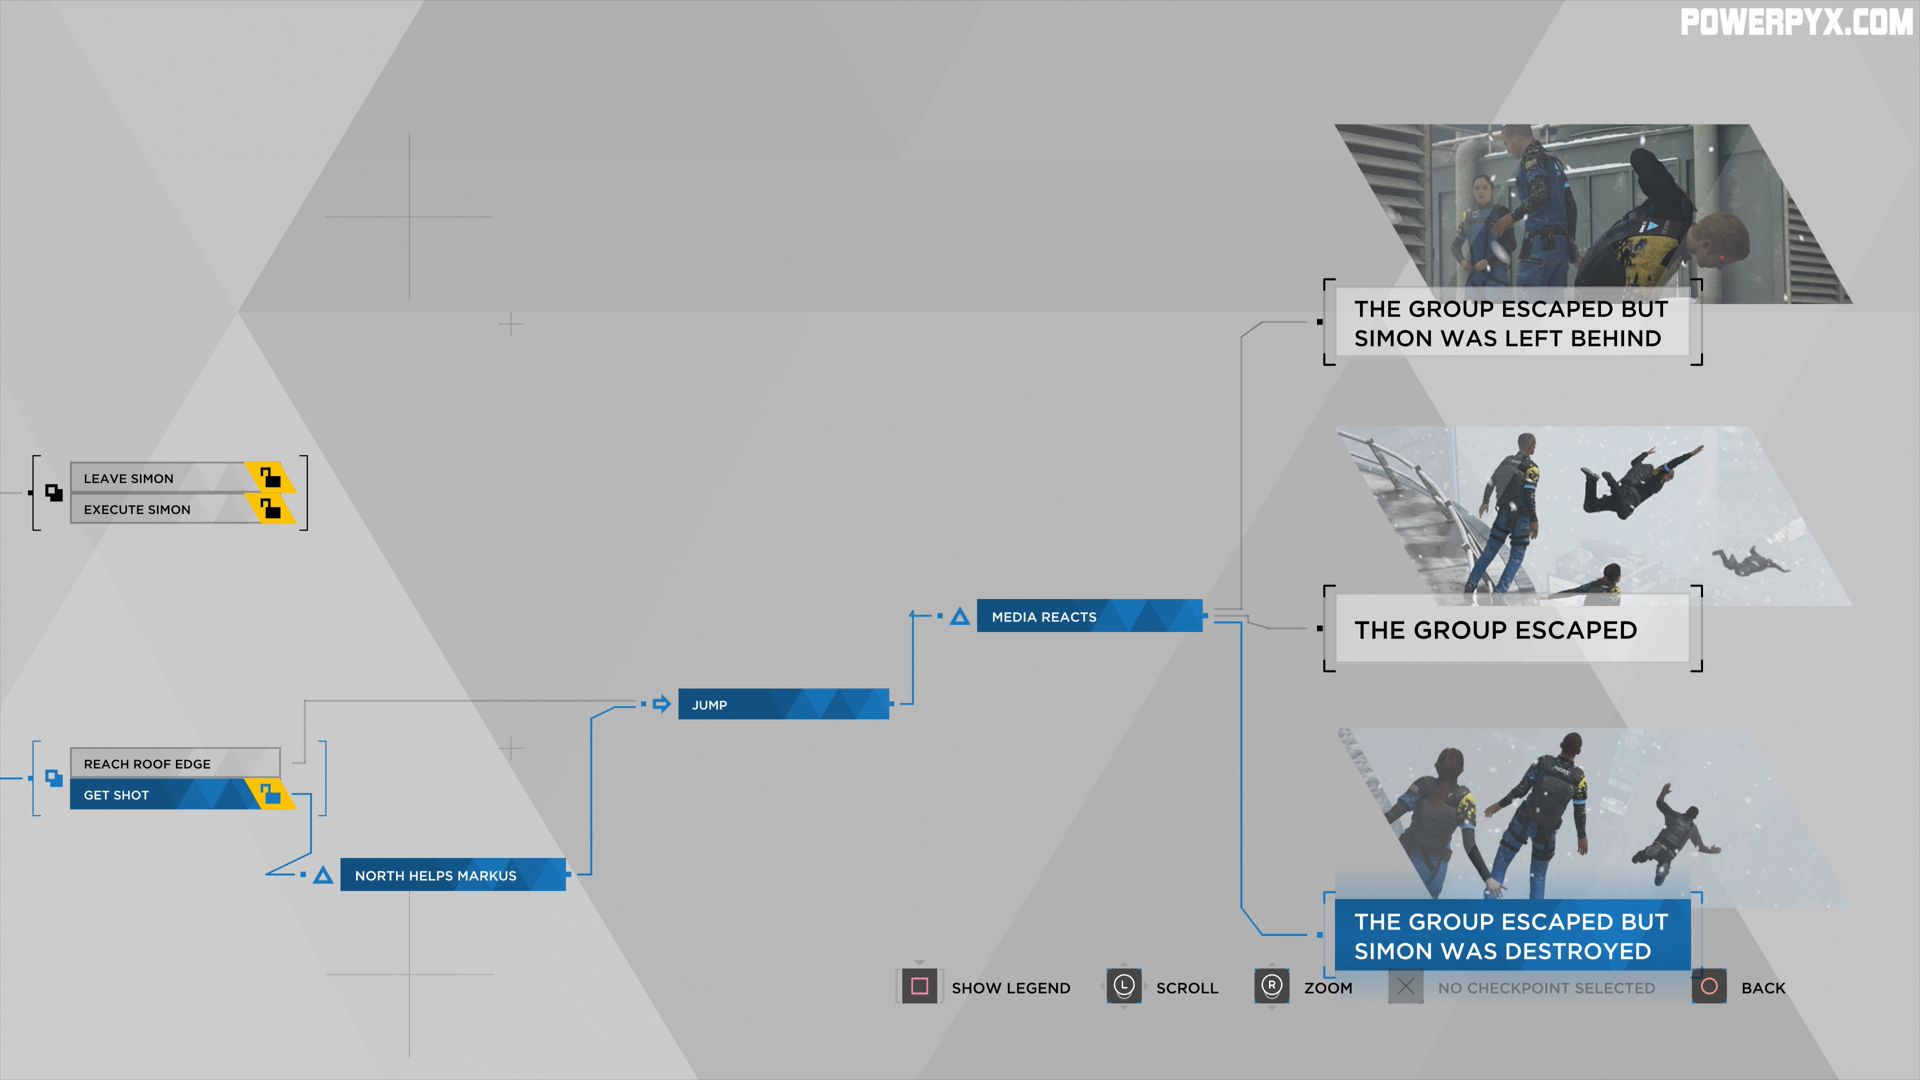
- The Group Escaped but Simon was left behind: Simon was left behind on the rooftop but you didn’t kill him. Either you chose the ASSAULT option at the security desk and shot the guy on phone or you SPARED the operator and the SWAT shot Simon. You must bring him to the roof with you (if SWAT comes, choose to save him).
- The Group Escaped: This happens if the whole group (including Simon) survive and escape from the roof. To do this, pick the RUSE option at the security desk and SHOOT the operator so he doesn’t call for backup.
- The Group Escaped but Simon was destroyed: Simon was killed during the mission. You SPARED the operator and the SWAT came in and killed Simon or you brought wounded Simon to the rooftop with you and then executed him.
All done! This concludes The Stratford Tower Chapter.
Up Next: Public Enemy
For more Walkthroughs, check out the complete Detroit Become Human Walkthrough.
Mrmystery99 says
I haven’t unlocked Leave Broadcast Room. Any ideas?
Bee says
So, I had this problem too for a while, until I went back and replayed it. To make sure that you get the “leave broadcast room” option, you have to make sure that you lock the server room door behind you, incapacitate the guards, and shoot the operator.
bronakopdin says
yeah the article fails to mention that you also have to lock the server room door after North tells you to before starting to work on the window so noone enters while you’re in there. Otherwise it can be assumed that the guy that enters woke up after being knocked out and alarmed security, even if it’s not as obvious as the assult on the guards or the fleeing operator.
M83 says
How do I get the “leave broadcast room” node? No matter what I do SWAT enters even when shooting the run away and that node won’t highlight no matter what.
Sing says
Make sure you locked the door to the server room. Then with the two human guards before the broadcast room, choose RUSE. Should you get your node.
suicide says
For Group Escaped but Simon was left behind, I think that you mean that you shot the guard with the gun or let the operator escape. If you shoot the guard on the phone, he can’t broadcast the alarm.
bronakopdin says
it doesn’t matter if Simon is shot at that point already or later in the broadcast room. Failing to lock the server room door also triggers the swat team so Simon is hit anyway.
Arbitrary says
If you don’t do anything when you pick ruse the guards phone for security and simon gets injured
Antony says
As mentioned in a comment, if you don’t lock the door to the server room and the employee enters this will also trigger the SWAT team attack.
Lock the door, ruse the guards and shoot the station operator to ensure no SWAT.
Marcus says
Ok the do nothing on the roof and get wounded isn’t working. It makes me auto jump off the roof. Every time
Janne says
Same. It’s so annoying I don’t know what to do.
EDWARD says
You have to shoot the operator to save simon and prevent swat but you will be labled a terrorist and public opinion will only go down. Hope that solves your issues.
StrangerDanger says
Using “Bluff” on the far left deviant Android didn’t trigger anything. I reloaded and tried the other three options “Violence, Torture and Probe Memory” those will trigger the Android to attack.
Also, you can only choose to go to the roof or interrogate the Androids in the kitchen. Not both. Doing either ends the chapter. If you want Simon to not be found on the roof, you have to interrogate the Androids in the kitchen. Thereby bypassing the roof option altogether.
RODRIGO SILVA says
That’s for the next chapter, “Public Enemy”
LULU says
I can not find the guards I’m supposed to almost get caught by.
amy says
anyone know what the cross chapter impact is if Markus gets shot by swat when on the roof?? I’m really interested… I accidentally got that path and apparently only 1% of people got it too, I’m thinking of just going back and replaying in case the chapter impact is bad
Mish says
There will be an extra puddle of blood for Connor to examine when investigating the roof in the next chapter
James says
It should be noted that you can still get the survivor trophy if you leave Simon on the roof alive but don’t investigate the roof in the next chapter. This results in Simon eventually making it back to Jericho on his own
Marcel says
I know I’m four years late but here’s one quick thing: You can choose “Determined” to start the speech and public opinion will still go up if you didn’t hurt anyone.
Kormy says
In the Checkpoint: At Floor 47 North stuns the employee in both alibi and stall options.