
This walkthrough for Chapter 6: Below in The Callisto Protocol will guide you through all objectives. This also includes Collectibles, Resource Caches and other important items.
For other Chapters see The Callisto Protocol Walkthrough.
Collectibles:
- Data-Bios: 5
- Obtainable Trophies:
 The Commonality,
  Power Up, Two Heads Are Better Than One


Follow Dani
After the intro cutscene just follow Dani.

Find Another Way Down
After walking a bit with Dani you will be separated. Just follow the given path.

You will soon come across this place. If you crawl through the left side you can find some credits.


If you got the credits, you can go back and jump down. After jumping down just get on the other side of the cell block.

Again follow the given path, there’s not much to see here. After a while, you will have to climb down a ladder.

Follow the path and go over the bridge to reach Dani.

You will fall down, and after that, you will hang upside down. Once you are free, kill both enemies in this room, now leave this room.

Data-Bios #28 – Dr. Sheehan Yune: Field Log 1
After the room where you hang upside down you will get into the room with the Data-Bio on the table.


Now go through the door. You will have two options here, to the left is the story path but if you follow the Path to the right you will find a Resource Cache.

Resource Cache:
Turn to the right and follow the given path.

After squeezing through a second wall you will reach a room with two enemies and the Resource Cache in the corner.


Now leave the room through the door next to the Cache and you will reach the room where you found Data-Bios #28 – Dr. Sheehan Yune: Field Log 1 , this time instead of turning right, go to the left.
Just follow the given path.

You will now reach this point after you fought two enemies that break out from the wall. In the room to the right, you can find a weapon schematic on the table.


Once again follow the given path, there’s nothing else to see. After a while you will come across this upgrade station, you can not miss it.

Follow the given path, and climb up here.

Data-Bios #29 – Dr. Sheehan Yune: Field Log 2
Shortly after climbing up, you will reach this floor with some blind enemies. You can sneak through here, you don’t need to kill someone.


After going through the door, immediately turn to the left and get the collectible.

Follow the given path, once you reached this place, climb up the ladder to the left.

Soon after you will reach a room with a lot of blind enemies. You can go completely stealth through this room. You have to reach a door on the other side of this room.


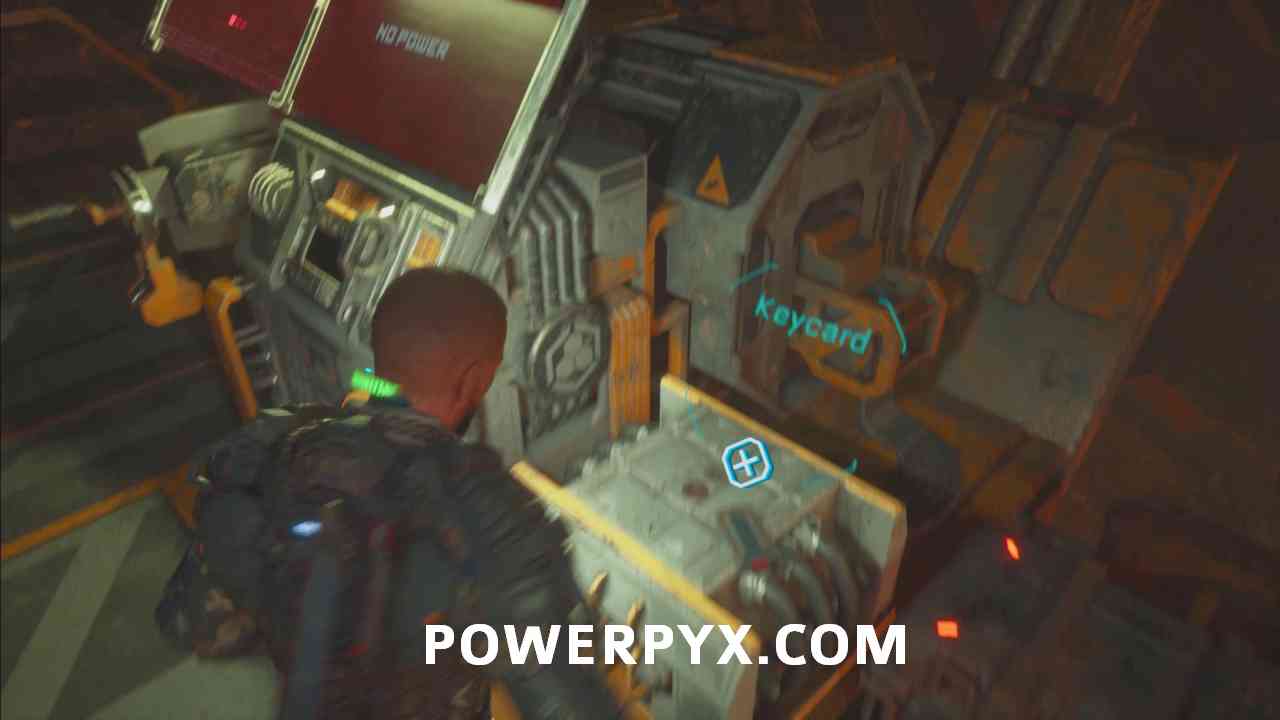
Find The Power Tunnels Keycard
After you get to the door, which you can not open yet, turn around and go to the left and squeeze through the wall.

You will get into a room with an upgrade station, leave this room through the door next to the upgrade station.

In the next room, you will find the Keycard on a box next to a terminal.
Unlock The Power Tunnels Door
Now backtrack to the closed door in the room with the blind enemies and use the keycard here.

Locate The Power Reactor
Data-Bios #30 (Harvest #14) – Dr. Sheehan Yune: Field Log 3 + Resource Cache
After opening the door with the keycard and follow the given path. You will reach this place where you can drop down on the left or for the collectible, go through the corridor on the right until the end to find the collectible on the ground.


Next to the Collectible, you will find a Cache with some resources.

Now go back through the corridor and go down and follow the story path. You will reach an area with a lot of blind enemies again. You can stealth through this area without killing anyone. You need to reach the door on the other side of this room.


After the room with the blind enemies, you will get into a corridor with an upgrade station to the left.

After the upgrade station jump down here, and you will fight against some enemies here.

Now leave this room, squeeze through the wall and climb up the ladder.


Data-Bios #31 – Yannick Sage: Secret Room 2 + Resource Cache
Right after climbing up the ladder, you are supposed to go to the right and enter the Control Room, but instead, crouch and go through the wall right in front of you and follow the given path.

After crawling and jumping down into a room, leave the room through a hole in the ground.

Follow the path until you reach the room. Once you enter it you will unlock The Commonality, only if you found Data-Bios #7 – Duncan Cole: Secret Room 1” from Chapter 2 before.

The Cache and the Data Bio are at the end of this room.


Now turn around and leave this room. Now instead of going to the right where you came from, you have to go to the left to leave this area.

Reset The Breakers
You will reach the Control Room, and interact with the button to reset the Breakers.

After pressing the button, turn around and leave the room through the door on the right.

Find The First Breaker
The first breaker is just on the other side of the bridge.


Find The Second Breaker
Now turn around and climb down the ladder, defeat the enemies here before interacting with the second breaker.


Find The Third Breaker
Now go through the gate and follow the given path to the third breaker. Interacting with it will unlock bronze: Power Up


Return To The Transport Platform
Follow the orange glowing cable back to the transport platform where you picked up the keycard earlier in this mission.


Now interact with the terminal, this will lock you into this area and a fight will start.

There will be a total of 4 waves. One wave has 3-4 enemies. Each wave will spawn from a different side.

After defeating all 4 waves a two-headed mutant will spawn. Dodge one attack, them shoot him once, repeat this cycle of one dodge, one shot. After it gets knocked out and goes on the ground you must MELEE ATTACK it to make it split it half. One head will be killed and the other remains. Repeat the strategy from before of dodging and shooting it, when it goes on the floor a second time you must again MELEE ATTACK it to kill it for good. Killing him will unlock Two Heads Are Better Than One.
Data-Bios #32 (Harvest #15) – Arden Jeddha: Arcas Evacuation
Right after killing the two-headed mutant, you can leave the platform. The collectible will be in front of you on the ground. You can not miss it.

To end this mission go through the door next to the collectible.

This concludes Chapter 6: Below.
Next Up: Chapter 7 Walkthrough
For other Chapters see The Callisto Protocol Walkthrough.
Eric says
This boss is stupid hard
Van Leibensperger says
On Max Security it took me 2 days off and on of playing. My issue was that my game thought I was swinging my weapon after firing but I wasn’t. Do 2 dodges and shoot in the second dodge, when you are closer to him than when you were on the first dodge.
Lina says
Genuine question, did someone else write this chapter’s guide? Because there are several sneaky snake heads here, which have been warned about in the previous guides, and a whole lot more enemies than what it says.
HardyBoy says
Chapter 6 till the end was written by me. So yes it is different from the previous 5 chapter guides. Personally, I didn’t think it was needed to include every enemy. But I’ll consider changing it.
Zaii_RoC says
In the very beginning instead of going straight go to the area on the right & there are 2 loot spawns & an energy converter.