
This walkthrough for Chapter 5: Lost in The Callisto Protocol will guide you through all objectives. This also includes Collectibles, Resource Caches and other important items.
For other Chapters see The Callisto Protocol Walkthrough.
- Number of Collectibles: 7
- Obtainable Trophies: 3 (You Need A Gun, Crash Site, In the Pipe Five by Five)
Lost in the Snow
Starting with this chapter you will finally obtain a suit which will upgrade your health and your inventory to 12 slots.


There is literally nothing you can find in the area so don’t bother searching through it. Head straight through the snowstorm until you run into a shape in the distance. It’s an enemy so dispose of it. Keep following the path, down the cliffs and after a while you will finally find Elias. A cutscene will follow. Afterward head through the gate in front of you.


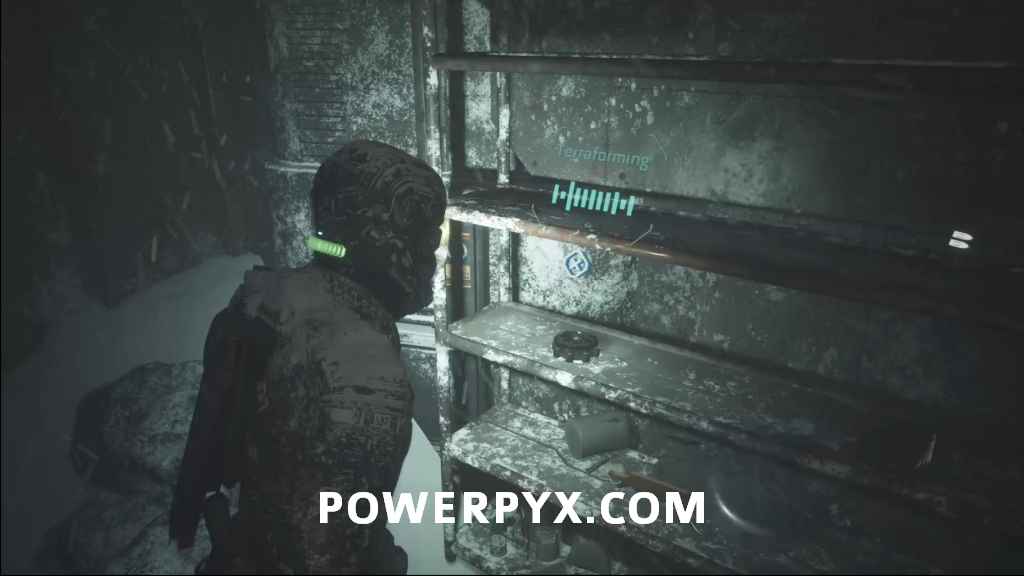
In the next area ignore the building labeled C2 on your right for now and head into the back of this area. There you will find 2 doors, in the left one on a shelf you can grab the collectible Data-Bios #20 – Miranda Kristofich: Terraforming.
The other door has nothing but loot. Once done head to building C2 you ran past while getting here. Head downstairs and follow the path – some of the frozen corpses are disguised enemies so watch out. Outside dispose of another 2 enemies and go uphill toward a broken bridge.

Cross the bridge and before you can open the gate you will be attacked by a stalker, kill it. Inside next section a trapped worker will ask for your help but there is nothing you can do. You have to simply survive the enemy onslaught in this open area. Defeat the stalkers and a couple of regular enemies. You can shoot the explosive canisters on the ground when enemies are near them (easy instant kills). You will hear the worker dying while fighting. Once you have killed everything head to the right side of the section and an enemy will come through the door. Inside pick up collectible Data-Bios #21 (Harvest #10) – Richard Cids as well as Health Injector. Now head back outside and go through the door on the left side. Once there head down to the Tunnels.


Tunnels
In the tunnels follow the path, crawl under some debris and when the road splits for the first time go left to find the collectible Data-Bios #22 – Dr. Caitlyn Mahler: Combustors. Afterward take the path on the right.


Once again follow the only path until the road splits and head left first for some loot. Afterward take the path that goes straight ahead. After a shimmy, kill the Crawler coming at you and head where it came from. Head downstairs to your left. Kill the enemy down there using the spikes and grab the loot from the left side where the next fork in the road is. Head right afterward. Another crawler will come at you from the left so kill it and once again head downstairs.


Go right and kill both the crawlers coming at you and follow the only path, shimmy through the crack right after. In the next room you can use a canister for a free kill on an unaware enemy. Head upstairs and kill the 2 crawlers coming at you. Upstairs the road will split into 3 paths: the one on the left has 2 enemies and a loot crate, the one straight ahead has some loot, the one on the right is where you have to go.


On the right path, an enemy will drop down so kill it and take the Health Injector from the wall before heading up the ladder. Outside grab the small loot container on the right and head into the garage. Wait for the airlock and go through the door. Inside you will have to fight a group of enemies to progress, once again use the environment to your advantage. There is also another Health Injector in this room on the left wall. Afterward head upstairs and shiv the door for a cutscene. You will receive a Riot Gun from Dani which is pretty useful (it’s a Shotgun). After the cutscene head upstairs, enter the next room and pick up the collectible Data-Bios #23 (Harvest #11) – Lt. Devon Wayne: Close the Gate from the corpse on the floor behind the tables.


Opening the Gates
Interacting with the computer will let you know that 2 security rooms have to be activated at the same time. Head through the next door to find a Reforge. Follow the path, go downstairs and through the airlock. Outside you can once again find a loot box on your right, then head back inside on the other side. Call the elevator and kill the Spitter that comes out of it.


In the next area don’t worry about the enemy in the cage, it is stuck there for good. Climb the crate and grab the fuse for the door you just ran past. Use the computer to unlock the security gate. Head back to the gate you saw when entering the room which is now open. Going left will let you find a small loot box again. Head through the door leading to Prisoner Transfer S408 next.

In the next room grab the collectible Data-Bios #24 (Harvest #12) – Ofc. Aaron Taycho from the corpse stuck in the spinning blade contraption. It will activate all the traps and spawn some enemies. There is also a Pristine Energy Converter on a box next to the contraption with the collectible. Head upstairs afterward and use the Reforge in the security room if you need to sell/buy/upgrade anything. Activate the computer afterward.


Head through the now-open door and follow the path downstairs and through the airlock. Outside defeat the fake frozen enemies and head to Dani.


Crash site and the Hangar
Dani will take you to the crash site of your ship. Follow her in and once inside check the second door on the left to find the collectible Data-Bios #25 – Max Barrow: Max’s Concern. You will also unlock the Crash Site trophy while inside your ship. Follow Dani and watch the cutscene.


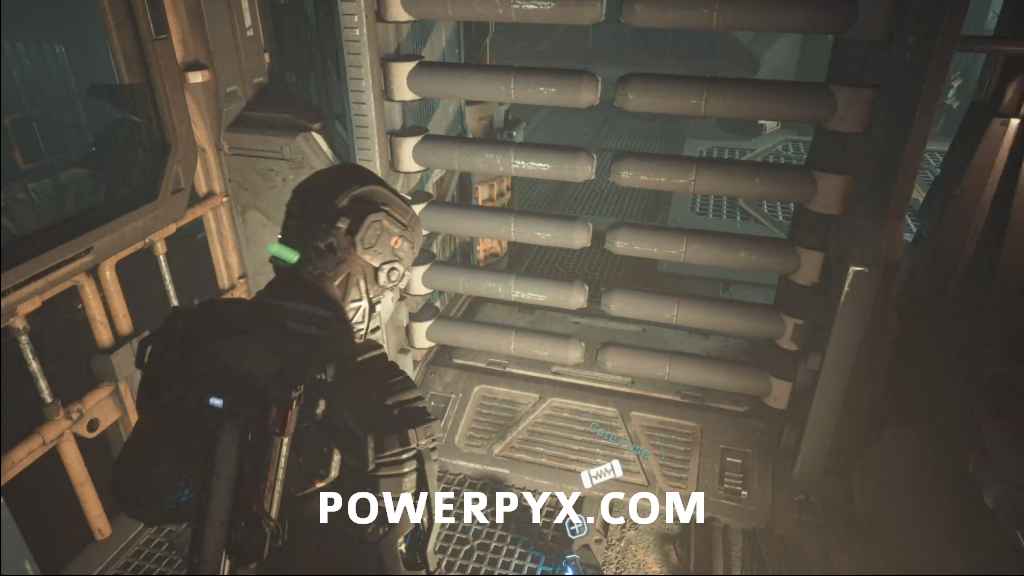
Shortly after the cutscene you will walk through snow and squeeze through a gap to enter a hangar. Once inside check the back of the vehicle on the right side of the room to find the collectible Data-Bios #26 (Harvest #13) – Sgt. Scott Dvitny: Eradication. Go upstairs and through the airlock afterward. Grab the loot crate and follow Dani.


In the room with all the dying robots make sure to grab the collectible Data-Bios #27 – Dr. Caitlyn Mahler: Shipments from the right corner of the room. Follow Dani into the elevator afterward. Once you arrive at the top, In the Pipe, Five by Five trophy will unlock. After the cutscene you will be launched into the air and have to dodge stuff while dropping, similar to the water sliding section from last chapter. At some point you will have to press  to grab a bar midair (if you have QTE accessibility settings enabled it may autocomplete). A cutscene will play and the chapter will end.


This concludes Chapter 5: Lost.
Next Up: Chapter 6 Walkthrough
For other Chapters see The Callisto Protocol Walkthrough.
Captain Bardiel says
There is a Reforge in Building C2.
Brandon C. says
In the room with the dead robots and Data Bios #27-Dr. Mahler: Shipments, there is a set of stairs with Pristine Energy Converter and to the right of that is a vent with 2 small loot crates