
The Gladiator Shrine puzzle is the second major puzzle challenge in Indiana Jones and the Great Circle: The Order of Giants DLC. This walkthrough will guide you through all the steps needed to solve the puzzle.
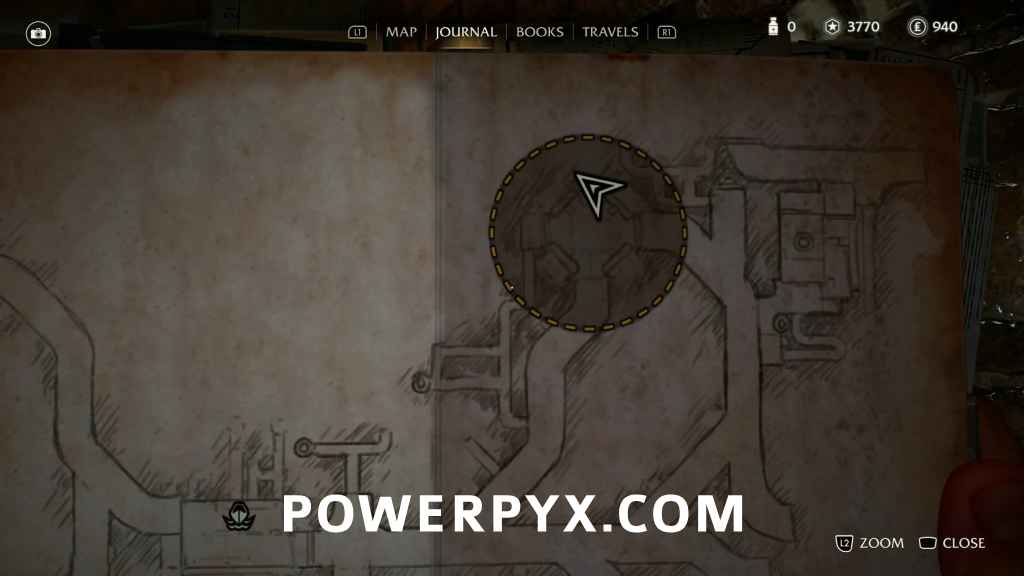
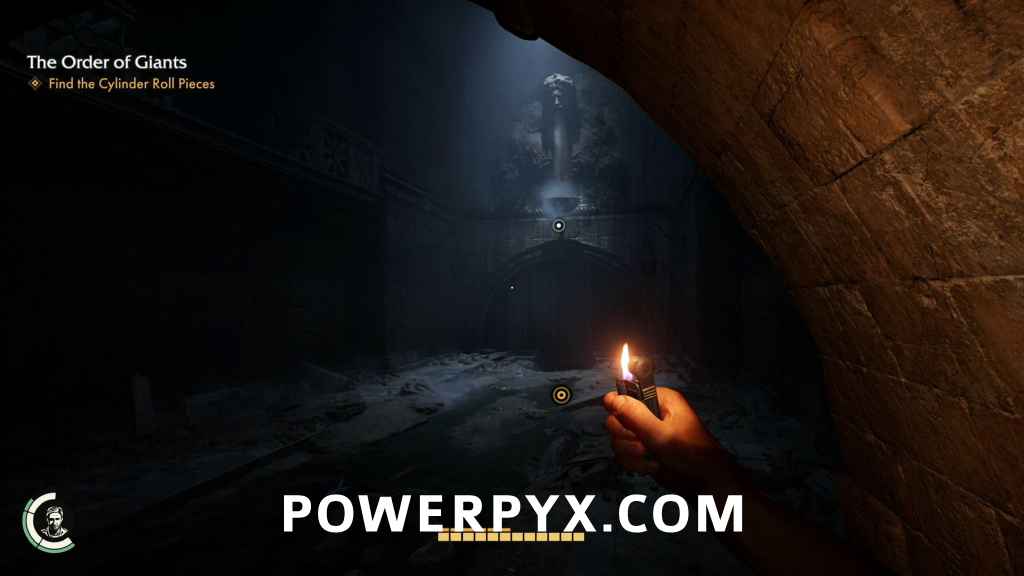
Starting in the large octagonal room in the north portion of the Cloaca Maxima, head through the door in the north wall and go down the stairs. When you reach the bottom, there will be a metal grate blocking the archway, and a small hole in the wall to its right. Go through the hole and follow it to a lower level. Keep following the path until you emerge at the bottom of a canal. Follow it, and narrowly miss being crushed by a falling body. Keep going to the end until you can see a hole in the floor. Right above it, there’s a ring on the underside of a bowl that you can attach your whip to in order to lower yourself down safely.
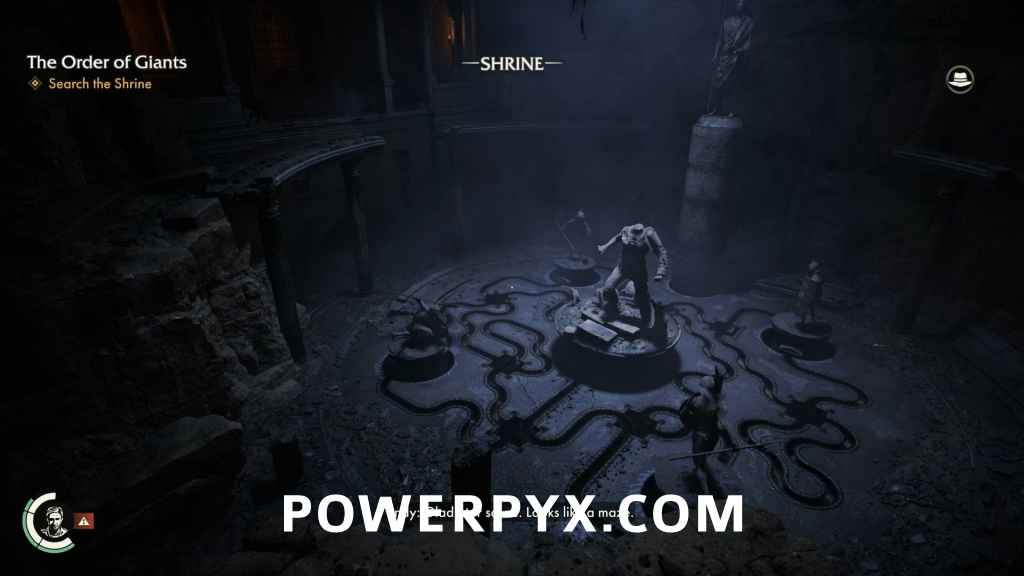
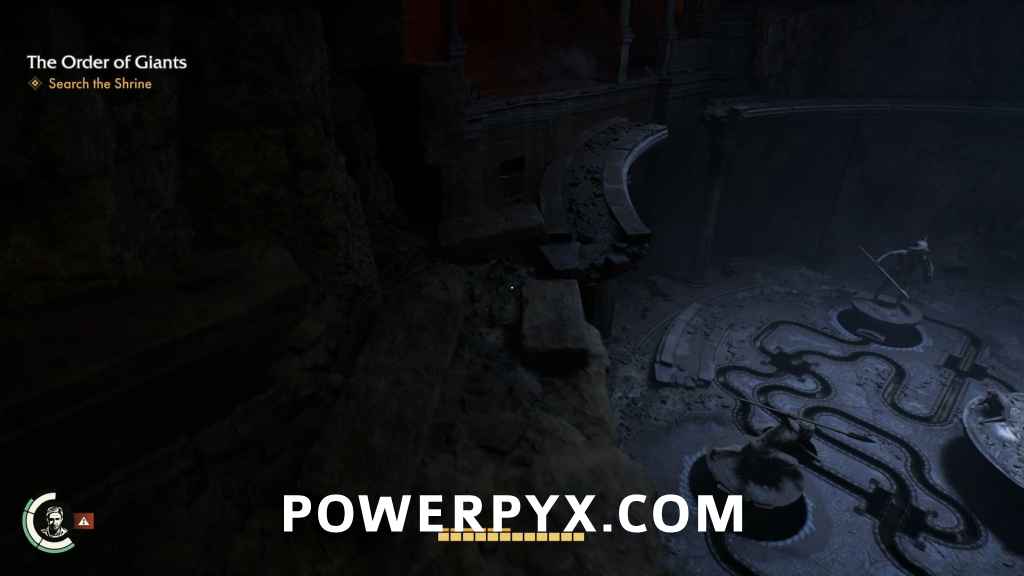
At the bottom you’ll emerge into the Shrine, and another puzzle to solve. This one takes a bit more planning if you want to do it easily, or you can just rely on your reflexes and hope for the best.
Search the Shrine
Before you can start the puzzle, search the Shrine of the Gladiator for a couple of pieces of critical information. First go to your left along the top of the ruined colonnades.
The balconies are lit up by torchlight, and there are two photo opportunities on each one.
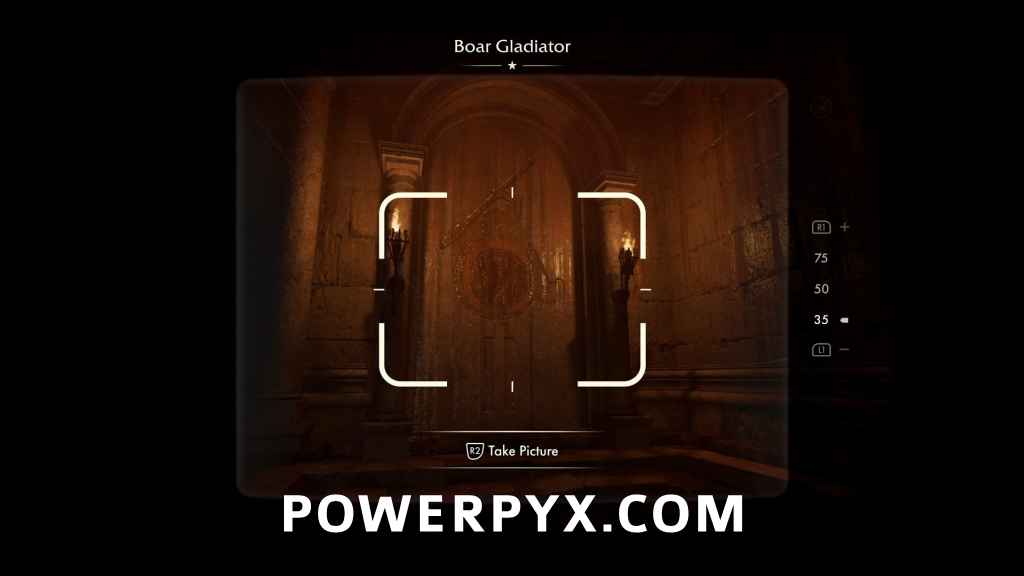
Adventure Note #33: Boar Gladiator (10 AP)

Adventure Note #34: Lion Gladiator (10 AP)

To reach the other balcony, just drop down to the ground floor head to the south side of the room. When you are beneath the balcony, you’ll be able to whip up to the ledge and climb up.
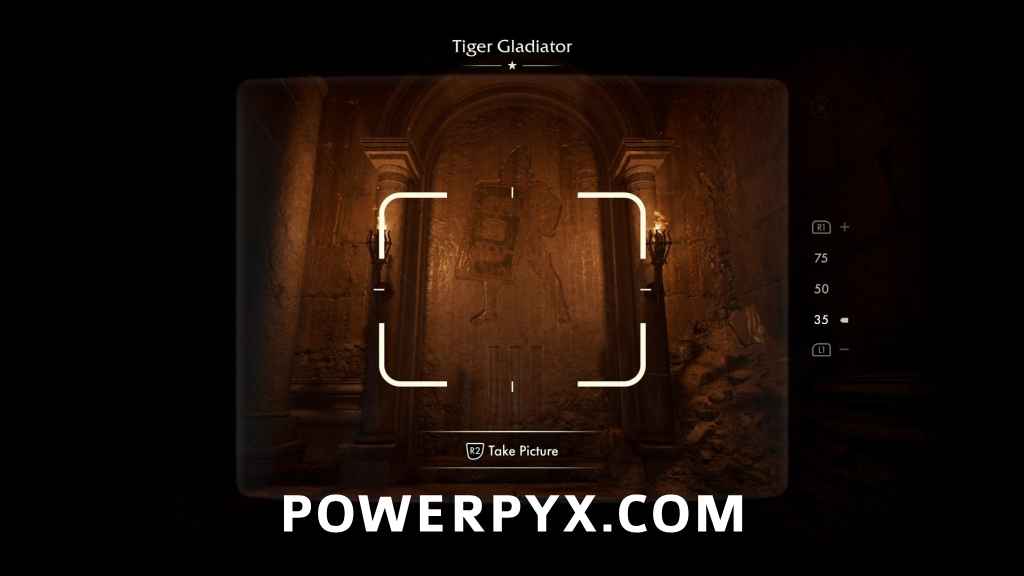
Adventure Note #35: Tiger Gladiator (10 AP)
Adventure Note #36: Bear Gladiator (10 AP)
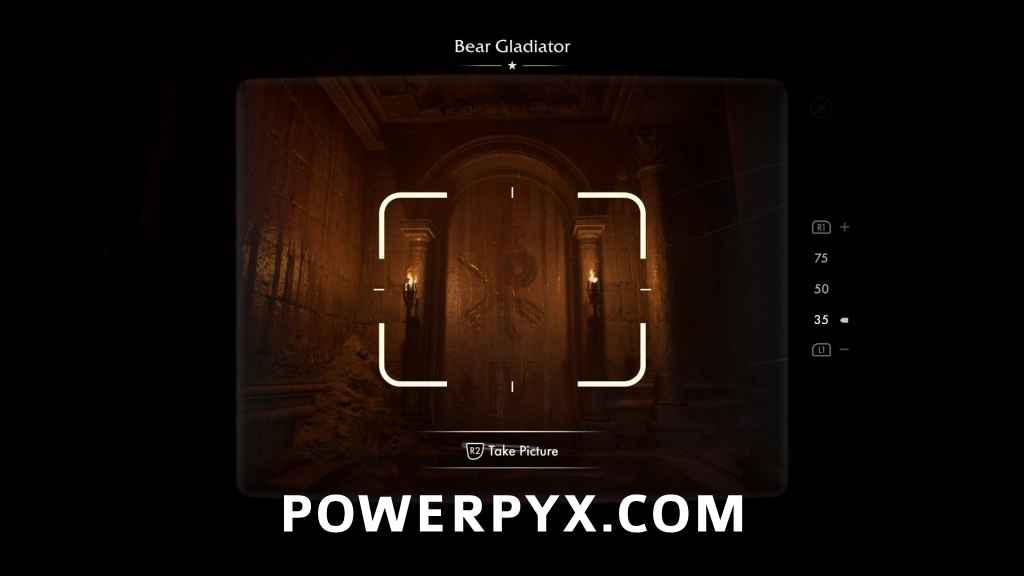
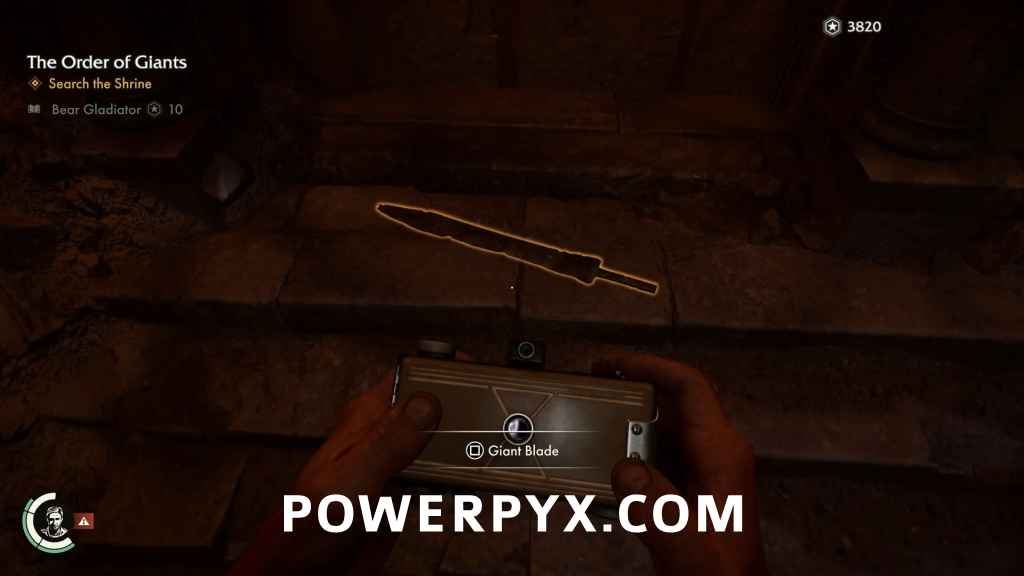
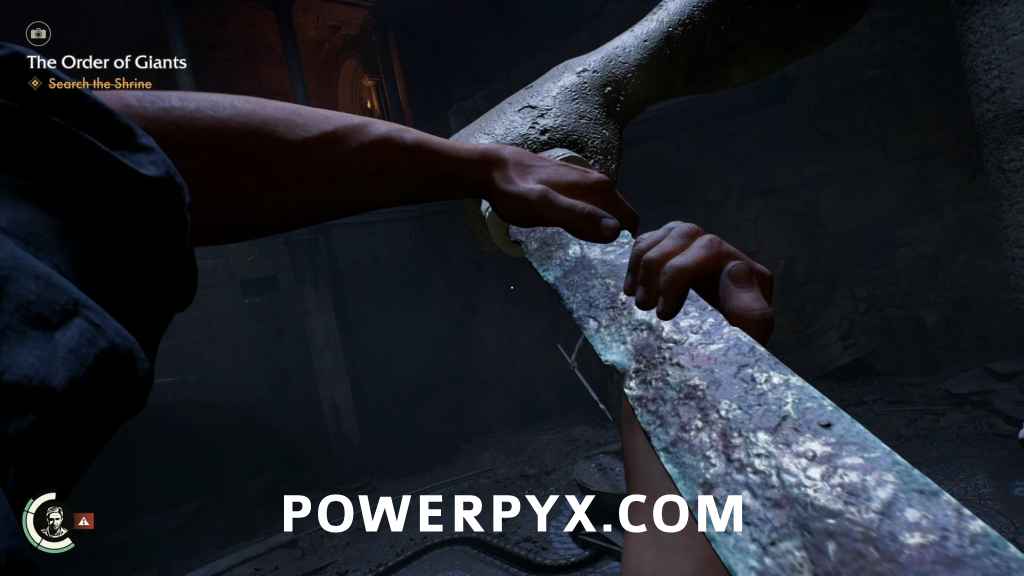
Right in front of the image of the Bear Gladiator, you’ll see the blade of a sword lying on the ground. Grab it, you’ll need it in a minute.
So there are four gladiator images, each one having a roman numeral beneath them. The gladiators are (in order):
- Lion Gladiator
- Boar Gladiator
- Tiger Gladiator
- Bear Gladiator
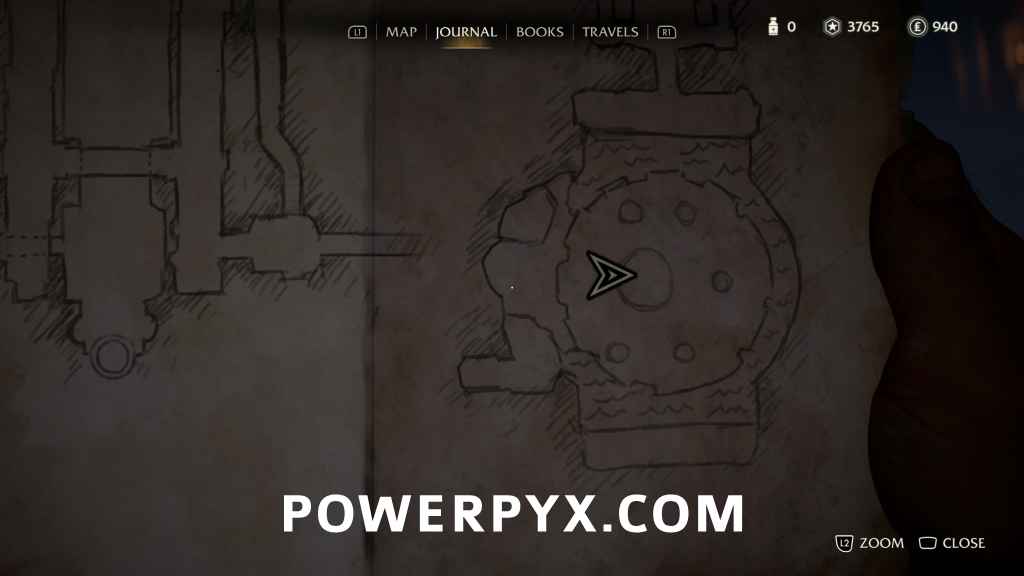
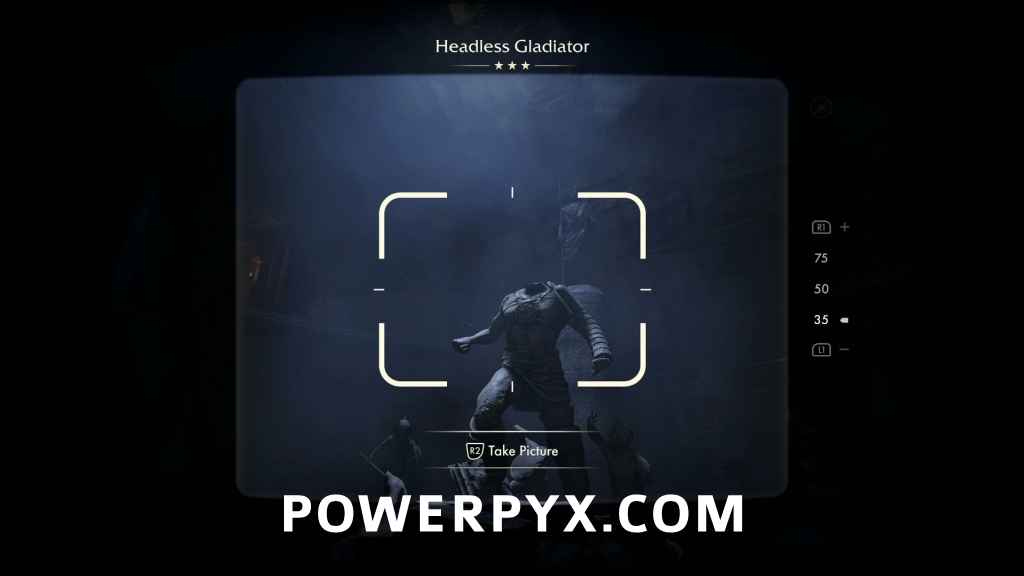
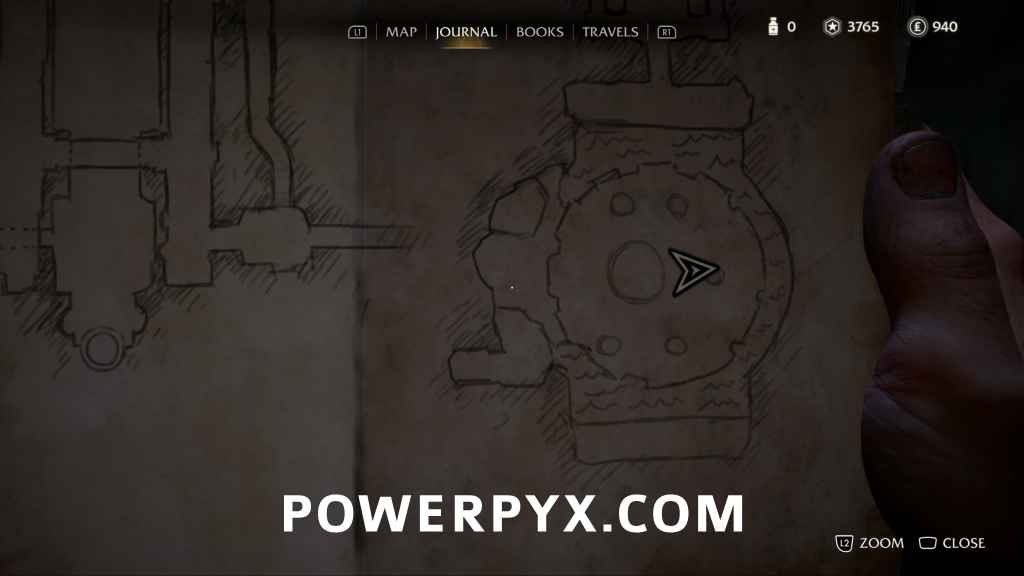
Now that you know that, what does it mean? Well if you look at the statues in the room, their shields all correspond to one of the statues. There are channels on the floor leading in and out of the four gladiator statues around the room, but there is only one channel leading out of the Headless Gladiator Statue in the center. Let’s get a closer look at it, but first take a second to take a picture of it.
Adventure Note #37: Headless Gladiator (25 AP)
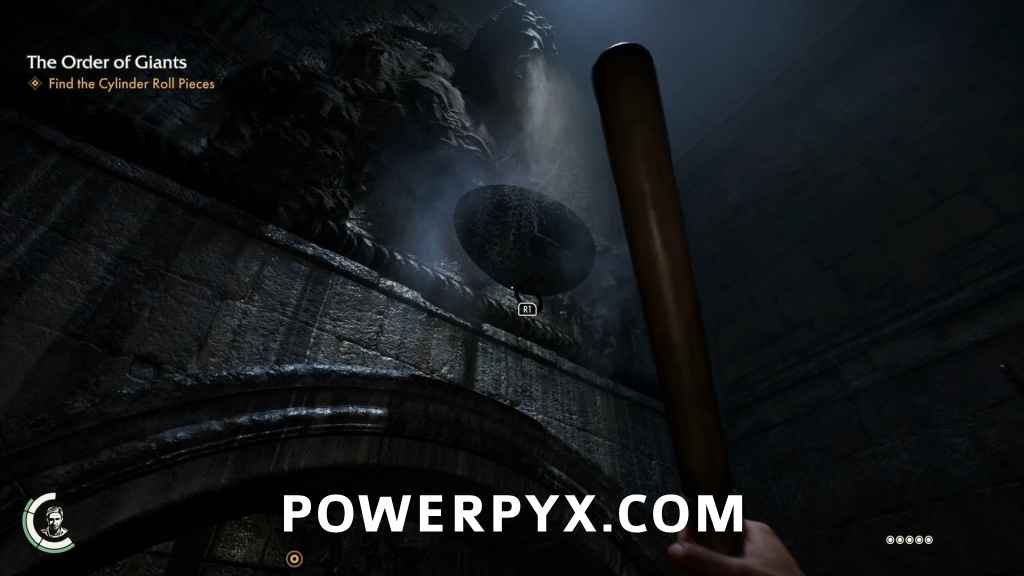
Having a look at the statue, you’ll see that it has a sword hilt in its hand, but the sword has no blade. Jump up on the statue’s base and slot the blade into the hilt. Suddenly you’ll hear a mechanism in the statue turning, and its sword arm will raise up as if it were claiming victory. When the arm comes to a stop, you’ll see a prompt to perform a whip yank on it.
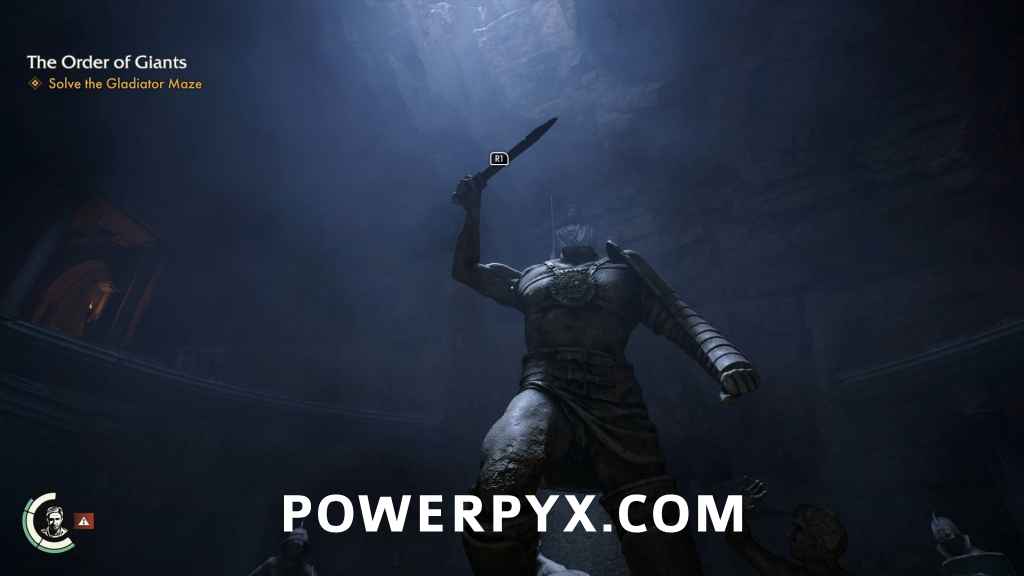
Yank the arm down with your whip, and a firey metal ball will roll out of the statue’s base and start rolling along a channel towards an empty hole. A quick survey of the area will net you three pipe segments that you can use to redirect the path of the ball by slotting them into the empty holes in the correct position. You only have three though, and you’ll have to be quick and decisive about moving them while the ball is in motion. While the ball is travelling along a pipe segment you won’t be able to move it, so the second you see the interact prompt it will be safe to grab. Feel free to hammer on the interact button before it appears, if you think it will help you.
Placement can be finicky sometimes, especially with the elbow pipes. When you are in position at a junction with a pipe segment in hand, you’ll know how it will be oriented when placed because the ends of the pipes you will be connecting to will glow. If the wrong pipes are glowing, try moving your camera or circle around to a different angle. If you happen to do it wrong, just pick it up and try again.
If you don’t have the right pipe in the right spot when the ball reaches a hole, or you direct it to a statue in the wrong order, or accidentally direct it to a statue you’ve already activated, or accidentally lead the ball into an elbow pipe segment that ends against a wall (yes, I’ve done it), you’ll have to start again from the beginning. Having attempted this puzzle numerous times, and seeing after I’d finished that unlike every other puzzle that there is no definitive solution given to you in your journal, I was irritated. So I’ve put together precise instructions to what I’ve found to be the least stressful sequence of pipe moves to complete this puzzle with maximum efficiency and minimum risk.
If you are still having trouble, or find yourself falling behind, make use of the two loops that can be closed with an elbow pipe. One is just west of the Tiger Gladiator, between it and the Bear Gladiator. The other is just southeast of the Boar Gladiator. If you use an elbow pipe to close the loop, the ball will roll around in that loop forever while you move the other pipes to the correct position, or just take a break for a minute to catch your breath. Then when you’re ready you can move or replace the pipe to dump the ball out in the direction you want to go. The sequence below is fairly straight forward though, and doesn’t require a lot of quick reflexes.
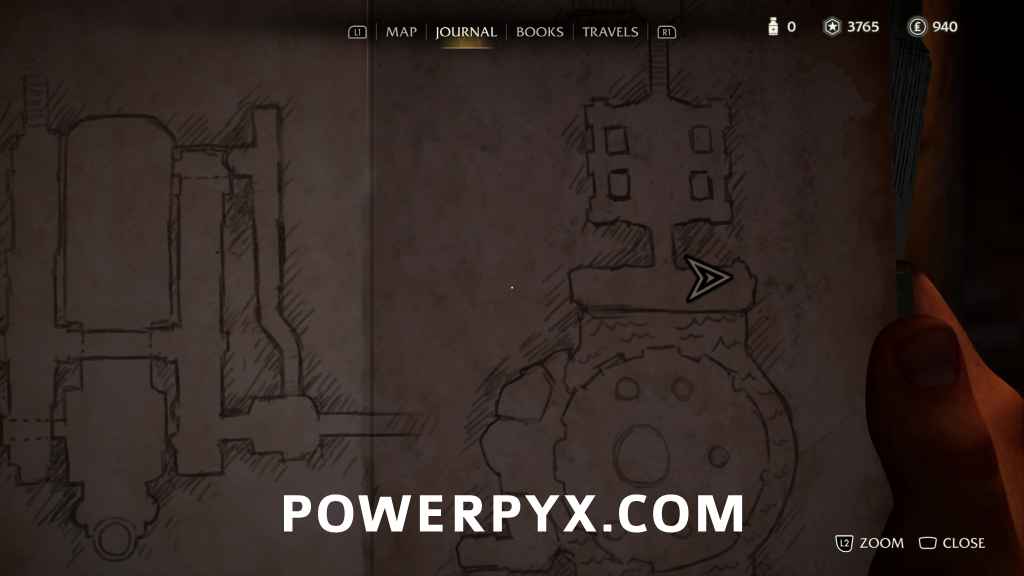
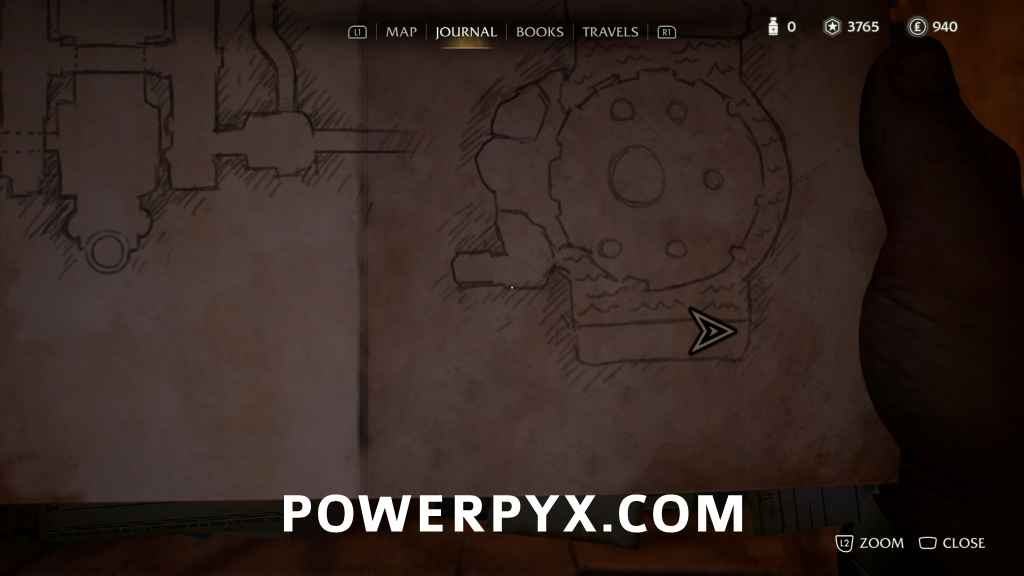
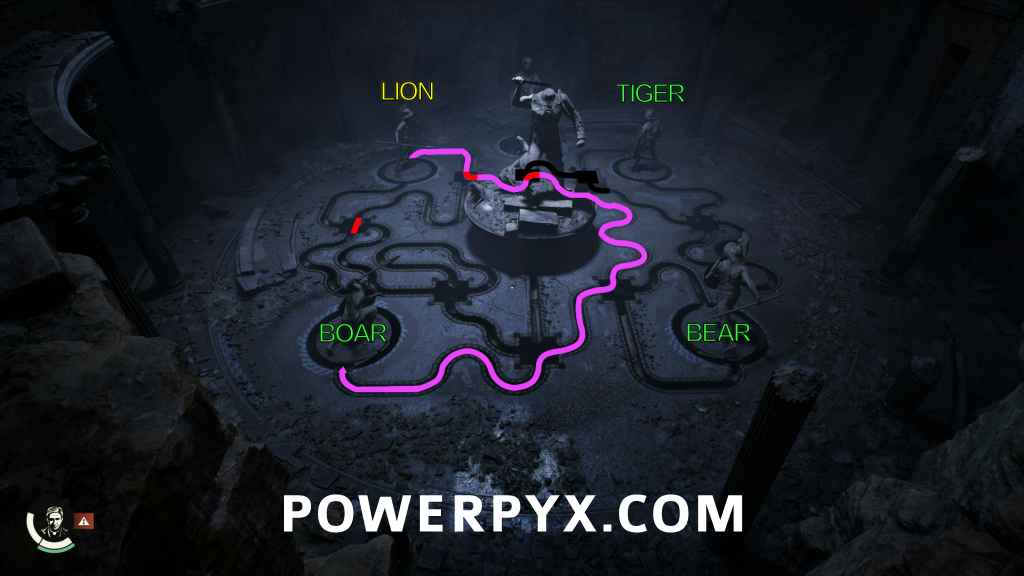
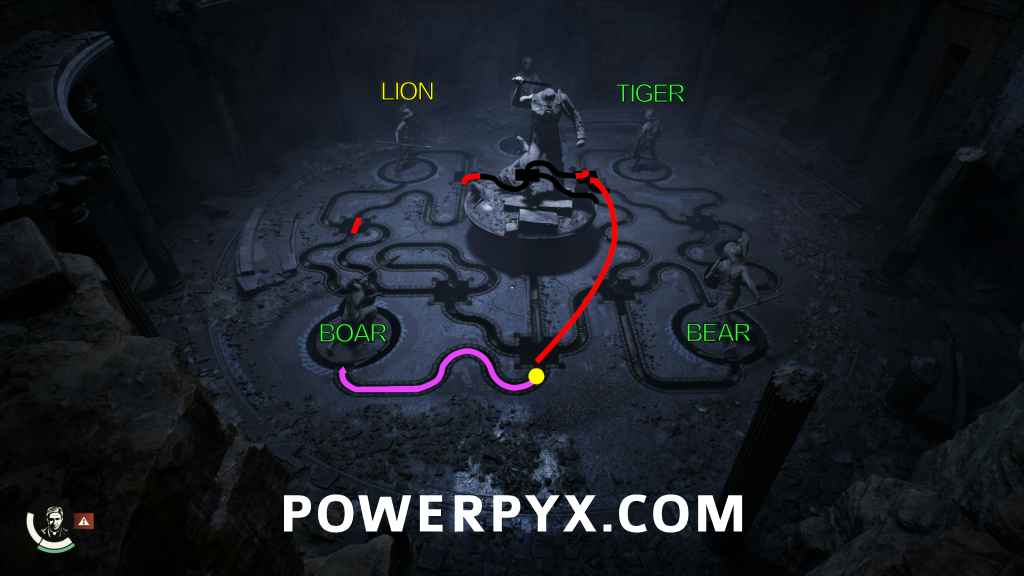
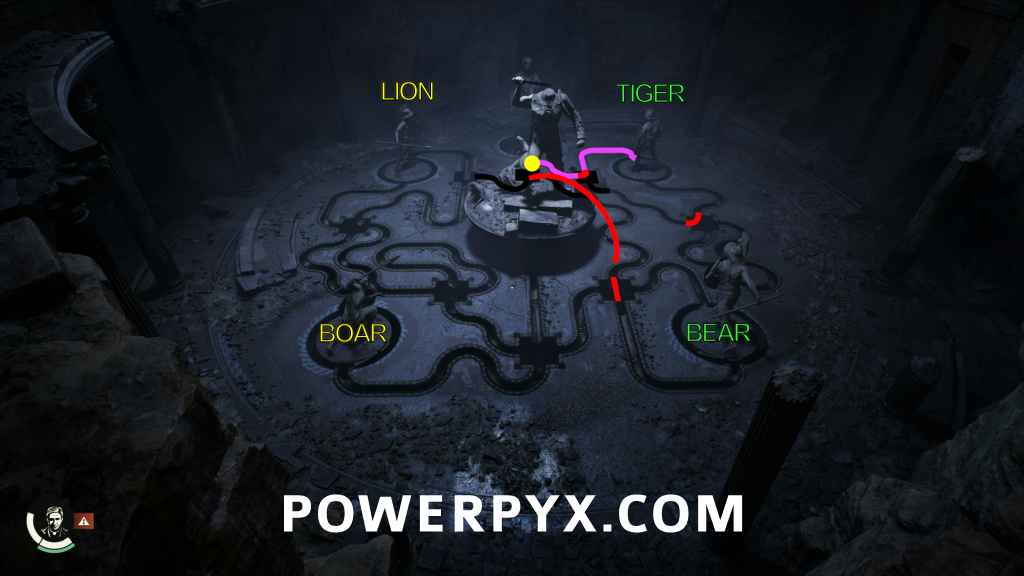
Step 1: Lay out the three pipe segments as shown in red, and then pull the gladiator’s arm to release the ball. The path we want to take the ball to take is in pink, to direct it first to the Lion Gladiator. I’ve superimposed in black the paths of the channels that run behind the Headless Gladiator in the middle, for ease of understanding.
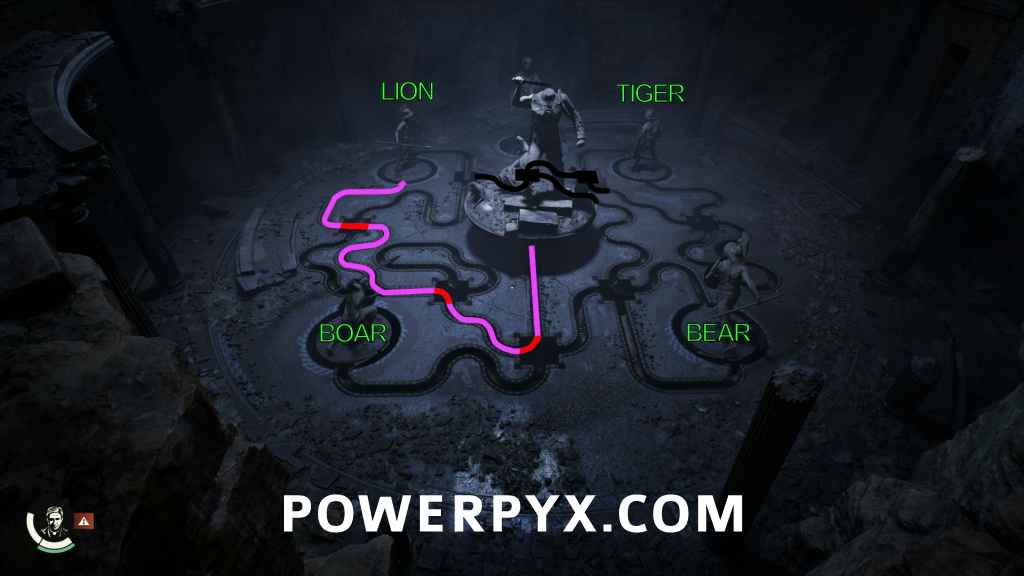
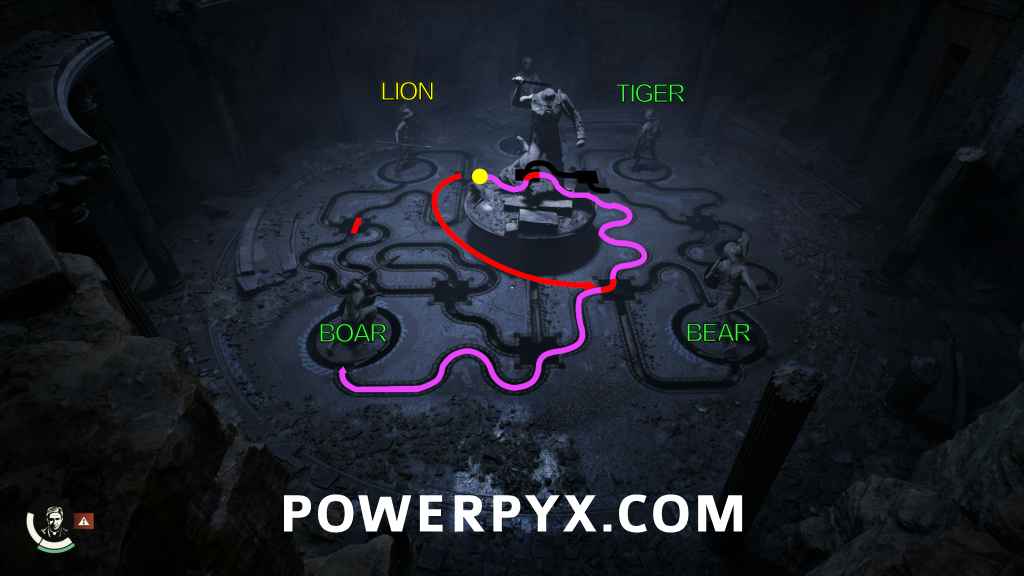
Step 2: When the ball is moving, you always want to be standing by one of the pipe segments and be ready to grab it and move it to a different location the moment the ball has cleared the pipe and you can interact with it. The first move is to take the elbow pipe and move it to the other side of the Lion Gladiator to direct it to the South. While heading west is the more direct route, to accomplish that, you’ll have to move the straight pipe and place it correctly multiple times in quick succession.
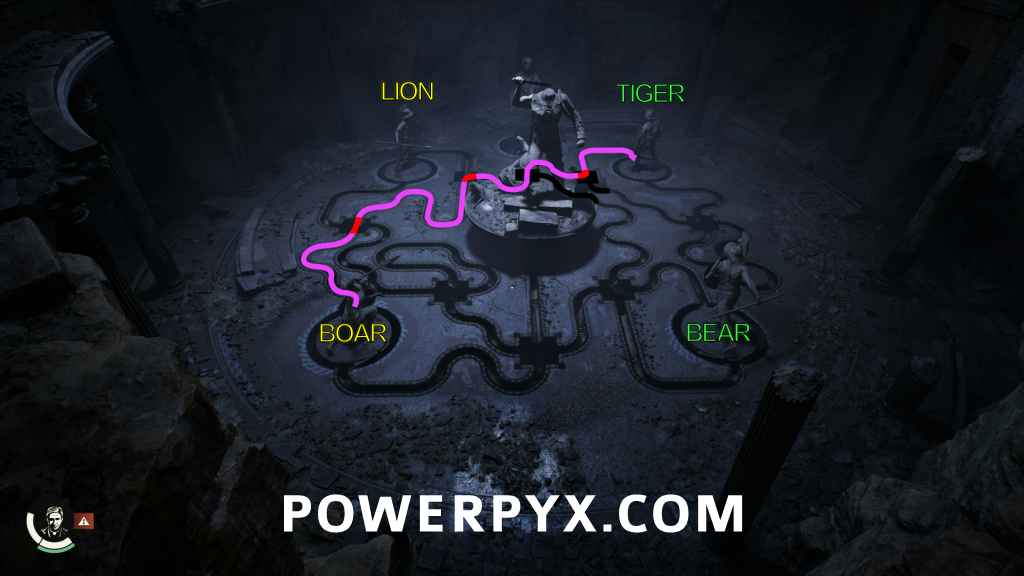
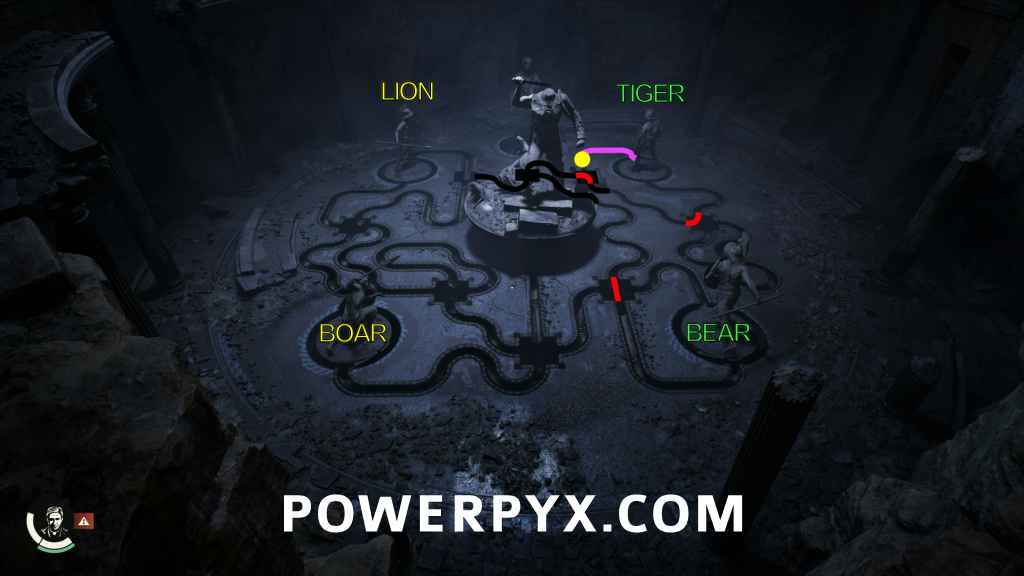
Step 3: As soon as the ball is past the second pipe, move it to the junction next to the last pipe, this time directing the ball to the west.
Step 4: An easy one, just rotate the straight pipe 90 degrees.
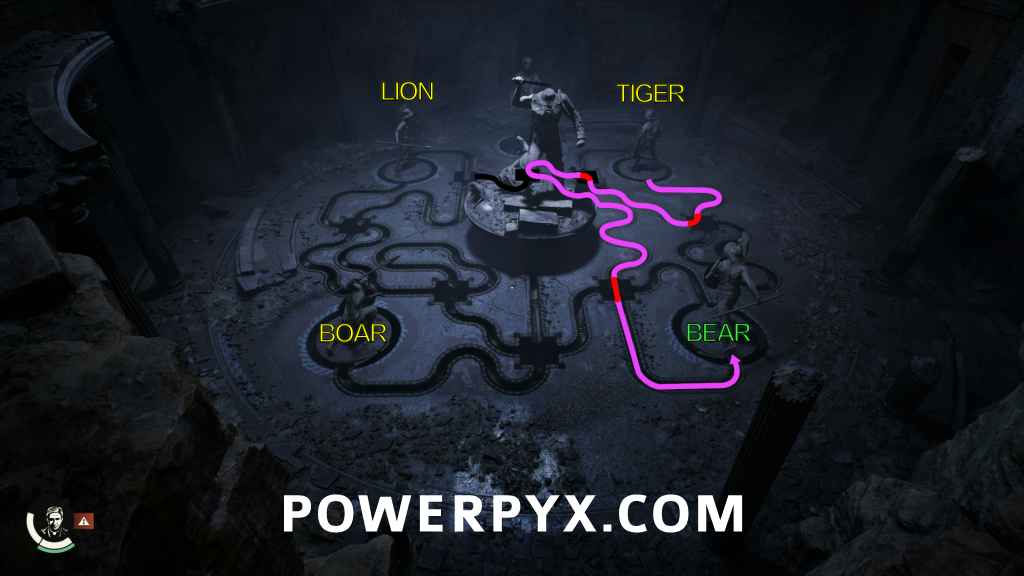
Step 5: The Lion Statue has been activated. So far so good. This next section has you placing two elbow pipes one after another, but the pipes wind back and forth to give you some extra time. Keep cool and be sure your placement is right before you hit the interact button. Its very easy to drop an elbow pipe into the wrong position under pressure. Stand by the elbow immediately to the south of the Lion Gladiator and wait for your moment.
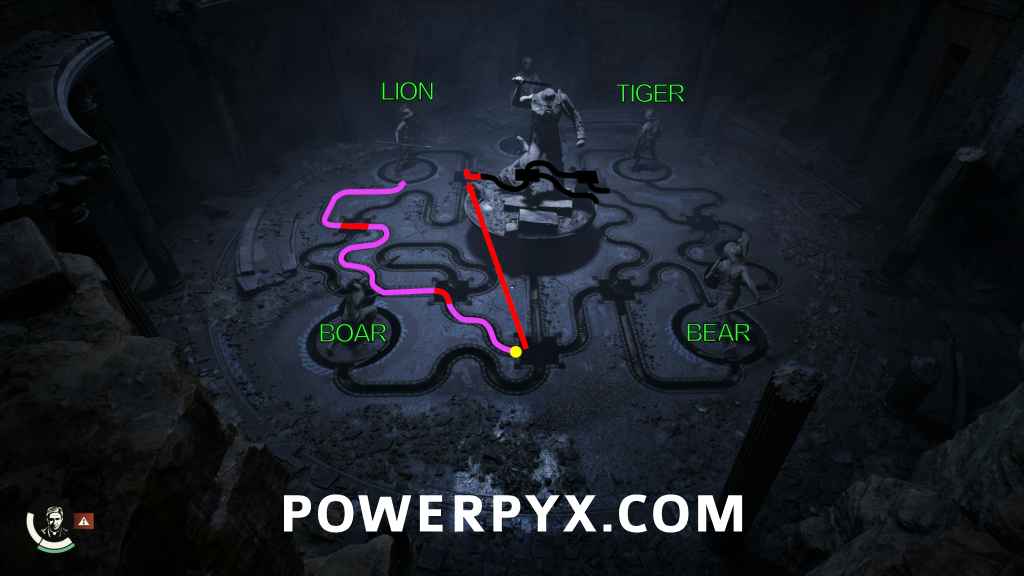
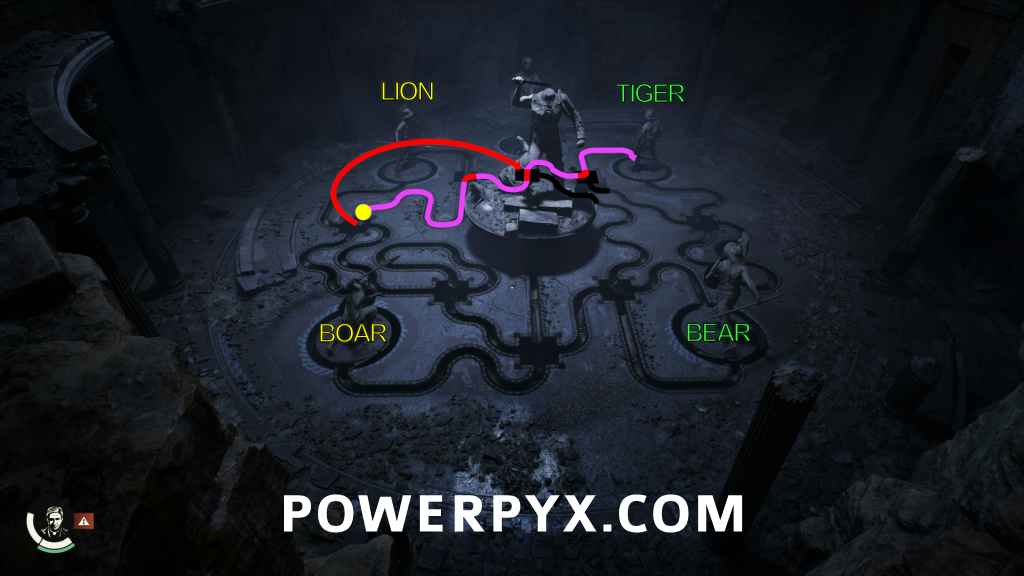
Step 6: As soon as you can grab it, move the first elbow to the junction by the Bear statue, sending the ball back to the north.
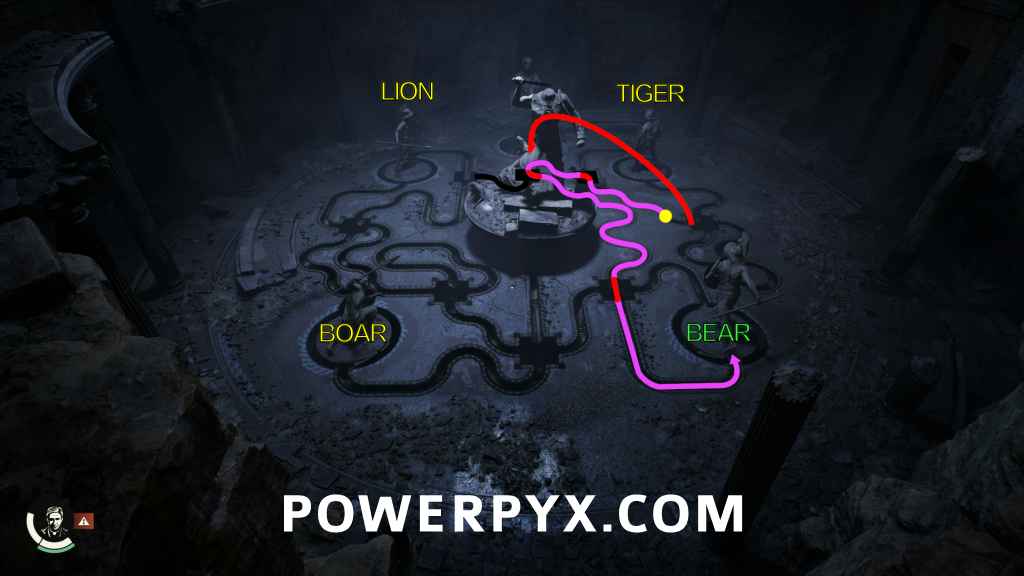
Step 7: By the time you get back to the next elbow, the ball will probably already be past so grab it right away and move it to the junction due west of the Headless Gladiator.
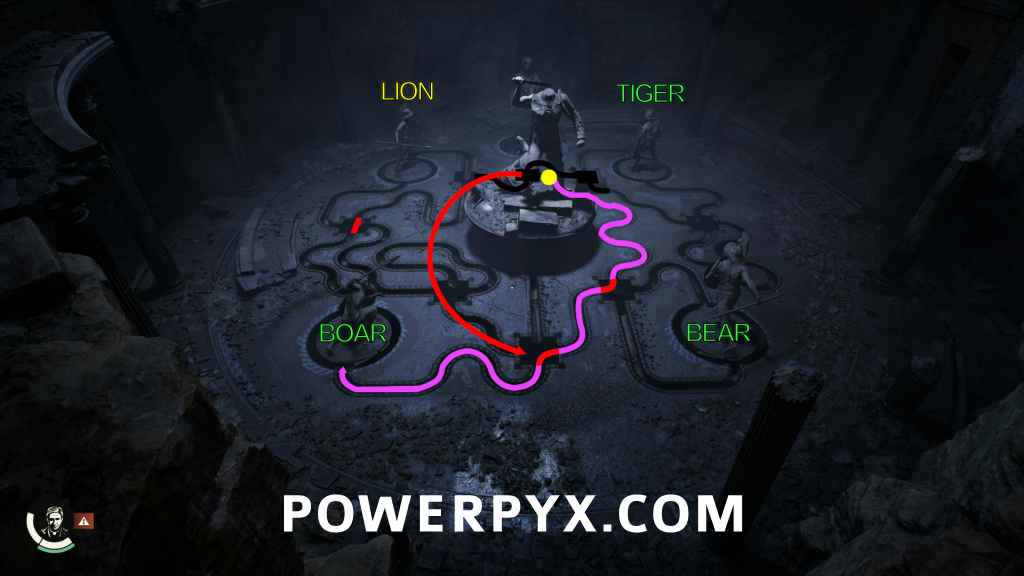
Step 8: The rest of the puzzle should be less hectic from this point on, as you’re building well in advance. As soon as you can, move the elbow pipe to the south of the Lion Gladiator.
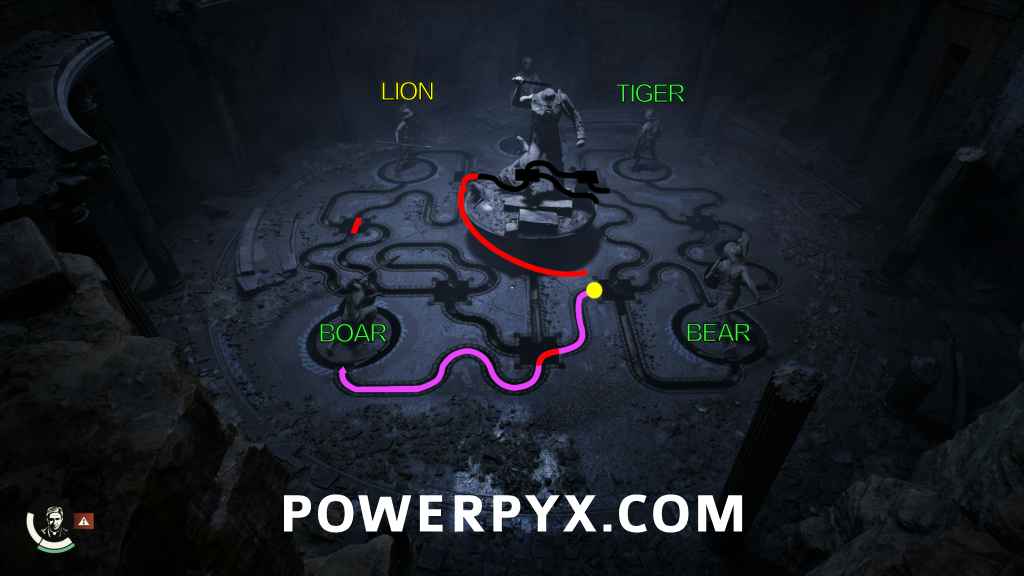
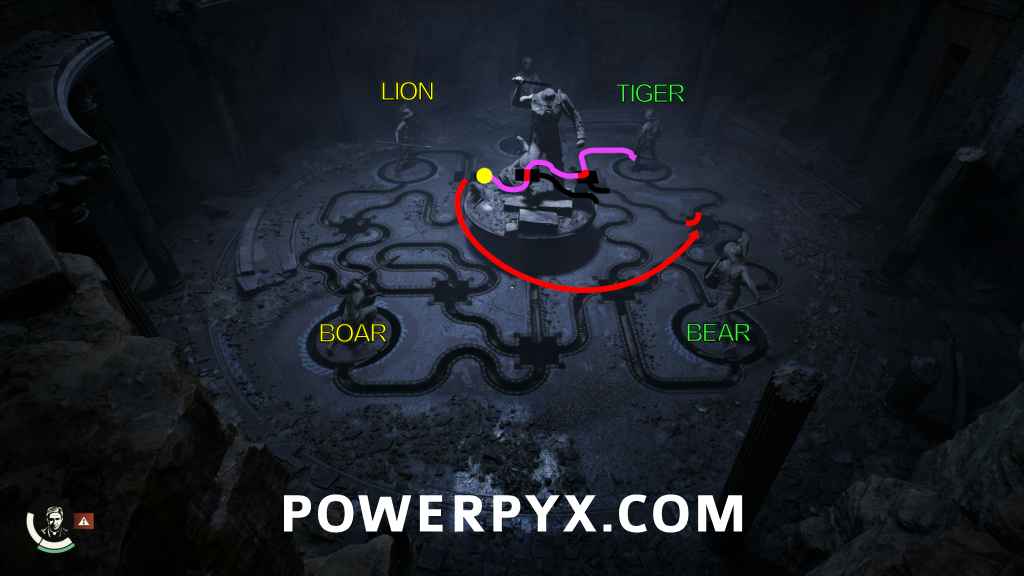
Step 9: Move the pipe segment south of the Headless Gladiator to the junction just north of the Tiger Gladiator.
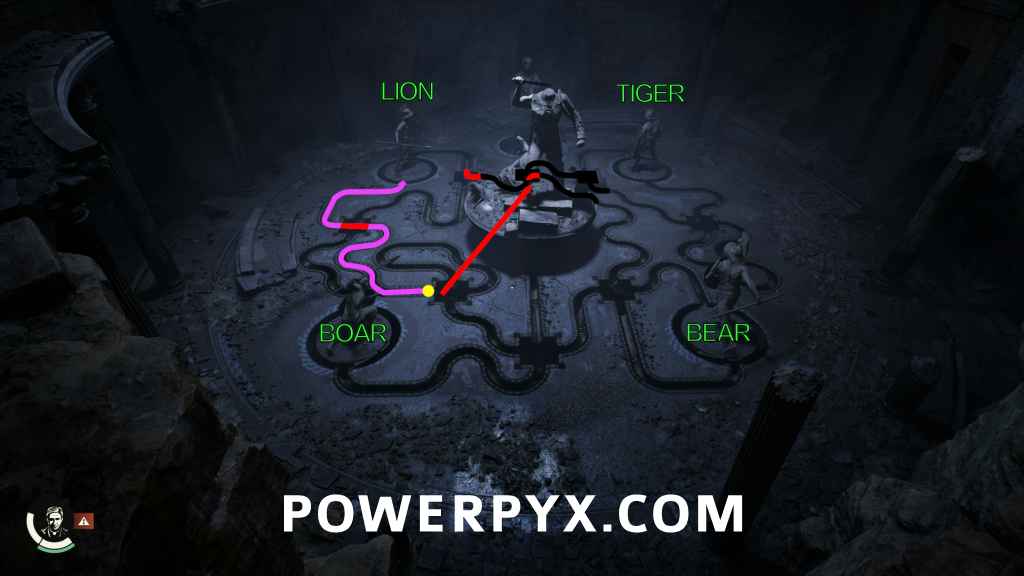
Step 10: Two down, two to go. Stand by the straight pipe and be ready to move it.
Step 11: Move the straight pipe to the to the only empty junction between you and your next Gladiator.
Step 12: As soon as the ball has passed the elbow pipe, move it to the junction just west of the Tiger Gladiator.
Step 13: Move the straight pipe to the junction between the Headless Gladiator and the Bear Gladiator.
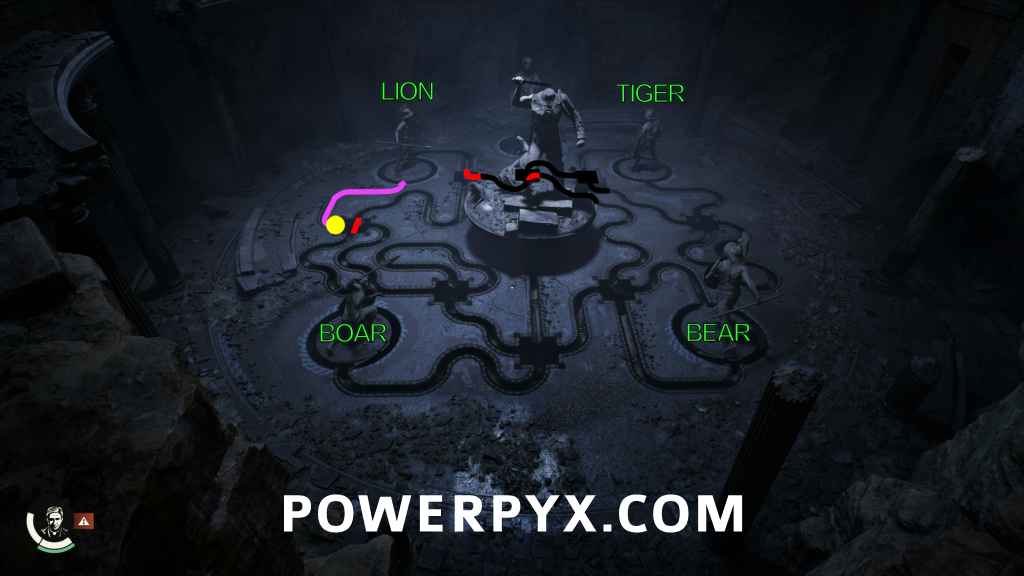
Step 14: As soon as the ball has passed, rotate the elbow pipe 90 degrees so that it will direct the ball to the north after activating the Tiger Gladiator.
Step 15: Just one more to go. One more statue, and actually only one pipe move too. Stand by the elbow pipe just west of the Tiger Gladiator.
Step 16: Move the elbow pipe to the junction due east of the Headless Gladiator, oriented so that the ball will be turned back to the south. At this point the only way you can fail is to start pulling out pipe segments, so just chill and wait for the ball to do its thing.
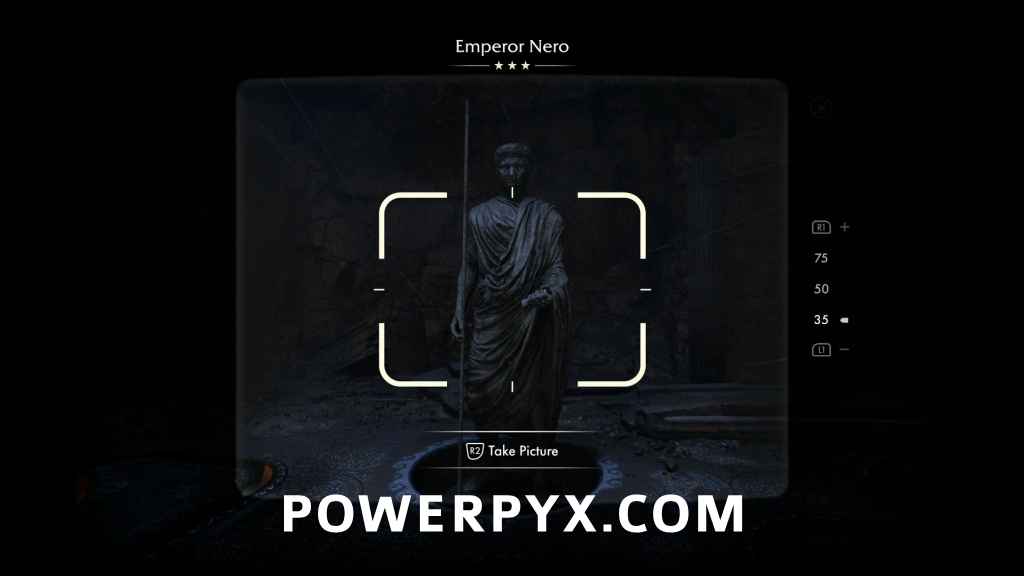
When you’ve activated all four statues, the statue of Nero that was on a high platform at the east side of the room will drop down to ground level and give you a photo opportunity.
Adventure Note #38: Emperor Nero (25 AP)
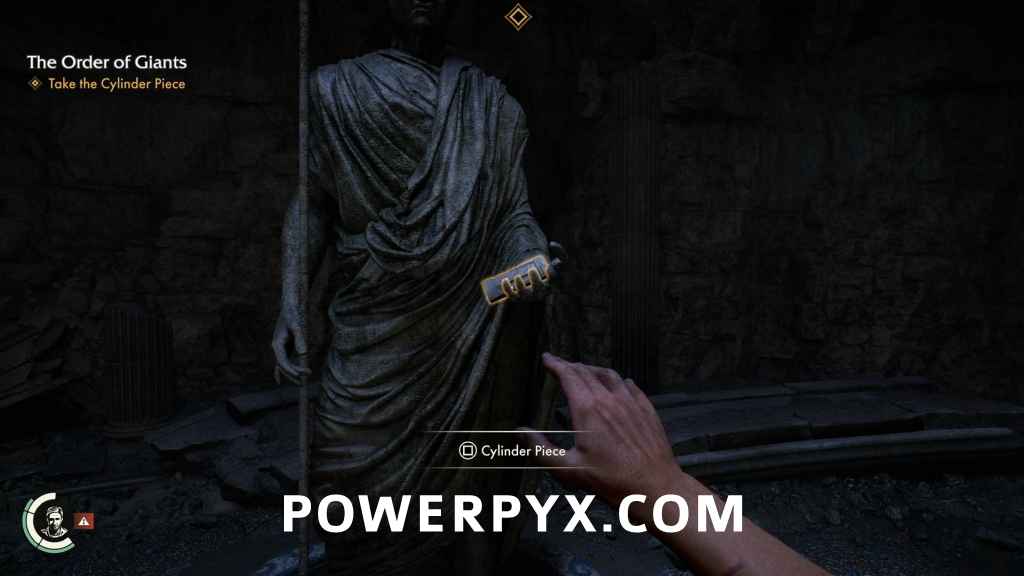
Take the Cylinder Piece
In its hand is the second Cylinder Piece.
Adventure Note #39: The Gladiator Shrine Solution (15 AP)
For more information, including a walkthrough, solutions to all puzzles and the location of all collectibles, see The Order of Giants Collectible Walkthrough.
Leave a Reply