
Resident Evil 9: Requiem Contains 75 File Locations. Finding all Files unlocks the Case Closed trophy and achievement.
Files can be tracked through the “Files” menu next to the inventory. This shows them by name so you can pinpoint exactly which ones you are missing. The in-game list doesn’t always follow the correct chronological order. This guide shows them in the chronological order you can reach them, but also has the full list from the in-game file menu order for easy comparison. This way you can quickly pinpoint what you’re missing. You can keep track of total progress under Challenges > Case Closed.
Everything in Resident Evil 9: Requiem is missable as there is no chapter select, but if you keep a manual save from each area you can still return everywhere.
Files List (in-game menu order)
This list shows the file names in the same order as the in-game list under “Files” categorized into the 4 main areas. If you end up missing a file, compare against this list to find the missing file name, then search for it here (CTRL+F on PC / ‘Find on Page’ on Mobile).
Wrenwood
- Wrenwood City Guide
- Investigation Report
- Hotel Pamphlet
- Notice of Closure
- Alyssa’s Journal
- Report on Victor Gideon
Rhodes Hill
- Progress Notes
- Note on Cardboard Box
- Care Center Pamphlet
- Whiteboard Scrawl
- Folded Note
- Chairman’s Note
- Copy of an Email to a Manager
- Note to the Chairman
- Blood Compound Synthesis
- Safe Replacements
- Lead Researcher’s Message
- Lead Researcher’s Picture 1
- Lead Researcher’s Picture 2
- Lead Researcher’s Picture 3
- Examination Room Safe Code
- Patient Medical Records
- Spencer’s Research I
- Unlocking the Organ Transport Box
- Victor’s Journal Entry
- Construction Notice
- Bar & Lounge Safe Code
- Background Check
- Disposal Team Report
- Double Mutation
- Nurse’s Log
- Satiety Suppression Medical Records
- Basement Safe Code
- Dishwasher’s Note
- Special Directive for Raccoon City
- Report on Raccoon City Syndrome
- Staff Member’s Last Words
- Operation to Eliminate “The Girl”
- Unlocking the Cells
- Technician’s Note
- Security Guard’s Report
- Visitor Record
- Note Regarding Research Results
- Spencer’s Research II
- Subject 170 Record
- Grace Ashcroft Blood Analysis Report
- Roof Hatch Manual
Raccoon City
- Report on the Raccoon City Incident
- Raccoon City Incident Newspaper
- Orders for the Engineer Corps
- Battery Storage Locations
- Inventory List
- Engineer Corps Note
- R.P.D. Perimeter Report
- Top Secret Operation
- Record of Events
- Guide Pamphlet
- Library Card
- Barry’s To Do List
- Scavenger Hunt – Clue 1
- Scavenger Hunt – Clue 2
- Photograph
- Toe Tag
- Series 60 Results
- New Researcher’s Notebook
ARK
- N0-AH Status Report
- Product Catalog 1 (2026)
- Raccoon City Bioweapon Research – Report
- Product Catalog 2 (2026)
- Access Log: 51st Assembly Minutes
- Sterilization Chamber Safe
- Monitor Control Room Safe
- Access Log: First Assembly Minutes
- Alyssa’s Interview Notes
- Letter from Patrick
Wrenwood (Prologue)
File #1 – Investigation Report
Automatically in your inventory from the start of the game. Press Touchpad > Items > Investigation Report > zoom in and rotate it until it lets you interact with the photo sticking out of the folder, read the file.
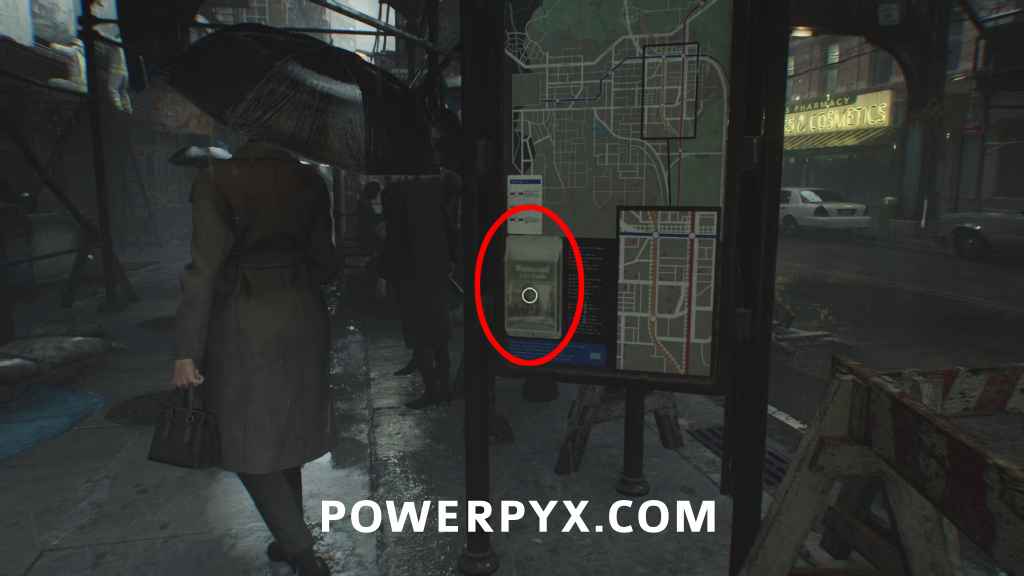
File #2 – Wrenwood City Guide
Check the City Map on the right while walking the street.
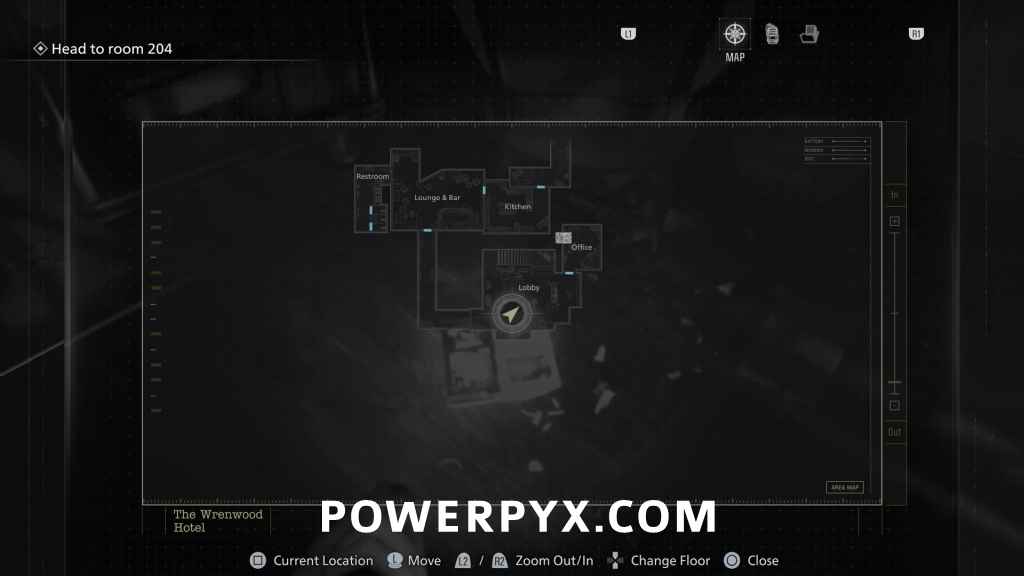
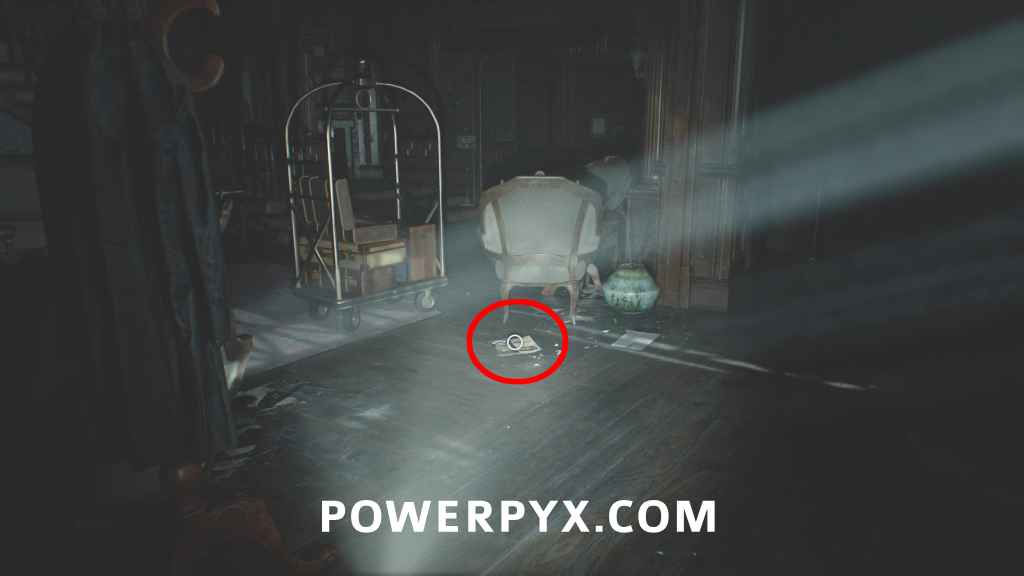
File #3 – Hotel Pamphlet
Lobby: After opening the door with the old key, go forward to a room with stairs leading up. Check the paper on the floor.
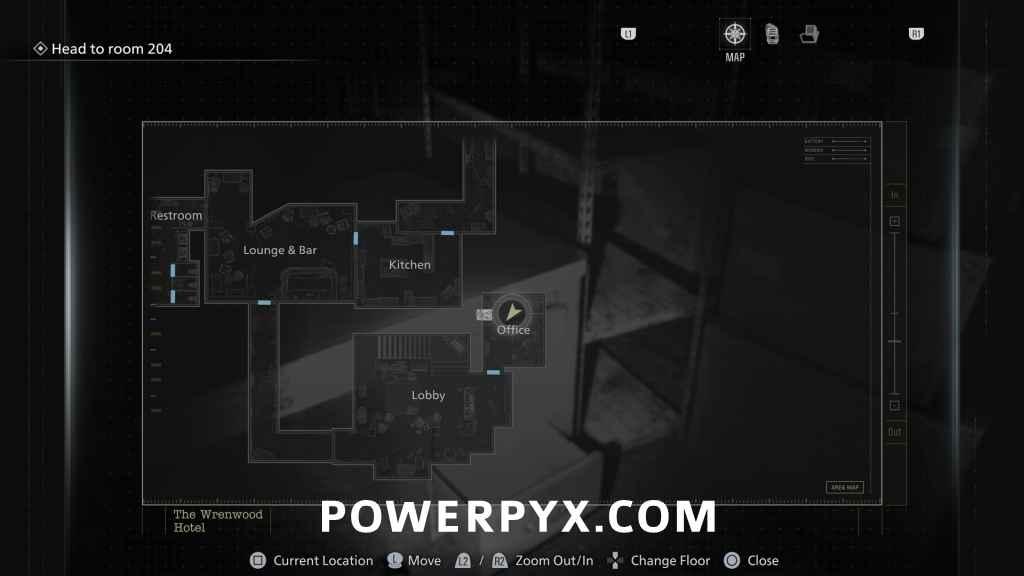
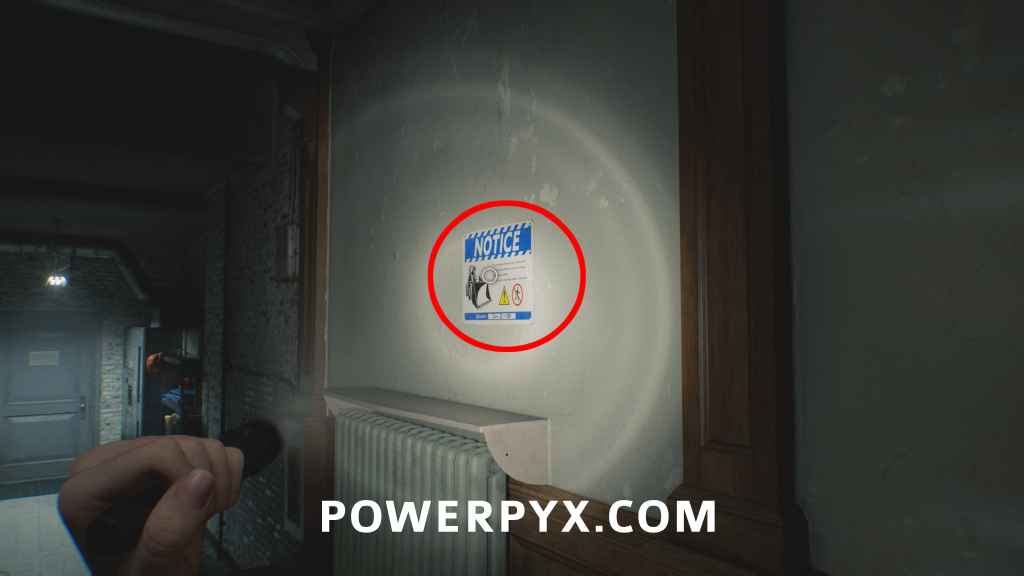
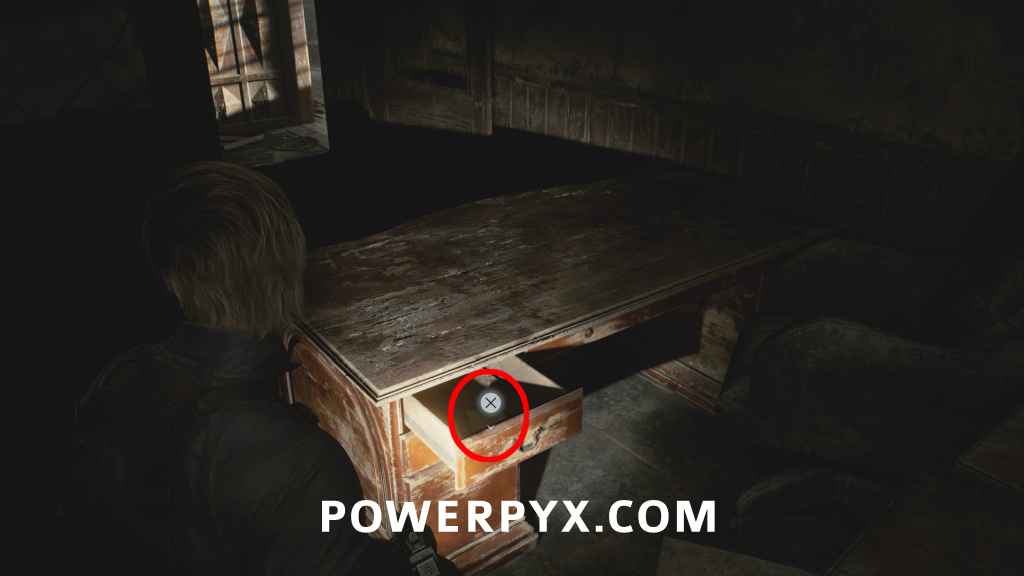
File #4 – Notice of Closure
Office: In the same area go behind the reception desk, follow the path to the backroom and open the blue drawer.
File #5 – Alyssa’s Journal
Automatic from story progression.
Wrenwood – Leon
File #6 – Report on Victor Gideon
Automatic from story progression, obtained during cutscene before playing Leon for the first time.
Care Center (Rhodes Hill) – Grace
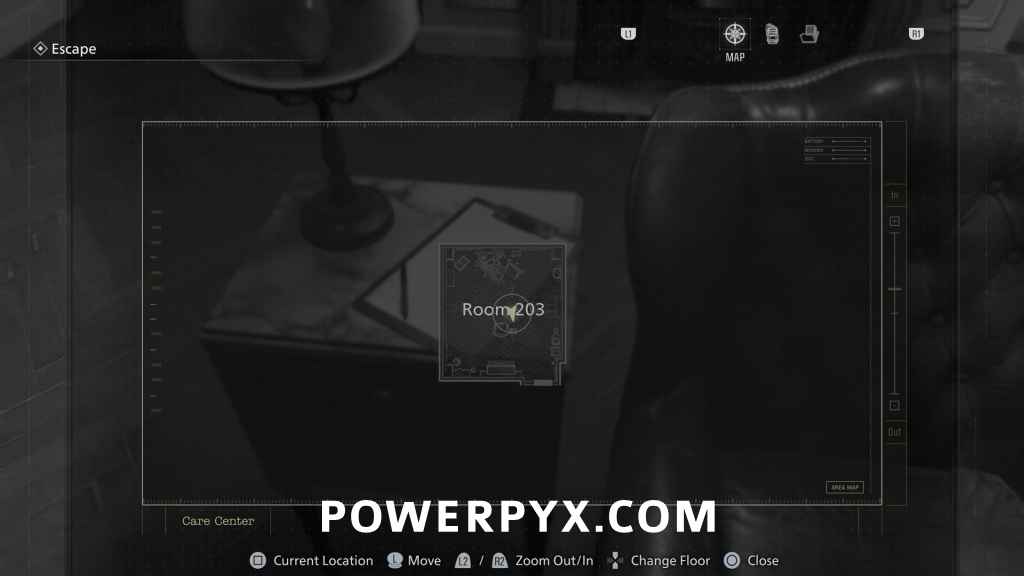
File #7 – Progress Notes
Room 203: On the small table in the room when you regain control of Grace.
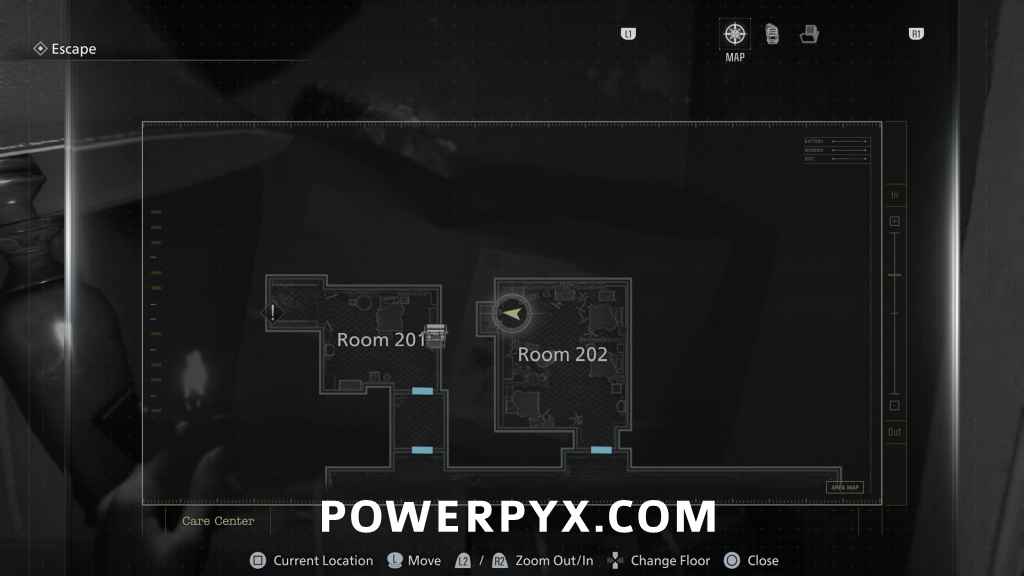
File #8 – Note on Cardboard Box
Room 202: Inside the closet in Room 202. It’s open after grabbing the Lighter from Room 201.

Care Center (Rhodes Hill) – Grace Part 2
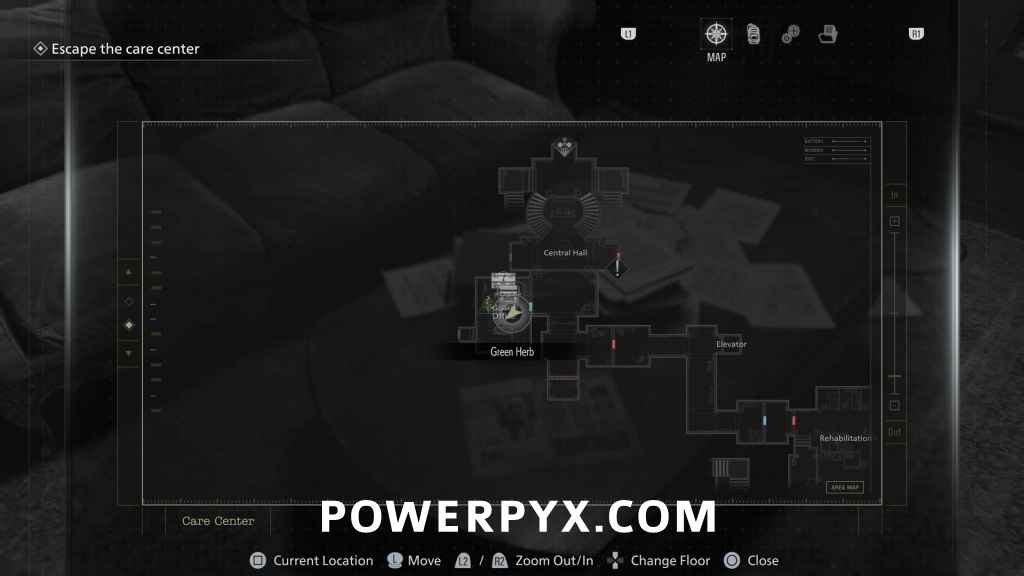
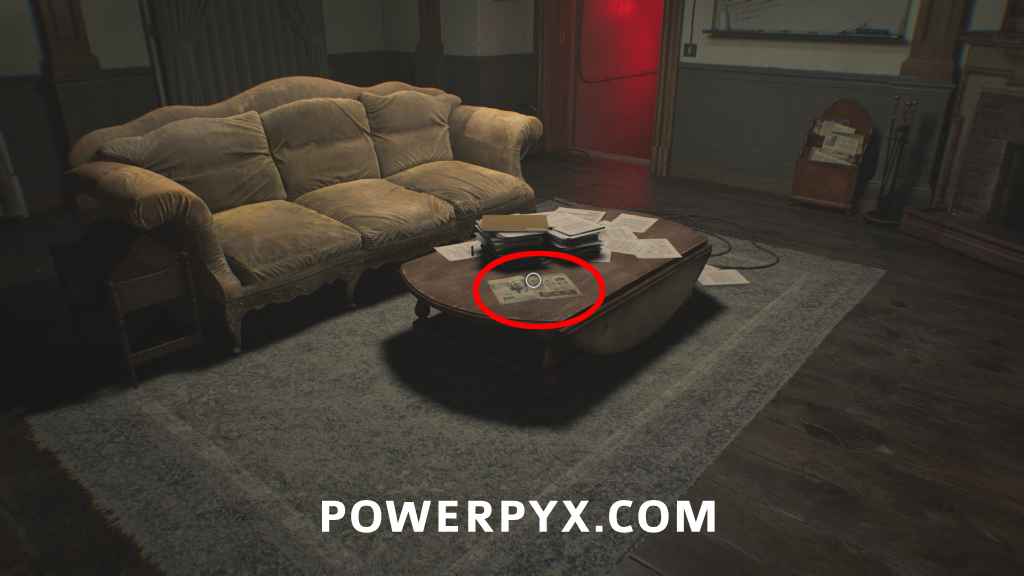
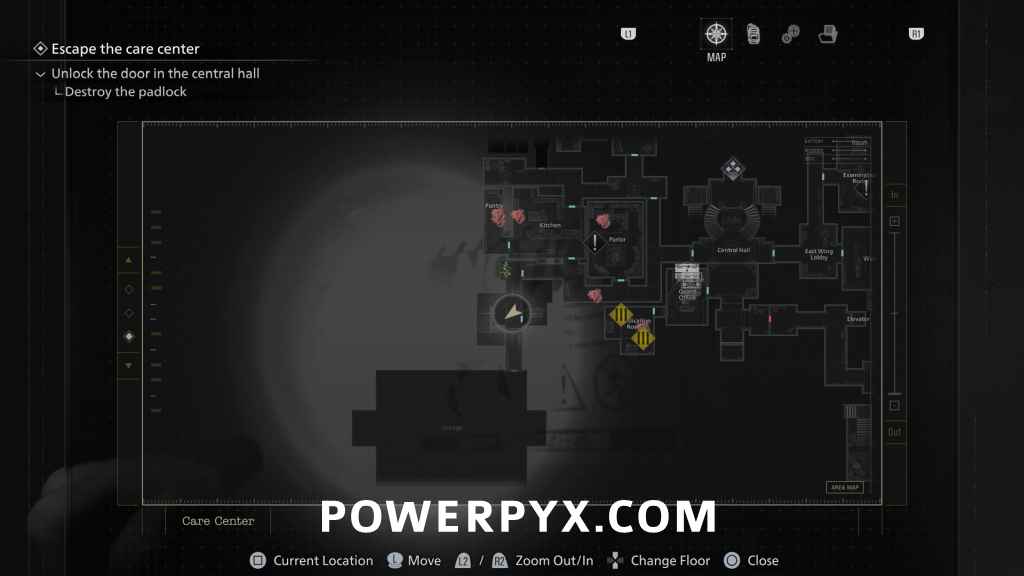
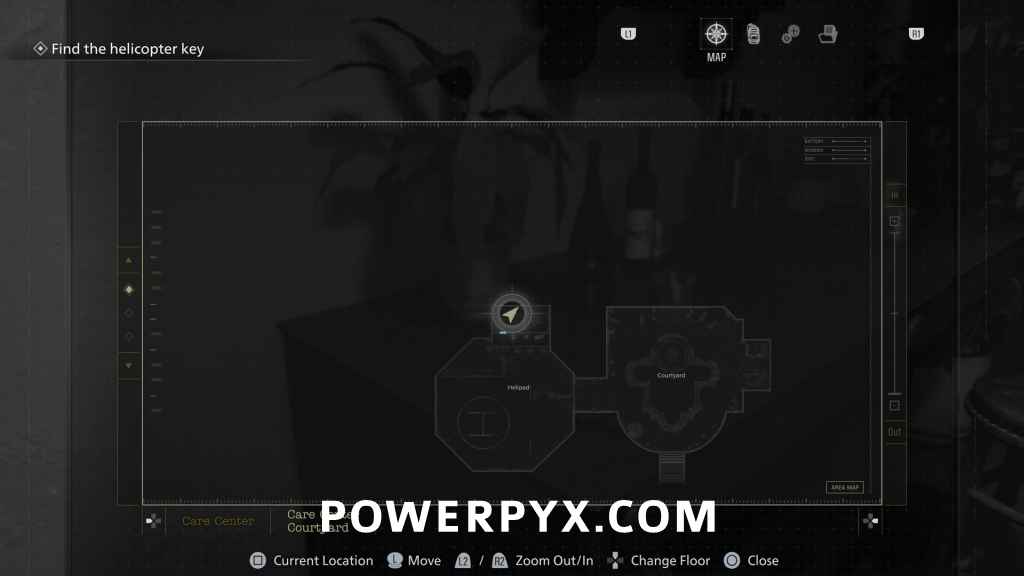
File #9 – Care Center Pamphlet
Guard Office: Inside the Safe Room where the typewriter is, this is on the couch table.
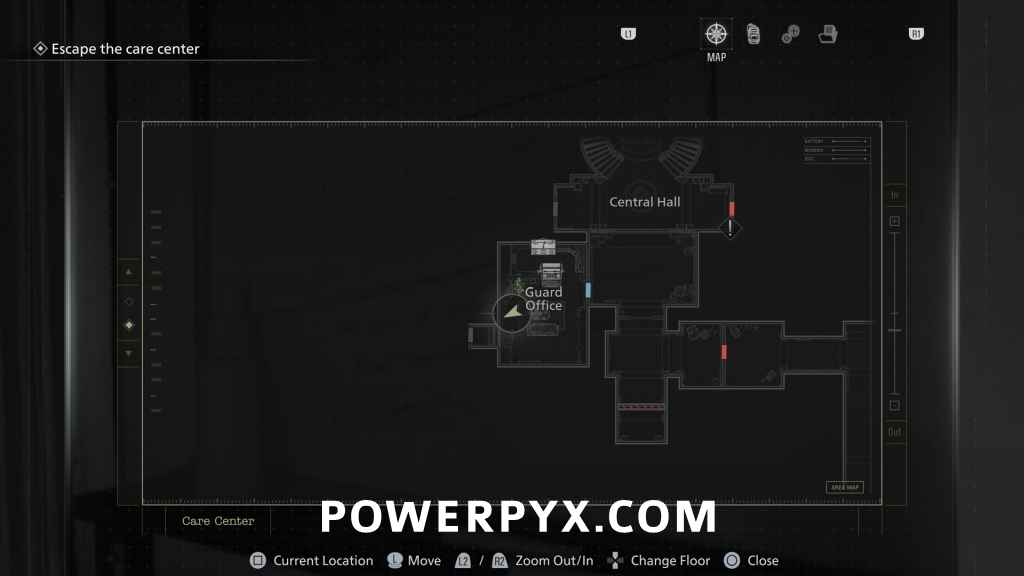
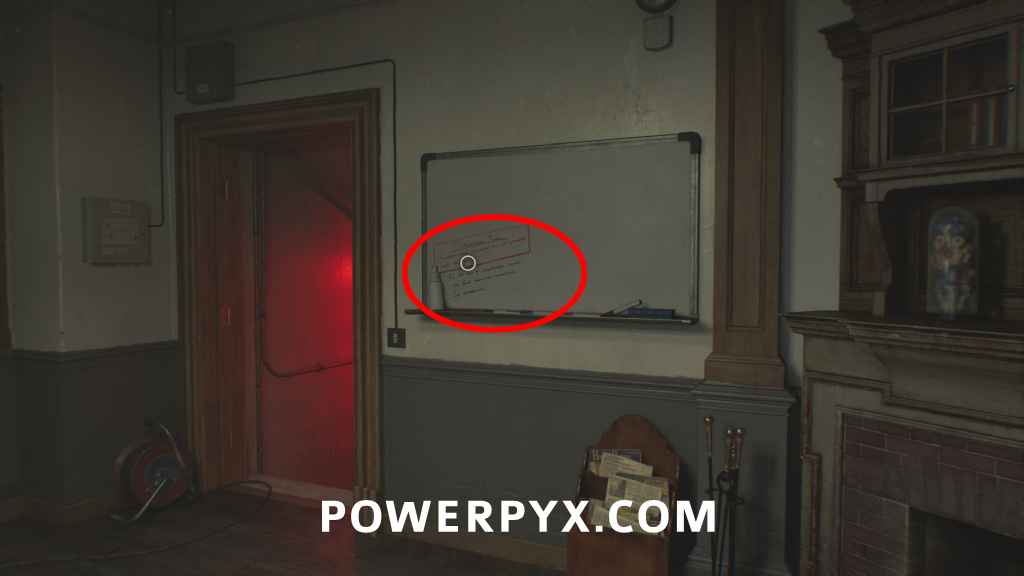
File #10 – Whiteboard Scrawl
Guard Office: Same room, on the wall on whiteboard, just before the exit.
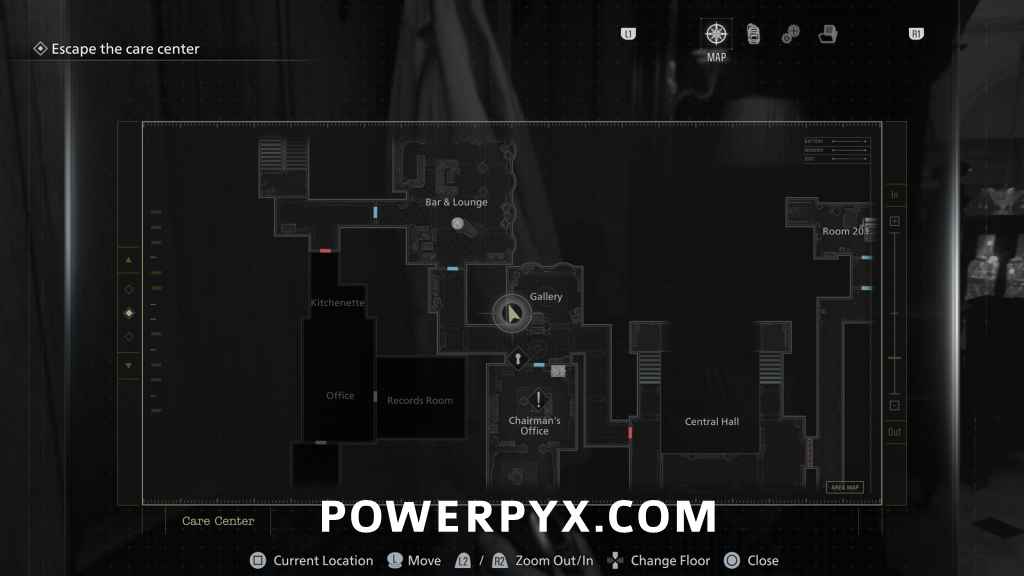
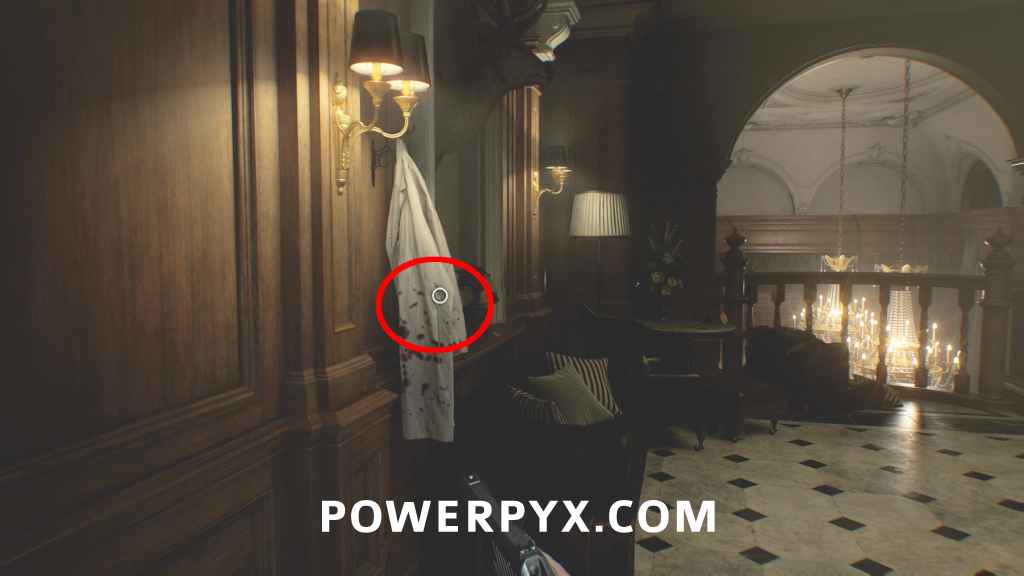
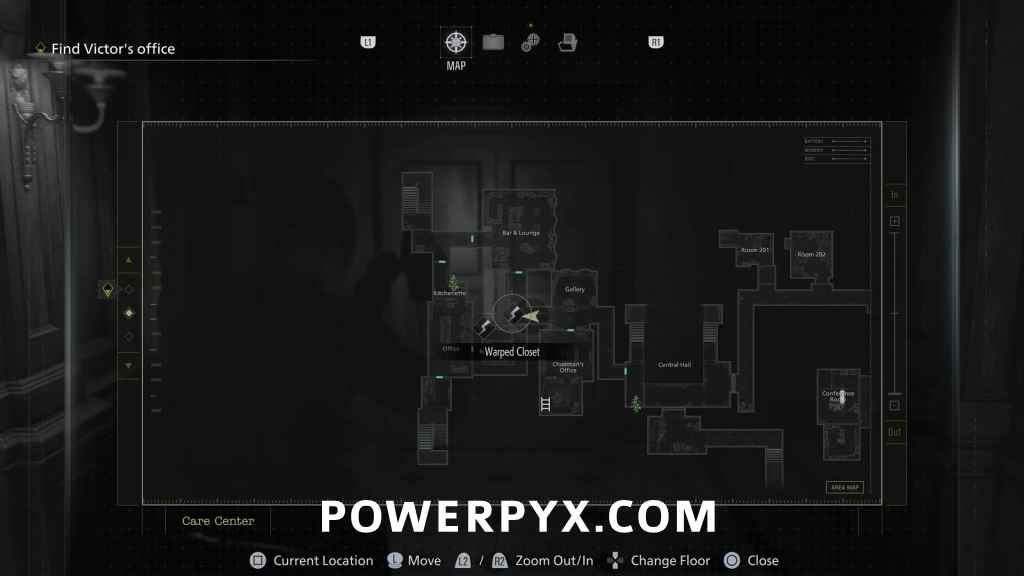
File #11 – Folded Note
Gallery: On the 2nd floor of West Wing, after going through Bar & Lounge, follow the corridor and turn left, inspect the white coat hanging on the wall.
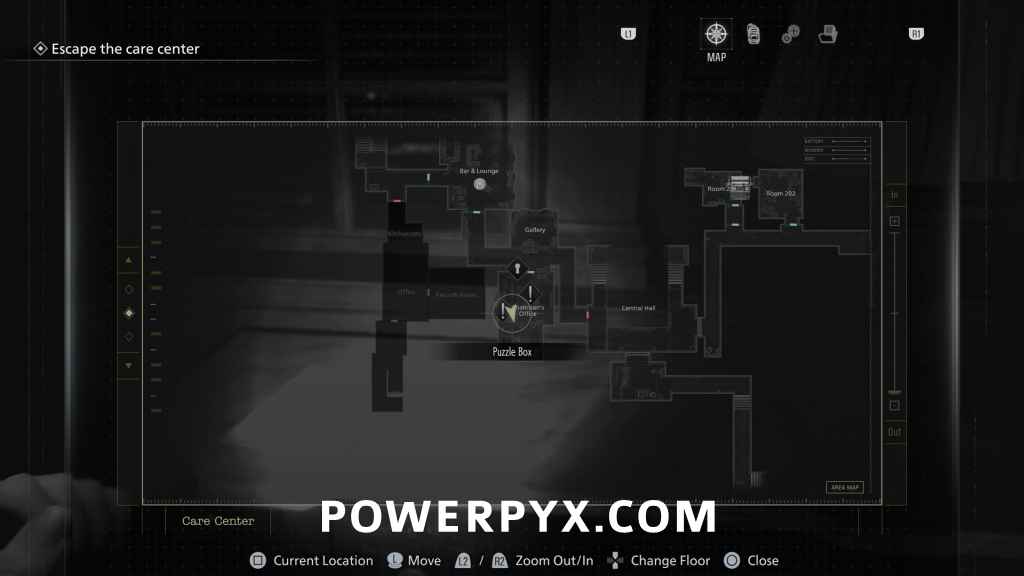
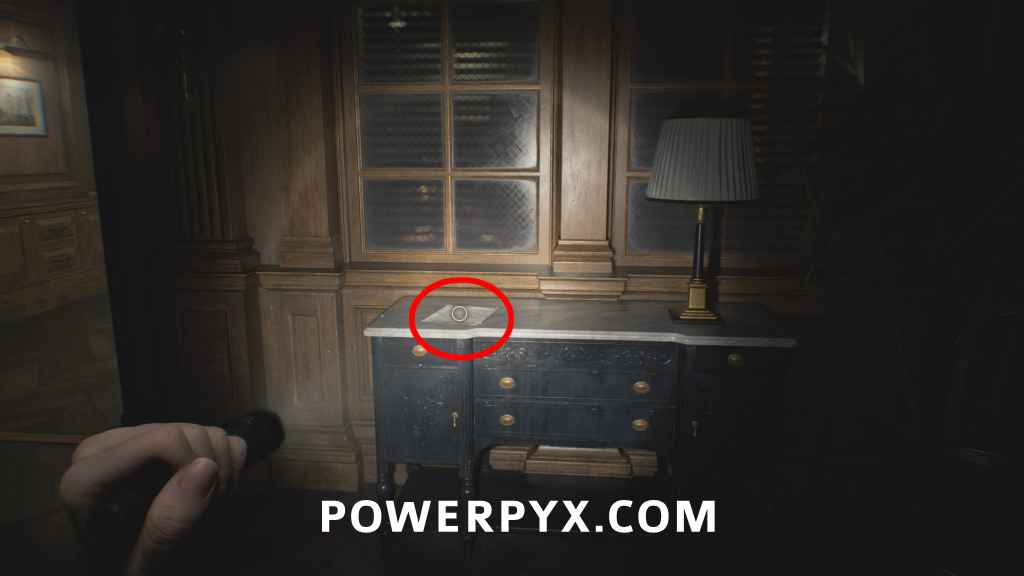
File #12 – Copy of an Email to a Manager
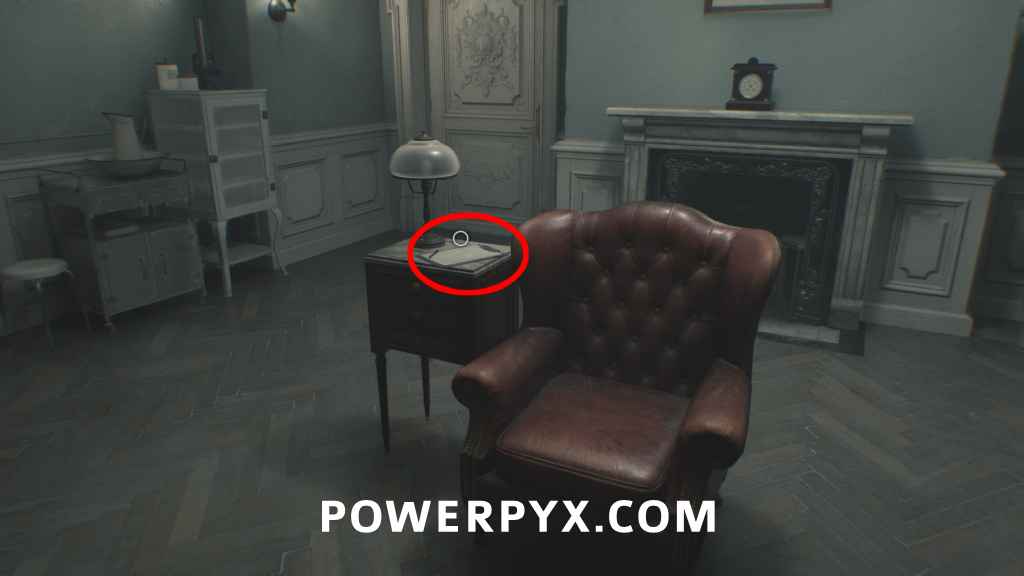
Chairman’s Office: Next to the previous file enter the Chairman’s Office to find this on the cupboard.
File #13 – Note to a Chairman
Chairman’s Office: In the backroom of the Chairman’s Office where a zombie is, inside the trash bin.
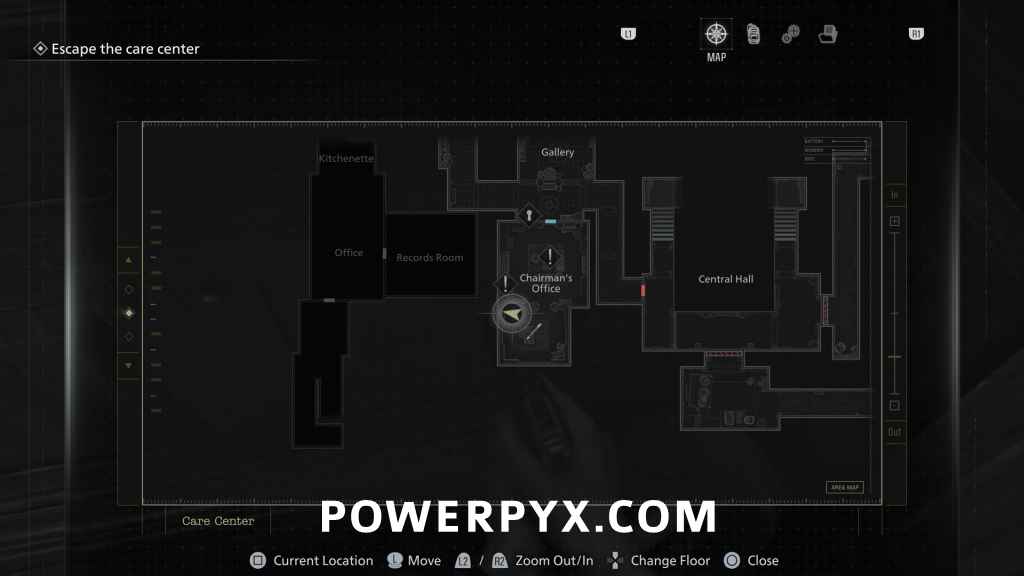
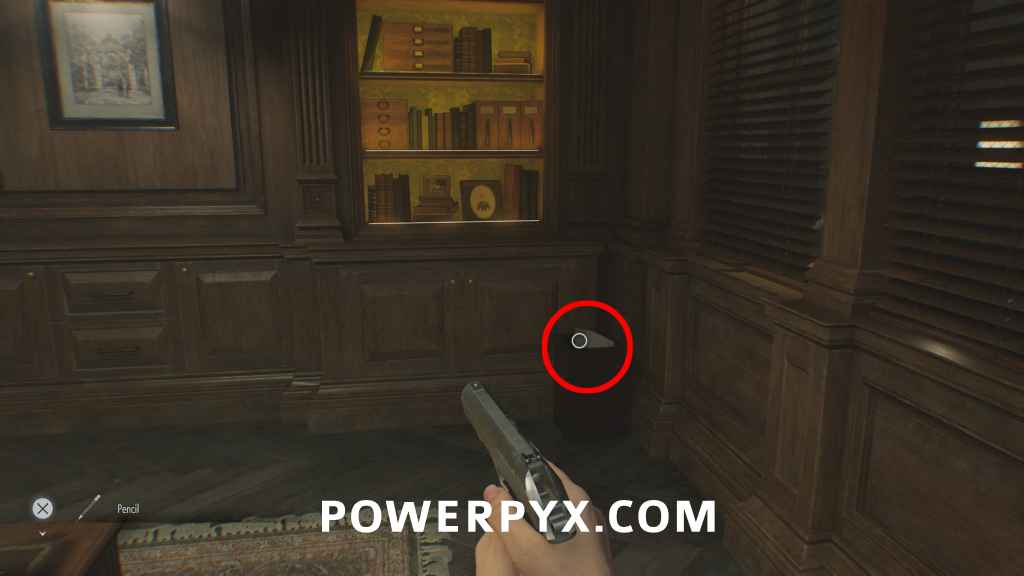
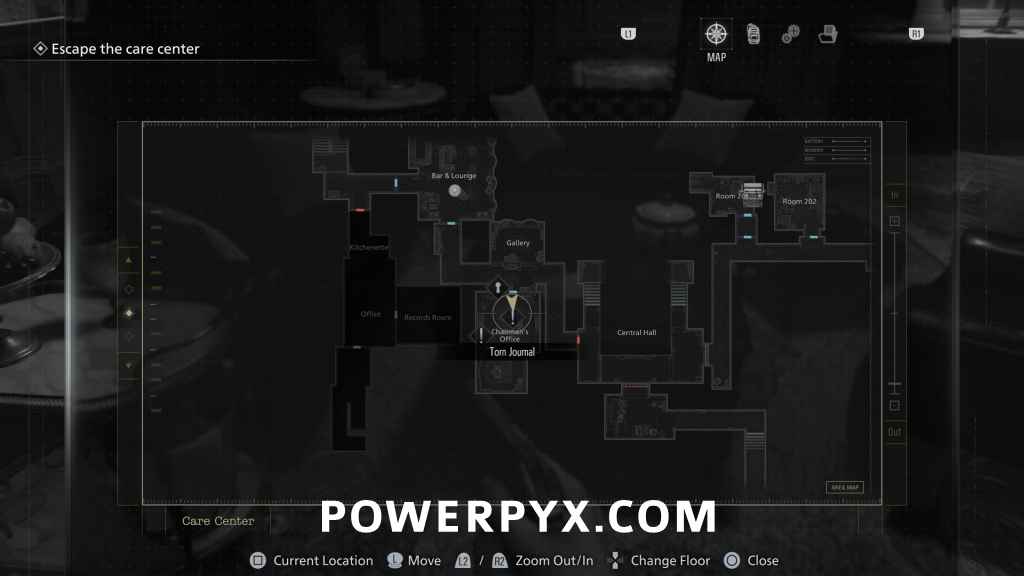
File #14 – Chairman’s Note
Chairman’s Office: You will receive it after using the Pencil to shade in the note in the Chairman’s Office.
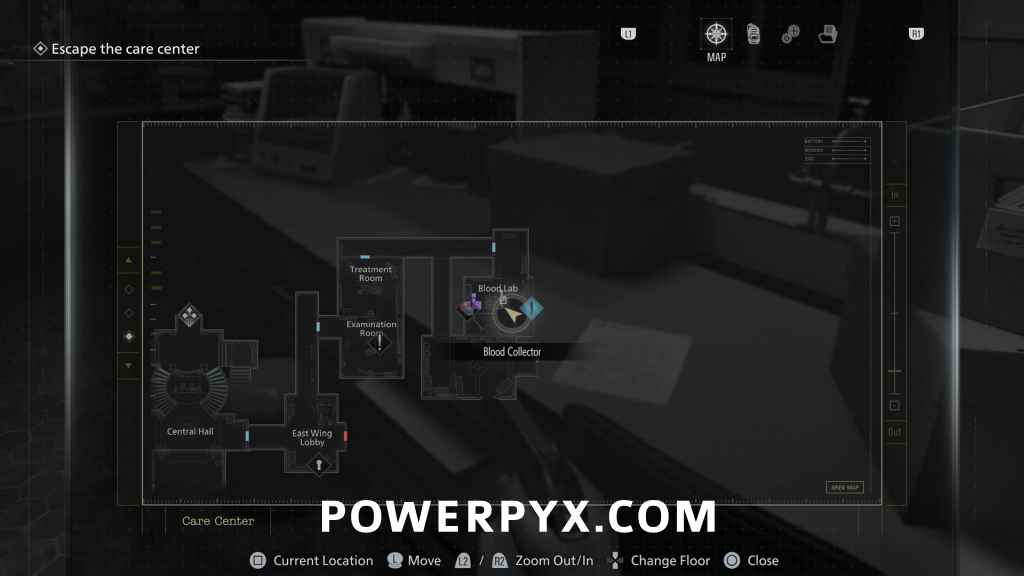
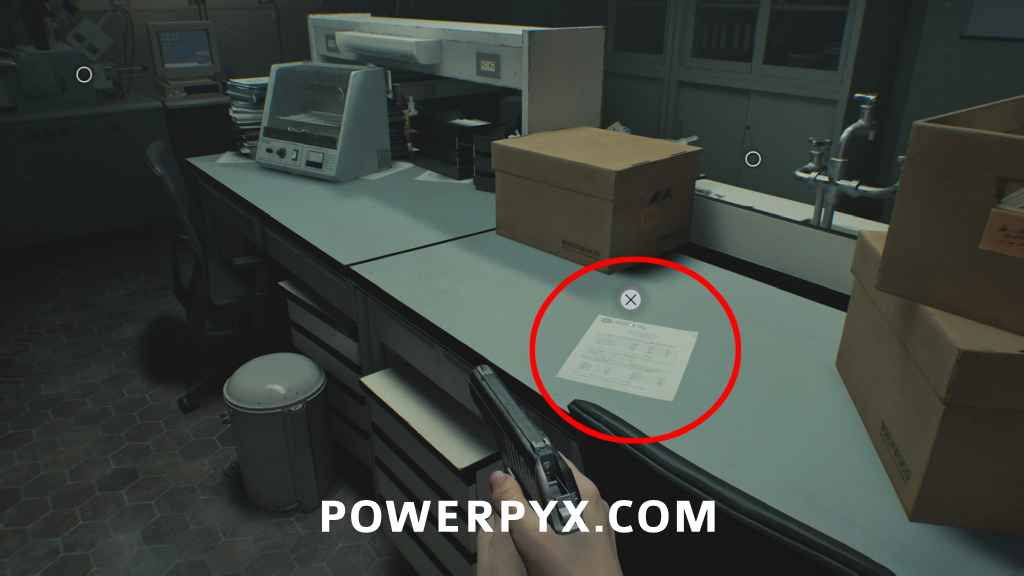
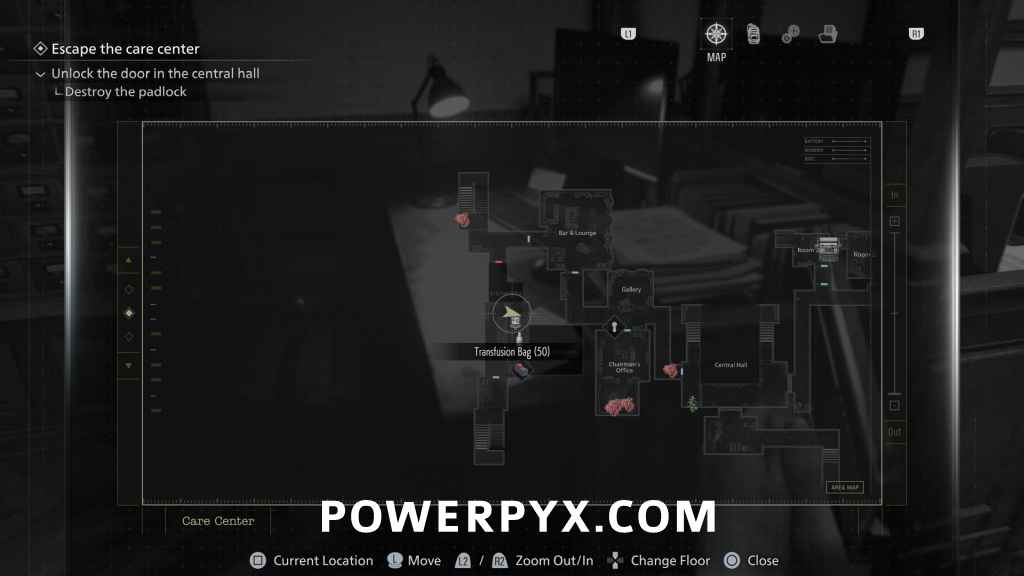
File #15 – Blood Compound Synthesis
Blood Lab: After using the key in Central Hall to enter the East Wing, you go through an Examination Room, then at the end of the hallway enter the Blood Lab to find this on the table.
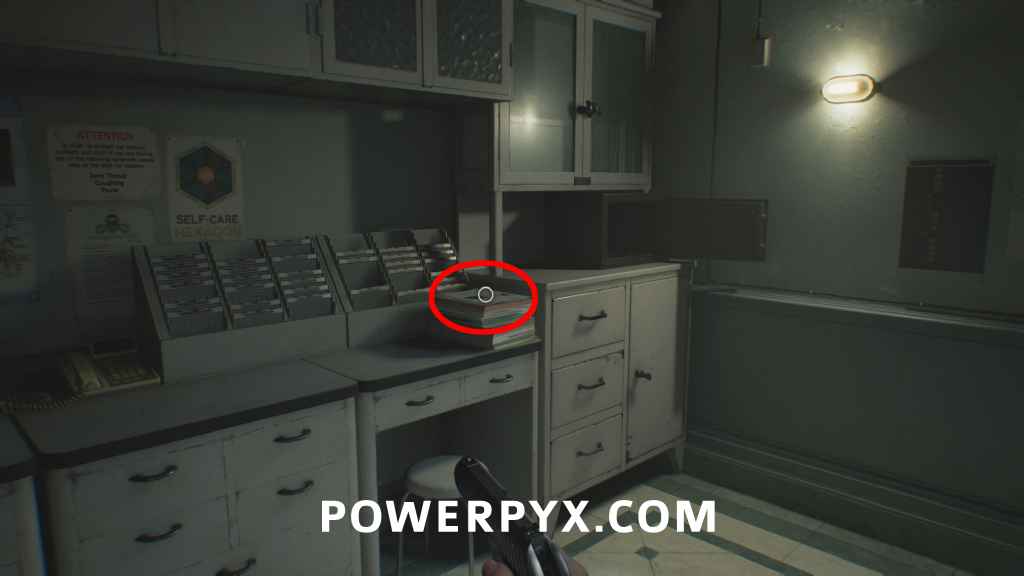
File #16 – Safe Replacements
Waiting Room: Next to open safe behind the counter.

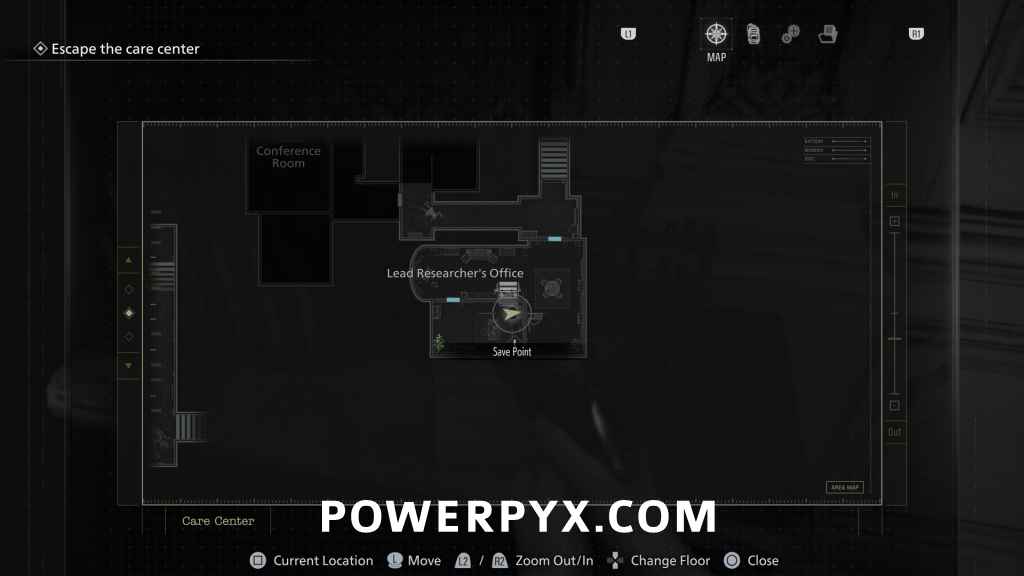
File #17 – Lead Researcher’s Picture 2
Lead Researcher’s Office: In the safe room on 2nd floor, in the back room on the cupboard.
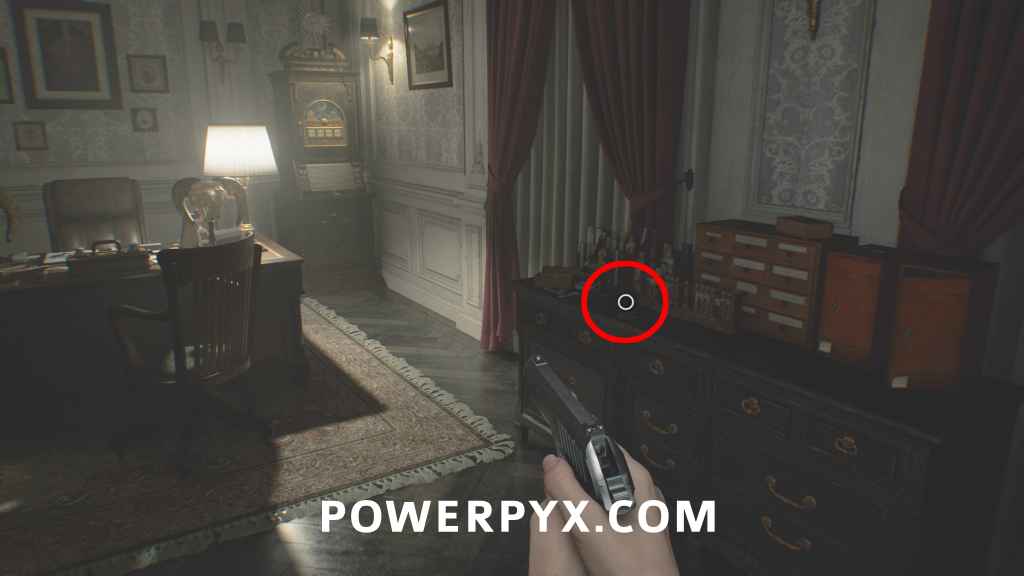
File #18 – Lead Researcher’s Picture 1
Lead Researcher’s Office: same room, on desk.

File #19 – Lead Researcher’s Picture 3
Lead Researcher’s Office: same room, on desk (framed picture).
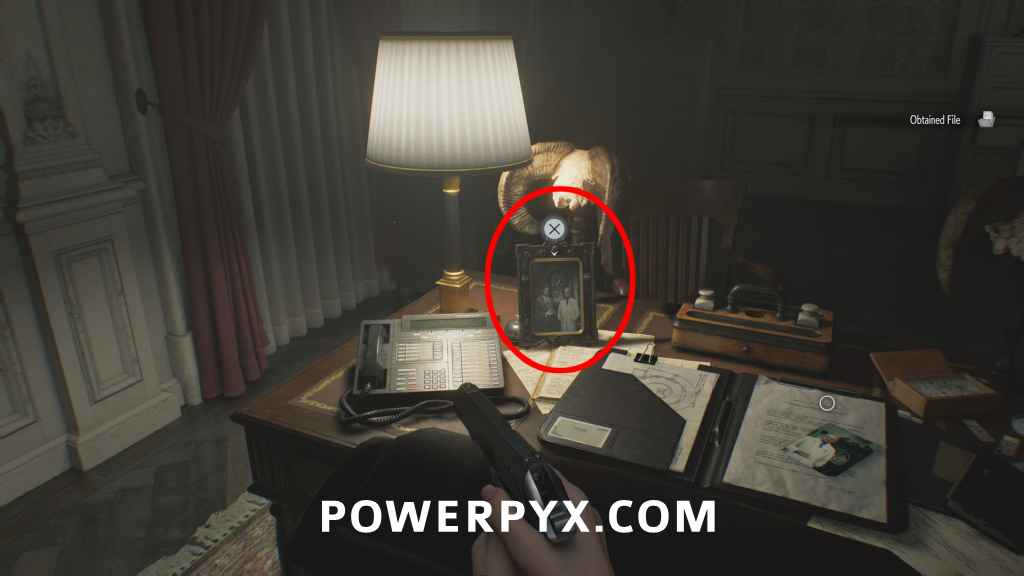
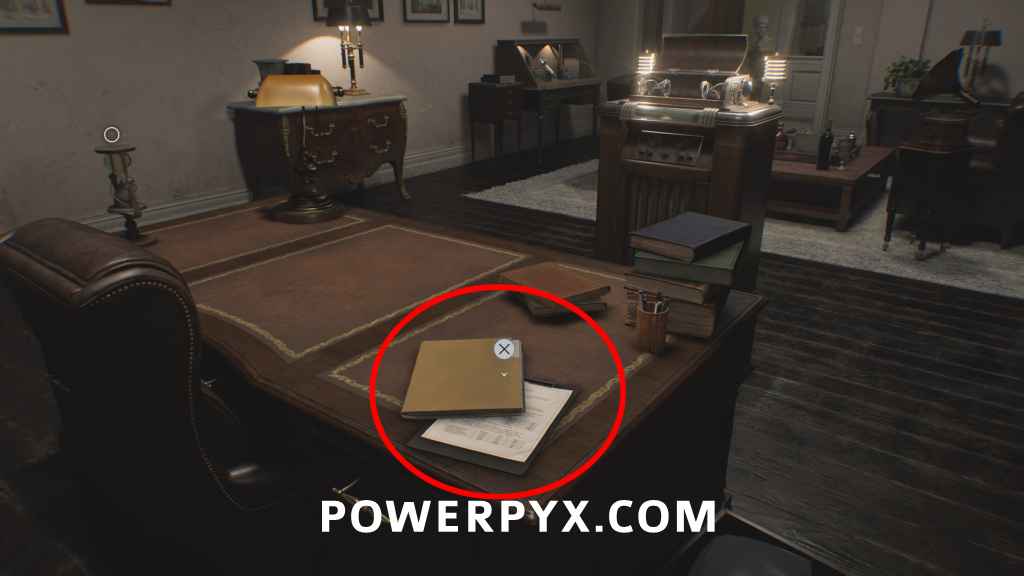
File #20 – Lead Researcher’s Message
Lead Researcher’s Office: Same room, other cupboard.
File #21 – Victor’s Journal Entry
Blood Lab: Backtrack to Blood Lab, use the Level 1 door there to find this on a table.
File #22 – Construction Notice
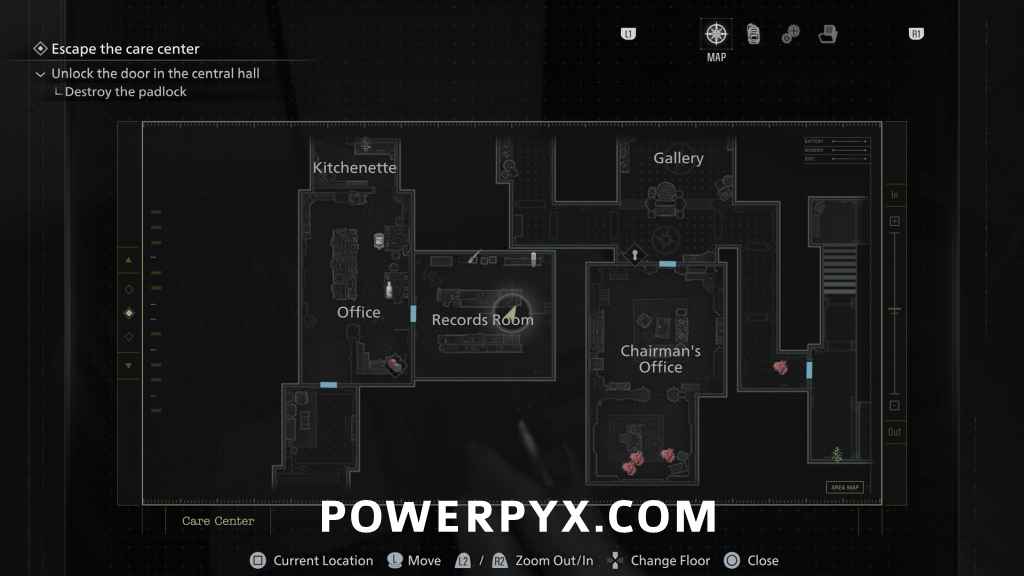
Custodian’s Office: In West Wing, in the corridor south from Kitchen, open the gate with Lvl. 1 lock and in the next corridor you will find it on a whiteboard to your right. Next to Custodian’s Office on the map.
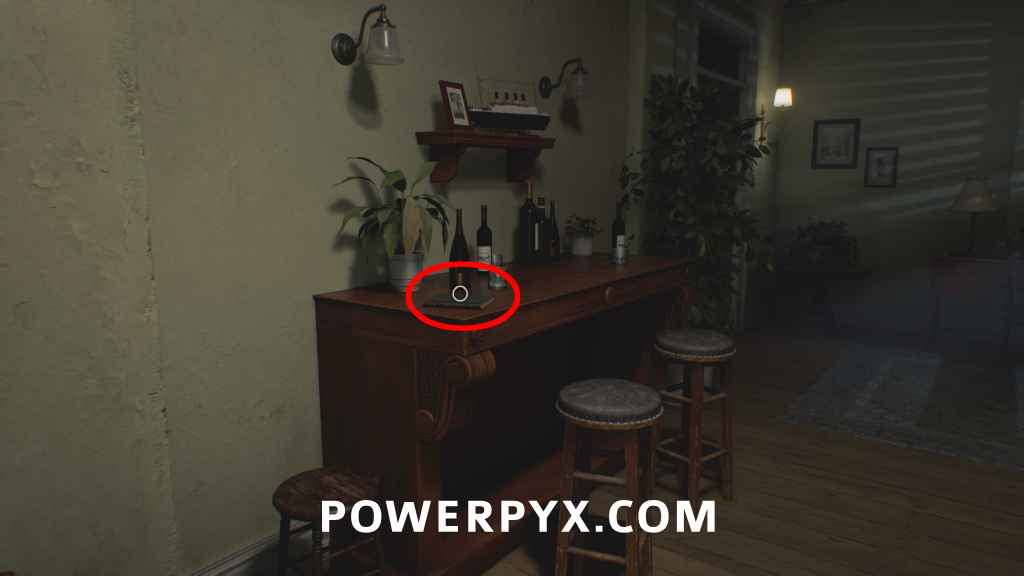
File #23 – Bar & Lounge Safe Code
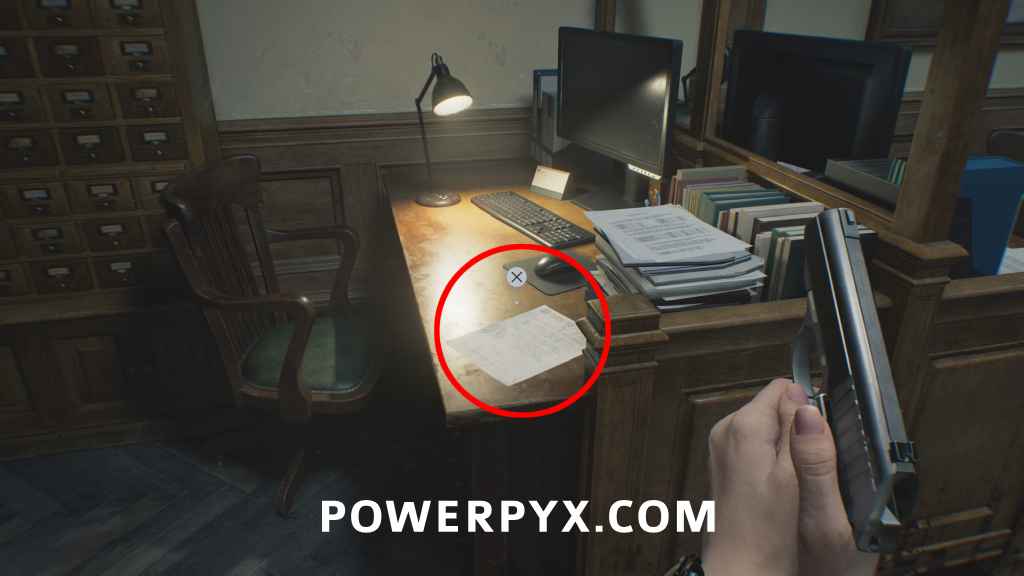
Office: After leaving the garage go upstairs to reach the Office. This is on the first desk.
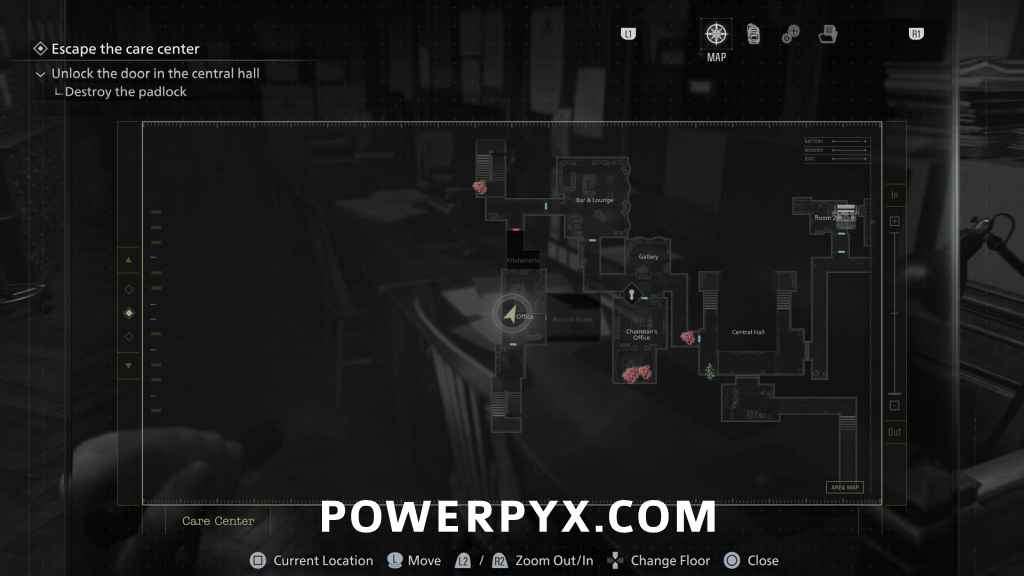
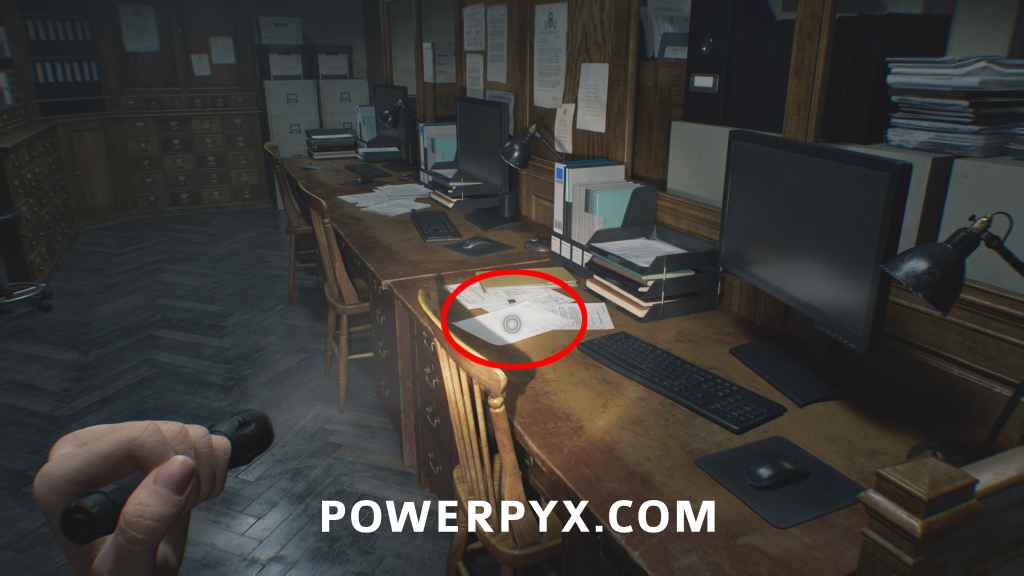
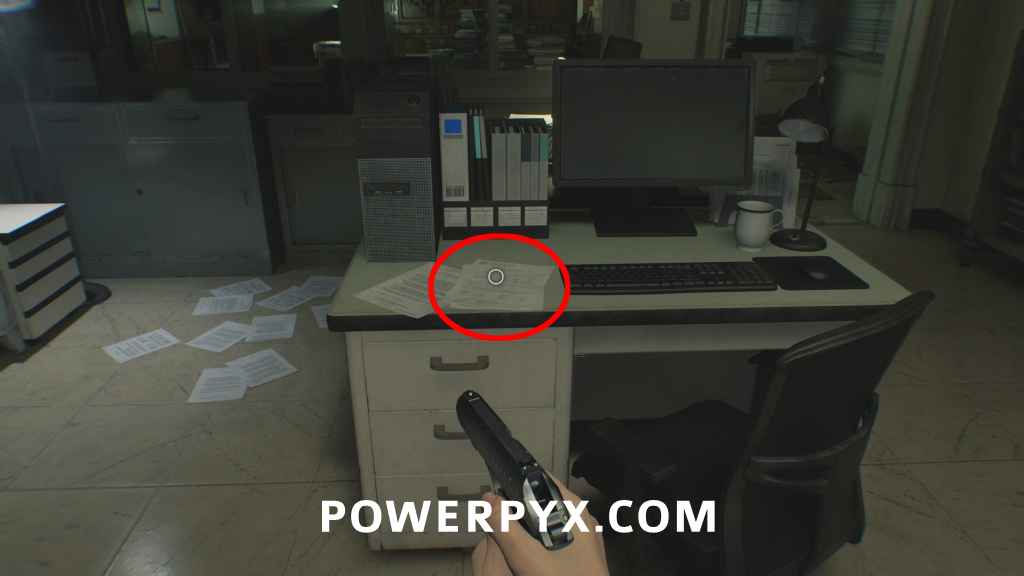
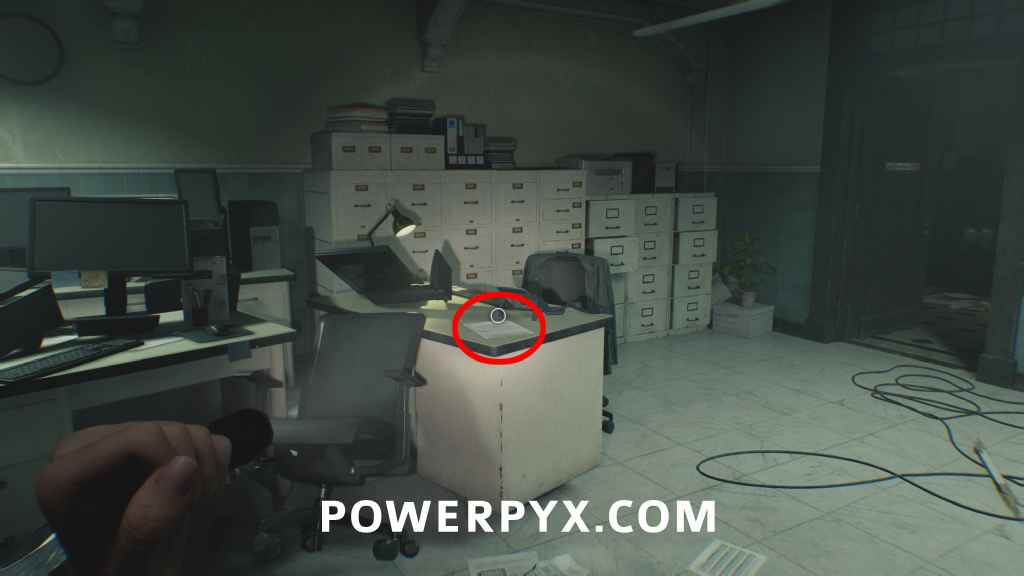
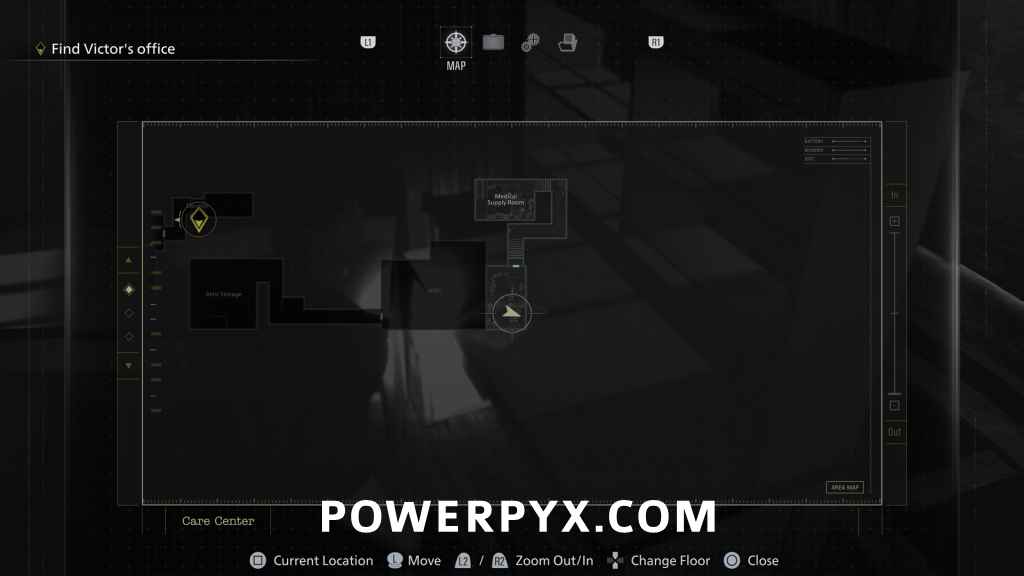
File #24 – Background Check
Office: Same room, on desk in back right corner.
File #25 – Disposal Team Report
Records Room: Enter the room on the right side of the Office to find this in a cardboard box at the end of the middle row of shelves.

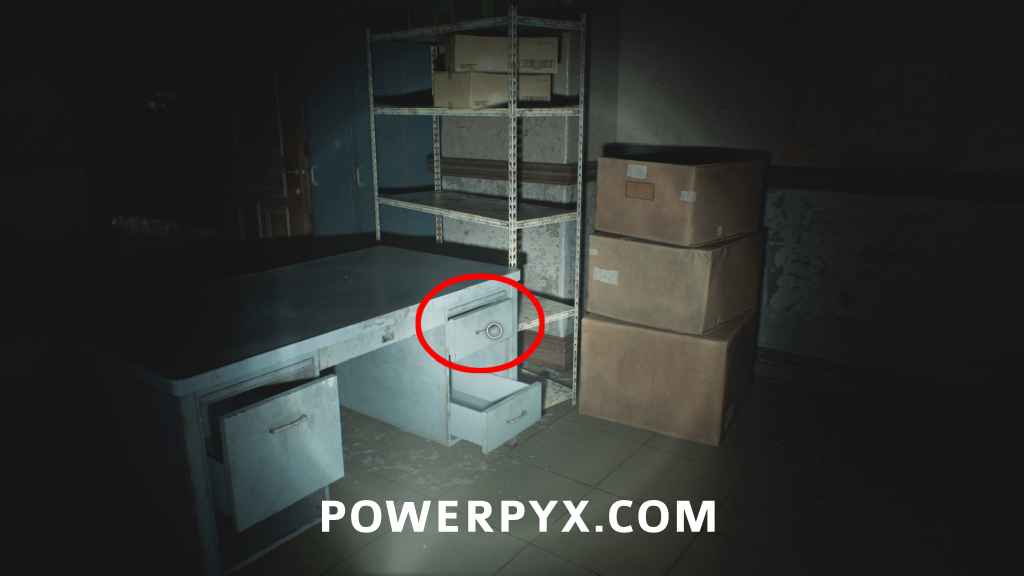
File #26 – Examination Room Safe Code
Backtrack to the East Wing 2nd Floor, where you first met the big Chunk monster and found Key Item: ID Wristband (Level 1). In the room where the big Chunk monster came from you find this on a locker.

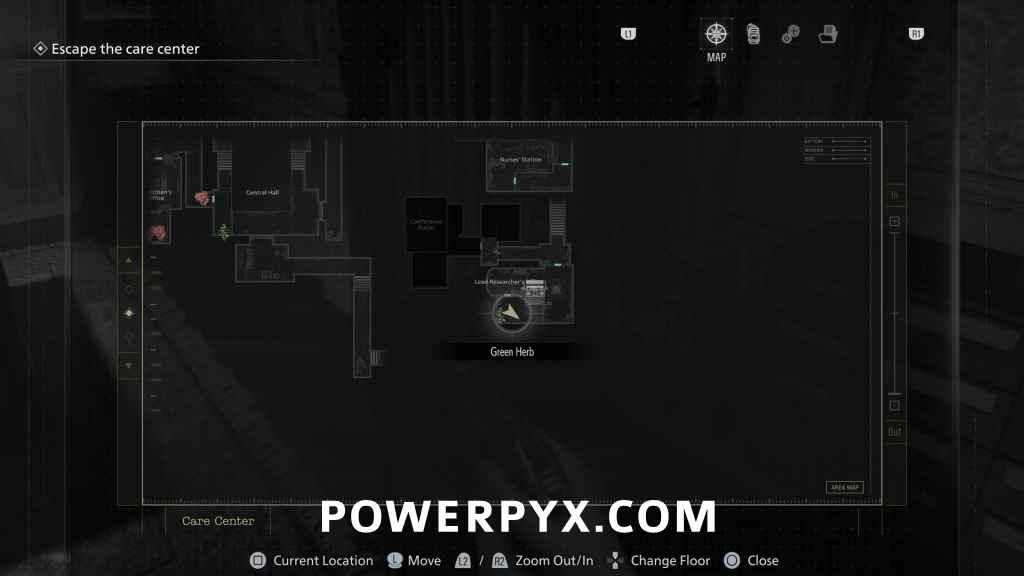
File #27 – Patient Medical Records
Conference Room: In the room where a singing zombie is, on a desk.
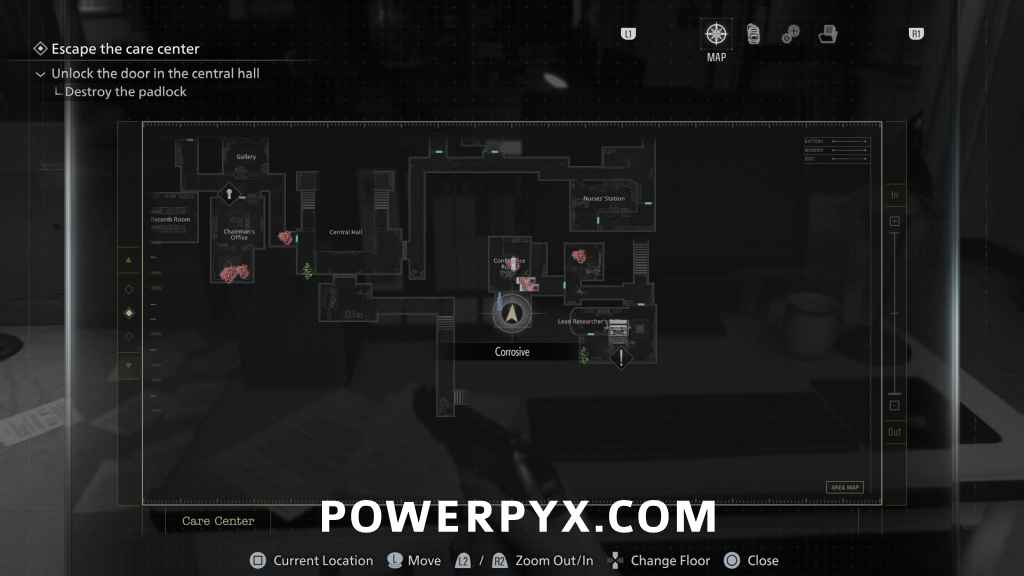
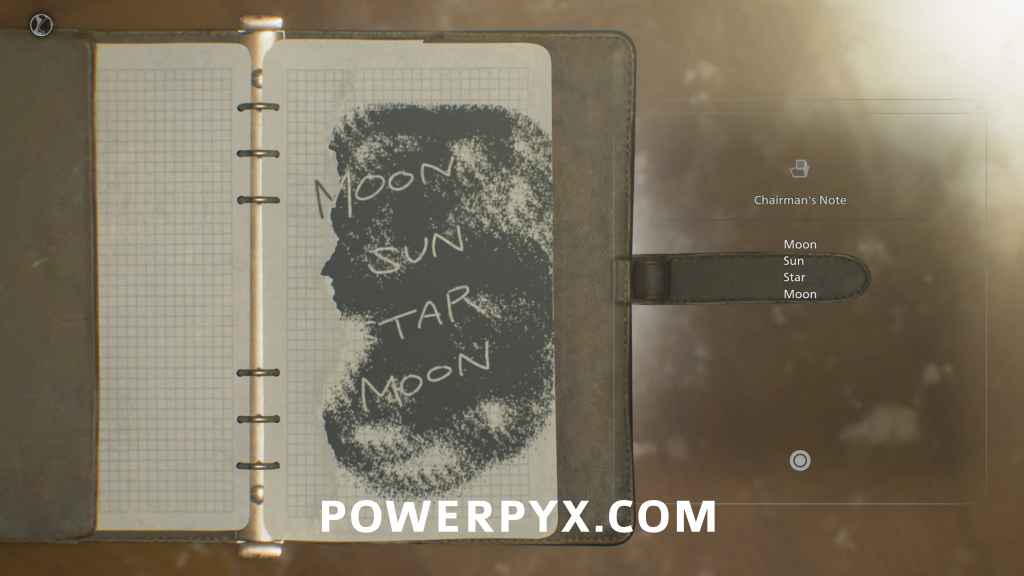
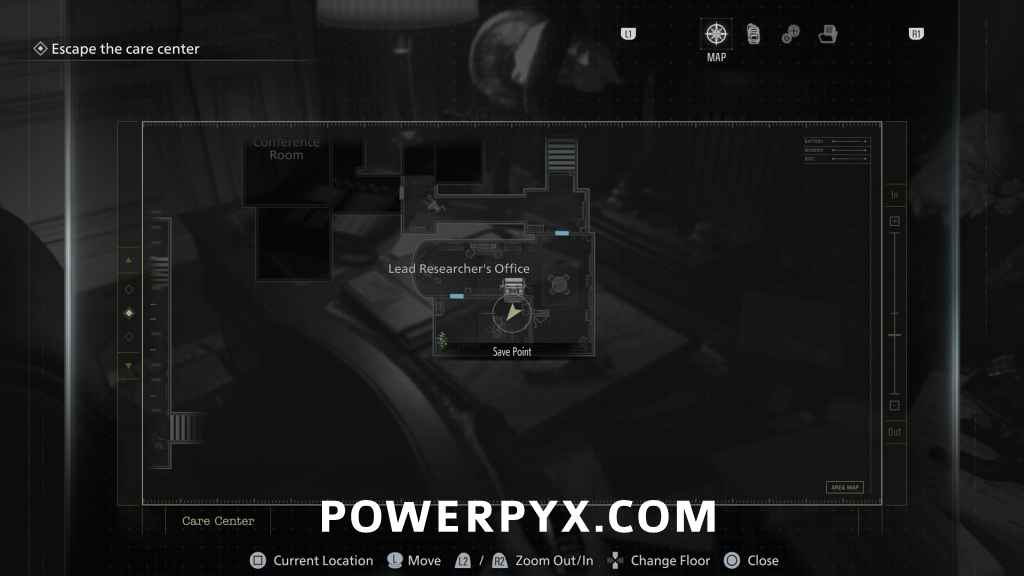
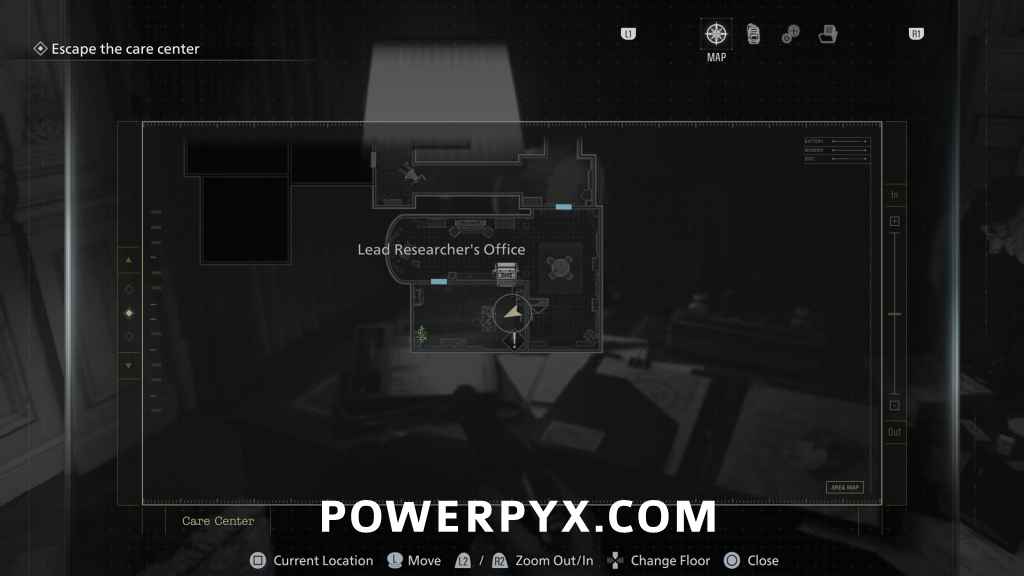
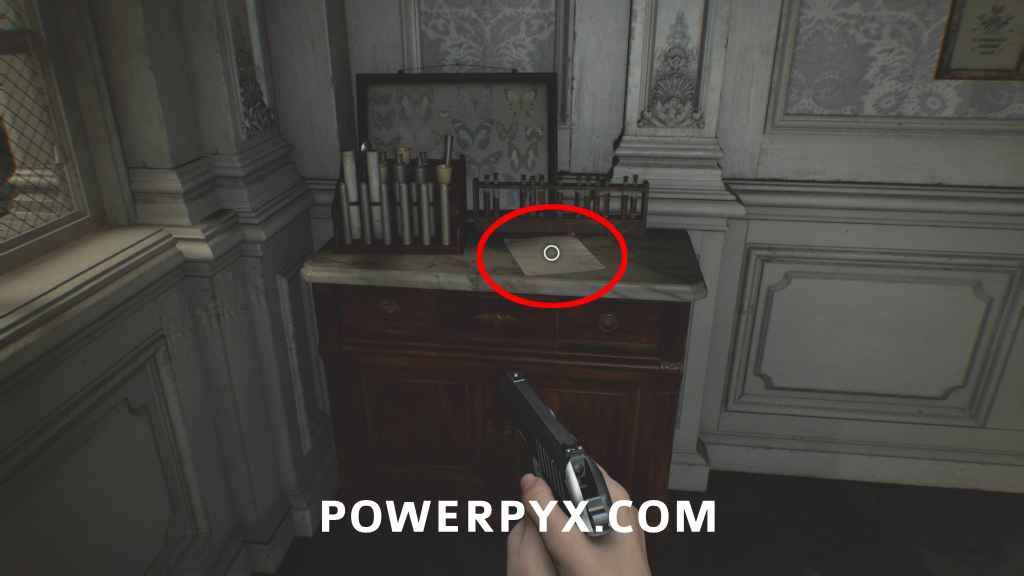
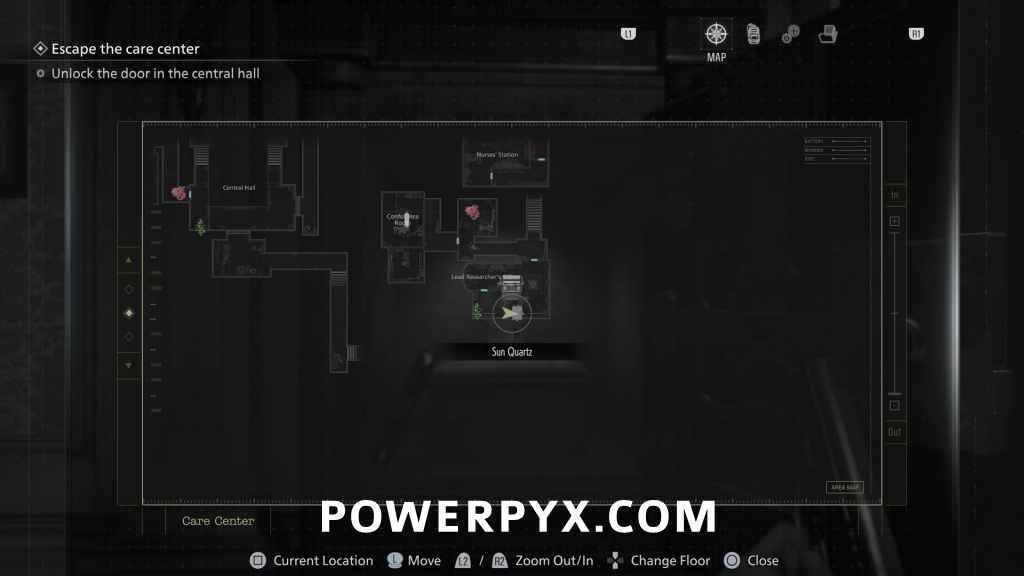
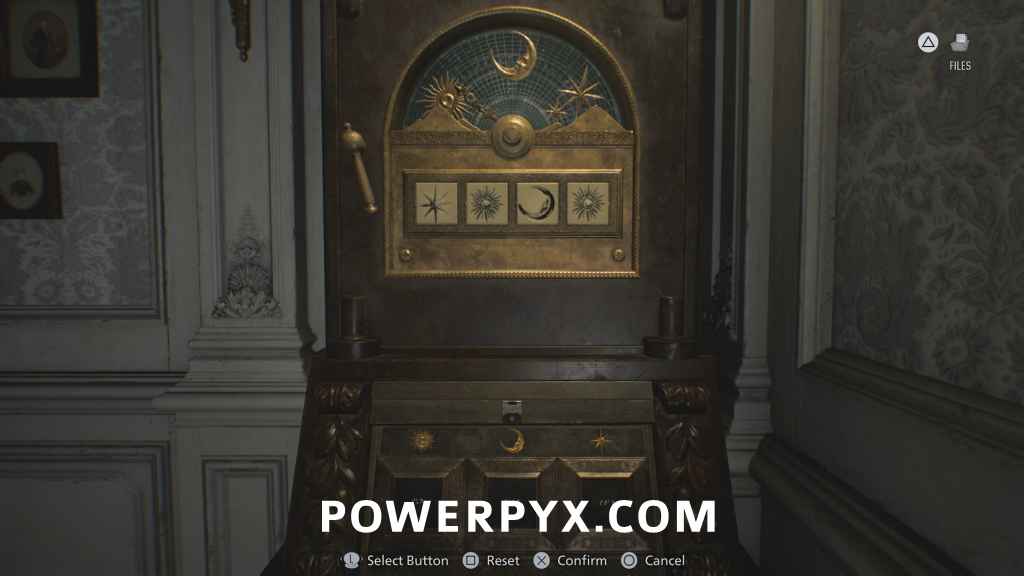
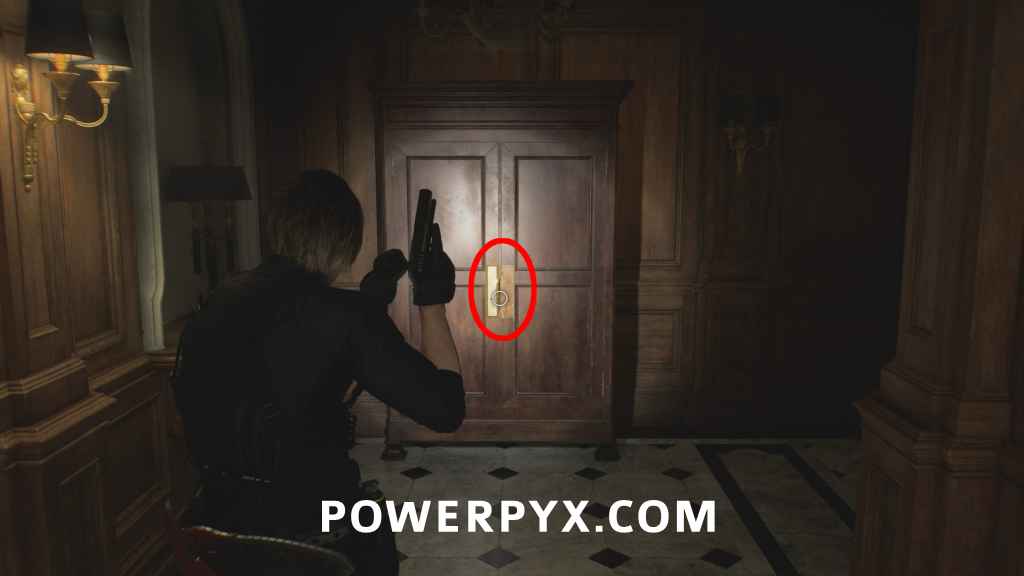
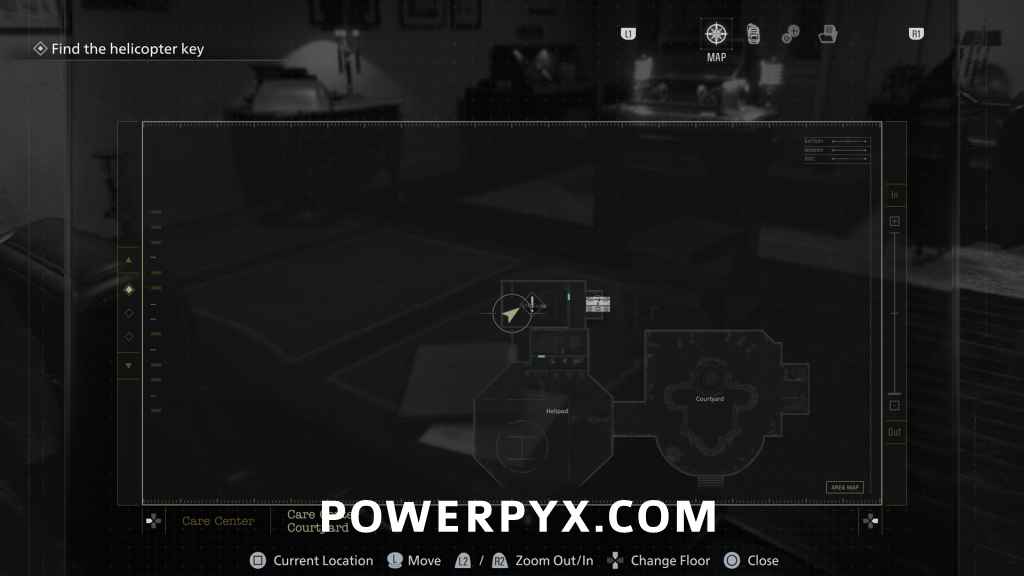
File #28 – Unlocking the Organ Transport Box
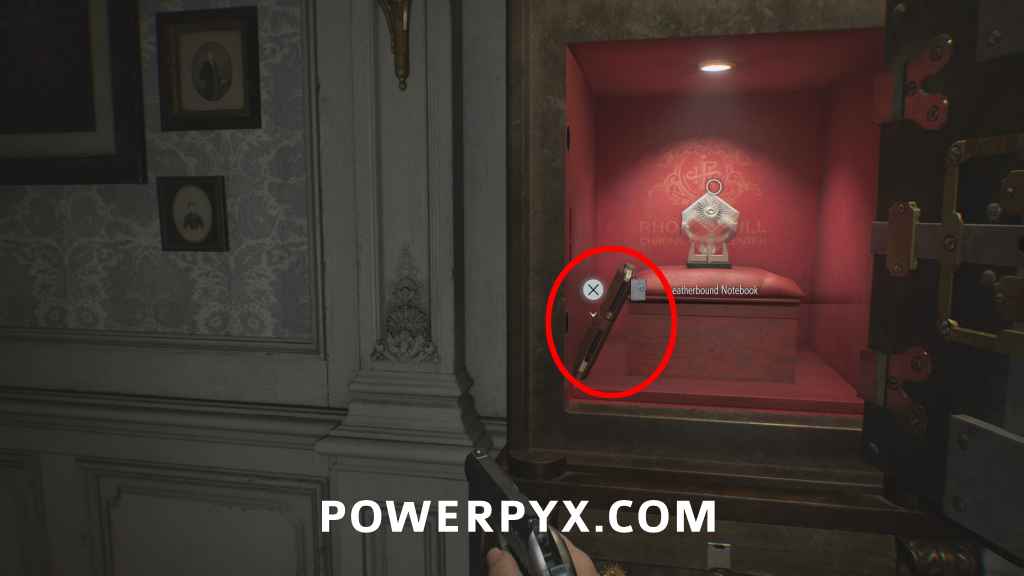
Lead Researcher’s Office: Go back to the backroom of Lead Researcher’s Office, interact with the padlock on the Puzzle Box and use the Corrosive on it. Afterward, you find the notebook in the opened Puzzle Box.
Solution (Casual) = Star – Sun – Moon – Sun (obtained by looking at the photos in the room)
File #29 – Spencer’s Research I
Same as above, both files are in the Puzzle Box, in the Leatherbound Notebook.
File #30 – Double Mutation
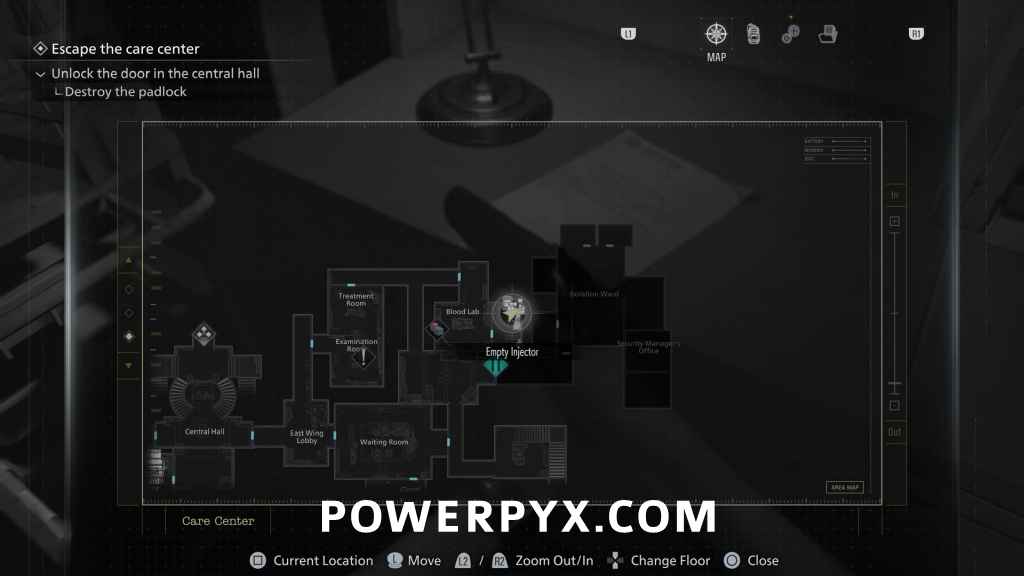
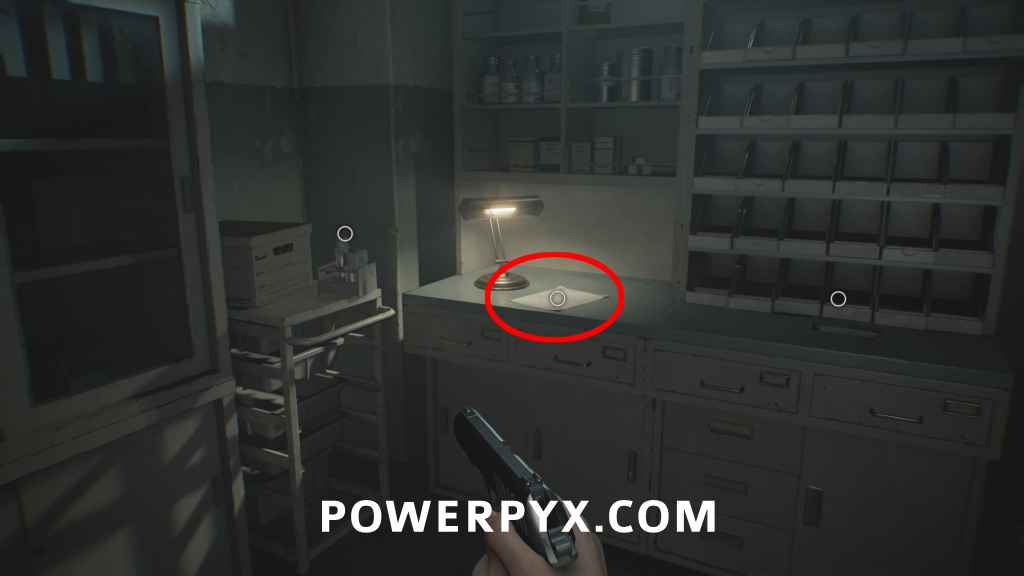
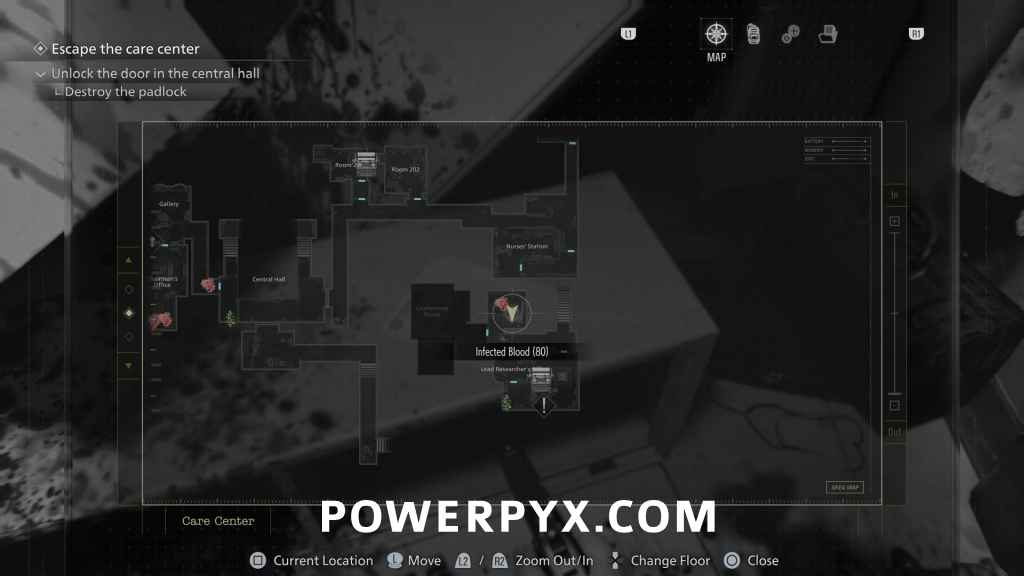
Isolation Ward: Use the Lvl 2. Wristband on the green lock door in the north-east corner of the East Wing (between Blood Lab and Waiting Room). This leads to the Isolation Ward. Enter the office on the right to find this file on a cardboard box.
File #31 – Nurse’s Log
Isolation Ward: Same room, on desk.
Care Center (Rhodes Hill) – Leon Part 2
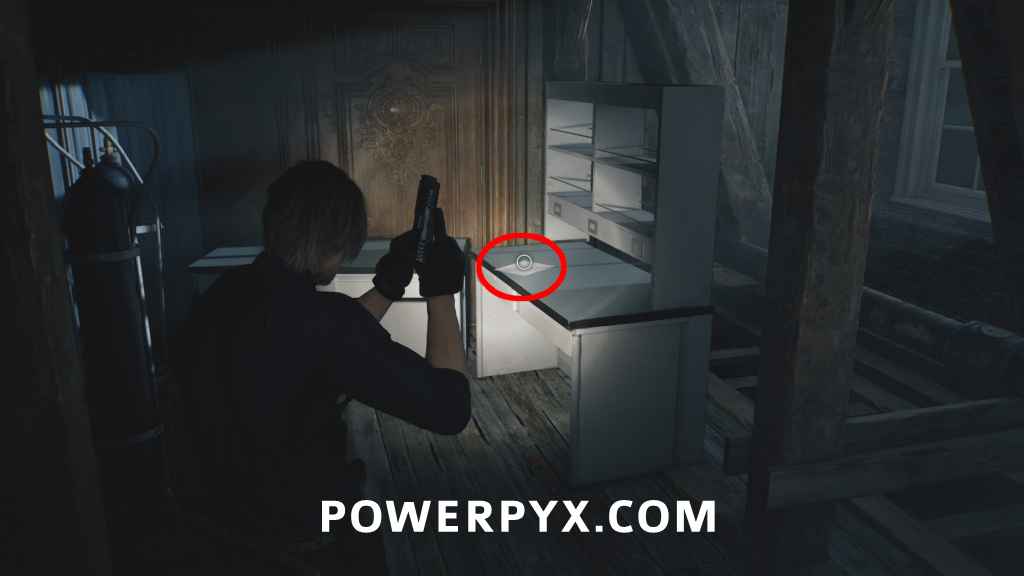
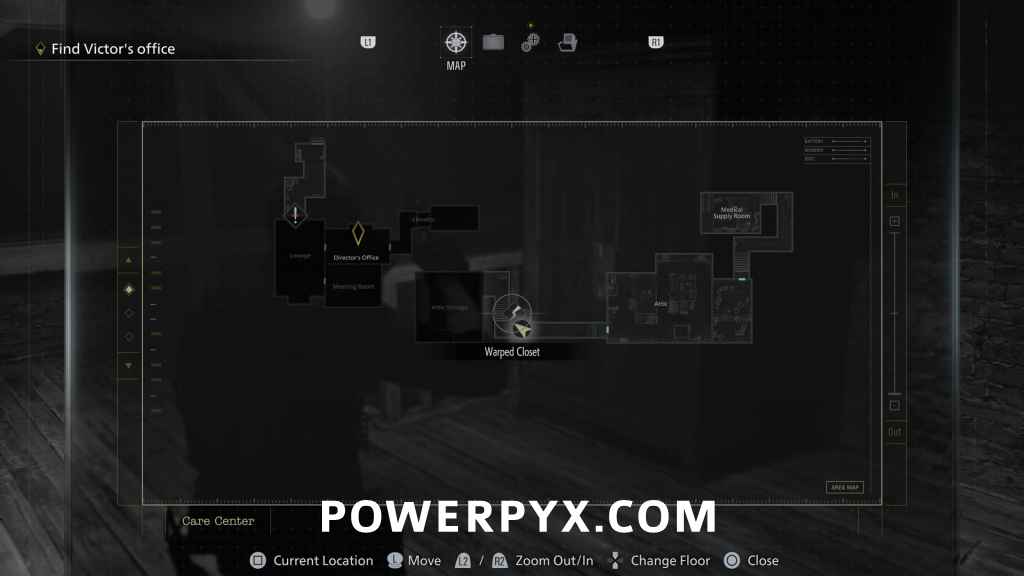
File #32 – Satiety Suppression Medical Records
Attic: When you play as Leon again, walk forward until you go through the next door. Then you find this in the back of the room, opposite the cupboard you push to progress.
File #33 – Basement Safe Code
After leaving the Attic, break open the first closet on the right with Leon’s Hatchet before going downstairs.

File #34 – Dishwasher’s Note
Found in the closet you can break open when going left from Chairman’s Office.
Care Center Basement (Rhodes Hill) – Grace
File #35 – Special Directive for Raccoon City + File #36 Report on Raccoon City Syndrome
Both obtained automatically as soon as you play as Grace again (you get a popup “New File” in the top right corner after cutscene, can view it from Files menu).
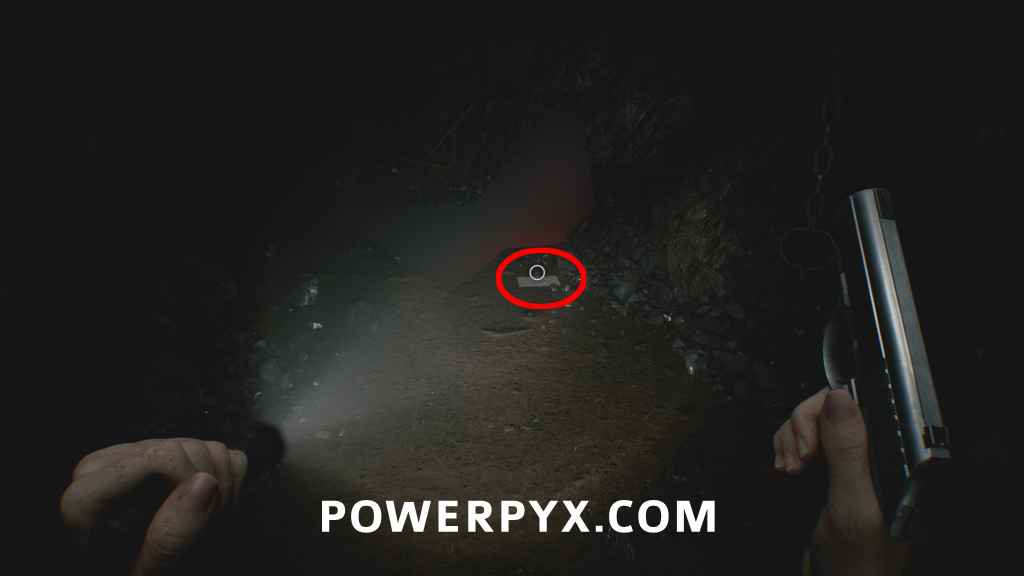
File #37 – Staff Member’s Last Words
Immediately after you start playing as Grace, go forward a few steps to find it next to a corpse in the tunnel.
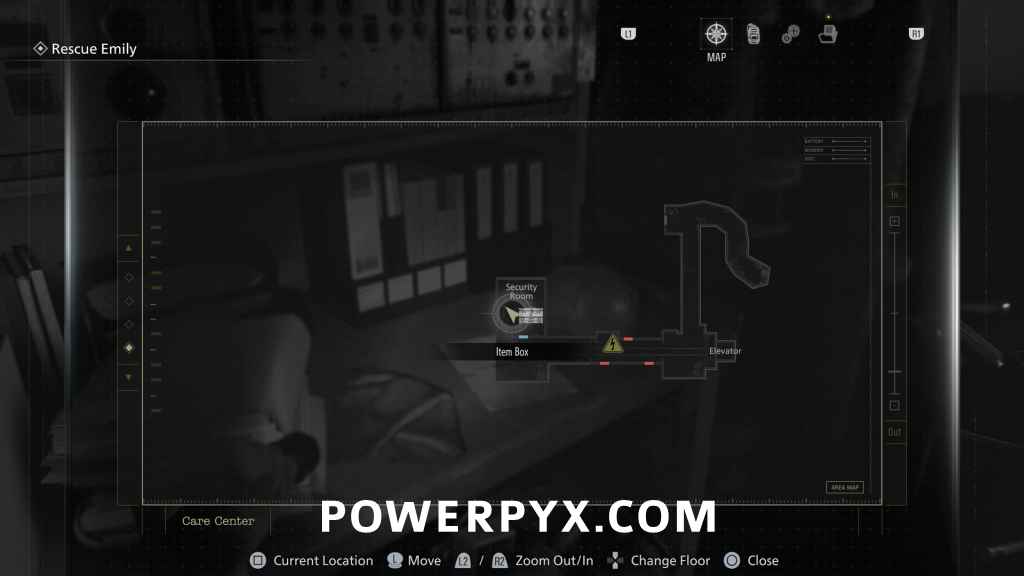
File #38 – Operation to Eliminate “The Girl”
Security Room: Found in the next safe room with all the CCTV.
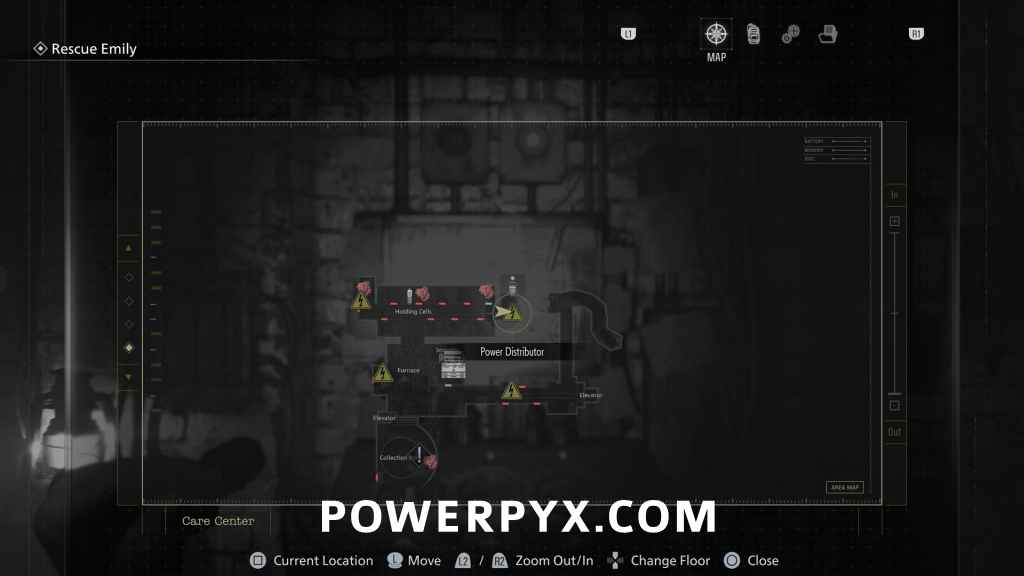
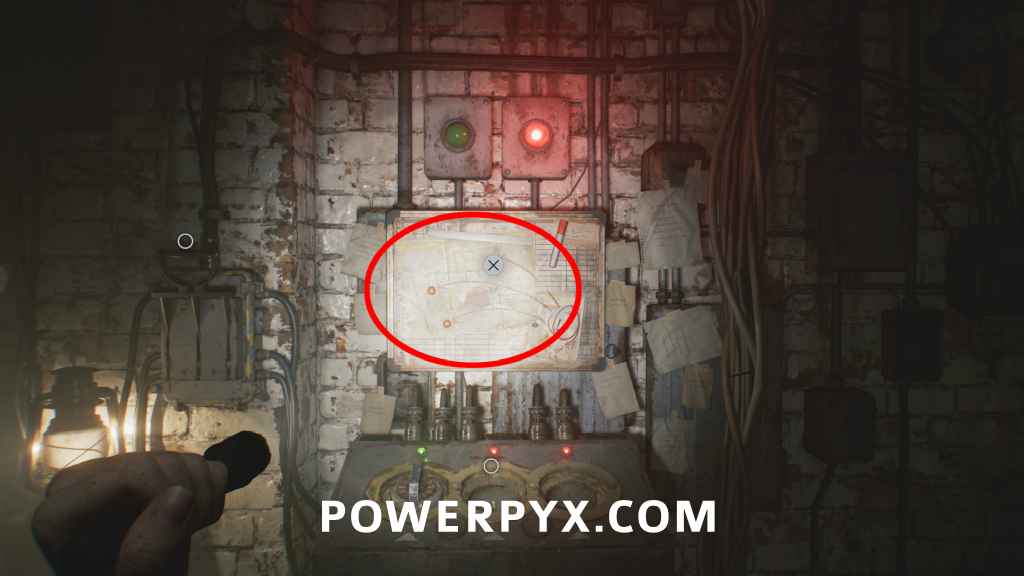
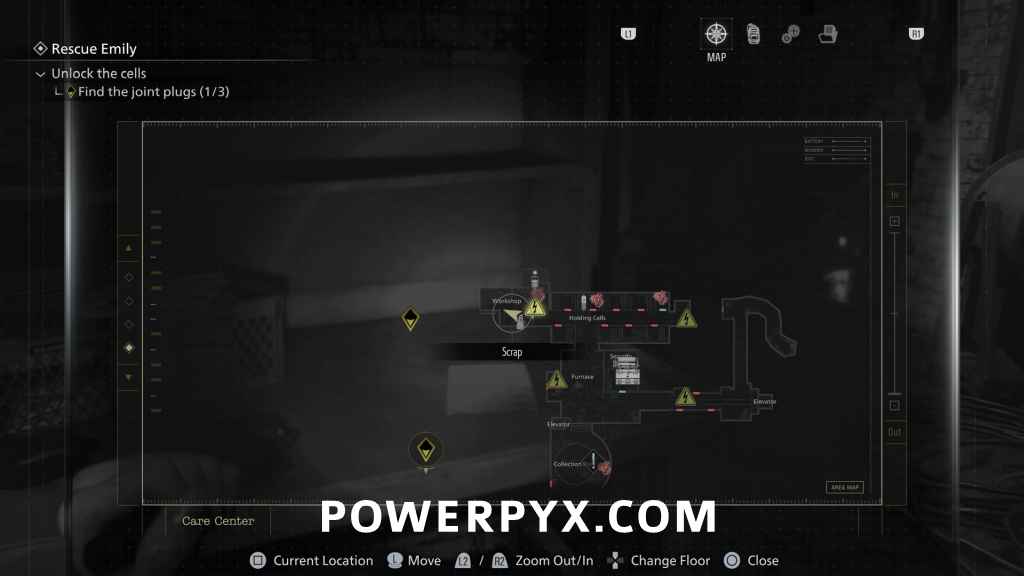
File #39 – Unlocking the Cells
Holding Cells: After the next cutscene at the end of the corridor, above the lever you have to pull for story progression.
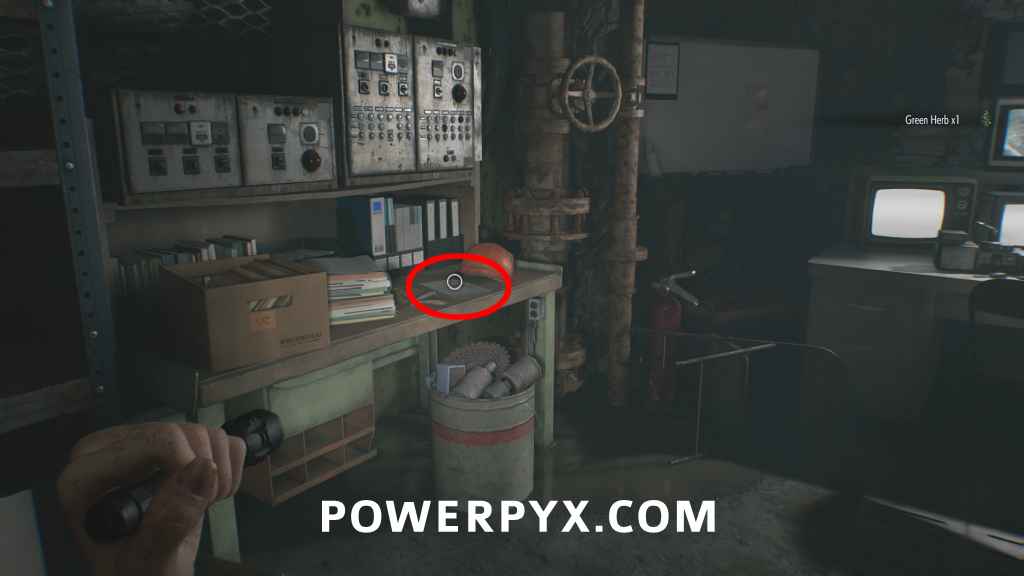
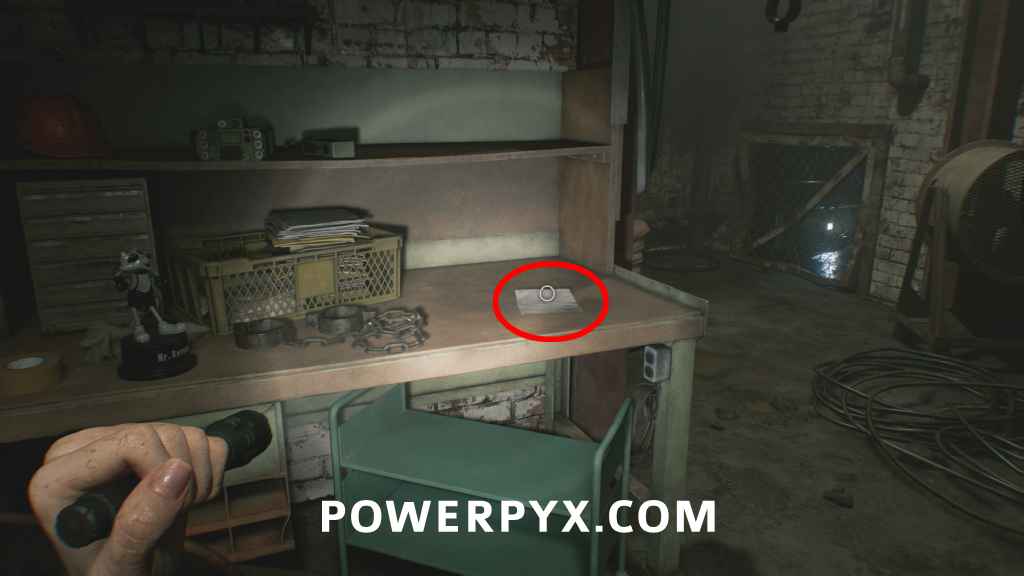
File #40 – Technician’s Note
Workshop: After taking the Joint Plug from the Holding Cells corridor, turn around and enter it at the other end of the corridor to enter the Workshop. There it’s on a workbench.
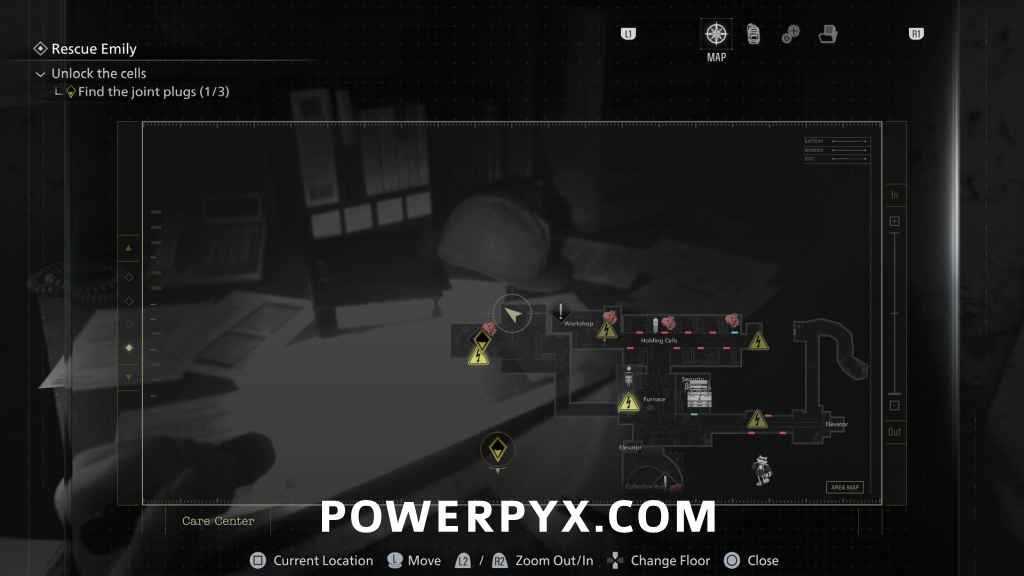
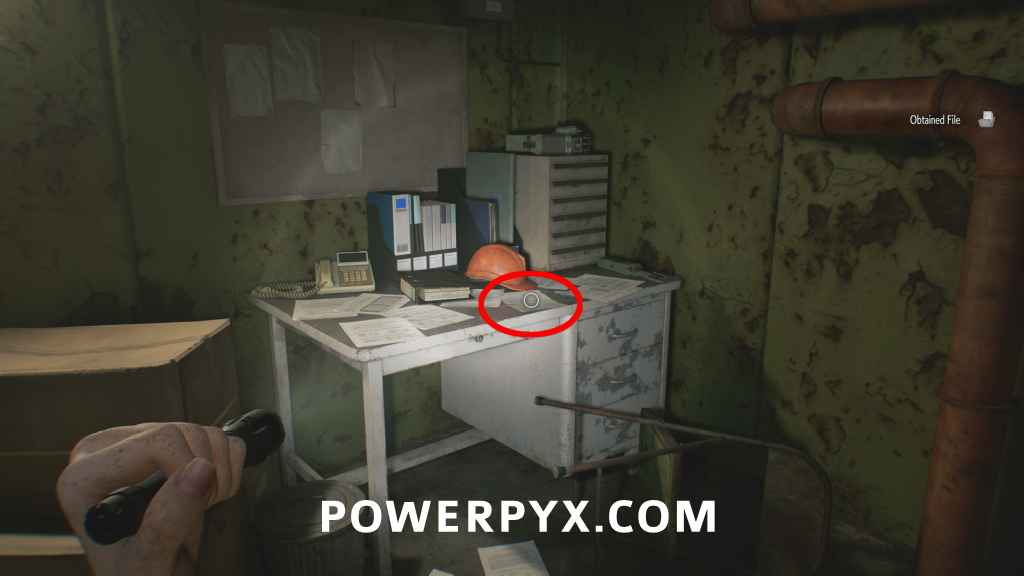
File #41 – Security Guard’s Report
Furnace: Take the Joint Plug and insert it at the door to the Furnace (the central room near safe room). Then in the Furnace room you find it in the small side office on the right.
Care Center Courtyard (Rhodes Hill) – Grace
File #42 – Visitor Record
VIP Suite: After the cutscene in the courtyard, enter the next house to find this on the wooden cupboard.
File #43 – Note Regarding Research Results
VIP Suite: In the next room, on the main desk.
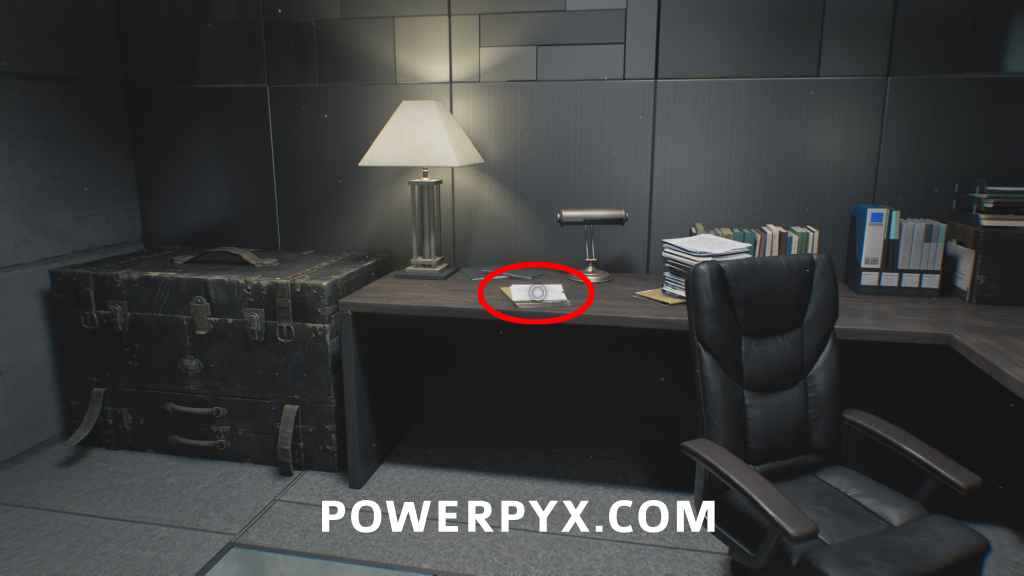
File #44 – Spencer’s Research II
Reception: After using the helix to activate the elevator, it’s on the Reception desk (next to typewriter).
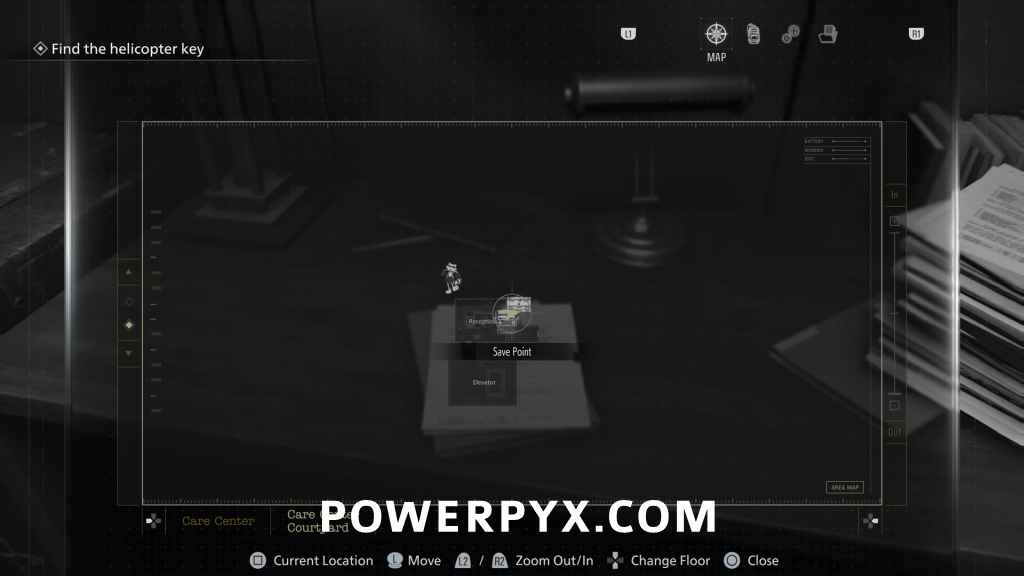
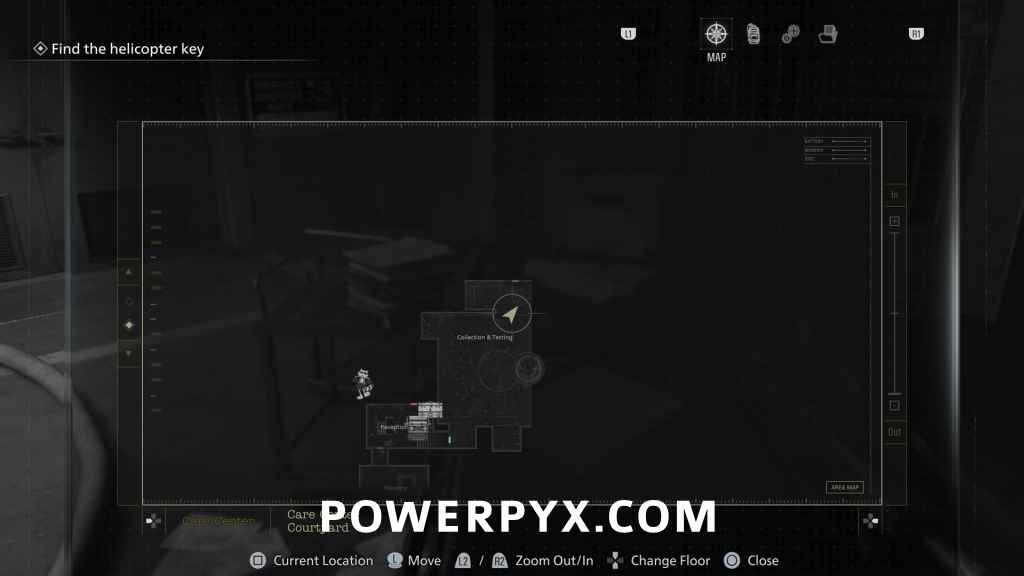
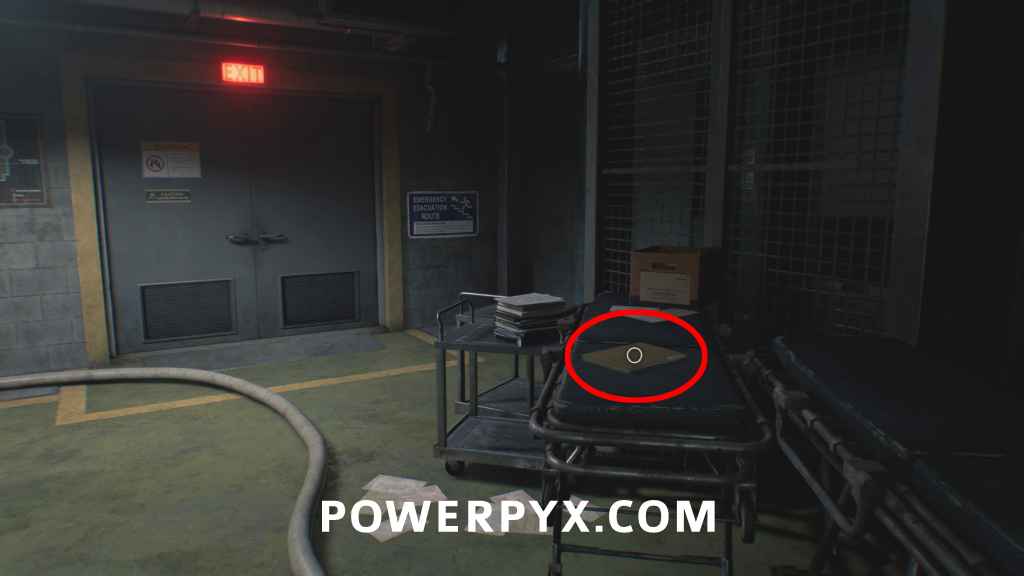
File #45 – Subject 170 Record
Collection & Testing: From the typewriter go downstairs, you find this near the exit of Collection & Testing on a stretcher.
File #46 – Grace Ashcroft Blood Analysis Report
Private Lab: From previous file go upstairs and through the next door to find this on a desk.

Water Treatment Plant (Rhodes Hill) – Grace
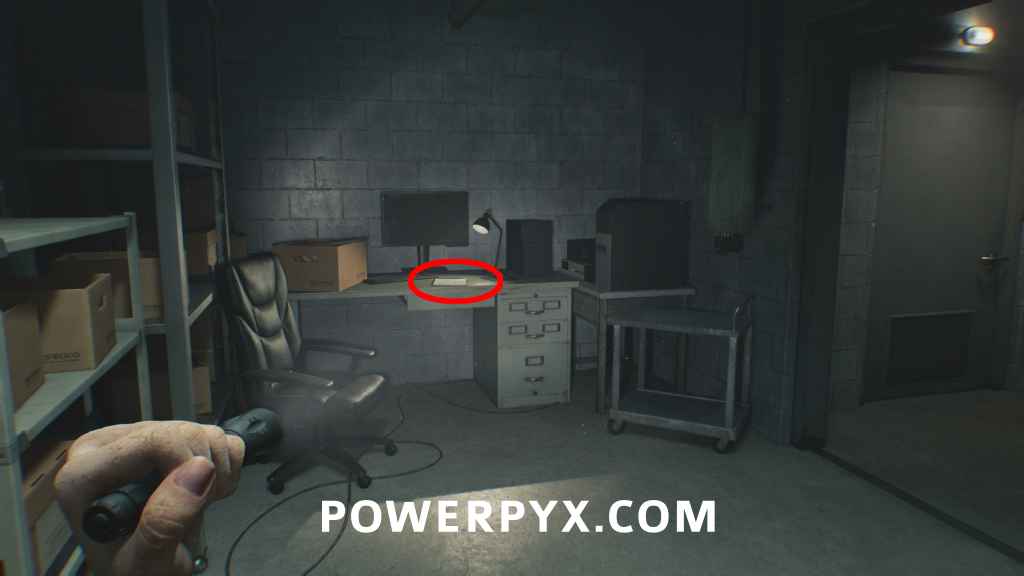
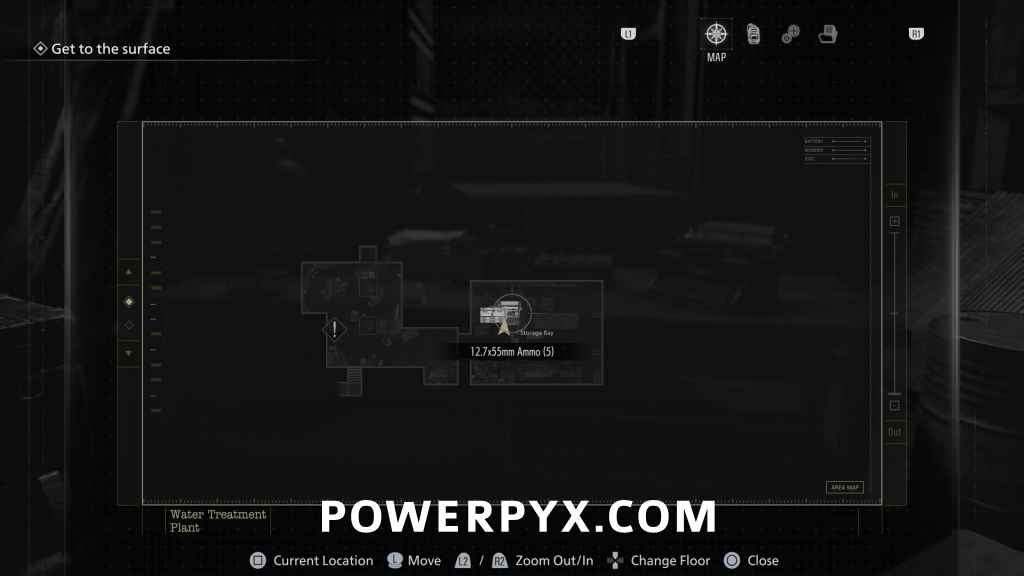
File #47 – Roof Hatch Manual
Storage Bay: When playing as Grace again, go forward until you lay down Emily and reach a safe room with a typewriter. The file is next to the typewriter.
East Raccoon City – Leon
File #48 – Report on the Raccoon City Incident
Automatically obtained when arriving in Raccoon City as Leon (goes directly in your collected Files menu).
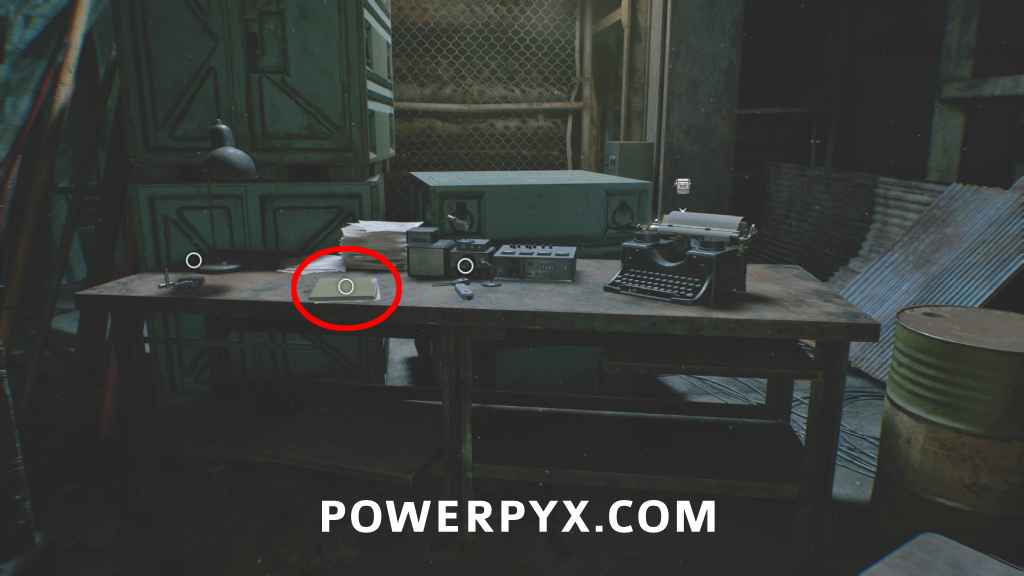
File #49 – Raccoon City Incident Newspaper
From where you start, go forward just a few steps to find this on the right, on the ground, near trash bags.

File #50 – Orders for the Engineer Corps
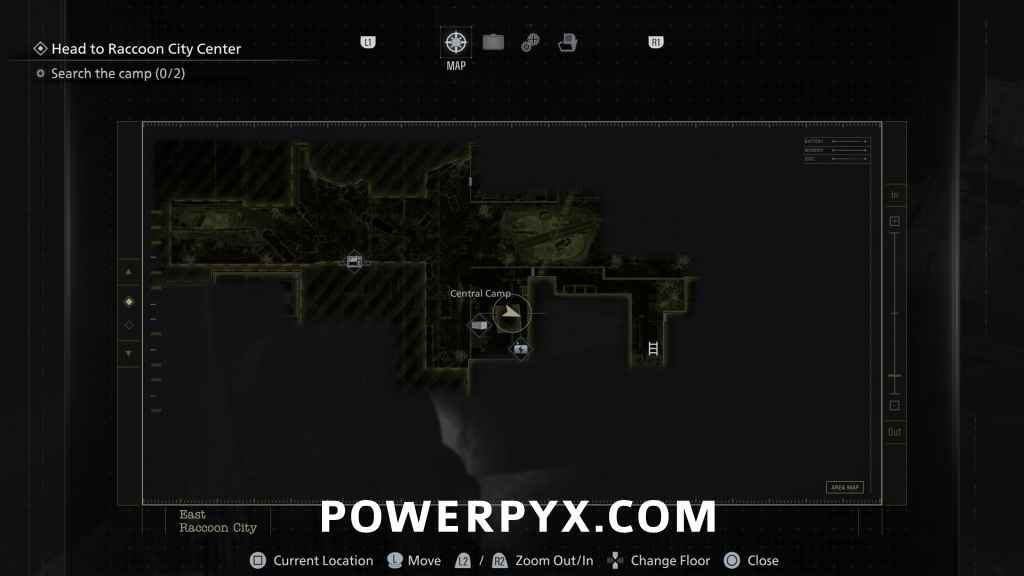
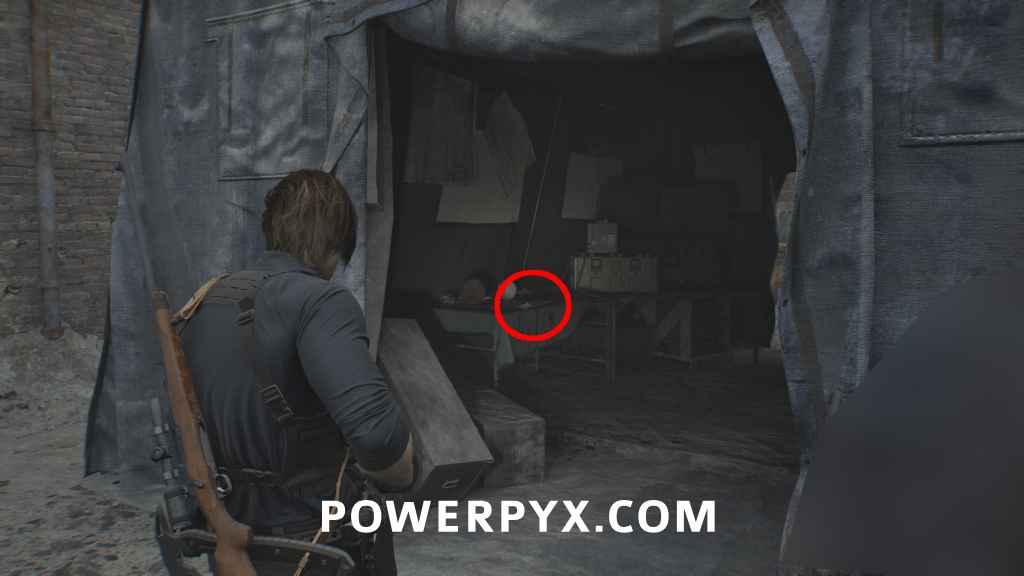
Central Camp: Use the revolving door in The Applegate Hotel and follow the linear story path until you reach the Incomplete Bomb (cutscene a couple minutes later). Go left and enter the Central Camp, you find this inside the blue BSAA tent. You go there for story purposes automatically to turn on a power generator, then you get a save point in the same room as the file.
File #51 – Battery Storage Locations
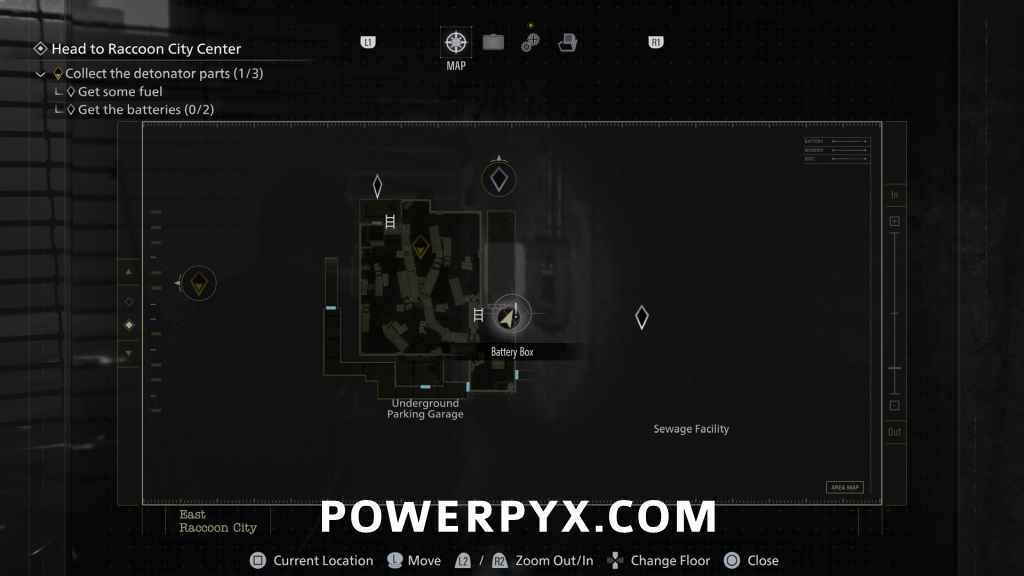
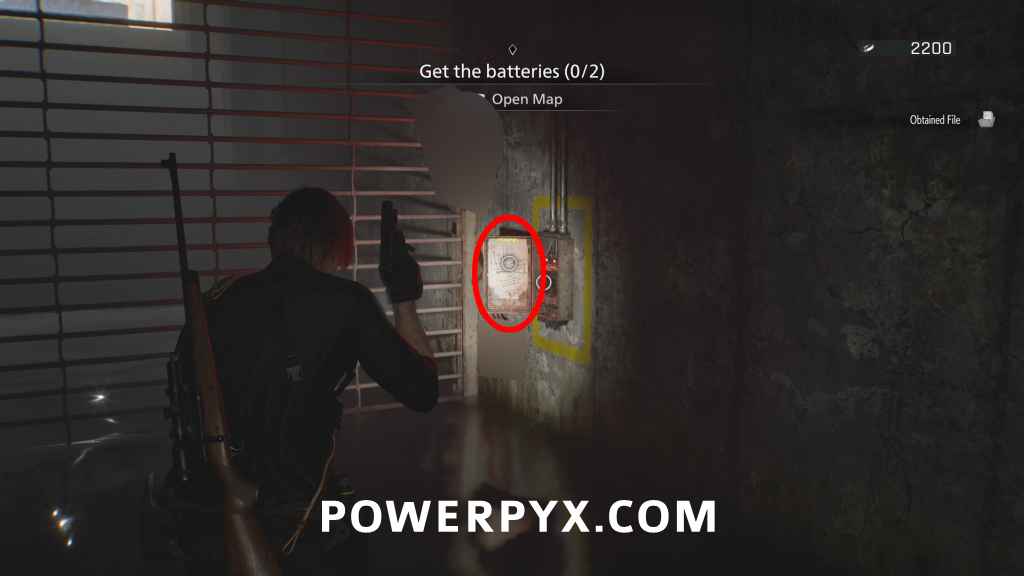
Underground Parking Garage: While going through the flooded Underground Parking Garage, you find this at the locked gate where you insert the two Batteries for story progression. Inspect the red-lit box on the right of the gate.
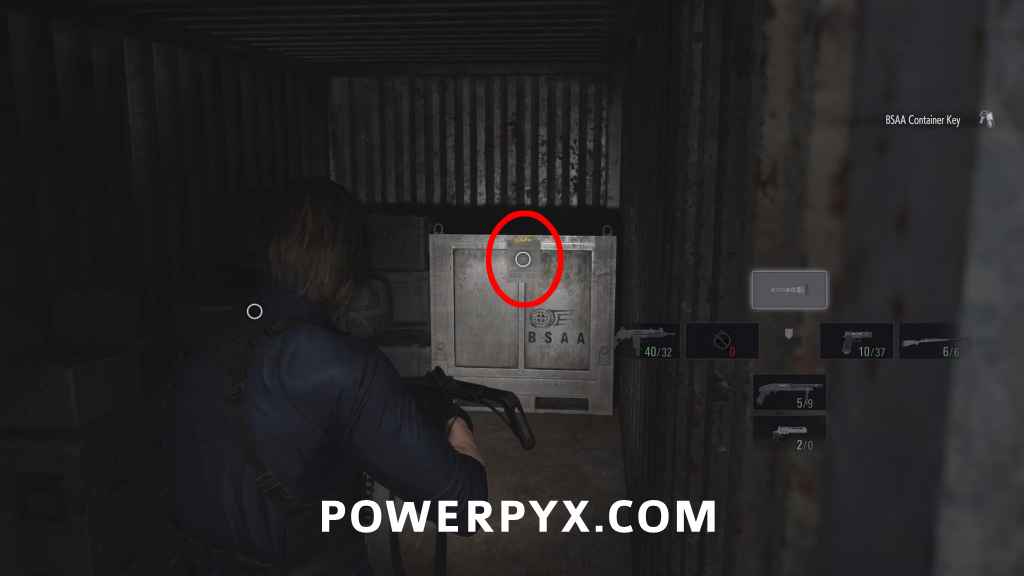
File #52 – Inventory List
After the cutscene where you get the BSAA Container Keys, to the immediate left in the open container (in front of entrance to Cedarbrook Apartments).
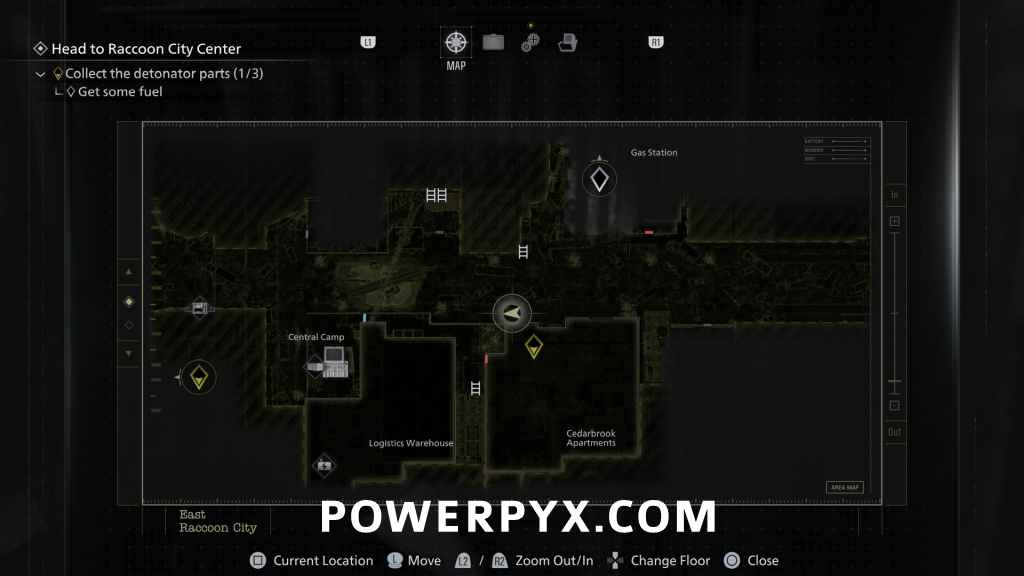
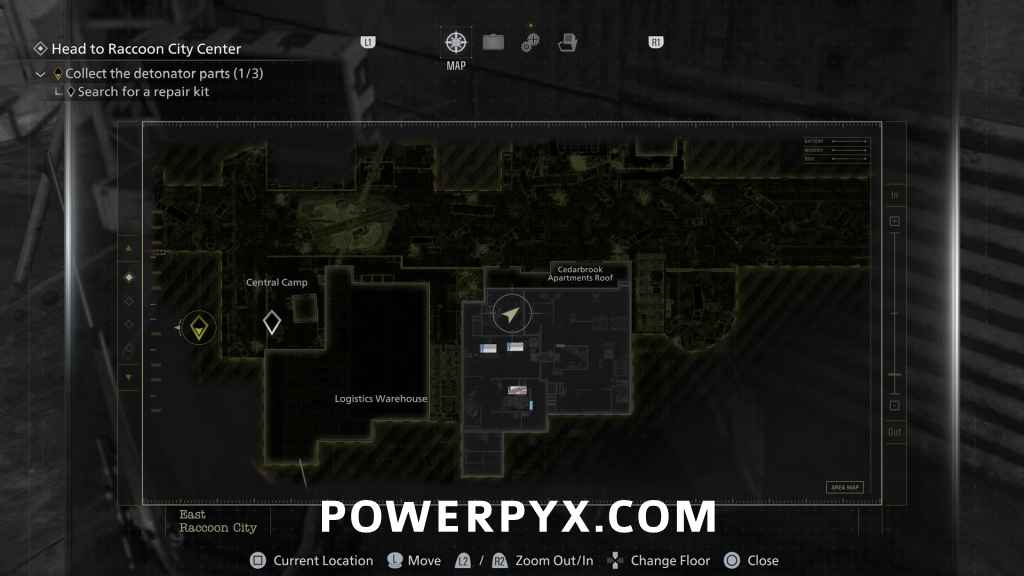
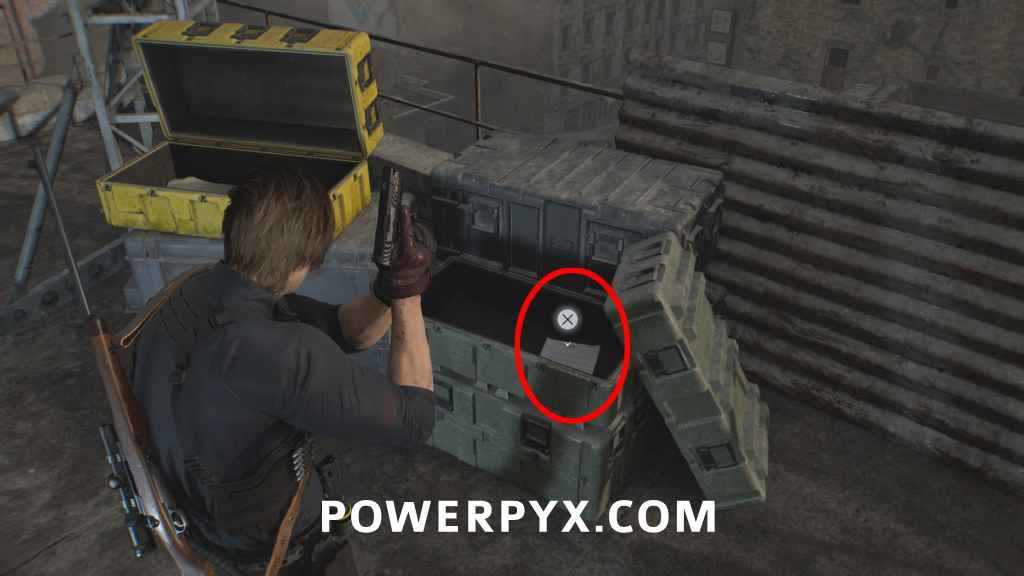
File #53 – Engineer Corps Note
Cedarbrook Apartments Roof: Next to the yellow box that contains Key Item “Broken Signal Receiver” (mandatory story item).
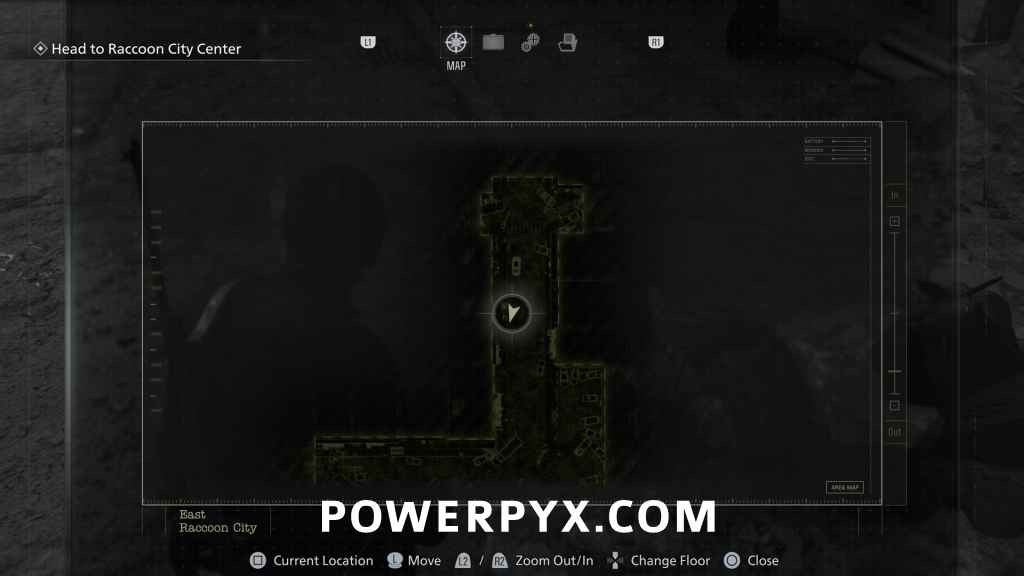
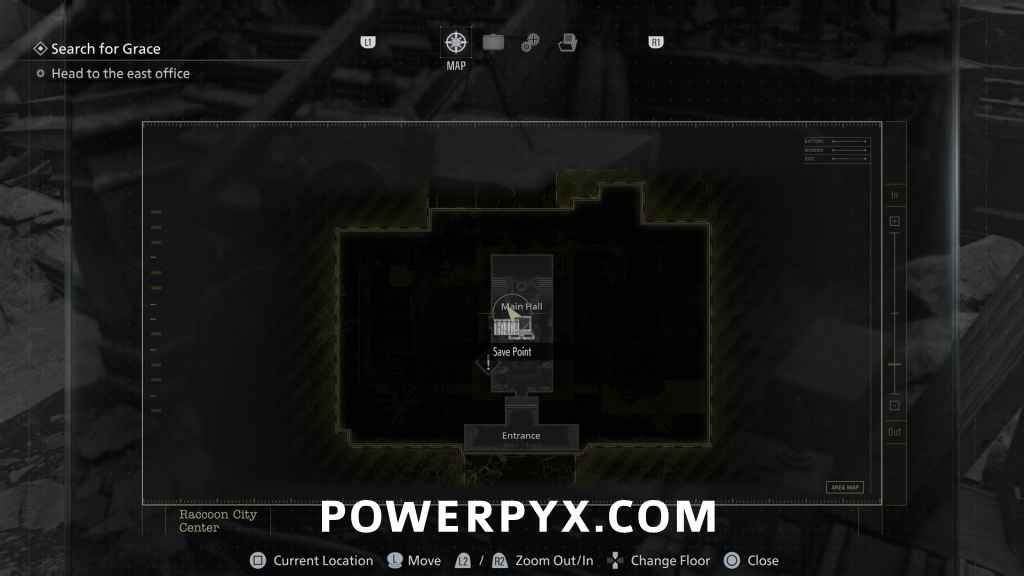
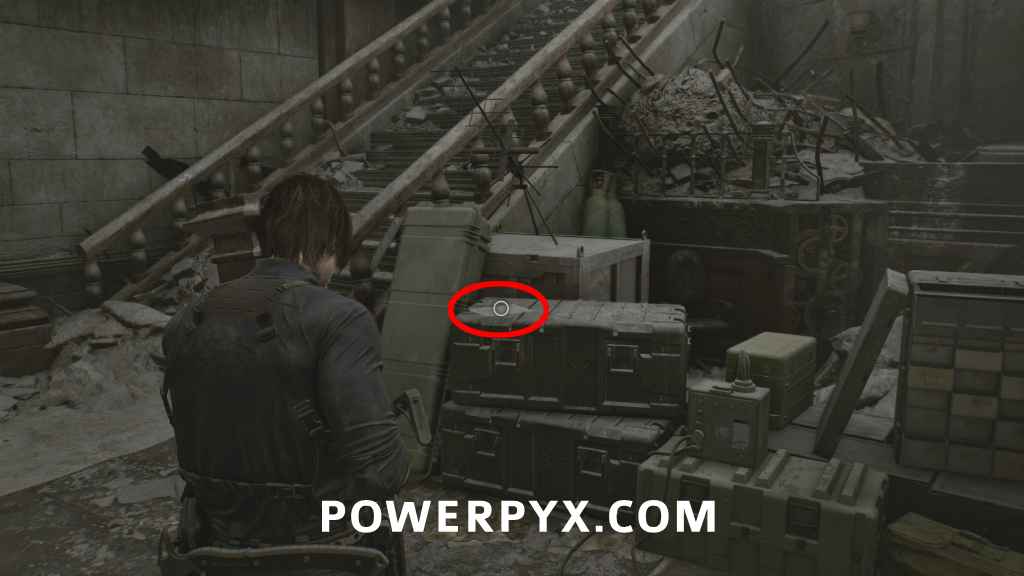
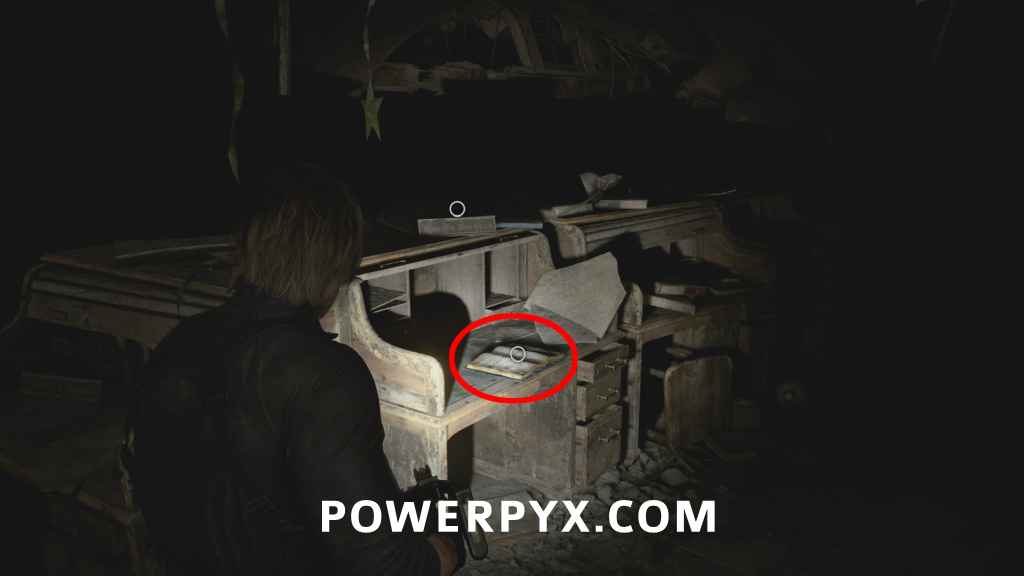
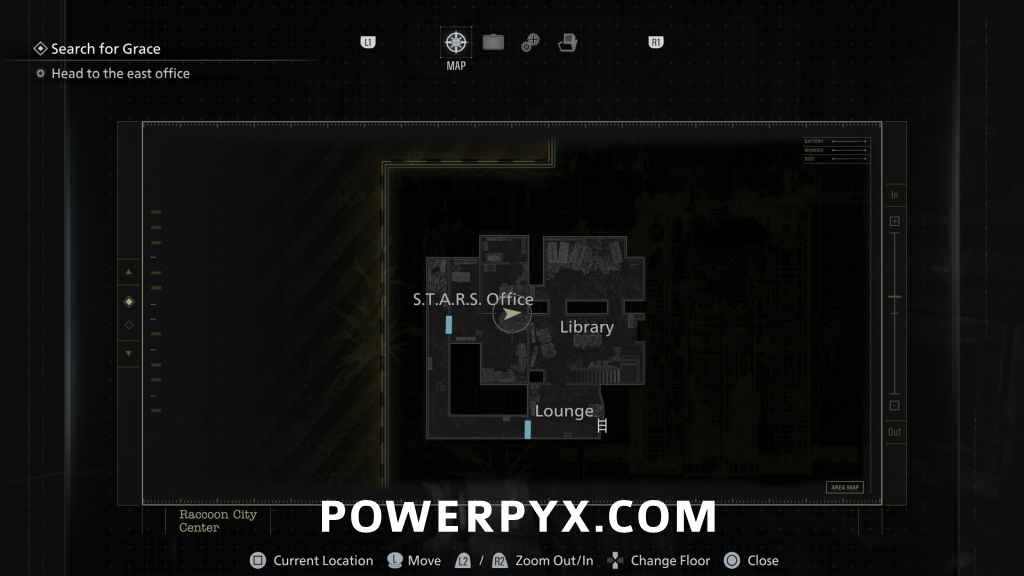
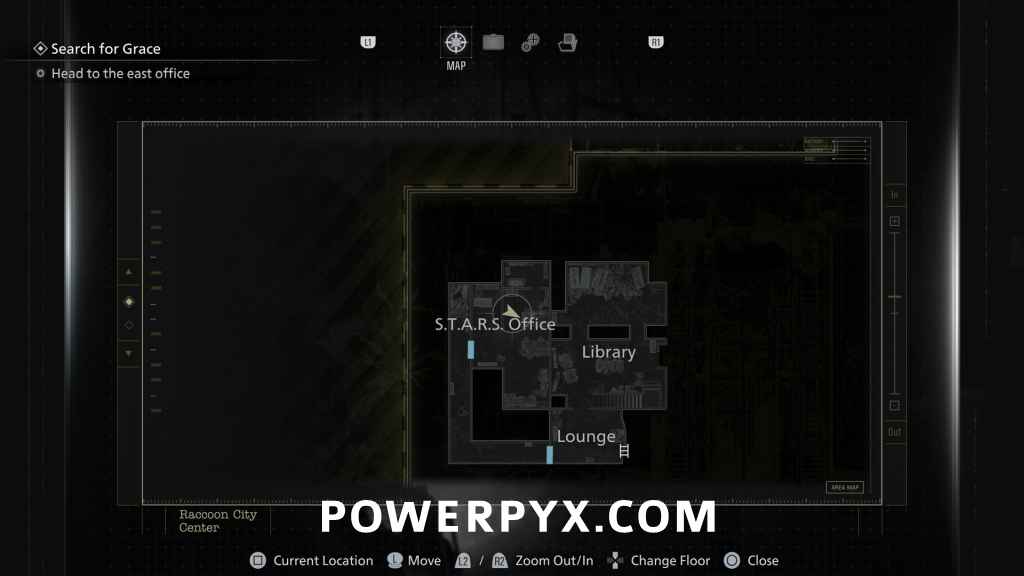
Raccoon City Center – Leon
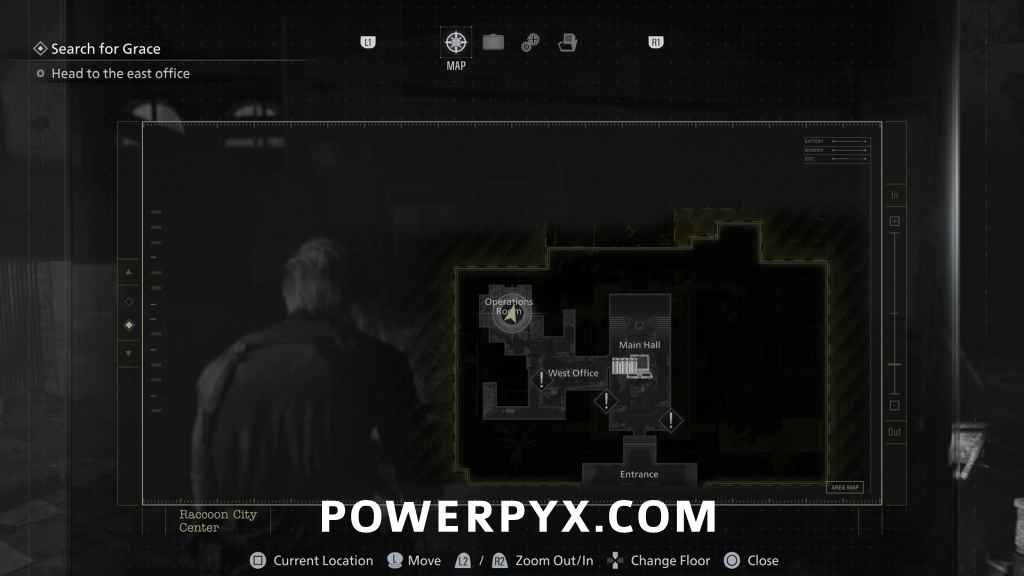
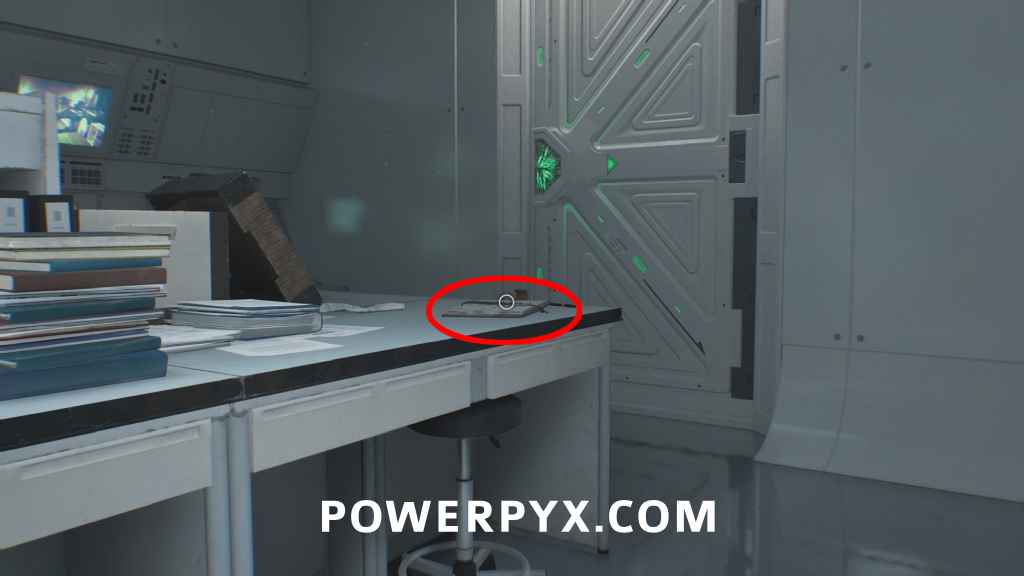
File #54 – R.P.D Perimeter Report
Main Hall: AInside the R.P.D. building, opposite the save point on a box.
File #55 – Top Secret Operation
West Office: In the room next to the save point, on the first desk on the right.
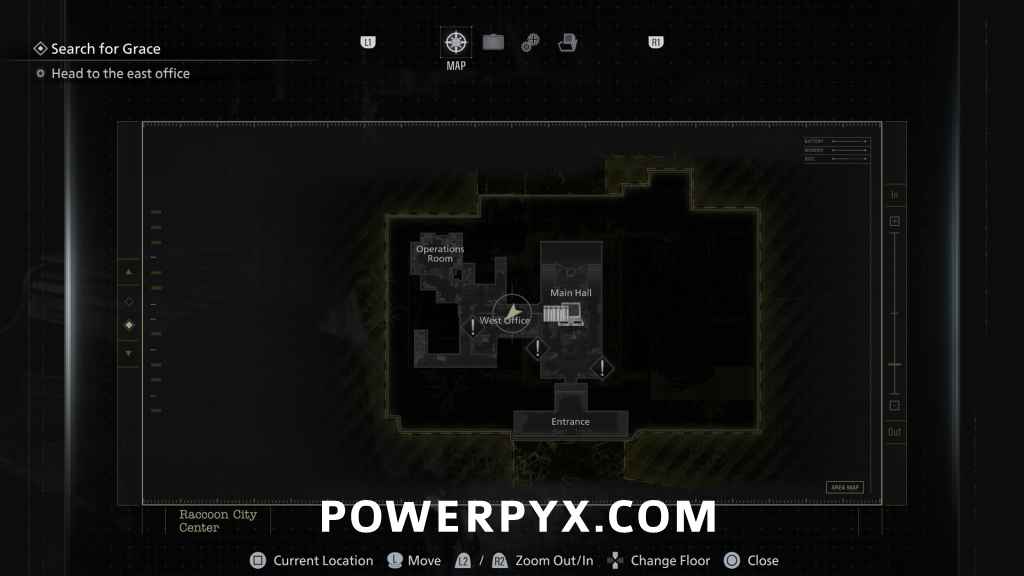
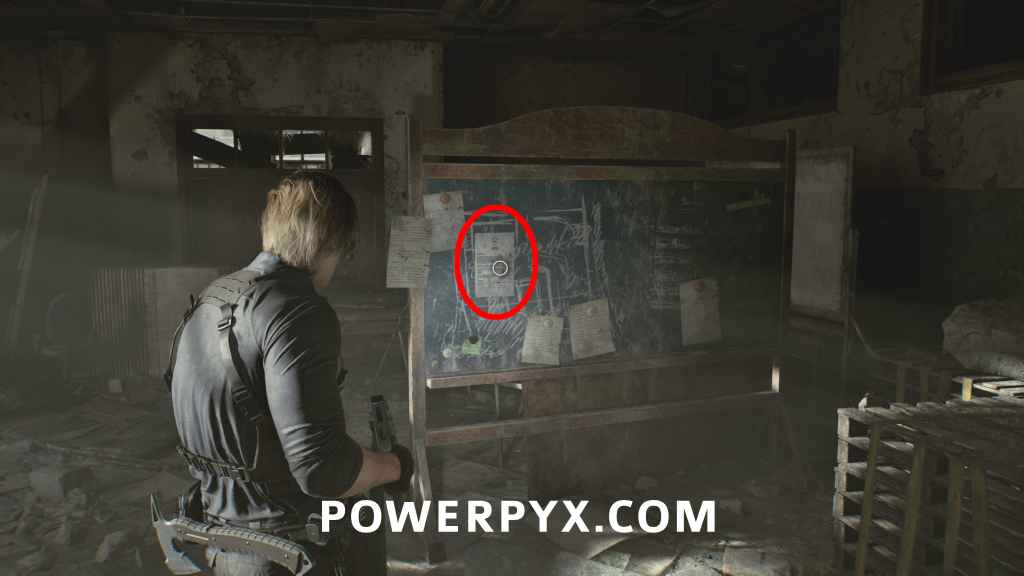
File #56 – Record of Events
Operations Room: On the chalkboard in the Operations Room.
File #57 – Scavenger Hunt – Clue 2
S.T.A.R.S. Office: Head south of “Operations Room” to “Reception” where the locked shutter is. Look up and shoot down the ladder to climb up. Go straight through the corridor (don’t enter the Library on the right), at the end of the corridor enter the S.T.A.R.S. Office. This is inside the shelf on the right. Turn it around to see the note. If you entered the Library you went the wrong way and must take the corridor outside the Library.

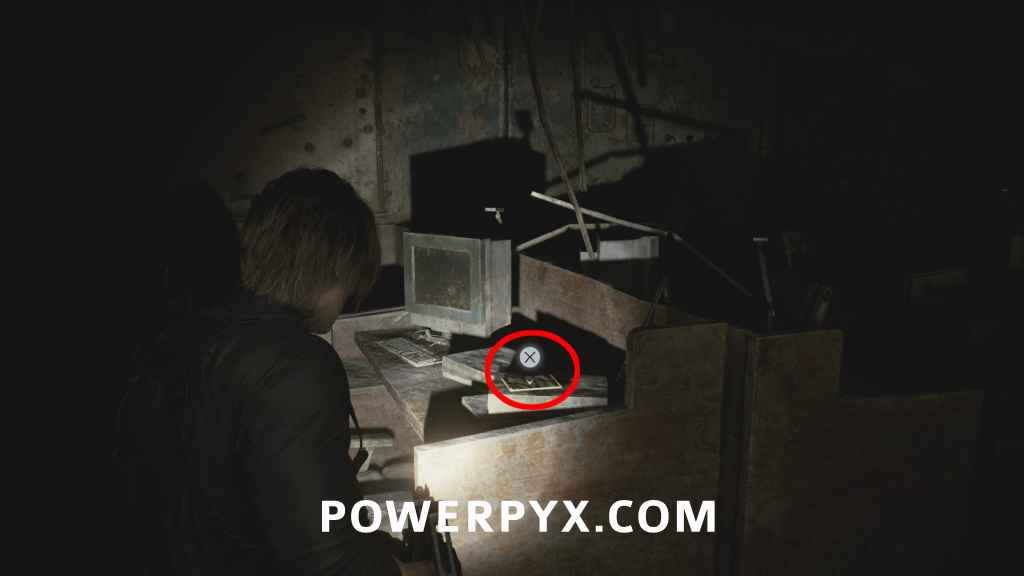
File #58 – Library Card
S.T.A.R.S. Office: Same room, enter the little side office on the left of where you entered to find this inside the desk drawer. Must interact with the drawer to open it and wait a moment for the file to appear.
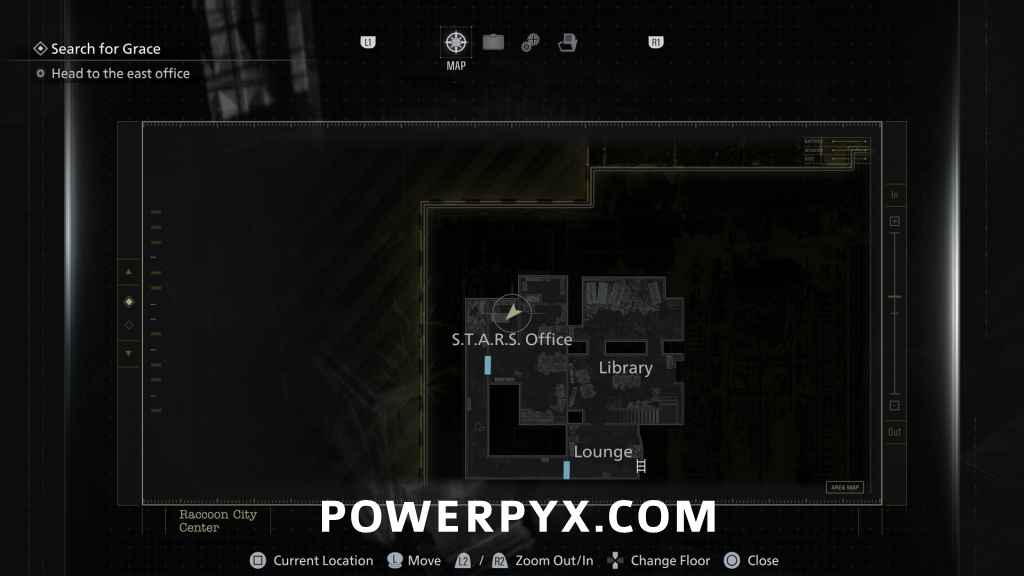
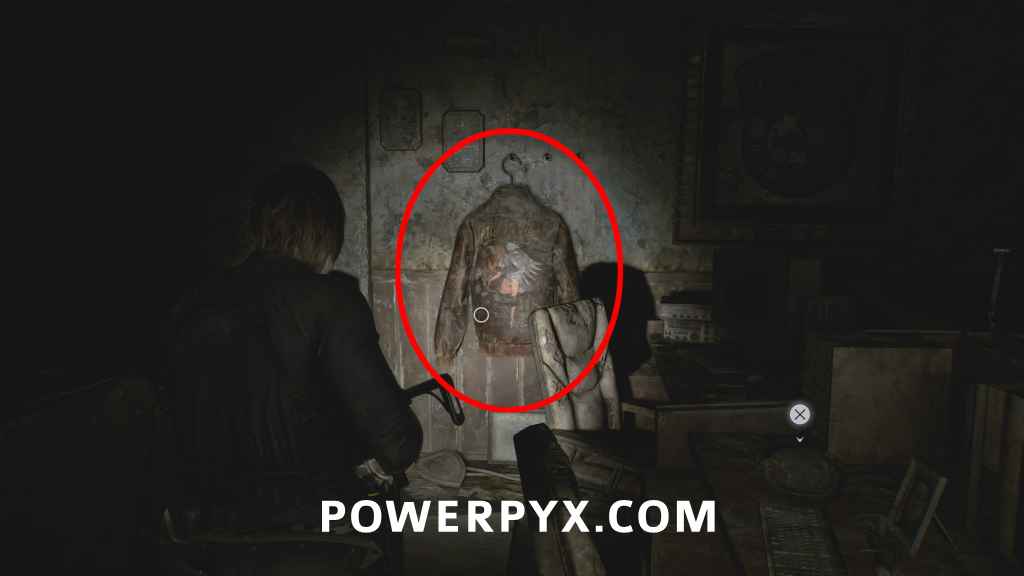
File #59 – Scavenger Hunt – Clue 1
S.T.A.R.S. Office: Same room, directly opposite the door from where you entered, interact with the brown jacket hanging on the wall between the desks. Turn the file around to see the note.
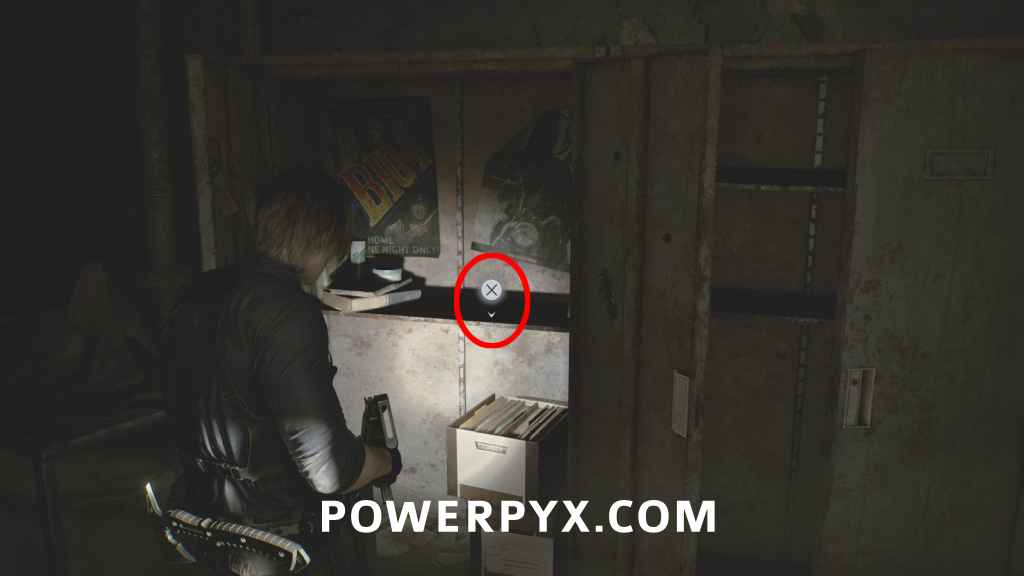
File #60 – Barry’s To Do List
S.T.A.R.S. Office: Same room, on the leftmost desk.
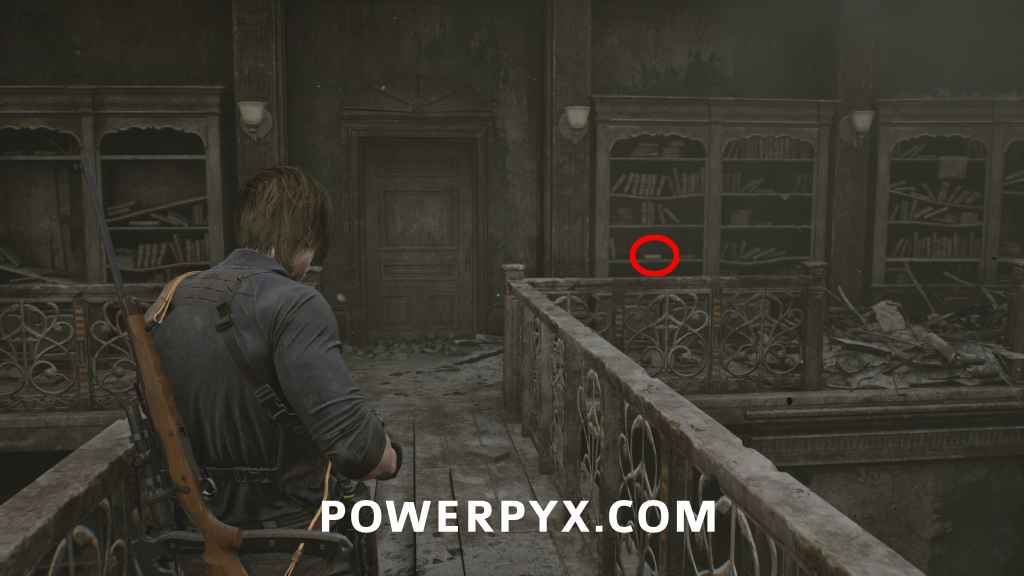
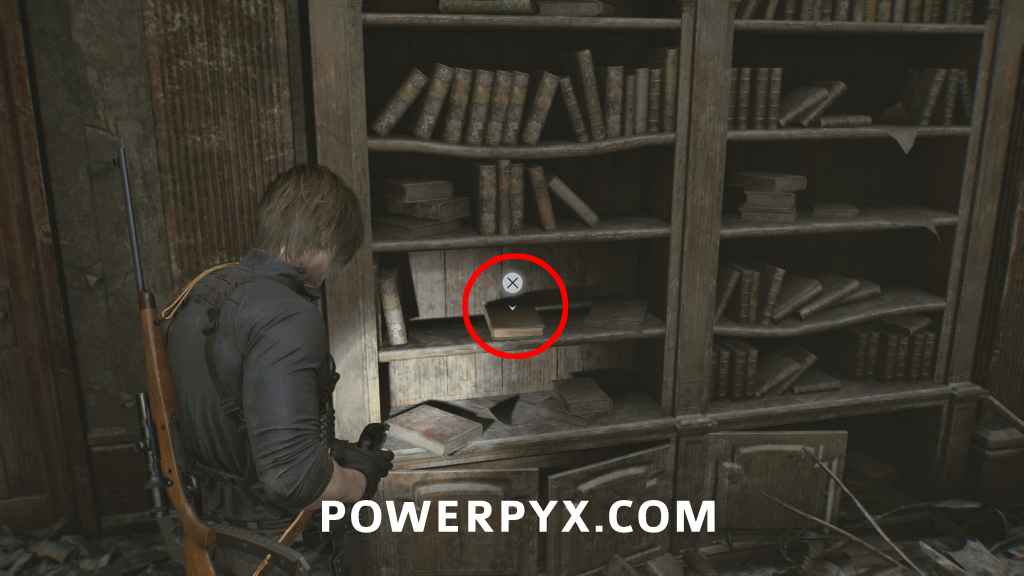
File #61 – Photograph
Library: In the Library go upstairs, then go left across the walkway toward a wooden door that is locked. To the right of the wooden door in the bookshelf interact with the brown leather book, open it and inspect the photograph. This ONLY spawns after you’ve read all 4 files in S.T.A.R.S. Office (Barry’s To Do List, Scavenger Hunt – Clue 1, Scavenger Hunt – Clue 2, Library Card).
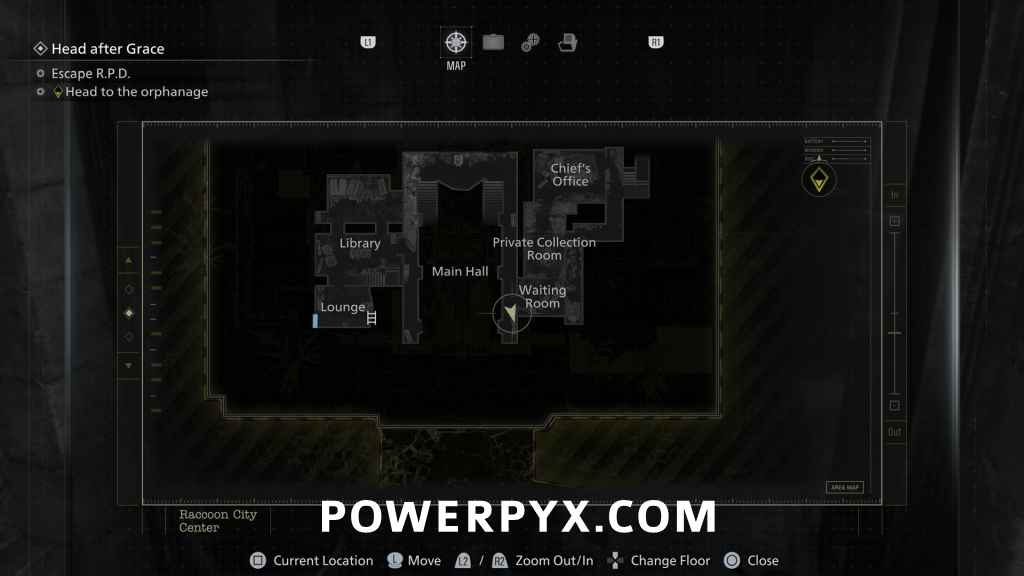
Orphanage
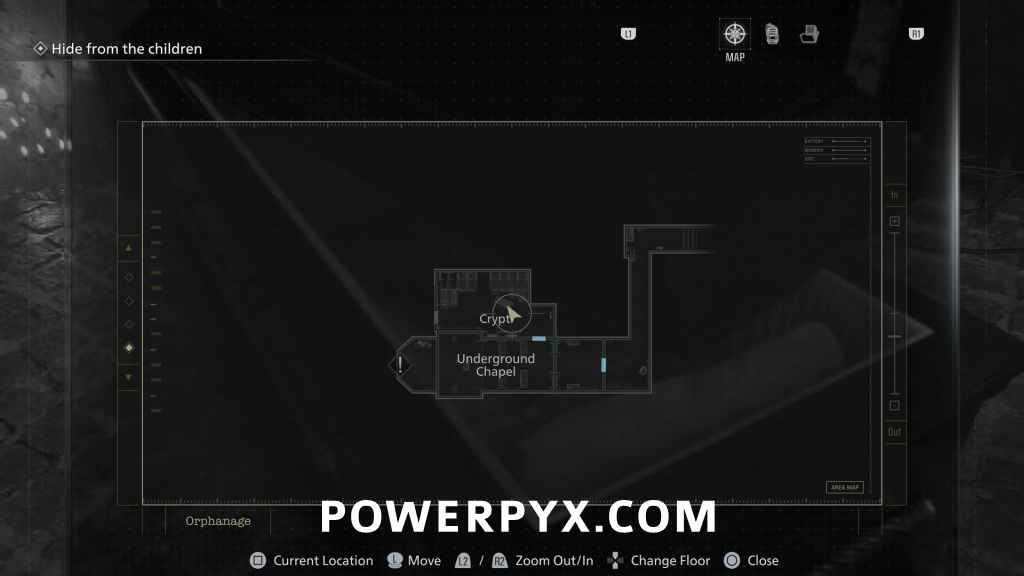
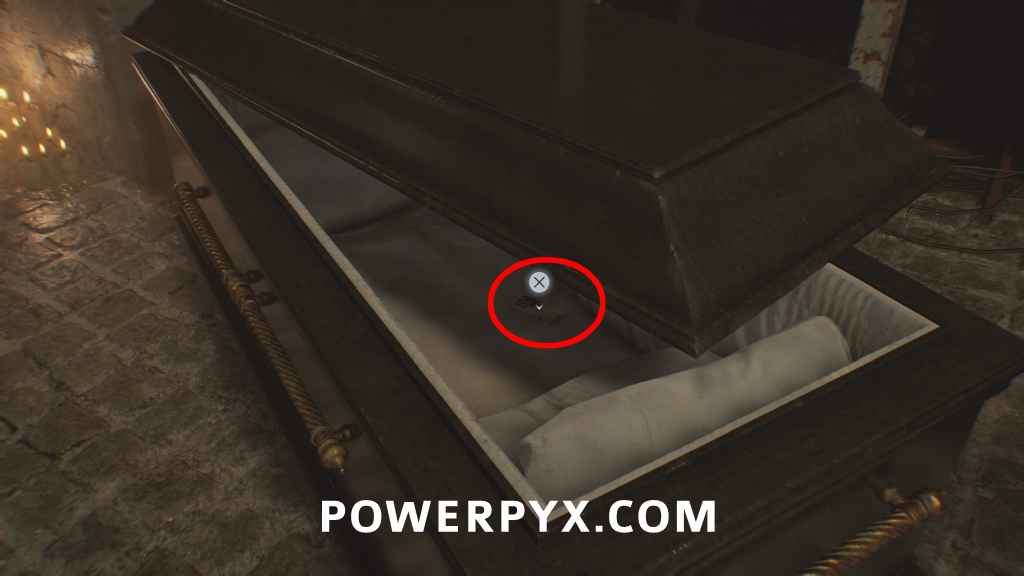
File #62 – Toe Tag
After using the wall lever in the Underground Chapel, use the now-open door on the side and you’ll see black coffins as soon as you enter. Open the coffin on the right to find the file inside of it. Turn it and read the back.

File #63 – Series 60 Results
After escaping the Underground Chapel and arriving at the lab (white corridor), go through the first green-glowing door on the right and it will be in front of you.
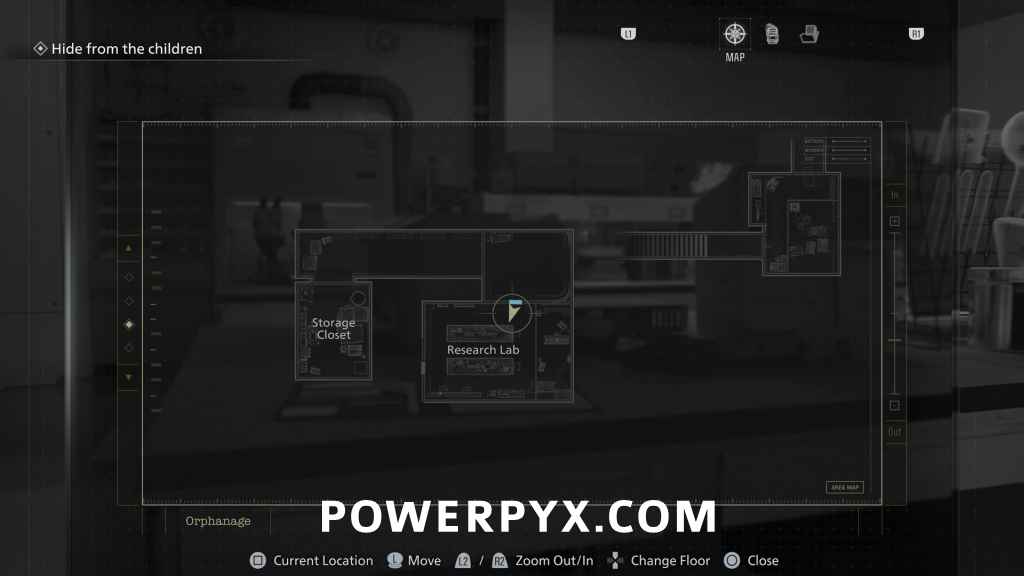
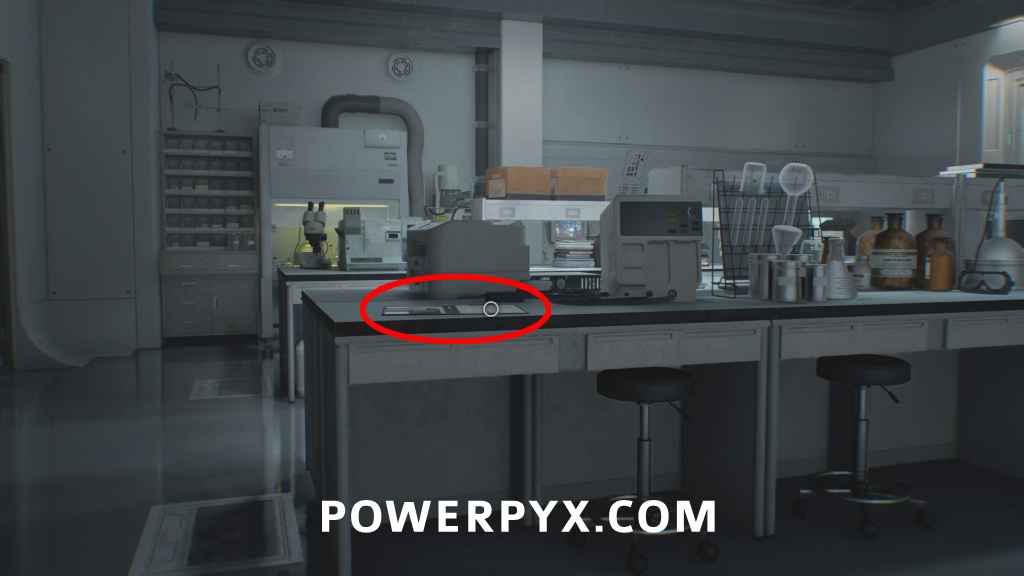
File #64 – New Researcher’s Notebook
Same room, in the back right corner on the desk.

Raccoon City Center (After Orphanage) – Leon
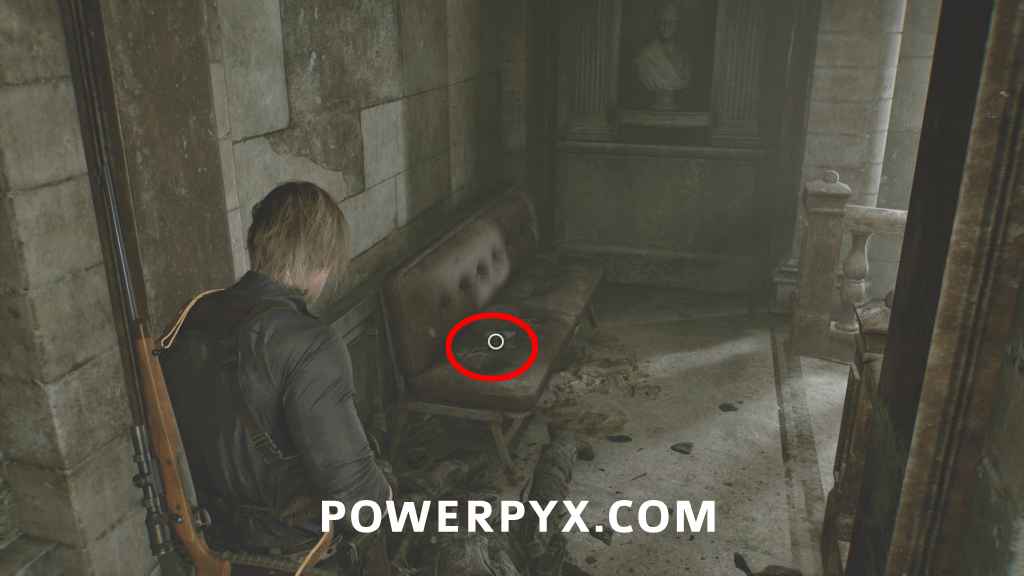
File #65 – Guide Pamphlet
When playing as Leon again, run away until you reach the Main Hall again after a cutscene. Immediately after the cutscene turn around to find this on a bench. On the eastern upper floor of the main hall.
ARK – Leon
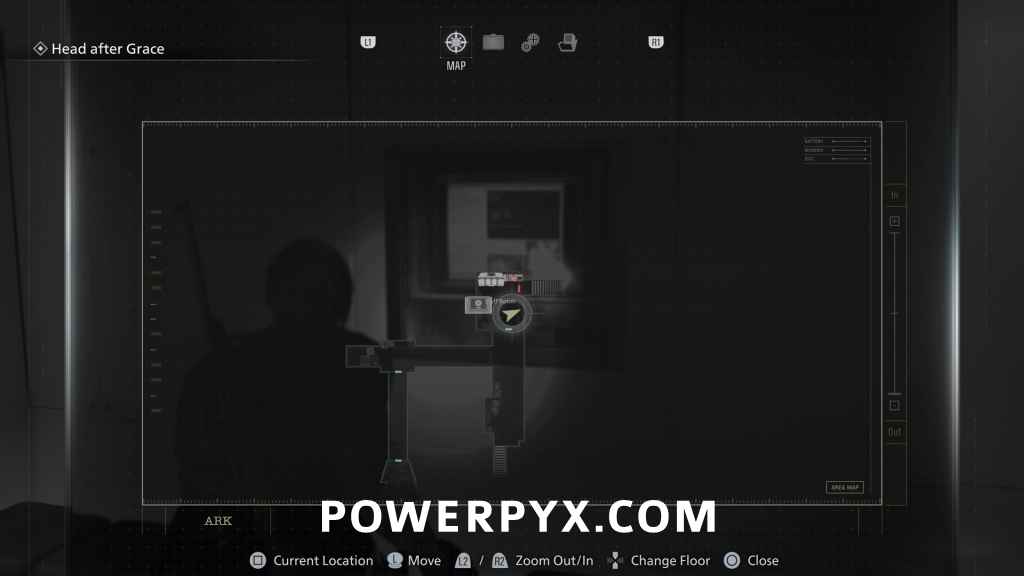
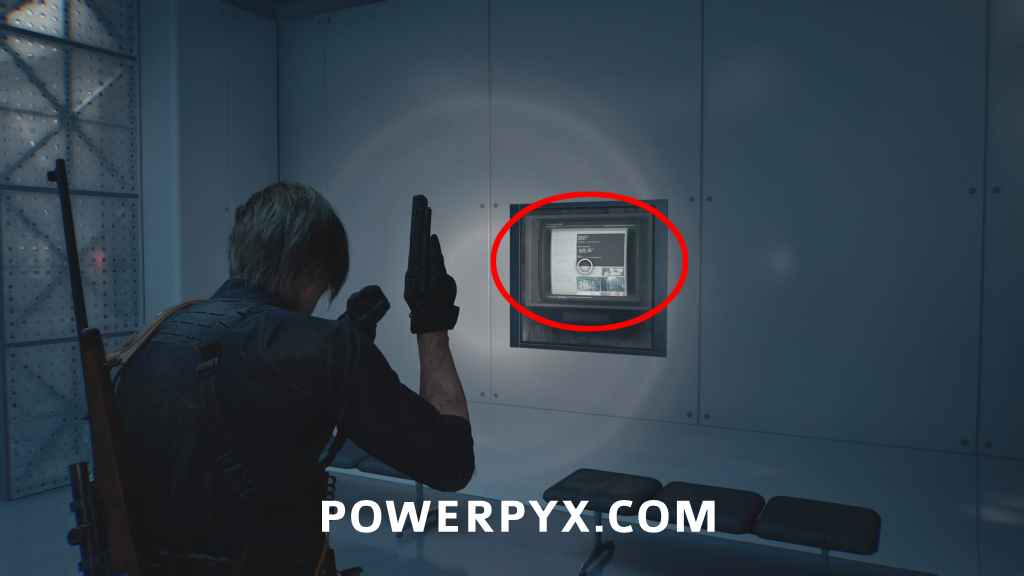
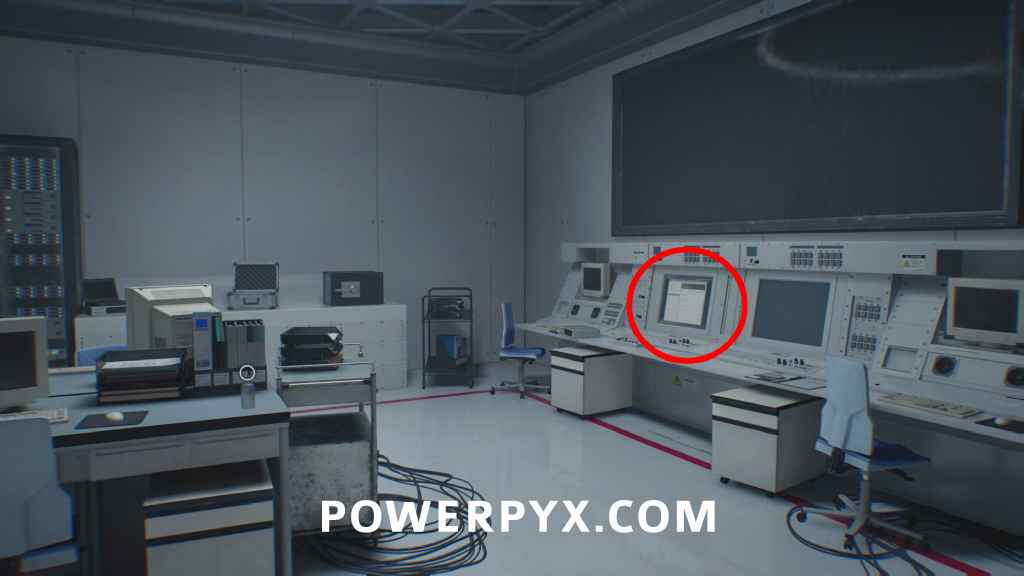
File #66 – N0-AH Status Report
After going through the decontamination tunnel, turn left and go through the green door to find a save point. Check the monitor on the wall.
File #67 – Raccoon City Bioweapon Research – Report
Guest Lounge: After going up the stairs with golden skeleton statues, enter the green door on the right to reach Guest Lounge. Check all 3 monitors on the walls for 3 files.

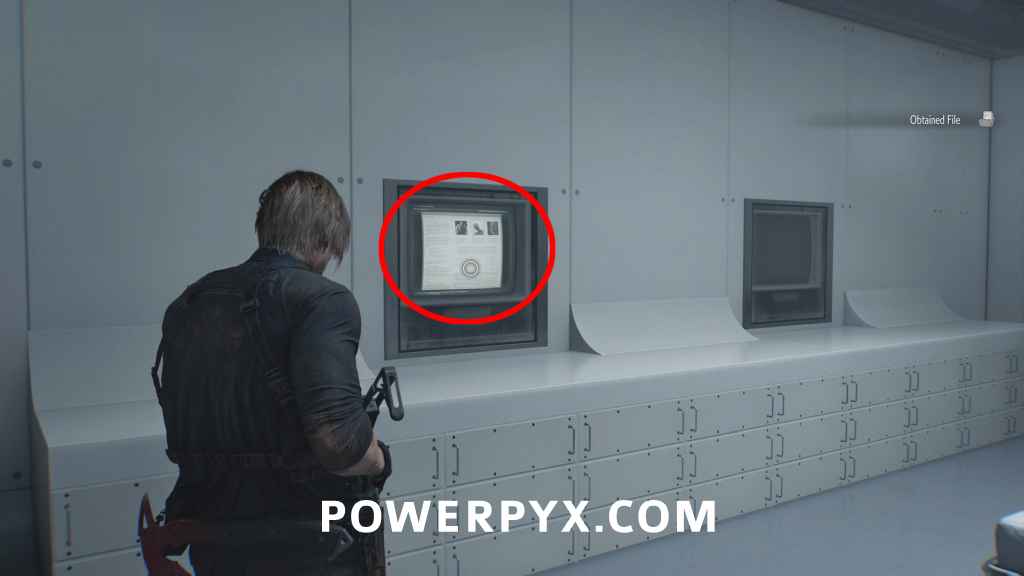
File #68 – Product Catalog 1 (2026)
Same as above.

File #69 – Product Catalog 2 (2026)
Same as above.
ARK – Grace
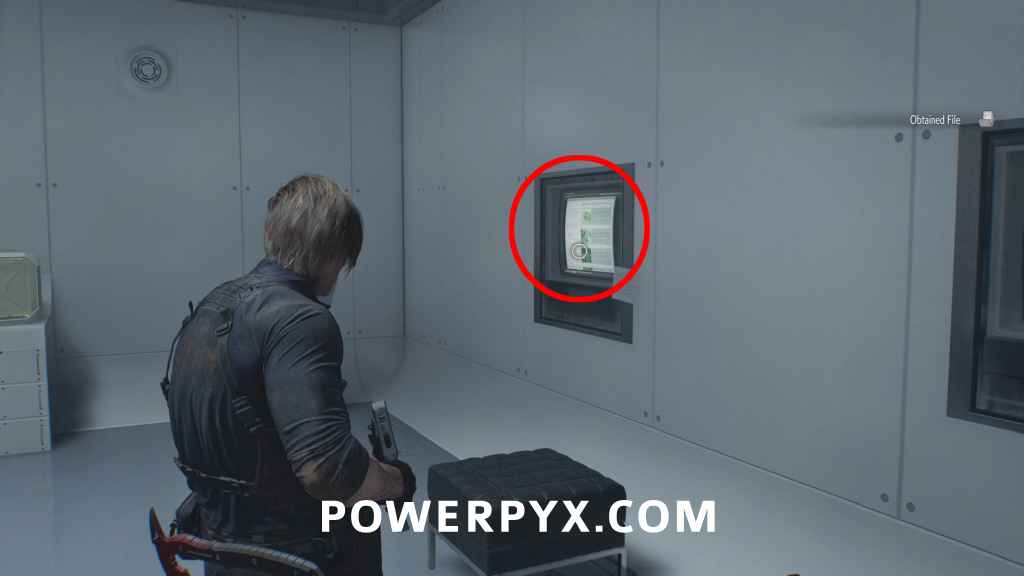
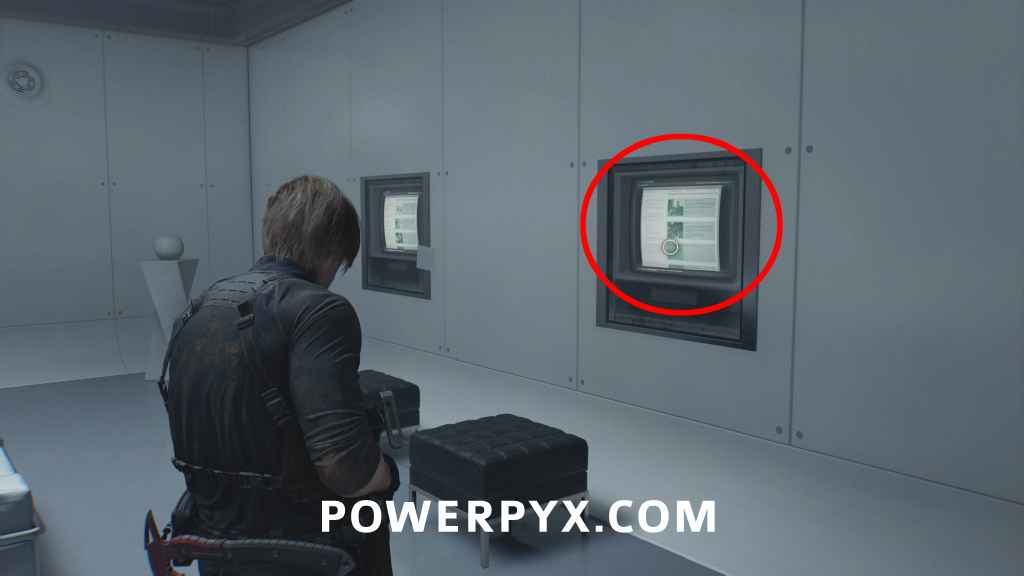
File #70 – Access Log: 51st Assembly Minutes
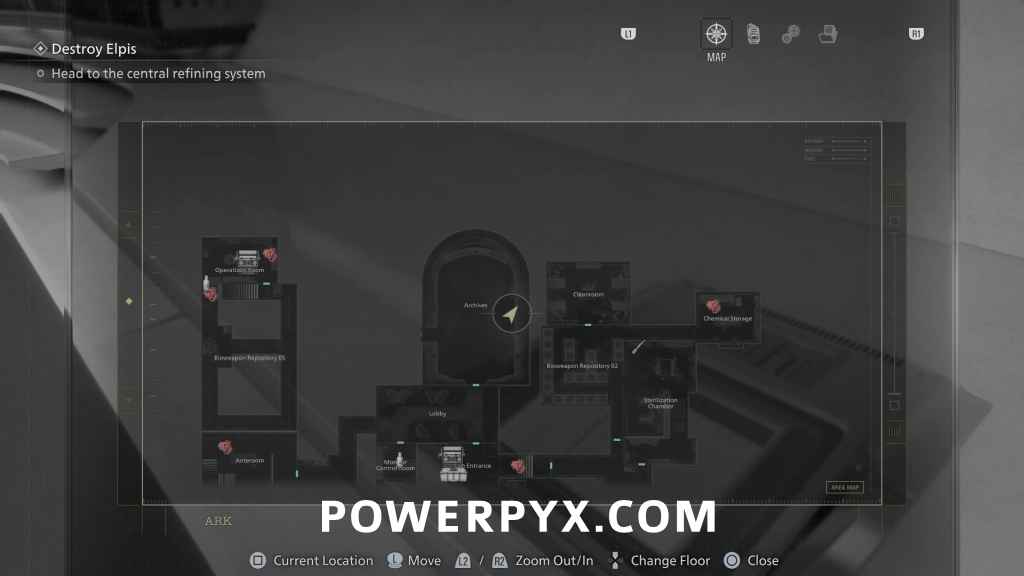
Monitor Control Room: After grabbing the Magnetic Key, use it on the red door by the typewriter upstairs. This leads to the “Lobby” with red floor paint. Enter the first green door on the left and inspect the monitor on the right side.
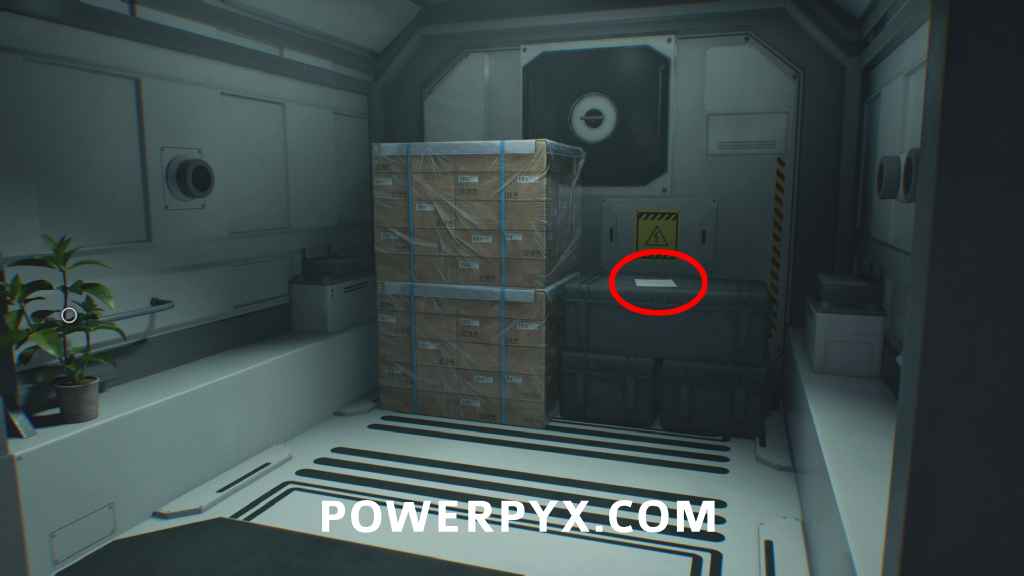
File #71 – Sterilization Chamber Safe
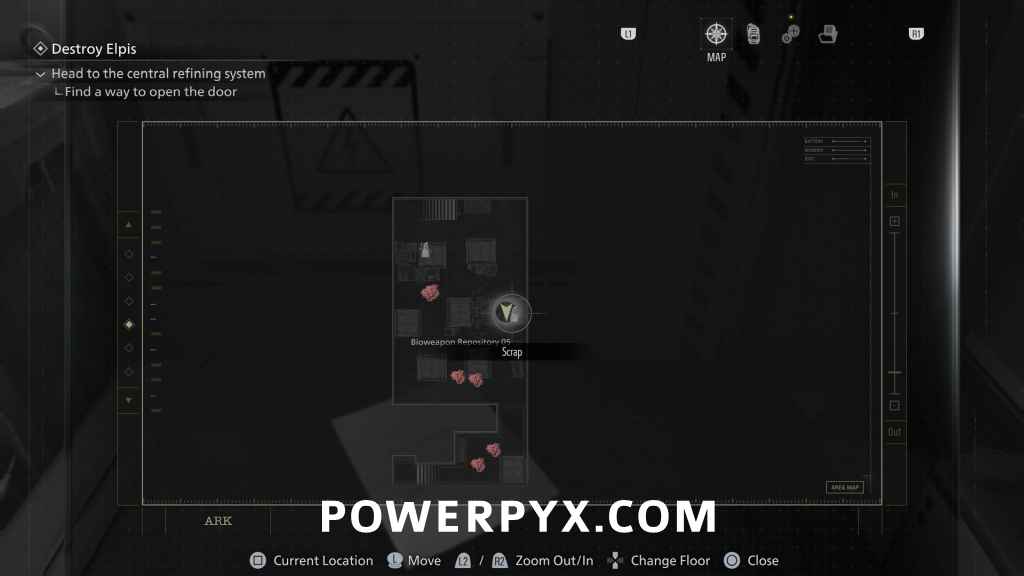
Anteroom: In Anteroom go downstairs. At the first corner check the right side to find it on a crate, before going into Bioweapon Repository 05.
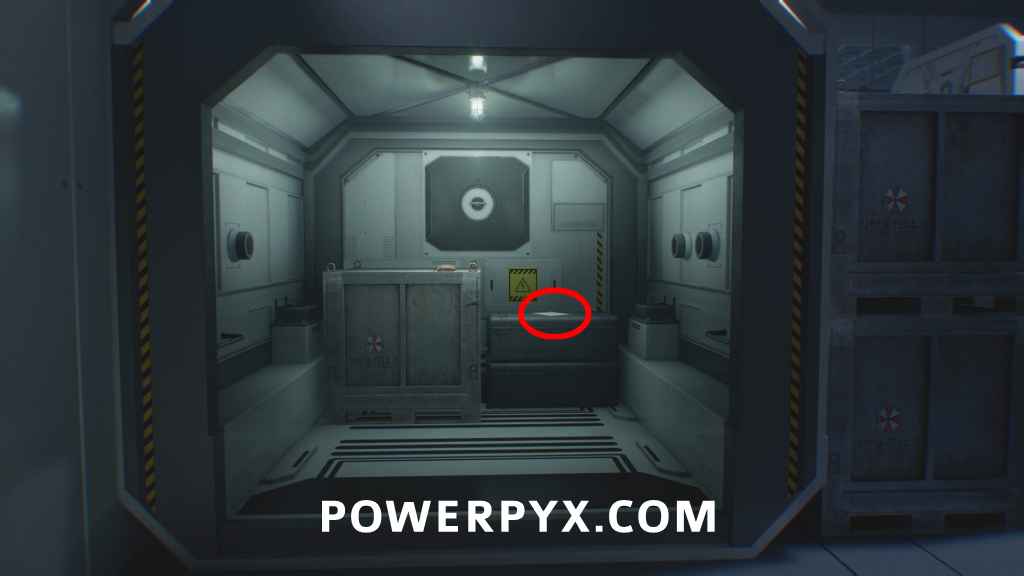
File #72 – Monitor Control Room Safe
Bioweapon Repository 05: In the middle row rightmost open container. There are many enemies in the room, clear them out with Molotovs and Acid Bottles and headshots. You find various crafting materials in the other containers here to regain ammo spent on the enemies.
File #73 – Access Log: First Assembly Minutes
Archives: Use the 2 orbs in the “Lobby” (the room with red painted floor past the typewriter). This leads to the archives. On the right wall, check the last monitor. DO THIS BEFORE INTERACTING WITH THE BIG CONSOLE AT THE END OF THE ROOM (AREA END).

ARK – Leon Part 2
File #74: Alyssa’s Interview Notes + File #75: Letter from Patrick
Automatically obtained during next cutscene, unmissable.  Case Closed trophy/achievement unlocks after the cutscene. If you missed a file you can view them from the files menu, and either find it on one of your next playthroughs, or if you have a manual save can grab them from there. For a list of files by in-game list order refer to Files List at the top of the page.
Leave a Reply