
Message from an Ancient Era is a Side Adventure Quest in The Legend of Zelda: Tears of the Kingdom (TotK). This walkthrough will guide you through all objectives of the Message from an Ancient Era side adventure mission.
Location: Lookout Landing
Quest Giver: Wortsworth
Requirement: Having completed any one of the five story-related Temples (recruited any one Sage from story progress)
Rewards: x12 Silver Rupees and Zonai Survey Team Fabric
Quest Info: A priceless stone tablet engraved with ancient Hyrulean text has fallen from the sky into Lookout Landing. Wortsworth, a scholar of ancient Hyrulean, said he intends to decipher the text by comparing it to ancient documents left at the lab in Kakariko Village. He’s departed for the village in the southeast.
Objectives:
- Speak to Wortsworth
- Head to Kakariko Village
- Head to the first shrine
- Head to the second shrine
- Head to the third shrine
- Head to the fourth shrine
- Head to the fifth shrine
- Head to the sixth shrine
- Head to the seventh shrine
- Head to the eighth shrine
- Head to the ninth shrine
- Head to the tenth shrine
- Head to the eleventh shrine
- Head to the twelfth shrine
- Return to Wortsworth
Starting Location: Message from an Ancient Era


Speak to Wortsworth
Speak to Wortsworth in Lookout Landing at the location above to start this Side Adventure.
Head to Kakariko Village
Head to the village and inside the village head to the Zonai Survey Team Base:


Speak to Wortsworth who is staring at a painting:

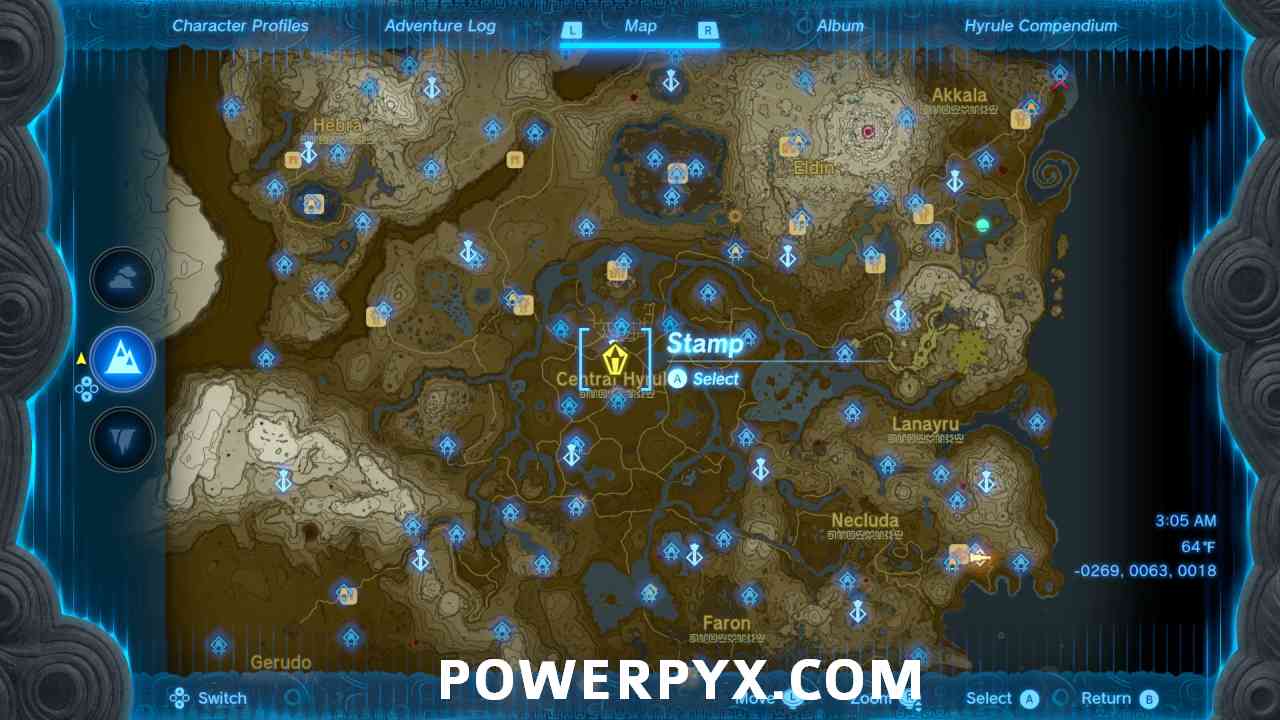
Head to the first Shrine
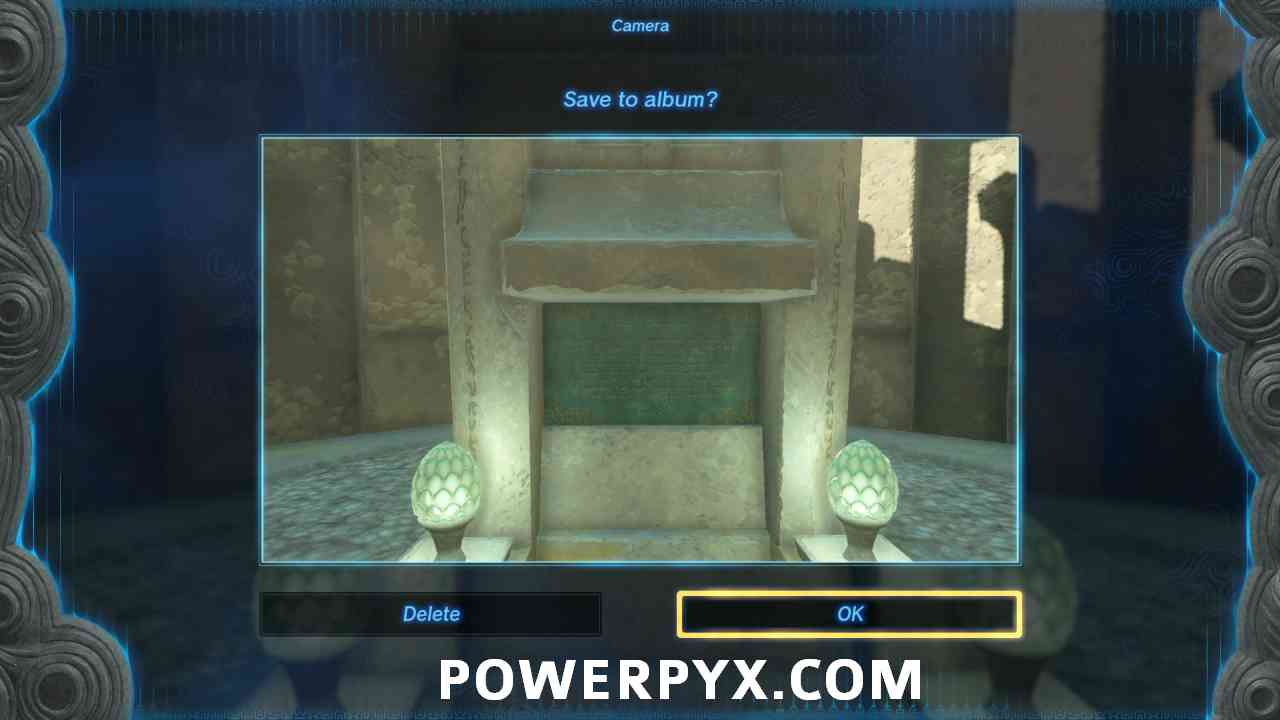
Head to the first shrine located below and take a picture of the shrine’s face between the two dragon egg lamps:


Can be reached from Mayam Shrine.
Note when you step on the platform in front of the shrine the bottom will fall out. You can continue to to follow the portion that fell to the ground and take a picture of it there but if you are fast enough you can take a picture before it drops.
Head to the second Shrine
Head to the second shrine located below and take a picture of the shrine’s face between the two dragon egg lamps:


Can be reached from Tenbez Shrine.
Head to the third Shrine
Head to the third shrine located below and take a picture of the shrine’s face between the two dragon egg lamps:


Can be reached from Ijo-Shrine.
Head to the fourth Shrine
Head to the fourth shrine located below and take a picture of the shrine’s face between the two dragon egg lamps:


Can be reached from Gerudo Highlands Skyview Tower.
Note when you step on the platform in front of the shrine the bottom will fall out. You can continue to to follow the portion that fell to the ground and take a picture of it there but if you are fast enough you can take a picture before it drops.
Head to the fifth Shrine
Head to the fifth shrine located below and take a picture of the shrine’s face between the two dragon egg lamps:


You will need an extra flying device to reach this one from the Siyamotsus Shrine.
Note when you step on the platform in front of the shrine the bottom will fall out. You can continue to to follow the portion that fell to the ground and take a picture of it there but if you are fast enough you can take a picture before it drops.
Head to the sixth Shrine
Head to the sixth shrine located below and take a picture of the shrine’s face between the two dragon egg lamps:


Can be reached from Jinodok Shrine.
Head to the seventh Shrine
Head to the seventh shrine located below and take a picture of the shrine’s face between the two dragon egg lamps:


Can be reached from the Great Sky Island.
Head to the eighth Shrine
Head to the eighth shrine located below and take a picture of the shrine’s face between the two dragon egg lamps:


Can be reached from Kumamayn Shrine but requires you to build a flying machine.
Note when you step on the platform in front of the shrine the bottom will fall out. You can continue to to follow the portion that fell to the ground and take a picture of it there but if you are fast enough you can take a picture before it drops.
Head to the ninth Shrine
Head to the ninth shrine located below and take a picture of the shrine’s face between the two dragon egg lamps:


Can be reached from Kumamayn Shrine but requires you to build a flying machine.
Note when you step on the platform in front of the shrine the bottom will fall out. You can continue to to follow the portion that fell to the ground and take a picture of it there but if you are fast enough you can take a picture before it drops.
Head to the tenth Shrine
Head to the tenth shrine located below and take a picture of the shrine’s face between the two dragon egg lamps:


Can be reached from Jirutagumac Shrine by pointing the hole in the sphere south.
Note when you step on the platform in front of the shrine the bottom will fall out. You can continue to to follow the portion that fell to the ground and take a picture of it there but if you are fast enough you can take a picture before it drops.
Head to the eleventh Shrine
Head to the eleventh shrine located below and take a picture of the shrine’s face between the two dragon egg lamps:


Can be reached from Natak Shrine.
Head to the twelfth Shrine
Head to the twelfth shrine located below and take a picture of the shrine’s face between the two dragon egg lamps:


Can be reached from Kadaunar Shrine.
Return to Wortsworth
Return to Kakariko Village and head to the Zonai Survey Team Base to speak to Wortsworth. Show him each picture one at a time and you will be rewarded for each one. Once you have shown him all 12 pictures this Adventure will be complete.
This finishes Message from an Ancient Era Side Quest in The Legend of Zelda: Tears of the Kingdom (TotK).
For all other Quests refer to The Legend of Zelda: Tears of the Kingdom Walkthrough.
Leave a Reply