
Resident Evil 9: Requiem has 136 Collectible Locations. This collectible guide shows all collectibles for 100% game completion and all missable trophies & achievements. There are the following types of collectibles:
- 25 Mr. Raccoon Memoriam –
 You Little Rascal!
 - 75 Files – Case Closed
- 5 Safes – No Safe is Safe
- 3 BSAA Containers – Crate Expectations
- 9 Plant 43 Seedlings – Not Today, Buds!
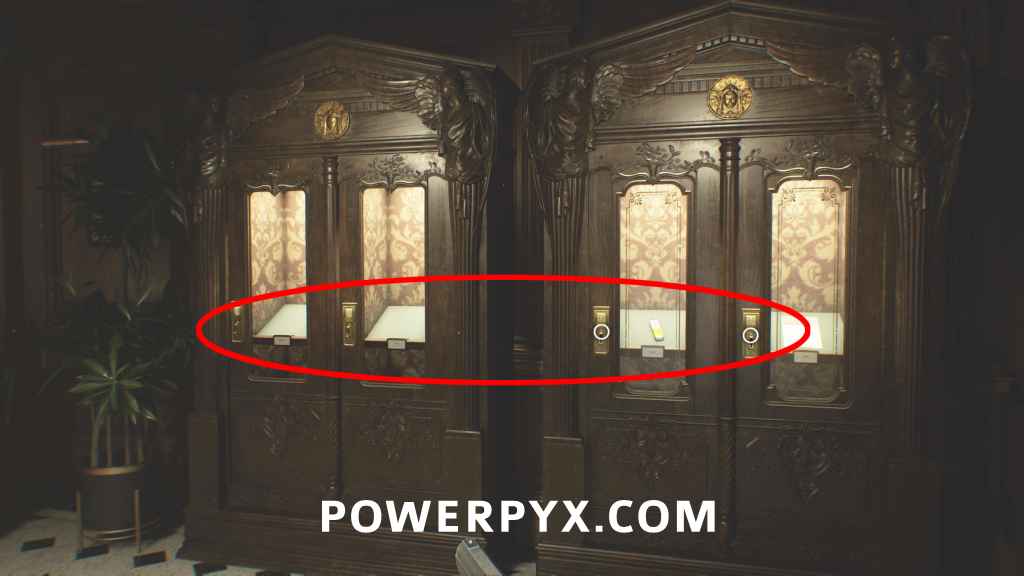
- 19 Antique Coins – needed for Upgrades
 You Little Rascal!
This guide also includes all Key Items, Upgrades, Weapons, Weapon Parts, Antique Coins, and Missable Trophies, which brings the total count to 235 items. There are also 44 Models and 56 Concept Arts, but these are bought from the Bonus Menu and not picked up in the world.
Everything in Resident Evil Requiem is missable as there is no chapter select, but if you keep a manual save from each area you can still return everywhere. Collectibles are tracked through the in-game Challenge Menu. However, some challenge trackers are only visible after beating the game once on any difficulty. Files can also be viewed through the “Files” Menu next to the inventory. Mr. Raccoons and Files count across all playthroughs. For Mr. Raccoons you can buy maps after the first playthrough from the Bonus Menu, which will mark all of them.
This guide is based on Casual/Standard difficulty. Some items have different locations on Insanity, particularly the Antique Coins.
The best approach is to collect everything on the first playthrough. Then if you’re missing anything you can refer to the guides by type and clean up on the next playthrough. Finding all collectibles on the first playthrough is recommended to get the CP (Challenge Points) to buy items in the Bonus Menu, and also so you don’t need to spend time during the Speedrun.
Area Quick Select:
- Wrenwood
- Rhodes Hill – Care Center
- Rhodes Hill – Care Center Basement
- Rhodes Hill – Care Center Courtyard
- Raccoon City – East Raccoon City
- Raccoon City – Raccoon City Center
- Orphanage
- Raccoon City – Side Street
- ARK
Collectibles by Type:
If you missed anything you can use the by-type guides to clean up on the next playthrough.
Video Guide

Wrenwood (Prologue)
File #1 – Investigation Report
Automatically in your inventory from the start of the game. Press Touchpad > Items > Investigation Report > zoom in and rotate it until it lets you interact with the photo sticking out of the folder, read the file.
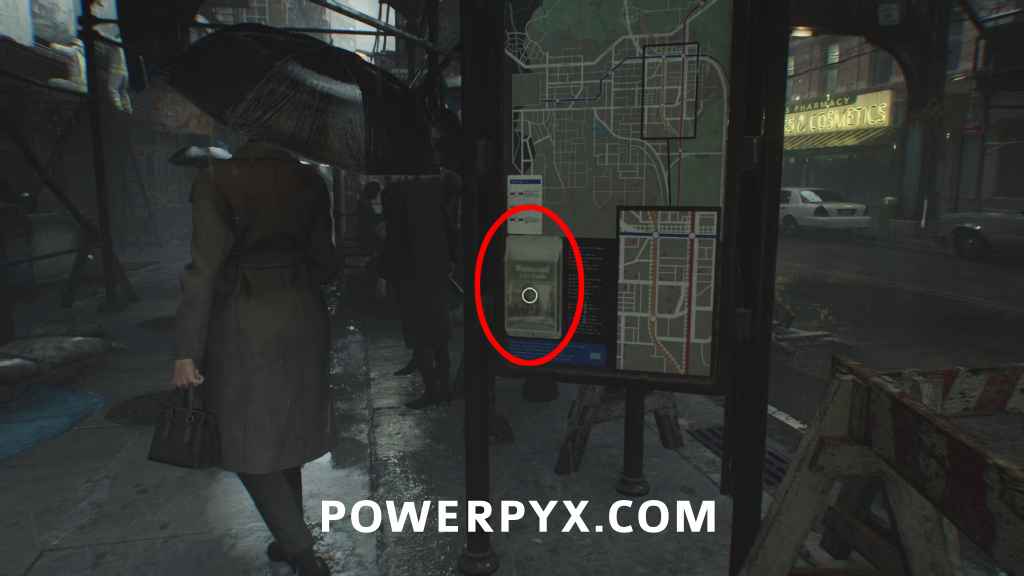
File #2 – Wrenwood City Guide
Check the City Map on the right while walking the street.
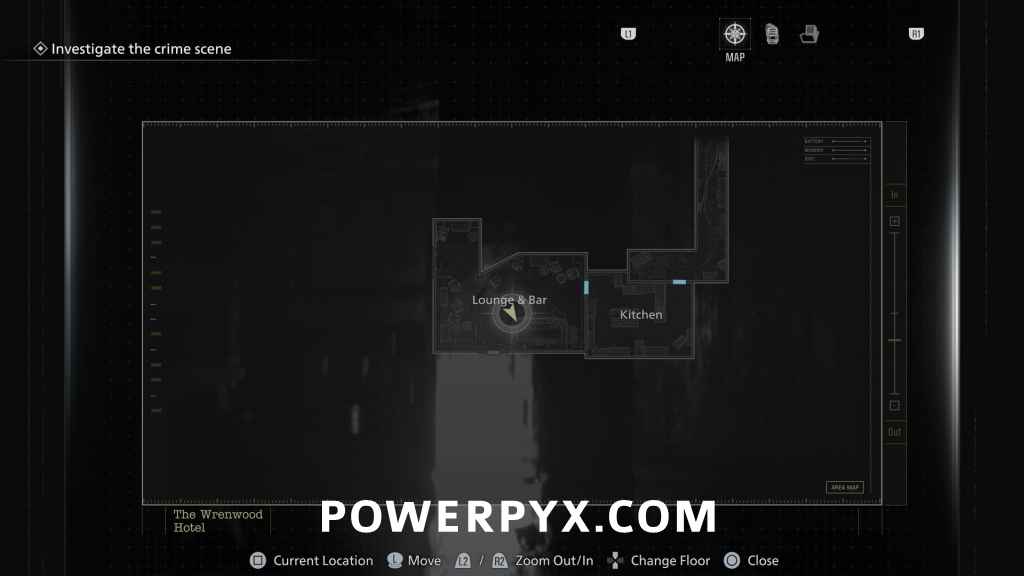
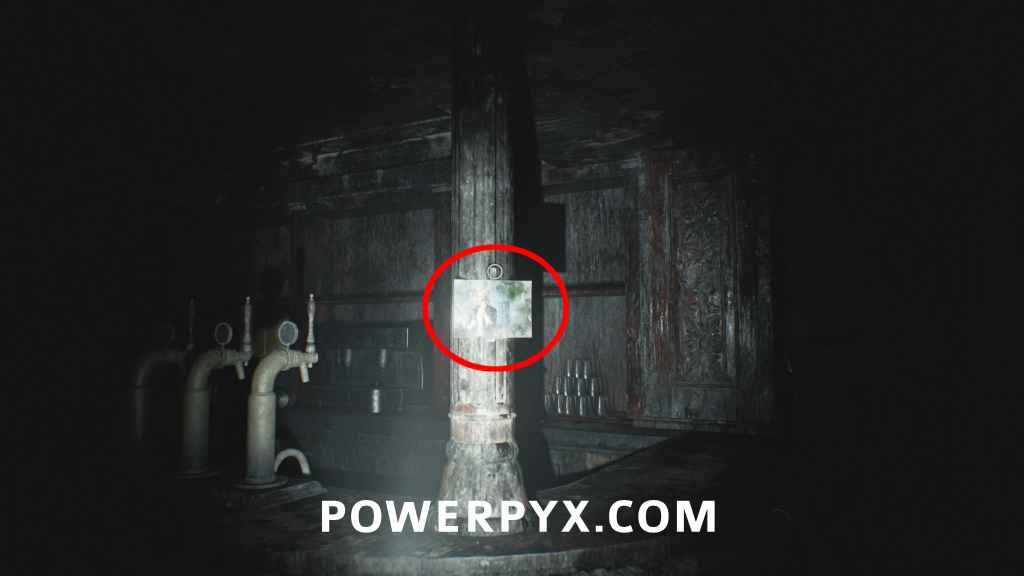
Key Item: Old Key
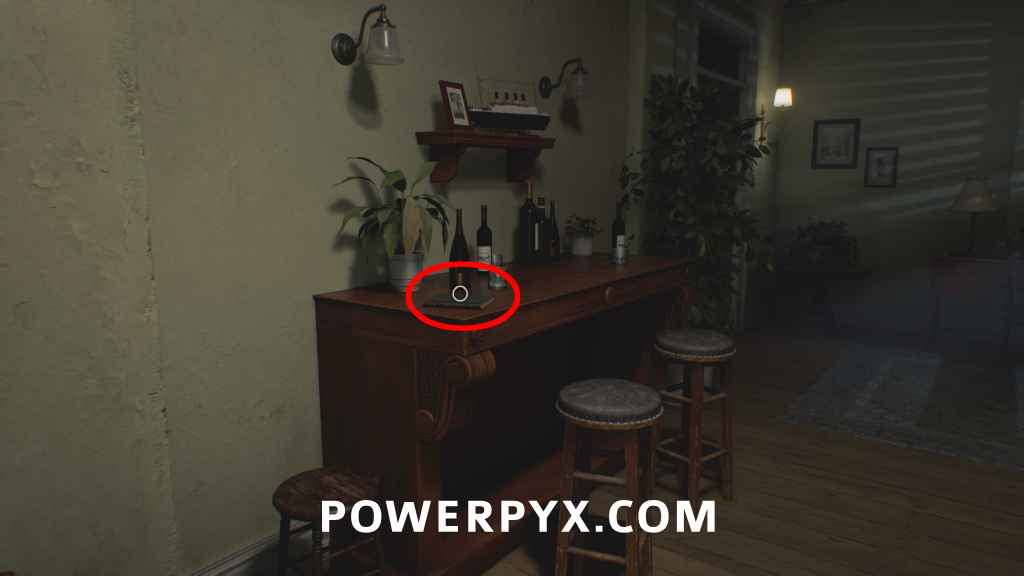
Lounge & Bar: In the dark area where you use the flashlight, after going through the kitchen. In the next room where it’s very dark, check the photo taped to the bar and examine the back. This is also the first area where you can use the map (Touchpad).
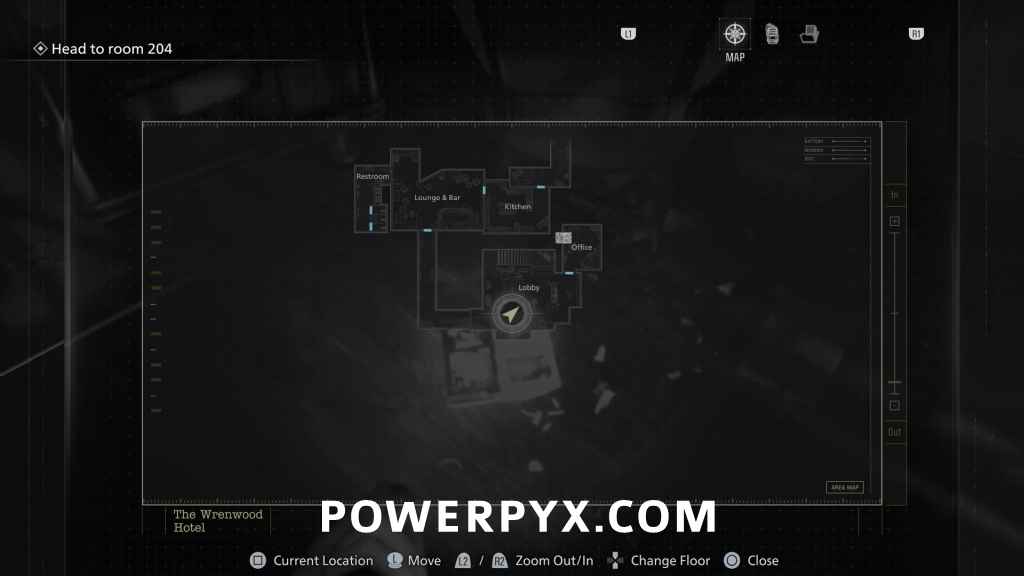
File #3 – Hotel Pamphlet
Lobby: After opening the door with the old key, go forward to a room with stairs leading up. Check the paper on the floor.
File #4 – Notice of Closure
Office: In the same area go behind the reception desk, follow the path to the backroom and open the blue drawer.
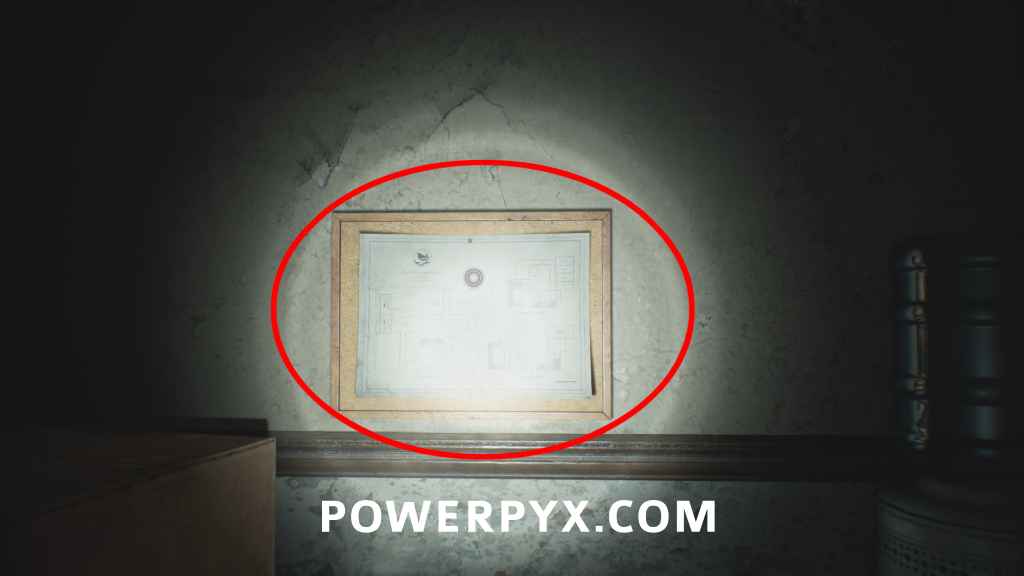
Wrenwood Hotel Map
Office: In same room on the wall.
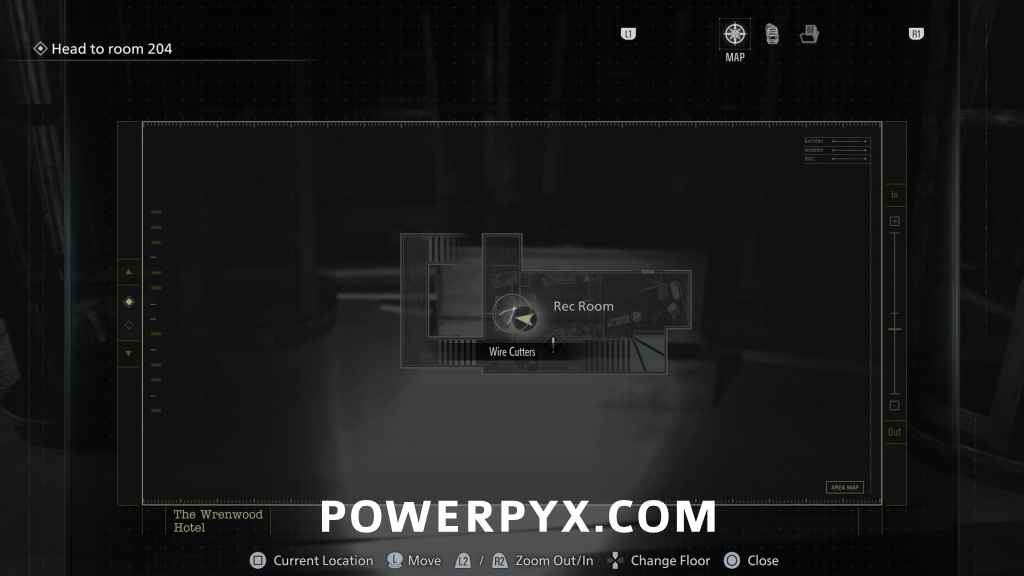
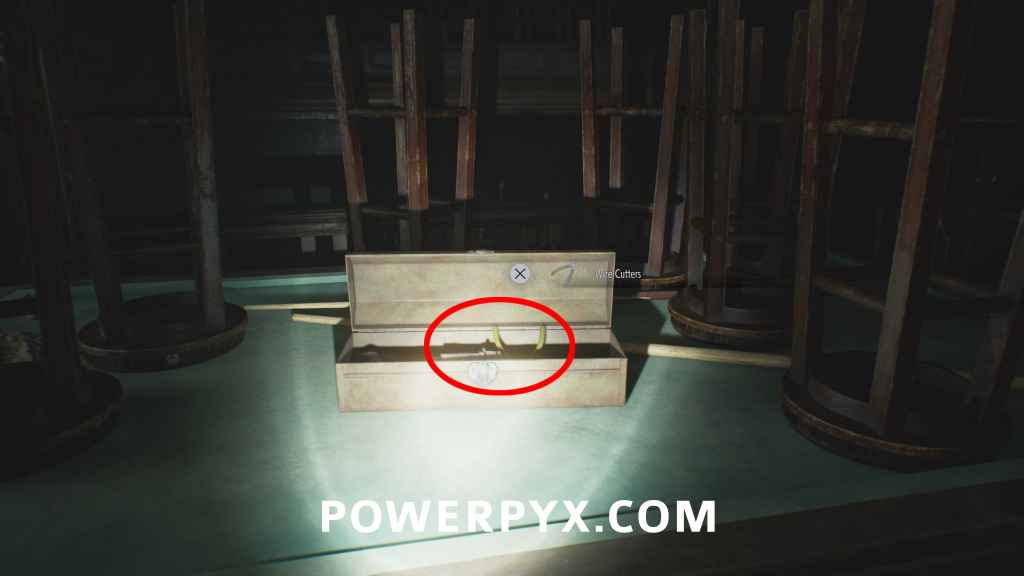
Key Item: Wire Cutters
Rec Room – 2nd Floor: Upstairs on the pool table.
File #5 – Alyssa’s Journal
Automatic from story progression, after interacting with the painting downstairs.
Key Item: Emergency Exit Key
Automatic from story progression, directly after getting the previous file.
Wrenwood – Leon
File #6 – Report on Victor Gideon
Automatic from story progression, obtained during cutscene.
Care Center (Rhodes Hill) – Grace
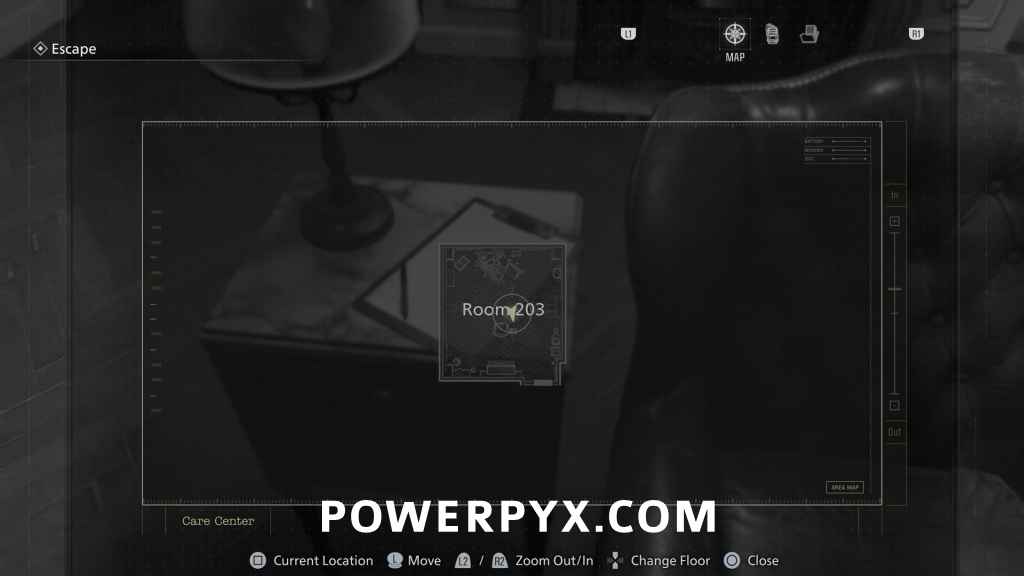
File #7 – Progress Notes
Room 203: On the small table in the room when you regain control of Grace.
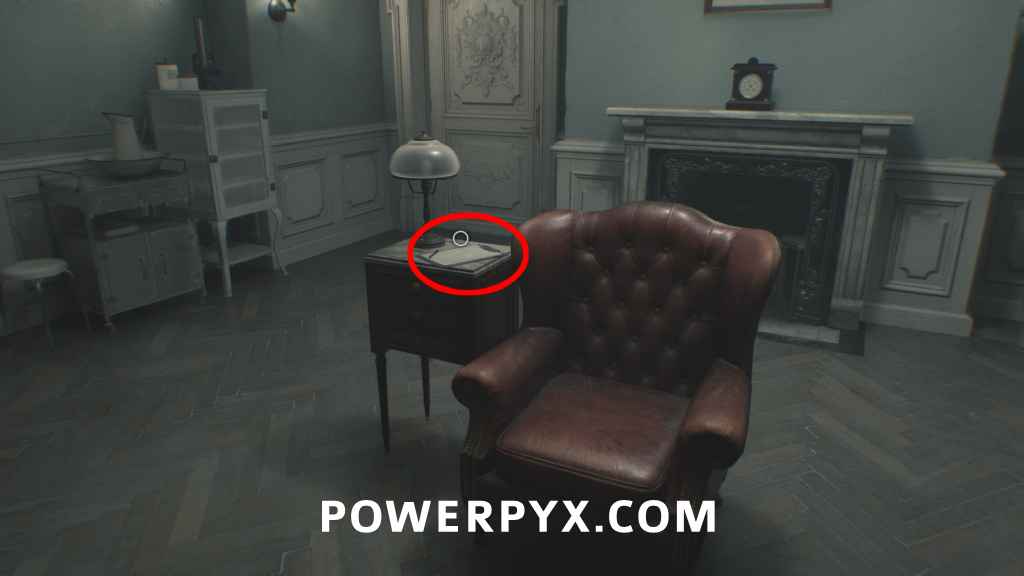
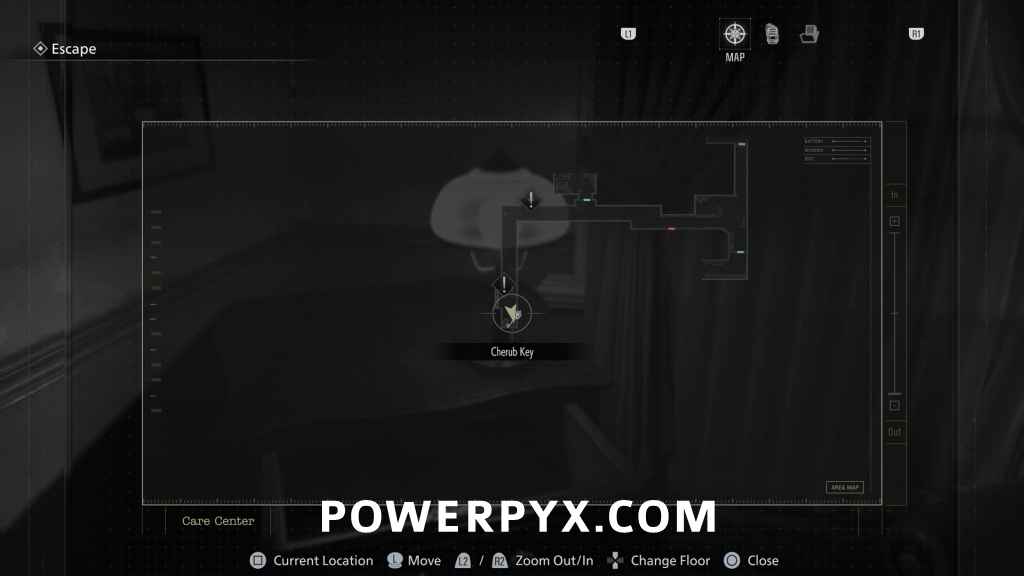
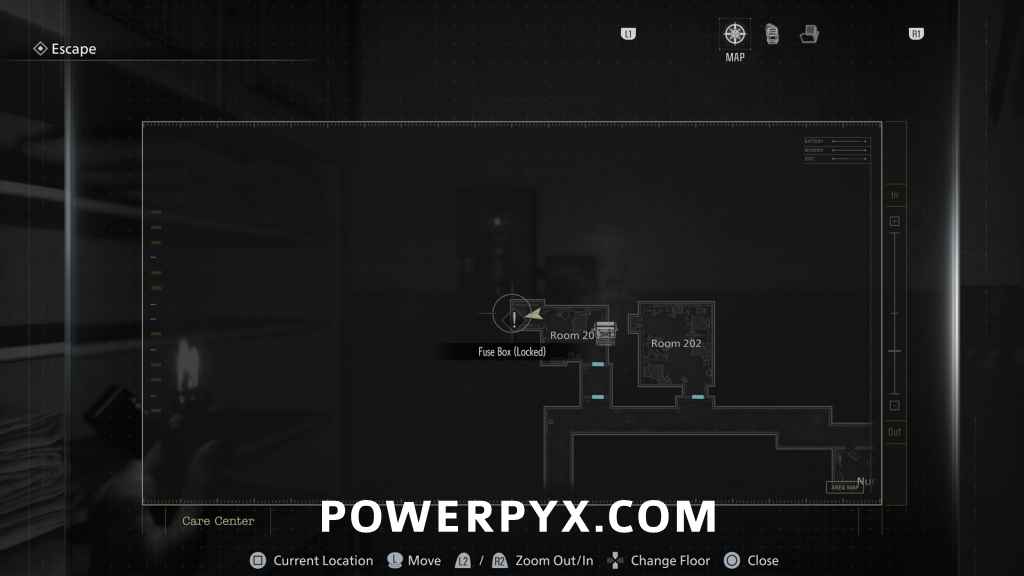
Key Item: Cherub Key
In a drawer next to a locked gate with a fuse box next to it. Used to open Room 201.
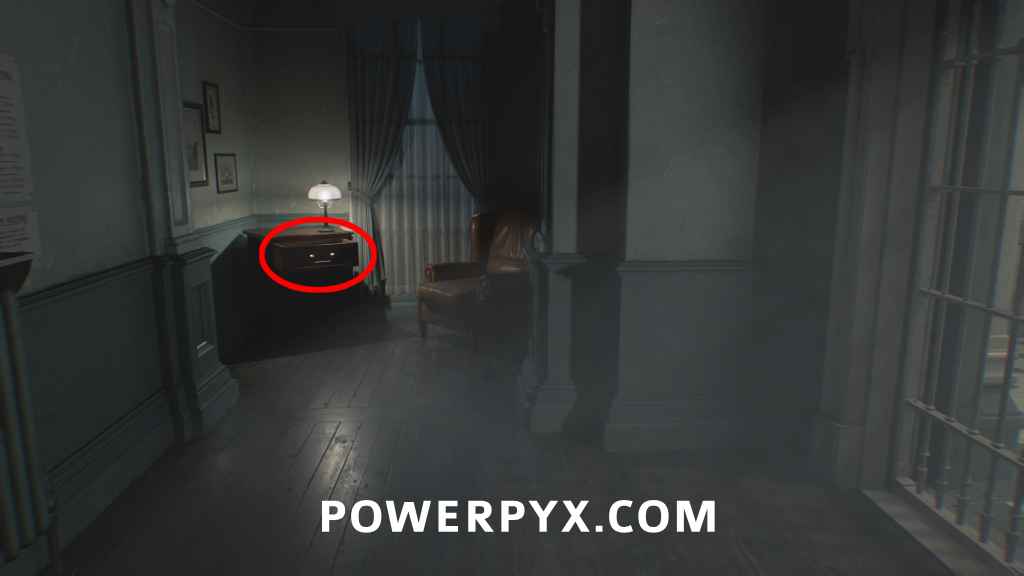
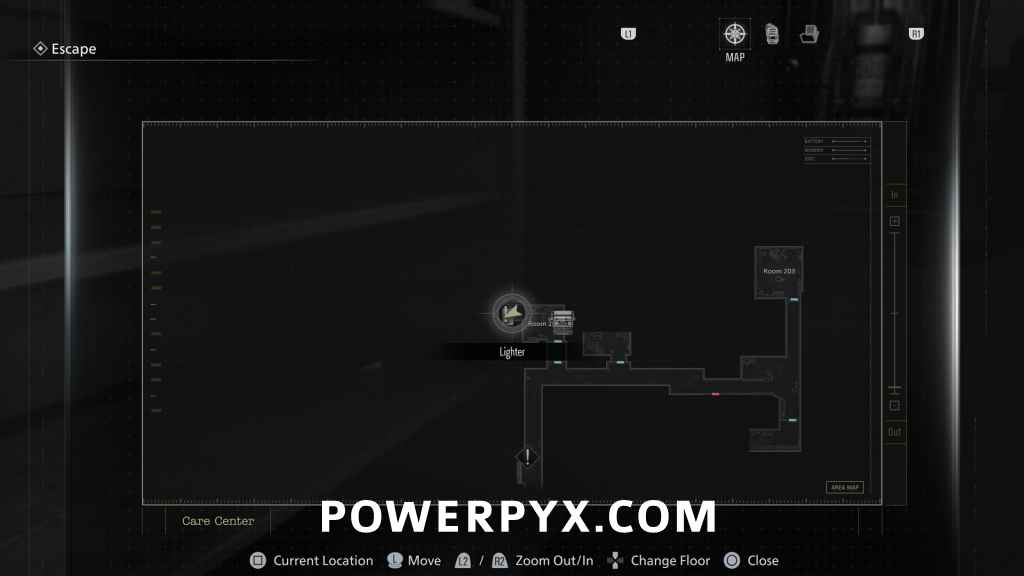
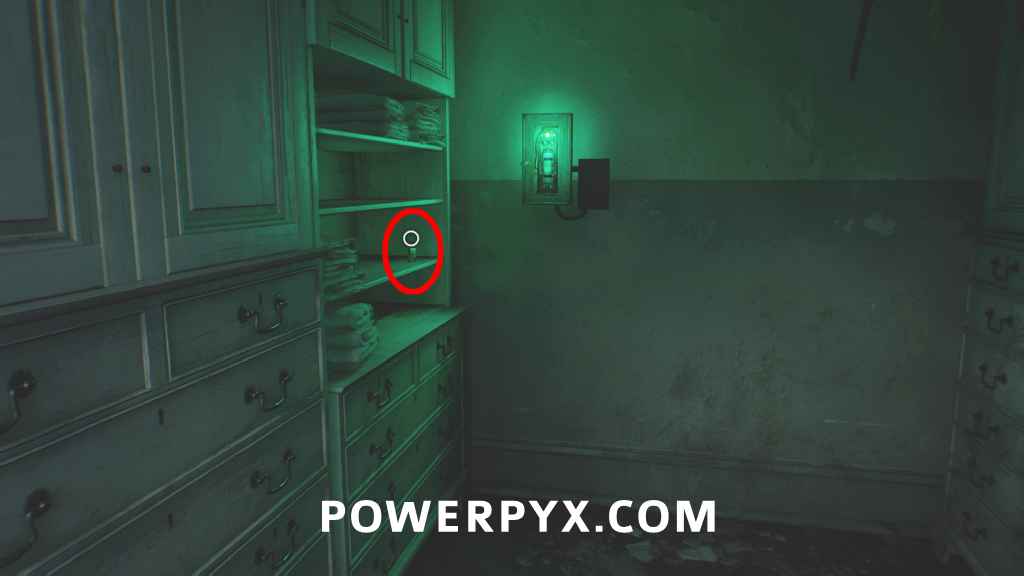
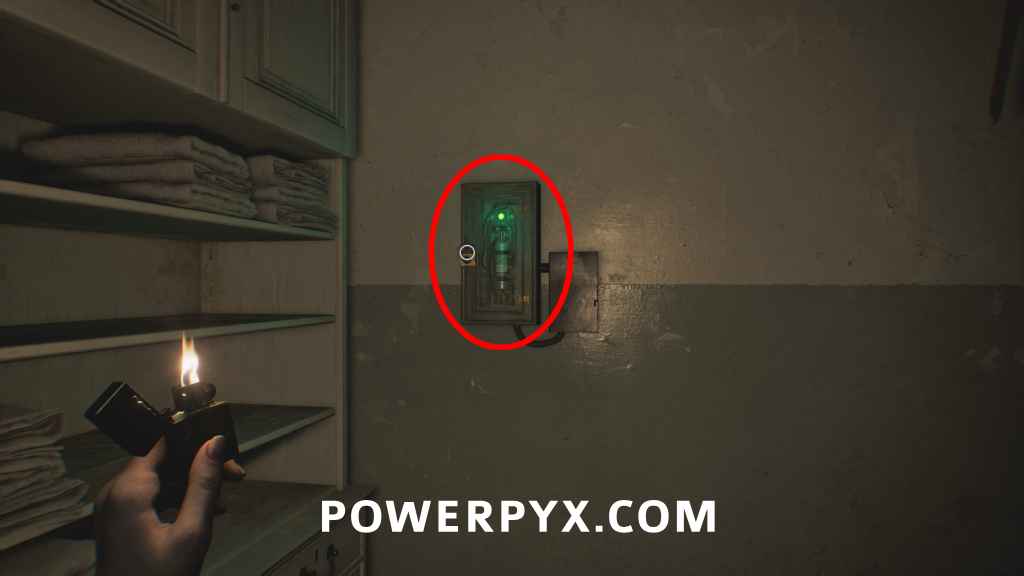
Key Item: Lighter
Room 201: Inside Room 201, next to the green fusebox.
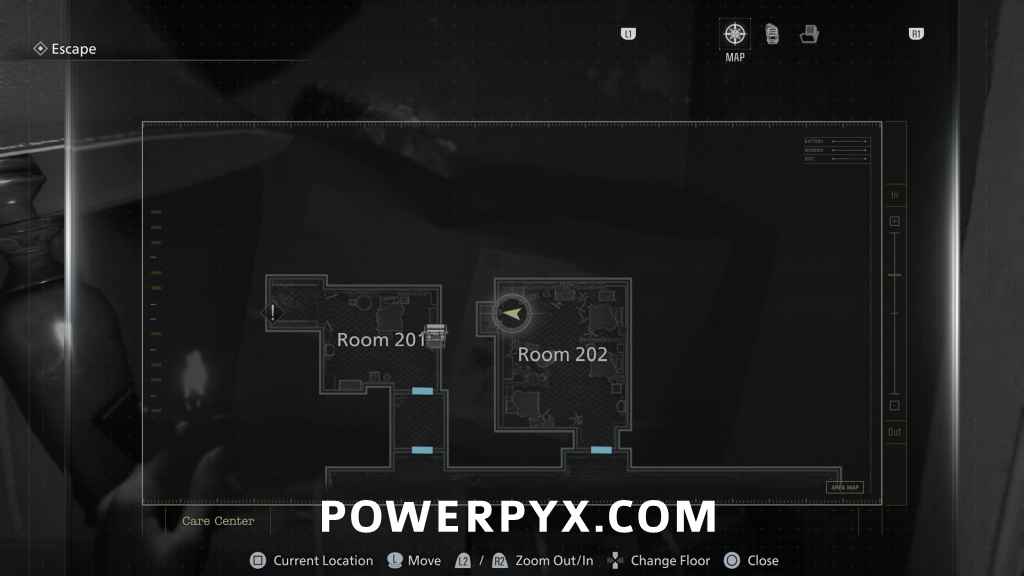
File #8 – Note on Cardboard Box
Room 202: Inside the closet in Room 202.

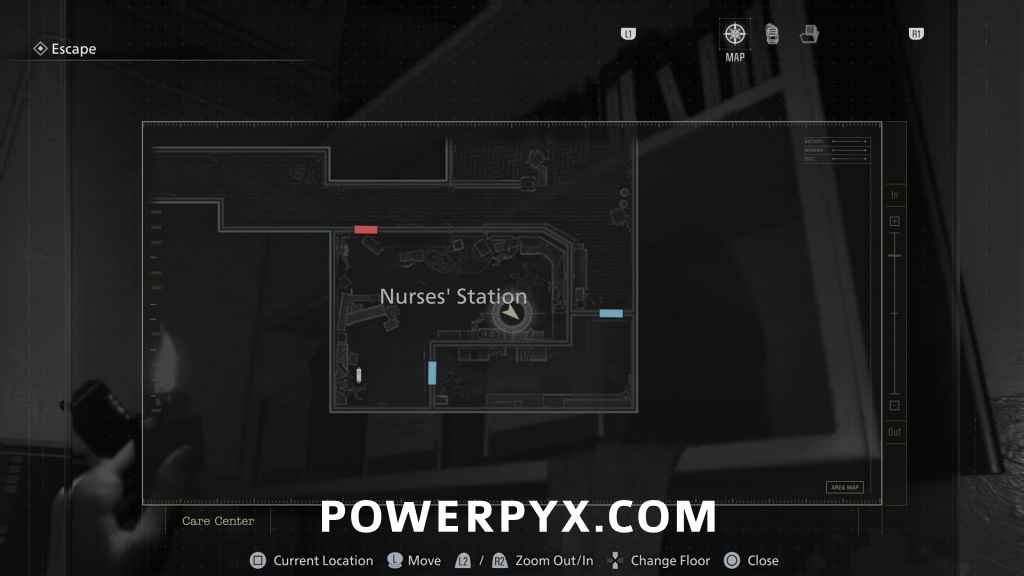
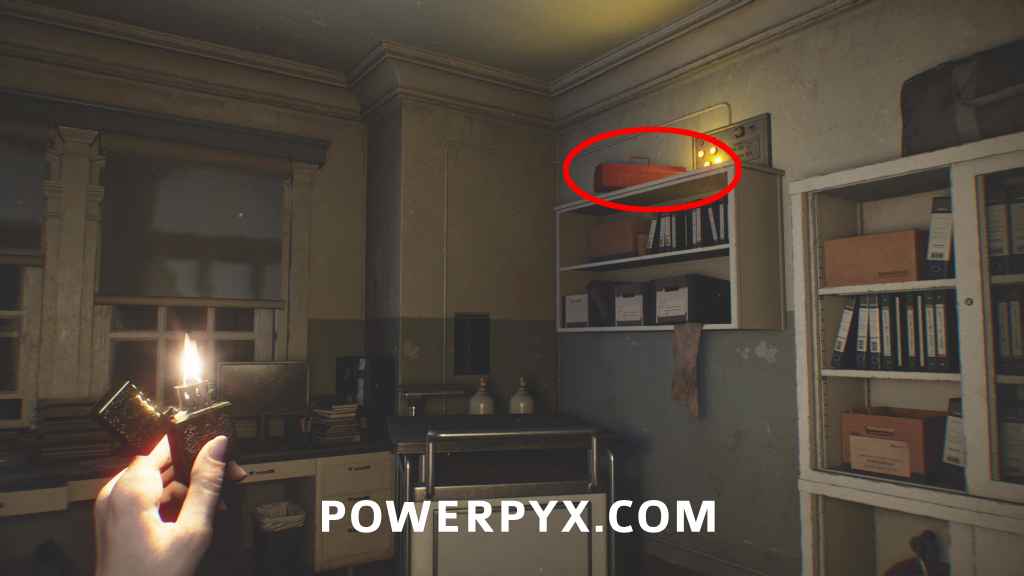
Key Item: Screwdriver
Nurses’ Station: In a toolbox on the shelf in Nurses’ Station. Move cart in the same room to reach it.
Key Item: Fuse
Room 201: Inside Room 201, need Screwdriver to open fusebox. Insert it at the locked gate.
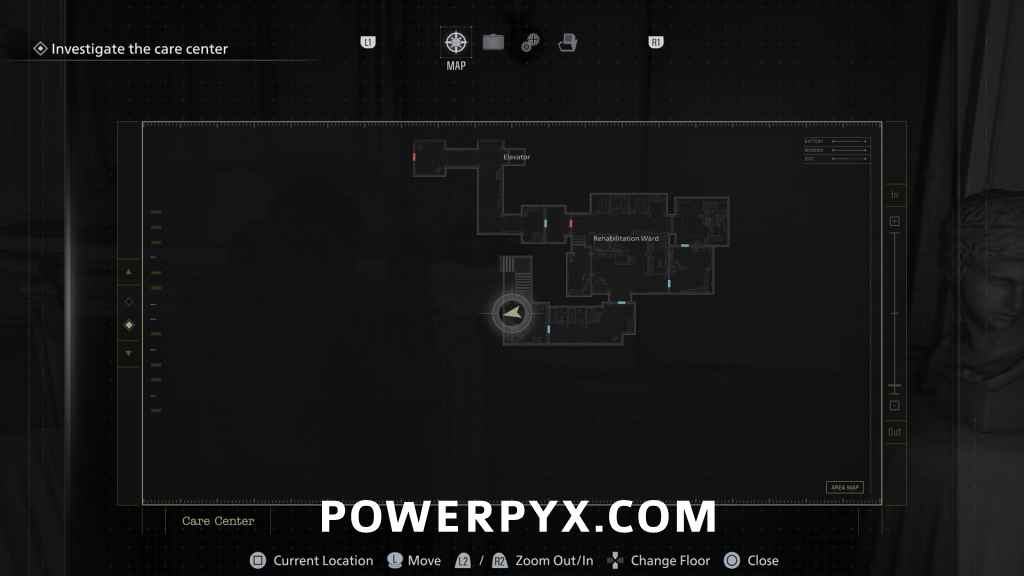
Care Center (Rhodes Hill) – Leon
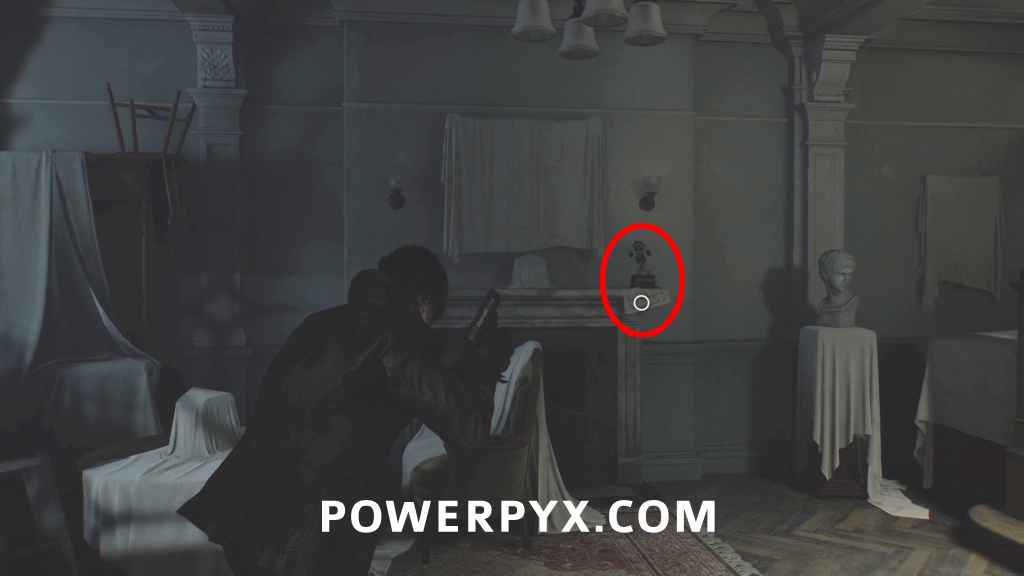
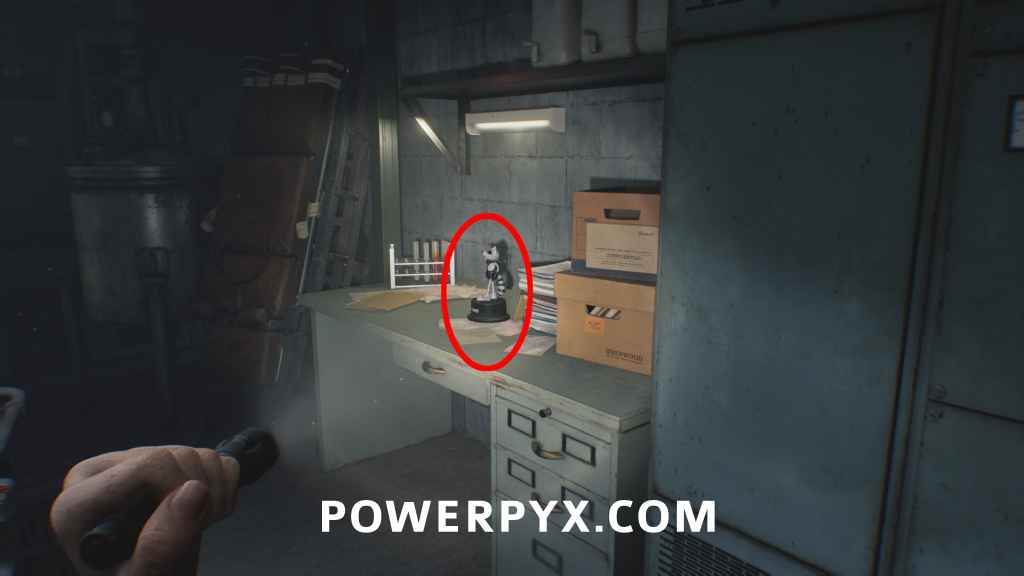
Mr. Raccoon #1
After cutting a door open with the chainsaw, go through the next door and it will be in front of you on the fireplace. The Mr. Raccoons move and make a noise.
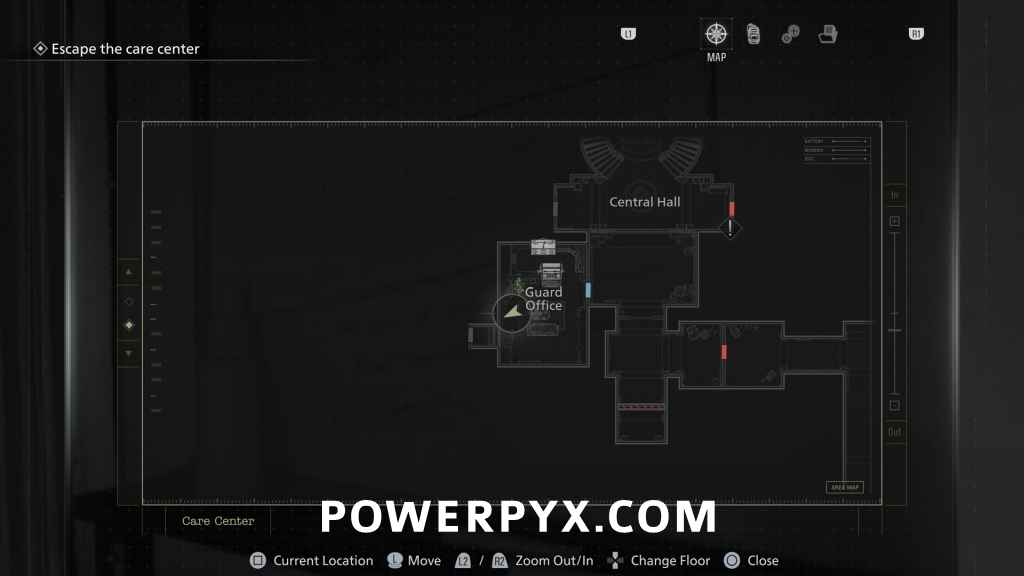
Care Center (Rhodes Hill) – Grace Part 2
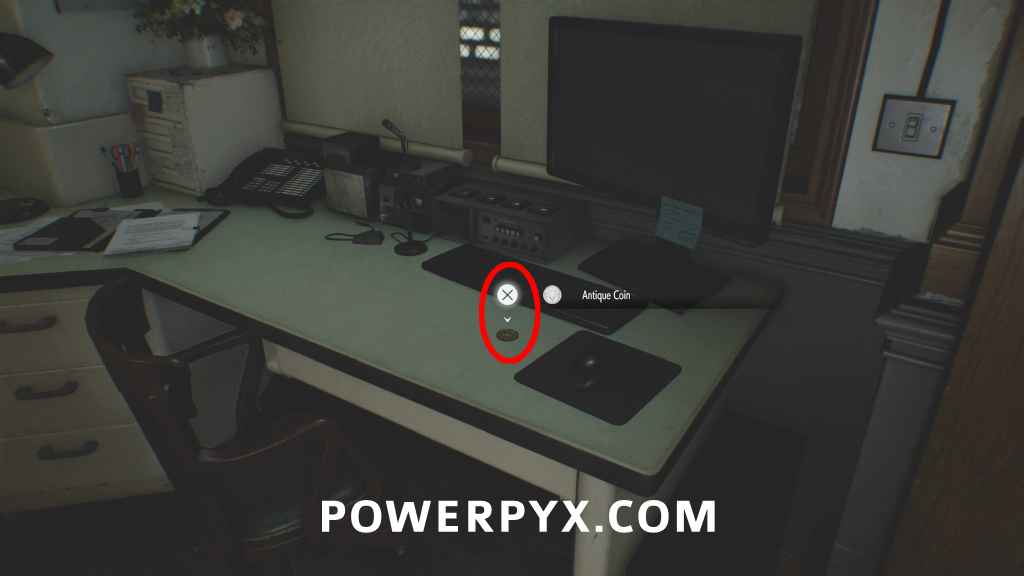
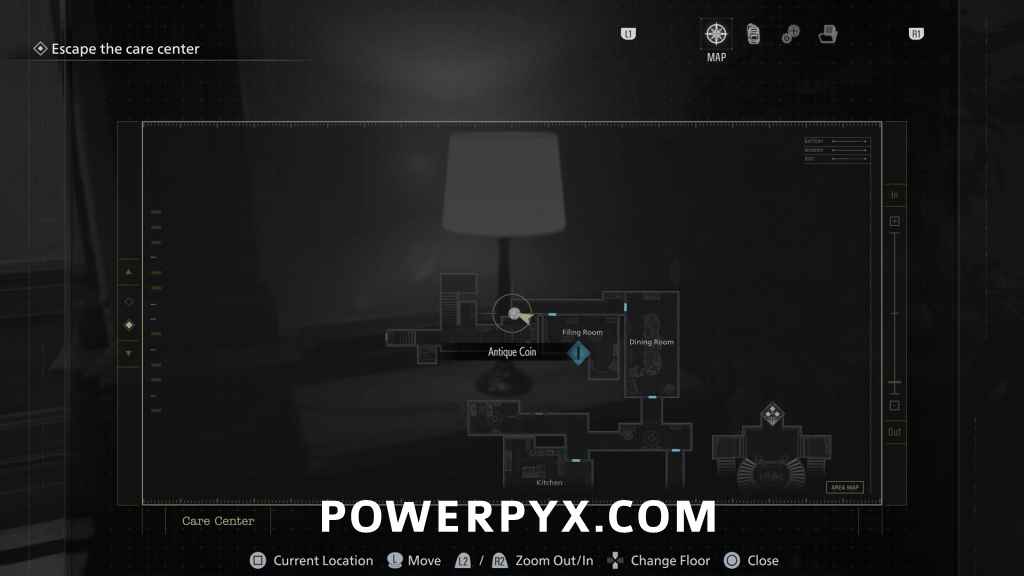
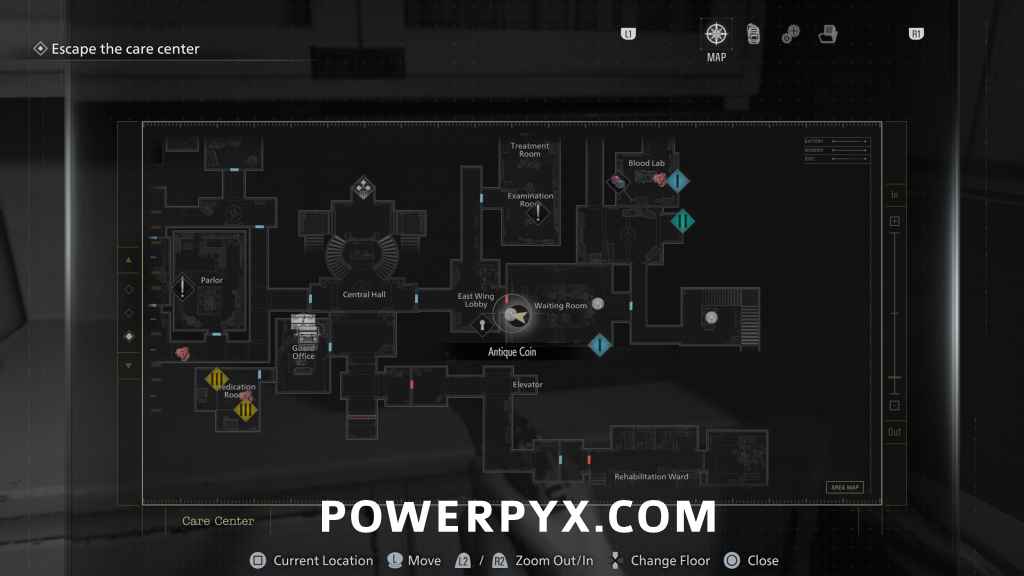
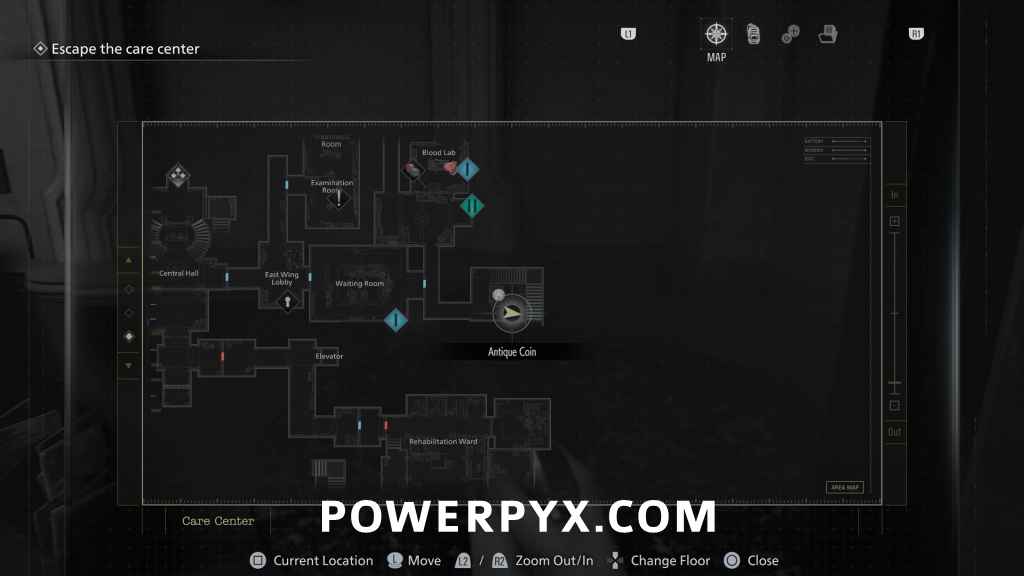
Antique Coin #1
Guard Office: From where you start, go downstairs and enter the Safe Room. Coin is on desk.
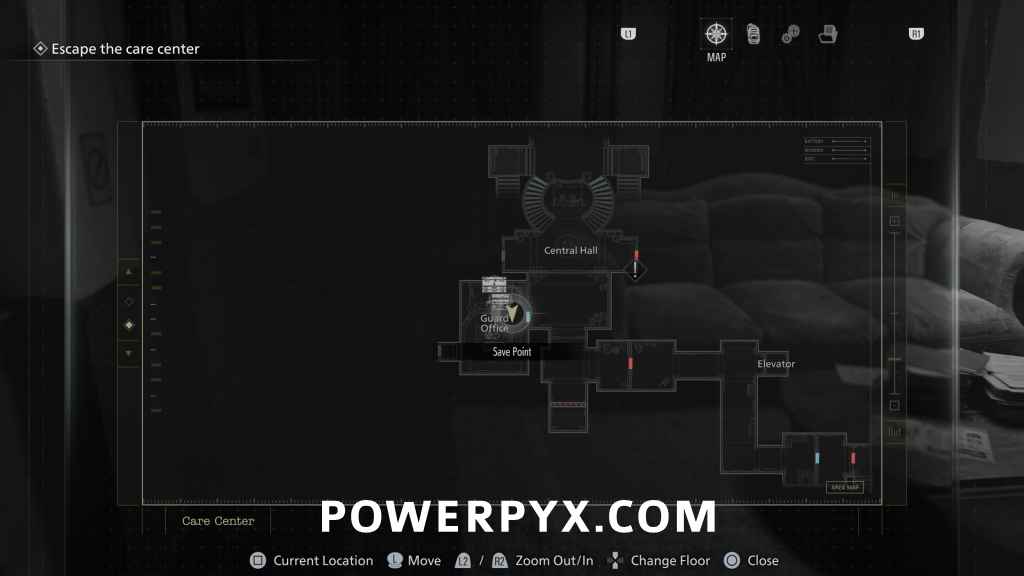
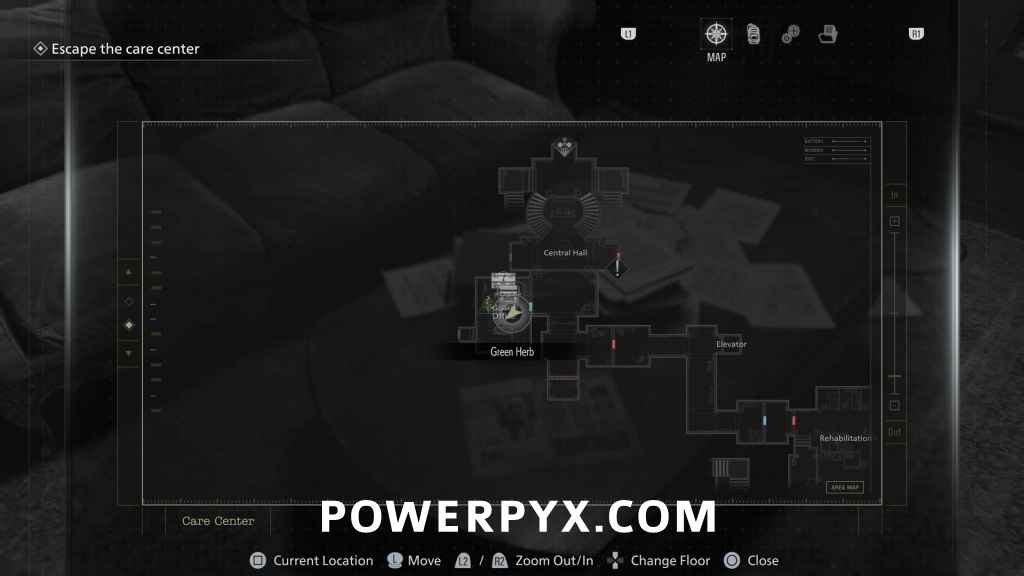
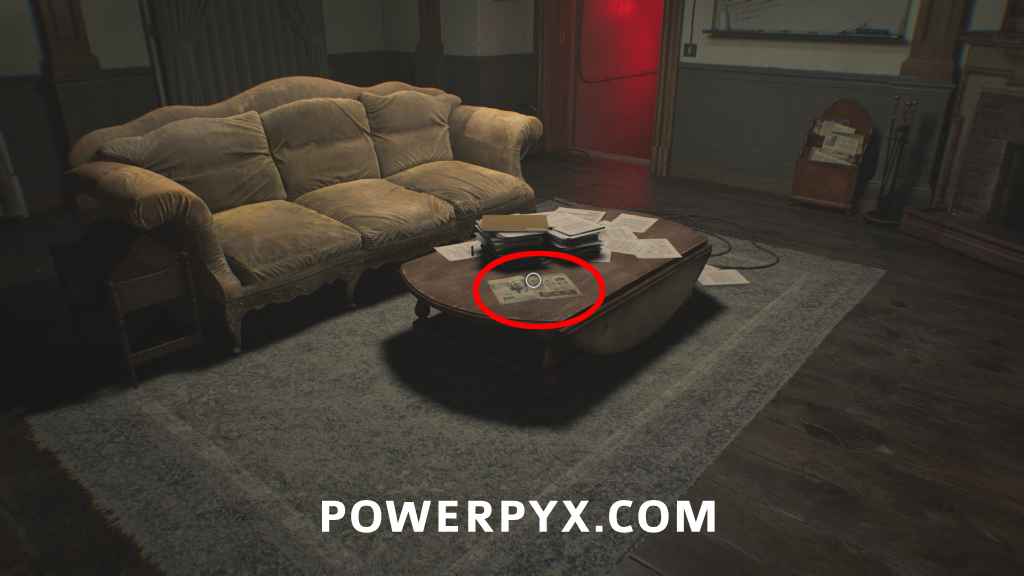
File #9 – Care Center Pamphlet
Guard Office: From where you start, go downstairs to the Safe Room, this is on the couch table.
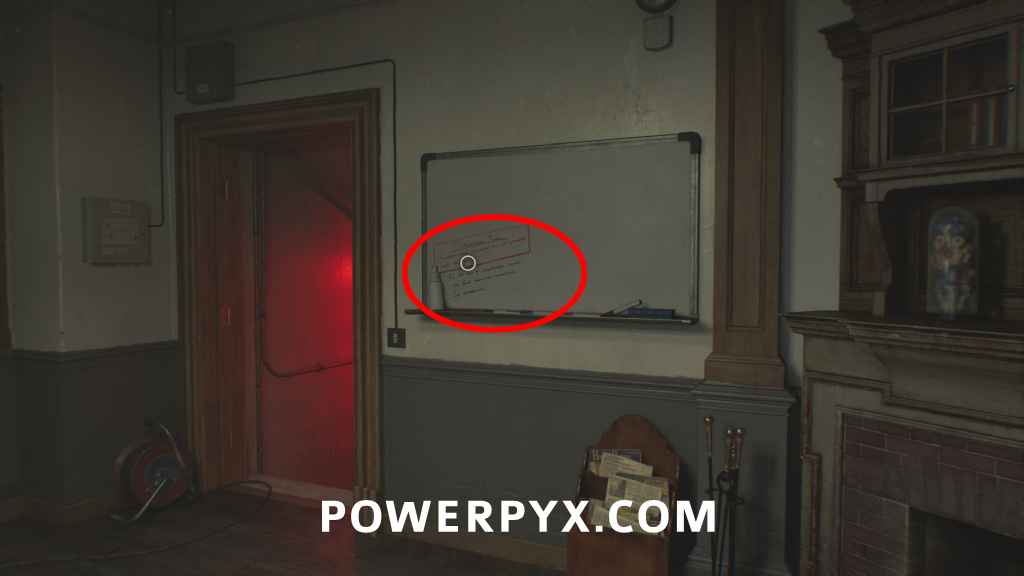
File #10 – Whiteboard Scrawl
Guard Office: Same room, on the wall on whiteboard, just before the exit.
Trophy: Out of Sight, Out of Mind
Guard Office: Same room, interact with the box and place any item in it.
Key Item: West Wing Keycard
In Safe Room go through the red-lit door to get this automatically. Use in Central Hall on door to West Wing.
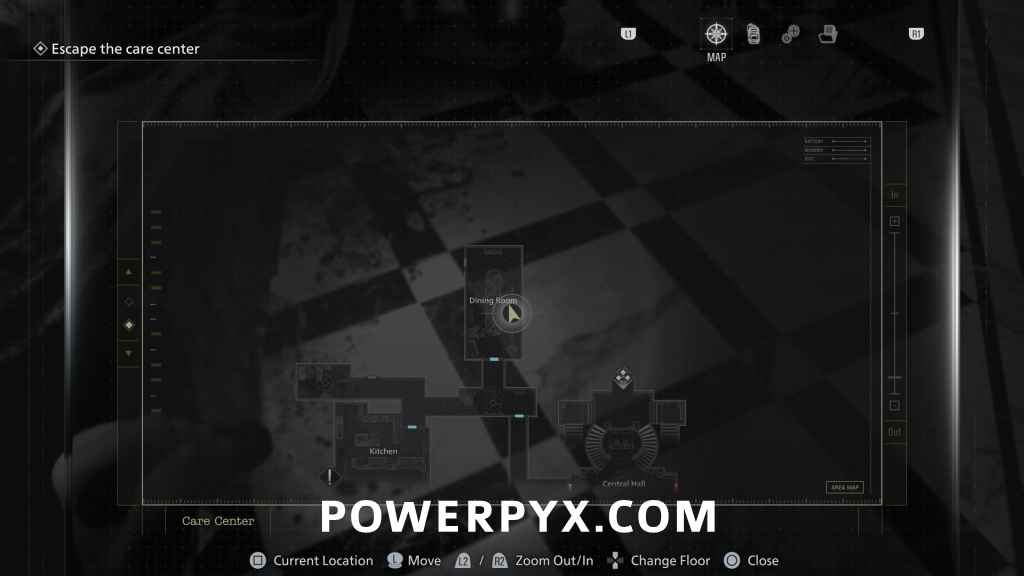
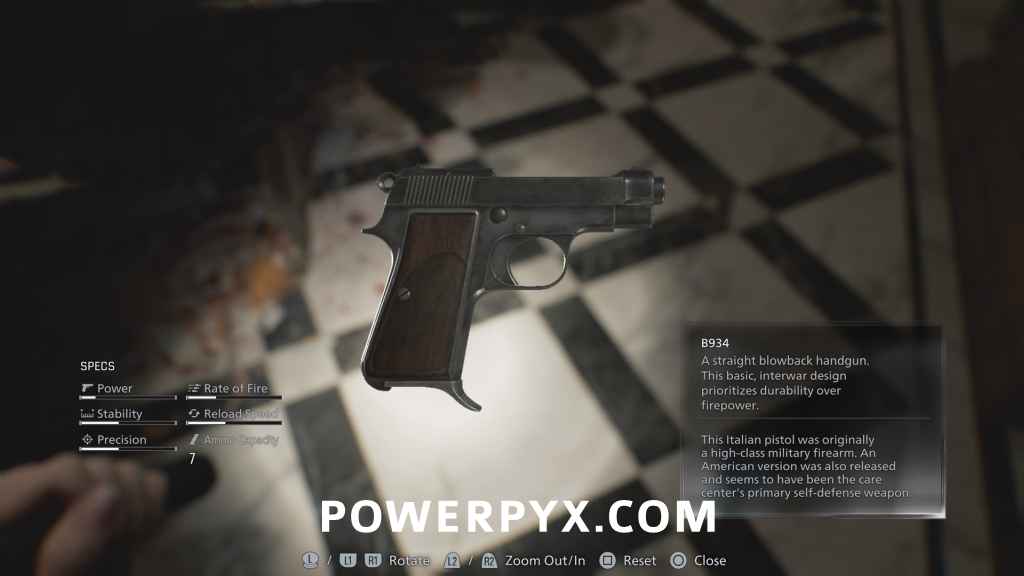
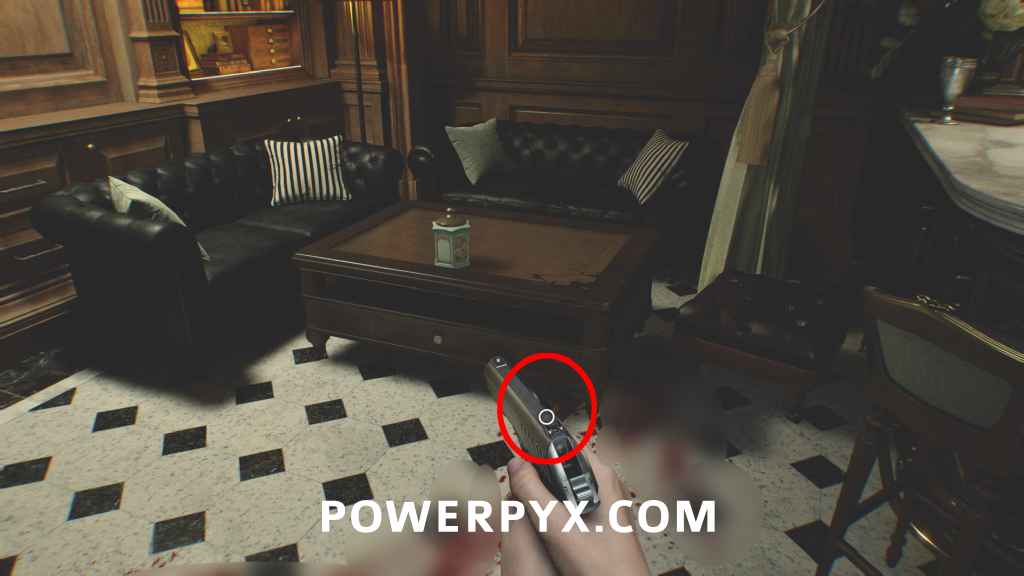
Weapon: B934 (Pistol)
Dining Room: On the floor in the Dining Room (after going through Kitchen).
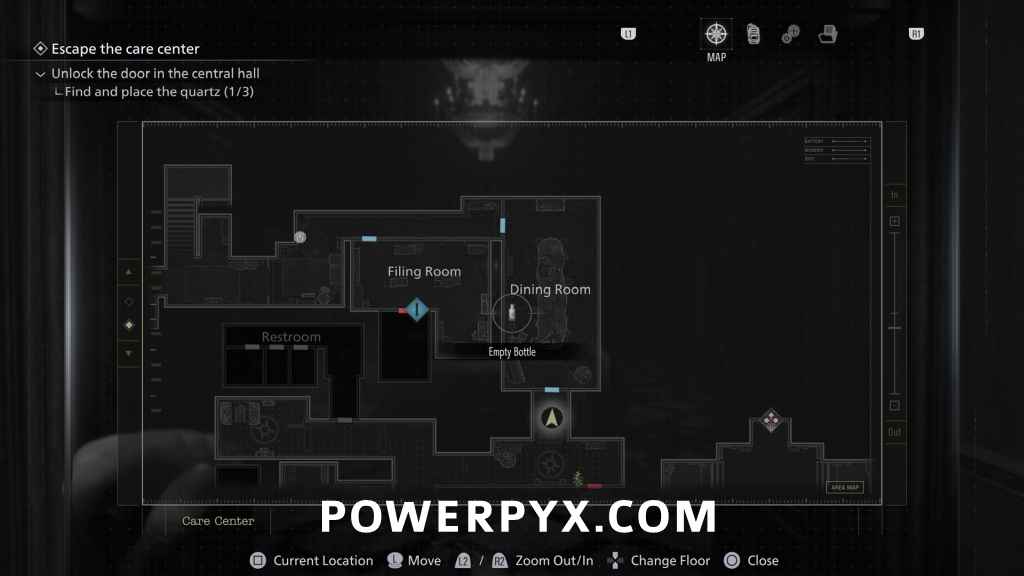
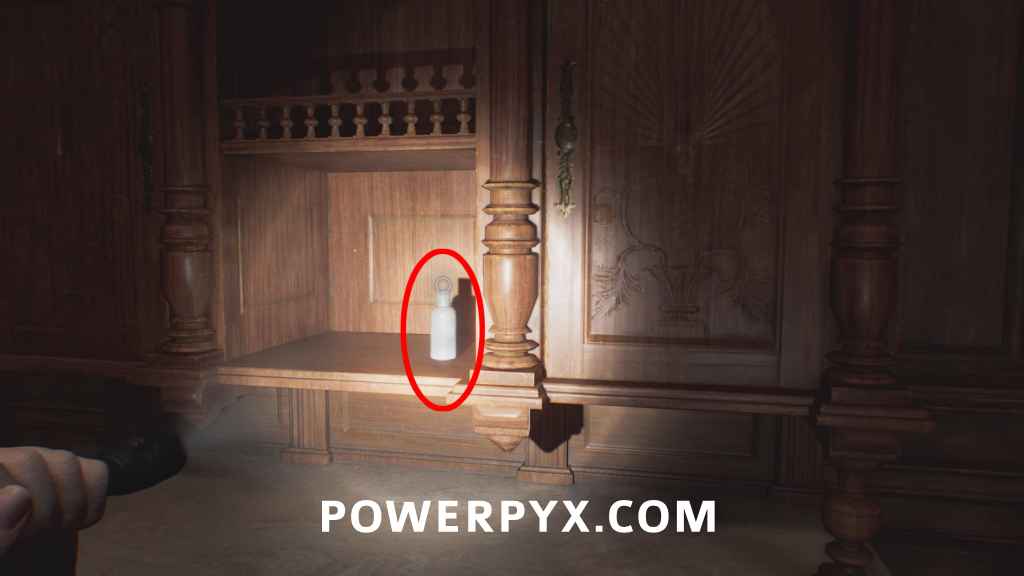
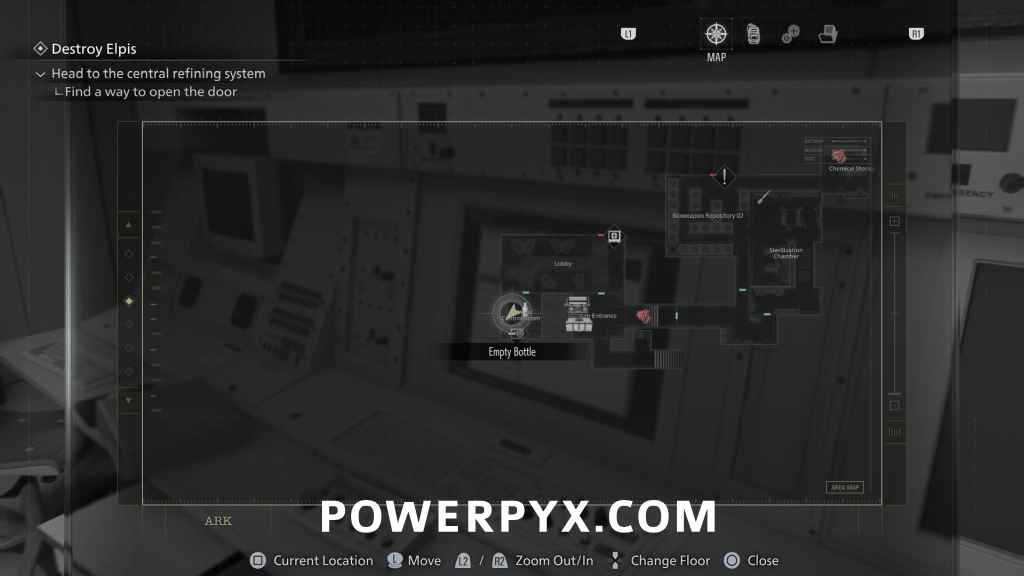
Trophy Item: Empty Bottle
Dining Room: On the left side of the dining room behind the table, you find this on the shelf. Pick it up and keep it with you or put it in the storage box. It will be needed later for the trophy “Internal Dispute”. DON’T THROW AWAY THE BOTTLE!
Weapon: Makeshift Knife
Filing Room: In the locker inside the Filing Room (next to Dining Room).

Weapon: Hunting Knife
Dropped by one of the enemies near the Dining Room & Filing Room, he holds the knife in his hand.
Antique Coin #2
In the corridor north from Filing Room.
Map: West Wing Map
After going up the first set of stairs it’s on the wall.
Antique Coin #3
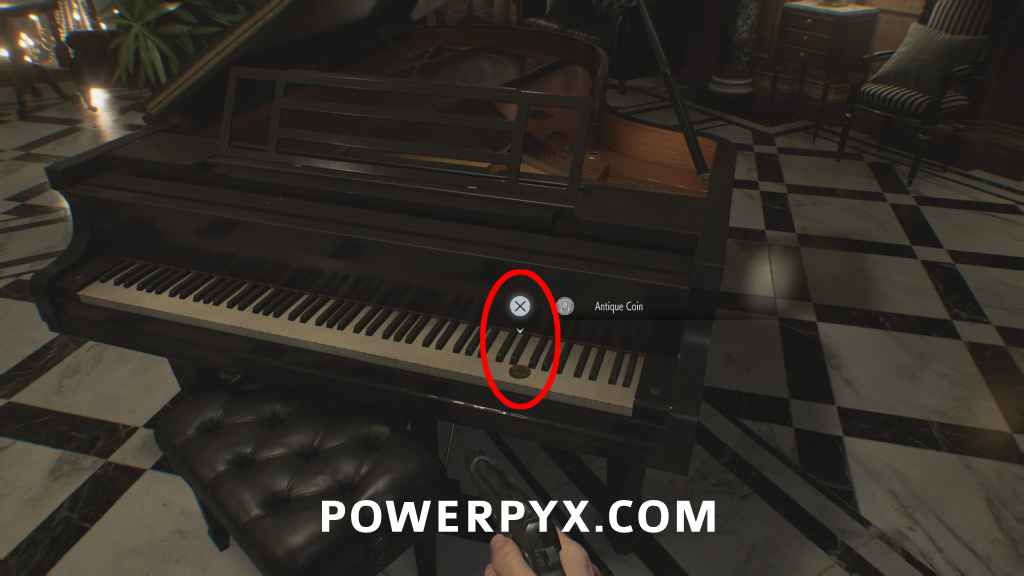
Bar & Lounge: On the piano.

Antique Coin #4
Bar & Lounge: Dropped by the singing lady enemy in white dress.
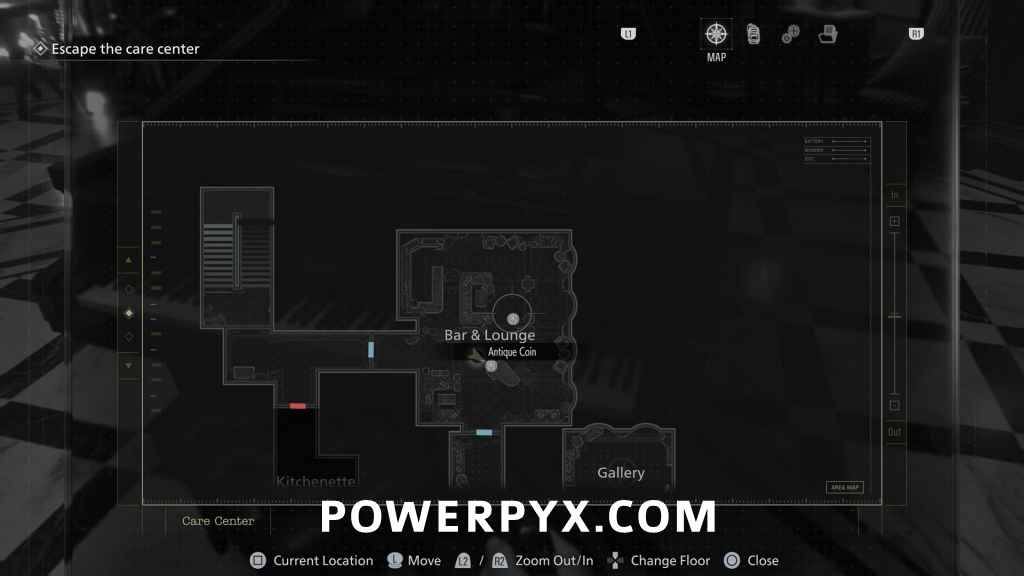
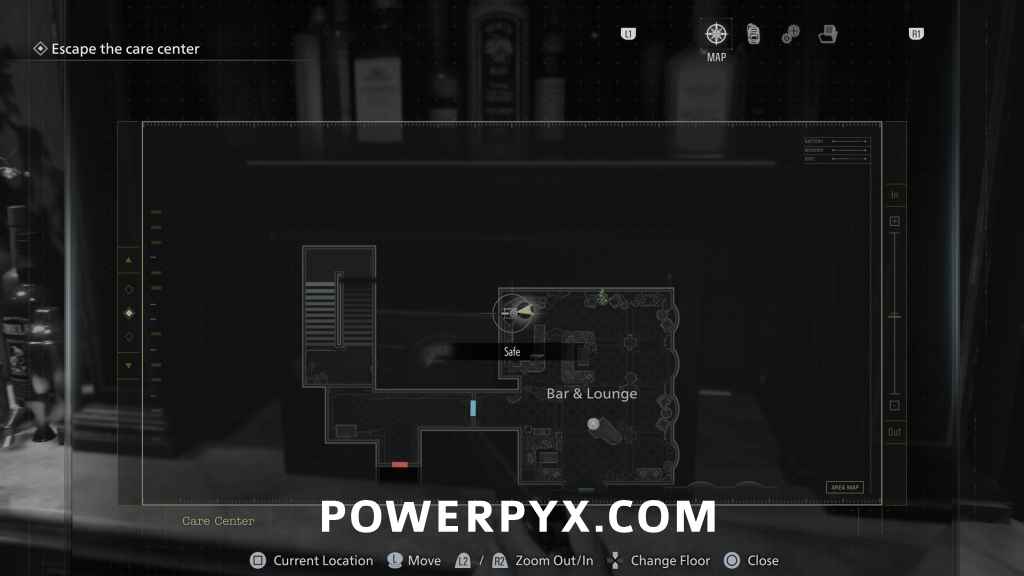
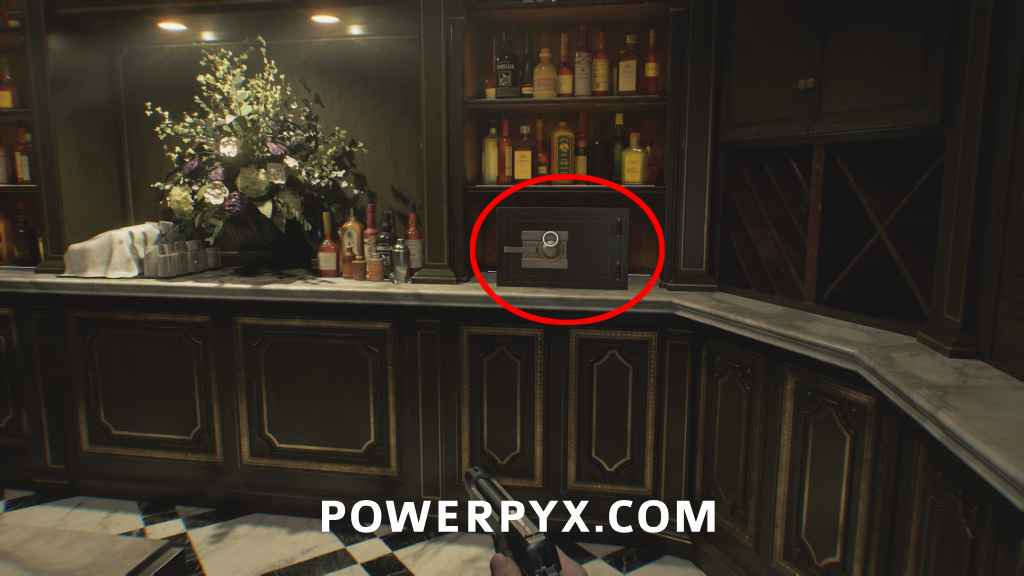
Safe #1 + 3x Antique Coin (#5-#7)
Bar & Lounge: On the bar counter behind the enemies.
Combination (Casual) = Left 10 – Right 80 – Left 30. Contains 3 Antique Coins.
Combination (Insanity) = Right 20 – Left 50 – Right 30.
(Normally you’d find the code later from “File #23 Bar & Lounge Safe Code”, but can already open it now)
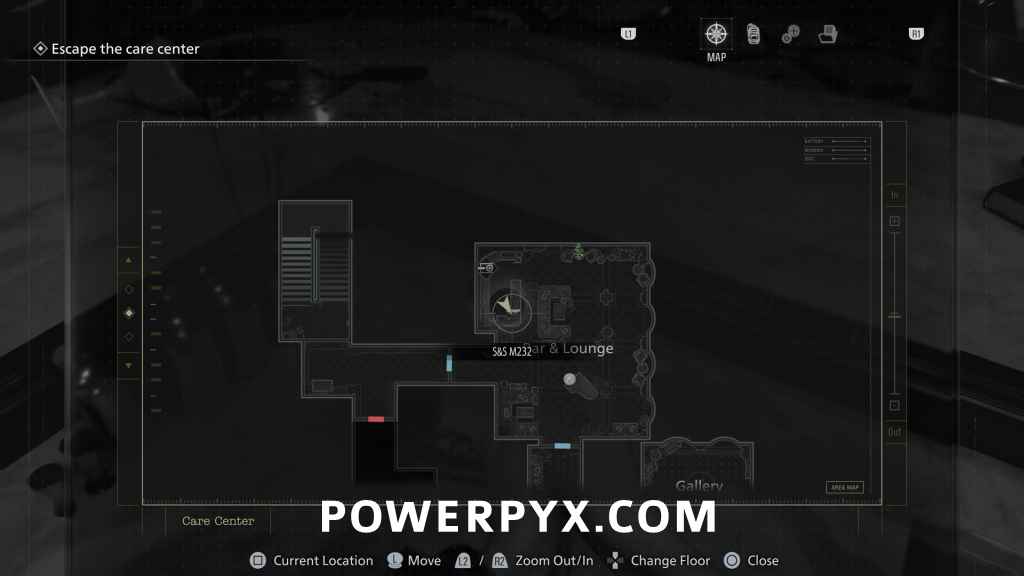
Weapon: S&S M232
Bar & Lounge: On the bar counter.
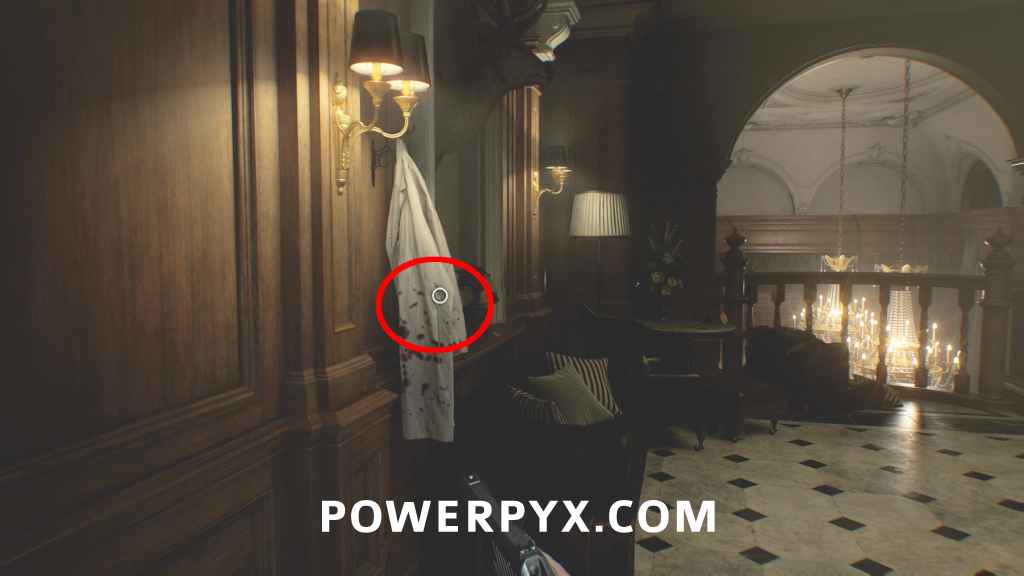
File #11 – Folded Note
Gallery: After going through Bar & Lounge, follow the corridor and turn left, inspect the white coat hanging on the wall.
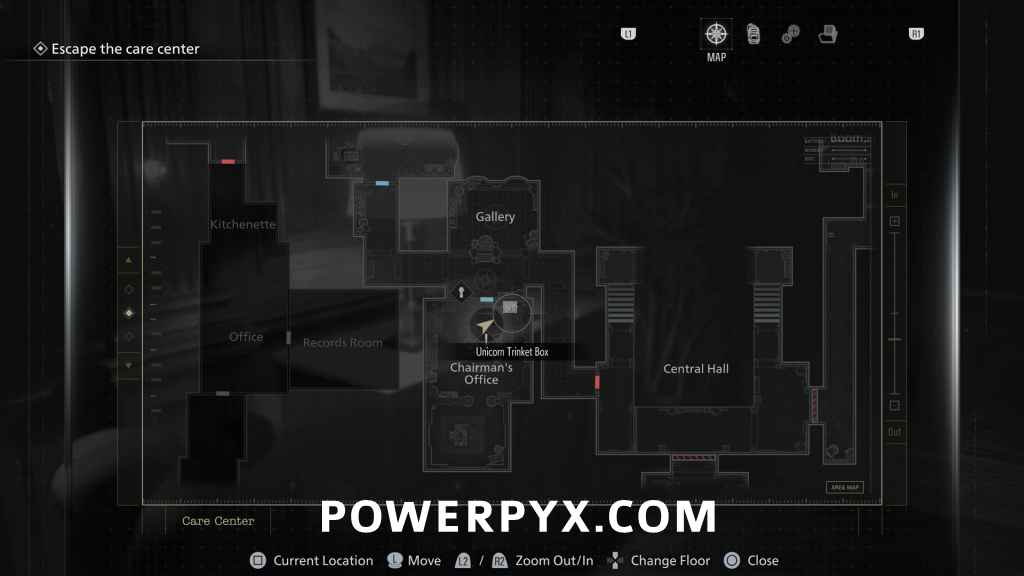
Red Jewel (Unicorn Trinket Box)
Chairman’s Office: In the left corner of Chairman’s Office (dark room).
(On Insanity difficulty this is slightly moved to the back of Chairman’s Office where a zombie is)
File #12 – Copy of an Email to a Manager
Chairman’s Office: Same room, on the cupboard.
File #13 – Note to a Chairman
Chairman’s Office: In the backroom of the Chairman’s Office where a zombie is, inside the trash bin.
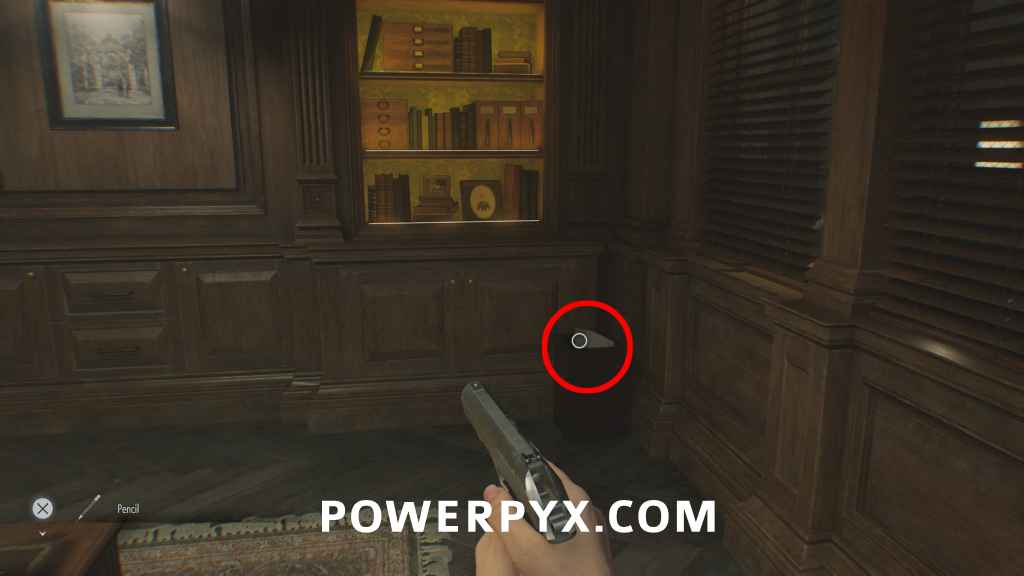
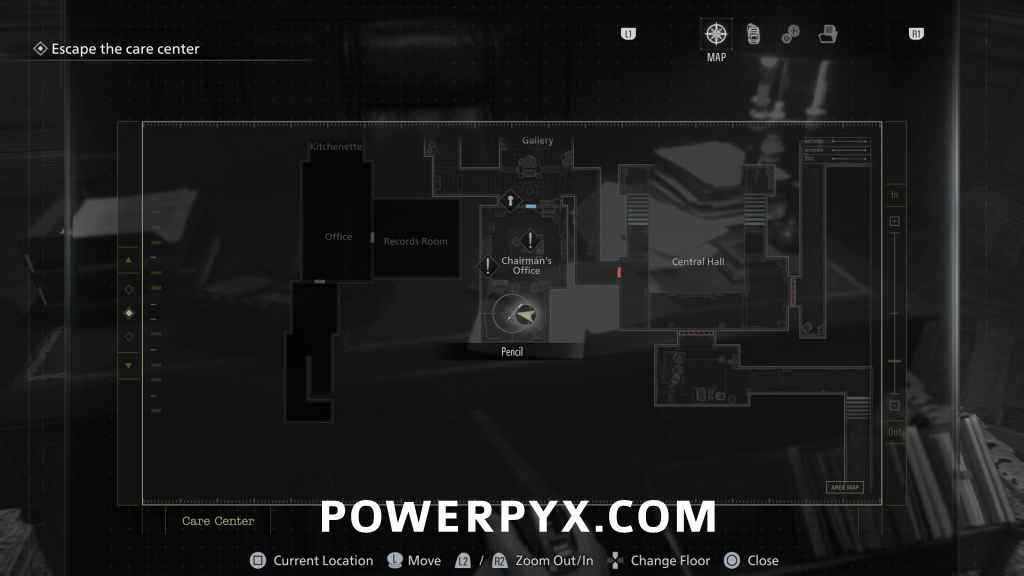
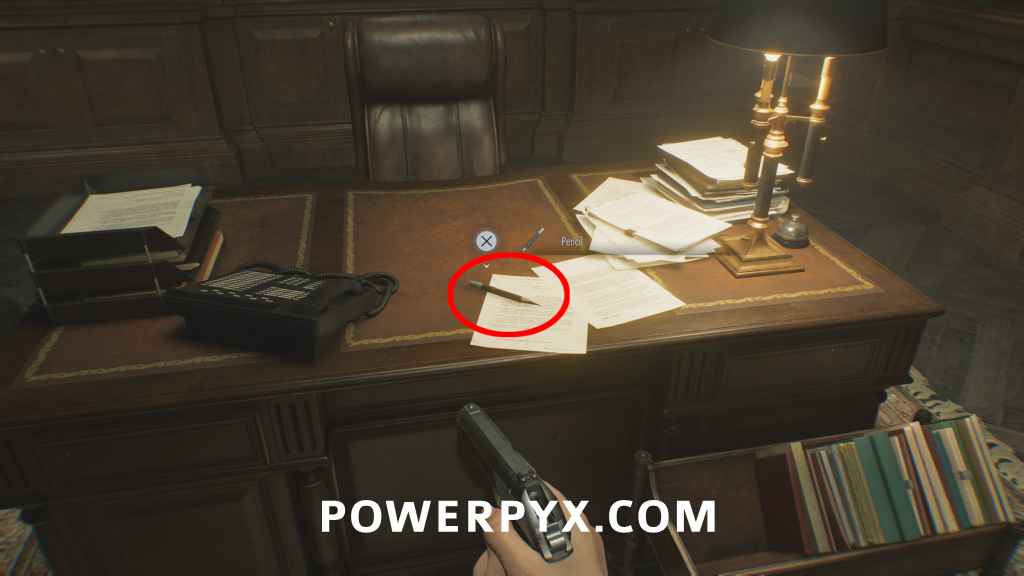
Key Item: Pencil
Chairman’s Office: Same room, on the table.
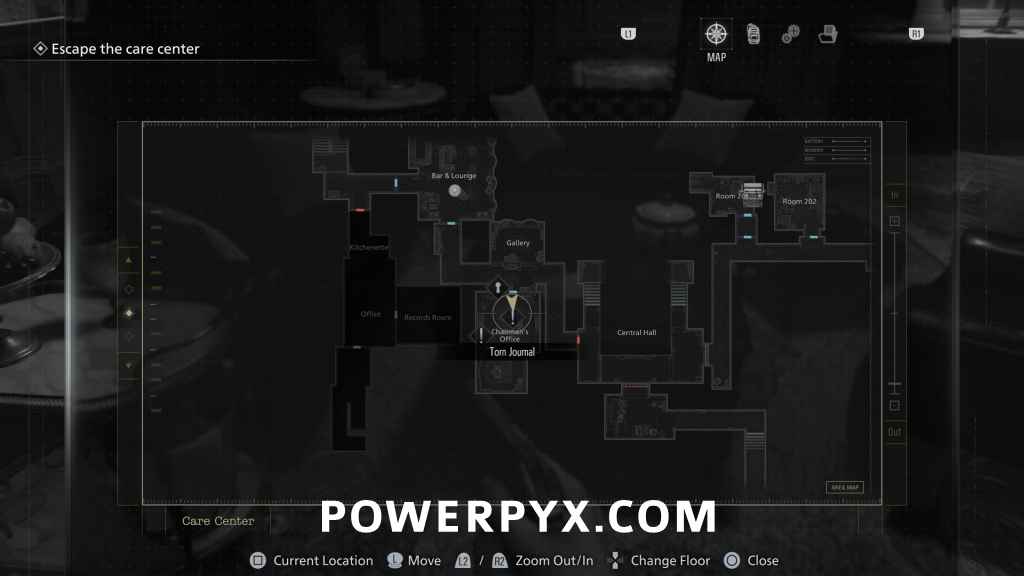
File #14 – Chairman’s Note
Chairman’s Office: You will receive it after using the Pencil to shade in the note in the Chairman’s Office.
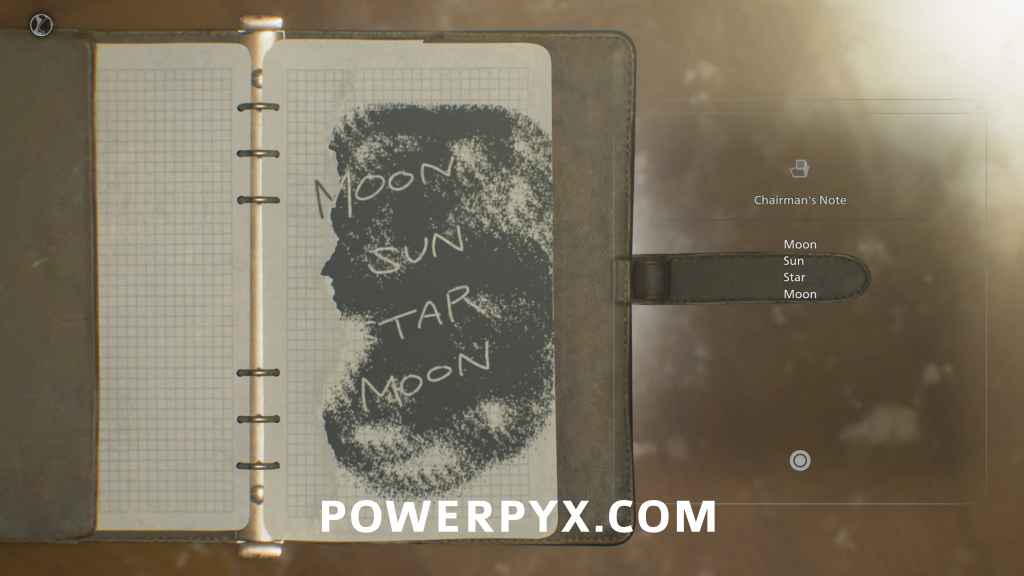
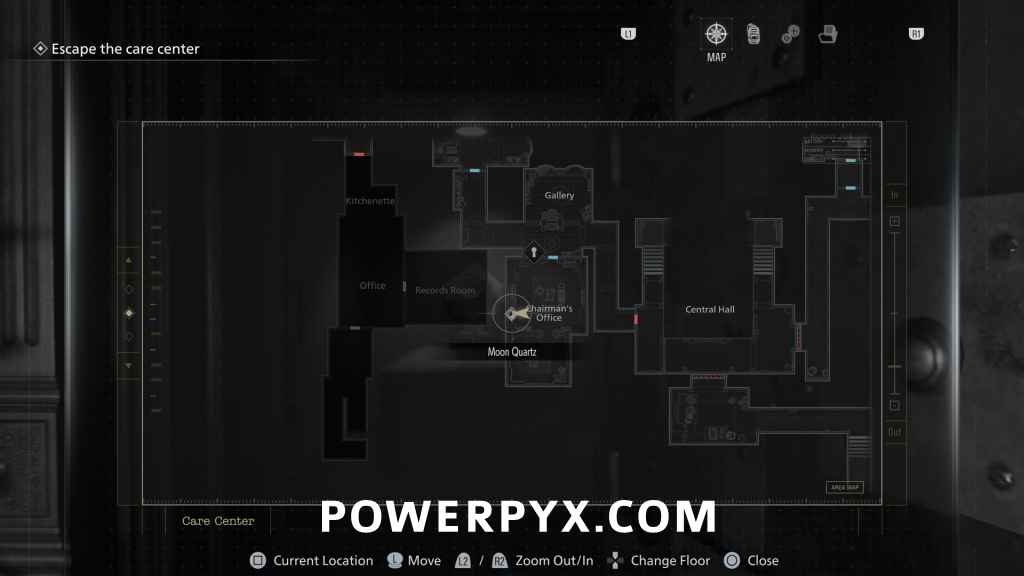
Key Item: Moon Quartz
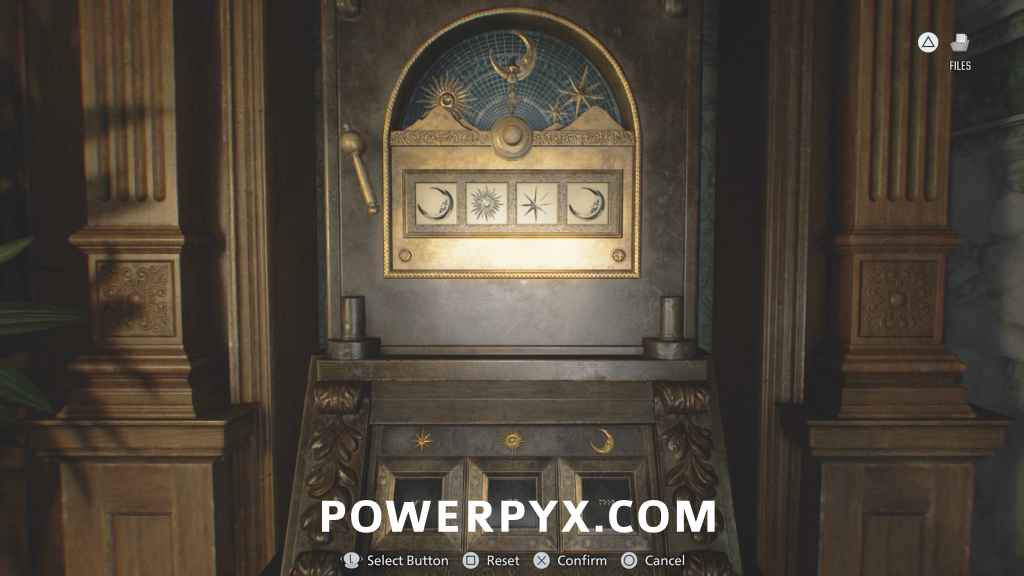
Chairman’s Office: In same room interact with the puzzle safe. To be used on the Quartz Door in Central Hall.
Solution = Moon – Sun – Star – Moon.
Antique Coin #8
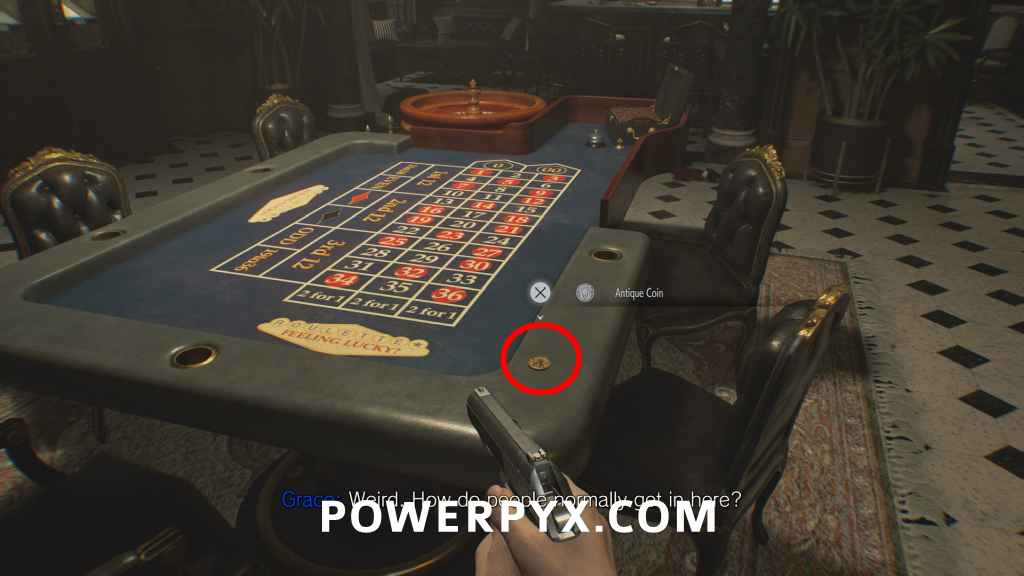
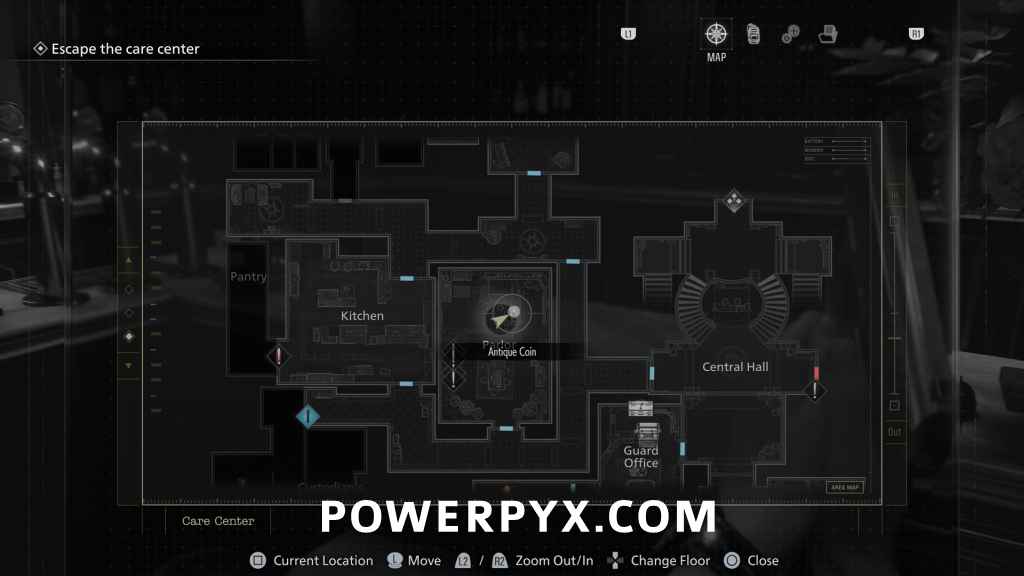
Parlor: Go back downstairs through the West Wing and insert the Red Jewel on the Parlor door. Then find this on the Roulette table.
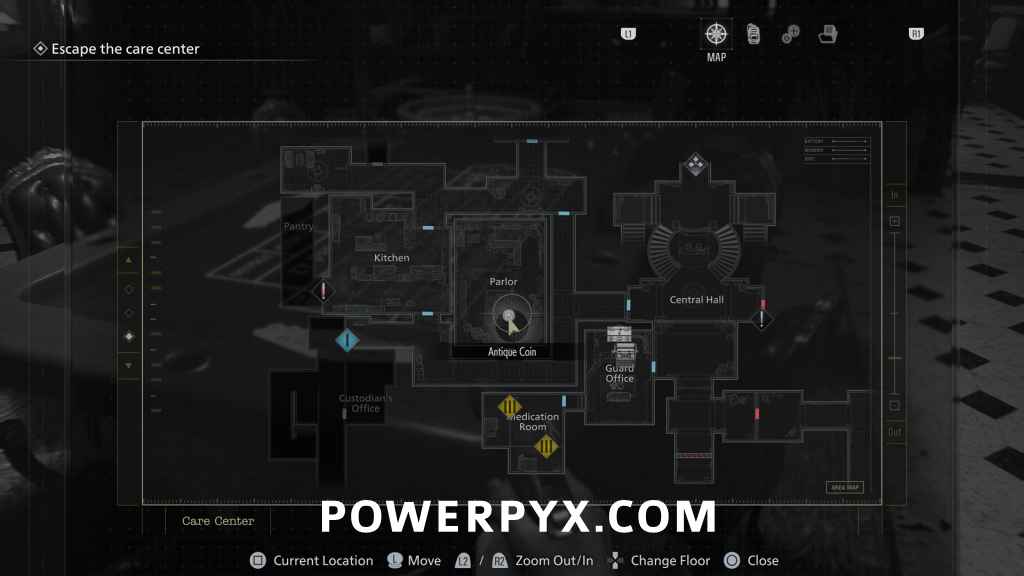
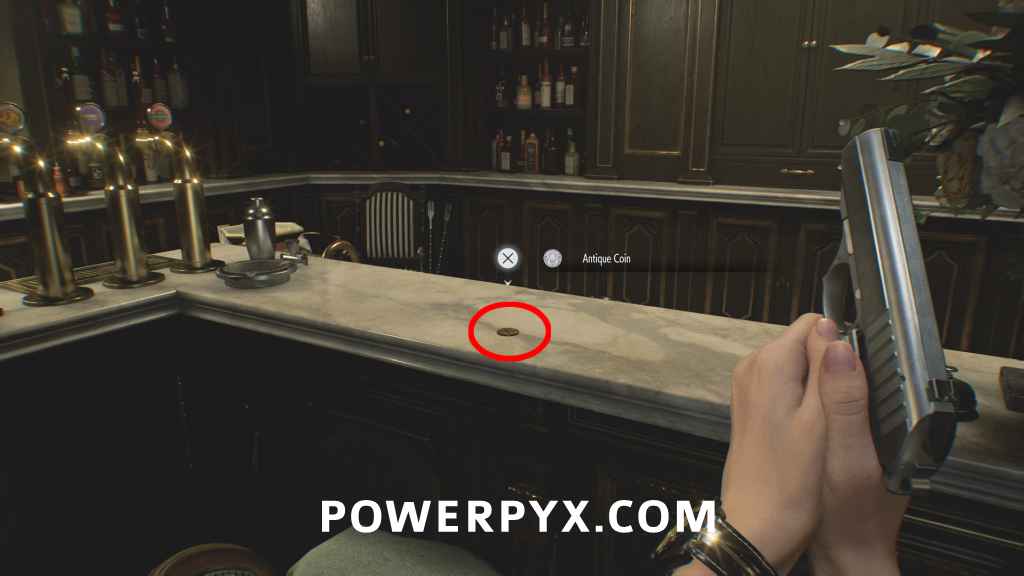
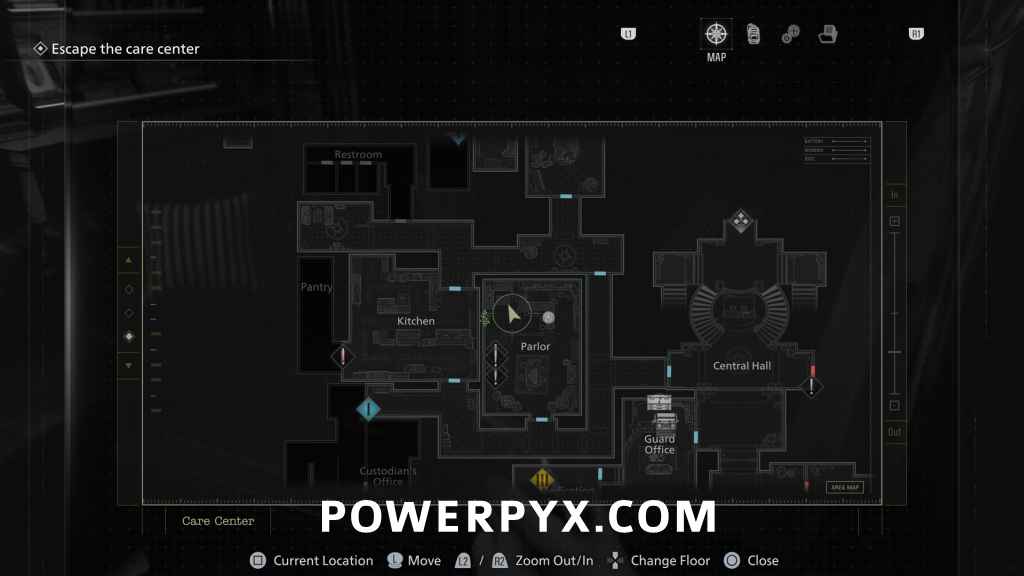
Antique Coin #9
Parlor: Same room, on the bar counter.
Key Item: East Wing Keycard
Parlor: Inspect the severed arm in the back left corner of the Parlor.
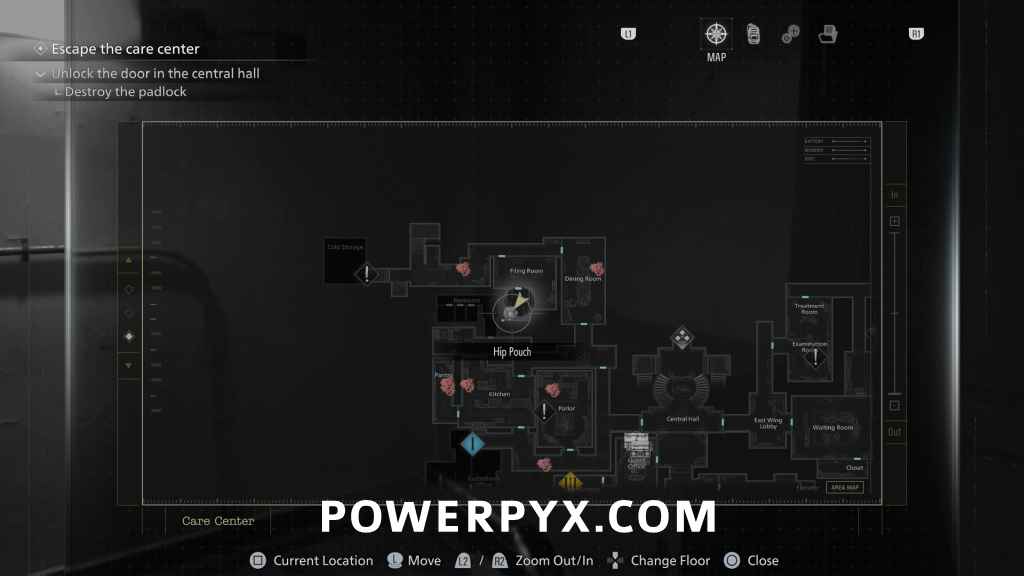
Upgrades (x4): Hip Pouch + Stabilizer + Steroids + Override Manual
Obtained from the 4 lockers in the Parlor which require Antique Coins to open. In total all 4 will cost 17 Antique Coins. At this point you should have 8-9, get whichever upgrade you want and come back later for the rest.
(On Insanity difficulty, these items are changed to Hip Pouch + 30x Handgun Ammo + RIP Knife + Override Manual)
Trophy: Order Up! + Key Item: Pantry Key
Defeat the Chef in the Kitchen area, he’s the big guy who walks around with a cleaver. On casual difficulty doing 1 Headshot with Requiem and 4-5 headshots with any other pistol will suffice (on higher difficulties it requires more damage, if you don’t have enough ammo remember to come back for him when you got enough).
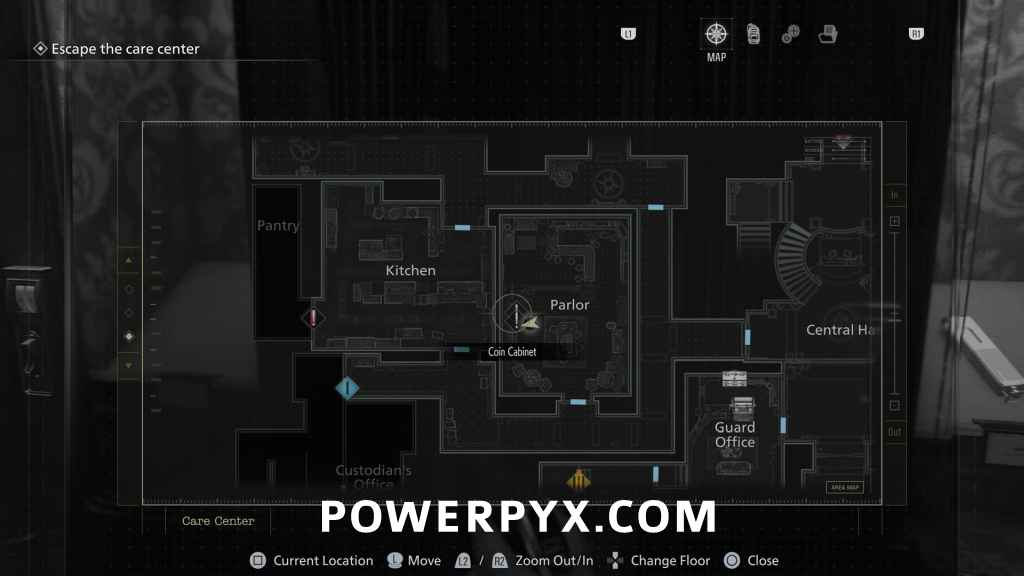
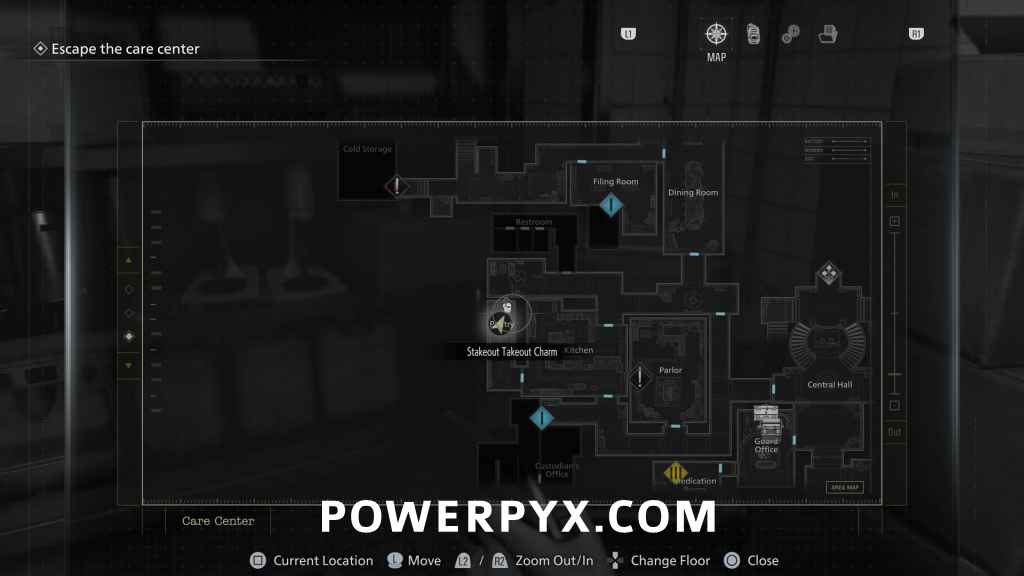
Charm: Stakeout Takeout Charm
Pantry: Use the Pantry Key on the door in the kitchen to reach the Pantry. The Charm is in the back of this room (also a lockbox here with ammo). If you didn’t have enough ammo to defeat the Chef remember to grab this later.
Mr. Raccoon #2
East Wing Lobby: In Central Hall use the East Wing Keycard on the door, this will be in front of you on the reception desk.
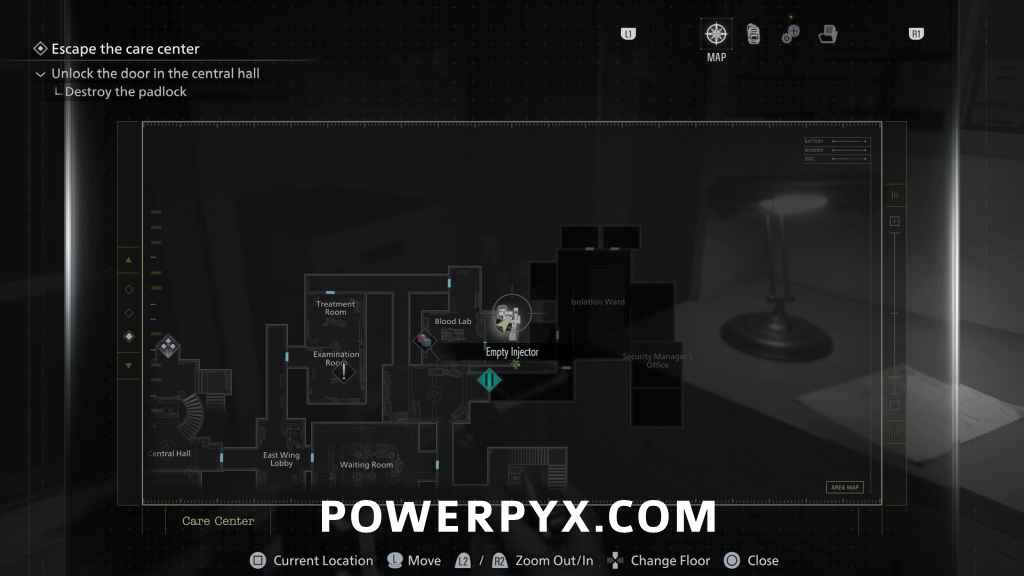
Trophy: Fatal Dose
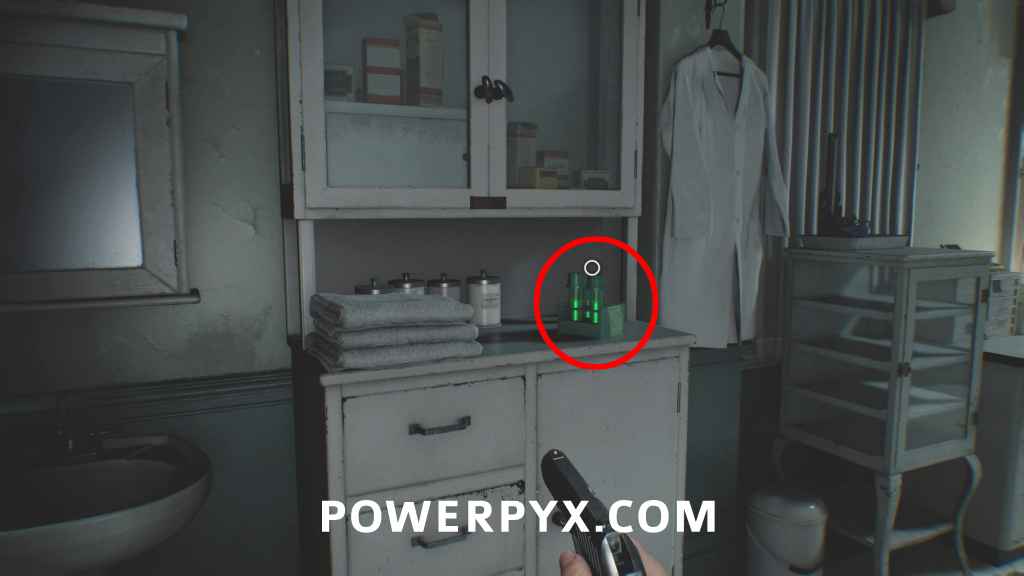
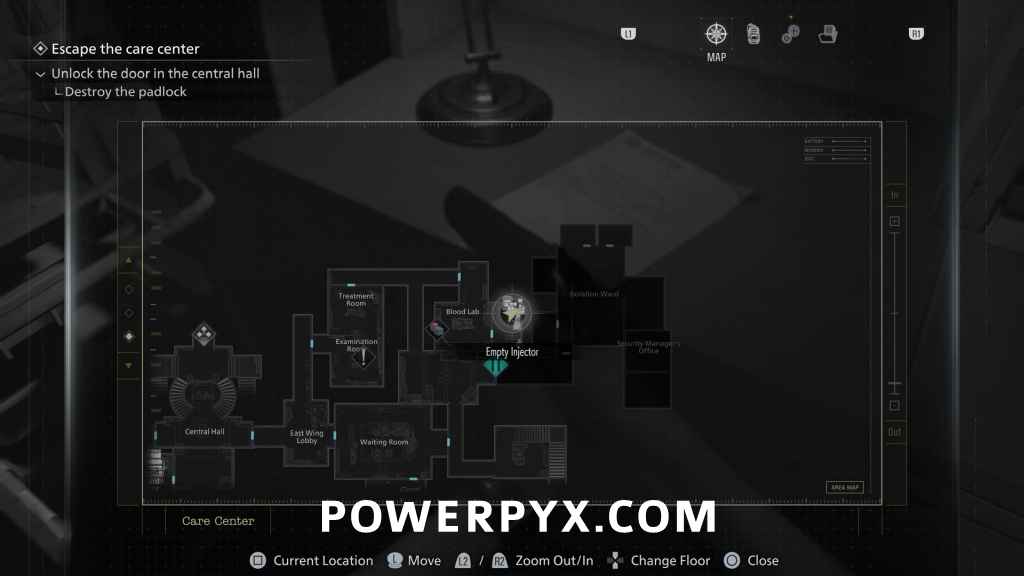
Examination Room: In Examination Room pick up the “Hemolytic Injector” from the white desk. Sneak up to the next zombies while crouched and press  /
/  from behind while remaining in stealth. This will use the Injector to instakill the zombie and unlocks the trophy. There’s a zombie with his back turned to you directly to the left of where you find the Injector.
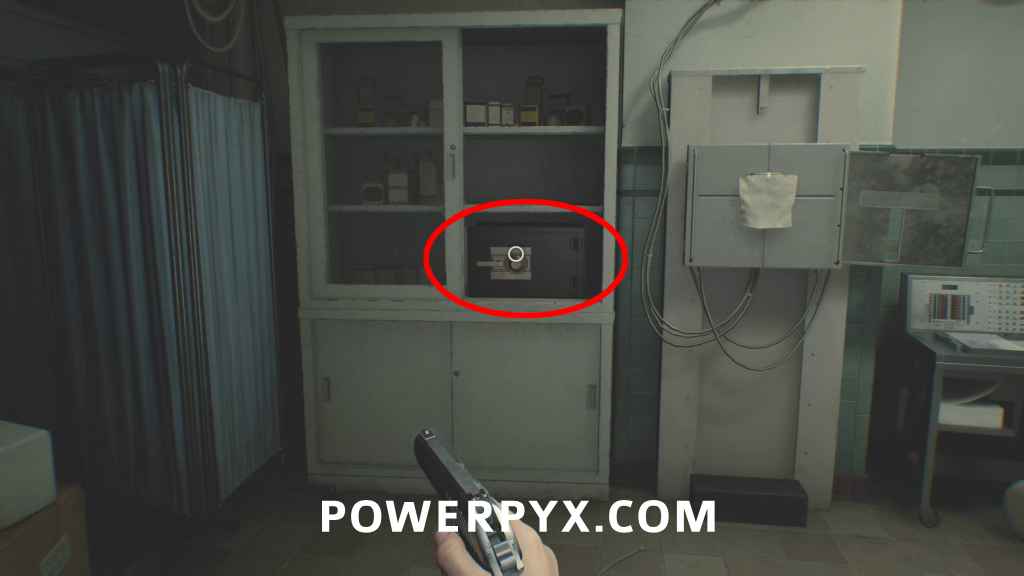
Safe #2 + 3x Antique Coin (#10-#12)
Examination Room: In the corner of the Exam room inside the cabinet you find this safe.
Combination (Casual) = Right 30 – Left 10 – Right 50. Contains 3 Antique Coins.
Combination (Insanity) = Left 50 – Right 30 – Left 90.
(Normally you’d find the code later from “File #26: Examination Room Safe Code”, but can already open it now)
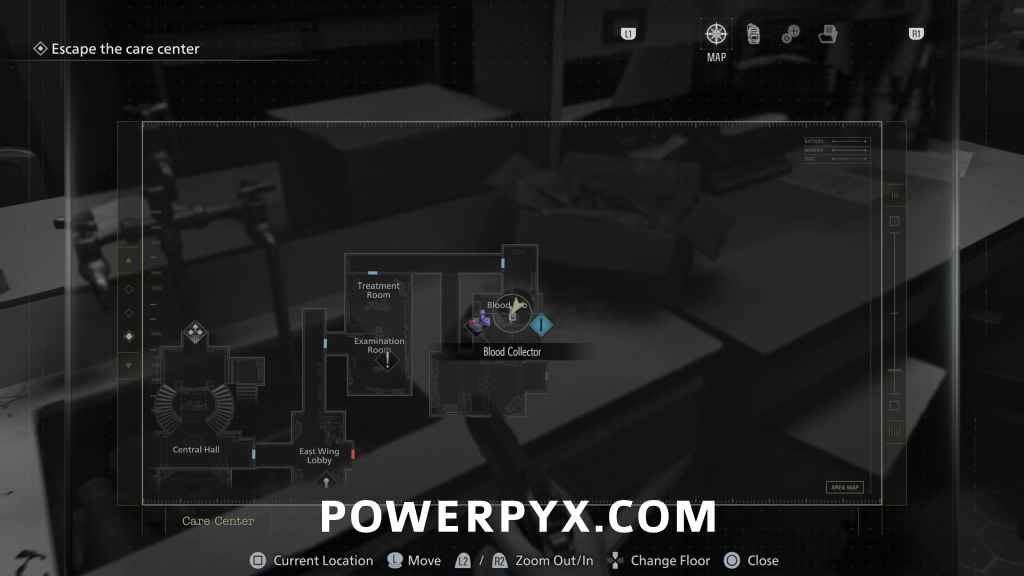
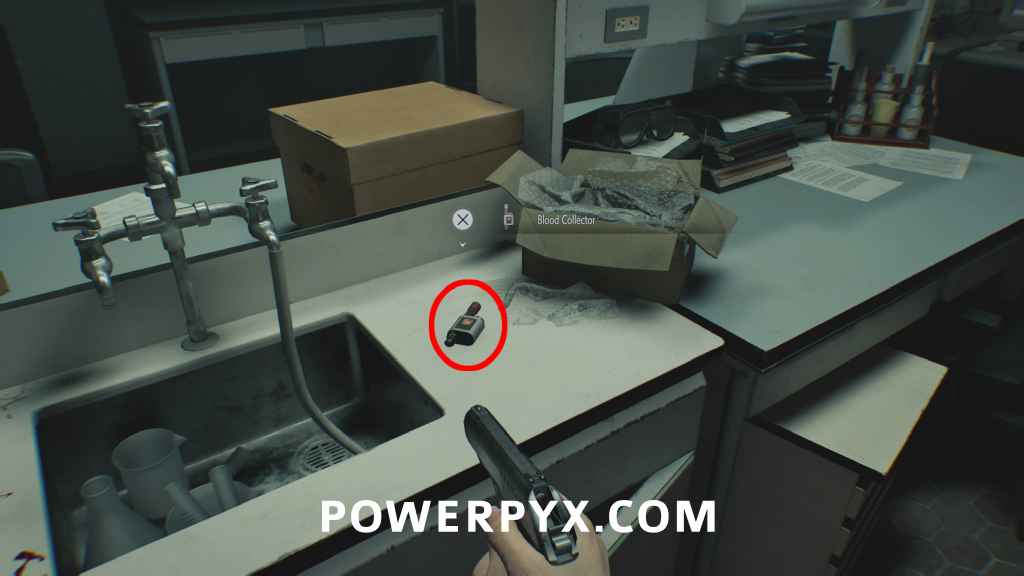
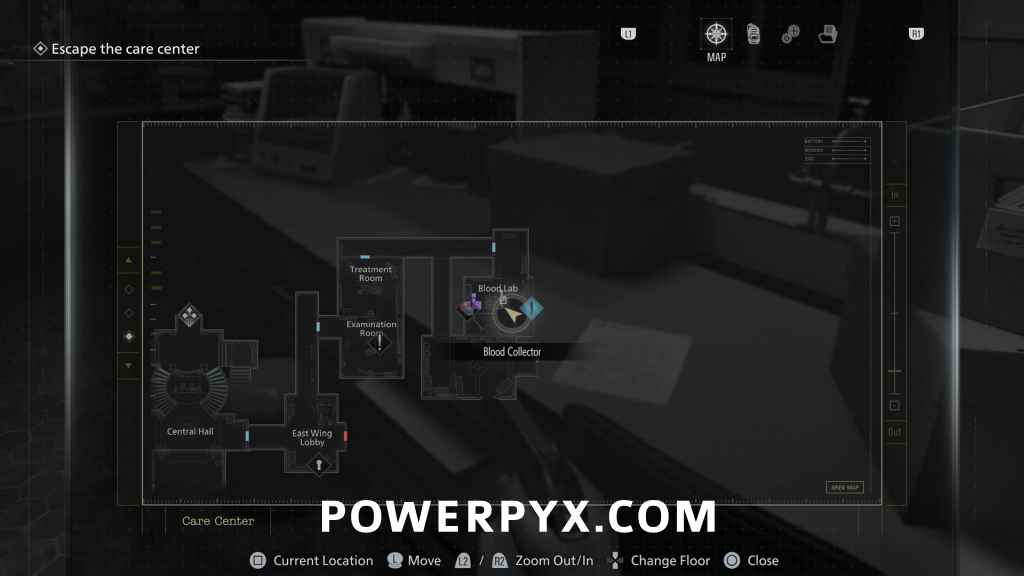
Key Item: Blood Collector
Blood Lab: After leaving the Treatment Room head straight to the end of the corridor to enter the Blood Lab. This sits on the table.
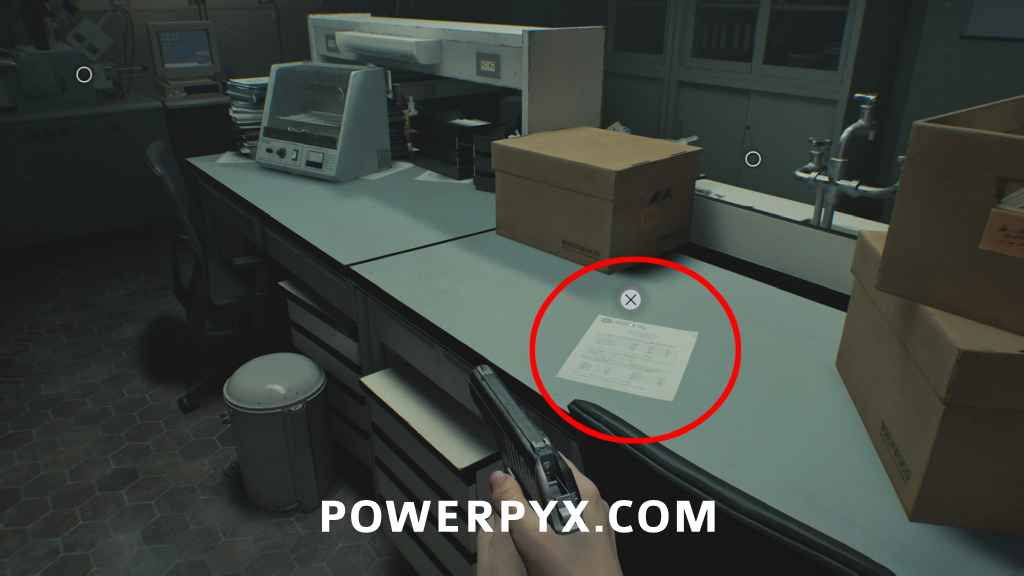
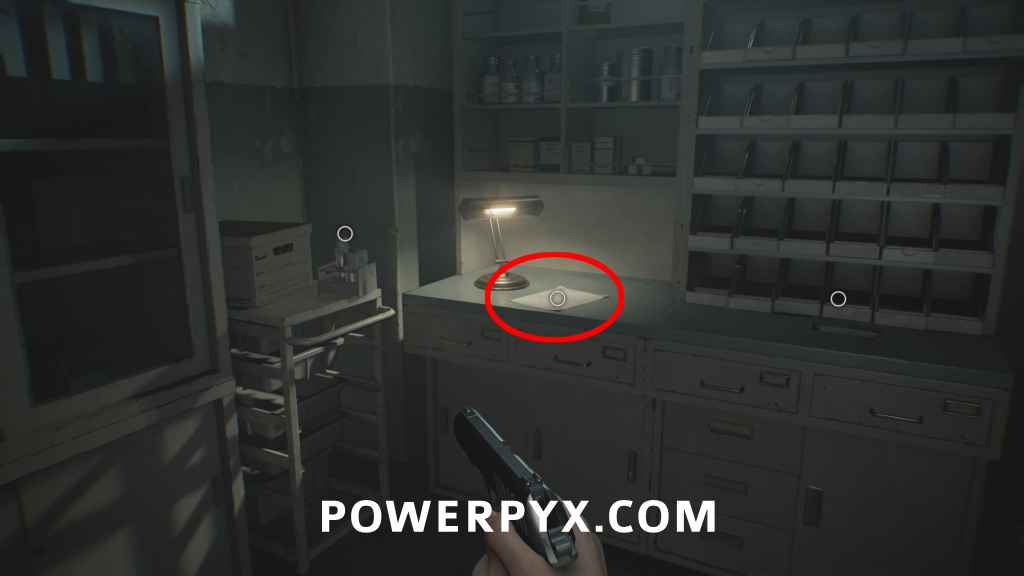
File #15 – Blood Compound Synthesis
Blood Lab: Same room, on the other side of the table.
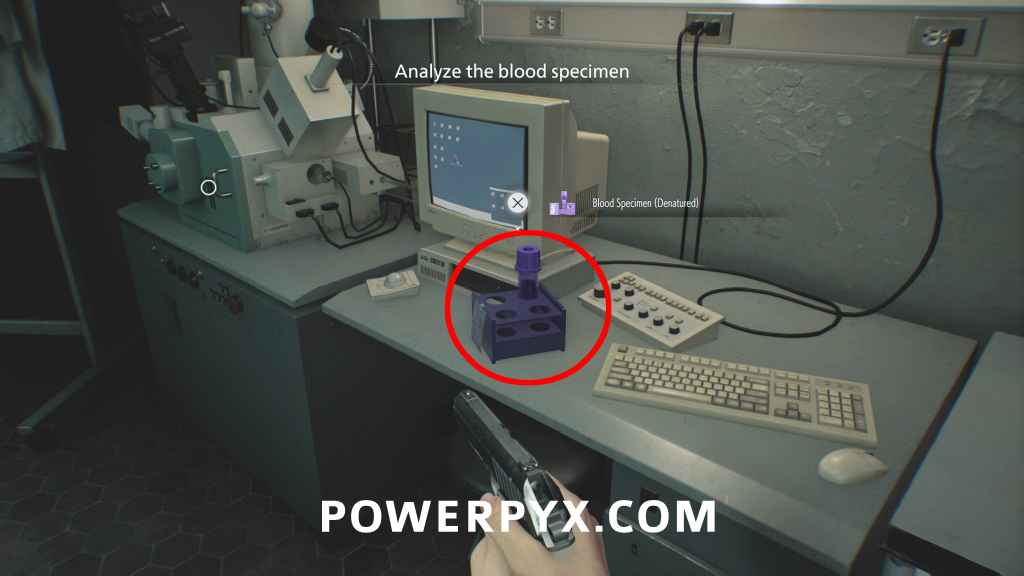
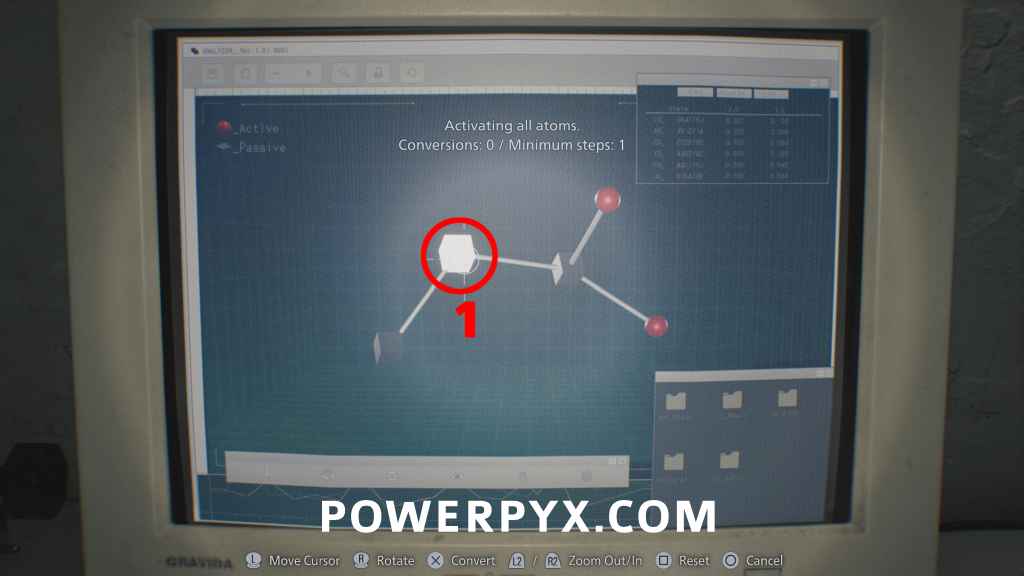
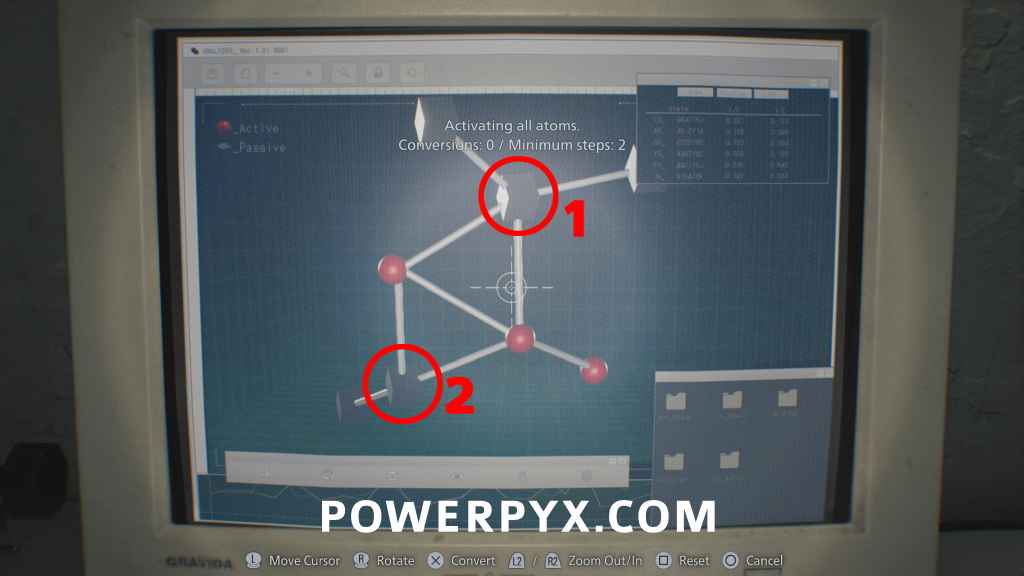
Blood Specimen (Denatured) – Purple
Blood Lab: Interact with the purple blood sample on the desk. Use it on the Analyzer to the immediate left. Turn all atoms red. Unlocks crafting: Handgun ammo + Hemolytic Injector.

Trophies: Science! + The Power of Blood
After using the Analyzer to unlock crafting recipes you unlock “Science!”. Then interact with the blood bucket on the floor (or use it on defeated zombies), press Touchpad to go to the Crafting Menu and craft Handgun ammo to unlock “The Power of Blood” (if you need Scrap, one is found in the locker in the same room).
Trophy: Internal Dispute (make a zombie attack another zombie in the hospital wards)
Before going any further, make sure you have the empty bottle in your inventory (was found in Dining Room), and that you made a manual save before going any further. This trophy is tricky and can take several attempts, if you fail will need to reload save. From Blood Lab, go south until you reach a red-lit corridor. 3 zombies will come from the corridor, kill them quickly, then enter the Waiting Room through the door on the right. You have to make the blind zombie (white gown) attack the maid zombie (black dress). Destroy the first vase on the right and hide in the corner, this will lure both zombies to the destroyed vase. When they both stand next to each other, throw the empty bottle at the maid, then the blind zombie will attack her which unlocks the trophy. Don’t have either of them hear your footsteps or they will chase you instead. Also don’t let the maid zombie leave the room. If you kill either zombie before getting this trophy, you’ll miss out on it and need to reload save.
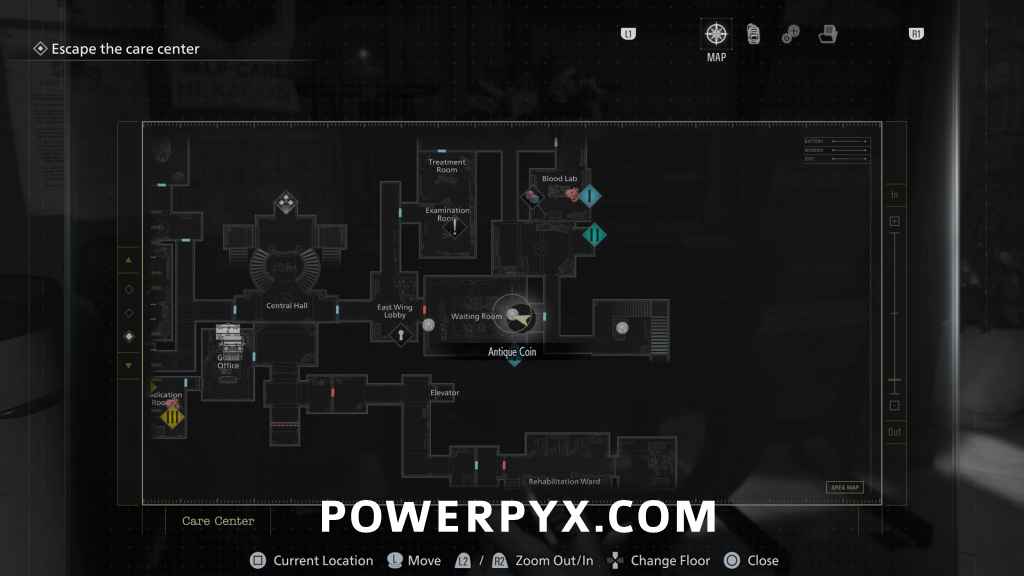
Antique Coin #13
Waiting Room: When you enter the Waiting Room, the coin is on the table in front of you.
File #16 – Safe Replacements
Waiting Room: Same room, next to open safe behind the counter.

Antique Coin x2 (#14-#15)
Waiting Room: Inside the open safe, directly next to the file.

Mr. Raccoon #3
At the end of the corridor east from Waiting Room on the map, before going upstairs.
Antique Coin #16
Directly next to the Mr. Raccoon on the small table.
Map: East Wing Map
From the Mr. Raccoon go upstairs to find it on the wall.
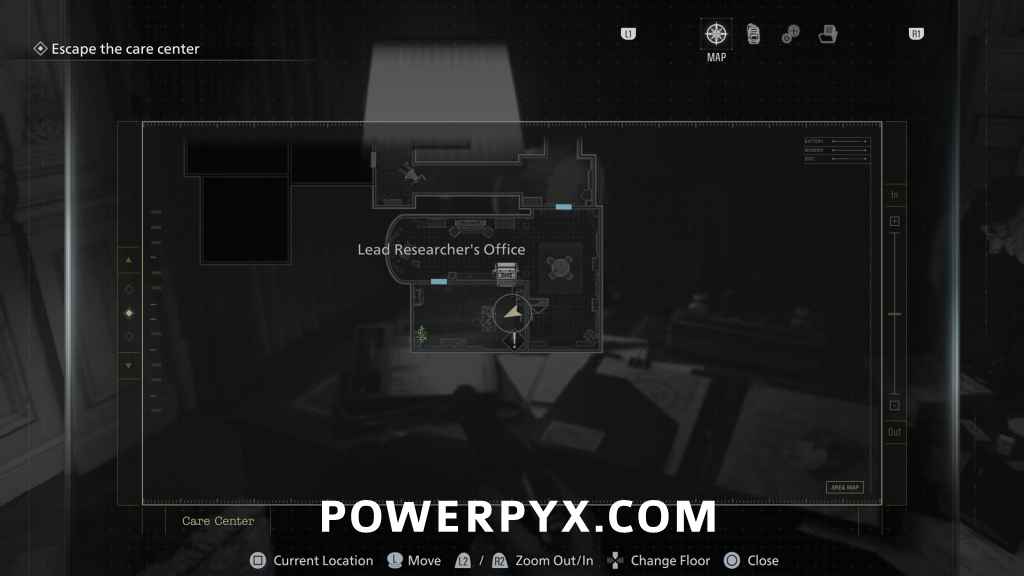
File #17 – Lead Researcher’s Picture 2
Lead Researcher’s Office: In the safe room upstairs, in the back room on the cupboard.
File #18 – Lead Researcher’s Picture 1
Lead Researcher’s Office: same room, on desk.

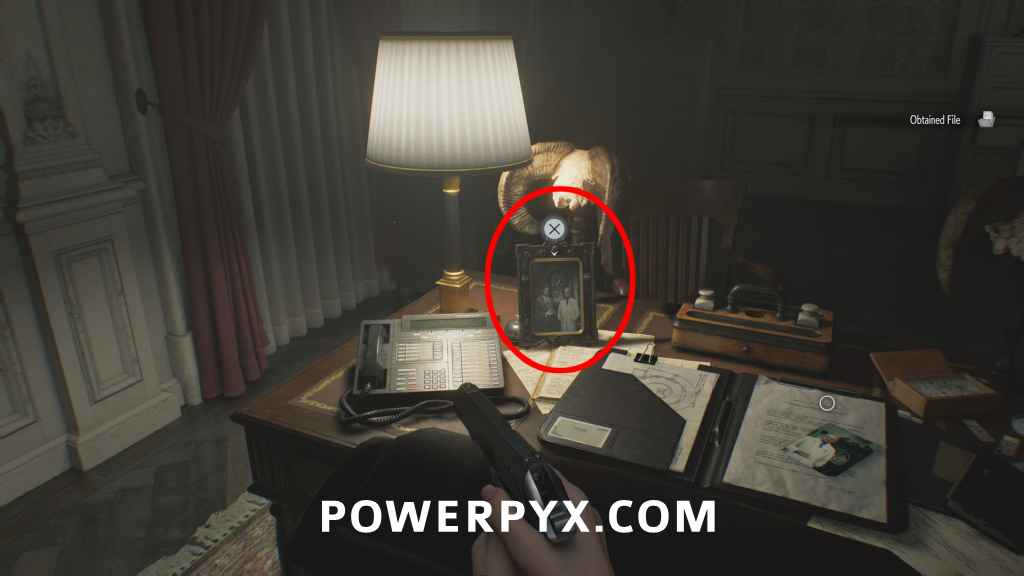
File #19 – Lead Researcher’s Picture 3
Lead Researcher’s Office: same room, on desk (framed picture).
File #20 – Lead Researcher’s Message
Lead Researcher’s Office: Same room, other cupboard.
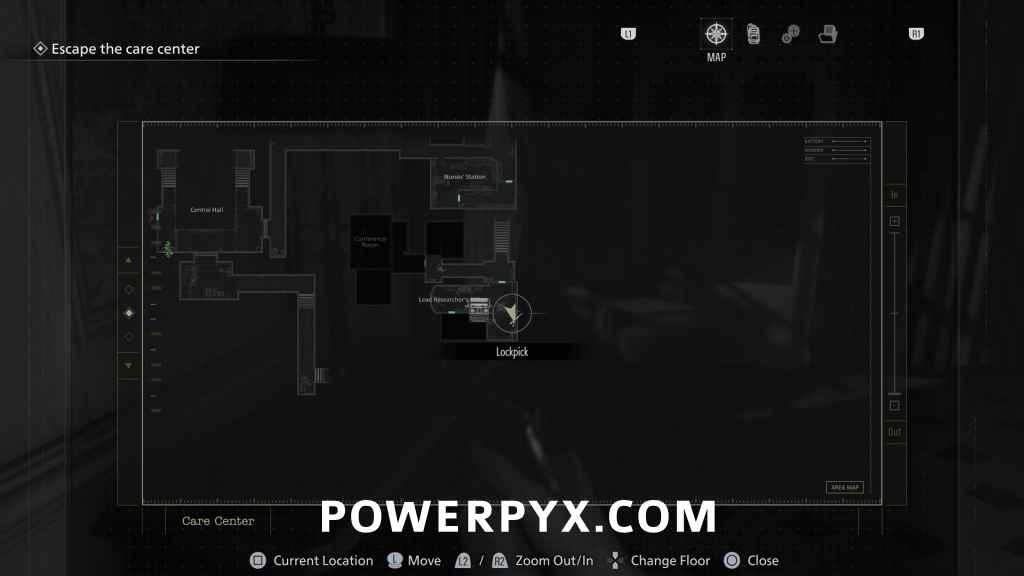
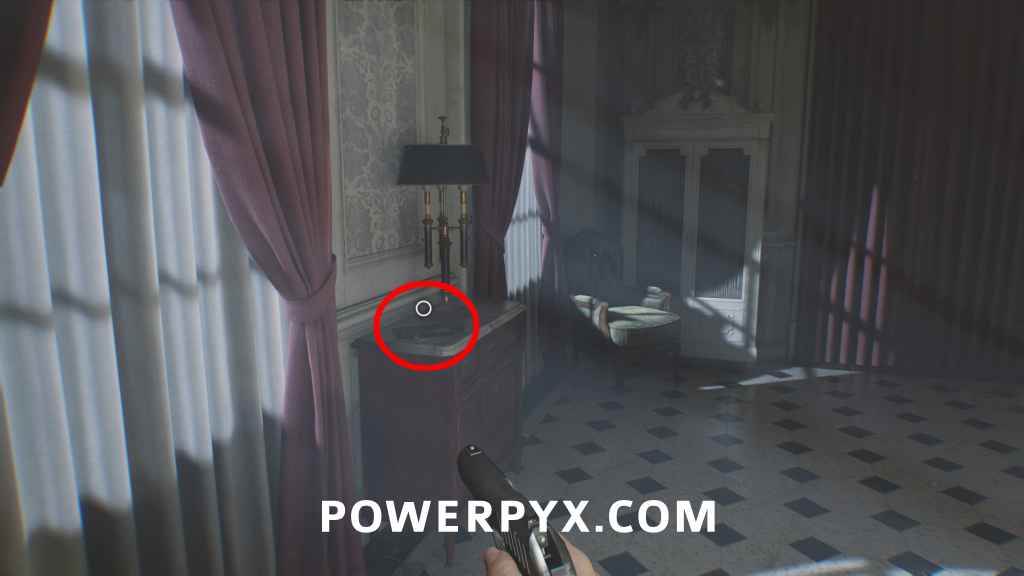
Trophy: Like Mother, Like Daugther
Pick up the Lockpick in Lead Researcher’s Office, to the left of the typewriter. Then use it on any locked drawer, for example in East Wing Lobby. This will also give you a Rare Metal which you can use to craft x2 Requiem ammo to kill the Chunk for the next trophy, so it’s good to grab this now.
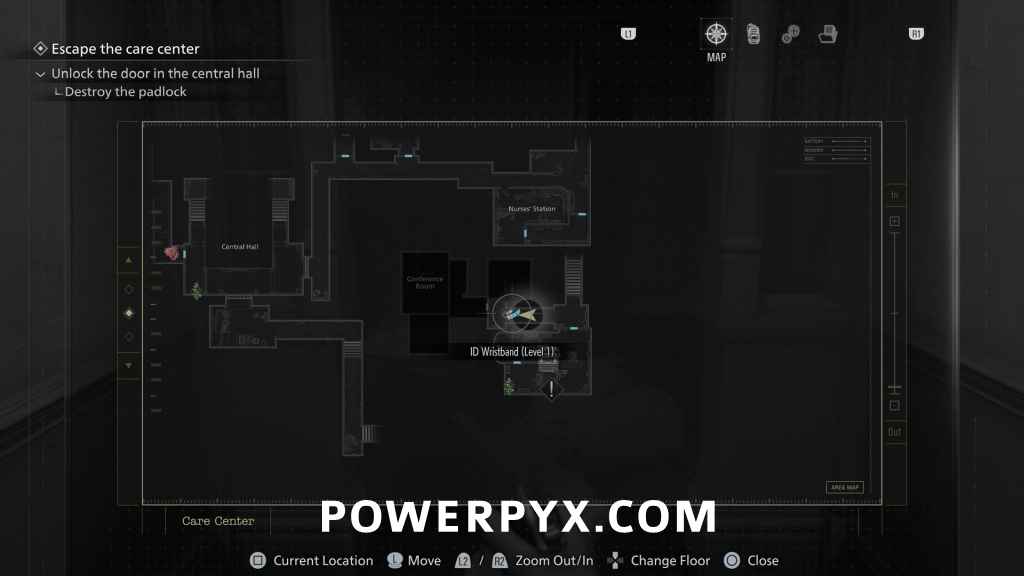
Key Item: ID Wristband (Level 1)
In corridor next to the Lead Researcher’s Office. Can be used on the blue level 1 doors.
Trophy: Grace and Goliath + Charm: Eye Spy Charm
Kill the Chunk that appears after picking up the wristband, drops the charm on death. On casual difficulty it takes 1 Headshot with Requiem + 15 Headshots with S&S M232, or alternatively 3 Requiem Headshots. Can also use Injectors on it. If you looted everything carefully you should be able to craft enough ammo already. If you don’t have enough ammo, come back for it after getting more Requiem ammo. (There will be a reminder in the guide at the last opportunity before leaving the area).
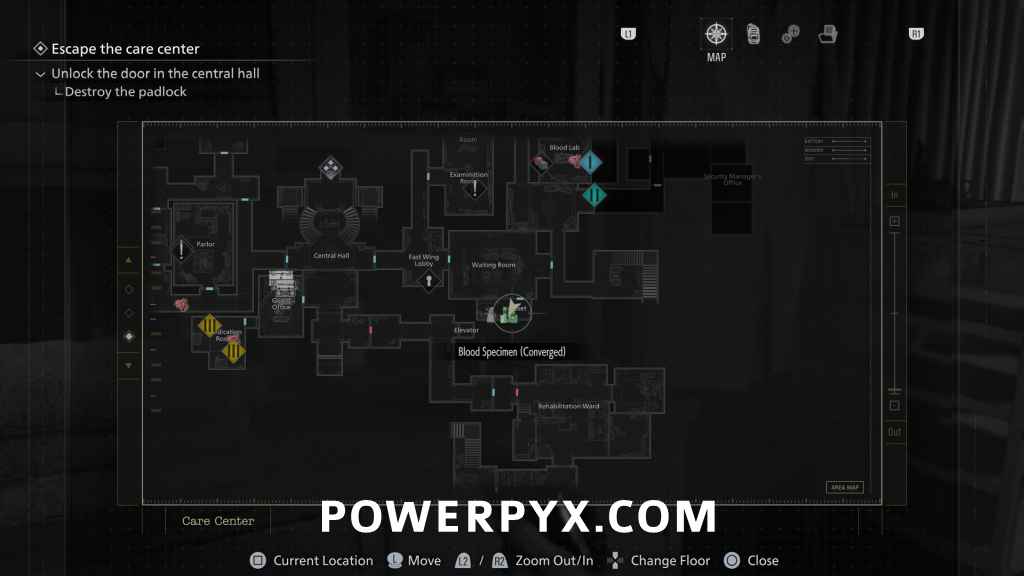
Blood Specimen (Converged) – Green
Closet: After getting the ID Wristband, go downstairs and enter the level 1 door in Waiting Room to the Closet to find this. Remember to backtrack to Blood Lab and use it on the Analyzer. Unlocks Crafting Recipes: Med Injector, 12.7x55mm Ammo.
File #21 – Victor’s Journal Entry
Backtrack to Blood Lab, use the Level 1 door there to find this on a table.
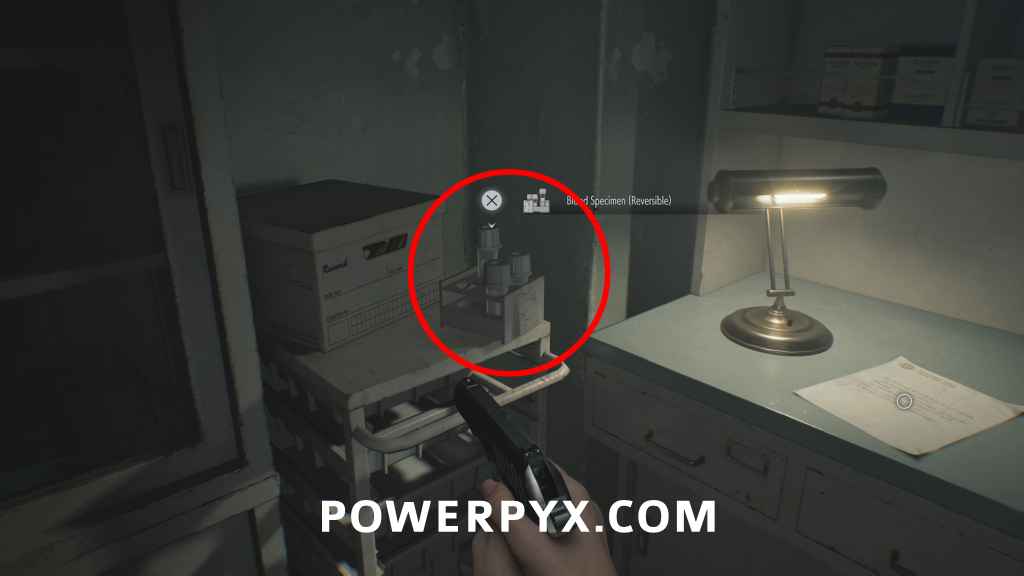
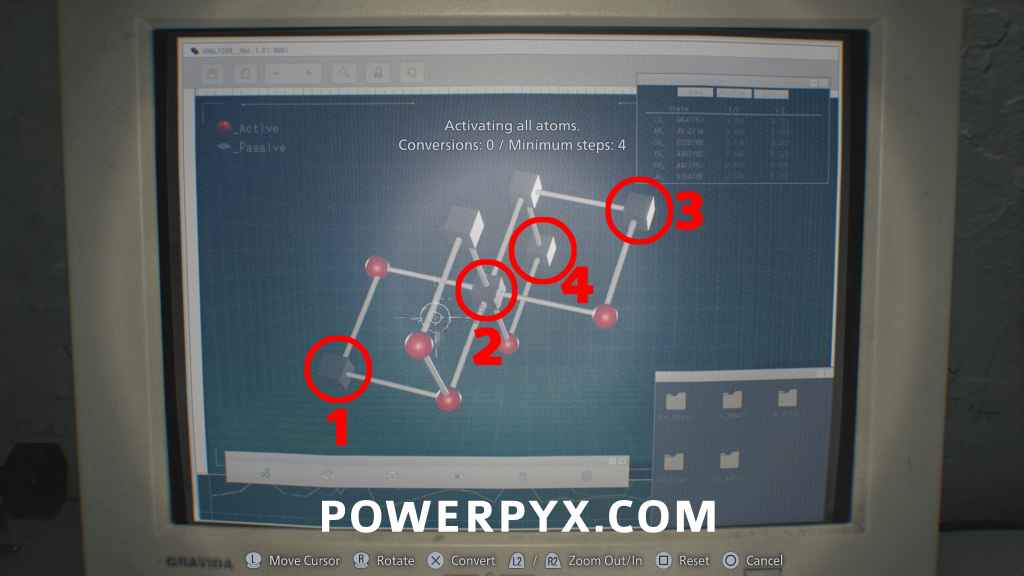
Blood Specimen (Reversible) – White
Same room, pick up the white blood sample. Use it on the Analyzer. Unlocks Crafting Recipes: Steroids, Stabilizer.
Upgrade: Hip Pouch
Filing Room: Backtrack to the Filing Room in West Wing to find it behind the Lvl. 1 door.
File #22 – Construction Notice
In West Wing, in the corridor south from Kitchen, open the gate with Lvl. 1 lock and in the next corridor you will find it on a whiteboard to your right. Next to Custodian’s Office on the map.
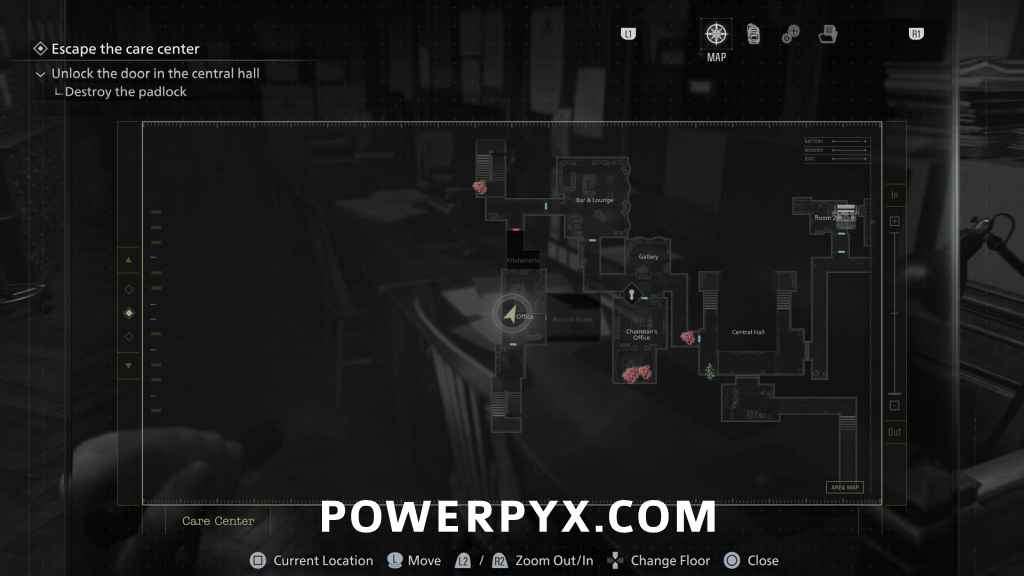
Key Item: Wrench
Custodian’s Office: In the safe room next to the typewriter.
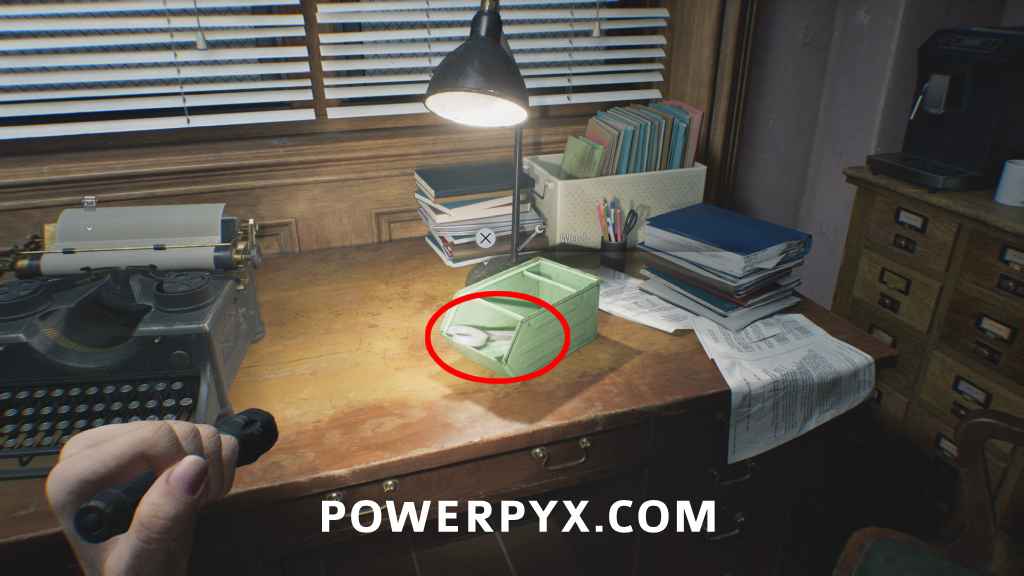
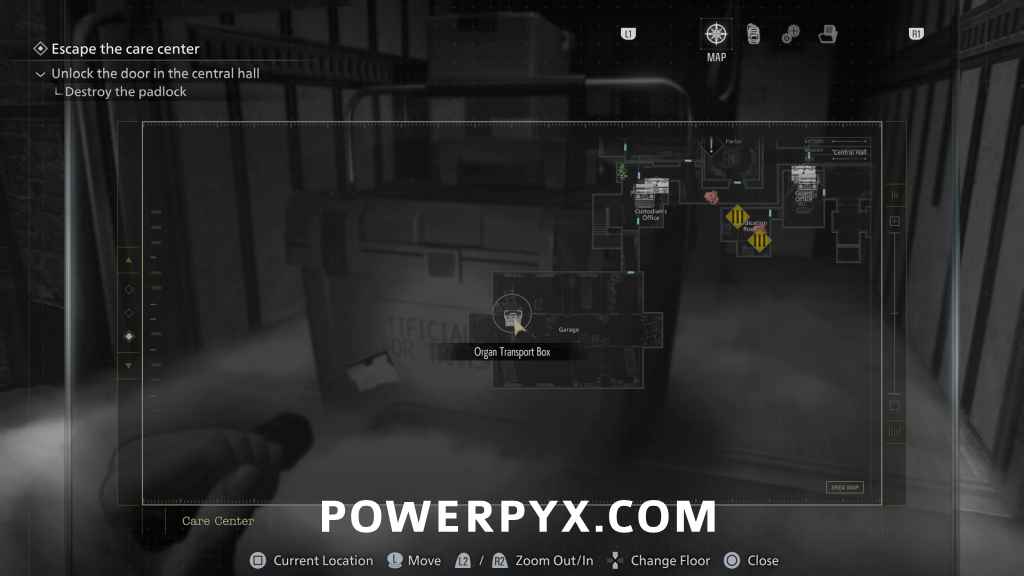
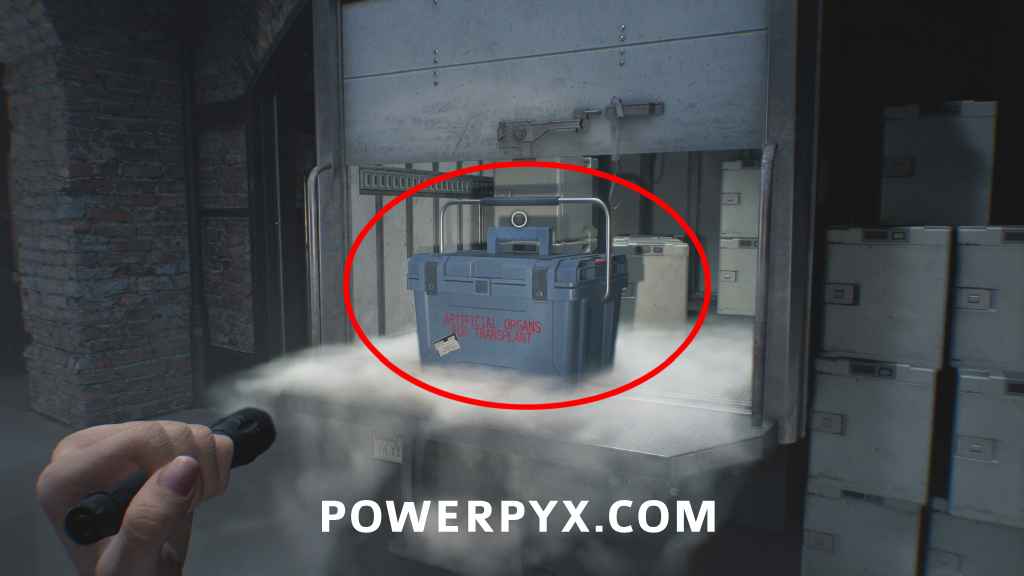
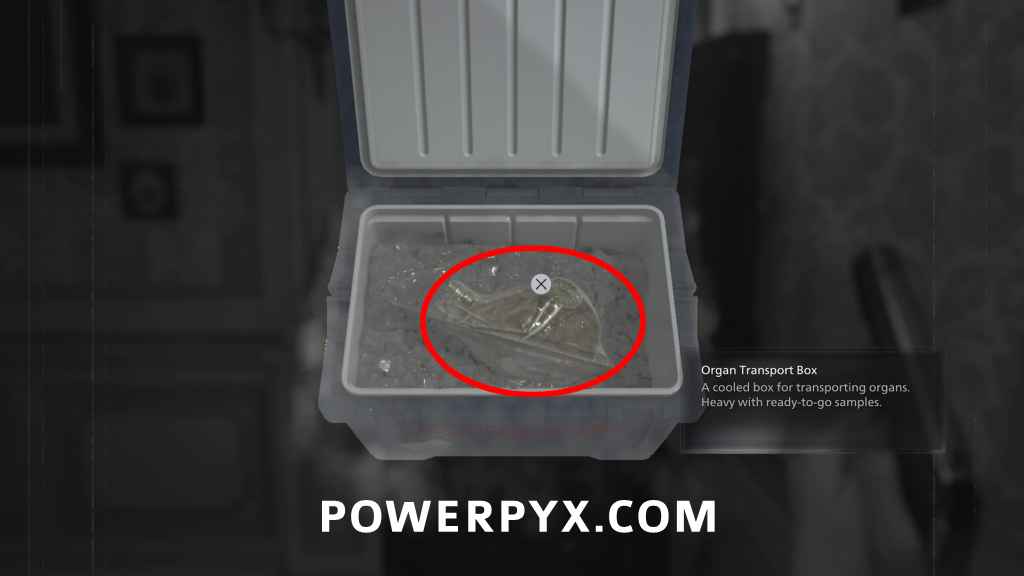
Key Item: Organ Transport Box
Garage: At the end of the garage on the back of a truck.
File #23 – Bar & Lounge Safe Code
Office: After leaving the garage go upstairs to reach the Office. This is on the first desk. Combination = Left 10 – Right 80 Left – 30. (Already opened earlier, see Safe #1)
File #24 – Background Check
Office: Same room, on desk in back right corner.
File #25 – Disposal Team Report
Records Room: Enter the room on the right side of the Office to find this in a cardboard box at the end of the middle row of shelves. (Note: you will also hear a Mr. Raccoon in the closet but this can’t be opened yet and requires backtracking later)

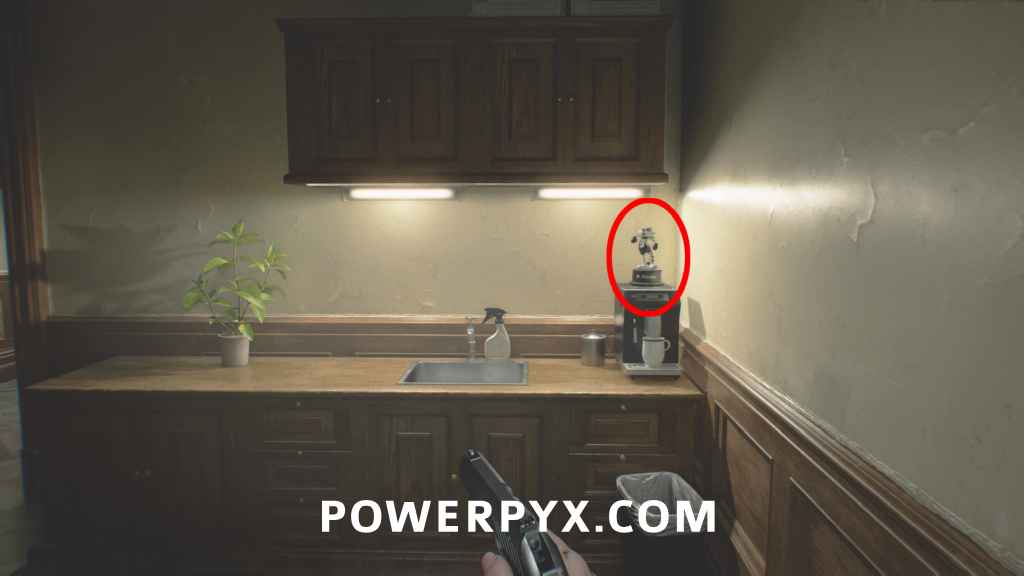
Mr. Raccoon #4
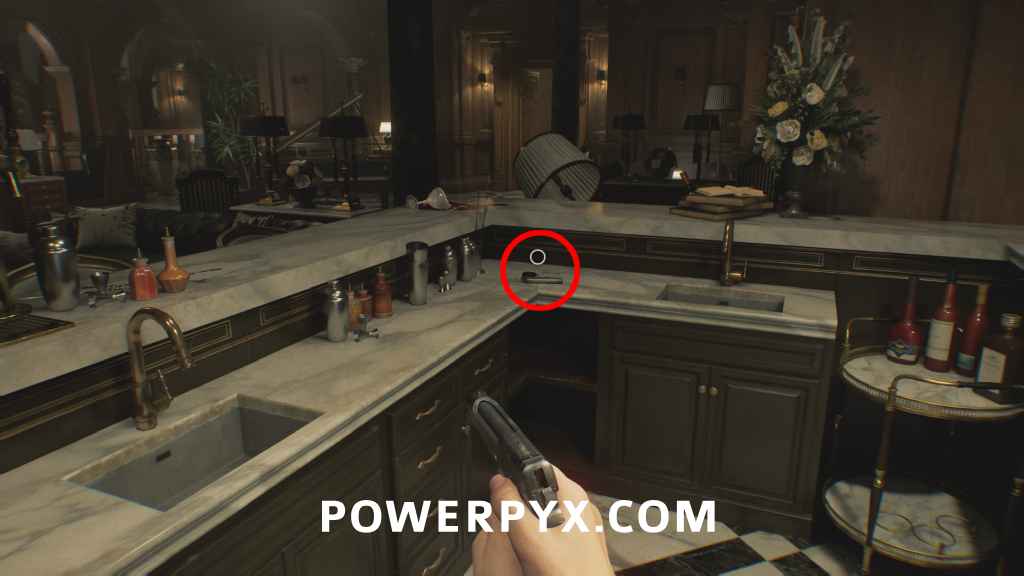
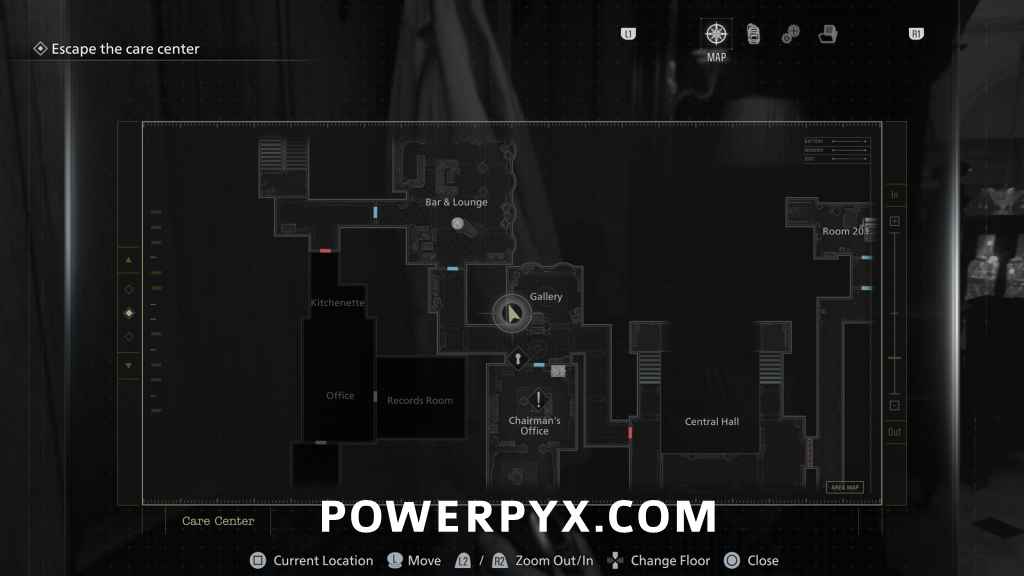
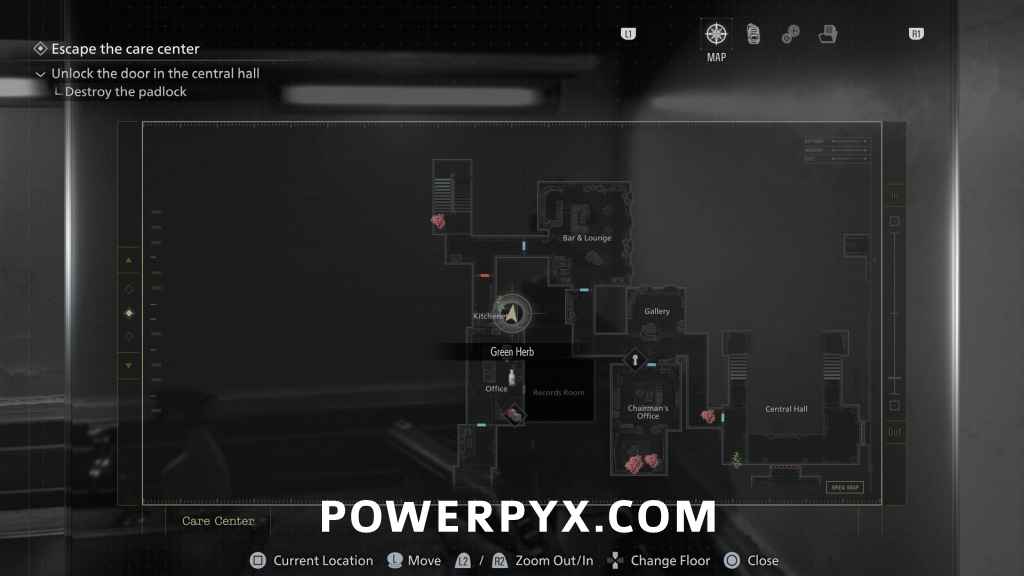
Kitchenette: Take the northern exit from the office to reach a small coffee break room. This sits next to the sink in the Kitchenette.
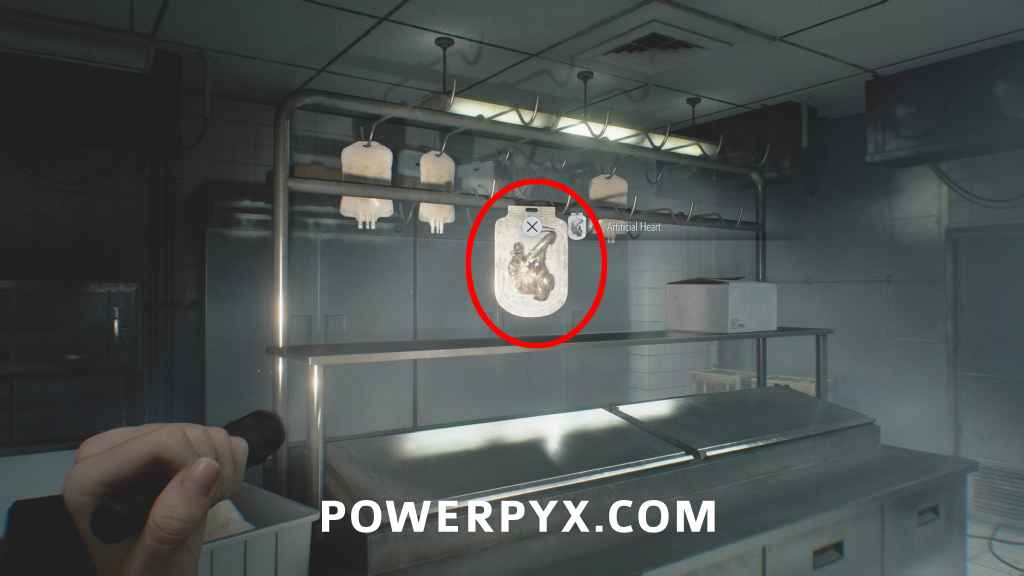
Key Item: Artificial Heart
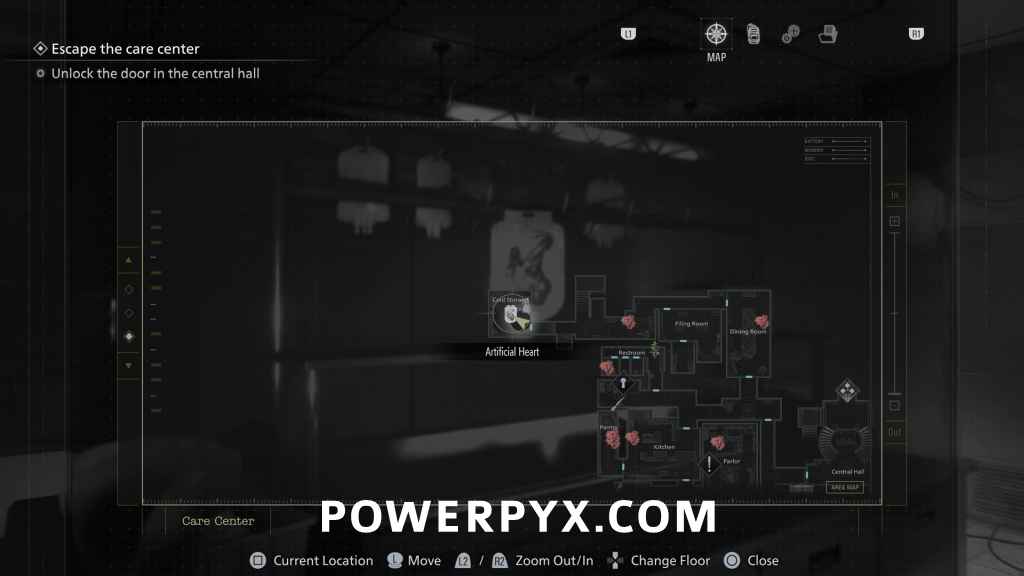
Cold Storage: Use the Wrench on the door in the north-west corner of the West Wing (1st floor). It’ll be in front of you when entering the Cold Storage.
File #26 – Examination Room Safe Code
Backtrack to the East Wing 2nd Floor, where you first met the big Chunk monster and found Key Item: ID Wristband (Level 1). In the room where the big Chunk monster came from you find this on a locker. It reveals the safe combination which we already opened, see Safe #2 (Right 30 – Left 10 – Right 50).

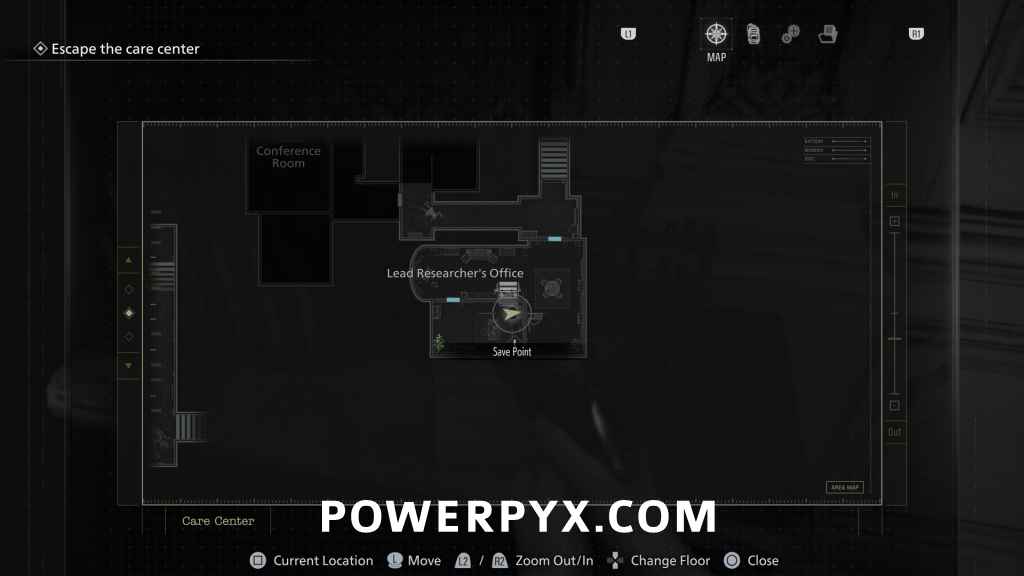
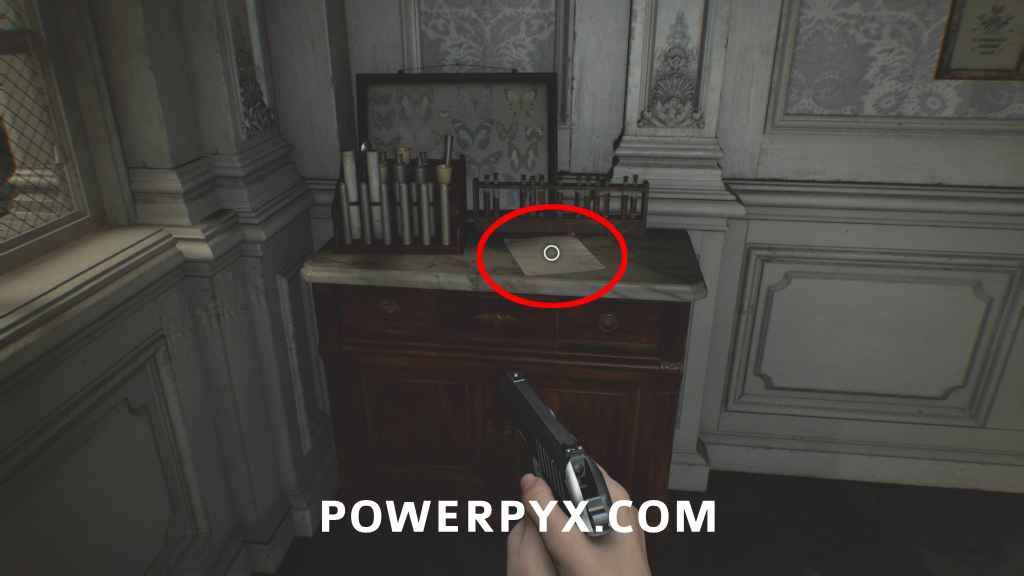
Antique Coin #17
Conference Room: Enter the conference room directly next to the previous file, it’s on a white desk after entering.
Trophy: Deadly Duet
You have to kill the 2 singing zombies. First is found in Bar & Lounge (2nd floor of West Wing) which you probably already killed. The second is in Conference Room, kill it now.
Antique Coin #18
Conference Room: dropped by the singing zombie.
File #27 – Patient Medical Records
Conference Room: In the room where a singing zombie is, on a desk.
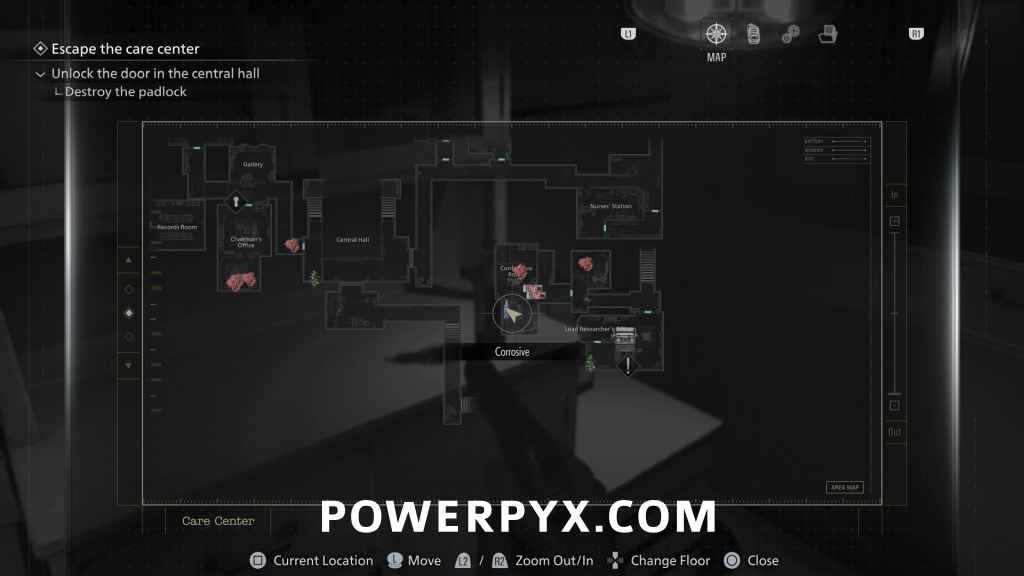
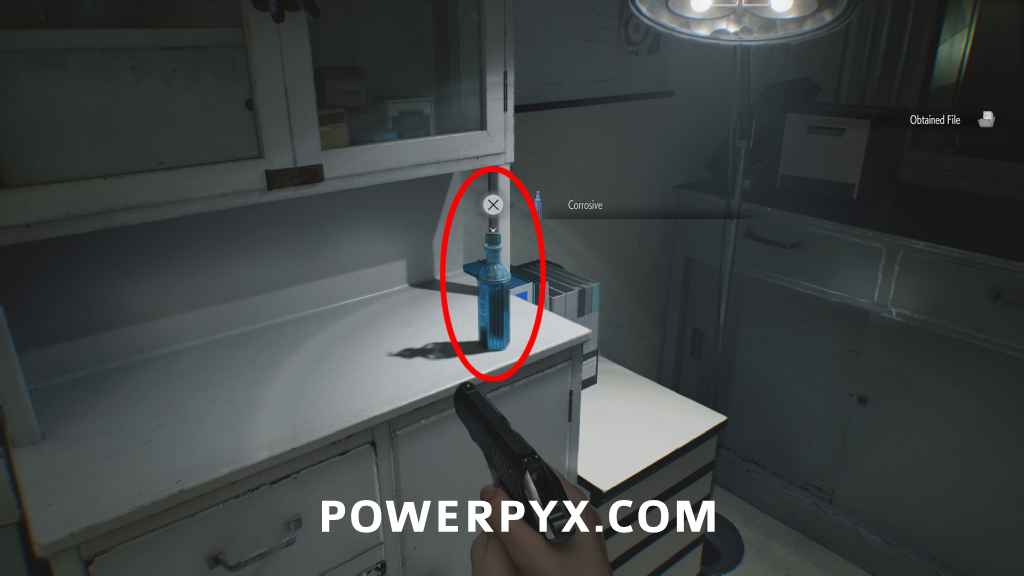
Key Item: Corrosive
Conference Room: Same room, take the blue bottle.
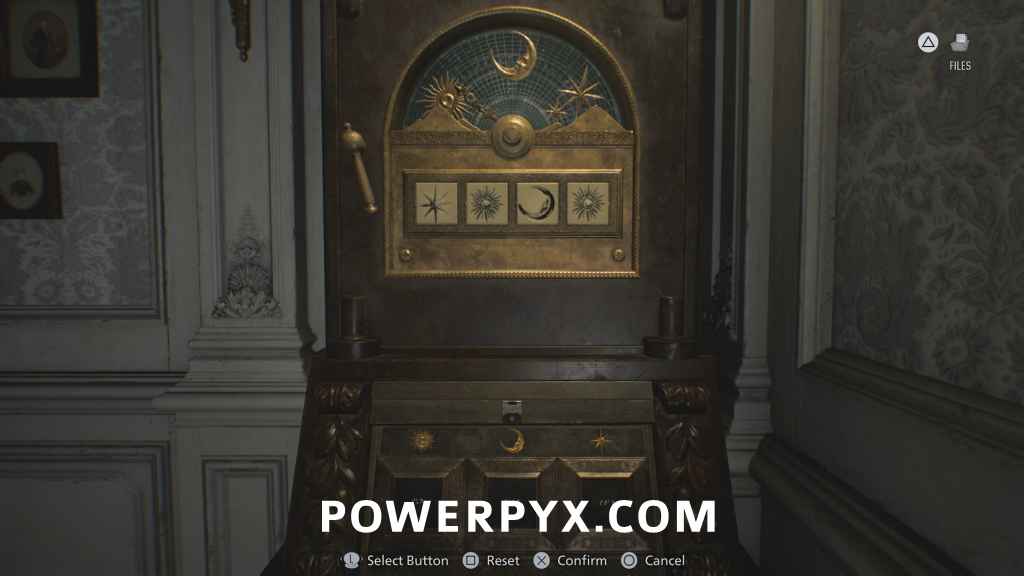
File #28 – Unlocking the Organ Transport Box
Lead Researcher’s Office: Go back to the backroom of Lead Researcher’s Office, interact with the padlock on the Puzzle Box and use the Corrosive on it. Afterward, you find the notebook in the opened Puzzle Box.
Solution (Casual) = Star – Sun – Moon – Sun
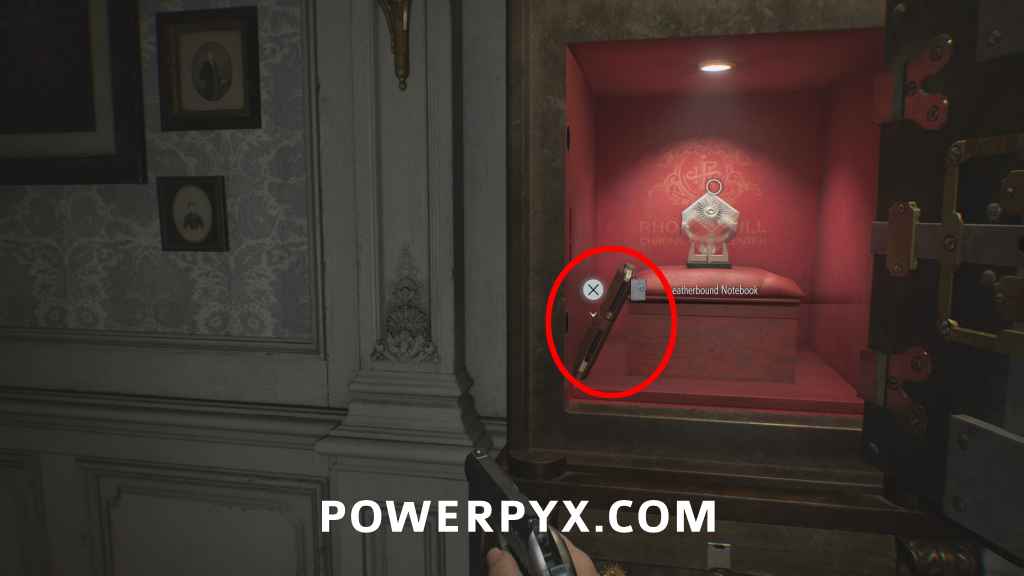
File #29 – Spencer’s Research I
Same as above, both files are in the Puzzle Box, in the Leatherbound Notebook.
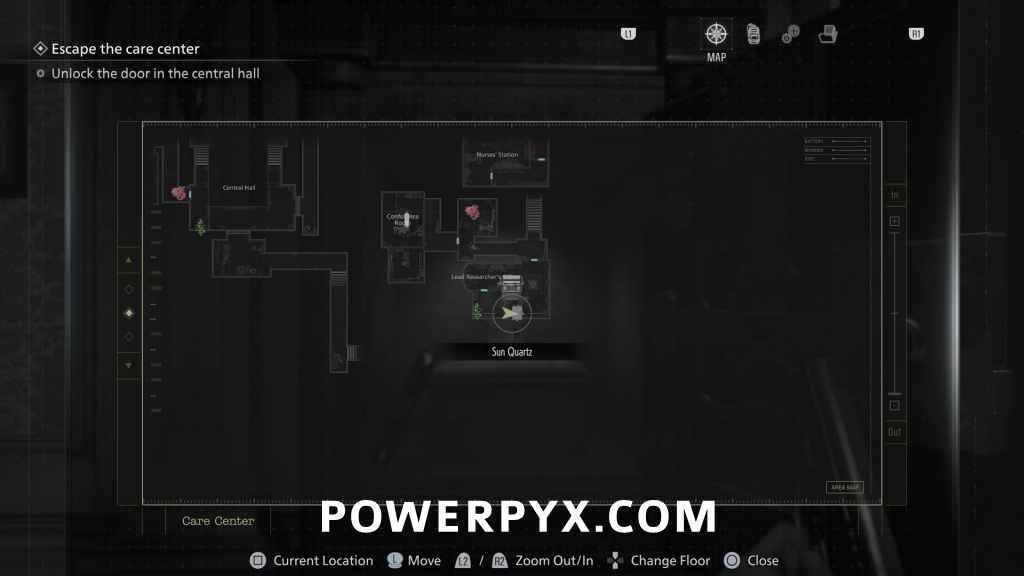
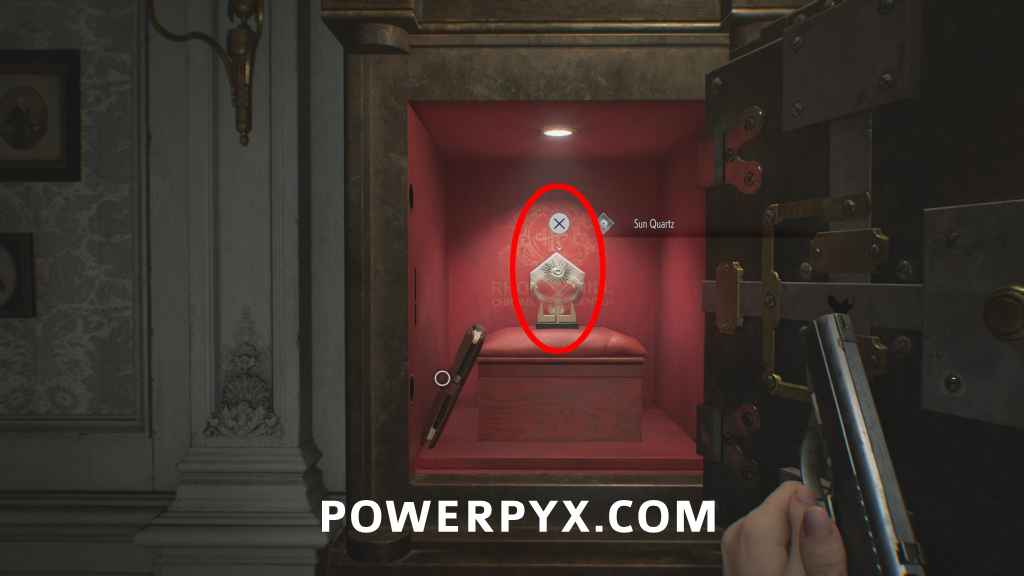
Key Item: Sun Quartz
Same as above, in the Puzzle Box. To be used on the Quartz Door in the Central Hall.
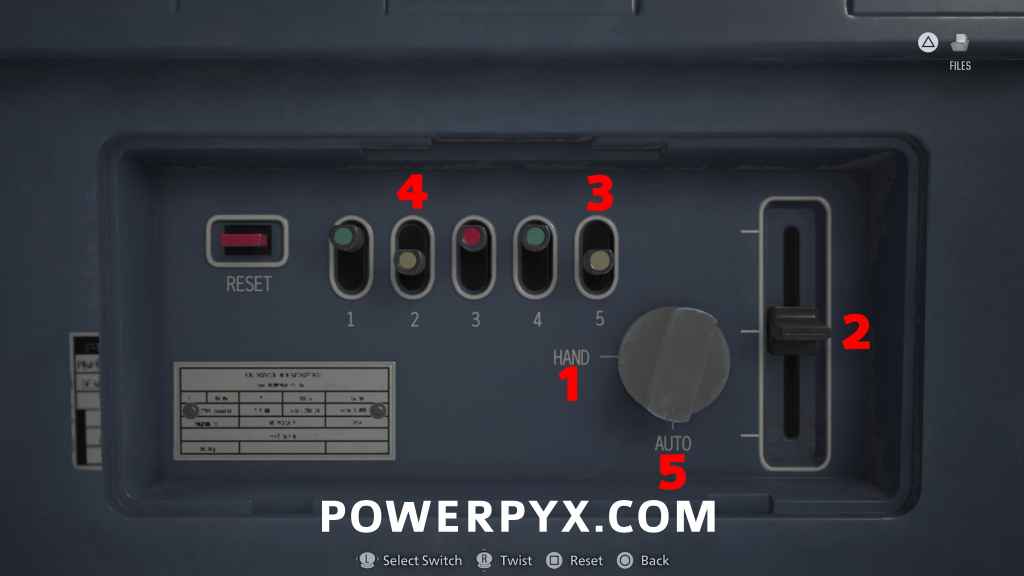
Key Item: Artificial Lungs
Examine the Organ Transport Box from inventory, turn it and click on the back panel.
Solution = Set bottom right switch to HAND > get the right switch to the middle level > press Button 5 > press Button 2 > set bottom right switch to AUTO again > take out Artifical Lungs.
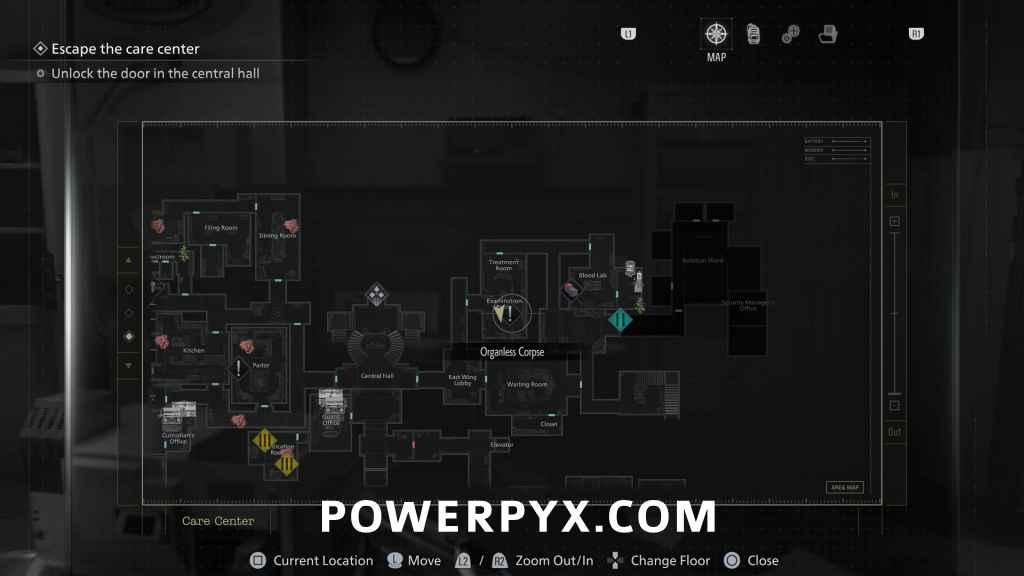
Key Item: ID Wristband Level 2
Examination Room: In East Wing, go to Examination Room to find the Organless Corpse. Use the Artifical Heart + Artificial Lungs on it. Defeat the zombie and loot the Wristband from it.
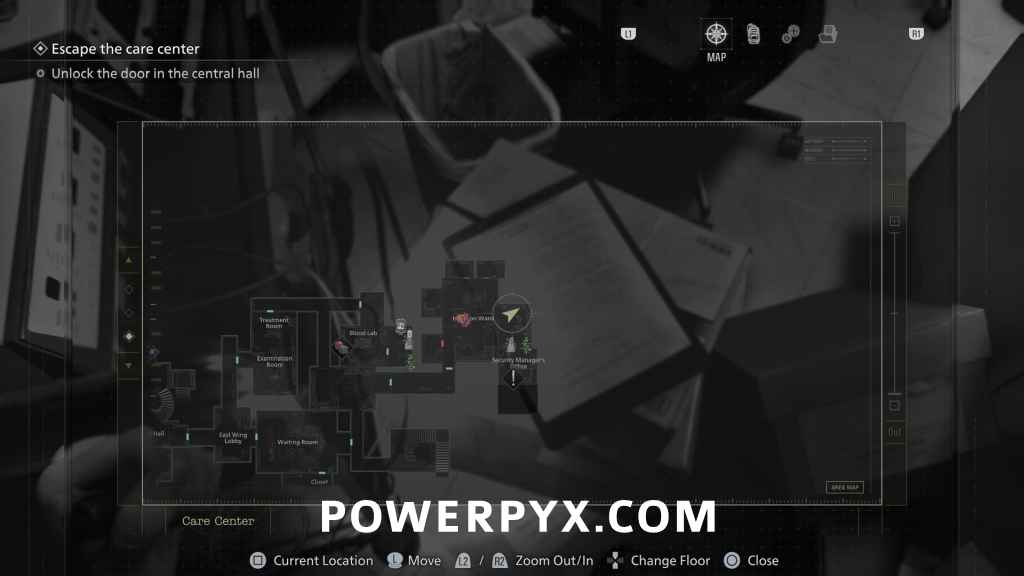
File #30 – Double Mutation
Isolation Ward: Use the Lvl 2. Wristband on the green lock door in the north-east corner of the East Wing (between Blood Lab and Waiting Room). This leads to the Isolation Ward. Enter the office on the right to find this file on a cardboard box.
File #31 – Nurse’s Log
Isolation Ward: Same room, on desk.
Key Item: ID Wristband (Level 3)
Security Manager’s Office: At the end of the Isolation Ward enter the Security Manager’s Office, interact with the note on the table and interact with the puzzle box to start a cutscene and you’ll automatically loot the ID Wristband from the body in the room. The puzzle box can’t be opened yet.
Remaining Parlor Upgrades: You should have more than enough Antique Coins now (if you followed the guide will have 1 more than needed). So make a quick detour back to the Parlor and open all lockers there. You don’t need any Antique Coins past this point, the 4 Parlor Upgrades are the only use for them.
Mr. Raccoon #5
Medication Room: Go back through the Guard Office to the room where the little girl is locked in a cell. Use the Lvl. 3 Wristband on the left room (the empty one without the girl) to find this behind the bed.
Afterward, interact with the Girl’s cell and carry her to the Security Manager’s Office puzzle box. If you have anything left to do, you can sit her down on the couch in the Guard Office safe room. This is also your last chance here to get Trophy “Grace and Goliath”.
Reminder – Trophies: Grace and Goliath + Order Up!
If you haven’t already killed Chunk (the big monster that roams the East Wing), or the Chef (big guy in kitchen), you can do it before bringing the Girl to the puzzle box. If you didn’t have enough ammo earlier, you can use lockpicks to open drawers for Rare Metal and use it to craft ammo for the Requiem. 3 headshots with the Requiem should suffice to kill Chunk.
Care Center (Rhodes Hill) – Leon Part 2
File #32 – Satiety Suppression Medical Records
Attic: When you play as Leon again, walk forward until you go through the next door. Then you find this in the back of the room, opposite the cupboard you push to progress.
Weapon: MSBG 500 (Shotgun)
Attic: On the floor, on the main path when you reach a Chunk monster (big bloated enemy).

Weapon: Hand Grenade
Dropped by the Chunk monster.
File #33 – Basement Safe Code + Weapon Part: Compensator
After leaving the Attic, break open the first closet on the right with Leon’s Hatchet before going downstairs. Gives Save Combination (Right 60 – Left 40 – Right 80).

Trophy: Tailor Made
In inventory attach the Compensator to Leon’s Pistol.
File #34 – Dishwasher’s Note
Found in the closet you can break open when going left from Chairman’s Office.
Mr. Raccoon #6
Records Room: You can hear this one in the Records Room. It is in the closet only Leon can break open with his Hatchet.
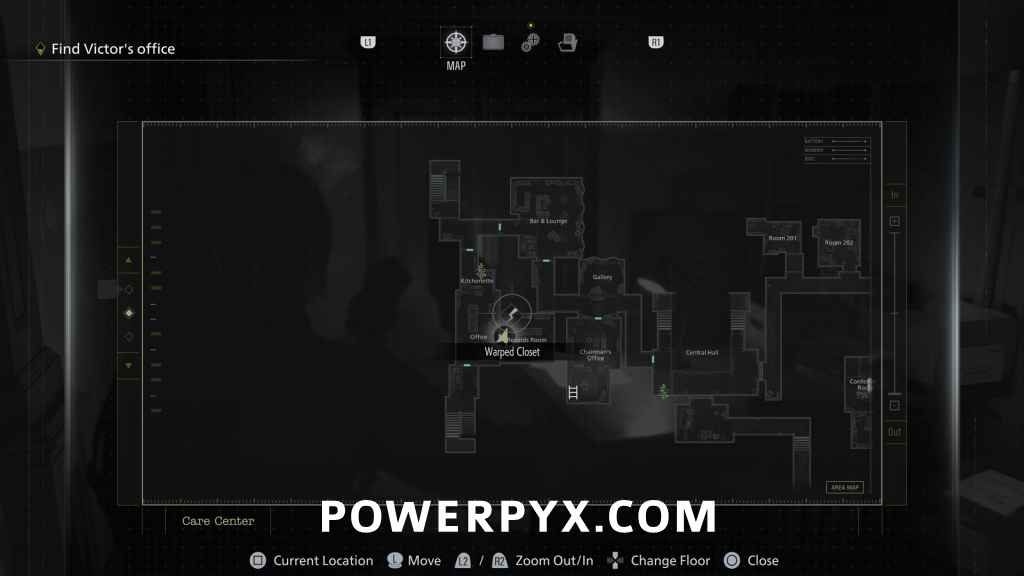
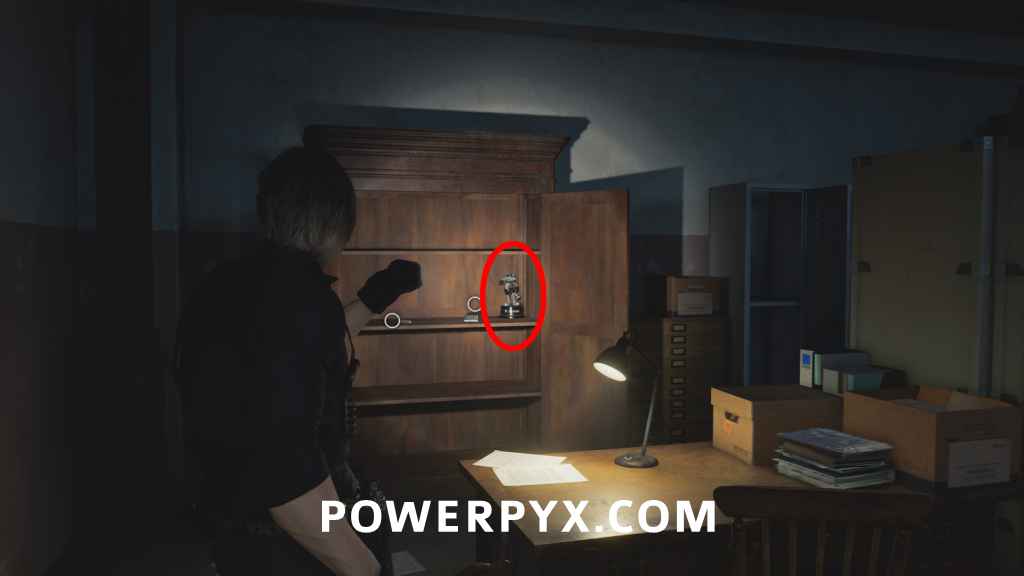
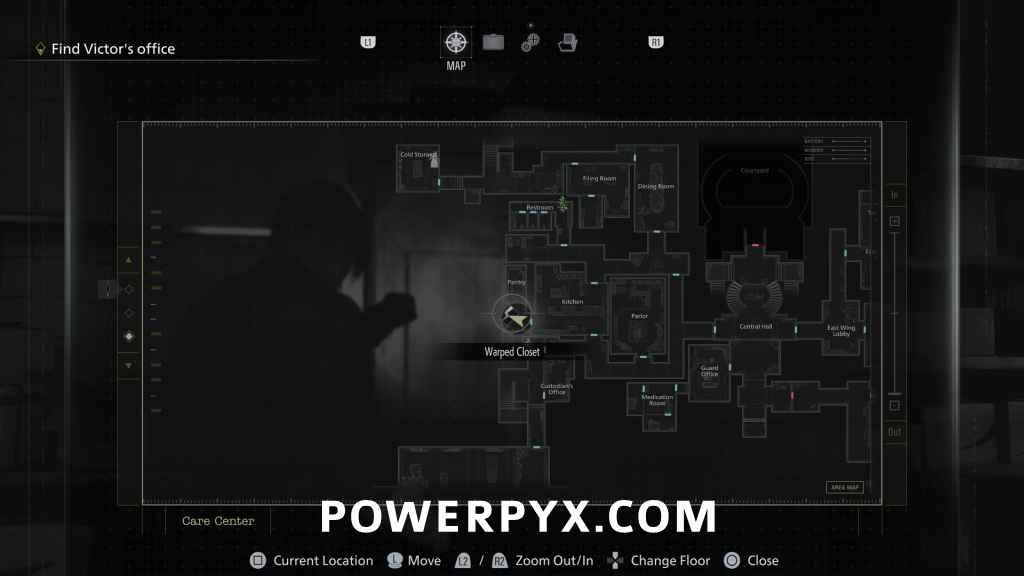
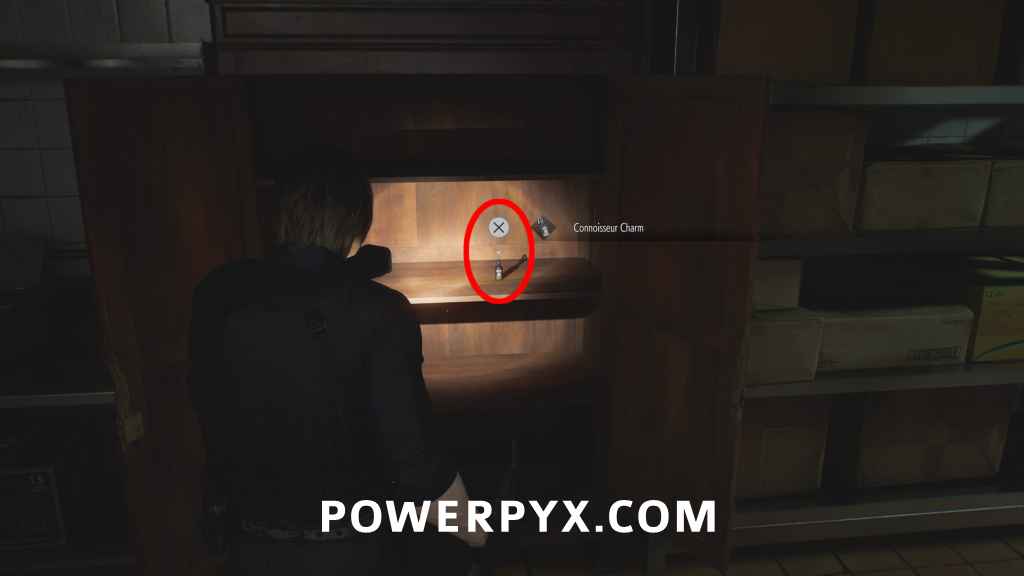
Charm: Connoisseur Charm
Pantry: In the pantry closet. If you didn’t kill the chef as Grace to get the pantry key, you can do so now as Leon.
To proceed the story, go to the top floor in West Wing, up the stairs in the north-west corner.
Care Center Basement (Rhodes Hill) – Grace
File #35 – Special Directive for Raccoon City + File #36 Report on Raccoon City Syndrome
Both obtained automatically as soon as you play as Grace again (you get a popup “New File” in the top right corner after cutscene, can view it from Files menu).
File #37 – Staff Member’s Last Words
Immediately after you start playing as Grace, go forward a few steps to find it next to a corpse in the tunnel.
File #38 – Operation to Eliminate “The Girl”
Security Room: Found in the next safe room with all the CCTV.
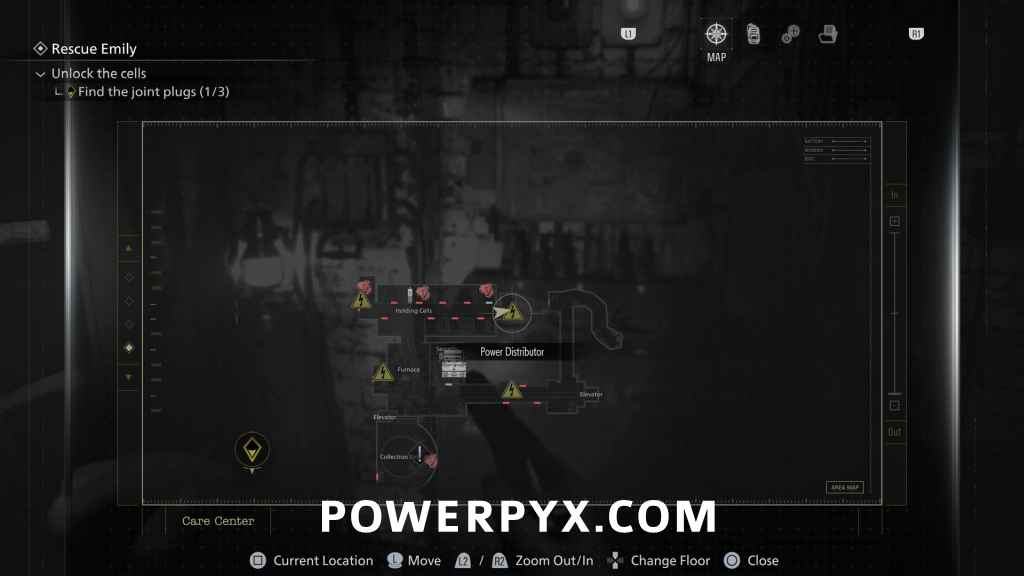
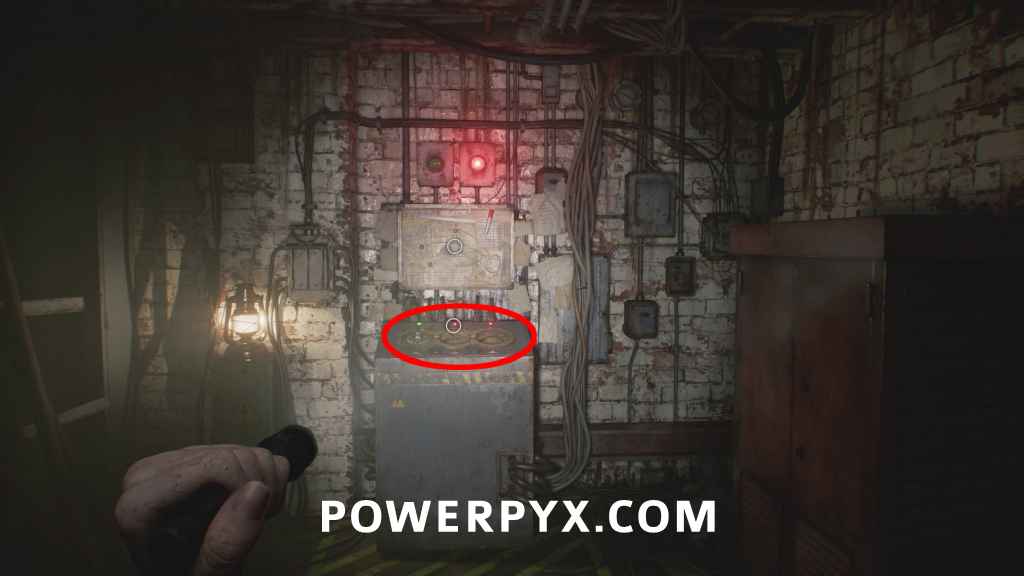
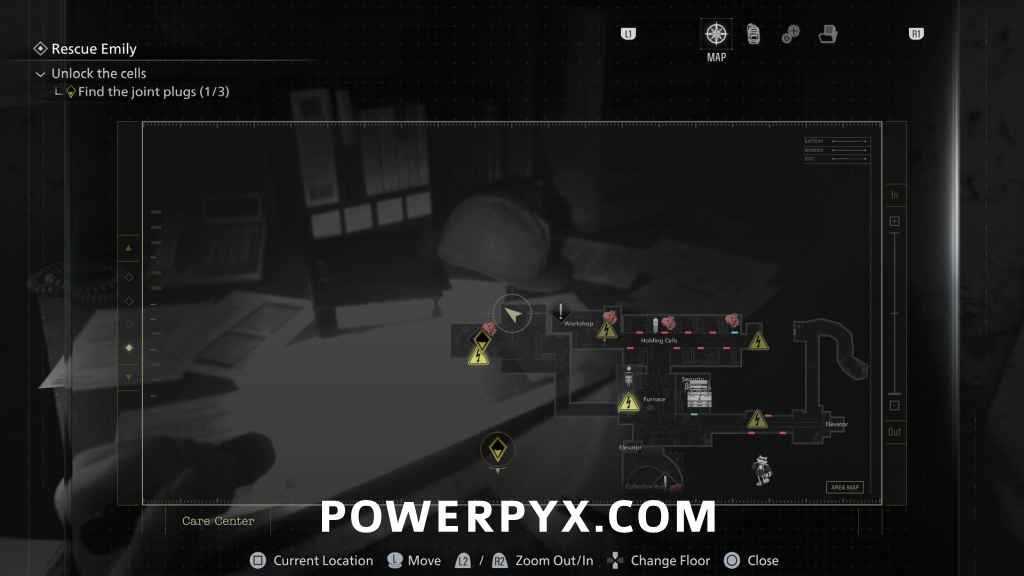
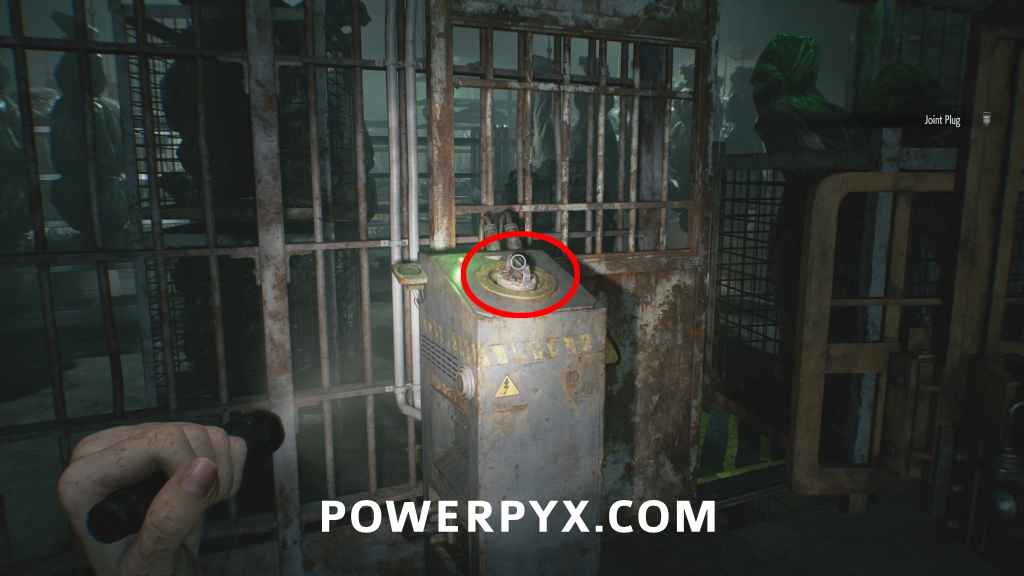
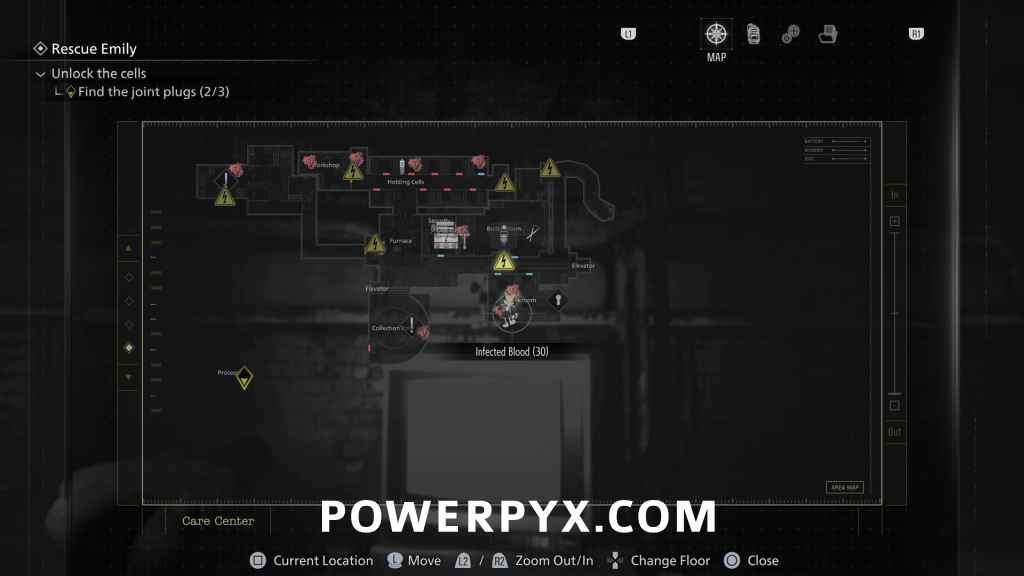
File #39 – Unlocking the Cells
Holding Cells: After the next cutscene at the end of the corridor, above the lever you have to pull for story progression.
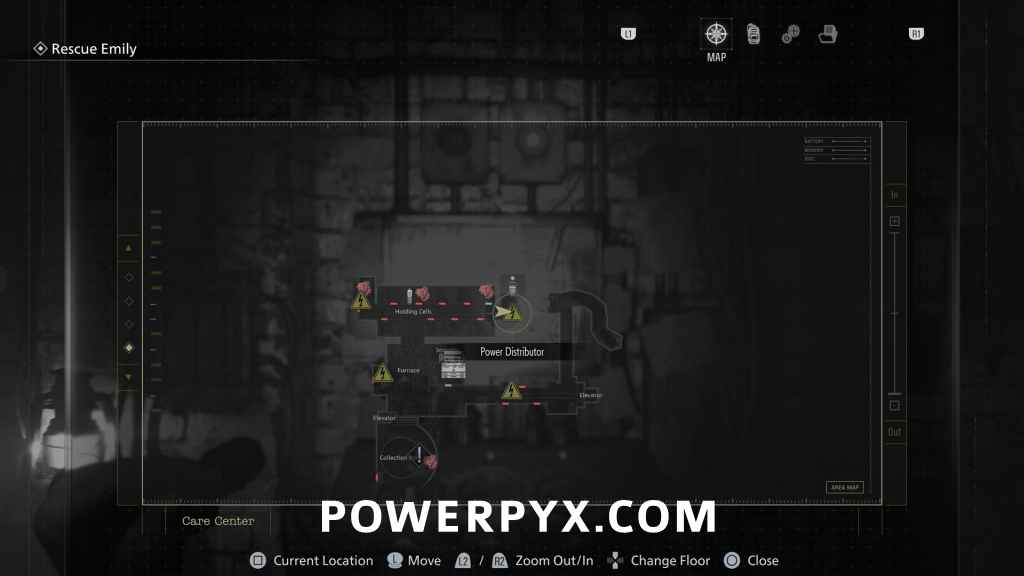
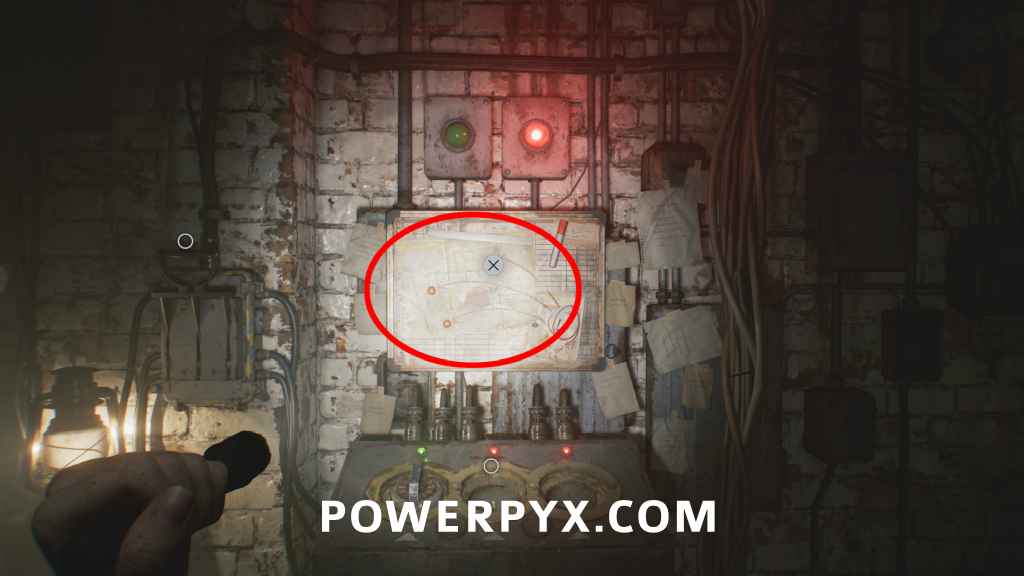
Key Item: Joint Plug #1
Holding Cells: same place as the file.
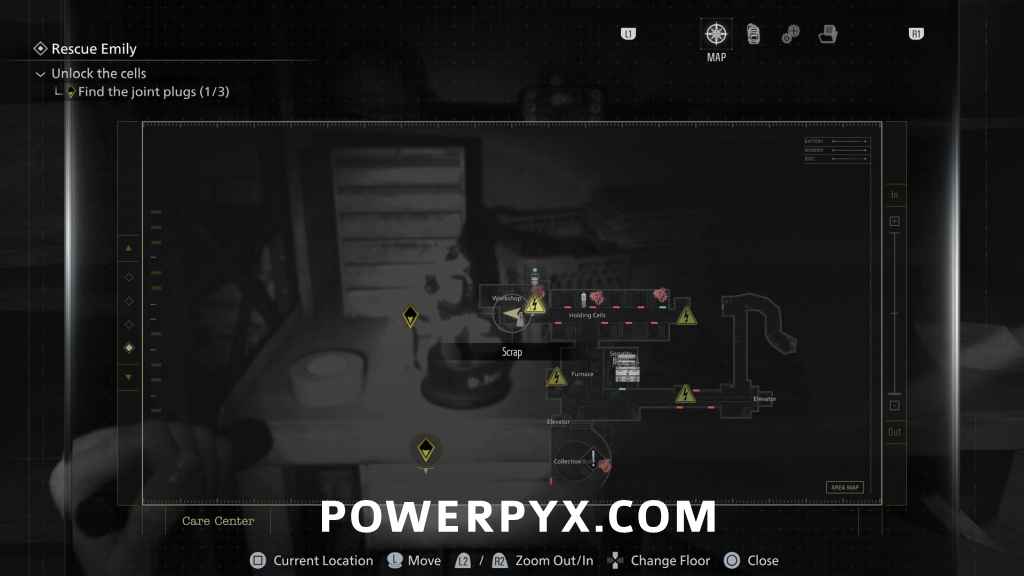
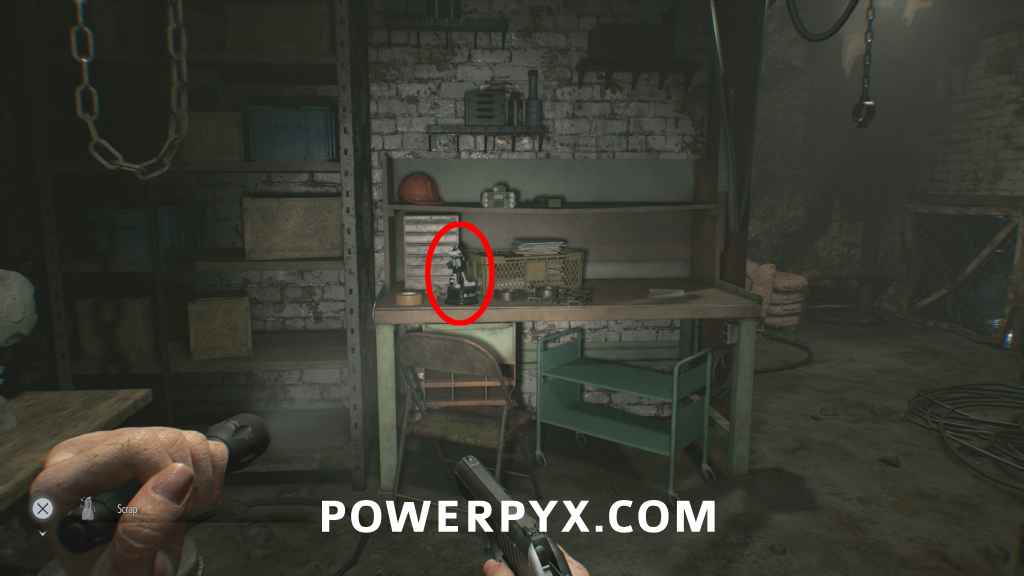
Mr. Raccoon #7
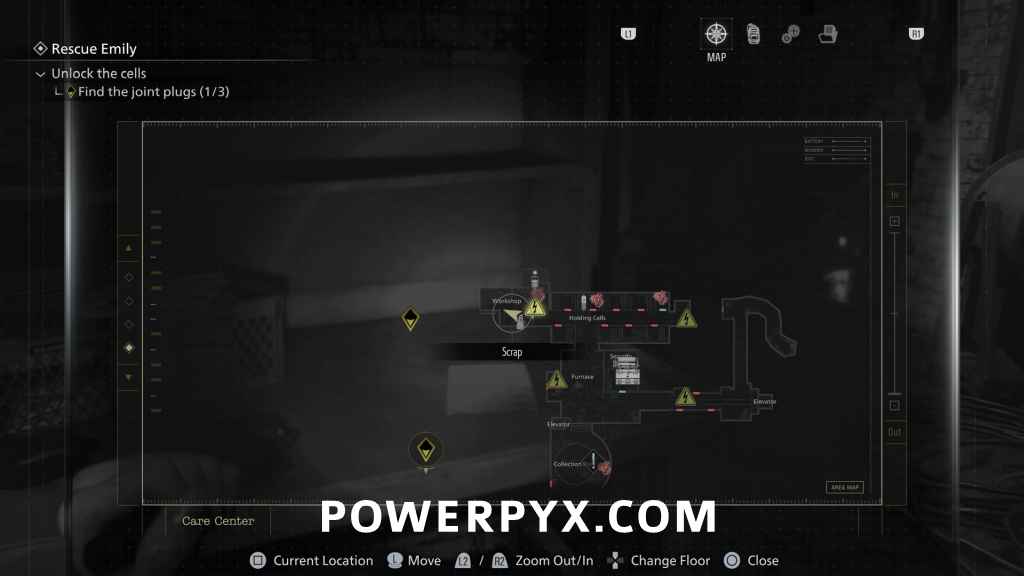
Workshop: At the opposite end of the Holding Cells corridor, insert the Joint Plug to open the door to the Workshop. Then you find this in front of you when entering the room, on the workbench.
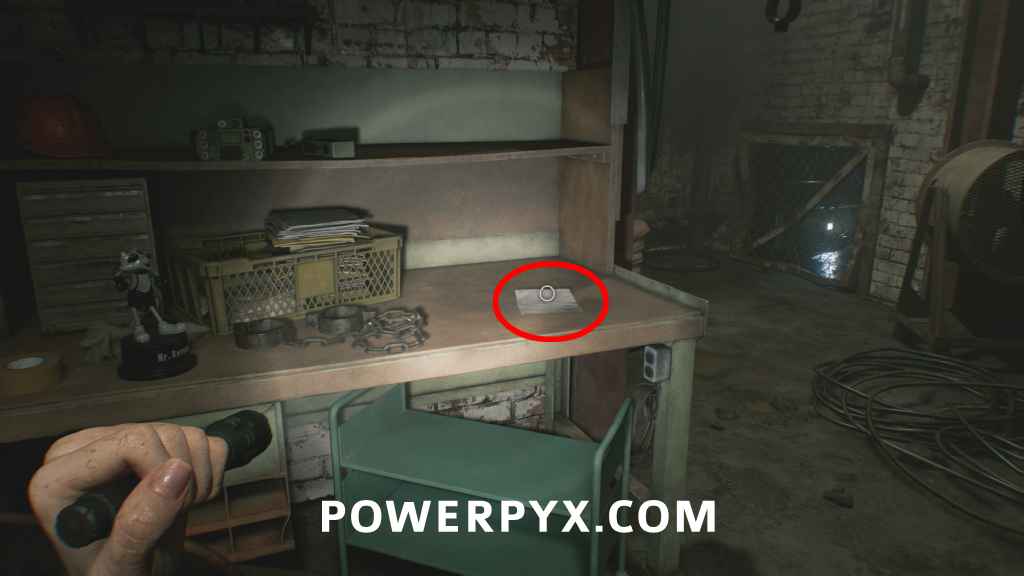
File #40 – Technician’s Note
Workshop: Right next to the raccoon.
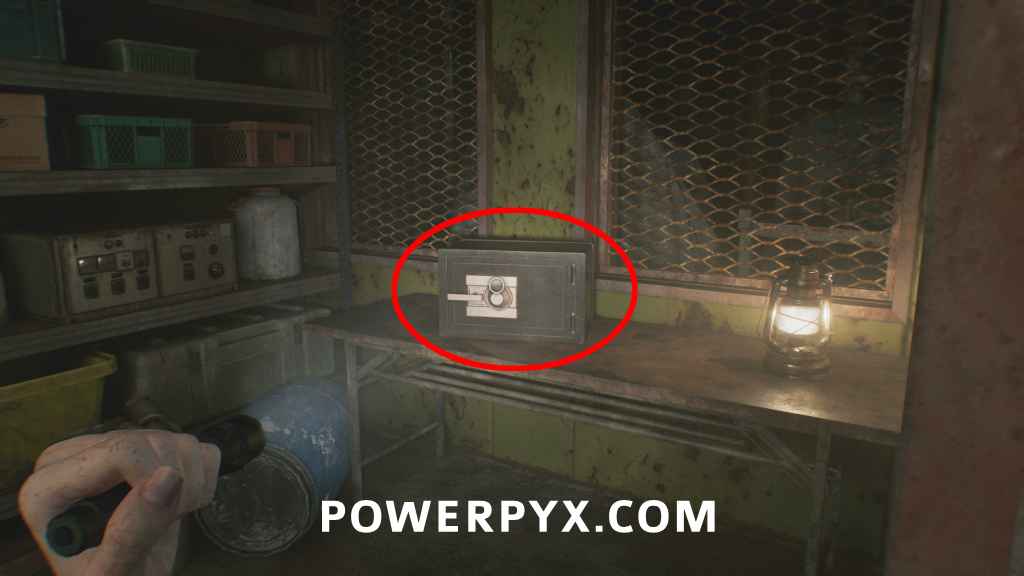
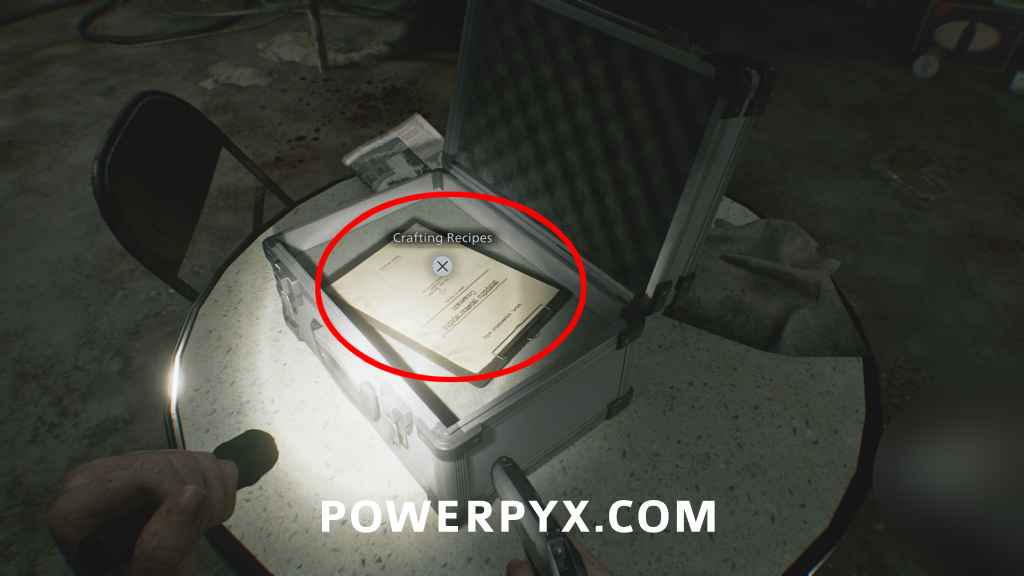
Safe #3 + Raccoon Roundup Map (Rhodes Hill)
Furnace: Take the Joint Plug out of the Workshop door and insert it in the Furnace room door (the central room). In the next room in a side office on the right you find the Safe. Contains a document that marks Mr. Raccoons on the map.
Combination (Casual) = Right 60 – Left 40 – Right 80.
Combination (Insanity) = Left 70 – Right 50 – Left 20.
(Note: the combination is obtained from “File #33: Basement Safe Code” which was found as Leon, but you can open it even without the file).

File #41 – Security Guard’s Report
Furnace: same room as the safe.
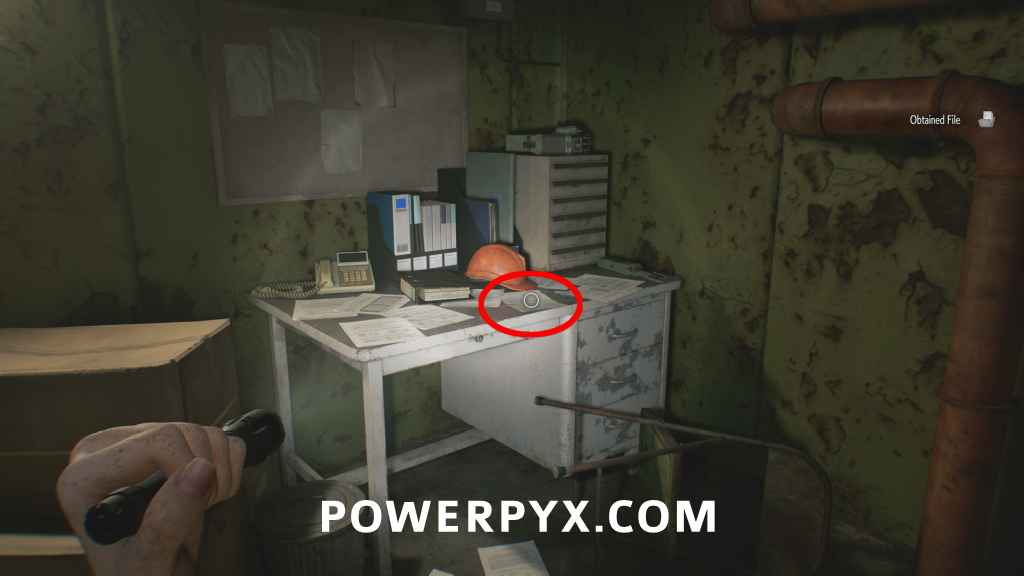
Key Item: Joint Plug #2
Furnace: same room, next to the forklift.
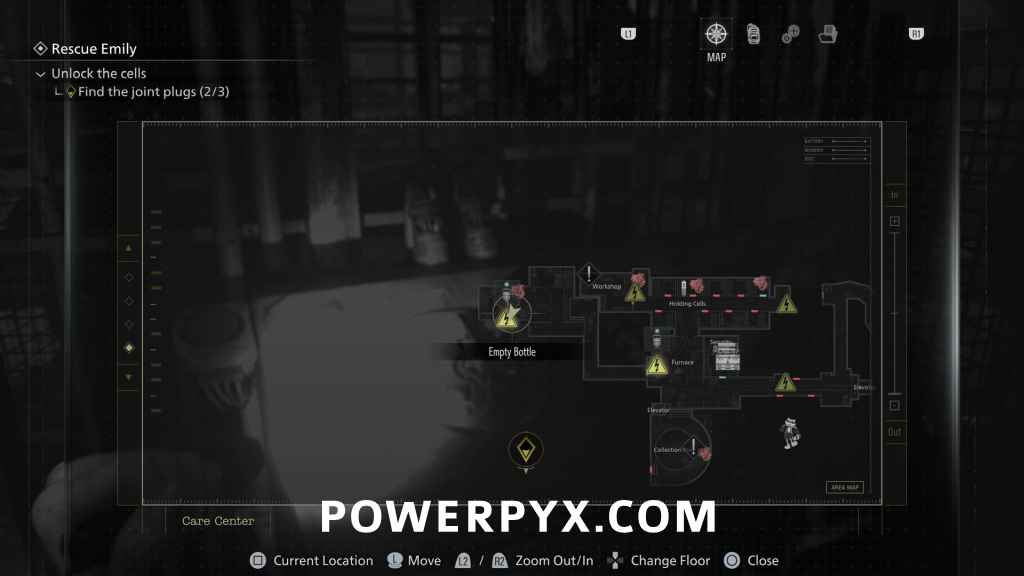
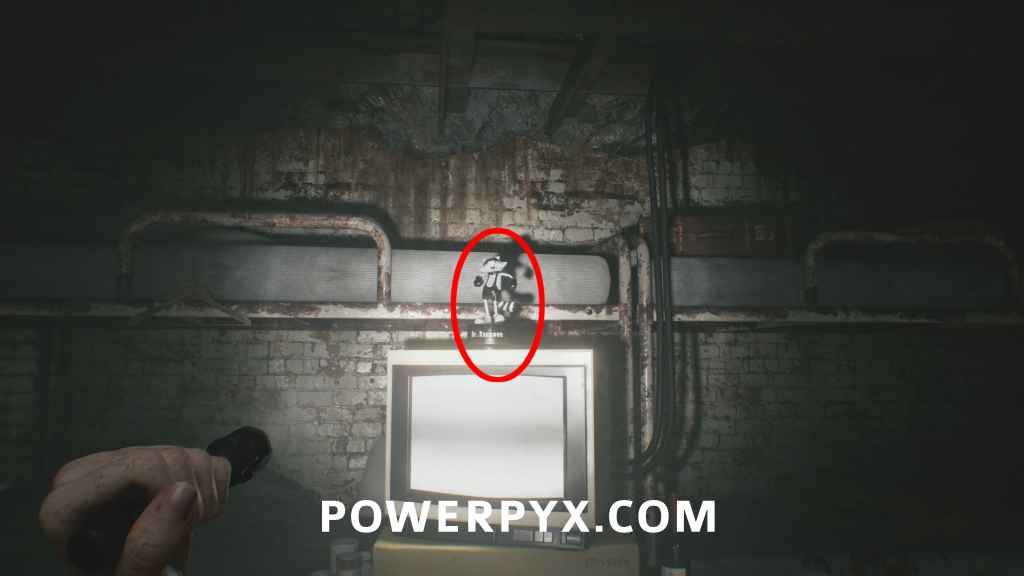
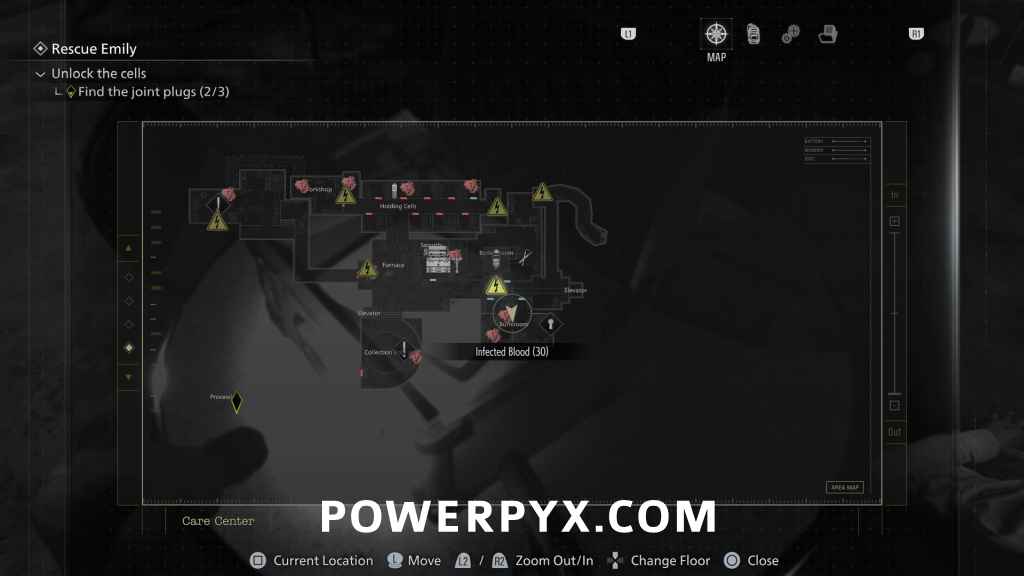
Mr. Raccoon #8
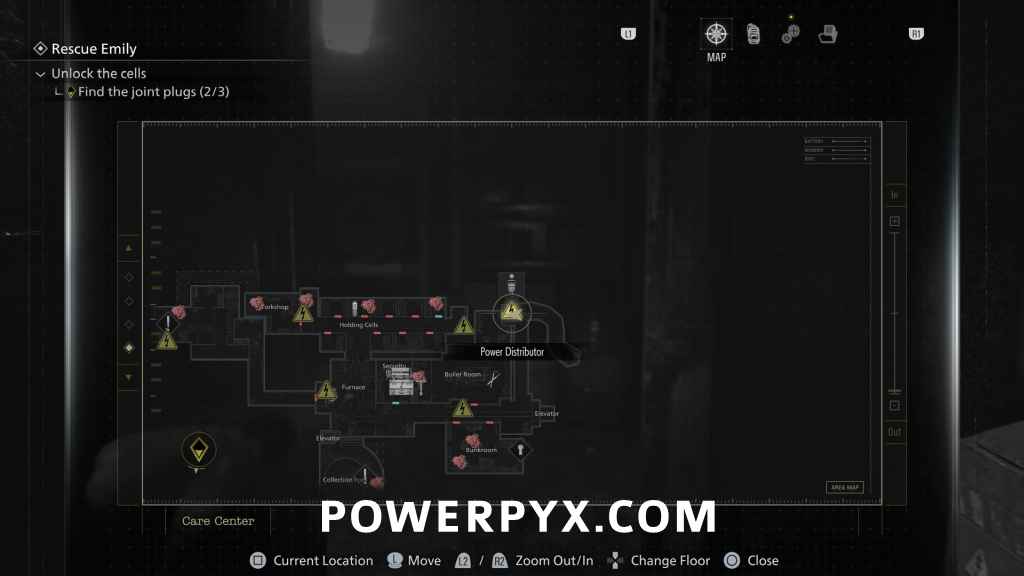
Bunkroom: Insert a Joint Plug at the Boiler Room, in the corridor to the right of Security Room on the map (marked with yellow “!” icon). This will open multiple rooms, you’ll want to enter the room to the right of where you inserted the plug, which is the bunkroom. The Mr. Raccoon sits on the TV.
Crafting Recipe: Molotov Cocktail
Bunkroom: In the middle of the Bunkroom in a box on the table. (doesn’t count as a file)
Key Item: Square Socket Wrench
Boiler Room: Now take out the Joint Plug from the Boiler Room and backtrack to the start of the dark tunnel where you began this area (north-east corner of the map). Insert the plug in the door there to reach Boiler Room, push the crate, go through the fence, collect the wrench in the back of the room. If you have the plug inserted next to Bunkroom the water is electrified and will shock you, so must have taken out the plug there. You use the wrench on the button in the Collection Pool.
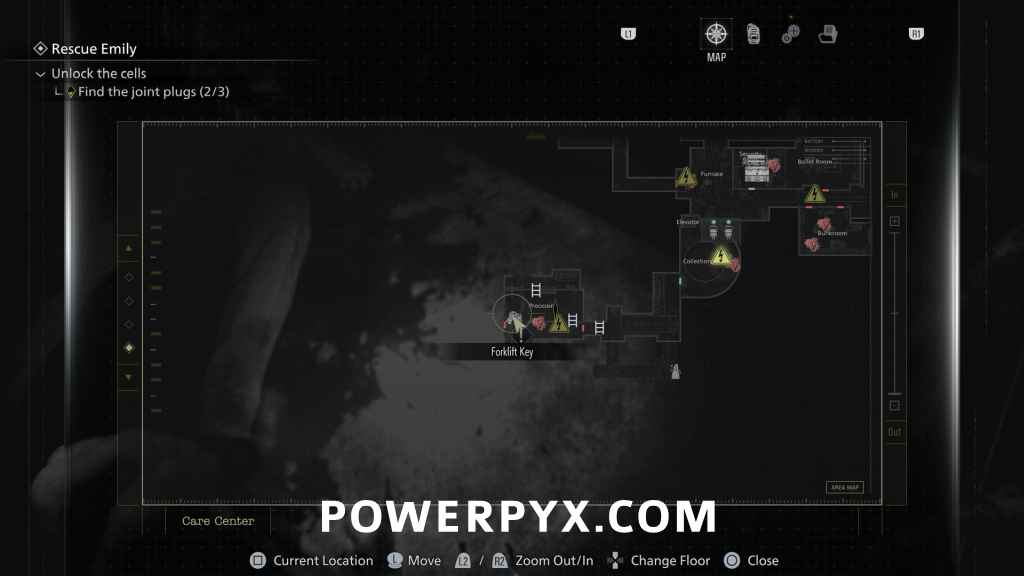
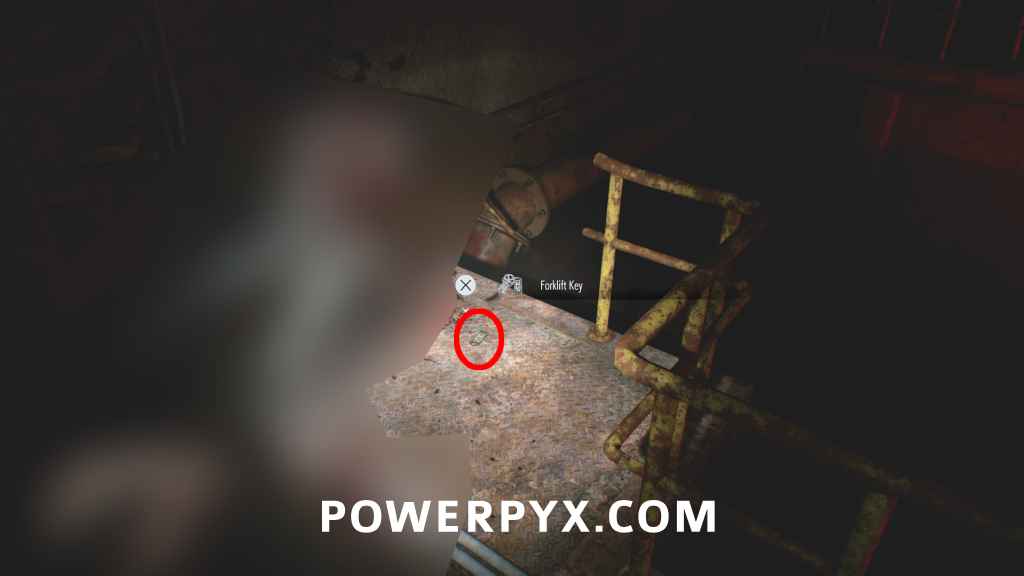
Key Item: Forklift Key
Processing: Go to the Collection Pool in the south of the map, use Square Socket Wrench on the console button, insert 2 Joint Plugs to power the door to Processing. At the end of the area you find the key next to the forklift on the floor.
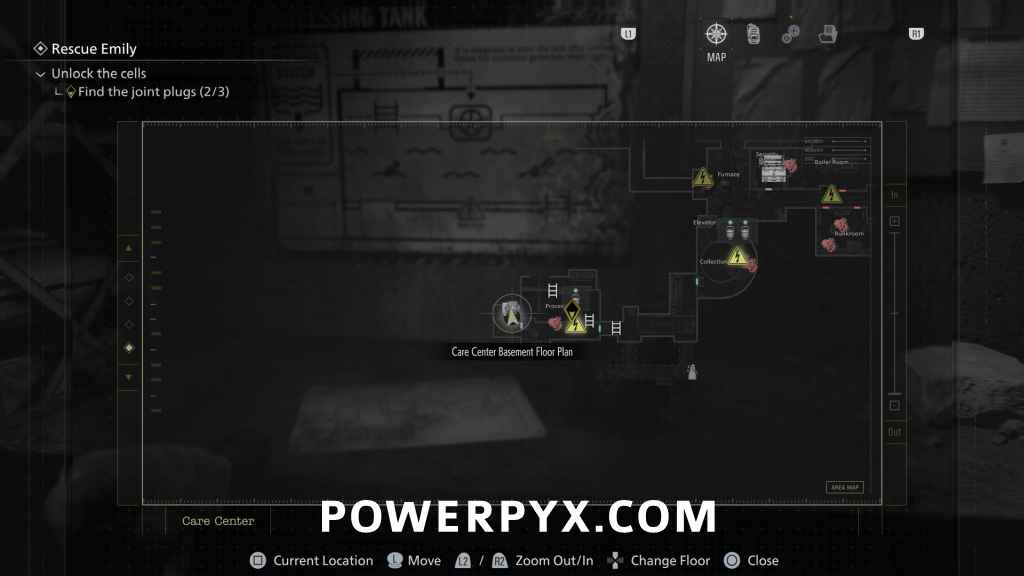
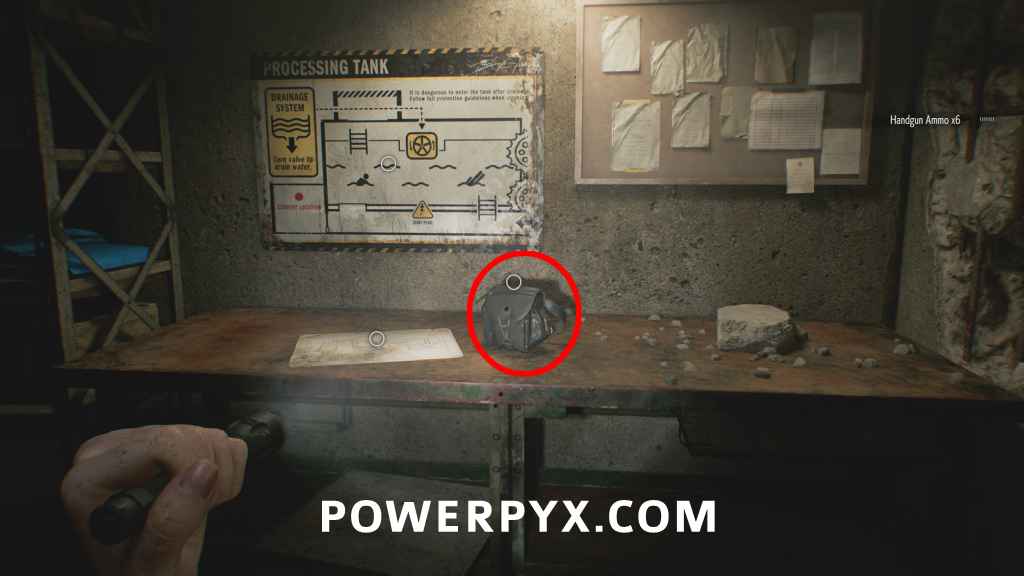
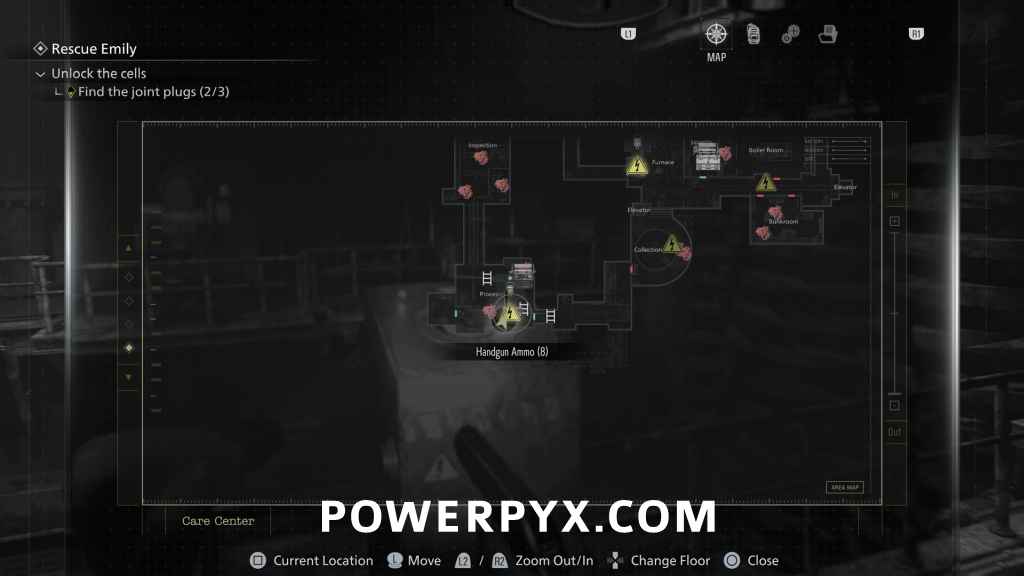
Upgrade: Hip Pouch + Map: Care Center Basement Floor Plan
Processing: Use the key on the forklift and go through the door to find these. Must keep the plug in the console here so the door is open.
Key Item: Joint Plug #3
Leave the plug in the console, backtrack to the forklift behind the Furnace door and bring the two plugs from Collection Pool with you. Use the forklift key on the forklift there, insert a plug next to it to open the path. Move with the hanging body bags (don’t flip the switch), until you can push a cart to make a shortcut, return to the start of the room and flip the switch. Go back through the shortcut and move with the corpse bags to the end of the room. Turn the wheel to drain the water, then head over to the third Joint Plug from earlier.
Afterward, head back to the other side you came from, crouch through the vent next to the typewriter. Flip the switch and use the elevator, recollect your other 2 plugs from the forklift and Furnace door. Insert all 3 plugs in the Holding Cells corridor to open Emily’s cell (where you found the first plug). Quickly carry Emily to the elevator in the tunnel where you started this area.
Key Item: Star Quartz
Automatically obtained after the elevator ride. You insert this and the Sun Quartz + Moon Quartz in the door in Central Hall to proceed the story.
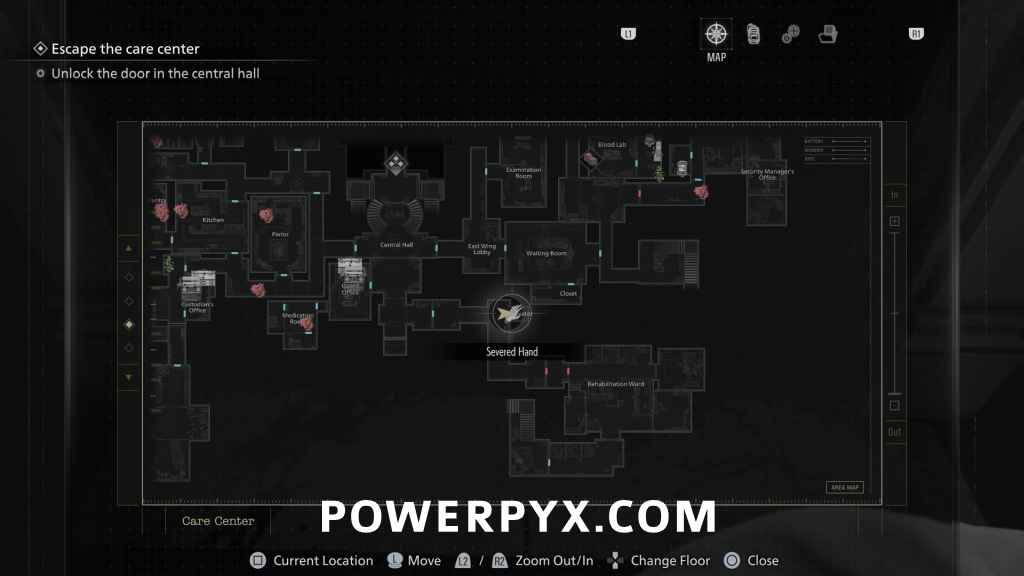
Key Item: Severed Hand
At the same time you get Star Quartz (after elevator ride), you can pick this up in front of the elevator door. Can bring it to the Analyzer in Blood Lab, solving it brings up a screen that says “Let’s play” with an Amino Acid sequence – the first letter of each corresponding amino acid spells out GLITCH. (not used for story progress, just an easter egg, not needed for trophies)
Care Center Courtyard (Rhodes Hill) – Grace
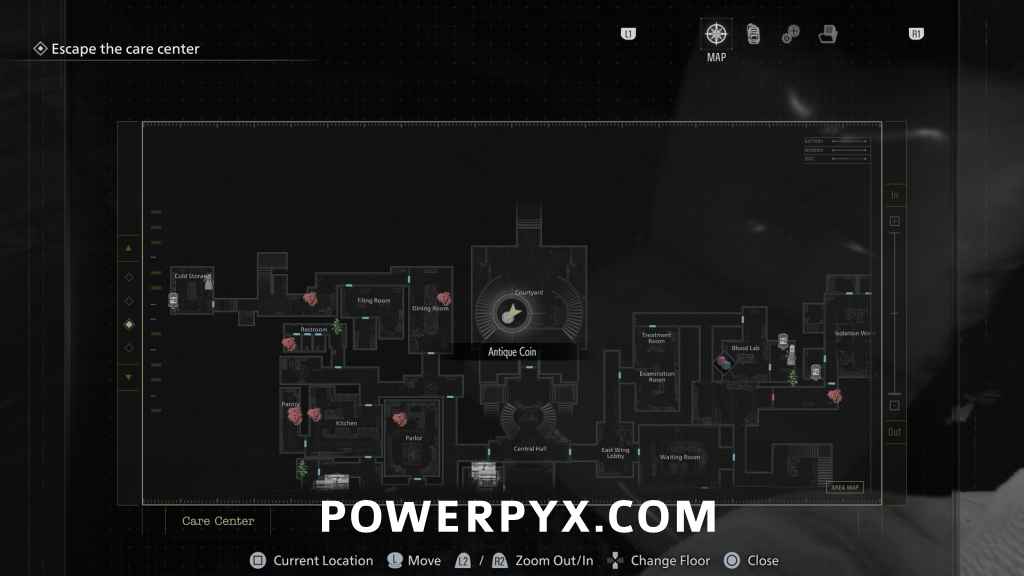
Antique Coin #19
Courtyard: After opening the quartz door in Central Hall, go down the round staircase, then turn around and it’s on one of the chairs between the stairways.

File #42 – Visitor Record
VIP Suite: After the cutscene in the courtyard, enter the next house to find this on the wooden cupboard.
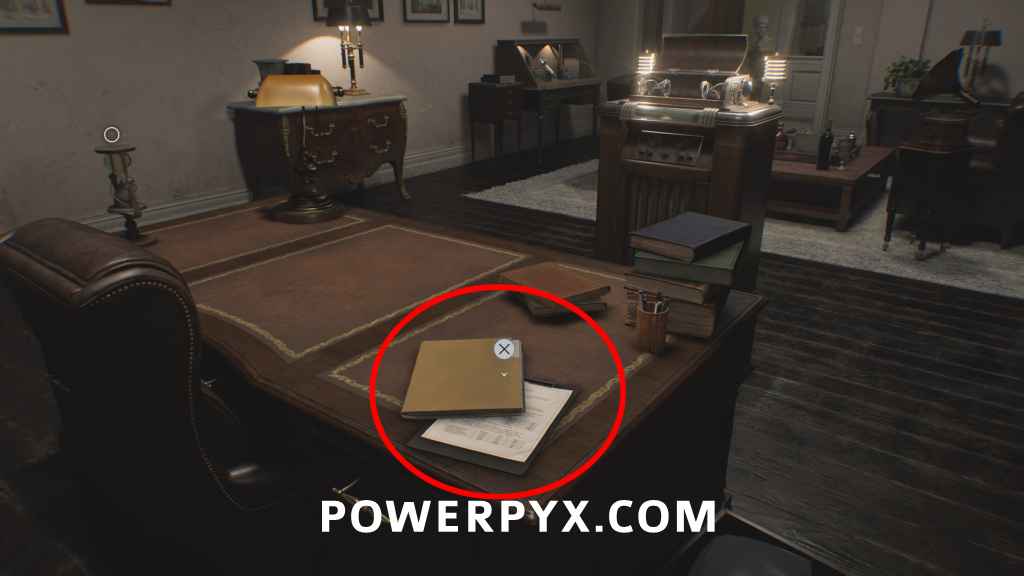
File #43 – Note Regarding Research Results
VIP Suite: In the next room, on the main desk.
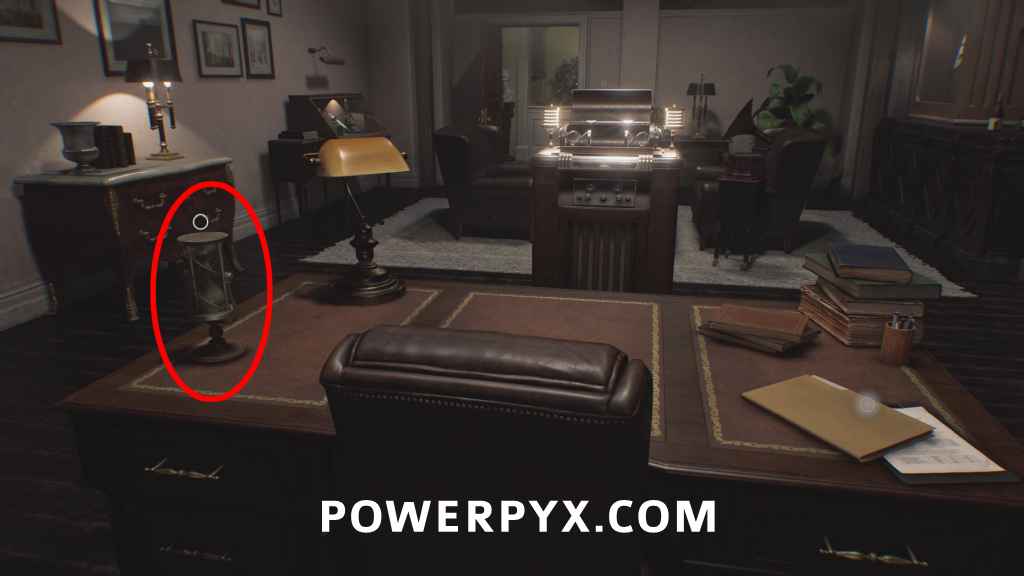
Key Item: Hourglass
VIP Suite: Same desk, inspect the hourglass and from each side interact with it to loosen the screws and take out the glass. You can let the sand run out, inspect and turn the hourglass to see a code inside “U = 380,000”. However, this is seemingly not used for anything and just there to distract from the real puzzle solution (which is the next item in wine bottle).

Key Item: Double Helix Model
VIP Suite: Same room, inspect the wine bottle and rotate it to reveal a hidden helix inside of it. Insert it on the lectern at the desk.
File #44 – Spencer’s Research II
Reception: After using the helix to activate the elevator, it’s on the Reception desk (next to typewriter).
File #45 – Subject 170 Record
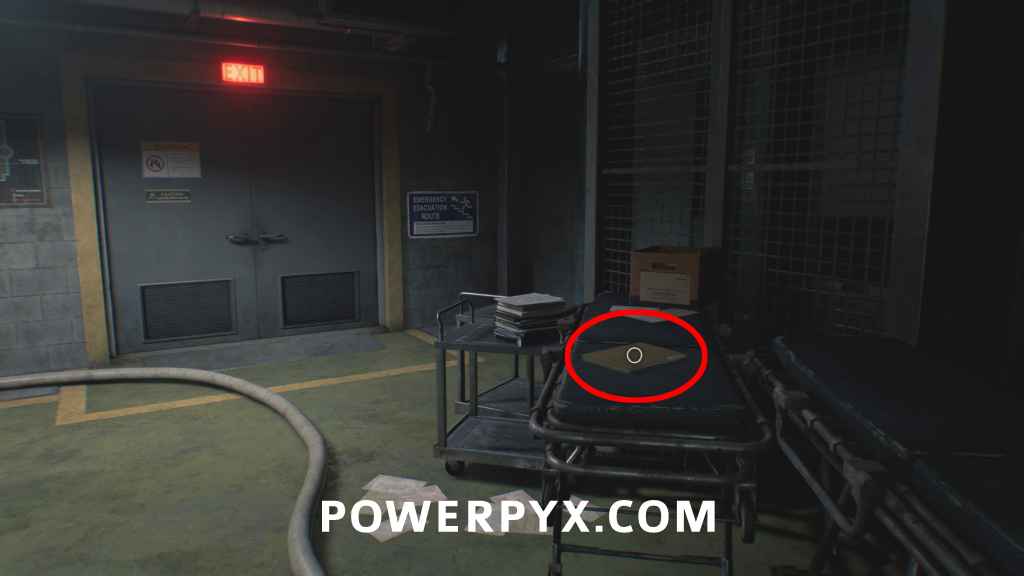
Collection & Testing: From the typewriter go downstairs, you find this near the exit of Collection & Testing on a stretcher.
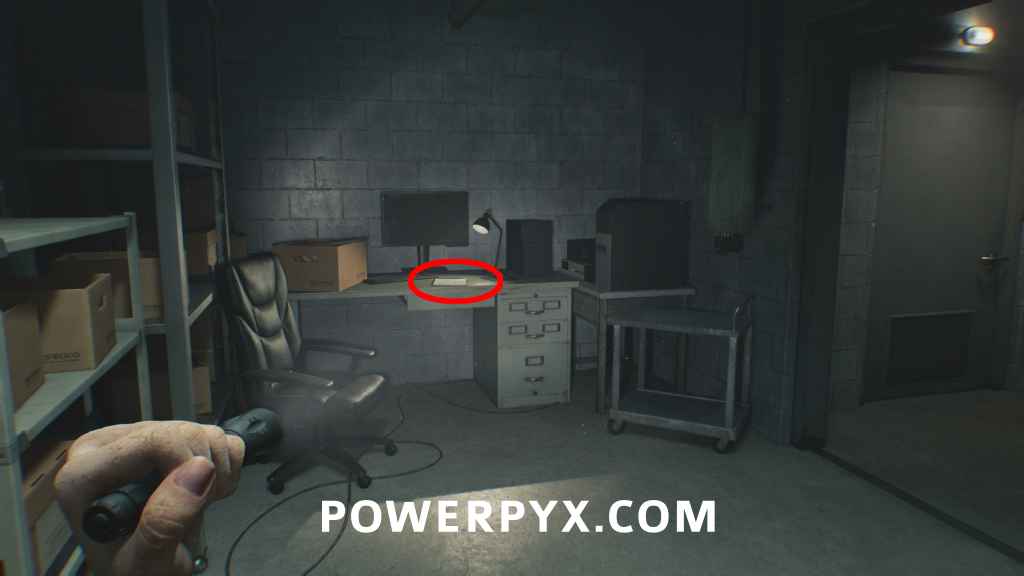
File #46 – Grace Ashcroft Blood Analysis Report
Private Lab: From previous file go upstairs and through the next door to find this on a desk.

Mr. Raccoon #9
Private Lab: Same room, on another desk.
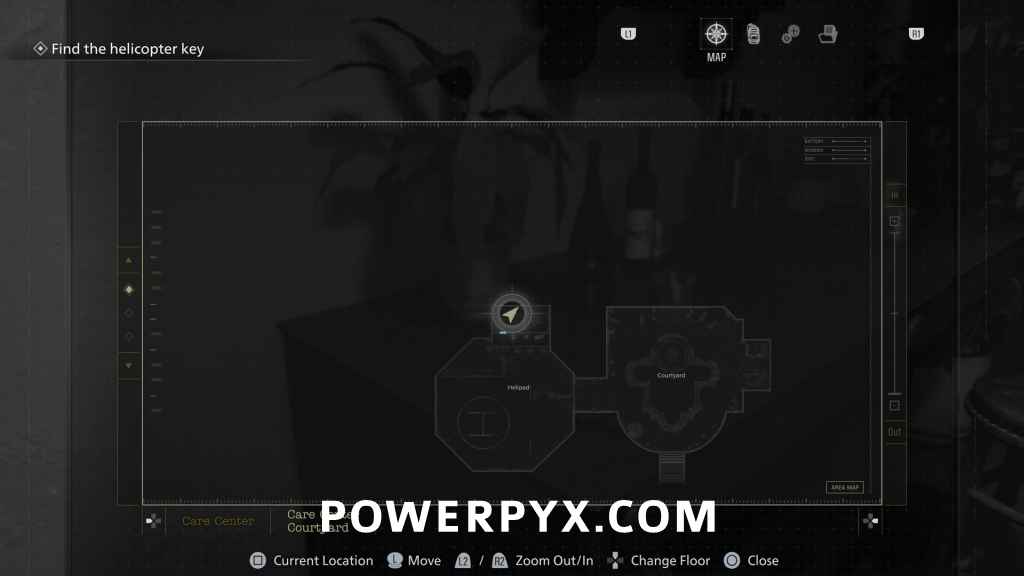
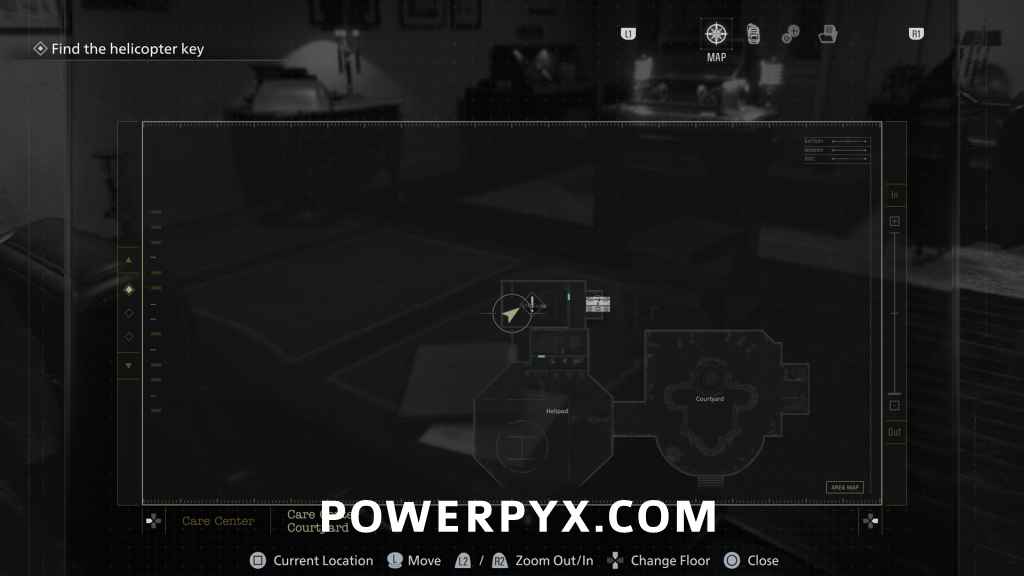
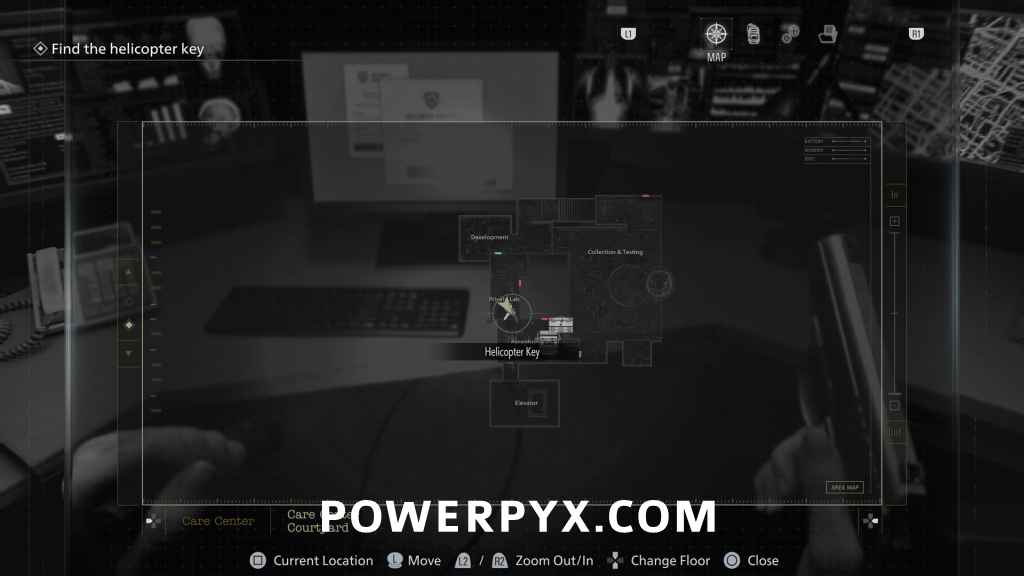
Key Item: Helicopter Key
Private Lab: Same room, on CCTV desk.

Afterward, interact with the PC where you got the Helicopter Key, click “Authorize”, go through the door. Go past the typewriter and downstairs to Collection & Testing, interact with the Disposal Tanks and spray at the enemies to make it across the room to the exit. Then keep running upstairs on the linear path back to the helicopter.
Care Center Courtyard (Rhodes Hill) – Leon
Weapon: Classic 70 (Sniper Rifle)
Automatically equipped as soon as you play Leon again.
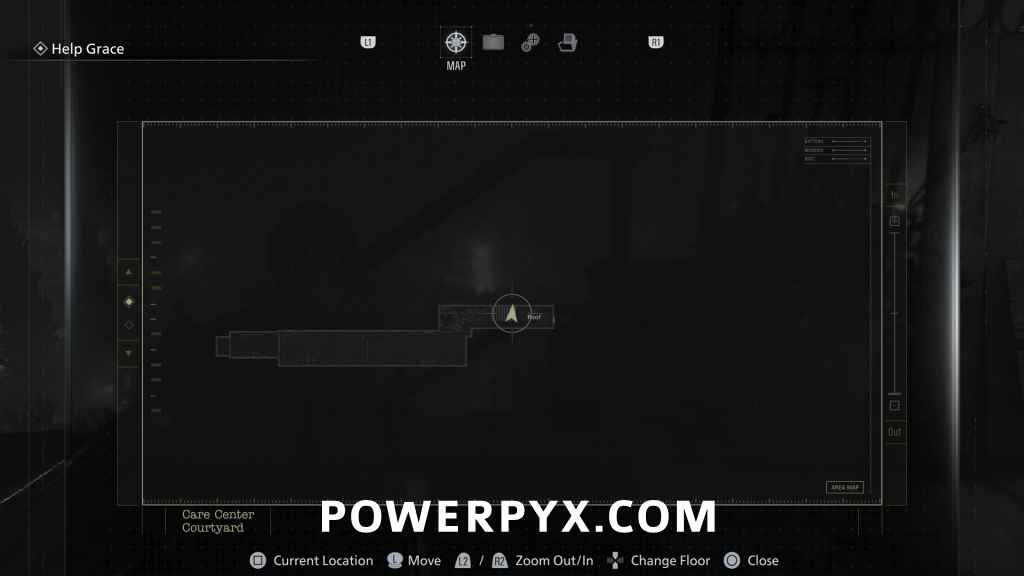
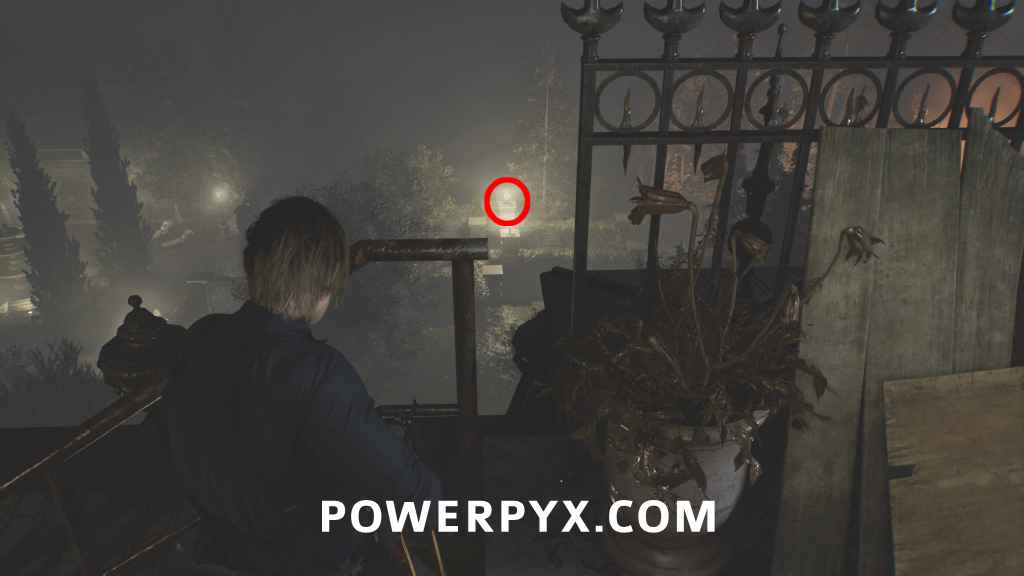
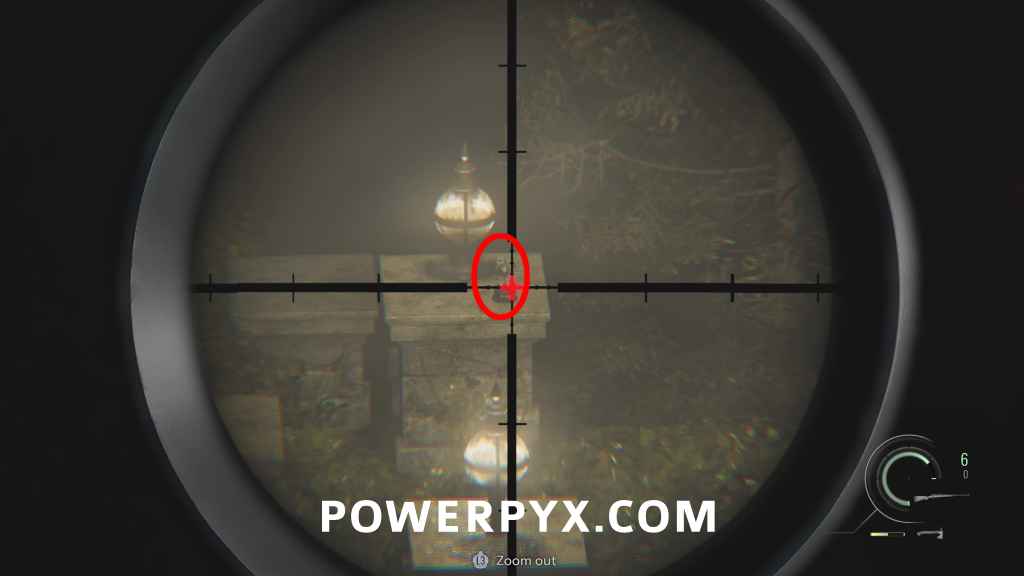
Mr. Raccoon #10
As soon as you play Leon again, climb over the window in front of you. Go straight across the roof until you drop down on the left side. You will see a staircase in front of you. Go to the top of the staircase but DON’T go through the wooden door yet. Turn left at the staircase and aim down at the lit lamps in the garden area. The Mr. Raccoon sits on the pedestal one of the garden lights is on, must shoot it with the scoped sniper from a distance. One of the best hidden Mr. Raccoons. Where the staircase ends you want to turn in a 90° angle and look through the opening between the staircase and the metal fence, aim down slightly and look under the second garden light.
Water Treatment Plant (Rhodes Hill) – Grace
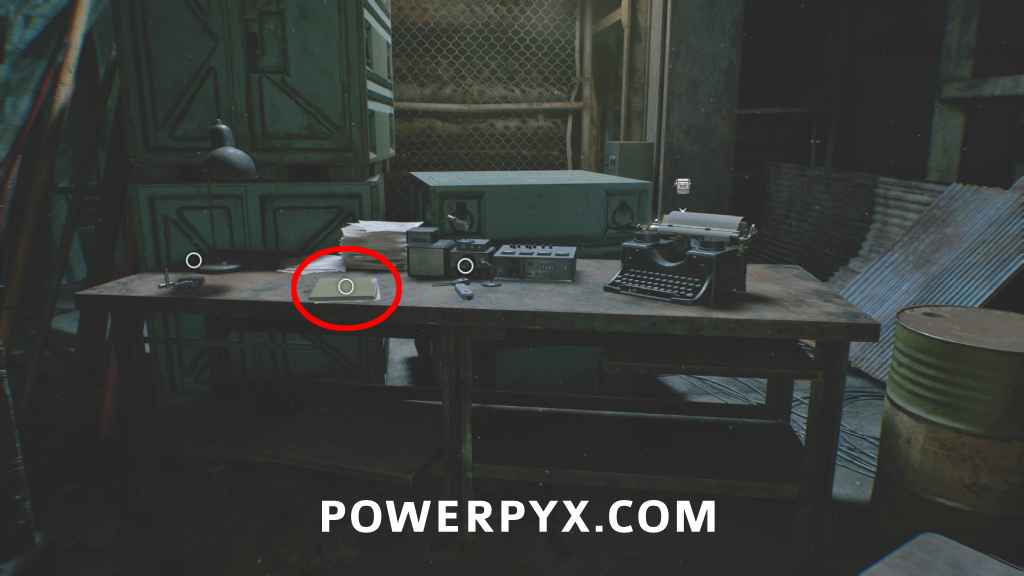
File #47 – Roof Hatch Manual
Storage Bay: When playing as Grace again, go forward until you lay down Emily and reach a safe room with a typewriter. The file is next to the typewriter.
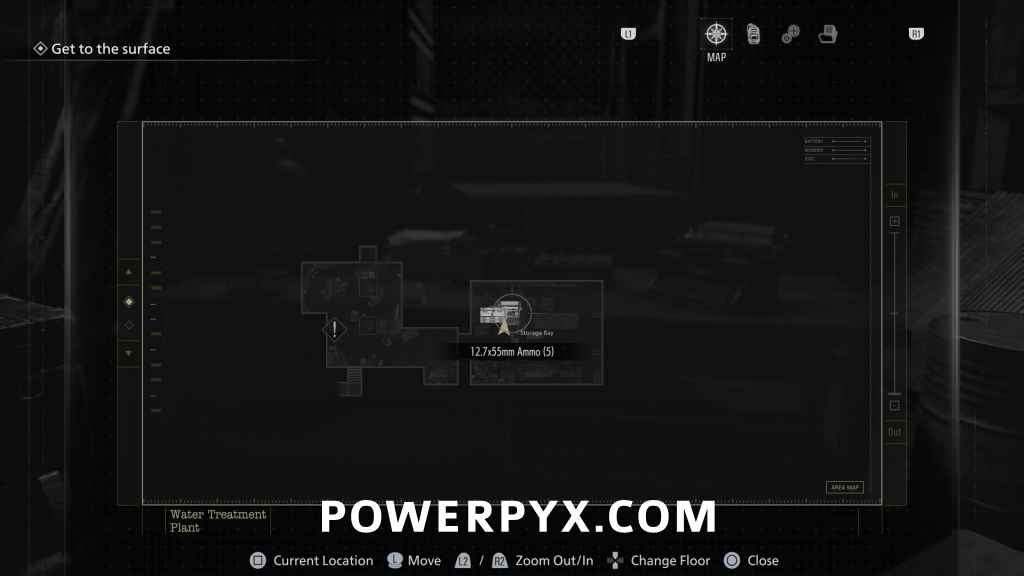
Trophy: Bring Out the Big Guns
While in the safe room be sure to equip the Requiem revolver (if you stored it in the box, transfer it to your inventory). Pick up the 12.7x55mm ammo from the typewriter table, and take any you stored in the box. In the next section after you go downstairs, you get chased by the big monster (“The Girl”) again. Shoot her once with the Requiem to unlock the trophy. Could also be done earlier but here is the spot where you are meant to shoot her to stun her while you turn on the power.
Key Item: Crank Lever
Filing Room: Found on shelf in Filing Room, use in Control Room to turn on power.
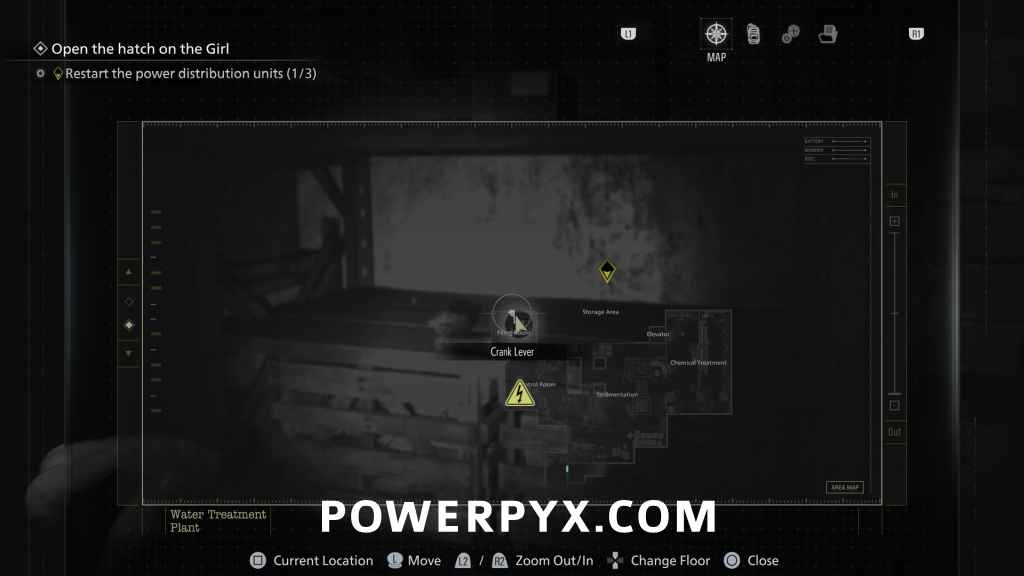
Turn on all 3 power switches on the bottom floor, then use the elevator to get to the upper floor, interact with the roof hatch controls (green panel). Return to the safe room.
East Raccoon City – Leon
File #48 – Report on the Raccoon City Incident
Automatically obtained when arriving in Raccoon City as Leon (goes directly in your collected Files menu).
File #49 – Raccoon City Incident Newspaper
From where you start, go forward just a few steps to find this on the right, on the ground, near trash bags.

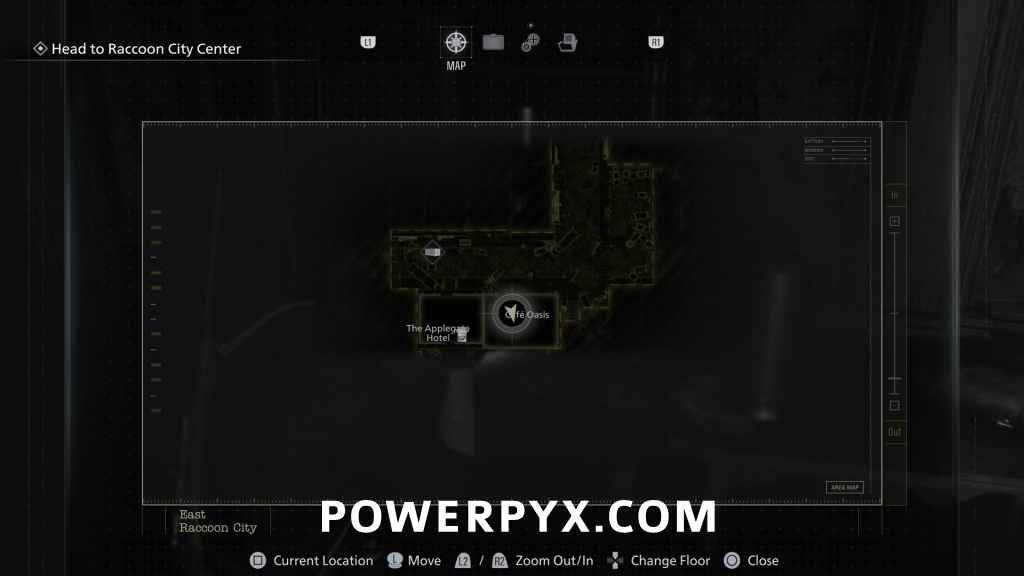
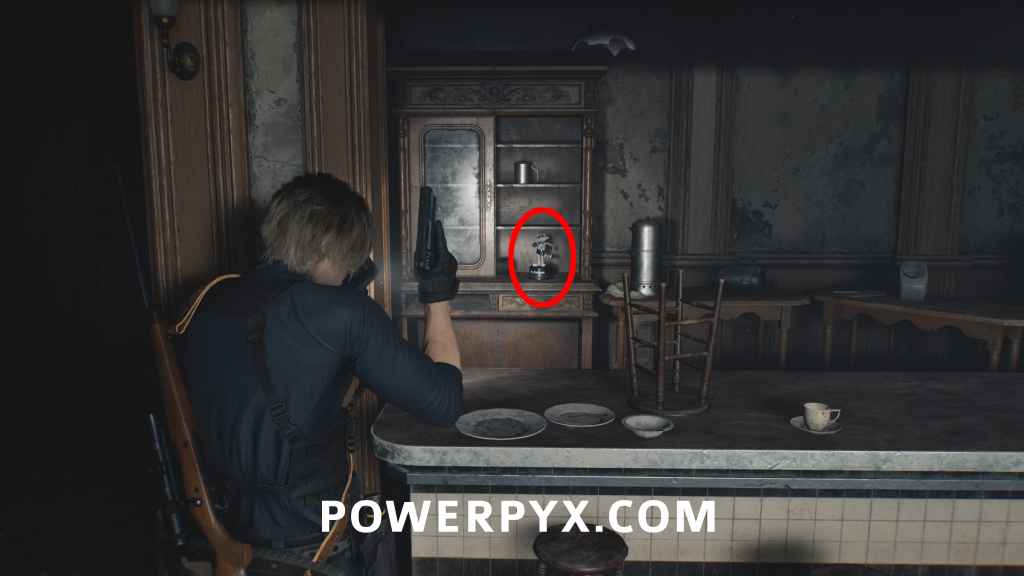
Mr. Raccoon #11
Café Oasis: From the start, go forward until you reach an intersection. At the intersection go right and enter the first open building to your left which is Café Oasis (before The Applegate Hotel). You find this behind the counter.
File #50 – Orders for the Engineer Corps
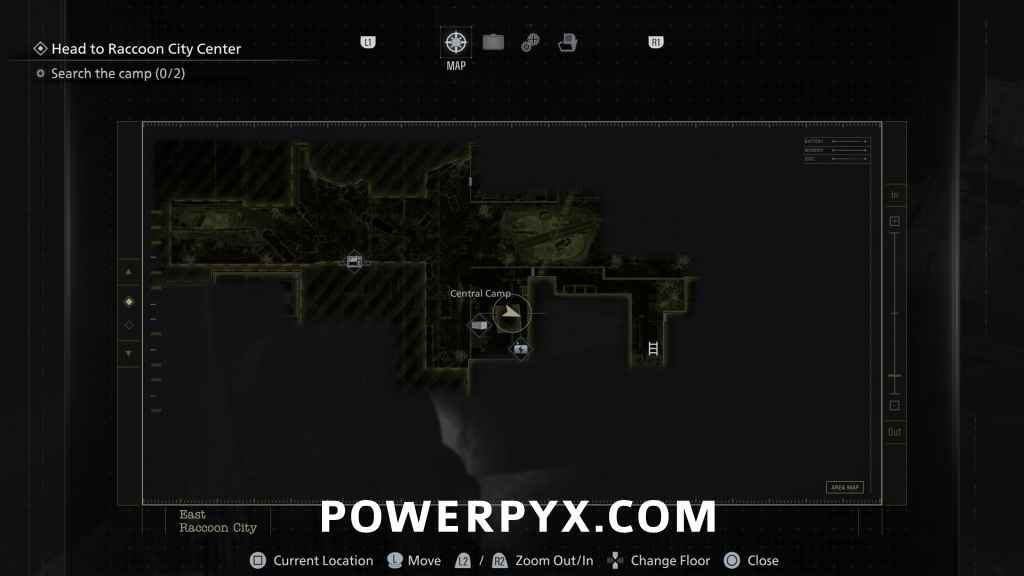
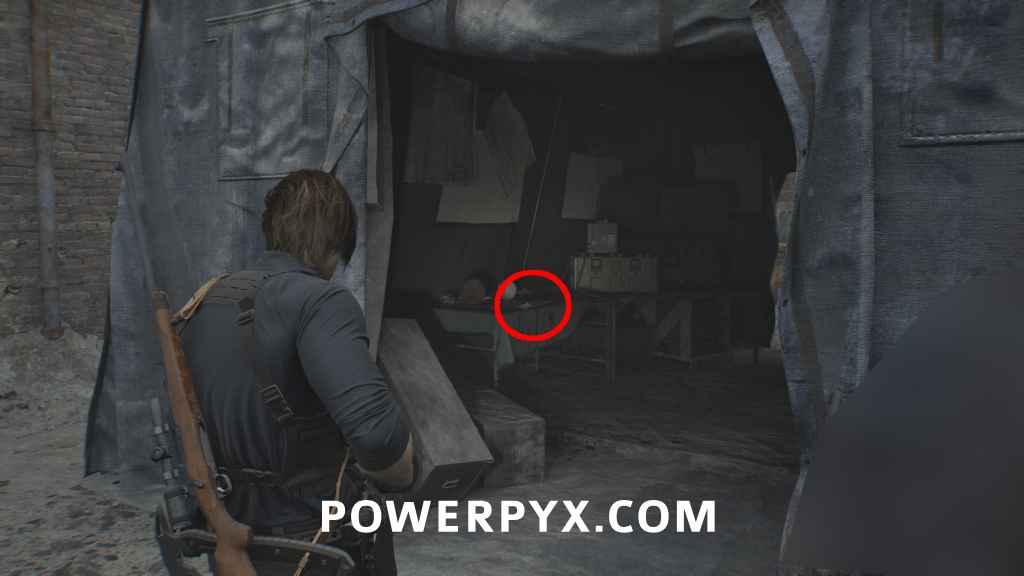
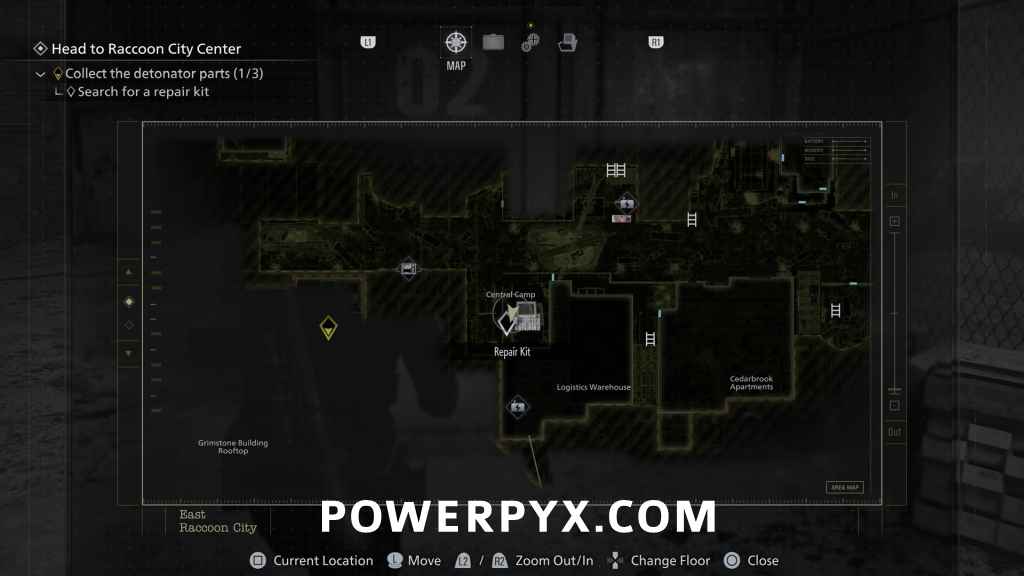
Central Camp: Use the revolving door in The Applegate Hotel and follow the linear story path until you reach the Incomplete Bomb (cutscene a couple minutes later). Go left and enter the Central Camp, you find this inside the blue BSAA tent. You go there for story purposes automatically to turn on a power generator, then you get a save point in the same room as the file.
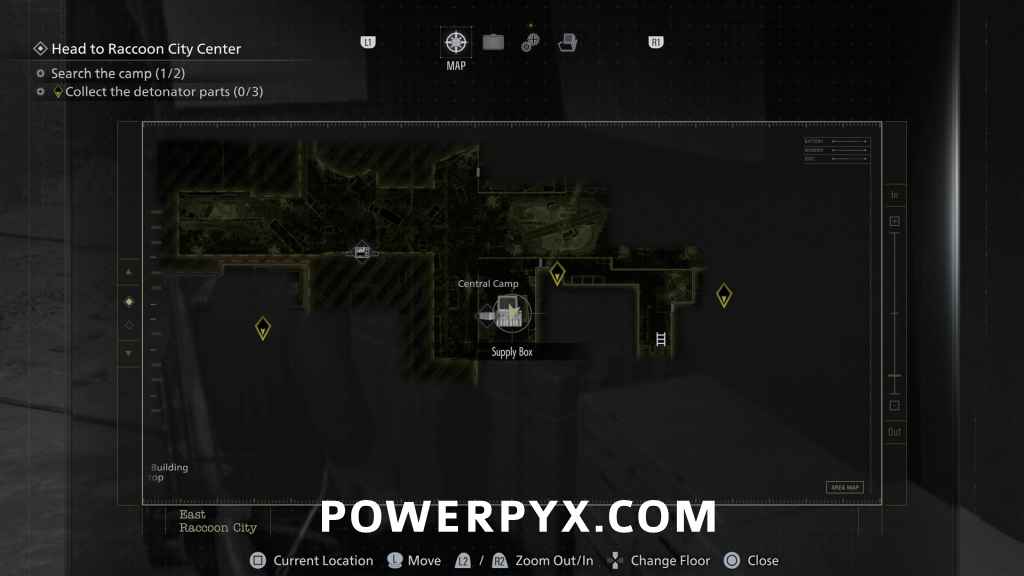
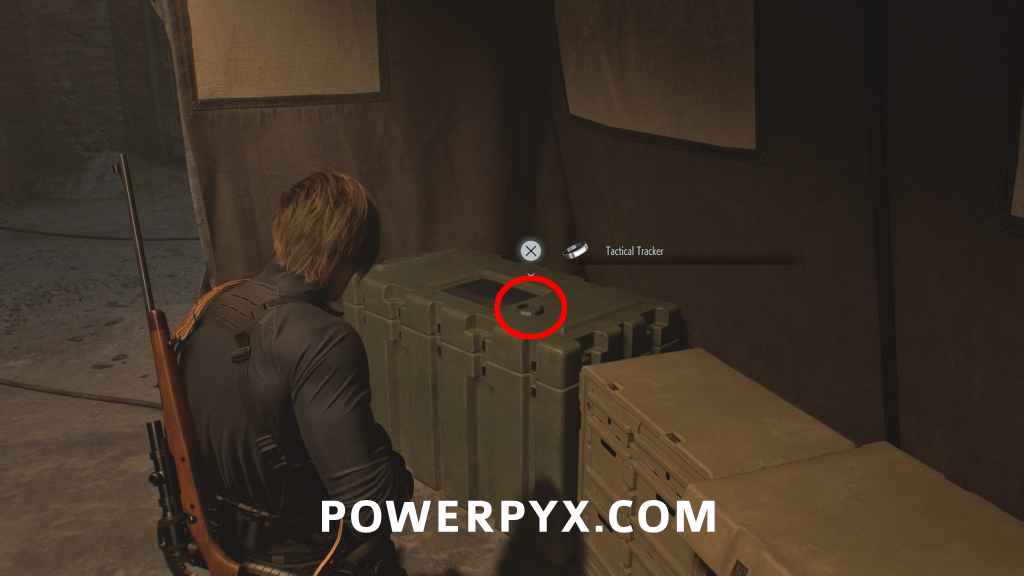
Key Item: Tactical Tracker
Central Camp: After using the power generator in Central Camp, you find this on the supply box next to the save point laptop. Killing enemies will give credits that can be traded for items at Supply boxes from now on.
Weapons/Upgrades: Silencer 9 (Pistol) + 990-TAC (Shotgun) + Stiri REVO3 A1 (SMG) + Body Armor + Case Upgrade (8×13)
Can be bought from the Supply Box in exchange for credits from killing enemies. Body Armor Lv. 2 is available after buying Lv. 1. You can use the combat axe infinitely to kill enemies, it can be resharpened anytime by pressing  +
+  /
/  +
+  and has infinite durability.
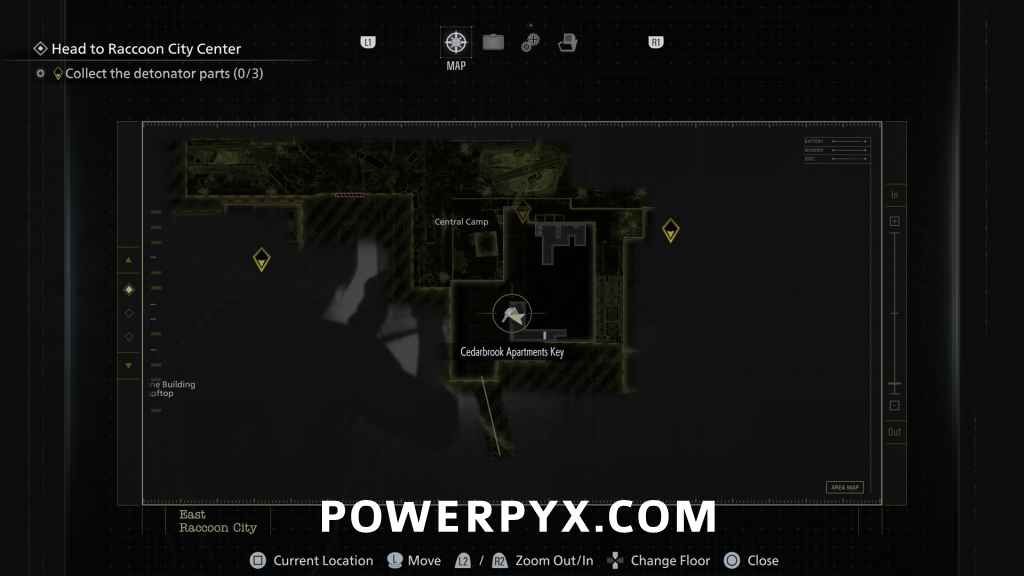
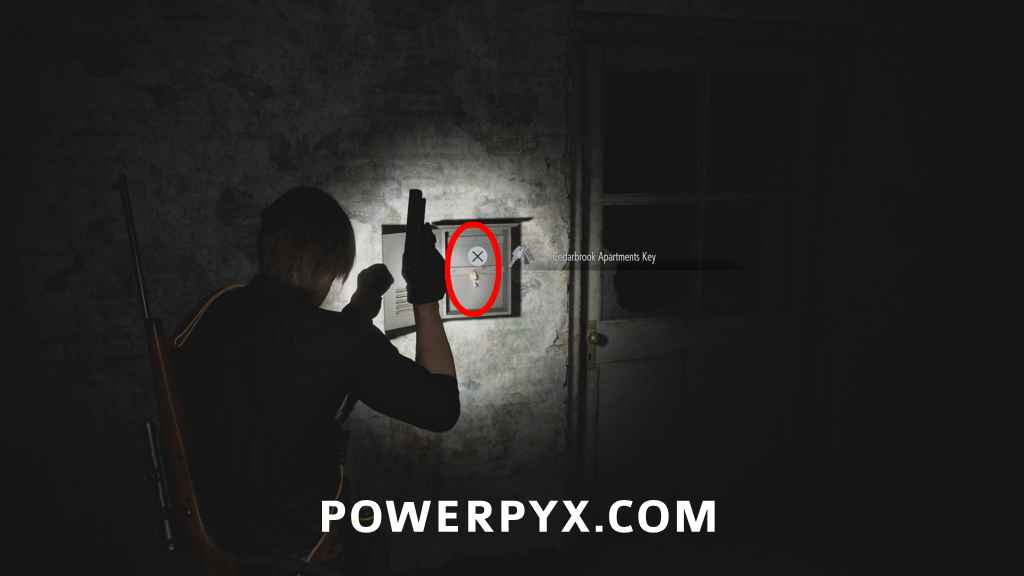
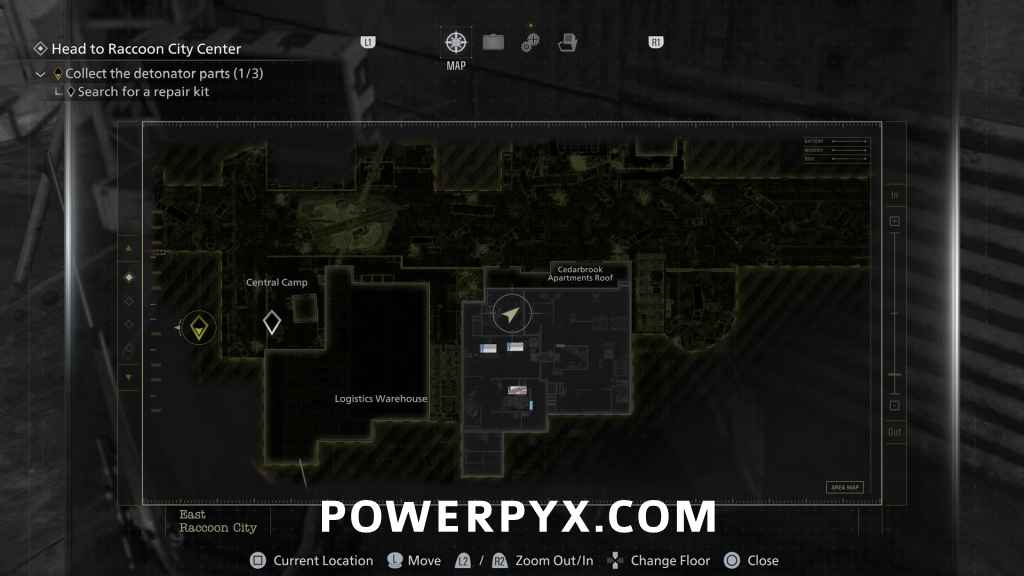
Key Item: Cedarbrook Apartments Key
Logistics Warehouse 2F: In the back of Central Camp, press the red button on the wall to raise the shutter. Then advance through the Warehouse by shooting down the hanging crates until you reach a dark room on the 2nd floor. You find this hanging on the wall by the door.
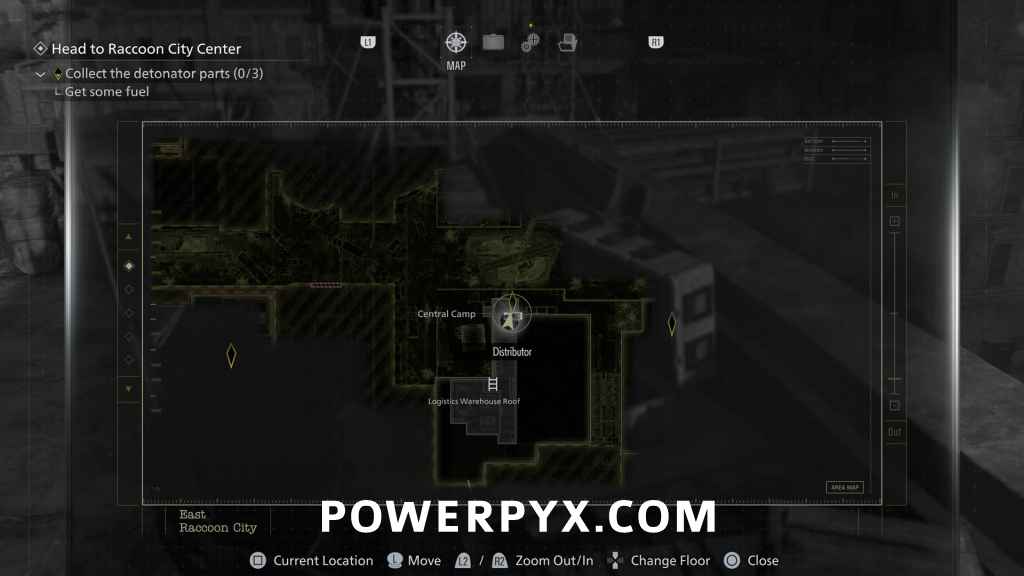
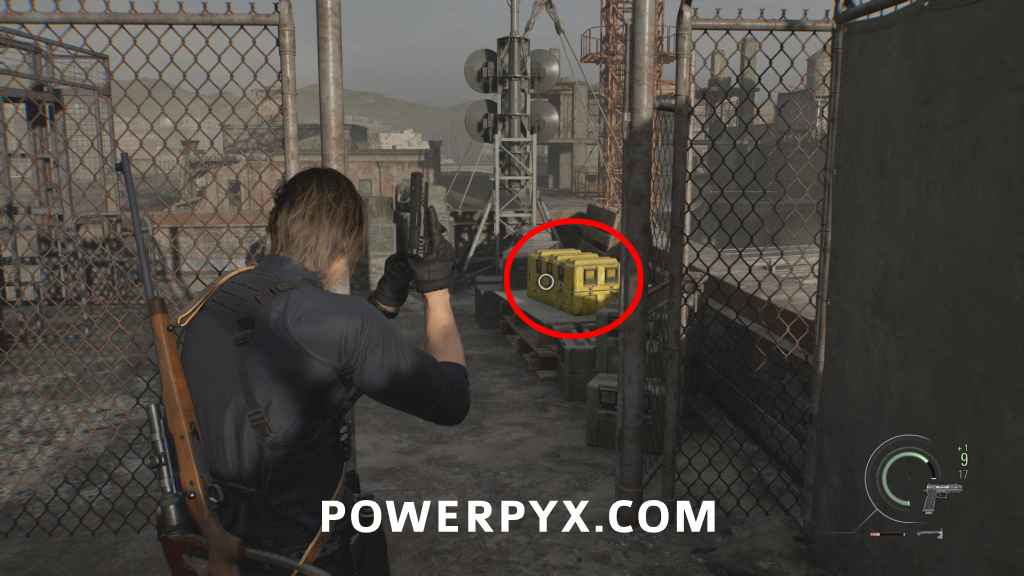
Key Item: Distributor
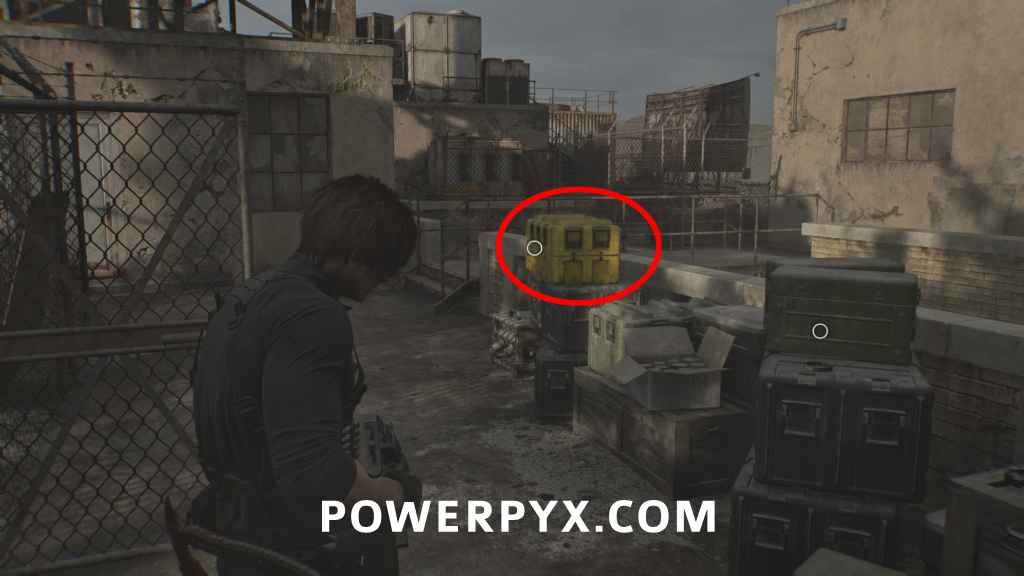
Logistics Warehouse Roof: Climb to the roof and then go left to find this is in a yellow box.
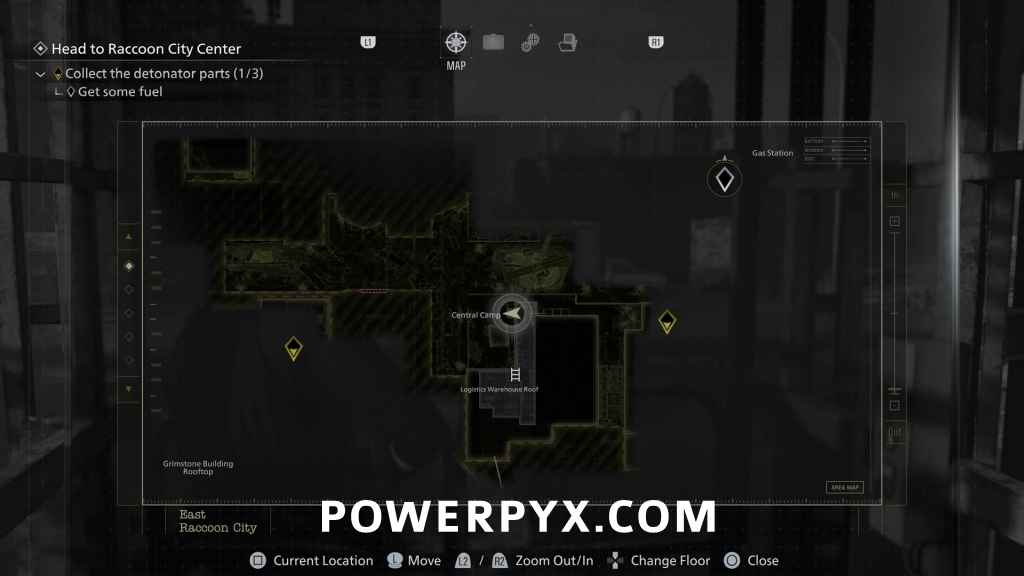
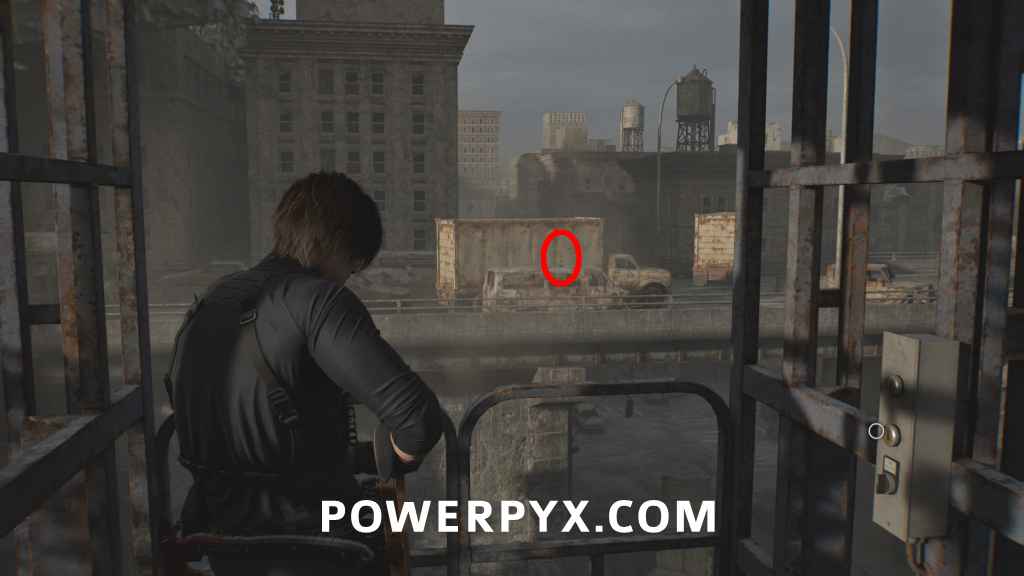
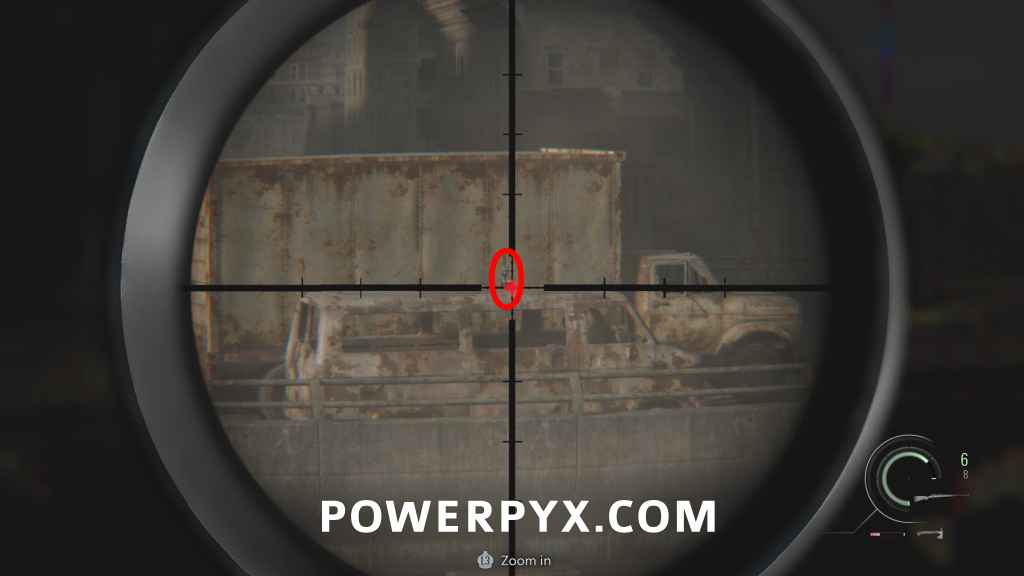
Mr. Raccoon #12
Logistics Warehouse Roof: After you pick up the Distributor you automatically use the binoculars to scout the area. Then turn around towards the elevator and look at the highway (facing East on the map). This sits on top of a car wreck on the highway, shoot it with the sniper rifle. On the van in front of a delivery truck.
Mr. Raccoon #13
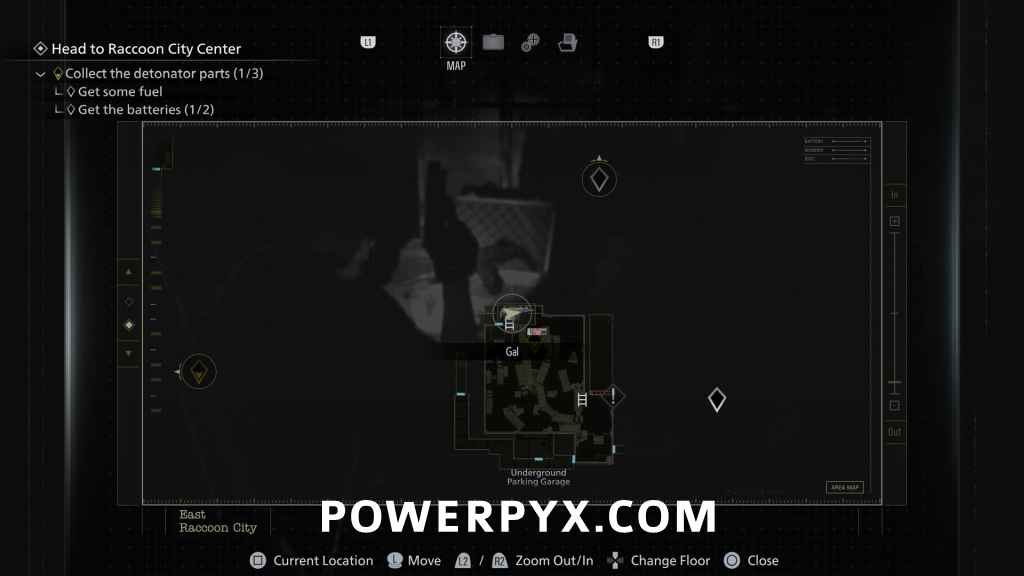
Underground Parking Garage: Use the Apartments key on the gate in the Central Camp, next to the elevator. Then enter the door on the right downstairs. When you reach the first enemy where you get a tutorial on stealth kills, enter the room on the left to find this on a box.
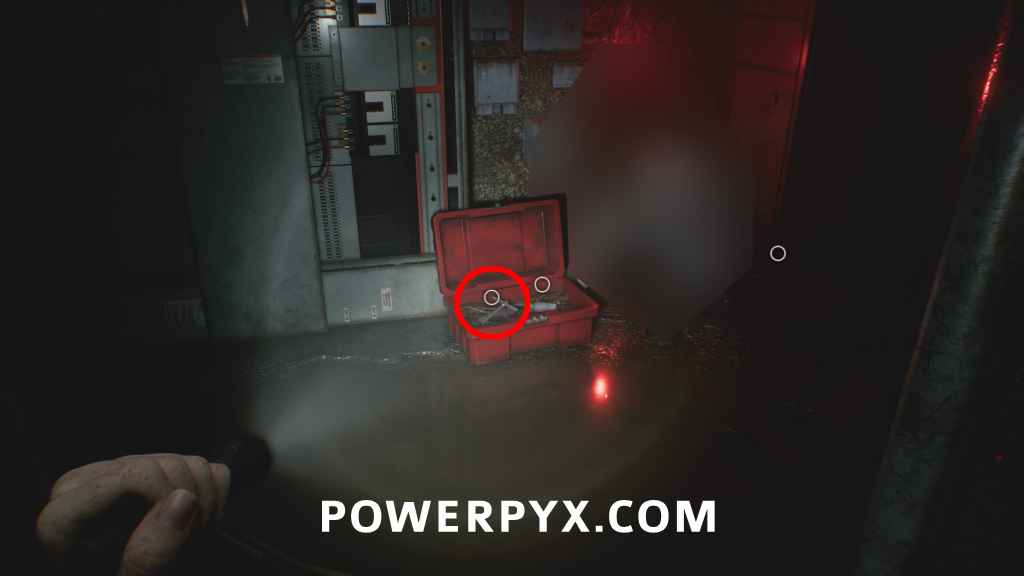
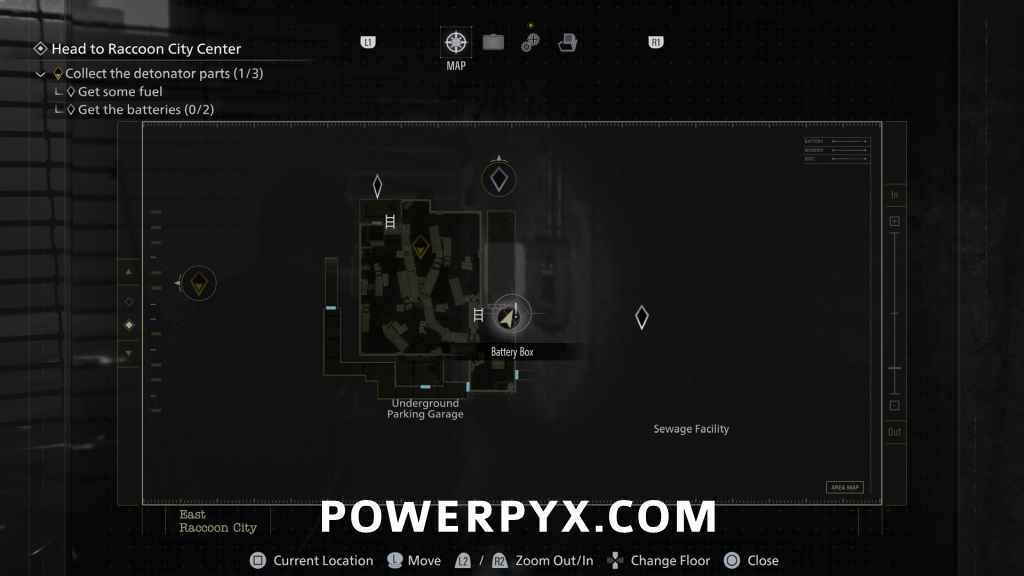
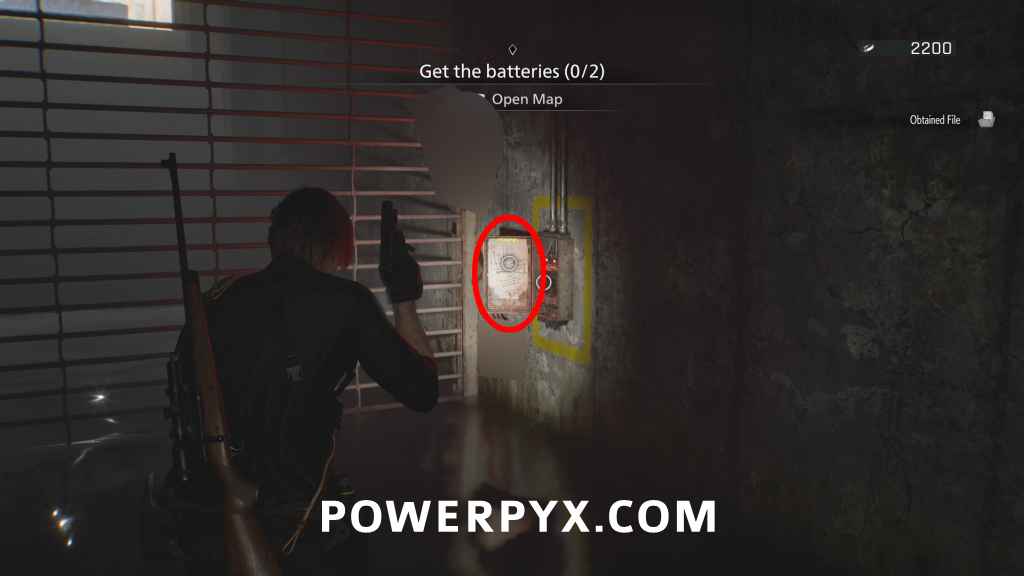
File #51 – Battery Storage Locations
Underground Parking Garage: From the previous location, enter the next section of the parking garage and turn left to find a flooded area with a single zombie. Inspect the red-lit box on the right of the gate.
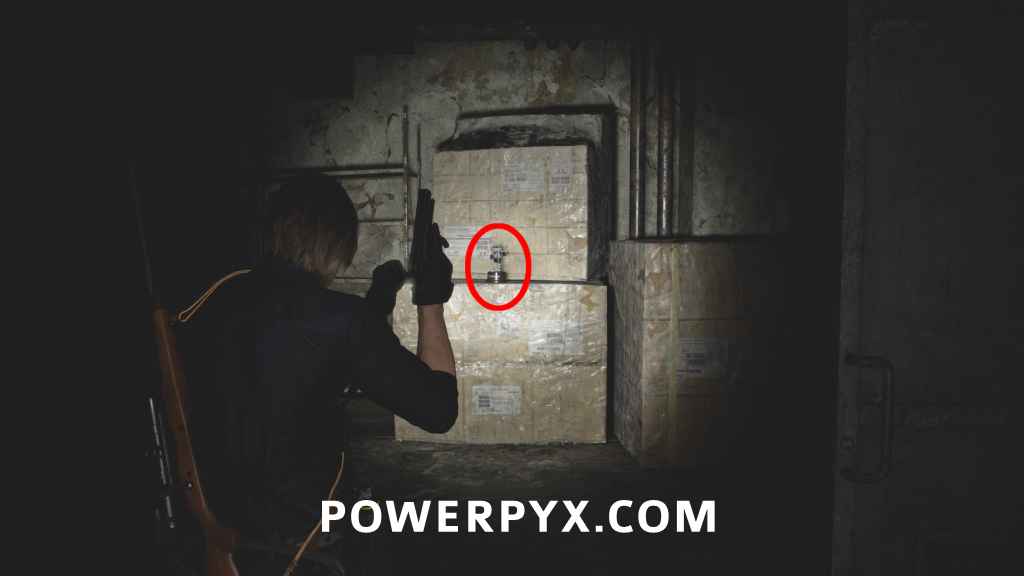
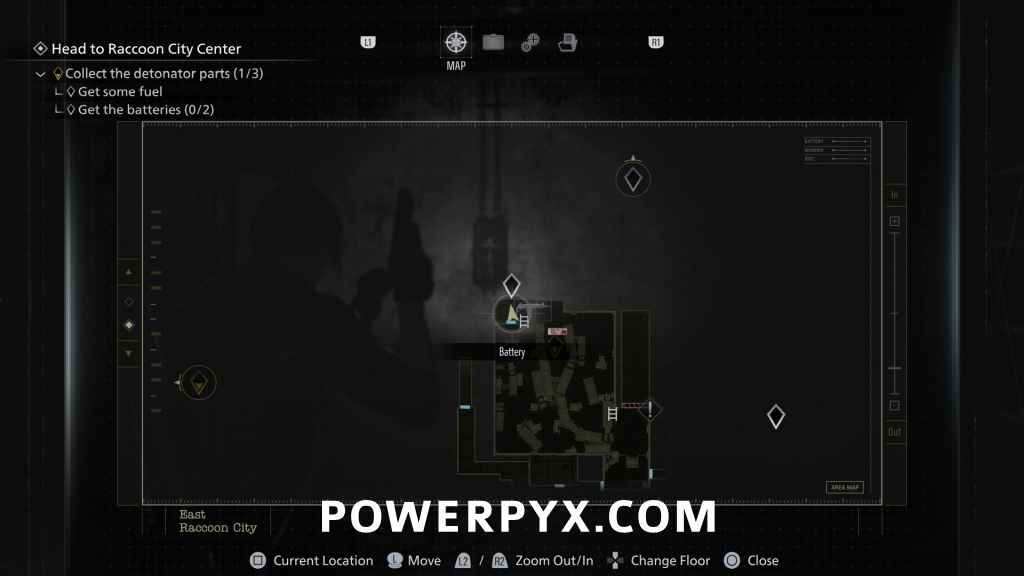
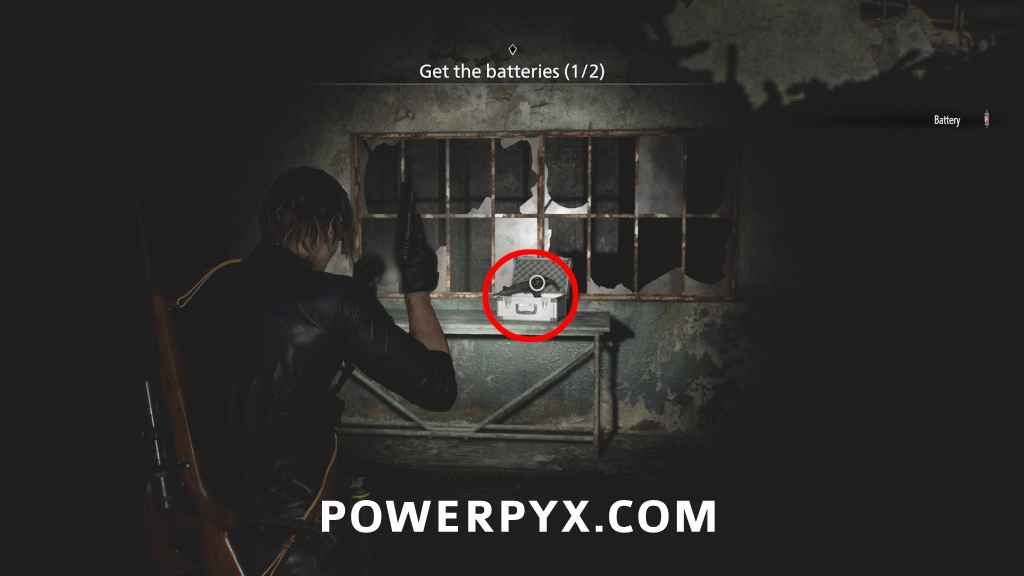
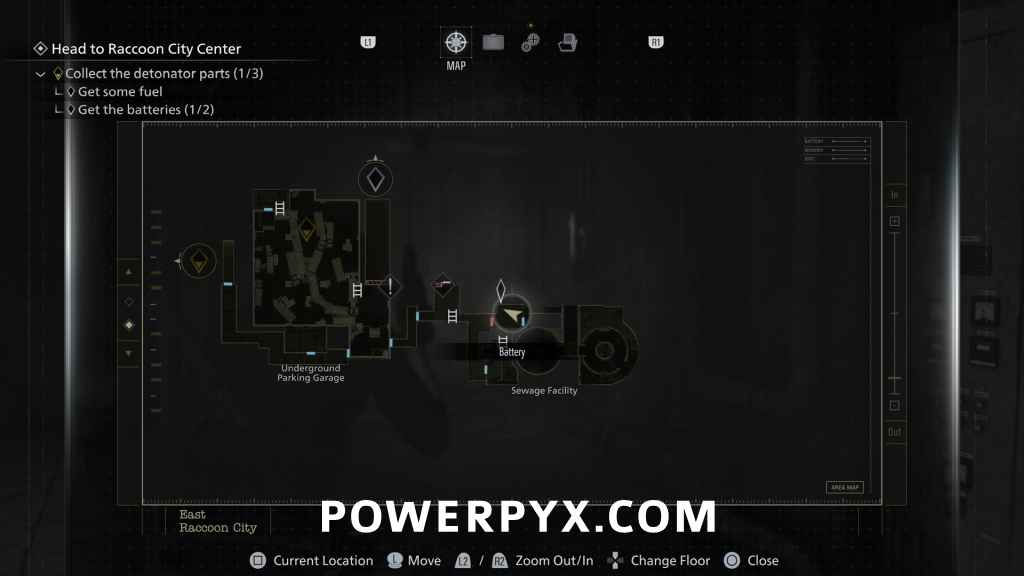
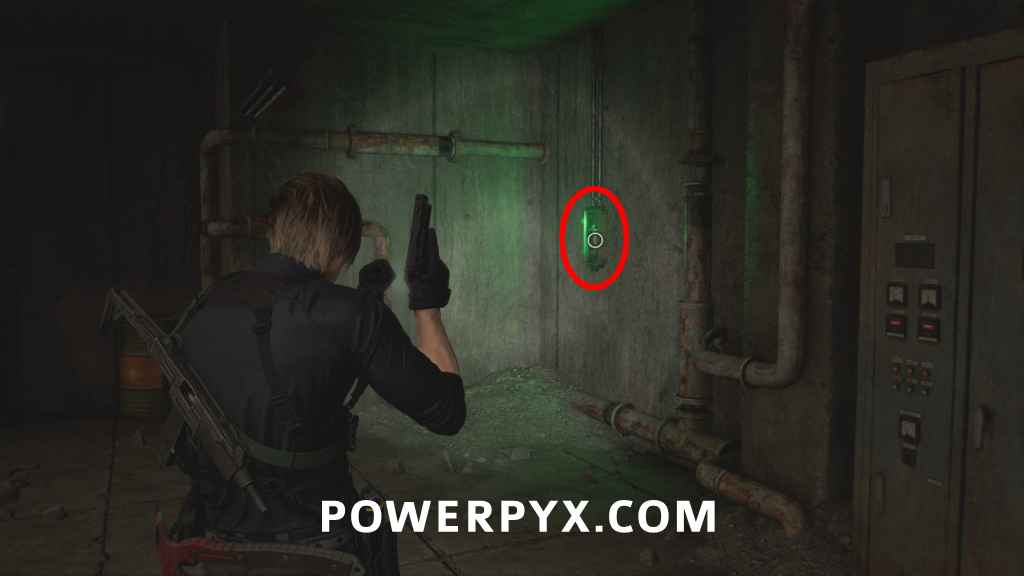
Key Item: Battery #1
Underground Parking Garage: From the box where you got the previous file, turn around 180° and climb over the ladder. Reach the north-west corner of the flooded garage to find the battery on the wall in a small room.
Weapon: Gal (SMG)
Same room, in a silver box.
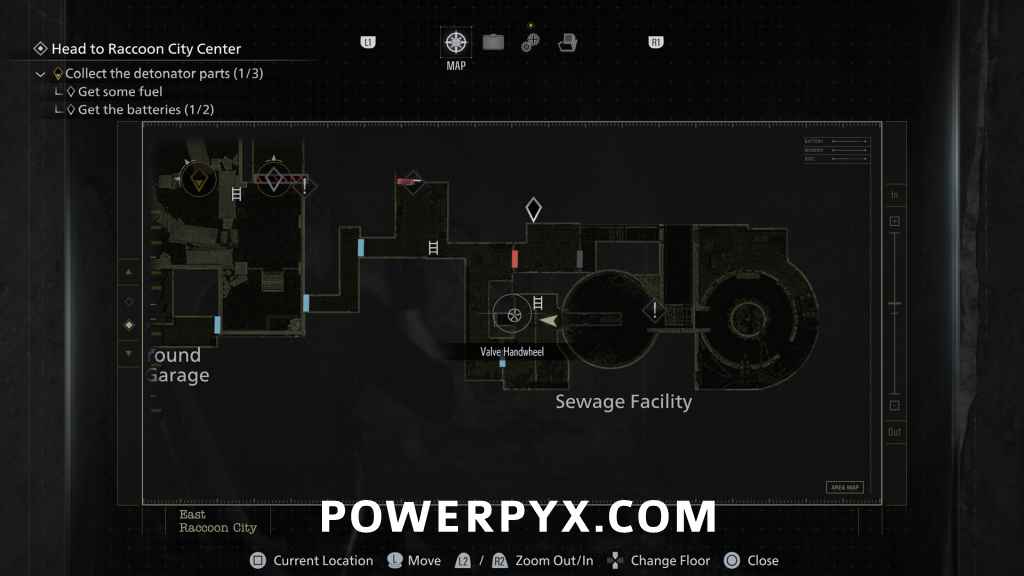
Afterward, climb the ladder in the same room and walk over the roofs to drop back down to the closed gate, insert the battery. Then go back up the stairs and through the blue door on the side to reach Sewage Facility.
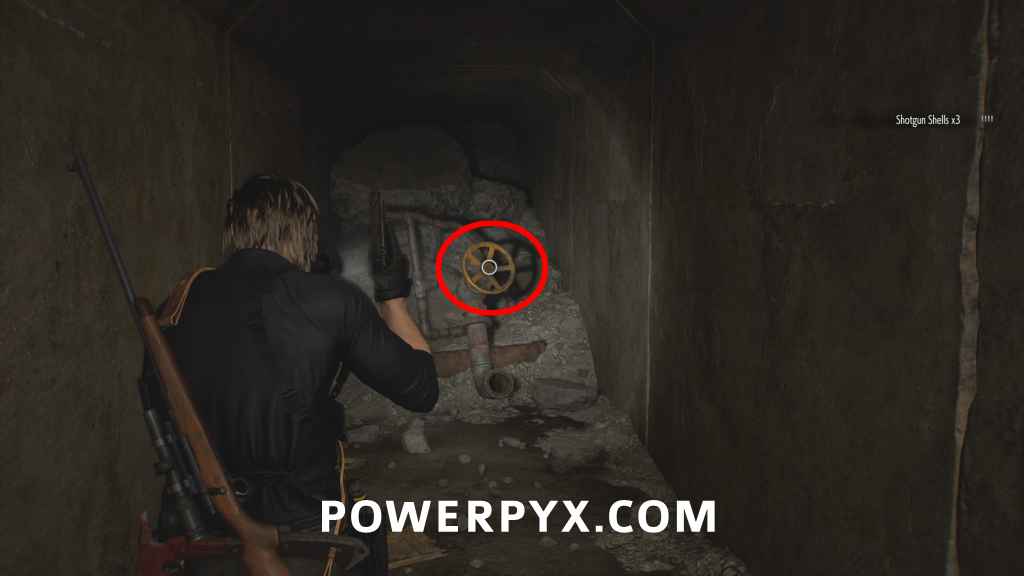
Key Item: Valve Handwheel
Sewage Facility: Found on the path through the sewage facility, after dropping down.
Key Item: Battery #2
Sewage Facility: Insert the wheel in the door directly across. Turn it all the way to make a bridge you can walk over at the top of the room to reach the 2nd battery.
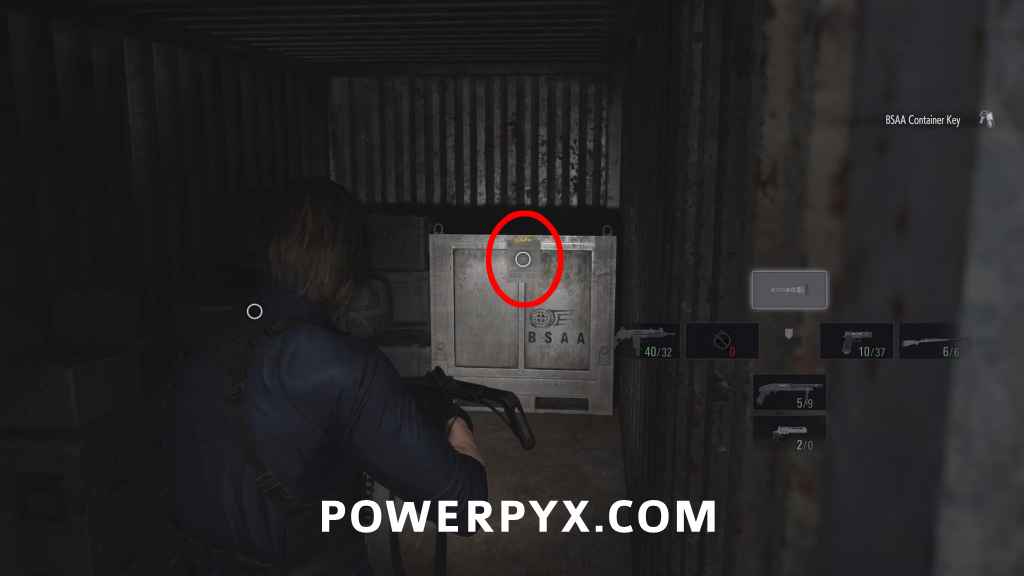
Key Item: BSAA Container Keys
Insert both batteries at the flooded garage gate. Then go forward and left to get a cutscene, you automatically get the keys from the cutscene. You need this to open the 3 BSAA Containers for  Crate Expectations, which we’ll collect soon.
File #52 – Inventory List
After the cutscene where you get the BSAA Container Keys, to the immediate left in the open container (in front of entrance to Cedarbrook Apartments).
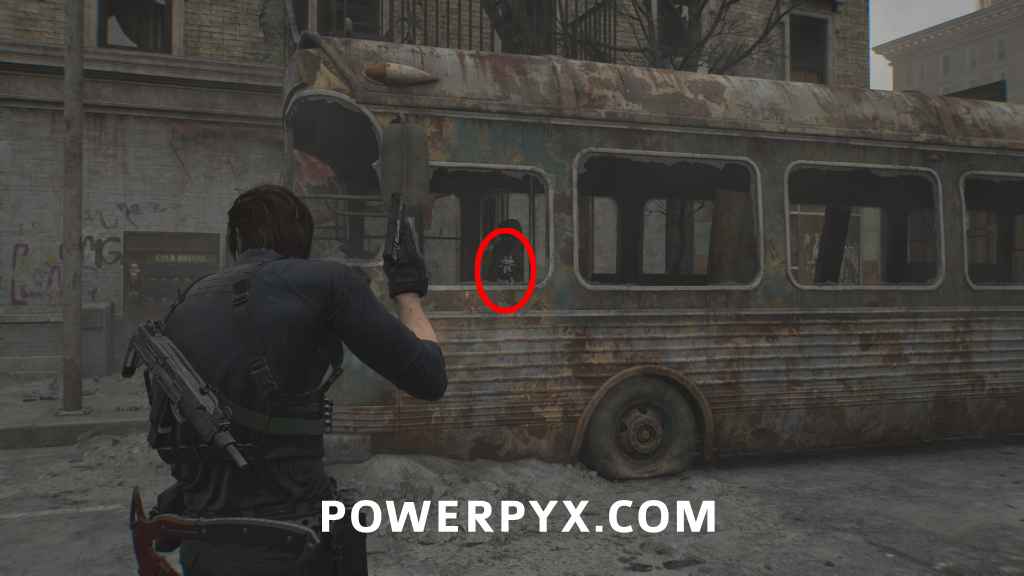
Mr. Raccoon #14
In the driver seat of the bus directly next to the previous file.
Key Item: Rusty Crank
Cedarbrook Apartments 1F: Progress through the Cedarbrook Apartments and crank the door on the bottom floor. (You can use it on the apartments upper floor for story progression, and in the Sewage Facility which leads to some consumables)
Mr. Raccoon #15
Cedarbrook Apartments: After getting the crank, go back upstairs in the Apartments and use the crank on the balcony gate. Climb the next ladder, then turn right to enter the upper floor of the apartments. Go right to the stairwell and walk to the back of the floor to find it inside an open fridge (don’t go downstairs).
Key Item: Broken Signal Receiver / Distributor & Broken Signal Receiver
Cedarbrook Apartments Roof: On the rooftop of Cedarbrook Apartments. Make it past the rocket launchers to find this in a yellow box at the end of the roof. Combine it with the Distributor.

File #53 – Engineer Corps Note
Cedarbrook Apartments Roof: Same place as the previous item, to the right of the yellow crate.
Mr. Raccoon #16
Shoot down the ladder on the street opposite the entrance to Cedarbrook Apartments, climb it to drop into the gas station. You find this inside the Gas Station, on a metal shelf.
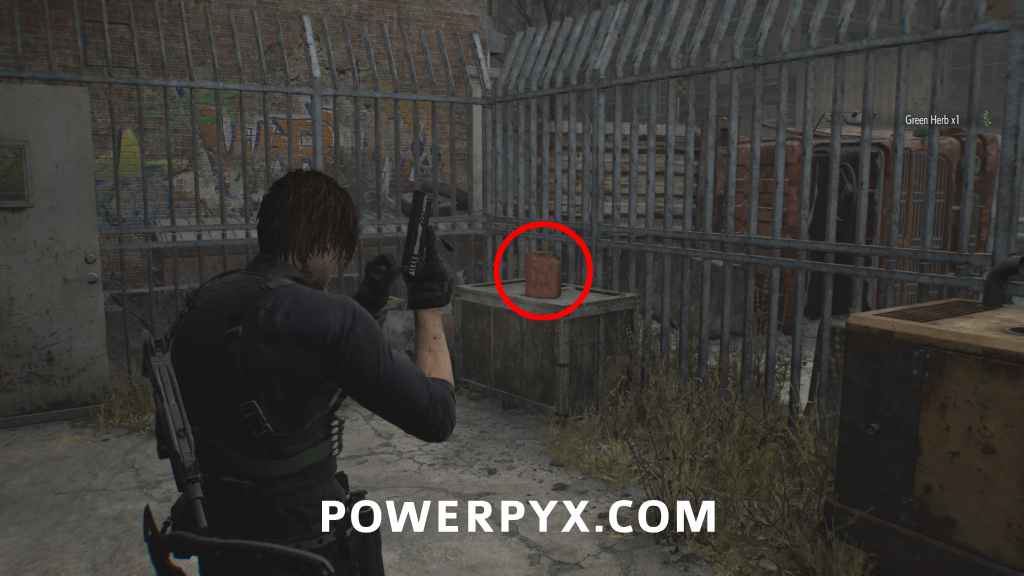
Key Item: Gas Can / Gas Can with Fuel
Go through the Gas Station to find it. Afterward, fill it in the back of the gas station main yard to turn it into “Gas Can with Fuel” and use it on the generator where you picked it up.

BSAA Container #1 + Weapon: Marksman 1A (Sniper)
At the east end of the main road between Gas Station and Apartments. At the end of the road climb up behind the truck to reach the big blue container. Use the BSAA Container Keys you got from the cutscene. The 3 containers get marked on the map when near them. (If the rifle doesn’t fit in your inventory you can still buy it at later supply boxes)
Mr. Raccoon #17
Go to the west end of the main road. At the end of the road is a big crane, flip the switch on it to make a shortcut back to the Central Camp. While going over the shortcut look down and to the left to see this in open sewage pipe.

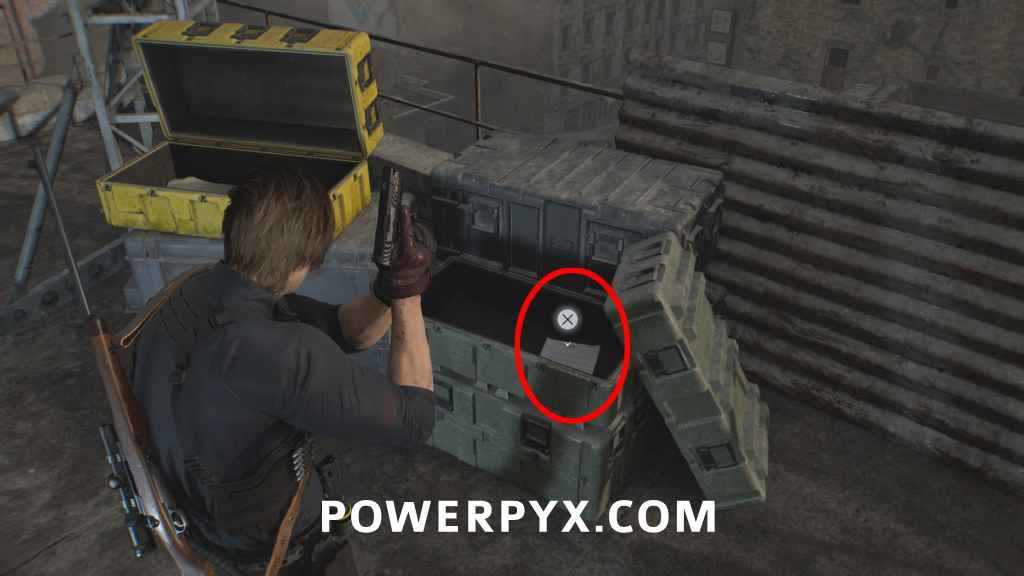
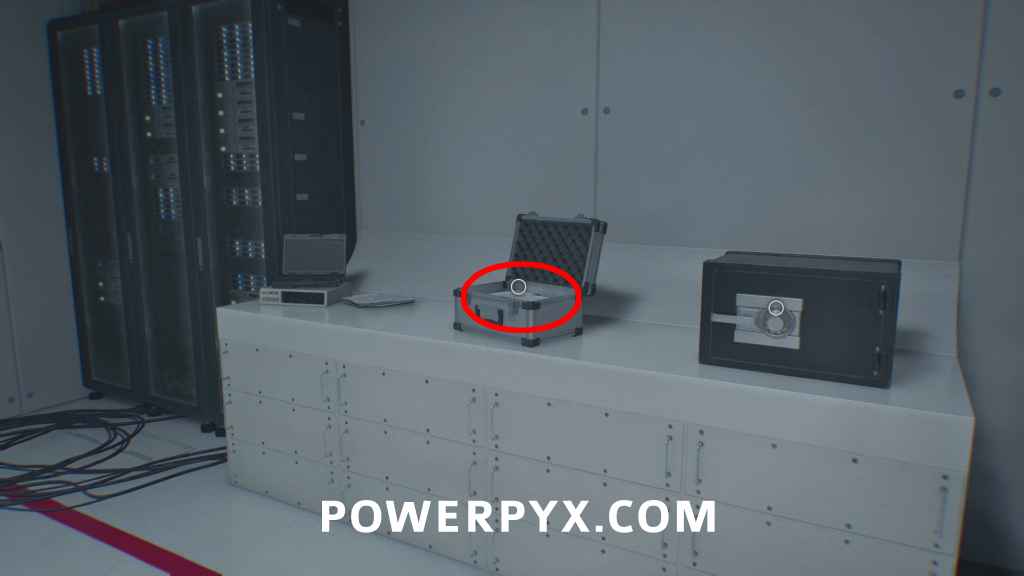
BSAA Container #2 + Key Item: Repair Kit
Central Camp: Backtrack to Central Camp and open the big blue container there in the corner next to the tent. Inside you find a Repair Kit, use it on the Distributor & Broken Signal Receiver.

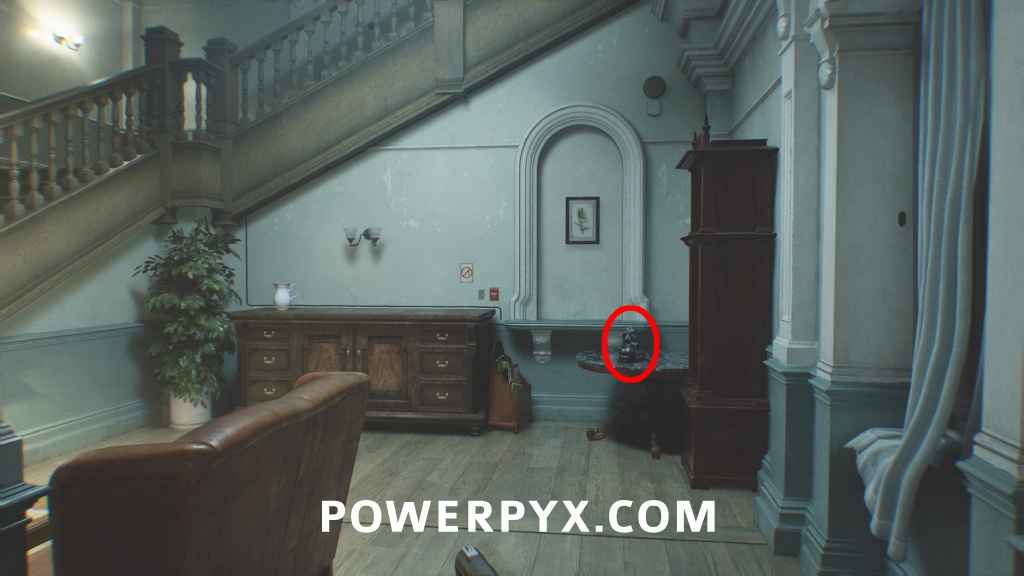
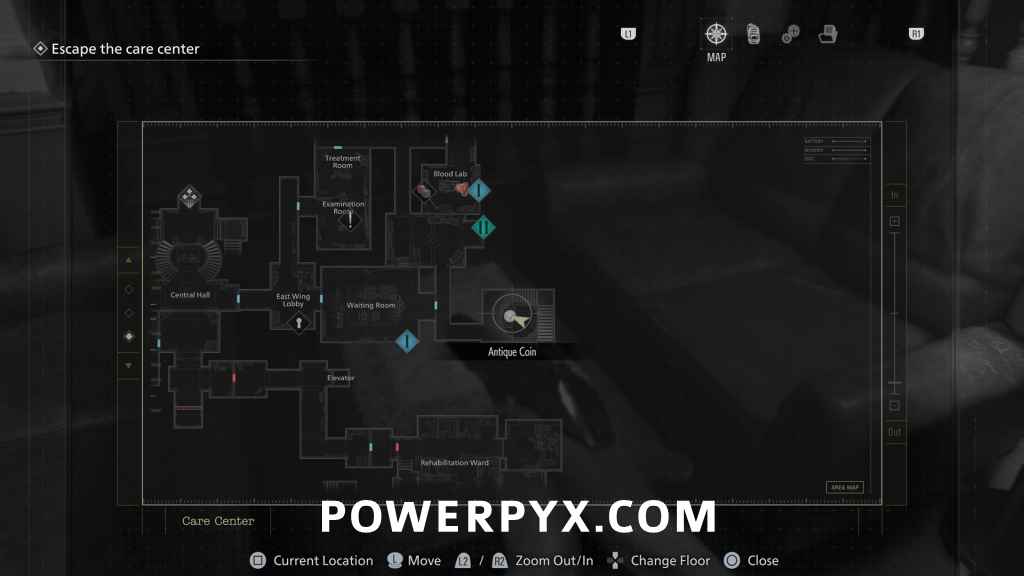
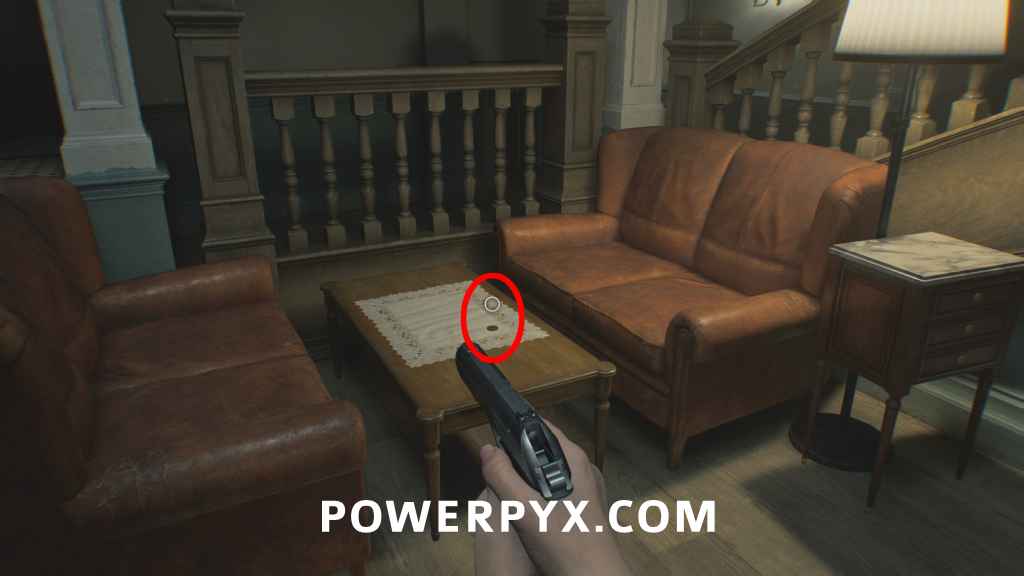
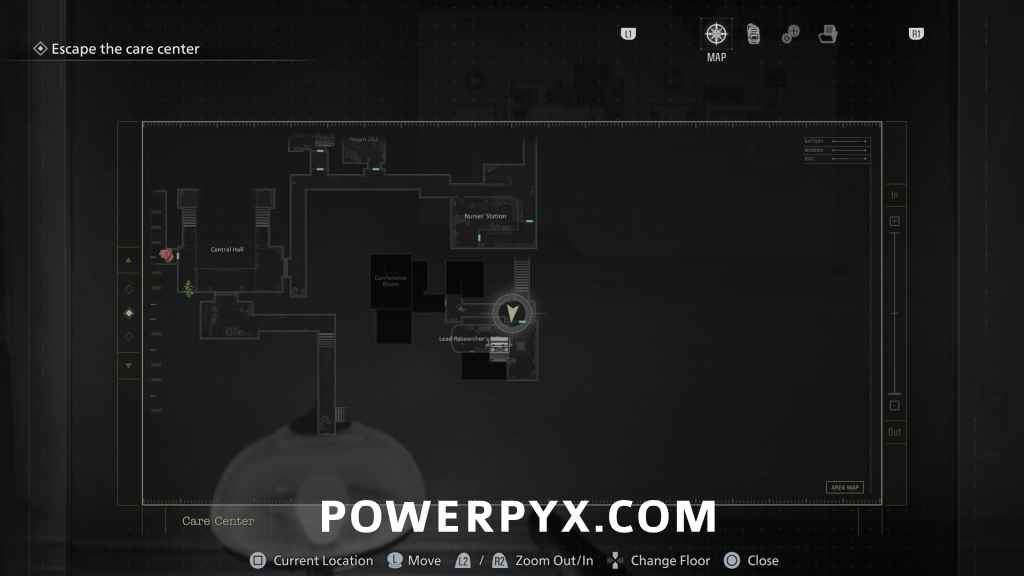
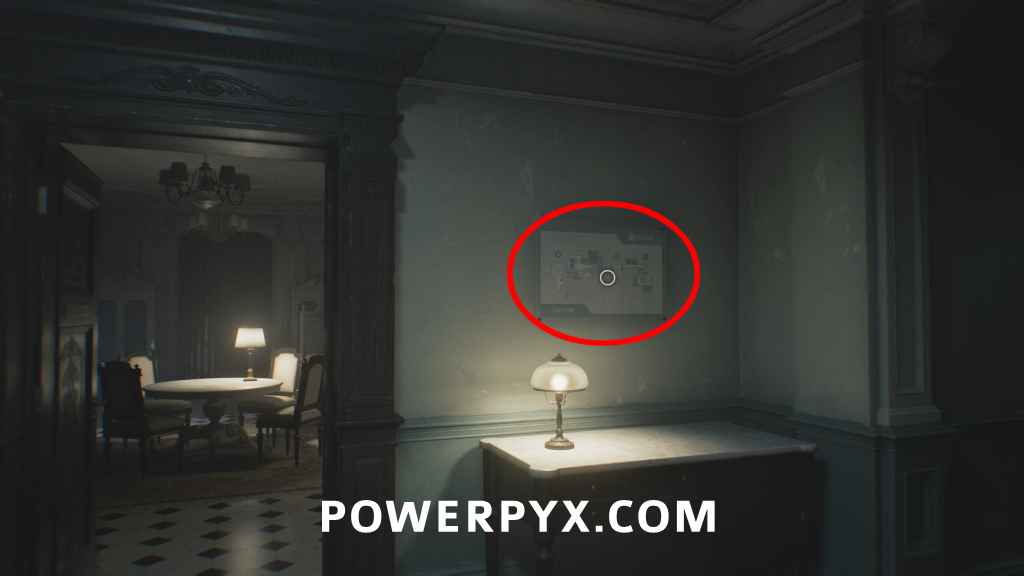
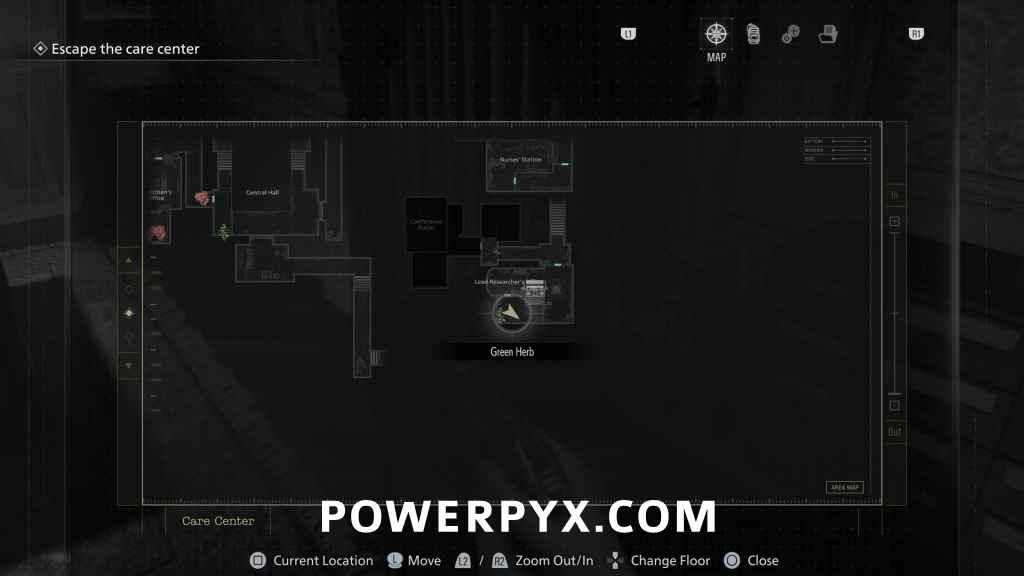
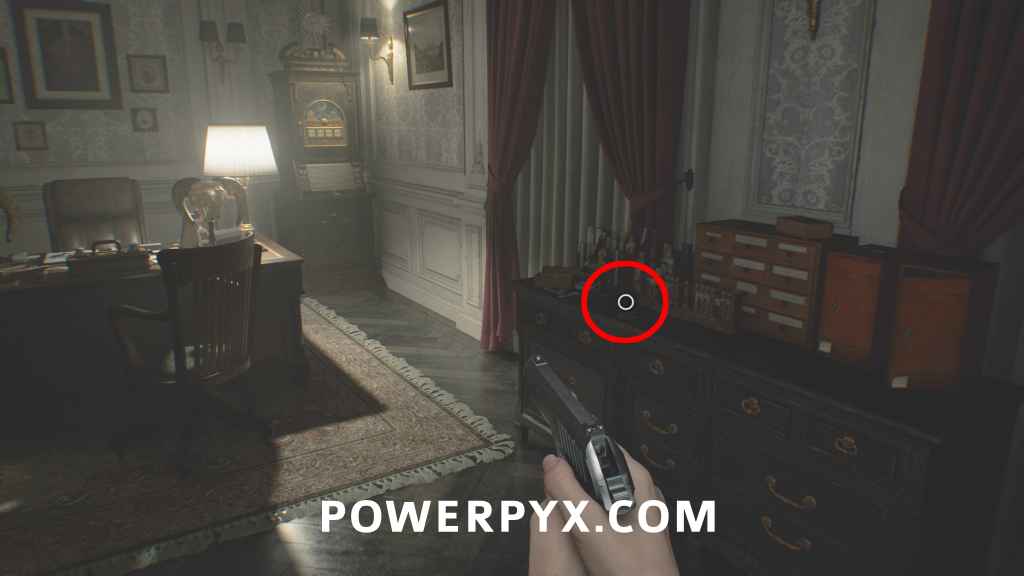
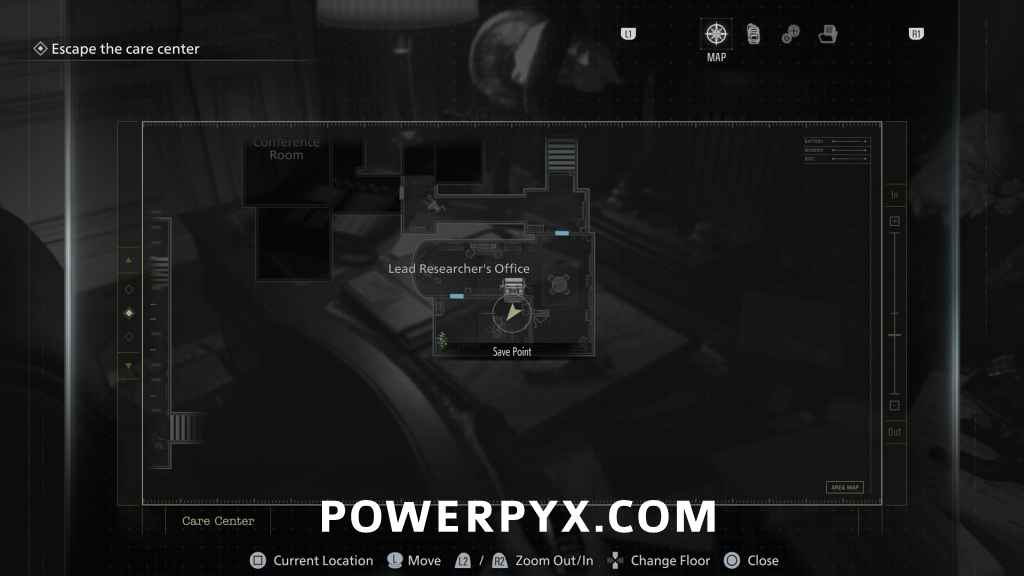
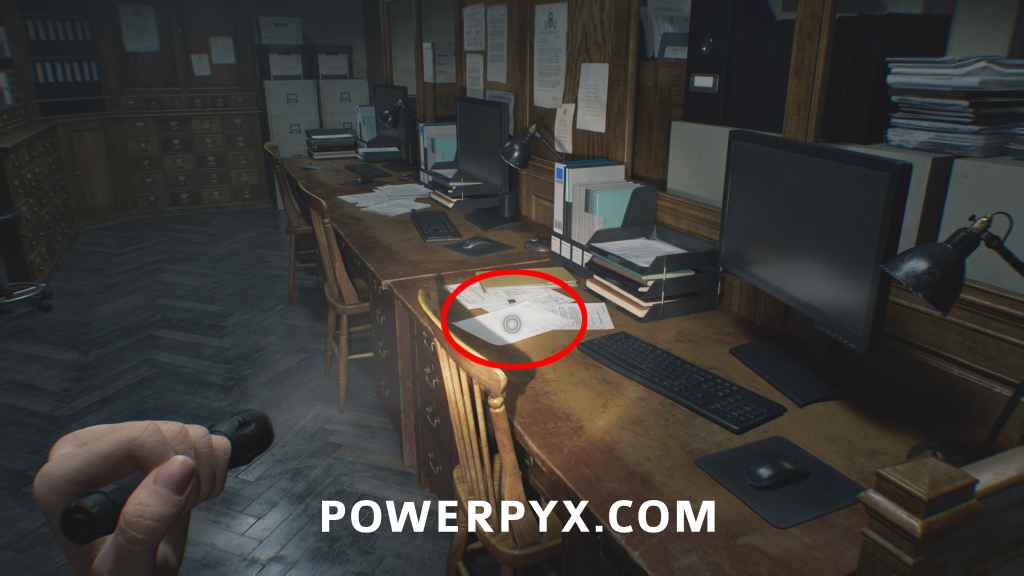
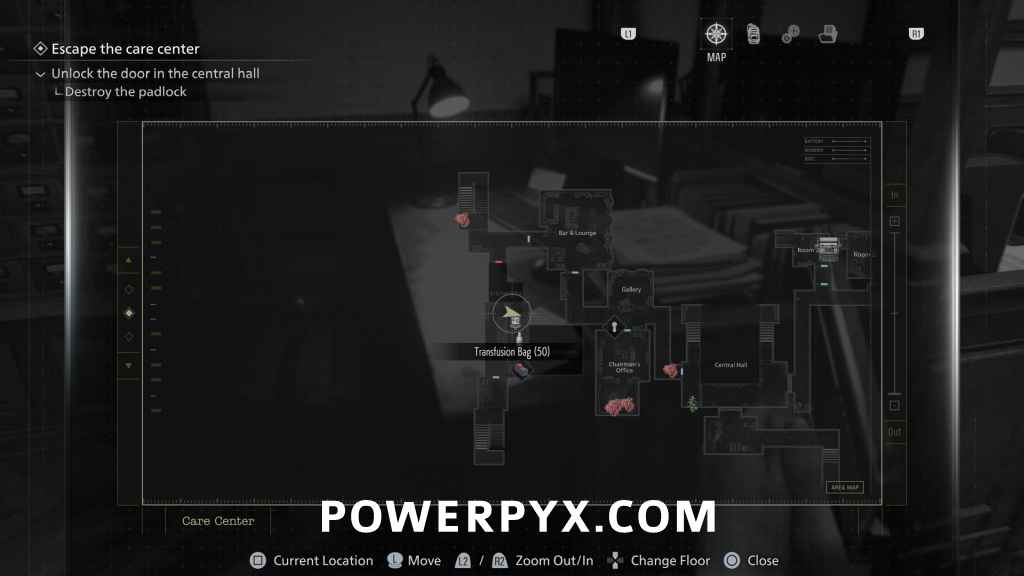
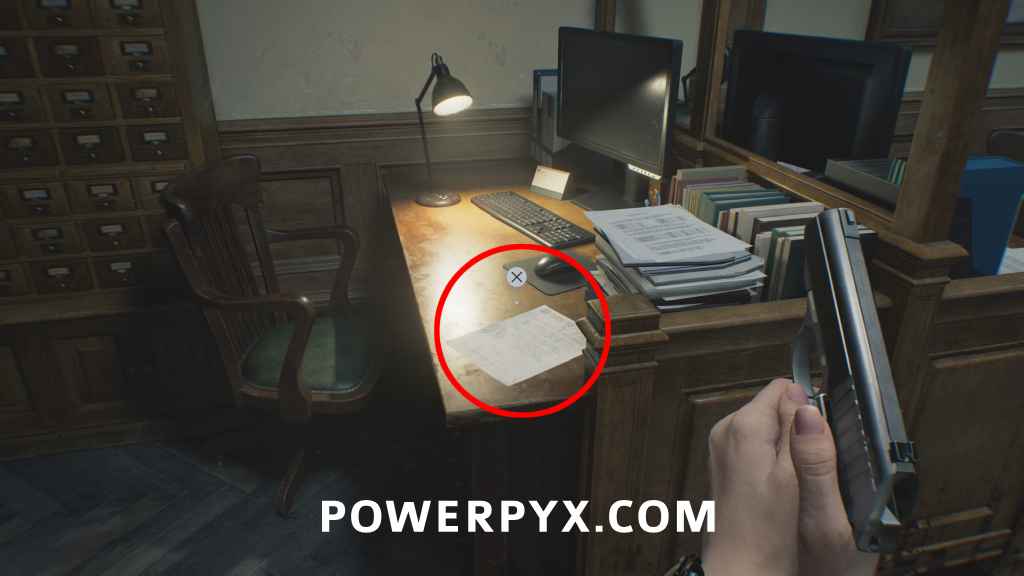
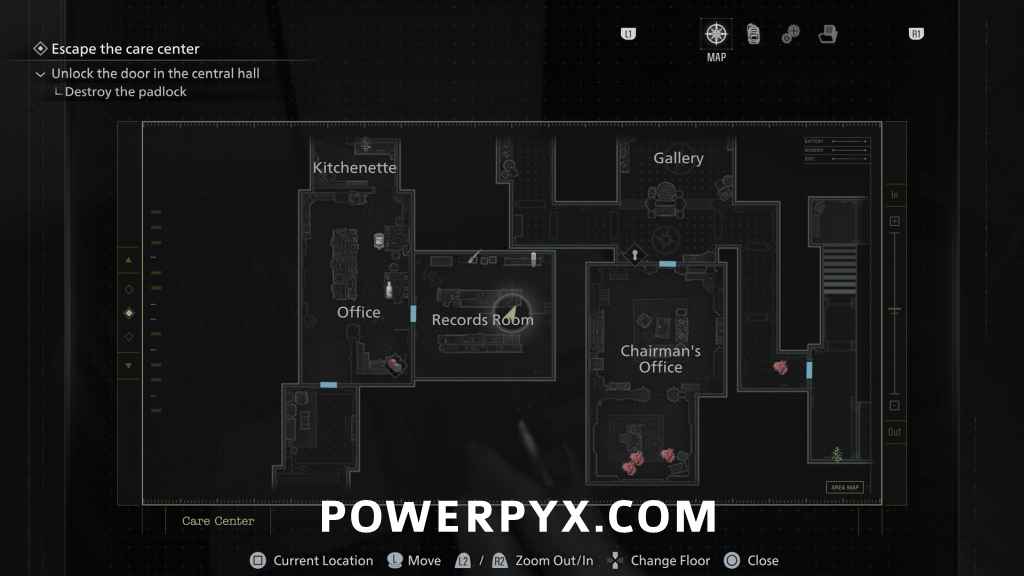
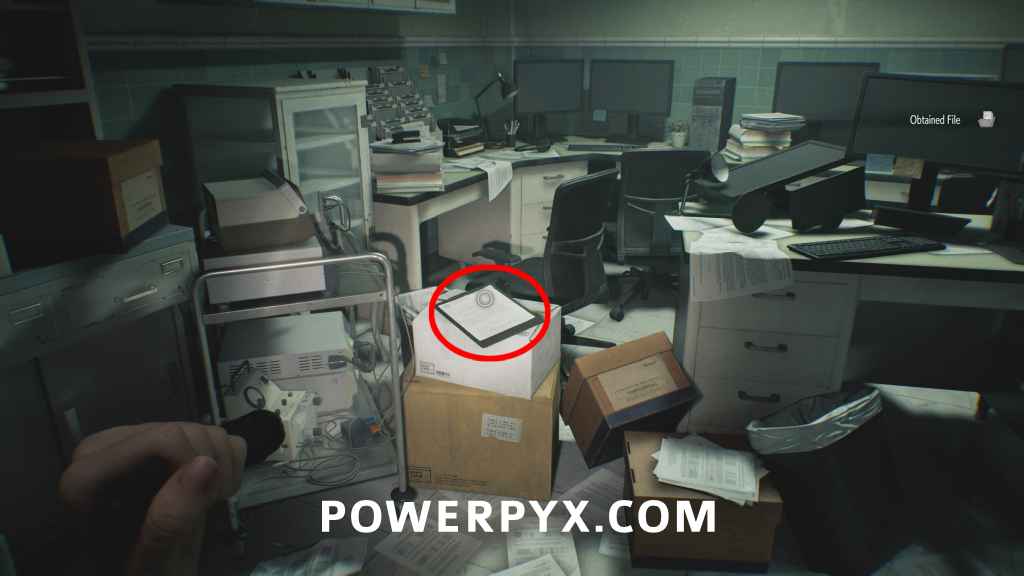
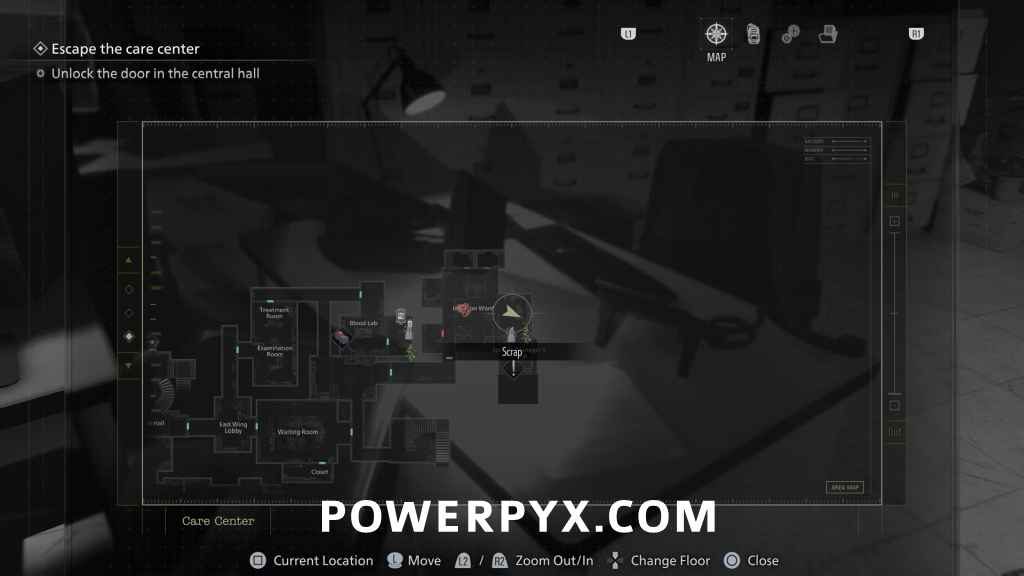
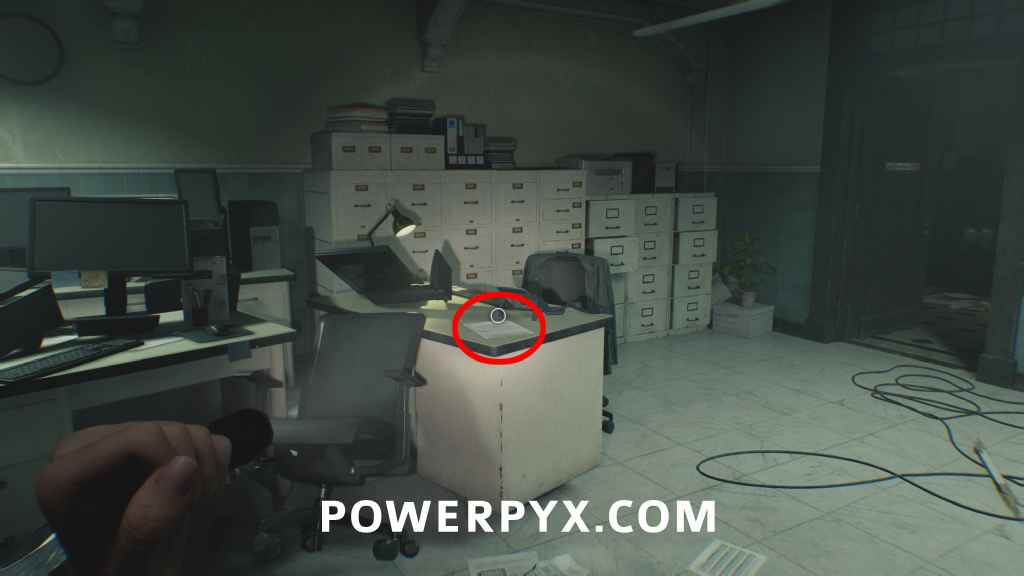
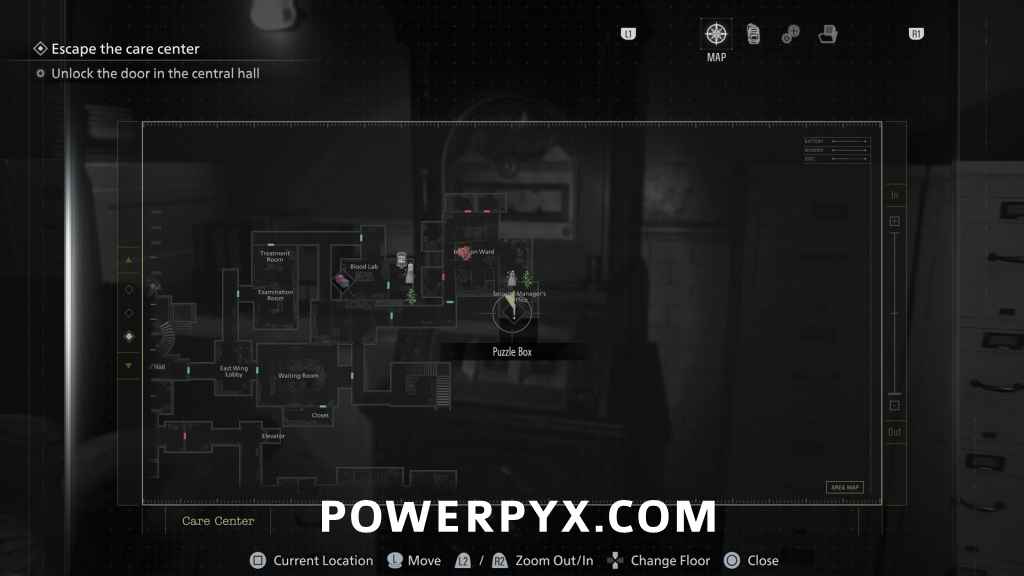
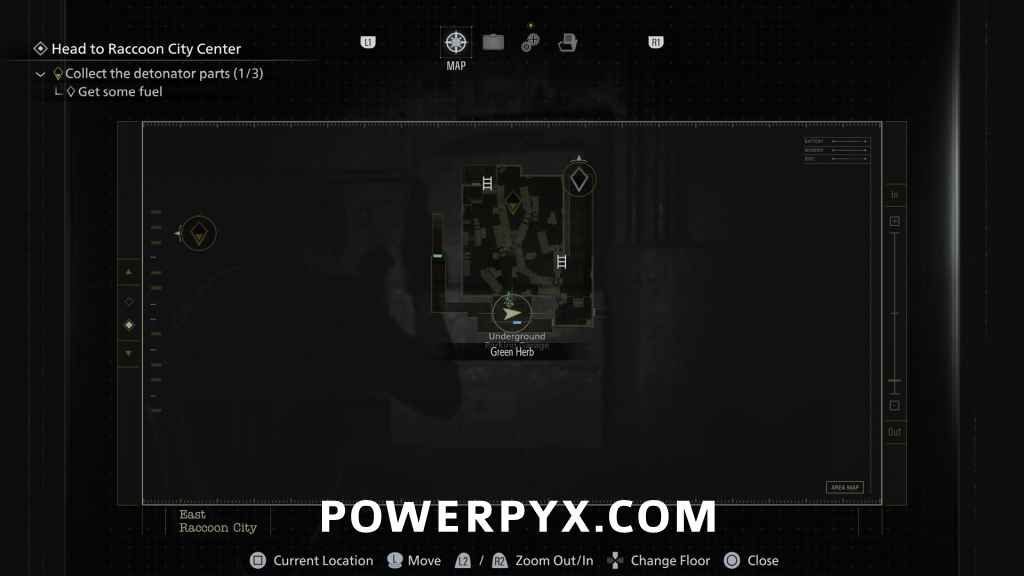
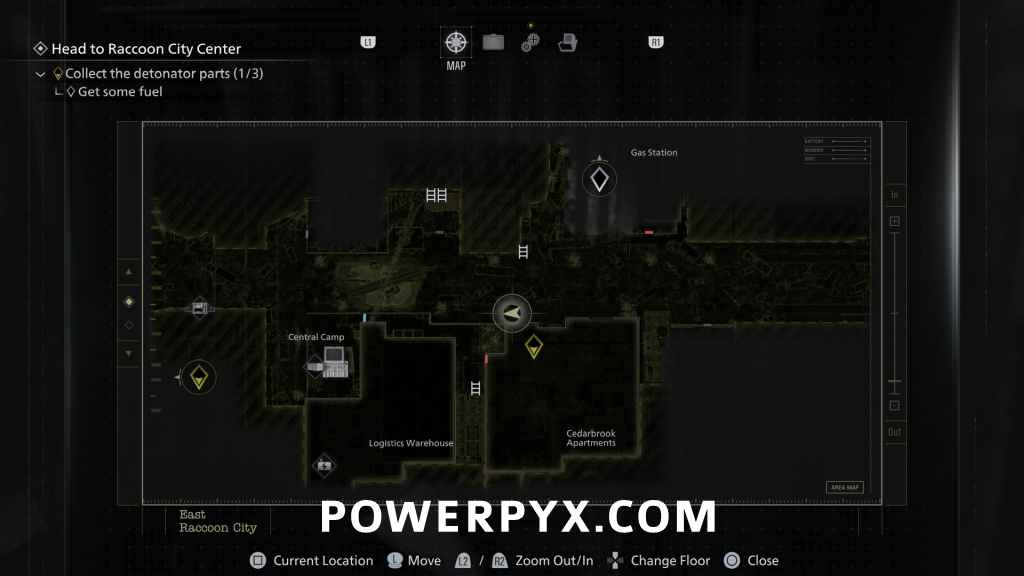
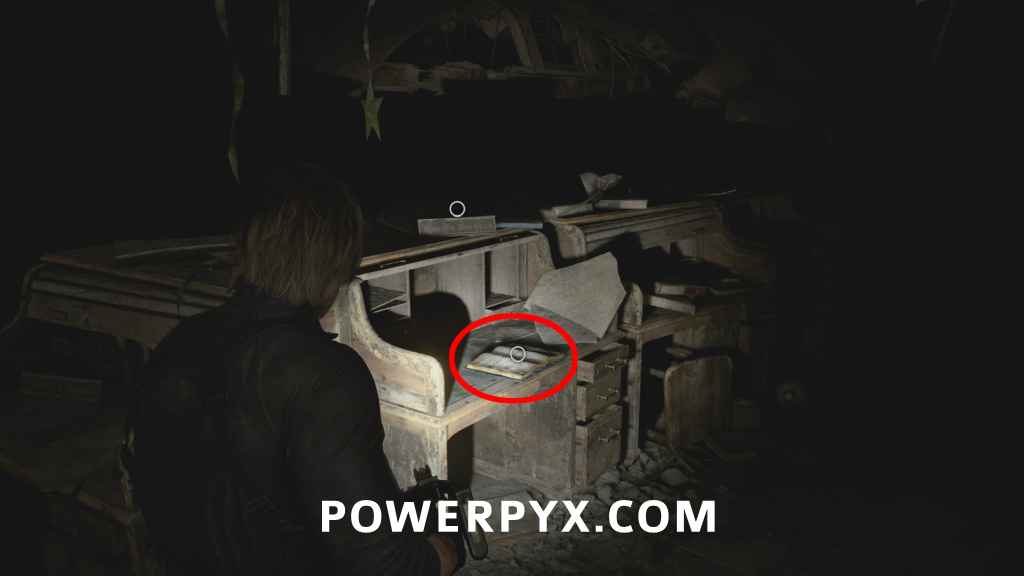
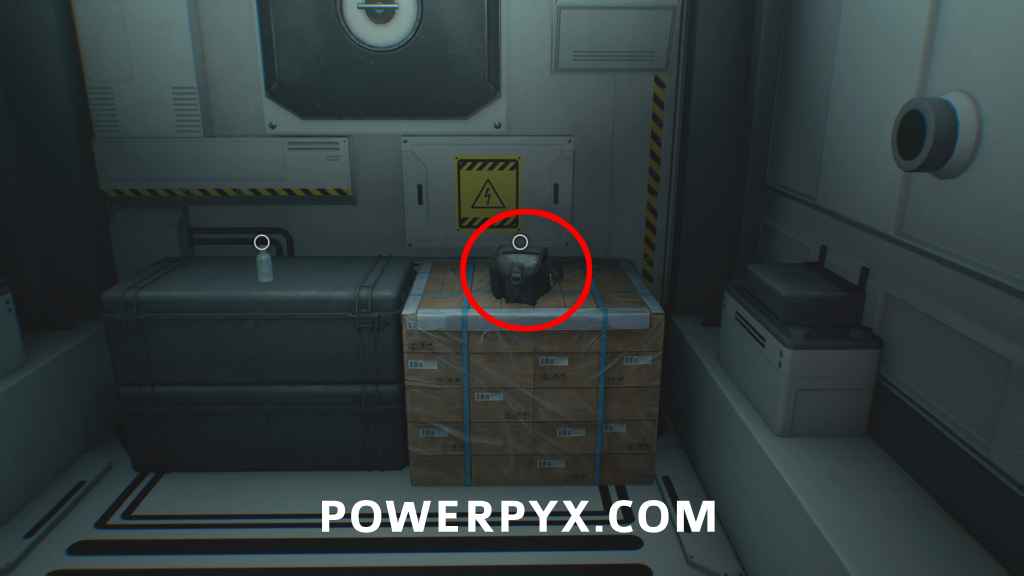
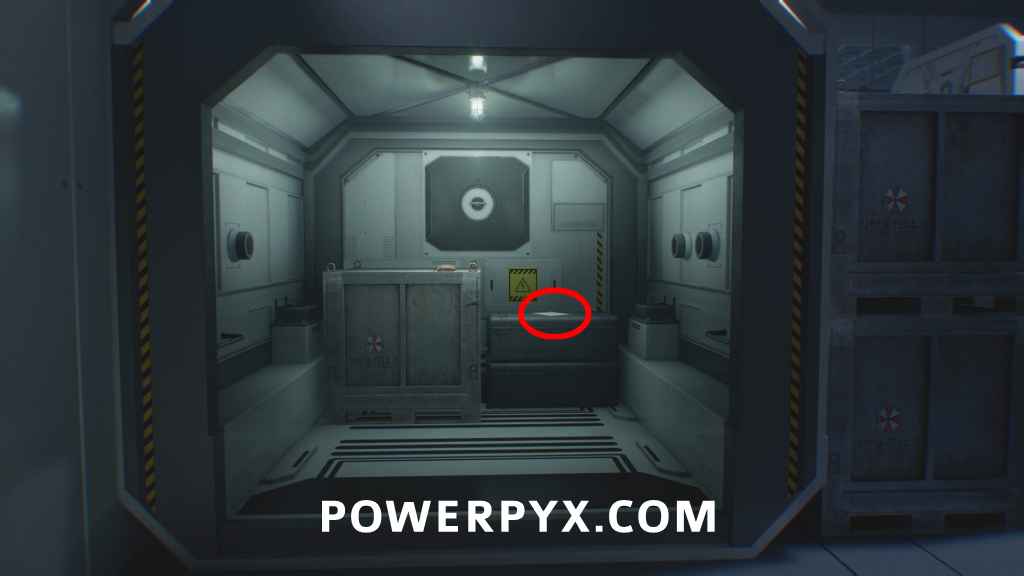
Mr. Raccoon #18
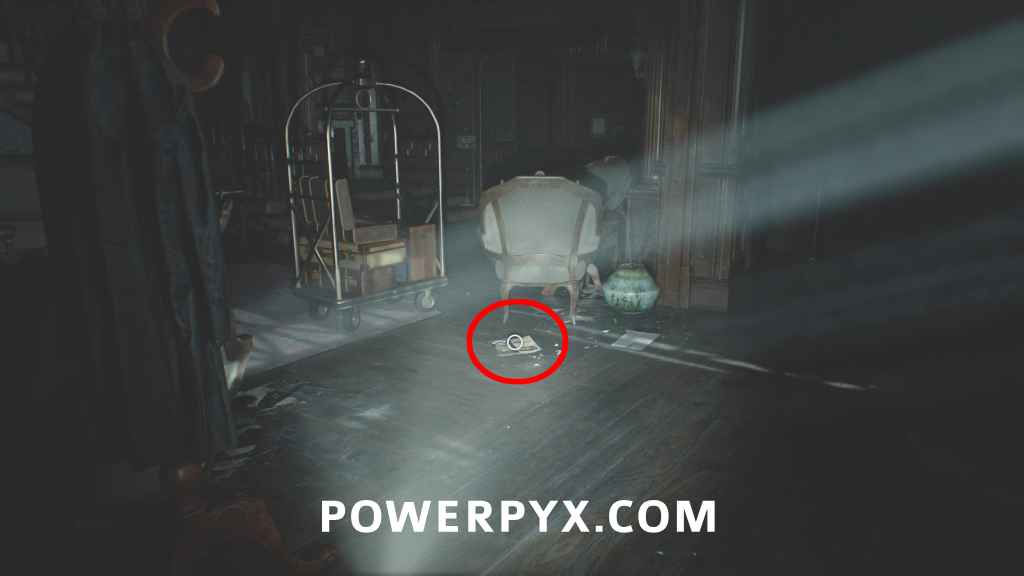
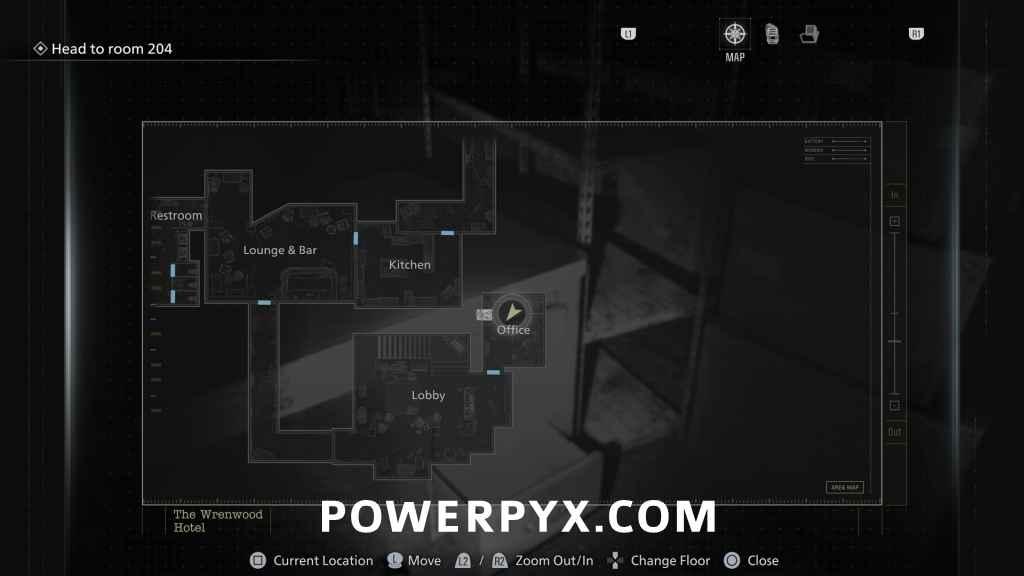
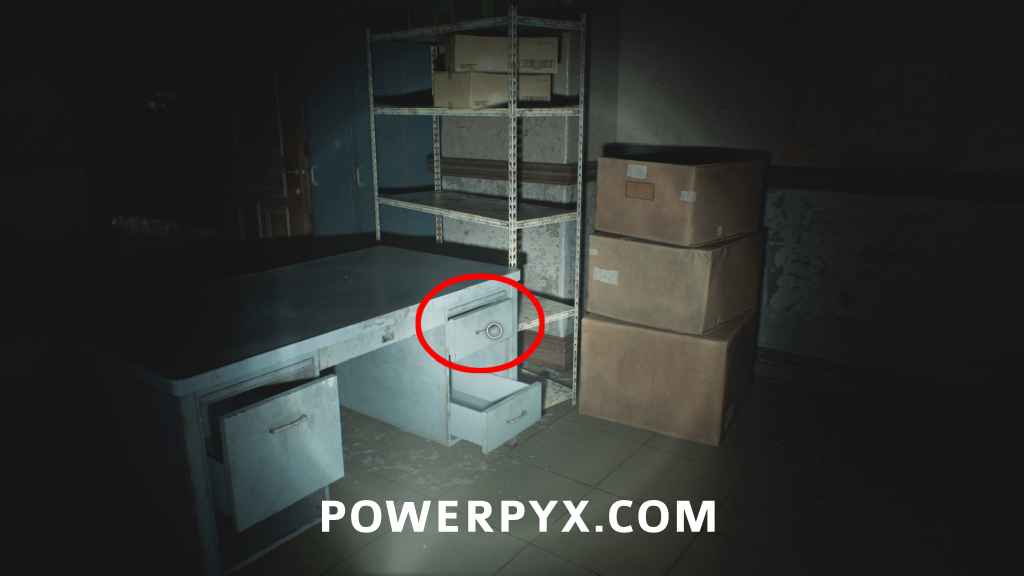
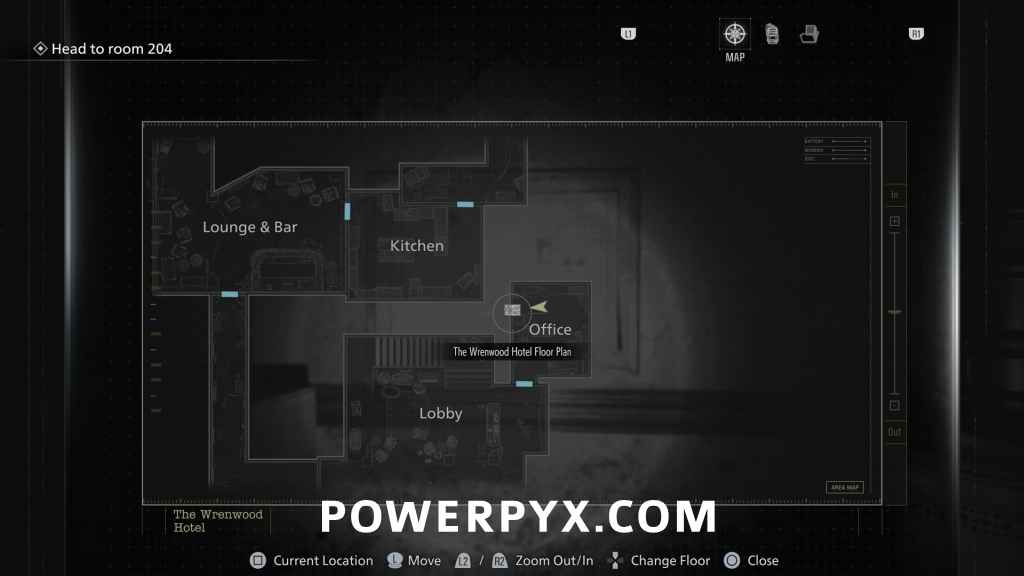
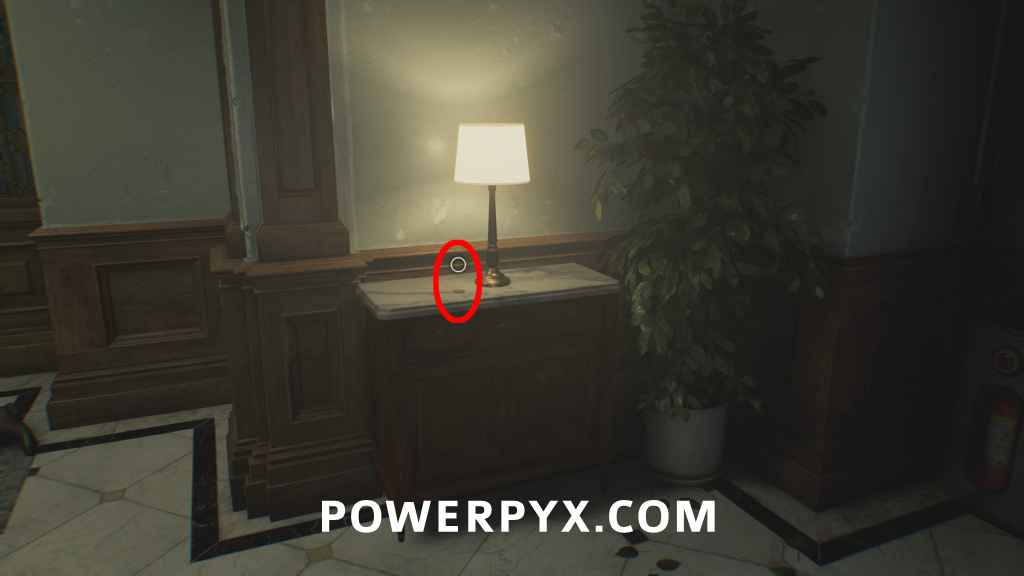
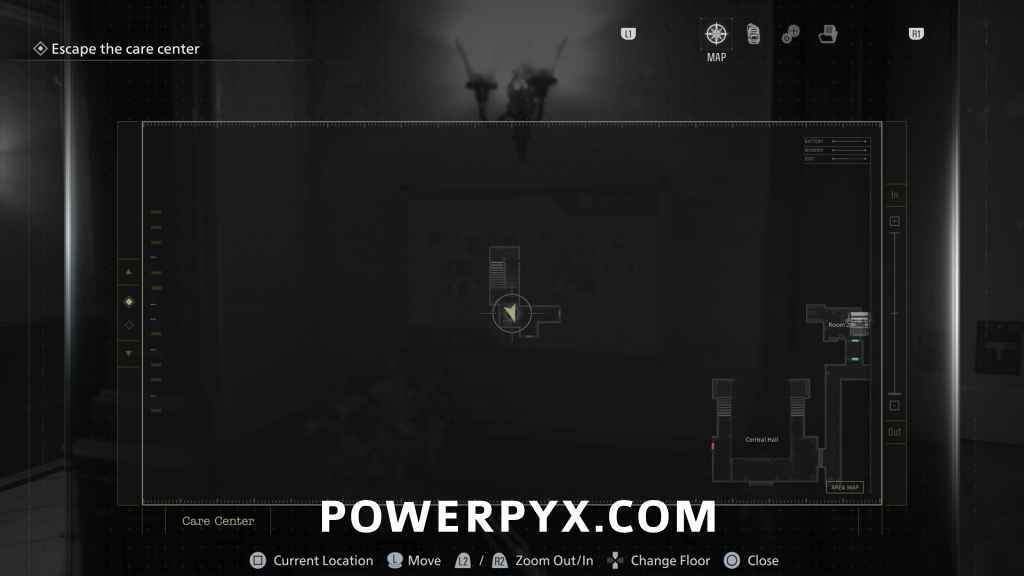
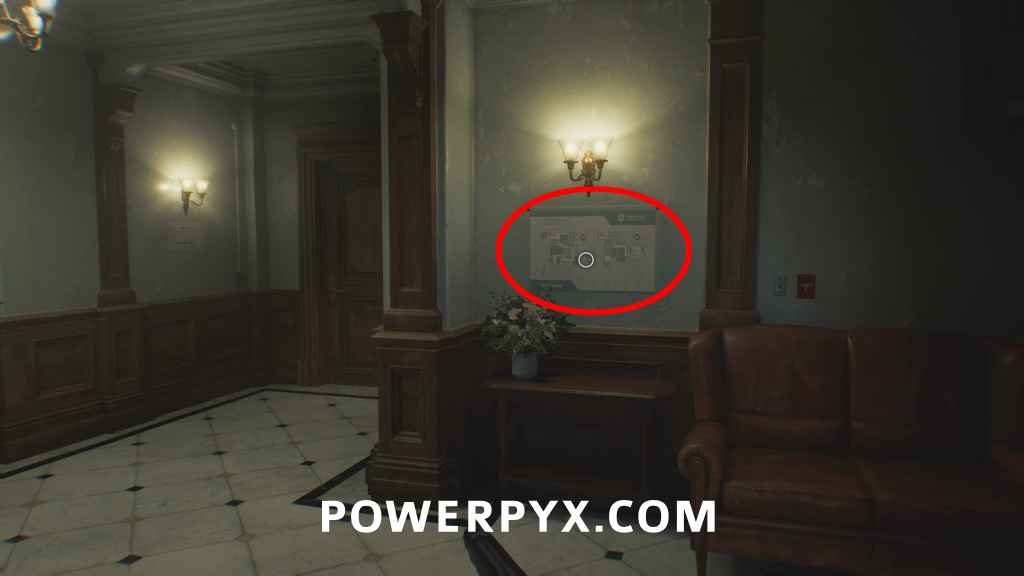
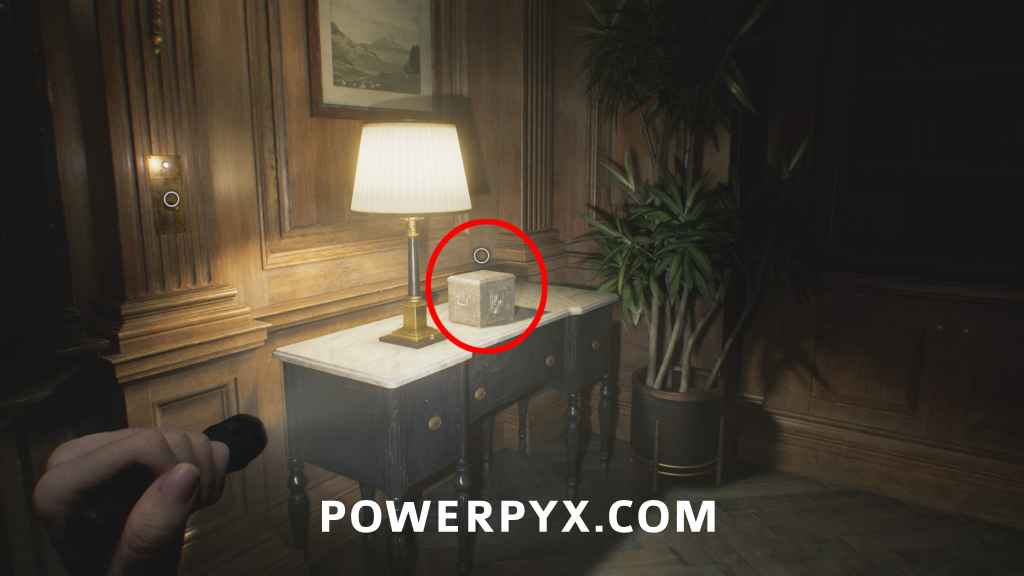
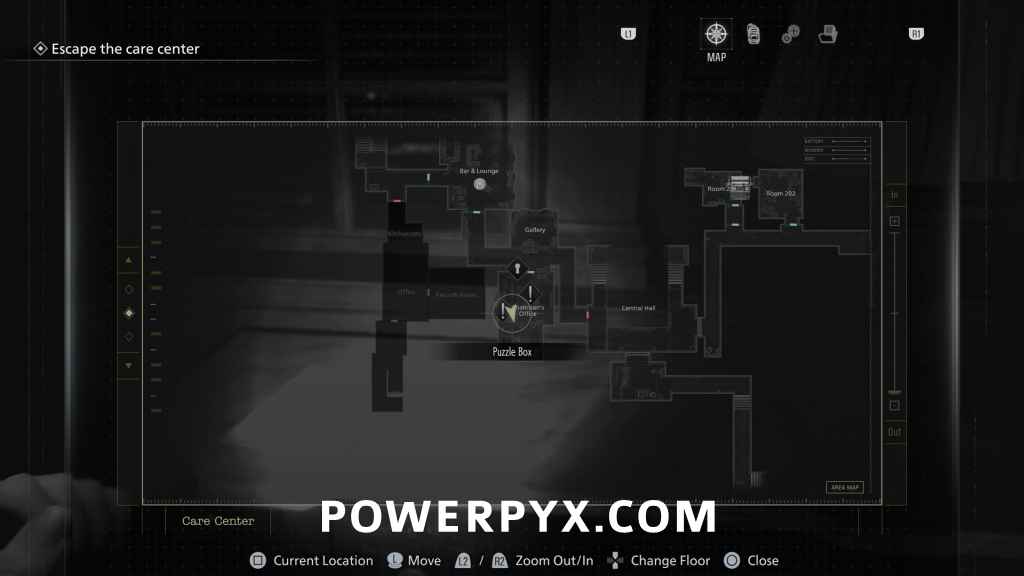
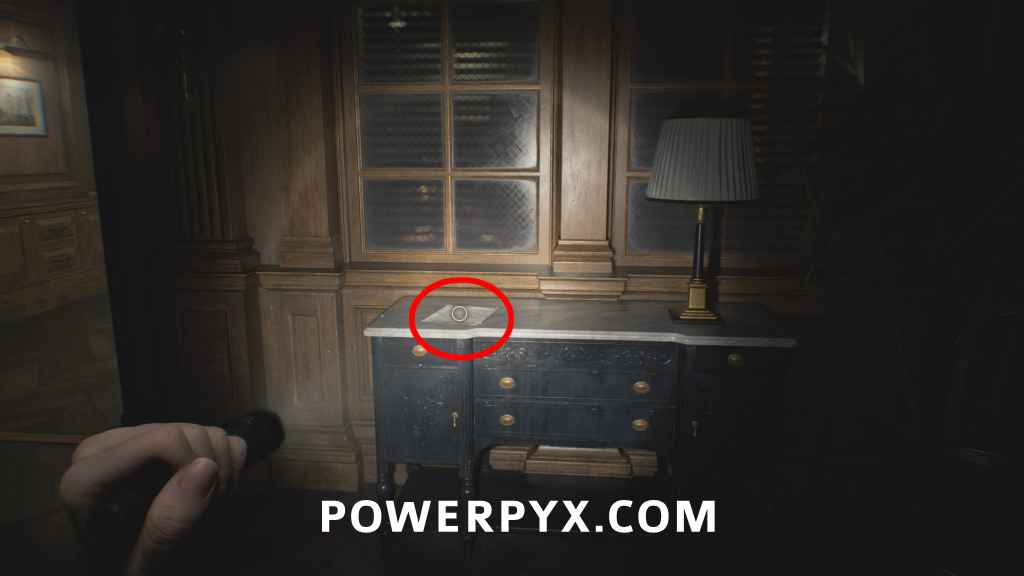
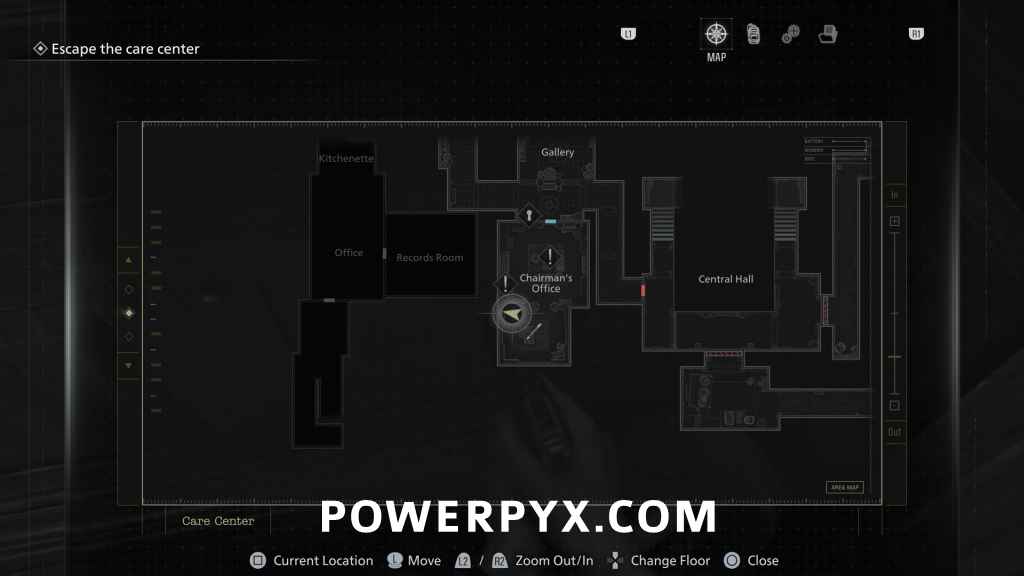
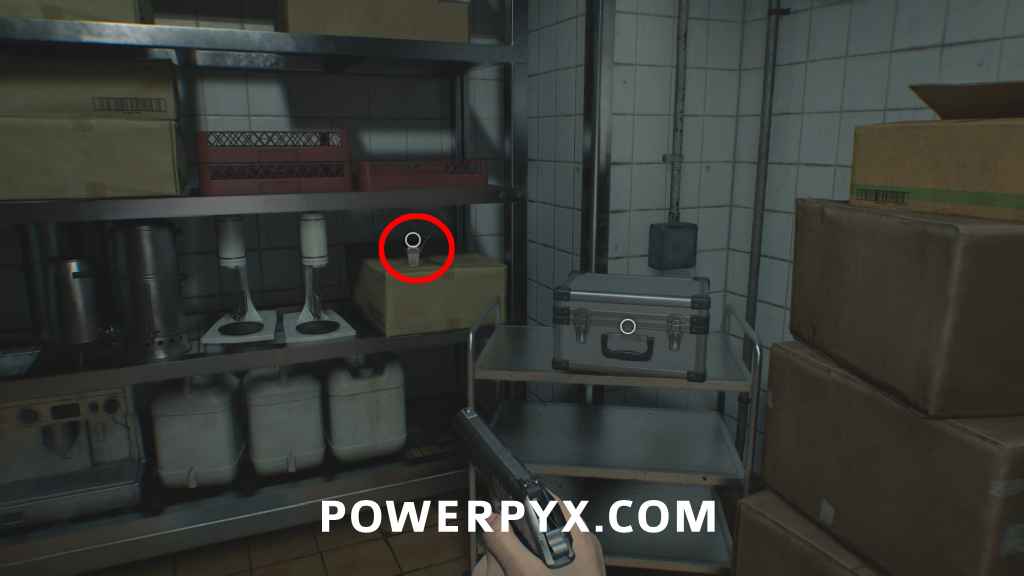
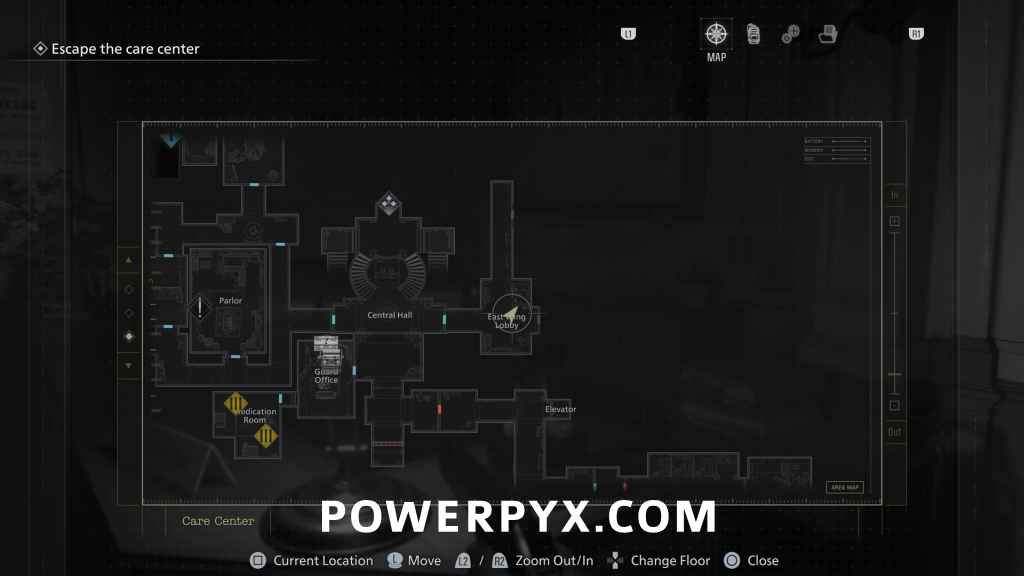
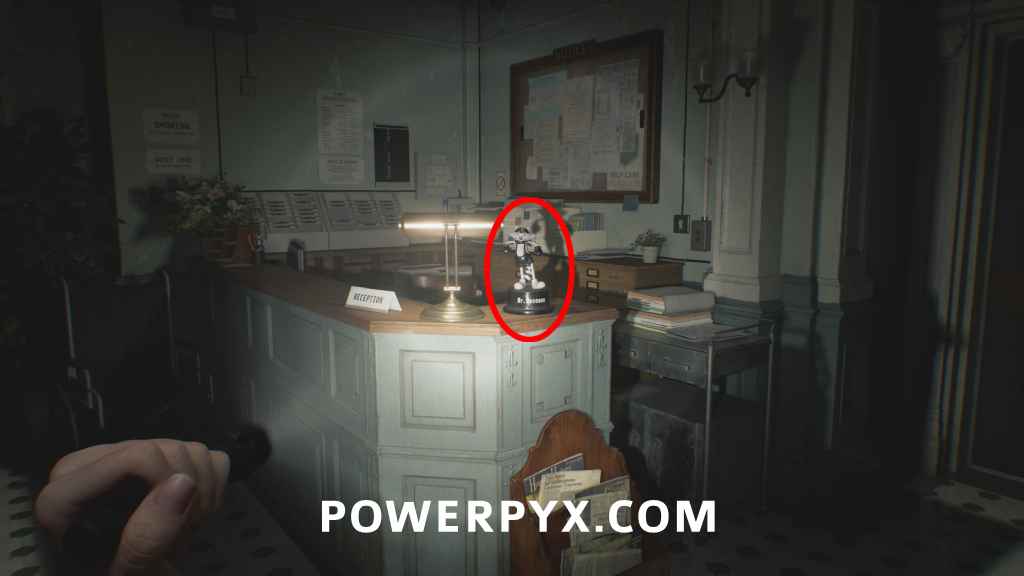
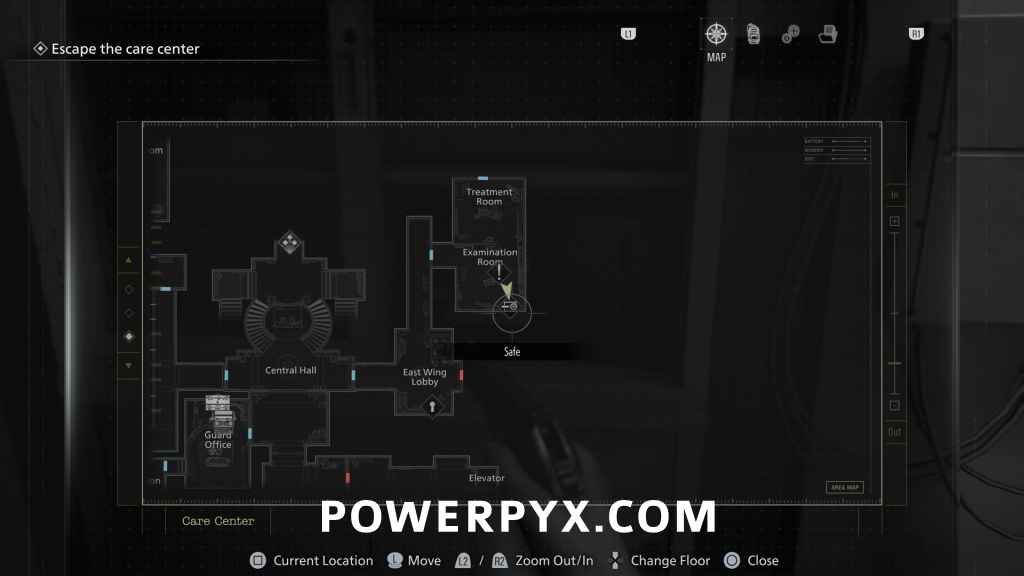
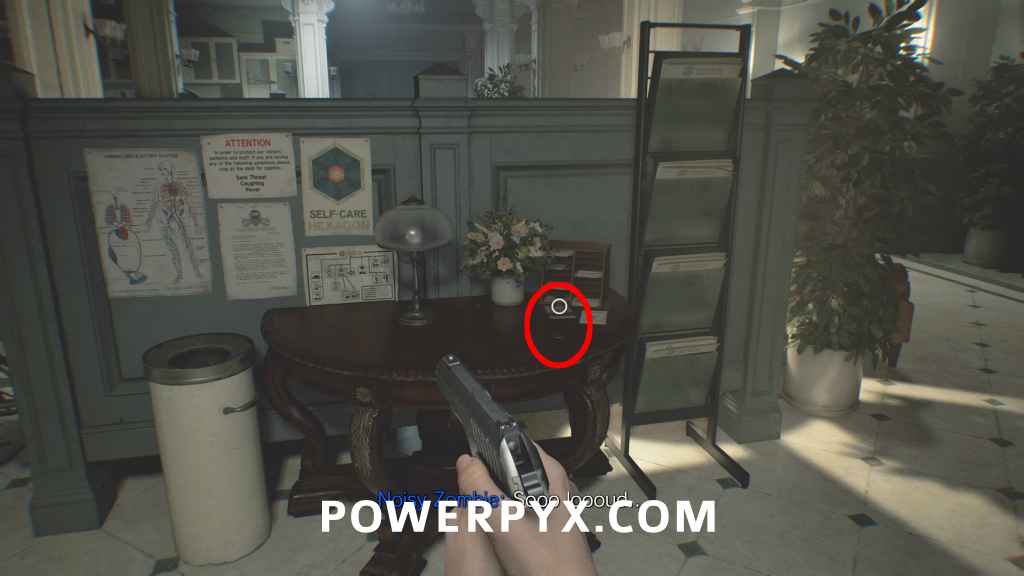
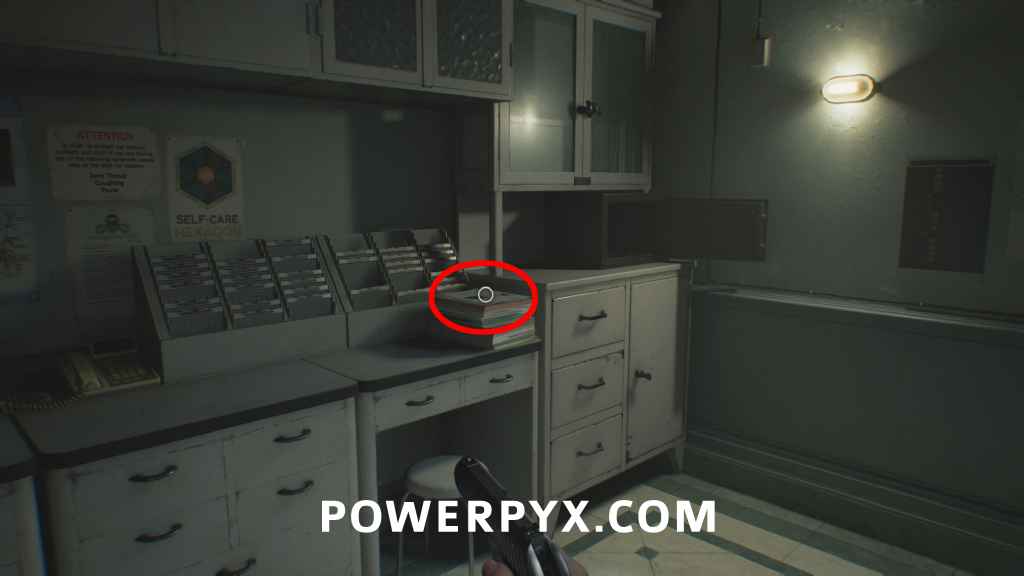
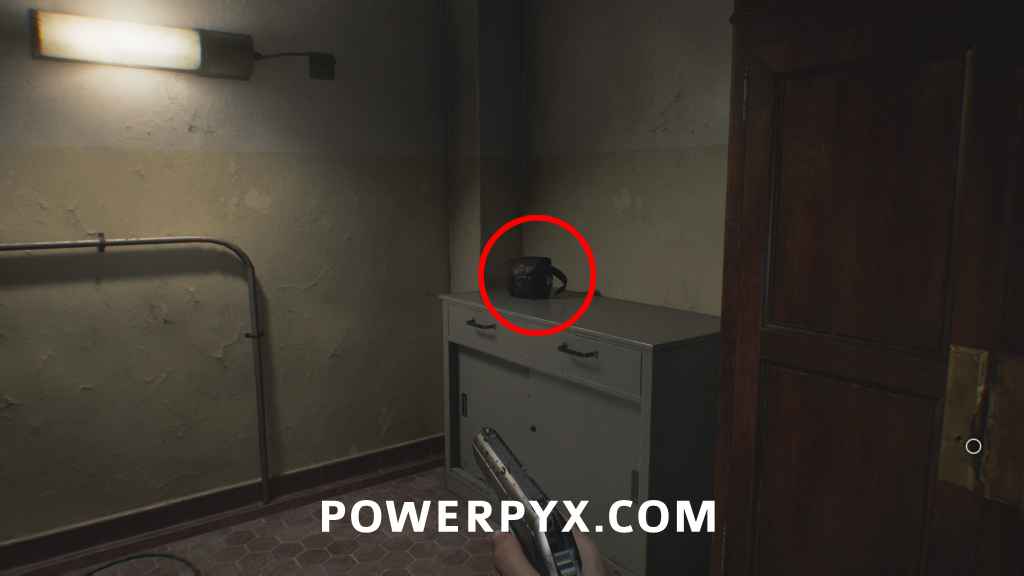
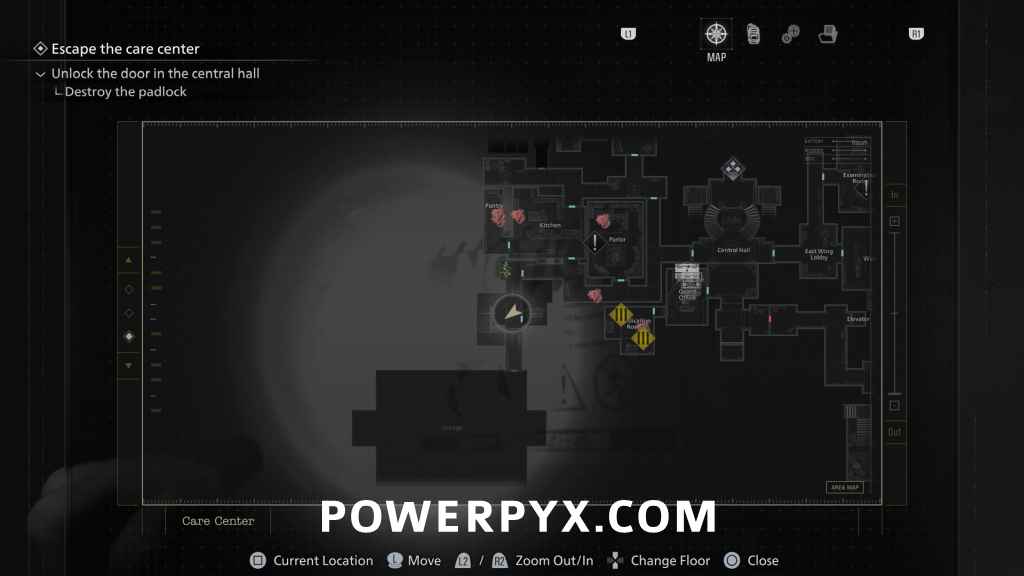
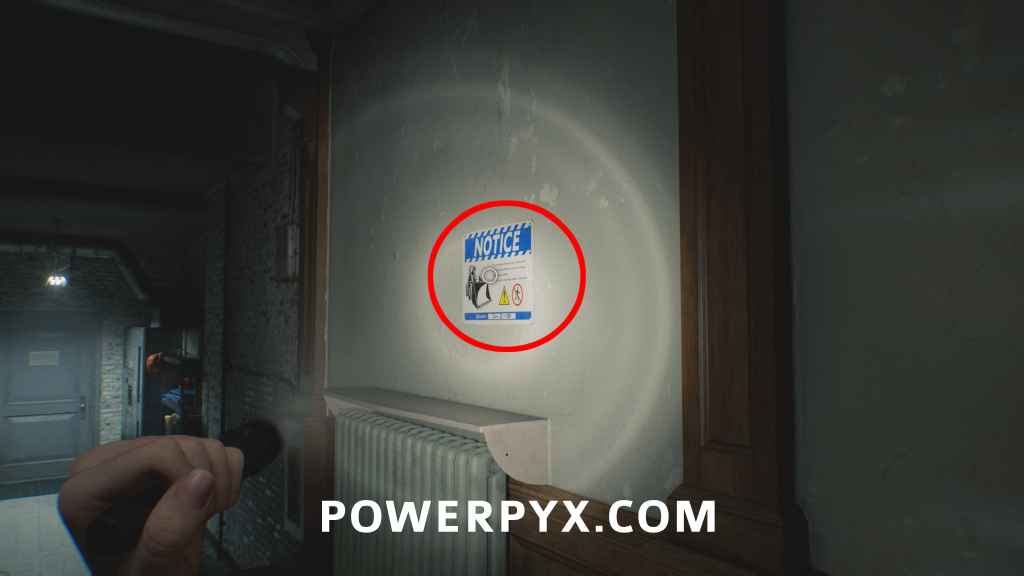
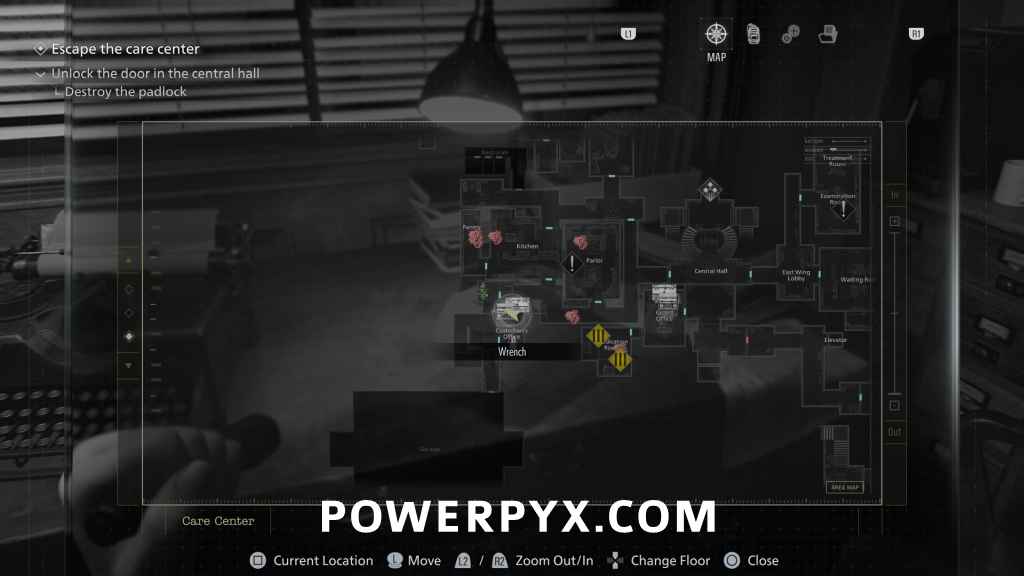
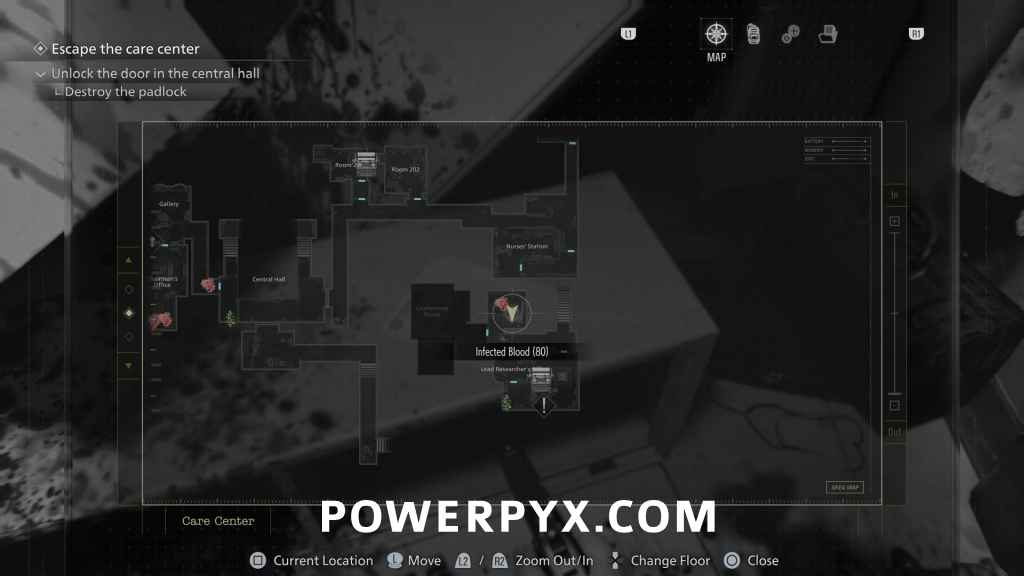
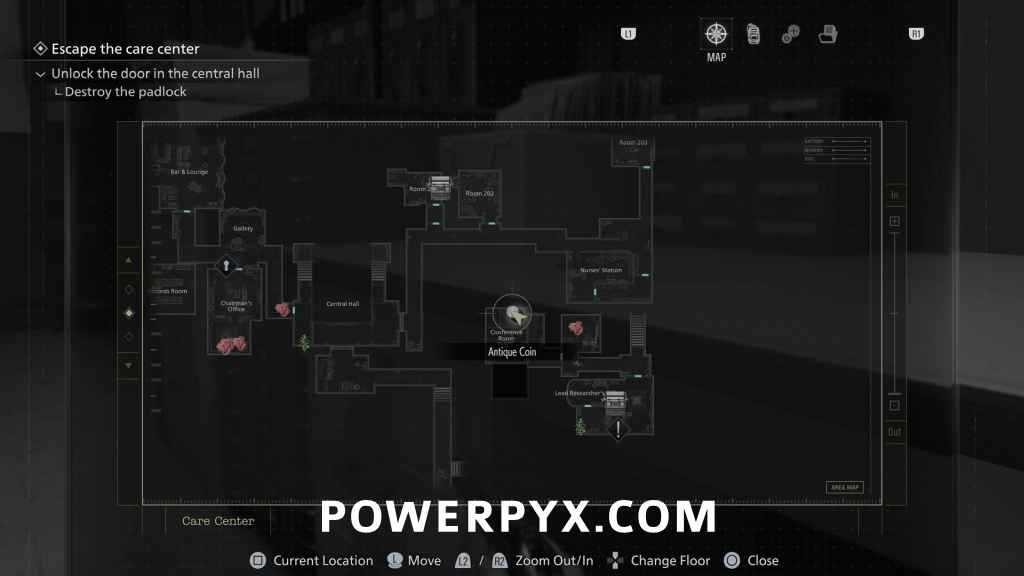
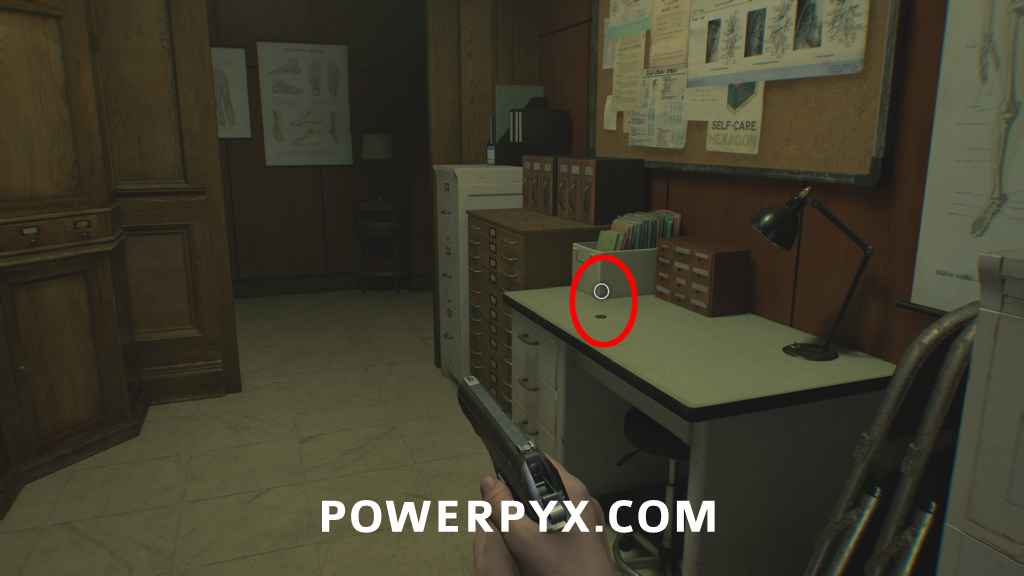
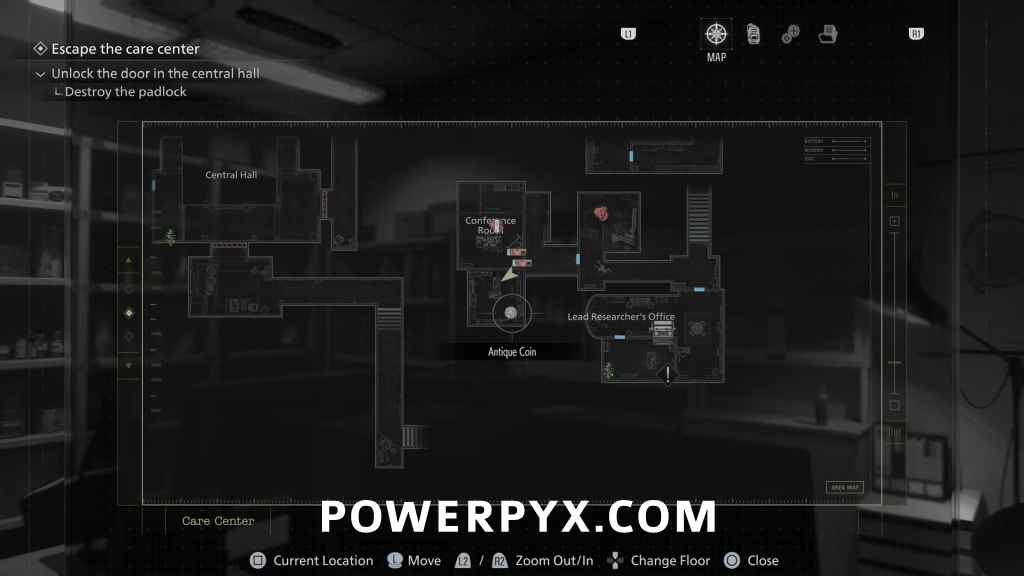
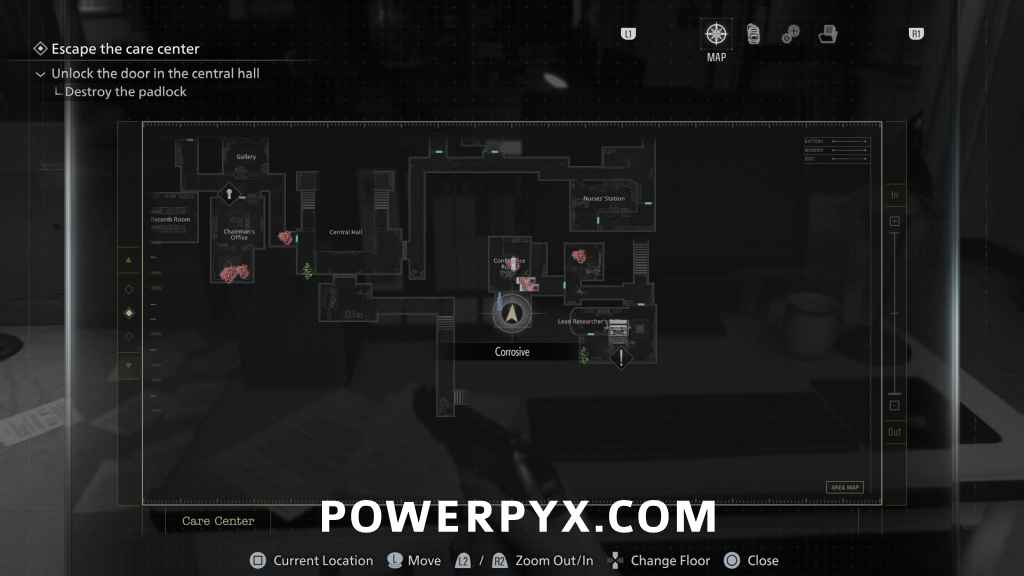
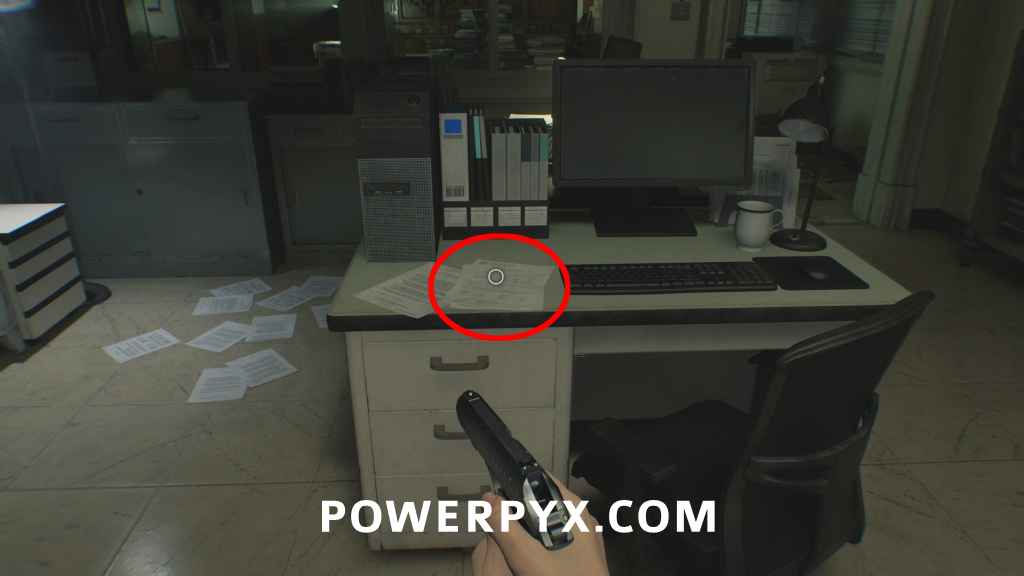
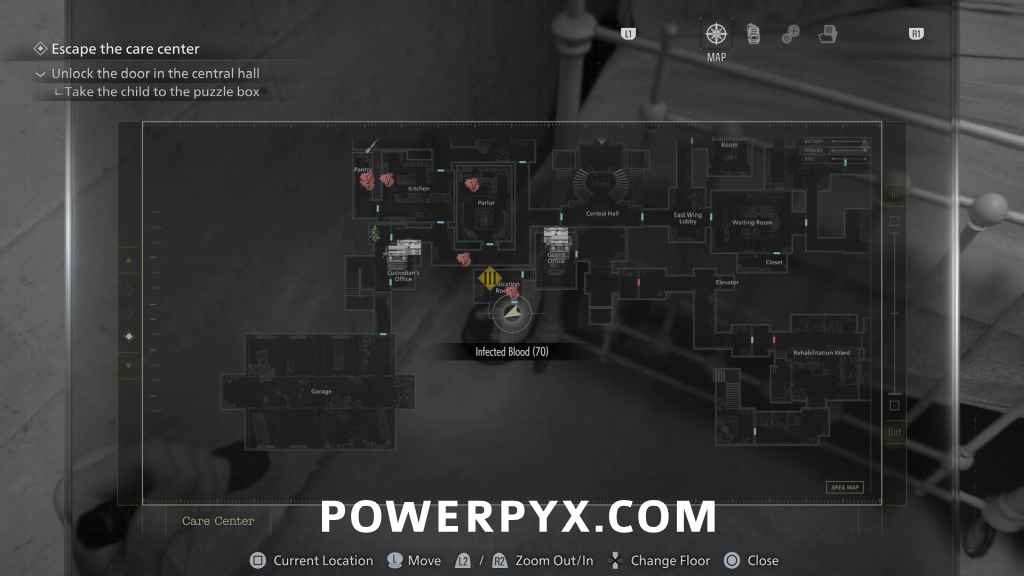
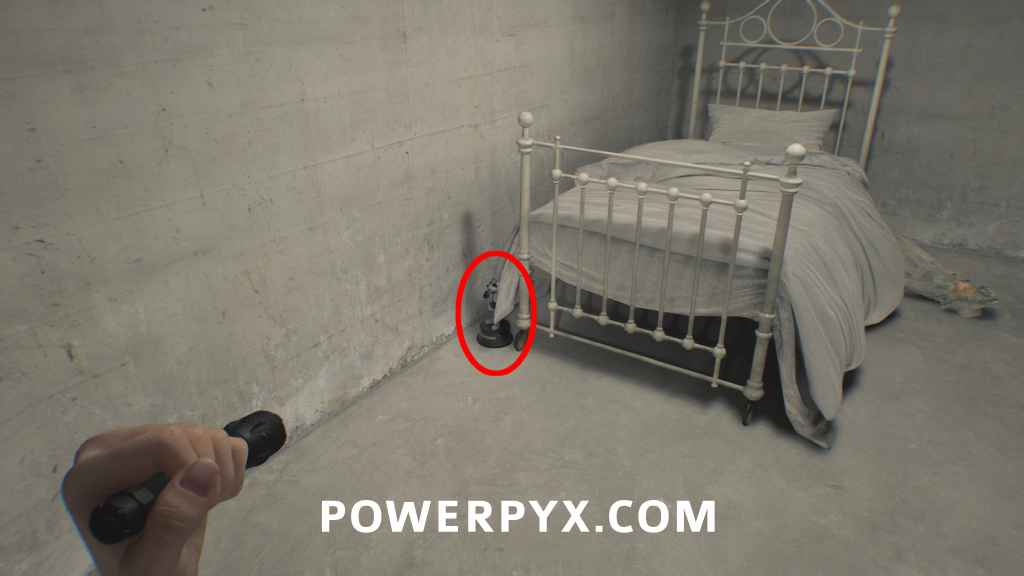
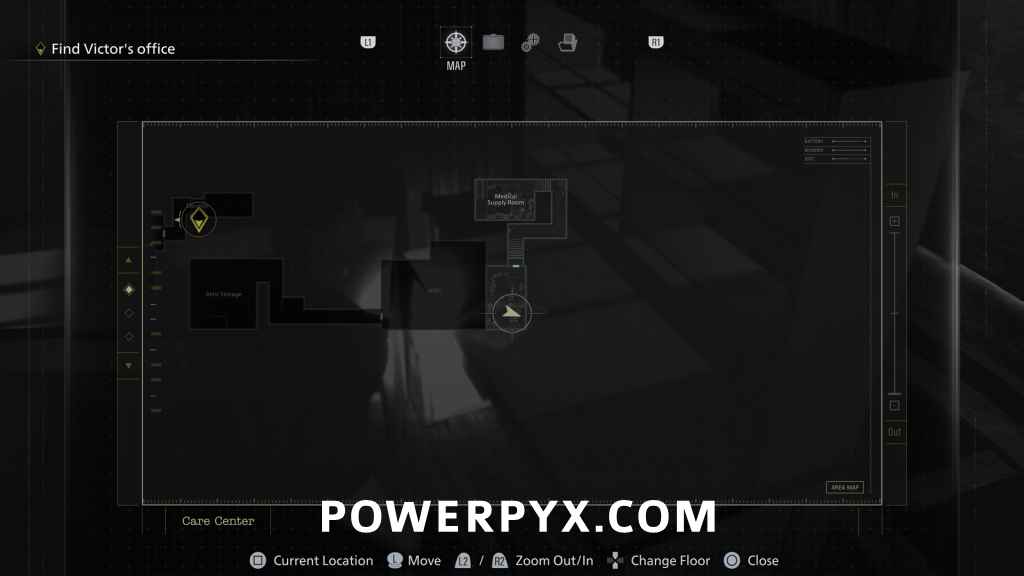
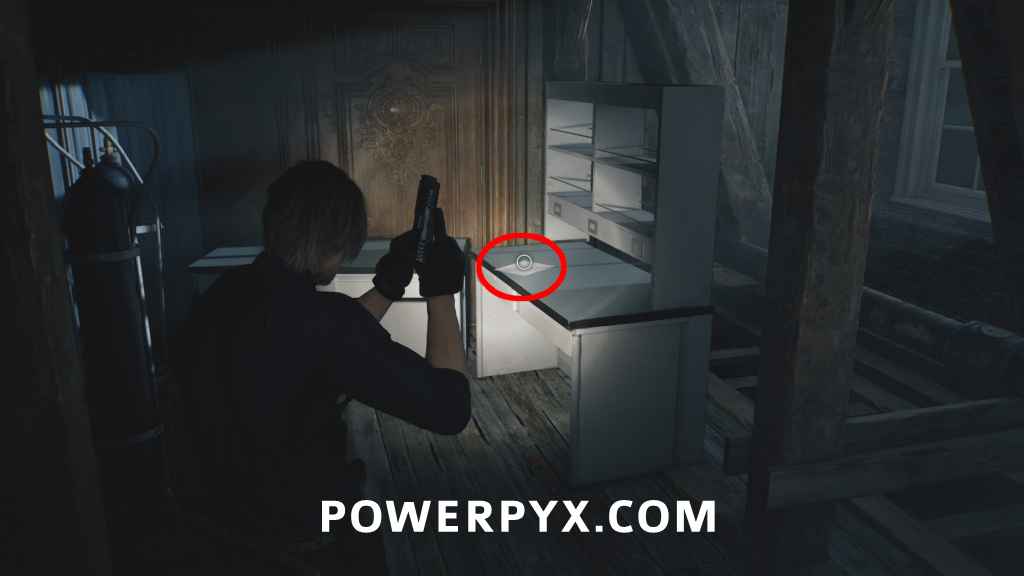
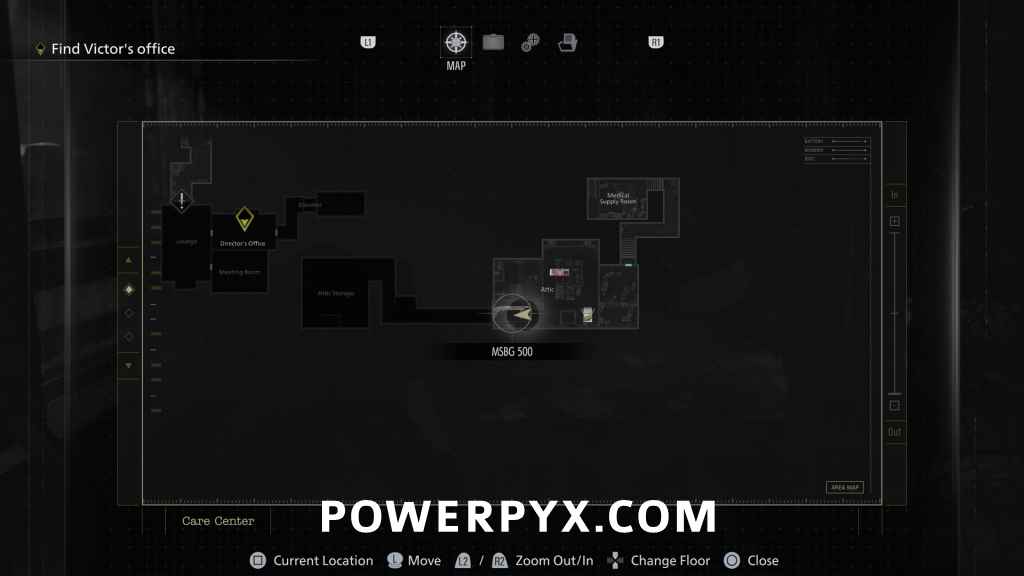
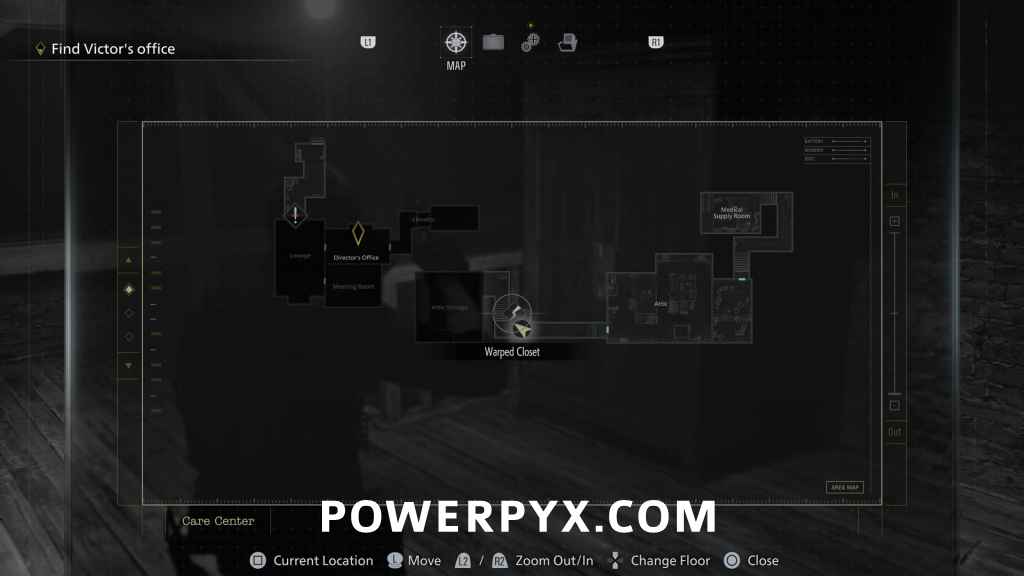
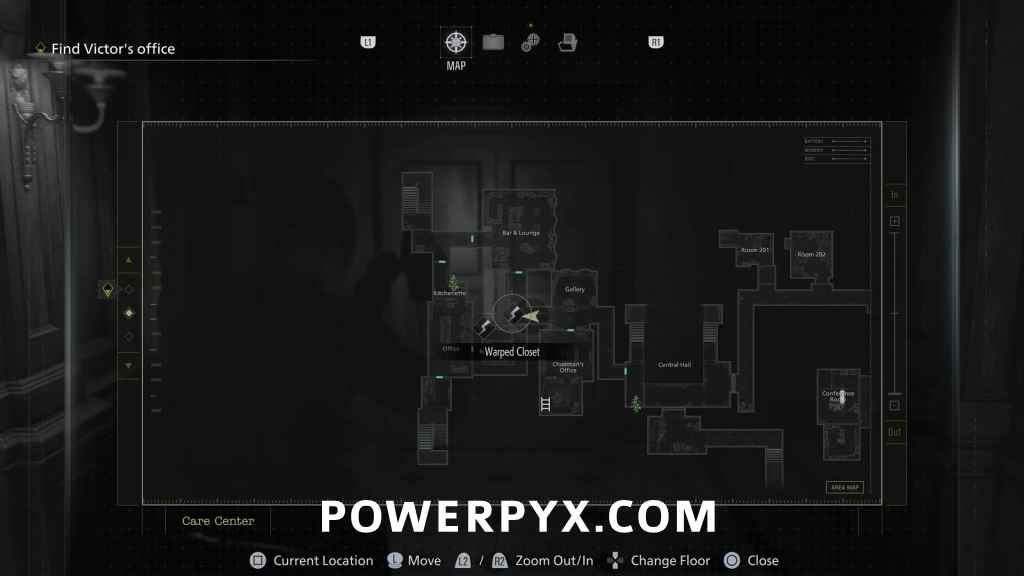
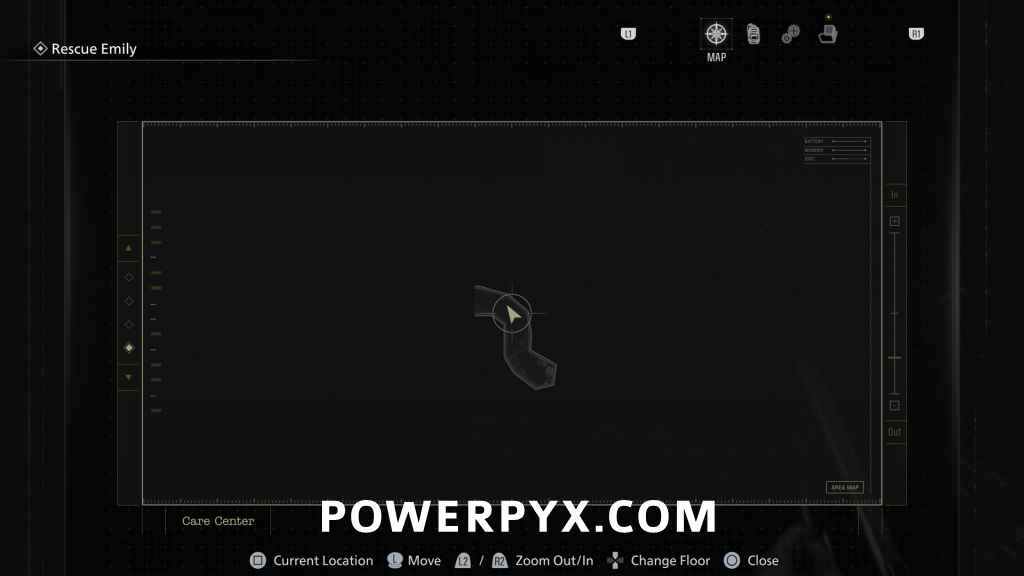
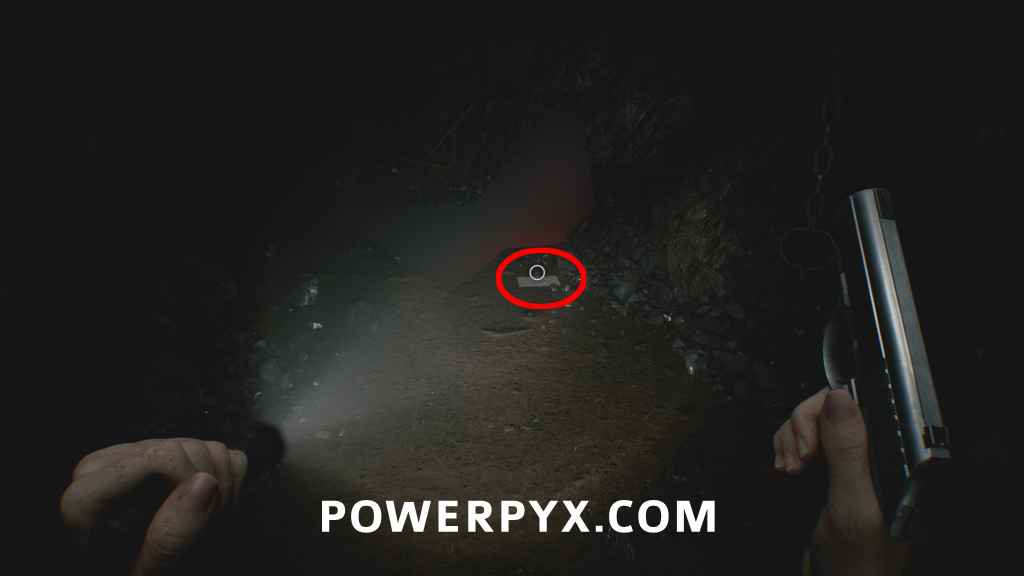
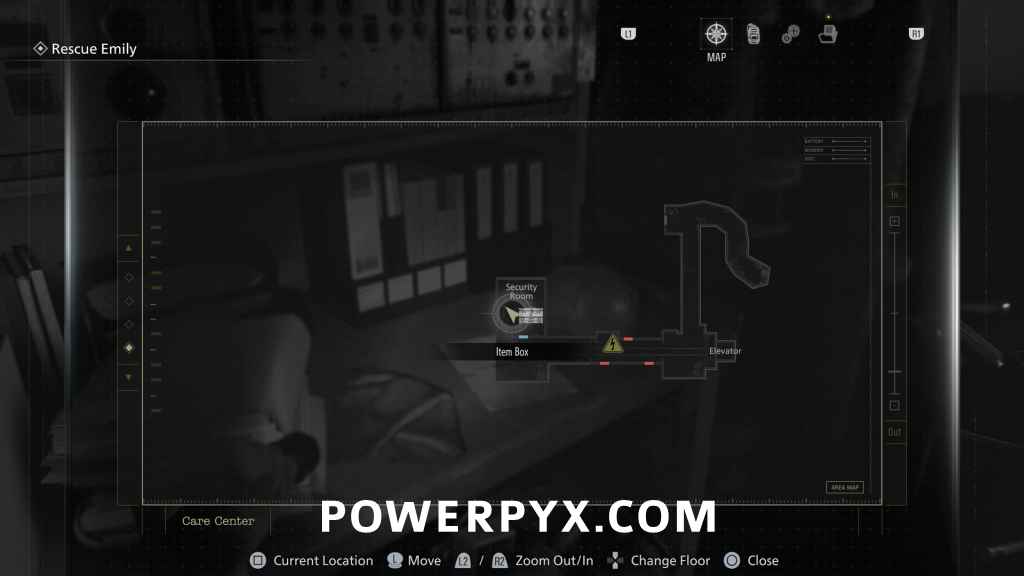
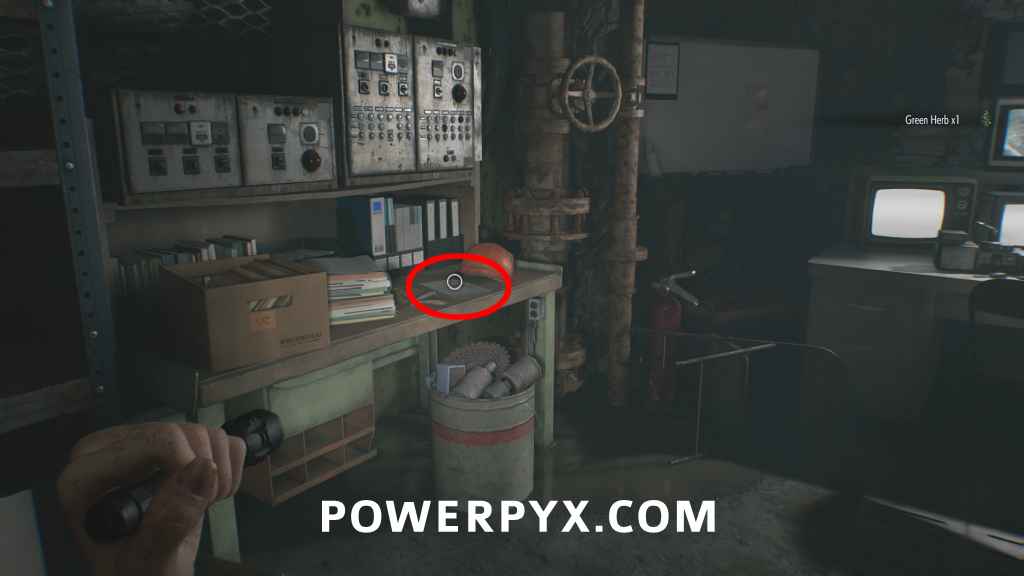
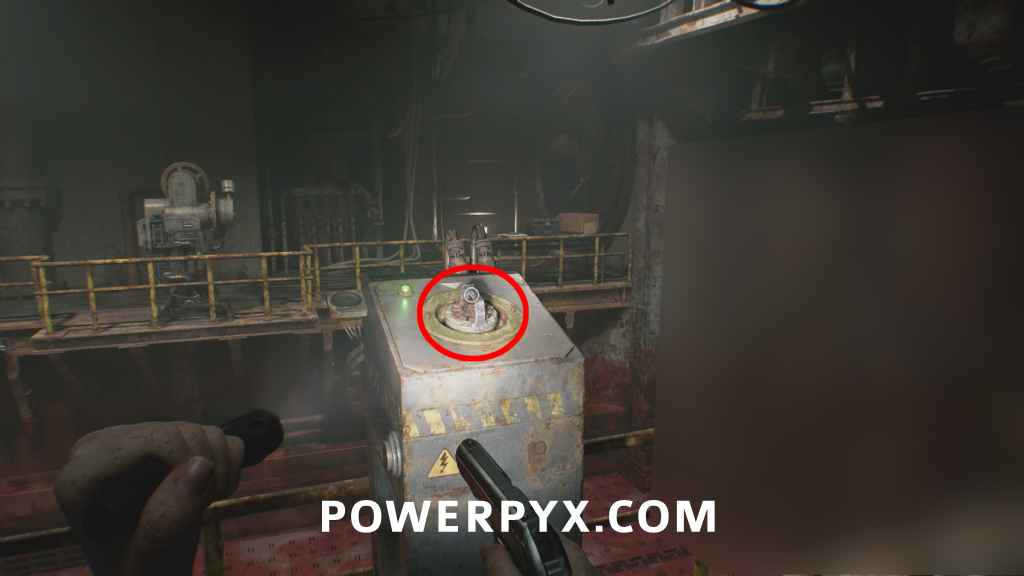
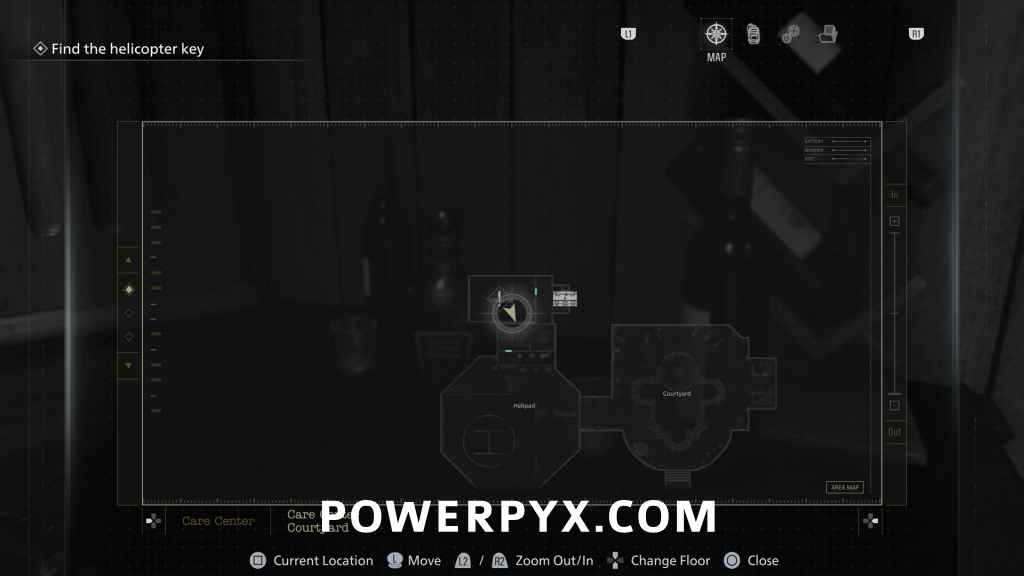
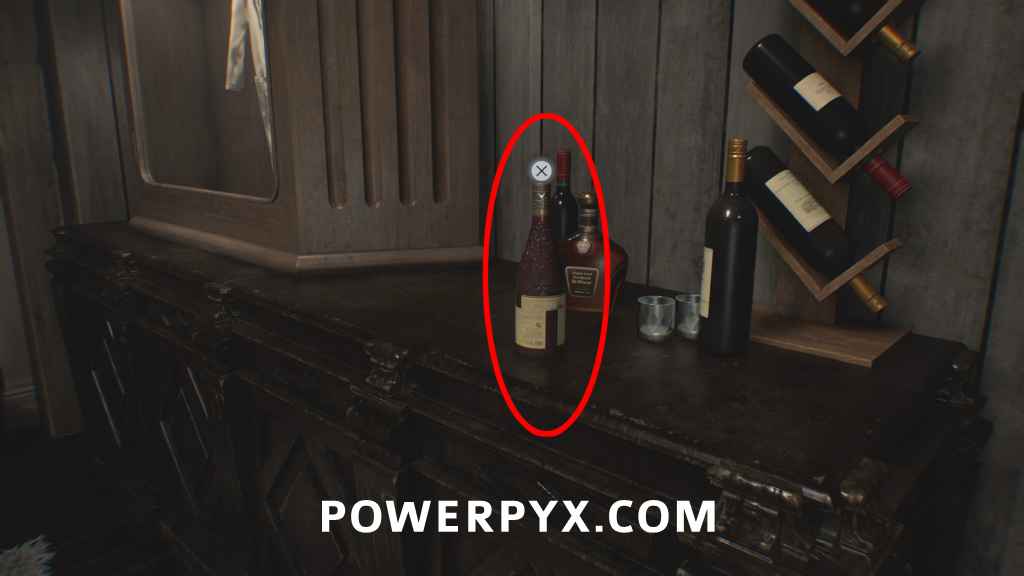
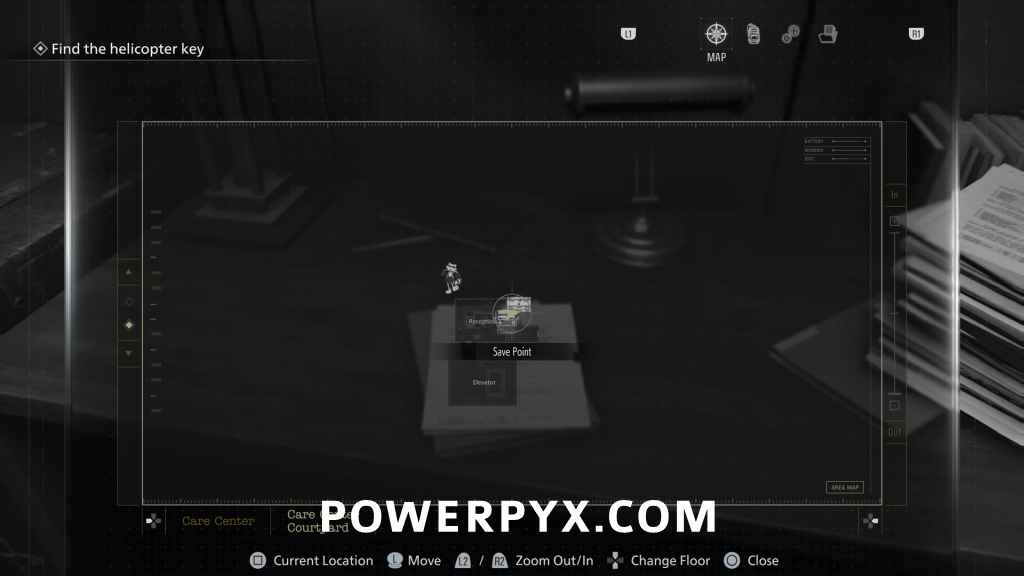
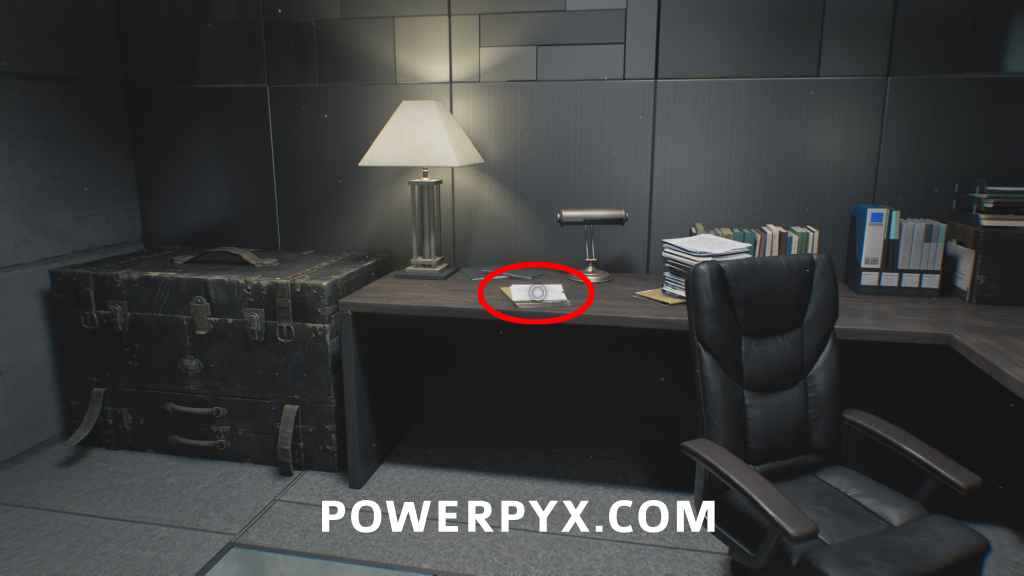
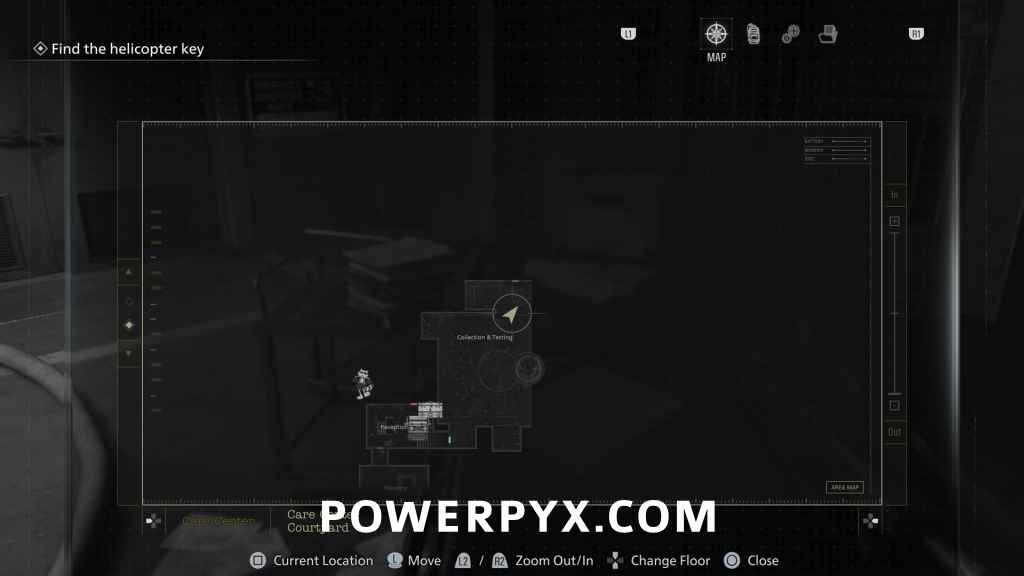
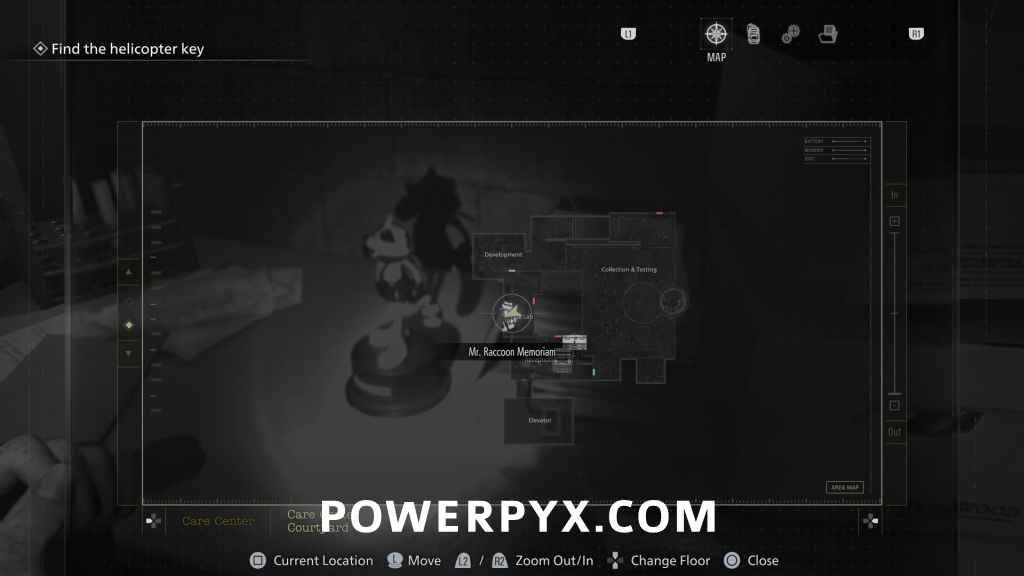
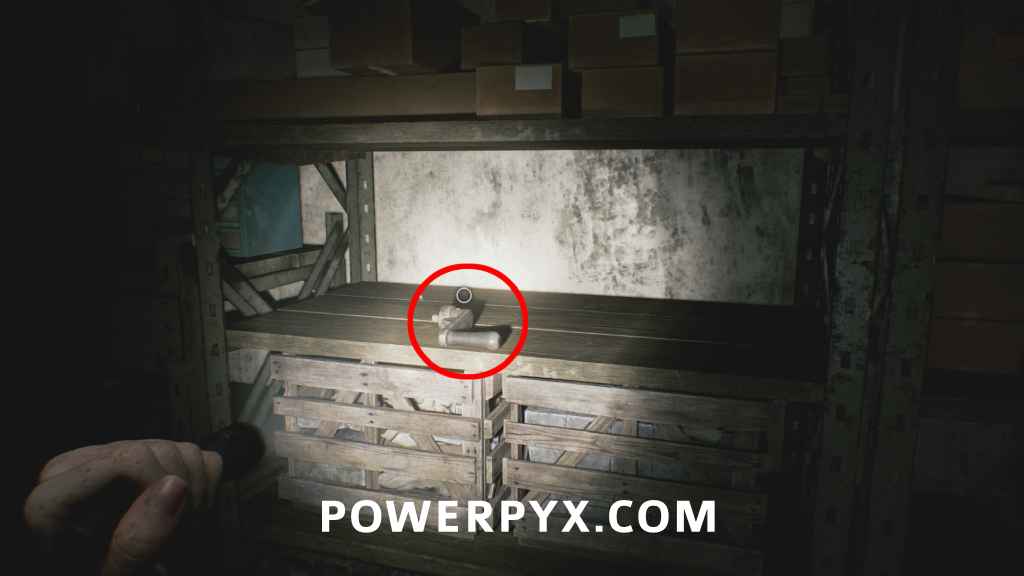
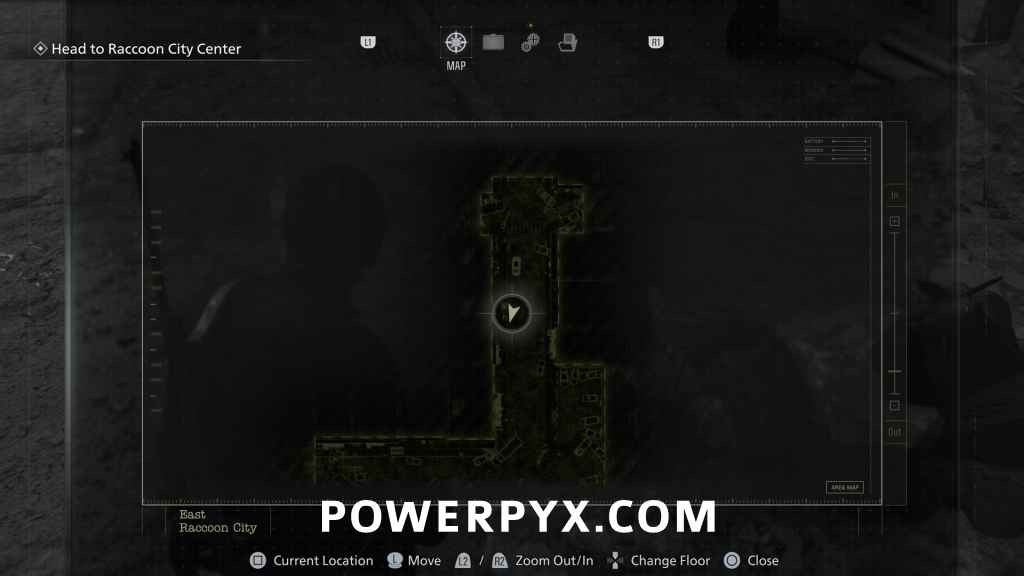
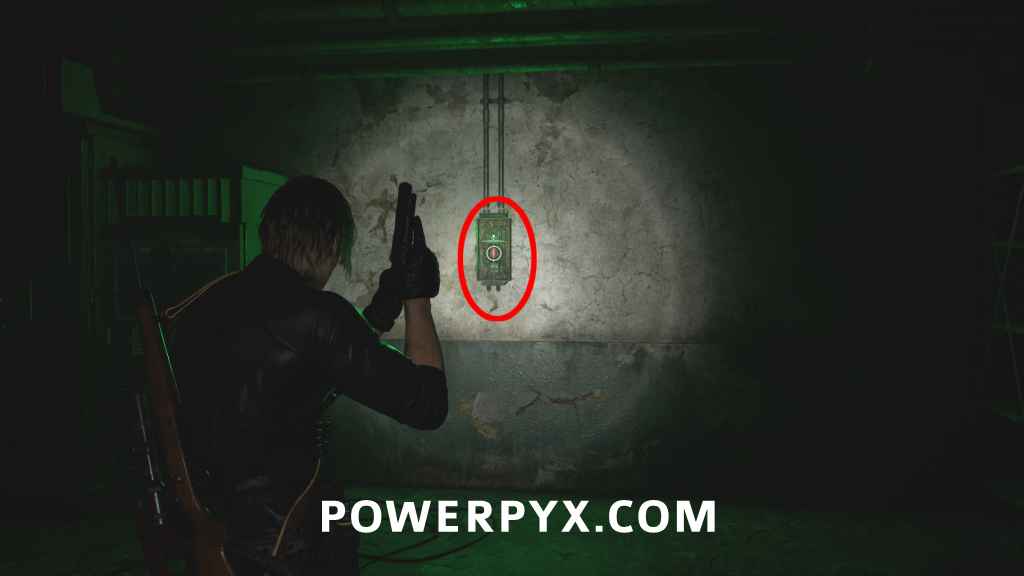
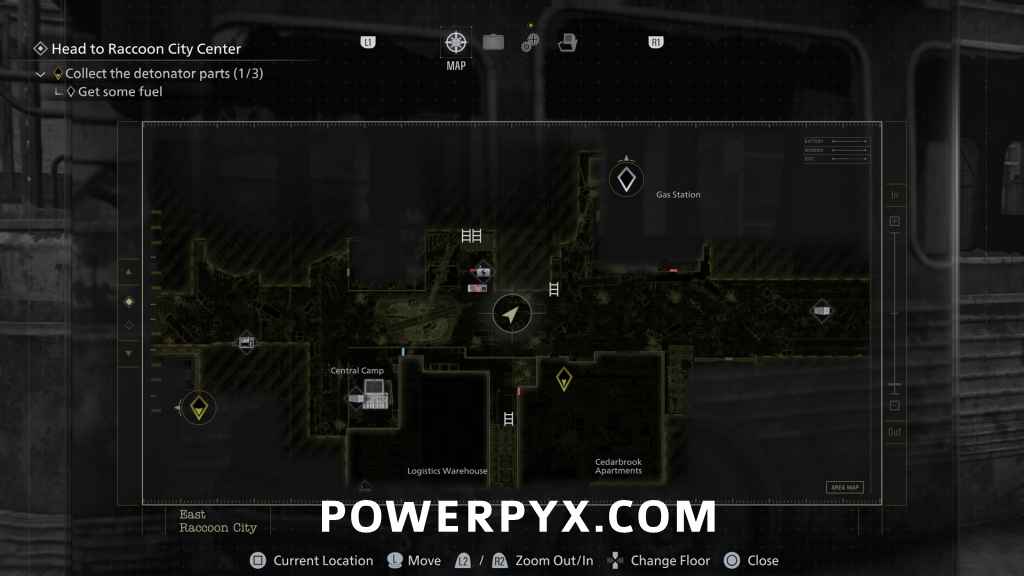
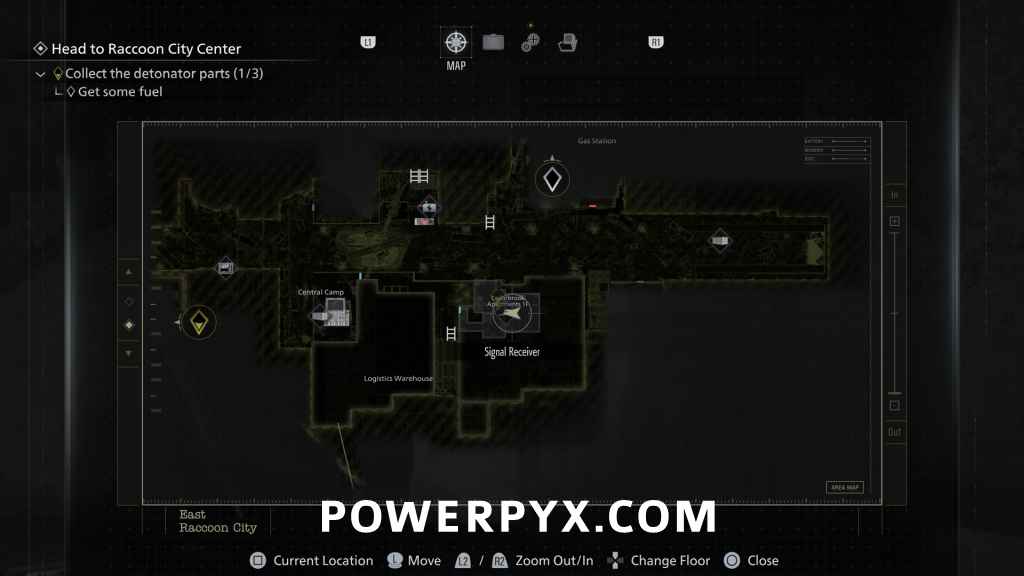
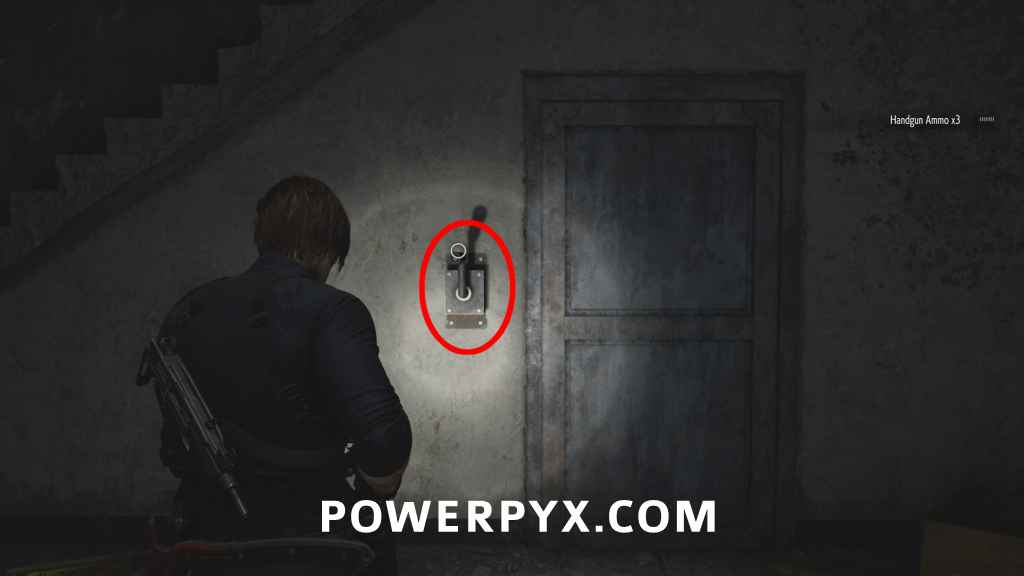
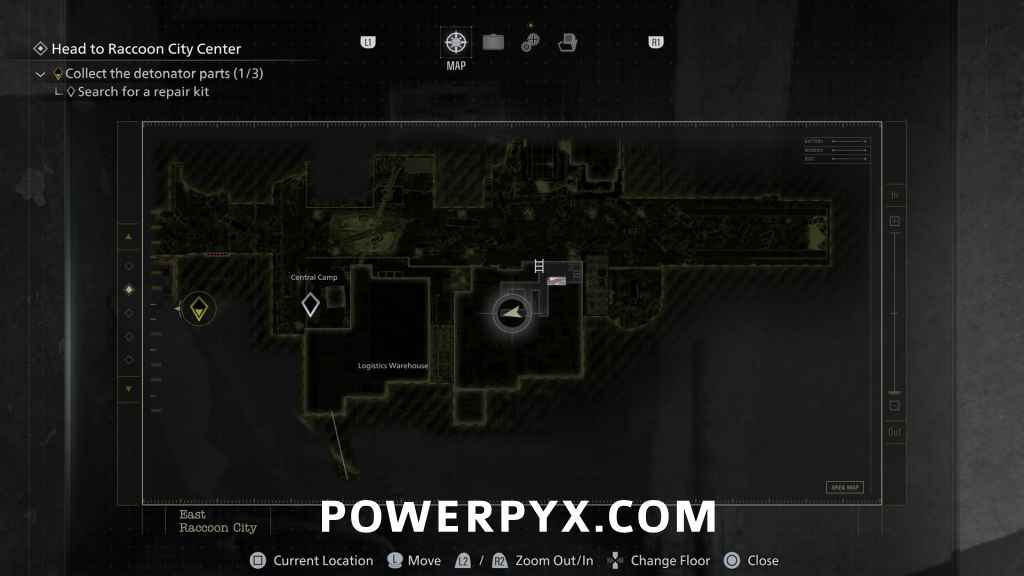
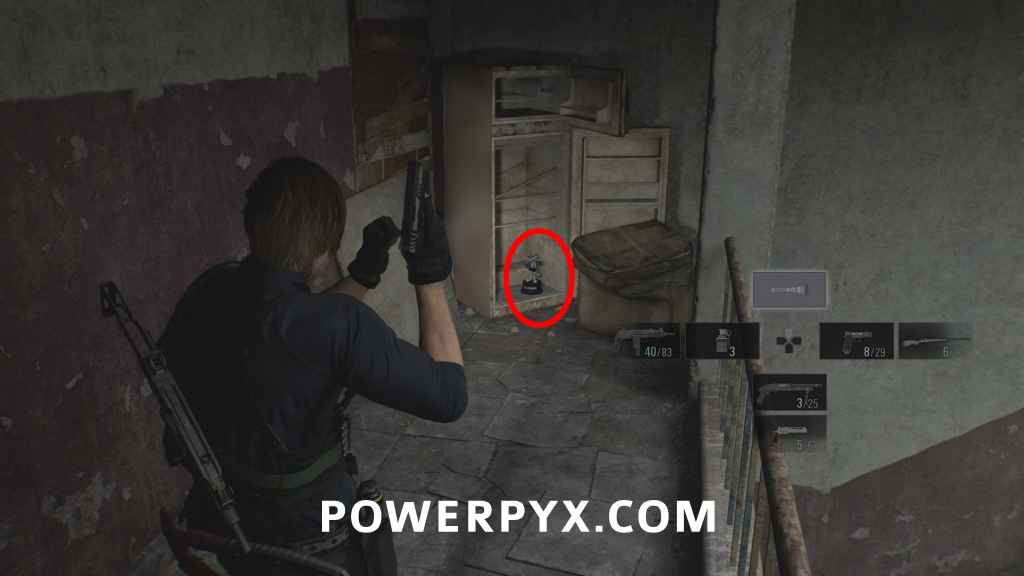
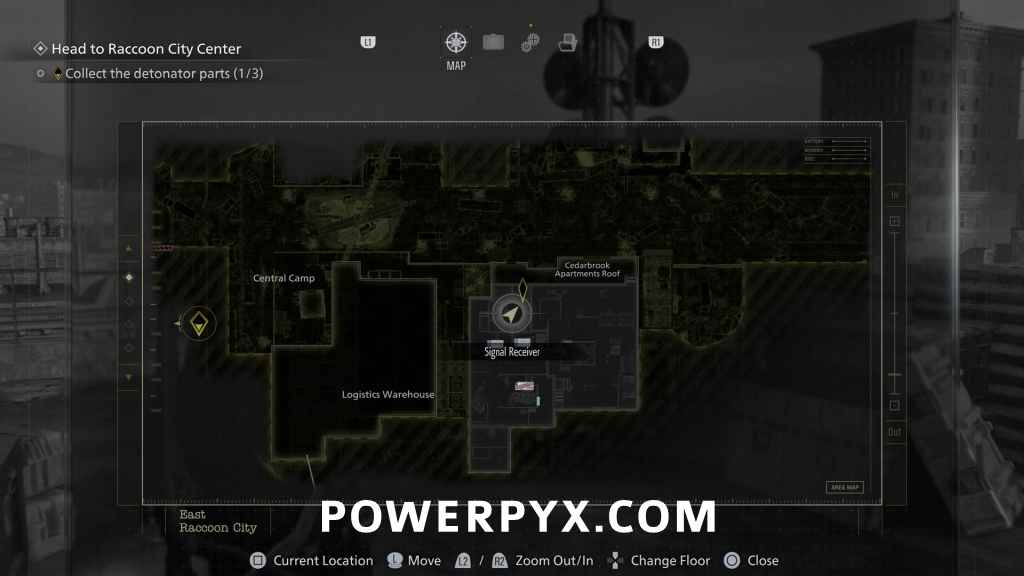
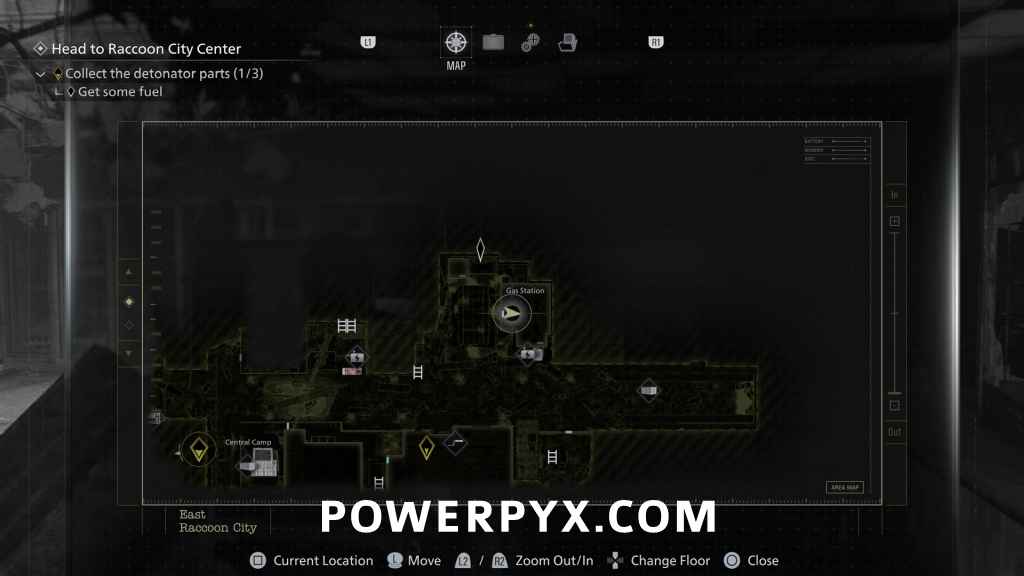
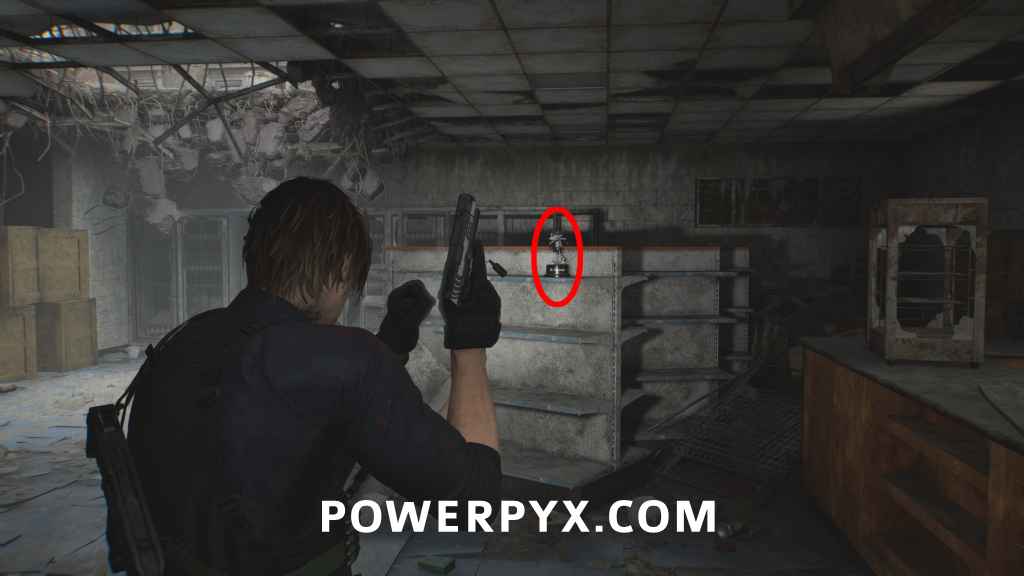
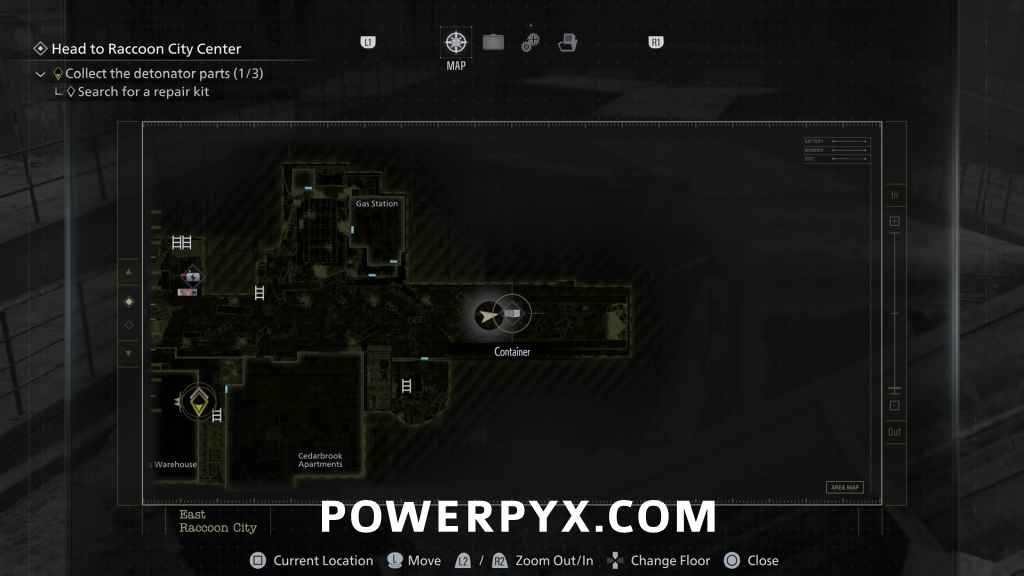
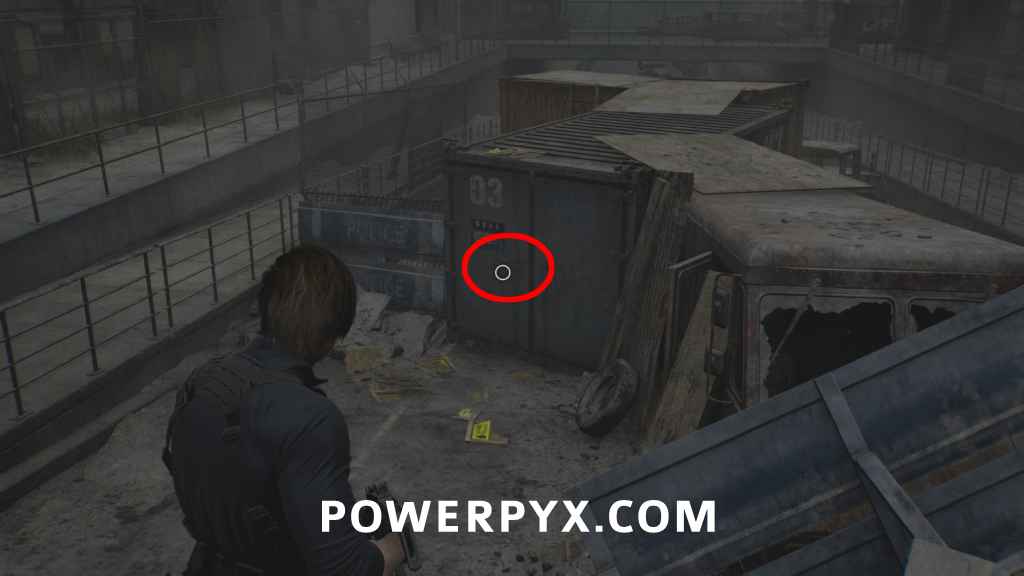
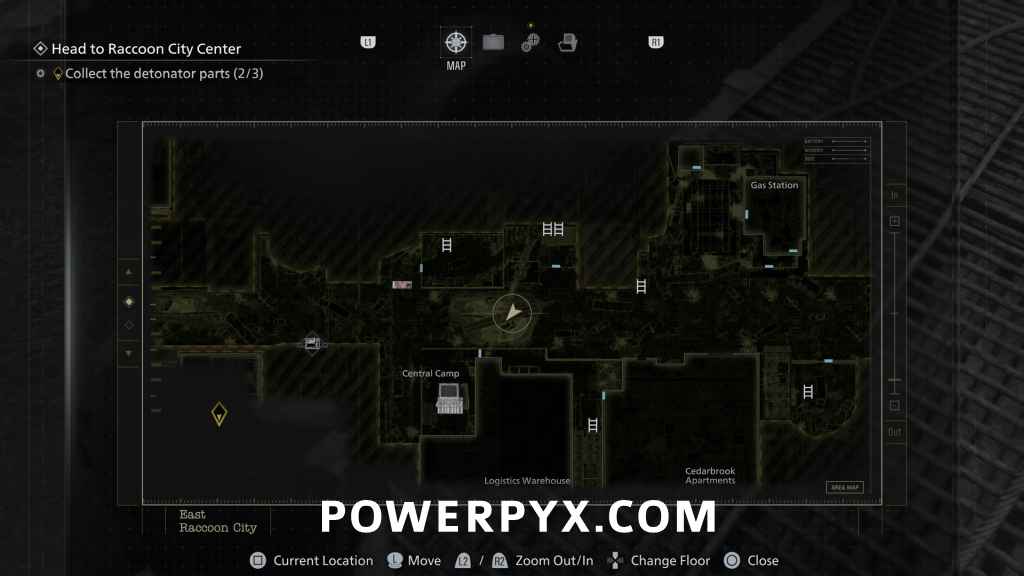
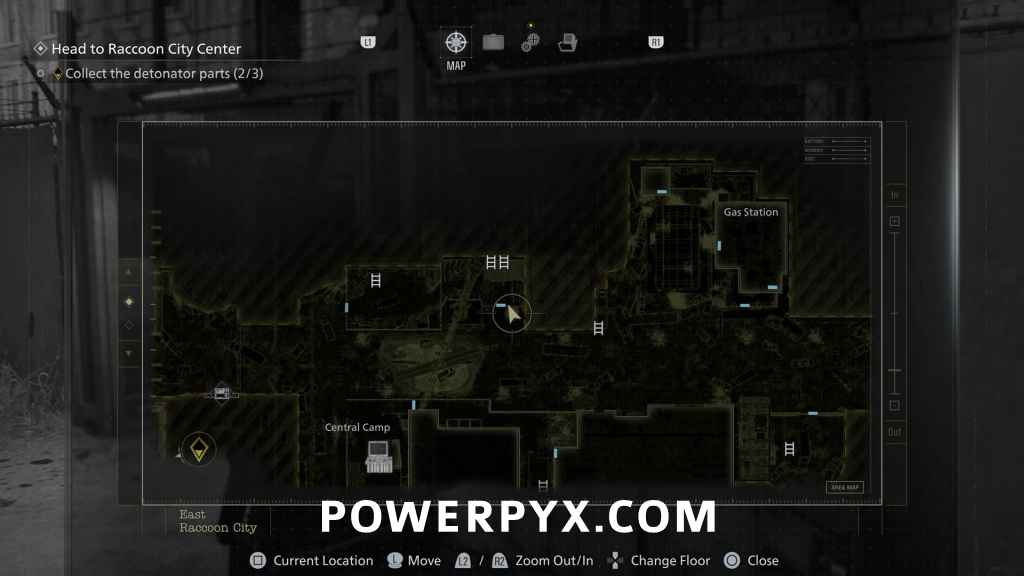
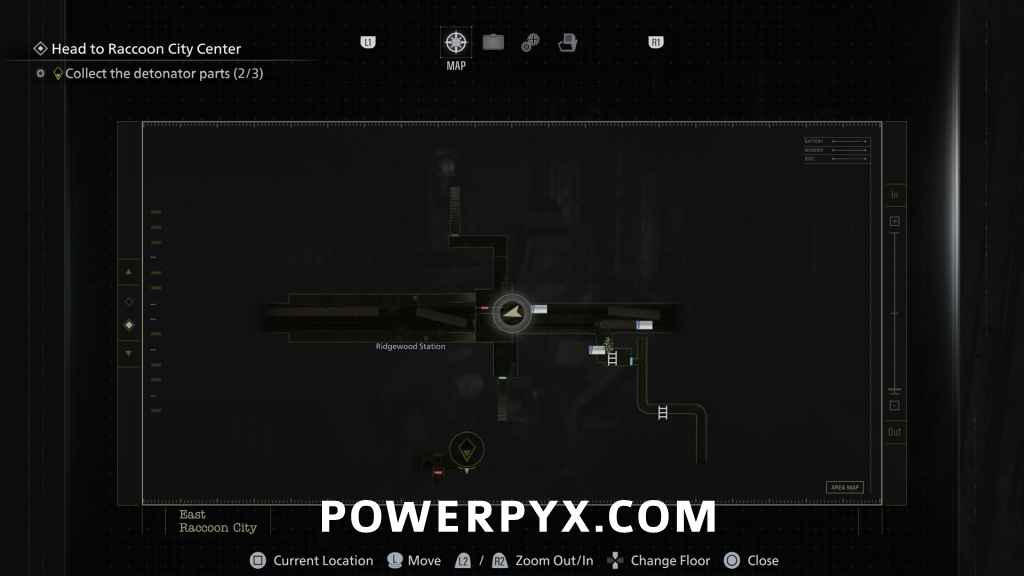
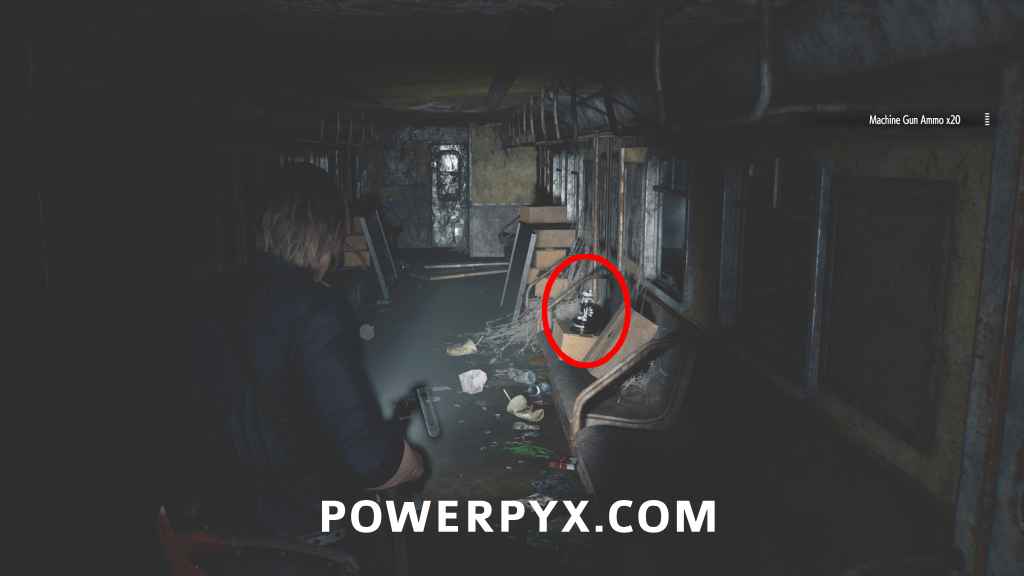
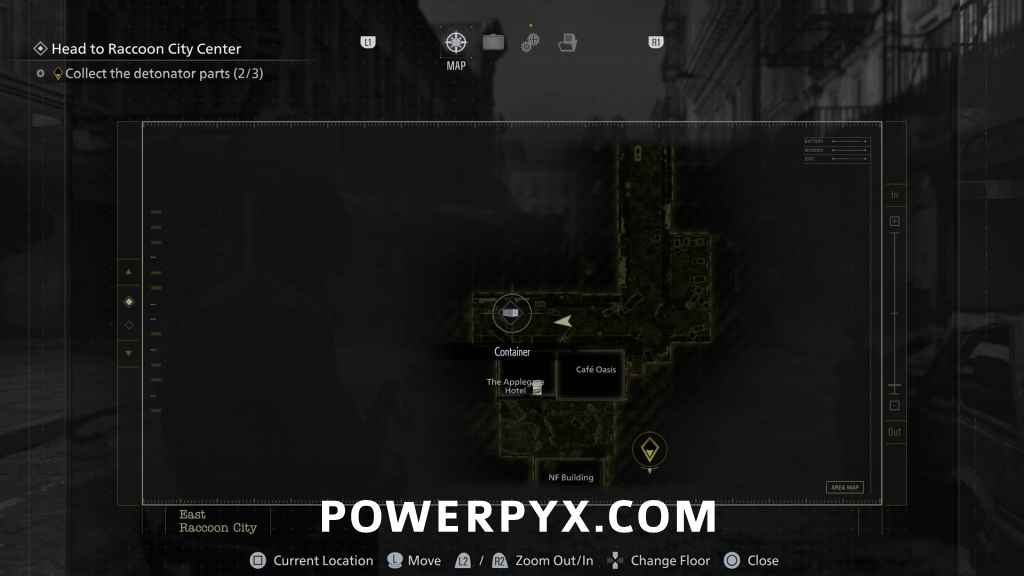
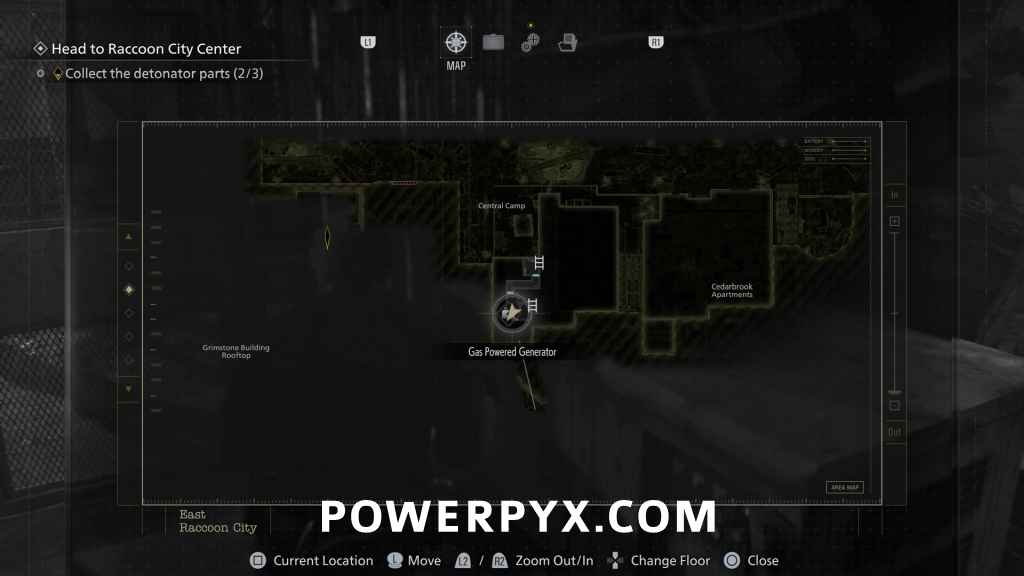
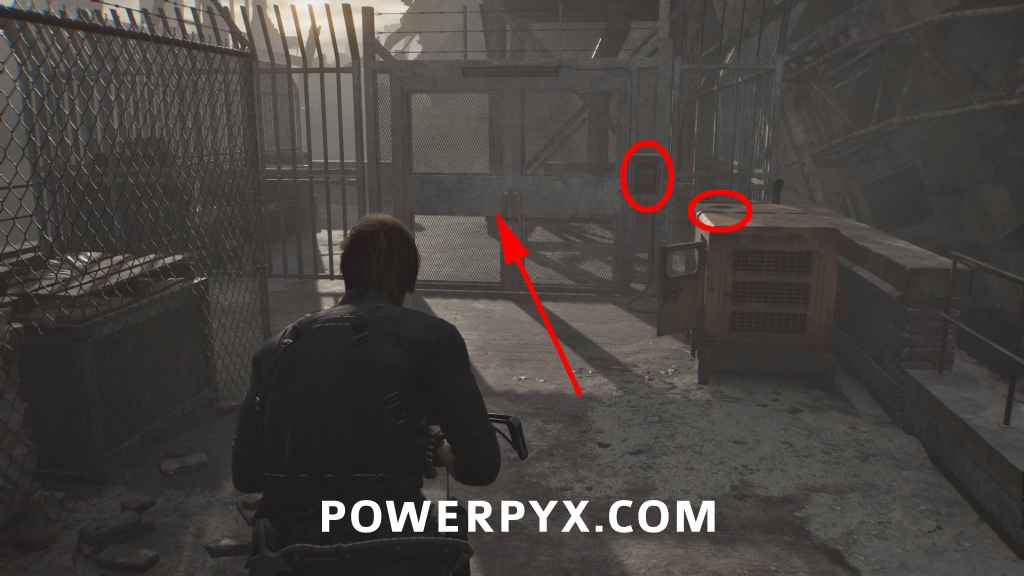
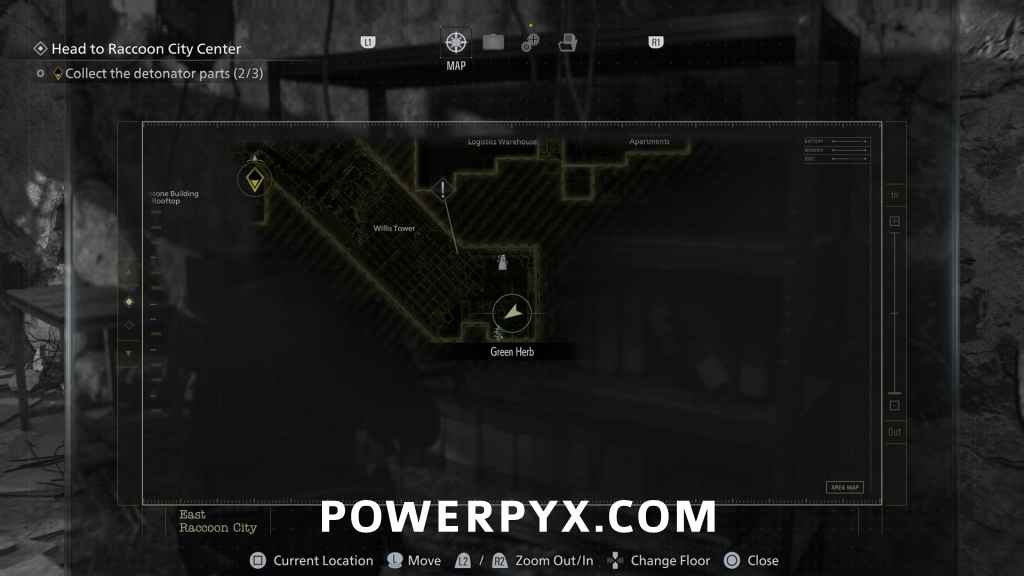
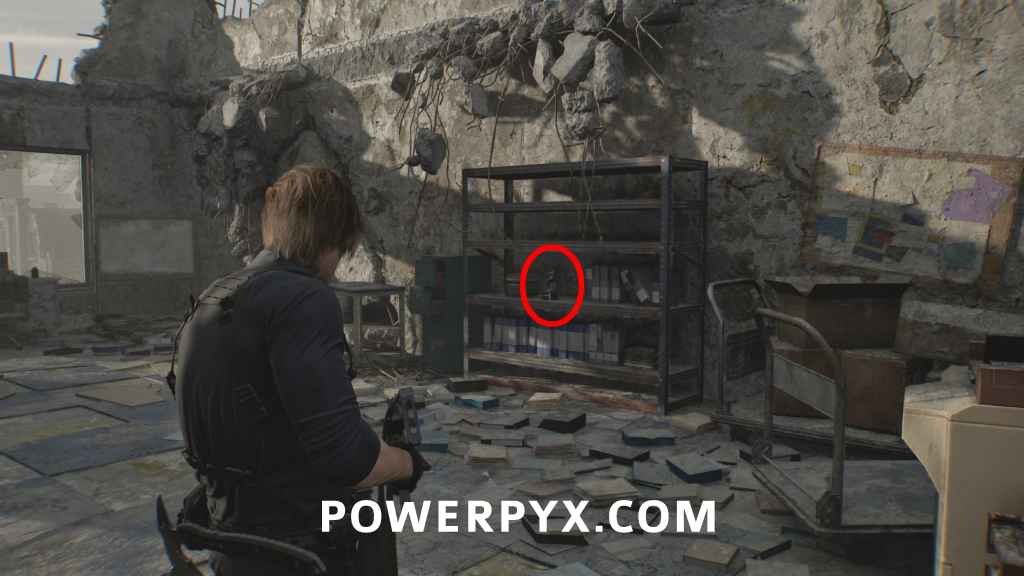
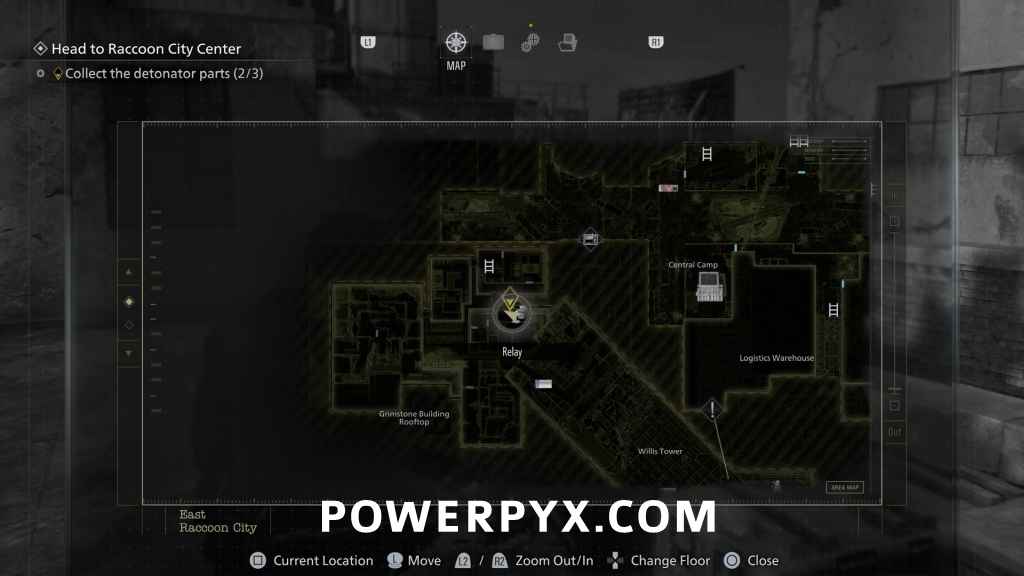
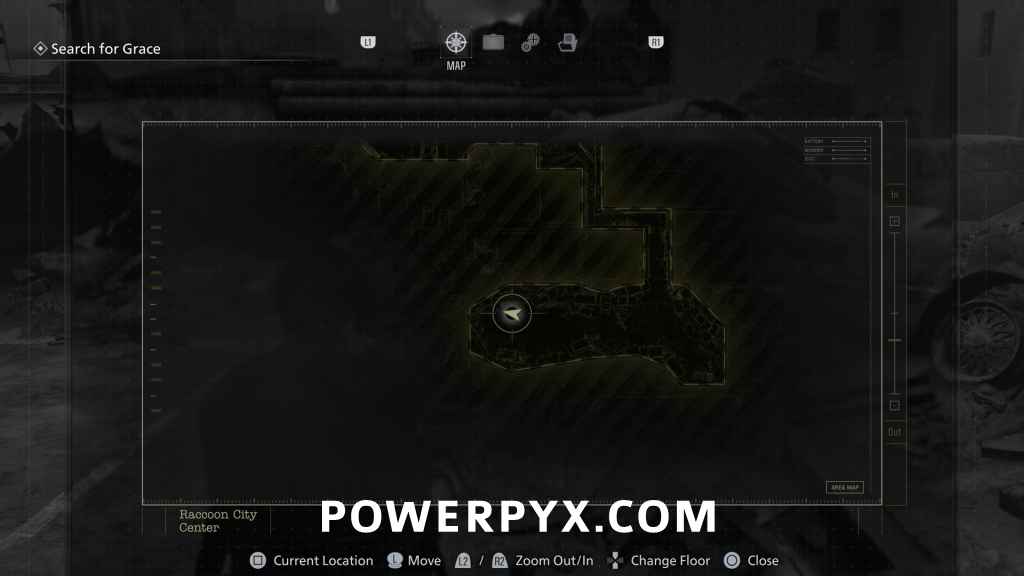
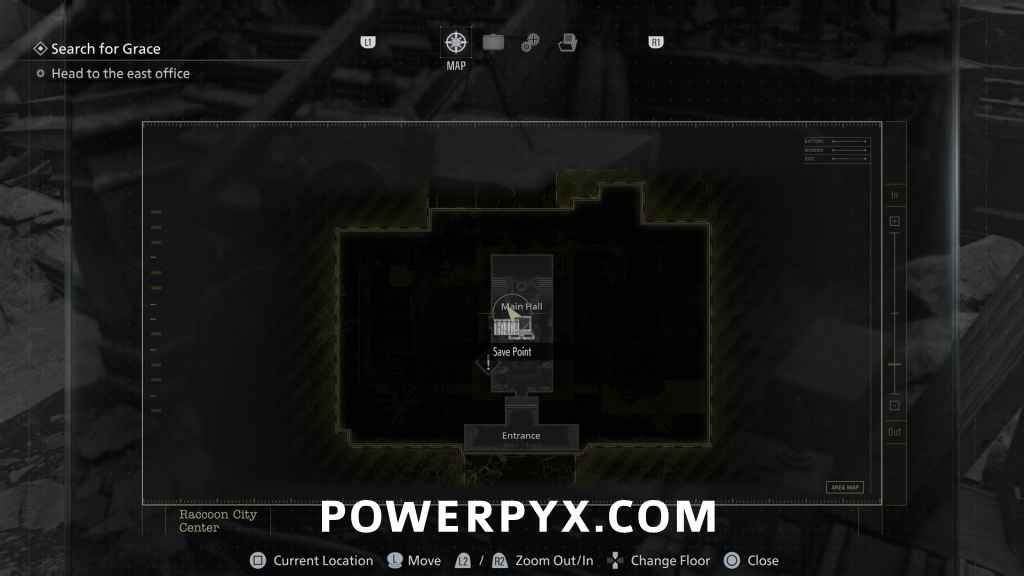
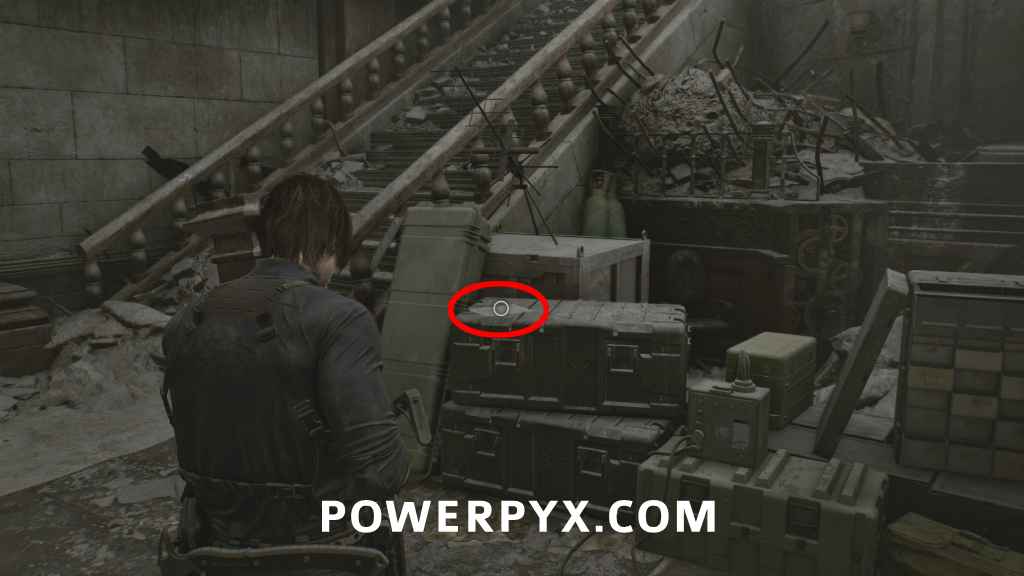
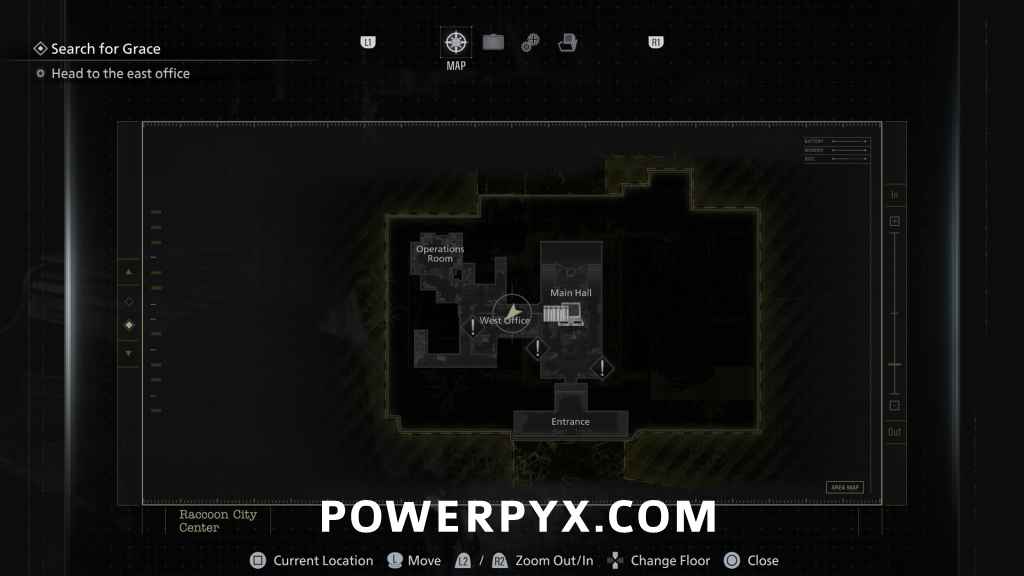
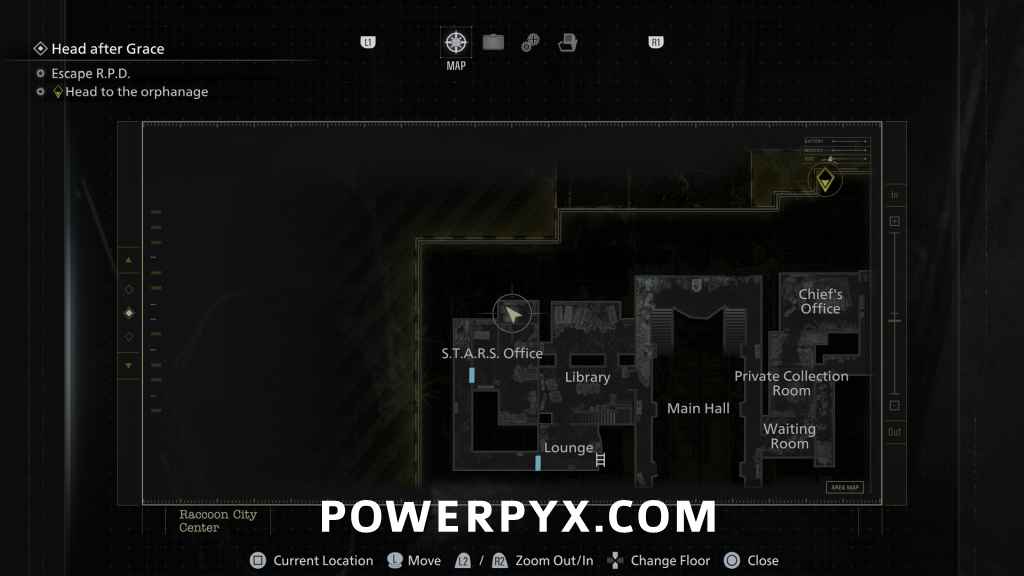
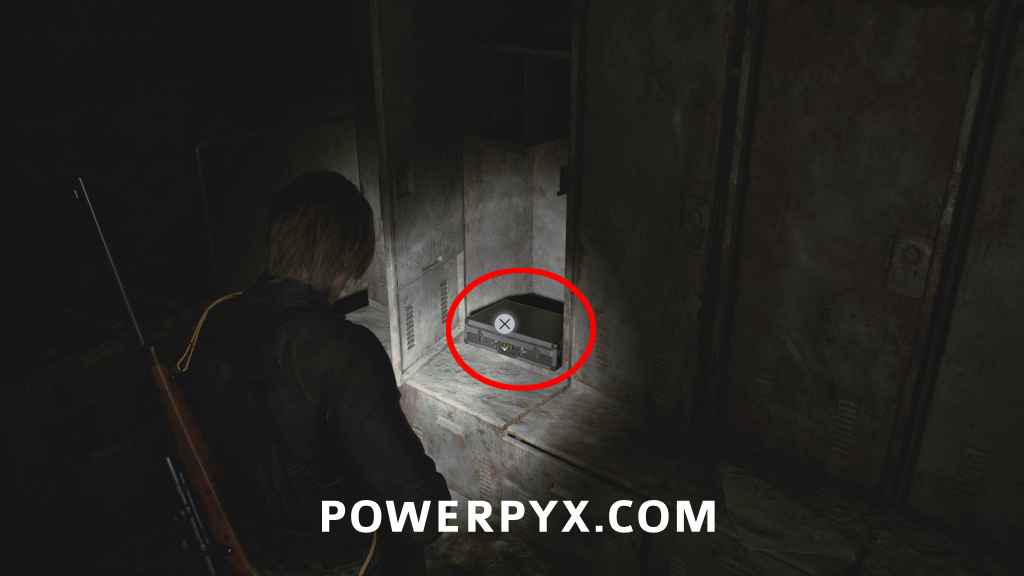
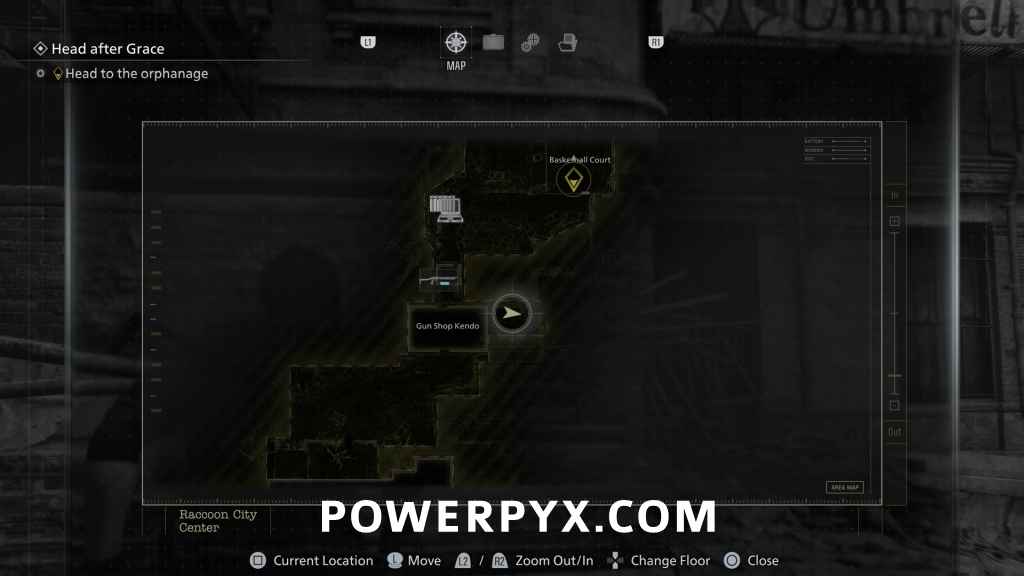
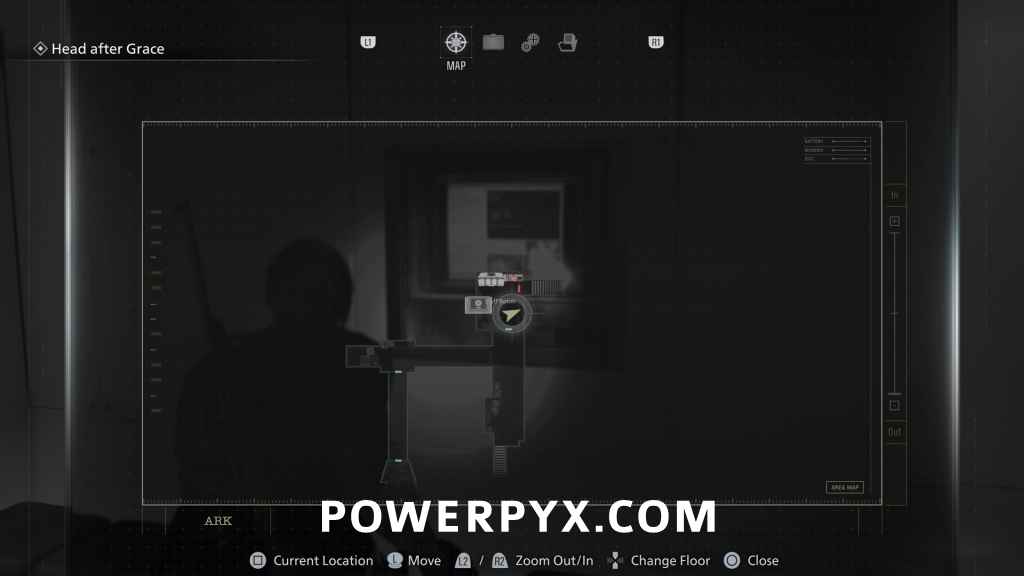
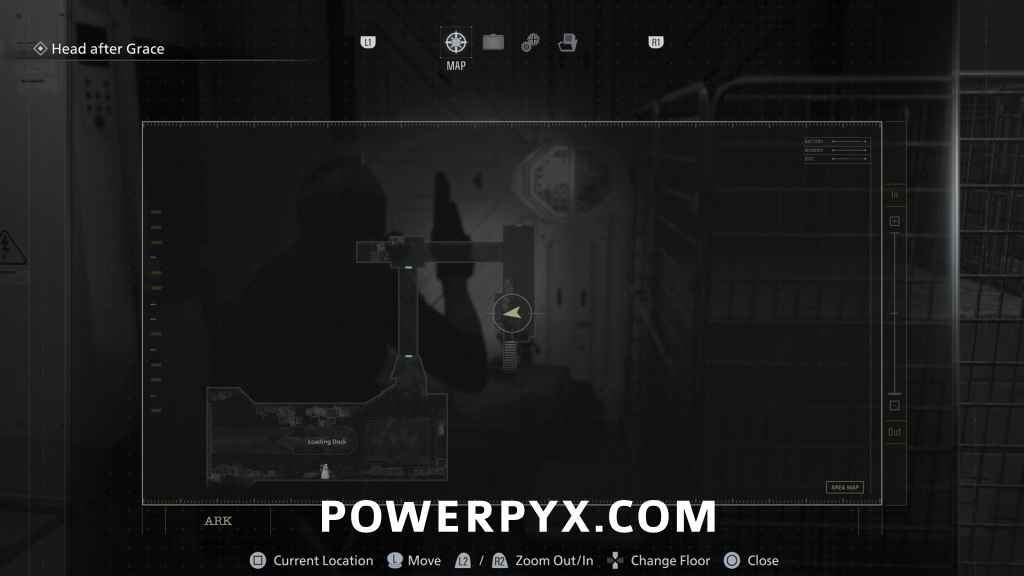
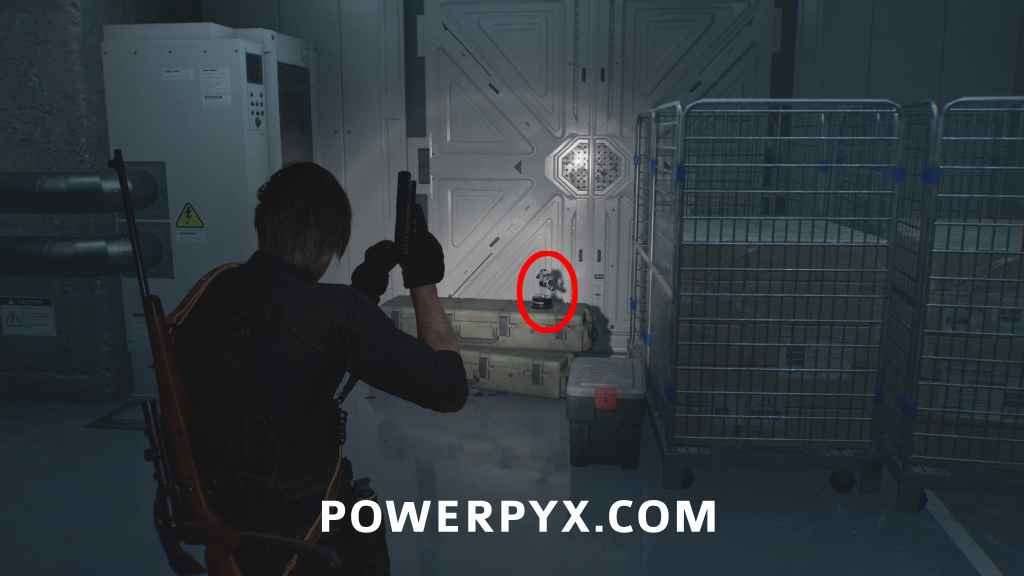
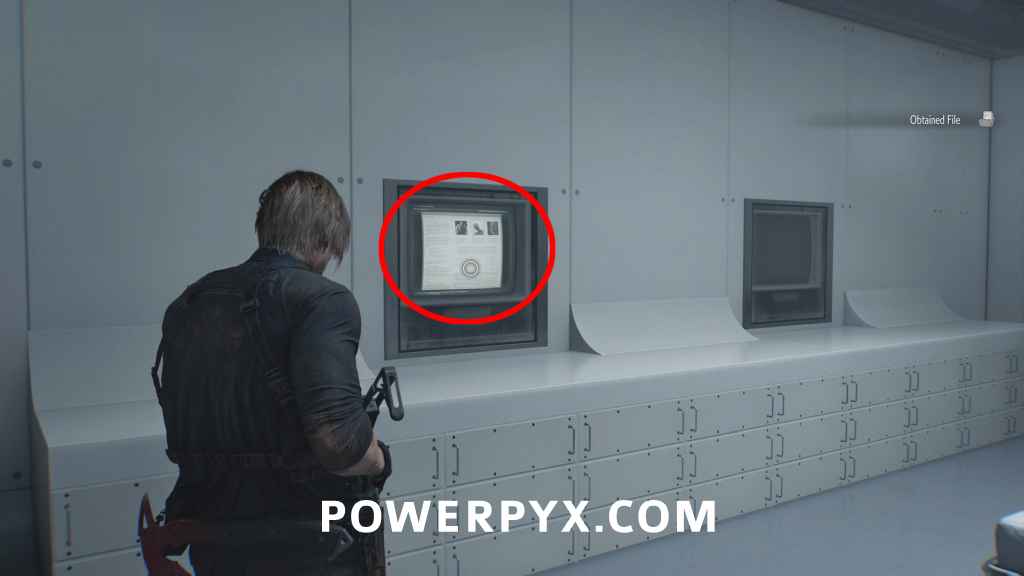
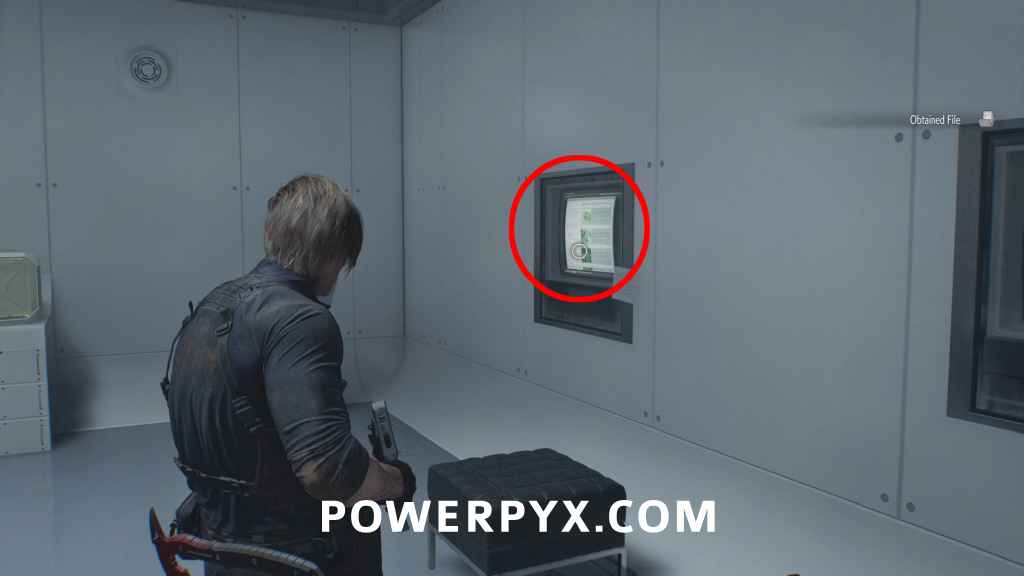
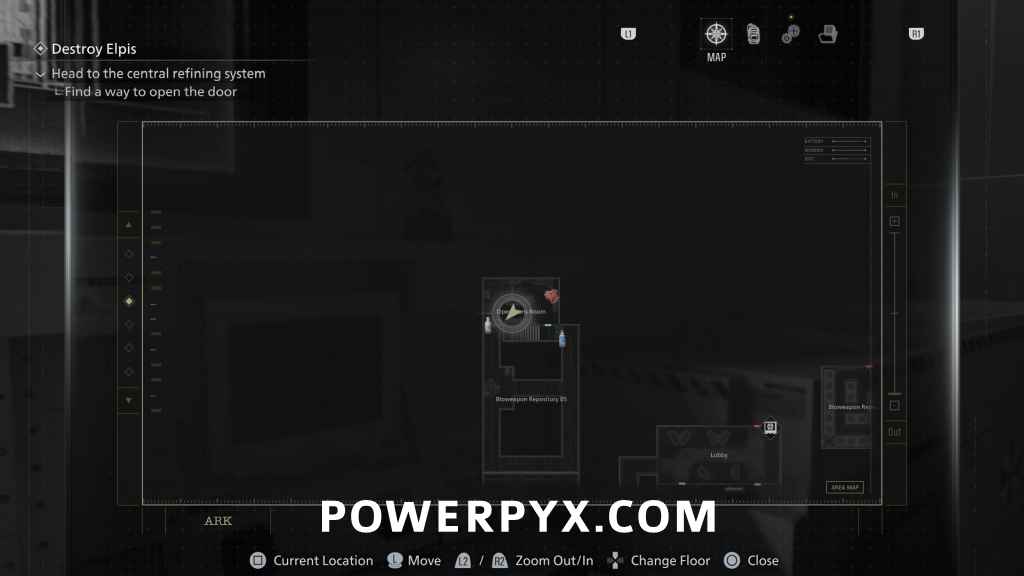
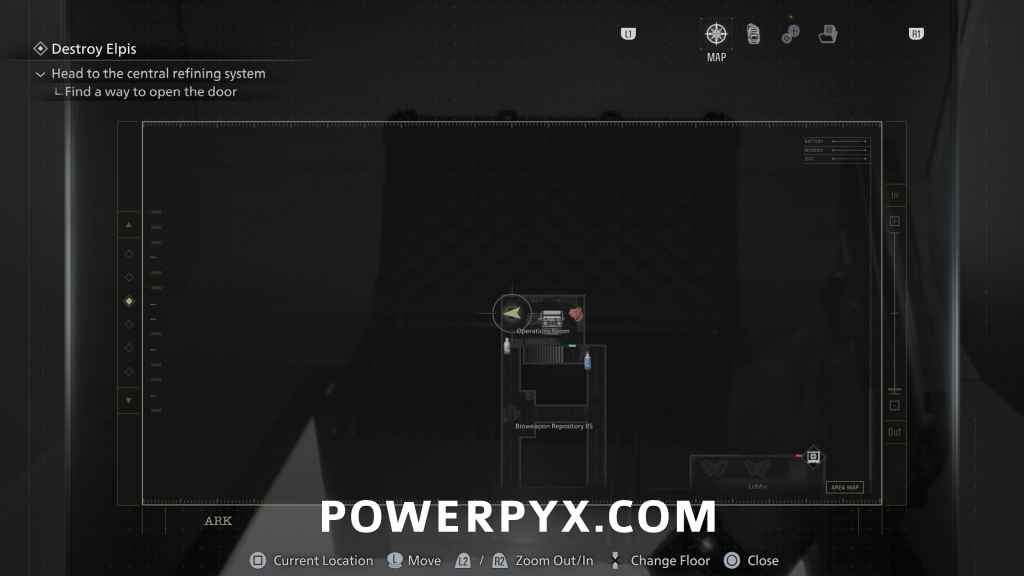
Ridgewood Station: On the main road between Gas Station & Central Camp, use the fuel can on the generator at the big crane. Go through the now-open gate at the generator until you reach a ladder that leads underground. Follow the path through the underground and you will automatically reach a train compartment where the Raccoon sits on a passenger seat. This path also leads back to the start of Raccoon City where the last BSAA Container is. (First two images show the generator entry point, last two images show the Raccoon)

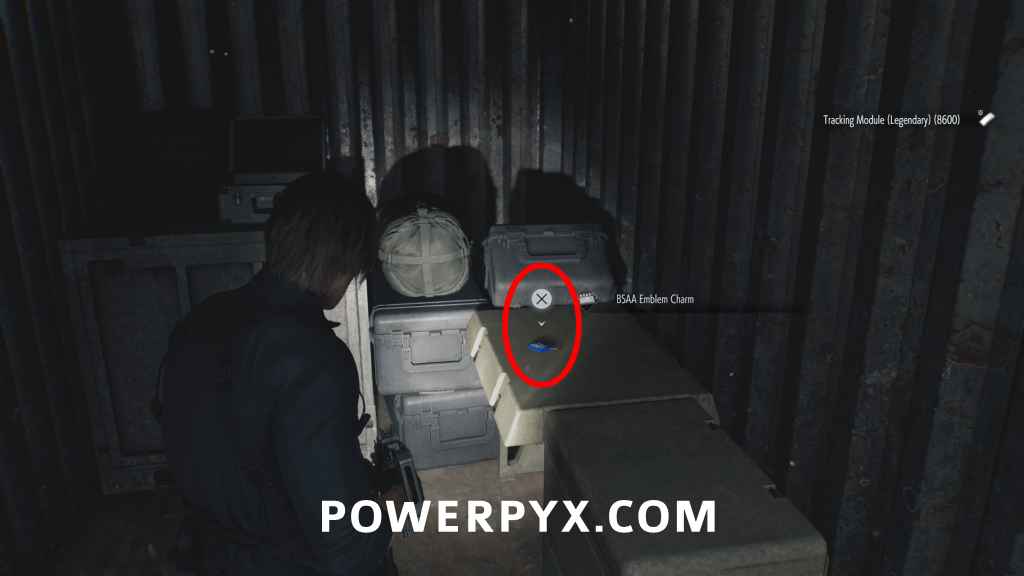
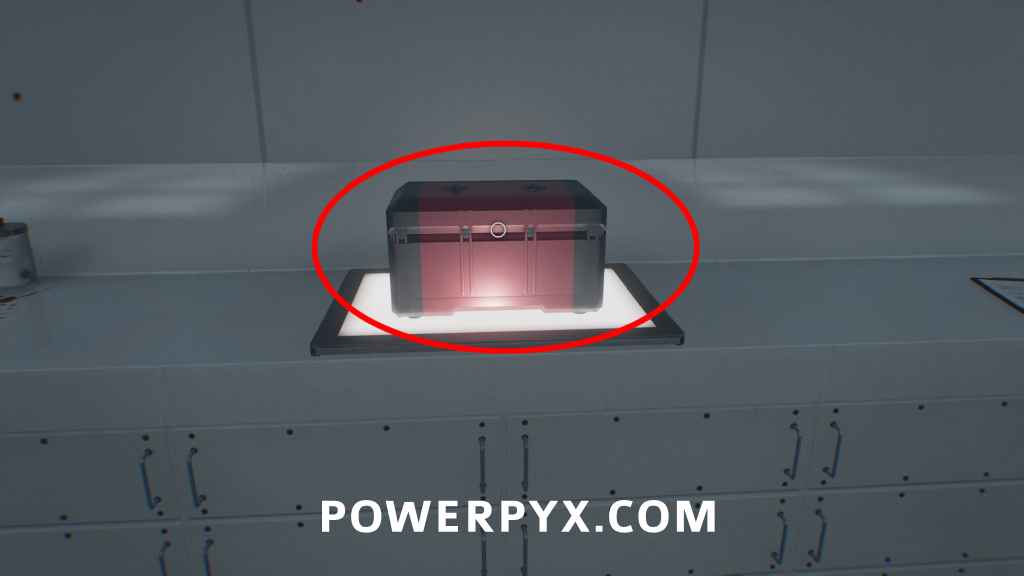
BSAA Container #3 + Charm: BSAA Emblem Charm (increases firepower only when the scope is not equipped)
From the previous location, keep going through Ridgewood Station until you exit back to where you first started Raccoon City. Open the container outside The Applegate Hotel, contains a charm.

Mr. Raccoon #19
Backtrack to Central Camp, go back through Ridgewood Station and after passing the first revolving door keep to the left to immediately go through another revolving door that brings you back to Central Camp. Use the elevator in Central Camp to reach the roof and climb down the ladder on the right. This leads to a generator, fill it with gas and press the red button, then use the zipline to reach Willis Tower. From where you land, go upstairs, turn right to follow the sofas into a room with the Raccoon on a shelf.
Now advance through Willis Tower. You need to shoot barricades on various doors and to create “bridges” that let you progress. When you get to a point where armored zombies walk over glass, you must shoot the glass underneath a metallic support beam on the right side of the area to create a ramp that leads up.
Key Item: Relay / Detonator
At the end of Willis Tower. Combine with the other parts to get finished Detonator.
Now keep advancing across the roof and use the two wheels on either side of the red elevator in the middle. Then use the elevator to get back down to street level and use the Detonator on the gate east of Central Camp.
Trophy: Road Rage
During the motorcycle section, shoot Victor to interrupt one of his attacks. He will have a red arrow over his head when he’s about to shoot the RPG at you, that’s when you need to shoot him. If you miss the trophy, quickly reload one of the last autosaves. The earliest opportunity is immediately when you see Victor on his bike for the second time.
Raccoon City Center – Leon
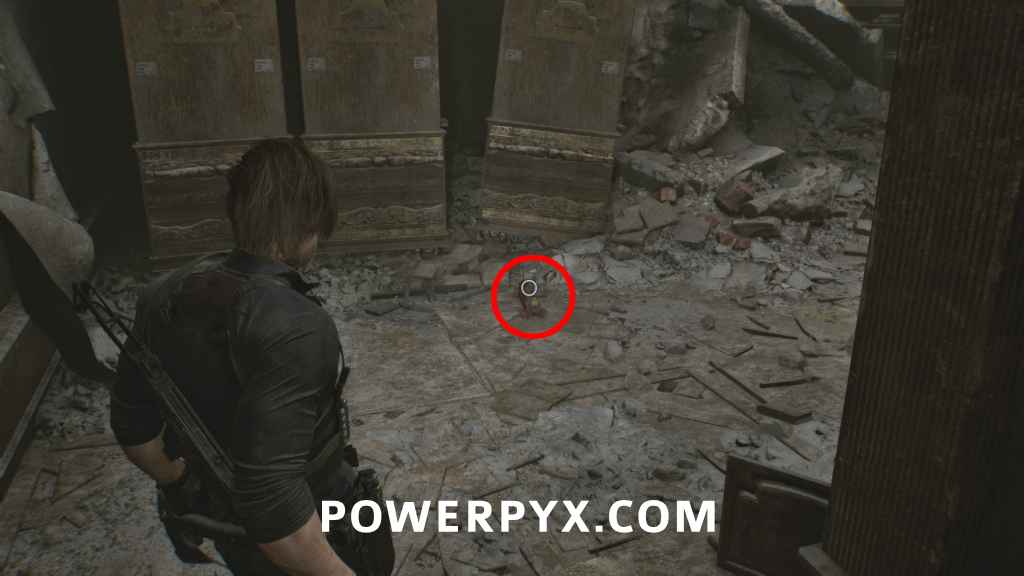
Mr. Raccoon #20
After the motorcycle section when you’re on foot again, turn slightly left to find this in front of the destroyed tanker in the rubble.

File #54 – R.P.D Perimeter Report
Main Hall: Advance on the story path until you go inside the R.P.D. building, then find this opposite the save point on a box.
File #55 – Top Secret Operation
West Office: In the room next to the save point, on the first desk on the right.
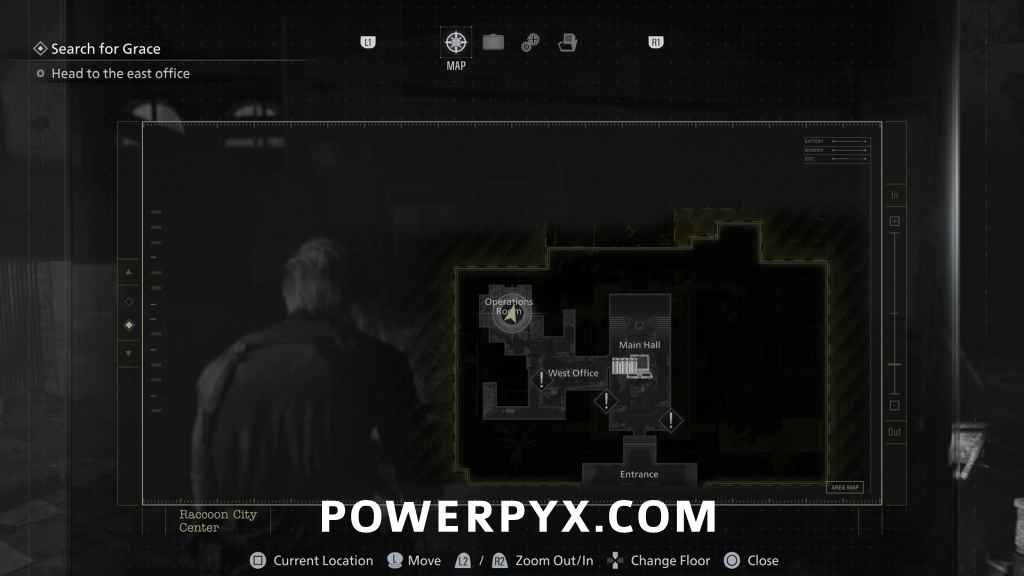
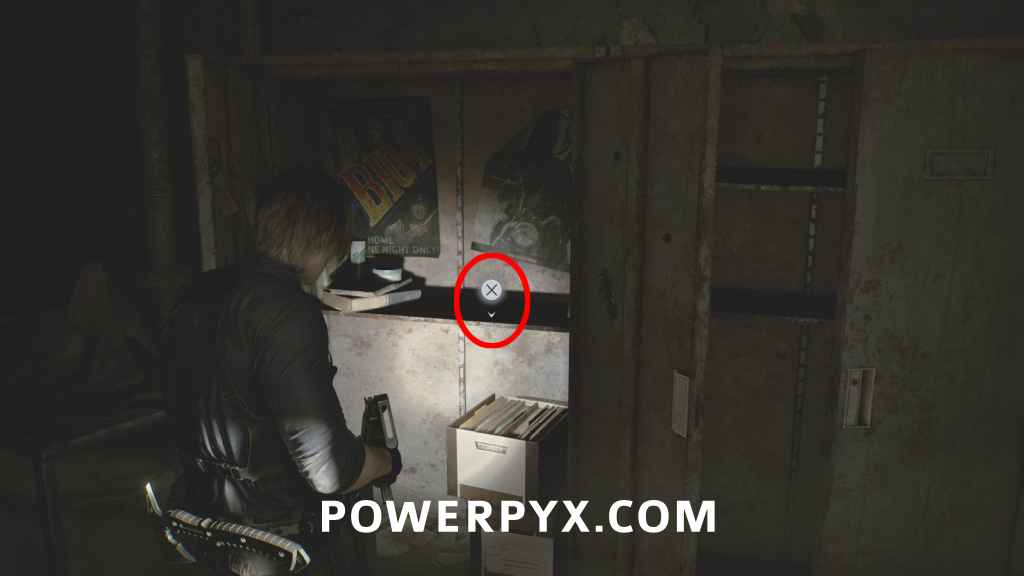
Mr. Raccoon #21
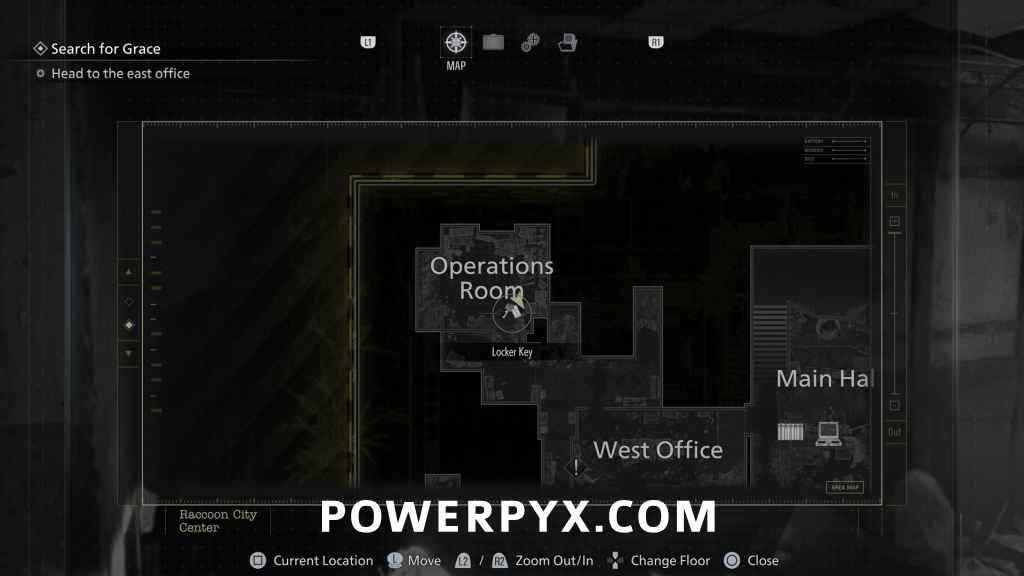
Operations Room: Inside the rubble on the left side of the Operations Room, behind a wooden barricade.


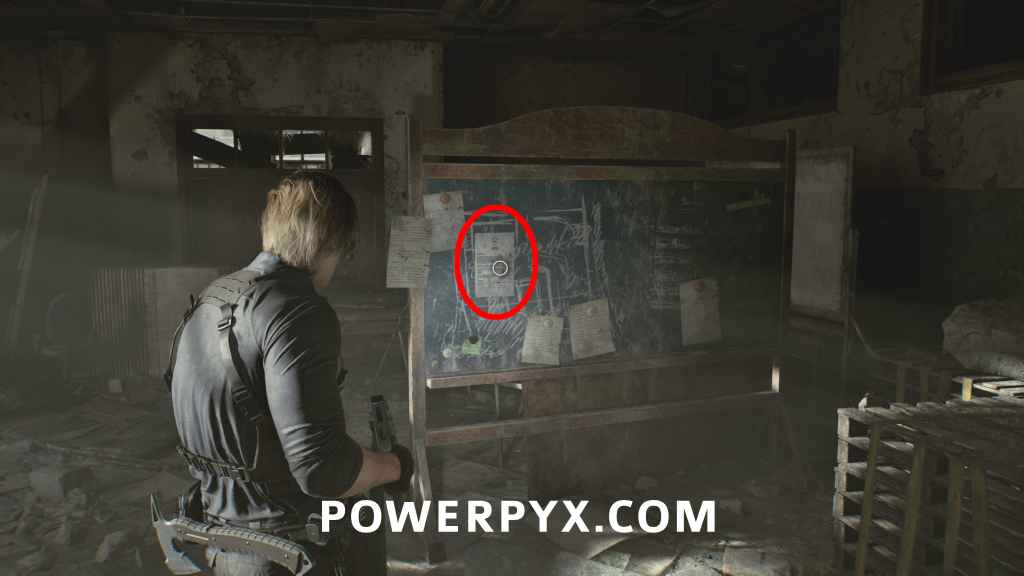
File #56 – Record of Events
Operations Room: On the chalkboard in the Operations Room.
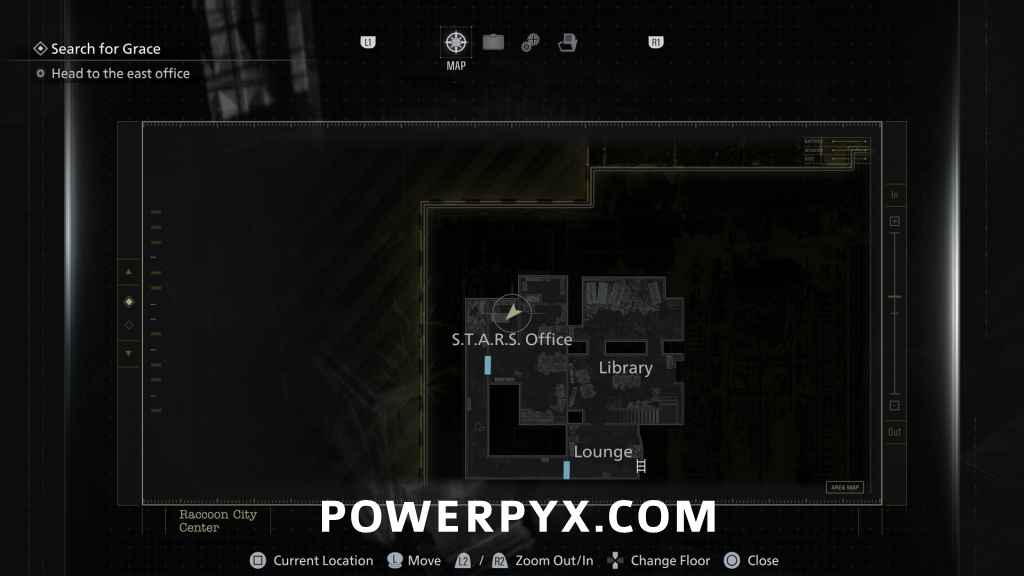
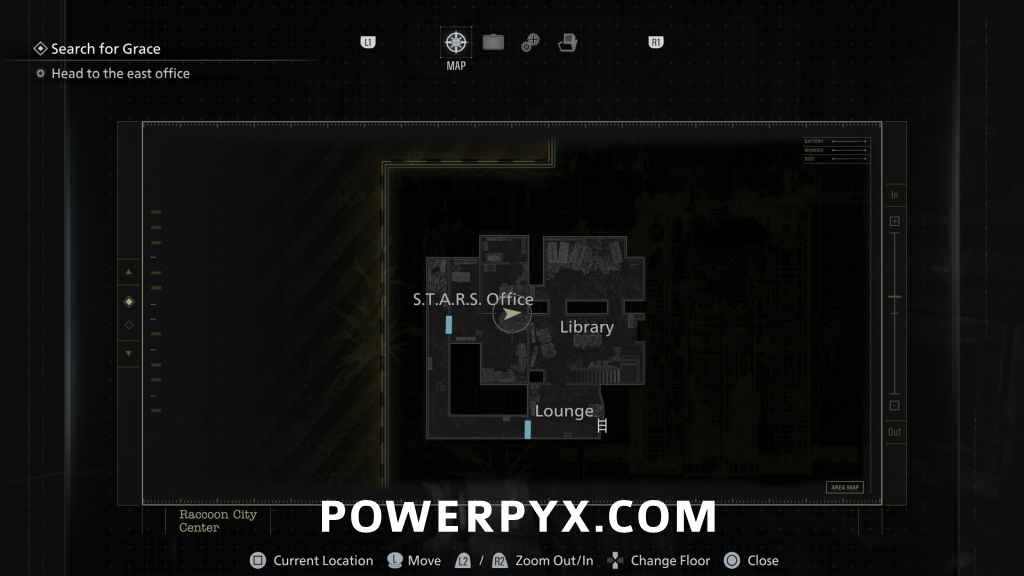
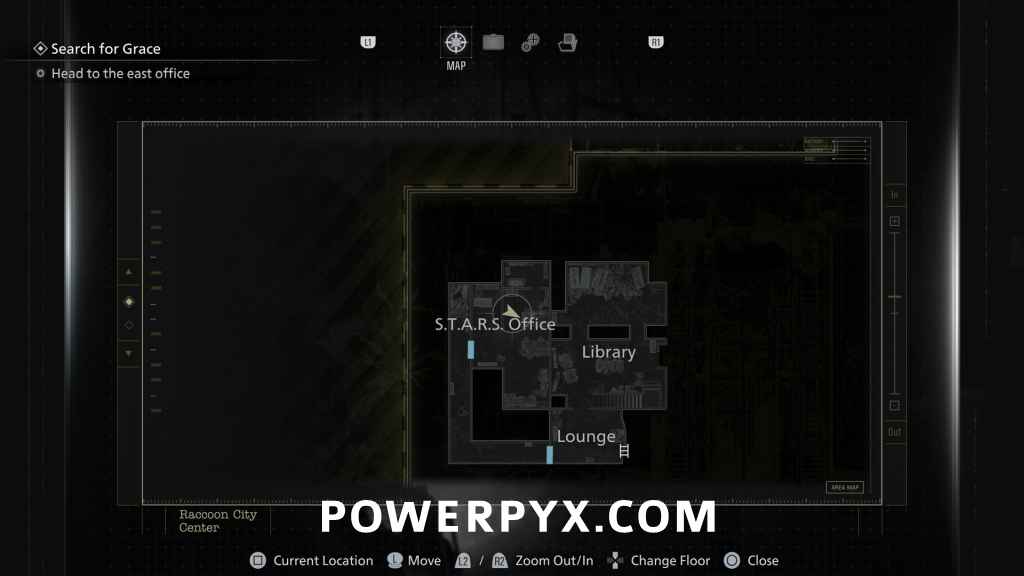
File #57 – Scavenger Hunt – Clue 2
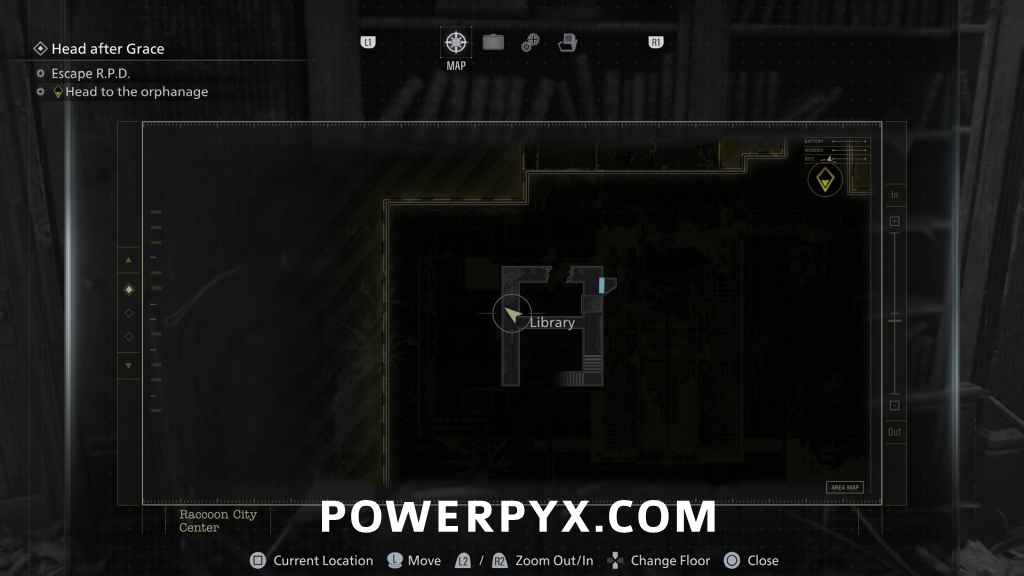
S.T.A.R.S. Office: Head south of “Operations Room” to “Reception” where the locked shutter is. Look up and shoot down the ladder to climb up. Go straight through the corridor (don’t enter the Library on the right), at the end of the corridor enter the S.T.A.R.S. Office. This is inside the shelf on the right. Turn it around to see the note. If you entered the Library you went the wrong way and must take the corridor outside the Library.

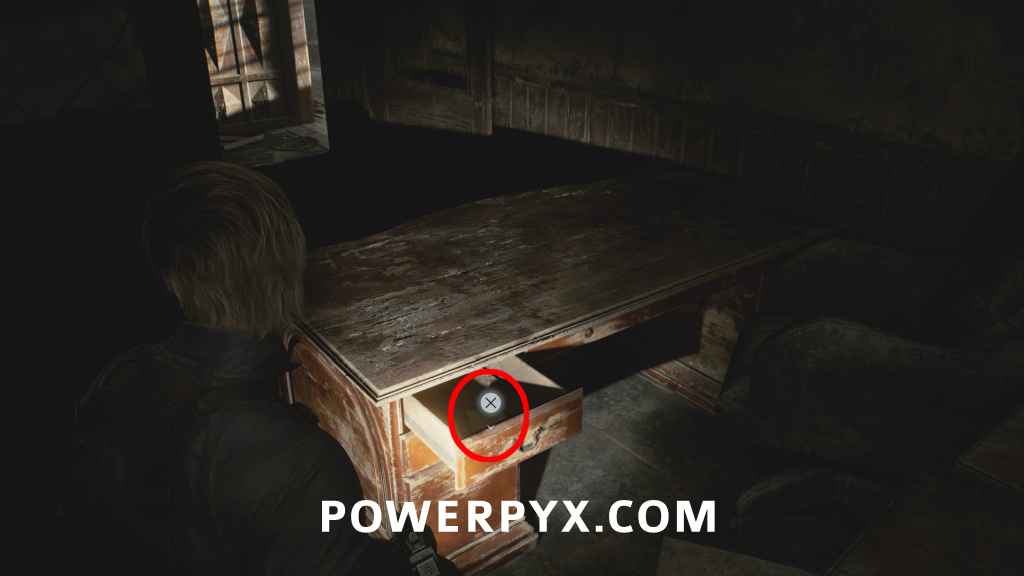
File #58 – Library Card
S.T.A.R.S. Office: Same room, enter the little side office on the left of where you entered to find this inside the desk drawer. Must interact with the drawer to open it and wait a moment for the file to appear.
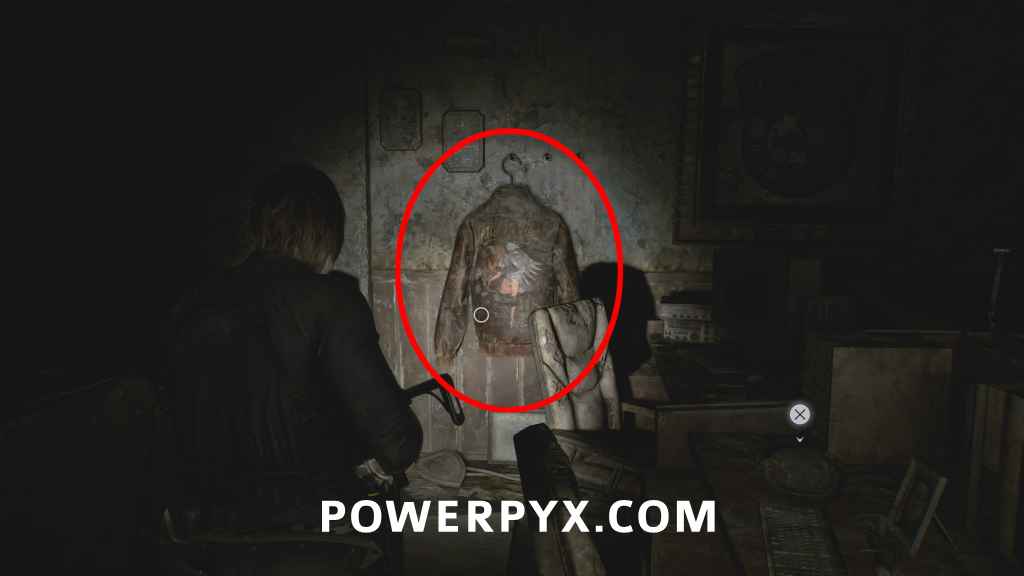
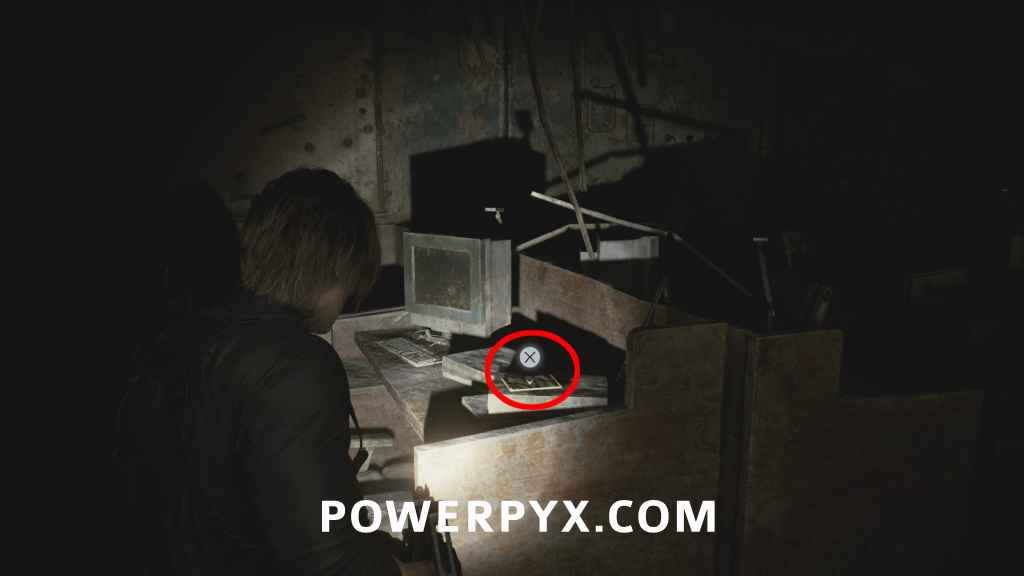
File #59 – Scavenger Hunt – Clue 1
S.T.A.R.S. Office: Same room, directly opposite the door from where you entered, interact with the brown jacket hanging on the wall between the desks. Turn the file around to see the note.
File #60 – Barry’s To Do List
S.T.A.R.S. Office: Same room, on the leftmost desk.
Charm: Power Shades Charm (Offers limitless bullet penetration and increases the firepower of the last bullet in the cylinder)
S.T.A.R.S. Office: Same room, in the left corner enter the locker room to find a locked briefcase. Enter code RRR (Rising Rookie Rebecca) to open it.
(Normally, the solution is obtained from “File #61 – Photograph”, but the code is always RRR and you can already open it now)
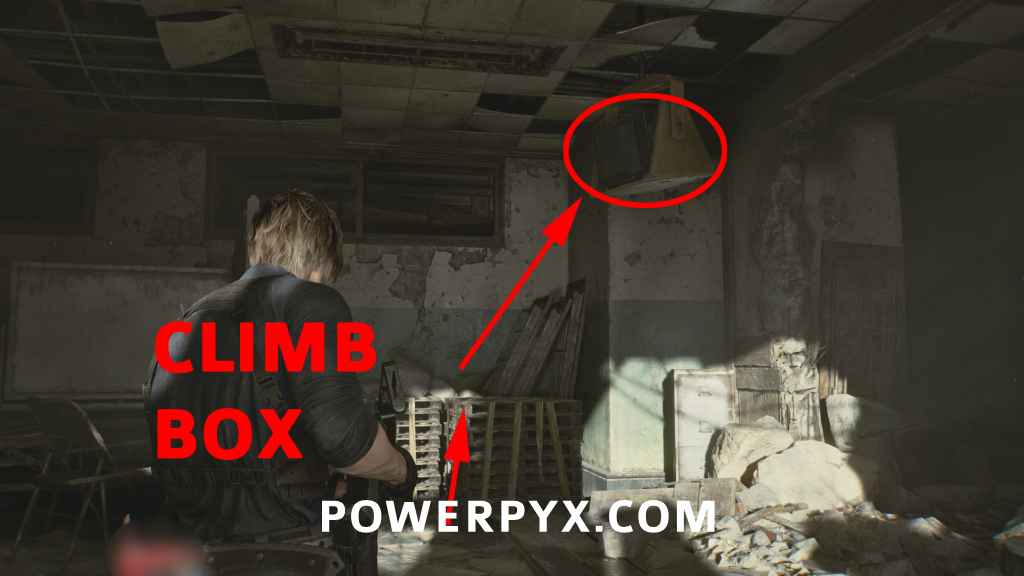
Key Item: Locker Key
Operations Room: After picking up both Scavenger Hunt Clue files from S.T.A.R.S. Office, go back downstairs to Operations Room (ignore Library upstairs for now). As soon as you enter the Operations Room, turn right and climb the crate in front of the chalkboard in the corner of the room. Then while standing on the crate turn towards the TV that’s fixed to the ceiling and you’ll see the key pickup. This ONLY appears after you’ve read both Scavenger Hunt files in STARS Office (otherwise the key isn’t there).

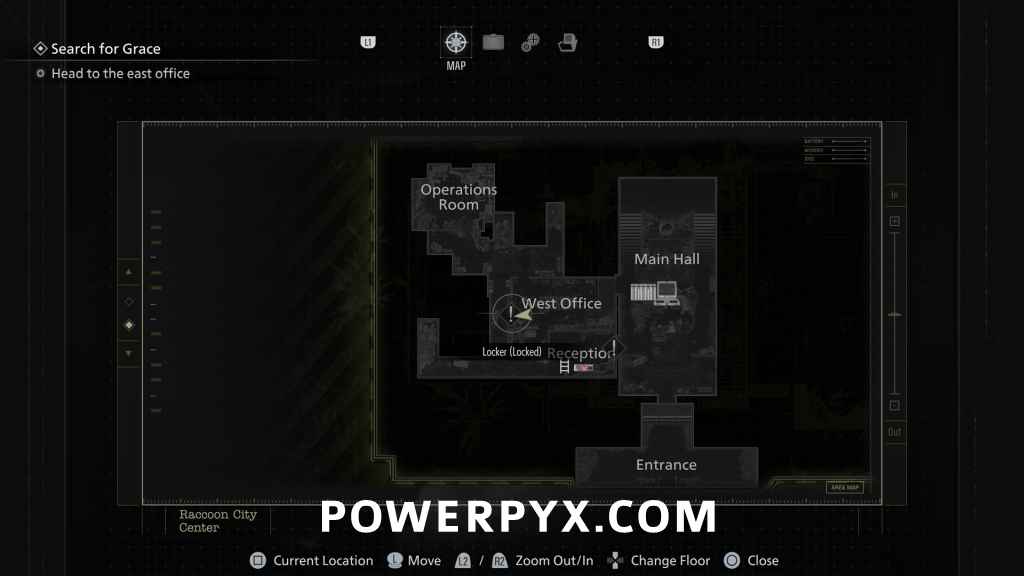
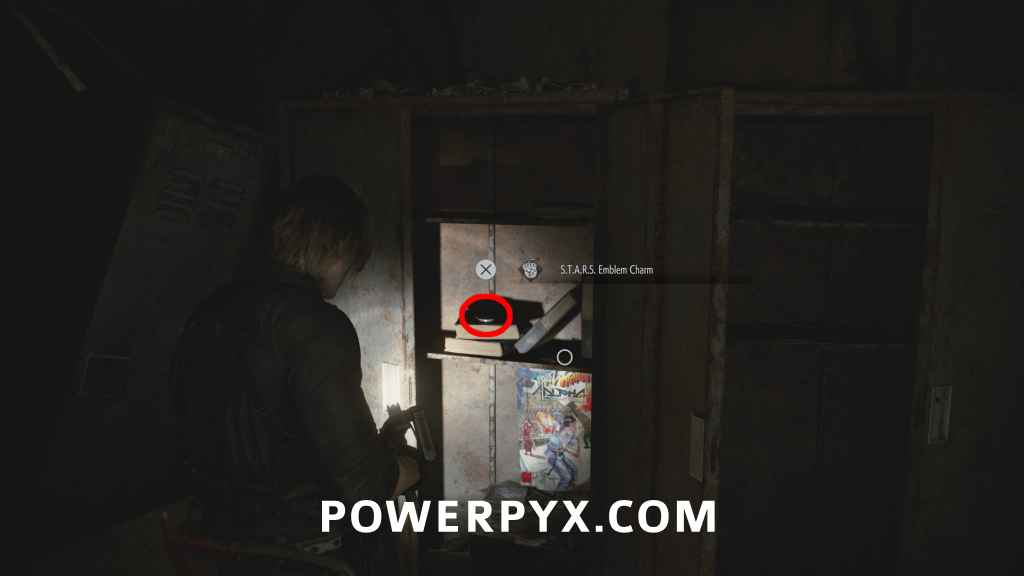
Charm: S.T.A.R.S. Emblem Charm (increases firepower at the cost of more sway while aiming)
West Office: Go back to West Office and open the locker using the Locker Key. The locker is marked with a “!” icon on the map. Collect the charm from the locker and view the zoo tickets from the back, thus the scavenger hunt is complete.
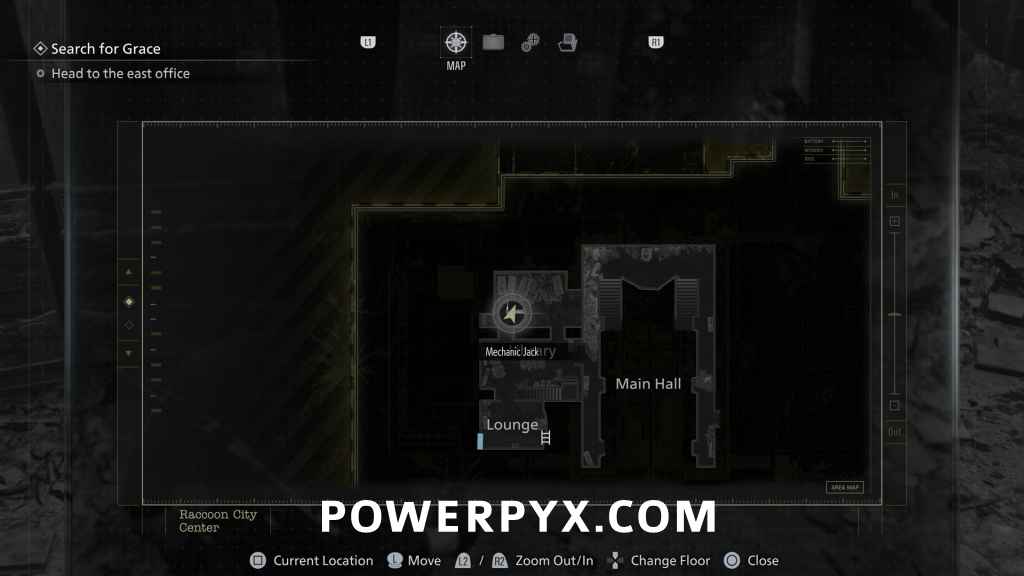
Key Item: Mechanic Jack
Library: Head south of “Operations Room” to “Reception” where the locked shutter is. Go up the ladder to the 2nd floor and enter the door on the right to the Library. You find this on the floor in the northern part of the Library.
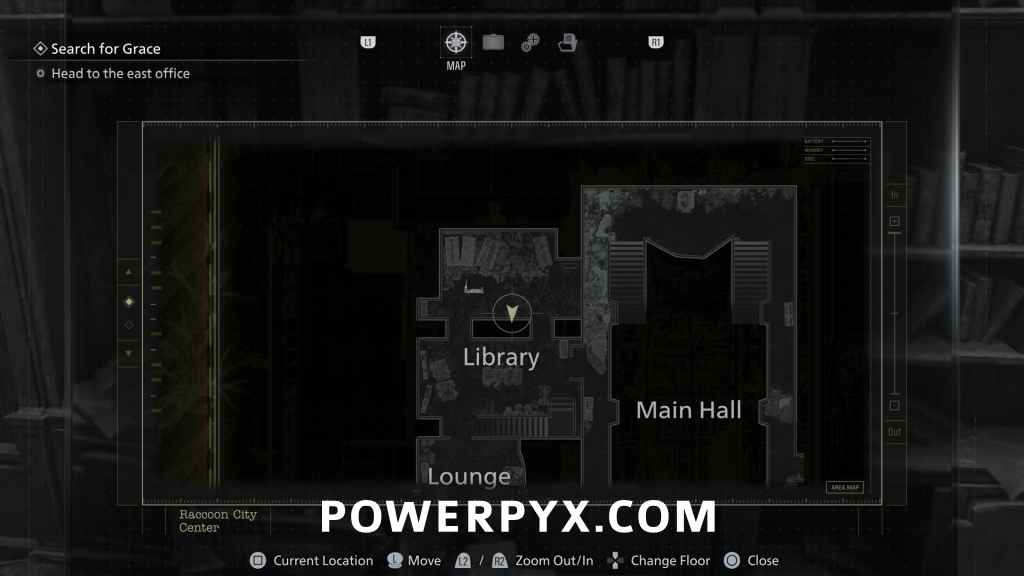
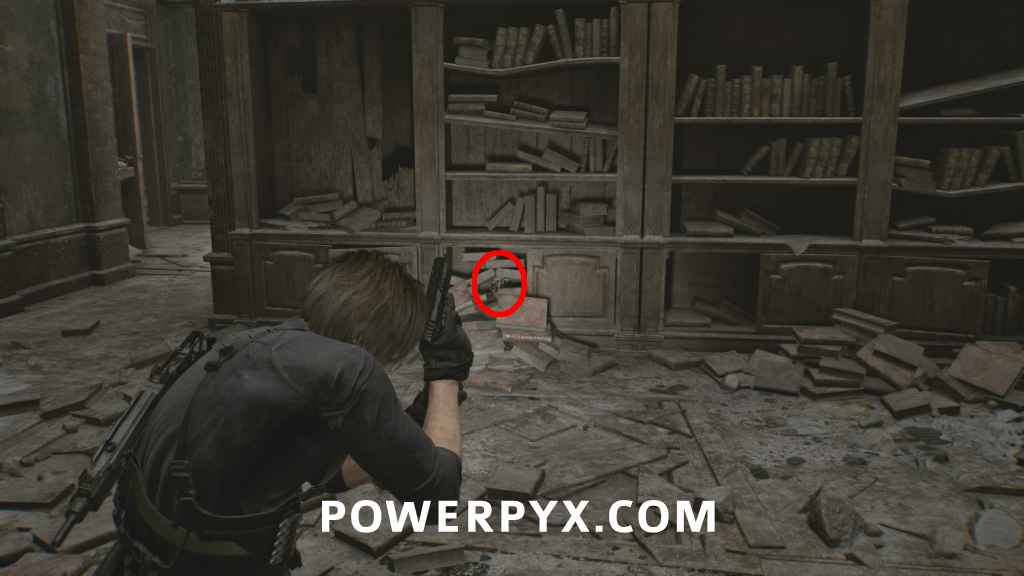
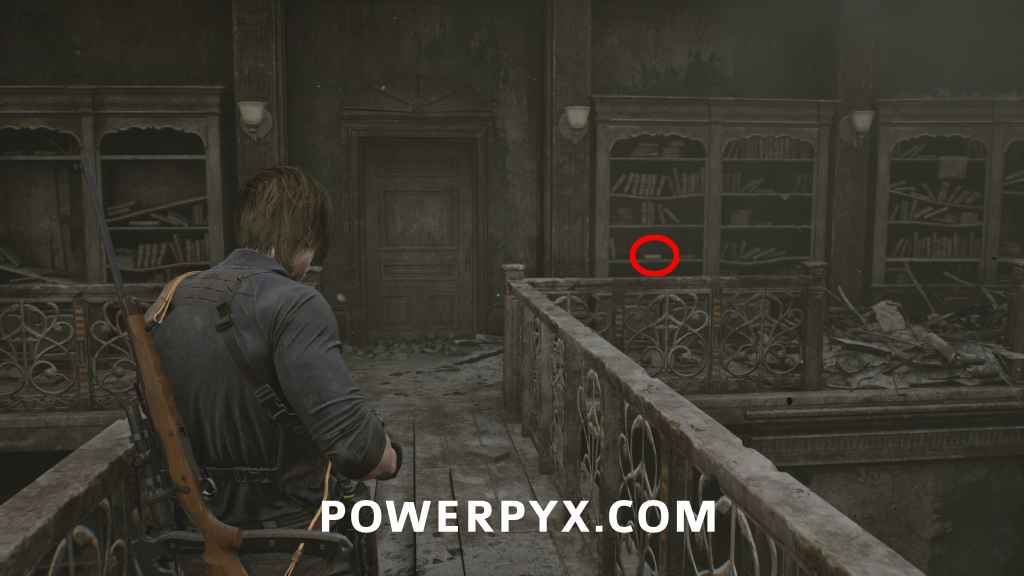
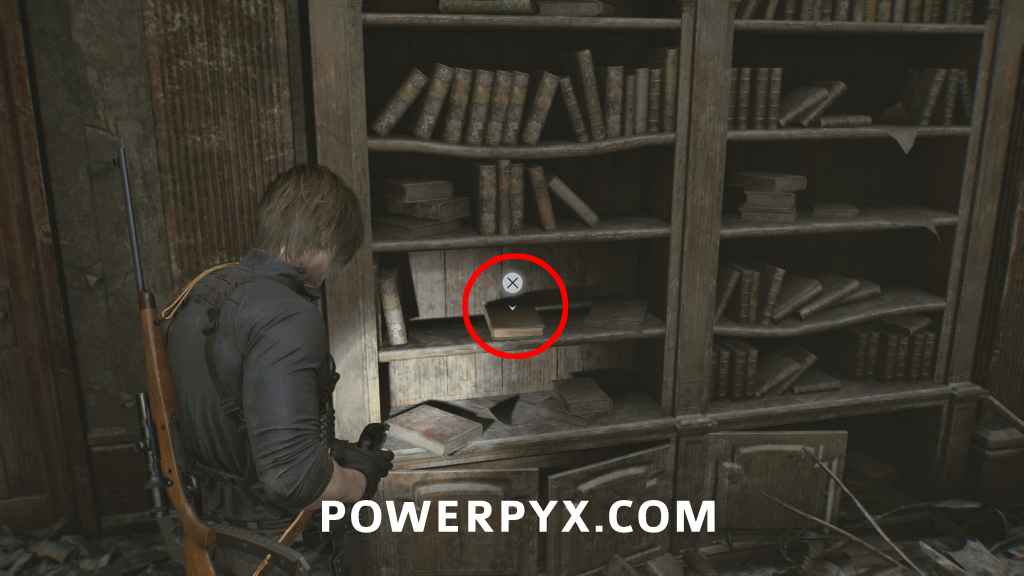
Mr. Raccoon #22
Library: Inside the tall bookshelf in the middle of the Library. Go to the north-facing side and aim at the bottom row of shelves (directly next to where you pick up Mechanic Jack). In the second shelf from the left, hidden behind a pile of books inside the shelf. Hard to see.
File #61 – Photograph
Library: In the Library go upstairs, then go left across the walkway toward a wooden door that is locked. To the right of the wooden door in the bookshelf interact with the brown leather book, open it and inspect the photograph. This ONLY spawns after you’ve read all 4 files in S.T.A.R.S. Office (Barry’s To Do List, Scavenger Hunt – Clue 1, Scavenger Hunt – Clue 2, Library Card).
When you got everything, use the Mechanic Jack on the two shutters near the Entrance of Main Hall. Go through the rusted shutter on the east side and follow the corridor until you get a cutscene – this will skip to the Orphanage.
Orphanage
After the cutscene you continue in the Orphanage. Enter the hallway and the first door on the left. Go back to the bedroom and under the bed. Wait there until it’s safe, then go back to the left room and crouch into the play area in the corner to find a door that leads downstairs.
Go to the lower floor and hide under the kid’s table on the right. Wait there for 1-2 minutes until the kids go away, then crawl out and through the door. The kids will stand guard at the end of the hall, you can let them see you and quickly run back to hide under the same table again. Then they leave the hallway and you can go through.
In the Director’s Office open the wooden drawer on the side wall to get the Hatch Key. When the kids appear again, hide in the corner behind the white boxes, to the right of the drawer you opened. Wait 1-2 minutes for the kids to go away, just stay crouched in the corner.
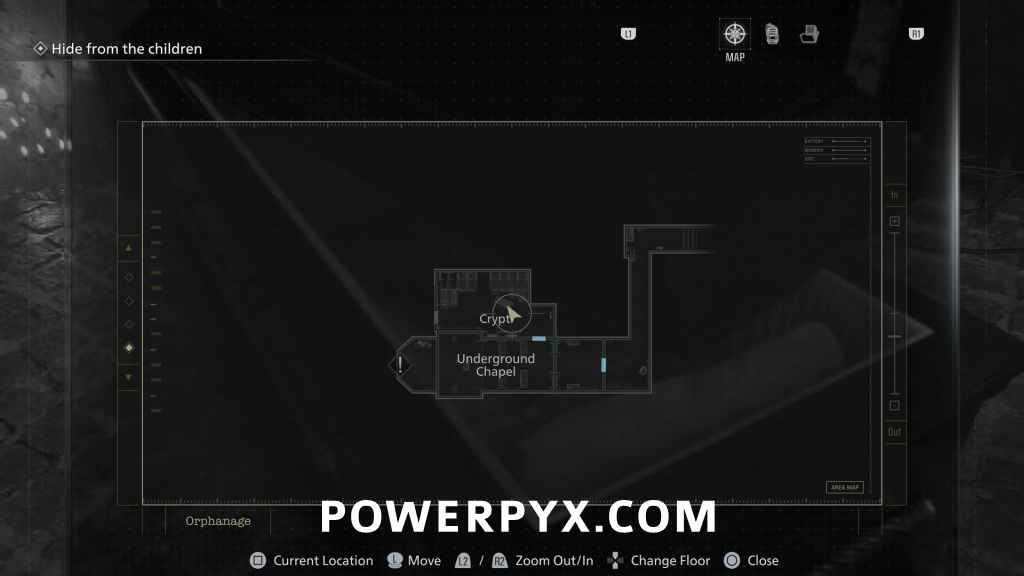
Then go to the south side of the office and open the hatch in the floor using the key. Climb down and follow the linear path through the tunnels until you reach an altar room in the Underground Chapel. Go behind the altar and the wall will open. It reveals a ladder but you can’t climb it. Use the lever in the same room as the ladder to turn on the lights.
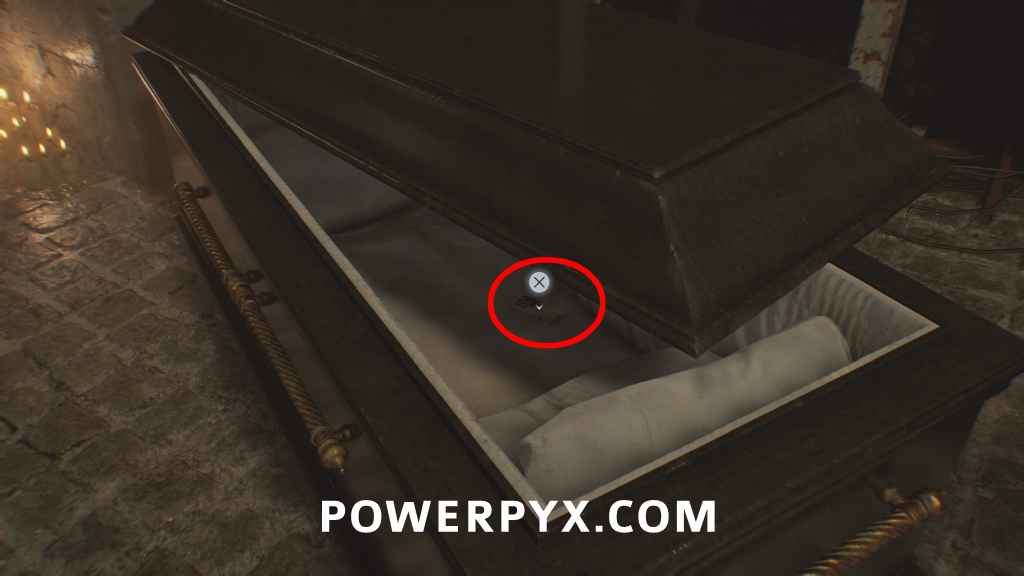
File #62 – Toe Tag
After using the wall lever in the Underground Chapel, use the now-open door on the side and you’ll see black coffins as soon as you enter. Open the coffin on the right to find the file inside of it. Turn it and read the back.

Behind the coffins you reach a locked gate. To the right, pull out the coffin on the floor, then you can climb the 3 coffins to vault over the gate. Take the Fire Poker and open the gate.
After a cutscene, quickly run to the ladder while avoiding the children and use the poker on it. You will reach a lab area (white corridor). Two files are here.
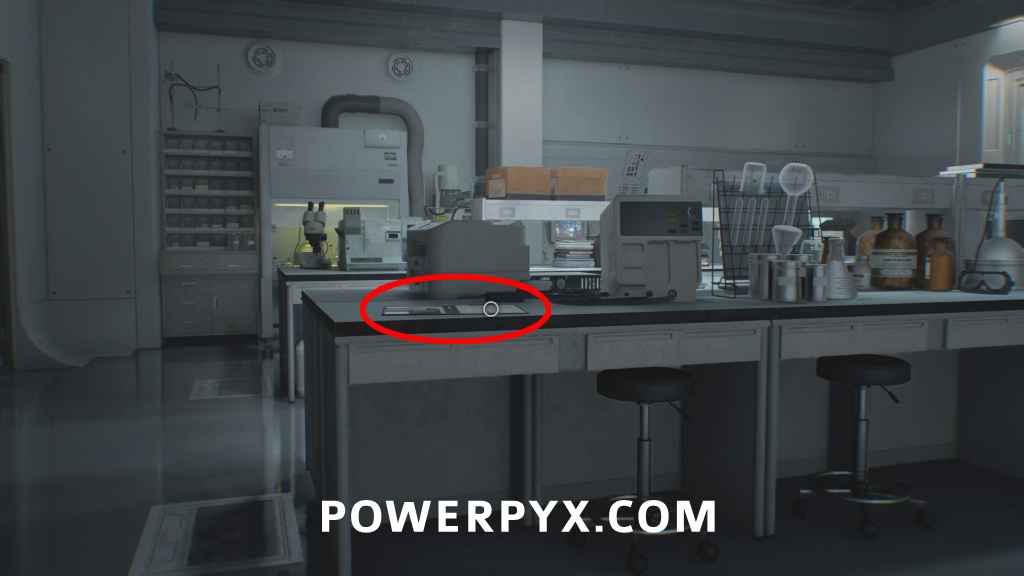
File #63 – Series 60 Results
After escaping the Underground Chapel and arriving at the lab (white corridor), go through the first green-glowing door on the right and it will be in front of you.
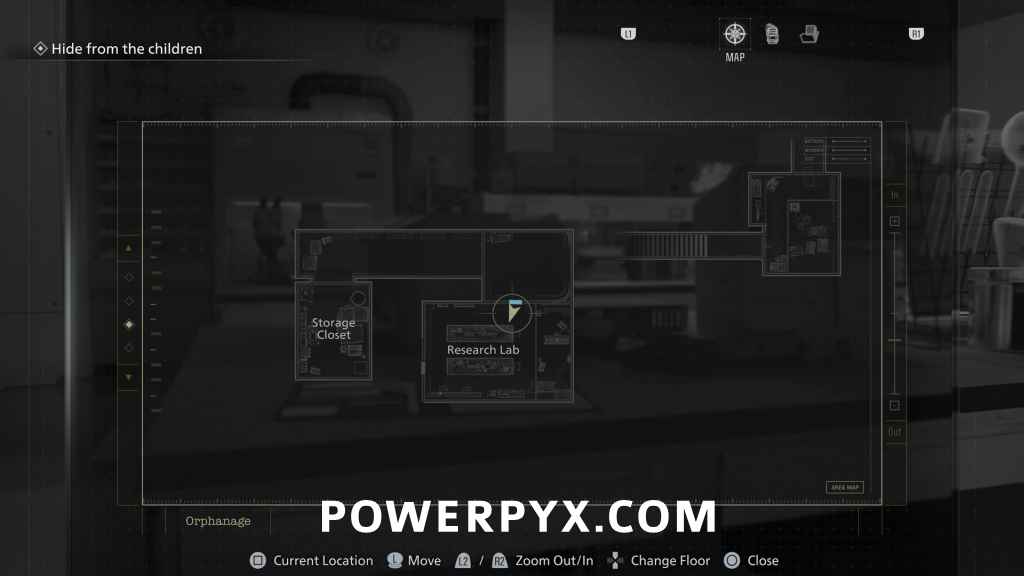
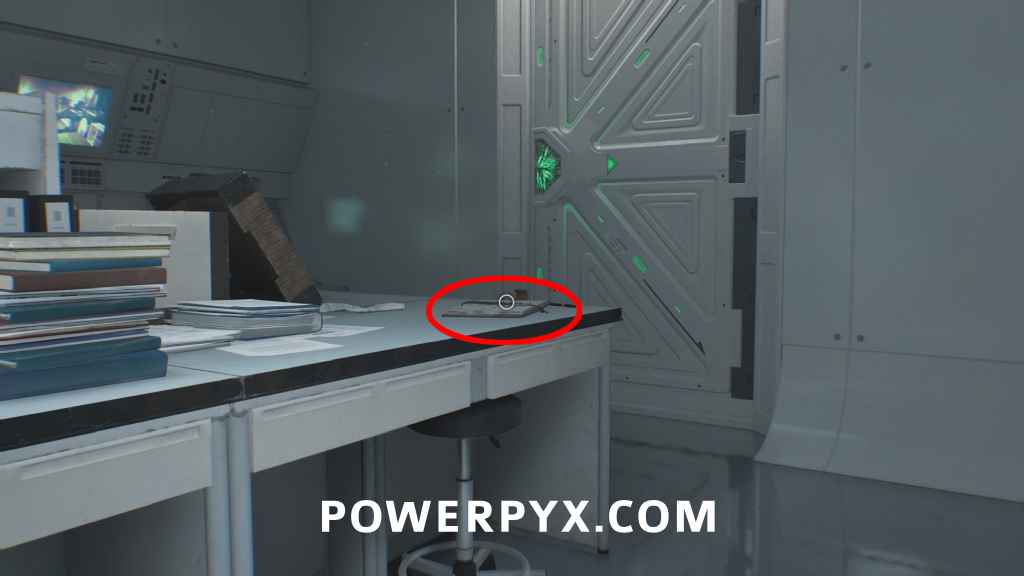
File #64 – New Researcher’s Notebook
Same room, in the back right corner on the desk.

Go through the green door in the back right corner and in the Meeting Room use the remote on the desk. Flip through all slides to trigger a cutscene. Afterward you continue as Leon in the R.P.D building.
Raccoon City Center (After Orphanage) Side Street – Leon
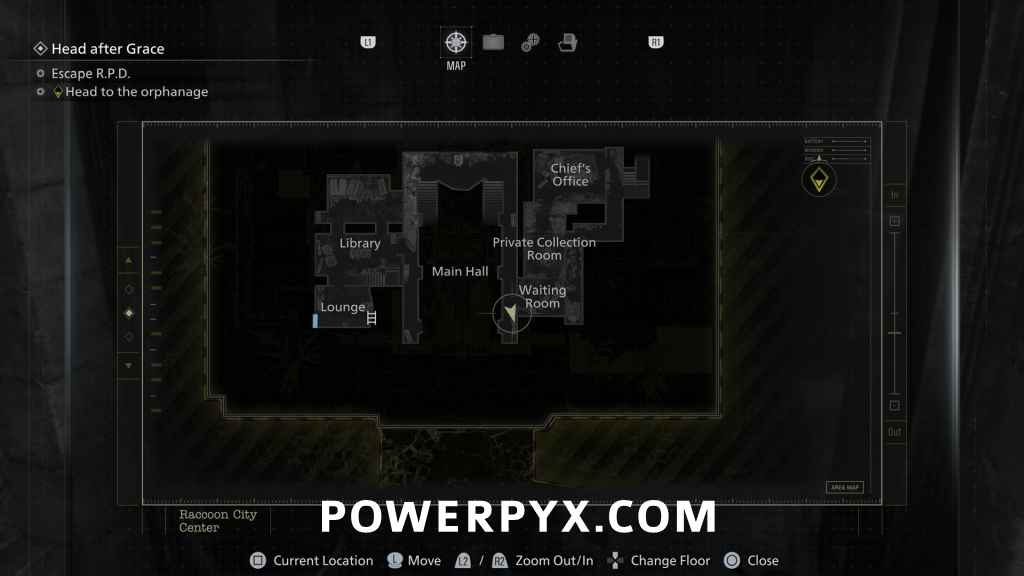
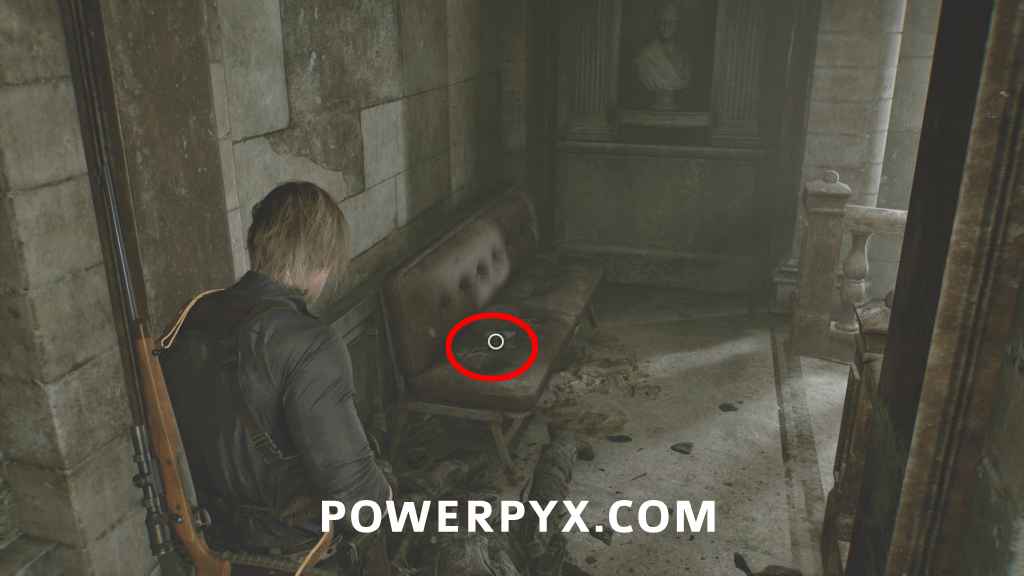
File #65 – Guide Pamphlet
When playing as Leon again, run away until you reach the Main Hall again after a cutscene. Immediately after the cutscene turn around to find this on a bench. On the eastern upper floor of the main hall.
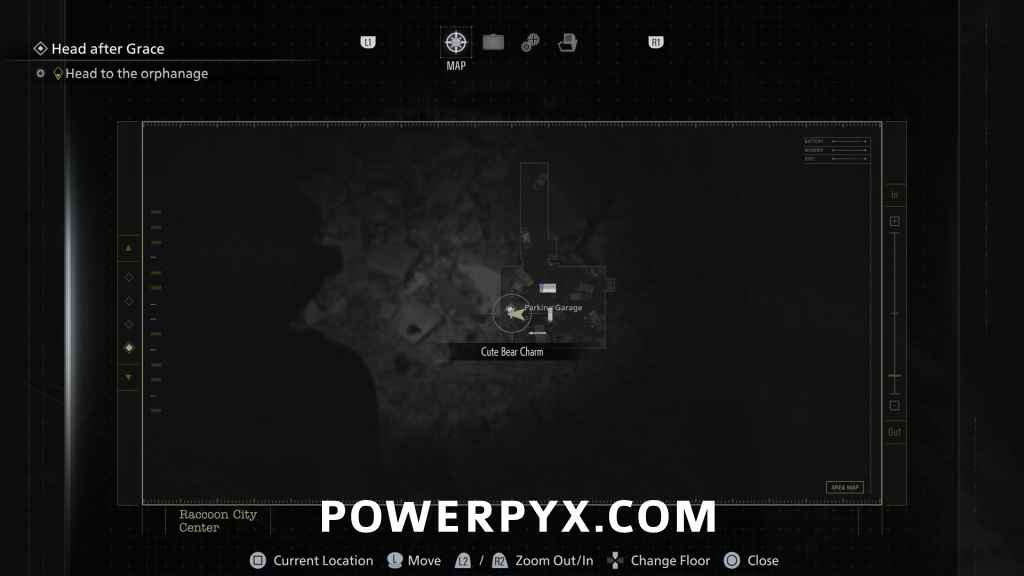
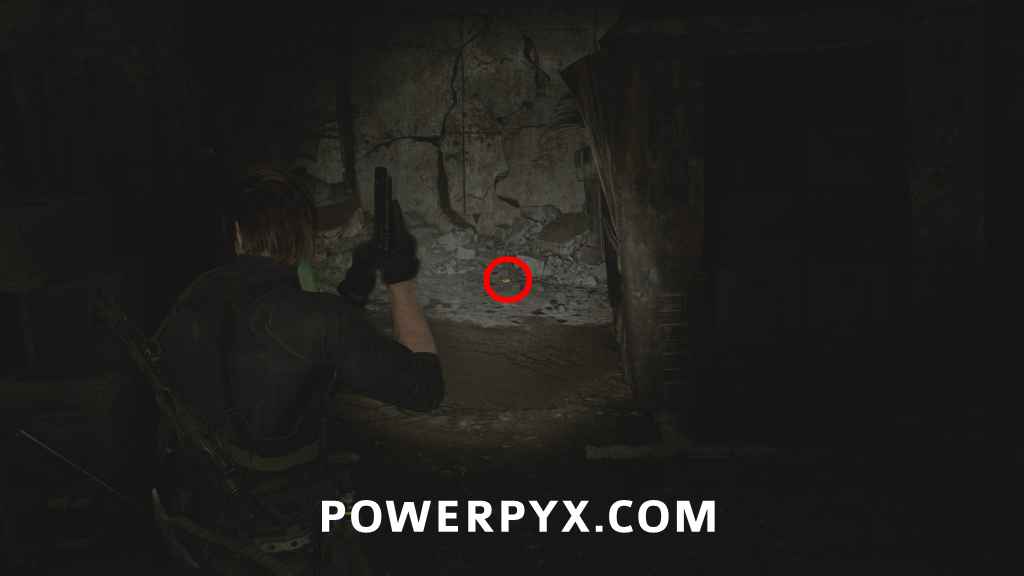
Charm: Cute Bear Charm (Increases mid-range firepower, sacrificing close-quarters potency)
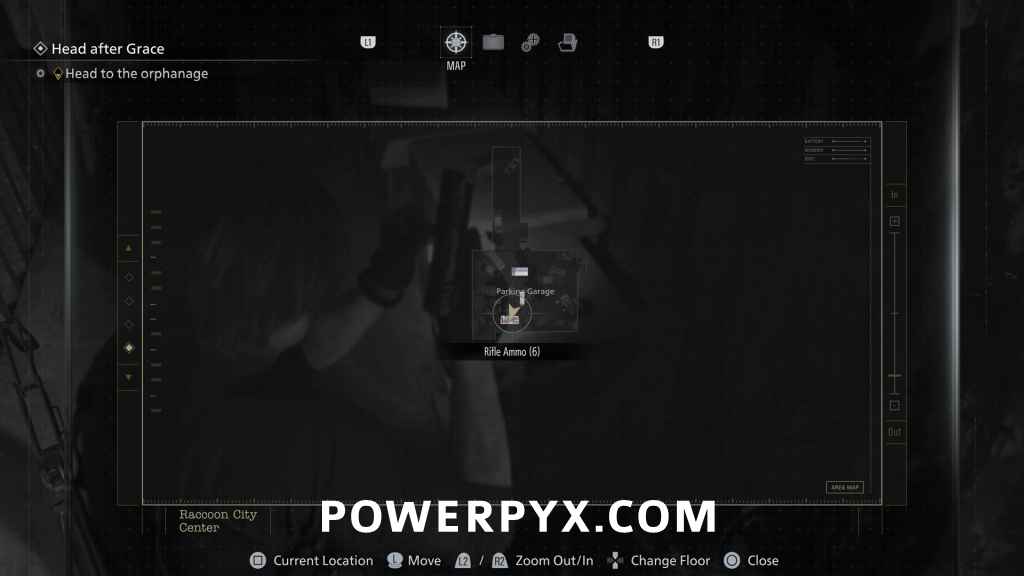
Parking Garage: After leaving the R.P.D. building, go left and down into a dark parking garage. Straight ahead will be an open container with lights on. To the right of it on the ground is the charm. This is an optional area just before the story path to Gun Shop Kendo.
Weapon Part: Silver Finish Scope (Classic 70)
Parking Garage: Inside the open container with lights on.
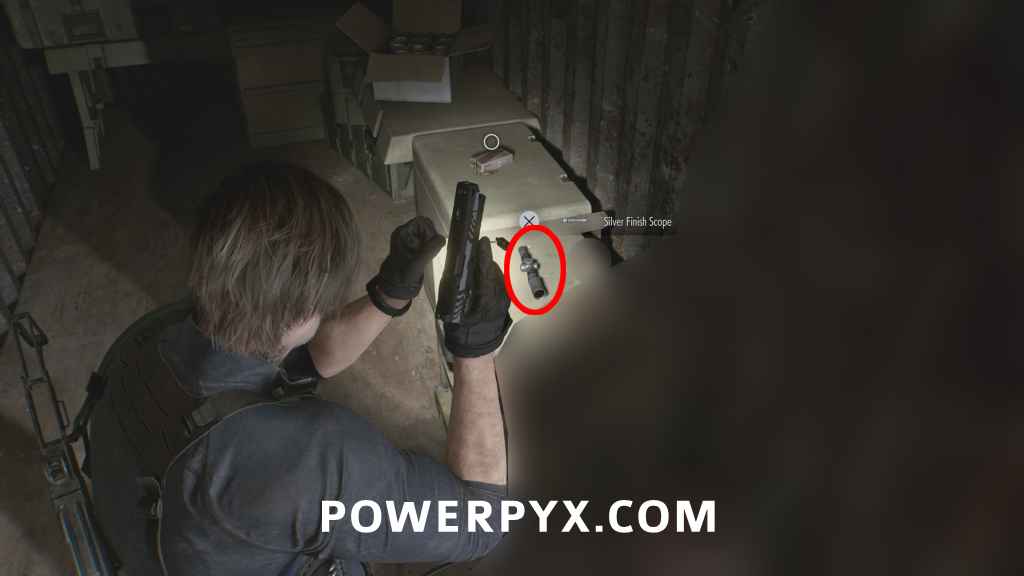
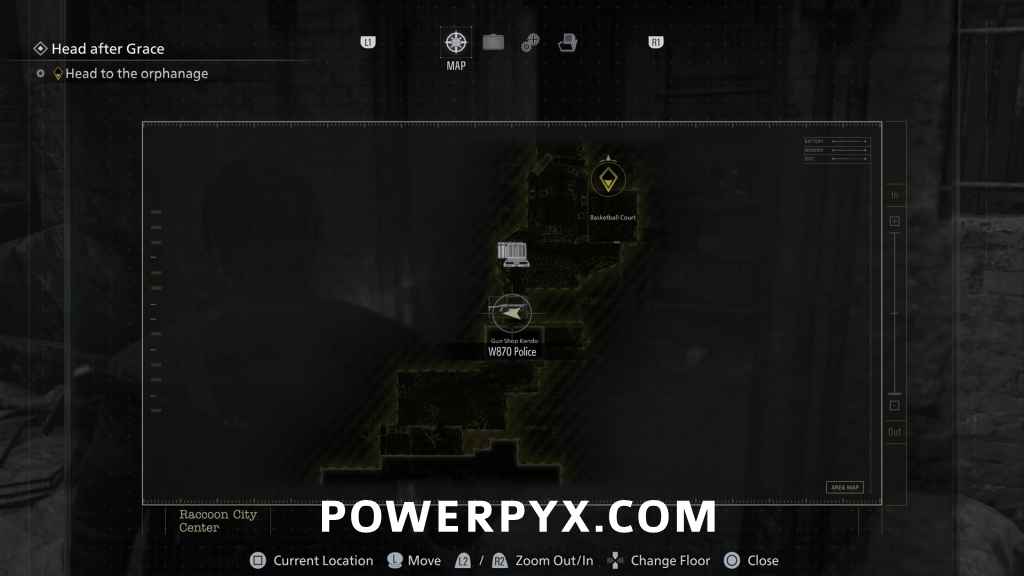
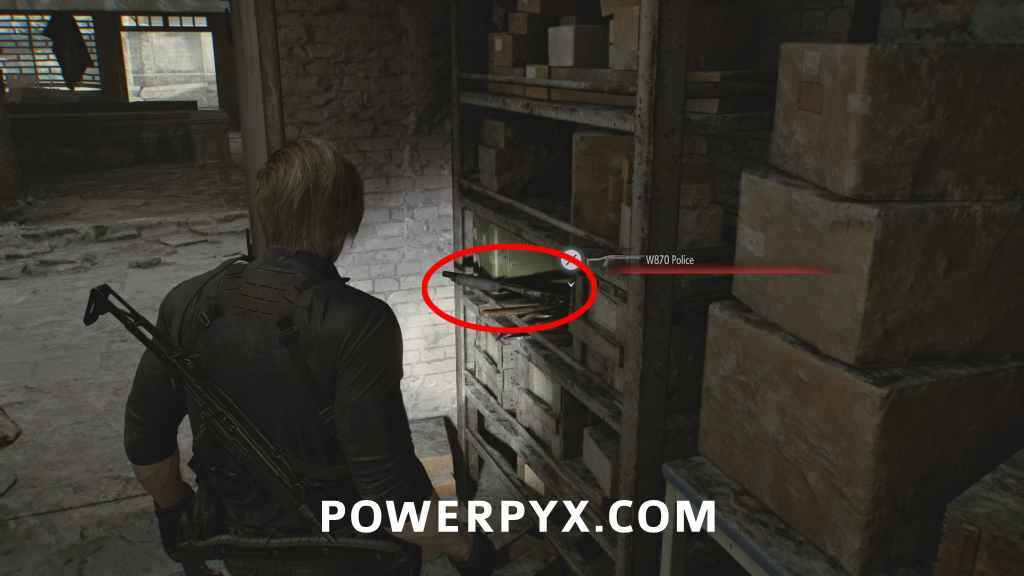
Weapon: W870 Police (Shotgun)
Gun Shop Kendo: Backtrack out of the parking garage the way you came and enter the Gun Shop on the side of the road until you get a cutscene. After the cutscene turn around 180° to find it in the shelf behind the door. If you don’t have inventory space for it, there’s a Supply Box straight ahead where you can sell unneeded items.
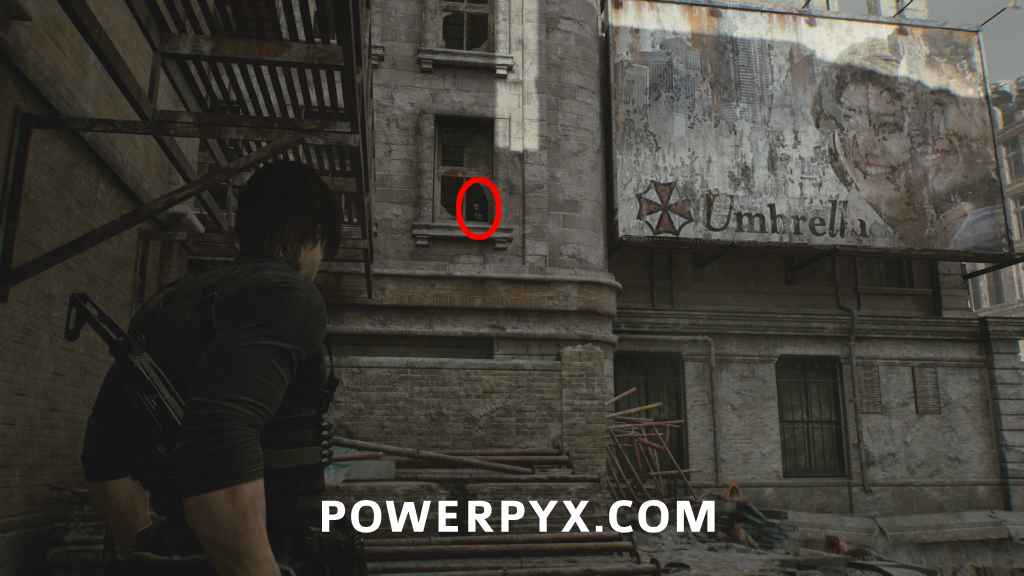
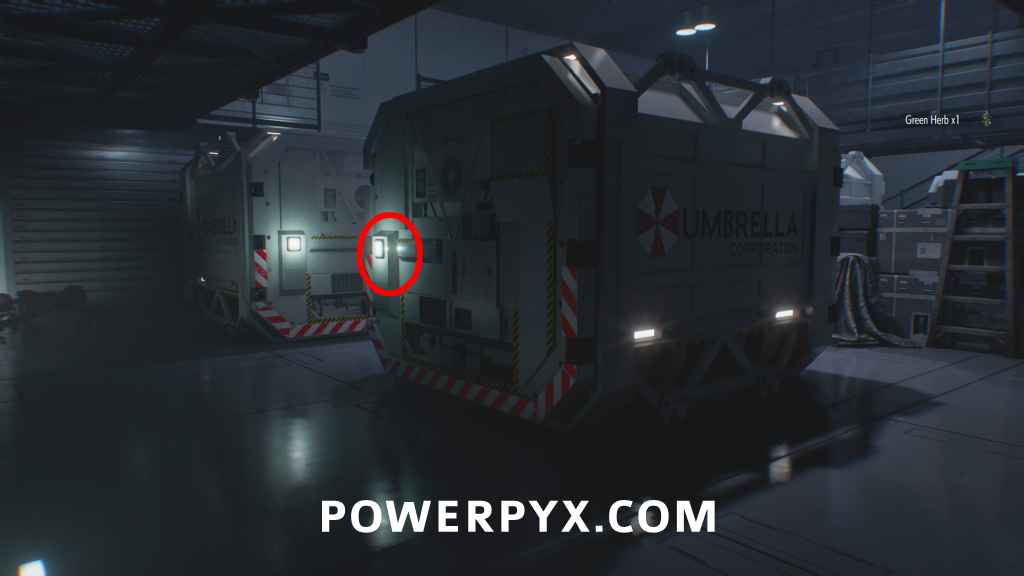
Mr. Raccoon #23
Gun Shop Kendo: Immediately after the cutscene in Gun Shop Kendo, turn around and enter the open alley on the side. Straight at the end of the alley look up to find this in an open window. Left from the “Umbrella” billboard.
Trophy: Not Today, Buds! (9x Plant 43 Seedlings)
After a boss fight, continue on the story path until you enter a train, there you are automatically attacked by the first Plant 43 Seedling. They look like vines with sharp teeth. You must shoot them when they open their “mouth” to kill them. There are 9 total. The first one is unmissable.
Then proceed until you rappel down a rope into a cave. The remaining 8 are all in this cave. If you fully explore the cave you will find them all.
The second is on the main path near the start of the cave.
The third and fourth are in next cave section on main path.
The fifth is on the side path to the left of the previous two (it will grab your feet).
The sixth is on the main path in the next cave section (flooded area).
The seventh is on the main path directly to the left of the previous one.
The eighth and ninth are on the main path directly after the previous one when heading toward the light at the end of the cave.
Finish the rest of the section until you get a cutscene and enter the ARK.
ARK – Leon
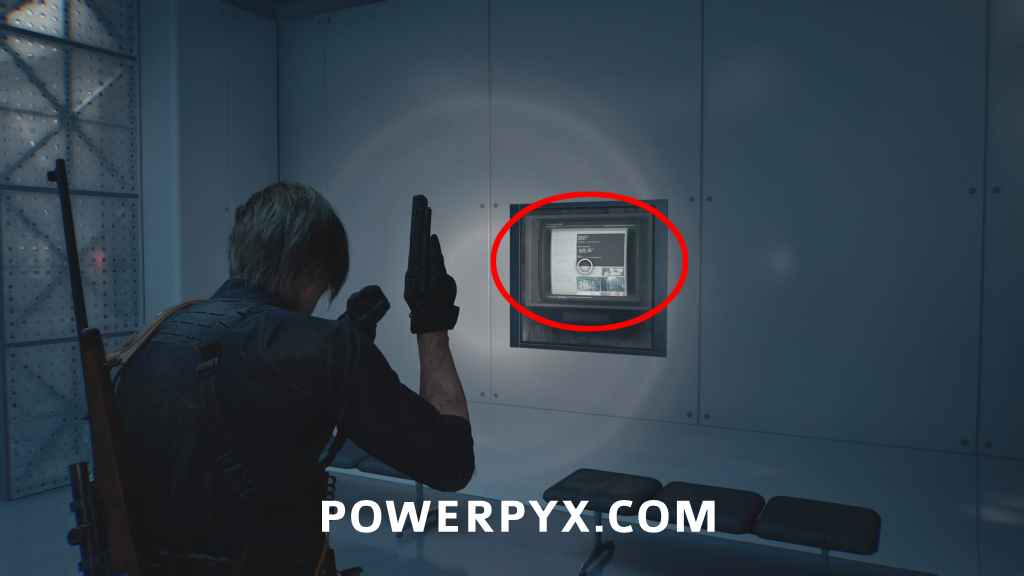
File #66 – N0-AH Status Report
After going through the decontamination tunnel, turn left and go through the green door to find a save point. Check the monitor on the wall.
Mr. Raccoon #24
From the previous file, leave the save room, go straight and look right behind the boxes in the corridor, before going downstairs.
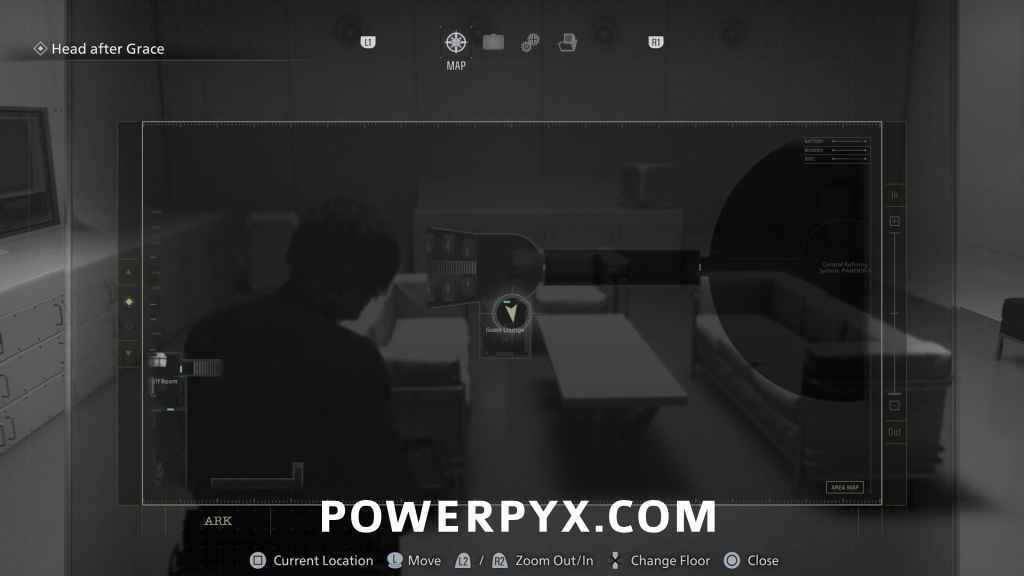
Go straight forward until you use a computer (cutscene). Then clear out the room and go through the now-open door on the right through the Stockroom. After Stockroom you enter an exhibition room with human mannequins where an AI voice speaks. Then go up the stairs with golden skeleton statues on either side. Enter the first green door on the right to reach Guest Lounge.
File #67 – Raccoon City Bioweapon Research – Report
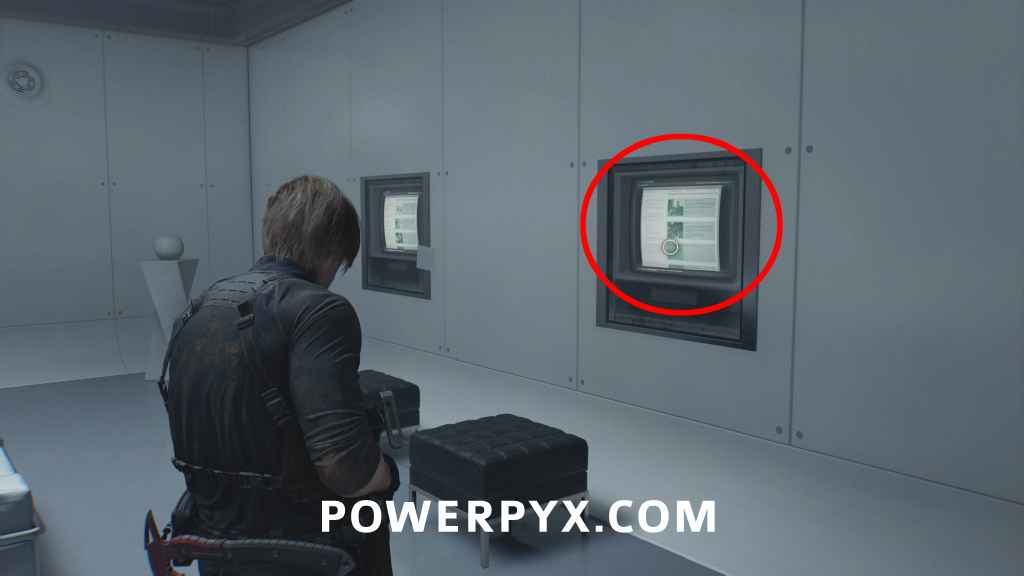
Guest Lounge: After going up the stairs with golden skeleton statues, enter the green door on the right to reach Guest Lounge. Check all 3 monitors on the walls for 3 files.

File #68 – Product Catalog 1 (2026)
Same as above.

File #69 – Product Catalog 2 (2026)
Same as above.
Weapon: Mortal Edge
After a boss fight, you can loot it from the boss. You can unequip your current Hatchet in inventory and click Equip on Mortal Edge, it does more damage and has better durability.
ARK – Grace
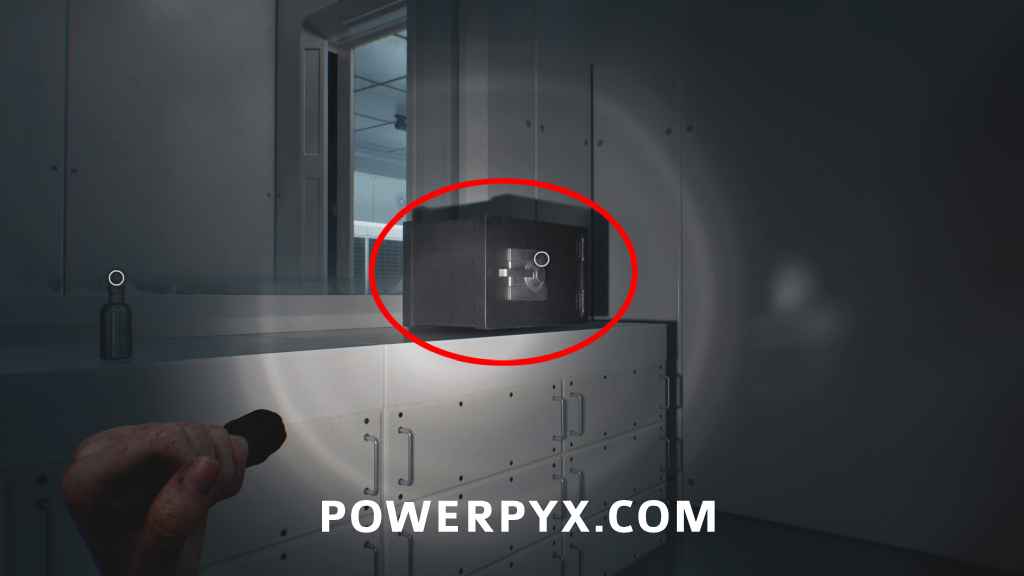
Safe #4
Sterilization Chamber: Advance until you play as Grace again and reach the next typewriter save point. Then go through the open door on the right to reach the Sterilization Chamber. This sits on the window directly in front of where you enter the room. Sneak around the enemy to reach it.
Combination (Casual) = Right 10 – Left 90 – Right 20
Combination (Insanity) = Left 80 – Right 50 – Left 0
(Normally, the code is obtained from “File #71: Sterilization Chamber Safe”, but you can already open it now before collecting the file).

Weapon: Bottle of Acid
Chemical Storage: Go through the next room to reach Chemical Storage, it’s on the table where you enter.
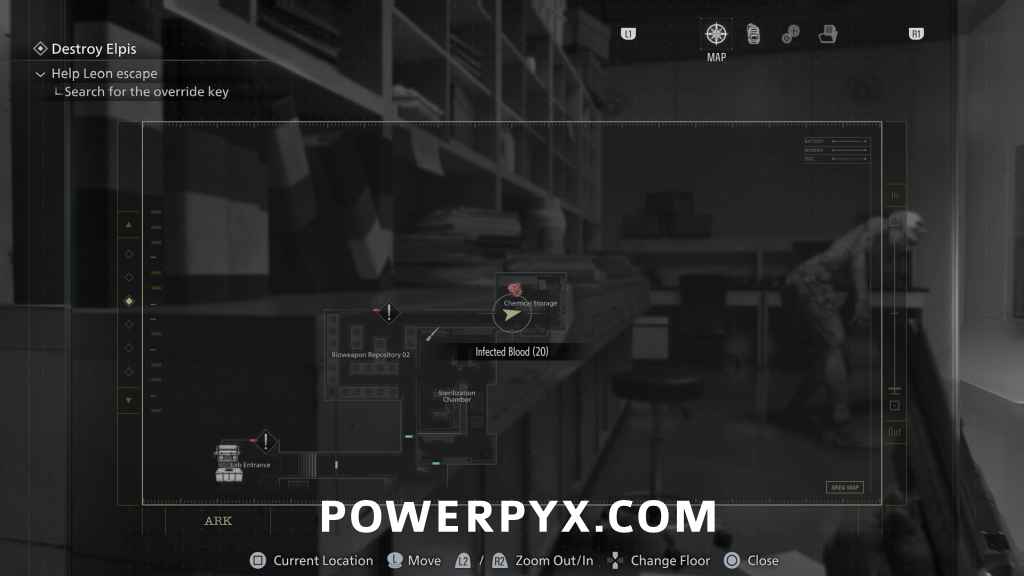
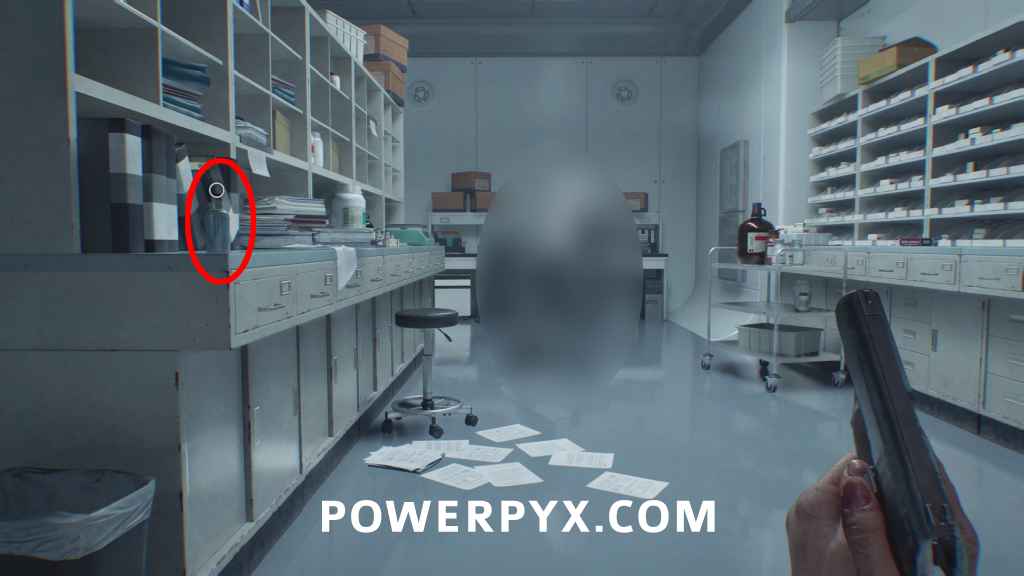
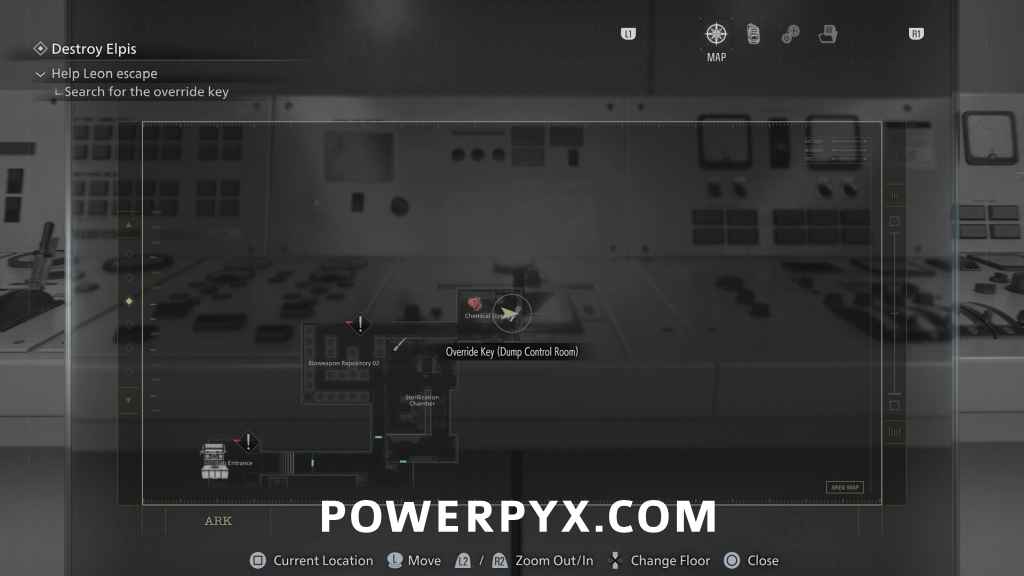
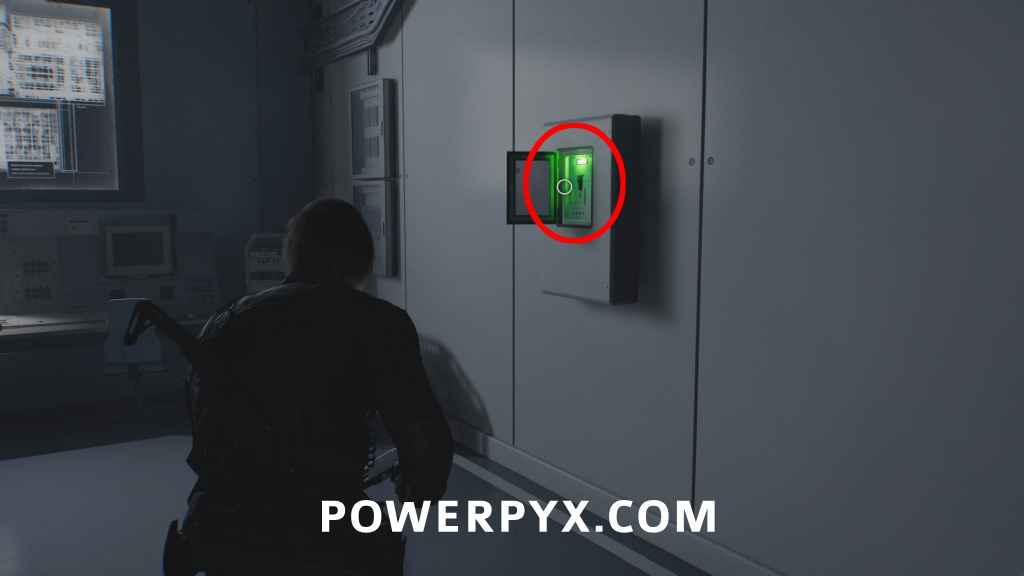
Key Item: Override Key (Dump Control Room)
Chemical Storage: At the end of Chemical Storage room, glowing green on computer panel. Afterward, backtrack downstairs where you came from (before save point) and use it on the console in Dump Control Room.
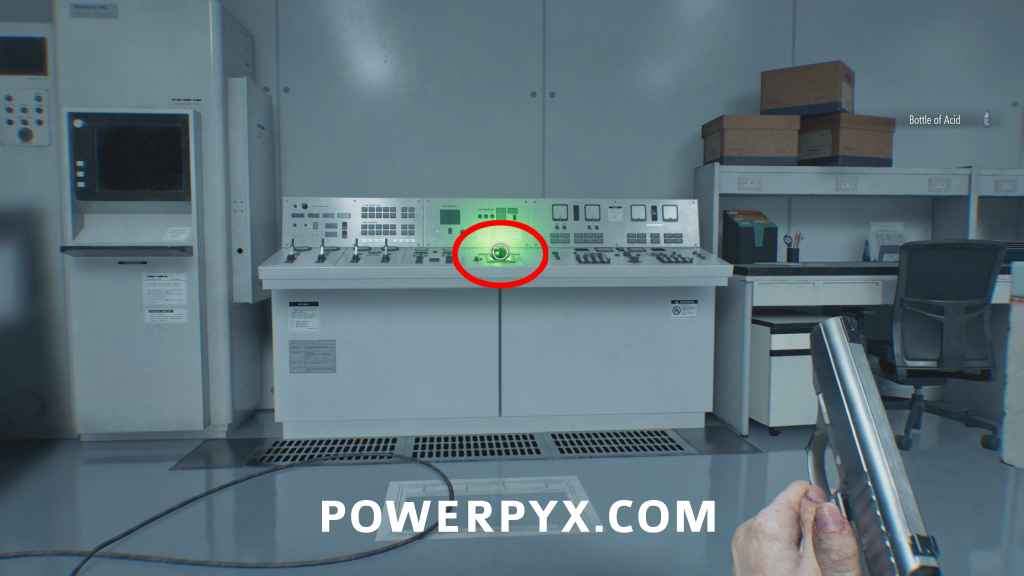
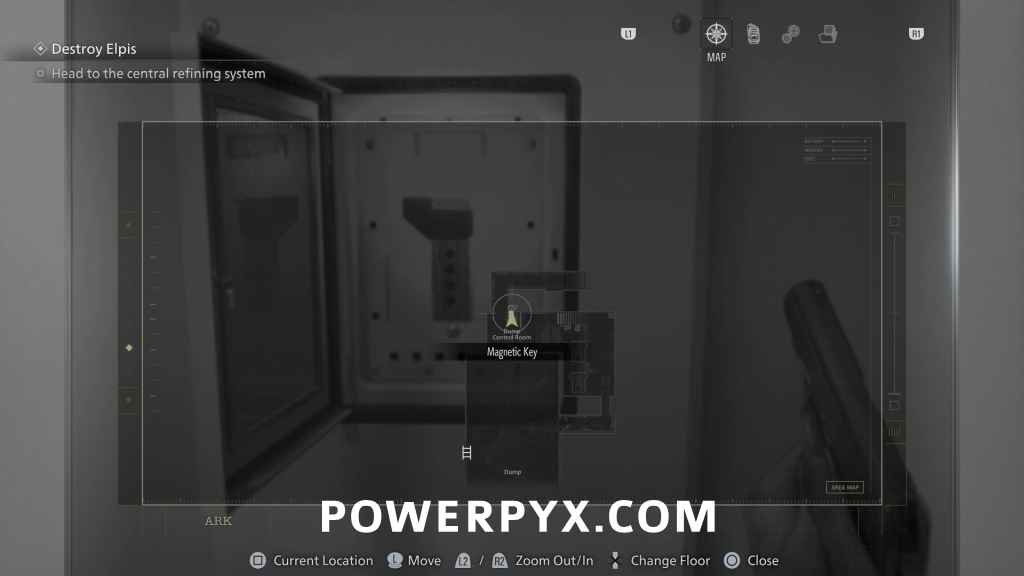
Key Item: Magnetic Key
Dump Control Room: After using Override Key in Dump Control Room and getting a cutscene, it’s in the same room on the wall, in green glowing panel.

File #70 – Access Log: 51st Assembly Minutes
Monitor Control Room: After grabbing the Magnetic Key, use it on the red door by the typewriter upstairs. This leads to the “Lobby” with red floor paint. Enter the first green door on the left and inspect the monitor on the right side.

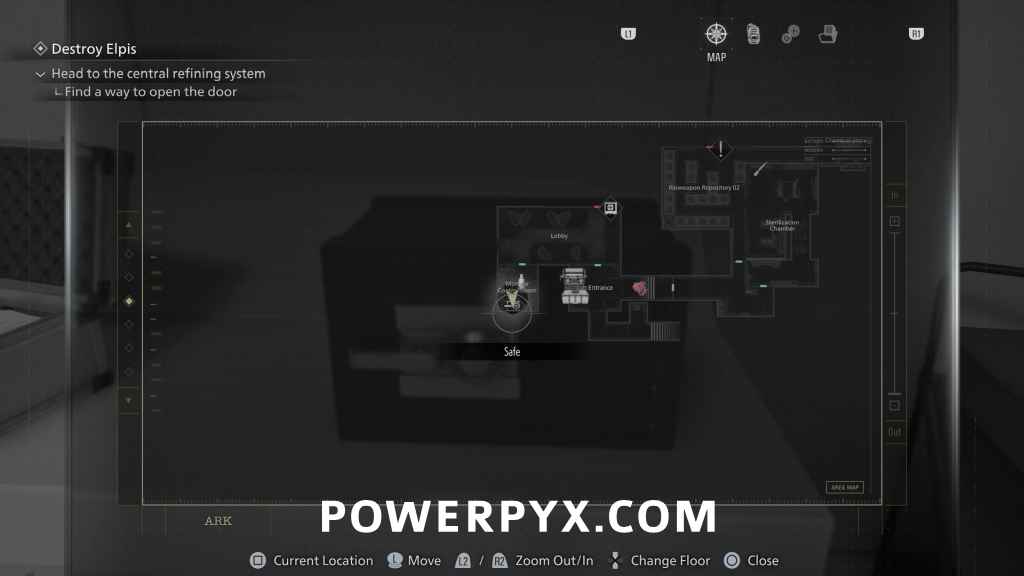
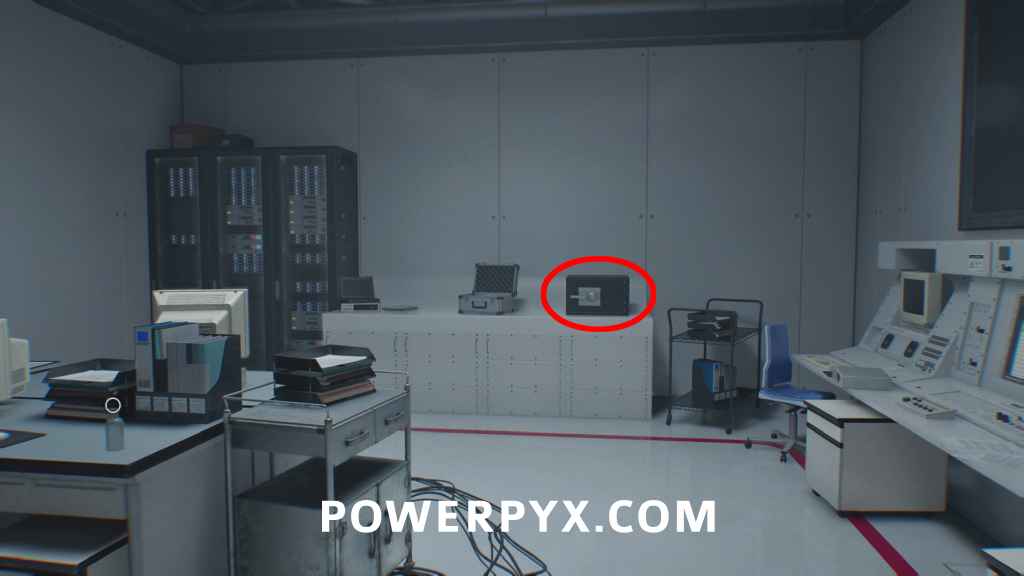
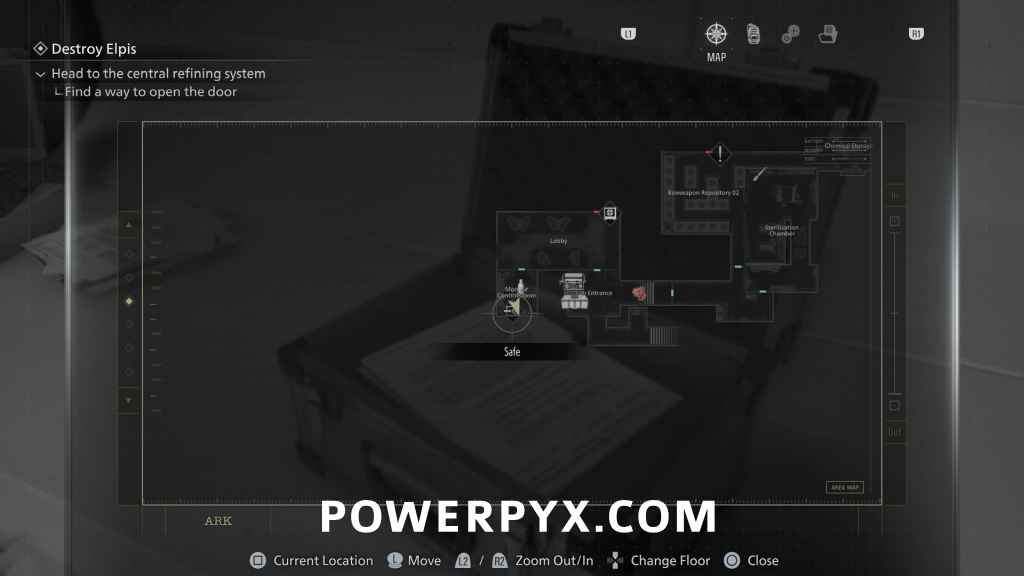
Safe #5
Monitor Control Room: Same room, on the counter. This is the final safe and unlocks No Safe is Safe.
Combination (Casual) = Left 50 – Right 60 – Left 80.
Combination (Insanity) = Right 20 – Left 0 – Right 70.
(Normally, you get the code from “File #72: Monitor Control Room Safe”, but you can already open it now).
Crafting Recipe: Bottle of Acid
Monitor Control Room: Same room, left of the safe.
File #71 – Sterilization Chamber Safe
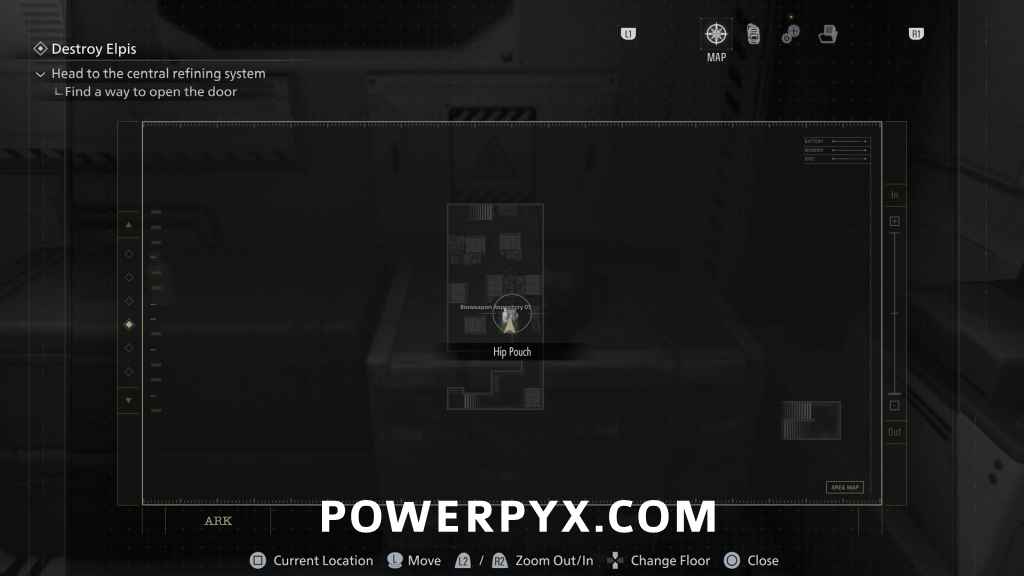
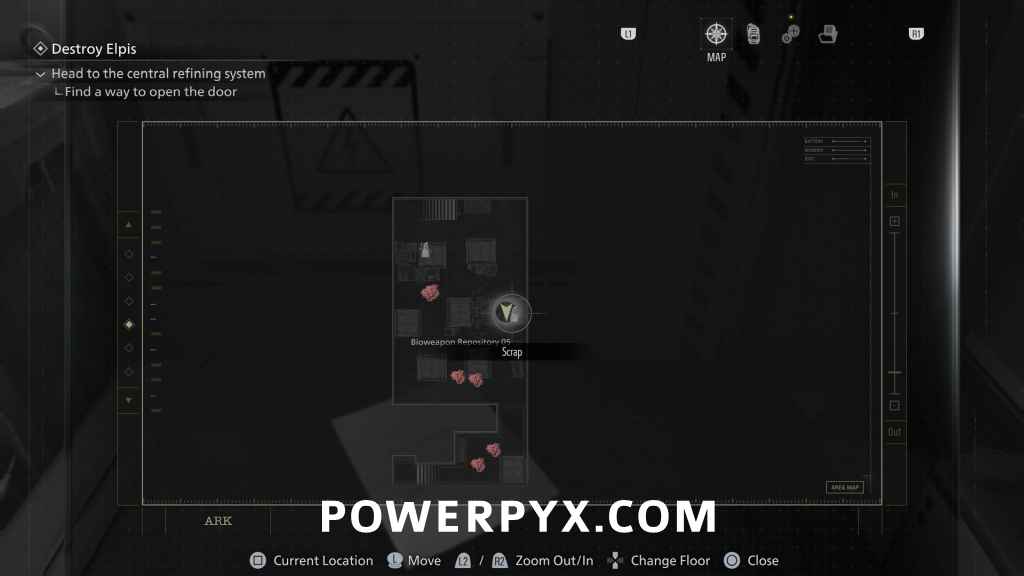
Anteroom: Go through the next green door to Anteroom and go downstairs. At the first corner check the right side to find it on a crate, before going into Bioweapon Repository 05.
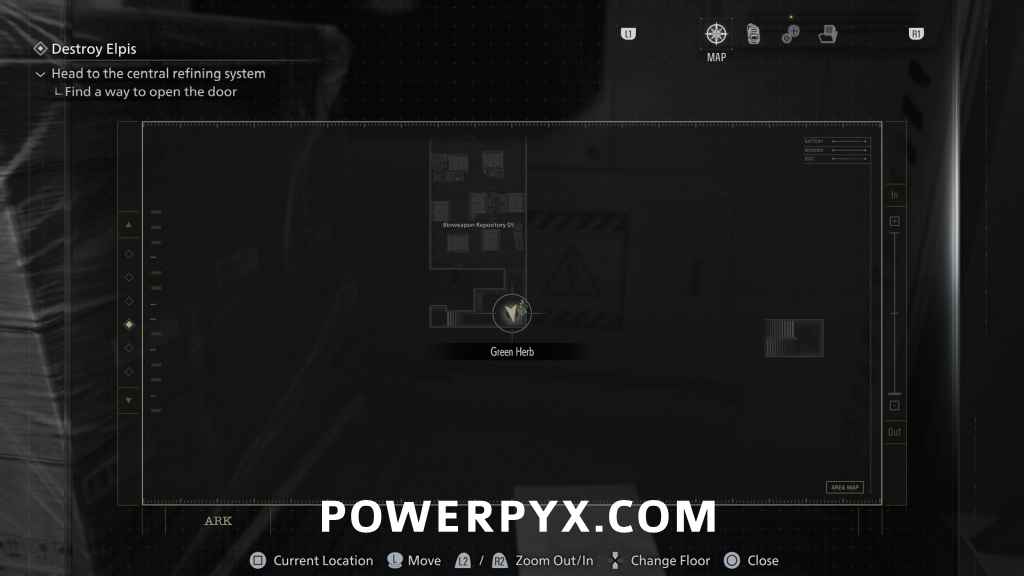
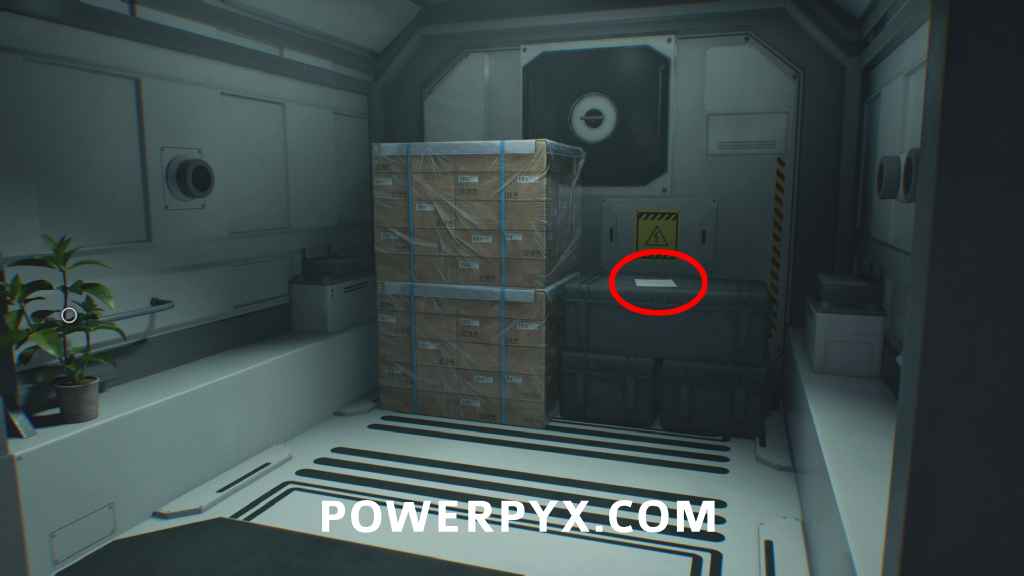
Upgrade: Hip Pouch
Bioweapon Repository 05: After the previous file, you enter a big room with containers and licker enemies. Open the first container on the left to find the Pouch inside.
File #72 – Monitor Control Room Safe
Bioweapon Repository 05: Same room, in the middle row rightmost open container. There are many enemies in the room, clear them out with Molotovs and Acid Bottles and headshots. You find various crafting materials in the other containers here to regain ammo spent on the enemies.
Mr. Raccoon #25
Operations Room: The next room you enter is the Operations Room, which will trigger an alarm. The final Mr. Raccoon sits there in front of the big monitor.

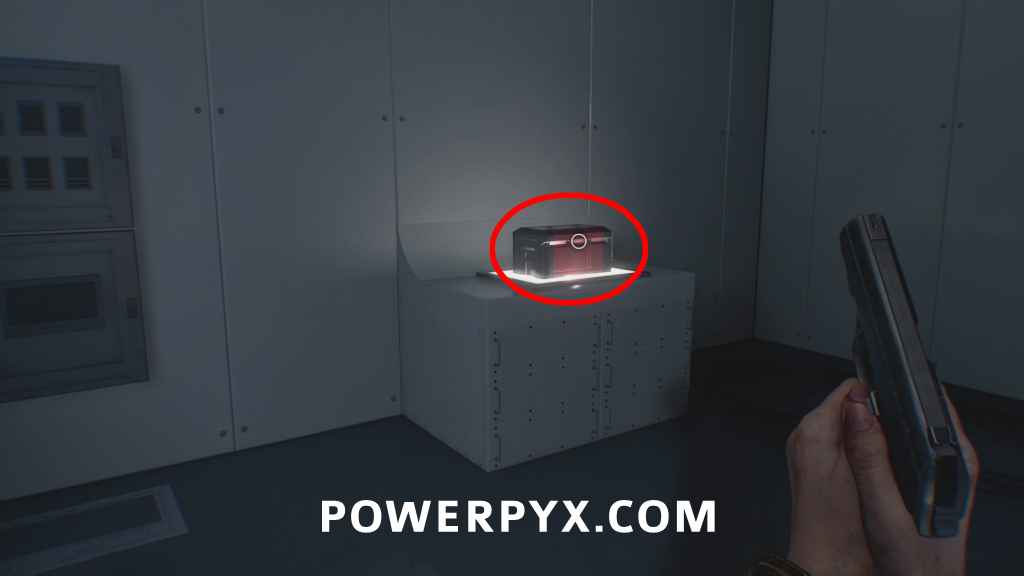
Key Item: Noblesse Orb
Operations Room: Next to the Mr. Raccoon in the red box.
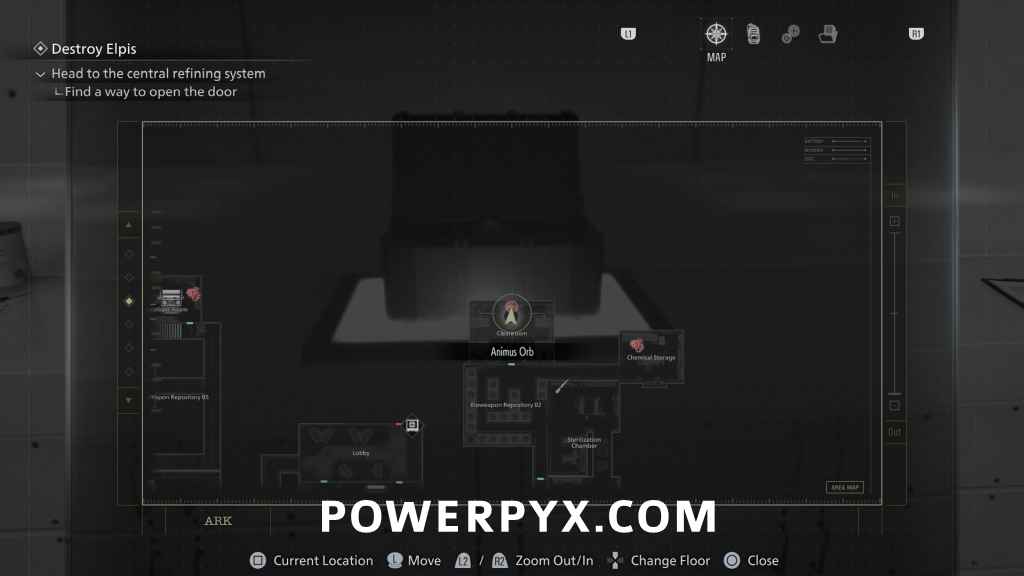
Key Item: Animus Orb
Cleanroom: Backtrack all the way upstairs to the first typewriter in the Lab Entrance (where you opened the first red door with Magnetic Key). Then go north to through Bioweapon Repository 02 and open the door there to reach the Cleanroom with a red box containing the item.
File #73 – Access Log: First Assembly Minutes
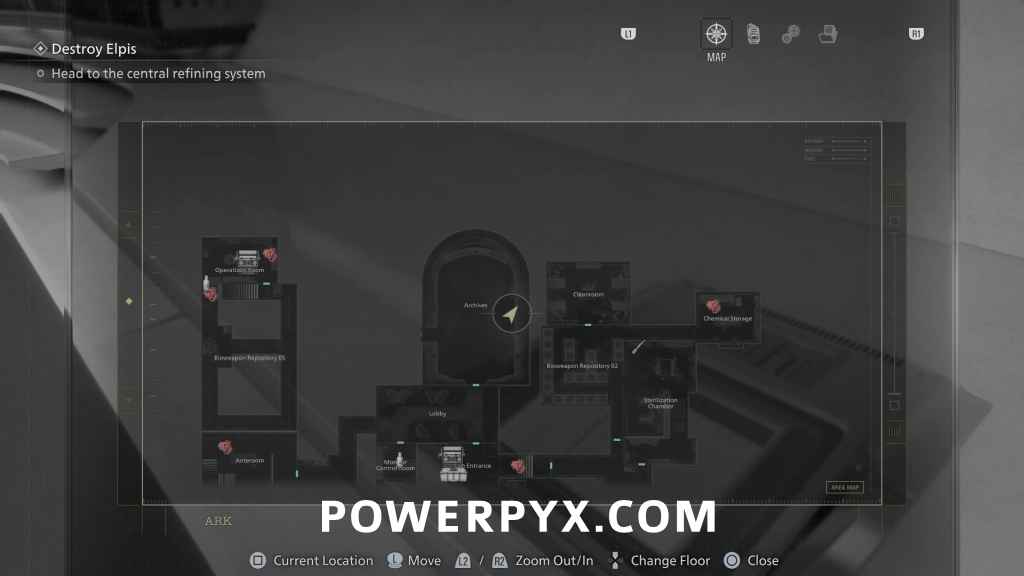
Archives: Use the 2 orbs in the “Lobby” (the room with red painted floor past the typewriter). This leads to the archives. On the right wall, check the last monitor. DO THIS BEFORE INTERACTING WITH THE BIG CONSOLE AT THE END OF THE ROOM (AREA END).

ARK – Leon Part 2
When playing as Leon, climb up the ladder out of the Dump. Go through the corridor to find a save room ahead of you. Go through the next green door, go left through another green room. You reach a room with several Licker enemies, can do a trophy here.
Trophy: Cat Got Your Tongue?
While playing as Leon, press / to parry when a Licker attacks with its tongue (the crawling enemies with claws). If you time this perfectly you will perform a parry that cuts off the tongue and unlocks this trophy. Lickers don’t use this move very often so you need to move around until they do. The timing is also tricky, block just before their tongue touches you, it can take a few tries.
In the room with lickers jump down and press the red button on the console between the containers. This opens the door on the west side to reach Generator Room. Press the red button in there. Then go up the stairs on the east of Bioweapon Repository 12 to reach System Management.
Key Item: Override Key (Bioweapon Repository 11)
Systems Management: On the wall in Systems Management.
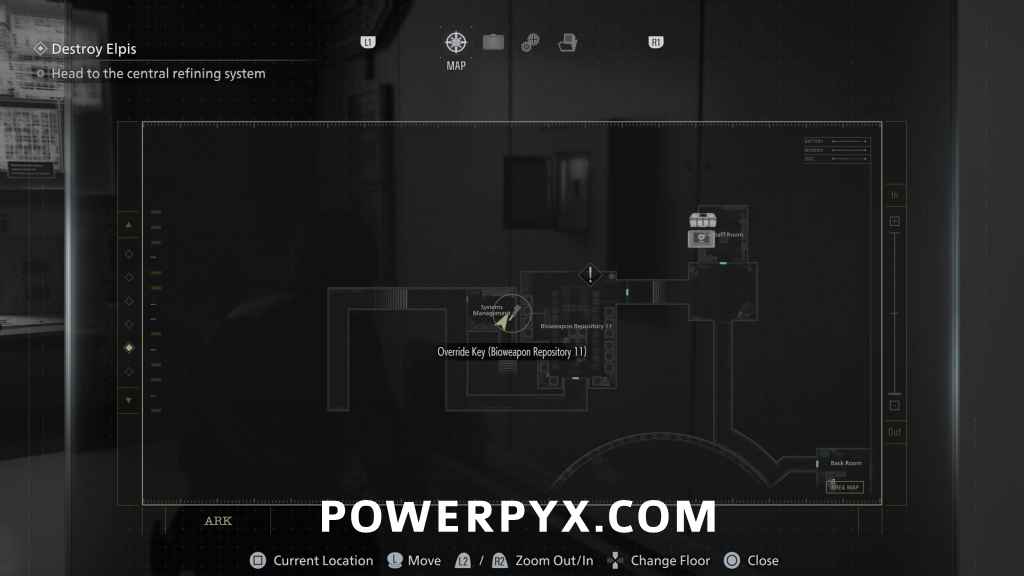
Backtrack the way you came from to Bioweapon Repository 11 and use the key on the red console there. Defend yourself while waiting on the elevator (grenades are most effective here). Then enter the elevator.
File #74: Alyssa’s Interview Notes + File #75: Letter from Patrick
Automatically obtained during next cutscene, unmissable. Case Closed trophy/achievement unlocks after the cutscene. If you missed a file you can view them from the files menu, and either find it on one of your next playthroughs, or if you have a manual save can grab them from there. For a list of files by in-game list order refer to Files List.
Afterward go through the green door in the archive and use the elevator. After the cutscene, make your final choice. To unlock Hope and Requiem, you have to pick “Release Elpis” (the other choice doesn’t unlock the trophy, but you can reload the last autosave to try both options).
If you missed anything you can use the by-type guides to clean up on the next playthrough.
Leave a Reply