
Rhodes Hill – Care Center is the 2nd area in Resident Evil 9: Requiem. This 100% walkthrough includes all Collectibles, Trophies and Key Items.
For other Areas see Resident Evil Requiem Walkthrough.
Care Center (Rhodes Hill) – Grace
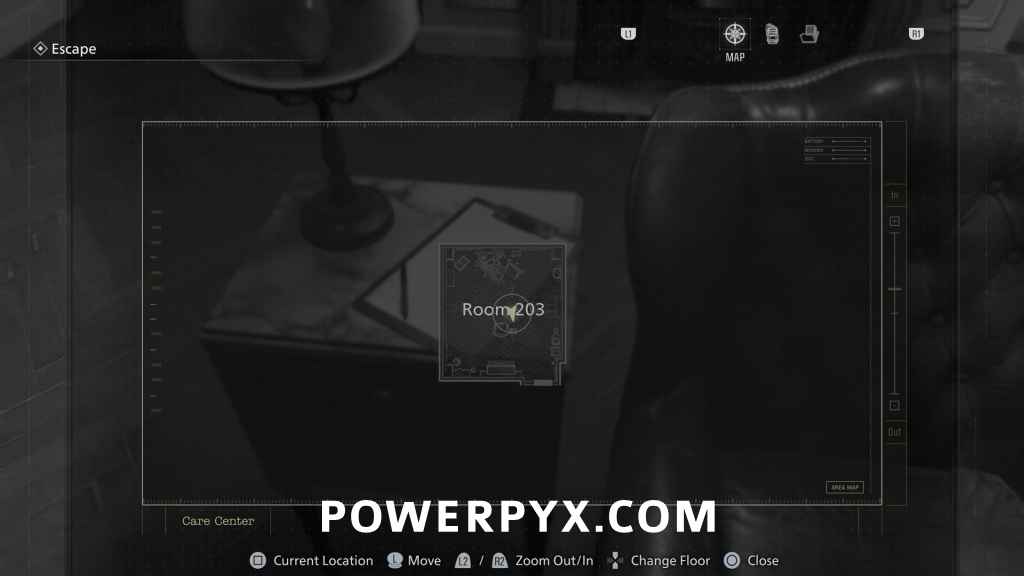
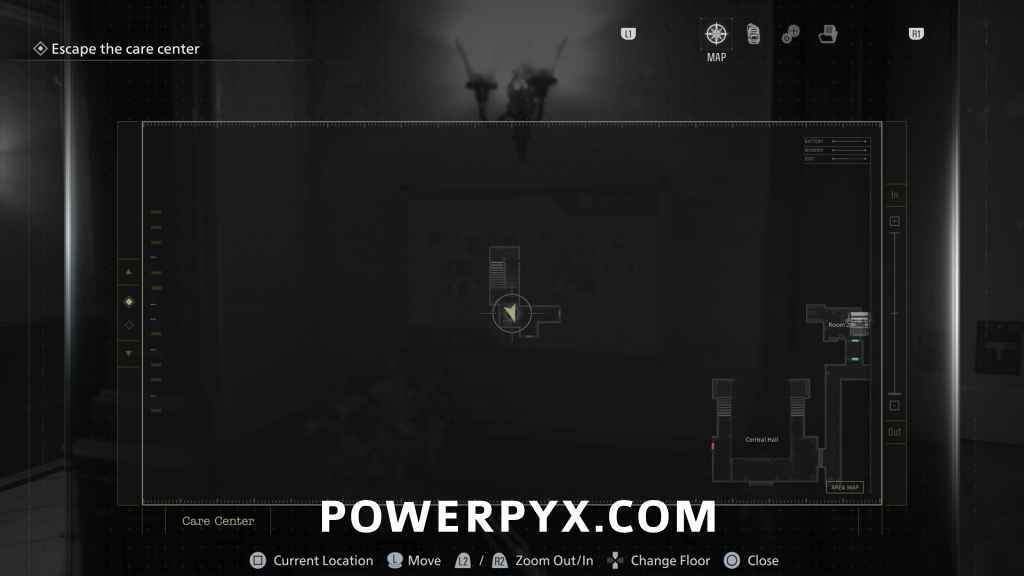
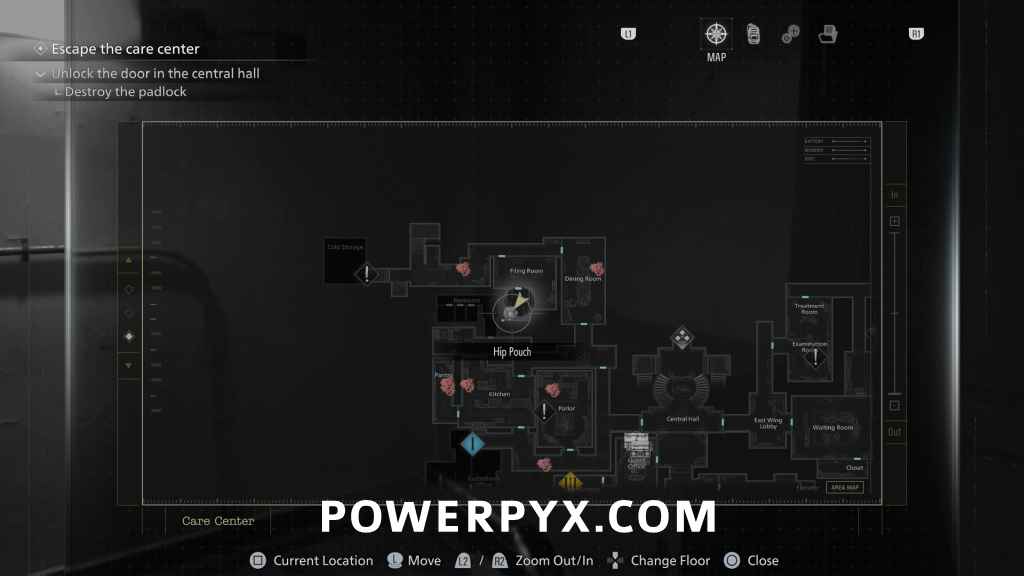
Escape
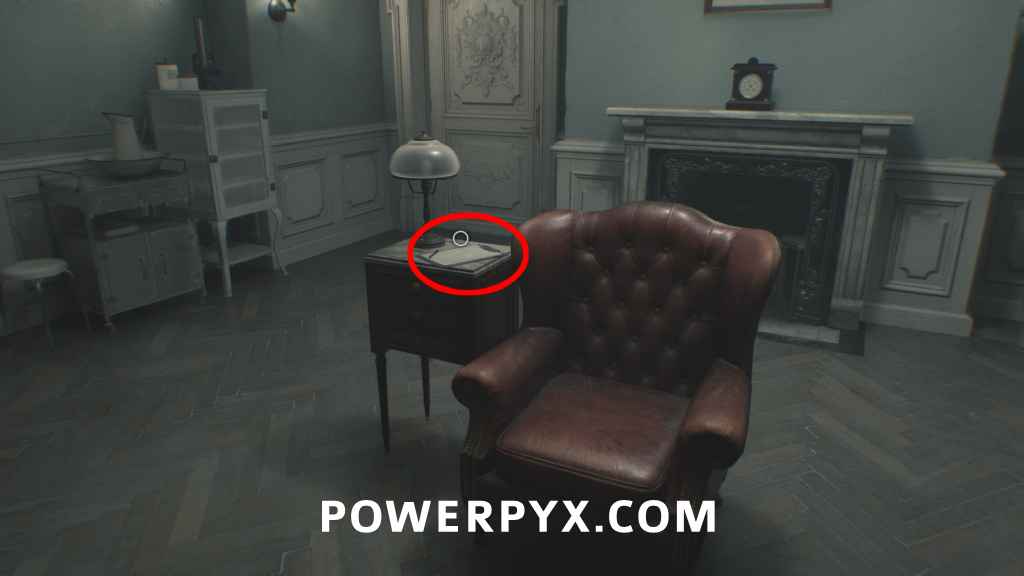
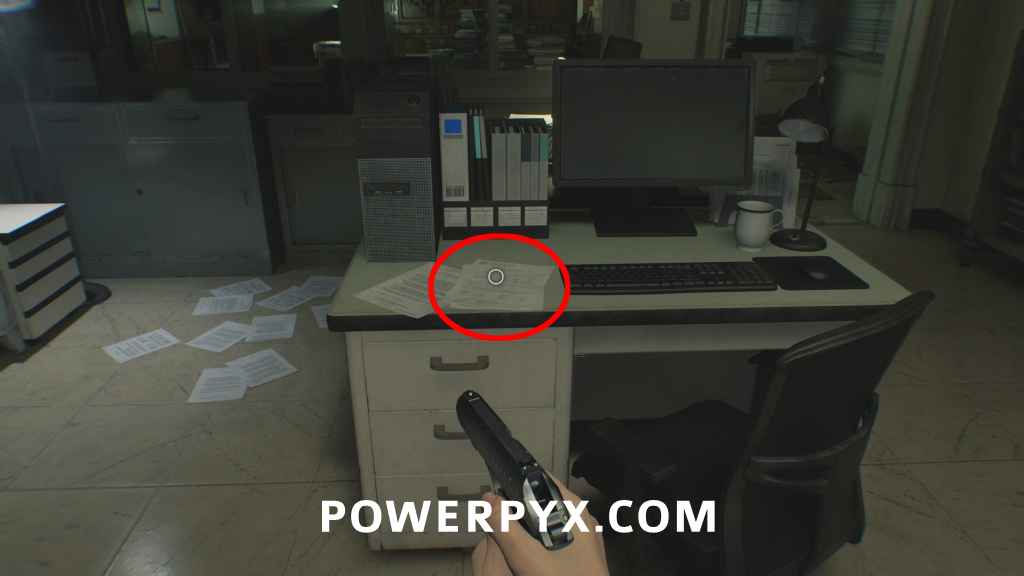
File #7 – Progress Notes
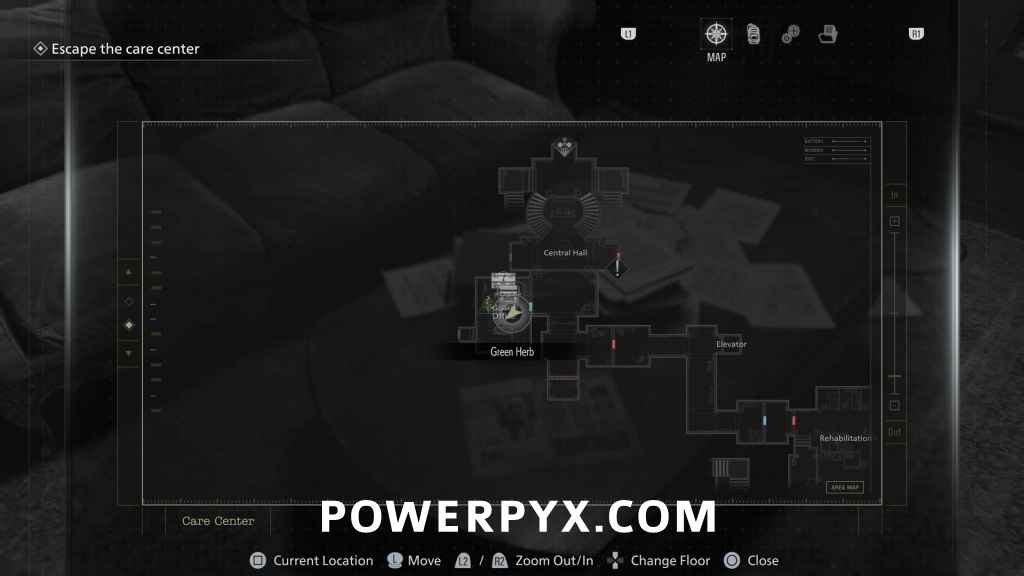
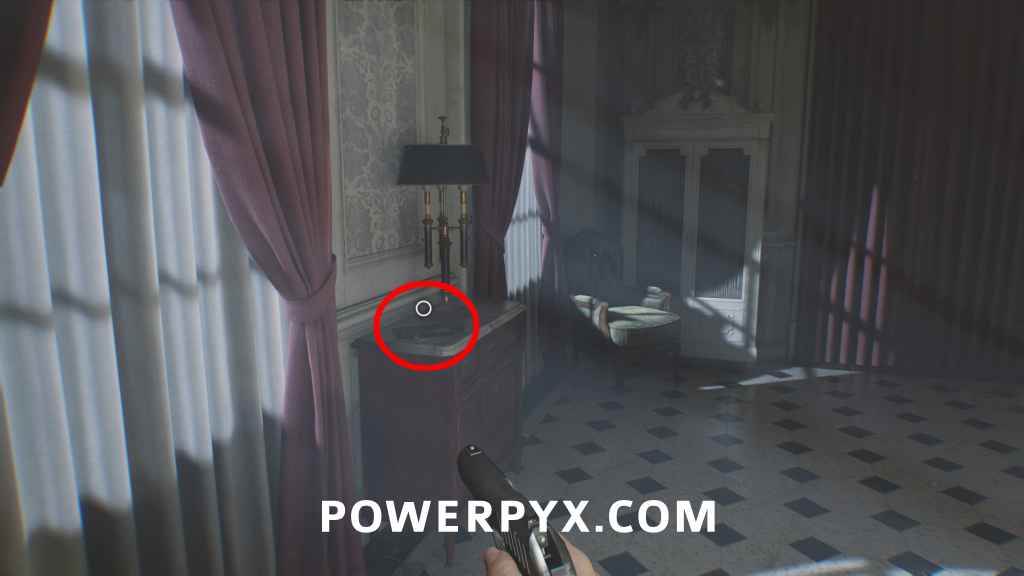
Room 203: On the small table in the room when you regain control of Grace.
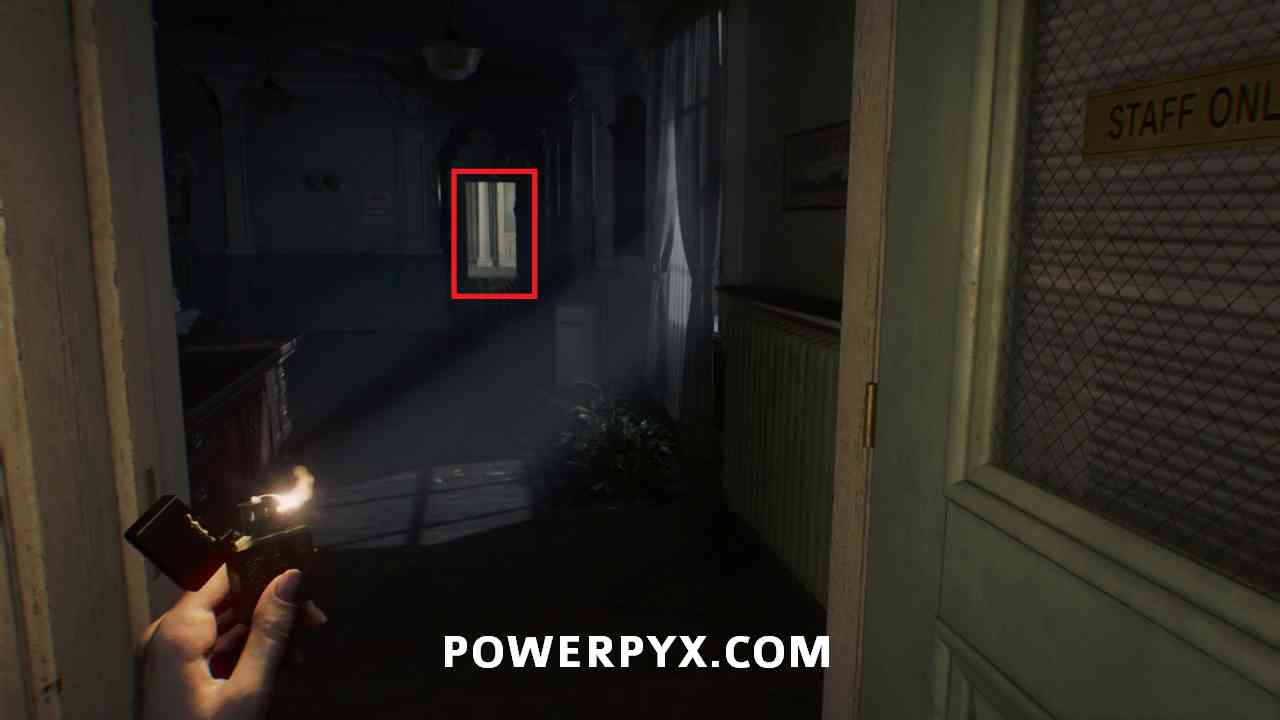
Leave the room and follow the hallway to the right. When you reach the spot with the red light, interact with the light switch on the wall to turn on the light at the end of the far hallway. This section you won’t be able to move into the rooms with no light, so you need to turn this on to progress. Once you turn the light on you can walk all the way to the end of the hallway.

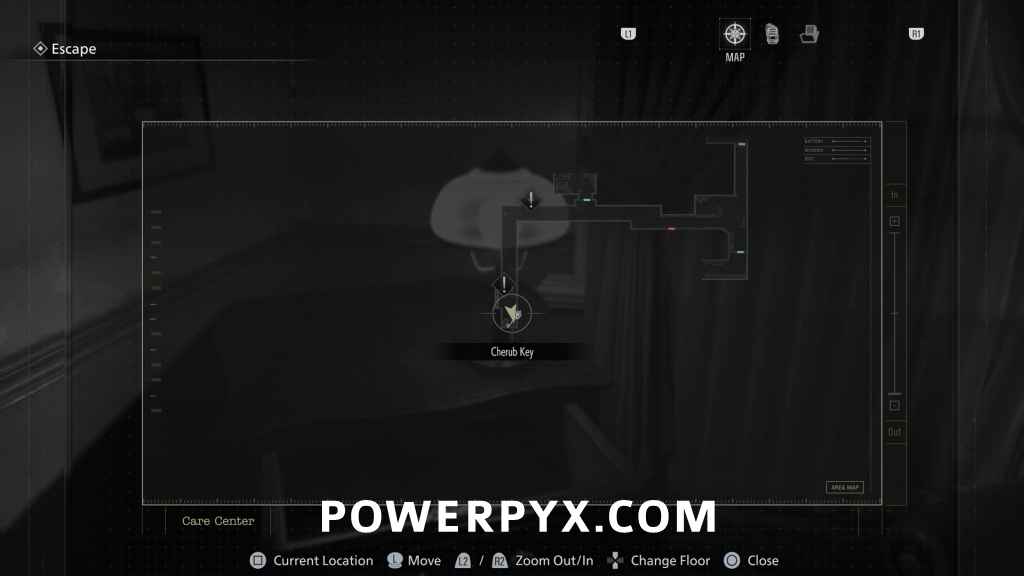
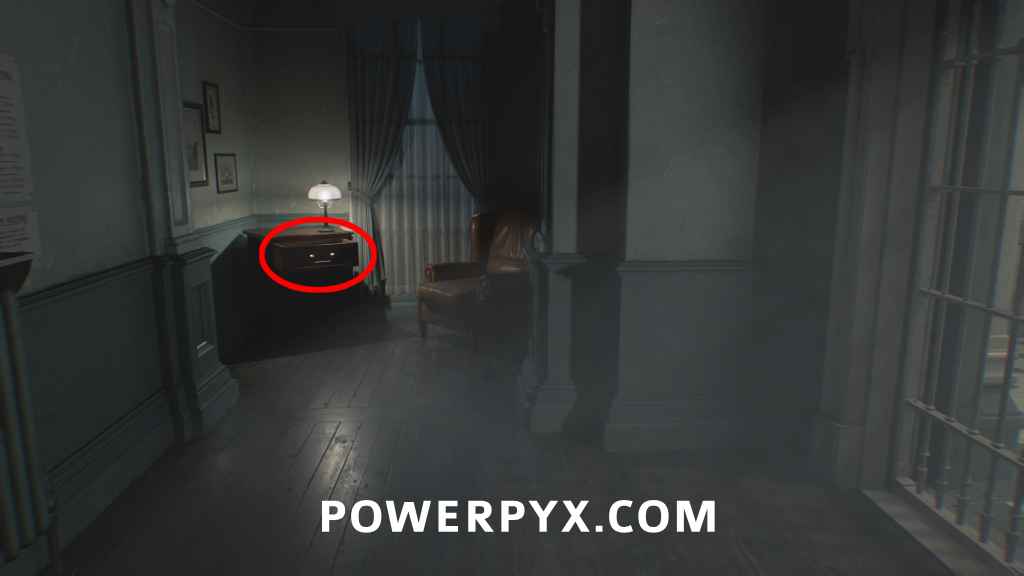
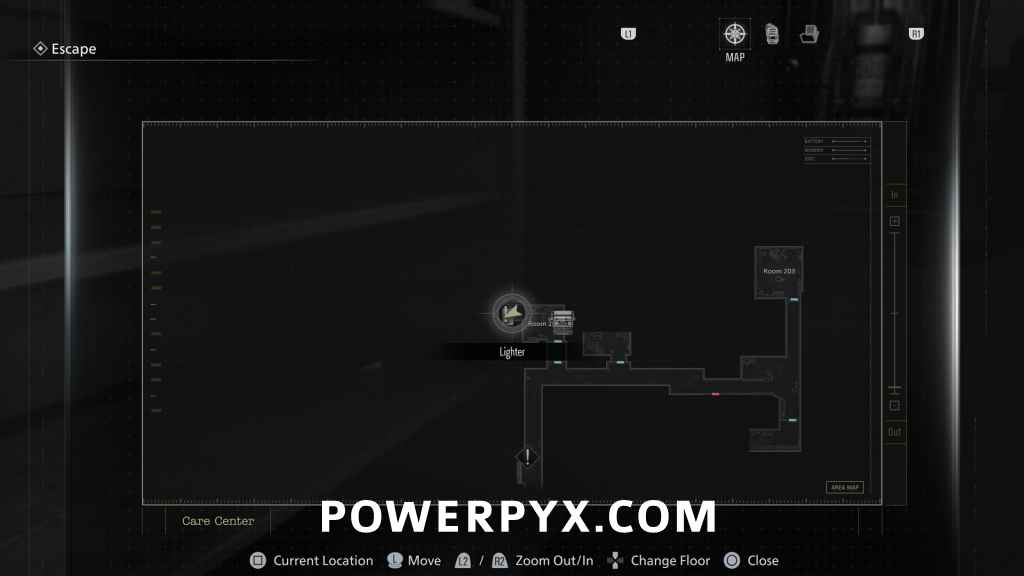
Key Item: Cherub Key
In a drawer next to a locked gate with a fuse box next to it. Used to open Room 201.
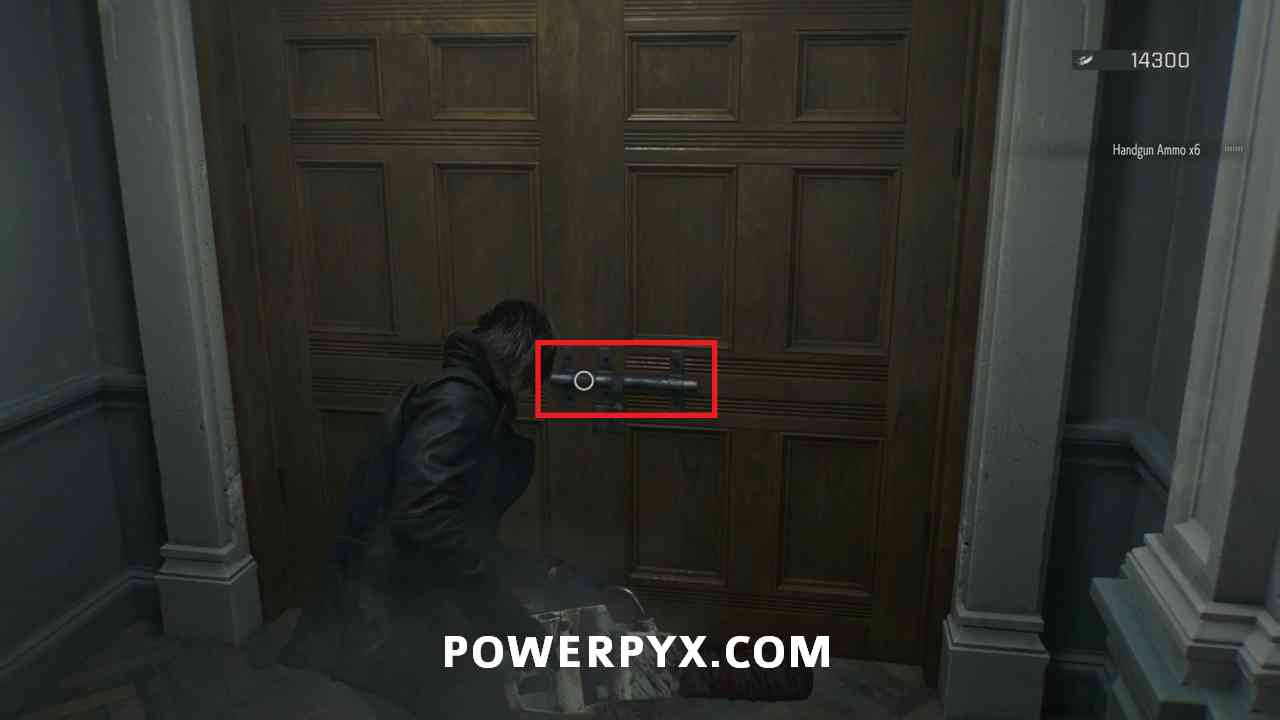
Walk back to the door you passed earlier and use the Cherub Key to open it, this door represents the save rooms in Rhodes Hill.
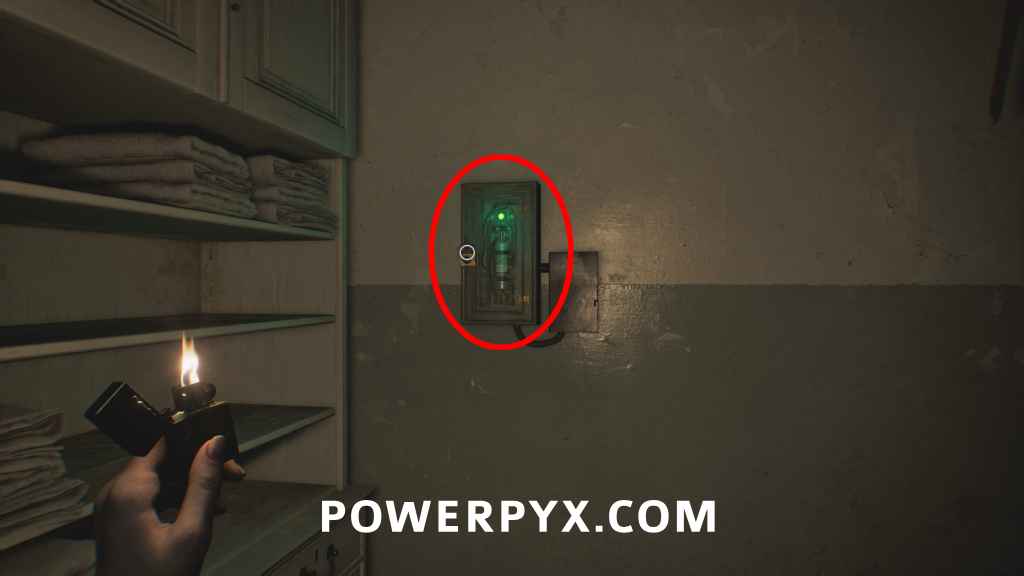
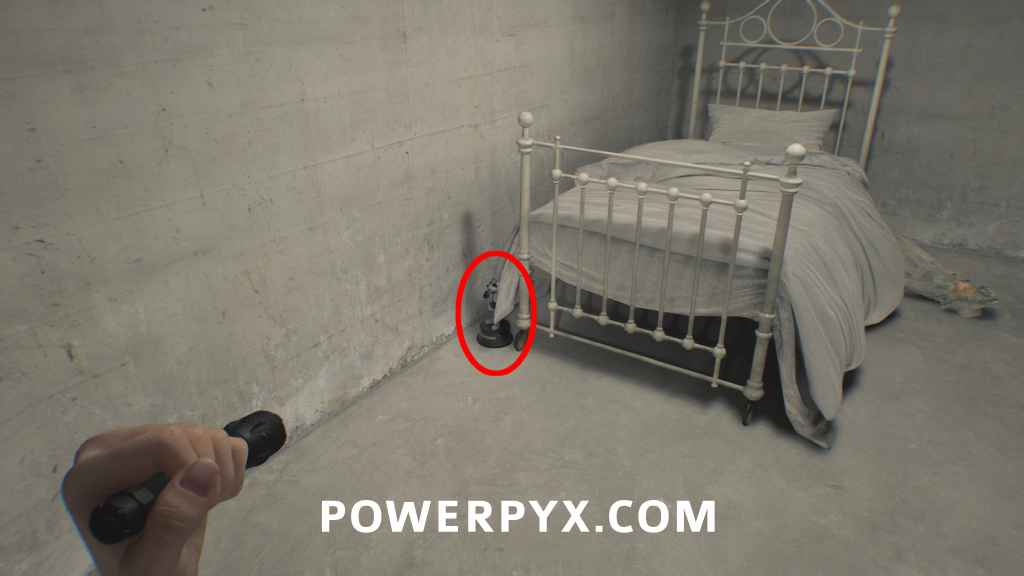
Key Item: Lighter
Room 201: Inside Room 201, next to the green fusebox.
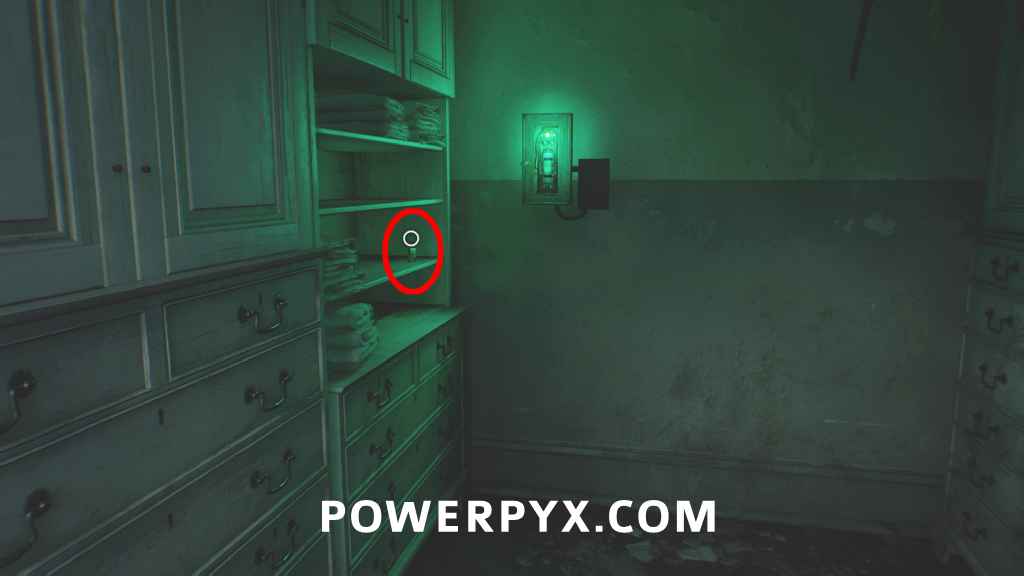
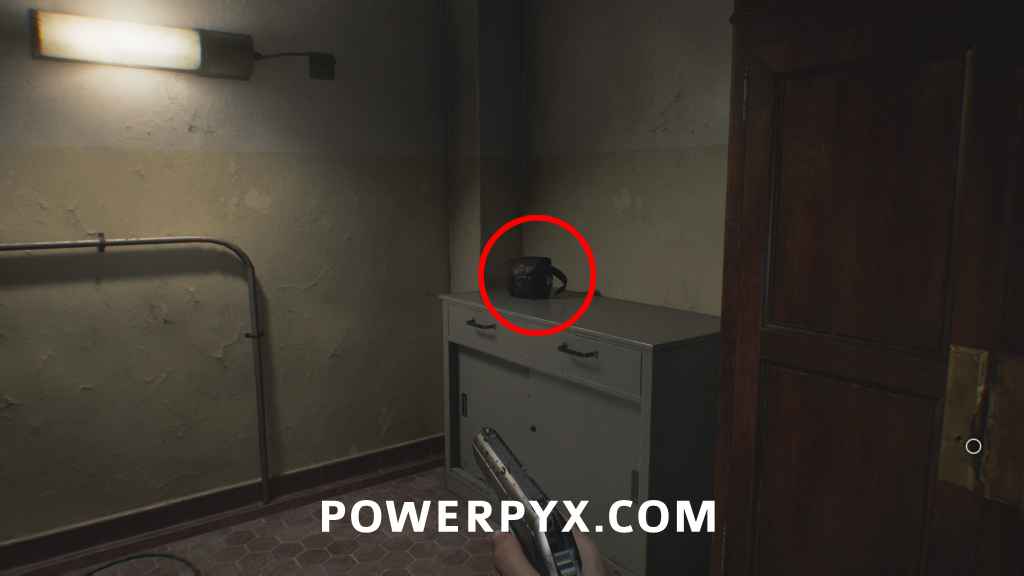
Before leaving this room interact with the cabinet and pick up the Empty Bottle, which can be thrown to distract enemies and you will want to keep at least one Empty Bottle for a trophy later on.
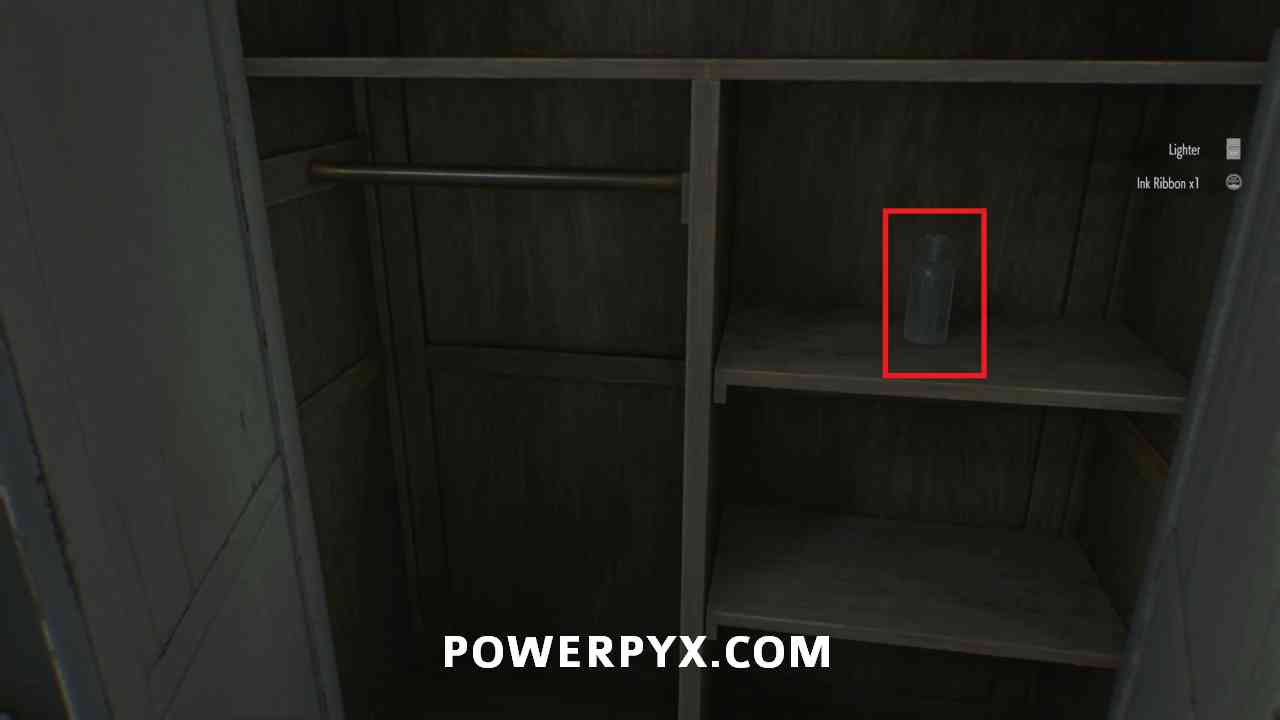
Now that you have the lighter you can go into Room 202. Interact with the closet in the back left corner.
File #8 – Note on Cardboard Box
Room 202: Inside the closet in Room 202.
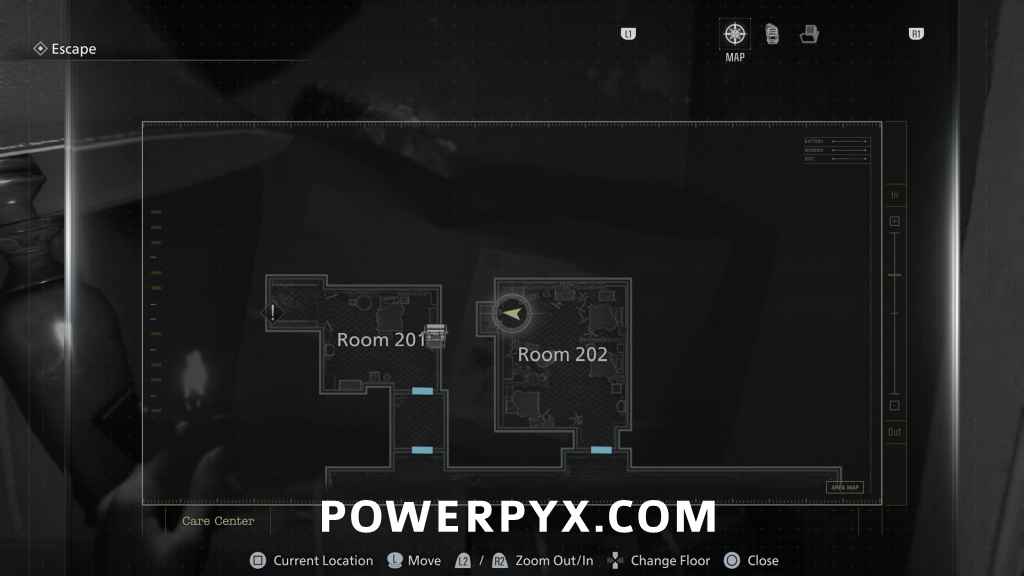

Go back into the hallway to the Nurses’ Station in the southeast corner. This will be the first time you are attacked by the monster in this area, and need to run back to the room you woke up in with the light on. The monster can’t go into rooms with lights, so this is how to deal with it in this section.
After it disappears you can go back to the Nurses’ Station.
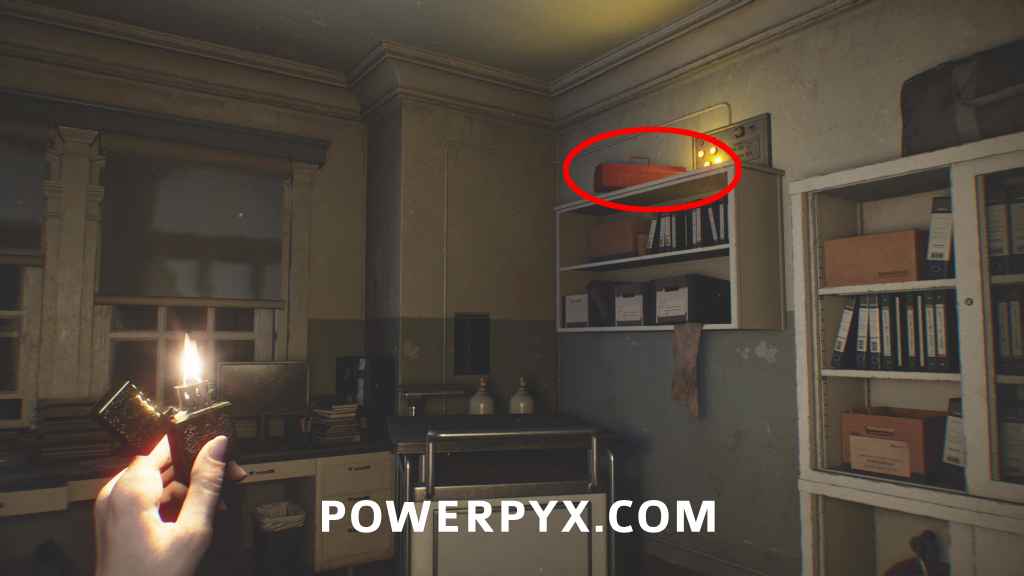
Key Item: Screwdriver
Nurses’ Station: In a toolbox on the shelf in Nurses’ Station. Move cart in the same room to reach it. Once you attempt to move the cart the monster will appear out in the hallway and make its way into the room, but you can quickly move the cart into the corner and grab the Screwdriver before it reaches the room.
After grabbing the screwdriver (or if you aren’t quick enough and need to hide), you can crouch under the stack of items on the opposite side of the room. Once the monster enters and moves to the left of the room you can crouch walk back out through the side door, then attempt to walk down the hallway toward the Save Room.

The monster will break through the door and immediately start chasing you again, so run back to the room you started in one more time. After the monster disappears, it will be walking around in the hallway in your way. Go back into the Nurses’ Station through the southeast door and then look out the door on the north where the monster broke through. You can use the Empty Bottle you picked up to throw down the hallway east and lead the monster away so you can get back to the save room.

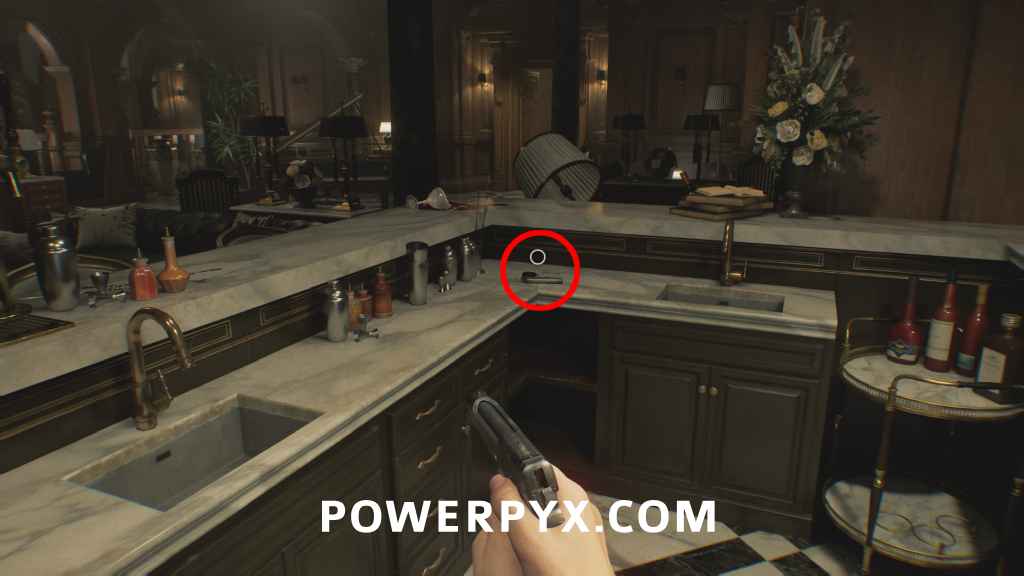
Key Item: Fuse
Room 201: Inside Room 201, need Screwdriver to open fusebox. Insert it at the locked gate.
After picking up the Fuse you will automatically be attacked by the monster again. Immediately run out into the hallway and toward the locked gate you saw before. Interact with the fusebox to place the Fuse which ends this section.
Care Center (Rhodes Hill) – Leon
Investigate the Care Center
When you switch perspective to Leon follow the doctor in front of you until you encounter a cutscene, and will have another combat section with Leon. The first enemy that attacks you has a chainsaw, which you want to avoid being hit by if at all possible. You can parry chainsaw attacks with enemies with  , but it’s generally safer to keep your distance and pick the chainsaw up yourself once you defeat the enemy holding it. You need to be careful while trying to do this though as the chainsaw will spin around on the ground for a short period and damage you if you touch the blade while it is doing this. Other enemies will also try to go for the chainsaw, so if you don’t want to pick it up still keep in mind where it is as other enemies will go for it.
After all the enemies are defeated you can loot some supplies from boxes in one of the side rooms, then pick up the chainsaw and interact with the door while holding it to open the door and progress.
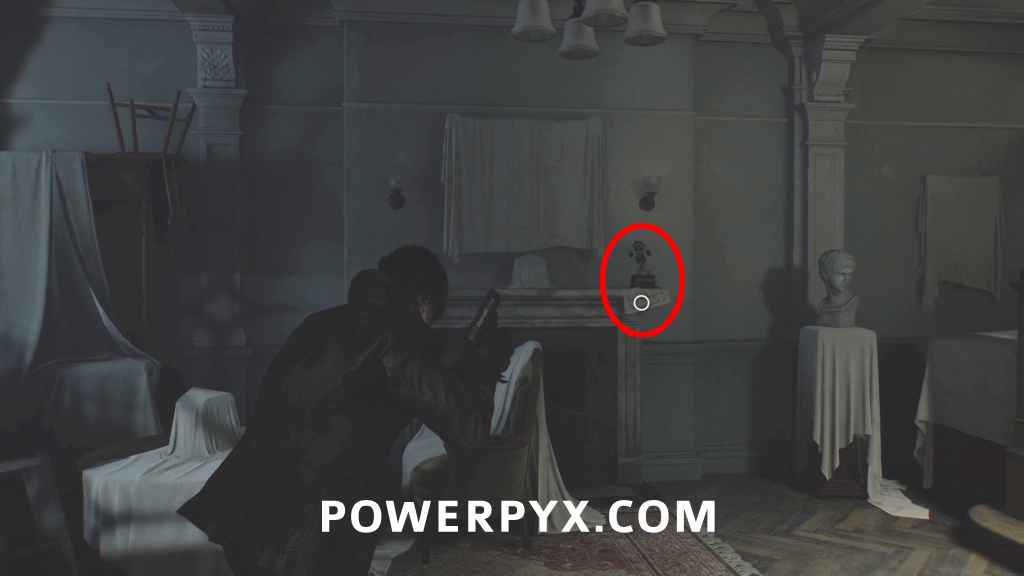
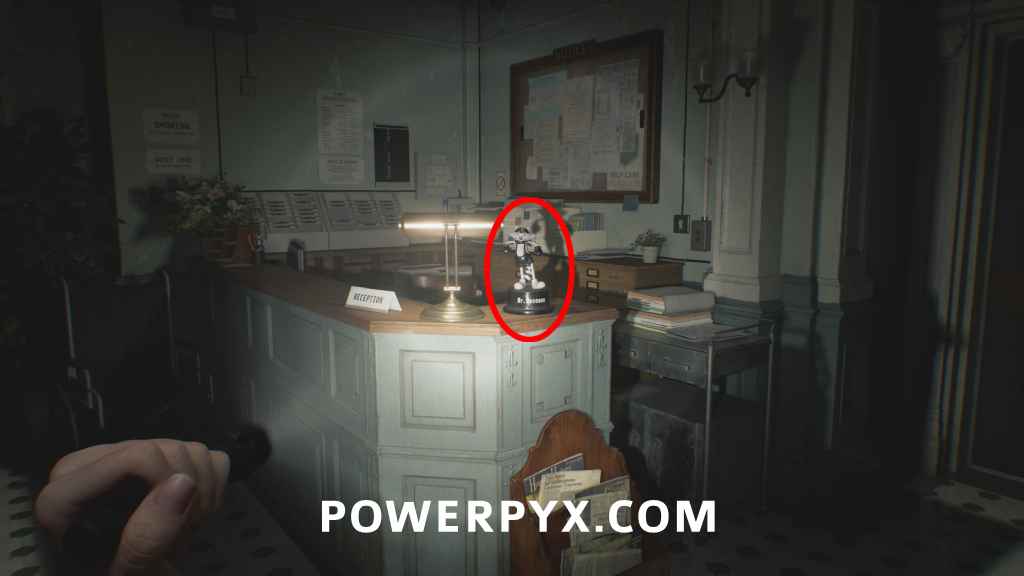
Mr. Raccoon #1
After cutting a door open with the chainsaw, go through the next door and it will be in front of you on the fireplace. The Mr. Raccoons move and make a noise.
Keep following the linear path forward until a scene triggers and you switch perspective back to Grace.
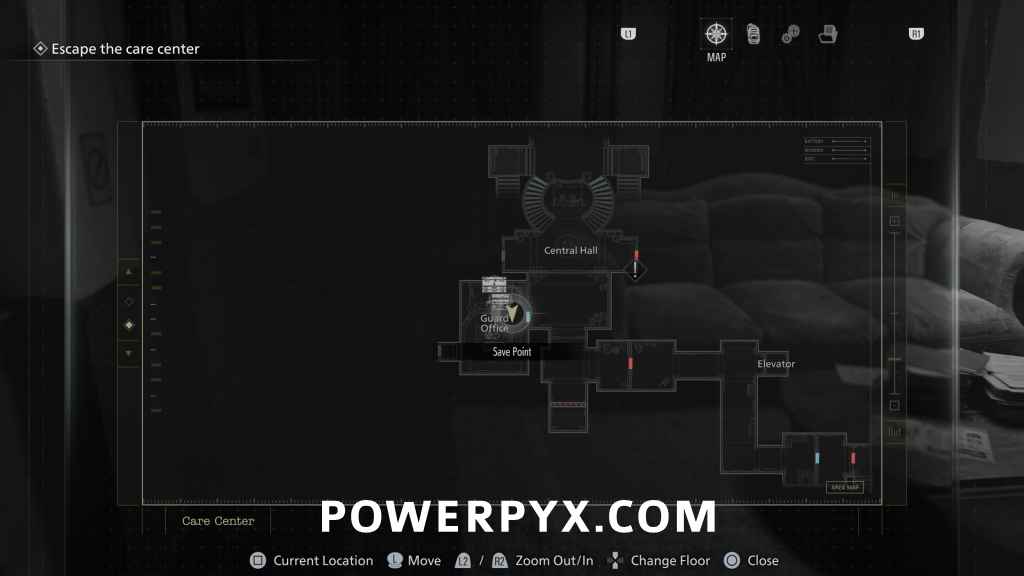
Care Center (Rhodes Hill) – Grace Part 2
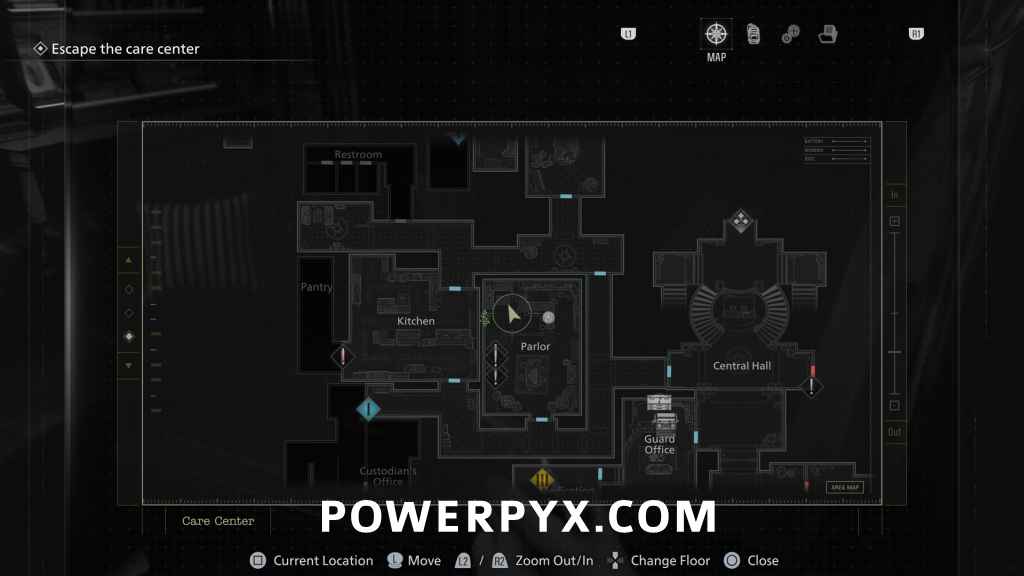
Escape the Care Center
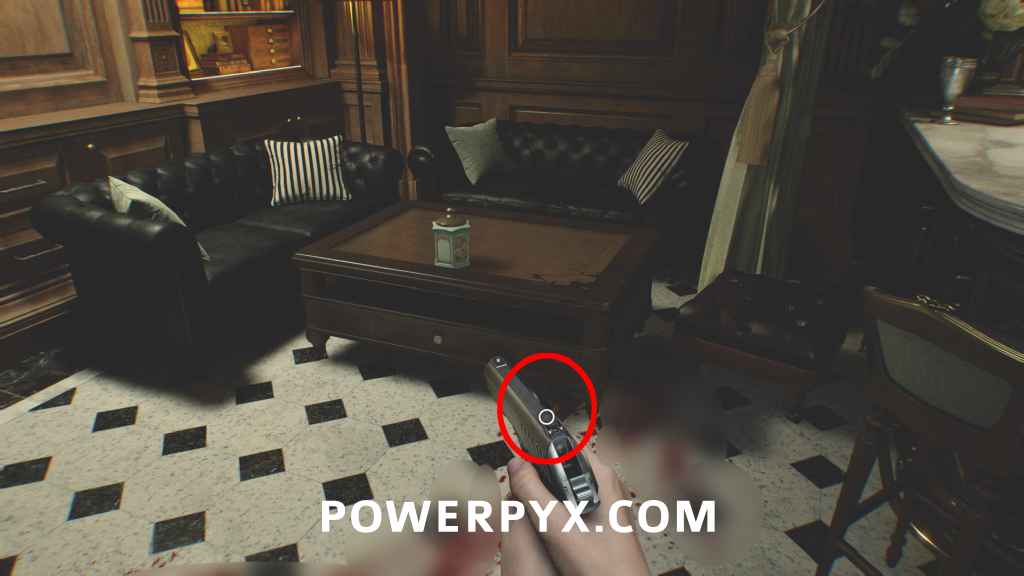
In this section Grace now has Leon’s Requiem (revolver), but you only start with one bullet for it so you want to be careful about how you use it. You can get more ammo throughout this part of the game while Grace has it, but there is one spot early in this section where you will want to have the initial bullet for.
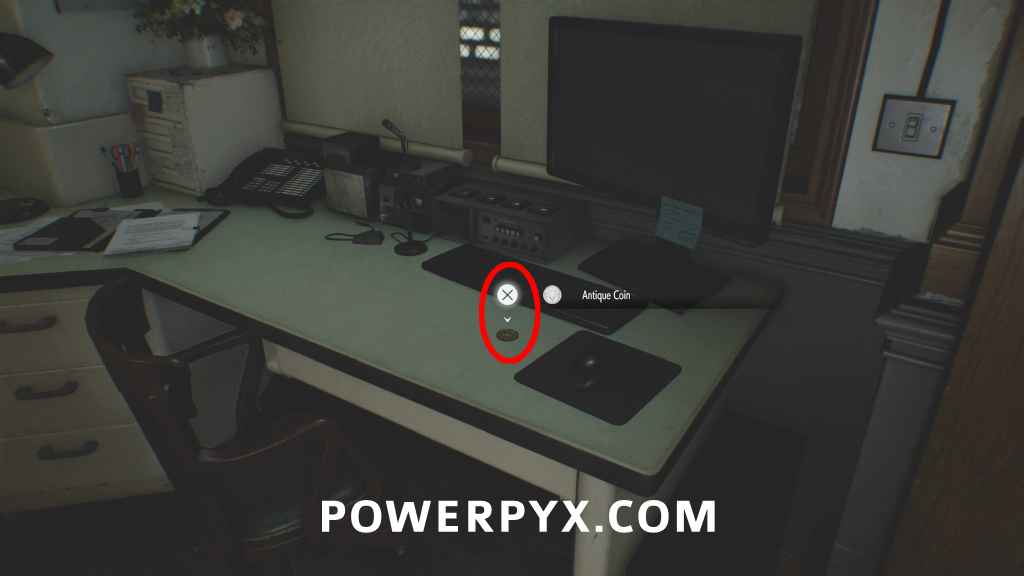
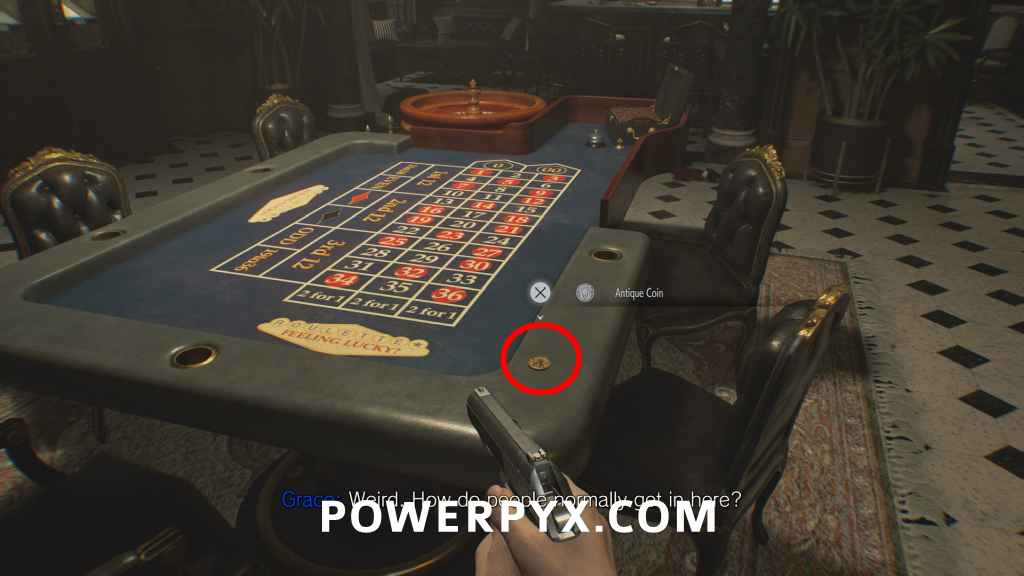
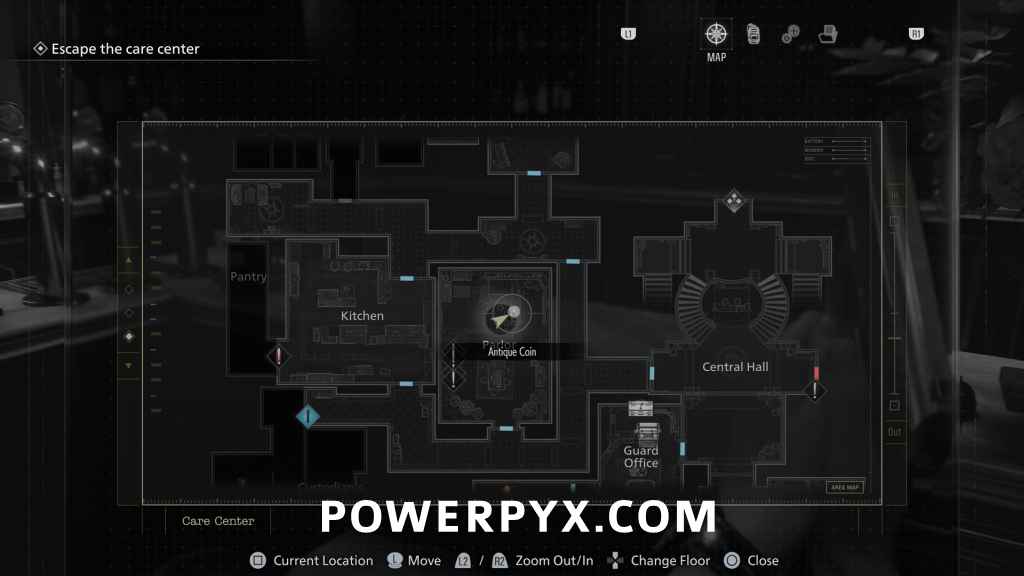
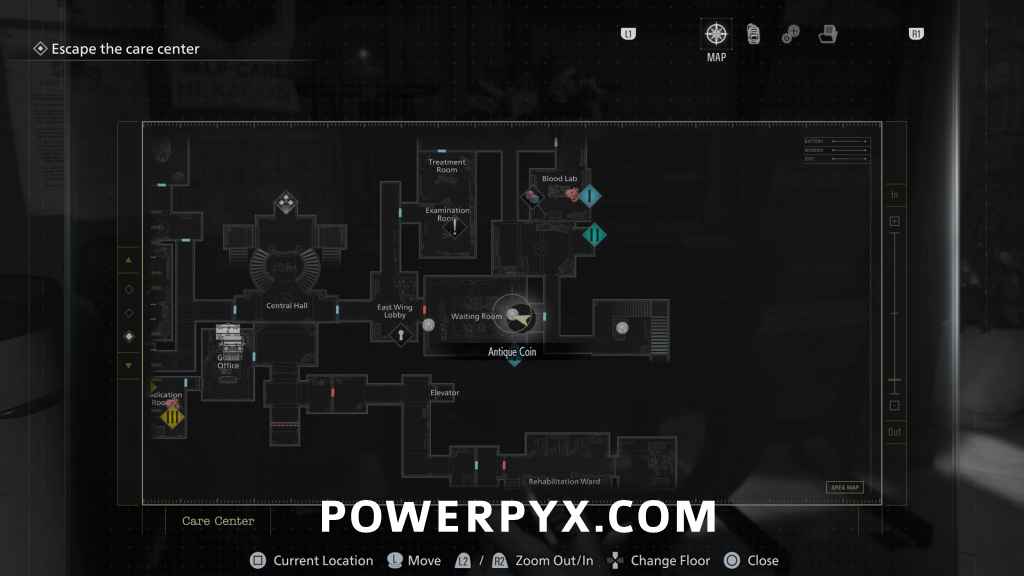
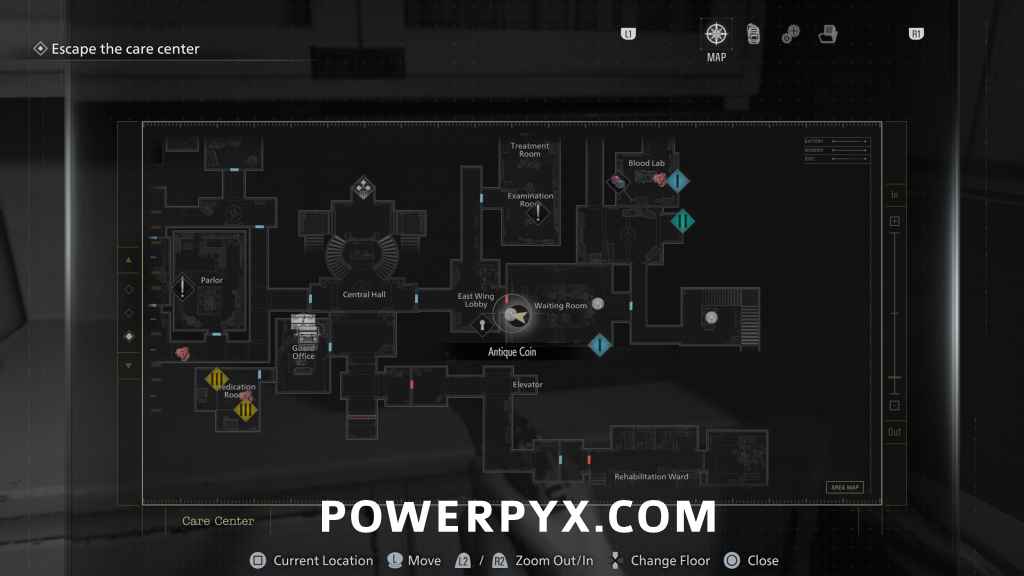
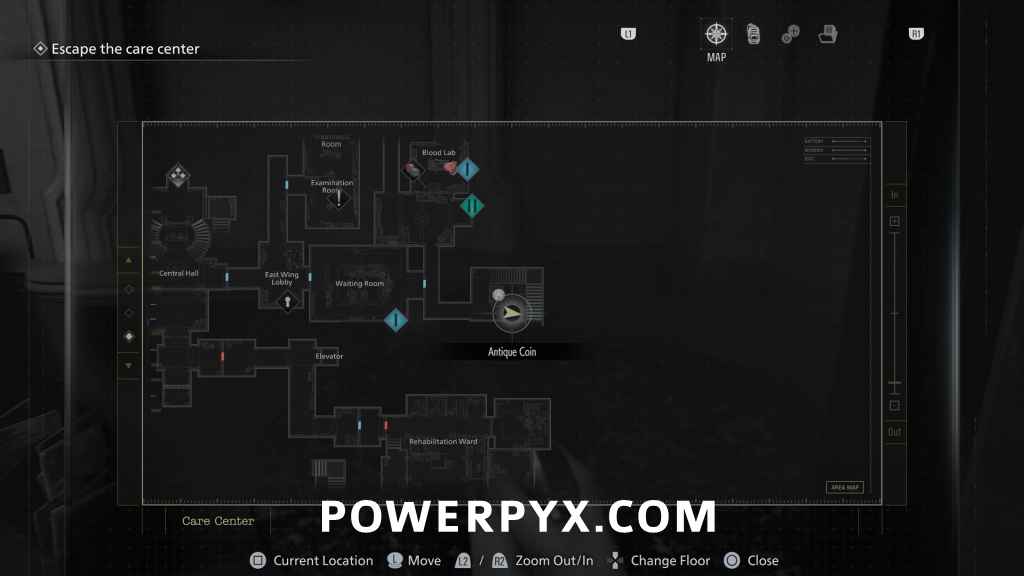
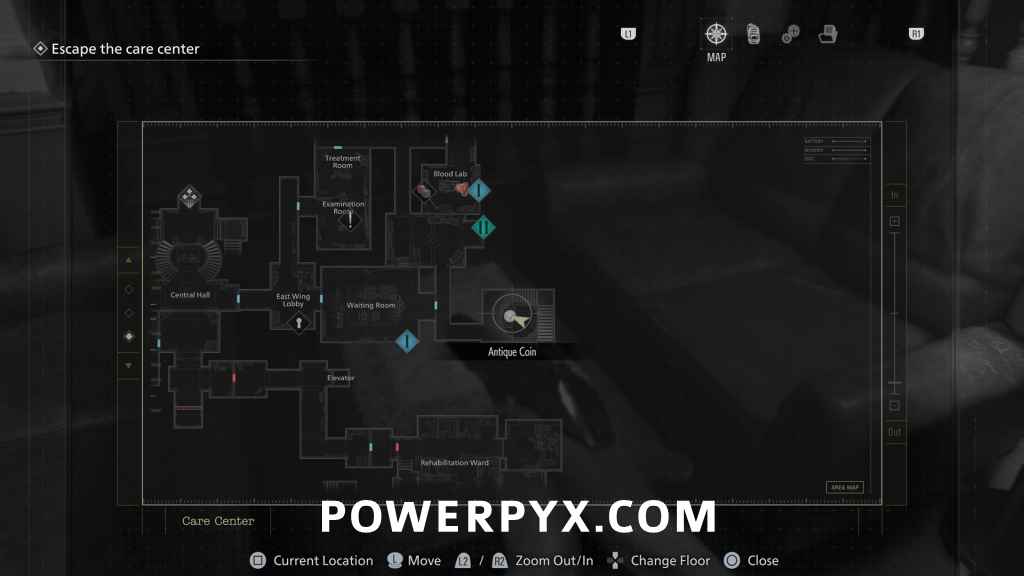
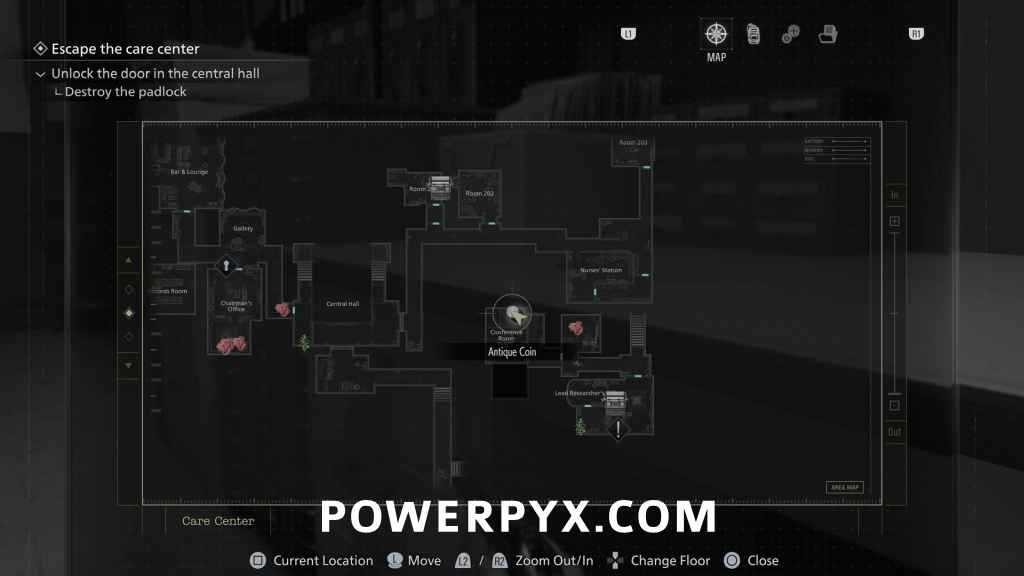
Antique Coin #1
Guard Office: From where you start, go downstairs and enter the Safe Room. Coin is on desk.
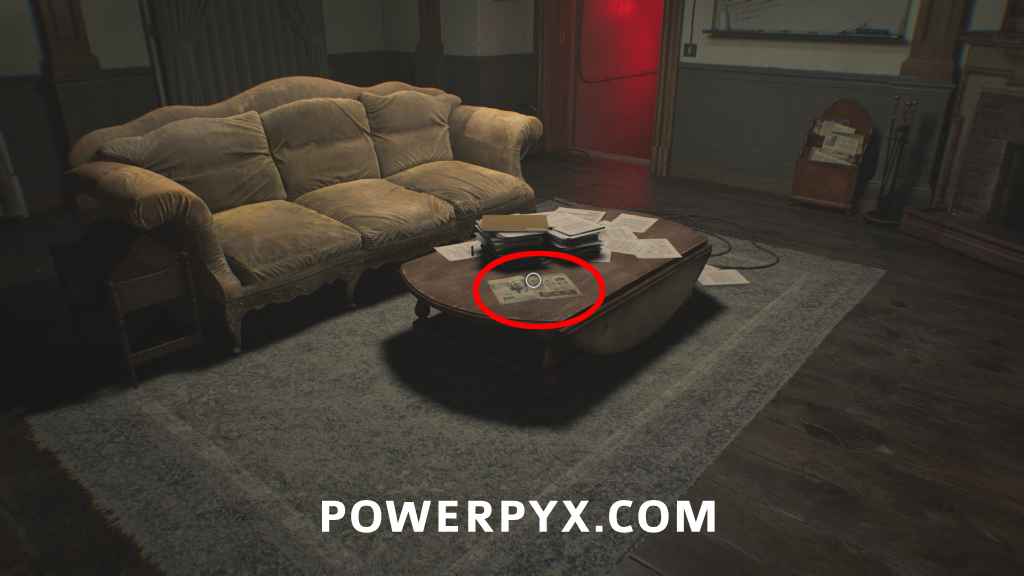
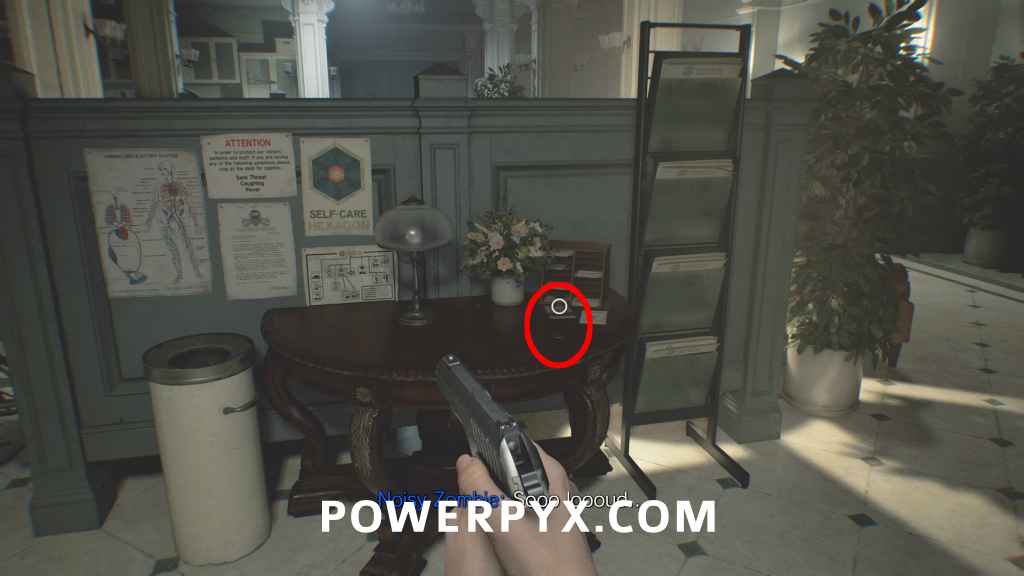
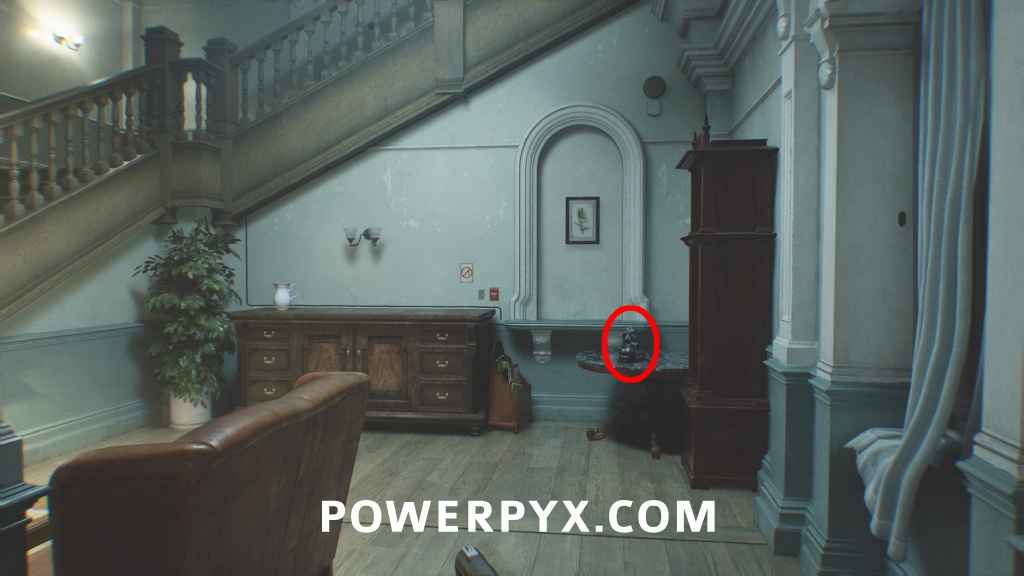
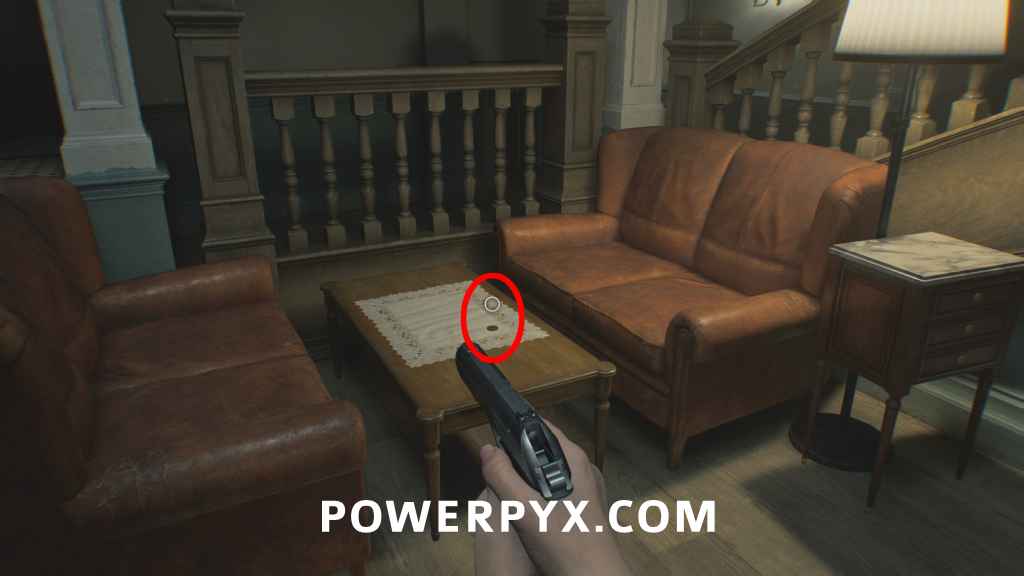
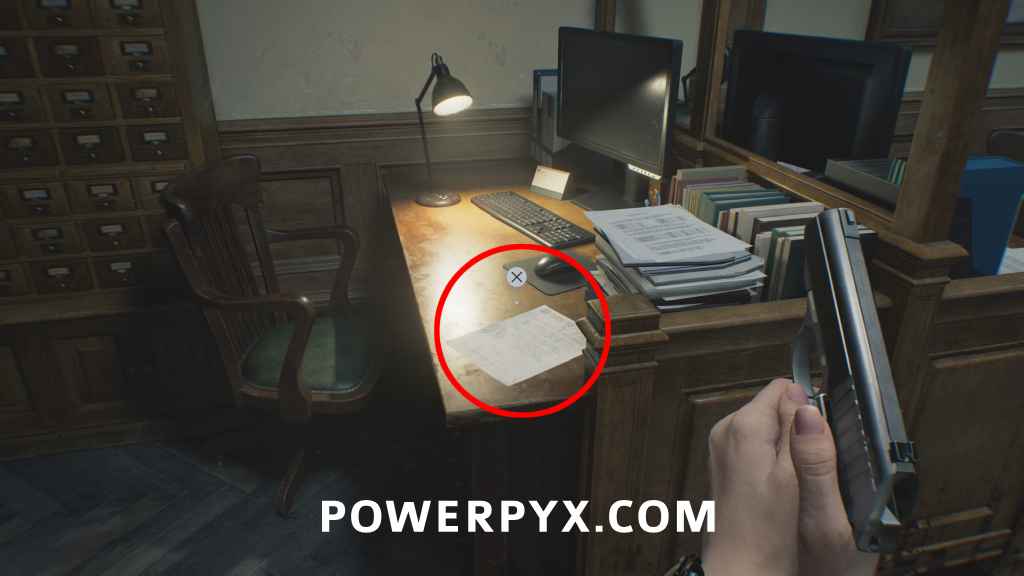
File #9 – Care Center Pamphlet
Guard Office: From where you start, go downstairs to the Safe Room, this is on the couch table.
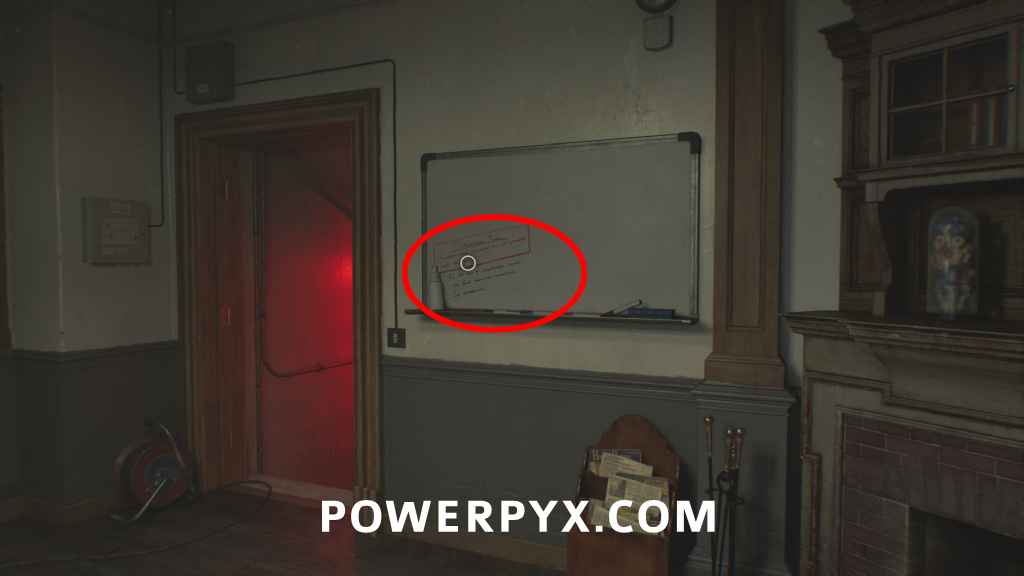
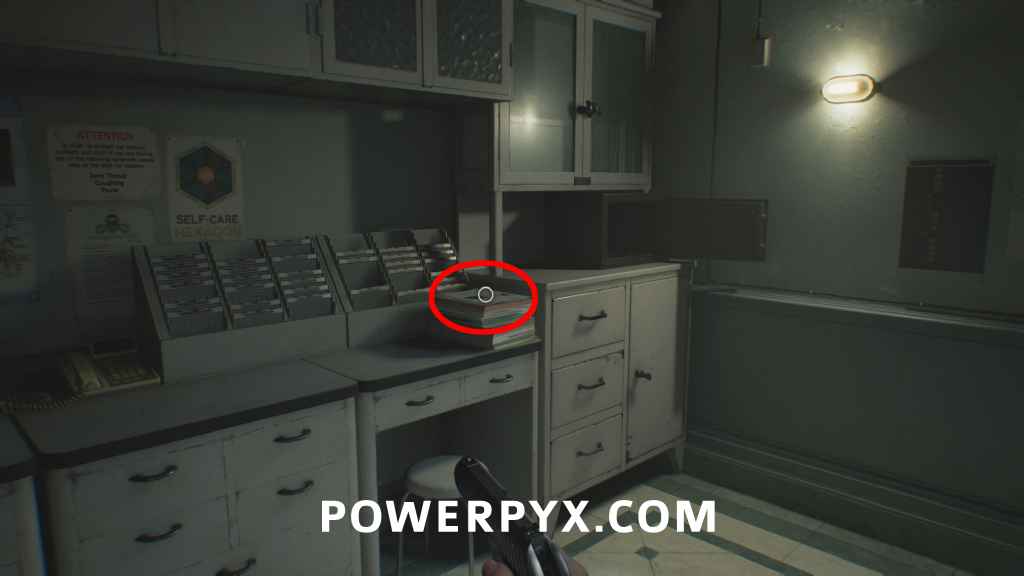
File #10 – Whiteboard Scrawl
Guard Office: Same room, on the wall on whiteboard, just before the exit.
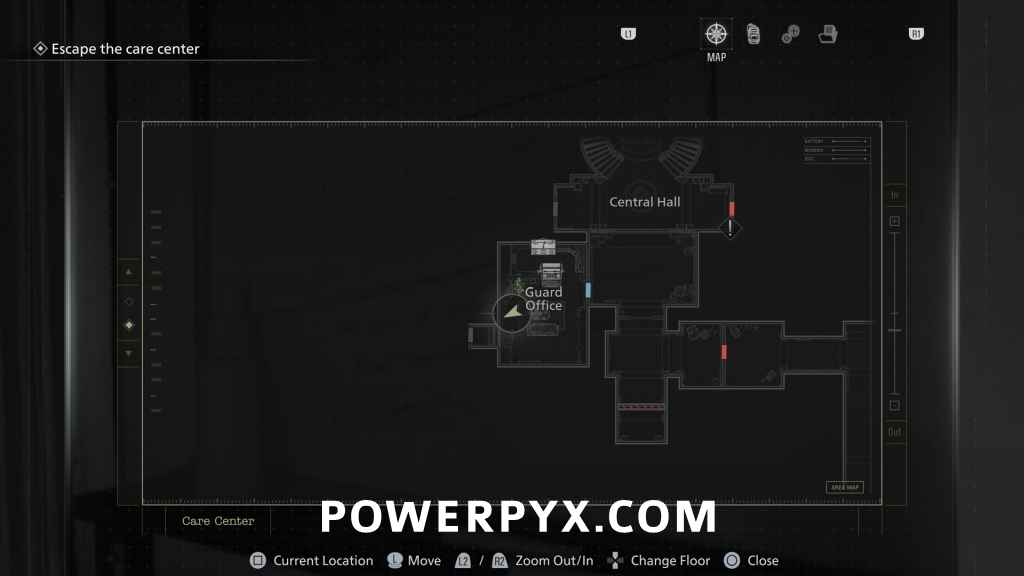
Trophy: Out of Sight, Out of Mind
Guard Office: Same room, interact with the box and place any item in it.
Key Item: West Wing Keycard
In Safe Room go through the red-lit door to get this automatically. Use in Central Hall on door to West Wing.
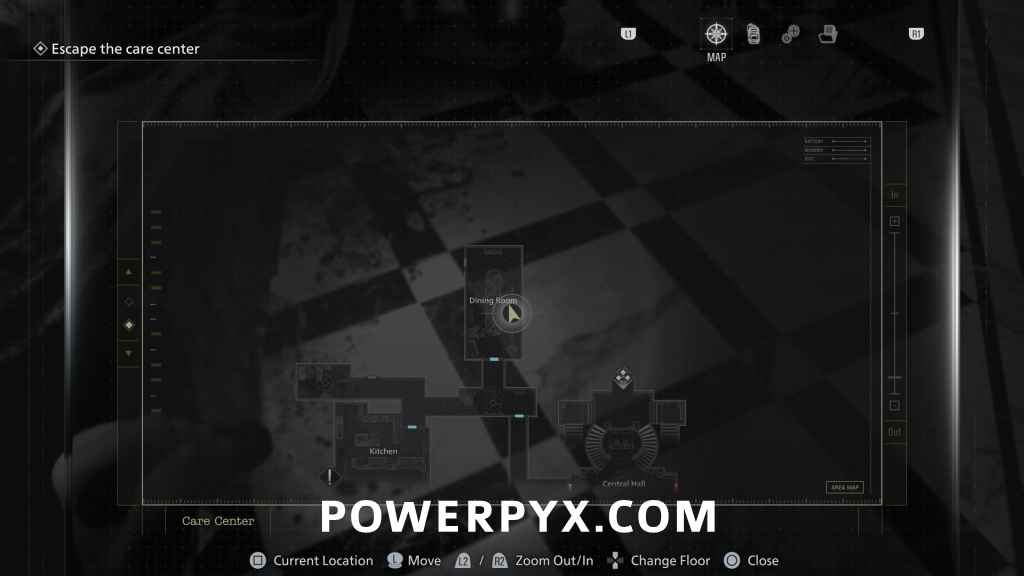
In the west wing you can progress down the hallway to the left, through the kitchen. In the kitchen you will encounter the Chef, who for now you will want to avoid. He will move around the kitchen area interacting with the counters and the tub on the cart, so you can wait for him to move out of your way then progress through the door on the other side of the kitchen. Keep going right and deal with or avoid the zombie messing with the light switch, then interact with the door on the right to unlock it and give you a shorter path back to the central area.
You can make a trip back to the Safe Room if needed (enemies won’t follow you into the central area near the Save Room so you can use this to escape them if needed). Once ready go back through the door and progress into the Dining Room.
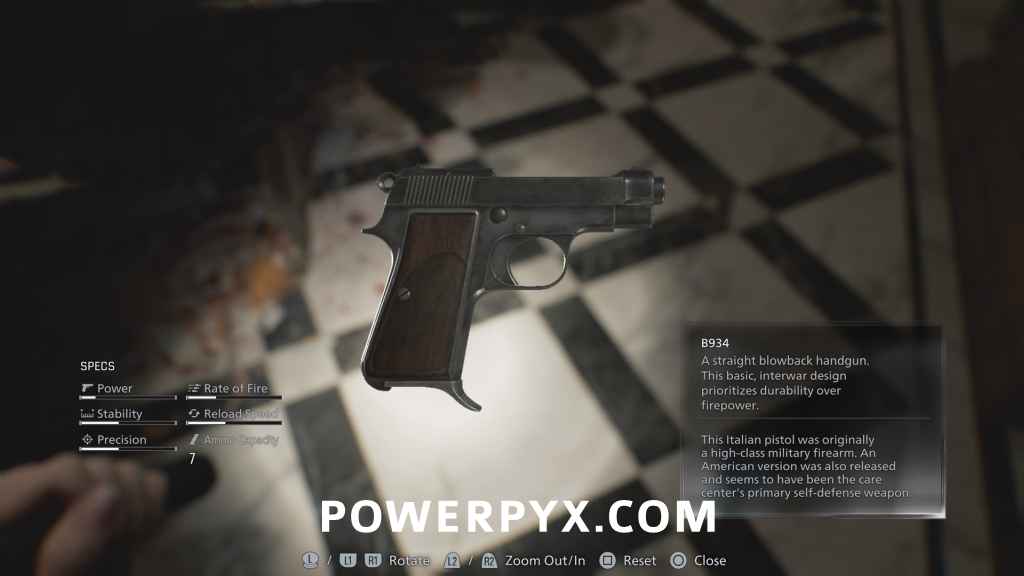
Weapon: B934
Dining Room: On the floor in the Dining Room (after going through Kitchen).
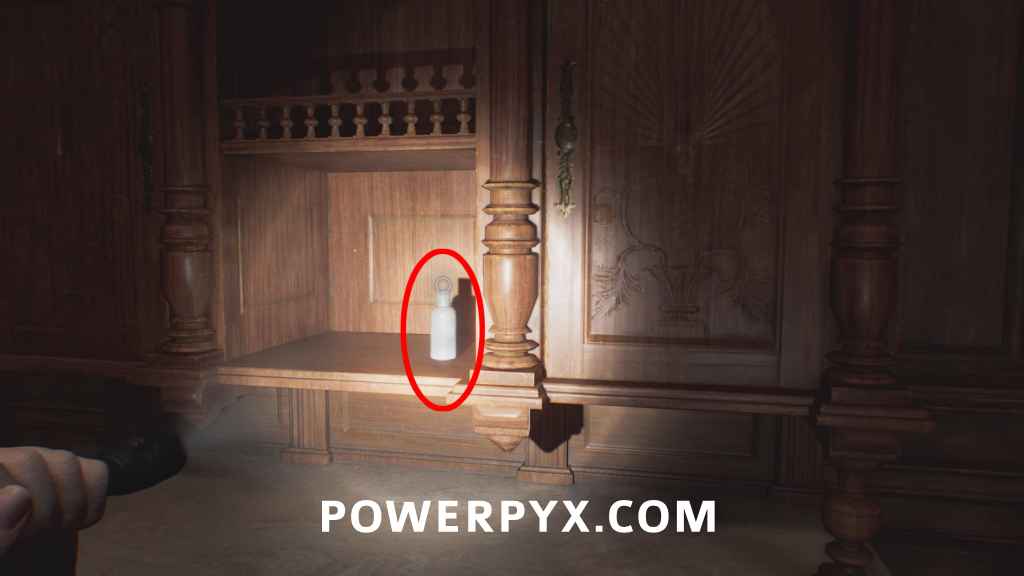
Trophy Item: Empty Bottle
Dining Room: On the left side of the dining room behind the table, you find this on the shelf. Pick it up and keep it with you or put it in the storage box. It will be needed later for the trophy “Internal Dispute”. DON’T THROW AWAY THE BOTTLE!
Go past the Dining Room and enter the Filing Room on the left, make sure to pick up all items in here and watch for and zombies that follow you in.
Weapon: Makeshift Knife
Filing Room: In the locker inside the Filing Room (next to Dining Room).

Weapon: Hunting Knife
Dropped by one of the enemies near the Dining Room & Filing Room, he holds the knife in his hand.
While playing as Grace knives you find have limited durability and can’t be repaired, so be aware of this while holding them. You can use them to escape an enemy grapple, but this then sticks the knife in the enemy and you have to retrieve it if it doesn’t break.
Antique Coin #2
In the corridor north from Filing Room.
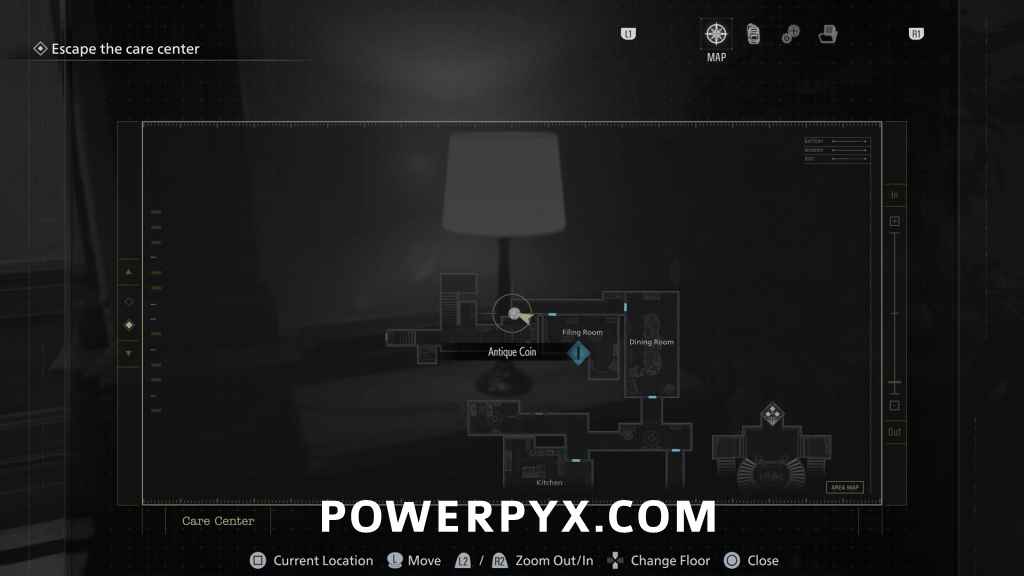
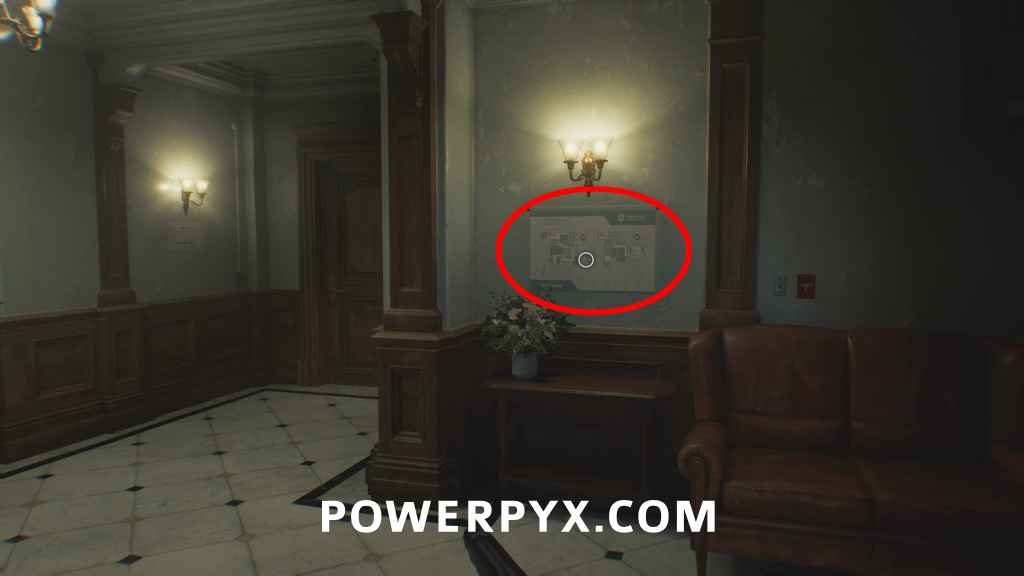
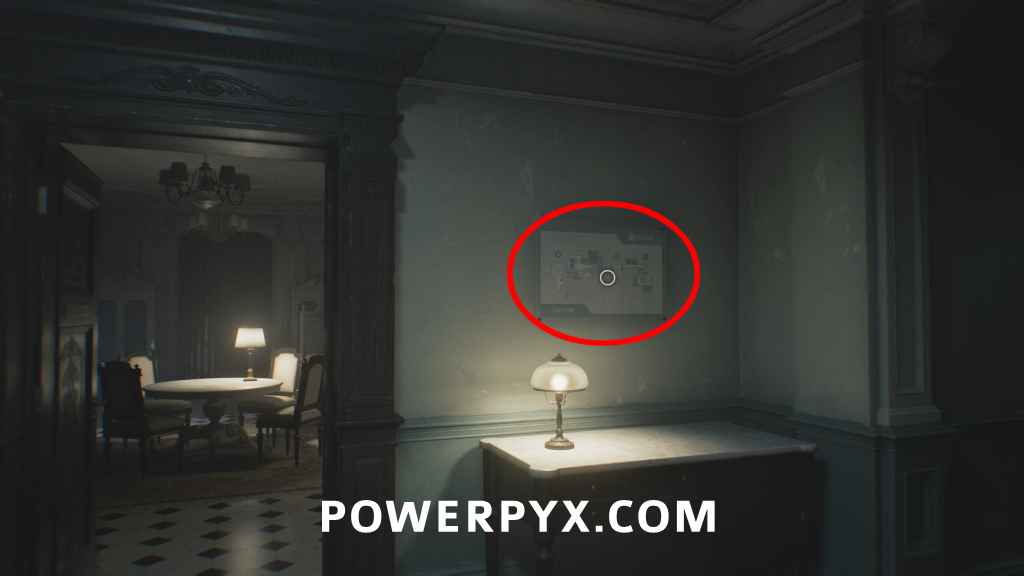
Map: West Wing Map
After going up the first set of stairs it’s on the wall.
Continue forward to the Bar & Lounge room. In here there will be three zombies, two normal and the singing one. The singing zombie will do a ranged area attack that temporarily stuns you if you are hit by it, so be aware of this while trying to fight it. It also takes more damage than the other enemies, so be aware of this if you are low on ammo.
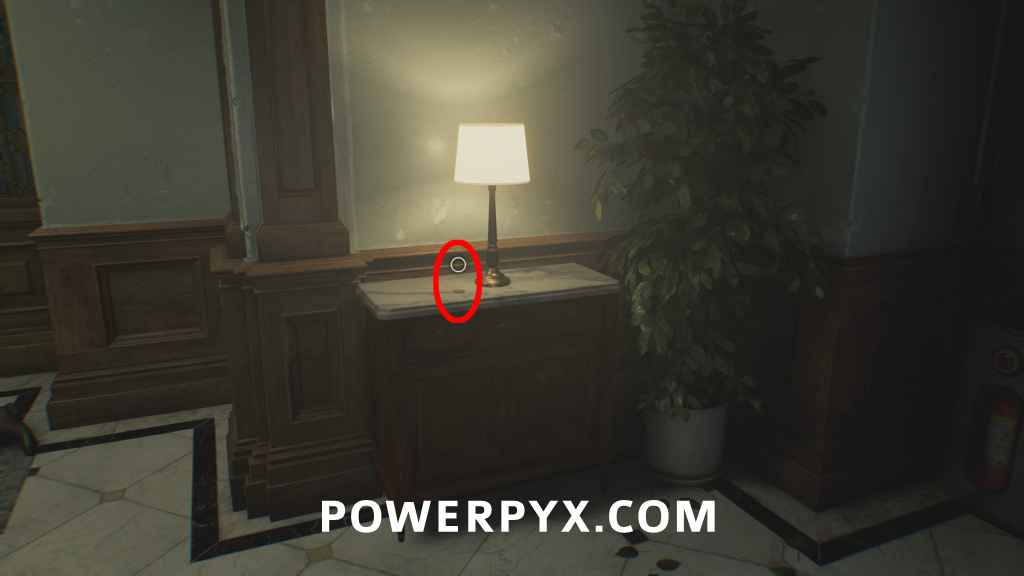
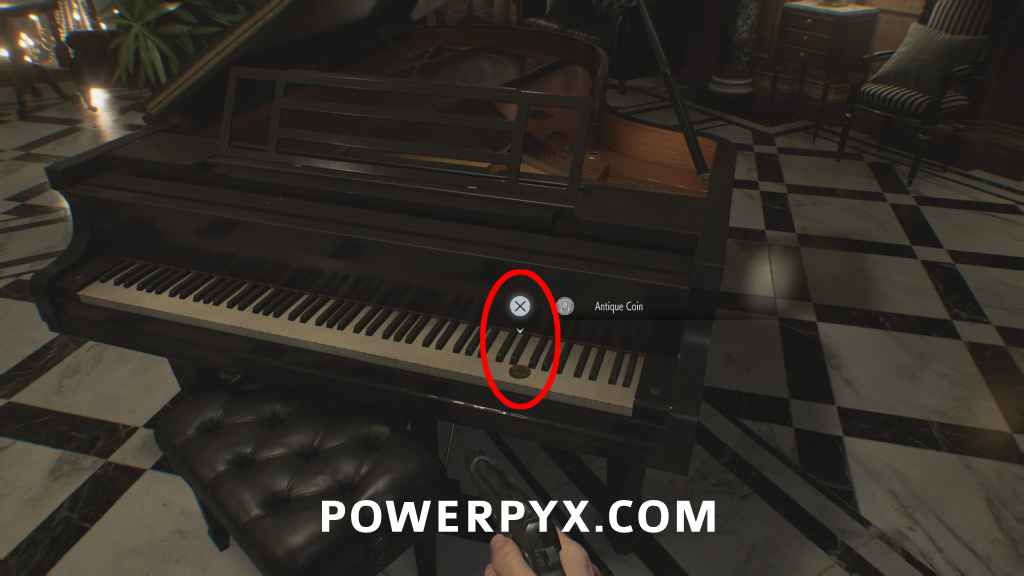
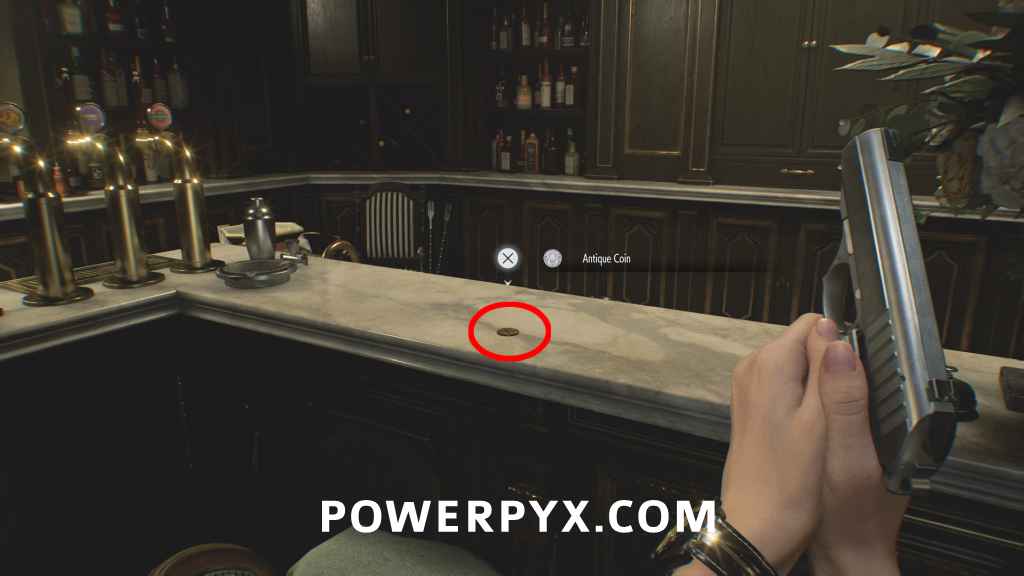
Antique Coin #3
Bar & Lounge: On the piano.

Antique Coin #4
Bar & Lounge: Dropped by the singing lady enemy in white dress.
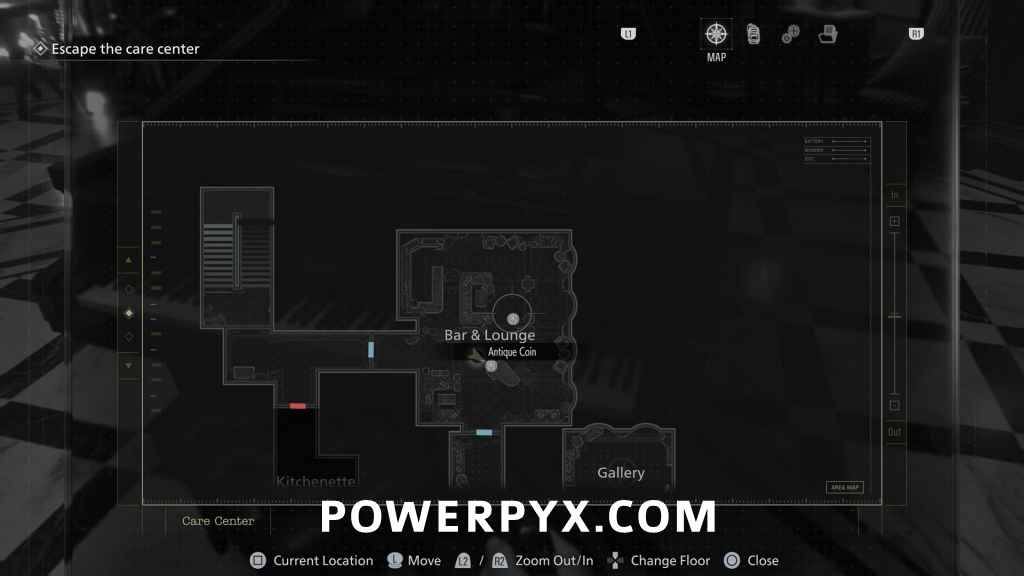
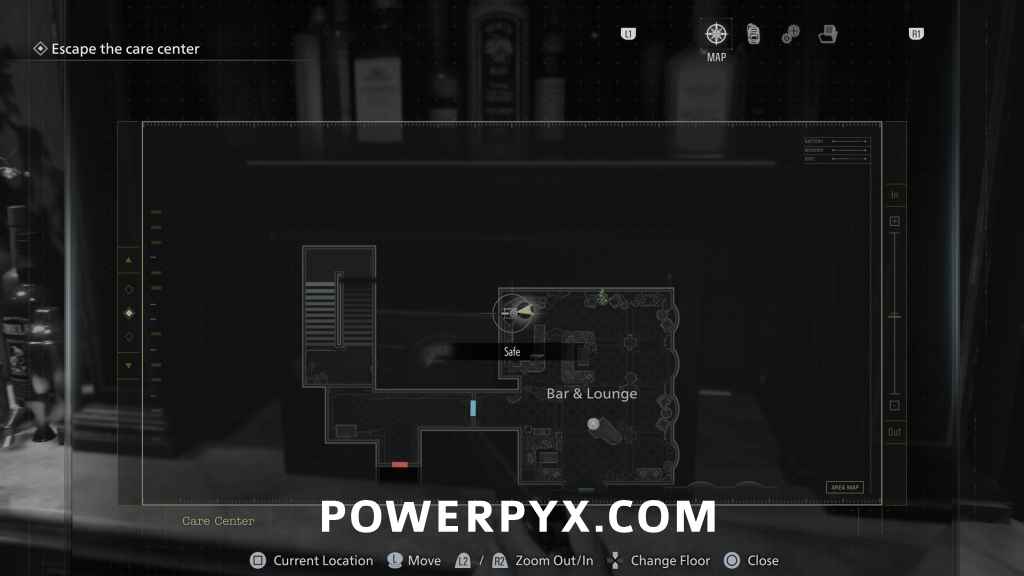
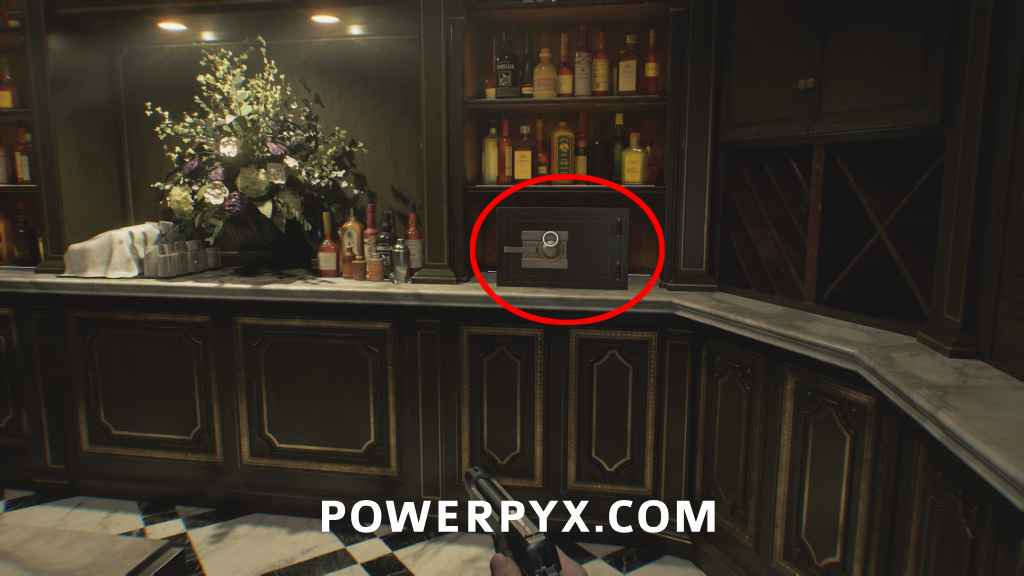
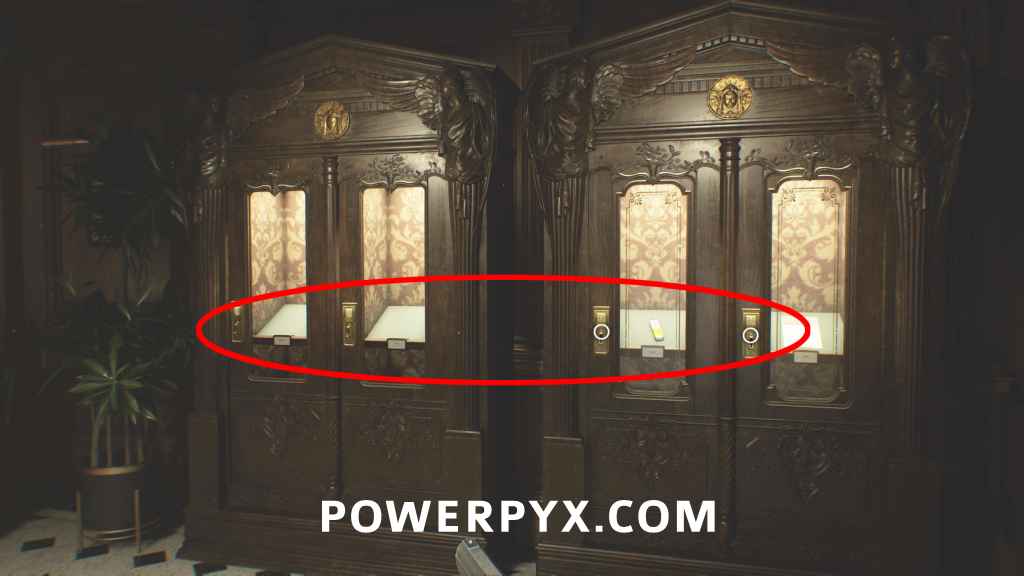
Safe #1 + 3x Antique Coin (#5-#7)
Bar & Lounge: On the bar counter behind the enemies.
Combination (Casual) = Left 10 – Right 80 – Left 30. Contains 3 Antique Coins.
Combination (Insanity) = Right 20 – Left 50 – Right 30.
(Normally you’d find the code later from File “Bar & Lounge Safe Code“, but can already open it now)
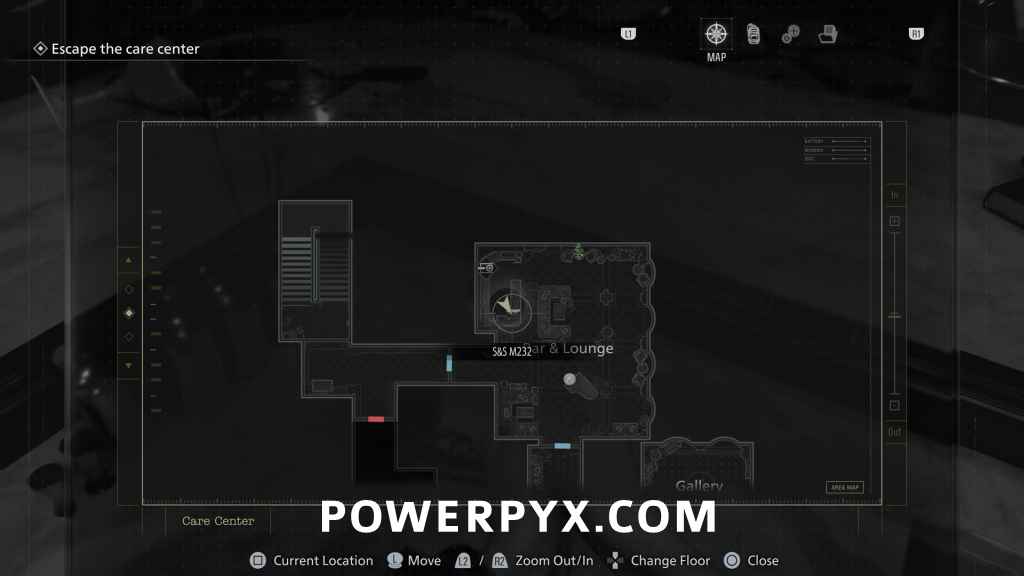
Weapon: S&S M232
Bar & Lounge: On the bar counter. This pistol is slightly stronger than the previous one, so its recommended to switch to it.
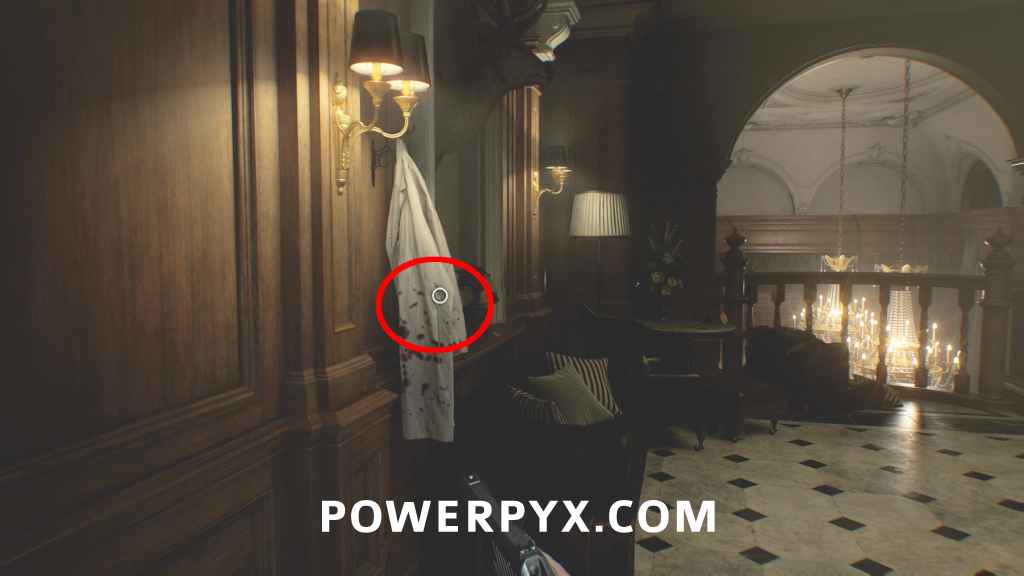
File #11 – Folded Note
Gallery: After going through Bar & Lounge, follow the corridor and turn left, inspect the white coat hanging on the wall.
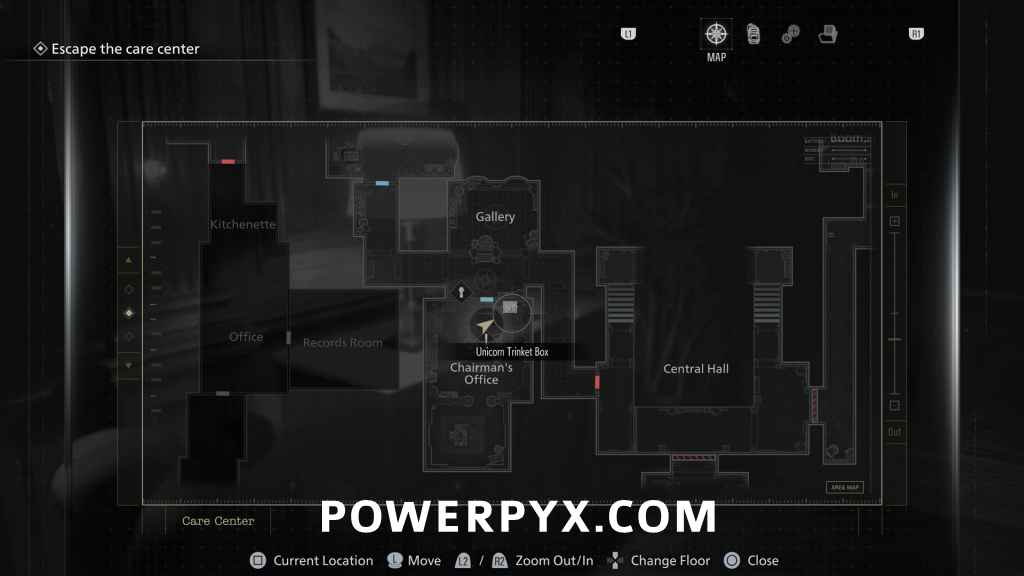
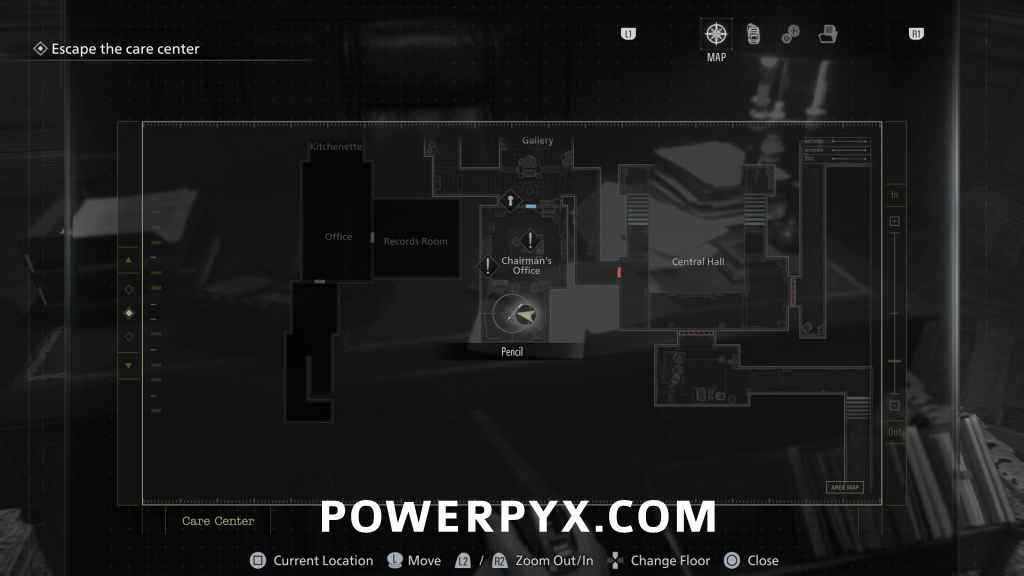
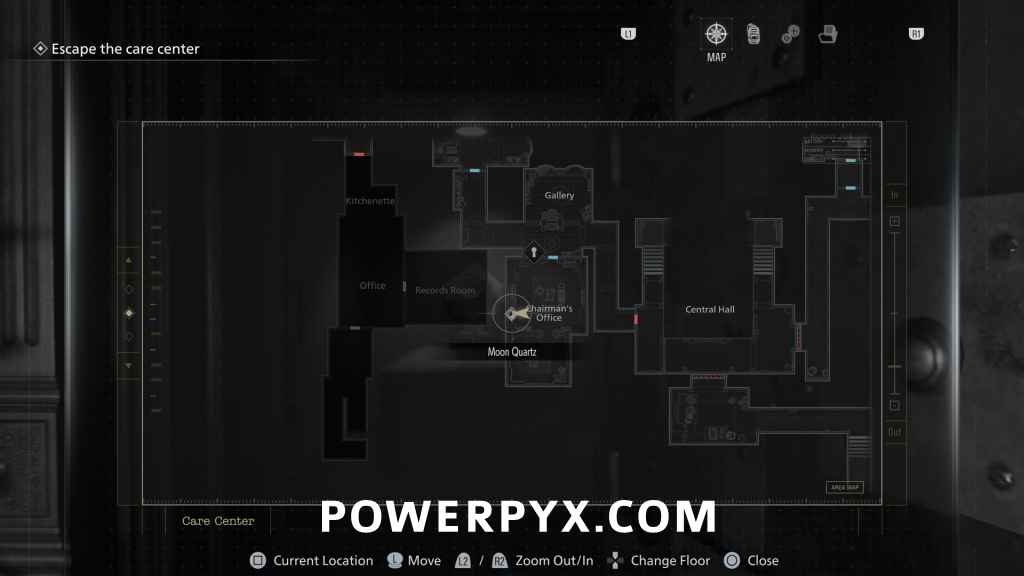
Red Jewel (Unicorn Trinket Box)
Chairman’s Office: In the left corner of Chairman’s Office (dark room).
(On Insanity difficulty this is slightly moved to the back of Chairman’s Office where a zombie is)
File #12 – Copy of an Email to a Manager
Chairman’s Office: Same room, on the cupboard.
File #13 – Note to a Chairman
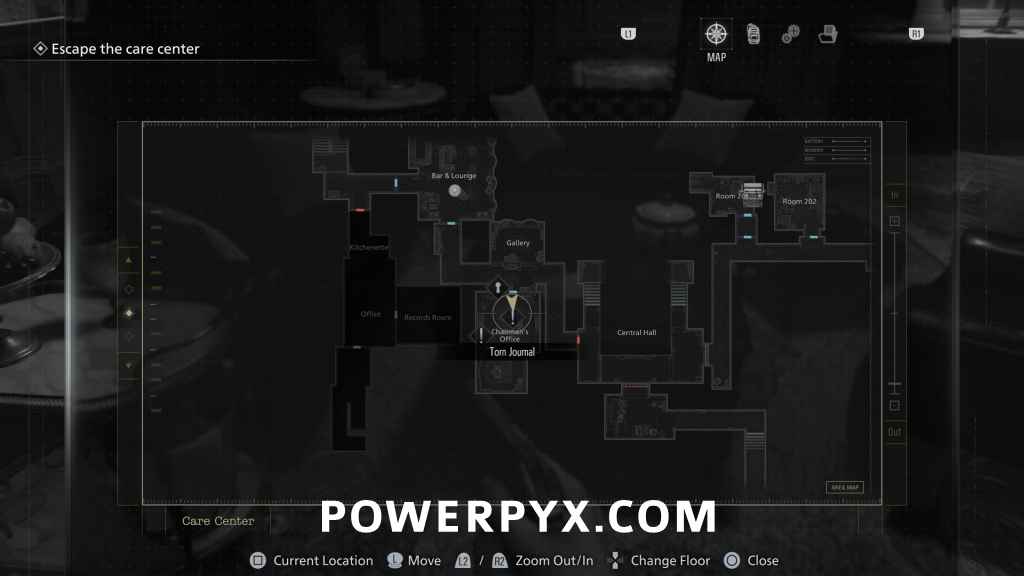
Chairman’s Office: In the backroom of the Chairman’s Office where a zombie is, inside the trash bin.
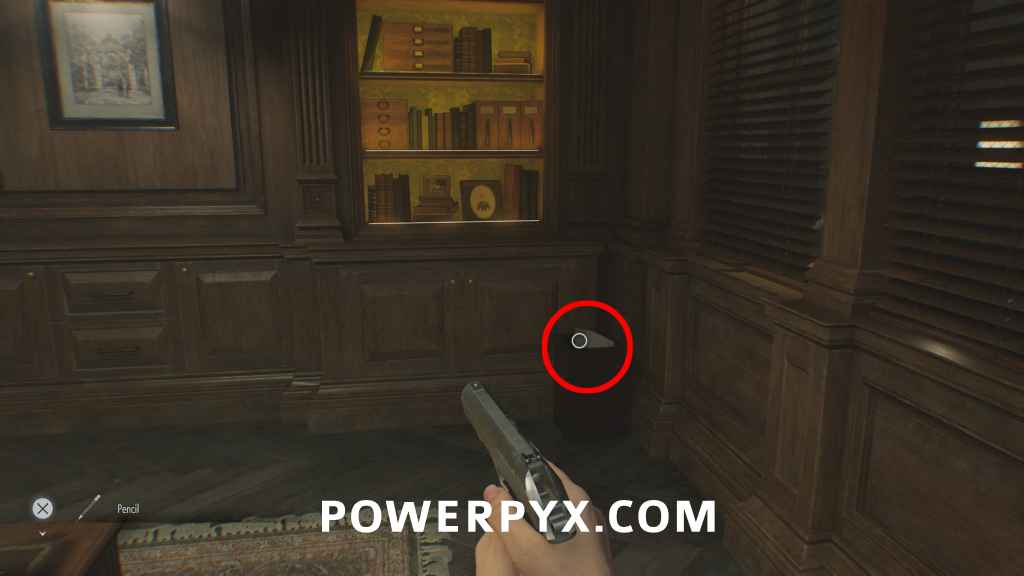
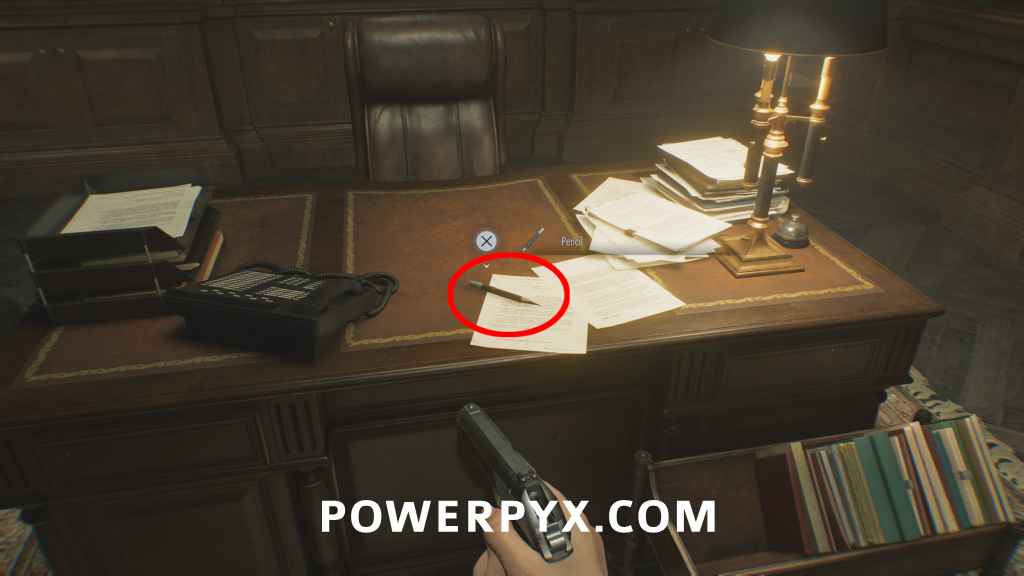
Key Item: Pencil
Chairman’s Office: Same room, on the table.
File #14 – Chairman’s Note
Chairman’s Office: You will receive it after using the Pencil to shade in the note in the Chairman’s Office. You can open the box without doing this, so make sure to still do this for the file.
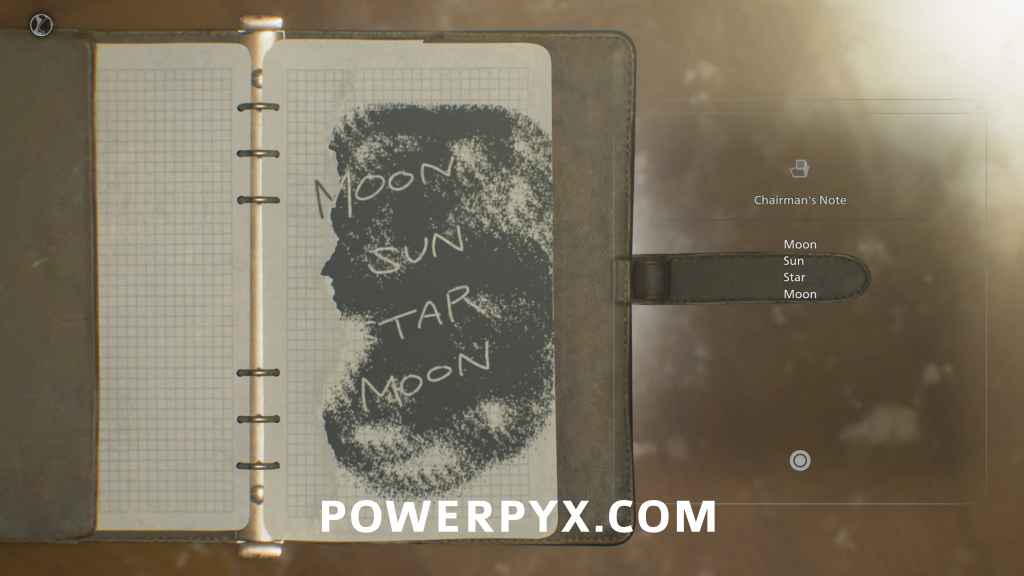
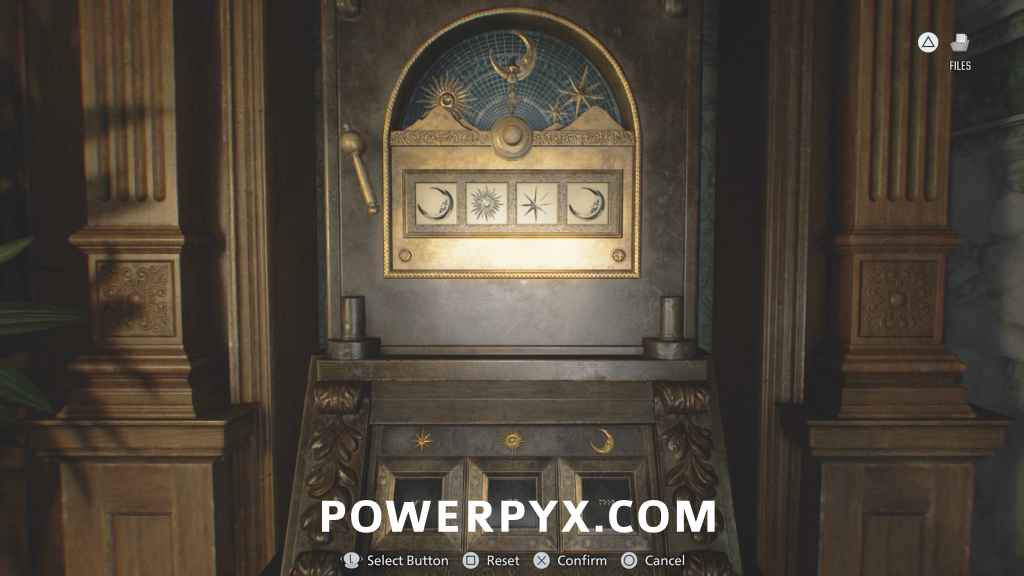
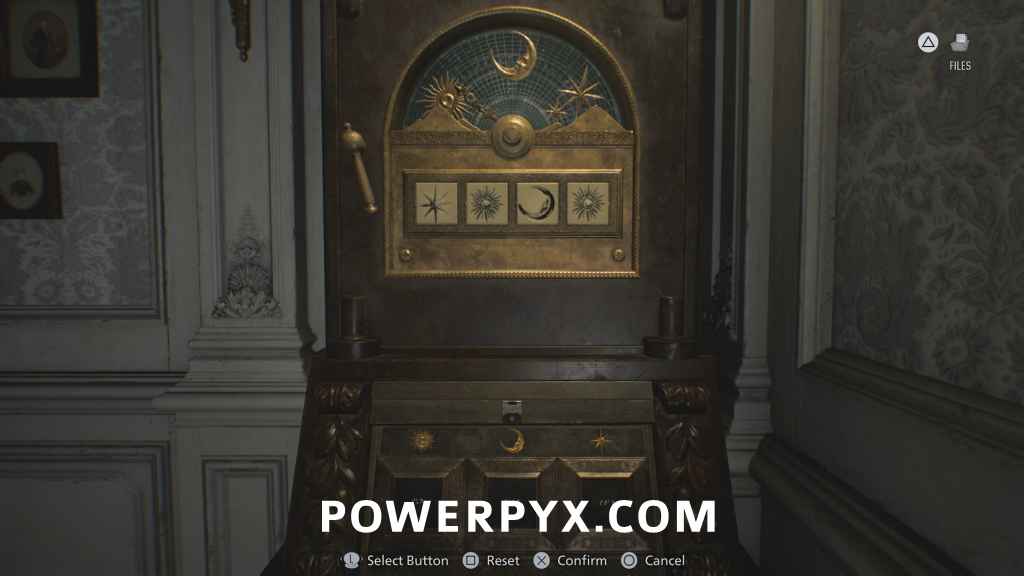
Key Item: Moon Quartz
Chairman’s Office: In same room interact with the puzzle safe. To be used on the Quartz Door in Central Hall.
Solution = Moon – Sun – Star – Moon.
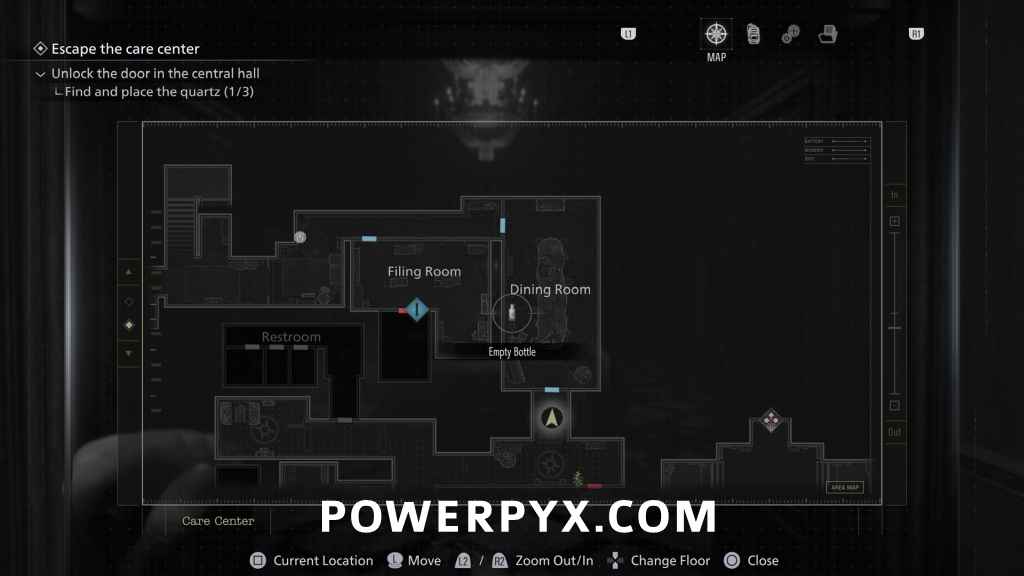
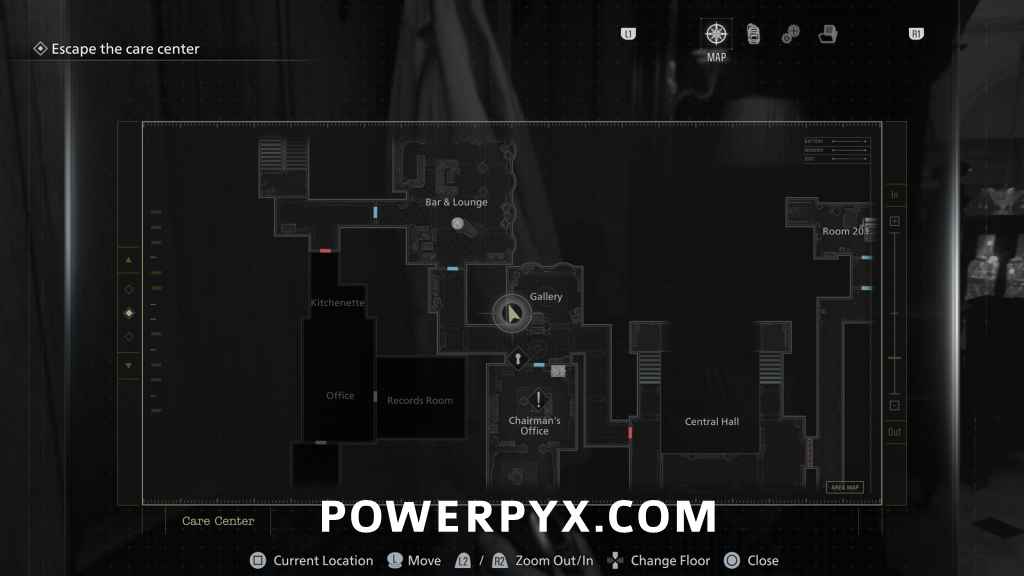
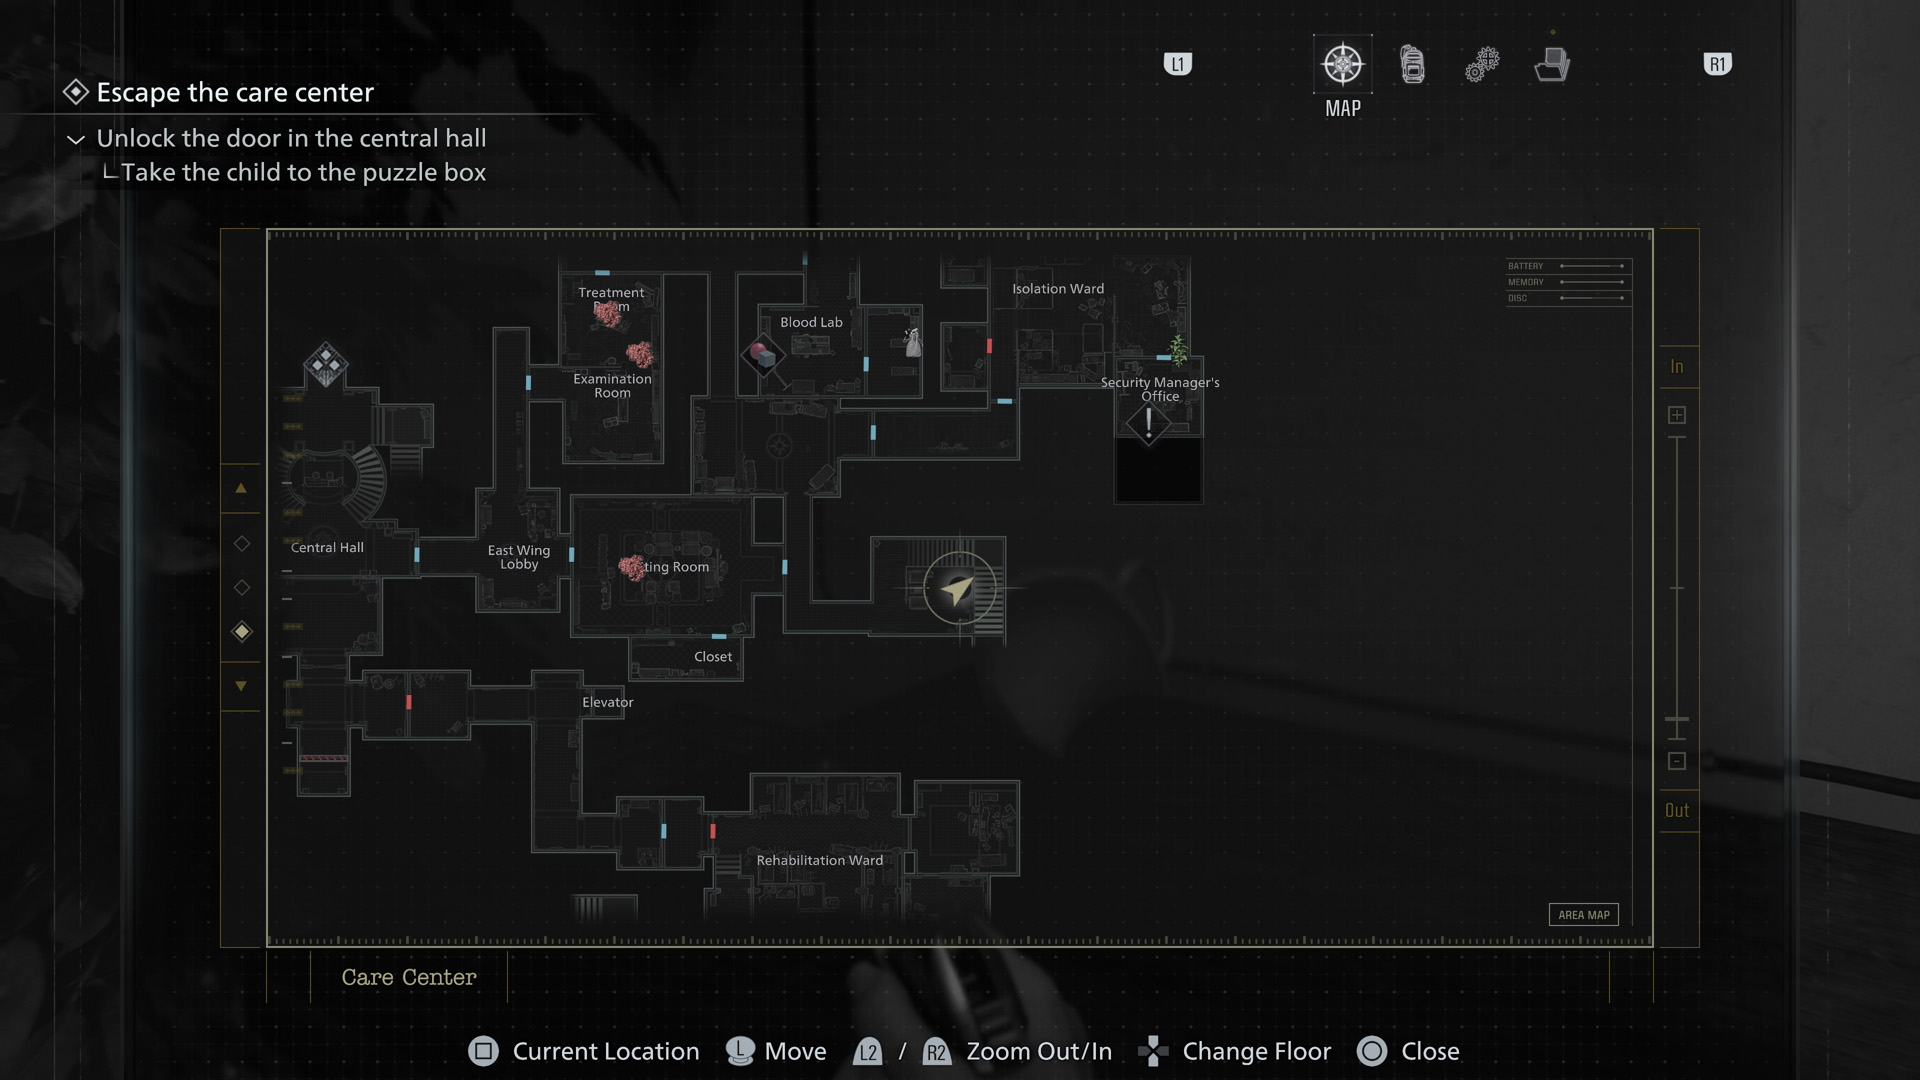
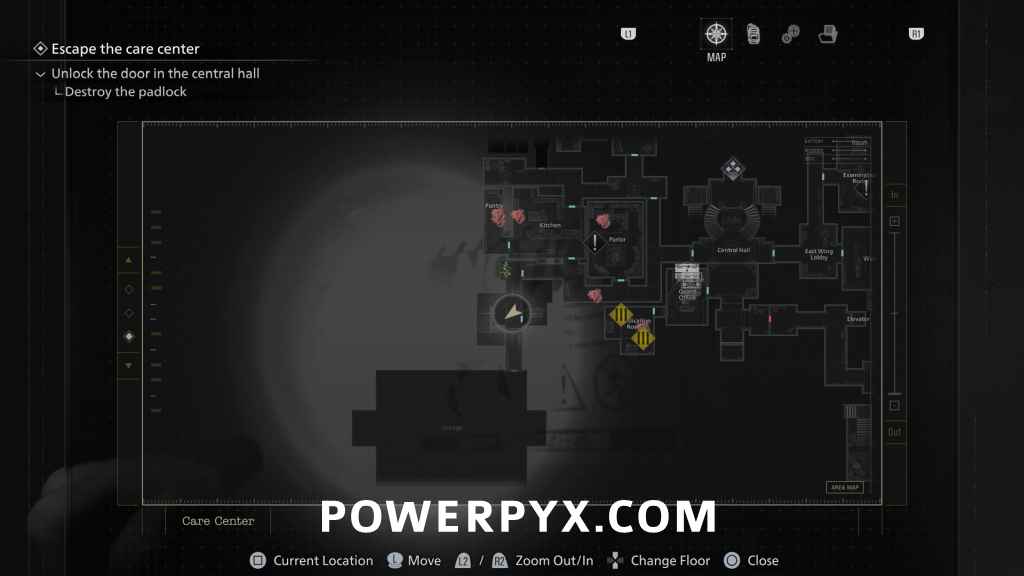
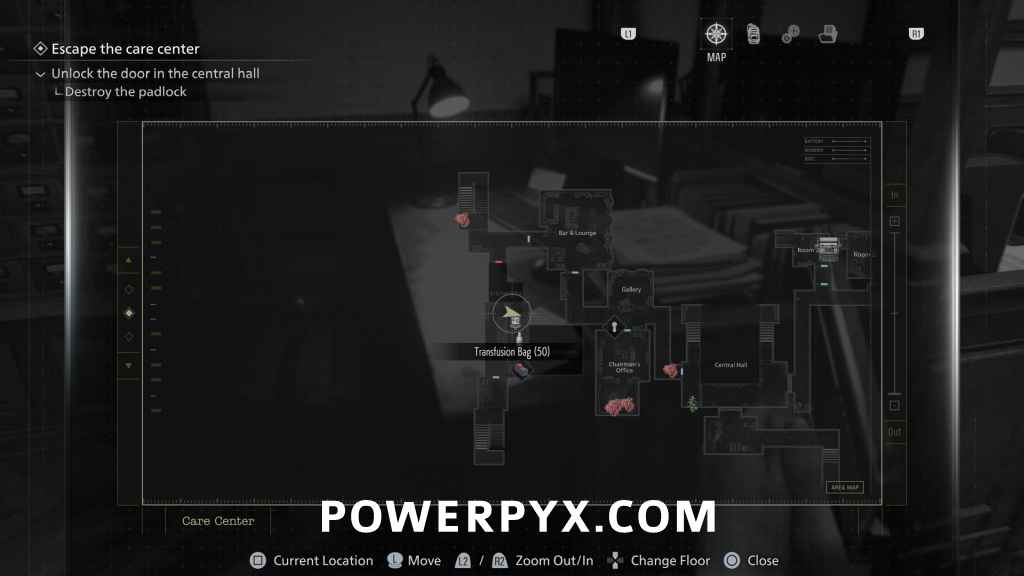
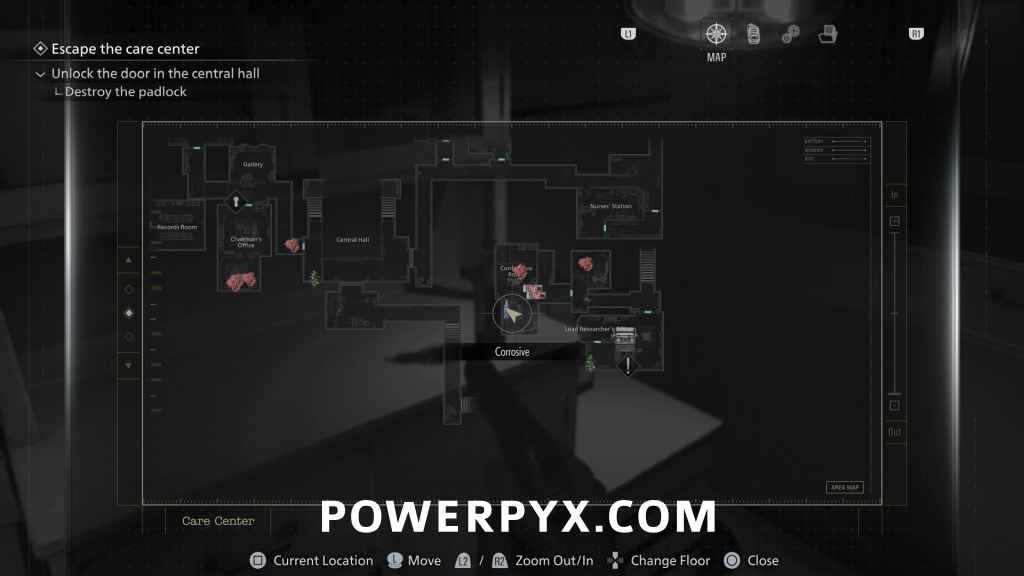
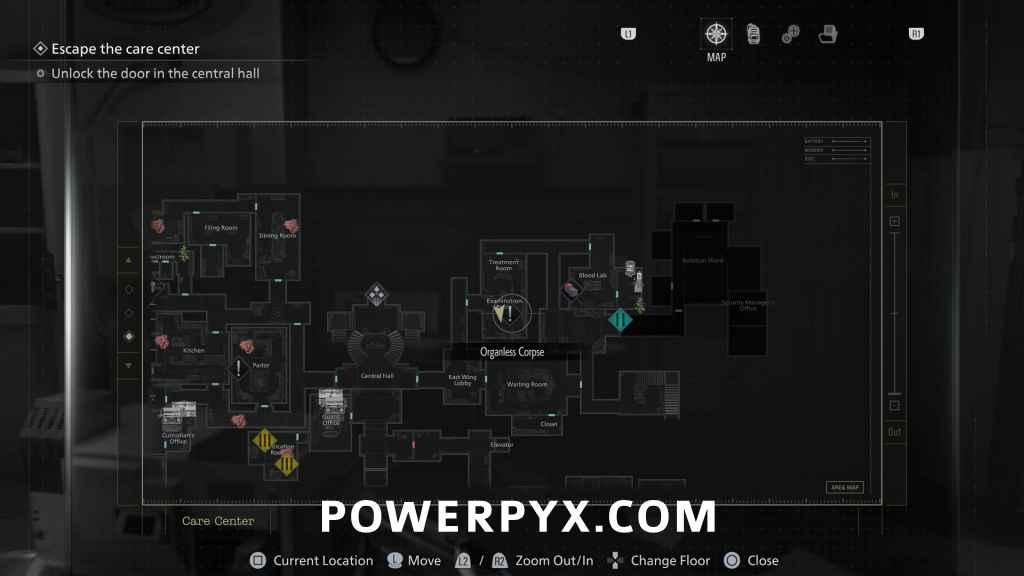
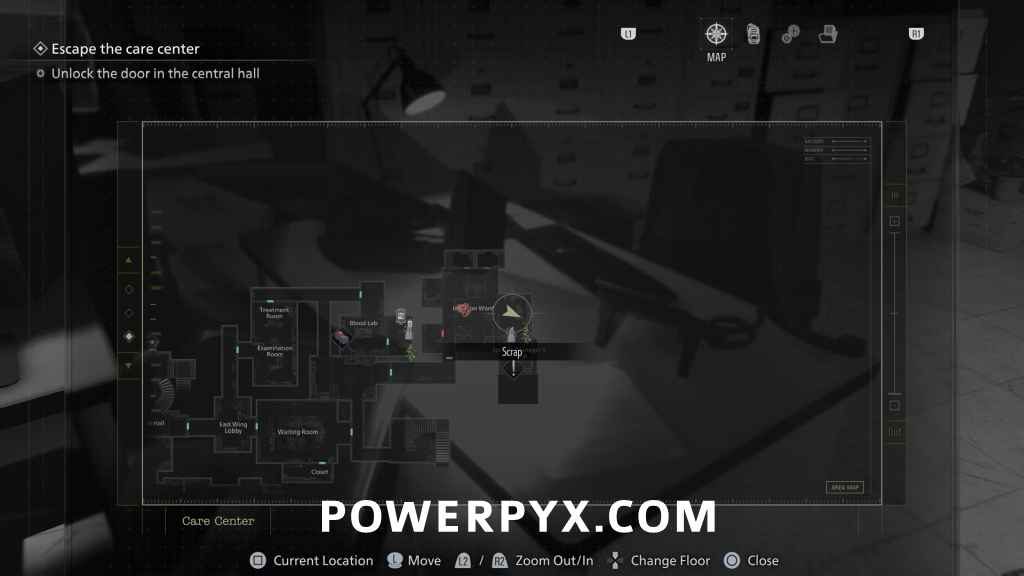
Unlock the Door in the Central Hall
Your main goal is using the three Quartz pickups to open the door in the Central Hall. You can stash these in the item box after picking them up now, or place them in the door after each one you receive.
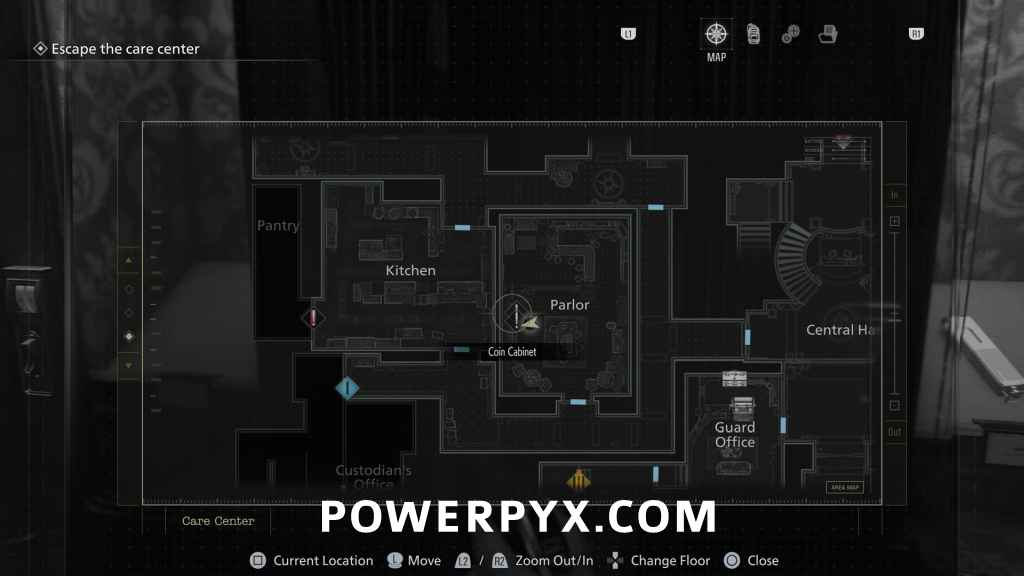
Antique Coin #8
Parlor: Go back downstairs through the West Wing and insert the Red Jewel on the Parlor door. Then find this on the Roulette table.
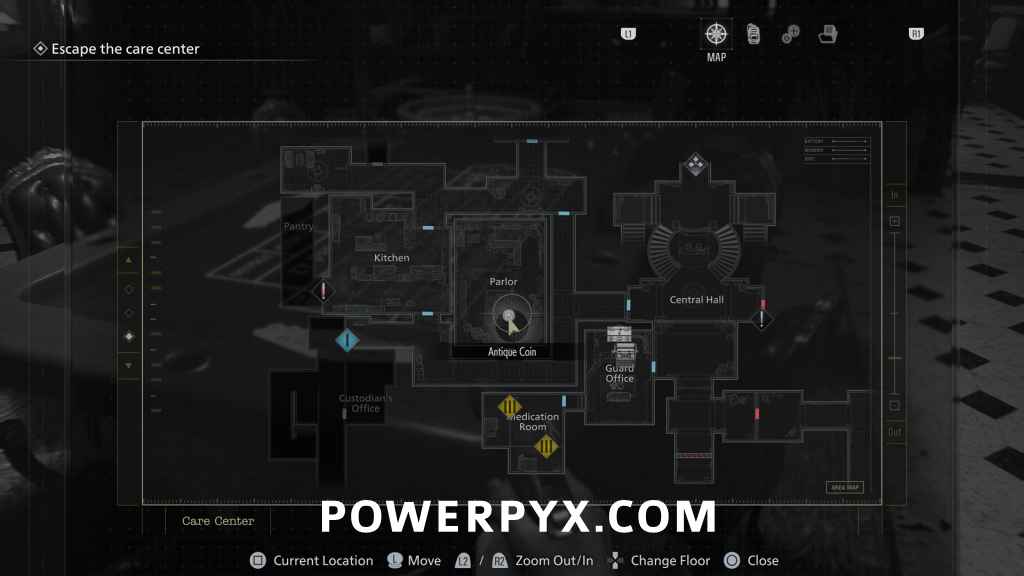
Antique Coin #9
Parlor: Same room, on the bar counter.
Antique Coin #10
Parlor: Next to the previous coin, behind the counter destroy the porcelain container.

Key Item: East Wing Keycard
Parlor: Inspect the severed arm in the back left corner of the Parlor.
Upgrades (x4): Hip Pouch + Stabilizer + Steroids + Override Manual
Obtained from the 4 lockers in the Parlor which require Antique Coins to open. In total all 4 will cost 17 Antique Coins. At this point you should have 9, purchase the Hip Pouch first, then others in your preferred order. Stabilizer is next recommended to help with combat, then Steroids if you are taking a lot of damage. The Override Manual is helpful to avoid a bunch of backtracking once you have the Blood Collector.
(On Insanity difficulty, these items are changed to Hip Pouch + 30x Handgun Ammo + RIP Knife + Override Manual)
Trophy: Order Up! + Key Item: Pantry Key
Defeat the Chef in the Kitchen area, he’s the big guy that walks around with a cleaver. On casual difficulty doing 1 Headshot with Requiem and 4-5 headshots with any other pistol will suffice (on higher difficulties it requires more damage, if you don’t have enough ammo remember to come back for him when you got enough). You can bait the Chef into walking to the hall near the central room and he will stop chasing you when you go through the door, so you can use this to your advantage to avoid him and get free shots in when he stops and turns around.

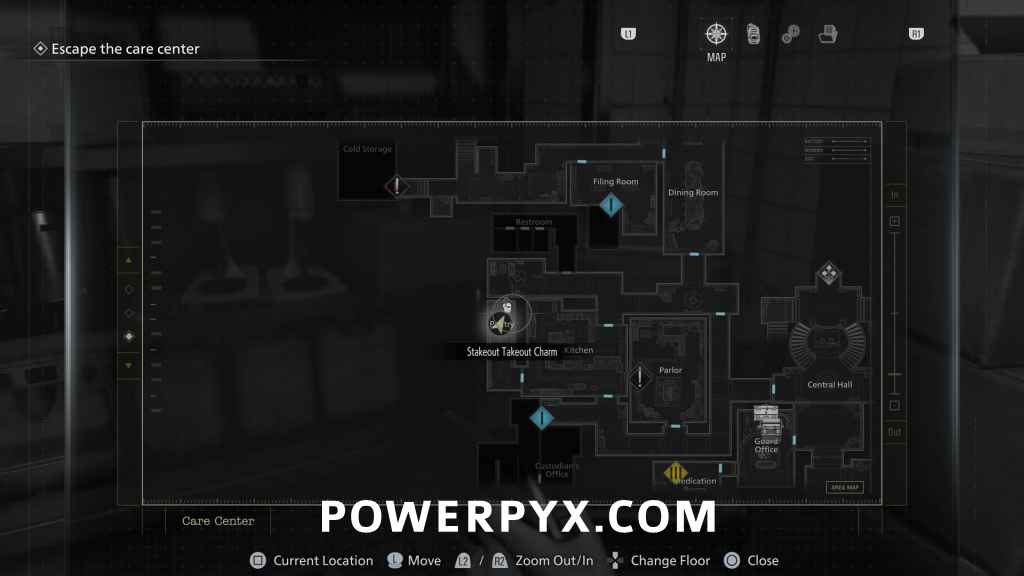
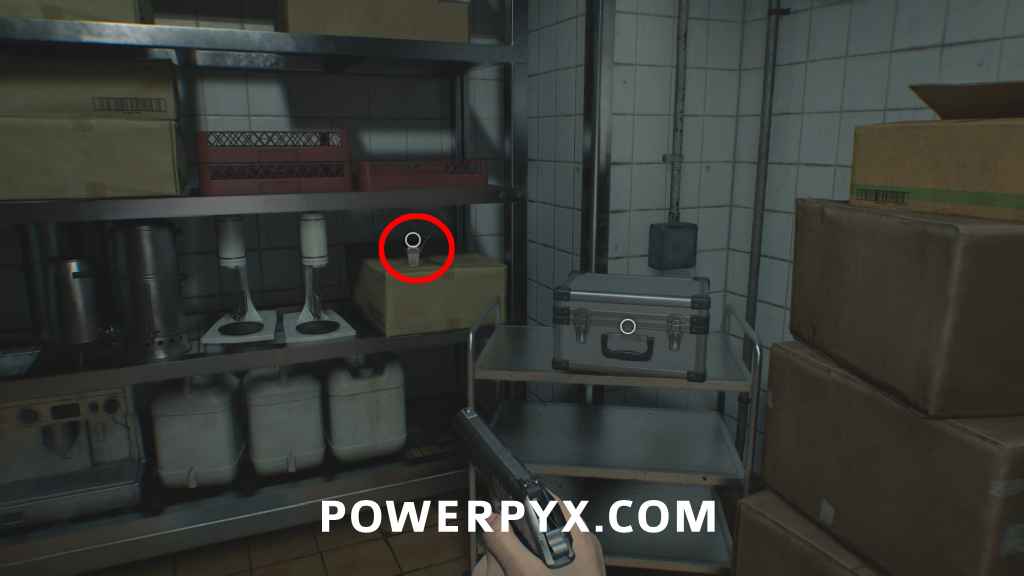
Charm: Stakeout Takeout Charm
Pantry: Use the Pantry Key on the door in the kitchen to reach the Pantry. The Charm is in the back of this room (also a lockbox here with ammo). If you didn’t have enough ammo to defeat the Chef remember to grab this later.
Once you’ve finished cleaning up the items available in the West Wing area you can go use the Moon Quartz on the north door in the central room (to get it out of your inventory so you don’t need to worry about it) then use the East Wing Keycard to progress to the next area.
Mr. Raccoon #2
East Wing Lobby: In Central Hall use the East Wing Keycard on the door, this will be in front of you on the reception desk.
Trophy: Fatal Dose
Examination Room: In Examination Room pick up the “Hemolytic Injector” from the white desk. Sneak up to the next zombies while crouched and press  /
/  from behind while remaining in stealth. This will use the Injector to instakill the zombie and unlocks the trophy. There’s a zombie with his back turned to you directly to the left of where you find the Injector.
After this you should save any Injectors you find for now, as you can use them to take out a strong enemy later. You are prompted to use them on downed enemies to stop them mutating, but there are very few that will do this so for now you’re better off saving any you find or create.
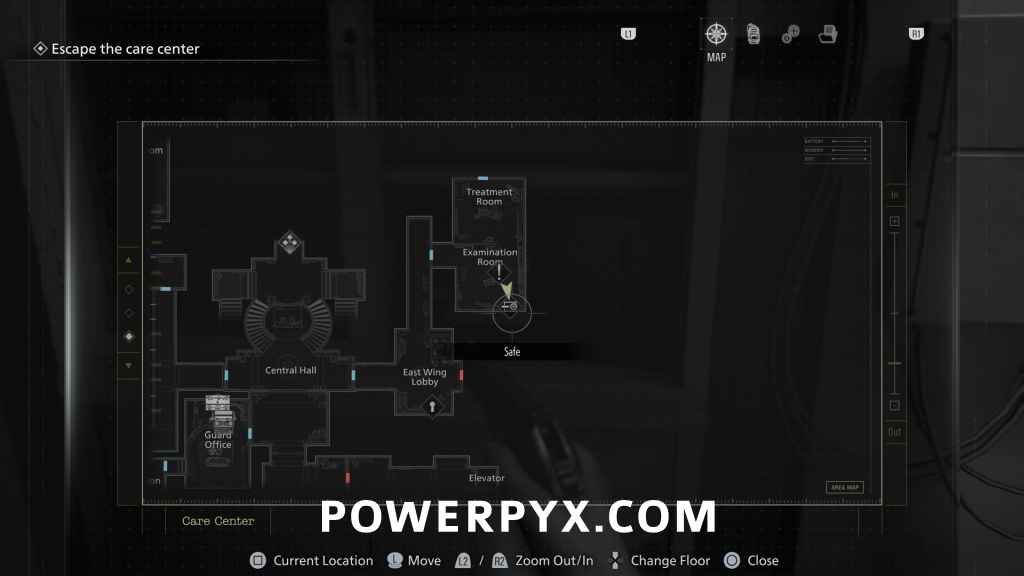
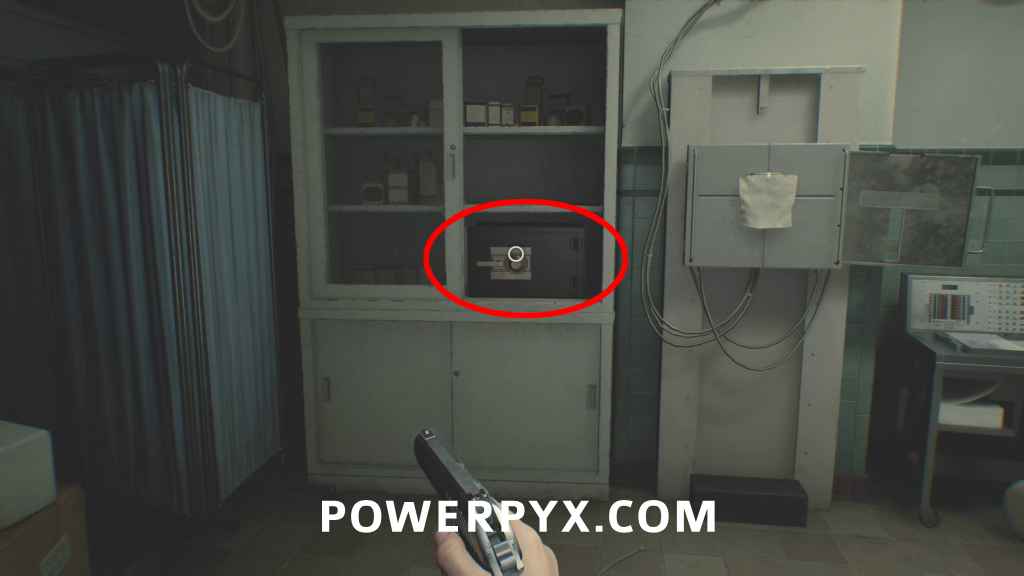
Safe #2 + 3x Antique Coin (#11-#13)
Examination Room: In the corner of the Exam room inside the cabinet you find this safe.
Combination (Casual) = Right 30 – Left 10 – Right 50. Contains 3 Antique Coins.
Combination (Insanity) = Left 50 – Right 30 – Left 90.
(Normally you’d find the code later from File “Examination Room Safe Code”, but can already open it now)
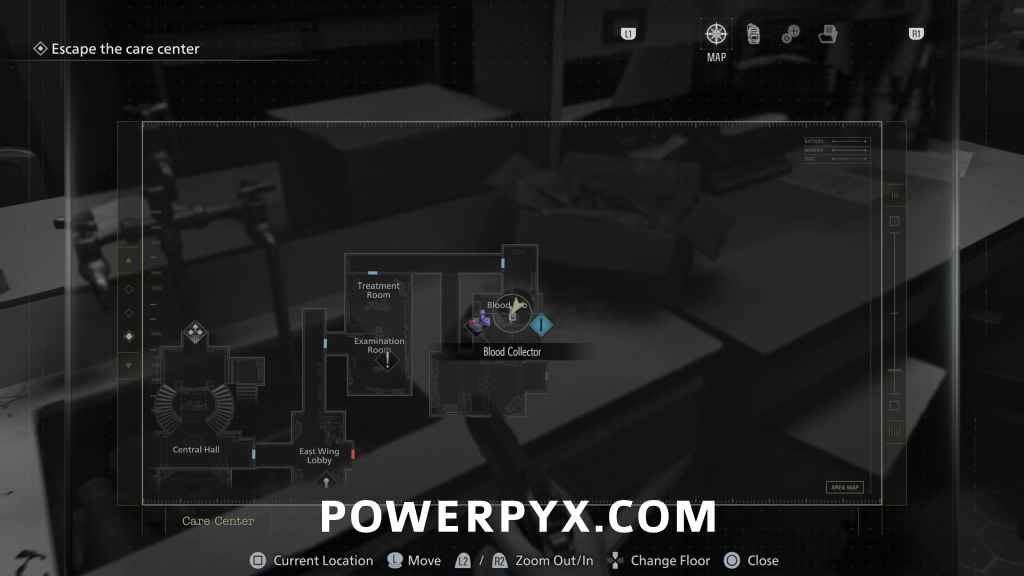
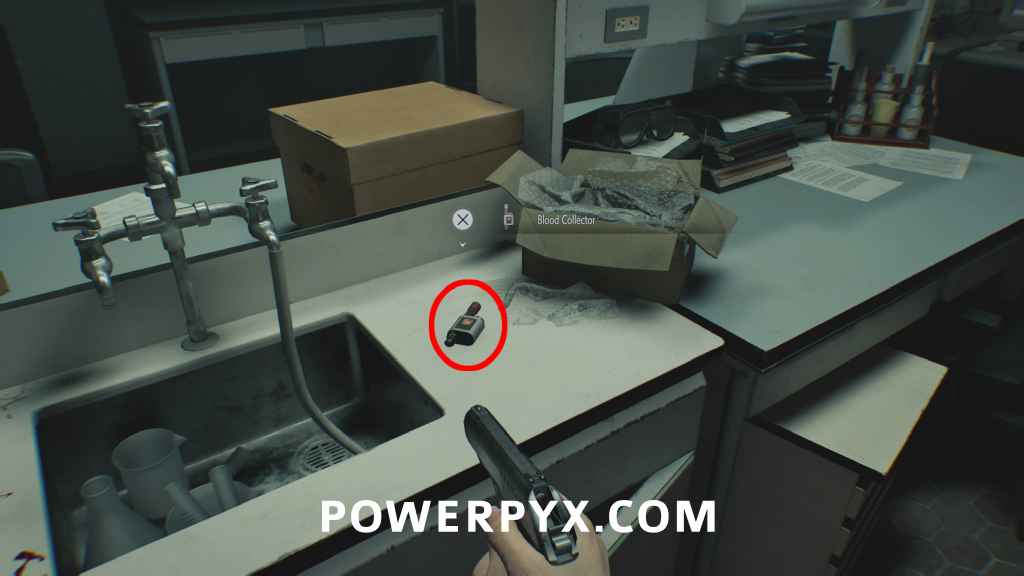
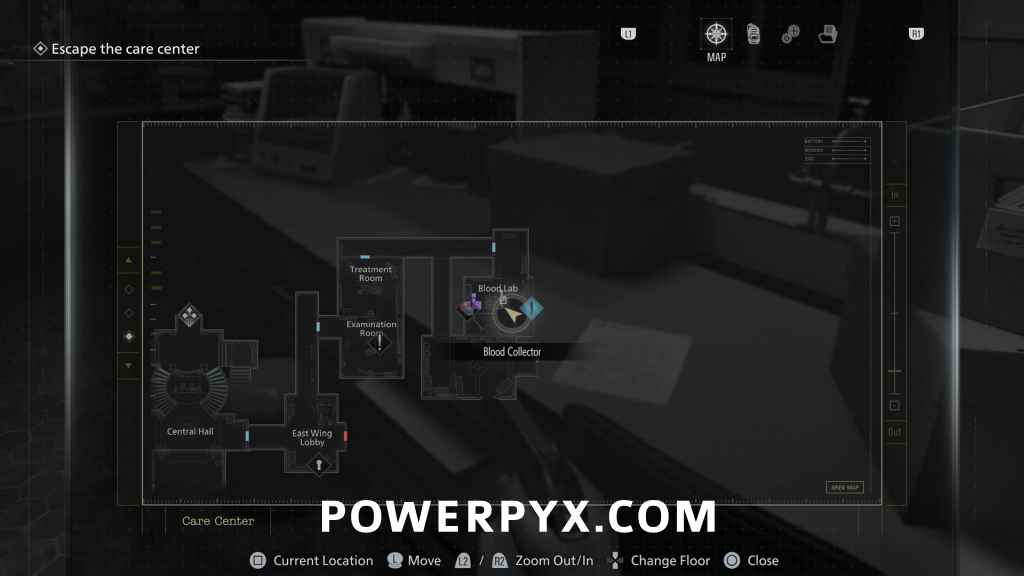
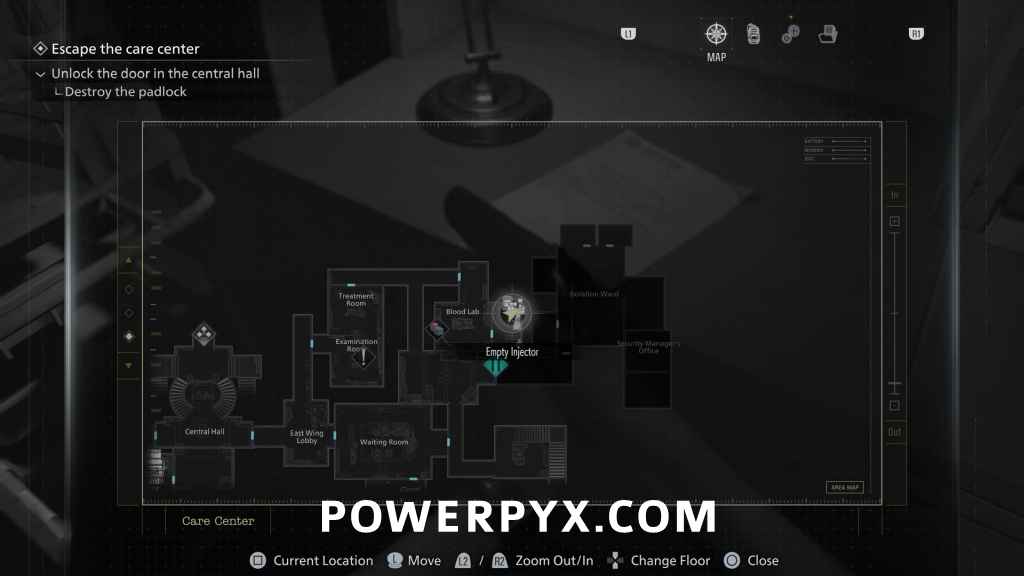
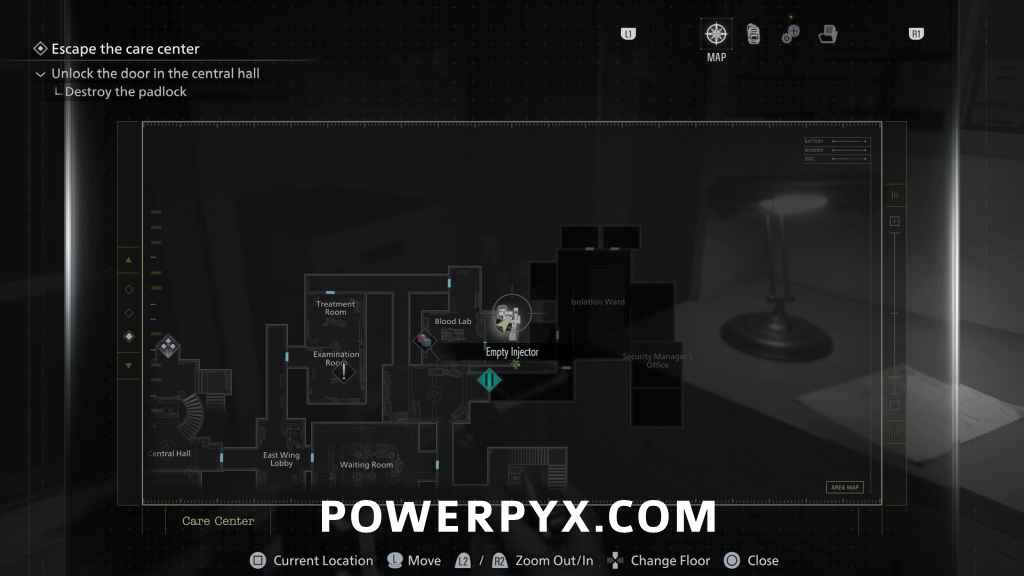
Key Item: Blood Collector
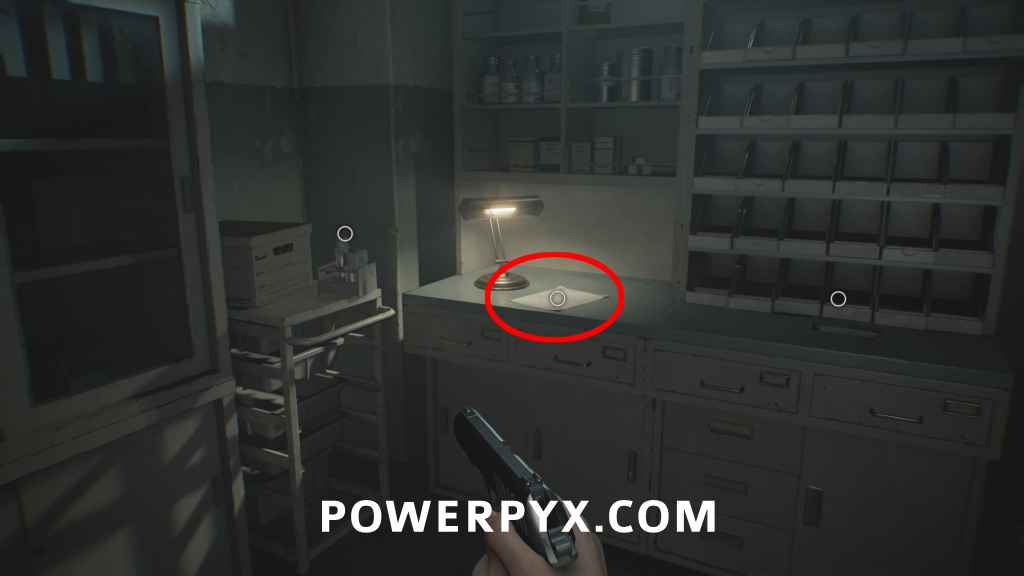
Blood Lab: After leaving the Treatment Room head straight to the end of the corridor to enter the Blood Lab. This sits on the table.
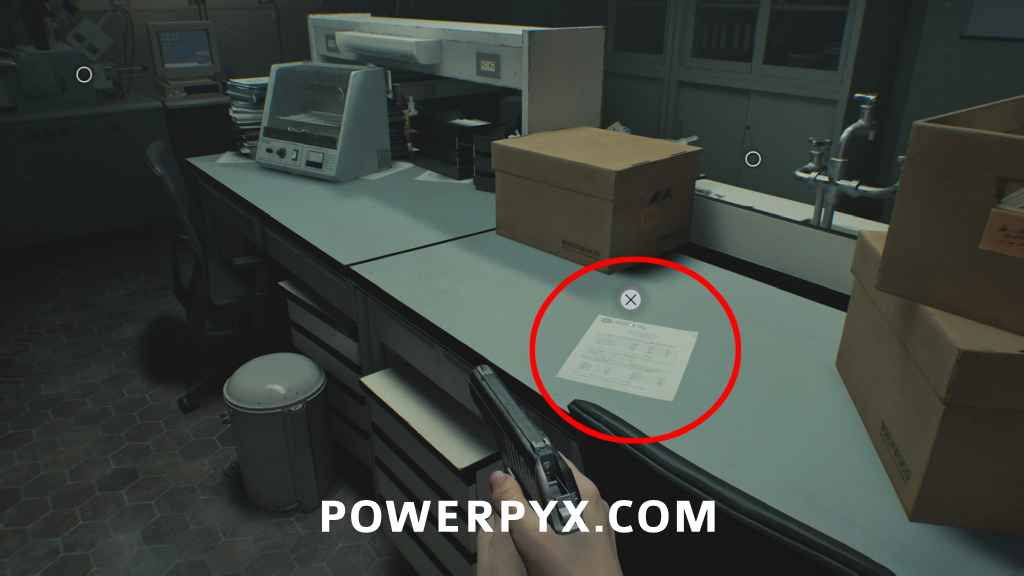
File #15 – Blood Compound Synthesis
Blood Lab: Same room, on the other side of the table.
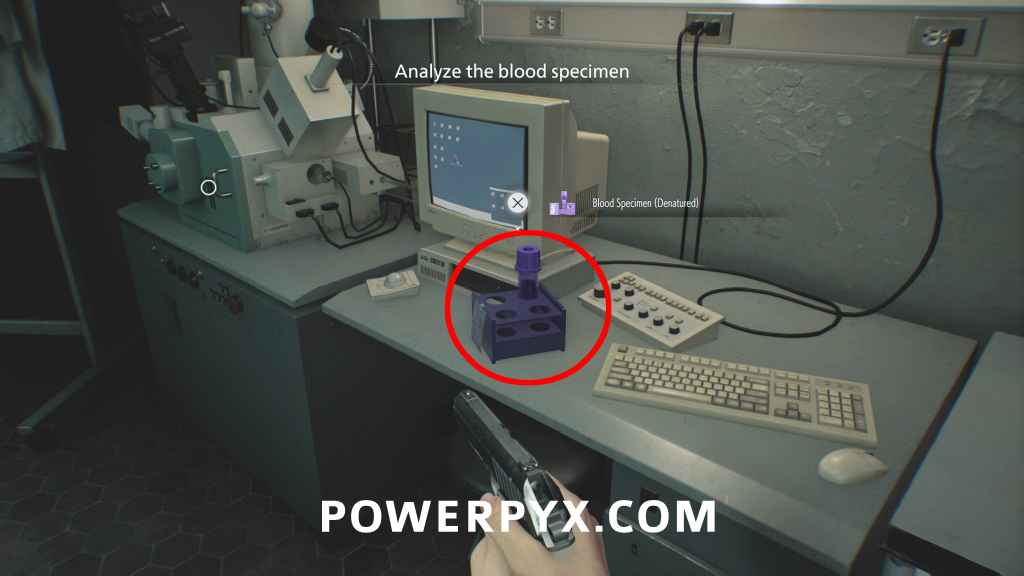
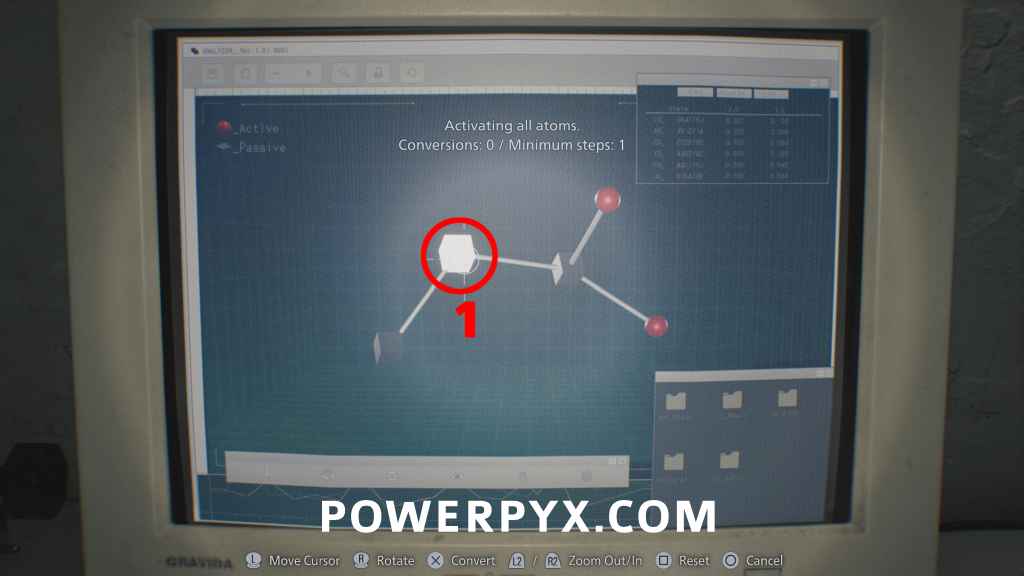
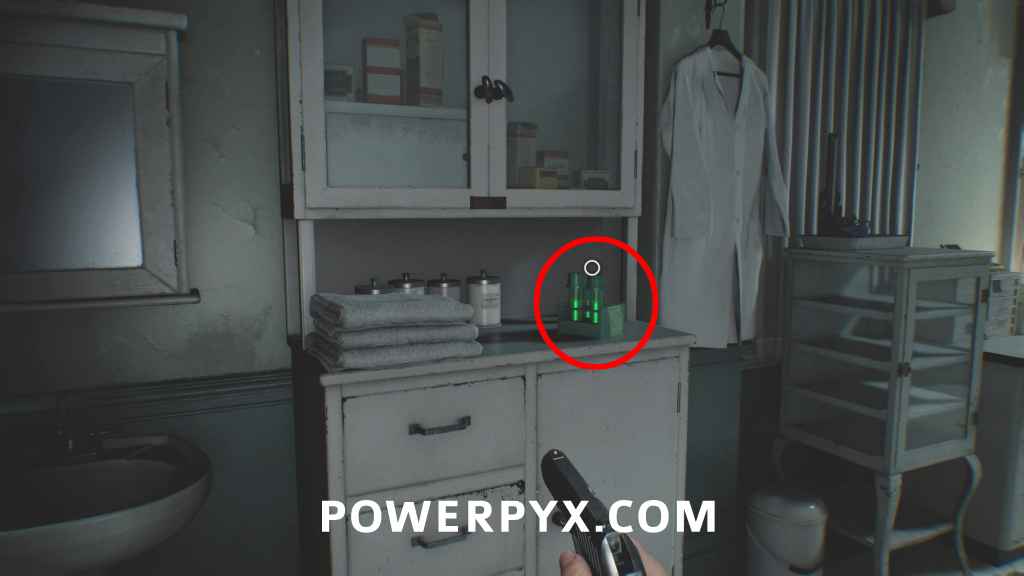
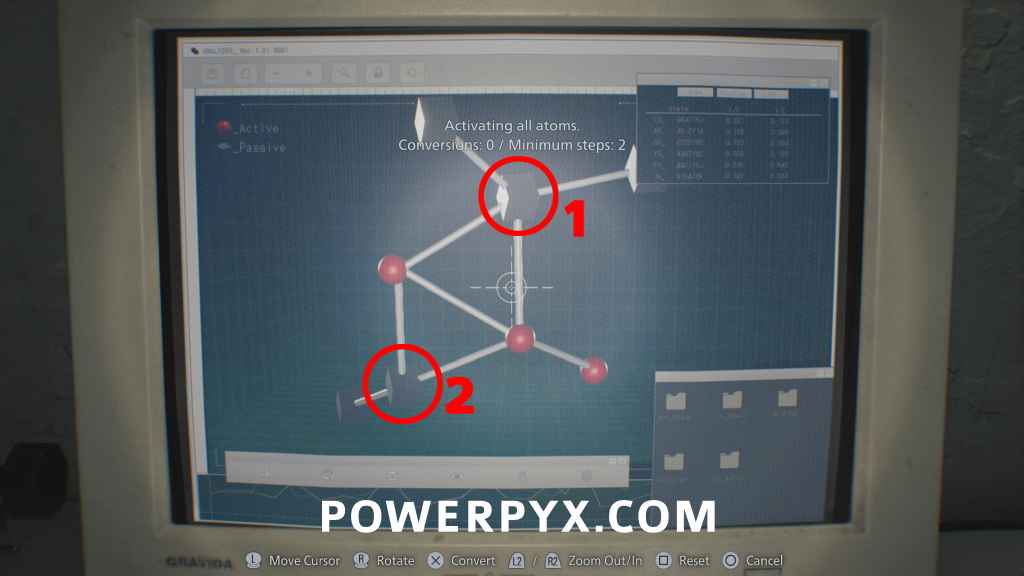
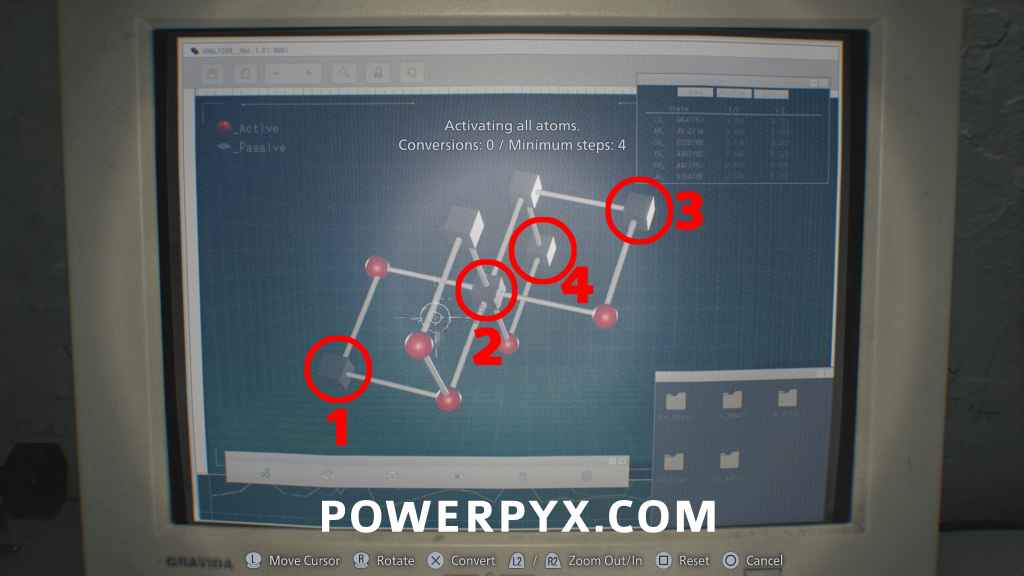
Blood Specimen (Denatured) – Red
Blood Lab: Interact with the purple blood sample on the desk. Use it on the Analyzer to the immediate left. Turn all atoms red. Unlocks crafting: Handgun ammo + Hemolytic Injector.

Trophies: Science! + The Power of Blood
After using the Analyzer to unlock crafting recipes you unlock “Science!”. Then interact with the blood bucket on the floor (or use it on defeated zombies where you can see pickups on the map), press Touchpad to go to the Crafting Menu and craft Handgun ammo to unlock “The Power of Blood” (if you need Scrap, one is found in the locker in the same room).
Blood is a major resource throughout Grace’s section, and you can see all locations of blood you have encountered displayed on the map. You can only hold a limited amount (100 normally and 150 with the Override Manual) so if you want to go out of your way to backtrack you can collect lots of blood and craft many items overall, but this is up to you.
Trophy: Internal Dispute (make a zombie attack another zombie in the hospital wards)
Before going any further, make sure you have the empty bottle in your inventory (was found in Dining Room), and that you made a manual save before going any further. This trophy is tricky and can take several attempts, if you fail will need to reload save. From Blood Lab, go south until you reach a red-lit corridor. 3 zombies will come from the corridor, kill them quickly, then enter the Waiting Room through the door on the right. You have to make the blind zombie (white gown) attack the maid zombie (black dress). Destroy the first vase on the right and hide in the corner, this will lure both zombies to the destroyed vase. When they both stand next to each other, throw the empty bottle at the maid, then the blind zombie will attack her which unlocks the trophy. Don’t have either of them hear your footsteps or they will chase you instead. Also don’t let the maid zombie leave the room. If you kill either zombie before getting this trophy, you’ll miss out on it and need to reload save.
Antique Coin #14
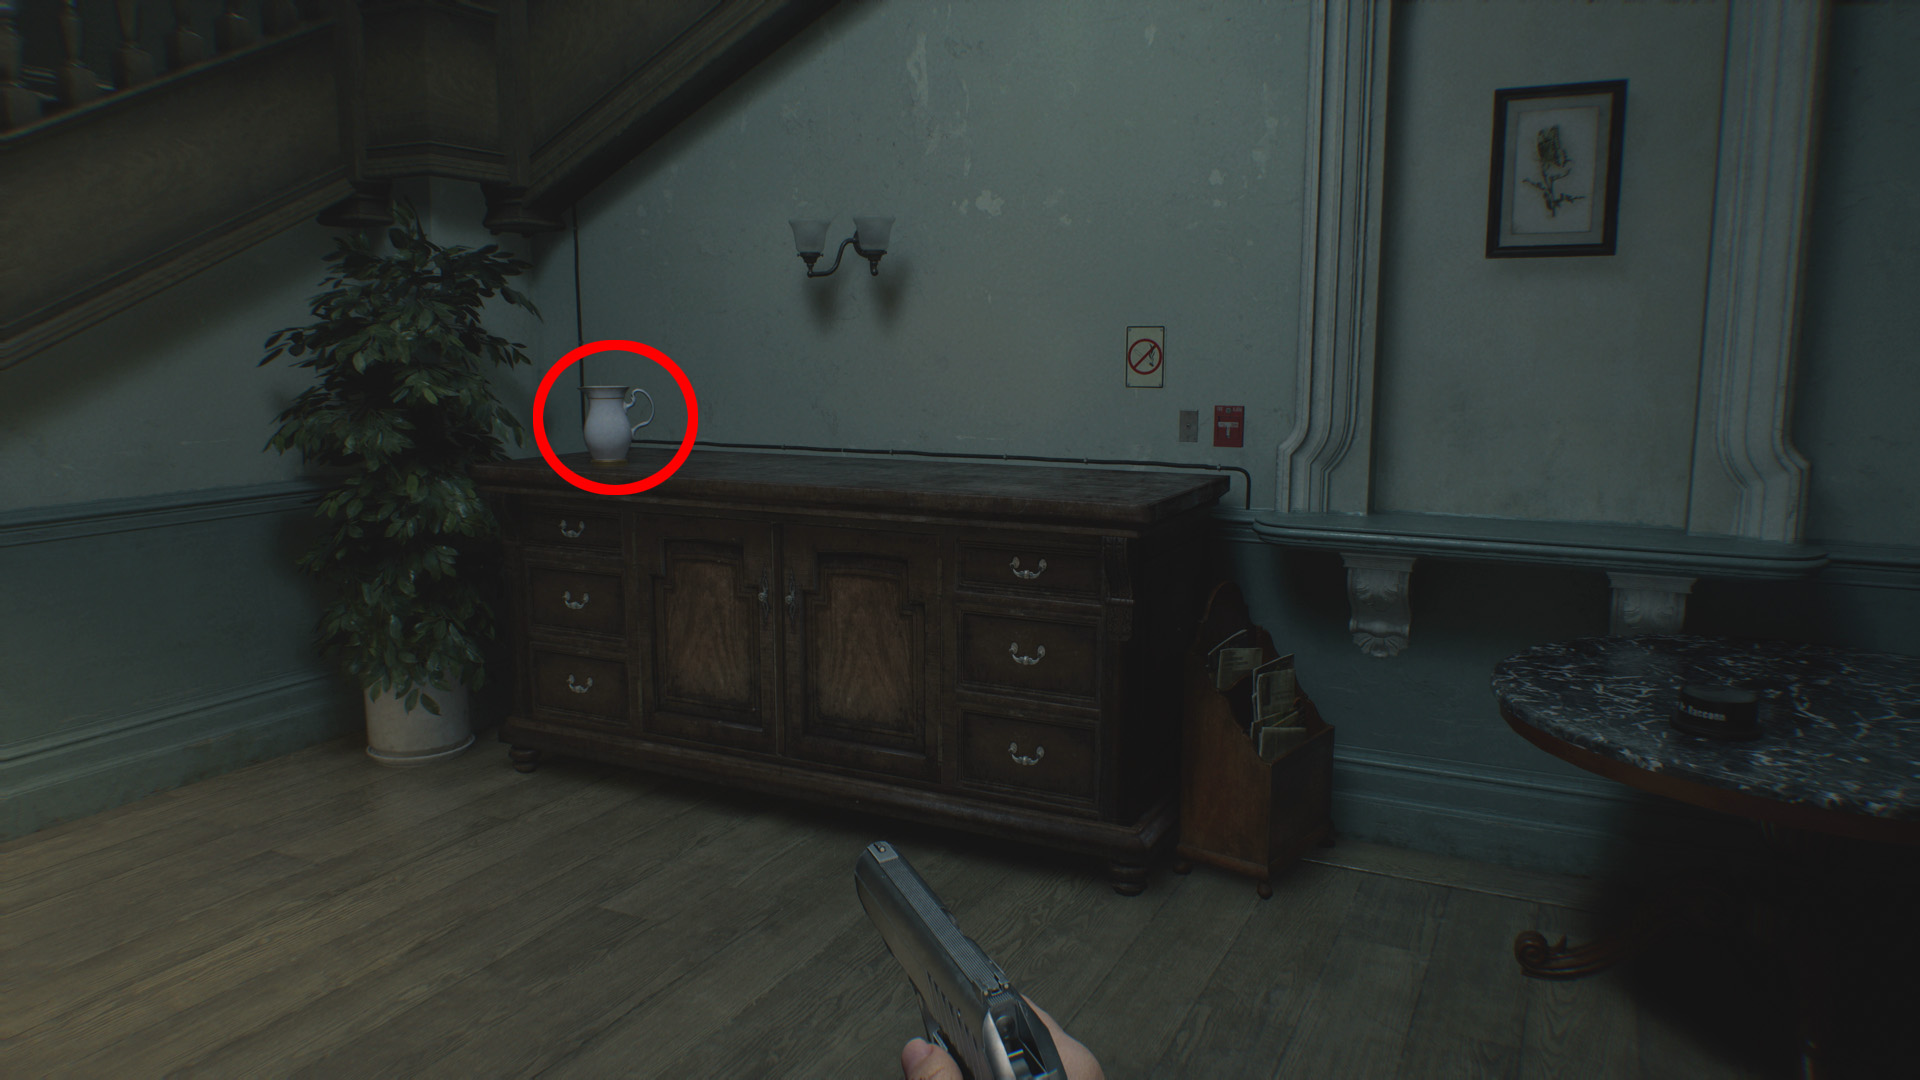
Waiting Room: When you enter the Waiting Room, the coin is on the table in front of you.
File #16 – Safe Replacements
Waiting Room: Same room, next to open safe behind the counter.

Antique Coin x2 (#15-#16)
Waiting Room: Inside the open safe, directly next to the file.

You can go through the door on the opposite side of the waiting room for a shorter path back to the central area and the save room.
Mr. Raccoon #3
At the end of the corridor east from Waiting Room on the map, before going upstairs.
Antique Coin #17
Directly next to the Mr. Raccoon on the small table.
Antique Coin #18
Directly next to the previous coin, inside the white vase, must destroy the vase to see it.
Map: East Wing Map
From the Mr. Raccoon go upstairs to find it on the wall.
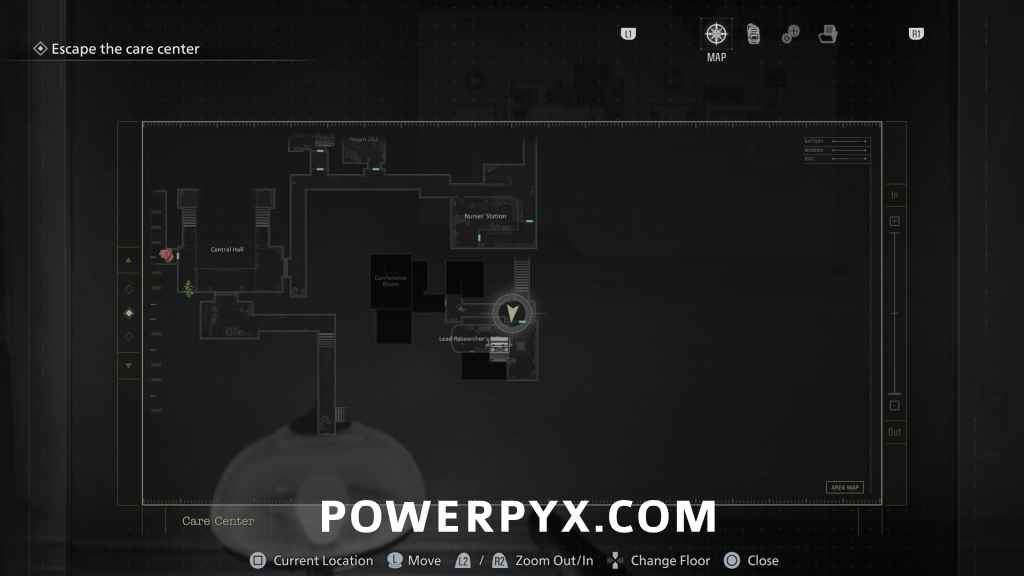
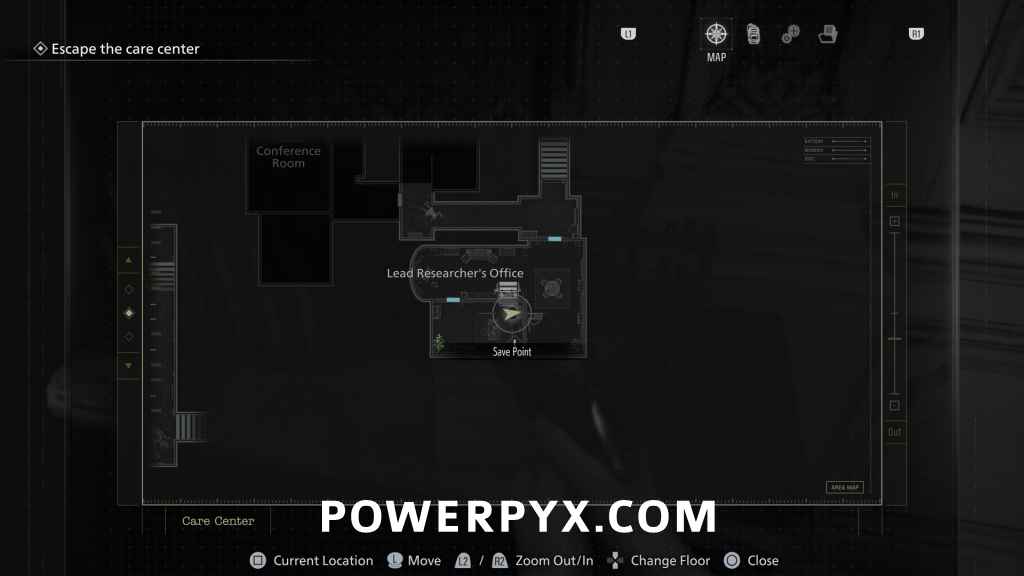
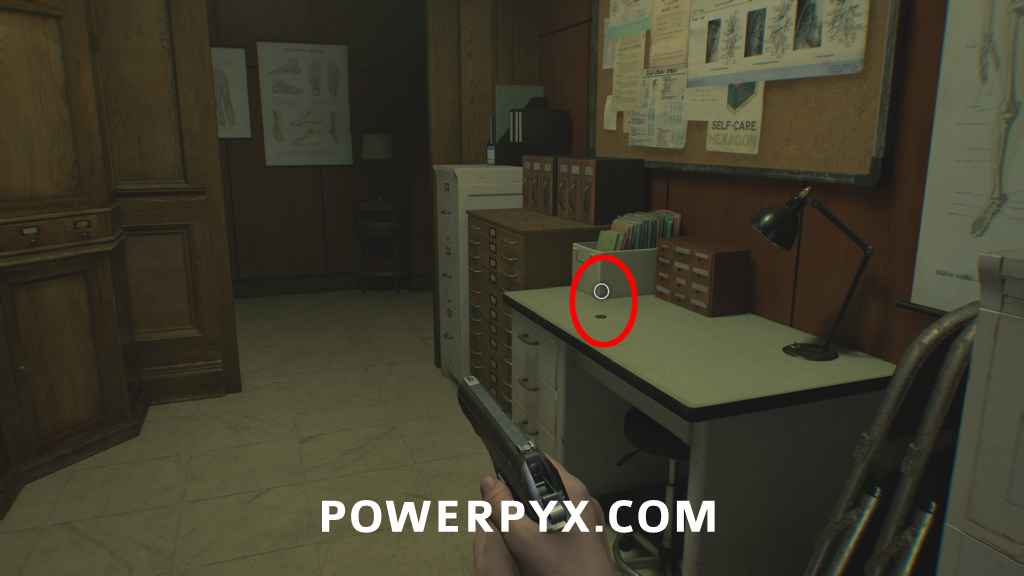
File #17 – Lead Researcher’s Picture 2
Lead Researcher’s Office: In the safe room upstairs, in the back room on the cupboard.
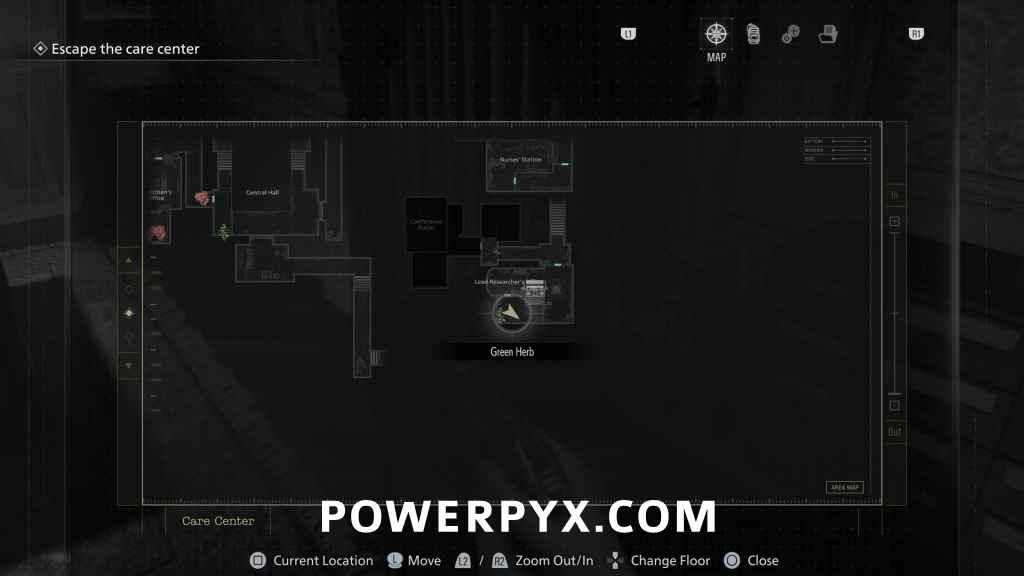
File #18 – Lead Researcher’s Picture 1
Lead Researcher’s Office: same room, on desk.
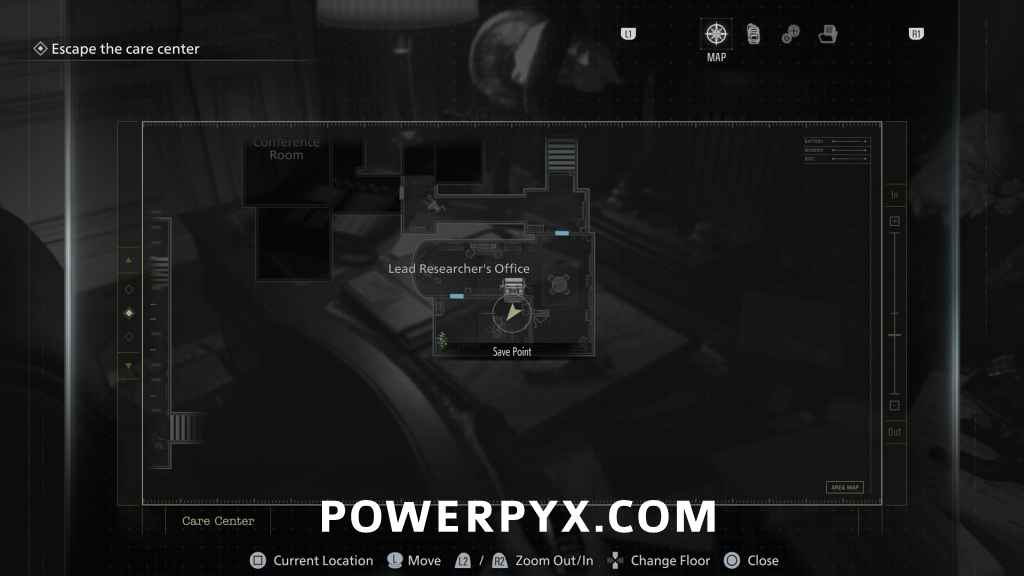

File #19 – Lead Researcher’s Picture 3
Lead Researcher’s Office: same room, on desk (framed picture).
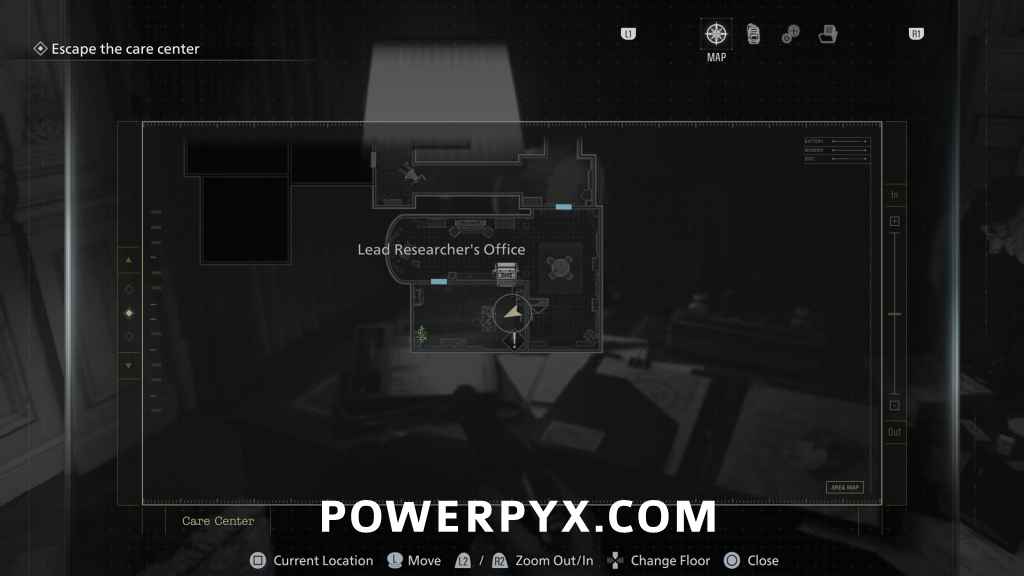
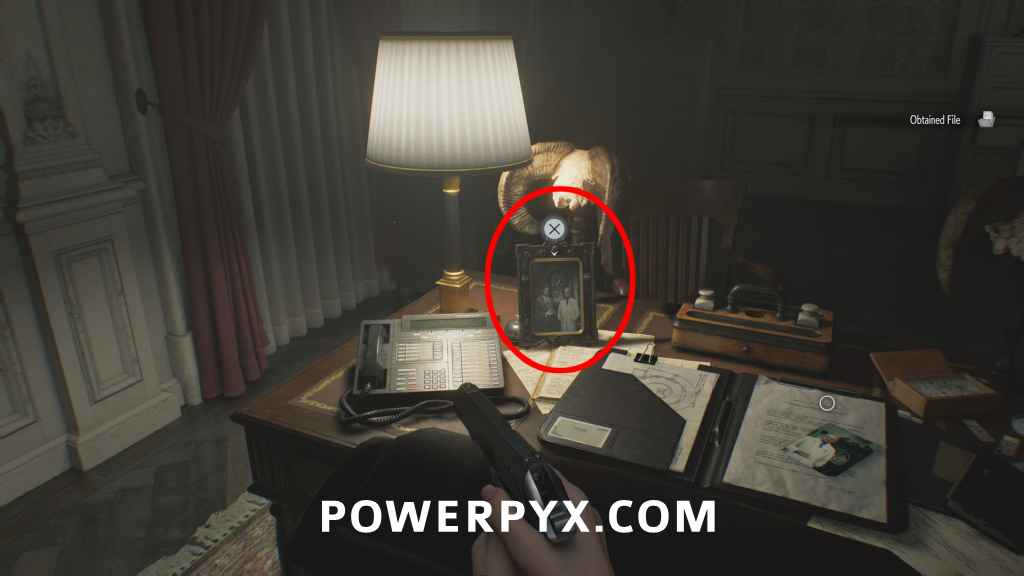
File #20 – Lead Researcher’s Message
Lead Researcher’s Office: Same room, other cupboard.
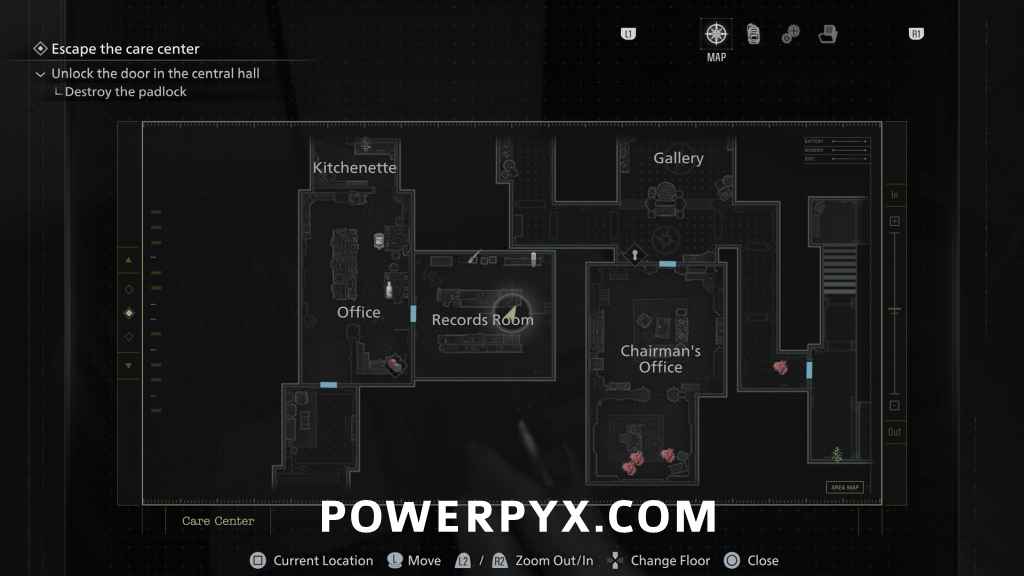
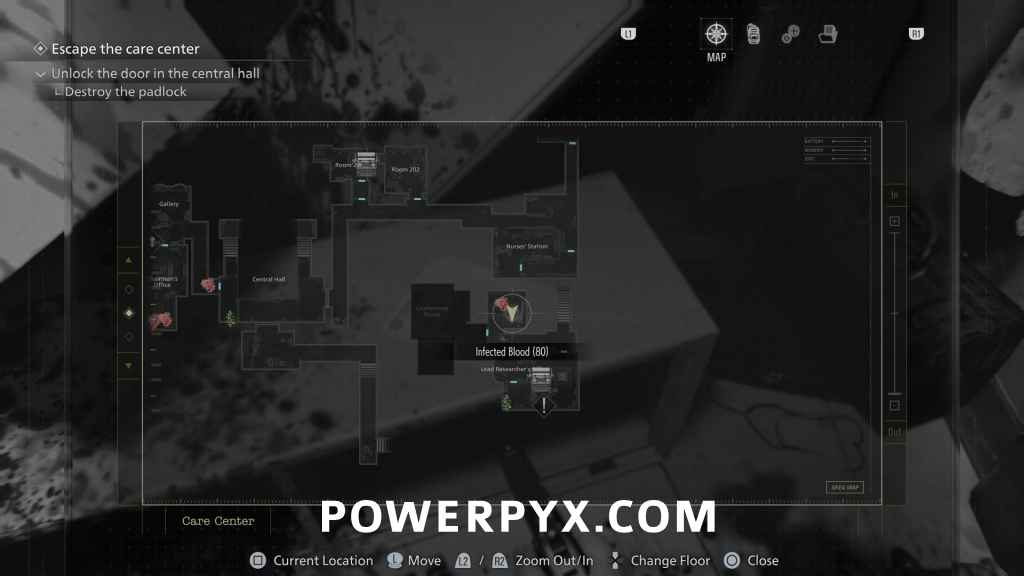
Destroy the Padlock
Trophy: Like Mother, Like Daugther
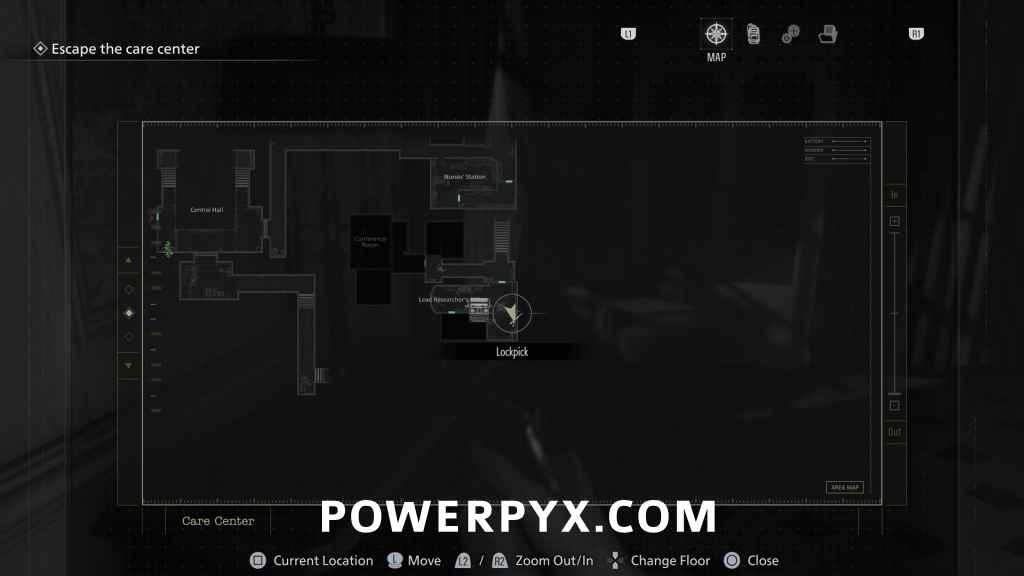
Pick up the Lockpick in Lead Researcher’s Office, to the left of the typewriter. Then use it on any locked drawer, for example in East Wing Lobby. This will also give you a Rare Metal which you can use to craft x2 Requiem ammo to kill the Chunk for the next trophy, so it’s good to grab this now. All locked drawers will appear on your map when you go near them, so if you encounter any other lockpicks you can backtrack to the marked locations. It’s recommended to make all possible Requiem ammo using the Rare Metal over most other items.
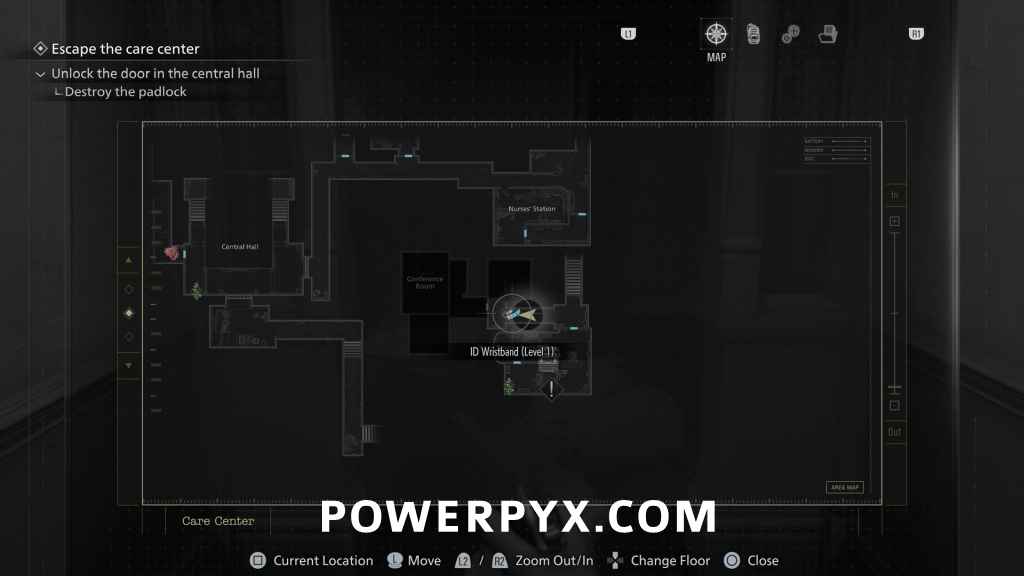
Key Item: ID Wristband (Level 1)
In corridor next to the Lead Researcher’s Office on the ground. Can be used on the blue level 1 doors, the ones you have passed will all be marked on the map now.
Trophy: Grace and Goliath + Charm: Eye Spy Charm
Kill the Chunk that appears after picking up the wristband, drops the charm on death. On casual difficulty it takes 1 Headshot with Requiem + 15 Headshots with S&S M232, or alternatively 3 Requiem Headshots. Can also use Injectors on it. If you looted everything carefully you should be able to craft enough ammo already. If you don’t have enough ammo, come back for it after getting more Requiem ammo. (There will be a reminder in the guide at the last opportunity before leaving the area).
Note that if you don’t kill the Chunk right now and instead run away, it will move around the hallways depending on how far you progress (for example it will be in the hallway around the Blood Lab next). Keep that in mind if you’re purposely avoiding it right now, or are searching for it again.
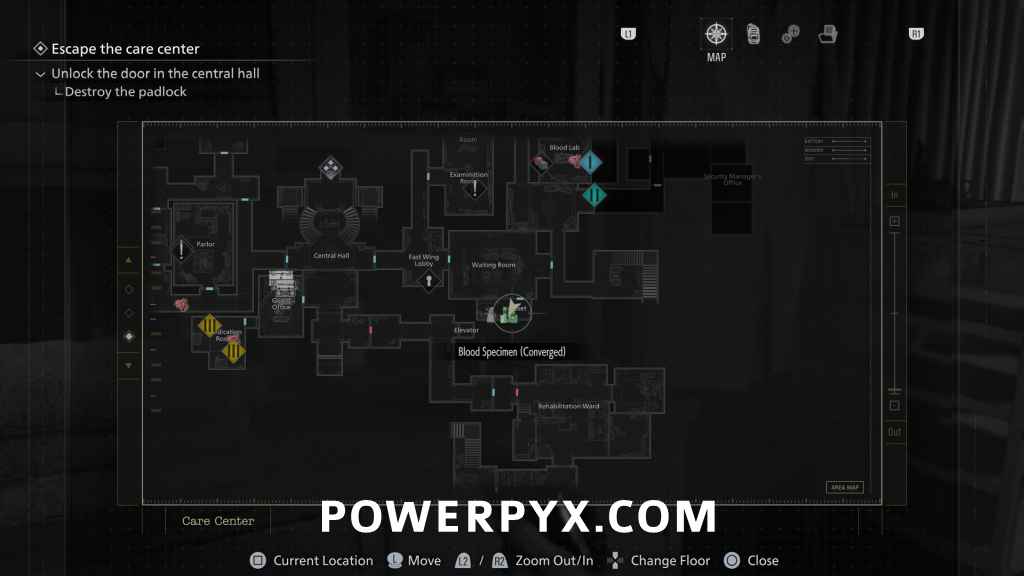
Blood Specimen (Converged) – Green
Closet: After getting the ID Wristband, go downstairs and enter the level 1 door in Waiting Room to the Closet to find this. Remember to backtrack to Blood Lab and use it on the Analyzer. Unlocks Crafting Recipes: Med Injector, 12.7x55mm Ammo.
File #21 – Victor’s Journal Entry
Backtrack to Blood Lab, use the Level 1 door there to find this on a table.
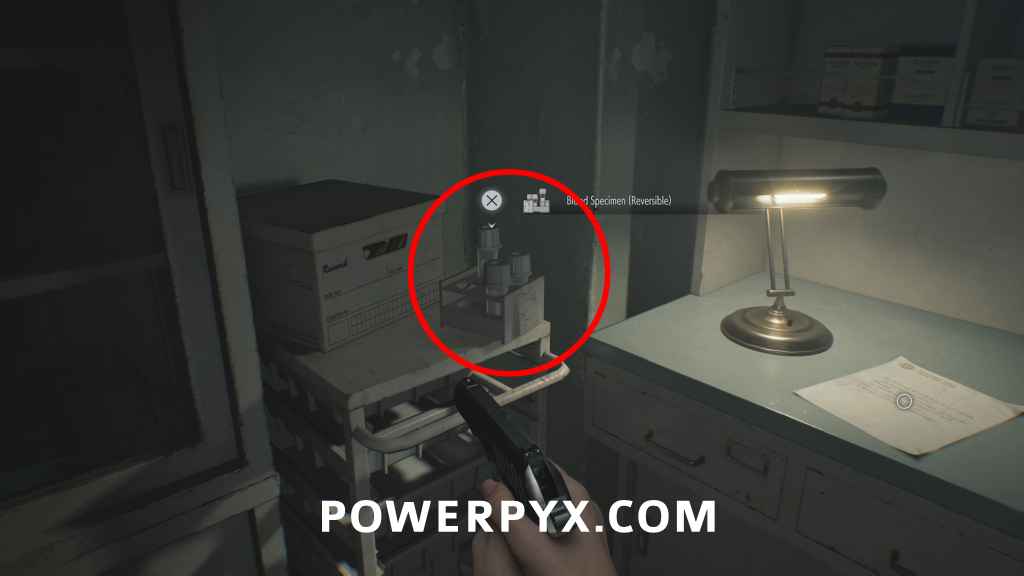
Blood Specimen (Reversible) – White
Same room, pick up the white blood sample. Use it on the Analyzer. Unlocks Crafting Recipes: Steroids, Stabilizer.
Upgrade: Hip Pouch
Filing Room: Backtrack to the Filing Room in West Wing to find it behind the Lvl. 1 door.
File #22 – Construction Notice
In West Wing, in the corridor south from Kitchen, open the gate with Lvl. 1 lock and in the next corridor you will find it on a whiteboard to your right. Next to Custodian’s Office on the map.
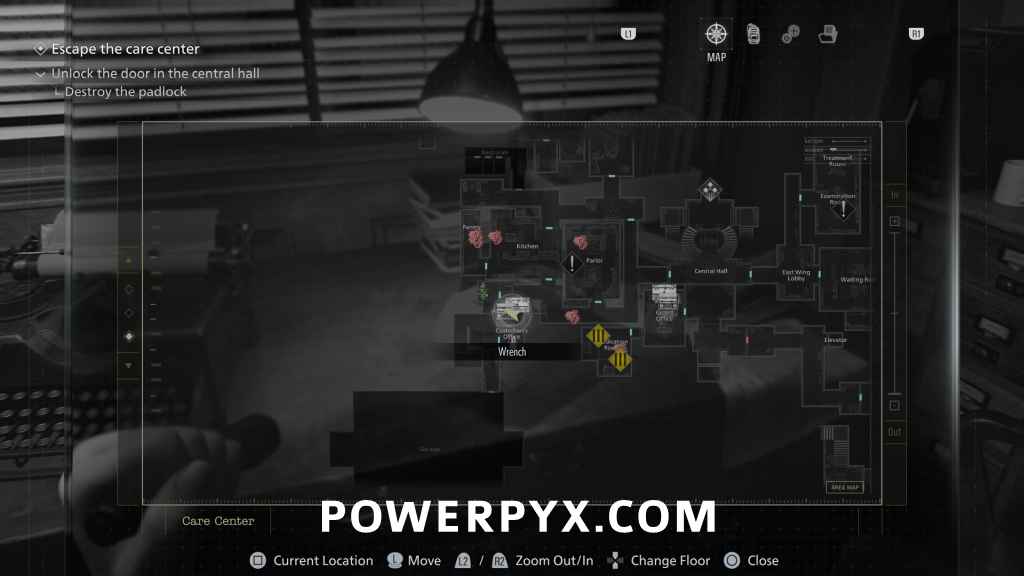
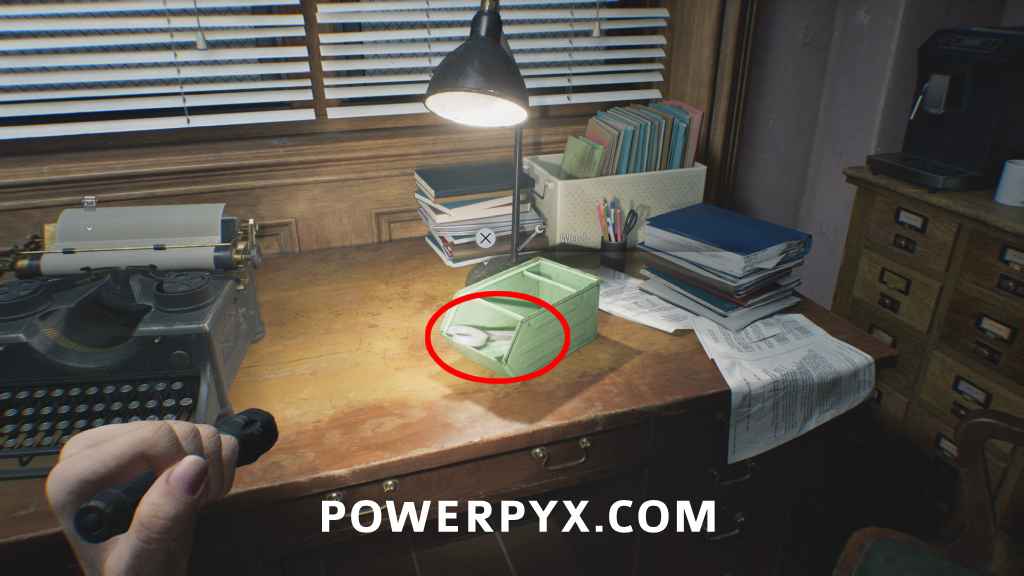
Key Item: Wrench
Custodian’s Office: In the safe room next to the typewriter.
Progress past the Custodian’s Office and into the garage area, then go to the back.
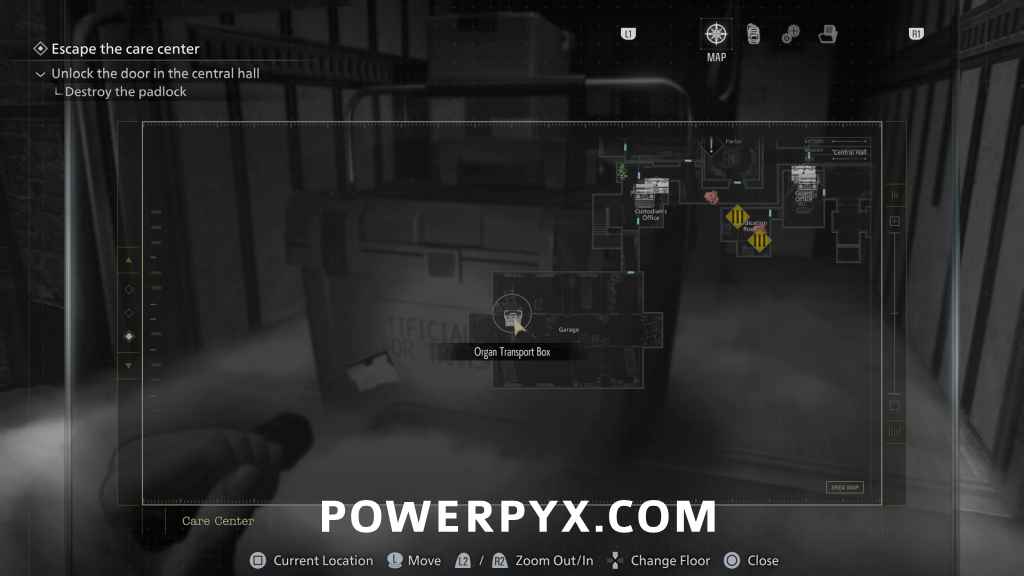
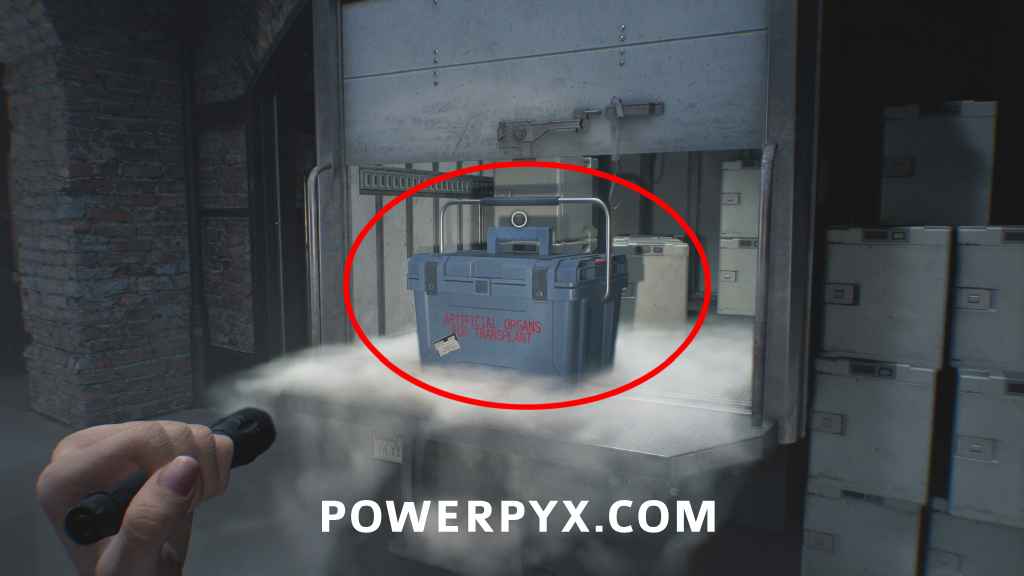
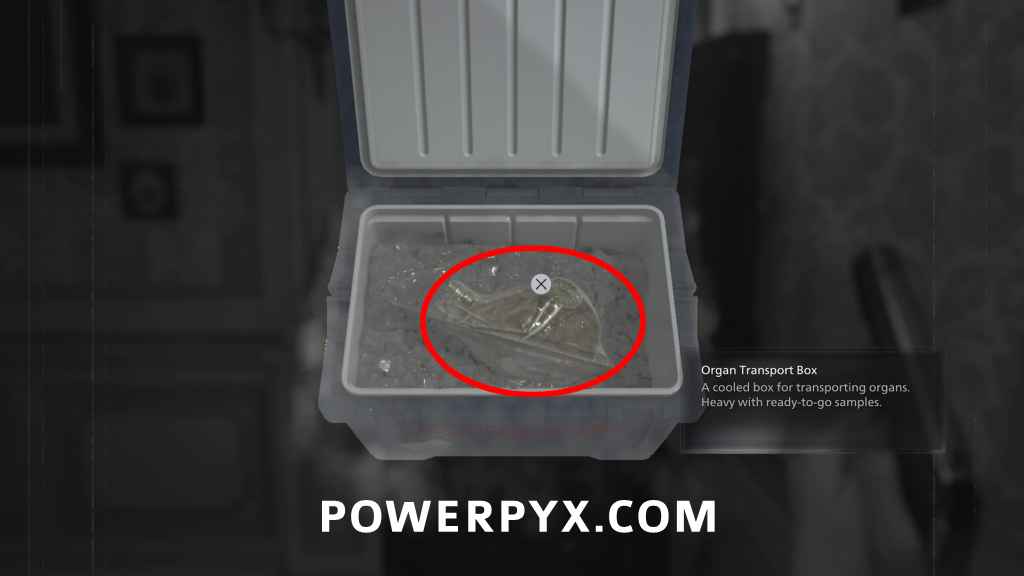
Key Item: Organ Transport Box
Garage: At the end of the garage on the back of a truck.
When you try to walk back through the garage a bulldozer will crash through the wall and move toward you. You need to quickly shoot the driver, then if you are on Insanity also shoot the flaming area under the plow to stop it moving. You can then crawl over it to exit the garage. There is also a couple boxes in the newly accessible spot on the right which can include some ammo or healing.
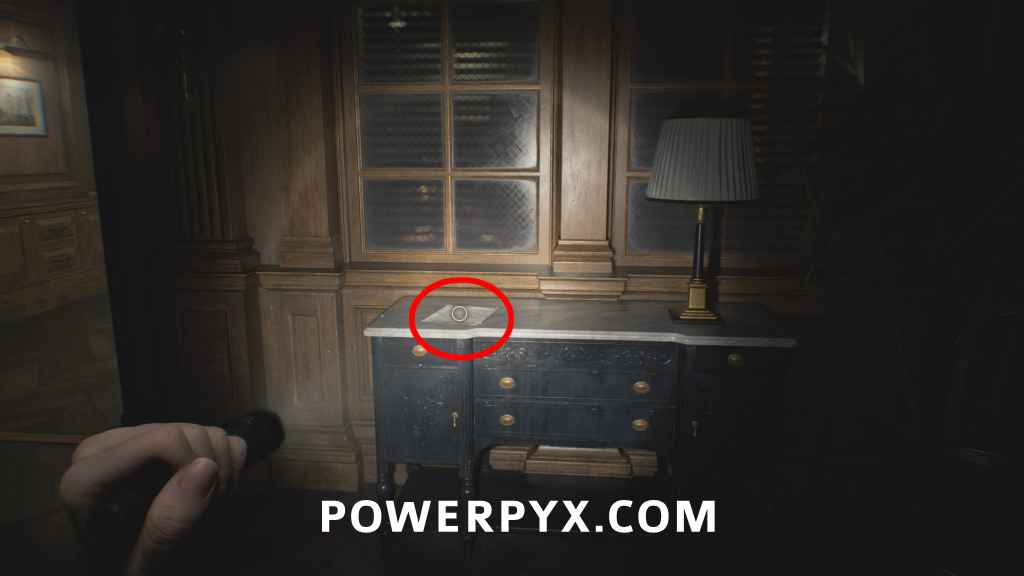
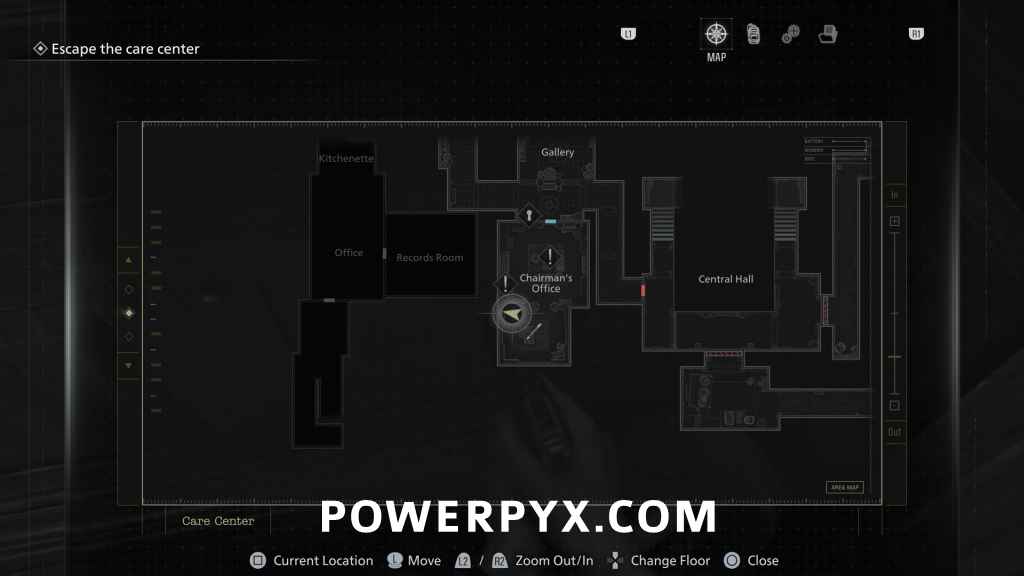
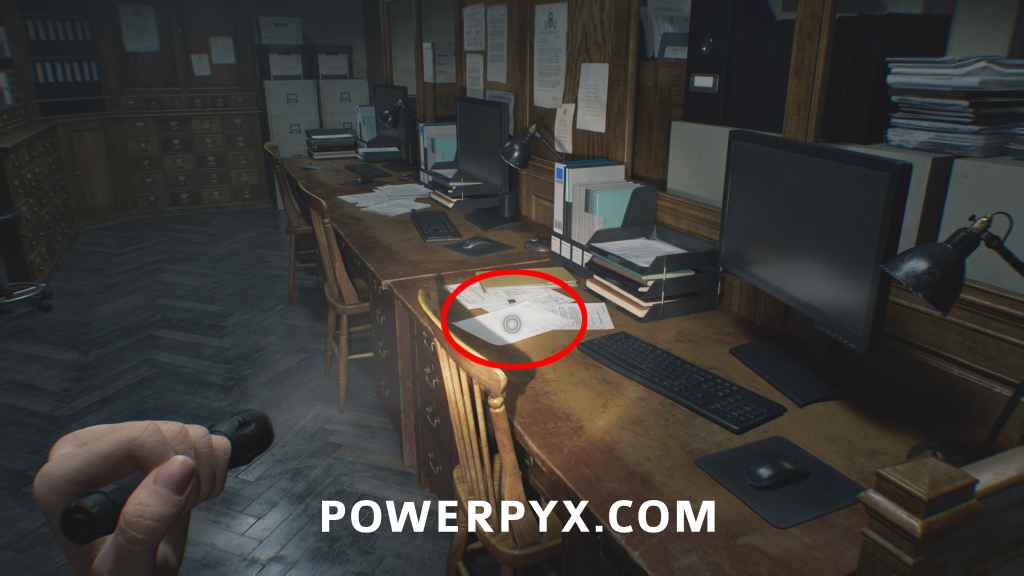
File #23 – Bar & Lounge Safe Code
Office: After leaving the garage go upstairs to reach the Office. This is on the first desk. Combination = Left 10 – Right 80 Left – 30. (Already opened earlier, see Safe #1)
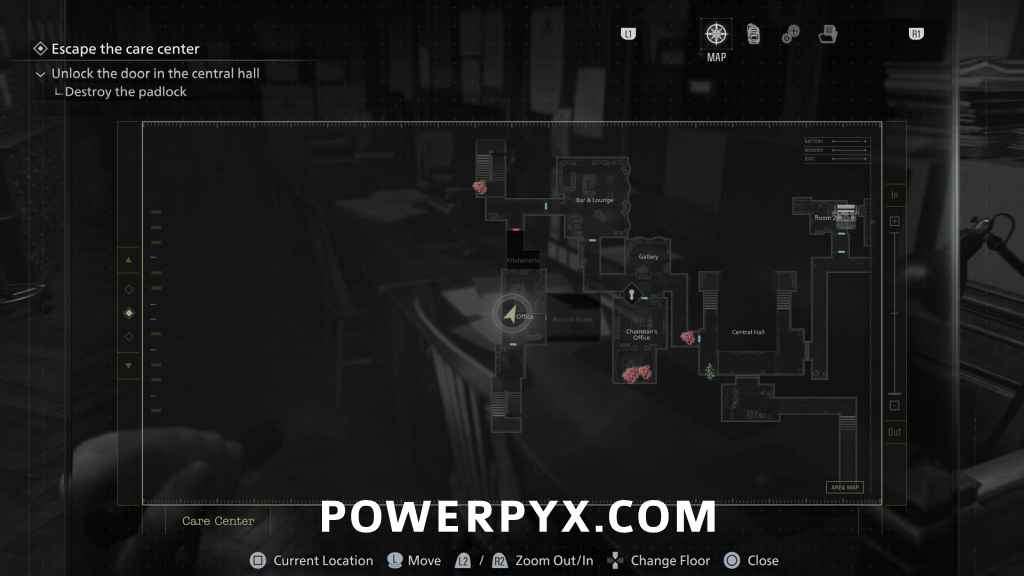
File #24 – Background Check
Office: Same room, on desk in back right corner.
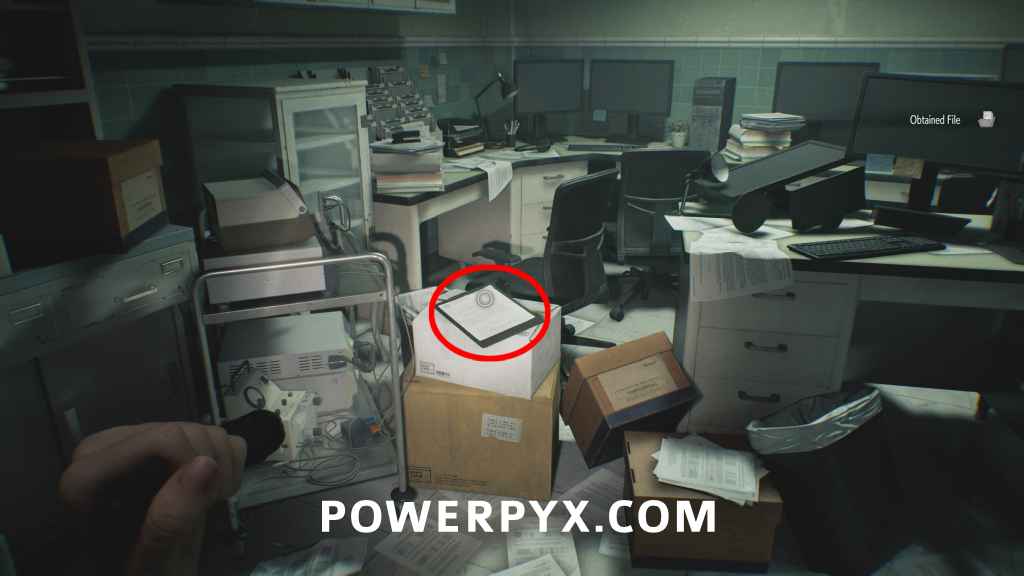
File #25 – Disposal Team Report
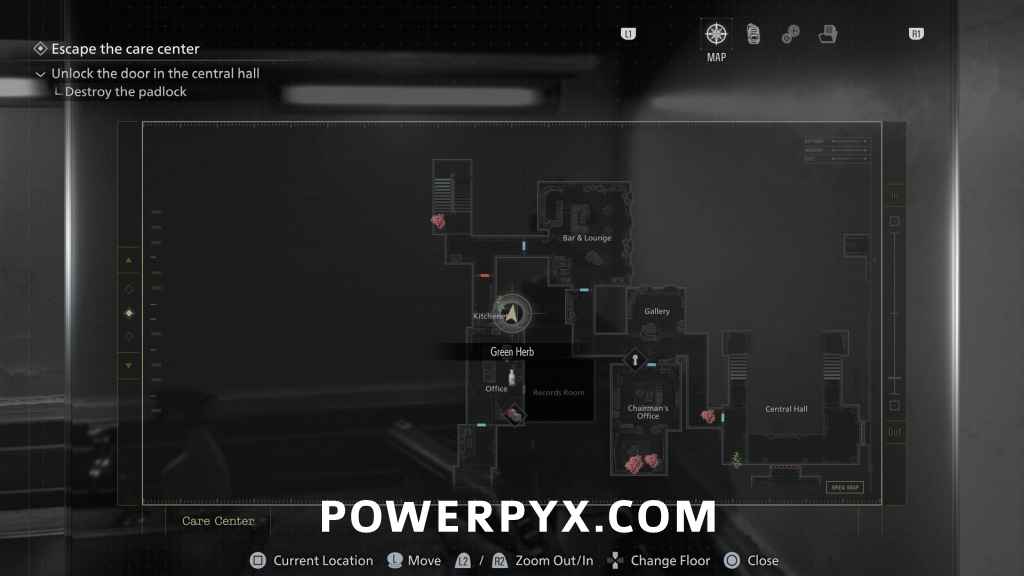
Records Room: Enter the room on the right side of the Office to find this in a cardboard box at the end of the middle row of shelves. (Note: you will also hear a Mr. Raccoon in the closet but this can’t be opened yet and requires backtracking later). Watch out for the two zombies in this room.

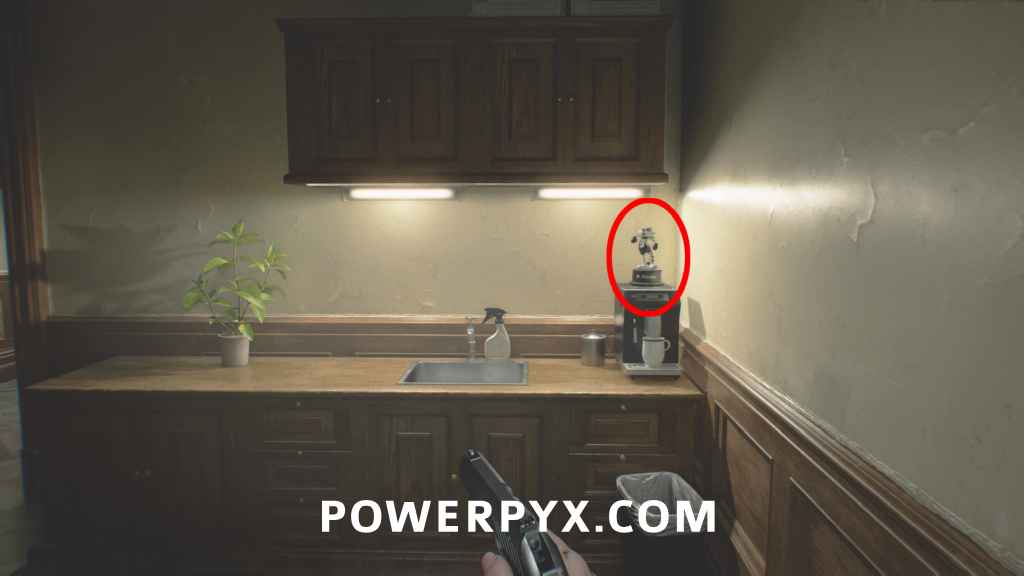
Mr. Raccoon #4
Kitchenette: Take the northern exit from the office to reach a small coffee break room. This sits next to the sink in the Kitchenette.
You can then continue through the hallway which unlocks the previously locked door by the Bar & Lounge, then go downstairs to the left. Be careful when going down because the zombie on the stairs will turn into a Blisterhead if it was in a position where you have to go near it, you want to try to avoid it unless you have extra ammo to deal with it.
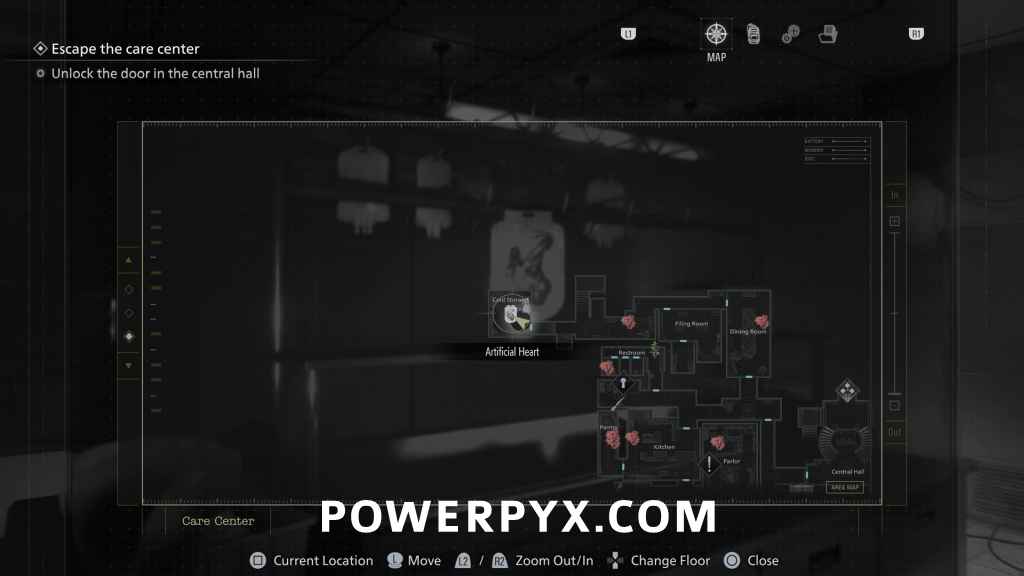
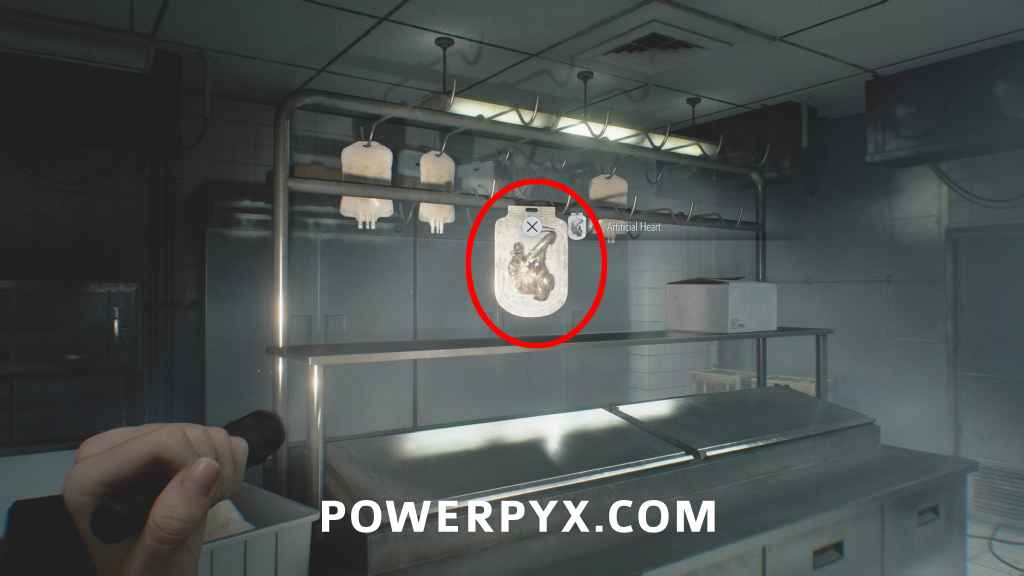
Key Item: Artificial Heart
Cold Storage: Use the Wrench on the door in the north-west corner of the West Wing (1st floor). It’ll be in front of you when entering the Cold Storage.
File #26 – Examination Room Safe Code
Backtrack to the East Wing 2nd Floor, where you first met the big Chunk monster and found Key Item: ID Wristband (Level 1). In the room where the big Chunk monster came from you find this on a locker. It reveals the safe combination which we already opened, see Safe #2 (Right 30 – Left 10 – Right 50).

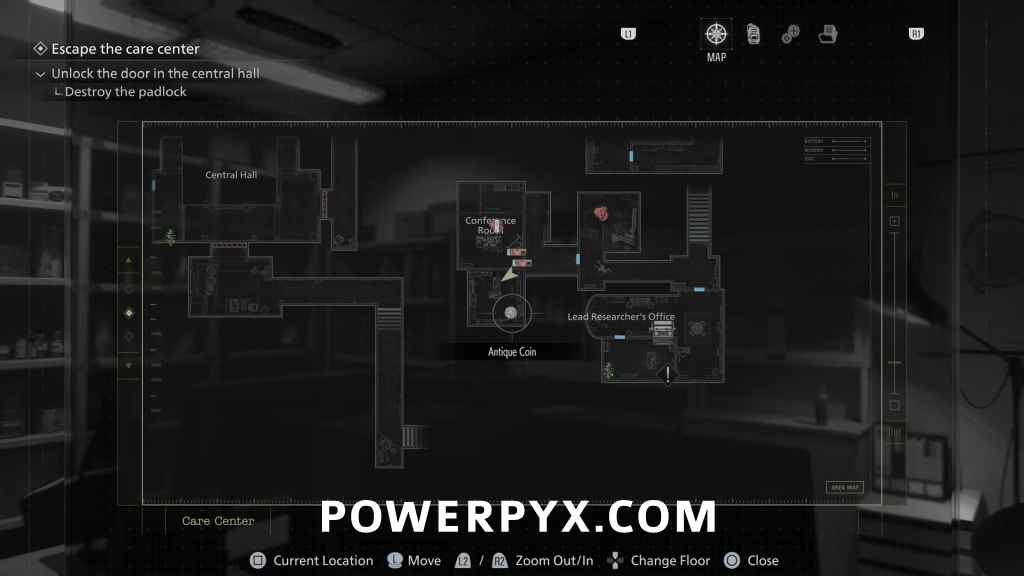
Antique Coin #19
Conference Room: Enter the conference room directly next to the previous file, it’s on a white desk after entering.
Trophy: Deadly Duet
You have to kill the 2 singing zombies. First is found in Bar & Lounge (2nd floor of West Wing) which you probably already killed. The second is in Conference Room, kill it now. Be careful because when you enter the room it is in there will be three other zombies alerted at the same time. You can back up toward the hallway while letting these come toward you, the singing zombie won’t approach you until you enter the room further or attack it.
Antique Coin #20
Conference Room: dropped by the singing zombie.
File #27 – Patient Medical Records
Conference Room: In the room where you will find the singing zombie on a desk.
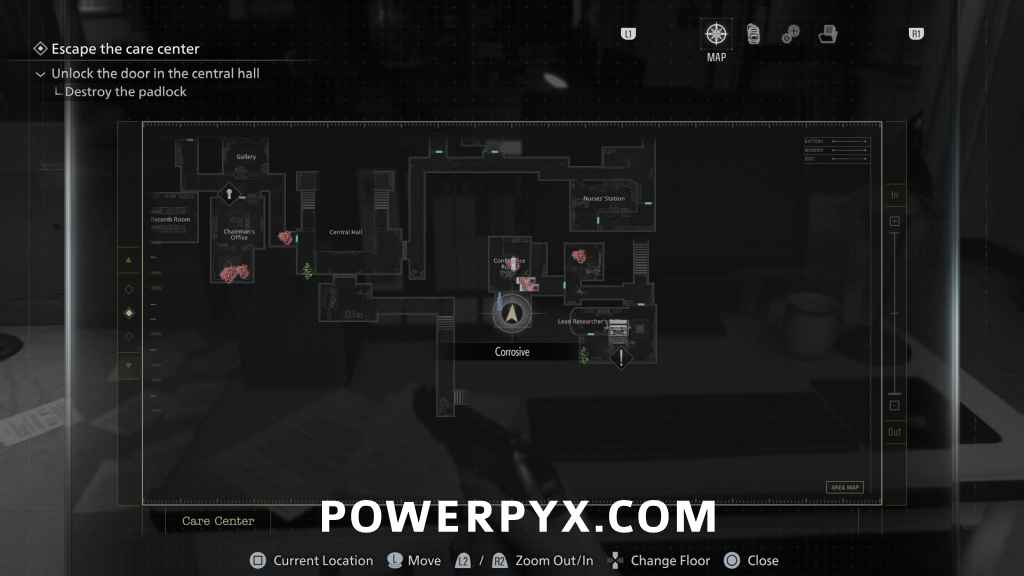
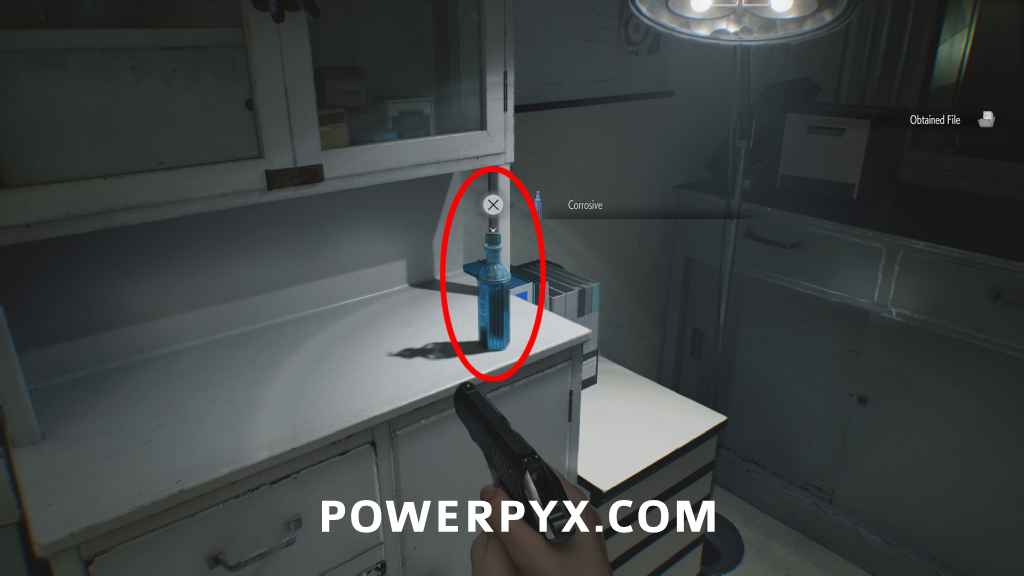
Key Item: Corrosive
Conference Room: Same room, take the blue bottle.
File #28 – Unlocking the Organ Transport Box
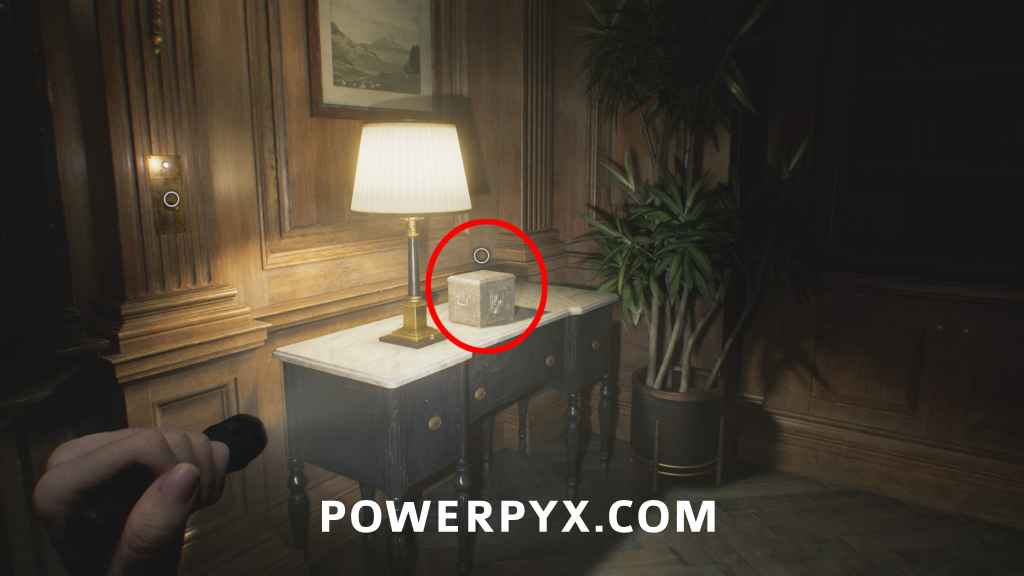
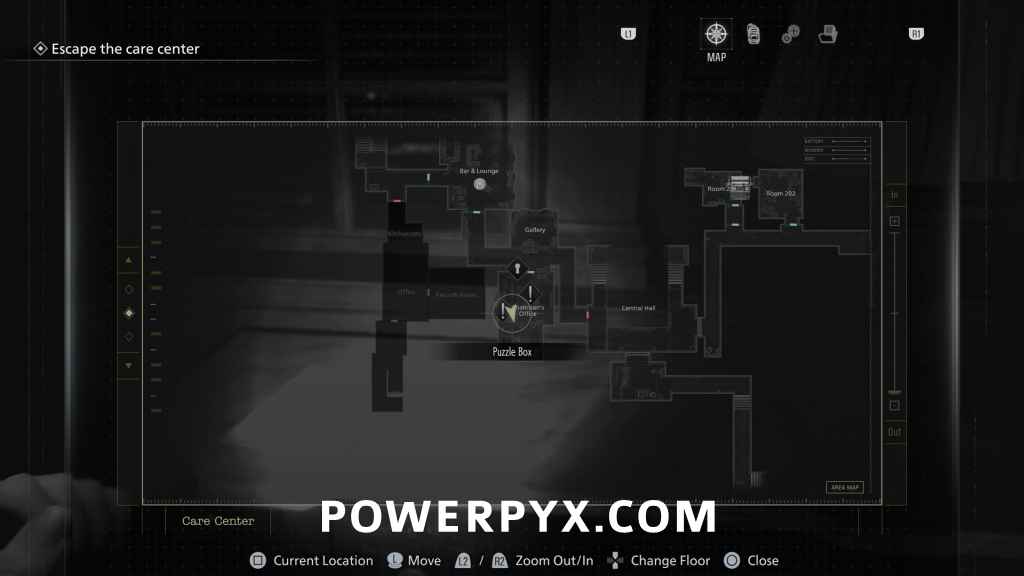
Lead Researcher’s Office: Go back to the backroom of Lead Researcher’s Office, interact with the padlock on the Puzzle Box and use the Corrosive on it. Afterward, you find the notebook in the opened Puzzle Box.
Solution (Casual) = Star – Sun – Moon – Sun
File #29 – Spencer’s Research I
Same as above, both files are in the Puzzle Box, in the Leatherbound Notebook.
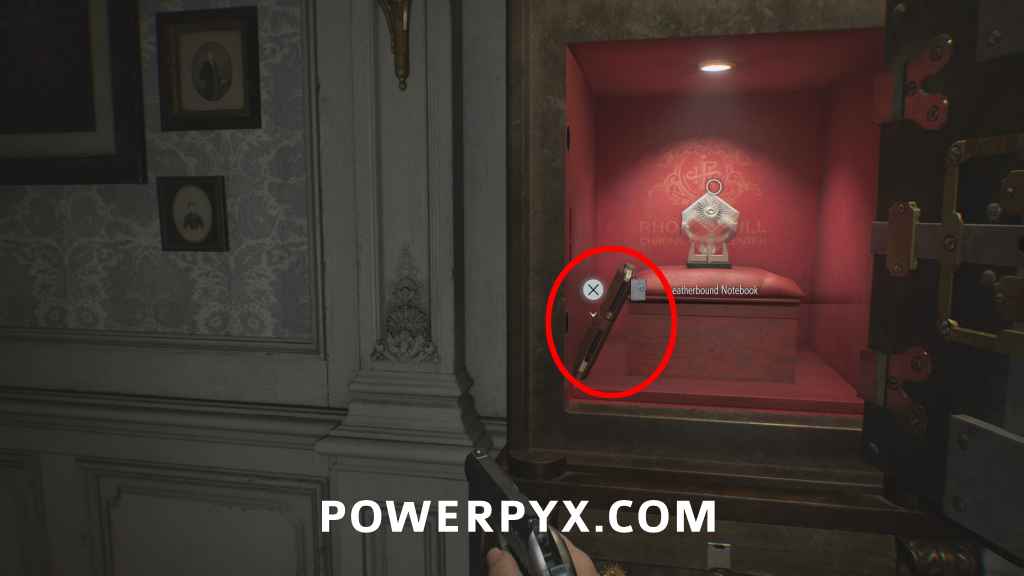
Note the Leatherbound Notebook stays in your inventory as an item after you pick it up here, you can place it in the item box and don’t need to carry it around.
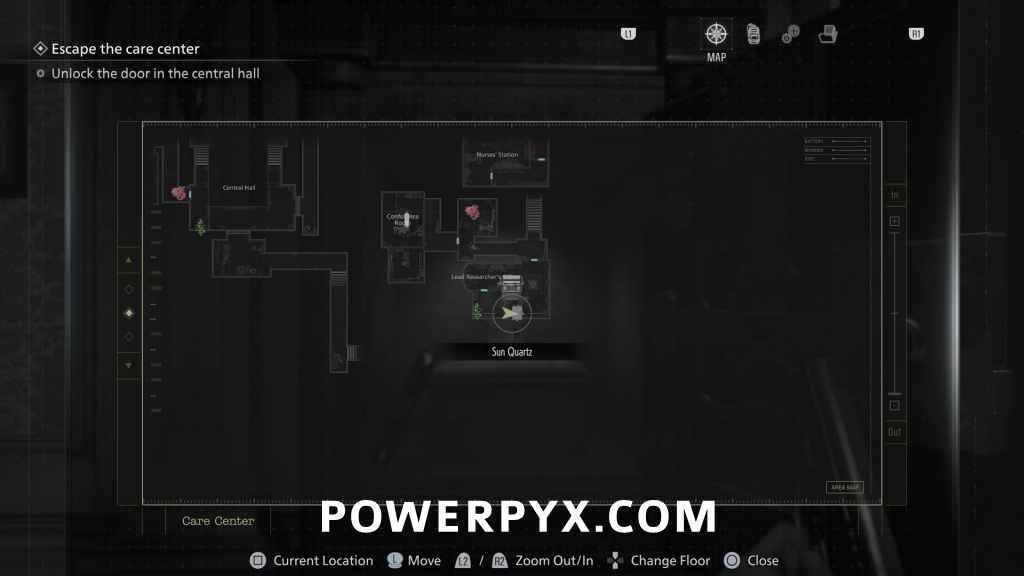
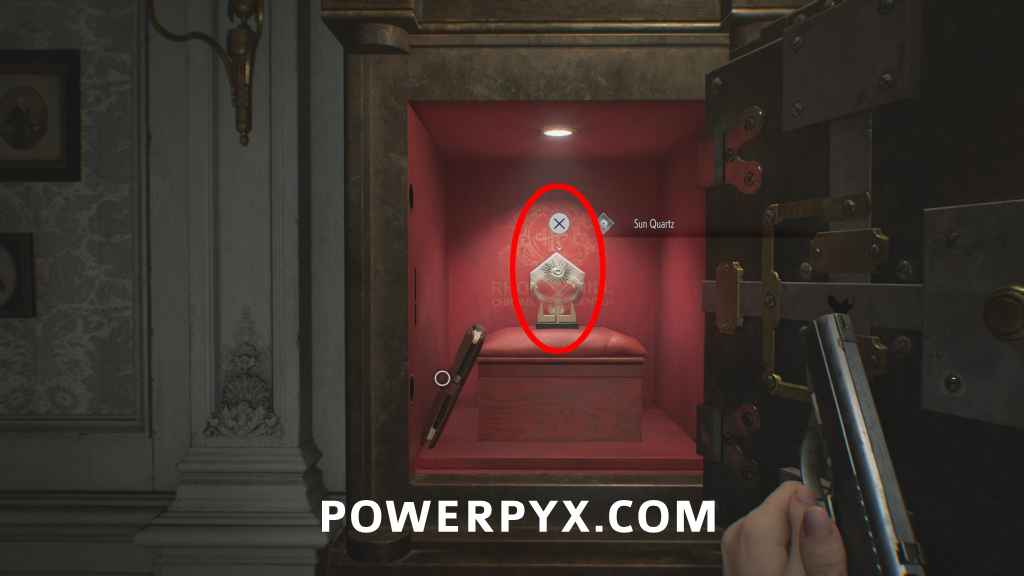
Key Item: Sun Quartz
Same as above, in the Puzzle Box. To be used on the Quartz Door in the Central Hall.
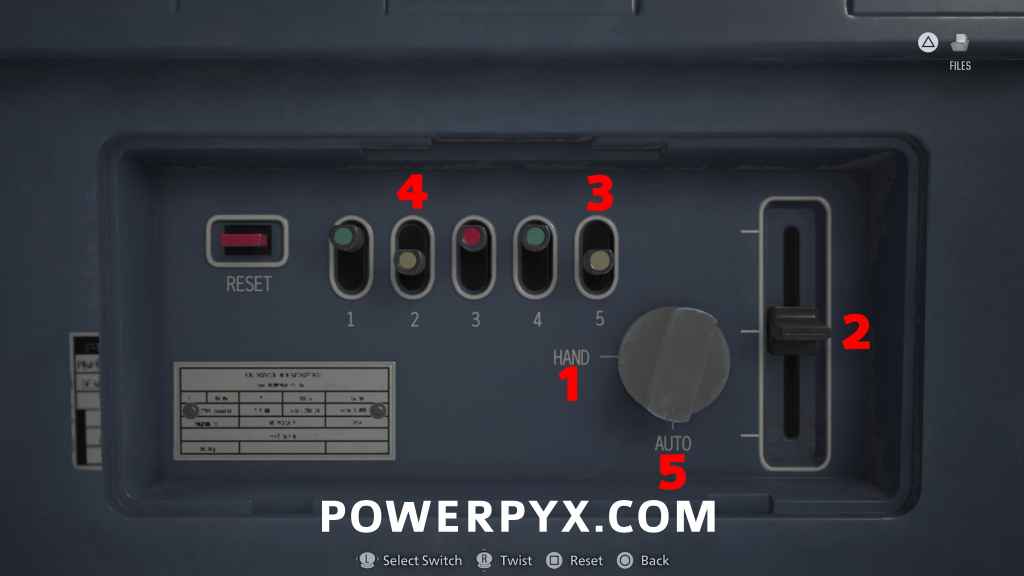
Key Item: Artificial Lungs
Examine the Organ Transport Box from inventory, turn it and click on the back panel.
Solution = Set bottom right switch to HAND > get the right switch to the middle level > press Button 5 > press Button 2 > set bottom right switch to AUTO again > take out Artifical Lungs.
Key Item: ID Wristband Level 2
Examination Room: In East Wing, go to Examination Room to find the Organless Corpse. Use the Artifical Heart + Artificial Lungs on it. Defeat the zombie and loot the Wristband from it. Be careful when going back through this room as the other zombie that was on the operating table before may turn into a Blisterhead depending on how close you get to it.
File #30 – Double Mutation
Isolation Ward: Use the Lvl 2. Wristband on the green lock door in the north-east corner of the East Wing (between Blood Lab and Waiting Room). This leads to the Isolation Ward. Enter the office on the right to find this file on a cardboard box.
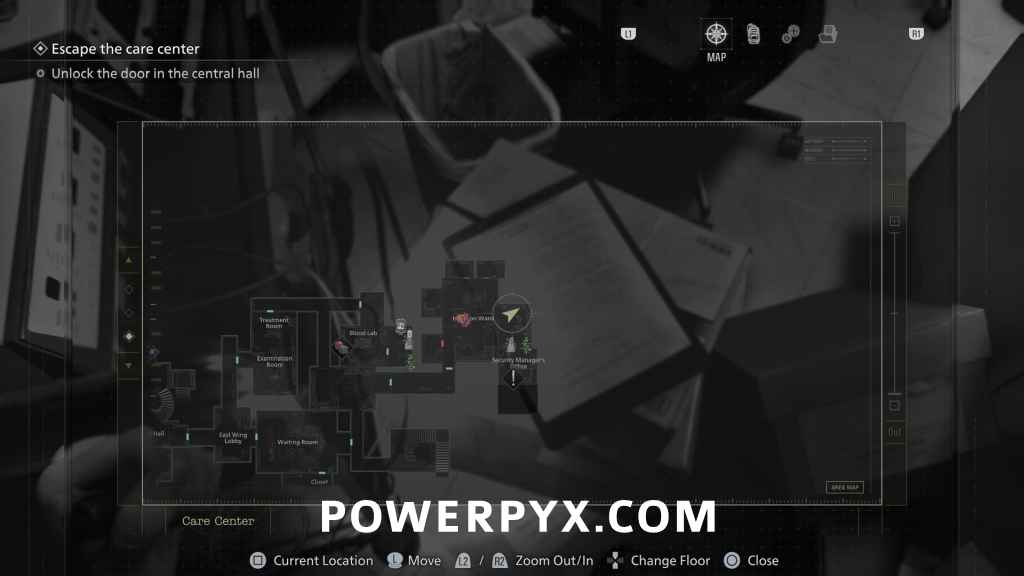
File #31 – Nurse’s Log
Isolation Ward: Same room, on desk.
Key Item: ID Wristband (Level 3)
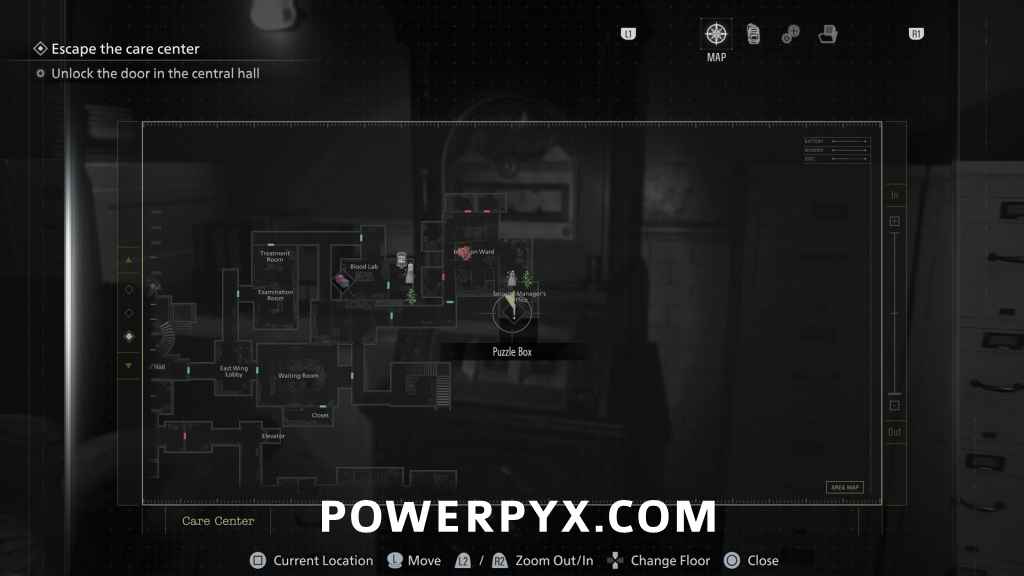
Security Manager’s Office: At the end of the Isolation Ward enter the Security Manager’s Office, interact with the note on the table and interact with the puzzle box to start a cutscene and you’ll automatically loot the ID Wristband from the body in the room. The puzzle box can’t be opened yet.
Remaining Parlor Upgrades: You should have more than enough Antique Coins now (if you followed the guide will have 1 more than needed). So make a quick detour back to the Parlor and open all lockers there. You don’t need any Antique Coins past this point, the 4 Parlor Upgrades are the only use for them so you can stick the rest in the Item Box.
Mr. Raccoon #5
Medication Room: Go back through the Guard Office to the room where the little girl is locked in a cell. Use the Lvl. 3 Wristband on the left room (the empty one without the girl) to find this behind the bed.
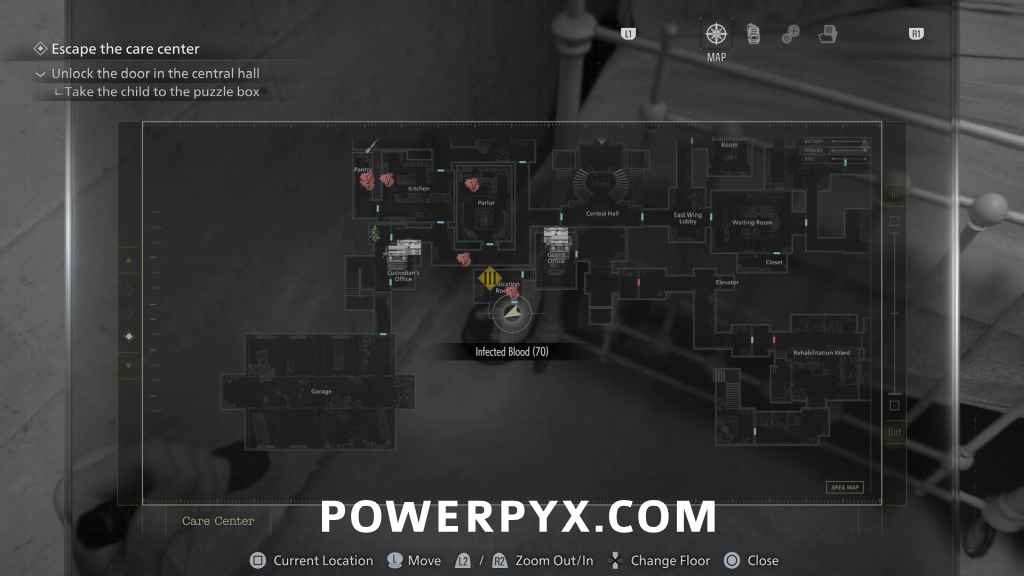
Take the Child to the Puzzle Box
Afterward, interact with the Girl’s cell and carry her to the Security Manager’s Office puzzle box. If you have anything left to do, you can sit her down on the couch in the Guard Office safe room. This is also your last chance here to get Trophy “Grace and Goliath”.
Your goal currently is getting Emily over to the puzzle box, but you can’t fight back against any enemies while carrying her, so if you didn’t finish off all the enemies that appeared out of the Isolation Ward or left some along the route you can put her down on the couch in the safe room and go deal with them if you need. It is possible to rush over there with all the enemies active if you go through the Waiting Room quickly, but can be easier to clean up the ones directly in the route.
Reminder – Trophies: Grace and Goliath + Order Up!
If you haven’t already killed Chunk (the big monster that roams the East Wing), or the Chef (big guy in kitchen), you can do it before bringing the Girl to the puzzle box. If you didn’t have enough ammo earlier, you can use lockpicks to open drawers for Rare Metal and use it to craft ammo for the Requiem. 3 headshots with the Requiem should suffice to kill Chunk.
After leaving Emily in the room a bunch of enemies will start appearing in the Isolation Ward that you need to deal with. Only a couple will appear at a time so you aren’t likely to get overwhelmed if you deal with them quickly. Make sure to push any that become stunned after shooting them, which lets you get in easier damage on them or other enemies they knock down. If you have some extra Requiem ammo you can use a bullet on the Blisterhead that will appear as the last enemy in the room once you have dealt with the others.
After all enemies are defeated Emily will eventually call out, then a scene will occur and she will be taken away. Before interacting with the hole in the floor make sure you’ve picked up any other items in the Isolation Ward, then interact with it to end this section.
Care Center (Rhodes Hill) – Leon Part 2
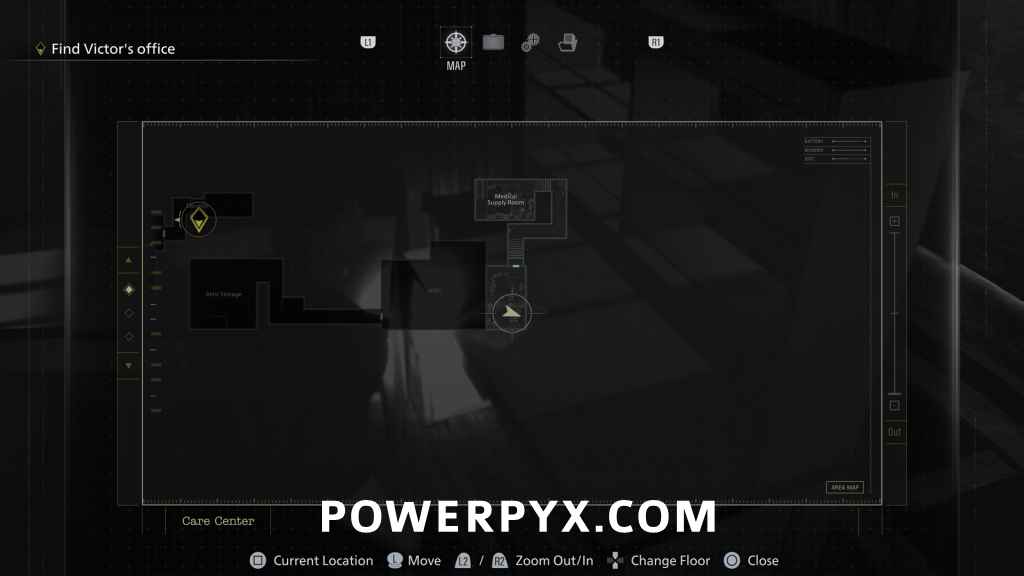
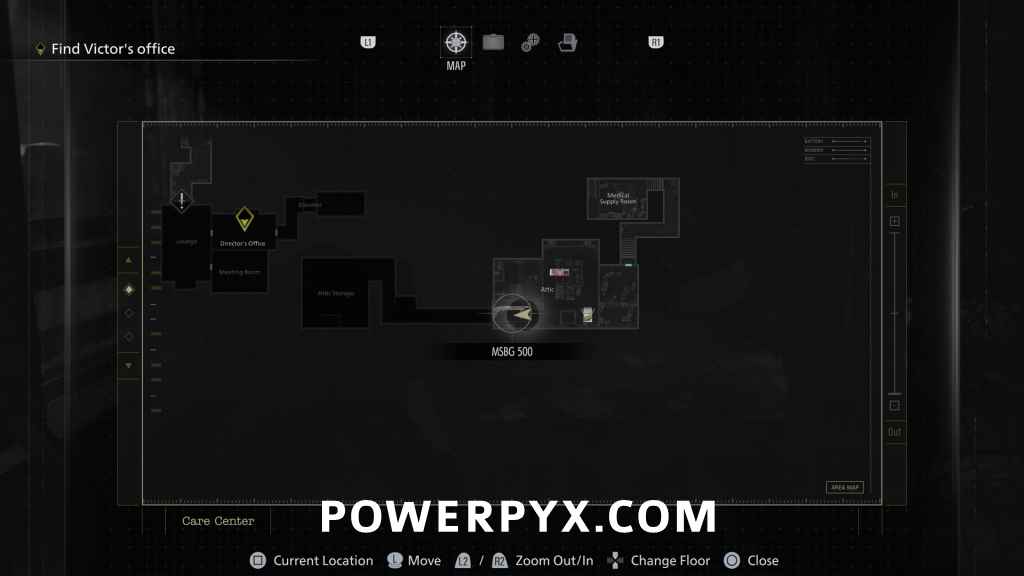
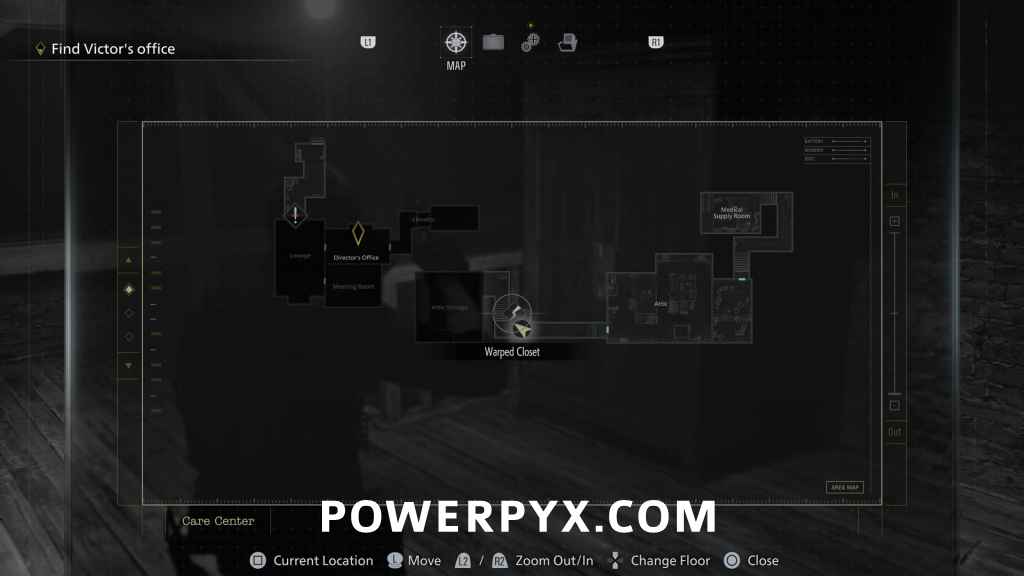
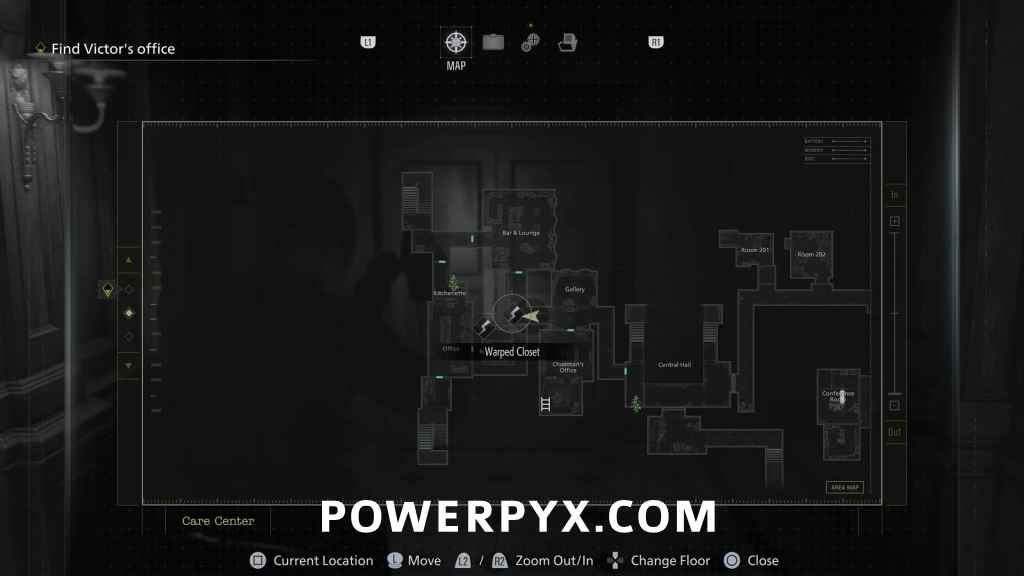
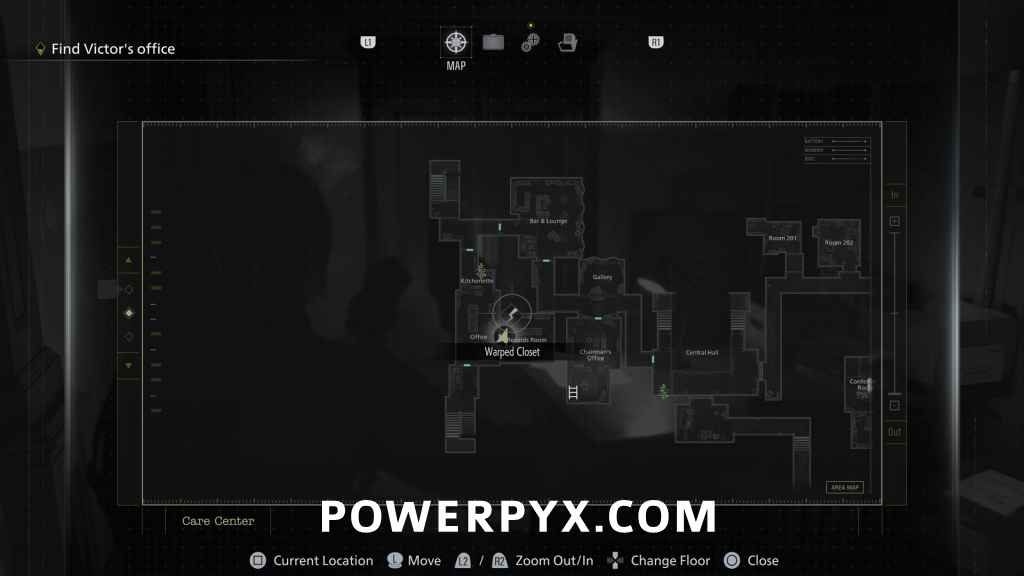
Find Victor’s Office
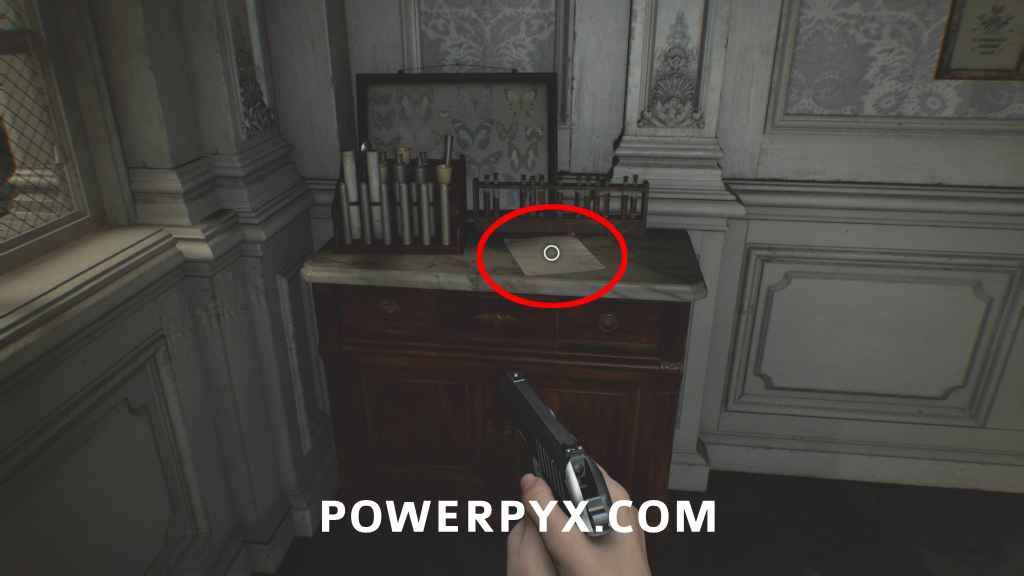
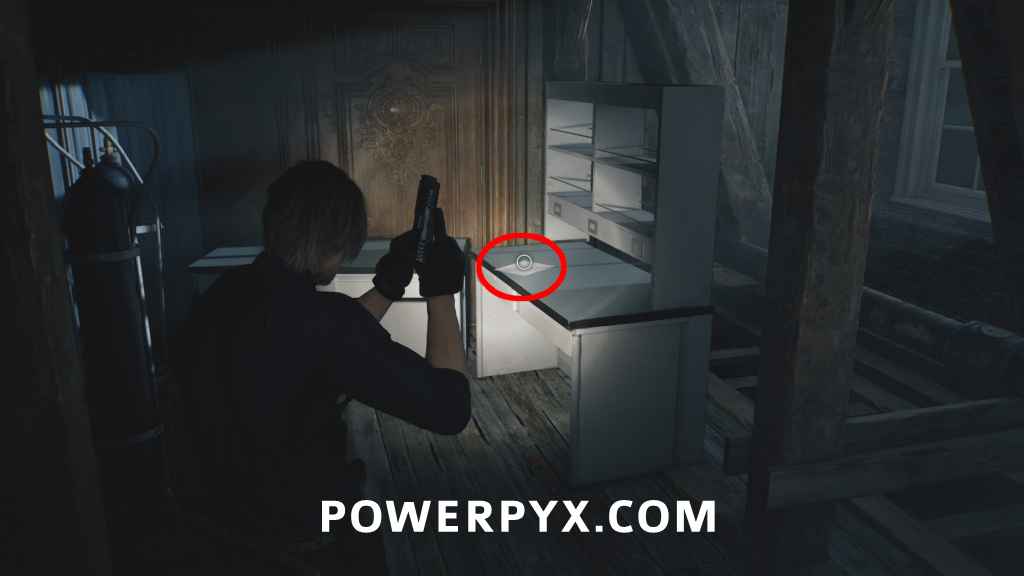
File #32 – Satiety Suppression Medical Records
Attic: When you play as Leon again, walk forward until you go through the next door. Then you find this in the back of the room, opposite the cupboard you push to progress.
Weapon: MSBG 500 (Shotgun)
Attic: On the floor, on the main path when you reach a Chunk monster (big bloated enemy).

You have to fight this Chunk here to progress, so make use of the shotgun you’ve just obtained to deal a lot of damage. As it follows you around the room it will get stuck in some of the doorways, allowing you to get free damage in. Once you stun it be sure to go up and interact with to deal a bunch of a melee damage to it. After you have done a bunch of damage it will start moving very quickly around the area, giving you little time to attack it if it broke the doorframes in the area. What you can do then is climb up the two ladders on the north and south of the room, which lets you reach the upper area that allow you to deal some more damage until the Chunk tears down the ceiling.
Weapon: Hand Grenade
Dropped by the Chunk monster.
File #33 – Basement Safe Code + Weapon Part: Compensator
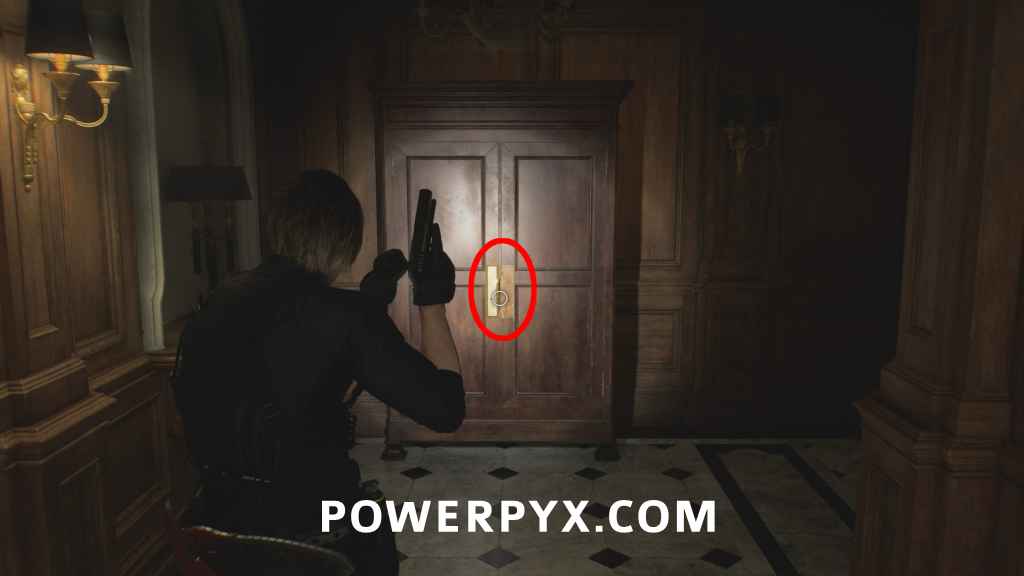
After leaving the Attic, break open the first closet on the right with Leon’s Hatchet before going downstairs. Gives Save Combination (Right 60 – Left 40 – Right 80).

Trophy: Tailor Made
In inventory attach the Compensator to Leon’s Pistol.
Progress along the path and use the button to drop the ladder, which will put you in the Chairman’s Office where you were with previously as Grace. There aren’t specifically any new items that weren’t there as Grace, but that means if you didn’t pick up ammo or scrap you can collect them as Leon if you feel like you will need them.
File #34 – Dishwasher’s Note
Found in the closet you can break open when going left from Chairman’s Office.
Mr. Raccoon #6
Records Room: You can hear this one in the Records Room. It is in the closet only Leon can break open with his Hatchet.
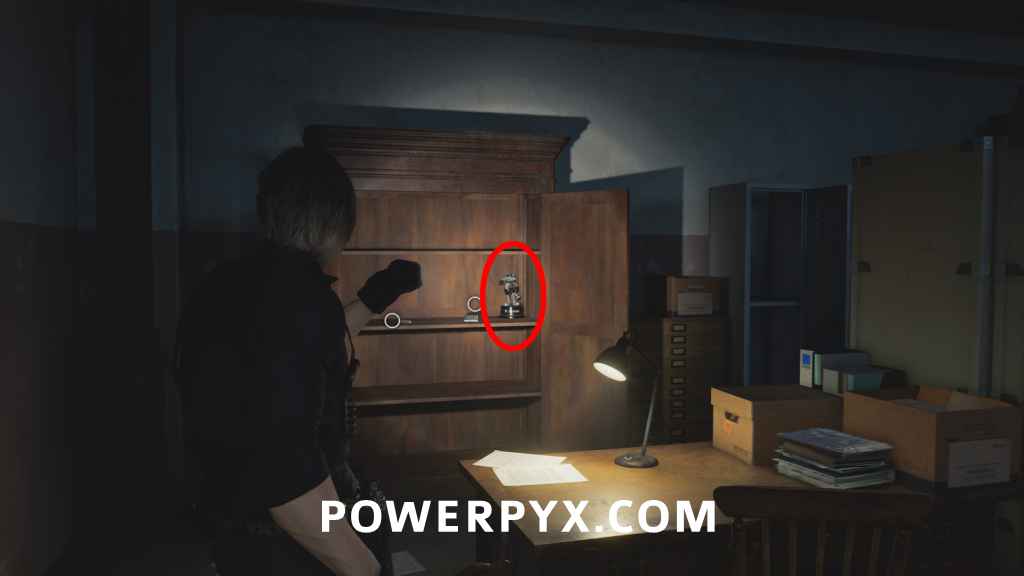
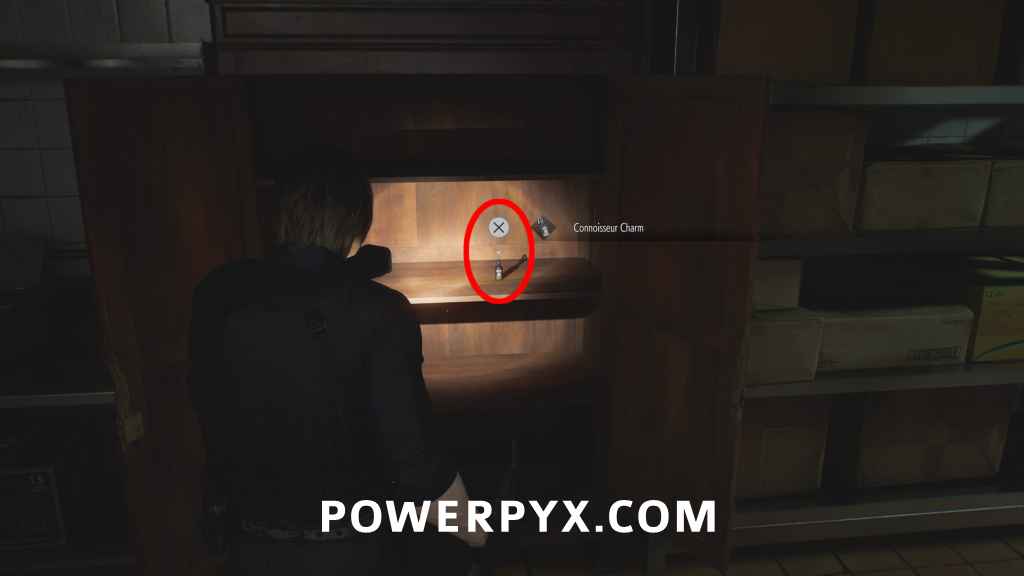
Charm: Connoisseur Charm
Pantry: In the pantry closet. If you didn’t kill the chef as Grace to get the pantry key, you can do so now as Leon.
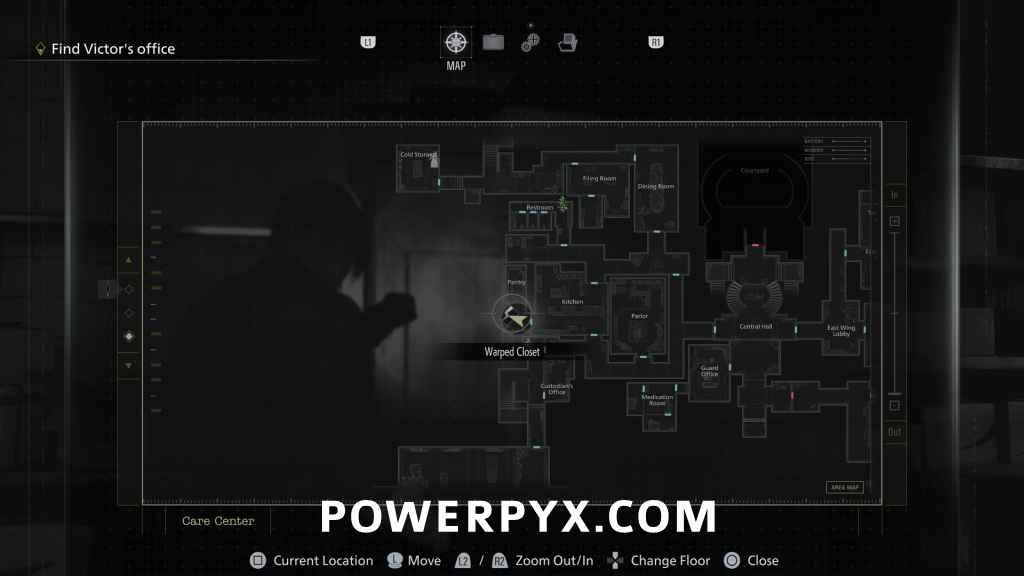
To proceed the story, go to the top floor in West Wing, up the stairs in the north-west corner.
Search Victor’s Office
Once you enter Victor’s Office you need to walk around the left to reach the main office. As you progress the enemies in the room will start reviving as Blisterheads, and you need to take them out to continue. There are some vases around the room you can break for ammo, otherwise try to only hit them in the head with the shotgun to save yourself on handgun ammo. In the third room with the table in the middle there are some throwable weapons on the ground you can also use if you lead the enemies in the room, which them allows you to do melee finishers with the hatchet.
After the first set of enemies are dealt with go into the office and interact with the painting behind the desk, then pull the level that appears. More enemies will appear while you are waiting for the door to open, so take them out as they appear. Use the throwables in the third room if you didn’t use them already to save ammo. Once the gate is open you can go through and use the elevator to complete this section.
NEXT: Rhodes Hill – Care Center Basement
For all areas refer to Resident Evil Requiem Walkthrough.
Leave a Reply