
Call of Duty Black Ops 7 has 31 Campaign Intel Locations. There are 11 Artifacts in the linear mission (1 per mission) and 20 Documents in the “Endgame” mission. Finding all Intel unlocks the Loremaster trophy & achievement.
You can keep track of what collectibles you found under Career > Campaign Intel > Missions / Endgame. The Mission Intel is numbered in the mission order in the Intel menu. So the 5th Intel in the menu would be in Mission 5. The Endgame map is open world.
The intel look different in each missions, they are unique objects. When you get close to them, they will have a white outline around them. None of them are missable, you can get everything through mission select after the story. The intel is saved instantly when you pick it up, there’s no need to reach the next checkpoint and you can quit the mission immediately without losing progress.
Video Guide
Mission 1: Exposure
Intel #1: Becoming the Monster
Objective: Clear the Area / Eliminate all hostiles
When leaving the facility you get a cutscene and you’ll continue playing outside. Then you enter a village with lots of enemies and swords dropping from the sky that cause splash damage. In this village, you find this sitting on the well as soon as you enter the village. If you’ve reached the Mendez boss you went too far, it’s the area just before the boss.

Mission 2: Inside
Intel #2: The Truth
Objective: Reach Karma in the Grotto
After you rapel down to where you meet up with Karma in the water cave, you find this to the immediate right of Karma, who is marked as main objective. Check the corpse bag on the floor.

Mission 3: Distortion
Intel #3: Family Ties
Objective: Rescue Woods / Open the container
After the section where you ride on the boat up the blood-filled room, follow the path to the next area where you are meant to open another container (main objective). BEFORE opening the container, go behind it and grapple to the farther platform where a self-revive and killstreak pickup are located. Turn back toward the container and grapple to the ledge where a second killstreak is sitting. The collectible is the dog tag hanging from a knife stuck in the wall. It’s just before the boss fight at the end of the mission (opening the container starts the boss fight).


Mission 4: Escalation
Intel #4: Cost of Business
Objective: Access the main terminal / Log in using the access card
Immediately after you defeat the sniper boss, you go to a building up a hill. When you enter the building, go into the room with the main objective to “Log in using the access card”. In the same room as this objective, in the corner enter the small side office and check the robot on the floor.

Mission 5: Disruption
Intel #5: Best Laid Plans
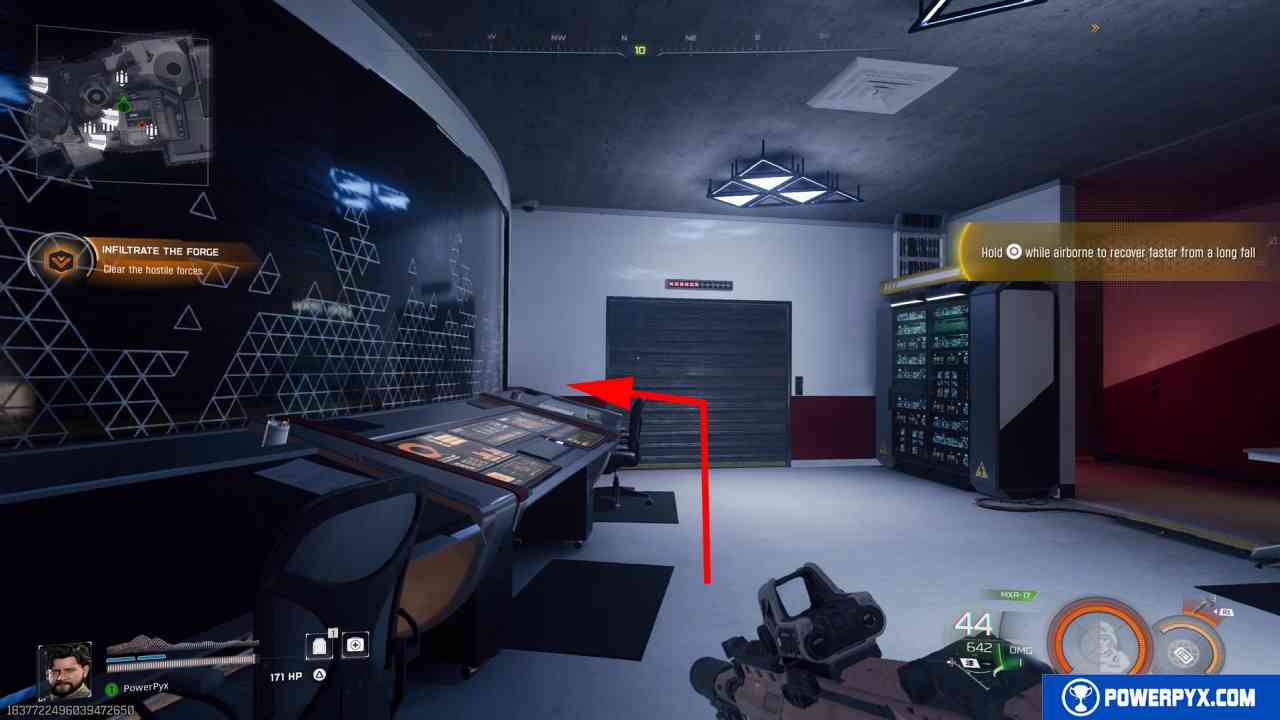
Objective: Infiltrate the Forge / Clear the hostile forces
After the scene where you ram the boat into the forge, follow the path and drop through the roof. Turn around and go up the stairs on the west of the area into the upper room. In the corner of the room on the consoles, you find this collectible, it looks like a PDA.

Mission 6: Collapse
Intel #6: Heavy is the Head
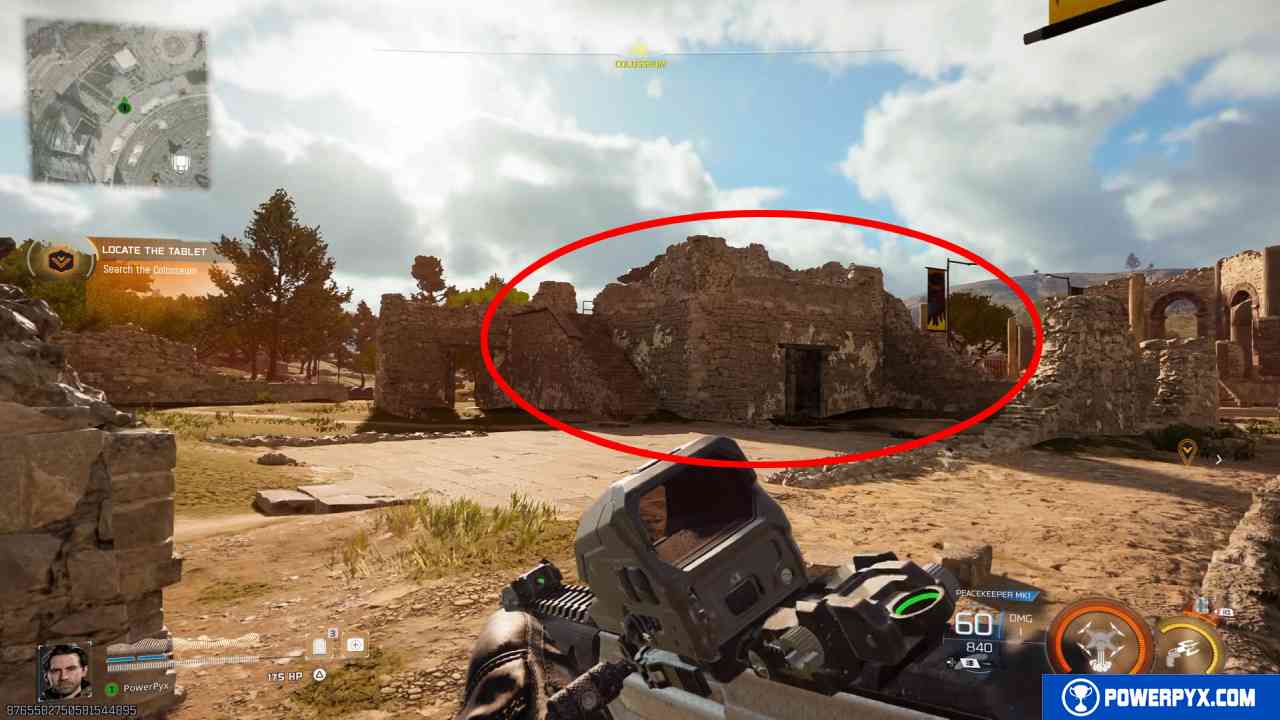
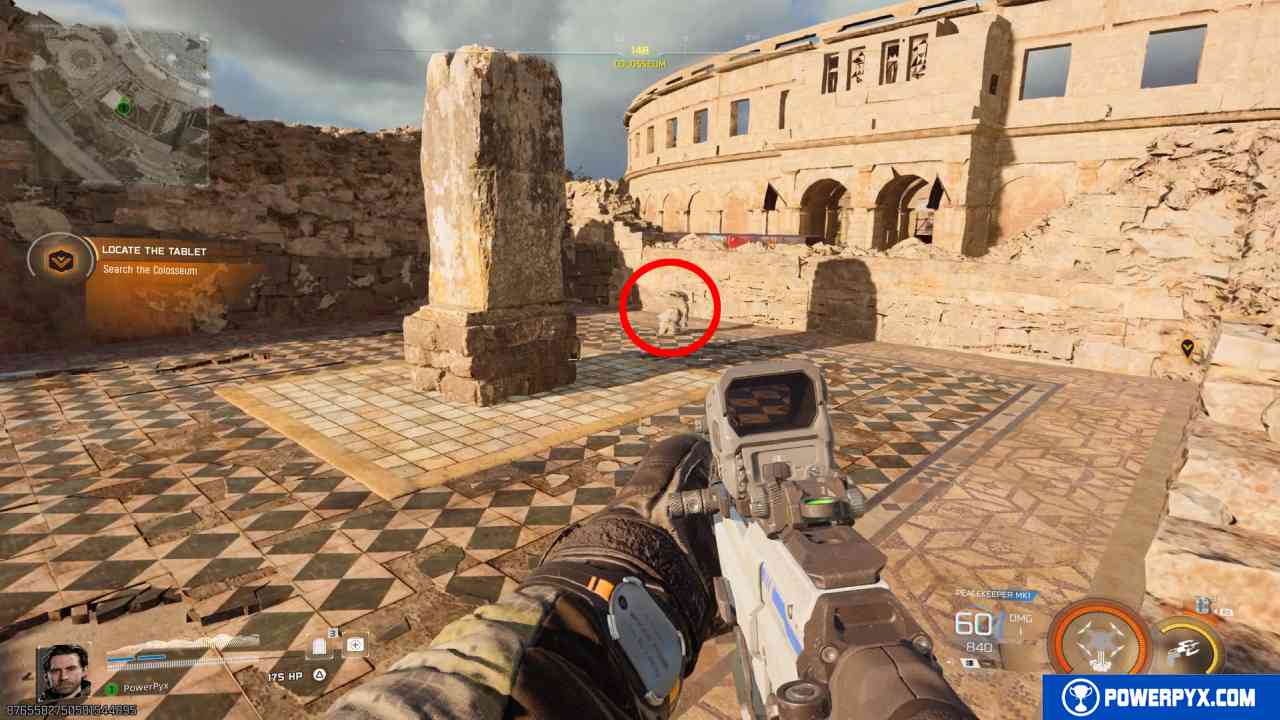
Objective: Locate the tablet / Search the Colosseum
Shortly after the start of the mission, when you reach the colosseum go left around to the outside to the northmost point where there is a destroyed stone building. Go up the stairs to the second level and interact with the stone head sitting on the floor.
Mission 7: Fracture
Keypad Code = look at the blue screen behind the counter for the 4 numbers that next to each other that stay onscreen and aren’t flashing. It’s different each run.
Intel #7: Team Bond
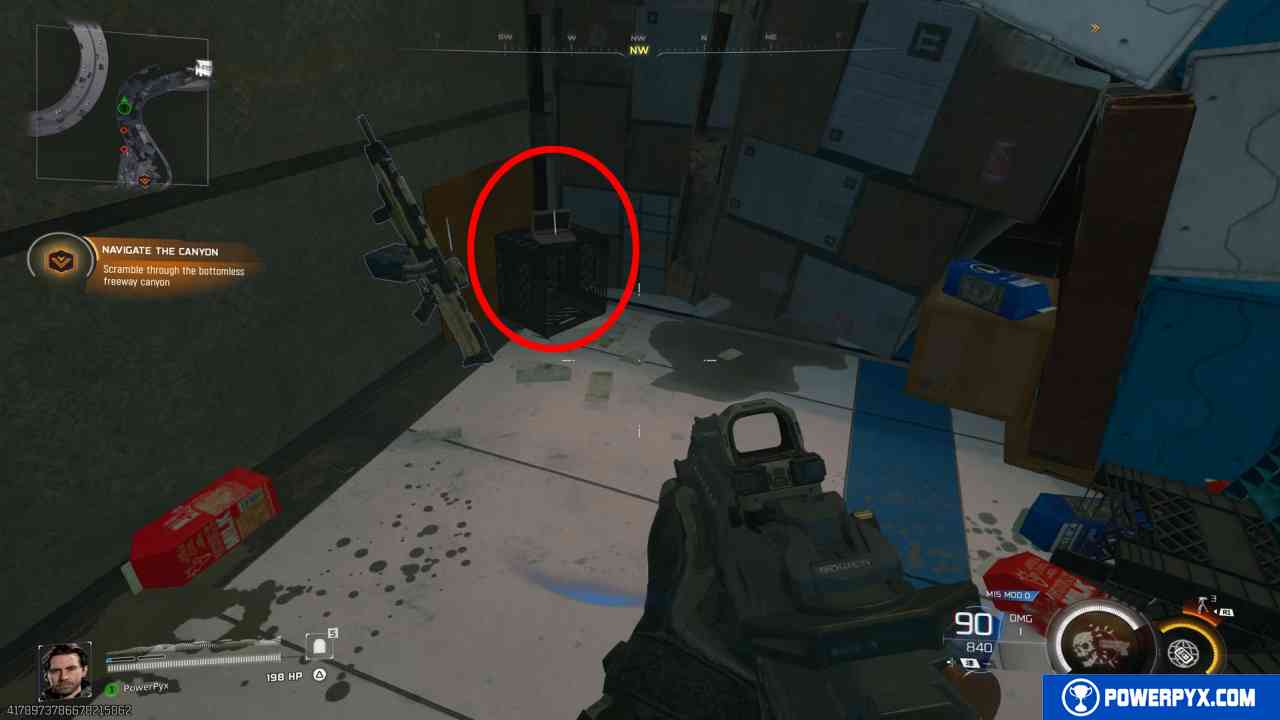
Objective: Navigate the Canyon / Scramble through the bottomless freeway canyon
Shortly after the start of the mission, you will pass through a portal and fight through a short highway area. Proceed here until the first ammo crate. After the first ammo crate, the road becomes twisted. Progress until the red semi truck with the “Find Yourself” digital sign above it. Drop into the trailer and turn around to find the pin sitting on a box in the corner.

Mission 8: Quarantine
Intel #8: “Case”
Objective: Find Dr. Falkner / Search the area for the doctor
Progress until you take the zipline up through the elevator to the top floor of the building. Turn left and go up the stairs outside into the room at the top. The collectible is the vial sitting on the conference table.

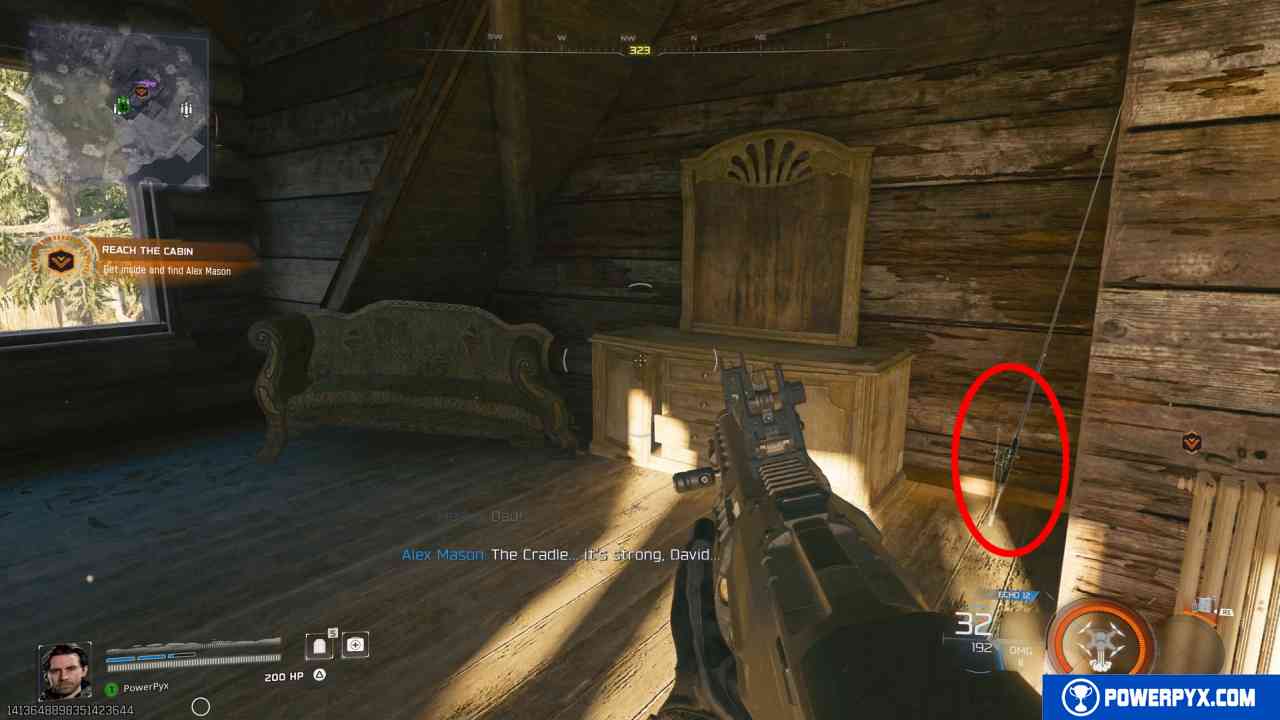
Mission 9: Suppression
Intel #9: Lake Time
Objective: Inspect the TV / Investigate the Masons’ memory
After entering the cabin, go up the stairs on the right and into the room on the right, then turn the corner where there is a fishing rod sitting in the corner.
Mission 10: Breakpoint
Intel #10: Trigger Finger
Objective: Disable Cradle Shipments / Overheat the Cradle shipments
After gearing up at the safe house, go toward the objective until you reach the area near the water with the Cradle Boxes and enemies nearby. From where the Cradle Boxes are (main objectives), go north and drop down onto the road, then go into the second level of the white containers near the bridge where this collectible is sitting on the ground in between the dark boxes.

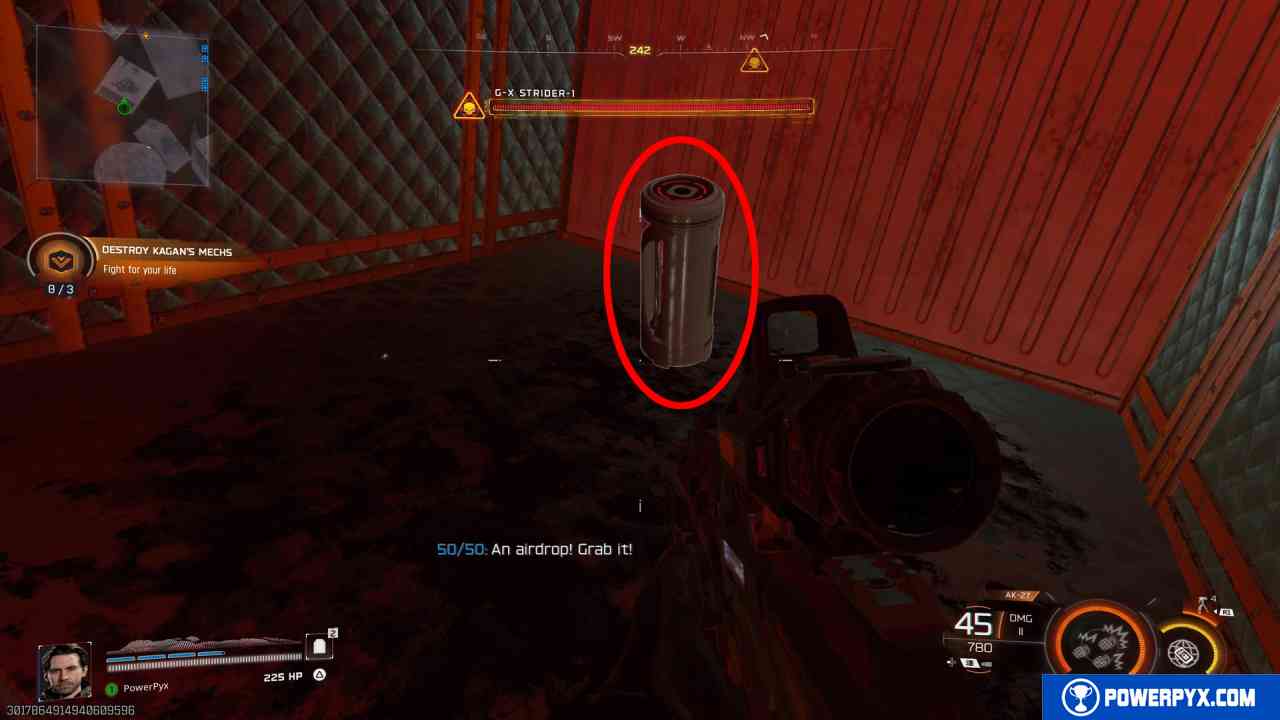
Mission 11: Containment
Intel #11: Face the Nightmare
Objective: Destroy Kagan’s Mechs / Fight for your life
During the final boss fight against the 3 mechs, jump toward the outer room on the north side on the white outer boxes. Turn to the right where there is a longer sloped box leading into the back of an open square one where you can find this canister.

Co-Op Endgame: Avalon
These intel are spread across the 4 zones of the open world endgame map. You can get them all immediately at combat rating 0. the best strategy is to equip the “Active Camo” to become invisible, and “Kinetic Jump” to jump and wingsuit everywhere quickly.
Zone 1
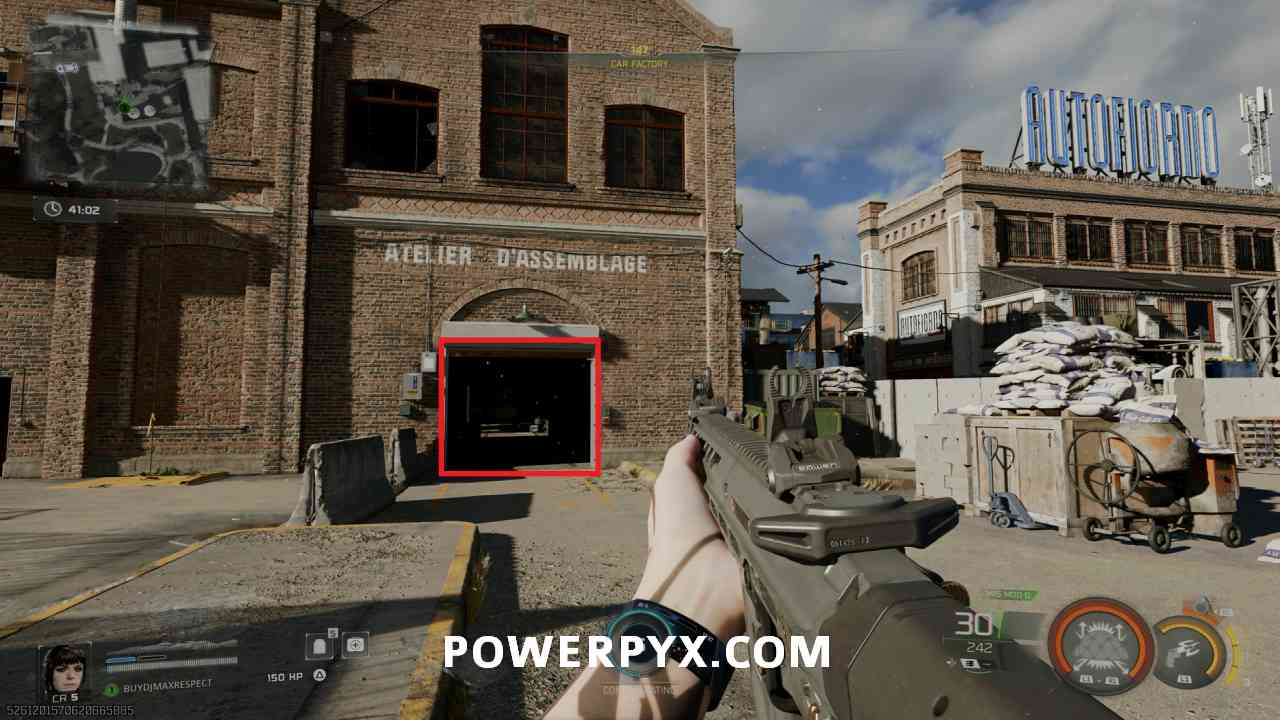
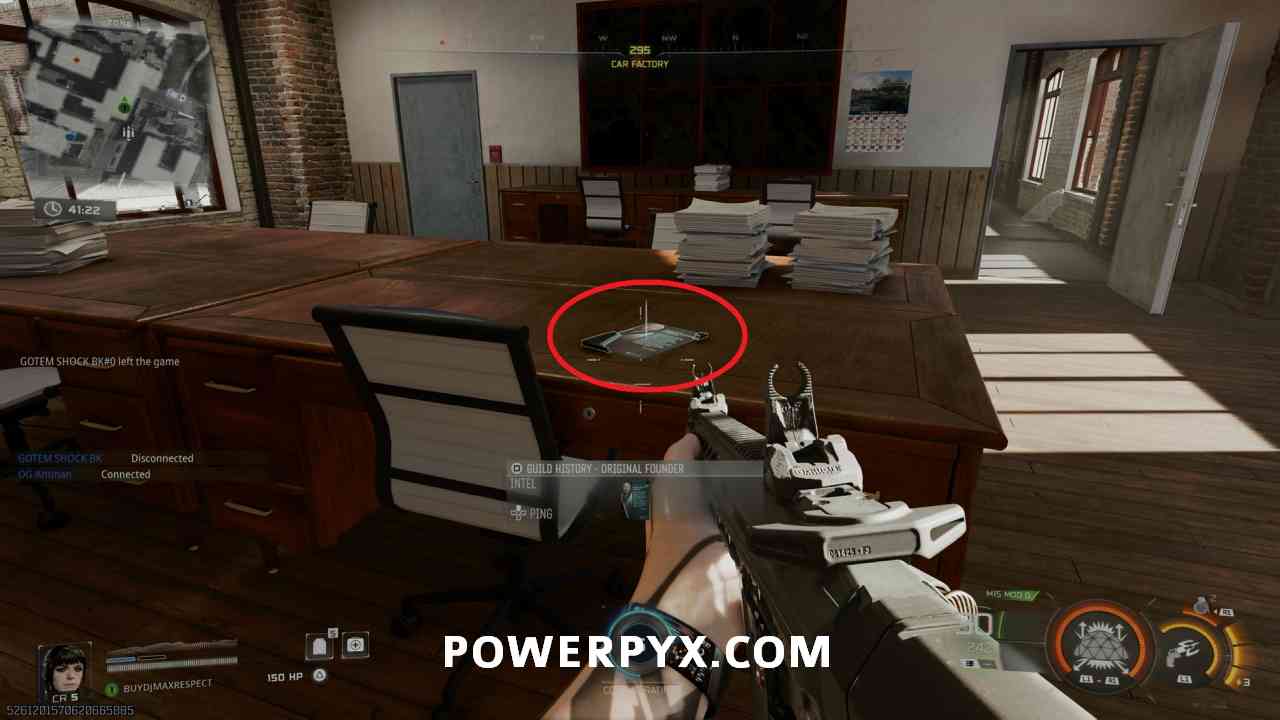
#1 – Intel 1: Guild History – Original Founder
Location: Zone 1 – Car Factory

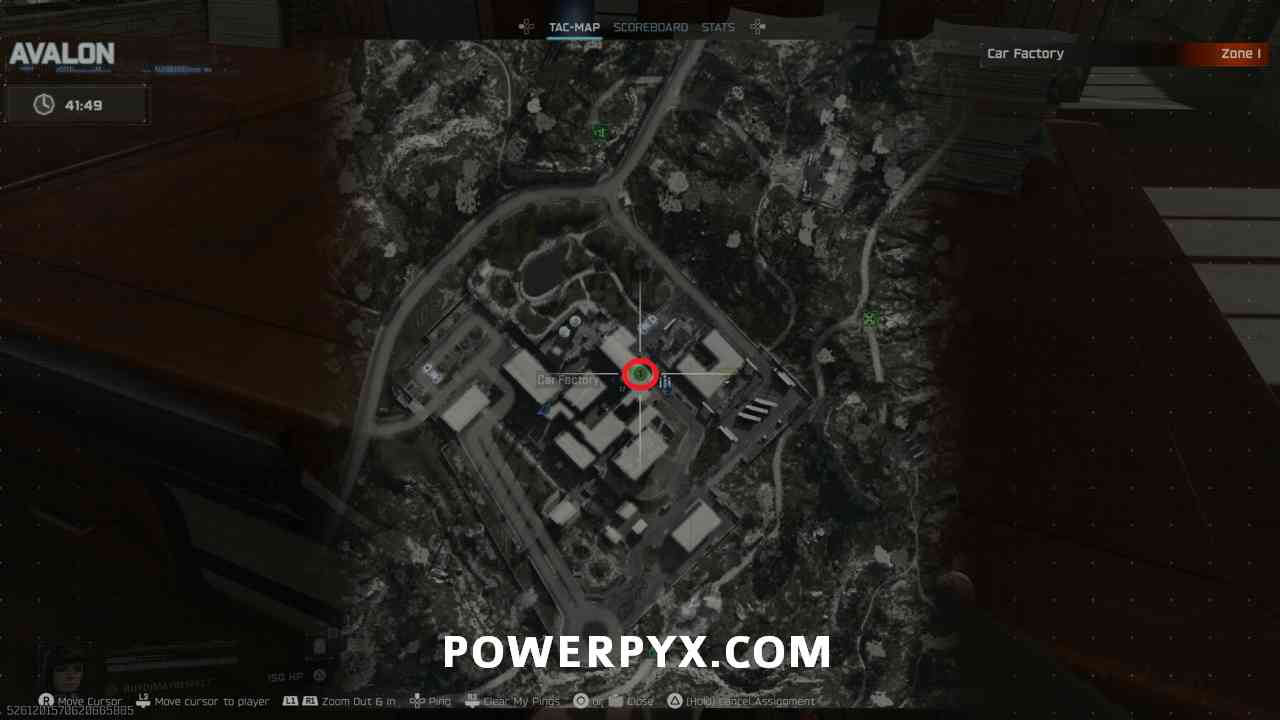
In the Car Factory location, go into the northern L shaped building and up the stairs to the second floor. Go into the southeast room where the document is on a table.
#2 – Intel 14: Avalon Security – We’re Here For You
Location: Zone 1 – Cliff Town


In the southwest building in cliff town, on a desk in the section that is over the top of the road.


Zone 2
#3 – Intel 3: Guild History – Whistleblowers
Location: Zone 2 – Colosseum

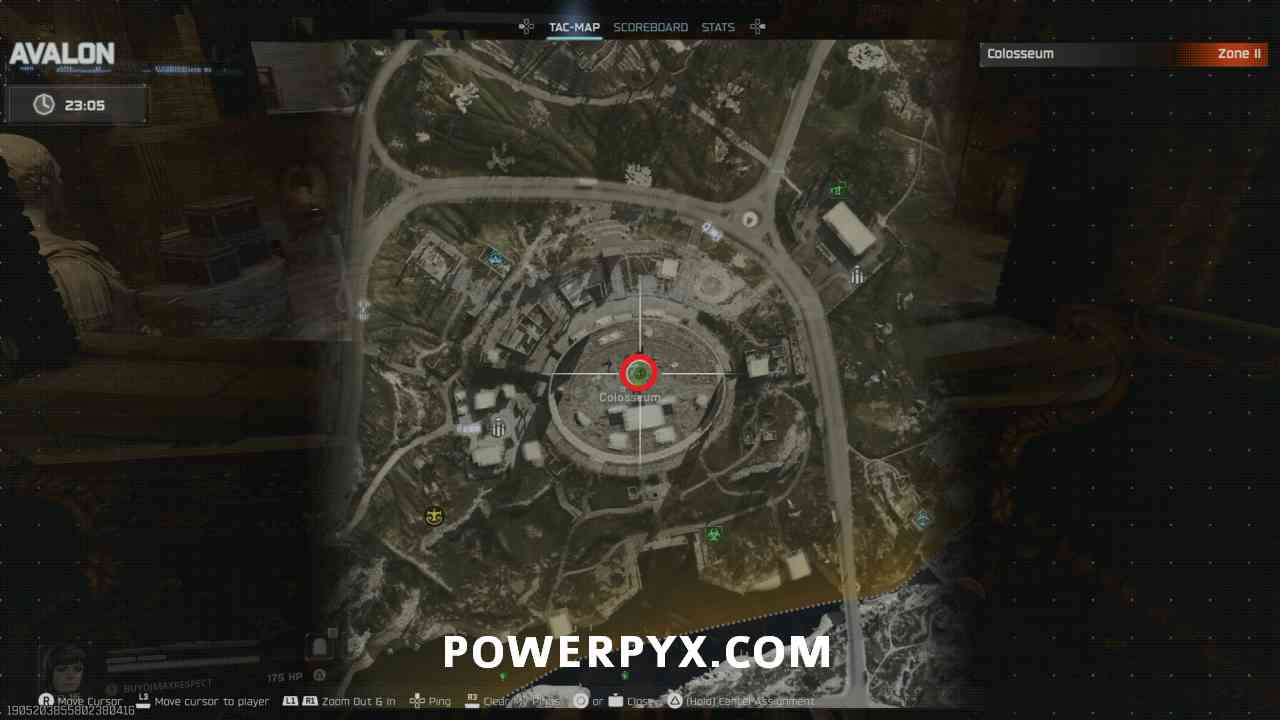
In the underground section of the Colosseum, on the table between the two chairs overlooking the boxing ring.


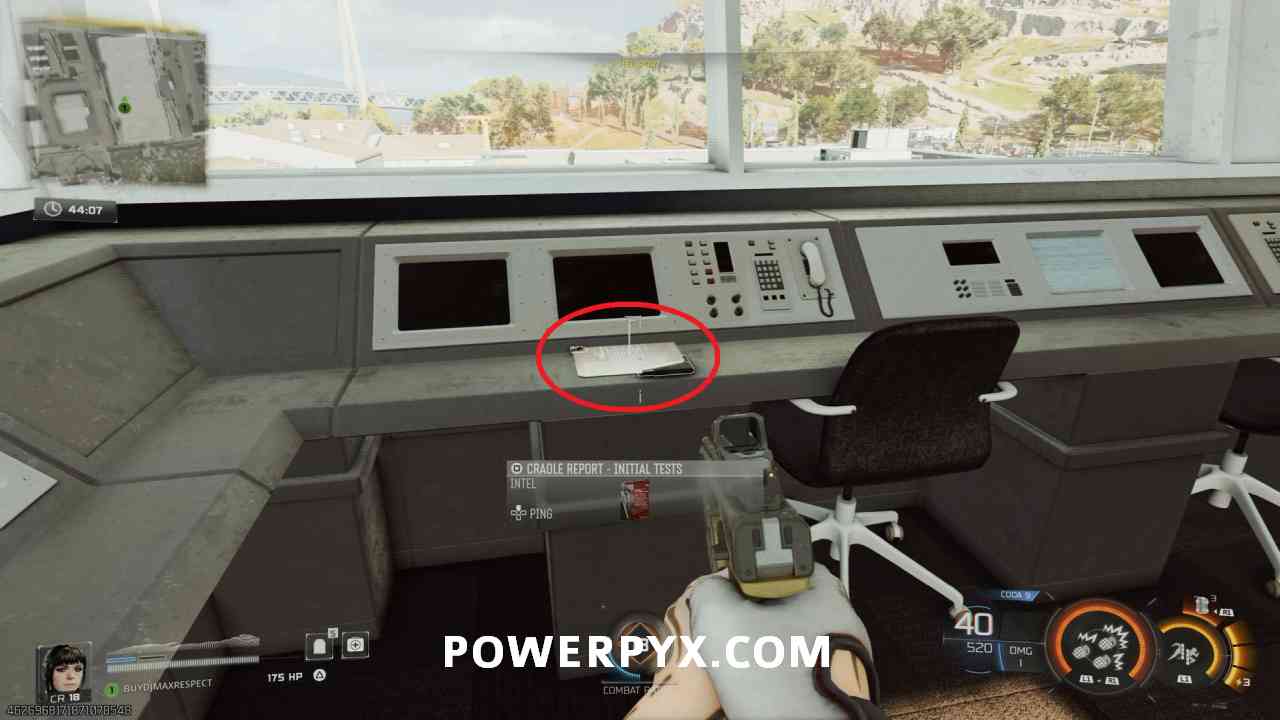
#4 – Intel 5: Cradle Report – Initial Tests
Location: Zone 2 – Heliport
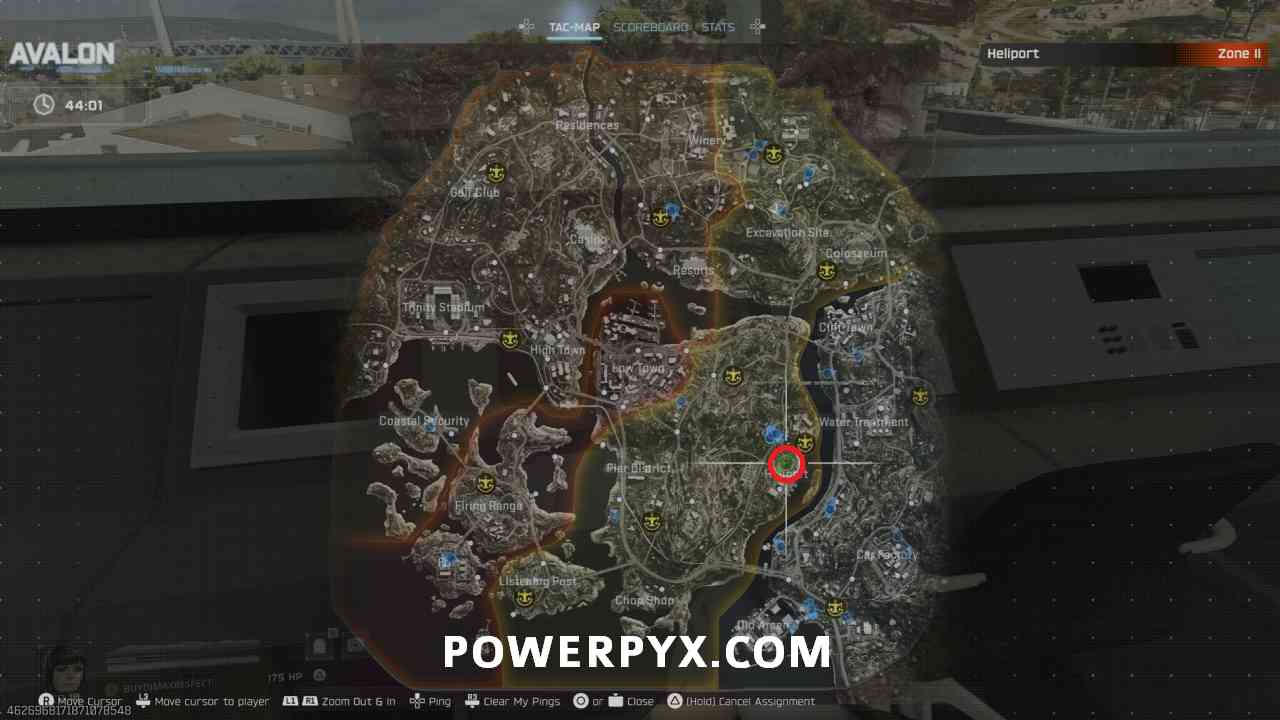
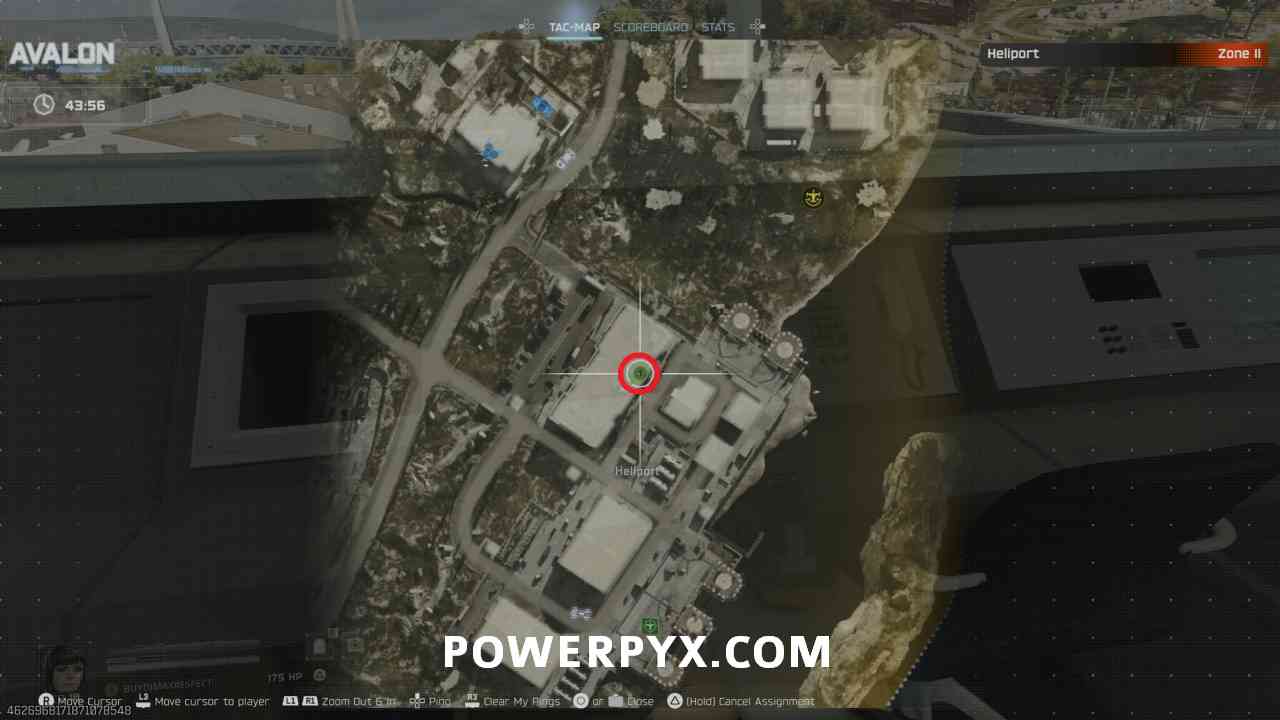
On the rooftop of the main Heliport building, inside the controller tower on the console in the south corner of the room.

#5 – Intel 19: Guild Report – Mike Harper
Location: Zone 2 – Northeast of Chop Shop


On top of the hill northeast of the Chop Shop location, climb the radio tower and the document is at the top.


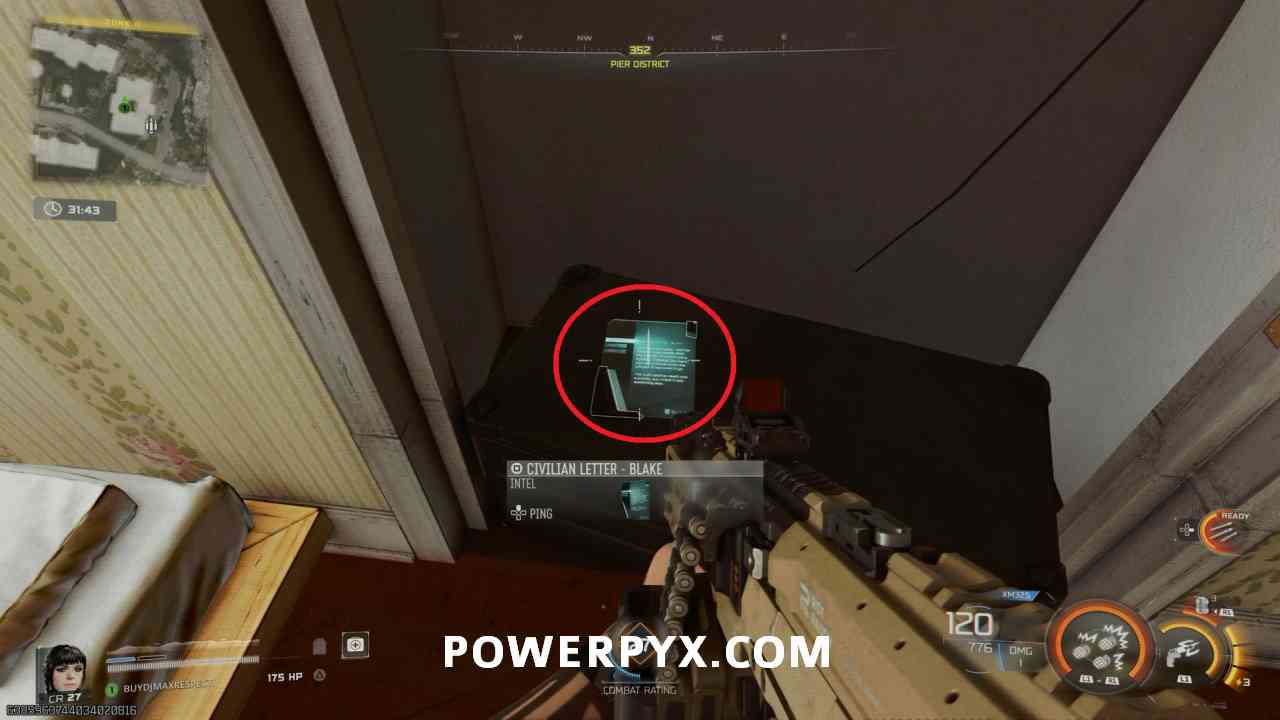
#6 – Intel 10: Civilian Letter – Blake
Location: Zone 2 – Pier District

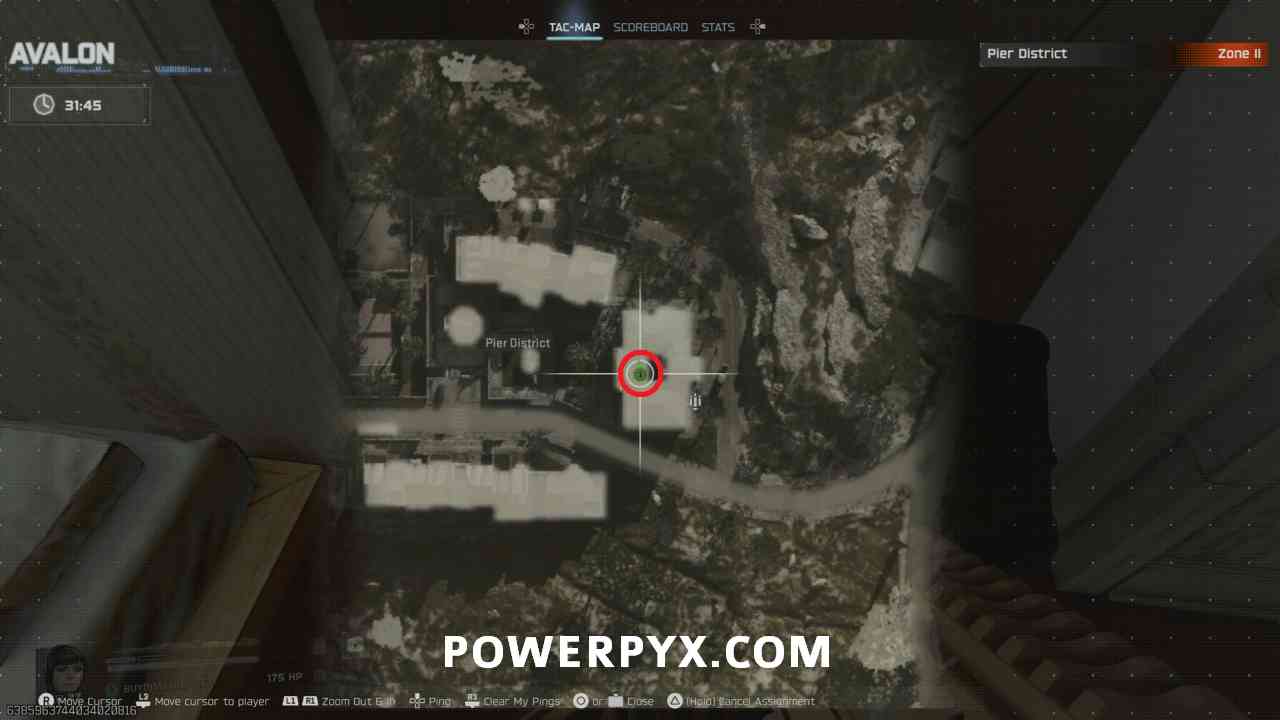
In the Pier District, climb the scaffolding to reach the top floor of the building with the hole in the middle, and the document is on the box to the right of the bed.

#7 – Intel 7: Cradle Report – Mid-level Tests
Location: Zone 2 – Listening Post

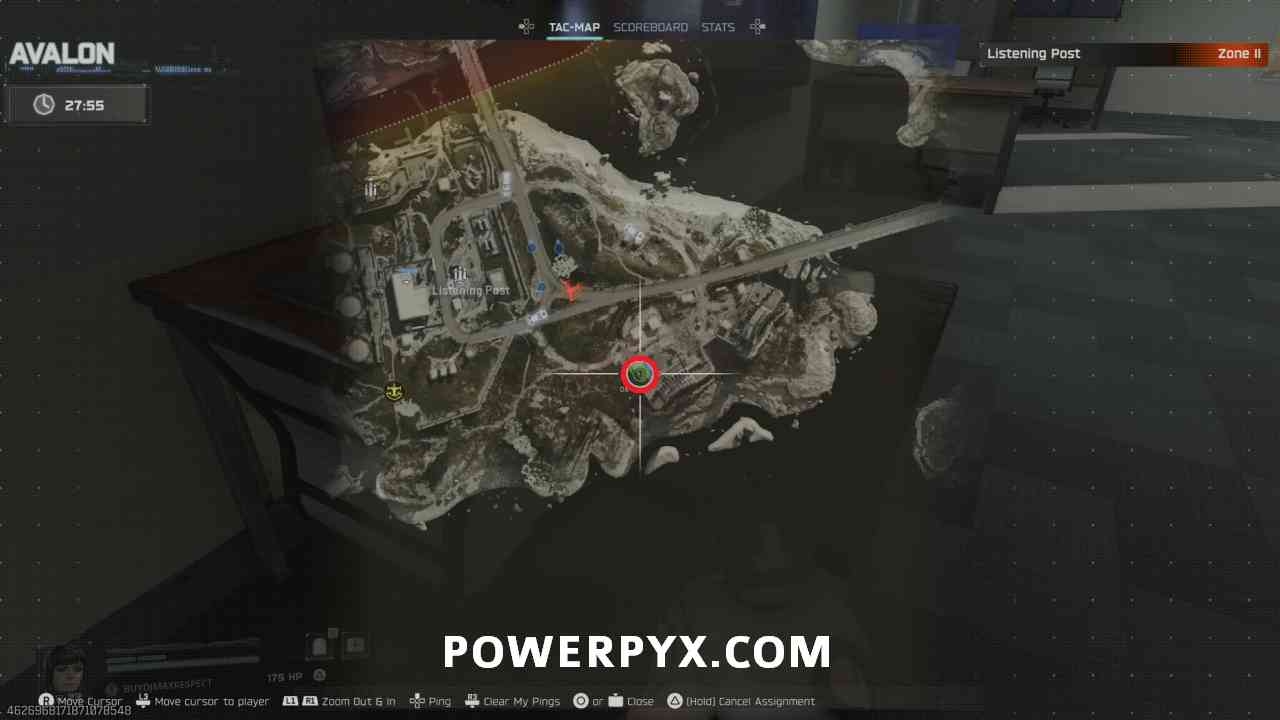
In the area southeast of Listening Post, on the top floor of the green building on a desk.

Zone 3
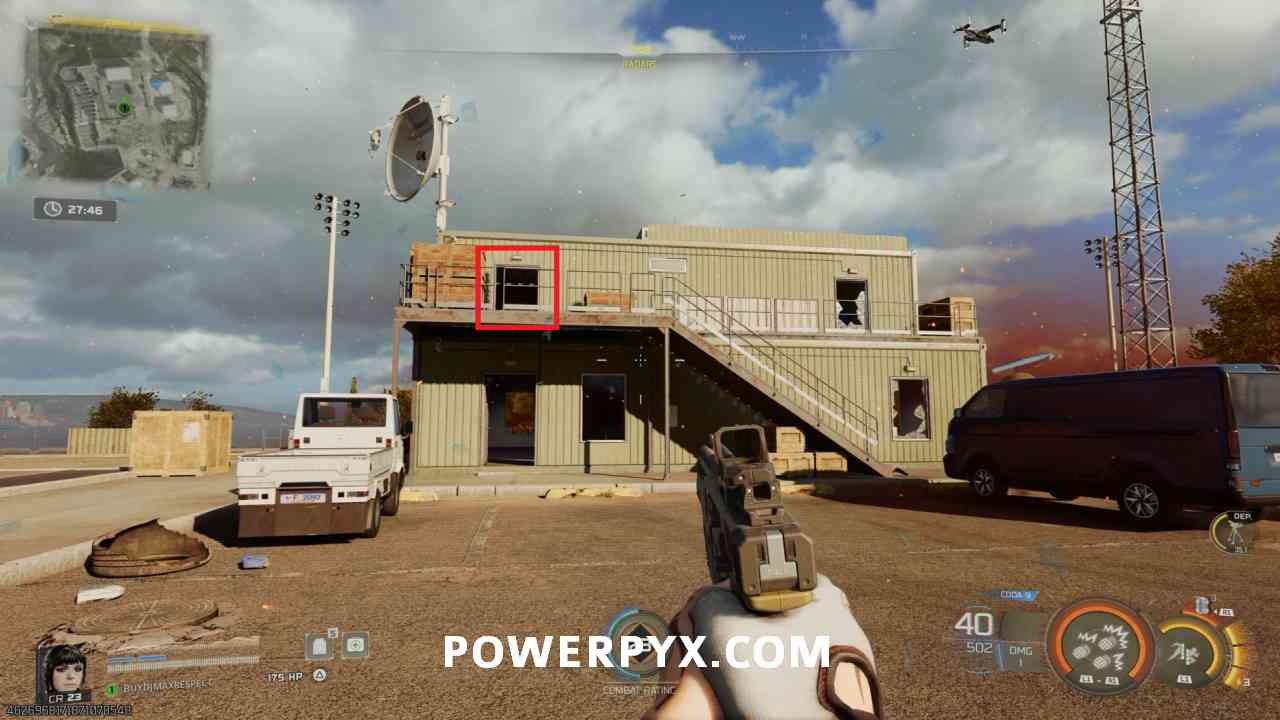
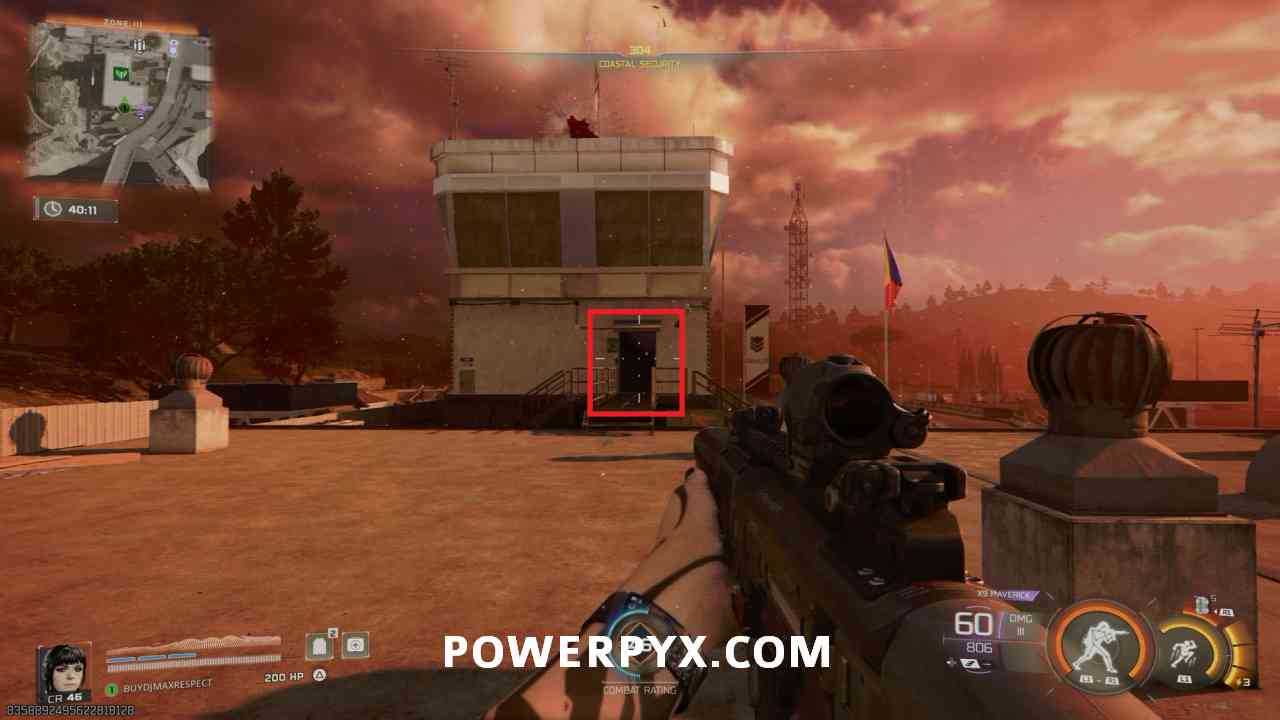
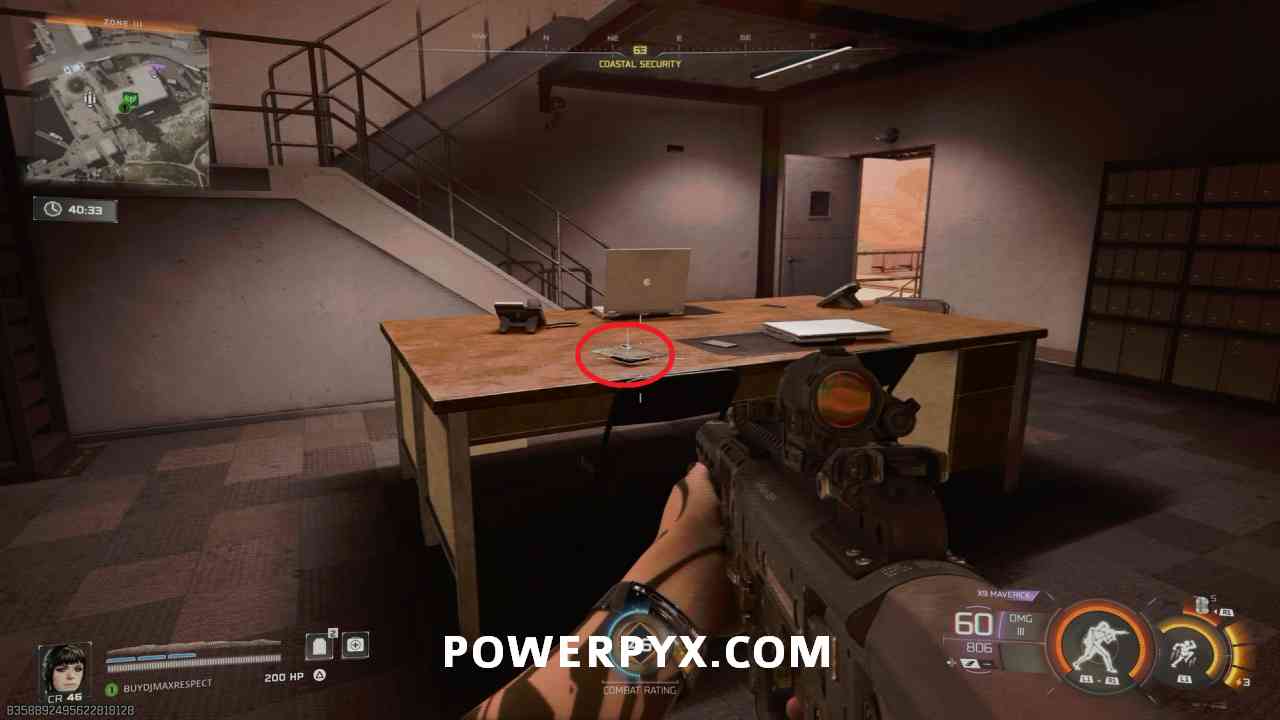
#8 – Intel 13: Avalon Security – Lockdown
Location: Zone 3 – Coastal Security
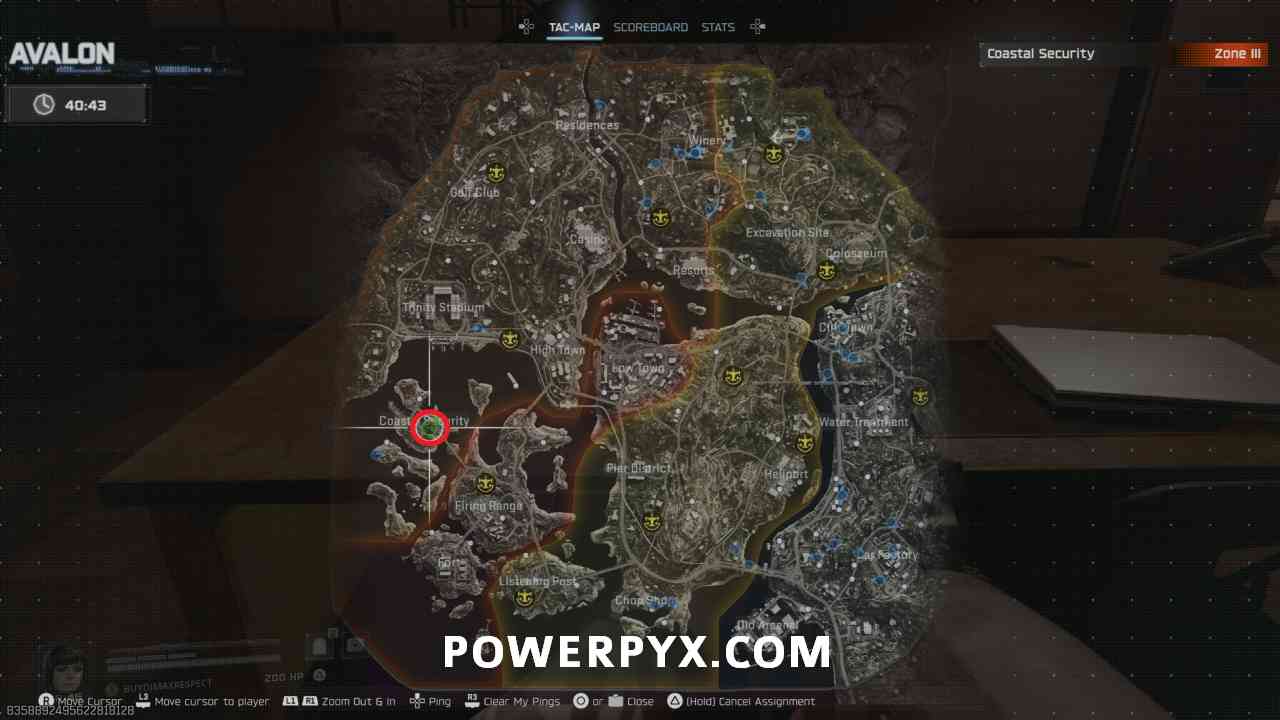
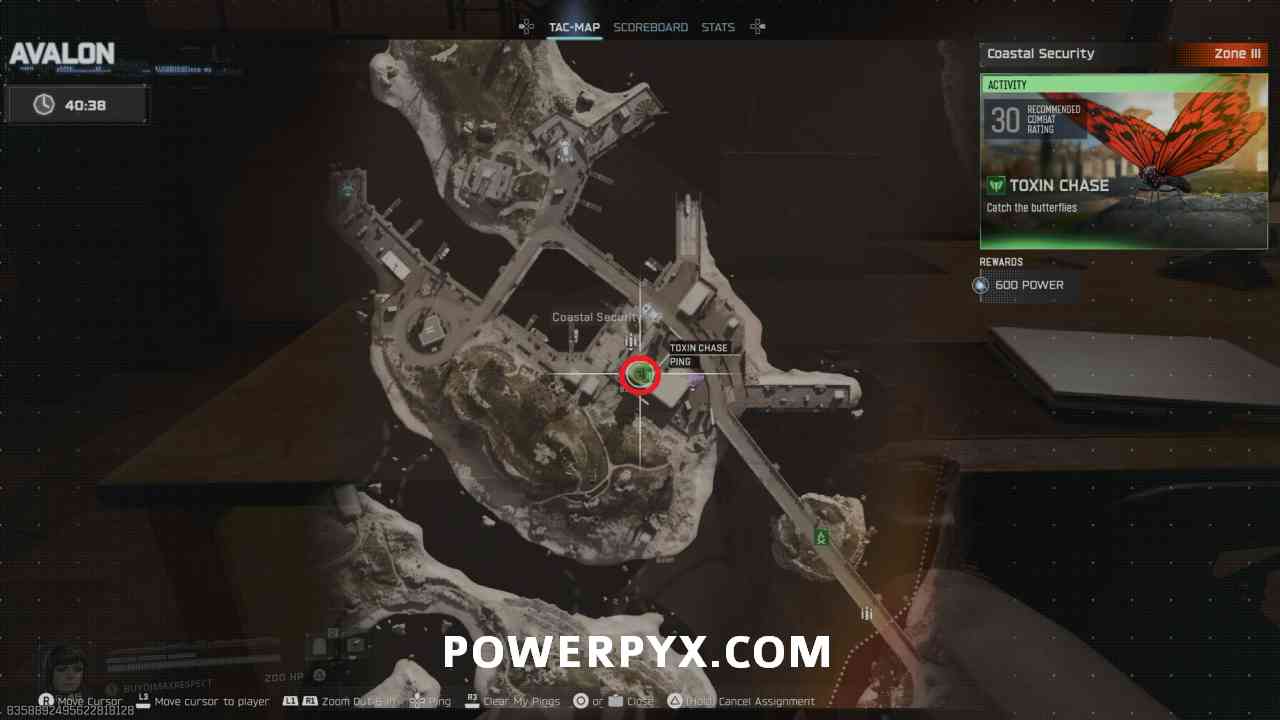
In Coastal Security, go on top of the main building and into the tower with the boarded up windows where the document is on the table.
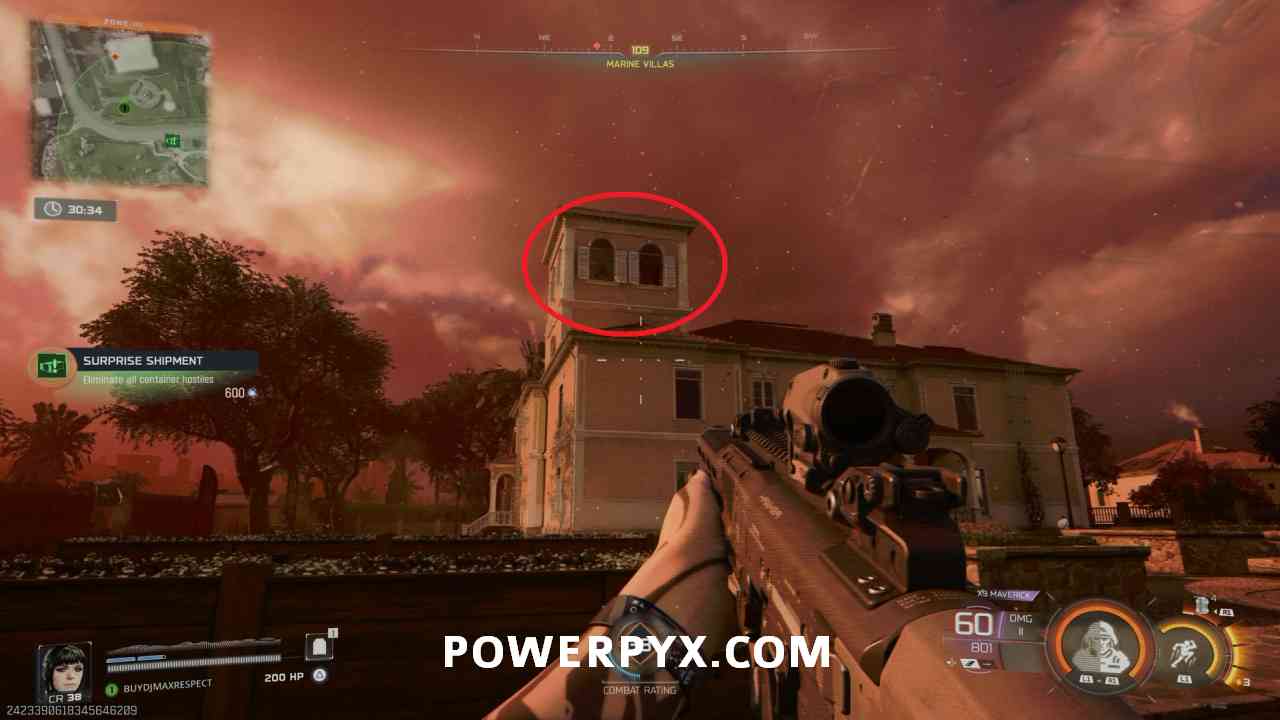
#9 – Intel 2: Guild History – Evolution of Vision
Location: Zone 3 – Southwest of Trinity Stadium

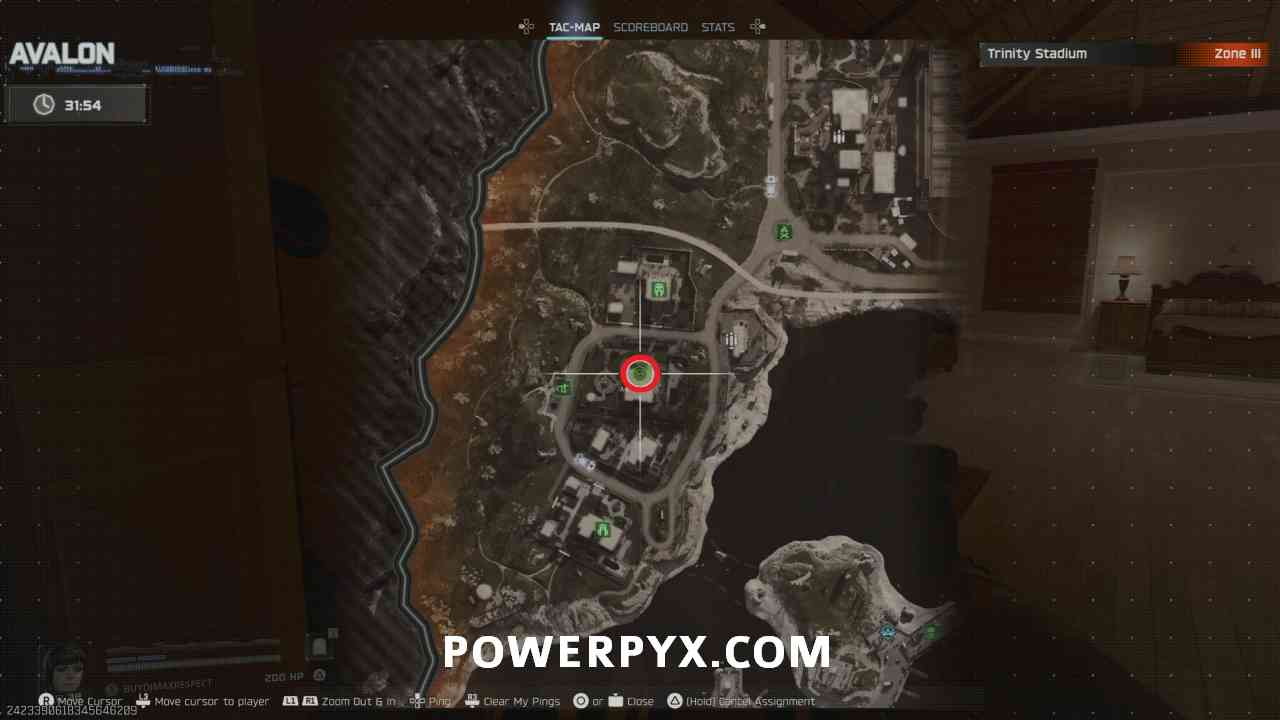
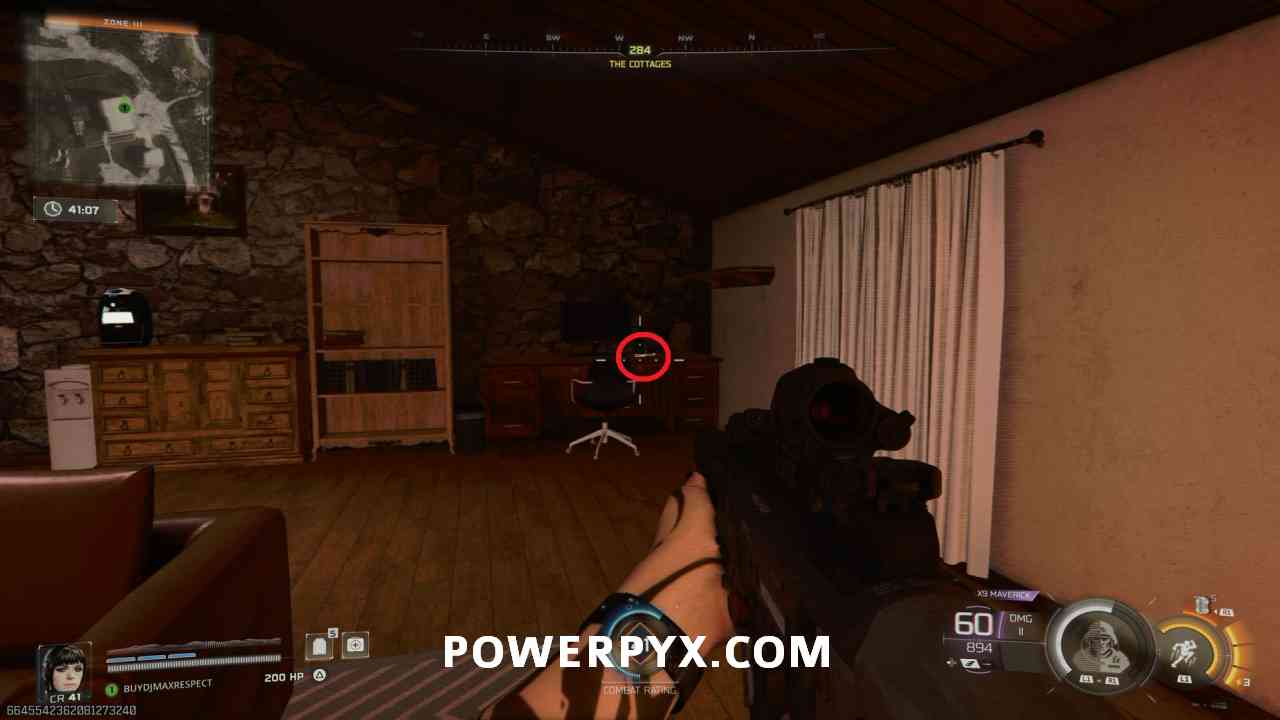
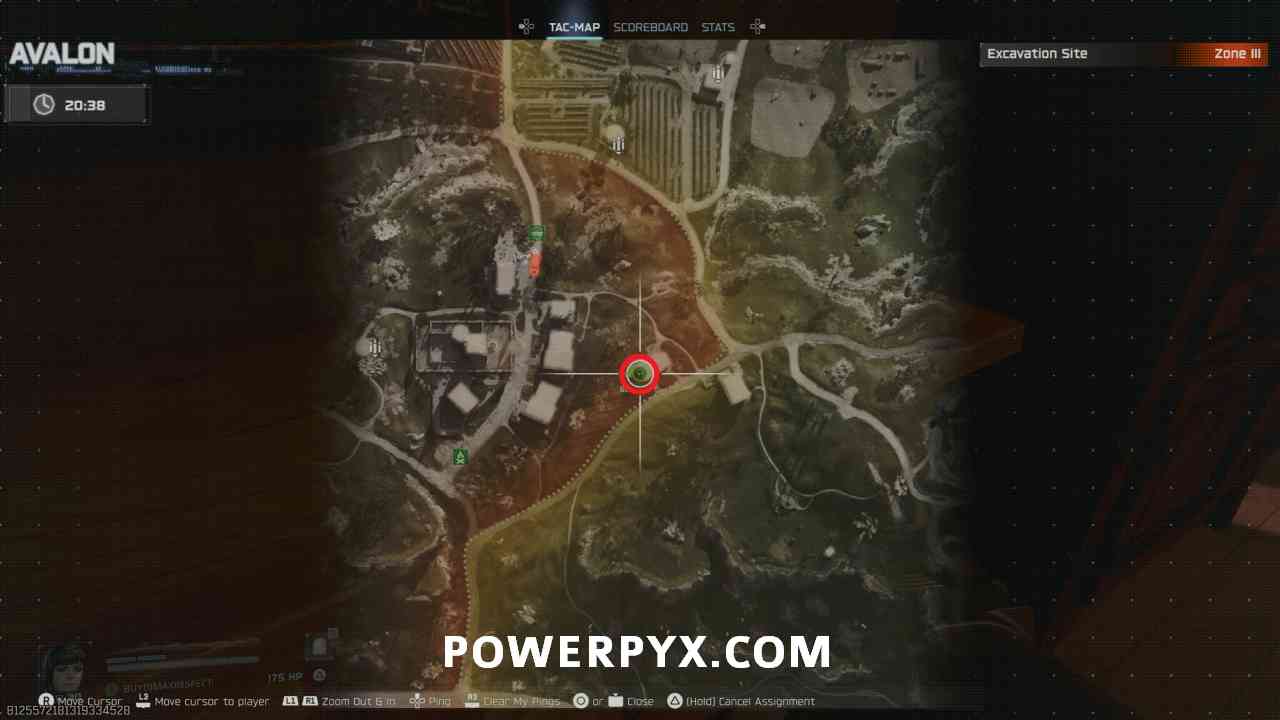
In the set of houses southwest of the Stadium, on the top floor of the middle one in a bedroom. You can reach the room quickly by going into the tower on top and going down the ladder.

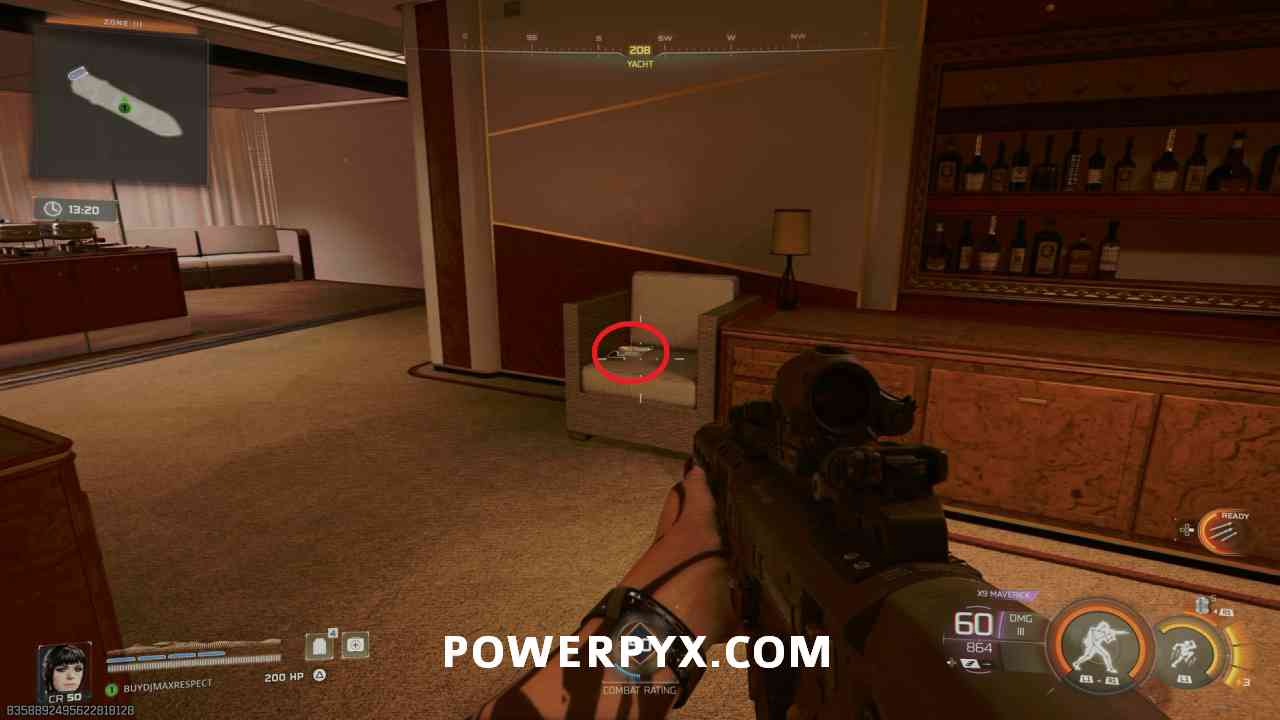
#10 – Intel 17: Guild Report – David Mason
Location: Zone 3 – Southwest of High Town

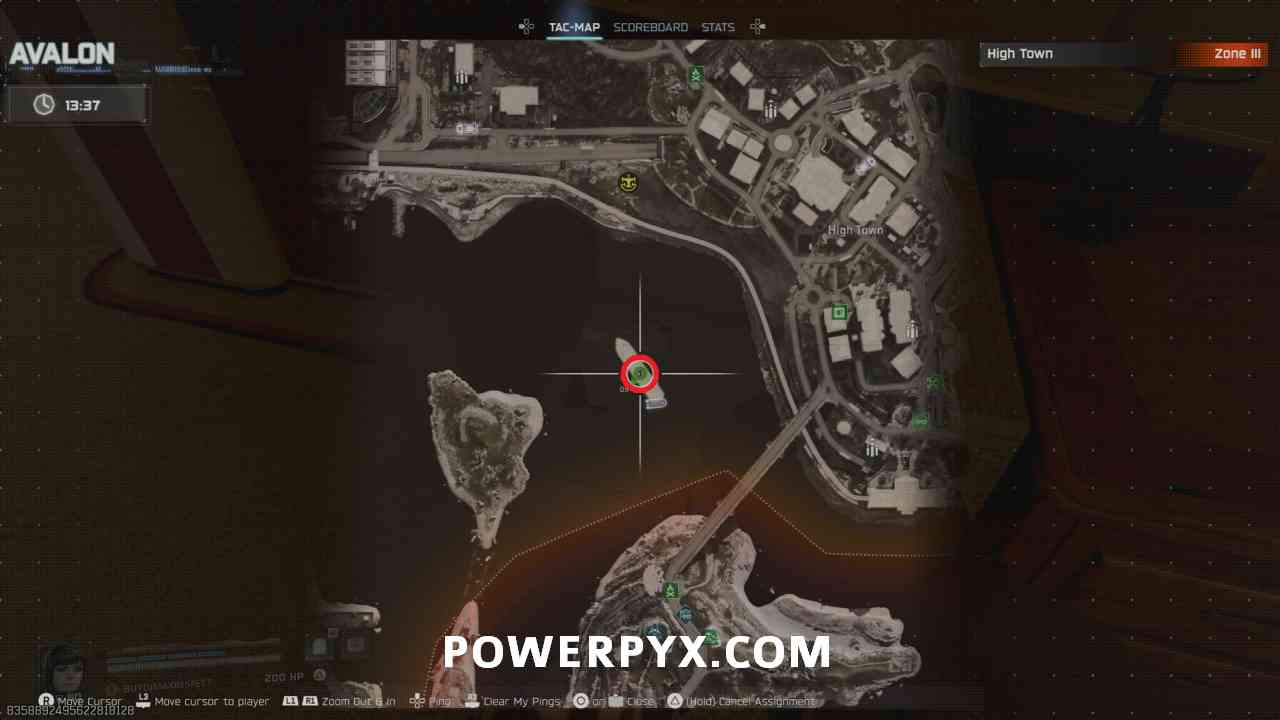
On the boat in the water southwest of High Town, on the second level sitting on a chair.

#11 – Intel 12: Civilian Letter – Rex
Location: Zone 3 – South of High Town


In the final building on the south end of High Town, on the ground floor east room on the table in the middle of the room.


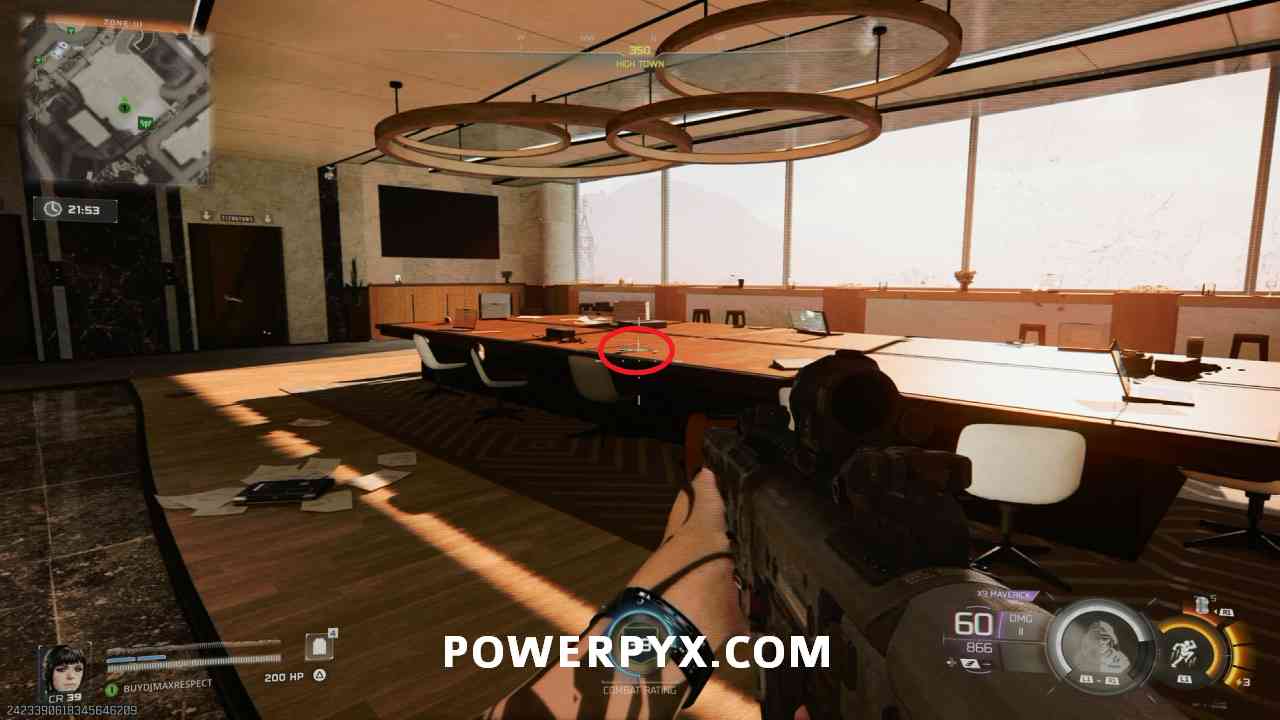
#12 – Intel 4: Guild History – Catalyst for Change
Location: Zone 3 – High Town
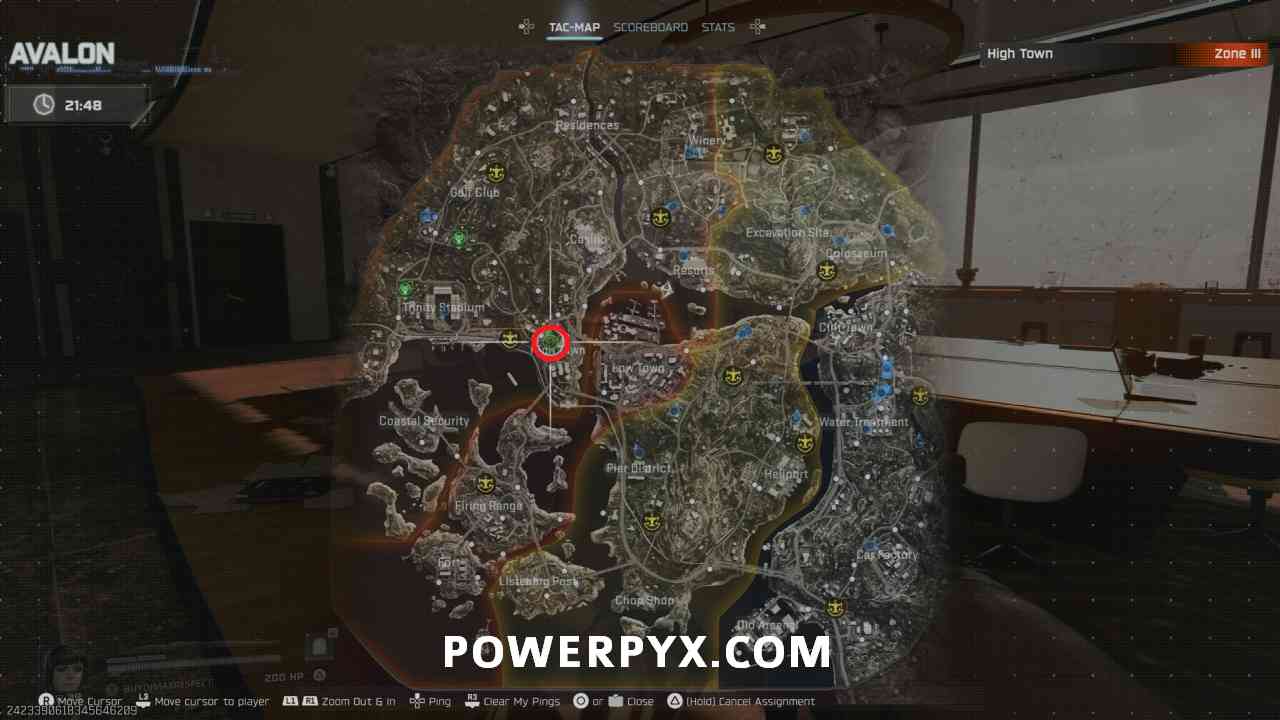

In High Town, use the ziplines to climb to the rooftop of the skyscraper, then down one floor to a boardroom where the document is sitting on the table.

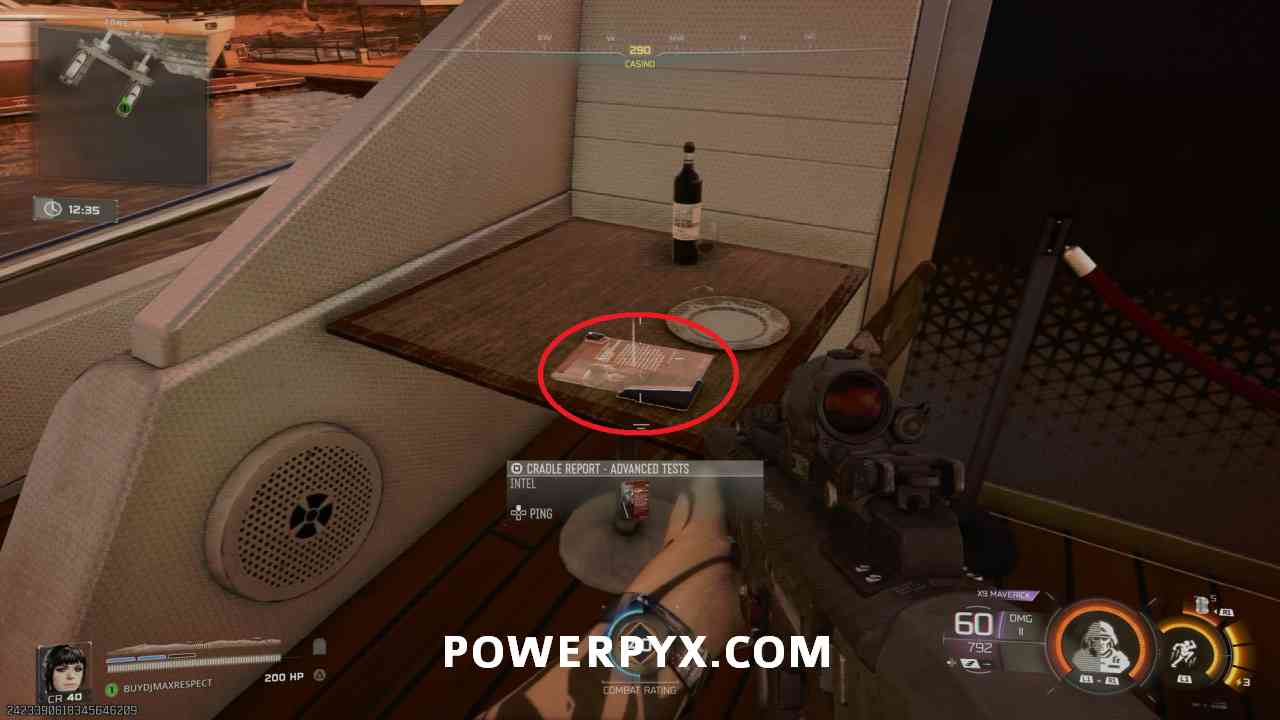
#13 – Intel 8: Cradle Report – Advanced Tests
Location: Zone 3 – Southeast of Casino


Southeast of Casino on the east boat, sitting on the back.

#14 – Intel 9: Civilian Letter – Mateo
Location: Zone 3 – South of Golf Club


South of Golf Club in the group of houses, on the bookshelf in the bedroom.

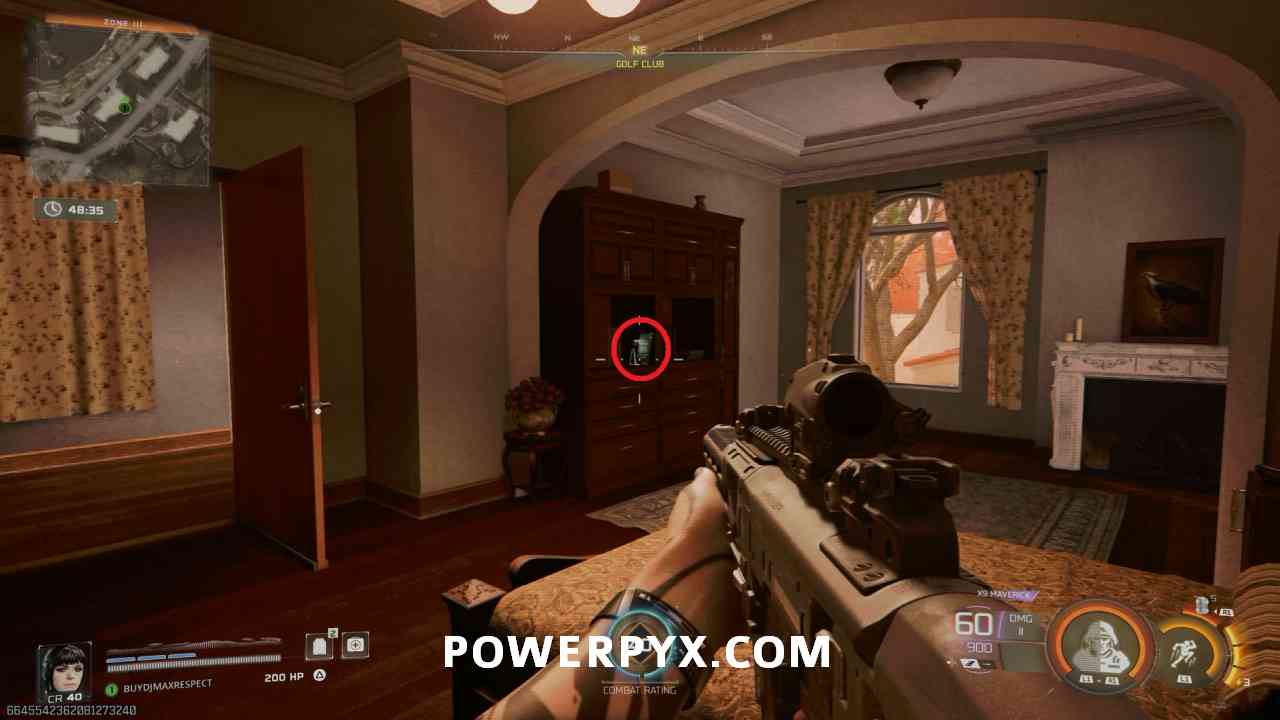
#15 – Intel 15: Avalon Security – Military Protection
Location: Zone 3 – North of Golf Club


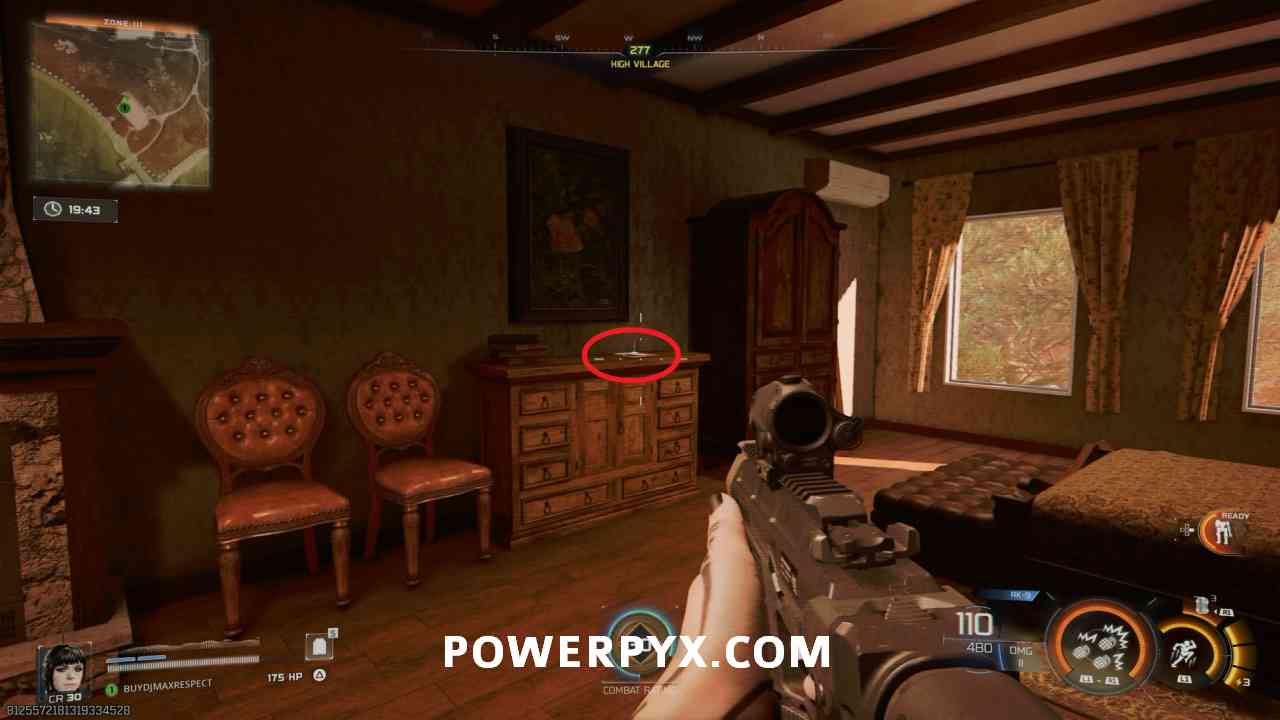
In the group of houses north of Golf Club, in the southern one in the bedroom on the second floor.
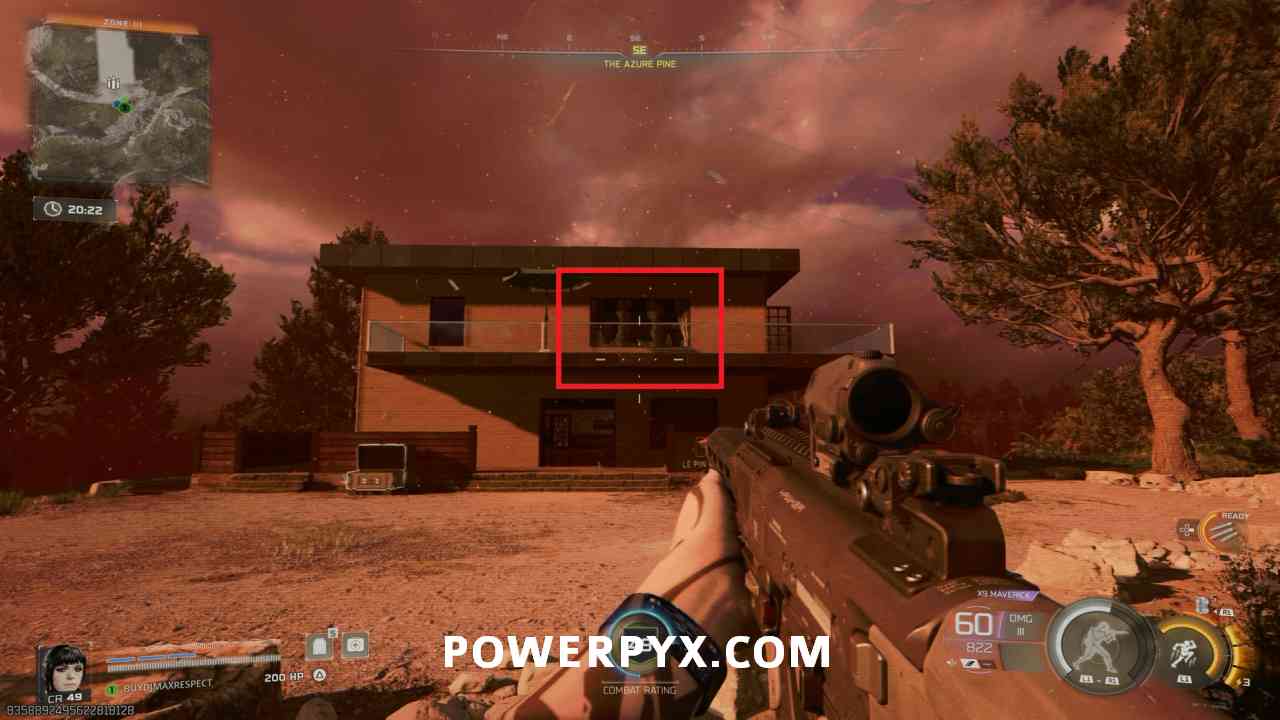

#16 – Intel 11: Civilian Letter – Nuha
Location: Zone 3 – Northwest of Winery
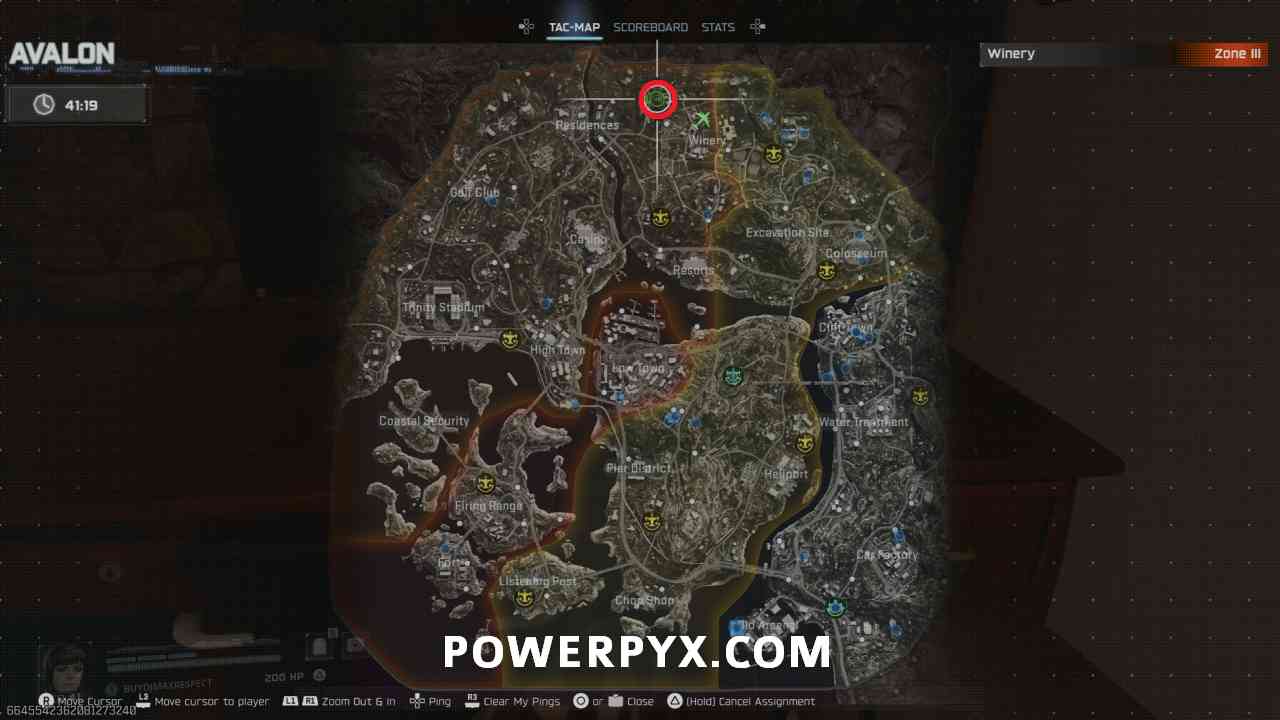
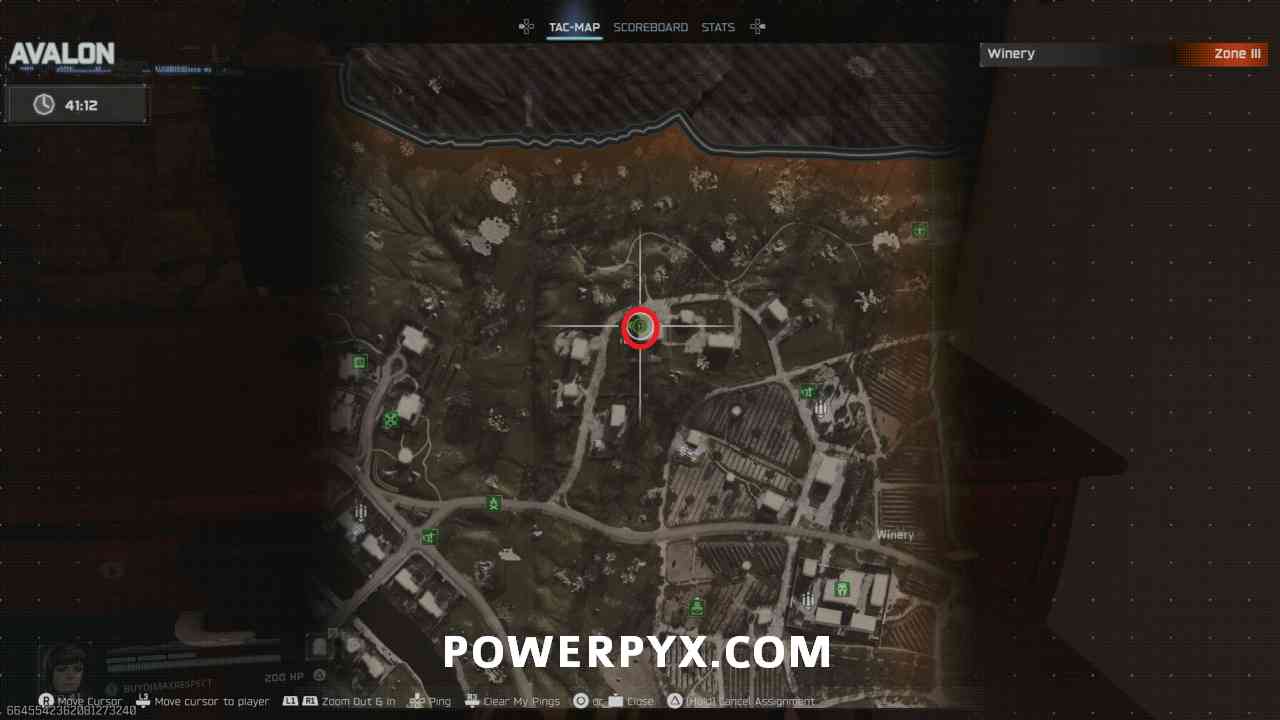
Northwest in the group of houses past the winery field, on the second floor on a desk.

#17 – Intel 20: Guild Report – Leilani Tupuola
Location: Zone 3 – Northeast of Resorts

In the area of buildings between Resorts and Winery, on the top floor of the building right near the Zone 2 and 3 border on a dresser.

Zone 4
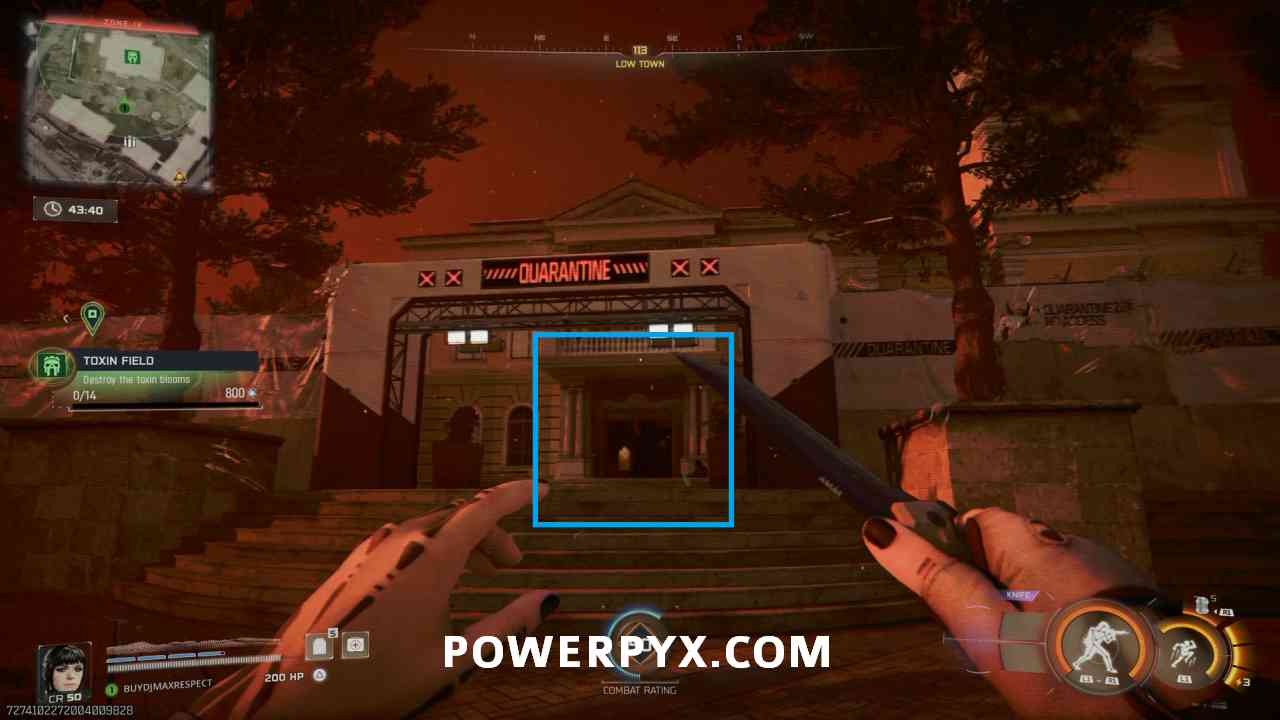
#18 – Intel 18: Guild Report – Eric Samuels
Location: Zone 4 – Low Town


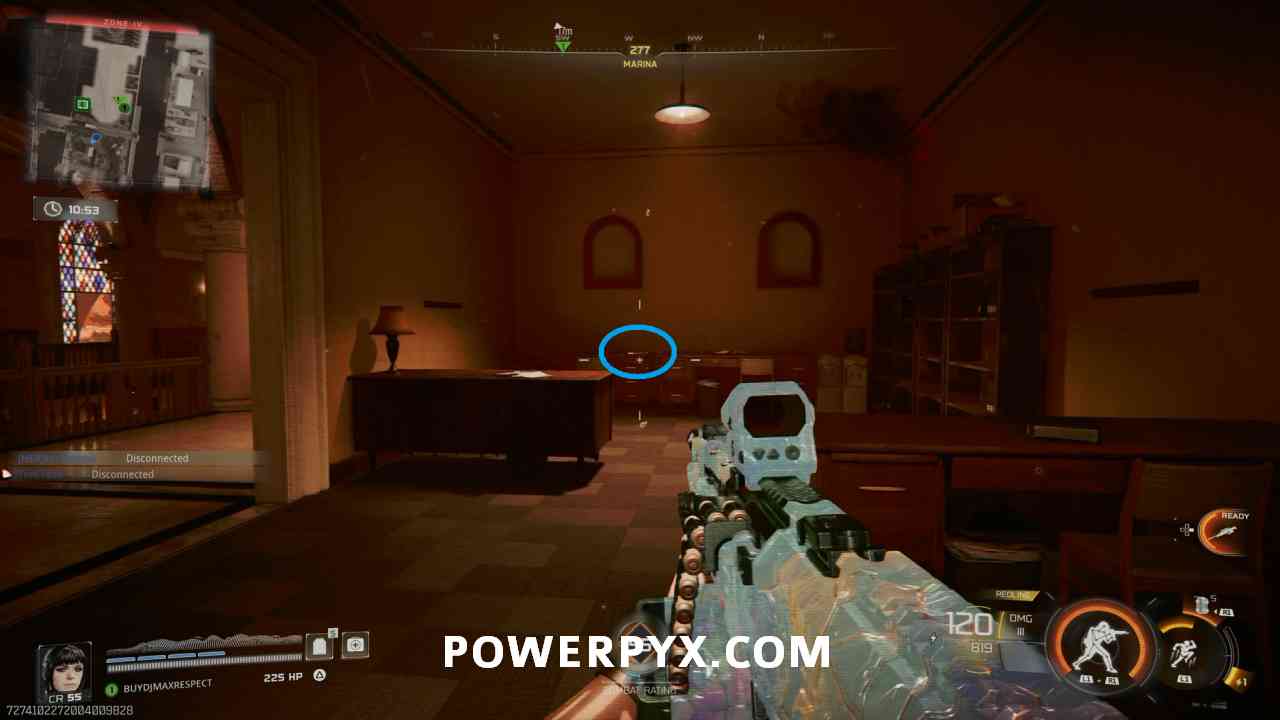
On the north end of Low Town in the cathedral, enter through the front door then go up to the balcony on the left side, where the document is on a desk in the room at the end of the balcony.

#19 – Intel 6: Cradle Report – Early Tests
Location: Zone 4 – Low Town

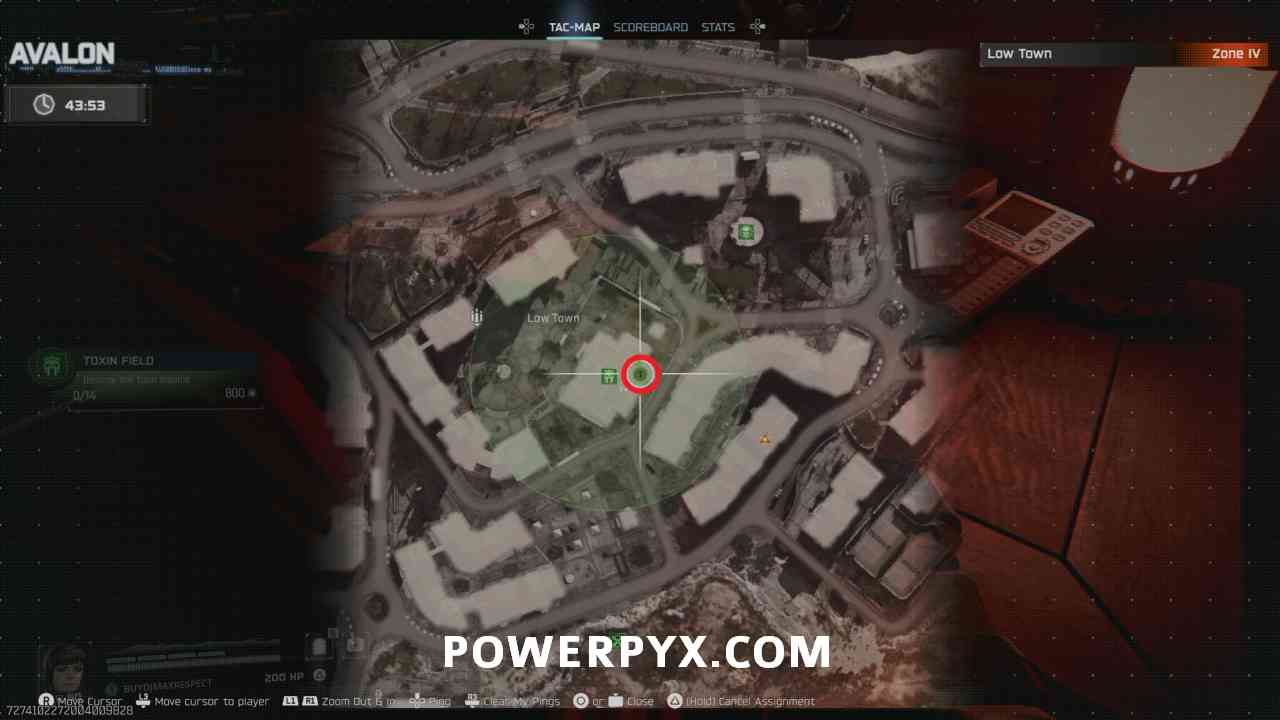
In Low Town go into the larger building which will typically have a Toxin Field event. Go up the stairs then left, then right to find the document on a desk on the second floor.

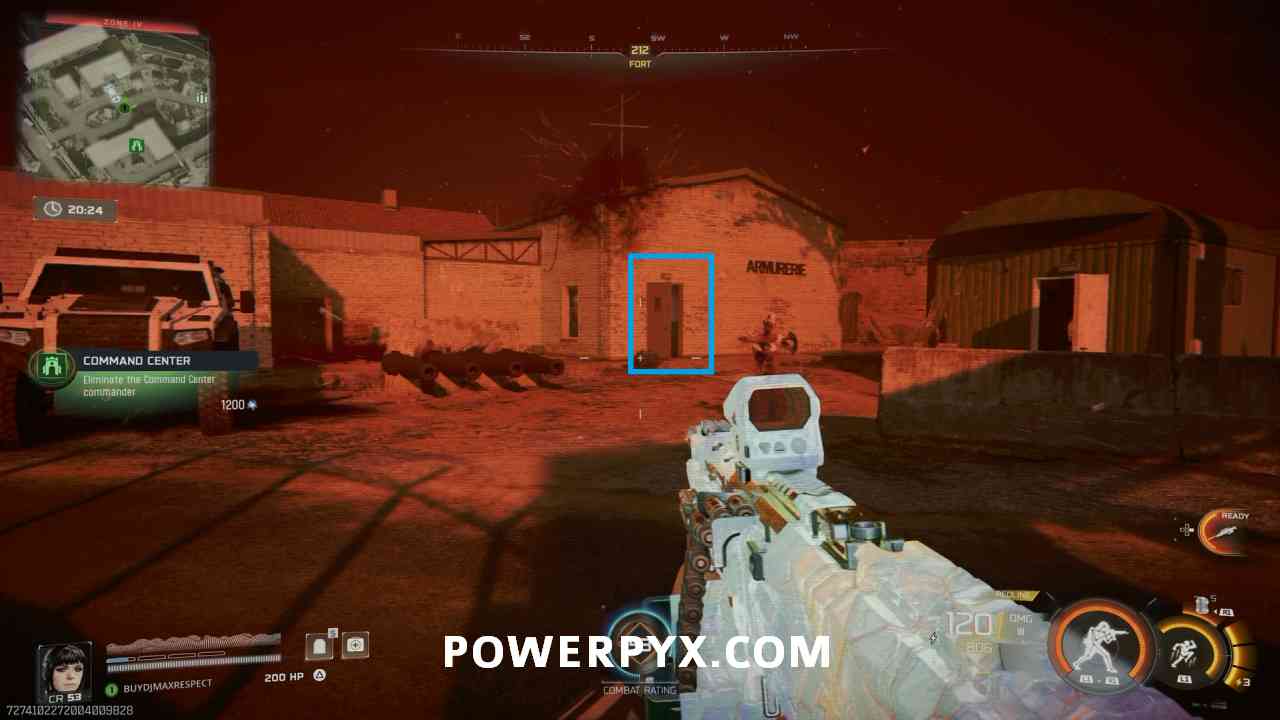
#20 – Intel 16: Restricted Access
Location: Zone 4 – Fort


In the Fort area, this is located in the armoury building in a room immediately on the right when entering by the “armurerie” text.

Leave a Reply