
Tormented Souls 2 contains a lot of puzzles, most of which are needed to advance through the game. Some of the puzzles can be tricky, so this guide will show you how to solve them.
Convent Puzzles
Flower Lock
Pick up the Holy Bible and Thumb Tack in the Infirmary. Examine the Holy Bible and combine the Thumb Tack on Jesus’ left hand to open the book and get the Flower Bud Key. Use the Flower Bud Key on the locked gate.

Bell Tower Puzzle
After obtaining the Hammer, you can go back to the Bell Tower and go all the way up. Use the Hammer to break the urns blocking your path and you can head to the top.
Once up town, you’ll want to attack the bells with your Hammer in this sequence to break the glass in the center of the area.
- 2nd Smallest (North)
- Largest (West)
- Smallest (East)
- 2nd Largest (South)
If you broke them in the correct order, the glass case in the center will shatter and reward you with the Shotgun.

Frozen Hand Puzzle
Obtain the Sawblade from the body hanging at the gallows in the Courtyard, and the Saw Handle in the Refectory behind the movable shelf. Combine them both to get the Handsaw, and use it on the frozen hand inside the freezer in the Kitchen.
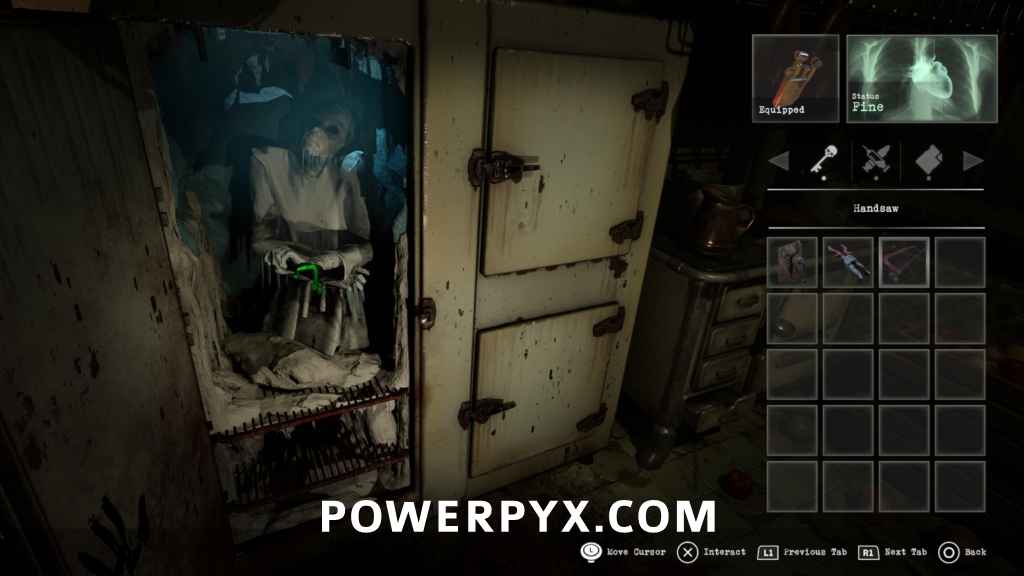
While still in the Kitchen, go down to the stoves and interact with one of them to open it up and use the Lighter on it to light the burner. Use the Frozen Hand on the hot burner to melt the ice and get the Cryptex.

Cryptex Puzzle
Examine the Cryptex in your inventory and arrange the chess pieces in this order from left to right.
- Knight.
- Rook.
- Bishop.
- Queen.
- King.
- Pawn.
- Knight.
If done in the correct order, it will open and give you the Crown Key.

Prison Cell Power Puzzle
Interact with the power box and use the Pliers on the wire to open it. You’ll then want to arrange the dials in the order below from left to right.
- Pointing Right.
- Pointing Left.
- Pointing Left.
- Pointing Left.
- Pointing Right.
After that, go into the room with the prison cells and activate the lever to unlock all the cells.

Museum Door Puzzle
After getting the Museum Key from Joseph, you can use the key on the Museum door to move the bolts in a specific order to have them unlock the path of the bar in order to open it.
- Middle Bolt.
- Left Bolt.
- Right Bolt.
Afterwards, all 3 bolts should be out of the way and let you open the door.

Mirror to the Other Side Puzzle
Interact with the mirror and then use your lighter to light specific candles to open the way through. Below are the candles you should light.
- Top Left.
- Bottom Left.
- All Right Side, except Top Right.

Telephone Puzzle
After obtaining the Rotary Dial in the Basement, use it on the Telephone in the Library. You’ll then want to dial “3890*”, which will open the nearby painting, giving you the Jade Disk.

Jade Ornament Puzzle
After obtaining the Jade Ornament in the Museum and the Jade Disk from the Telephone Puzzle, examine the Jade Ornament and turn it around, then combine the Jade Disk with the missing spot. You’ll then need to click the buttons on the side to rotate the discs to make a complete square. The order you want to click the buttons in is below.
- Right.
- Down.
- Left.
- Right.
- Right.
Afterwards, this should make a perfect square and you can now use the Jade Ornament to unlock the Chapter House Door, where you can grab the Plant Sprayer (Empty) inside.

Angel Statue Puzzle
Go to the Angel Statue in the Museum (Other Side) and use the Lighter on the scroll. Go through the Torture Chamber (Other Side) until you locate the second mirror that leads you to a secret area and interact with the bronze bull to get the Stone Heart.
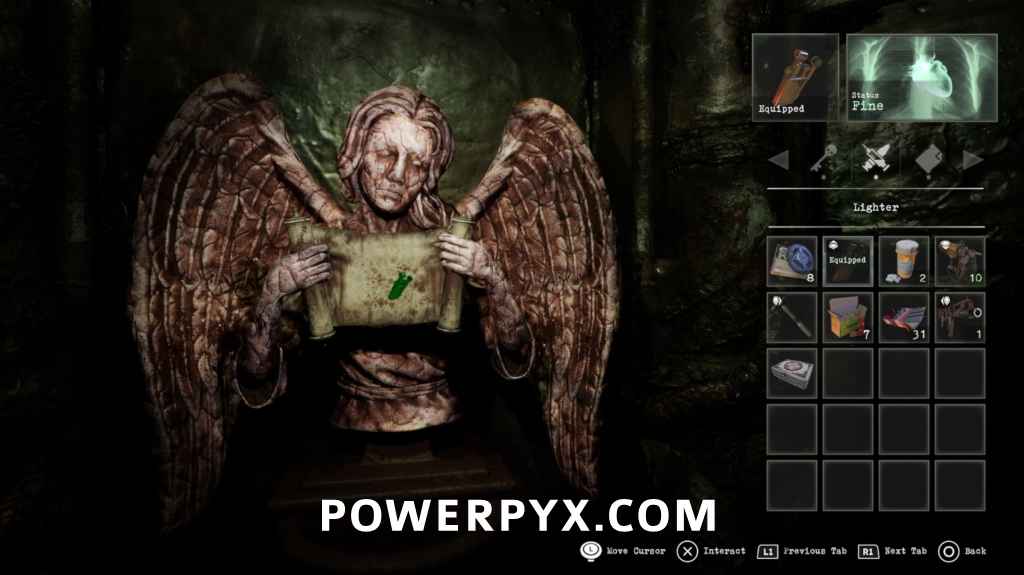
Go back to the Angel Statue in the actual Museum and use the Stone Heart to fill the bowl with blood, then use the Plant Sprayer (Empty) to fill it up, which will now let you go through the door into the Lady Chapel.

Mall Puzzles
Pharmacy Mini Fridge Puzzle
After turning on the power in the Mall, go into the Pharmacy and interact with the Mini Fridge in the back and input the colors left to right.
- A – Blue.
- B – Yellow.
- C – Red.
You can then interact with the door on the Mini Fridge to open it and get the Dojo Key.

Claw Machine Puzzle
After getting the Coins from the telephone, use them on the claw machine in the Amusement Arcade. Guide the claw to the bear on the far right in the middle that only has 1 eye and pick that one up. You can then examine it and use the Box Cutter on it to get the Gold Ring.

Processing Plant Puzzles
Open Vent Puzzle
Inside the Freezer, go into one of the rooms and you’ll see a painting on the wall. Interact with the painting and click where the heart is on the girl in the center of the photo to open a secret hallway. Go down the hallway and enter the last room on the left by interacting with the button on the wall. You can pick up the VHS Tape – Freezer there and go back to Conference Room. Use the VHS Tape – Freezer on the projector to go back to the past. Enter the last room on the left again then move the shelf on the back wall to block the vent, which will save the girl in the present.


Elevator Power
In the Underground Docks, interact with the power grid and spin the dials in the order below to power the elevator.
- Dial 3 – Spin Three times.
- Dial 2 – Spin Once.

Corridor 2F Keypad Lock
After getting the Cassette Player from the Underground Docks, examine the back of it and take out the batteries. Go to the locked door in Corridor 2F and use the batteries on the keypad to power it and input “1765” to unlock it. Make sure you take the batteries out of the keypad once the door is unlocked.

Voice Activated Lock
After getting the Cassette Tape – Confession, place it in the Cassette Player, as well as putting the batteries back in. Go to Voice activated lock in the Corridor Basement and interact with the intercom. Interact with the Cassette Player and press play on it, and you’ll hear it playing. Once it starts playing you can go back and hover over the red button on the intercom. Once the Cassette Player starts talking about passwords, press the button on the intercom and the door will unlock once the Cassette Player says “Long Pig”.

Cage Puzzle
In the Warehouse interact with the control panel to be able to move the cages around. You’ll need to not only have them moved so you can get through in this world, but also have them placed in a specific way to access the path in the Other Side.
- Pick up the cage in the bottom left and place it in the top right.
- Pick up the cage in the bottom middle and place it between the 2 cages at the top.
- Pick up the top cage in the left row and hold it.
You should be able to walk through this area now, and also be able to walk through it once you reach the Other Side.

Mirror to the Other Side Puzzle
Interact with the mirror and then use your lighter to light specific candles to open the way through. Below are the candles you should light.
- Middle Left.
- Middle Right.
- 1 below Middle Right.

Waste Disposal Furnace Puzzle
Once at the Other Side, pick up the Toy Figurine in the Warehouse and go into Waste Disposal (Other Side) and place the Toy Figurine on the table inside the incinerator.
Go back to the real world and go back to the Waste Disposal area and interact with the control panel. You’ll need to turn the knobs in this order to make them all pointing upwards.
- Bottom Left.
- Top Middle.
- Bottom Middle.
- Middle Left.
- Middle Right.
- Top Right.
- Top Left.
- Bottom Left.
Once all the dials are pointing upwards, interact with the other control panel to close the doors to the incinerator, and then to burn the corpse to get Spiral Keycard off him.

Dining Room Portrait Puzzle
In the dining Room, you’ll need to do specific actions in front of the paintings to get them to light up.
- In front of the painting with the girl aiming at a cow, aim your Crossbow.

- In front of the painting of the guy holding a lantern, hold your Lighter. You might need to walk around a bit for it to trigger.

- In front of the painting of the girl spinning, use tank controls so spin around in a circle until it lights up.

- In front of the painting of the guy forging, hit the painting with your hammer.

After doing all 4, the Mechanical Jack will drop in the center of the Dining Room.
Cemetery Puzzles
Reliquary Puzzle
You’ll first need to collect all 4 of the animal dials to do the puzzle.
- Bird Dial – Cemetery Grounds, Inside a coffin at the bottom of the stairs in the center area.
- Turtle Dial – Cemetery Entrance, inside a coffin in the right mausoleum at the north most area.
- Bat Dial – Cemetery Entrance, inside a coffin the mausoleum near the Cemetery Grounds gate.
- Dog Dial – Cemetery Grounds, inside the hanging coffin to the left of the Grave Puzzle.

After having all the dials, go to the small building on the far left of the Cemetery Grounds and interact with the Reliquary. You’ll need to put the dials in the correct order, and in the correct rotation.
- Bird Dial – Rotate once.
- Turtle Dial – Rotate 4 Times.
- Bat Dial – Rotate 4 Times.
- Dog Dial – Rotate 7 Times.

Star Constellation Puzzle
After getting the Constellation Outer Piece from the Mausoleum in the Cemetery Grounds, and the Constellation Center Piece in the Burial Chamber, combine them to make the Constellation Disc. You’ll then need to rotate it so it makes the star constellation for the Gemini star sign.
- Rotate the outer ring 5 times.
- Rotate the middle ring twice.
- Rotate the center ring 7 times.

After all the pieces are rotated correctly, you can use the Constellation Disc at the base of the statue outside the Mausoleum in the Cemetery Entrance.
Grave Puzzle
After getting the Metal Detector in the Gemini Mausoleum, you’ll need to find 3 metal octagons in the Cemetery. In order to find them, you’ll need to equip the Metal Detector and hold  /
/  to put it to the ground and listen for the beeping. Once you’re on the location where it starts beeping rapidly, the item will appear on the ground.
- Bronze Octagon – Near the tree where you find the Club Key in the Cemetery Entrance.

- Silver Octagon – Near the bridge in the Cemetery Entrance.

- Gold Octagon – Near the pointing statue in the West Cemetery.

After obtaining all 3 of the octagons, go to the grave in the center of the West Cemetery and use the octagons in the correct order from left to right, then spell out “PEDRO”.
- Gold Octagon.
- Silver Octagon.
- Bronze Octagon.

The Four Horsemen Puzzle
After getting the Marble Sword in the Catacombs, go to the Burial Chambers and use it on one of the Four Horsemen who’s missing an arm. You’ll then need to rotate their arms so their swords are pointing in a specific direction to activate the elevator.
- Horseman with the Crown – Don’t touch, his sword is already in the correct position.
- Horseman with soldiers armor – Rotate 6 times to the right.

- Horseman who looks like a zombie – Rotate 3 times to the right.

- Horseman who had the missing arm – Rotate once to the left.

If you rotated all the swords correctly, the elevator in the center will activate.
School Puzzles
Xylophone Puzzle
After getting the Xylophone from the Kindergarten Classroom and the Metal Spoon from the School Yard, go to East Corridor B and stand to the left of the Beethoven Statue, where his hearing implement is pointing. Use the Xylophone and combine the Metal Spoon with it to be able to play. You’ll need to play the colors in the order below.
- Purple (Key 4)
- Yellow (Key 6)
- Green (Key 1)
- Blue (Key 3)
- Red (Key 2)
- Blue (Key 3)
- Yellow (Key 6)
- Red (Key 2)
If you placed it correctly, the statue will unlock a hidden compartment and give you a 7A Fuse.

Helena’s Cabinet Puzzle
In Classroom 102 interact with the locked cabinet and input the code below.
- Book.
- Ruler.
- Compass.
- Sharpener.
If you did it correctly, the cabinet will open and give you another 7A Fuse.

Teacher’s Request Puzzle
After getting the Apple Seeds from Classroom 103 and the VHS Tape – Playground from Classroom 104, go to the Art and Music Room and use the VHS Tape – Playground on the projector to go to the past. Once in the past, use the Apple Seeds on the planter and drag the table it’s on so the planter is underneath the faucet. Go back to the present and go into the Playground to get an Apple from the planter. Head back to Classroom 103 and use the Apple on the teacher’s hand to get the Snake Figurine.

Mirror to the Other Side Puzzle
Interact with the mirror and then use your lighter to light specific candles to open the way through. Below are the candles you should light.
- Top Middle
- Bottom Left
- Middle Left.

Birdcage Puzzle
Inside Classroom 202 (Other Side), interact with the safe and input the following code from left to right.
- Grenade.
- Fire.
- Male Symbol.
- Sun.
- Happy Mask.
If you did it correctly, the safe should open. Once it opens, you can go back to Classroom 202 in the real world and collect the Hawk Figurine.

Girl’s Bathroom Puzzle
After getting the Insecticide Can in Storage Room 201 and the Insecticide Sprayer in the Director’s Office (Other Side), combine them to get the Filled Insecticide Sprayer. Go to the Girl’s Restroom (Other Side) and use the Filled Insecticide on the toilet covered in flies. You can then go back to the real Girl’s Restroom and pick up the Fly Figurine from the toilet.

Animal Figurine Puzzle
After collecting all 4 Figurines, 3 from completing puzzles listed above, and 1 inside Room 203 (Other Side), go to the Science Lab and interact with the wooden stand. You’ll need to place the figurines in order from the tallest slot to the lowest slot.
- Hawk Figurine.
- Snake Figurine.
- Toad Figurine.
- Fly Figurine.
If placed correctly, the stand will open giving you Master Key.

Combination Key Lock 1
After getting the Combination Key, go to the Director’s Office and examine the key. Turn dials on the key until it matches the symbols below.
- Female Symbol.
- Cross.
- Moon.
After the symbols are set, use the key on the door.

Combination Key Lock 2
After getting the Combination Key, go to the Computer Lab and examine the key. Turn dials on the key until it matches the symbols below.
- Sun.
- Heart.
- Man Symbol.
After the symbols are set, use the key on the door locker to get a Recoil Spring.

Saving Miguel Puzzle (Required for the Good Ending)
After clearing the School and getting the ability to leave, go back to the Convent and head to the Refectory. Equip the Sledgehammer and attack the broken brick wall to fully take it down and go into the West Corridor. Enter the Dormitories and pick up the Duct Tape. Backtrack all the way to the School again and head to the mirror to enter the Other Side. Go to the Director’s Office (Other Side) and use the Duct Tape on the robot there.

Church / Bunker Puzzles
Combination Key Lock 3
After leaving the School, go to the Church Entrance across from the Mall. Turn the dials on the key until it matches the symbols below.
- Heart.
- Yin and Yang.
- Star.
After the symbols are set, use the key to unlock the gate to the church.

Mirror to the Other Side Puzzle
Interact with the mirror and then use your lighter to light specific candles to open the way through. Below are the candles you should light.
- The right candle on the very top of the mirror.
- All the candles on the right side, except the top right one.
- Bottom Left.
- On the left side, above the previous candle.
- Top candle on the left side.
- 2 candles down from the previous candle.

Eye Door Puzzle
In the Undercroft, blow out the candles in the area, then approach the big door and turn off all your lights. Once you’re about to be consumed by the darkness, a light will turn on and open the door.


Puppet Virus Puzzle
At the Bunker Entrance interact with the injection machine. You’ll need to inject the correct combination of liquid or you’ll instantly die, so it’s recommended to save before doing this puzzle. To do the puzzle easier and with fewer mistakes, take all the liquid out of the tubes before doing the amount below. Do not input the amount of liquid below before fully draining the tubes.
- Red – Fill it up 6 times.
- Yellow – Fill it up once.
- Green – Fill it up twice.
After you’re sure the amount of liquid is correct, place your hand under the needle and press the red button to inject yourself.

More Tormented Souls 2 Guides:
Roberto says
Hi
Will you add the trophy and the complete guide like the first game?
PowerPyx says
Yes
Greneda says
Hi,
When will the guide be released, and is it true that some trophies are buggy?
ObsiEez says
It’s actively being worked on. As of right now, it does seem possible that Hoplophile for collecting all weapons & Master Key for unlocking all combination locks might be bugged currently as no one has unlocked them that we know of, & it doesn’t seem like there is anything else hidden in the game.
Flame says
Hi, what time are you guys going to release the other posts with all the collectibles and trophies?
ObsiEez says
Whenever they’re finished being written up, which hopefully will be by the end of this week, or a little after.
Boris R says
i need only 1 diaries entry i’m getting mad with it ……
Sophie says
Nobody has said it but thank you for a quick post on puzzle solutions!
Stephanie says
Thank you so much for posting these! Is it just the three combination key puzzles at the School and Church entrance that are required for the Master Key trophy? Or is it all puzzles in the game?
ObsiEez says
Those are the only 3 in the game, however the trophy is currently bugged. It’s recommended to leave a backup save before completing the last one, or a back up save directly after collecting the Combination Key so you can quickly do them all whenever the patch comes out
Matt says
Do you have a full walkthrough of the game yet?
ObsiEez says
Yes, the full walkthrough has been posted now. https://www.powerpyx.com/tormented-souls-2-walkthrough
Naphiliathedon says
About waste disposal puzzle (the furnace) u can solve it without ever pressing bottom left once.
You just need the other 6 buttons ;)
Tony says
Why would you put “Saving Miguel Puzzle (Required for the Good Ending)” right bottom of the combination keys and top of Jesus’s mirror to the Other Side Puzzle? I was stuck and wanted answer for only that mirror part but THANKS to you got a spoiler… You could’ve sort them correctly.
KNoeNa says
Actually the listing is appropriate for the backtracking order but you’re not wrong, should’ve put a spoiler alert (warning) for it.
ObsiEez says
Because the puzzles are listed in order of appearance to avoid further backtracking. If you’re looking at a guide, you should be expecting spoilers to appear every so often.
Stark Redfield says
Hey I would like to thanks to this work but could you help me with how did I figure the solution.. like is it on photo or some notes or paper..etc .. that will be so much help .. thanks again