
GTA San Andreas Definitive Edition has 50 Snapshot Locations. This guide shows where to find all of them (updated for GTA San Andreas Trilogy Remaster on PS5, Xbox Series X, PC). Snapshots are photos that are taken exclusively in San Fierro, the 2nd major town in the game (the one in the west).
Collecting all 50 Snapshots will give you $100,000 and spawns 4 weapons in front of your garage next to the train station, where the first save point in San Fierro is (Grenades, Sniper Rifle, Shotgun, SMG). They are also needed for 100% completion. None of them are missable, you can get them at any time after having reached San Fierro during the main story. They can still be collected later after the story.
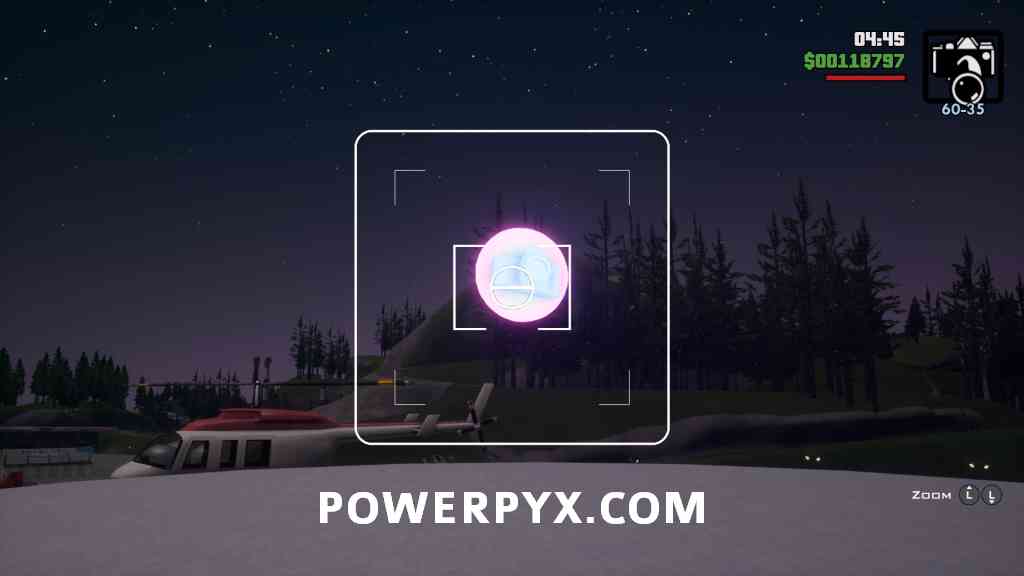
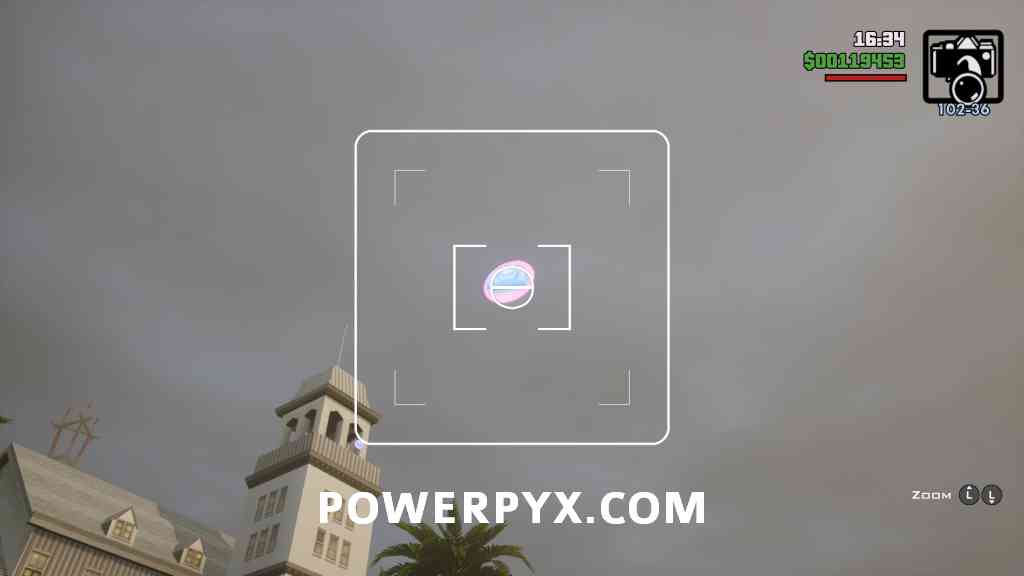
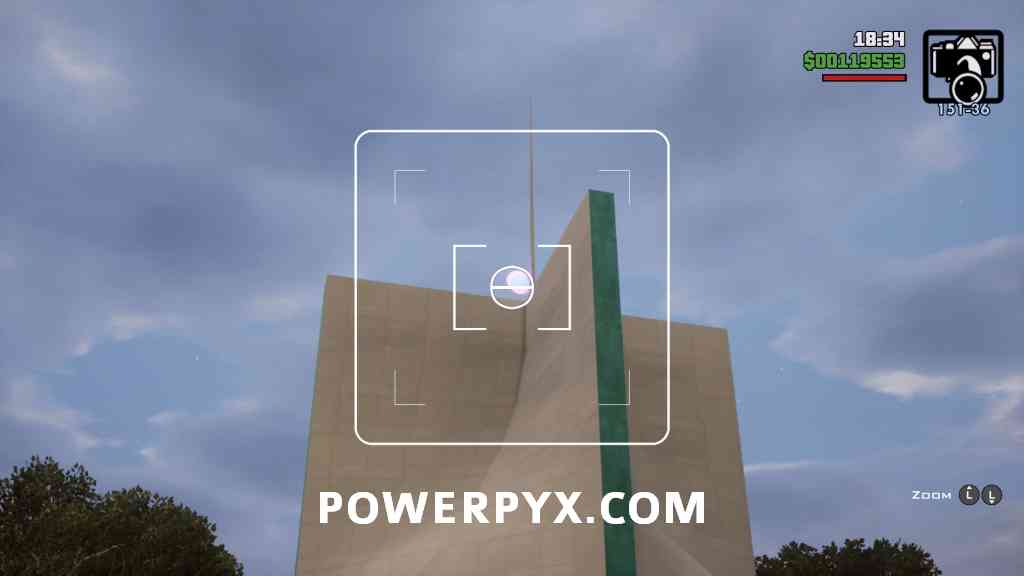
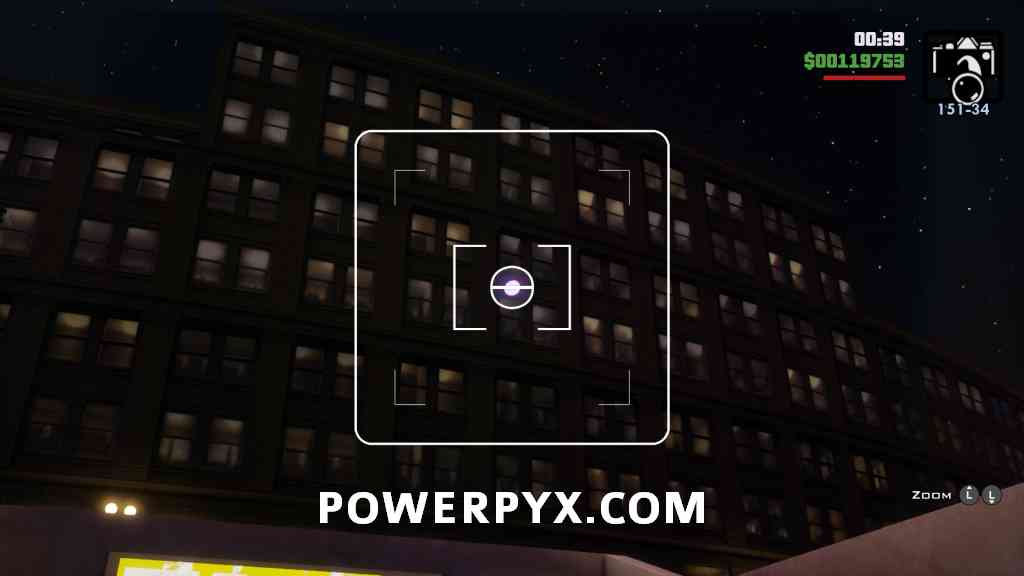
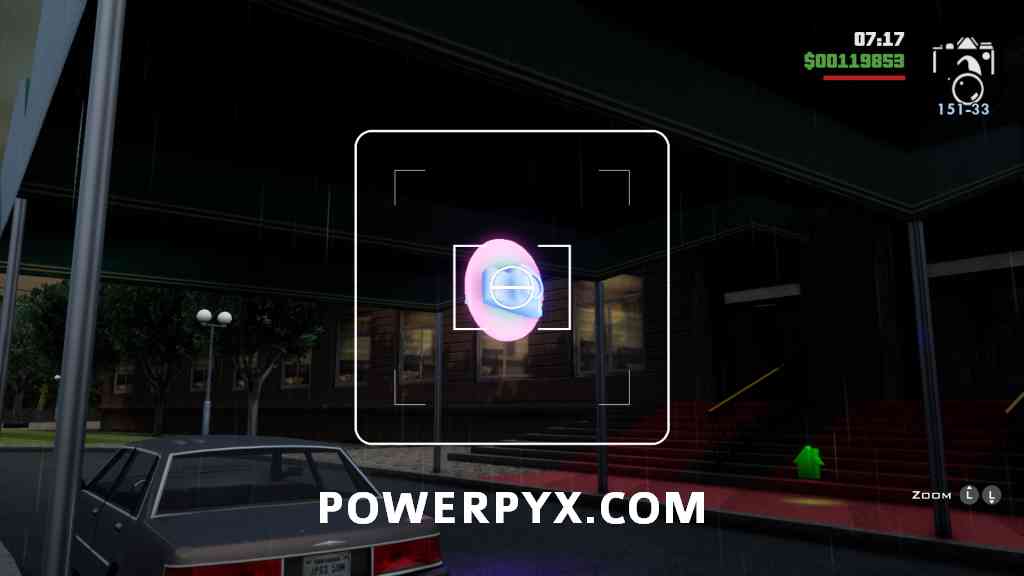
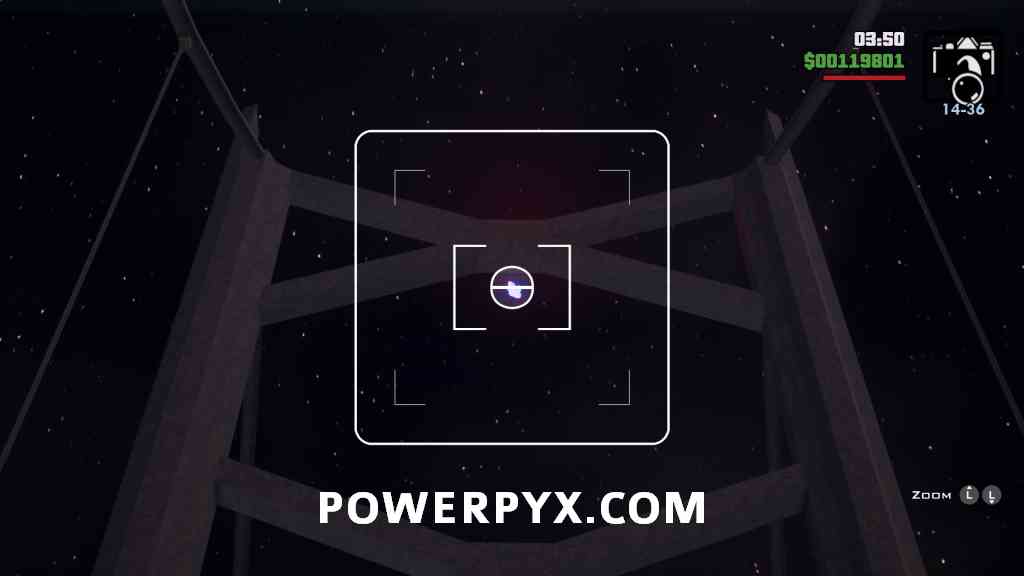
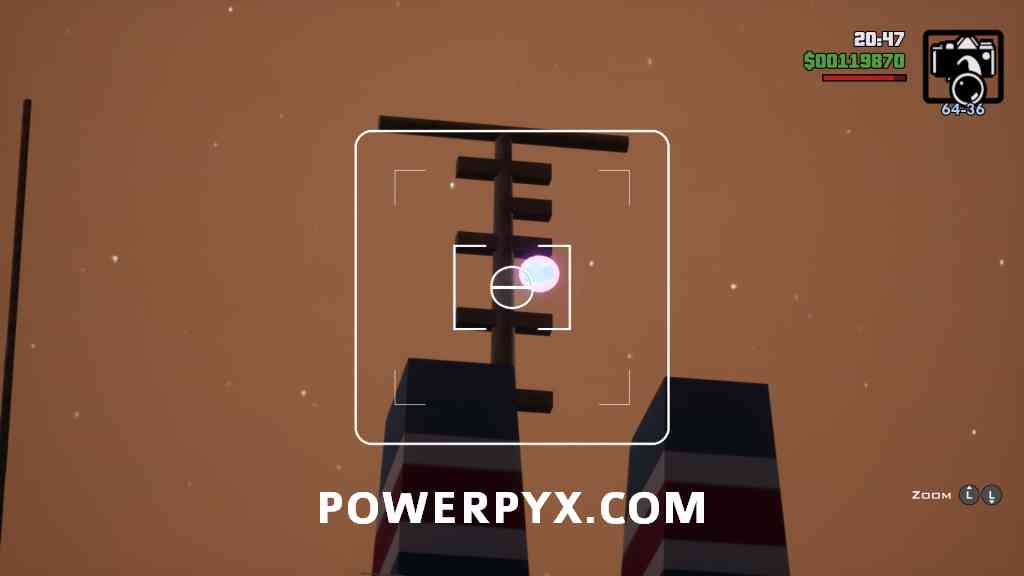
The Snapshots are round purple-colored icons you must photograph using the camera. When done correctly it will show a yellow text on-screen to confirm it has been “collected”. These icons only appear when looking through the camera lens and cannot be seen otherwise (the exact photo perspectives are shown below too). You must be relatively close as the icons won’t appear when too far away. The camera is a selectable item that spawns throughout the game world. You must then zoom in using the camera and take a picture of the snapshot icon from up close, they are usually high up in the air near tourist attractions and buildings.
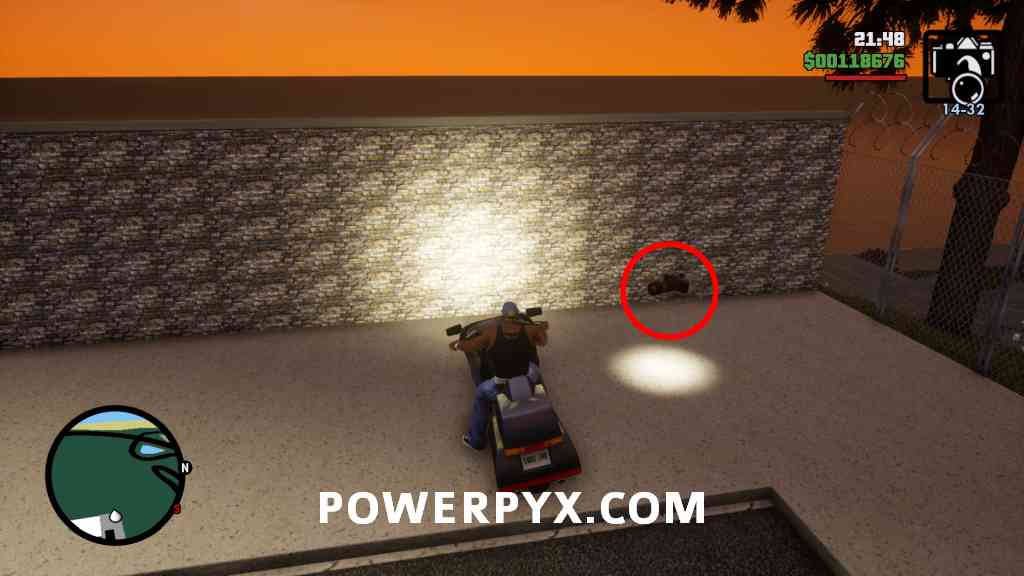
Here are two locations that always spawn a camera with a capacity of 50 photographs each, and they keep respawning there over time:
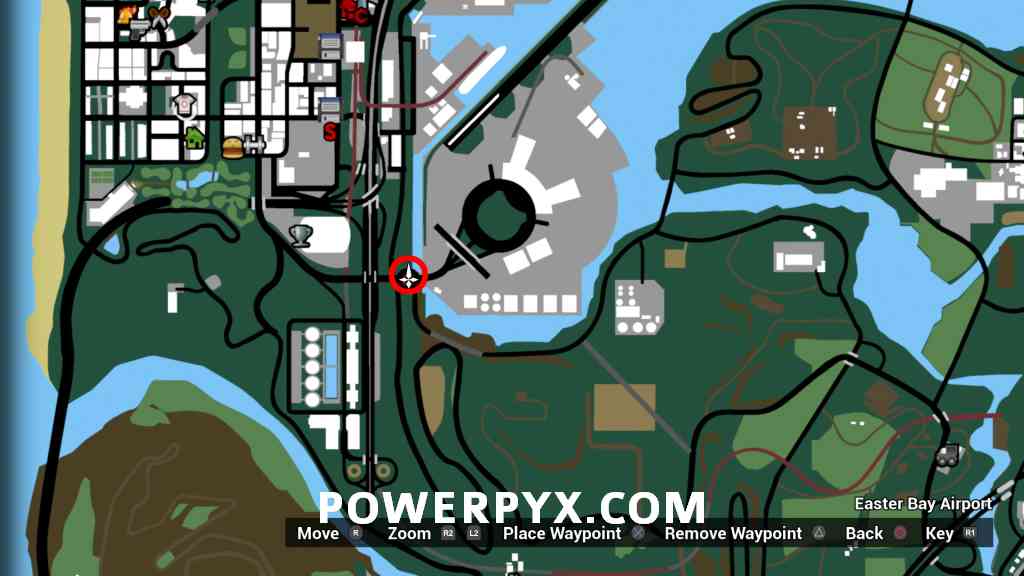
Camera Location #1: At the entrance to San Fierro Airport, in a patch of grass on the right side.

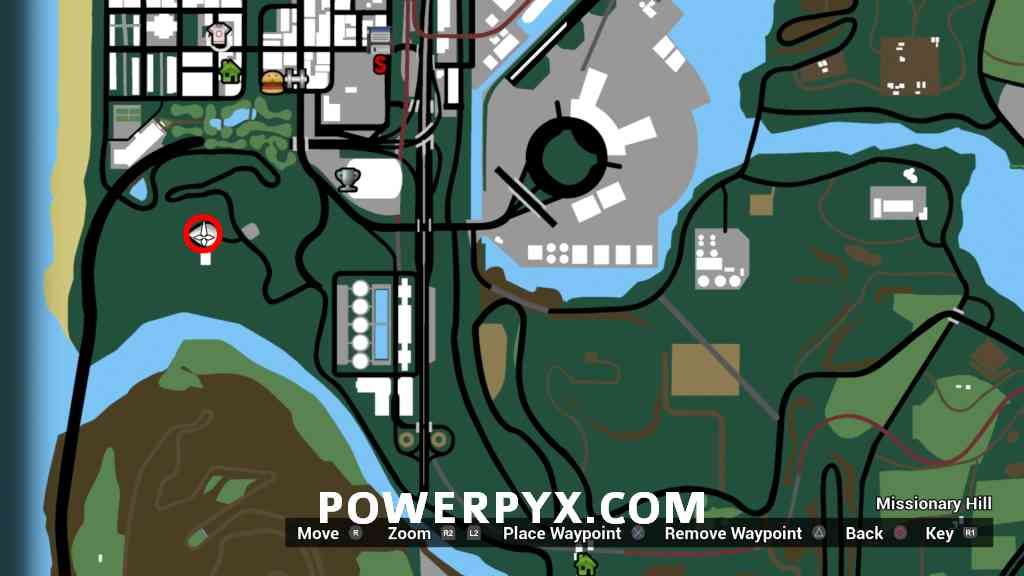
Camera Location #2: At the car parking by the big radio tower on top of Missionary Hill, in the south of San Fierro.
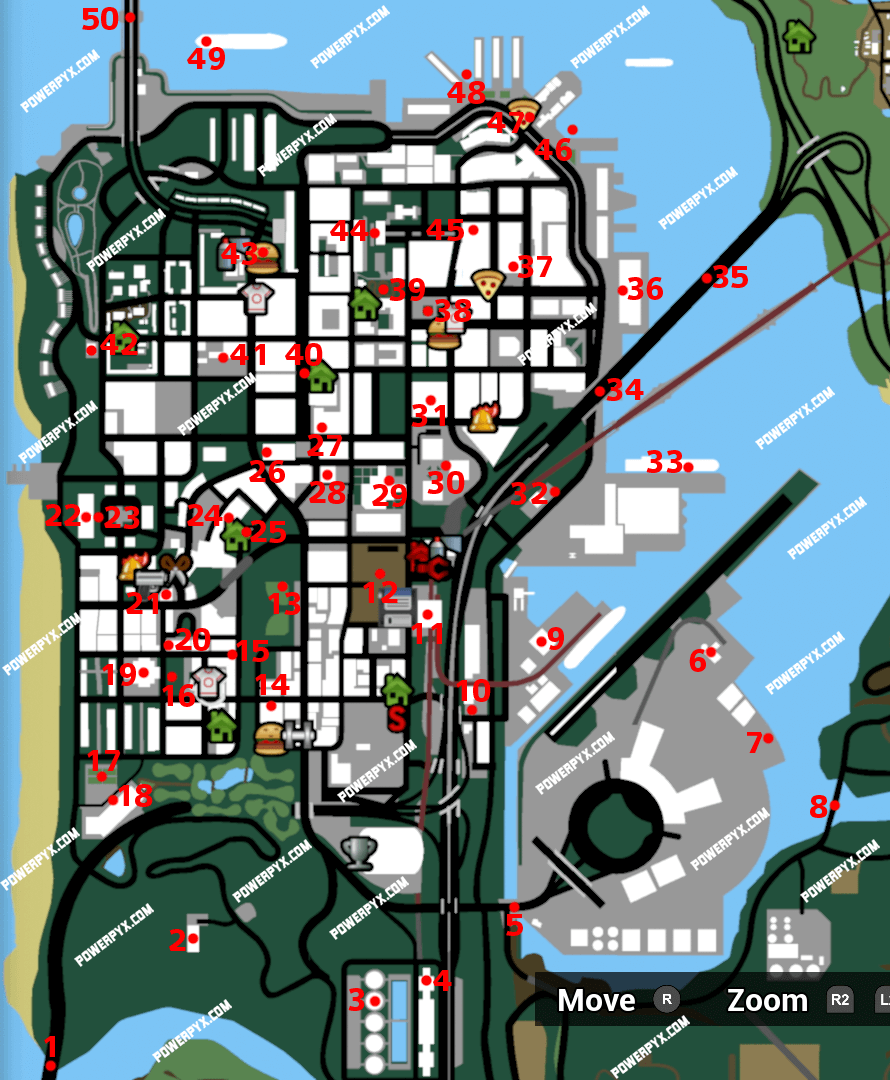
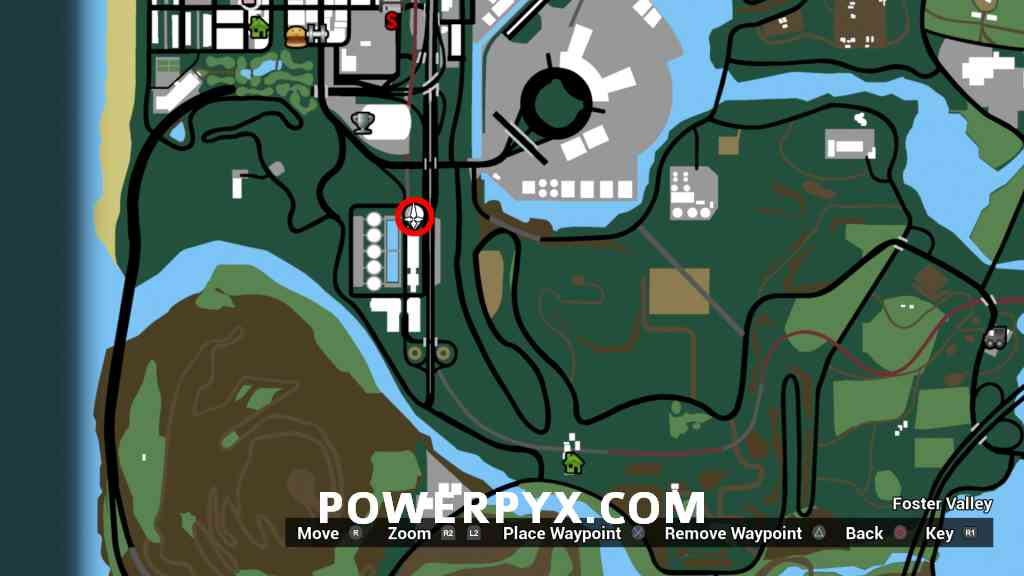
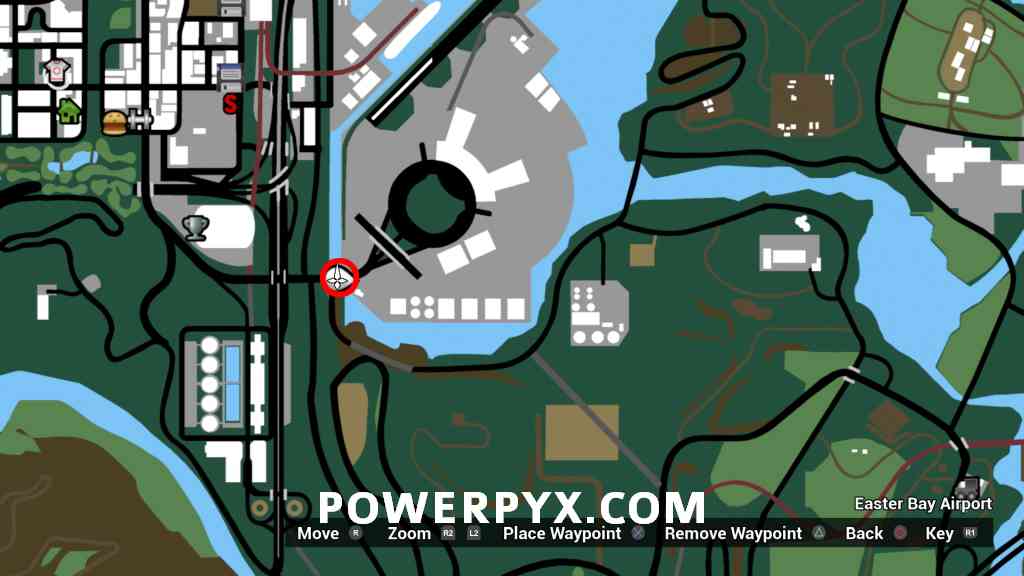
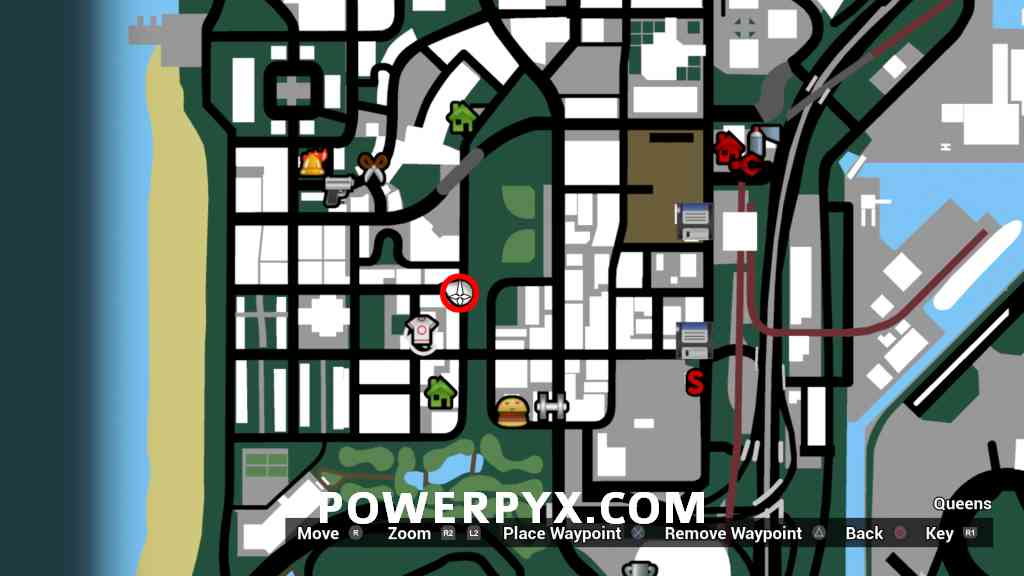
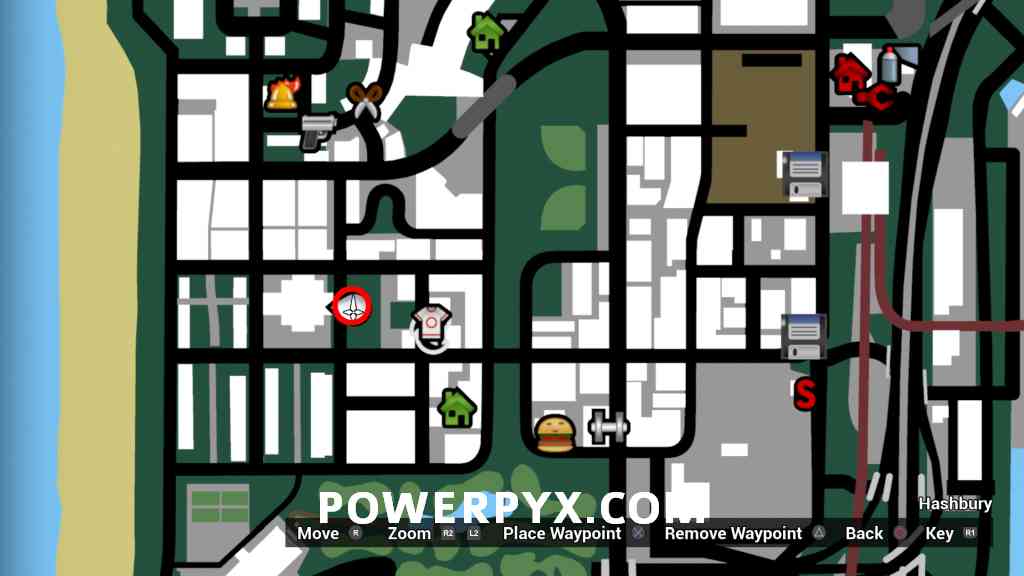
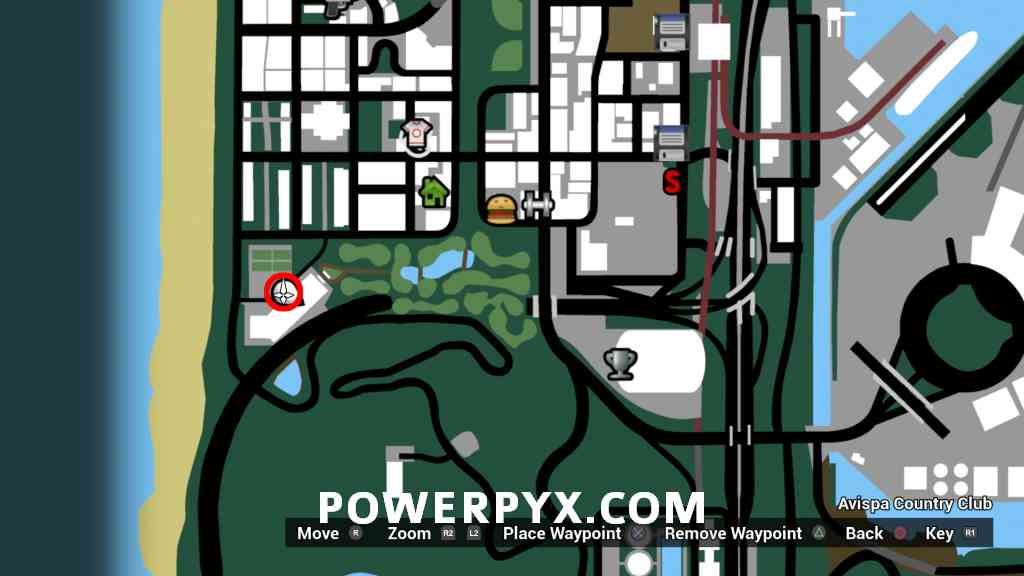
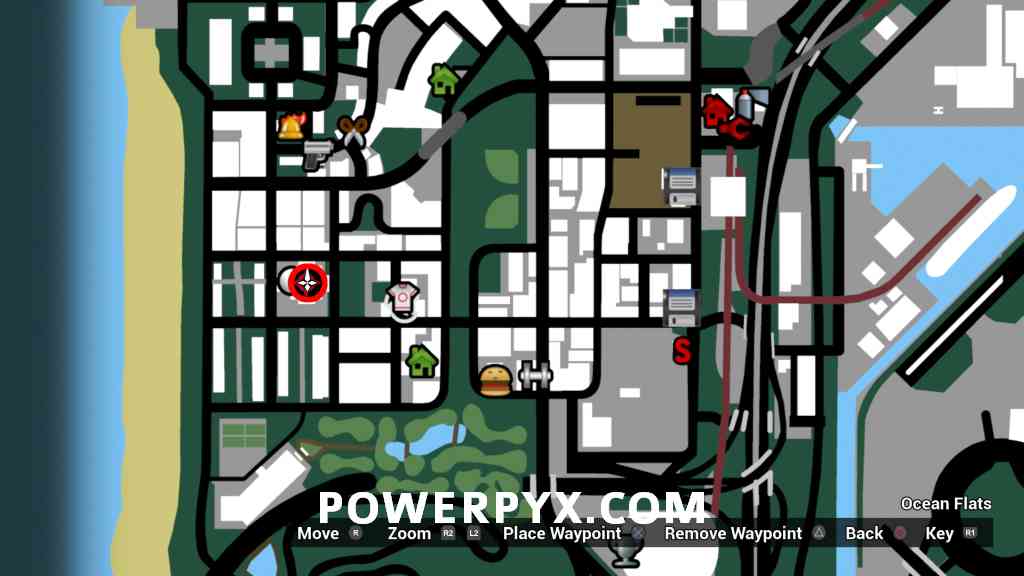
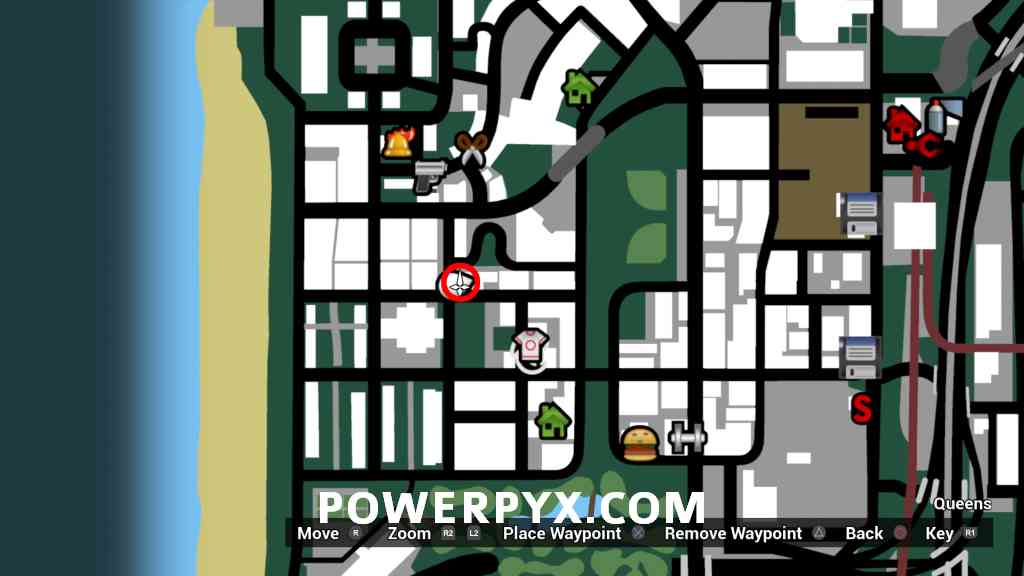
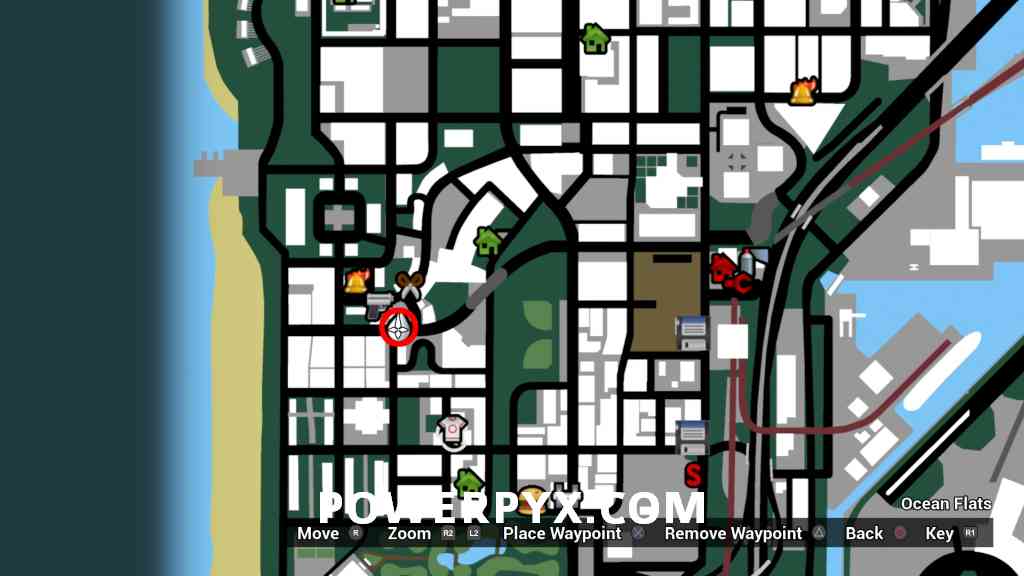
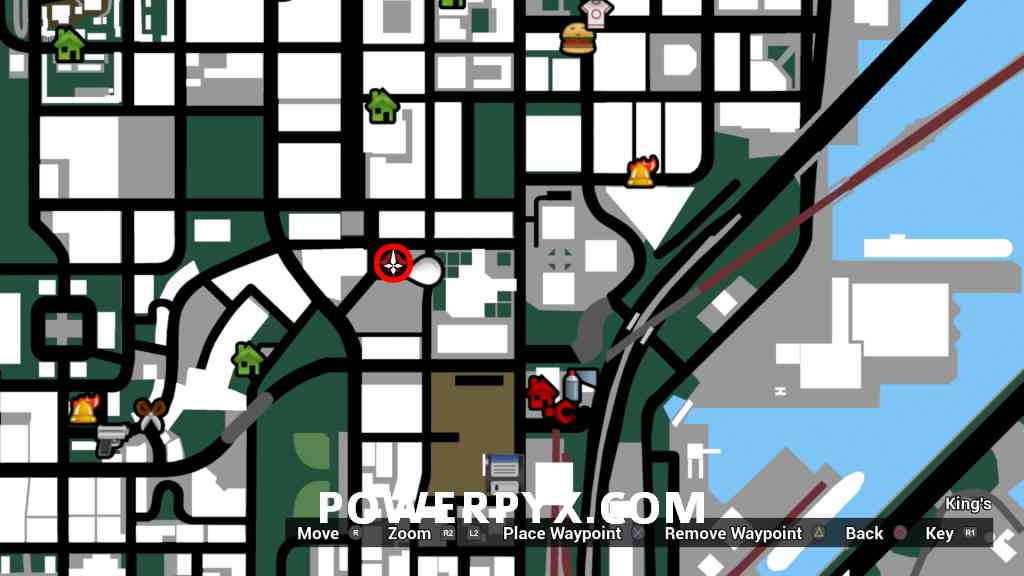
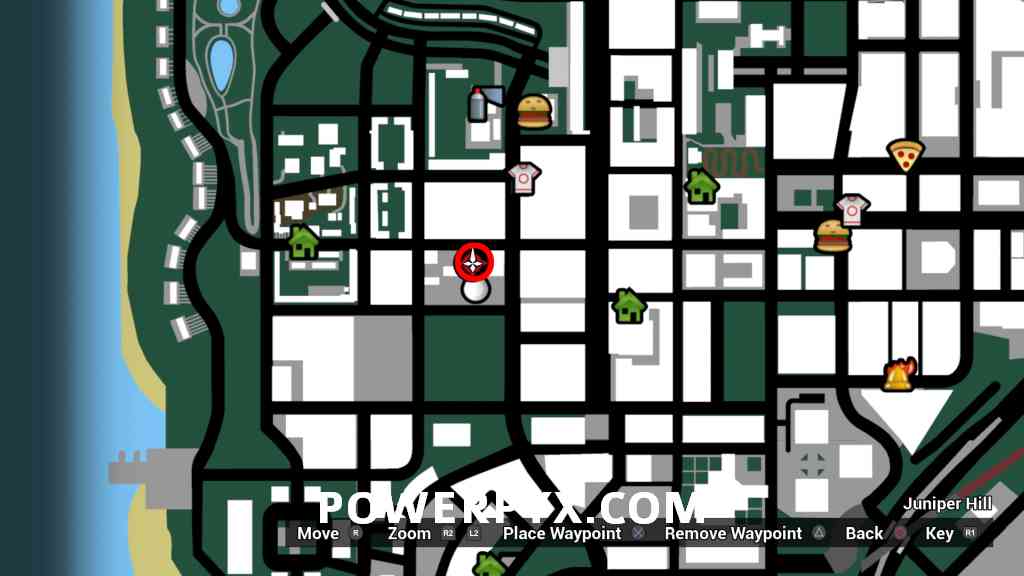
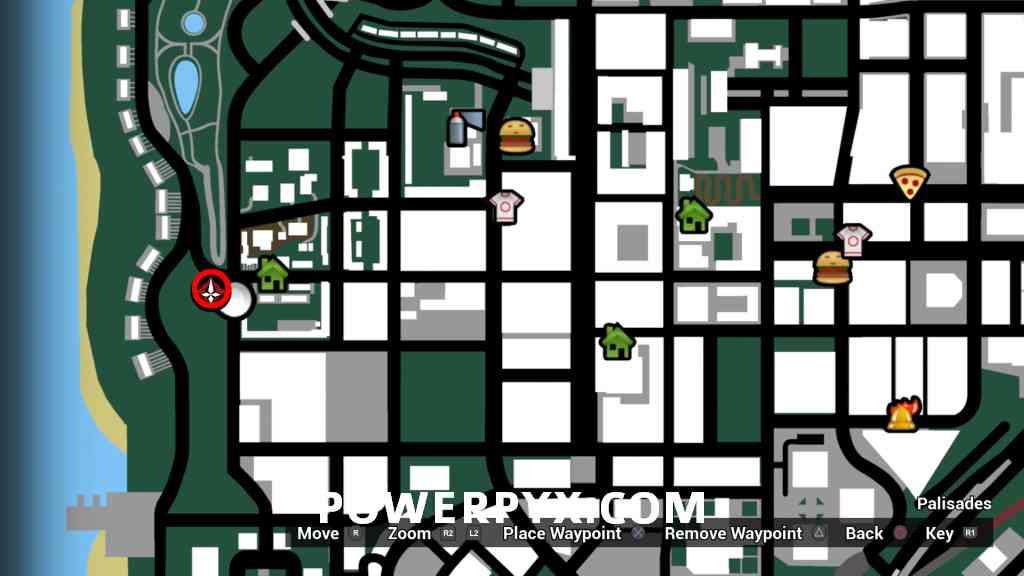
Snapshots Map
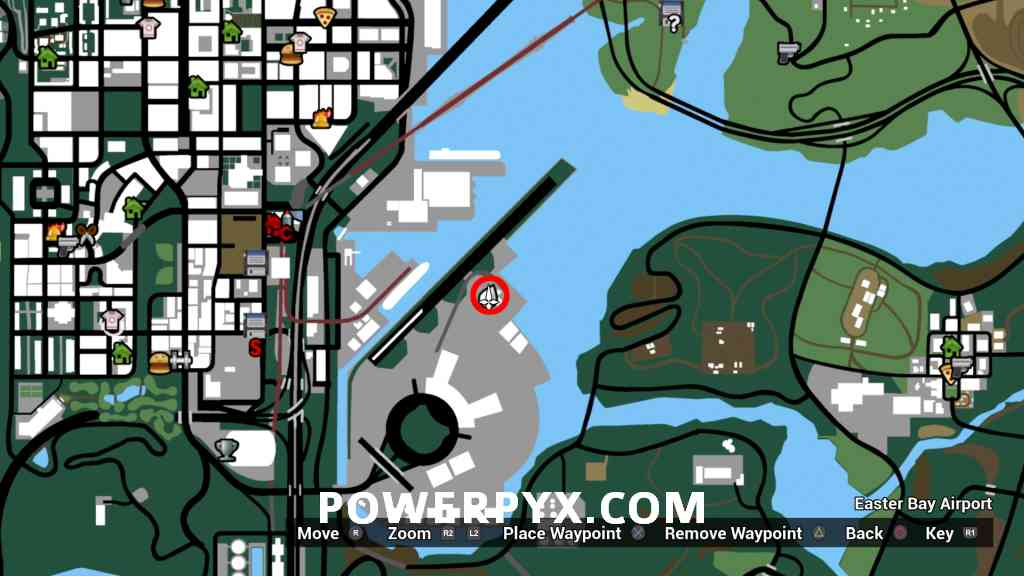
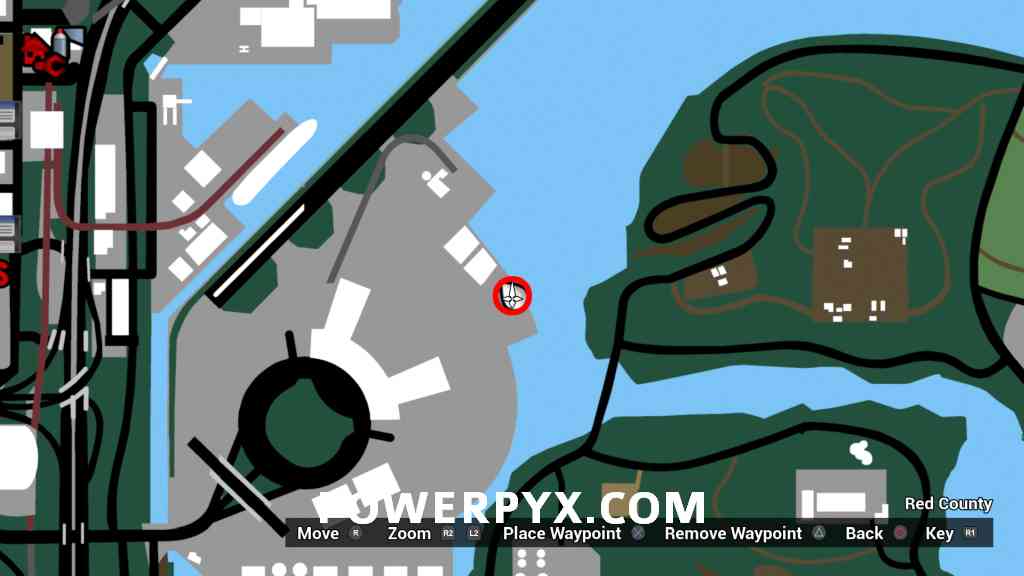
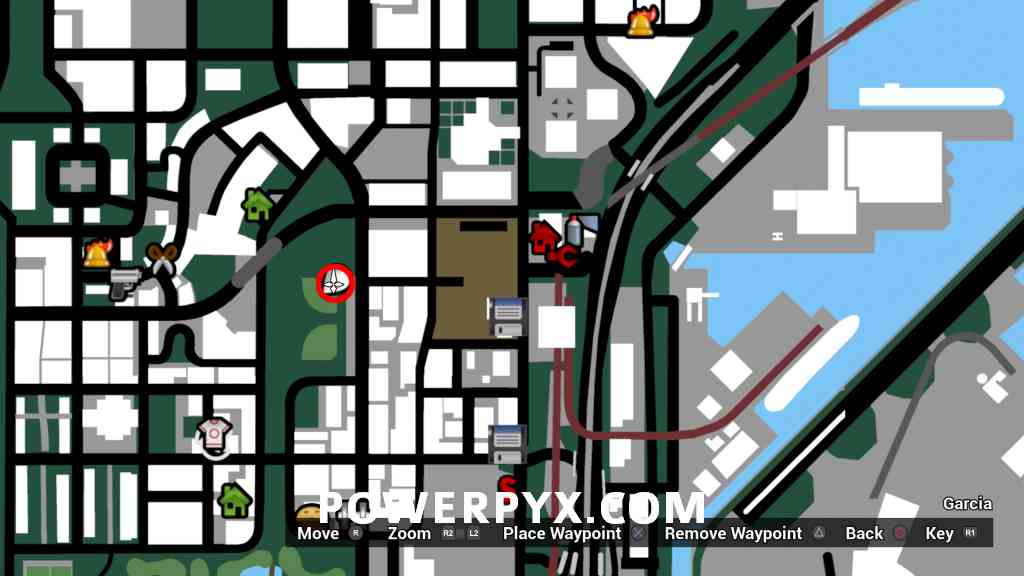
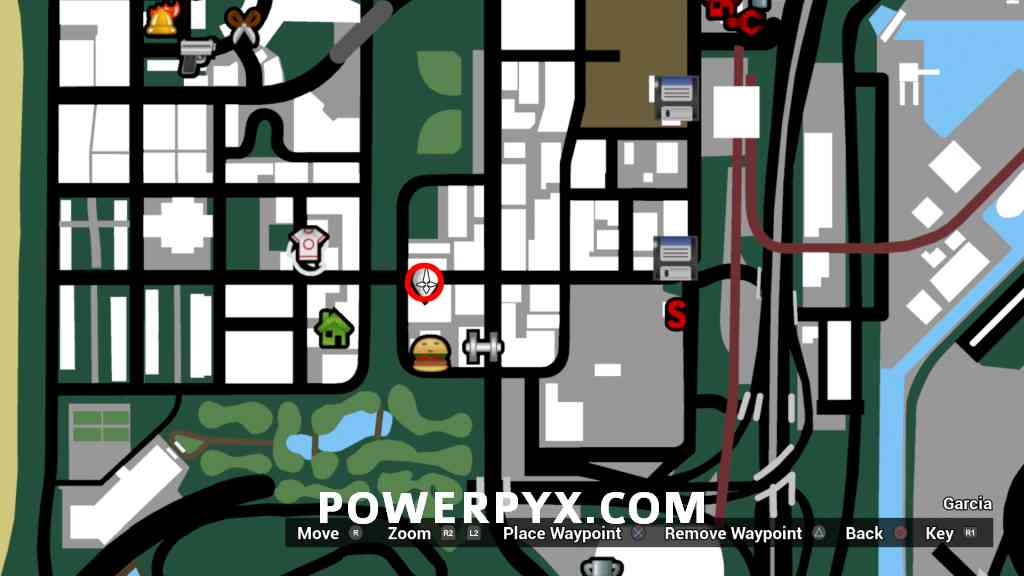
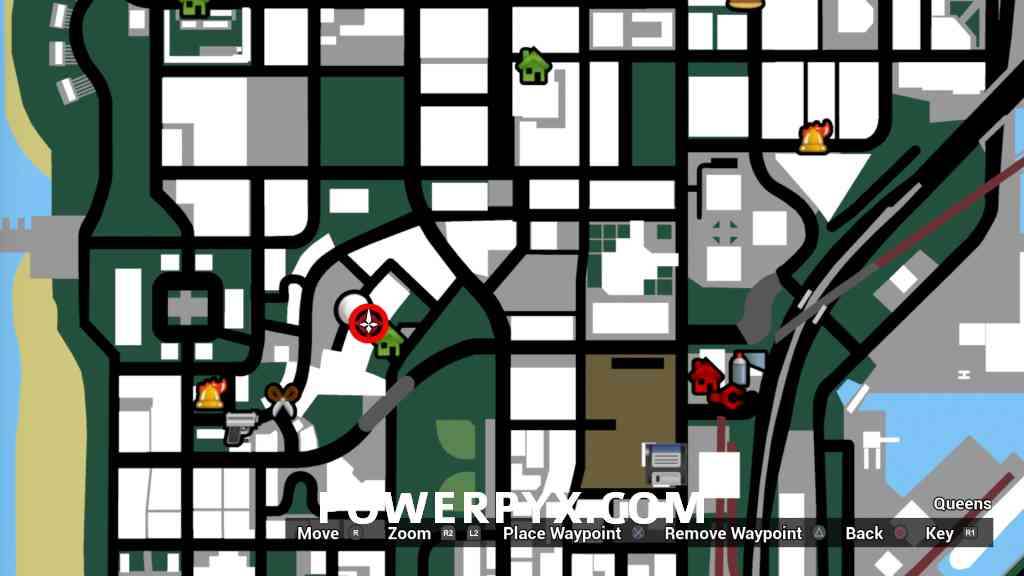
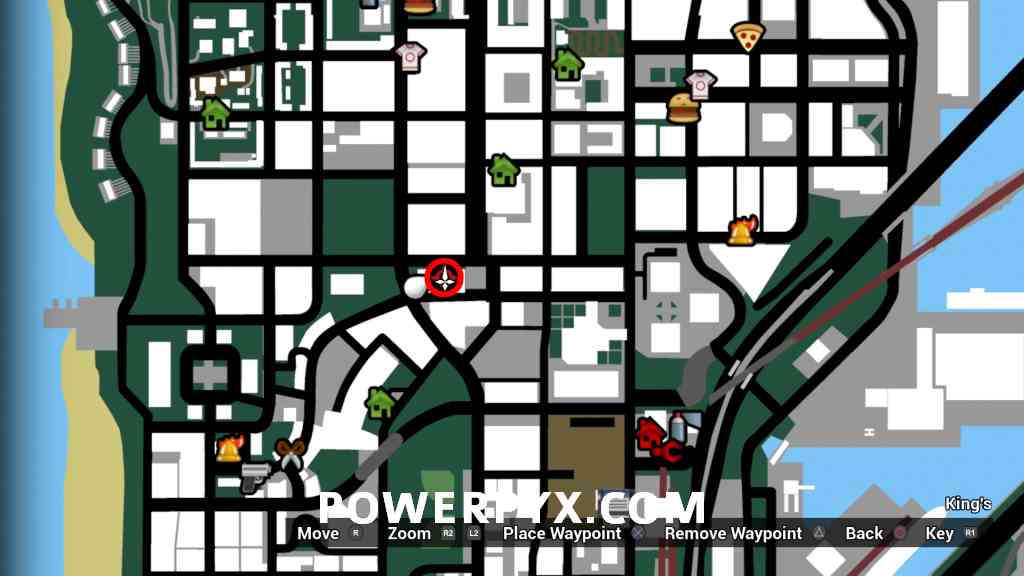
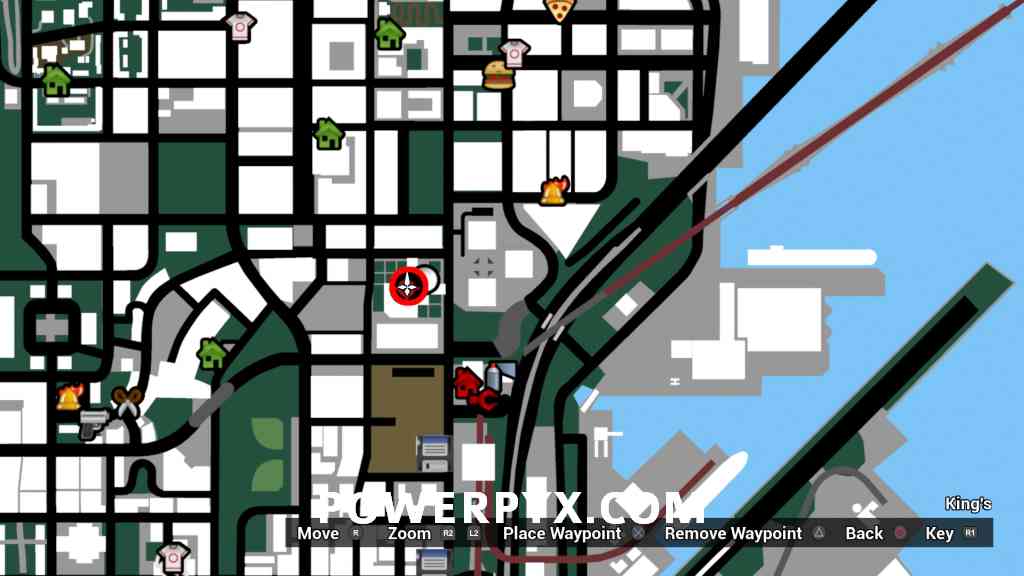
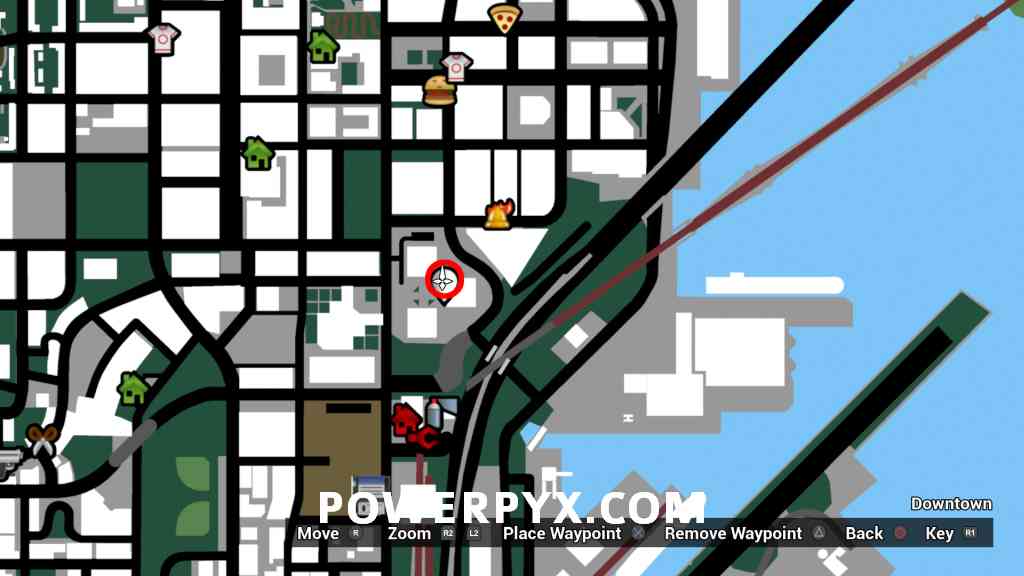
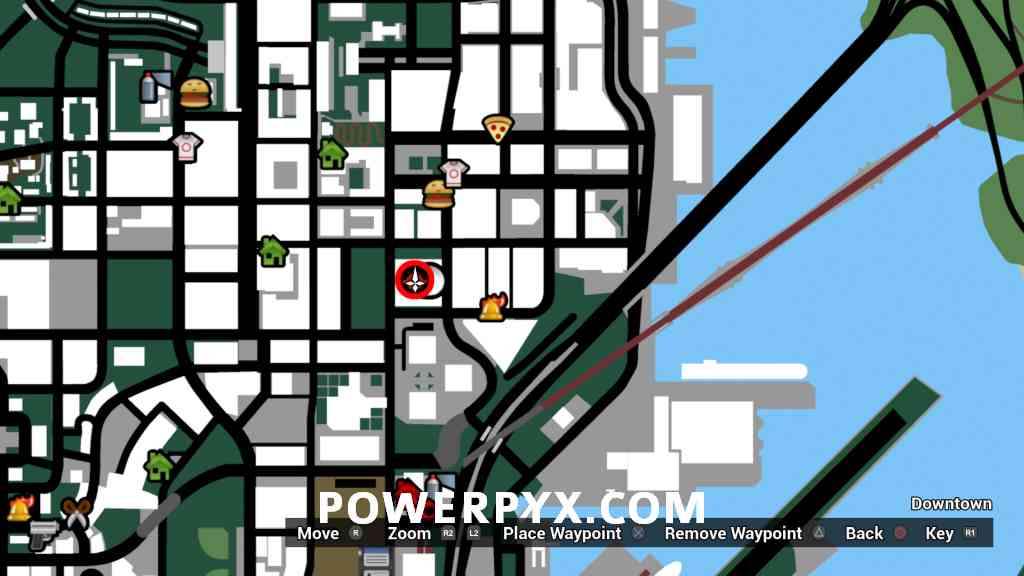
The red dots and numbers on the map below mark the locations.
Snapshot Locations
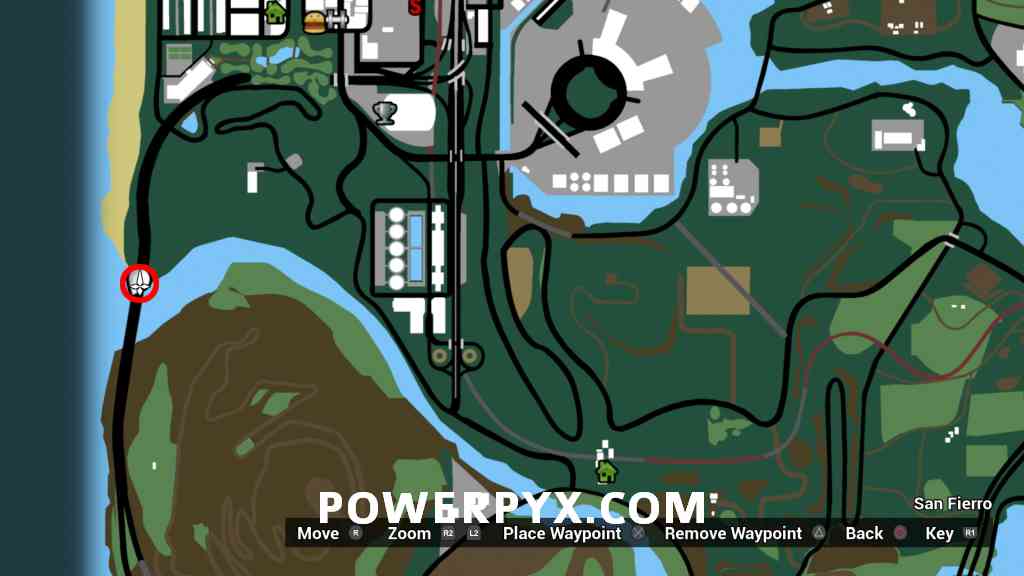
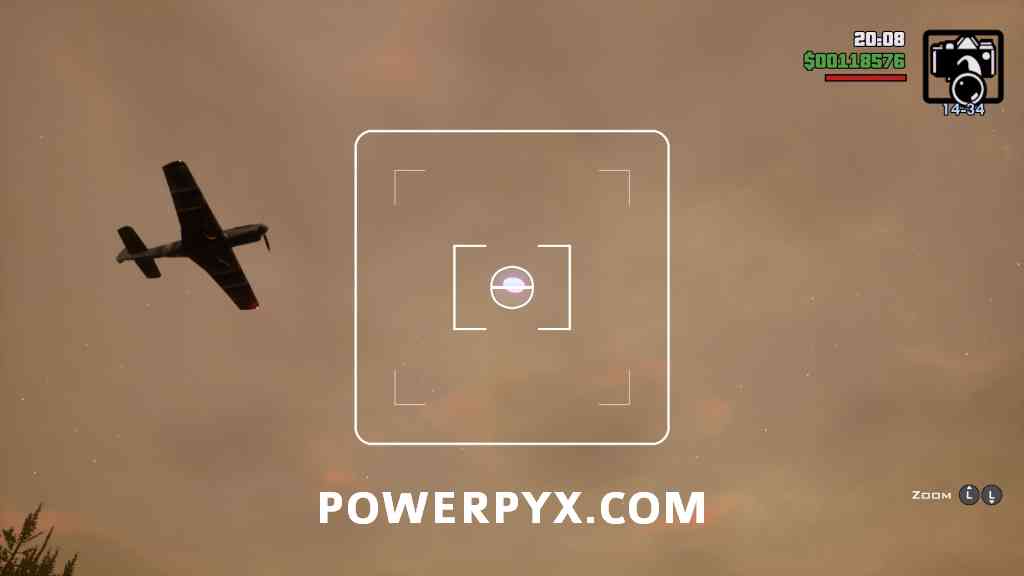
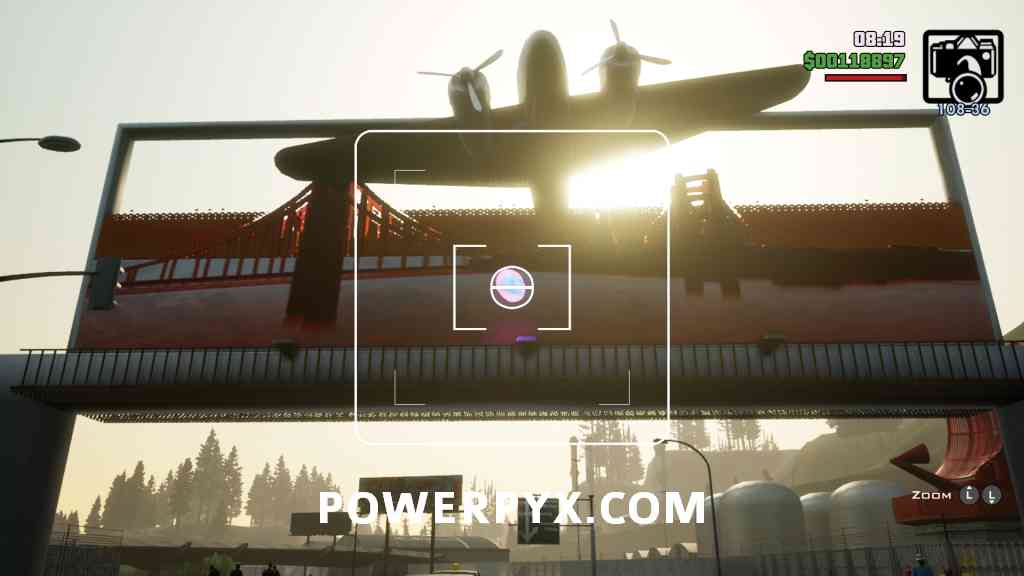
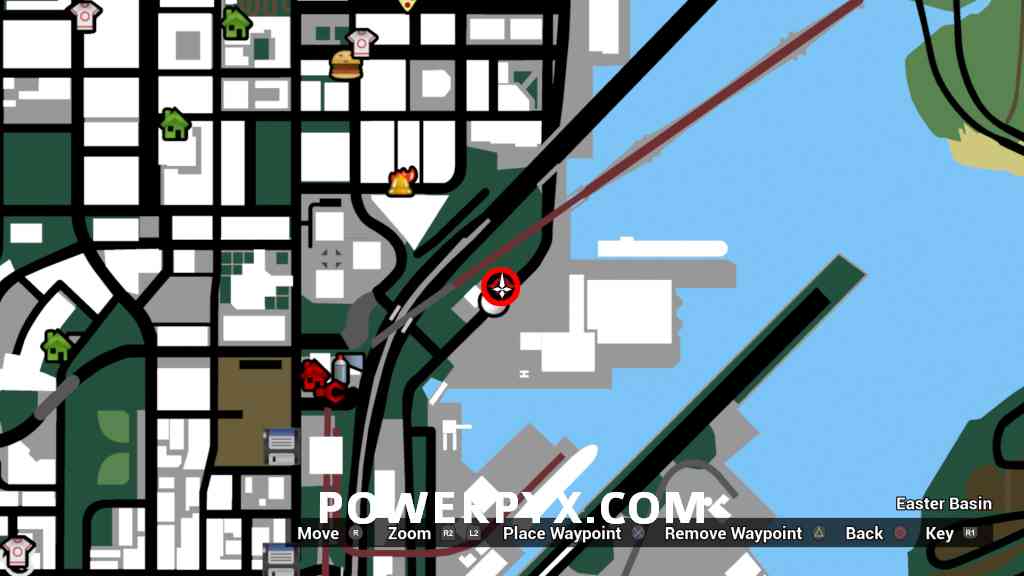
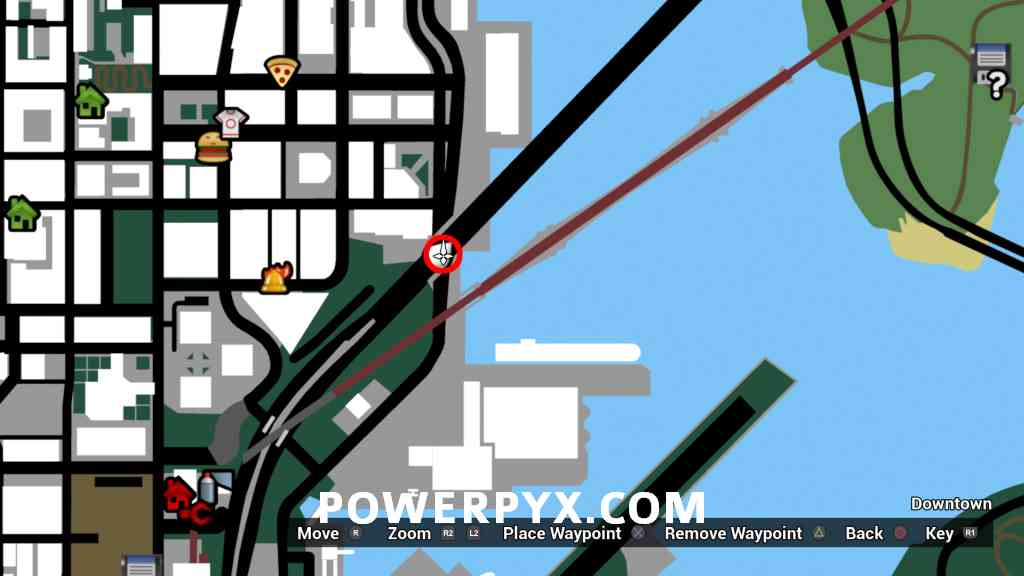
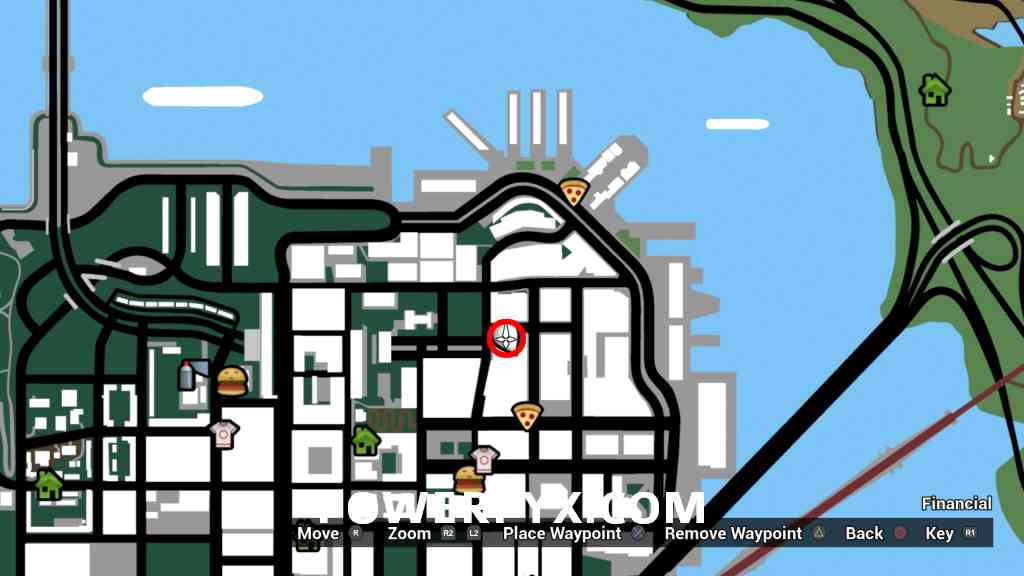
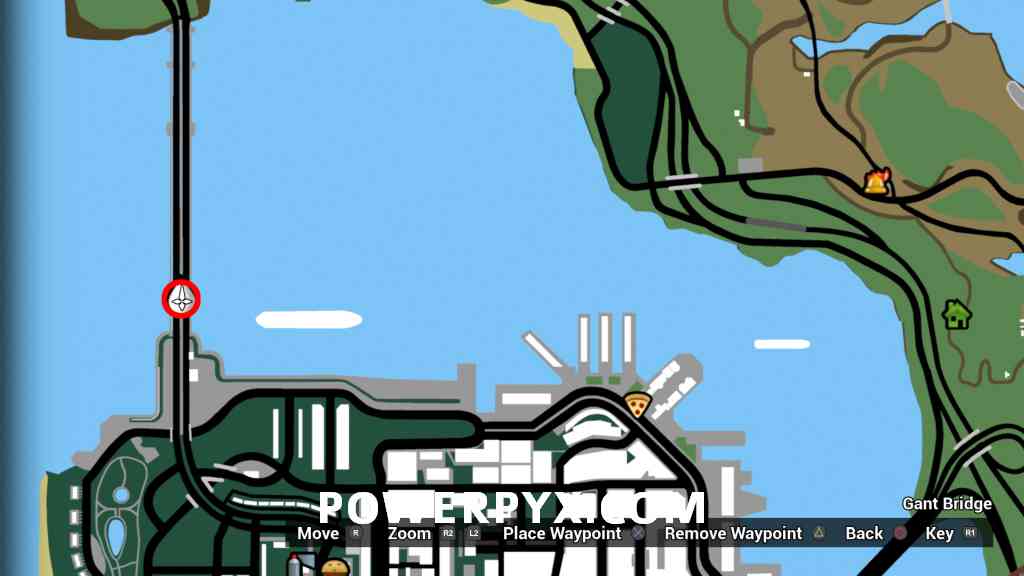
Snapshot #1: In the sky high above the bridge leading to San Fierro. Look for the round purple icon in the sky (about 30 meters above the northern end of the bridge) and zoom in to photograph it until it shows the yellow text on-screen that it counted the snapshot as collected.
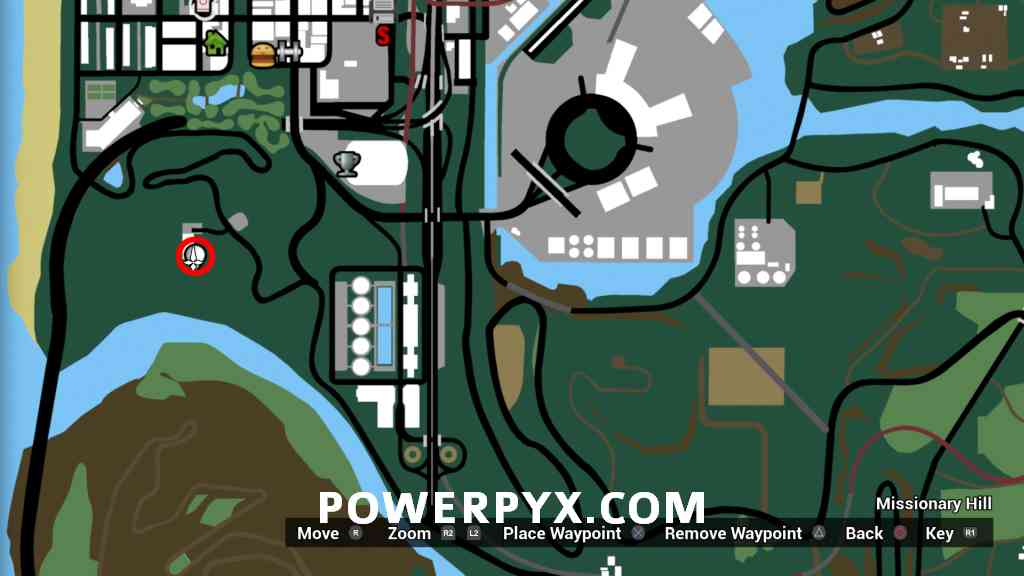
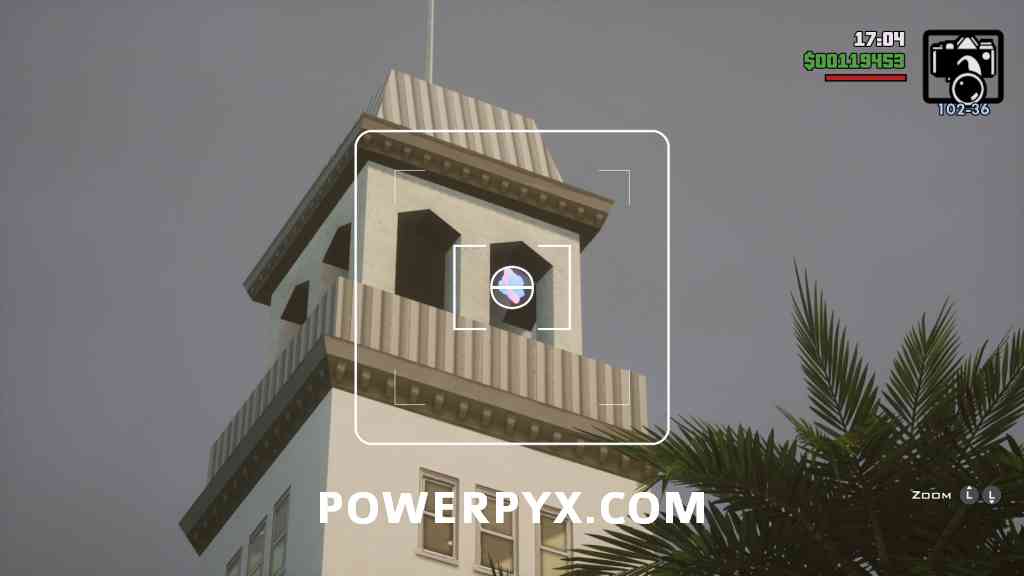
Snapshot #2: Halfway up the red/white tower.

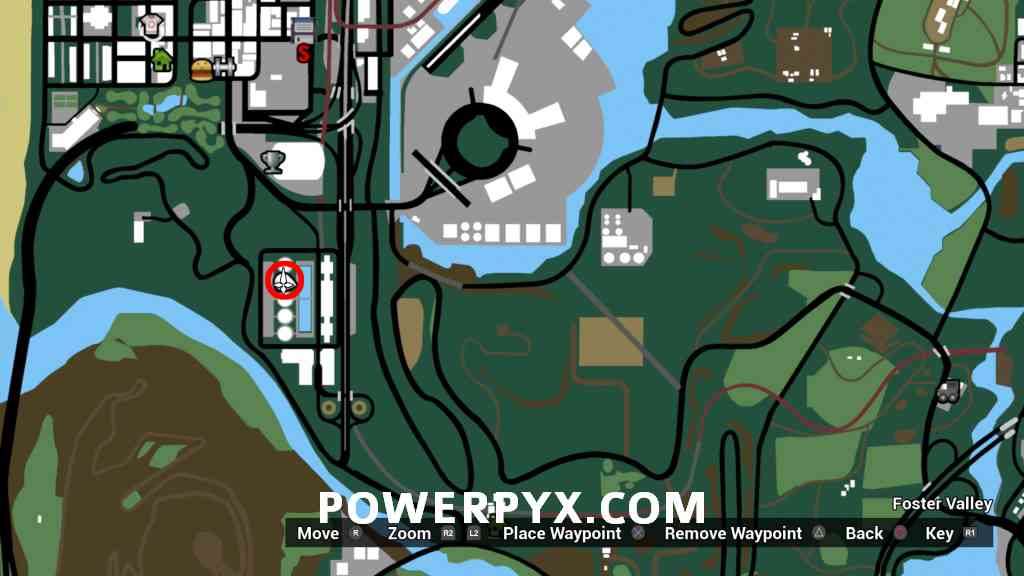
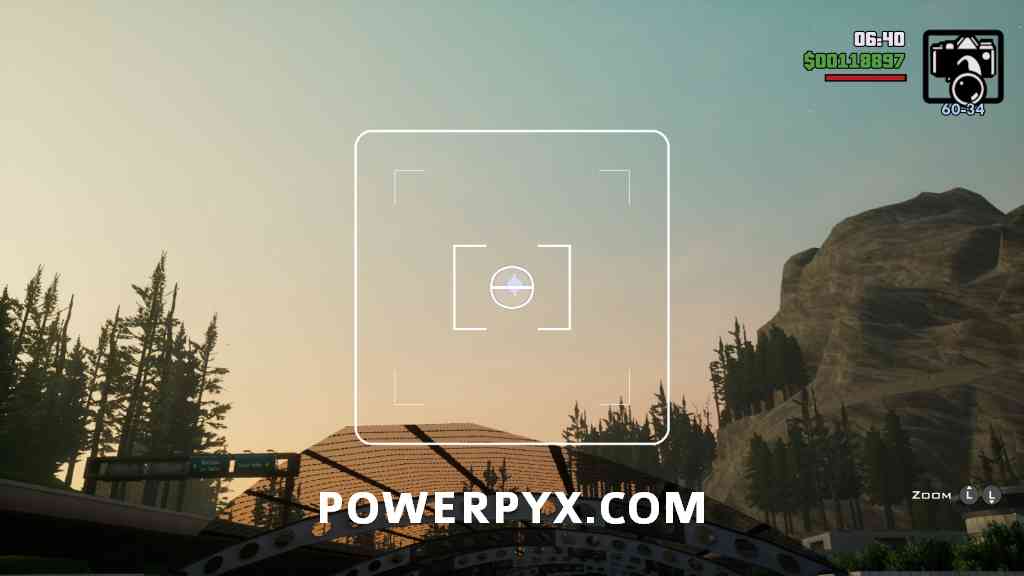
Snapshot #3: On top of a round building, must fly up there as you can’t see it from the ground below. You can find a helicopter at San Fierro airport, can park a car (preferably a van) in front the airport gate and from the car’s roof climb over the gate. Then fly the helicopter over to the snapshot location.
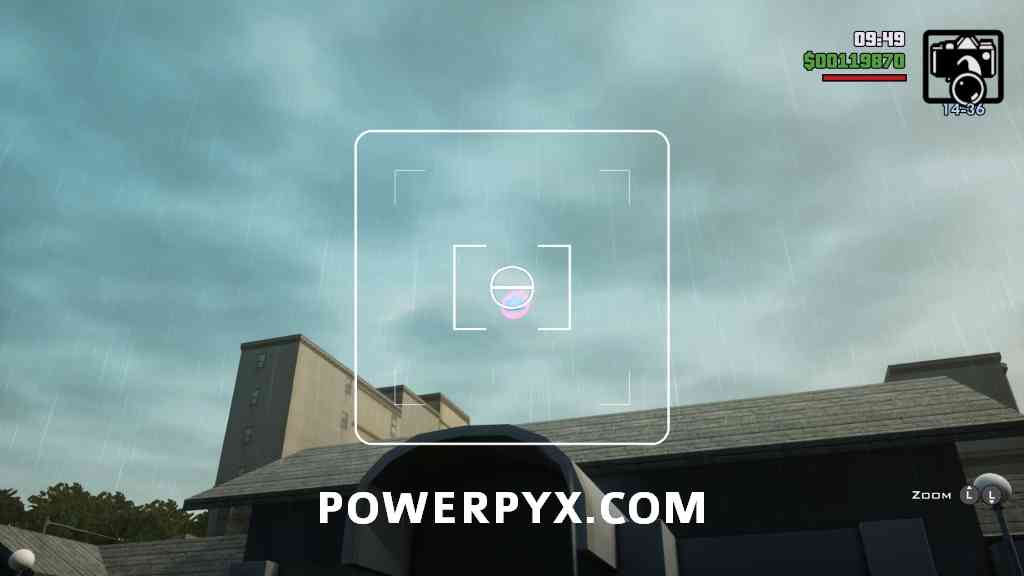
Snapshot #4: Above a roof in the air.
Snapshot #5: At the sign of the airport entrance.
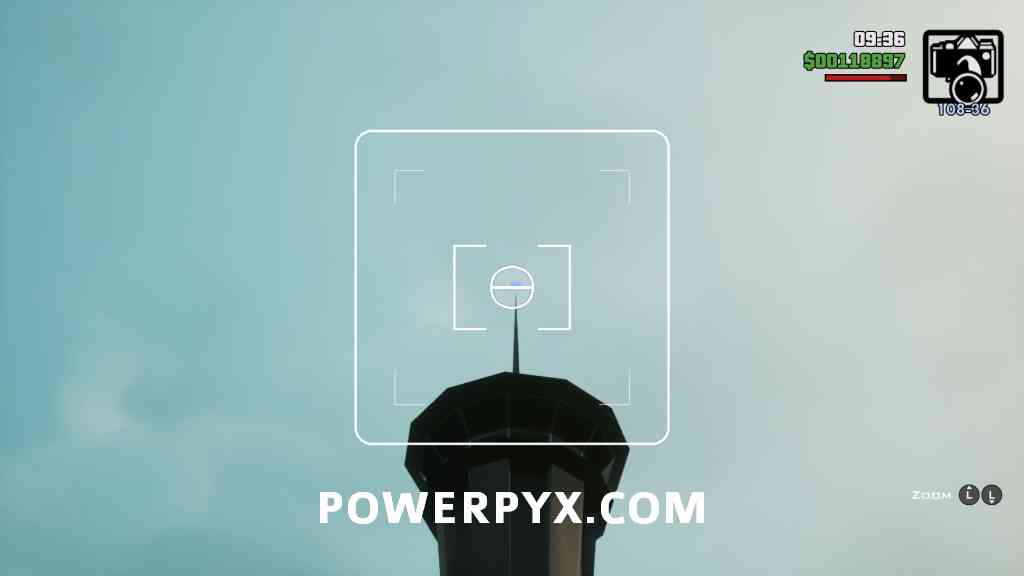
Snapshot #6: At the peak of the control tower in the airport, next to the landing strip.
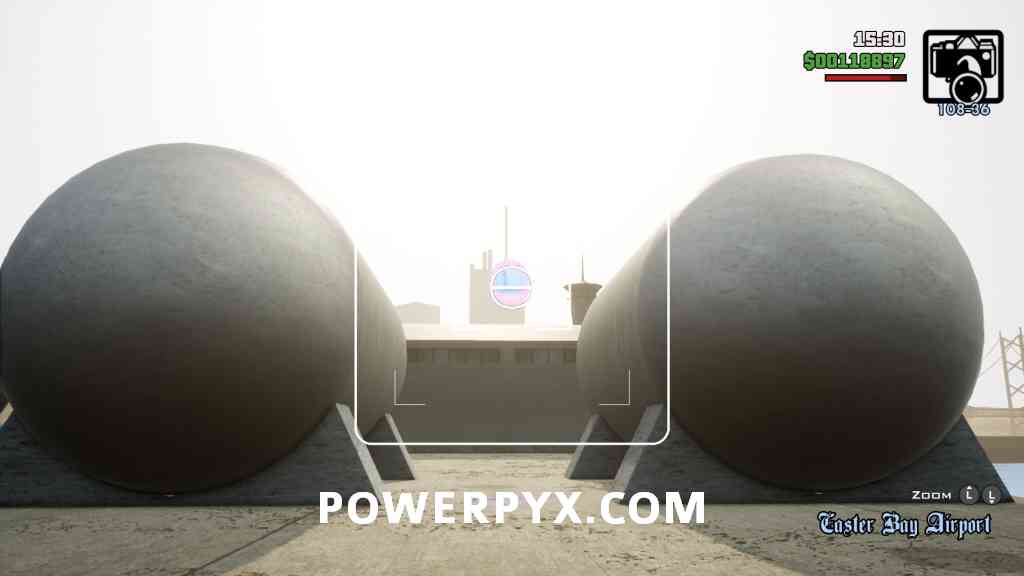
Snapshot #7: In the north-east corner of the airport, between two gas tanks.
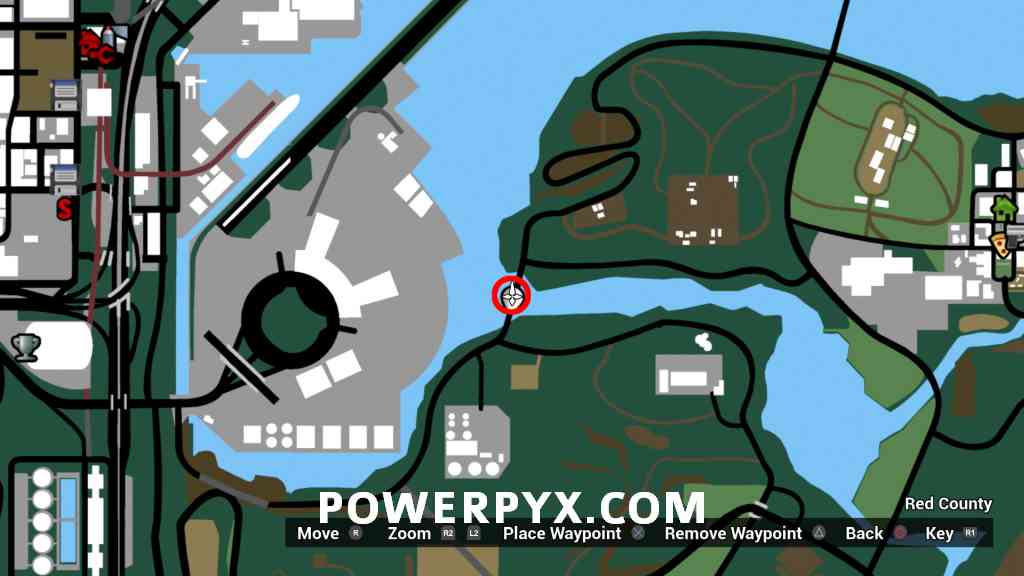
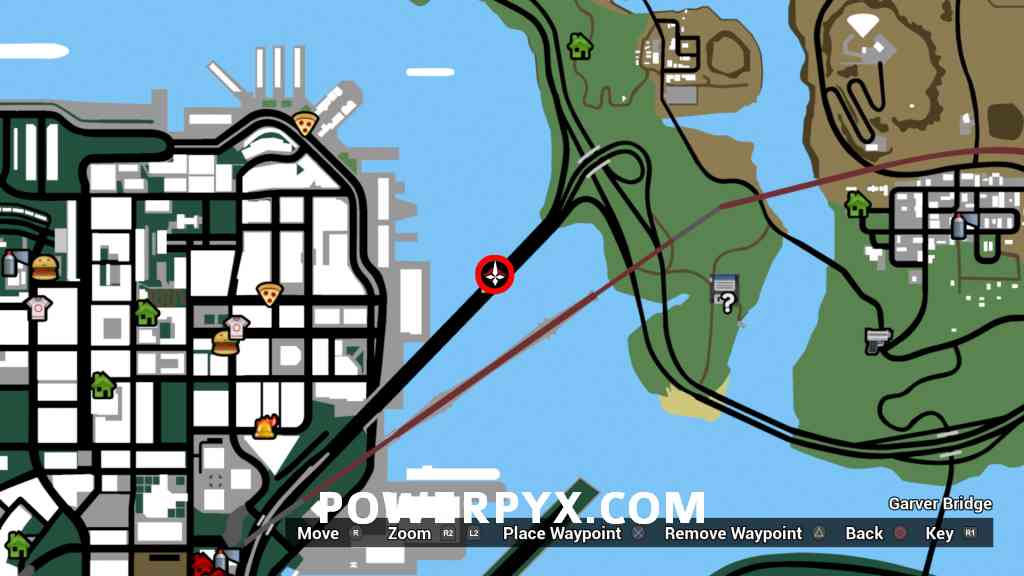
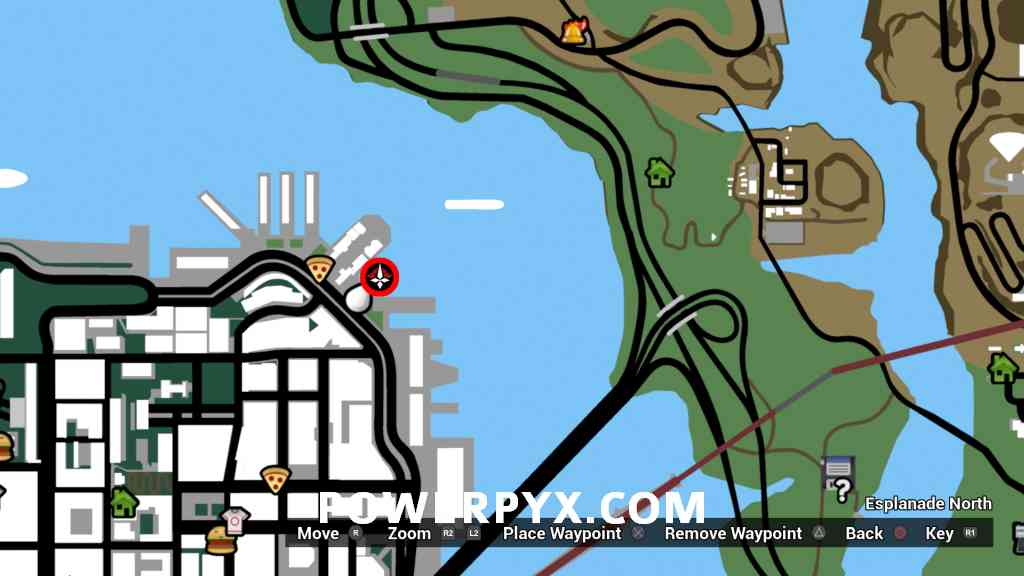
Snapshot #8: In the air above the middle of the bridge, east of the airport.
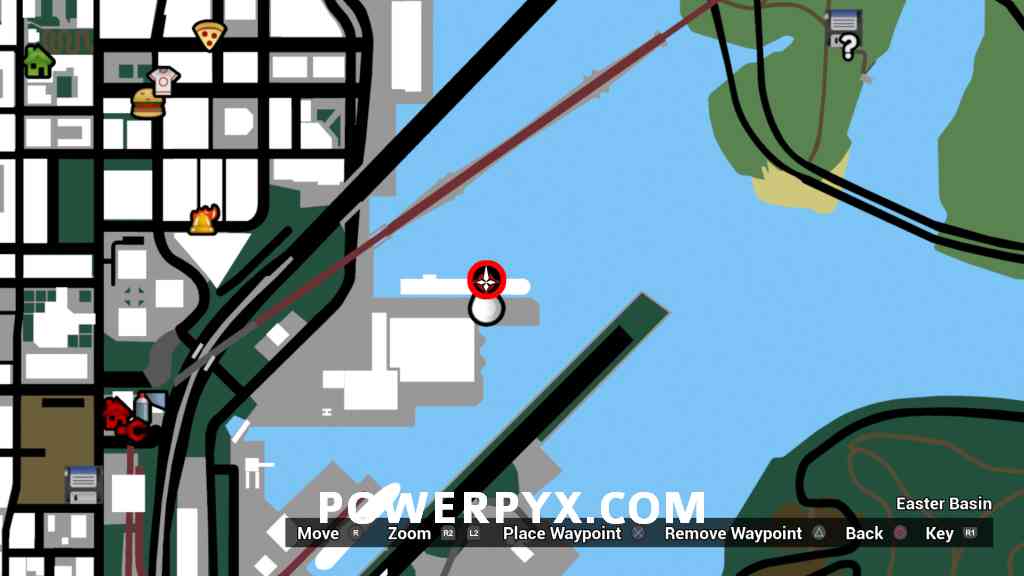
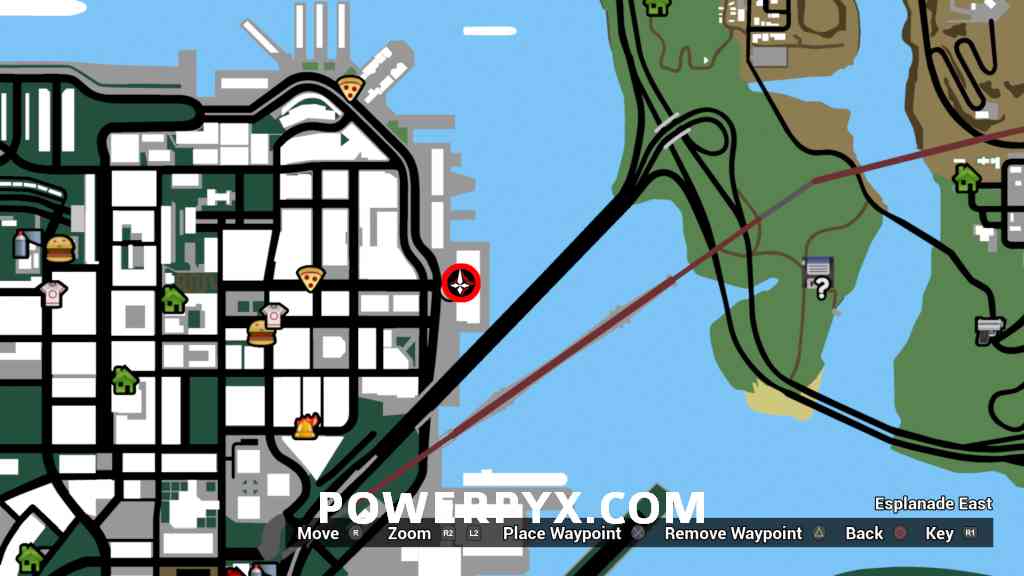
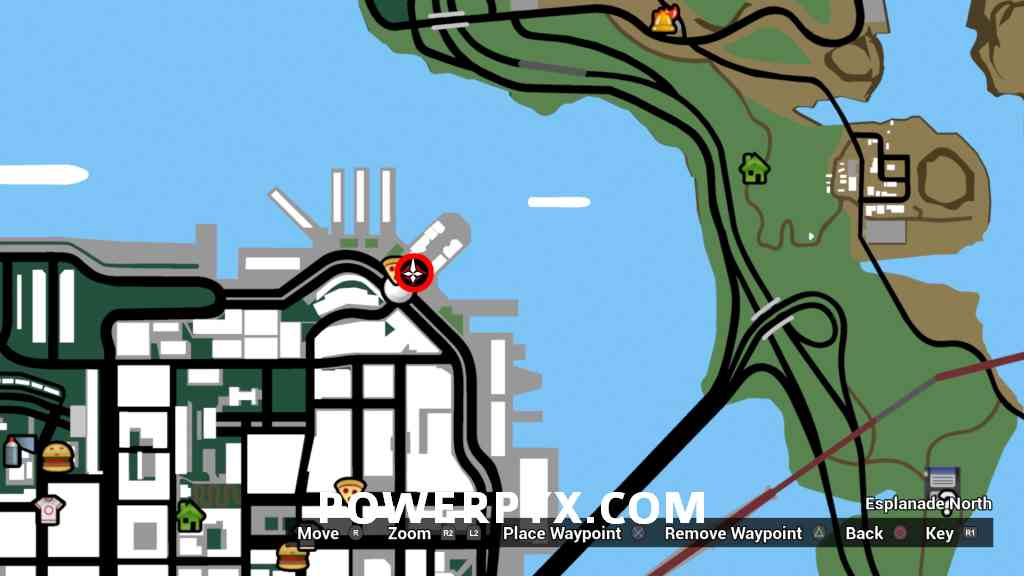
Snapshot #9: Above a building at the port, you can see it from the ground when looking up in the sky.

Snapshot #10: In front of two fuel containers.
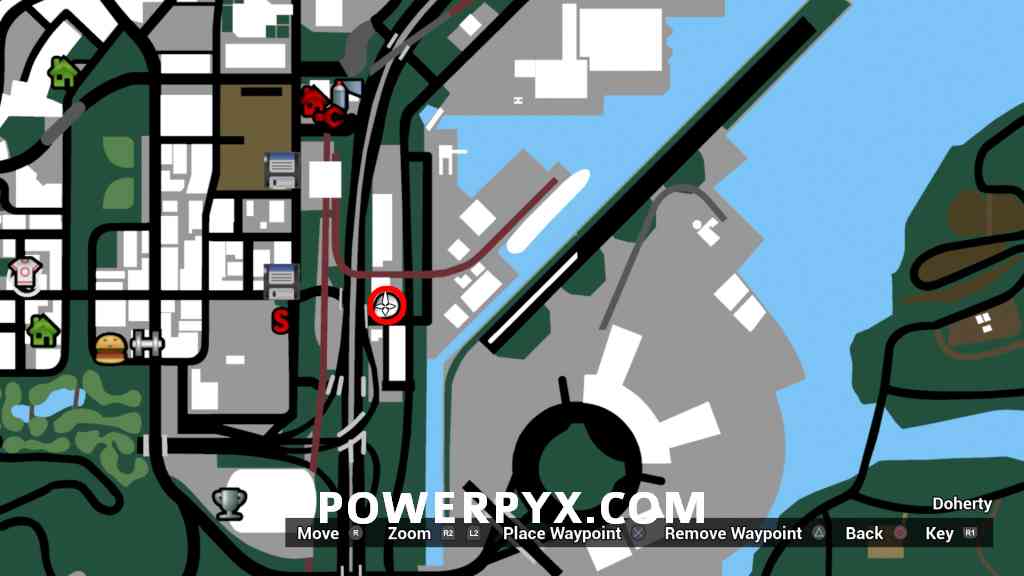

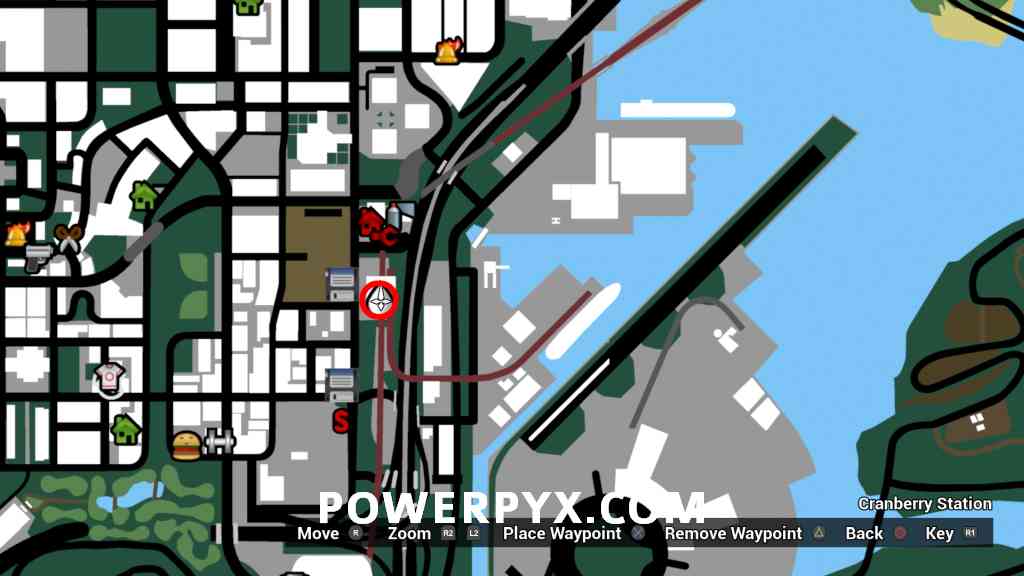
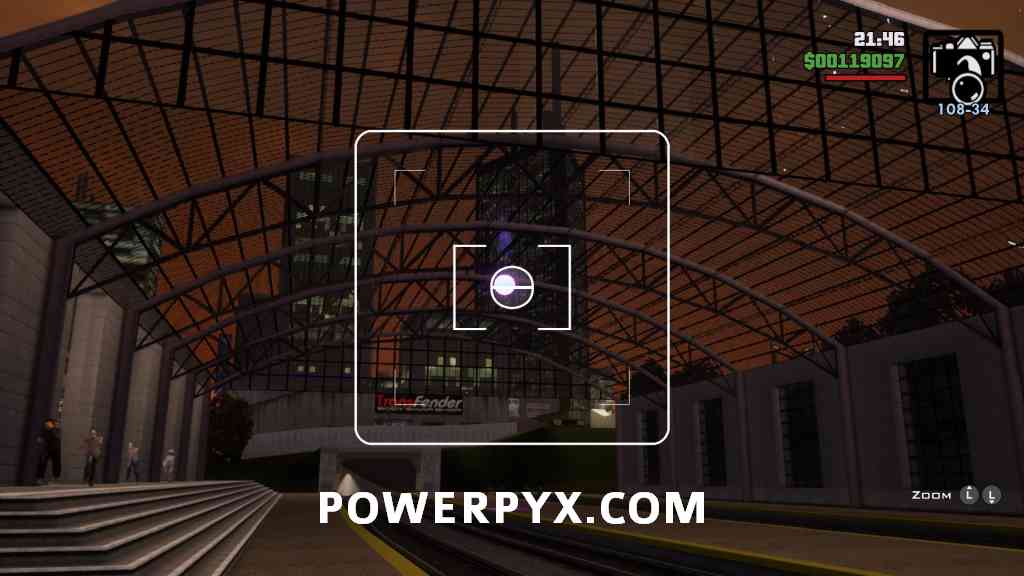
Snapshot #11: At the train station, in the middle above the railways.
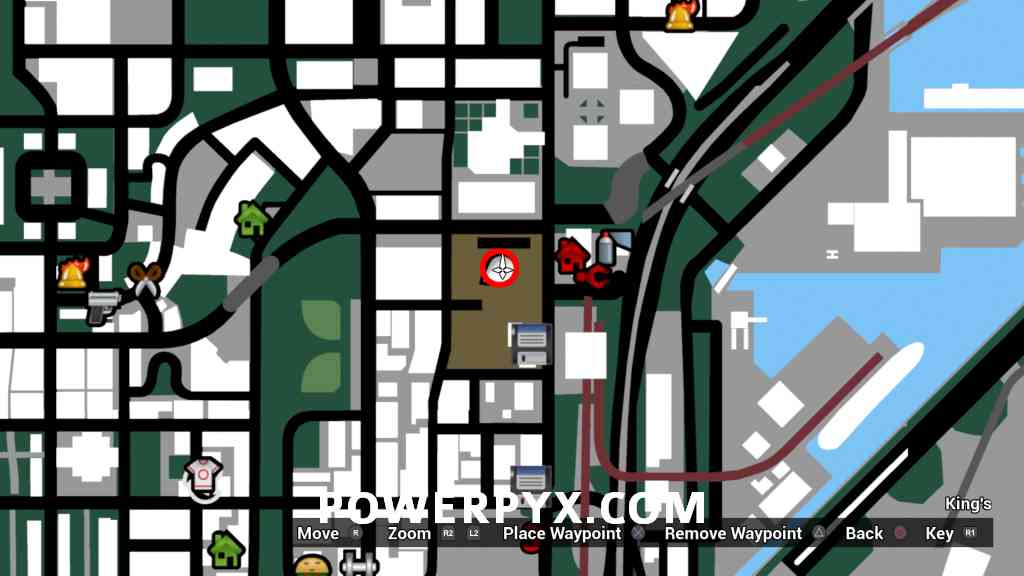
Snapshot #12: At the top of the yellow construction crane, at the construction side.

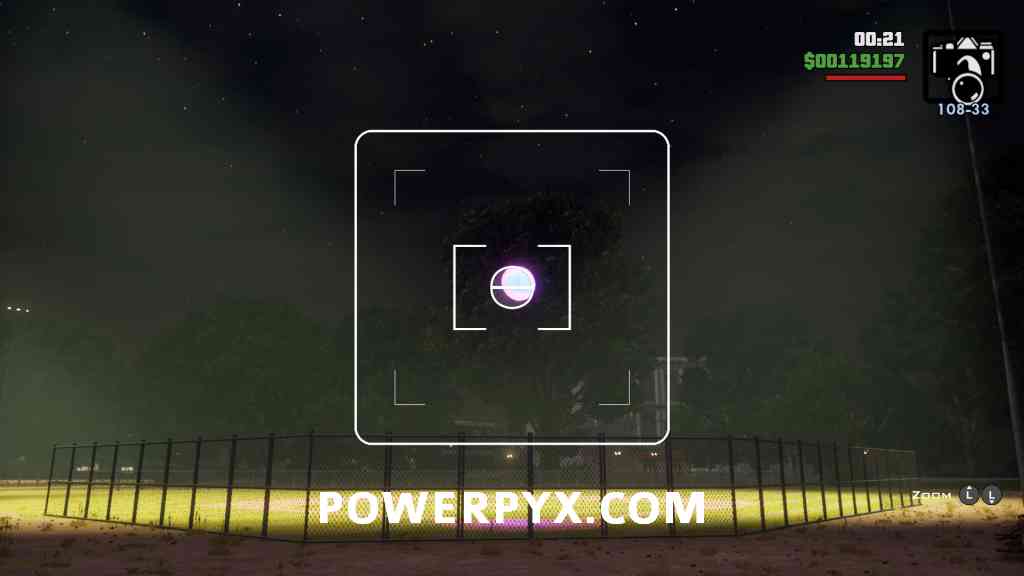
Snapshot #13: Above the baseball court.
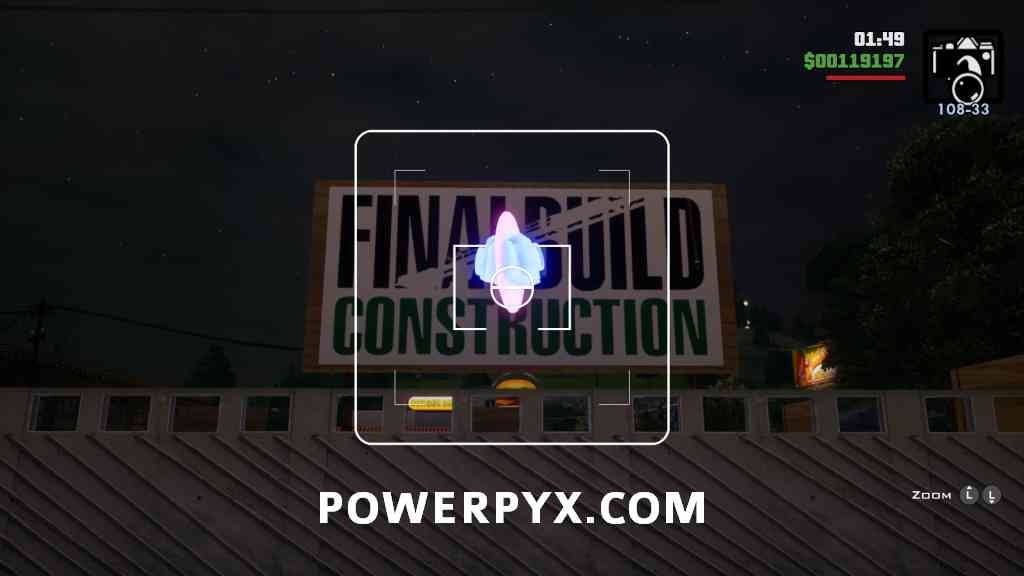
Snapshot #14: In front of the “Final Build Construction” sign at a small construction site.
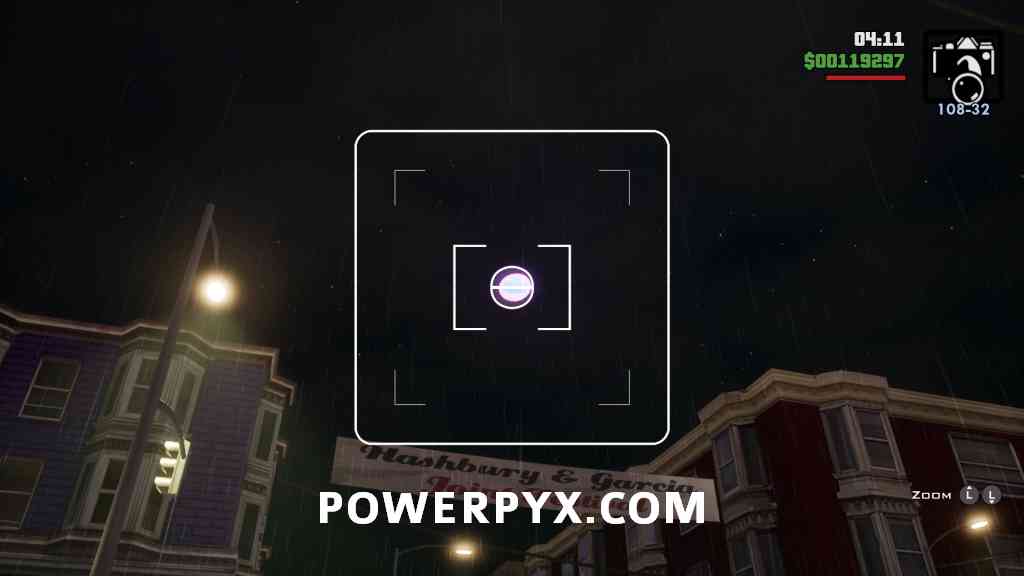
Snapshot #15: Above the street banner that says “Hasbury & Garcia Joint Festival”.
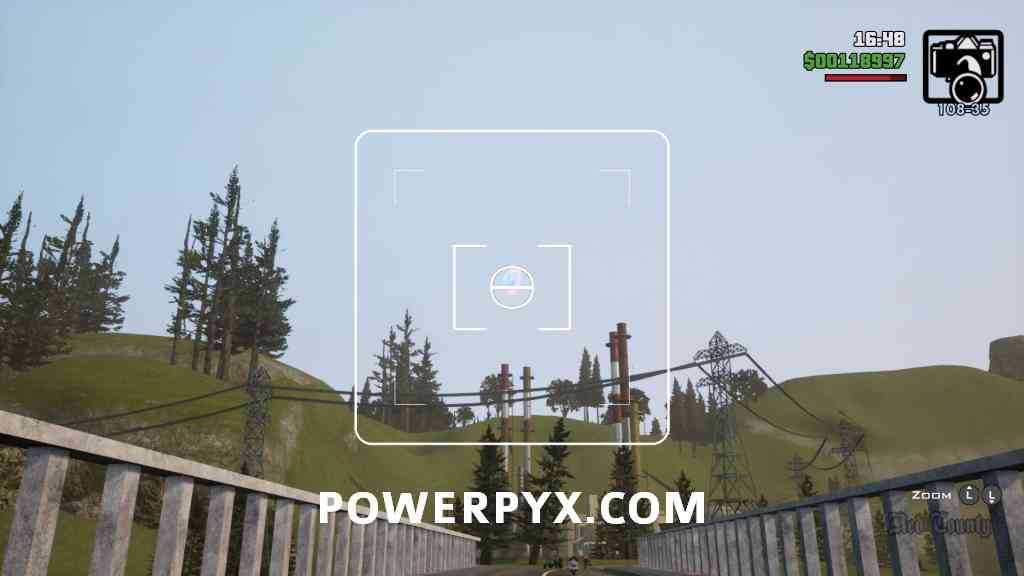
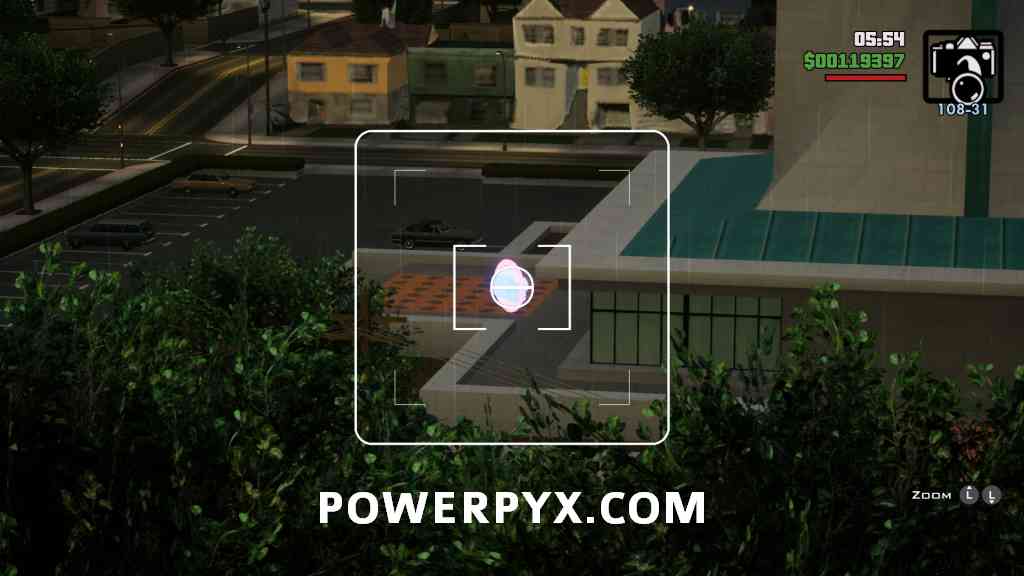
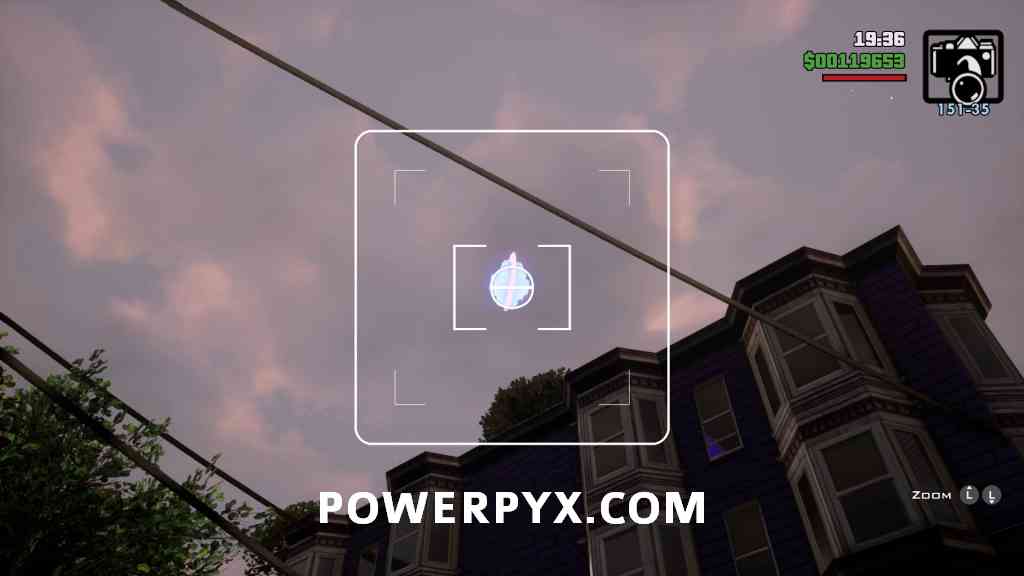
Snapshot #16: In a small park, in the air above some power cables near a wooden pole.
Snapshot #17: In the air above a tennis court.

Snapshot #18: In the tower directly south of the last snapshot. You can stay at the tennis court and zoom in from there.
Snapshot #19: At the top of a building, you can see this best from the building’s east or west side.
Snapshot #20: Above the “Hippie Shopper” building.
Snapshot #21: Above the cinema entrance.

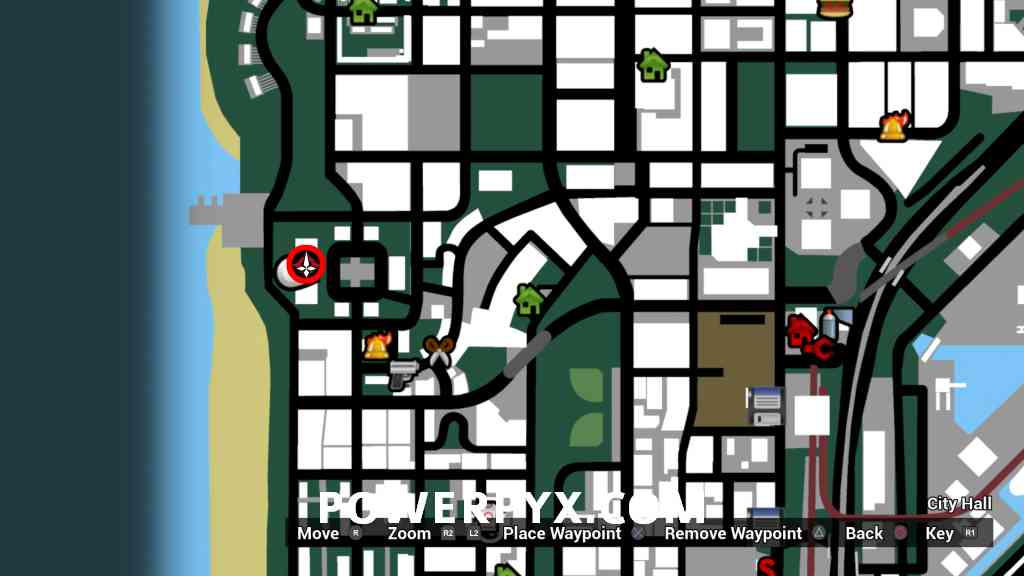
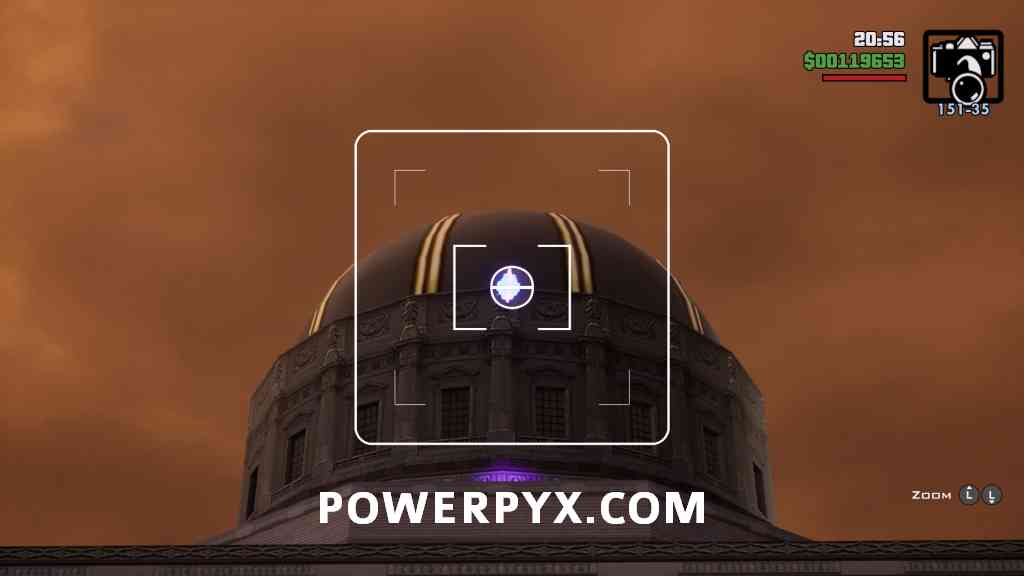
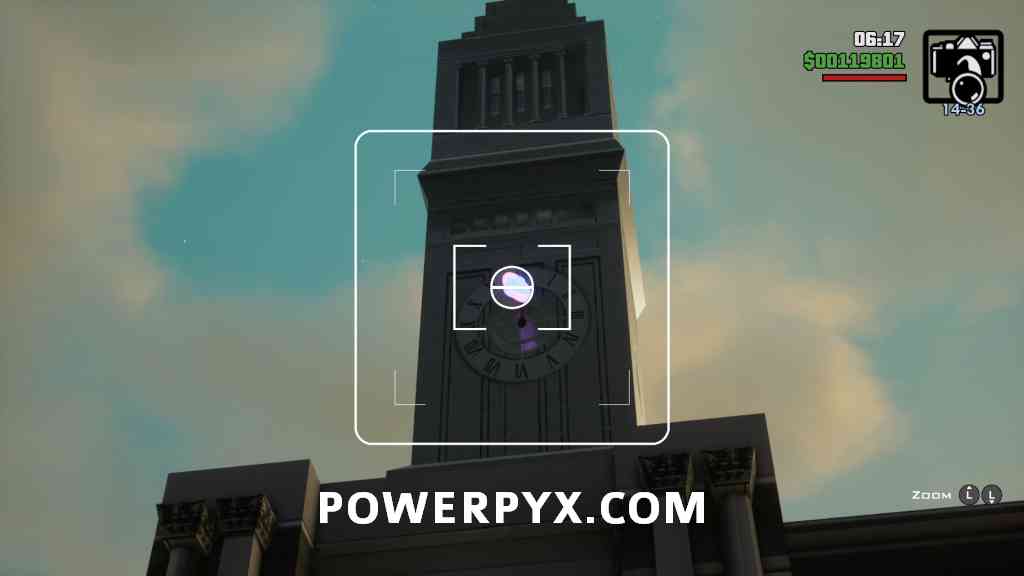
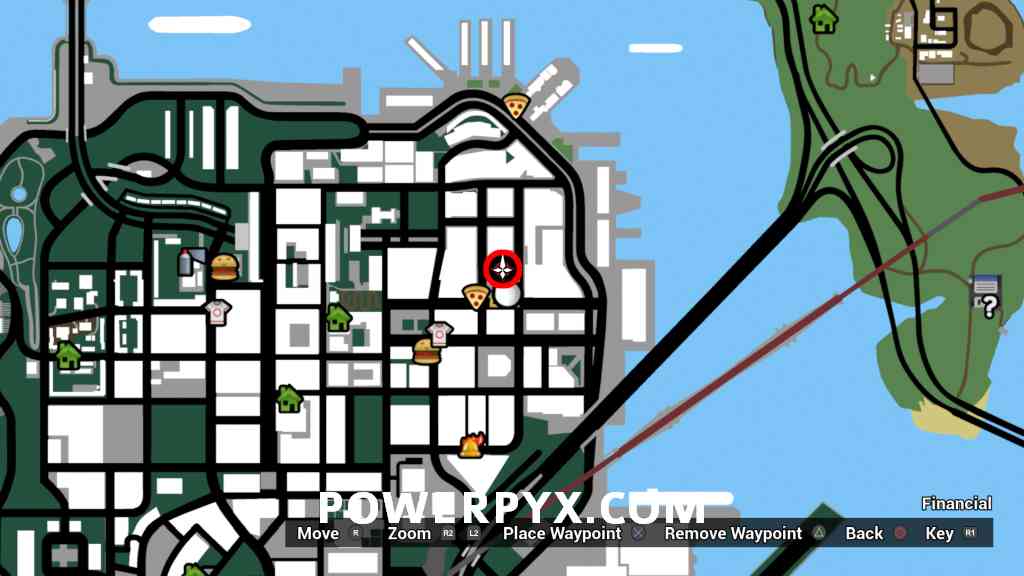
Snapshot #22: Above the City Hall building, in the middle of it.
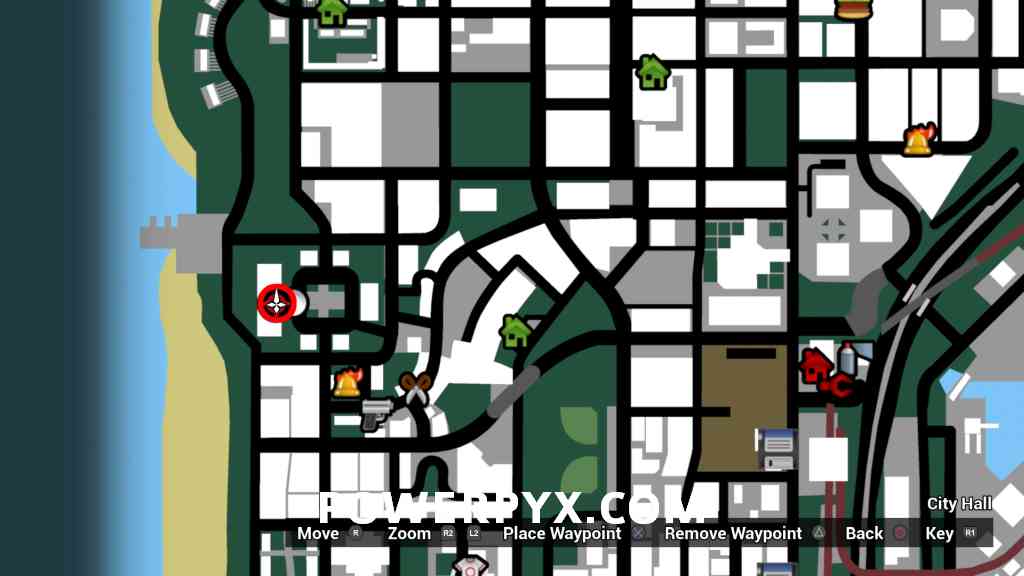
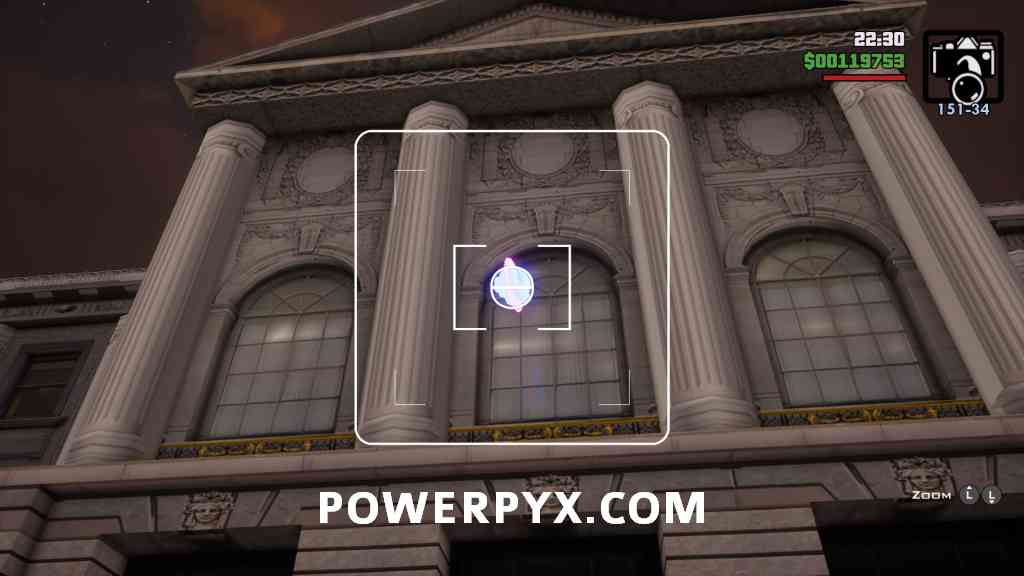
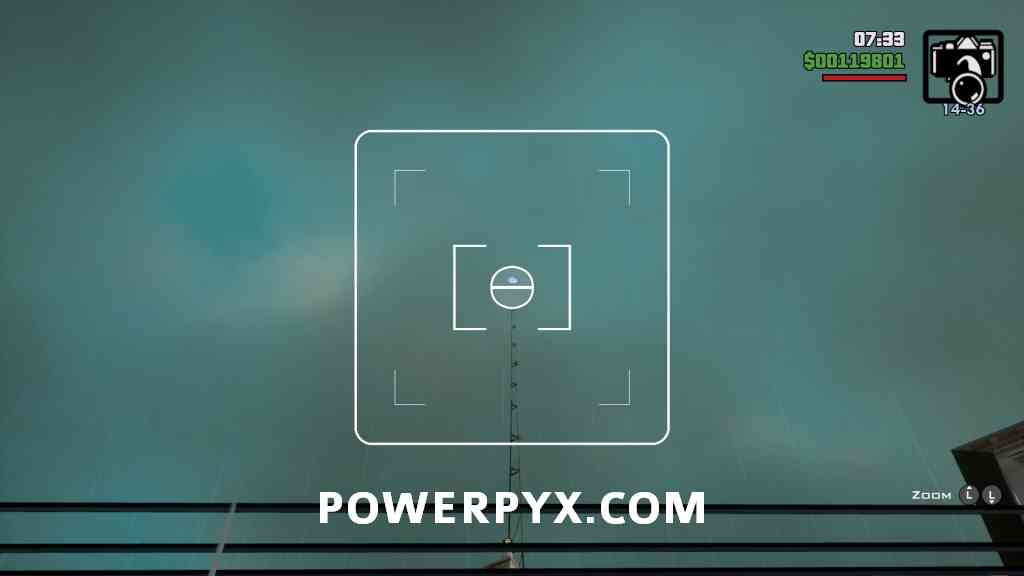
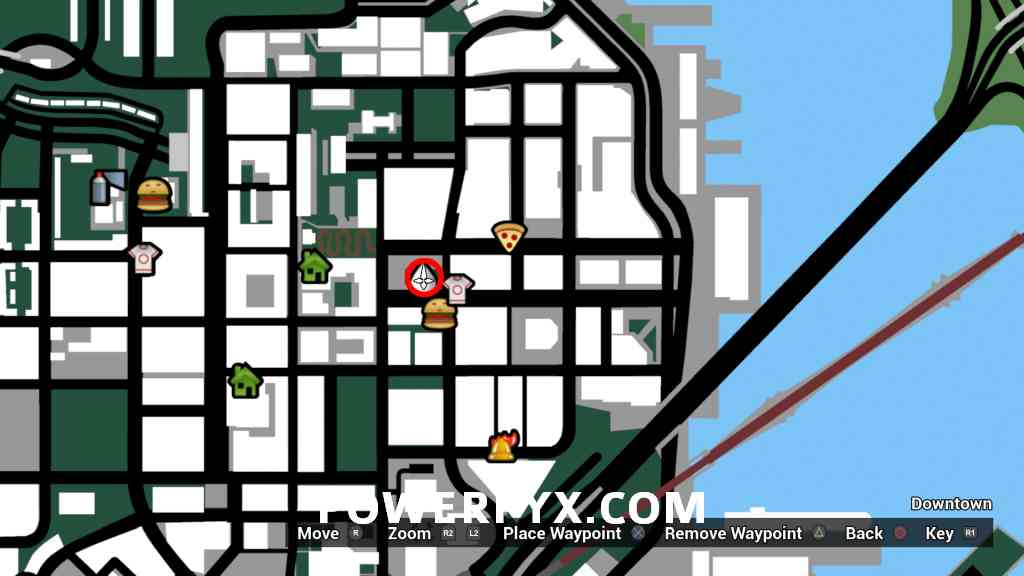
Snapshot #23: At the east-side entrance of the City Hall building.
Snapshot #24: At the north-west side of a purchasable property.
Snapshot #25: At the entrance of the purchasable property.

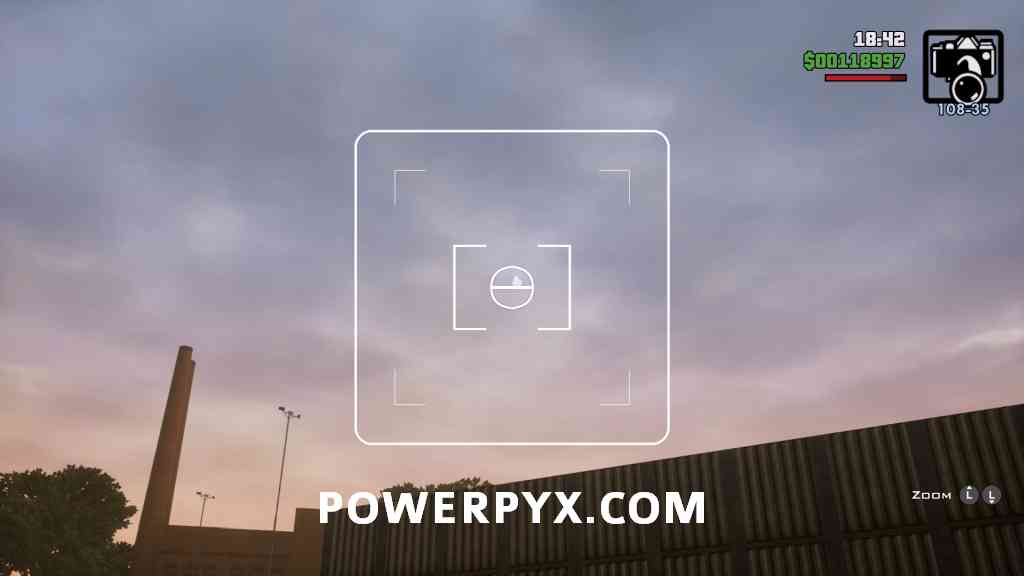
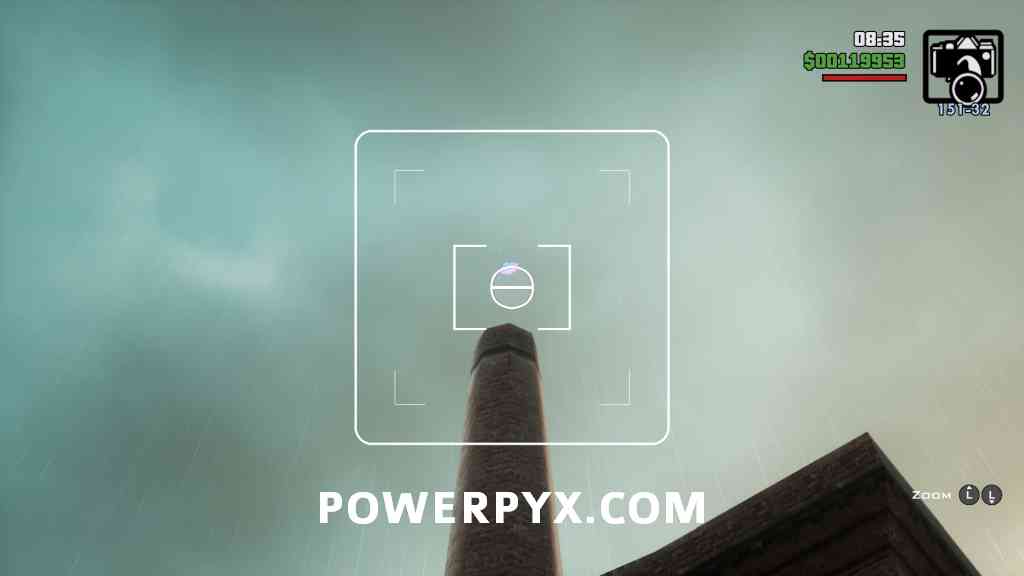
Snapshot #26: On the chimney of a factory.
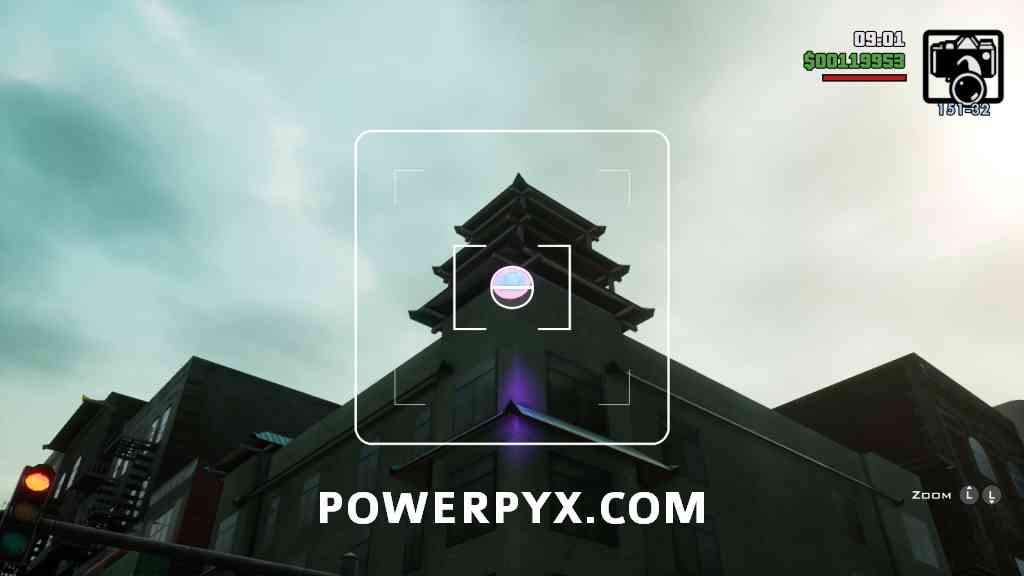
Snapshot #27: In Chinatown, at a Chinese-looking tower.

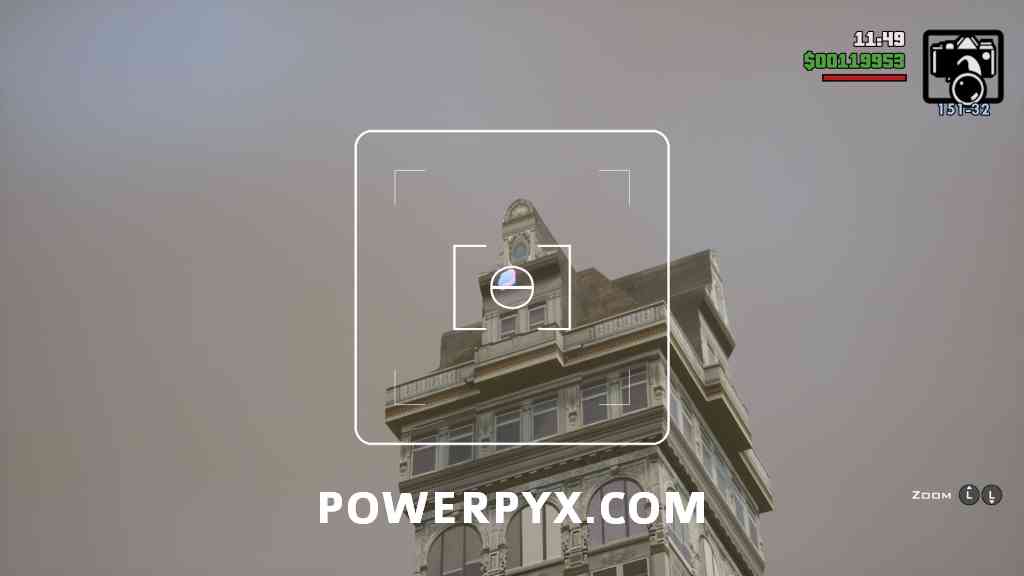
Snapshot #28: On top of a tall building, must photograph this from the other side of the street so that you can look far enough up in the correct angle.
Snapshot #29: On top another tall building, can be photographed from across the street so that you can look up far enough in a good angle.

Snapshot #30: Between 2 tall buildings, halfway up the buildings.

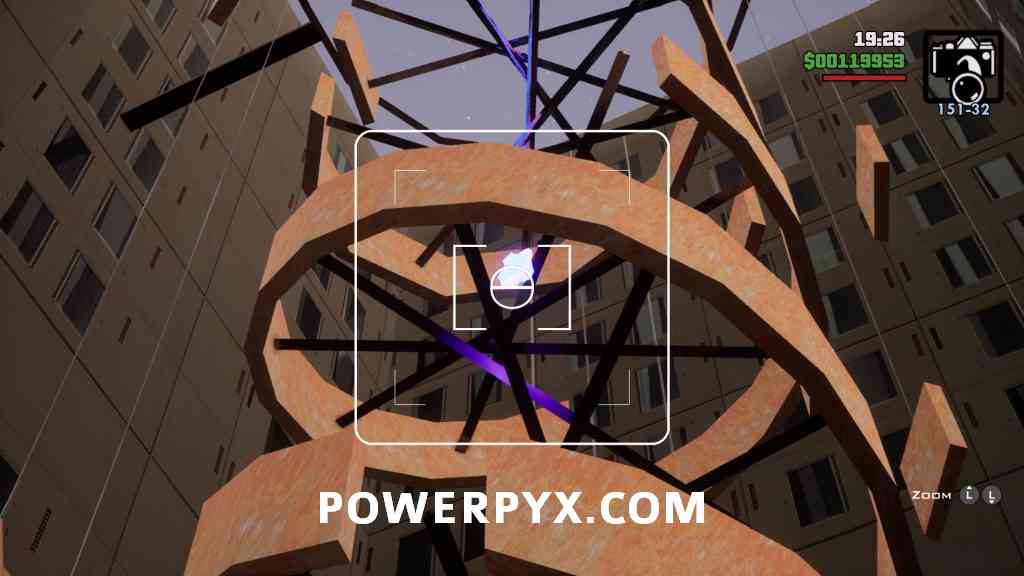
Snapshot #31: Inside a building (entered via street to the north), inside a twisted architectural structure.
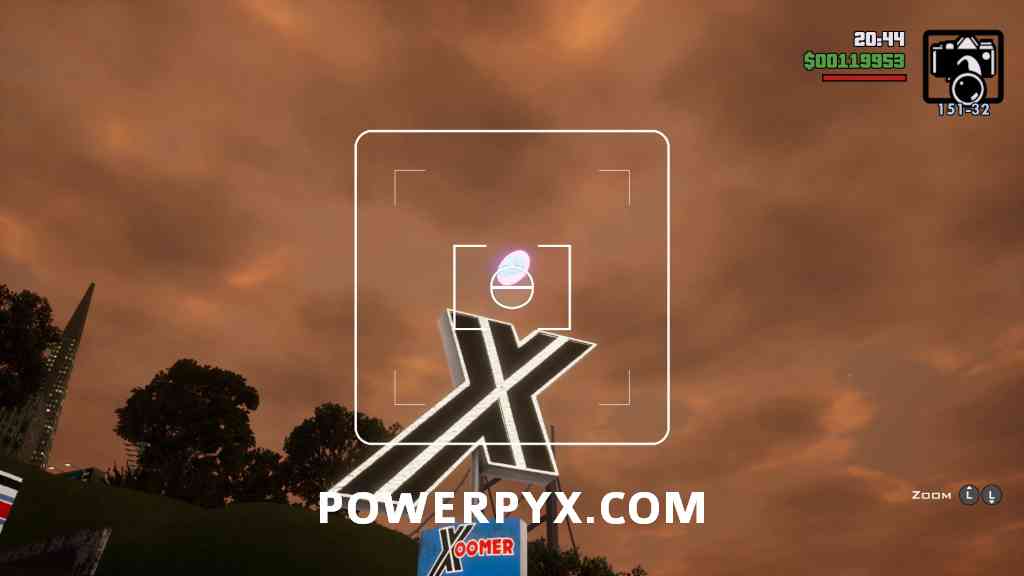
Snapshot #32: Above the price display of the gas station.
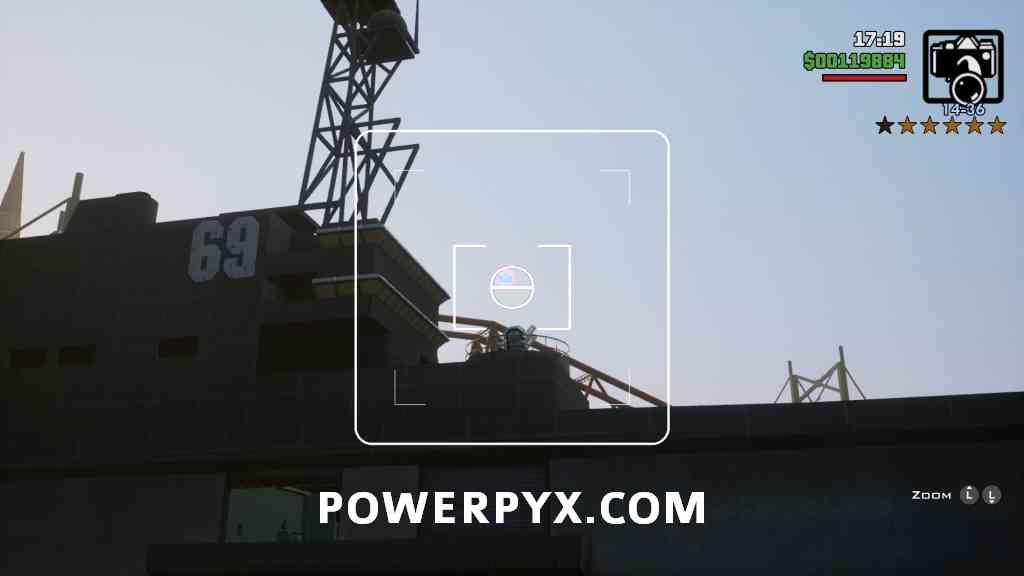
Snapshot #33: On top of the military ship above an anti-air turret. It can be photographed by standing at the harbor south of the ship. WARNING: Entering the harbor area around the ship will instantly give you Wanted Level 5. You should have a fast getaway vehicle and drive straight to a paint shop to lose the cops, or else you might get killed or arrested by them. Alternatively, you can take the picture from the train bridge to the north without entering the harbor.
Snapshot #34: In front of the first bridge pillar of Garver Bridge.

Snapshot #35: At the last bridge pillar of Garver Bridge, on the north-side.
Snapshot #36: In front of a clocktower by the coast.
Snapshot #37: On top of an antenna tower on the rooftop of a hotel. You can photograph it from across the street, must get some distance to look up far enough.
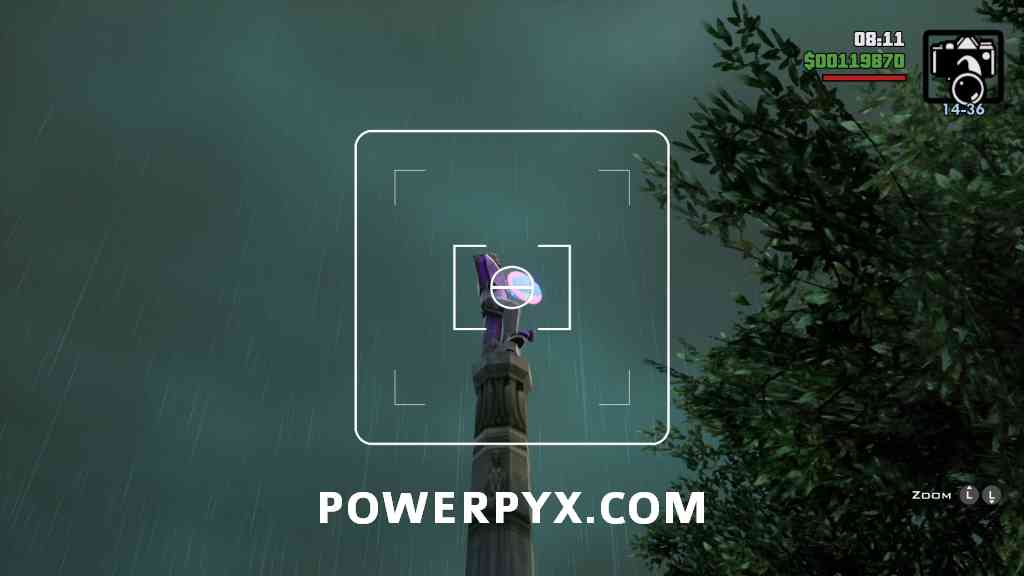
Snapshot #38: On top of a statue.
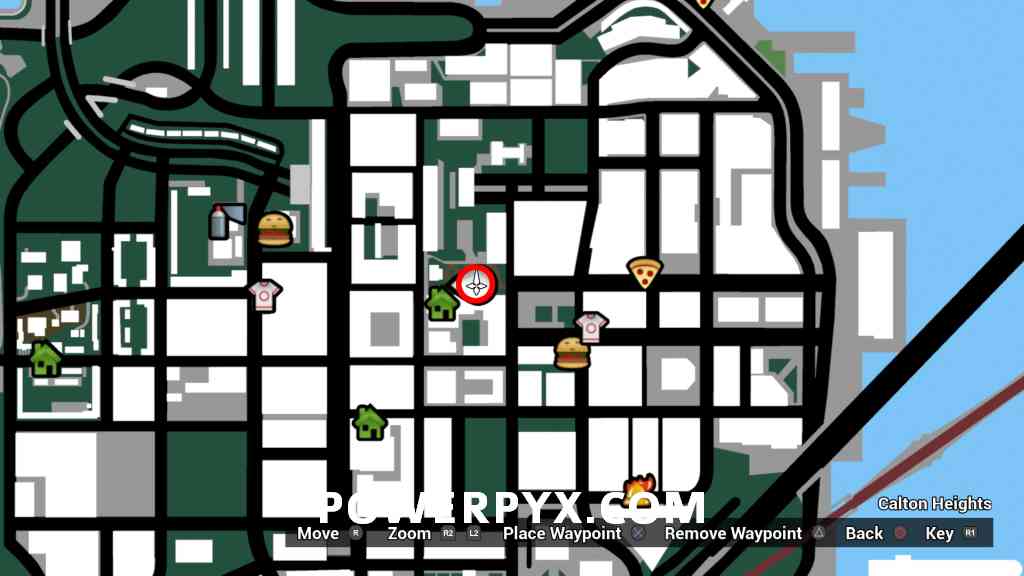
Snapshot #39: Inside a park on the serpentine path.
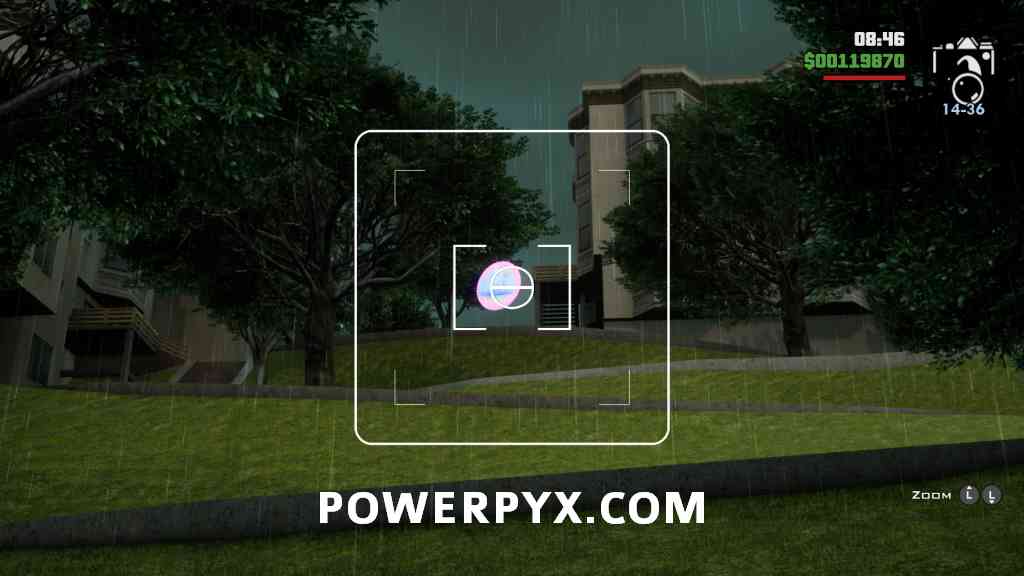
Snapshot #40: Above a Chinese gate next to a purchasable property.

Snapshot #41: Above a supermarket building.
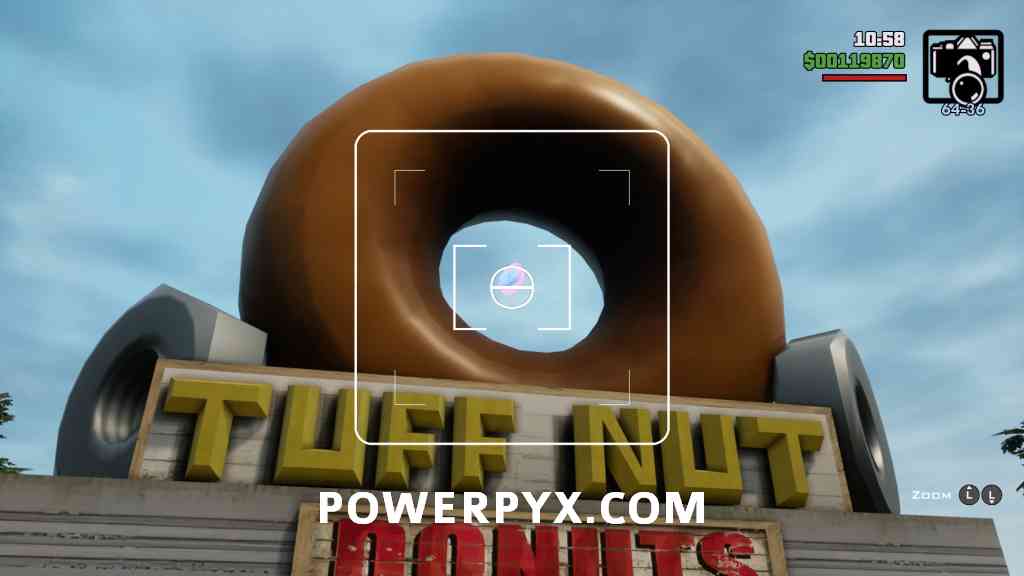
Snapshot #42: Inside a big donut over a donut shop.
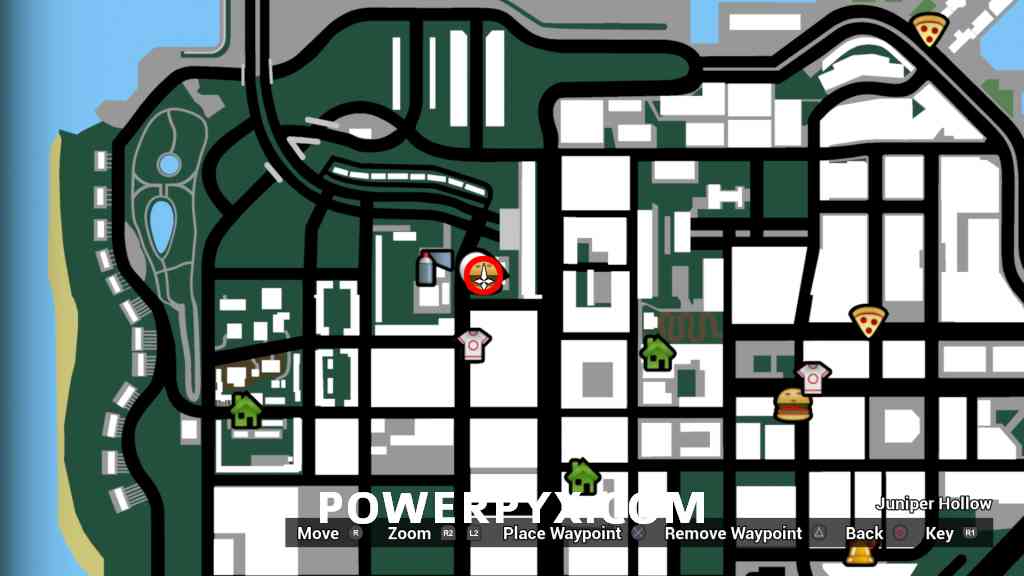
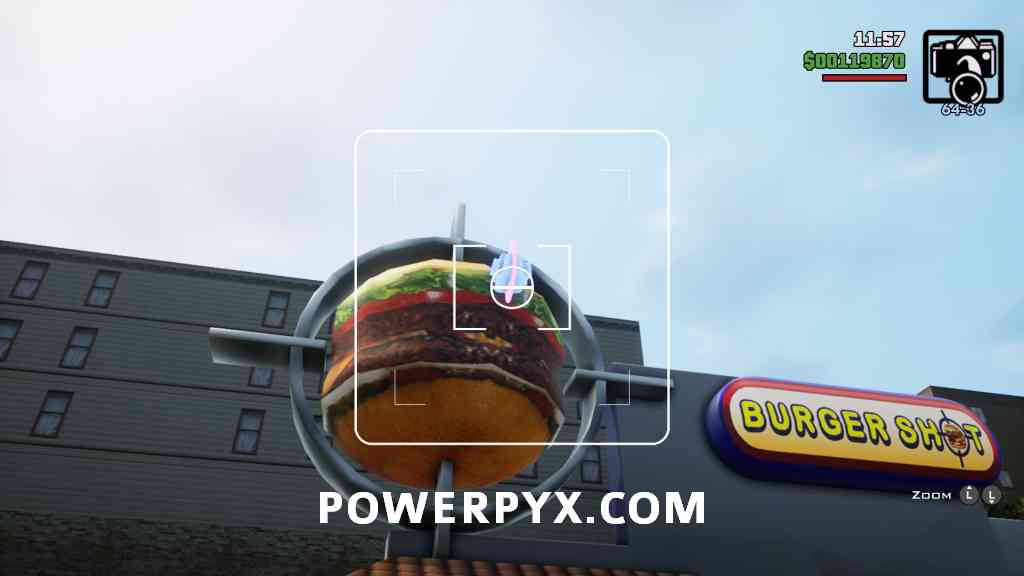
Snapshot #43: Above a rotating burger at a burger shop.
Snapshot #44: At the entrance/exit of a road tunnel.
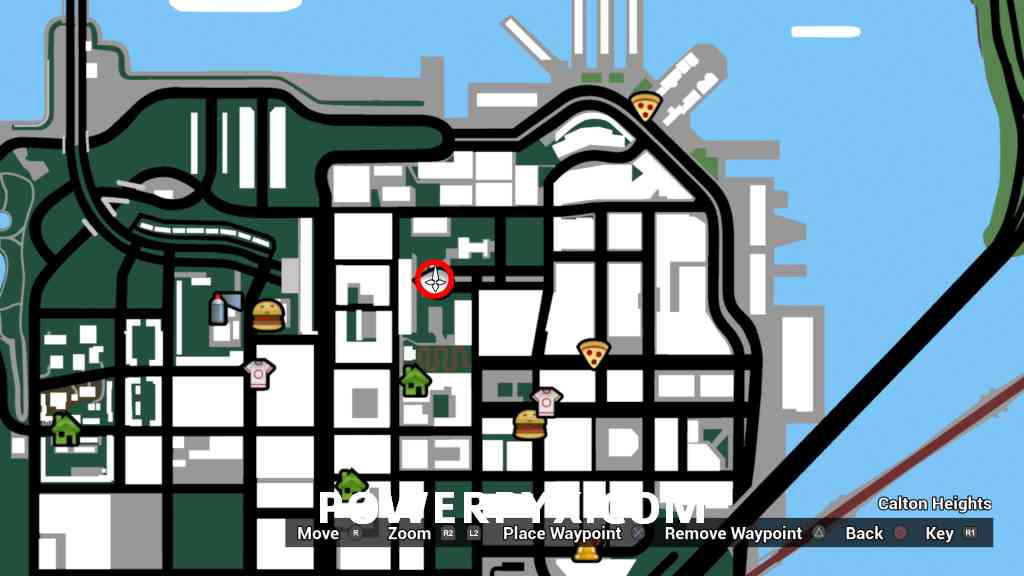
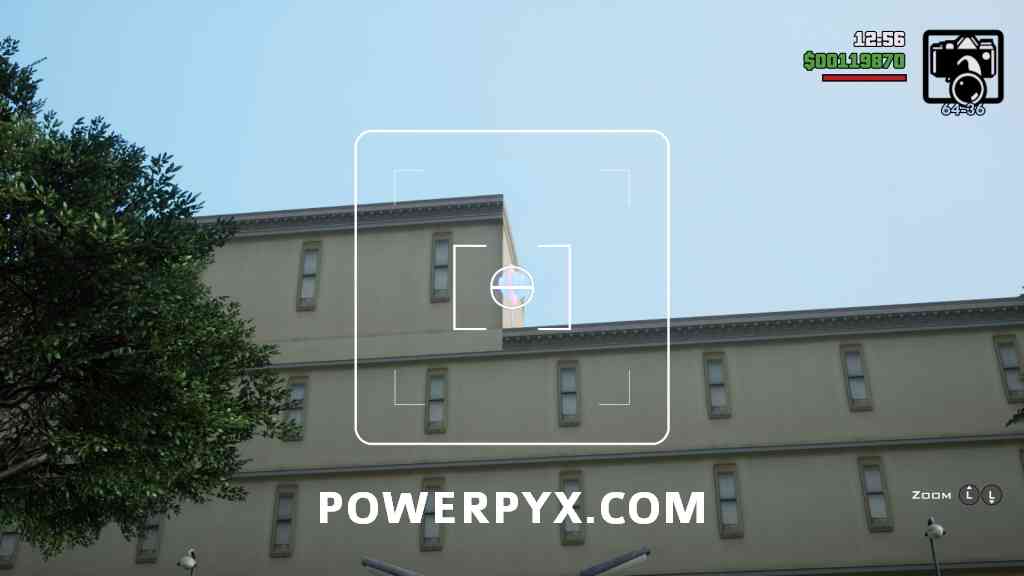
Snapshot #45: Halfway up the outside of a tall building.

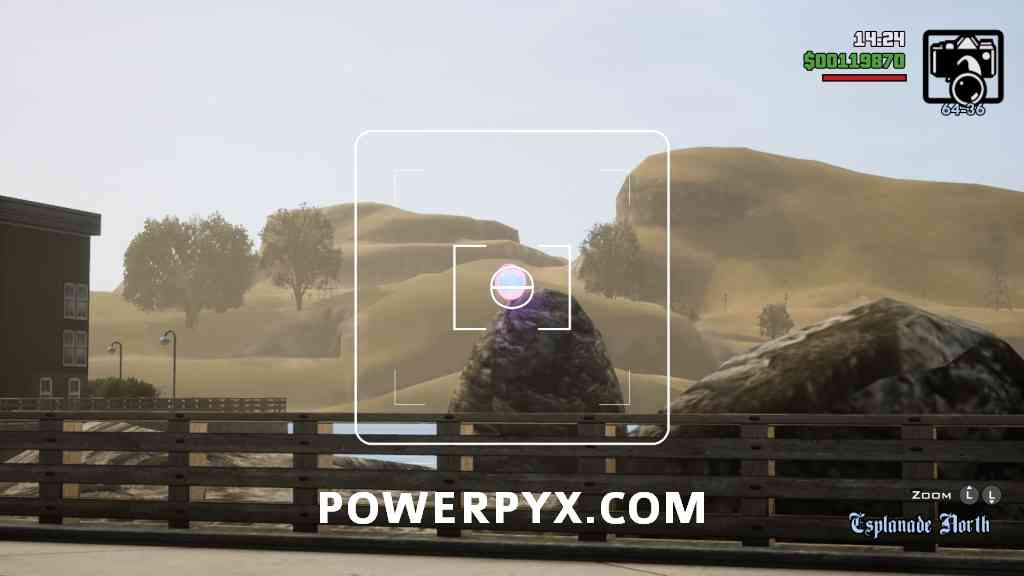
Snapshot #46: On a rock at the pier.
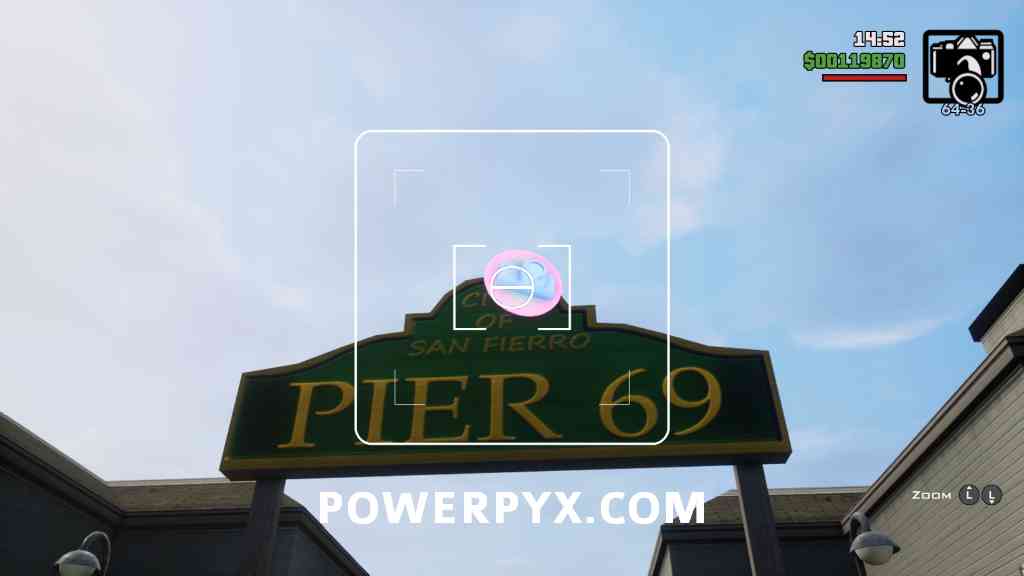
Snapshot #47: On the “Pier 69” sign, at the entrance of the long pier.
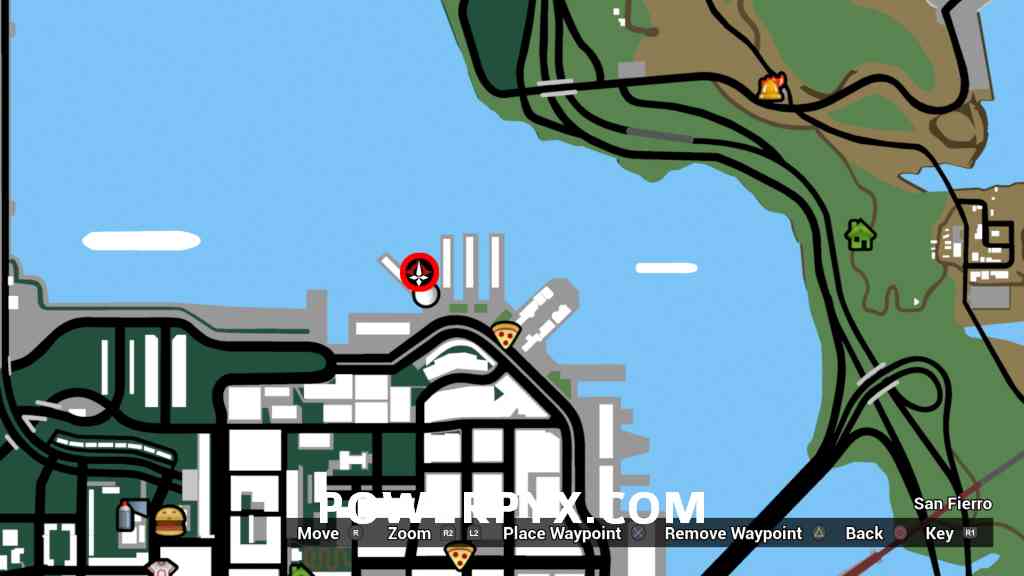
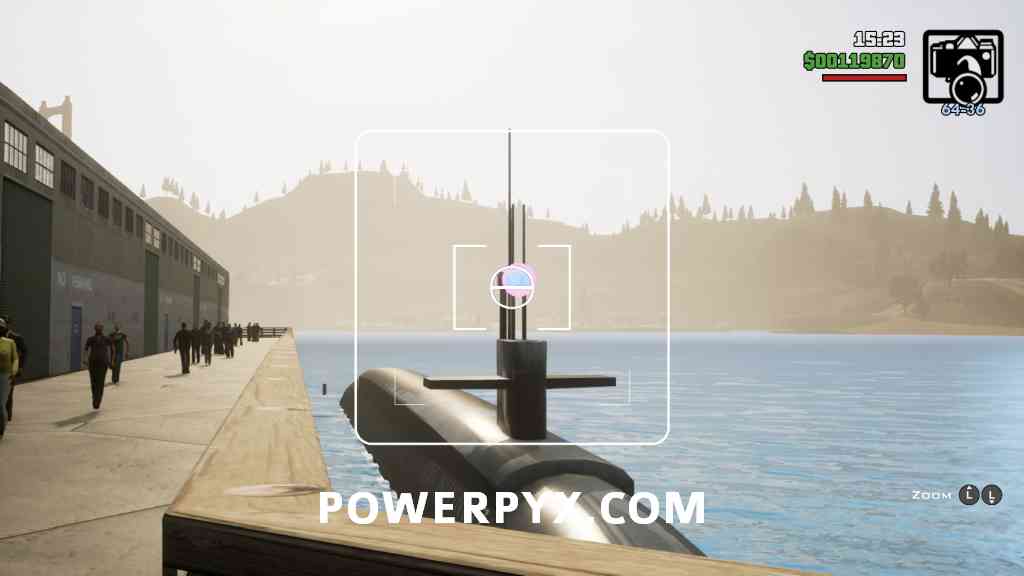
Snapshot #48: At the pier above a submarine.
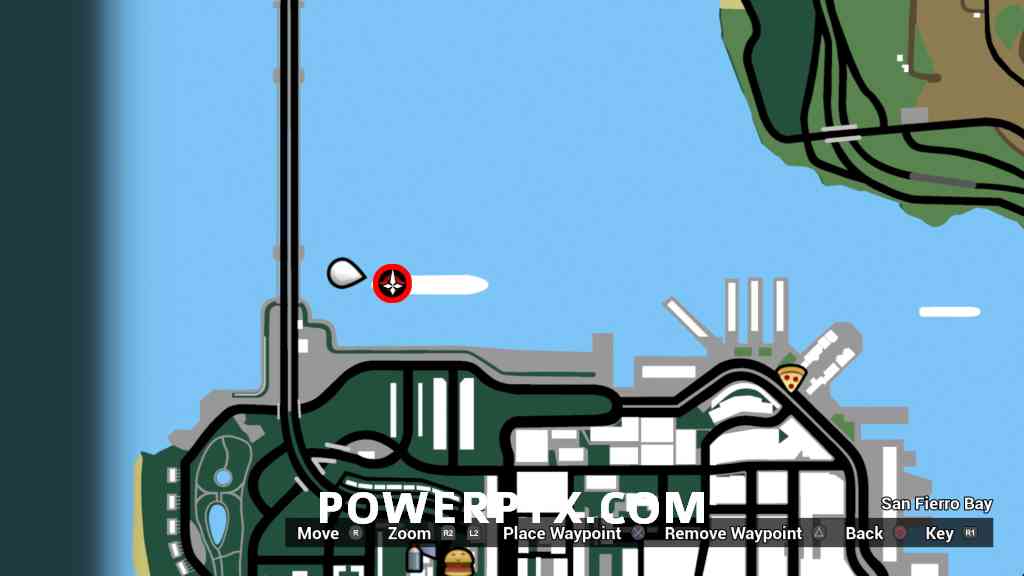
Snapshot #49: At the wooden ship mast. You must be relatively close, on the water, to see the icon show up. It’s best to steal a boat from around this area and drive up close to the ship.
Snapshot #50: At the first pillar of Gant Bridge.

That’s all of the Snapshot Photos in GTA San Andreas Trilogy Definitive Edition. For all other Collectibles, see the GTA San Andreas 100% Completion Guide & Checklist.
Earl Black says
Snapshot #44 does not appear
Sean Humphries says
Run dowm to the freeway, aim up above the lampost. The picture in the guide is way off, it’s not near that window, it’s back and to the right a bit
PowerPyx says
Might be a bit buggy. In the picture in the guide you can see the snapshot icon, it worked for me from that angle.
Mike says
Hey I love your walkthroughs on these collectables. I just wanted to say that on Snapshot #33, you can stand on the train bridge and get the snapshot without having to go into the bay and getting the wanted levels. Thank you for all the hard work!
PowerPyx says
Will add a note about that, thanks!
Robert says
Where on the bridge do you have to stand because it’s not showing up in my game, although my disc does have scratches on it and I don’t know if that affects it or not
Shadowalker13 says
For snapshot 49 you can take it from the bridge, so long as you line up the shot it will count even if the icon isn’t visible.
Sean Humphries says
Number 3 you can get from the road directly to the west of your icon. Aim for the rood of the second from left building, take the pic in the middle of that roof, should count, did for me and I couldn’t see the purple icon
Joe says
That’s how I got it, too.
Sean Humphries says
Number 35 you can get from near 36 if you haven’t locked that bridge. It’s a tricky shot and you’ll be snapping blind but lime the cable up with the top of the highest ‘X’ and it’ll take the pic
Patate says
Thanks, it worked for me ;)
Sean says
Snapshot #25 doesnt appear.
xSTILLALIVEx says
Doesnt show for me as well. It’s the last one I need.
Schizophror says
Where do I find the taken Photos?
Want to rewatch them on PC
Pez says
#19 doesn’t appear for me. I’ve tried every angle even with a jetpack. I’ve tried reloading etc. Anyone manage to fix a bugged one?
Ryan says
Same here guess you’ve had no help?
Shannon says
Same, no matter what I do it won’t appear
Chris says
Same here.
Ertürk says
Did you manage to get it? Having the same issue.
Dripmastadave says
I strangely found it a little bit off into the parking lot of the building instead of the area it should be in.
Spc says
Me either
strange says
I found it on a electric pole near the building. Other guy says it was on a parking lot so just look around.
Bayu Bimantara says
Number #34 doesn’t appear for me, now I’m stuck 49 out of 50.
Angus says
Yeah same
Brandon says
every one is collectible. just some don’t appear but if you take a picture in the spot shown it will count it. i just finished getting all 50.
LMTR14 says
highly recommended to use the jetpack for these. the reward is not good anyway
Robert says
Number 40 isnt there. Ive taken lots of shots at different angles but still isnt counting