
Layers of Fear (2023 PS5 Remaster) contains a side story called Daughter’s Story which is a revamped version of the Inheritance DLC to the original Layers of Fear for PS4. This story has three possible endings, each of which is dependent upon what you do and collect in the game. To unlock  The Tree and the Apple, you need to unlock the True ending. Below is a walkthrough of what needs to be done to achieve this ending. This walkthrough shows how to unlock all other trophies as well. This ending may be unlocked in other ways too, this is just one confirmed way to get it. Make sure to reach the end in one session if possible. If you quit the game, you’ll reload at the beginning of the Story. While all collectibles will have saved, because you start from the beginning, it may be confusing to know where to go next.
Video Walkthrough

Step 1: From the main menu, go to Chapters > Daughter’s Story > Inheritance. When you spawn, grab the note from the chair behind you. Then, proceed to the living room and grab the note and the pocket watch from the cupboard on your immediate left. Next, grab the note from the window sill behind the armchair. Now enter the kitchen and approach the door to the pantry to trigger a flashback memory. Unlock the door lock and free the dog. When the memory is over, open the door and grab Drawing 1 from the wall.
Step 2: Leave the kitchen and enter the bathroom and grab the magazine from the floor near the toilet. Now leave the room and enter the door on your right for a storeroom. Here you will trigger a new flashback memory. Make sure you lock the door here fast. When back in the storeroom, grab the mouse trap from one of the shelves, and Drawing 2 from the floor.
Step 3: Leave the storeroom and head downstairs into the basement. Continue on as far as the game allows you and you’ll trigger a new flashback memory. Make sure to pick up the music sheet from the pile of lit documents on the right. When back in the basement, grab Drawing 3 in front of you. Turn around and grab the note from one of the crates on your right, then head back upstairs. Now enter the Painter’s Studio and approach the cabinet left of the chest. Grab the blue crayon and interact with the canvas.
Step 4: You’re now in the crayon world. The first thing you want to do is follow the glitter path and interact with the tongue of the theater to trigger the first chapter of the Red Riding Hood story. When the first chapter is over, return to the canvas and activate the red switch behind it, then follow the green footprints. When you reach the serpent warning sign, grab the crayon from the floor and return to the canvas to interact with it. Now follow the new glitter path for the second chapter in the Red Riding Hood story. Return to the cavas and grab the paintbrush from the nearby nightstand and you’ll warp to a different Painter’s room with a somewhat labyrinthine structure.
Step 5: Here, turn around and go through the opening behind the red chair and immediately around the toppled furniture in front of you to find a tube of paint. Return to the canvas and interact with it. Now continue behind the cabinet with the flower vase, through the wooden tunnels and along the hallways at whose end you’ll find a portrait. When you see the portrait, turn around and around again to escape the moving cabinet. Push the beach ball up the slope of toys to have it automatically warp into a hole, giving you access to another tube of paint. Grab the tube of paint and go back to the canvas. As the Painter speaks, approach the faintly lit chair in the corner and grab the note under it, then the paintbrush atop it. Interact with the canvas and you’re now back in the crayon world.
Step 6: If you haven’t done so yet before, follow the glitter path first and watch the second chapter of the Red Riding Hood story. Then, return to the canvas and head behind it to grab the sword from the stone. Now follow the blue paw print path and turn right at the split until you come across a note in a bloody area. Grab the note and return to the split and follow the blue paw print path. You’ll soon be halted by a toy train. Go around it and grab the note from the base of the nearby lamppost. Now make your way back to the canvas to find a spotlight shining around the area. From the canvas, follow the green footprint path, then the claw marks path and grab the note at the end. Next, interact with the flower and wait for the weeds to open up. Make your way back and follow the green footprints when you see them again to reach a treehouse. Climb up the ladder and unlock the door for a cutscene.
Step 7: After the cutscene, grab the crayon on the ground in front of you. Go back to the canvas and interact with it. Now follow the glitter path a third time until you get to a destroyed house and unlock  Once Upon a Time for seeing all chapters of the Red Riding Hood story. Now return to the canvas and follow the big paw print path until you get to an area that lights up from the ground. Here, near one of the standing crayons, is a note. Grab the note and make your way back to the canvas. Now follow the small blue paw print path and you’ll find another note when you come across the red claw marks path. Now continue following the blue paw print path until you come across a tipped toy horse with another note on it. Return to the split and follow the red claw marks path to find another note at the end. Now, before doing anything else, make sure to seek the serpent to kill it if you haven’t unlocked the trophy for doing so yet. This is your last chance because after interacting with the canvas one more time, you won’t be coming back to the crayon world. After slaying the serpent, grab the paintbrush from the nightstand near the canvas and interact with the canvas itself. Now make your way to the outer edges of the room until you can collect two tubes of yellow paint on a wooden nightstand at the end of a hallway. Interact with the canvas and after some dialogue, you’ll be back in the original Painter’s Studio.
Step 8: As soon as you’re back in it, open the right drawer and grab the note, then the note from the top of the cabinet and then Drawing 4 next to it. Now open the chest and interact with the can of fluorescent paint. Leave the Painter’s Studio and head upstairs.
Step 9: Approach the couch by the window sill to trigger another flashback memory. While in it, tap the dog to make him go away. When the flashback memory is over, grab the note from the couch. Now enter the nearby office, the one with the babyface painting in and flank the right side to trigger a new flashback memory.
Step 10: During the entire memory, always choose the father’s path. You’ll have to do this a total of three times. In the first room, interact with the piano and keep playing until your mom tells you to go grab the crayons. When she does, grab them from one of the cupboards in the room and go back to the piano. Now make sure you play the exact sequence. Now continue on and a while after you’ll enter a small room with a toy chest with a big black cross on it. Climb up the tiny ladder and grab the clock note from inside.
Step 11: Continue on and after a while you’ll be in a room with a dining table in the middle. The same room can be found in the two floors below, each of which containing a scarp of the drawing of the mother. In the first room, one scrap is inside the cupboard opposite the dining table. In the first room downstairs, one scrap is hidden behind the painting of the mother. The final scrap can be found in the second room downstairs after pushing a picture down and walking on it. Now go down one more level to enter a hallway with a bunch of barrels and crates. On the ground here you can find a note. Now go back all the way upstairs until you can open a door leading to a fenced balcony. Opposite the balcony is the drawing of the mother you’ve just put together. Interact with it to continue on.
Step 12: Open the door and continue on, making sure you always choose the father’s side. You’ll soon be in a room with lots of beams you can walk up. In this room are three cakes. Make sure you grab them all before continuing. Once you have the three cakes, open the door and continue on until you’re eventually able to interact with a dog whistle. Open the door and continue until you get to a split. At the split, go froward into the toy room and grab the note from the floor, then continue down the other hallway.
Step 13: In the next room, grab the toy cat wheel from the bookcase’s shelf to reassemble it and then follow it as it moves along the hallway until it hides behind an opening in the wall. When the door opens, enter the room in front of you to find the portrait of the father.
Step 14: After some dialogue, you’ll be back in the office with the babyface painting. Grab Drawing 5 from the writing desk and the two notes from the open drawers. Leave the room and go across the hall to find Drawing 6 from a small table opposite the mother’s room. Now enter the mother’s room and open the wardrobe to find Drawing 7. Now interact with the wooden leg on the floor and this should unlock I remember It Like It Was Yesterday. Now interact with the gramophone to trigger a new flashback memory. While in it, interact with the gramophone. Leave the mother’s room and enter the room containing copies of the mother’s portrait. Grab Drawing 8 from the barrel in the corner and leave the room.
Step 15: Enter the child’s room on your right and approach the frame in the corner to trigger a new flashback memory. For the entire memory, make sure to keep the camera still and quickly redirect it towards the Painter when it moves away from him. You know you’ve done things right if the Painter apologizes at the end of the memory. When the memory ends, grab Drawing 9 from the floor.
Step 16: Now head back downstairs and into the Painter’s Studio. Interact with the wall above the cabinet and place the Drawings. Now rearrange the Drawings according to the picture below to form the face of the child.
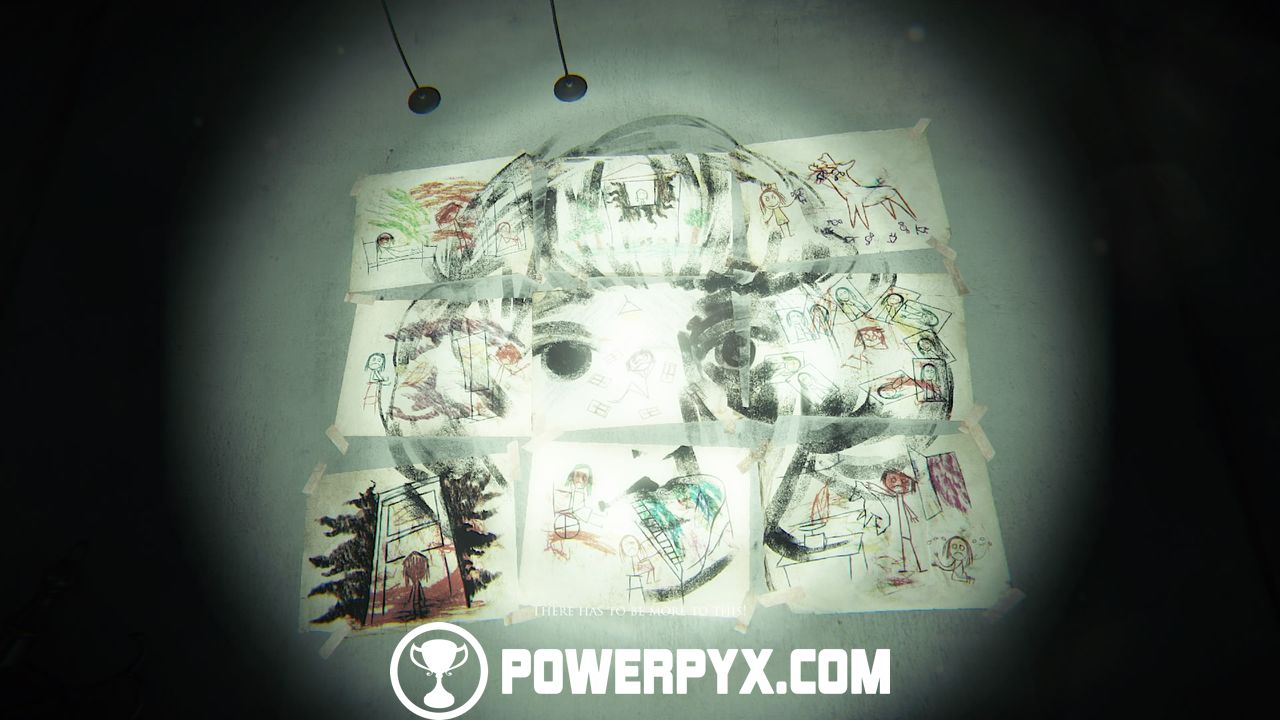
Step 17: Once you’ve rearranged everything, turn on your torch and point it at the Drawings, then turn it off to reveal what resembles a mouse’s snout. The mouse’s snout will then fade and reveal a secret map. Now simply interact with the cabinet behind you and you’ll unlock the True ending.
This will unlock the True ending and The Tree and the Apple in the Daughter’s Story in Layers of Fear (2023 PS5).
Leave a Reply