
Case 05: The Court of Owls is a Main Mission in Gotham Knights. This walkthrough will guide you through all Sub-Chapters and Objectives of the Case 05: The Court of Owls main story quest.
Requirement: having completed Case 04: The Masquerade
Reward:
- Subcase 5.1 – Little Birds: 3,300 XP
- Subcase 5.2 – Inside Gotham’s Walls: 4,560 XP
Mission Info: We enlisted the help of Batman’s old GCPD Contact, Detective Renee Montoya, to root out the Court of Owls. Unfortunately, the Court has bribed members of the force to keep their crimes quiet. It took some digging, but we managed to find a crime scene they hadn’t covered up yet. Now that Montoya can prove the Court is real, maybe we can find and stop them.
Objectives:
- 5.1 – Little Birds
- Talk to Talia al Ghul
- Talk to Detective Montoya
- Stop Corrupt Detectives 0/5
- Reach the Hideout
- Reach Gotham City Cemetery
- Reach the Hideout
- Disrupt the Court of Owls’ Plan – Defeat all Enemies 0/5 – BONUS: Perform Throws 0/2
- Disrupt the Court of Owls’ Plan – Find and Scan Evidence of a Cover-up
- Return to the Belfry
- Listen to The Penguin’s Recorded Message
- Reach the Iceberg Lounge
- 5.2 – Inside Gotham’s Walls
- Talk to the Penguin
- Escape the Labyrinth
- Find a Way Out of the Room
- Escape the Labyrinth
- Escape the Labyrinth – Defeat the Talons
- Escape the Labyrinth
- Escape the Labyrinth – Defeat the Talons – BONUS: Defeat Enemies Using Momentum Abilities
- Escape the Labyrinth
- Defeat the Gladiator Talon
- Search the Staging Area
- Clear the Court Operators from the Control Room – BONUS: Remain Undetected
- Defeat the Enemies
- Use the Room Assembly Controls
- Reach the Platform
- Scan the Fuel Tank
- Break Open the Thermal Valves 0/2
- Escape the Room
- Find a Way Out of the Underground
- Reach the Court Laboratory
- Interrogate the Head Surgeon
- Open the Gate
- Activate the Elevator
- Clear the Court Operators from the Coffin Room
- Defeat the Enemies
- Override Hibernation Controls 0/2
- Defeat the Talons 0/3
- Override the Failsafe
- Defeat the Gladiator Talons 0/2 – BONUS: Perform Perfect Evades 0/5
- Escape the Area
- Return to the Belfry

5.1 – Little Birds
Talk to Talia al Ghul
Exit the Belfry and proceed to Talia’s location in the Financial District.

Talk to Detective Montoya
Leave the garage and proceed to Detective Montoya’s location in Old Gotham.

Stop Corrupt Detectives 0/5
For the next step, we need to find 5 corrupt detectives and eliminate them. Here are two possible locations.


Reach the Hideout
Now make your way to the hideout’s location in Bristol.

Reach Gotham City Cemetery
When you get to the location, enter the cemetery.
Reach the Hideout
Continue making your way down to the hideout.
Disrupt the Court of Owls’ Plan – Defeat all Enemies 0/5 – BONUS: Perform Throws 0/2
At the location, defeat all enemies. If possible, perform 2 throws.
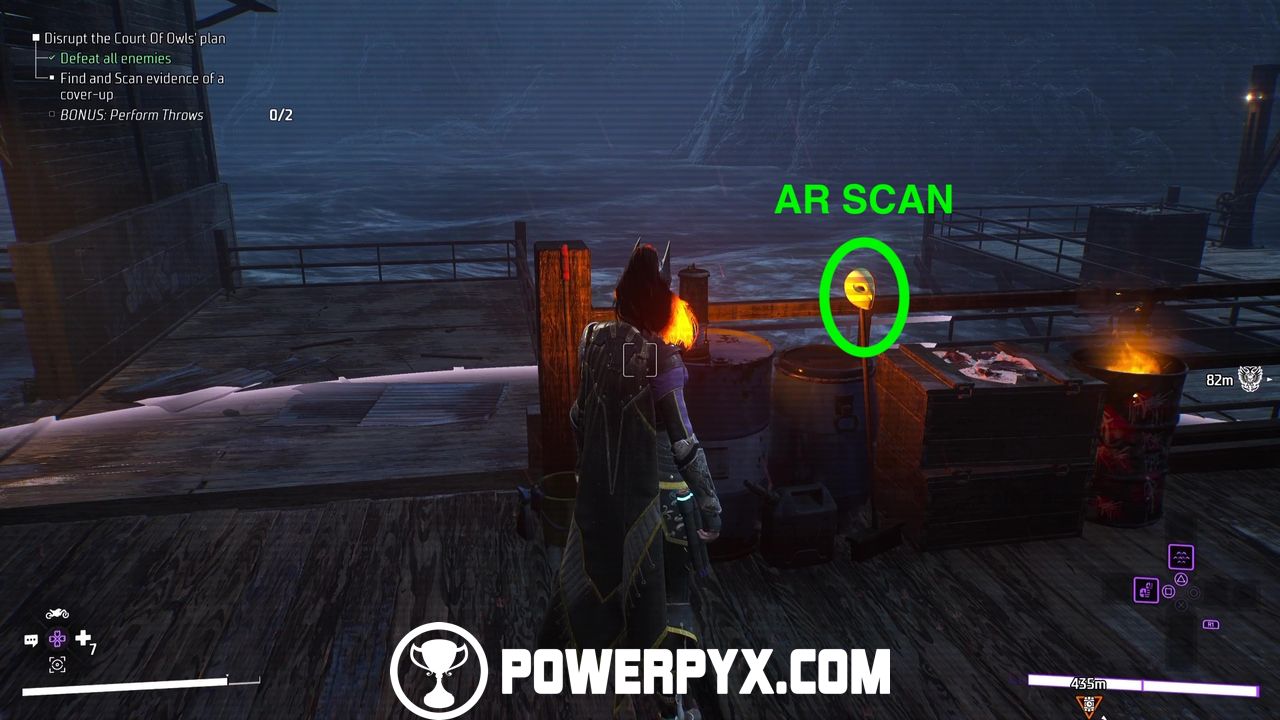
Disrupt the Court of Owls’ Plan – Find and Scan Evidence of a Cover-up
Now scan the Owl’s mask near the barrel on fire.
Return to the Belfry
As usual, open up your map and  to fast-travel to the Belfry.
Listen to The Penguin’s Recorded Message
Approach the recorded message by the console to listen to it.

Reach the Iceberg Lounge
Leave the Belfry and head out to the Iceberg Lounge in the Financial District, as usual, entering from the rooftop.

5.2 – Inside Gotham’s Walls
Talk to the Penguin
Head upstairs to enter the Penguin’s office. The Penguin was pinned to the wall.
Escape the Labyrinth
You’re now in a labyrinth with several different traps and every time you die, you start over. Run through the labyrinth and when you see holes in both walls, crouch to avoid getting killed by the trap.

Continue on and when you get to a room with overhead torches, you have to walk under those that are off to make it to the other side.

Continue on until you reach a dead-end, then turn around and keep going until you reach a room with moving spikes for a checkpoint.
It can seem impossible at first, but there is a very narrow path between the spinning blades on which you are safe. Aim your ranged weapon and watch the blades for a while, you will see where the free space is between them. Walk between the blades on the right side when they are spinning away, then quickly go to the wall in the middle. See the images below showing the path:
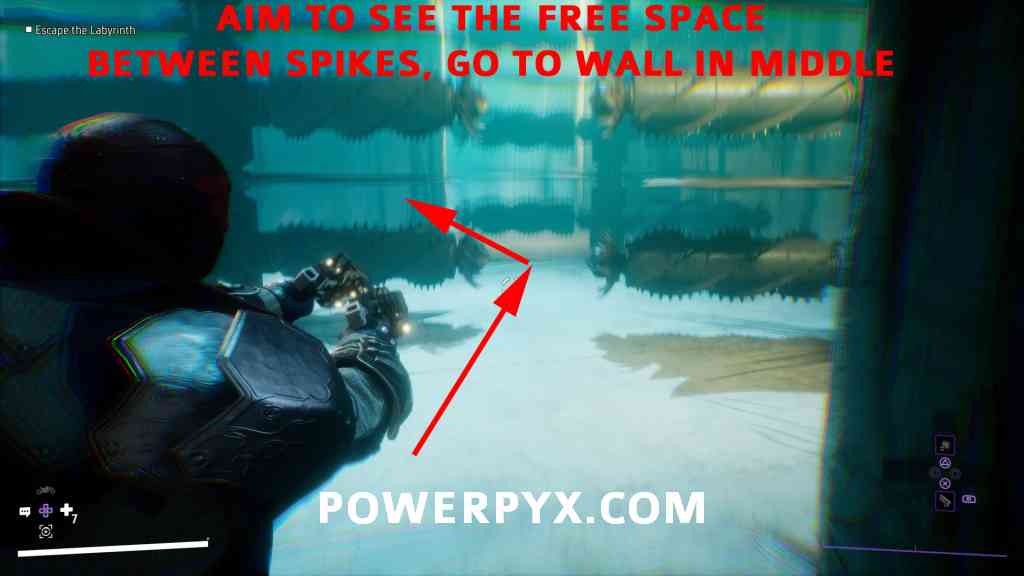
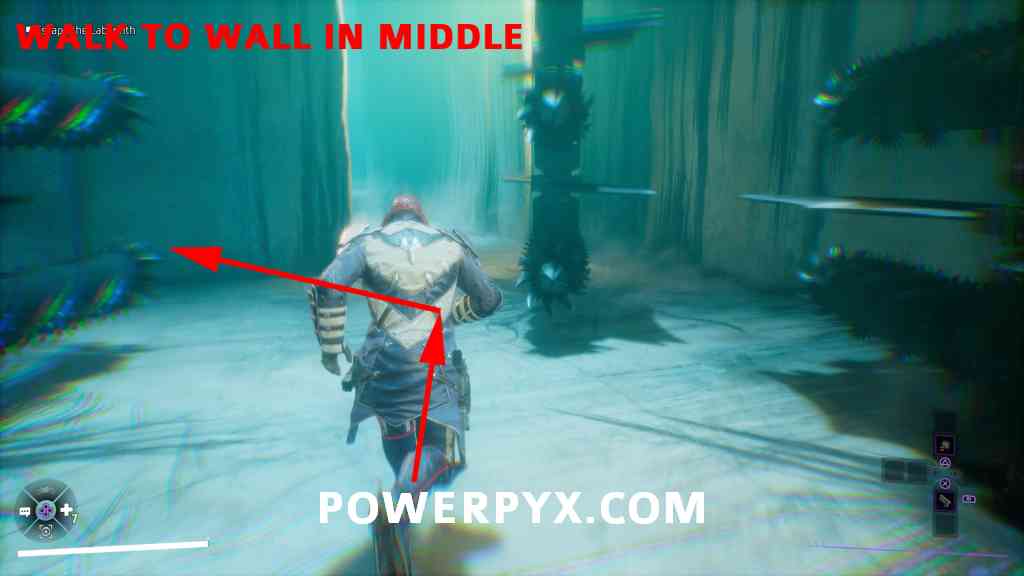
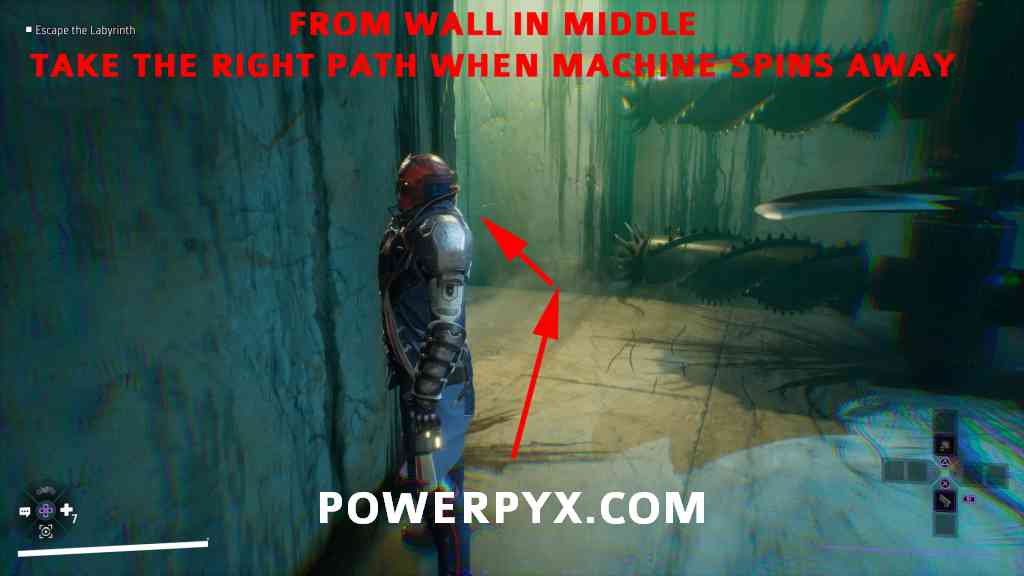
Stand at that wall and watch the spinning blade on the right at the exit. When you’ve memorized its rhythm, quickly move to the exit on the right side, when the blade has moved away. As long as you stay at the wall and don’t move you’re safe. So feel free to take your time for the last step.
For the next few sections, choose either path and you’ll eventually reach the exit.
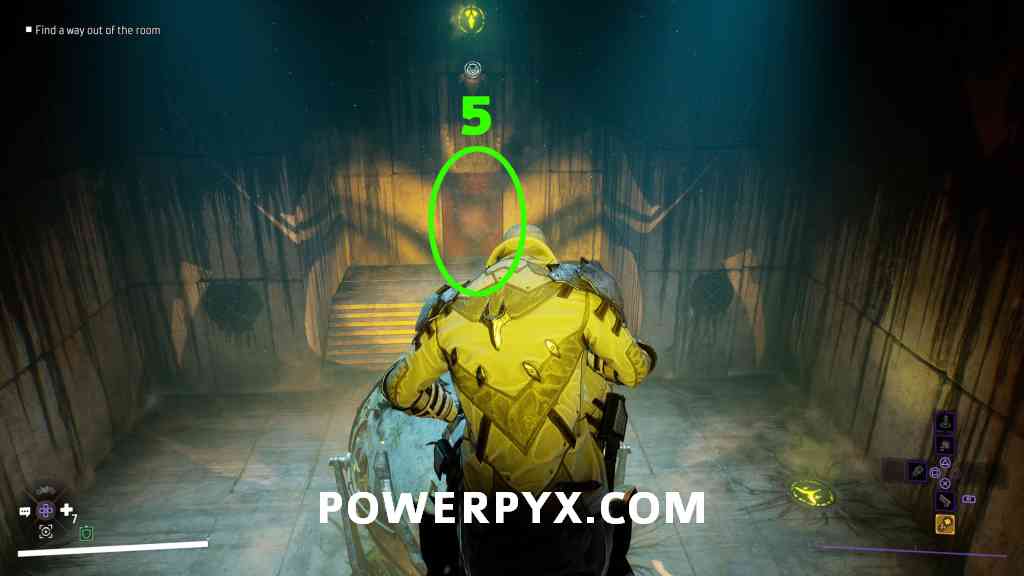
Find a Way Out of the Room
You’re now in a room with a big owl-looking sphere in the middle. In order to solve this puzzle, you have to quickly step on the four pads found in the room.
First, start by grappling to the point at the end of the room, across from where you entered.

Second, step on the floor plate closest to the first.
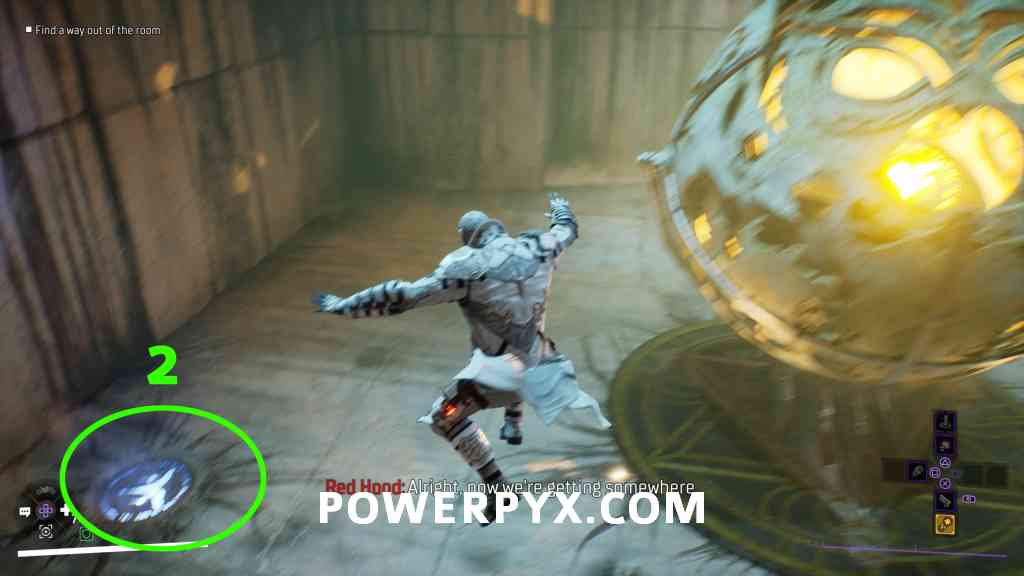
Third, step on the other floor plate (the one closer to where you entered the room).
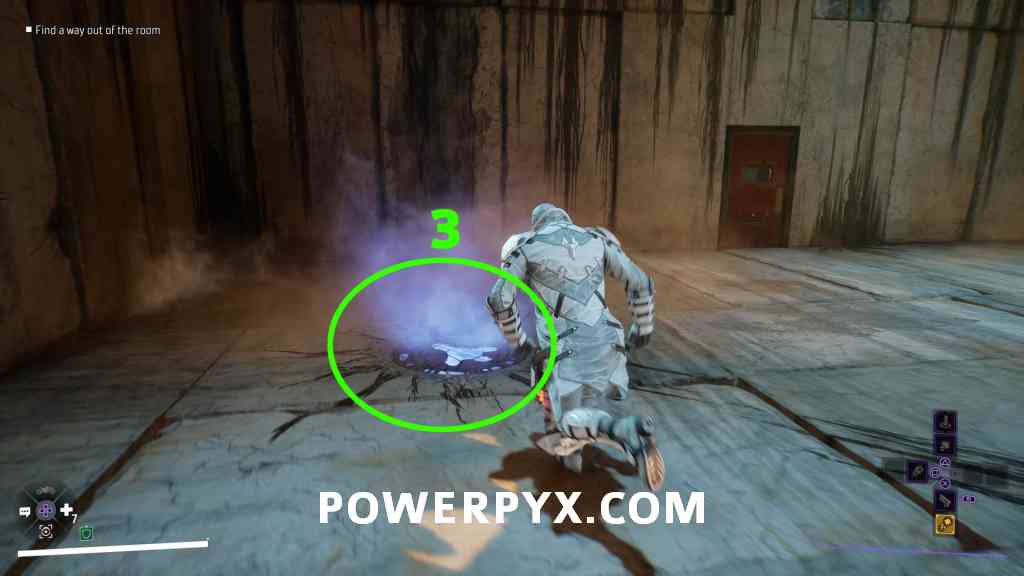
Fourth, use the grappling point above the entrance where you came from.

The owl head will now shine its light at the exit which opens the door. You can leave through there.
Escape the Labyrinth
We’re now back in the labyrinth. Continue down either path until you’ll have to fight some more Talons.
Escape the Labyrinth – Defeat the Talons
Beat all three Talons to continue on.
Escape the Labyrinth
Continue on past the statues.
Escape the Labyrinth – Defeat the Talons – BONUS: Defeat Enemies Using Momentum Abilities
Time to defeat some more Talons. If possible, use Momentum Abilities for some extra XP.
Escape the Labyrinth
Now continue past the door that opens and continue on until you unlock a new cutscene.
Defeat the Gladiator Talon
Unlike normal Talons, the Gladiator Talon doesn’t avoid your standard melee attacks. However, he’s got a shield, so you must use heavy melee attacks to find an opening for normal melee attacks. Continue doing so until a new cinematic unlocks.

Search the Staging Area
Continue past the collapsed statue, then drop down. Grapple to the platform in front of you and make a slight detour to the left for a chest, then continue on the opposite way.

Clear the Court Operators from the Control Room – BONUS: Remain Undetected
First, grab the second chest in the area and then approach the control room using the railings above.

From here, drop down and kill the enemies. Alternatively, you can try landing some Silent Takedowns for some extra XP.
Defeat the Enemies
Kill the three Court operators and the incoming Talons.
Use the Room Assembly Controls
Now approach the wheel on the console to use it.
Reach the Platform
Now, as the stage moves, reach the first platform in front of you.
Scan the Fuel Tank
From here, enter AR View and scan the big red fuel tank in front of you. Left of the tank is a chest.


Break Open the Thermal Valves 0/2
Now get closer to the fuel tank and use a Batarang to aim at and destroy the thermal valves on its side. This will blow the fuel tank up, allowing us to continue on.


Escape the Room
Now grapple onto the fence and drop down the hole.

Find a Way Out of the Underground
Continue along the underground tunnels, making sure you avoid the ice jets along the way.
Reach the Court Laboratory
At the end of the tunnel, grapple onto the ledge above and open the chest at the end of the section.

Now retrace your steps and enter the opening halfway through.
Interrogate the Head Surgeon
From the ledge, perform an Aerial Attack on the head surgeon, weaken him and  /
/  to grab and interrogate him when the prompt appears.


Open the Gate
Exit the laboratory by opening the gate at the end.
Activate the Elevator
Now activate the elevator by interacting with the switch.

Clear the Court Operators from the Coffin Room
Now clear out the area of all enemies.
Defeat the Enemies
Now repeat the same on the Talons.
Override Hibernation Controls 0/2
Approach the wheels on the consoles to override the hibernation controls. As you do, more Talons will show up.


Defeat the Talons 0/3
Now get rid of the final group of Talons.
Override the Failsafe
Lastly, override the failsafe from the central console.

Defeat the Gladiator Talons 0/2 – BONUS: Perform Perfect Evades 0/5
Now defeat the 2 Gladiator Talons. If possible, perform 5 Perfect Evades for some extra XP. Remember that a Perfect Evade takes place when you press  /
/  at the very last moment.
Escape the Area
Time to leave this place.
Return to the Belfry
As usual, open up your map and to fast-travel to the Belfry.
This finishes Case 05: The Court of Owls in Gotham Knights. Up next is Case 06: Jacob Kane.
For all other Main Missions, check out the complete Gotham Knights Walkthrough.
Leave a Reply