
AI Limit has a total of 32 weapons to collect for the Arsenal trophy & achievement. Weapons are obtained by picking them up from the environment, purchased from shops, defeating some enemies or bosses, and trading some boss Nuclei to Assis. Obtaining all weapons requires playing into NG+, as two of the weapons from Assis are traded with the same boss Nucleus, so you need to defeat the boss (Ursula) again in NG+ to receive a second to trade for the other.
DO NOT SELL ANY NUCLEI until you know you have all items required to trade for them, as you can’t get them back after selling and would need to obtain them again in another playthrough. You CAN equip Nuclei in your accessory slot until you want to trade them, as this doesn’t consume them.
Weapons can be sold, but it is recommended not to sell any aside from duplicates so that you can track which you have already obtained.
Obtaining all weapons is required for the trophy/achievement  Arsenal (obtain all weapons).
For trading Nuclei you will encounter Assis early in the story, then he will move to the Temporary Campsite and stay there for the rest of the game, so you can return to him there at any time.
Weapons
Weapons are listed in the order they appear in the weapons list in-game. Any that are picked up from a specific location list the Branch you start from to progress to the location.
Weapon #1: Rusty Longsword
Obtained at the start of the game, pickup along the main story path before you encounter any enemies.
Weapon #2: Rusty Pipe
Branch: Outer-Wall Ruins – Slums > Temporary Campsite
Follow the main path until you reach the area with the Flamethrower Sewer Cleaner that drops the Flame Jet spell. Climb the ladder, then follow the path behind the metal fence to reach the lower canyon area where you can encounter Necro enemies for the first time.

At the far end continue up the set of stairs then up the long ladder to reach a sewer area. Inside the small cell in the first room you can pick up this weapon.


Weapon #3: Blader Longsword
One of the possible weapons you pick at the start of the game when speaking with Asteria or below location.
Branch: Sewer Town – Center > Underground Shaft
From the Branch, drop down to the first platforms and then on the first beams jump across the gap in the middle. You can then drop down to the left to another set of beams which allow you to reach the doorway. Take the elevator in that room up to reach a platform above the Branch. Defeat the Lost Blader void enemy to receive the weapon.

Weapon #4: Forged Steel Blade
Branch: Sewer Town – Southwest > Sewer Confluence
Continue past the branch and on the right you can find a breakable wall. To the right of the Sewer Cleaner enemy on top of the stairs.


Weapon #5: Pickaxe
Branch: Outer-Wall Ruins – Slums > Temporary Campsite
Follow the main path until you reach the area with the Flamethrower Sewer Cleaner that drops the Flame Jet spell. Climb the ladder, then follow the path behind the metal fence to reach the lower canyon area where you can encounter Necro enemies for the first time.On the platform on the left where a sniper enemy is located you can find a chest that contains the weapon.

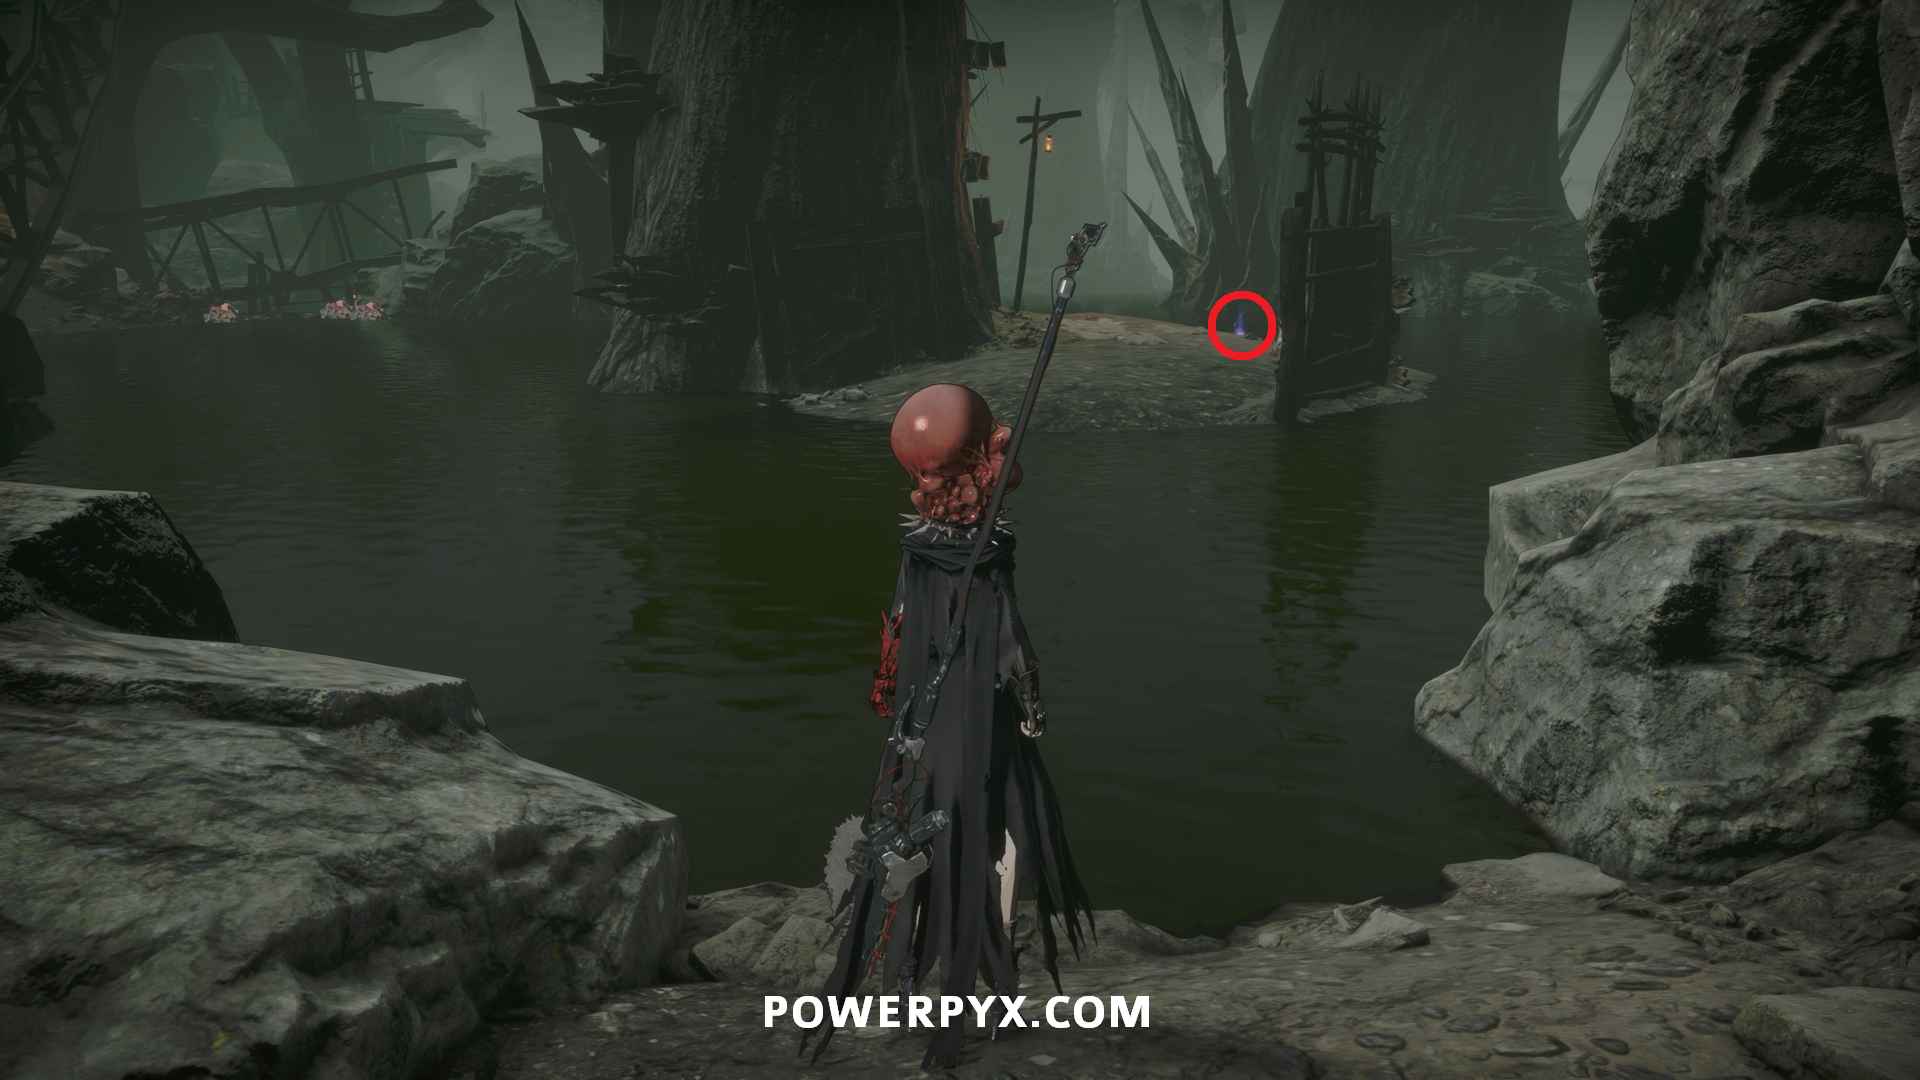
Weapon #6: Envenomed Blade
Branch: Sunken City Overground – Rooftop Street > Lounge
Follow the main path up the walkways in the room, then down the zipline (or go through the shortcut if you opened it). Go through the metal fence then to the right. At the end of the hallway with the exploding enemies you can find a chest with this weapon.


Weapon #7: Holy Ritual
Branch: Hagios Patir – Upper Level > Mud-Drawing Room
Opposite the room with the Branch at the end of the hall, interact with the box in the corner to obtain the weapon.

Weapon #8: Corrupted Blader Longsword
Branch: Sunken City Overground – Flooded Street > Survivors’ Stronghold
Follow the main path to where you can see the three Necro enemies and take the path to the left. Continue left through the subway car filled with spike traps, then left again and through the second subway car. In the large open area after you will find a Lost Blader. Defeat it to receive the weapon.


Weapon #9: Dawnfrost
Branch: Sunken City Underground – Underground Parish > Parish Station
From the right side of the center pillar go up the small ramp to the right, then follow the hallway past the large Church enemy (doesn’t respawn if you have killed it already) and take the elevator to reach the upper level of the room. Follow the path of beams and jump across to the middle area. Follow the path left around the outside past the remaining enemies and you can drop down to a lower area where a Normal Seal is located if you hadn’t picked it up.

Drop down to the lower platforms, then go into the room with the large window on the right and interact with the Memory. You can then pick up the weapon after the Memory is finished.

Weapon #10: Blader Swords
One of the possible weapons you pick at the start of the game when speaking with Asteria or below location.
Branch: Sewer Town – Courtyard of the Tree > Central Garden
From the Branch, go around the back right of the area (counterclockwise) and there is a glowing platform you can interact with that will teleport you to a hidden area in Sewer Town – Southwest. Follow the tubes until you drop into room and the weapon pickup will be right in front of you.

Weapon #11: Bonecrackers
Branch: Sewer Town – Southwest > Maintenance Access
On the main path before going down a ladder after the first Lost Blader miniboss location, go down hallway to the left and enter a room with two human enemies and pick this up in the corner.


Weapon #12: Steel Axes
Branch: Outer Wall Ruins – Ancient Machine Works > Shirley’s Room
Go into the main room and down the stairs to the bottom level. This is on the ground on the back side of the platform with the stairs.

Weapon #13: Opossums Sais
Branch: Sunken City Overground – Flooded Street > High Street
Purchased from Opossum’s Vending Machine beside Branch for 5500 Crystals.
Weapon #14: Hunter’s Blades
Branch: Twilight Hill – Withered Forest > Hunters’ Trestle
Obtained automatically after defeating Hunter Squad group boss.
Weapon #15: Corrupted Blader Swords
Branch: Twilight Hill – Withered Forest > Twilight Foothills
Obtained automatically after defeating Lost Blader immediately after Branch.
Weapon #16: Reapers
Purchase from Assis (Adrammelech’s Nucleus Trades) for Elite Necro’s Nucleus + 6000 Crystals.
Elite Necro’s Nucleus is obtained after defeating Necro, the Panic Reaper main story boss.
Weapon #17: Cast Iron Greatsword
Branch: Outer-Wall Ruins – Slums > Temporary Campsite
Purchased from Grayrhino Grocery for 3600 Crystals.
Weapon #18: Blader Greatsword
One of the possible weapons you pick at the start of the game when speaking with Asteria or below location.
Branch: Sunken City Overground – Rooftop Street > Hotel Corridor
If you haven’t, you must first obtain the Hideout Key item past the Lost Blader that drops the Corrupted Blader Longsword.
Return to the Hotel Corridor Branch and go back toward the balcony with the ziplines. Go down one level and you can use the Hideout Key to open the locked door. Go into the room down the stairs into the lower room and defeat the Lost Blader to receive the weapon.

Weapon #19: Serrated Halberd
Branch: Sewer Town – Southwest > Maintenance Access
Down the ladder in the room with the Mud Ball maker NPC (green square, other door is the shortcut to Maintenance Access Branch), then at the back of the room full of boxes on the ground by a destroyed Sewer Cleaner.

Weapon #20: Scrap Lance
Purchase from Assis (Adrammelech’s Nucleus Trades) for Void Nucleus + 5000 Crystals.
Void Nucleus is obtained after defeating Lore, the Lost Lancer main story boss.
Weapon #21: Knight’s Lance
Purchase from Assis (Adrammelech’s Nucleus Trades) for Cleansing Knight’s Nucleus + 6000 Crystals.
Cleansing Knight’s Nucleus is obtained after defeating Cleansing Knight main story boss, along with a miniboss later in the game.
Weapon #22: Road Sign
Branch: Twilight Hill – Withered Forest > Deadwoods
Take the left path from the Branch, then cross the poison area to the center island with the large tree to pick up this weapon.
Weapon #23: Corrupted Blader Greatsword
Branch: Outer-Wall Ruins – Slums > Abandoned Houses
Follow the main path from the Branch until after you encounter the large Necro enemy. Watch the path on the left where you can find a shortcut back to the Branch. Opposite that path you can open the metal gate using the Cemetery Key (purchased from Greyrhino Grocery at Temporary Camp). Follow the path to the left past the Necro enemies and jump the gap to the lower area. Defeat the Lost Blader to receive the weapon.


Weapon #24: Wilted Foliage
Purchase from Assis (Adrammelech’s Nucleus Trades) for Guardian’s Nucleus + 8000 Crystals.
Guardian’s Nucleus is obtained after defeating Guardians of the Tree hidden boss.
Weapon #25: Pardoner
Branch: Sunken City Overground – Rooftop Street > Hotel Corridor
Obtained automatically after defeating the Three-Faced Pardoner boss.
Weapon #26: Arbiter
Purchase from Assis (Adrammelech’s Nucleus Trades) for Nucleus on the Child’s Tiara + 12,000 Crystals.
Nucleus on the Child’s Tiara is obtained after defeating Loskid, the Blade of Judgement main story boss.
Weapon #27: Materialism
Branch: Sunken City Overground – Rooftop Street > Fisherman’s Camp
From the Branch follow the main path until you reach the building made of red metal. Instead of heading into the building go to the left where there is a ladder leading up (green arrow, shortcut back to Branch). After opening the shortcut drop onto the metal vents and follow the path into the red metal structure up the two sets of stairs, then use the platforms to drop down into the lower area. There is another door you can open leading back to the main path, then drop into the lowest area where there will be a bunch of exploding enemies and one that releases smoke. After dealing with them you can open the chest in the room to obtain this.


Weapon #28: Red Deer
Double check which weapon you need in second playthrough as the game doesn’t prevent you from buying multiple of the same one.
Purchase from Assis (Adrammelech’s Nucleus Trades) for Mutant Blader Nucleus + 10,000 Crystals.
Mutant Blader Nuclues is obtained after defeating Ursula, the Mutated hidden boss and exhausting Ursula’s dialogue after the fight.
Weapon #29: Mercy
Double check which weapon you need in second playthrough as the game doesn’t prevent you from buying multiple of the same one.
Purchase from Assis (Adrammelech’s Nucleus Trades) for Mutant Blader Nucleus + 10,000 Crystals.
Mutant Blader Nuclues is obtained after defeating Ursula, the Mutated hidden boss and exhausting Ursula’s dialogue after the fight.
Weapon #30: Impact Drill
Branch: Outer-Wall Ruins – Slums > Temporary Campsite
Purchased from Grayrhino Grocery for 3000 Crystals.
Weapon #31: Stygian Touch
Branch: Twilight Hill – Spirit Depths > Watch Tower
Follow the main path until you reach the lowest level where there is a hallway full of spike traps. Just before it is a side path with a bunch of Necro enemies. Deal with them then pick up the purple item by the wall to receive the weapon and an armor set.

Weapon #32: Holy Embrace
Purchase from Assis (Adrammelech’s Nucleus Trades) for Mutant Clergy’s Nucleus + 6000 Crystals.
Mutant Clergy’s Nuclues is obtained after defeating Winged Colossaint main story boss.
For all other collectible types check out the AI Limit Collectible Guide.
TalynnStrike says
For weapon 18 it’s faster to go to Hotel Corridor branch and use the key since you have to pass that one anyway to get the key.
Gage says
Thank you for pointing that out, I think I pasted the wrong name there. Updated to specify the correct one.
Leon says
Hi, may I ask where could I find Mutant Blader Nucleus? I am currently on NG+1 and still not have the options of Red Deer and Mercy on Assis’ shop.
Gage says
Mutant Blader is from the hidden boss Ursula, the Mutated. I’ll add a note under the trade ones which boss drops the Nucleus.
Alex says
#4 might require “after taking the elevator” remark