
Pragmata Trophy Roadmap
- Estimated trophy difficulty: 6/10
- Approximate amount of time to platinum: 30 hours
- Offline Trophies: 36 (1
 , 5
, 5 , 9
, 9 , 21
, 21 )
) - Online Trophies: 0
- Number of missable trophies: 1 – You’re Not Getting Away That Easy as the spawns of Sweeper Bots are very limited and a bit random
- Glitched trophies: 0
- Does difficulty affect trophies?: Yes, need to finish the game on Lunatic difficulty.
- Hardest Trophy: Lunar Supremacy
- Minimum Playthroughs: 2 (1 on any difficulty, 1 on Lunatic)
- PS4/PS5 Autopop, Save Transfer, Crossbuy: No, game doesn’t have a PS4 version
- Free-Roam / Level Select after Story?: Yes, there is still free-roam after the story via “Unknown Signal” mode, can still find all collectibles there.
- New Game+ Mode?: Yes, but not needed for any trophies, and Lunatic difficulty isn’t available for New Game+.
- Supports Manual Saves?: 10 Manual Save Slots
- Release Date: April 17, 2026
 , 5
, 5 , 21
, 21 )
)Introduction
Welcome to the Pragmata Trophy Guide! Pragmata is a new sci-fi IP by Capcom that takes you to the moon where Hugh has to team up with a small robot girl, a Pragmata, who he calls Diana. The game has a pretty unique gameplay that combines third-person shooting and hacking enemies at the same time. Your regular shooting controls are combined with a hacking minigame using the face buttons on your controller.
The game is structured similarly to Dead Space. Your Shelter is your safe space and is connected to every other sector by a tram station. You go to a sector, solve a problem there, and move to the next sector. You can find multiple Escape Hatches in every sector which are your fast travel points. Dying also brings you back to the Shelter where you can print weapons and hack nodes and refresh your ammo so you can then use the tram to return to your latest Escape Hatch to continue the journey. In the Shelter you can also talk to Diana and give her gifts called REM.
For trophies, two playthroughs are needed, as well as collecting everything for 100% completion of all areas. While at first glance the trophy descriptions don’t outright say you need 100% in all areas, it is a hidden requirement to complete Unknown Signal Mode (see Step 2 in Roadmap). Luckily, after the story you can still clean up all collectibles in Unknown Signal Mode which lets you revisit all areas via the tram station. Most of the trophies are pretty self-explanatory and will unlock naturally while playing the game, and enemies respawn after using an Escape Hatch.
Step 1: First Playthrough + Collectibles [12-15 Hours]
Simply finish the game once and grab the Collectibles along the way – see Pragmata Collectible Guide. Learn the controls and upgrade your gear as much as possible. Should you miss any collectibles on your first run, don’t worry, you can clean up everything in Unknown Signal Mode after the story. The highest difficulty ‘Lunatic’ isn’t available on the first playthrough, which is why 2 playthroughs are needed. It’s up to you if you want to do the first playthrough on the easiest difficulty or Standard (Medium).
Step 2: The Unknown Signal Mode [2-3 Hours]
The Unknown Signal is a sort of “Epilogue” that unlocks after finishing the game once. You will start in the Shelter and unlock a new area via the tram station. Go there, finish the first mission and after that all the tram locations from your first playthrough will be available again.
In this mode your goal is to finish 10 challenges and beat the final boss again. The challenges are unlocked by getting 100% collectibles completion in each sector and defeating a buffed version of the boss in the first 4 sectors again. So if you missed out on any collectibles in your story playthrough, you will need to collect the rest in The Unknown Signal Mode (all collectibles carry over). Finishing all challenges will reward you with a new Mod called “Black Box”, you must have it equipped during the ending to unlock the trophy and for an extra ending scene.
Step 3: Lunatic Difficulty Playthrough [10 Hours, skill-dependent]
Lunatic difficulty unlocks after finishing the game once on any difficulty. It’s not available in New Game+, so you’ll have to start a New Game after your first playthrough. The enemies are more aggressive, have more health and deal more damage. You can, however, print more weapons in the Shelter from the beginning. Lunatic is initially a test of patience as enemies take longer to die. The biggest issue is the bosses who take a long time to die because of their massive health pool.
Playing on Lunatic requires an approach not much different from a regular run: try to collect as many Safe Boxes, Pure Lunum etc. to upgrade your gear to deal more damage. Upgrade your health, your damage and Diana’s hack damage as far as you can, while your weapon damage should be your last priority since it only affects your yellow weapon slot.
Refer to  Lunar Supremacy trophy for tips.
Useful Tips, Tricks and Guides:
- Pragmata Collectible Guide
- Mini Cabin Locations
- Solar Power Plant
- Mass Production Array (MPA)
- Terra Dome
- Lunum Mines
- Central Port
Pragmata Trophy Guide
 |
Pragmata Obtain all trophies. |
|
| Earn all other trophies in Pragmata to unlock Platinum (no DLC required). | ||
 |
Rendezvous Make it to the Shelter. |
|
| Automatic story-related trophy, cannot be missed. | ||
 |
Power Trip Restore power. |
|
| Automatic story-related trophy, cannot be missed. | ||
 |
The Purr-fect Guide Reach the Comms Tower. |
|
| Automatic story-related trophy, cannot be missed. | ||
 |
Another Pragmata Meet the trapped girl. |
|
| Automatic story-related trophy, cannot be missed. | ||
 |
Entrusted Memory Get the stop code. |
|
| Automatic story-related trophy, cannot be missed. | ||
 |
Mission Unveiled Make it to Nexus Tower. |
|
| Automatic story-related trophy, cannot be missed. | ||
 |
Awakening Fix up Diana. |
|
| Automatic story-related trophy, cannot be missed. | ||
 |
Sentinel Breach Take down the Sentinel. |
|
| Automatic story-related trophy, cannot be missed. | ||
 |
Our Promise Complete the game on any difficulty. |
|
| Automatic story-related trophy, cannot be missed. Completing the story on the easiest difficulty will suffice for this. | ||
 |
The Right Man for the Job Complete Unknown Signal. |
|
| Unknown Signal is a mode that unlocks after finishing the game once on any difficulty. Unknown Signal is a set of 10 challenges that require getting 100% collectibles in every single area, and you need to fight stronger versions of the bosses.
When starting the mode you can travel to a Special Sector that has 10 Pods, each of them has a challenge. These can be anything from defeating enemies to platforming. One challenge will be unlocked from the start – once you finish it, you will be allowed to visit all the story regions to finish up their 100% collectibles completion. Additionally, the bosses from Solar Plant, MPA, Terra Dome and Lunum Mines will now be available to fight again in a stronger form which is also required for some of the challenges to unlock. After finishing all the challenges you will unlock a Black Box mod which you have to equip for a short post-ending scene (mandatory for trophy). You need to defeat a stronger version of the final boss and finish the game afterwards for the trophy to unlock. |
||
 |
Lunar Supremacy Complete the game on Lunatic difficulty. |
|
| Lunatic difficulty unlocks after finishing the game once on any difficulty. It’s not available in New Game+, so you’ll have to start a New Game after your first playthrough. The enemies are more aggressive, have more health and deal more damage. You can, however, print more weapons in the Shelter from the beginning. Lunatic is initially a test of patience as enemies take longer to die. The biggest issue is the bosses who take a long time to die because of their massive health pool.
Playing on Lunatic requires an approach not much different from a regular run: try to collect as many Safe Boxes, Pure Lunum etc. to upgrade your gear to deal more damage. Upgrade your health, your damage and Diana’s hack damage as far as you can, while your weapon damage should be your last priority since it only affects your yellow weapon slot. Recommendations:
For regular enemies a good combo is using Heat nodes combined with Combust Mode. Those combined with the Pulse Carbine will fill enemies’ overheat gauge very quickly, leaving them open for a massive Critical Shot. This combo, however, is not the best against bosses since their overheat bar does not fill that fast. For the final boss in particular:
|
||
 |
Small Talk Talk to Diana in the Shelter. |
|
| Shelter is your safe zone in the game where you upgrade gear. You will end up in the shelter after the Prologue. Once in the shelter you can approach Diana and have a conversation with her. Just keep talking to her until the trophy unlocks. | ||
 |
Thanks for Everything! Receive a picture as a present. |
|
| Just keep talking to Diana in the Shelter, give her REMs as gifts and sooner or later she will reward you with a picture. You will receive 4 in total if you keep talking to her. | ||
 |
Peekaboo Win at hide-and-seek. |
|
| Same as above. Talking to Diana in the Shelter will at some point unlock Hide-and-Seek. Just play a game with her and find her. The shelter is not particularly big so there aren’t many places for her to hide. | ||
 |
For Me? Give an REM as a present. |
|
| REM are holographic toys you can give to Diana as a present. The first one you will pick up automatically and can gift it to Diana in the Shelter after talking to her. | ||
 |
Replicating Extraordinaire! Complete an REM series. |
|
| » Pragmata Collectible Guide | ||
 |
Blackout! Complete a Cabin Stamp Board. |
|
| In the Shelter, there is a robot NPC called “Cabin”. He will have Stamp Boards that require Cabin Coins. He will have a total of 4 Stamp Boards that require 9, 16, 16 and 16 Coins respectively. You can obtain coins from Safe Boxes, from Diana as a rewards for REMs and from the Training Sim. Simply finish one of Stamp Boards for the trophy. | ||
 |
Mister Simulator Complete the main objective in a Training Sim. |
|
| See Master of the Simulator just below. |
||
 |
Master of the Simulator Complete the main objective in every Training Sim. |
|
| You will unlock Training Sim in the Shelter. There is a total of 30 Training Sim missions, which will unlock either by upgrading the Shelter after each boss fight, or by picking up Training Data collectibles. For their locations refer to the Pragmata Collectible Guide.
Each training mission has one main objective and 2 side objectives. Luckily you only need the main objective, the side objectives aren’t needed. Training missions cover everything from hacking, weapon usage, platforming, etc. None of the main objectives are particularly difficult if you only focus on them instead of the side objectives. |
||
 |
Red-Zoned and Loving It Secure a Red Zone. |
|
| Red Zone are short combat challenges you can find in every area of the game. They require Red Gate Keys to enter and will always give rewards (mostly Pure Lunum). You will have to finish them all for 100% completion. | ||
 |
You’re Not Getting Away That Easy Defeat a Sweeper bot. |
|
| MISSABLE
Sweeper bots are small flying enemies who will run away from you when you approach them. You will need to finish the hack matrix labyrinth while aiming at them to defeat them. What makes it potentially missable is the inconsistency of their spawns. Sometimes reloading a save will make them appear again in the same spot you saw them, sometimes it will not. So messing up defeating them too many times might lock you out of the trophy. There are multiple potential spawns:
There may be even more potential spawns, so you get multiple chances and also 2 playthroughs to catch it once, so keep an eye out for it. You can also use an Overdrive Protocol or Stasis Net on them to make it easier.
|
||
 |
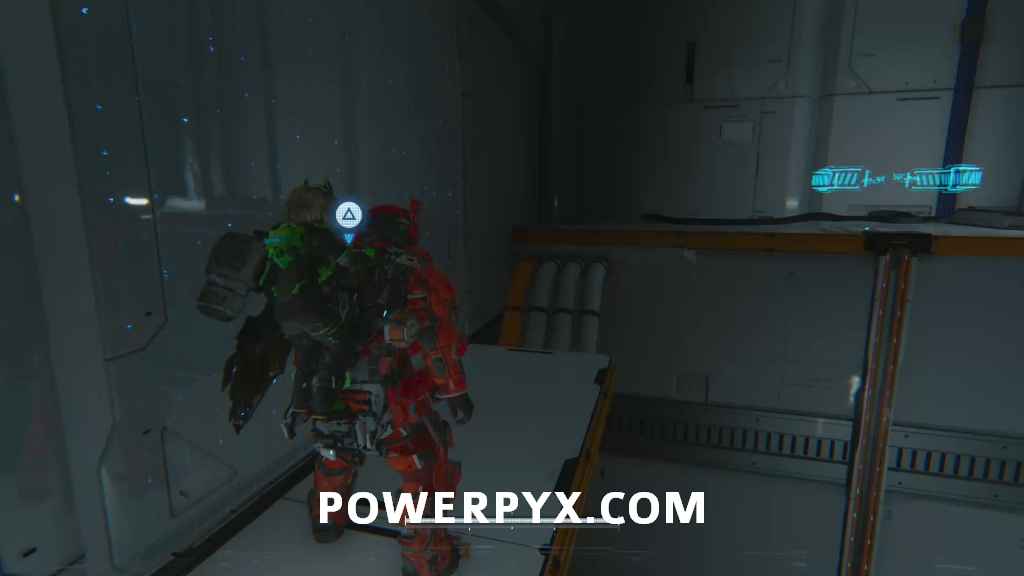
Wall? What Wall? Find a Holo-Wall. |
|
| Holo-Wall are fake walls you can remove to find collectibles behind them. You will automatically get this while grabbing the collectibles.
|
||
 |
Well Spotted! Shoot a Mini Cabin. |
|
| See Mini-Hunter Supreme. |
||
 |
Mini-Hunter Supreme Shoot every Mini Cabin. |
|
| There is a total of 15 Mini Cabin collectibles. They are small robots you need to shoot. You can find 3 of them in every area of the game, except Advanced Pragmatics which has no collectibles at all.
» Pragmata Collectible Guide |
||
 |
Top-Shelf Item Upgrade a weapon using Pure Lunum. |
|
| Upgrading a weapon requires only the ingame currency at first, until you reach a higher weapon level which will then require both money and a Pure Lunum to unlock. Simply spend one Pure Lunum on an upgrade once.
For all Pure Lunum locations refer to the Pragmata Collectible Guide. |
||
 |
Can’t Stop, Won’t Stop Print all obtainable weapons, hacking nodes, and abilities during the main story. |
|
| Simply printing each weapon, hacking node and ability once is enough, you don’t need to level up everything to the highest level. You will unlock everything needed either automatically or through Stamp Board completion. | ||
 |
Cradle Surveyor Reach 100% sector progress in a sector. |
|
| Reaching 100% progress requires collecting all Safe Boxes, Pure Lunum, Storage Expanders, Training Data, etc. Every collectible except Mini Cabins is required. | ||
 |
Escape Artist Unlock every escape hatch. |
|
| Escape Hatches are your fast travel points between the Shelter and rest of the game. | ||
 |
A Lunar Challenge Complete a mission in a special sector. |
|
| Awarded for completing the first challenge in The Unknown Signal mode. See The Right Man for the Job. |
||
 |
Round ‘Em Up Defeat three enemies at the same time with the Lim Recycler. |
|
There are 2 spots perfectly set up for the trophy.
|
||
 |
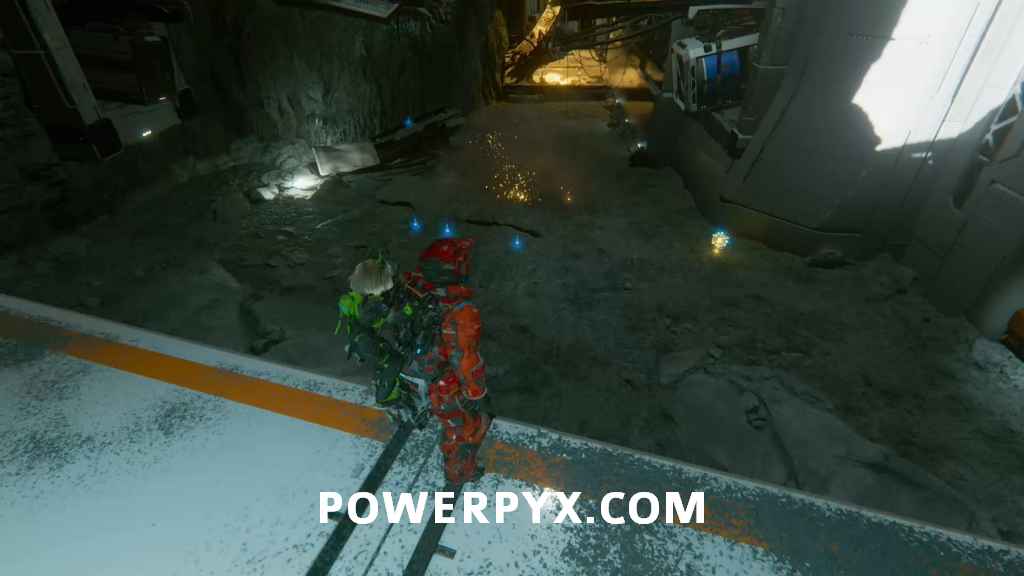
Courage in Desperation Repel the LunaDigger while progressing through the Lunum Mines. |
|
| In the Lunum Mines you will encounter multiple areas with LunaDigger roaming the area. Simply drop down on the ground to lure it out and keep fighting it until it runs away. Just stay some distance away from the sparkles coming out of the ground so it does not hit you immediately.
|
||
 |
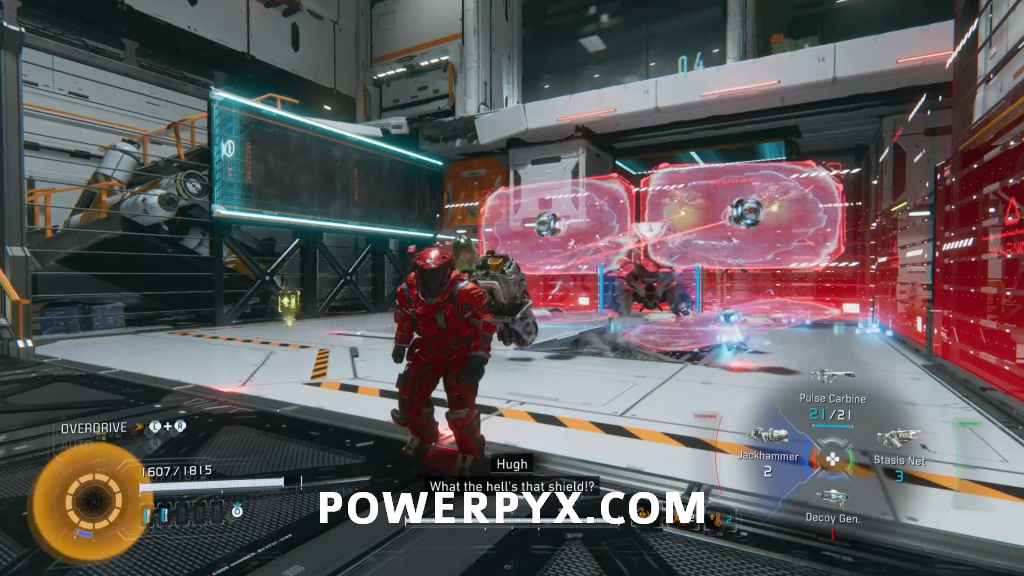
Can I Borrow That? Confuse a certain enemy and borrow its shield. |
|
| In Lunum Mines 03 – Warehouse you will encounter Defender bot for the first time. It is a bigger bot with 4 shields in front of it. You will need to hack it and during the hack pass through a Confuse node to steal its shield.
|
||
 |
Clean Up on Aisle Three Cleanse three or more enemies at the same time. |
|
You will unlock cleansing in Advanced Pragmatics. In Central Port you will have multiple opportunities to obtain the trophy. You need to hit 3 corrupted enemies at once, not regular ones. Hold  and let go once 3 corrupted enemies are close together. and let go once 3 corrupted enemies are close together. |
||
 |
IT’S OVER 6000! Deal 6000 gunshot damage in one second. |
|
| Very easily doable in Training Mission 07 – Project Pierce. Fully charge the Charge Piercer and shoot through 3 or more bots there. | ||
 |
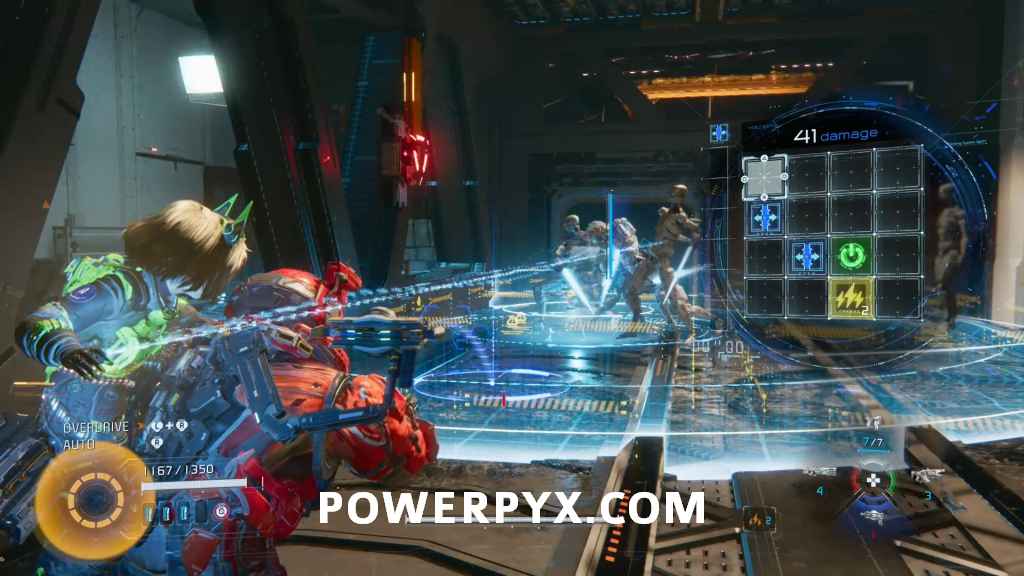
Who Needs Guns!? Deal 3000 hacking damage in a single hack. |
|
| Equip the Offense Mode Chip for Diana, hack an enemy once and open him. During the second hack pass through as many offensive moves as possible and unload your ammo into the enemy at the same time before finishing the hack. You are guaranteed to get it sooner or later while playing the game normally, or in the worst case you will get it during the final encounter of the game which has a scripted hack for over 30,000 damage. | ||
 at all time and letting go immediately after opening an enemy.
 after every successful hack to start a new one. Keep doing this until you run out of ammo and then hit the boss with one Jackhammer shot and its follow-up before it comes back from stun.
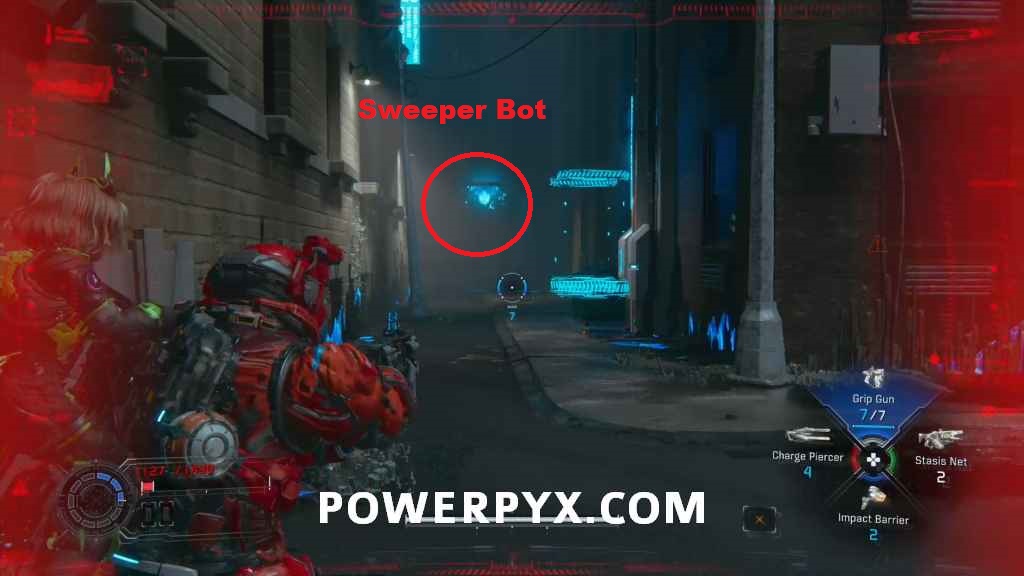
Mellors says
So excited to start this today. Blind playthrough first for me I think, thanks for the great guide as always!
Nikki_boagreis says
I really like the anime style trophy images.
NoHeroes94 says
Hope you enjoyed, thanks for the roadmap.
Would you say – given the comparisons to Dead Space – its comprable to, say, Impossible mode in Dead Space remake? I personally didn’t find it too bad at all.
Jamie says
6/10? Surely lunatic isn’t that hard
Jedi says
Hello there,
Great guide as always. One thing is confusing. Lunatic difficulty unlocks after finishing the game at any difficulty but does not appear on new game plus. Thats very odd. So how does system knows our first playtrough or second if we choose a new game after a finished one? This is lunatic 🙂
Andyman says
Because of savefile?
Bob L. says
Thank you for the guide!!
I’m guessing Lunatic is the main reason for the 6/10 diff?
Sunny Khandait says
Hardest difficulty not allowed on NG+ is absolutely pathetic. might wait for a patch. Don’t wanna pull my hair over 1 trophy.
JuanFFG says
I feel exactly the same way… having all your weapons fully upgraded with every item you can get your hands on, yet not being able to use them in Lunatic mode… it really hurts.
Skrubits says
Hardest difficulty offering a challenge? Oh no.
Anonymous says
Agreed, that’s usually the main reason why I do another playthrough in New Game Plus.
Alastor says
That’s how it should be! Ninja gaiden 4 screwed it up by letting you do the hardest mode with your upgraded character. You’re supposed to start fresh otherwise it’s too easy
Kevin says
I wonder if you beat it on NG+ would unlock Lunatic difficulty
JuanFFG says
I’m waiting for an update for Lunatic mode… this difficulty level is making the game a bit of a struggle for me…
Anonymous says
Thank you for the trophy guide. I’m kinda interested in playing Pragmata eventually at a discount or if it’s added to PS Plus (since the hacking part of the game isn’t that appealing to me), but not having the ability to play through Lunatic difficulty in New Game Plus is disappointing (I wonder if Capcom will change this or probably leave it the way it is).
Dev says
What’s The point of having NG+ If you can’t replay the game On the highest difficulty
Alastor says
You can after you proved you can beat it
Riku says
Thank you for the guide.
Got my game today and guide is already ready.
Glad, there is just one missable Trophy.
Aj says
Does the game have a pretty comprehensive collectible tracker? So if you don’t use a guide it’s easy to know what you still need? Or would you be scrambling through the collectible guide until you finally found the items you still needed?
Dzonathan says
It does indeed. The game also has an upgrade to scanner (Square button) to show you the location of said collectibles. Only weird thing is the tracker seems to show double the amount of what is avaiable in each level and each collectible counts as 2. What this means is that if a level has 5 chests to collect then it shows them as 10 and collecting your first one would show as 2/10.
Dix3n says
It does, it shows a tracker for every area, and they’re divided into sub-areas aswell. You also get the ability to scan the surrounding area for collectibles.
Bugsy says
Excellent guide, as always! I love that you guys keep everything concise and straight to the point. Sometimes lots of detail is not always needed. Keep up the great work, everyone. Thank you!
Mike says
Just wanted to let you know that you probably should remove the missable for sweeper bot because even if you miss it the first attempt you just need to keep going into the shelter and back until he reappear I didnt get it in time the one in the second zone in the alley way and just kept going back and forth from shelter until he reappear again. So technically there’s not a missable trophy. Anyways thanks for the guide.
Dix3n says
They do disappear at some point. I remember missing one the first time, then I went straight back to the shelter and then returned to the bot, and it was there again, but I missed it again, so I continued the game.
Then later on after returning to the shelter I decided to go back to the bot location to see if it was still there, but it wasn’t. Not sure what triggers it.
But as you said, I think if you go straight back to the shelter and then straight back to the bot, it should always reappear.
Jurgen says
Still missable as a PS5 Pro player; both alley sweeper and office building one disappeared on me. Nothing respawns there after reload save/restart game. I’m at the story point in the game, not signal search
Dizzy says
I don’t think it’s missable, I went back to the shelter then returned to where the sweeper was multiple times and it was there 3 times out of the 10 rounds I did. It’s just RNG.
Jurgen says
Did get the office one to spawn; spawns may be alternating between all places i.e. alley, office, mines 1+2
Mike says
I personally think its rng if they spawn not that there disappeared because i failed a couple of times before I got it to appear. Tho maybe I was just lucky enough for it to not completely disappeared on me. Because I progress the story and went back to alley way half way through the last section of the game.
Cryptic says
Guide fails to mention the Black Box mod is a MUST to pop the Unknown Signal completion trophy. Put it on before fighting Eight in the last area. It’s earned by doing the 10 challenges in this mode.
Failing to do it the first time means you’ll struggle against the Mark 2 variant of Eight in a subsequent run. It’s annoying to say the least.
PowerPyx says
It was already in the guide to equip it. I’ve updated the wording to make it even clearer it’s mandatory.
Hasney says
For Can’t Stop Won’t Stop, do you need to do Lunatic mode for everything? At the end of the real ending, I levelled everything I had up to level 2 minimum, finished all the stamp boards, but it hasn’t popped.
EarthBear says
Make sure you buy all of the different hacking modes too, they all count.
Locii says
First playtrough for me and I got that Trophy. It’s not needed to level any skill/Weapon, Level 1 of that counts.
Anonymous says
I Also did not have it after two whole playthroughs including lunatic, it turns out you need all abilities, i did not have autohacking unlocked because i like manually hacking and buying it gave me the achievement finally
C says
Jesus 30 hours. Guess I’ll wait until its 30 dollars.
Skylor says
You think you should be entertained for $1 USD an hour? lol…
Hasney says
Just beat lunatic mode. So glad there wasn’t a NG+ or cheat crutch, because I’m weak minded and would have used it, but the final boss was one of the single most satisfying fights I’ve ever had.
Can’t Stop Won’t Stop did pop during that run when I got everything, so either it doesn’t count in Unknown Signal mode, or I hit a bug.
Absplay94 says
I got my platinum today, took me 45ish hours.
Firstly the sweeper bot trophy is not missable. You can infinitely repswan the one in Terra Dome by just walking to the window by the Escape hatch which makes it a good lunafilament farm.
Lunatic with a decent Overheat build isn’t too bad, it will get you through 99% of that mode. The final boss on Lunatic will probably be the platinum breaker for most people.
If anyone wants my strategy I used to beat that fight let me know.
Dahmoot says
Hey guys, unfortunately the (The Right Man for the Job) which you have to complete the unknown signal, is locked for me!
I tried to do it again five times and still the trophy didn’t pop for me yet, i don’t know what is the problem i tried everything, this is very disappointing I can’t get my platinum trophy because of this problem.
Marley says
Did you equip the new mod black box that you get from finishing the 10 challenges in Unknown Signal?
This will change the Eight boss fight and get you the trophy ????
Hope this helps
Jeff says
This walkthrough, like so many others on this site, are very helpful. Thank you for the time and effort in making these guides.
Have a blessed one.