
The Final Hunt of the Onryo is the 10th main tale in Ghost of Yotei. This walkthrough will guide you through all objectives of the The Final Hunt of the Onryo main quest.
- Chapter: 3 – The Cost of Revenge
- Region: Yotei Grasslands
- Requirement: Complete Main Tale 9: Call of the Hunt
- Reward:
 The Onryo Rests (finished the story)
 - Quest Info: This is it. Saito is holding Jubei and Oyuki prisoner. I just have to trust the Spider in order to find them.
Starting Location: The Final Hunt of the Onryo
This automatically begins after Main Tale 9: Call of the Hunt.


Meet the Spider near the Central Ferry
Fast travel to the Central Ferry.

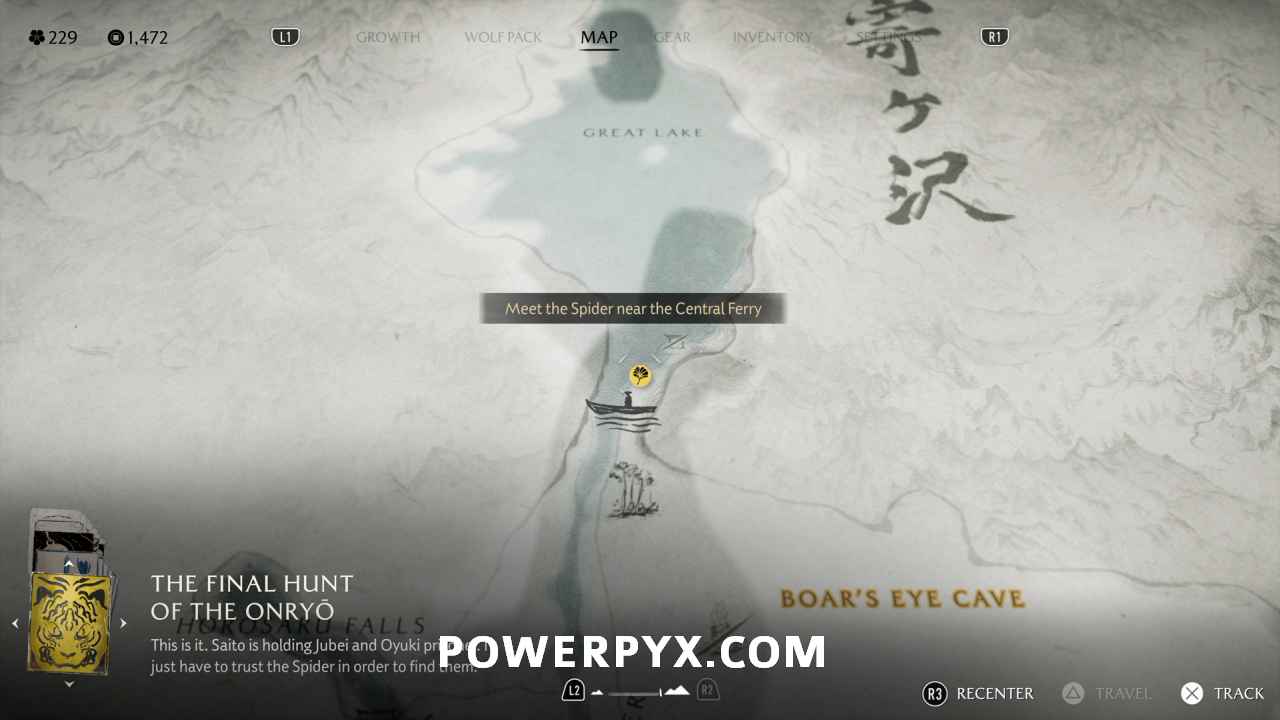
Go forward to find the Spider on the dock a little bit ahead.

Note that interacting with the Spider here is a temporary Point of No Return. You will not be able to return to the open world map until you finish the ending. After the ending you will be put back into the open world and all side tales and collectibles are still available. So don’t worry, nothing is missable, you can still clean up everything post-story.

When ready, hold  the continue.
A dialogue choice appears here. Choose whichever one you like better. The quest continues the same way regardless of your choice.
Reach Koga Fortress
When you regain control, continue climbing the rock face using the stone handholds.

At the top, continue the climb up the rocky slope.

Jump over the log you come across. A little further in, use the fallen tree to jump the gap.

Survey Koga Fortress
Open your spyglass with  and interact with these three locations:

Reach Koga Fortress
Slide down the loose gravel. You end up in a patch of tall grass.

You can do this first section one of three ways: Fight your way through, go through stealthily, or just run through.
Get across the bridge on the other side of the compound. Then, head to the right and off the ledge.


Go up the ramp, with a loose gravel slide to your right. Use the grapple point to swing to some handholds.


If you decide to just run through, this is where all of Saito’s soldiers will stop following you.

Turn left and jump the gap using the grapple point. Climb up.

Climb up the handholds behind the grapple point.

At the top, use the fallen tree to reach the grapple point on the lookout tower. Climb up.

Survey Koga Fortress
Use your spyglass and interact with the one spot near the center of the screen.

Rescue Jubei
When you regain control, you get an attempt to take out the large Brute enemy below you. Unless you unlocked Brute Assassination, you will not kill him in one attack.
Either way, you need to clear out this area of enemies in order to open the gate and move forward.

This area is equally challenging to stealth through. It’s much easier to just fight your way through and defeat everyone here.

After the enemies are cleared out, interact with the gate to get to Jubei.

Once inside the gate, use Ghost Stance by pressing  +
+  .
.
Jubei gets free and joins you in the fight. Take out the remaining enemies.
Survey the fortress
After the cutscene, follow Jubei through the gap in the fence.
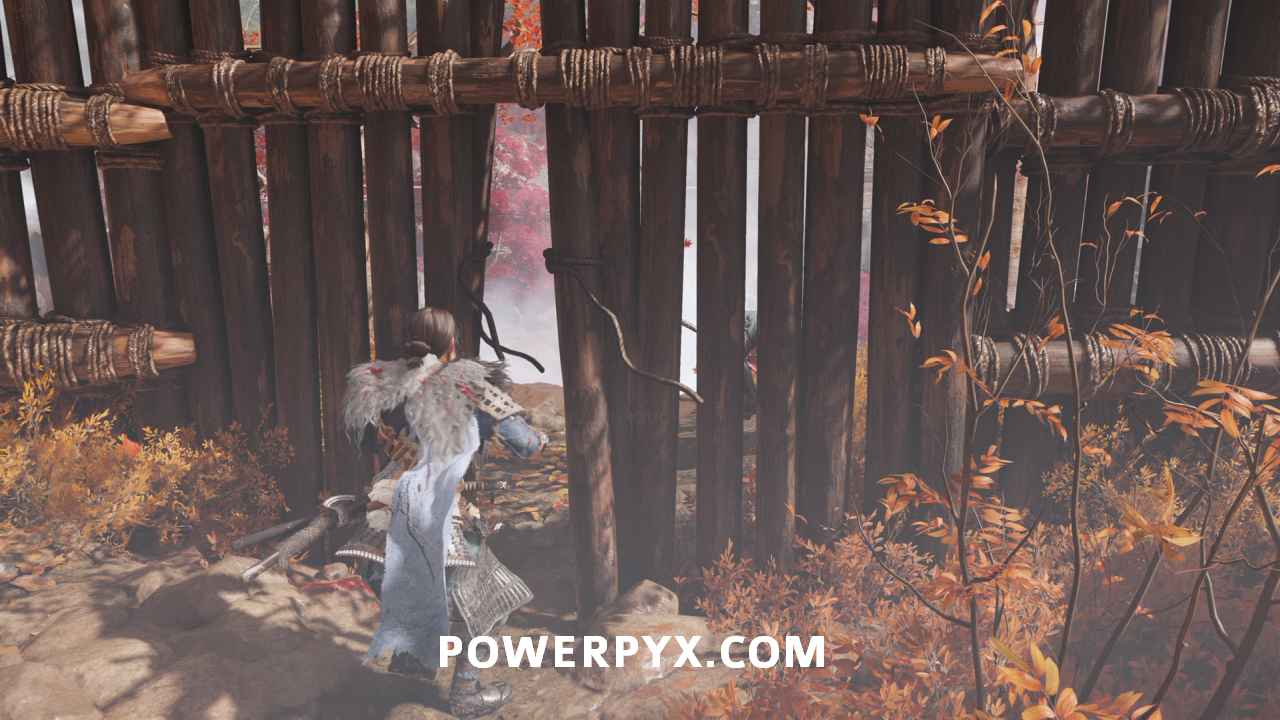
On the other side, aim at and interact with the three points.

Reach Oyuki at the upper keep
Go down the rocky path to the left, jumping across the gap when you reach it.

Jump to the stone handholds and make your way down to the fallen tree.

Cross the tree. Before jumping to the handholds, open the chest right by the waterfall.
Go across the handholds and up using the tree branch. A cutscene triggers at the top of the cliff.

Finish the automatic standoff. Then, defeat all of Saito’s forces to open the gate just ahead. Just like the last areas, take out all enemies to get through the next gate.

In the next area, you are met with three gunners. Use cover when they fire at you. Then advance on them when they reload.

Another pair of gunners meets you at the stairs to the jail. Rinse and repeat to get past them.
At the jail, use Jubei to boost yourself up to the roof. This triggers a cutscene.

Rescue Oyuki
Again, Brutal Assassination allows you to assassinate the Brute enemy facing Oyuki. Otherwise, just take out one of the enemies on the side and then fight your way through the remaining four.

Fight your way out of the fortress
You regain control while sliding down loose gravel.

At the bottom, leave the water and fight your way up the path to the gate.

You could try to rush the fight and flee, but the gate gets closed before you can reach it.
Defeat everyone to continue the quest.
When on your horse. hold  +
+  to Horse Charge your way through the enemy line.

Escape
You automatically take the path to the exit. Take note that there is a timed situation upcoming that you can fail if you do not do it quickly enough. Read ahead.
It’s also worth mentioning that this is a convenient place to level up the minor charm Charm of Enduring Resolve (if you have it), since Horse Charge is an ability that uses Spirit. You can intentionally die at this sequence or restart from last checkpoint and farm kills with the Horse Charge to max out this charm.


The next enemy line proves far too imposing to just charge. Here, time slows for a short time, allowing you to shoot at black powder barrels. There is a large batch on the left and a large batch on the right. Go after the left batch, since you’re practically aiming at it automatically. The game automatically equips your gun for this part.

If you don’t shoot the barrels in time, then you restart where you Horse Charge.
The rest of this escape goes by automatically.

Return home
When you regain control, you head straight for home. Run straight ahead to reach home.

Approach the property to trigger a cutscene.
Kill Lord Saito
If you use a katana, he switches to a spear. If you use dual katanas, he uses a kusarigama and a shield. Switch to an odachi, and he does the same.
He also adapts to the situation. For instance, if you break his stance while using an odachi, he switches to dual wielding kusarigama. Adapt to him when he start to change his tactics. In this case, switch to dual katanas.
Generally, dual katanas is the easiest option, since it works against practically everything. Take down his health bar to continue.

Phase two refreshes Saito’s health bar and gives him three spirit points. Here, he quickly disarms you, triggering a cutscene.
When you regain control, hold  to replenish your health and then pick up your katana directly in front of you.
Saito no longer has his spirit points. Start taking him down with Jubei.
After Jubei falls, fire surrounds you and Saito replenishes his spirit points. Just like the rest of the fight, switch to dual katanas for the easiest experience. Use heavy attacks to break his stance and then quick attacks to deal more damage while his guard is down.
When Saito’s health is gone, he tries to disarm you again. Time stops for you, so you cannot fail this time. Hold  and then release to disarm him.
When you regain control, press to kill Saito.

After the cutscene, follow Kiku on her path, collecting mushrooms along the way.

You get two dialogue choices during this mushroom hunt. Choose whichever you prefer.

After collecting the big batch of mushrooms, Kiku leads you to a batch of flowers.
Leave the forest and head back home.

Get home again to trigger the final cutscene.
This finishes The Final Hunt of the Onryo in Ghost of Yotei. This also finishes the story, for which you will earn The Onryo Rests.
After the story you’re put back into the open world and all side content and collectibles are still available. You can now clean up whatever you have remaining for the Platinum trophy.
For an overview of all side content refer to Ghost of Yotei Walkthrough.
Leave a Reply