
Forza Horizon 6 Achievement Roadmap
- Estimated achievement difficulty: 3.5/10
- Approximate amount of time to 100%: 40-60 hours for Singleplayer & Hundreds of hours for Multiplayer Level 100 (Horizon Play) & 2-3 months real time to earn a Festival Playlist History Reward (a few hours real playtime per week in Festival Playlist)
- Offline Achievements: 50
- Online Achievements: 7 (Four Swords, Ready to Rumble, What Are You Doing In My Estate?, Even Playing Field, Played-List, Maxed Out, Historic Effort)
- Total Achievements: 57
- Number of missable Achievements: 0, nothing missable, everything is replayable at any time
- Glitched Achievements: 0
- Does difficulty affect Achievements?: No, can play on the easiest difficulty with Autodrive enabled (car drives on its own and wins every race)
- Hardest Achievement: Storyteller (all 81 Stars from Story Events) & Maxed Out (Level 100 in Horizon Play Online)
- Minimum Playthroughs: 1 (some races can be skipped entirely as there are more than needed to gain the Gold Wristband)
- Free-Roam / Level Select after Story?: Yes, there is still free-roam after the story and all races can be replayed
- New Game+ Mode?: No
- Supports Manual Saves?: No, only 1 Autosave
- Release Date: May 15, 2026 (Premium Edition) / May 19, 2026 (Standard Edition)
Introduction
Welcome to the Forza Horizon 6 Achievement Guide! Forza Horizon 6 has a very similar structure to the previous game Forza Horizon 5. There are two main progression arcs which are tracked in the Collection Journal of the Campaign Menu: Horizon Festival for your typical races, and Discover Japan which tracks your exploration progress. Each of these features 7 colored Wristbands/Stamps, with Gold being the maximum. Getting to Gold requires around 50% total completion, there is much more to do than needed for achievements, allowing you to skip some content (especially PR Stunts). You can even use the Autodrive feature ( 
 ) and play on the easiest difficulty “Tourist”. With Autodrive enabled, the AI drives the car for you and automatically wins every race, no button input required. The Autodrive can also be used in the open world to unfog the map. You can fast travel to any section of road you have discovered. The map also includes a filter option to find specific events and collectible types. The hardest part is getting all 81 stars in Story Events (marked yellow on map), which requires getting 3 stars in all 27 story races. These are separate from the Horizon Festival races. The game also features 409 collectibles for achievements (200 Mascots, 200 Bonus Boards, 9 Treasure Cars). If you keep them for after you unfogged the map, you can fast travel everywhere and grab everything in a short time. The biggest time investment by far is reaching Level 100 in the online mode “Horizon Play” which requires grinding online races repeatedly for a long time. Another big time investment is earning a History Reward in the Festival Playlist, which takes around 12 weeks real time. Everything other than the online achievements can be done in 40-60 hours. Don’t waste time trying to get 3 stars on the PR stunts, there are more than needed, and it’s more efficient to move on to the next if you only get 1-2 stars.
After the prologue you enter the open world and can work on the Roadmap steps in any order you like. More Races become available gradually as you increase your Wristband/Stamp rating.
Step 1: Horizon Festival Gold Wristband, Win 57 Horizon Festival Races, Festival Playlist
The main campaign consists of obtaining the Gold Wristband in the Horizon Festival. This works the same way it did in Forza Horizon 5. When you scroll over races on the world map, look out for the ones labeled “Horizon Festival”. Do these races to increase your Horizon rating.
When you’ve reached enough points, you can play the next “Wristband Event”. Each of these levels up your Wristband Color and unlocks more races on the map. There are 7 Wristband Events total: Yellow > Green > Blue > Pink > Orange > Purple > Gold. You can keep track under Campaign > Collection Journal > Horizon Festival.
PR Stunts also give points, they are marked red/white on the map (Speed Traps, Speed Zones, Danger Signs, Drift Zones, Trailblazers). Getting 3 stars in them isn’t mandatory, there are more than needed to reach the Gold Wristband. It’s more time-efficient to attempt them once and move on to the next. If you get 3 stars in some PR Stunts, you can skip others entirely. So don’t worry if you have trouble with Drift stunts or Speed Zones, just focus on the other types of events. The 200 Bonus Boards also give Horizon points.
Keep in mind for Racing Aficionado you must win 57 Horizon Festival Races. There are more than needed, but you must win the majority of them. If you want to make this easy, play on the lowest difficulty “Tourist”, you’ll get less money but it pretty much guarantees a victory. You can even use Autodrive ( ) to automatically win every race.
After earning the Yellow Wristband, you unlock the Festival Playlist (Campaign > Festival Playlist). Each Festival Series lasts 4 weeks real time, split into segments of weekly “Seasons”. For Historic Effort you must earn a History Progress Reward, which costs 500 points. You can earn 45 points per week if you do all available challenges, meaning this will take around 12 weeks real time (500 points / 45 points per week = 11 weeks and 1 day). The Festival Playlist events are marked red on the map. Be sure to do all of them every week if you want to earn this achievement. For Played-List, you also need all available points in one week.
Step 2: Discover Japan Gold Stamp (Collectibles) + Touge Battles
“Discover Japan” is the second Collection Journal. You view it under Campaign > Collection Journal > Discover Japan. This is a separate progression from Horizon Festivals. Instead of Wristbands you earn colored “Stamps”. It focuses on exploration and races that aren’t classified as Horizon Festival.
The fastest way is to do Story Events (see Step 3), Touge Races, Street Races, buying Houses, destroying all 200 Mascots.
You’ll also want to get all Collectible requirements out of the way. You should have most of the map unfogged now and can fast travel between collectibles.
Collectibles needed for Achievements:
- 9 Treasure Cars (Treasure Hunter)
- 200 Mascots (Gotta Smash ‘Em All)
- 200 Bonus Boards (A Few Splinters Is Nothing!)
- 5 Touge Battles (White Ghost)
Step 3: 81 Stars in Story Events
Story Events are the big yellow icons on the map. You need all 81 stars from them, meaning you must get the highest rating (3 stars) in each individual story race. Ideally, you should combine this with Step 2 to increase your Discover Japan ranking.
For all Story Events refer to Storyteller.
Step 4: Job Maximum Promotion
For The Boss you must reach the maximum promotion at a job. Go to the big blue icon in Tokyo called “Tokyo City Food Delivery” and keep doing Food Deliveries until you reach Level 9. This is a bit grindy and takes a while, you’ll have to do many deliveries. Your level is increased by the total amount of money you’ve earned from deliveries. You can view your current level by hovering over the map icon, or check it under Campaign > Collection Journal > Discover Japan > Tokyo City Food Delivery.
Step 5: Miscellaneous Cleanup
Most of the miscellaneous achievements will come naturally while working on the other steps. If you have anything left, you will have access to all content now to clean up what you still need.
Step 6: Horizon Play (Online Achievements)
Lastly, you’ll need all of the Online Achievements. The big time investment here is Level 100 in Horizon Play. You only earn progress from Online Races (Online > Horizon Play). This is very grindy and takes potentially hundreds of hours. It’s also skill-dependent as you earn more XP for winning than losing. The one other time intensive task is getting a Festival Playlist History Reward for Historic Effort, so keep working on this too. The other online achievements not tied to leveling are quick to do however.
Useful Tips, Tricks and Guides:
- Collectible Map – Mascots, Bonus Boards (Treasure Map)
- All Treasure Car Locations
- All Barn Find Locations (Free Cars)
Forza Horizon 6 Achievement Guide
 |
Welcome to Horizon Earn the Yellow Wristband and join the Horizon Festival |
10 G |
| Automatic story-related achievement, cannot be missed. Unlocks after you qualified for the first Horizon Festival through the race “Horizon Invitational Event”. | ||
 |
Stamping Ground Earn the Yellow Stamp for your Collection Journal |
10 G |
| See Master Explorer for getting the Gold Stamp in Collection Journal. | ||
 |
Just Getting Started Complete your first Touge Battle |
10 G |
| See White Ghost for all Touge Battle locations. | ||
 |
Working 9 to 5 Complete your first Job |
10 G |
| In the middle of Tokyo City go to the big blue icon “Tokyo City Food Delivery” and complete one food delivery drive. You will get this while working toward The Boss, which requires getting the maximum Job promotion level.
|
||
 |
Festival Fan Earn the Green Horizon Festival Wristband |
10 G |
| Automatic story-related achievement, cannot be missed. Unlocks after the second Horizon Festival “Pier Pressure” (Green). | ||
 |
Making Waves Earn the Blue Horizon Festival Wristband |
10 G |
| Automatic story-related achievement, cannot be missed. Unlocks after the third Horizon Festival “Mech My Day” (Blue). | ||
 |
Seeing the Sights Earn the Green Stamp in your Collection Journal |
10 G |
| See Master Explorer for getting the Gold Stamp in Collection Journal. | ||
 |
Travelling All Around Earn the Blue Stamp in your Collection Journal |
10 G |
| See Master Explorer for getting the Gold Stamp in Collection Journal. | ||
 |
A Fine Addition To My Collection Discover and claim a Treasure Car |
10 G |
| » Forza Horizon 6 All Treasure Car Locations | ||
 |
Bargain Hunt Purchase an Aftermarket Car |
10 G |
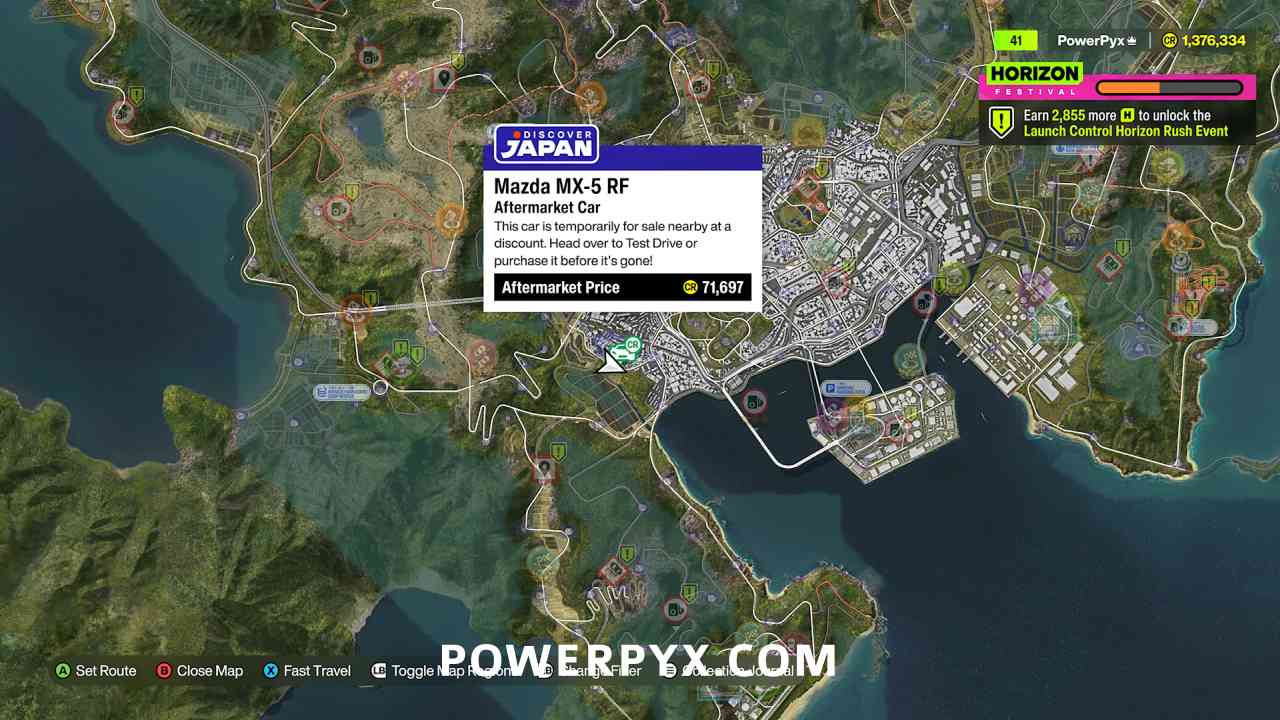
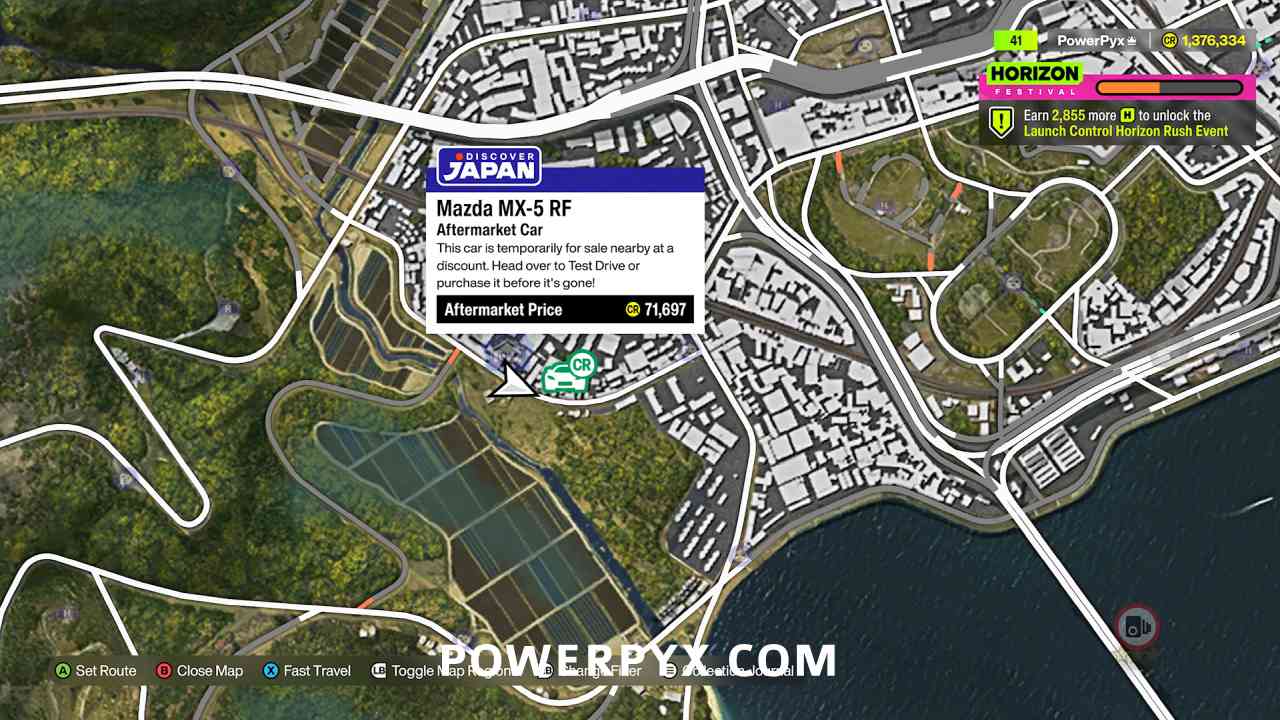
| Aftermarket Cars get marked on the map with a green Car icon when nearby. For example, one can be found next to the Tokyo House (blue house marked on map). These only appear on the map when nearby and will disappear from the map when you drive away. They are discounted versions of regular cars. Go to one of their locations and buy it. Unlike normal cars you buy from the garage, Aftermarket Cars are bought in the open world.
|
||
 |
Another Lap Won’t Hurt Set a lap time at a Time Attack Circuit |
10 G |
| Go to any “Time Attack” event on the map (blue clock icon) and complete one run to set a personal time. You will do this naturally for the story progress toward Horizon Festival. Time Attacks automatically get marked as you increase your Horizon Festival Wristbands. | ||
 |
Fresh Tire Smoke Complete a Drag Meet |
10 G |
| Go to any “Drag Meet” event on the map (red lights icon) and complete one run to set a personal time. You will do this naturally for the story progress toward Horizon Festival. A Drag Meet automatically gets marked after you earn the first Horizon Festival Wristband from story progress. | ||
 |
Four Swords Complete a LINK Skill |
10 G |
| *Online Achievement*
LINK Skill is triggered when you drive near another player and perform the same type of stunt that gives points at the top of the screen. For example, performing a “near miss” by driving in oncoming traffic with another player, or drifting at the same time. Any stunt that shows points at the top of the screen is considered a “Skill” and doing it at the same time as another player is a “Link Skill”. This only works with REAL players online, not against the AI Avatars you see offline. Just drive close to other players for a while until you get this. Another almost guaranteed way is to visit Horizon Stunt Parties, if you play online you will get an onscreen popup when they are available, and other players tend to perform a lot of skills there. |
||
 |
Carkour! Complete a Horizon Rush |
10 G |
| Automatic story-related achievement, cannot be missed. Unlocks after the second Horizon Festival “Pier Pressure” (Green). | ||
 |
Blank Slate Purchase the Yashiki Player House |
10 G |
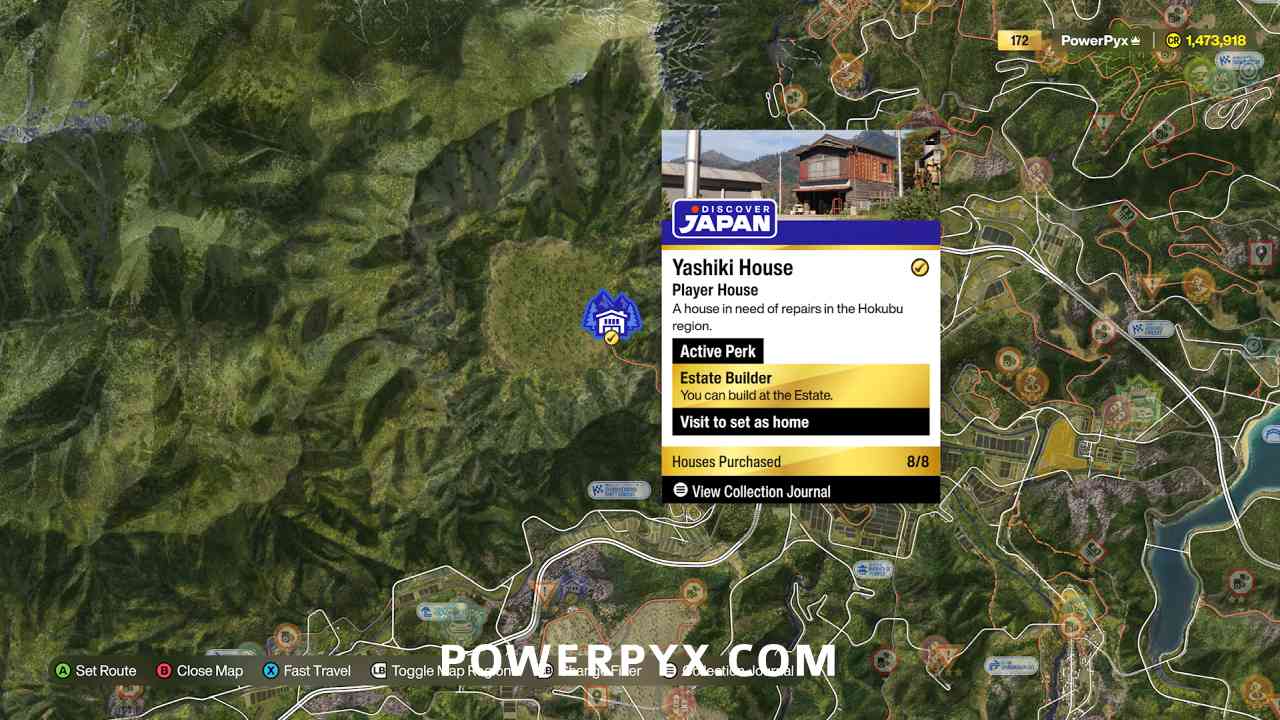
| Yashiki House is the house north of Tokyo that you can buy for 10,000 CP. It gets marked on the map automatically after earning the Yellow Collection Stamp (Campaign > Collection Journal > Discover Japan). Just go there and buy the house to get the achievement.
|
||
 |
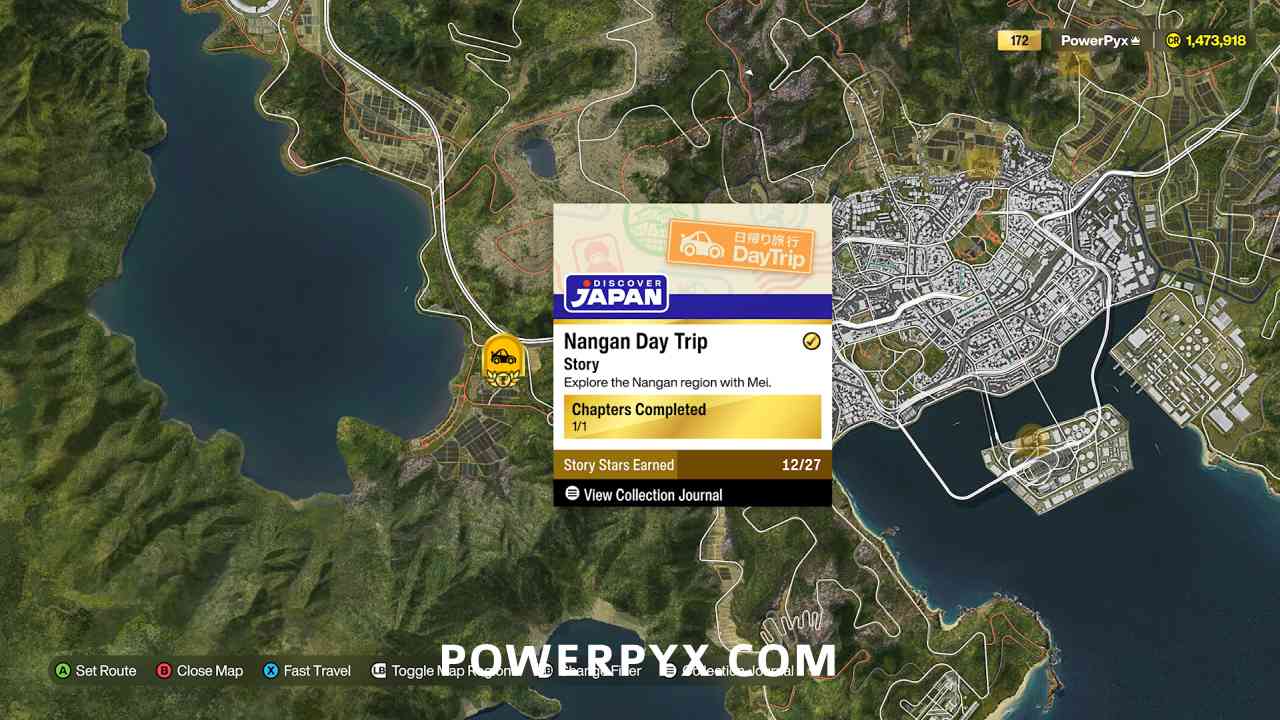
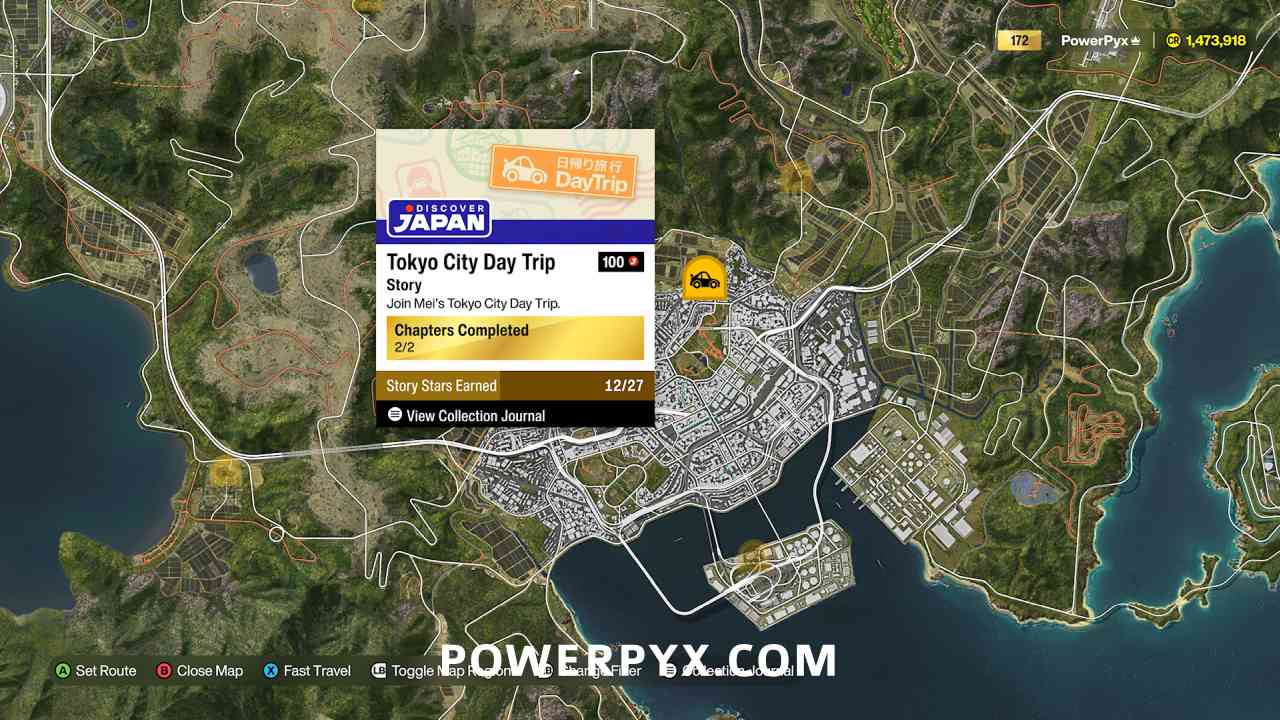
Dedicated Tourist Earn 3 Stars on any Day Trip Story Chapter |
10 G |
| You will get this naturally while going for Storyteller.
Day Trips get marked with big yellow car icons on the map. You can press To get 3 stars you must fulfill the requirements displayed at the start of the event – beating a time requirement or completing speed zones with a certain average speed. If you want to make this very simple you can use the autodrive with |
||
 |
First Love Purchase a car from the Autoshow |
10 G |
Go to Cars Menu > Buy New & Used Cars (click Yes to fast travel to Festival) > Buy & Sell (menu at top) > Autoshow > buy any car. You can filter them by price by pressing  > Value and buy the cheapest one. > Value and buy the cheapest one. |
||
 |
Meching My Way Downtown Complete the Mech My Day Showcase Event |
20 G |
| Automatic story-related achievement, cannot be missed. Unlocks after the third Horizon Festival “Mech My Day” (Blue). | ||
 |
Ready to Rumble Earn 10 Levels in Horizon Play |
10 G |
| *Online Achievement*
See Maxed Out. |
||
 |
Smashcot Smash your first Regional Mascot |
10 G |
| » Forza Horizon 6 All Collectible Locations | ||
 |
On the Board Win your first Horizon Festival Race Event |
10 G |
| Automatic story-related achievement, cannot be missed. Win any race after the Opening Act to unlock this. | ||
 |
What, Like It’s Hard? Earn the Pink Horizon Festival Wristband |
20 G |
| Automatic story-related achievement, cannot be missed. Unlocks after the fourth Horizon Festival “Off Piste” (Pink). | ||
 |
Orange You Glad You Made It? Earn the Orange Horizon Festival Wristband |
20 G |
| Automatic story-related achievement, cannot be missed. Unlocks after the fifth Horizon Festival “Fight Club” (Orange). | ||
 |
Making Your Own Path Earn the Pink Stamp in your Collection Journal |
20 G |
| See Master Explorer for getting the Gold Stamp in Collection Journal. | ||
 |
Hey! Listen! Earn the Orange Stamp in your Collection Journal |
20 G |
| See Master Explorer for getting the Gold Stamp in Collection Journal. | ||
 |
Racking Up The Miles Discover all 10 Regions |
20 G |
On the map press  to view the regions. Initially, you only have access to 9 regions. The 10th region “Legend Island” in the east of the map is only reachable at the end of the story, after reaching the end of the Horizon Festival storyline. You will automatically enter Legend Island as part of the final race for the Gold Wristband, the achievement will unlock during the race. to view the regions. Initially, you only have access to 9 regions. The 10th region “Legend Island” in the east of the map is only reachable at the end of the story, after reaching the end of the Horizon Festival storyline. You will automatically enter Legend Island as part of the final race for the Gold Wristband, the achievement will unlock during the race.
The 10 regions are (from south to north):
|
||
 |
Tokyo Resident Complete 33 activities in the Tokyo City Region |
20 G |
| Press on map to view all activities, Tokyo City is the city in the center of the map. On the left of the map it will show all 125 activities, do any 33 of them (collectibles, races, points of interest etc). While you work on other achievements this is guaranteed to come naturally, especially from finding the Mascots, Bonus Boards, and winning story-related races. |
||
 |
Crowd Pleaser Earn 36 Stars from PR Stunts in the Ohtani Region |
20 G |
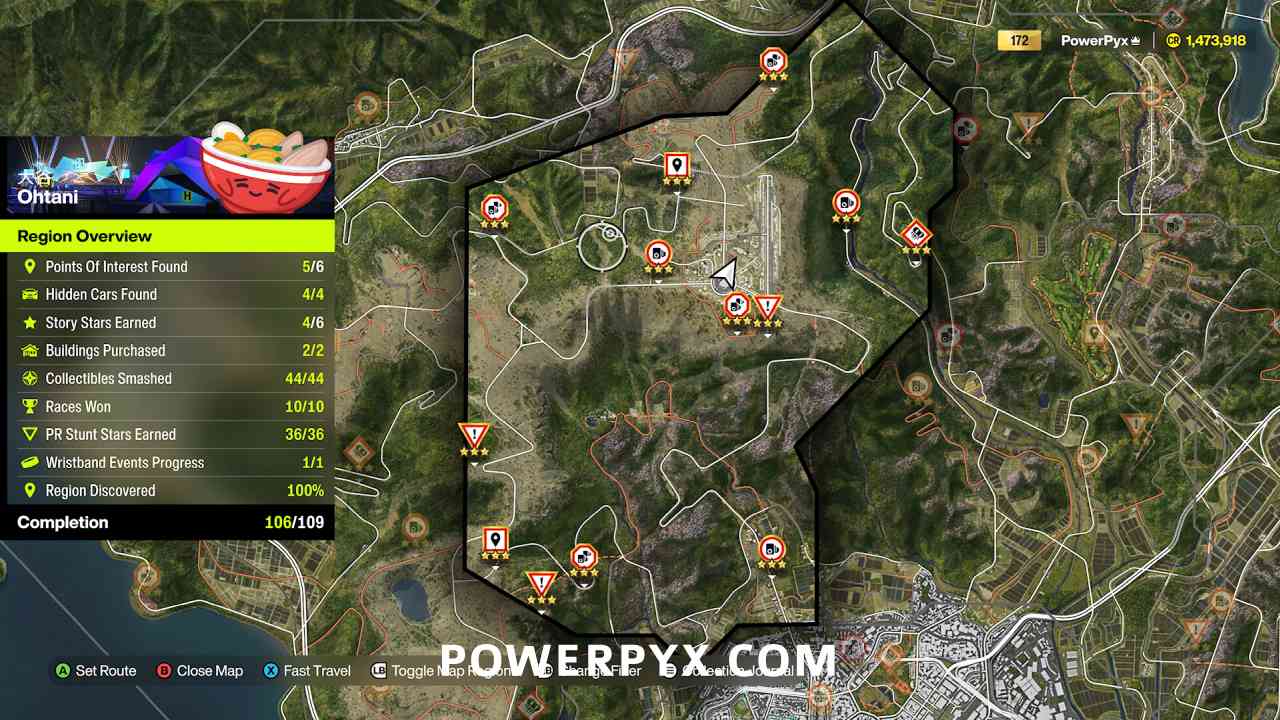
On the map press to view the regions. Ohtani is the region directly north of Tokyo City where the game starts, and where the Horizon Festival Site is. PR Stunts are the red and white icons on the map. Ohtani contains 13 of them: 3 Speed Traps, 4 Speed Zones, 3 Danger Signs, 1 Drift Zone, 2 Trailblazers. You can filter for them by pressing  on the map. on the map.
First, you must unlock the PR Stunts. New ones unlock on the map at each Horizon Wristband you reach (Yellow > Green > Blue > Pink > Orange > Purple > Gold). To unlock all PR Stunts in Ohtani you must first reach Purple Wristband from story progress, the second highest. So you can’t do this right away, it requires significant game progress. Even if you go to the PR Stunt icons they won’t be there until the required Wristband rank is reached. Here’s the full map of the Ohtani PR Stunt events after reaching Purple Wristband (the red and white icons):
|
||
 |
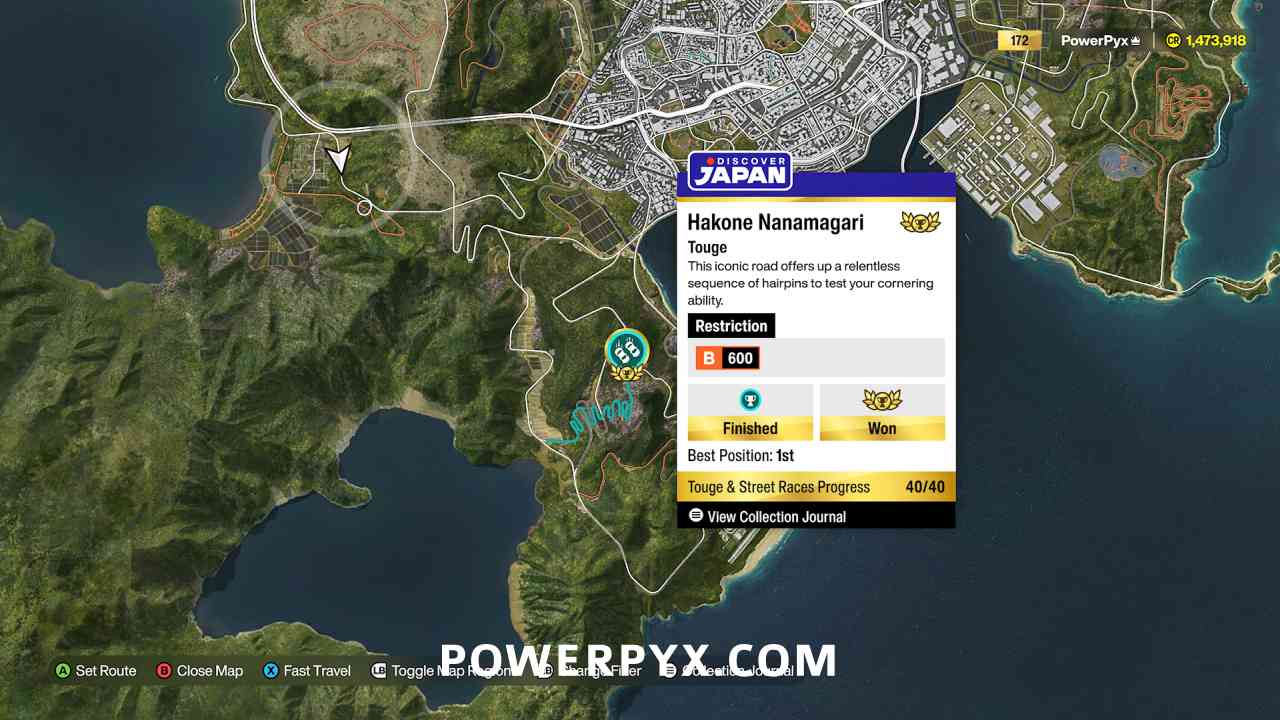
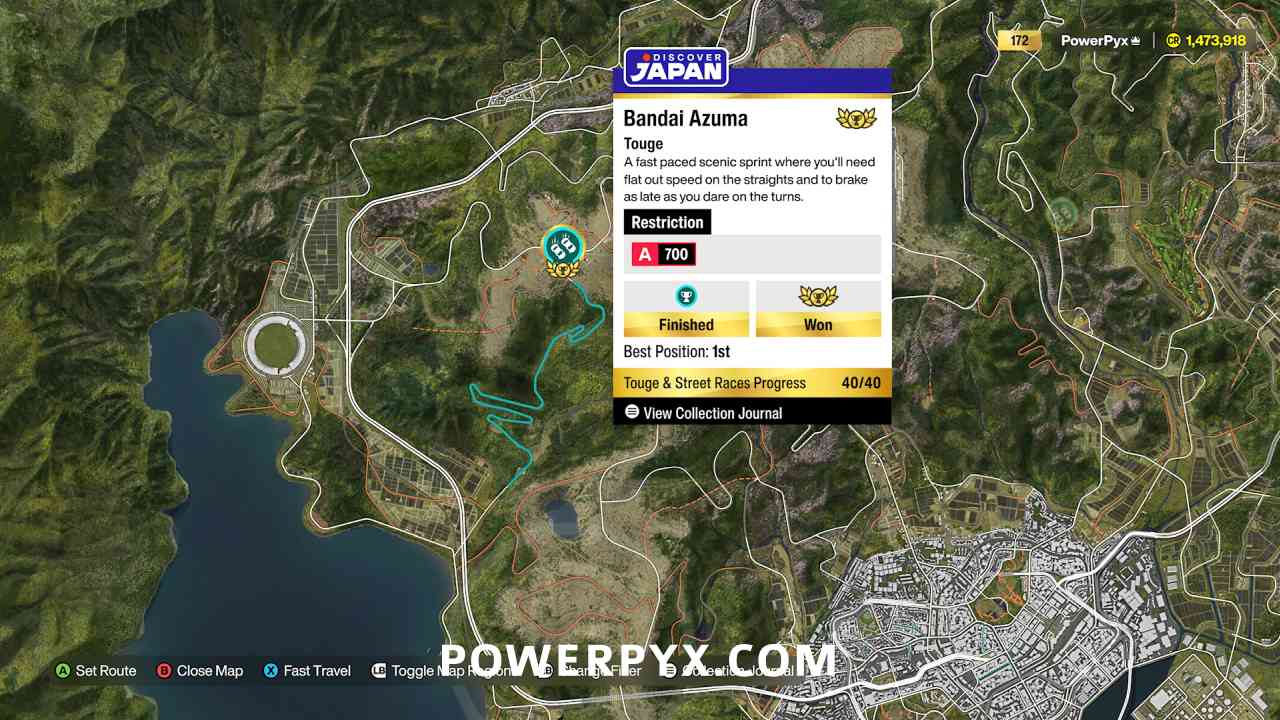
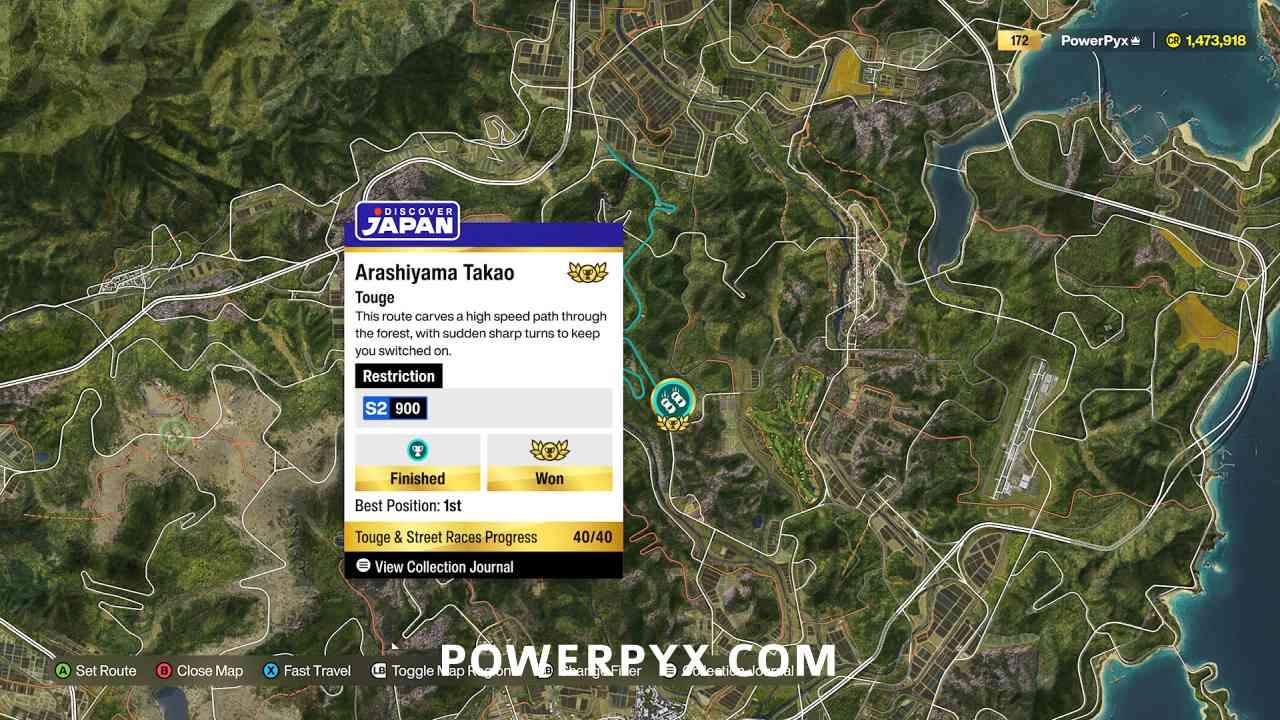
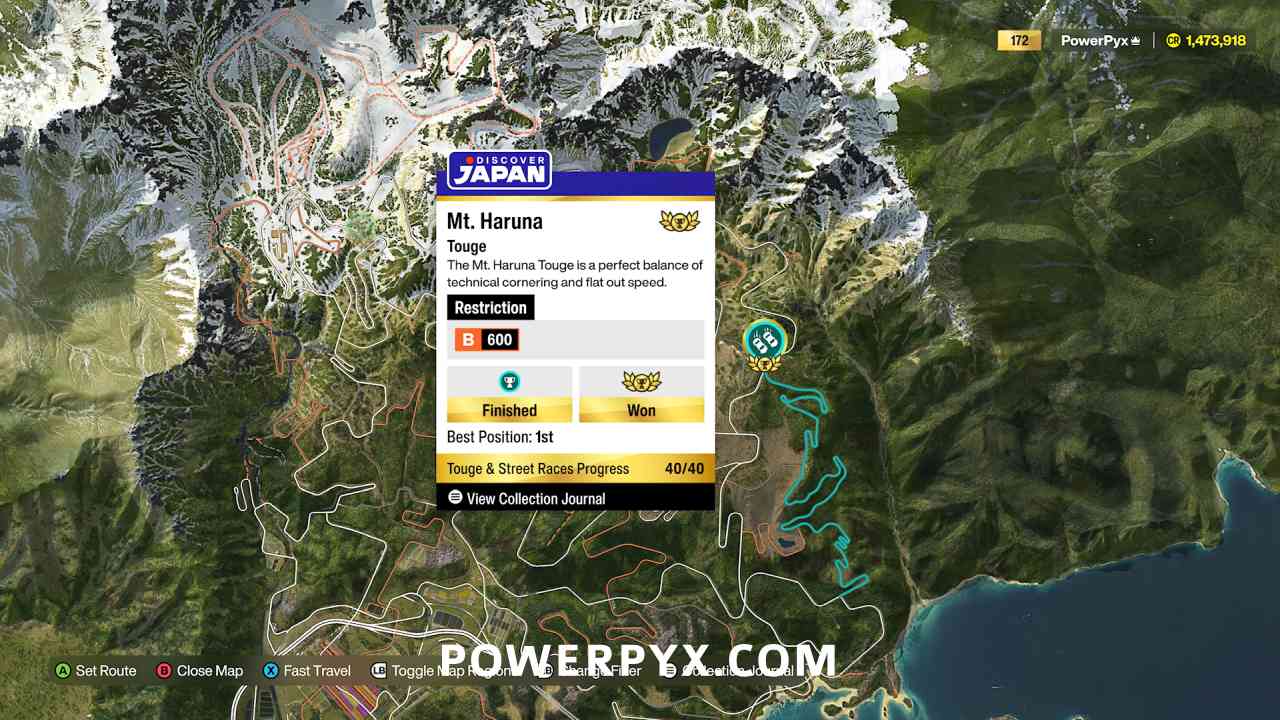
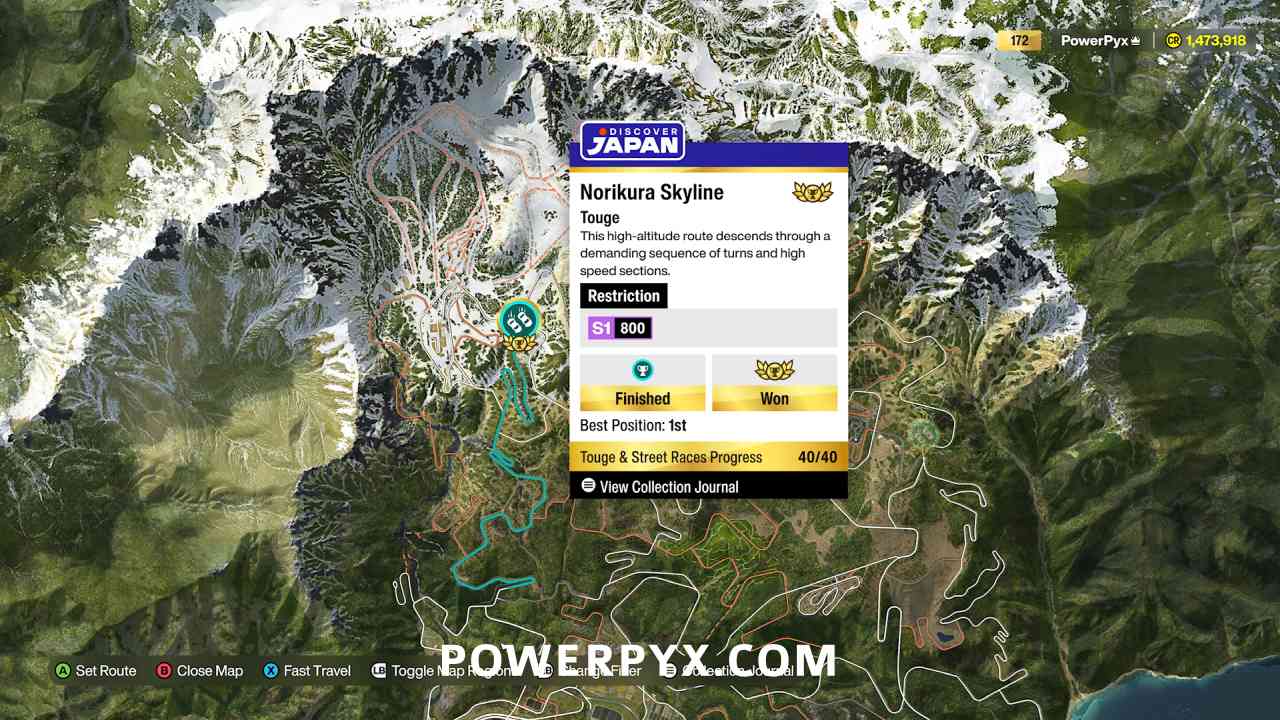
White Ghost Complete 5 Touge Battles |
20 G |
| There are 5 Touge Battles in the open world, you must finish all of them. They get marked with a turquoise-colored icon, you can use the map filter to search for these specifically. They only show on the map after you went near them.
Touge Battle Locations: #1 – Hakone Nanamagari
#2 – Bandai Azuma
#3 – Arashiyama Takao
#4 – Mt. Haruna
#5 – Norikura Skyline
|
||
 |
What Are You Doing In My Estate? Visit another player’s Estate |
10 G |
| *Online Achievement*
Go to Creative Hub > Estates > click |
||
 |
Show Me What You’ve Got! Display 3 different cars in your Garage at the same time |
20 G |
| Buy the Tokyo House, it allows displaying 3 cars (costs 3,000,000 credits, or free with Premium Edition) > Customizable Garage > Display Cars > fill all 3 slots. | ||
 |
Collector Collect 100 different cars |
20 G |
| There are over 550 cars at the time of the game’s launch, with more being added in the future. You only need any 100 cars. You can buy cars from the Autoshow – go to Cars menu > Buy New & Used Cars (confirm Yes to travel to Festival Site) > Autoshow. Then filter for the cheapest cars by pressing > Value.
Before you go on a buying spree, you can get many cars for free. Each Horizon Festival rewards a free car. You can also win many free Wheel Spins – go to “My Horizon” menu > Super Wheelspin (left) / Wheelspin (right). You earn Wheelspins as rewards from time to time. Also check under Campaign > Collection Journal > click on both journals and press Also grab the 9 Treasure Cars and 15 Barn Finds (however, Barn Finds are only available after increasing the Collection Journal stamps). While working on all other achievements you should get 50-80 cars for free. Then just buy the rest until the achievement unlocks. You can track the progress for unique cars in your Badges under My Horizon > Badges > Campaign > Growing Collection (very bottom icon). Note that the “Cars Owned” it shows under “Cars” menu > below “Change Car” also counts duplicates and is therefore not reliable to keep track, so it’s better to check the Badge tracker for the unique count. |
||
 |
Ascending New Heights Complete the Flight Club Showcase Event |
20 G |
| Automatic story-related achievement, cannot be missed. Unlocks after the fifth Horizon Festival “Fight Club” (Orange). | ||
 |
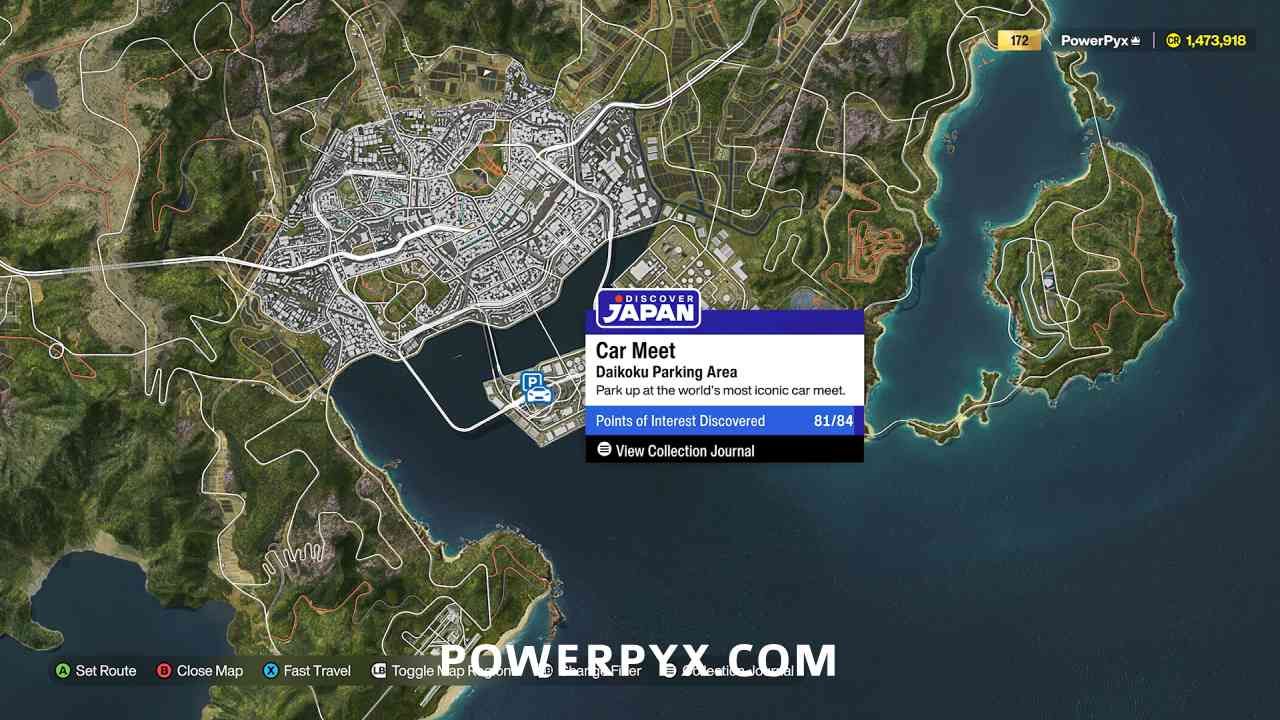
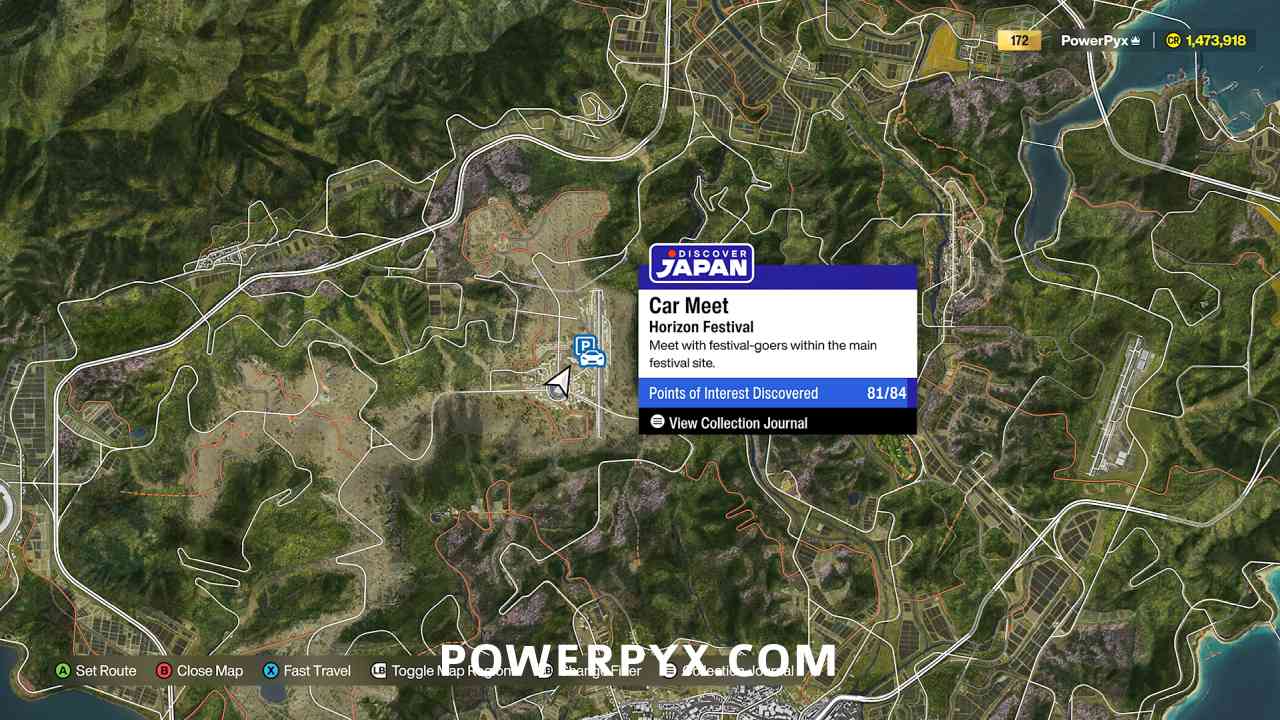
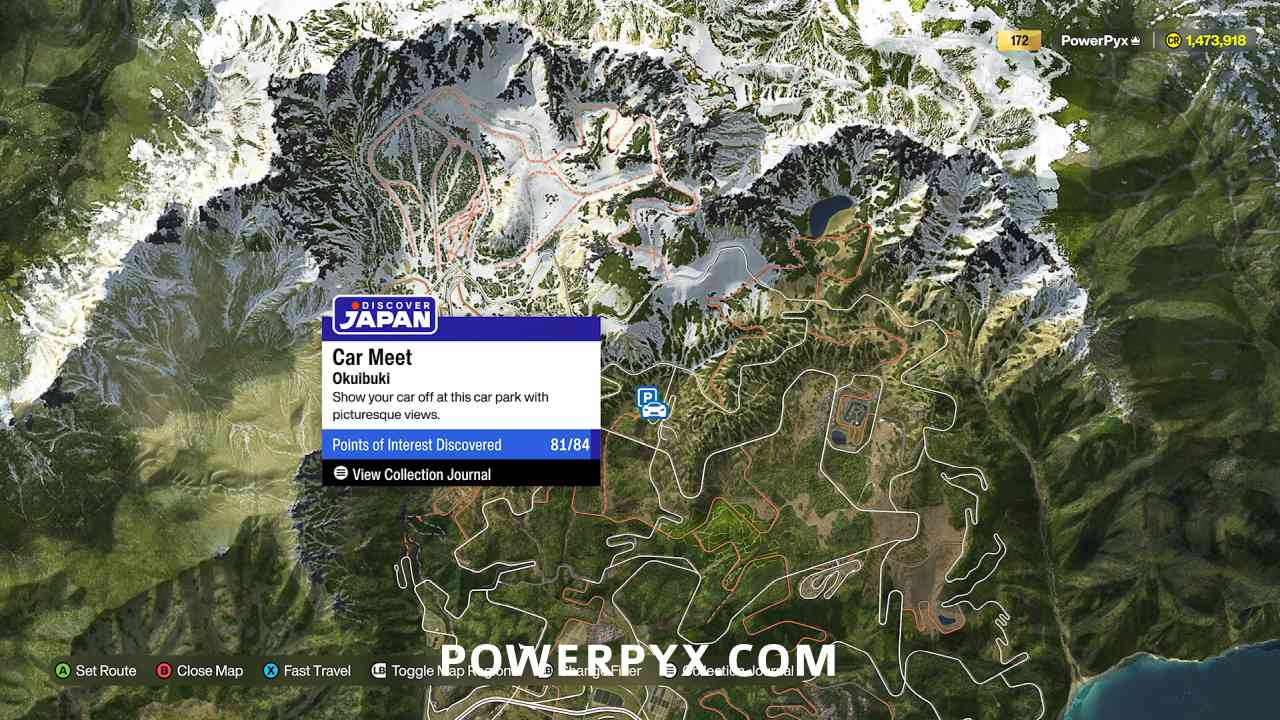
Parking All Over The World Park at 3 different Car Meets |
10 G |
| “Car Meets” are blue icons on the map. You can filter for them by pressing on the map screen. They are unlocked by going near them in the open world. There are only 3 total so you need all of them.
Car Meet Locations: #1 – Daikoku Parking Area
#2 – Horizon Festival
#3 – Okuibuki
|
||
 |
A Whole New World Drive any R Class Car |
10 G |
| Acquire and drive any car that has the pink “R” class rating in the cars screen. If you own the Premium Edition you automatically start out with multiple free R class cars, for example the 2018 Ferrari.
You can buy these from the Autoshow (Cars Menu > Buy New & Used Cars > Autoshow > press |
||
 |
Even Playing Field Complete a Race Event within a Spec Racing Championship |
10 G |
| *Online Achievement*
Go to Online > Horizon Play > Spec Racing. Now simply play through one of these events, you don’t need to win. Just participating and seeing the end screen of one single race will suffice. In this mode all cars have the exact same specs. The Championship typically consists of 3 races in a row, but you only need to participate in one single race of the three (not all three in a row). You can also join in-progress events and still earn the achievement. You don’t even need to finish the race, you can just stay at the start without driving at all, after the first person crosses the finish line the race will automatically end within 30 seconds. Even if you get a “Did not finish” you earn the achievement after the race. |
||
 |
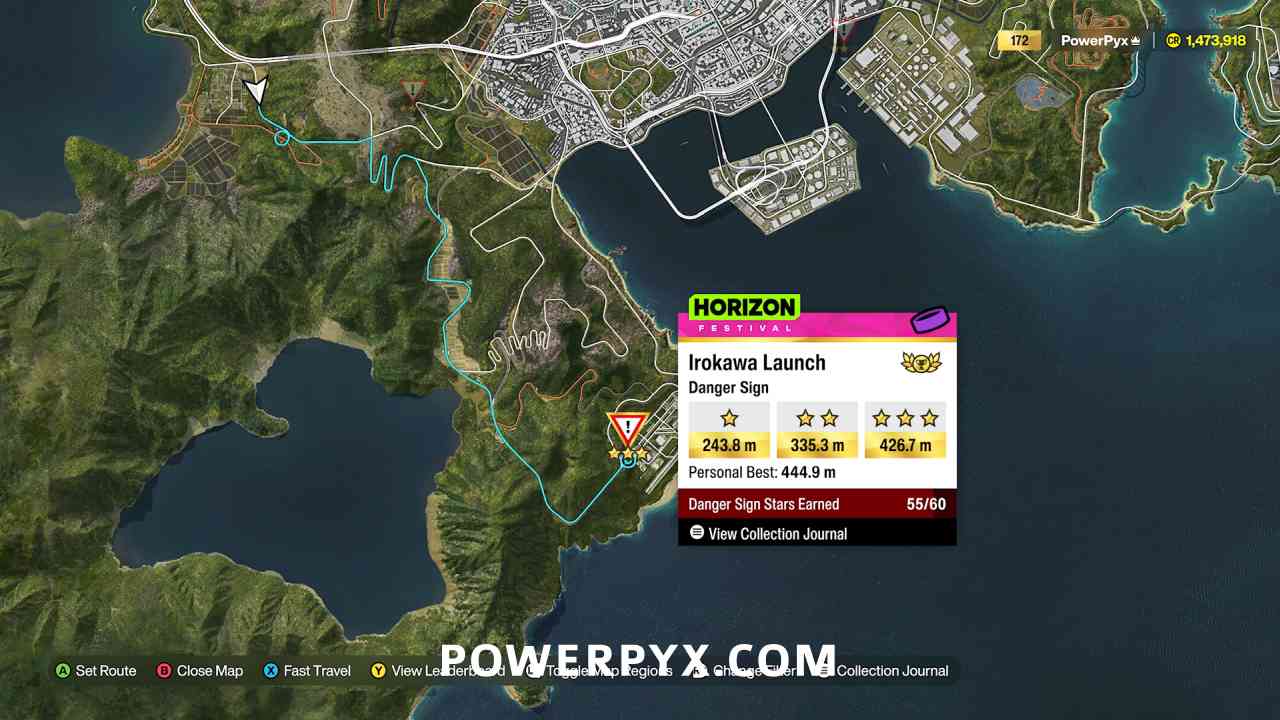
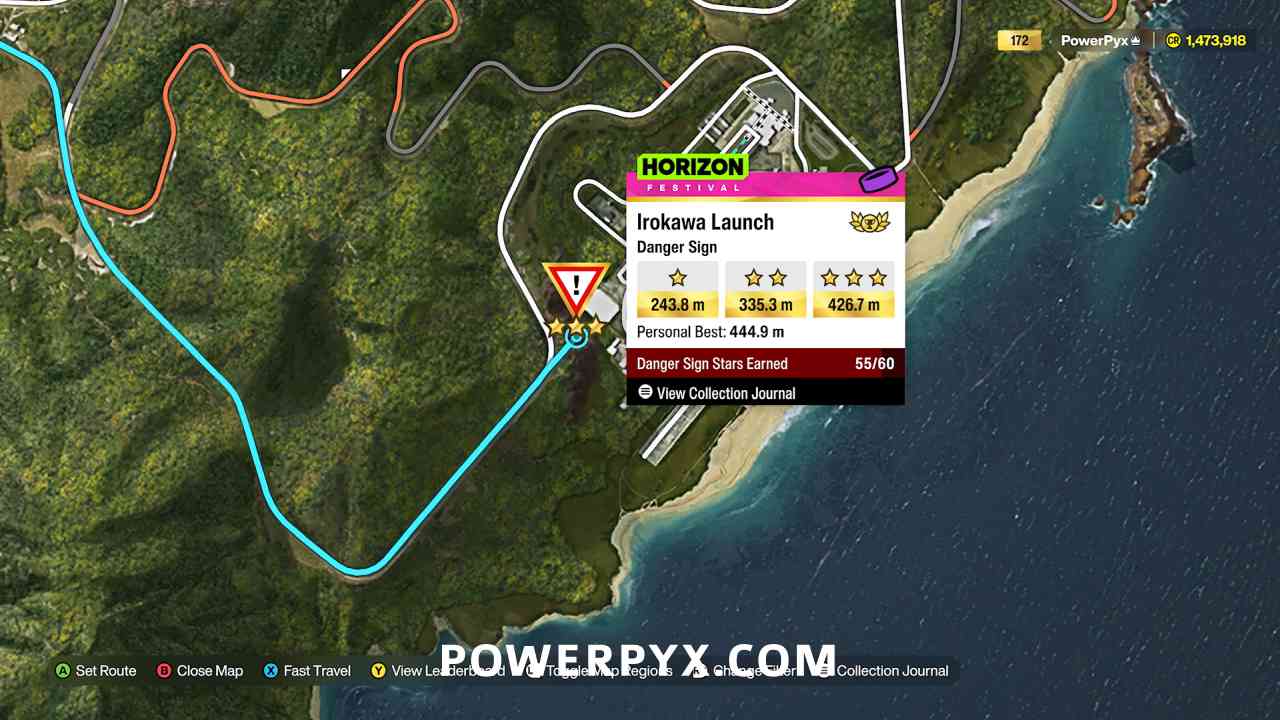
To The Moon Earn at least 1 Star at the Irokawa Launch Danger Sign |
10 G |
| Irokawa Launch is the danger sign in the south-west of the map. It’s unlocked on the map when you reach the Purple Horizon Wristband (the second highest). It then gets marked with a red warning sign on the map. It’s not available before reaching the Purple Wristband, the ramp will be missing if you go there before. Danger Signs are jump ramps where you must drive onto them at full speed and perform a long jump. You need to jump at least 243.8 meters. Use the road leading up to the sign to build enough speed and use a car with fast acceleration.
|
||
 |
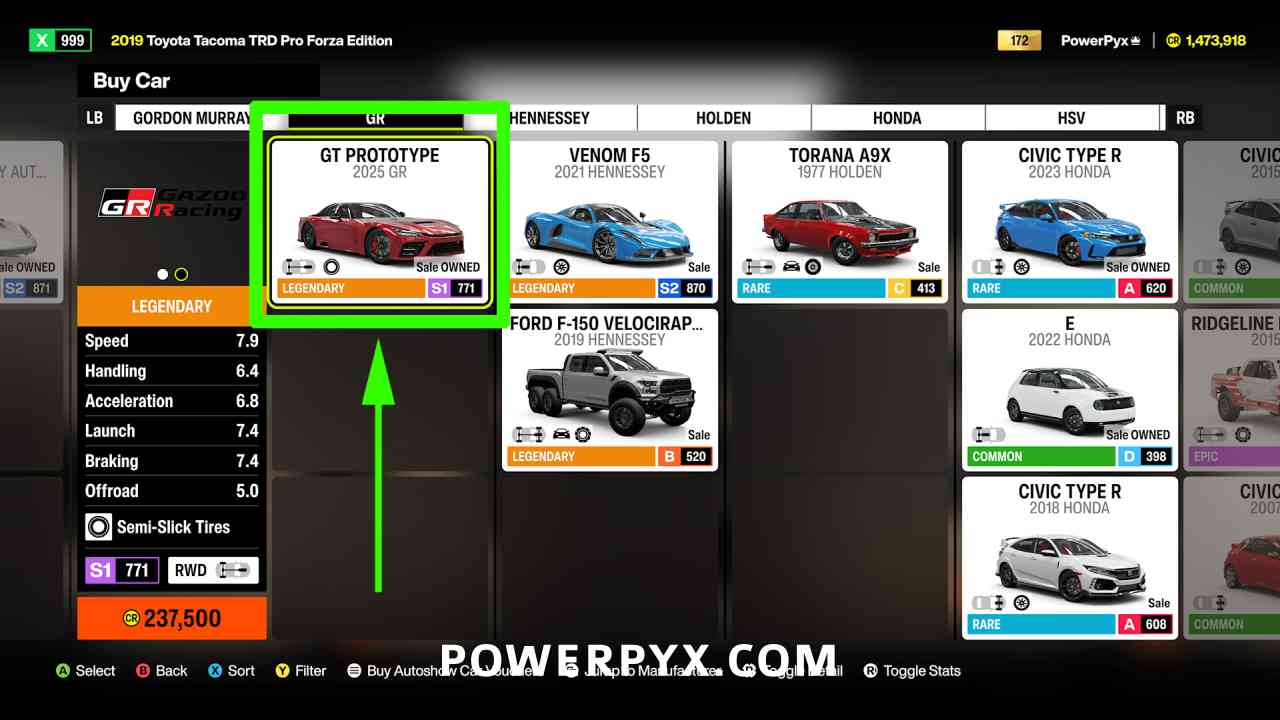
All Eyes On You Park the 2025 GR GT Prototype at a Car Meet |
10 G |
| The 2025 GR GT Prototype is the cover car of Forza Horizon 6 (the one on the game logo/wallpaper). You can buy it at any time from the Autoshow (Cars Menu > Buy New & Used Cars > Autoshow). Scroll to the “GR” manufacturer > “GT Prototype (2025 GR)”. It costs 250,000 credits.
Now drive it to any Car Meet (blue icons on map), park it in a parking spot and press the prompt that appears on the screen. You get a cutscene where you park your car and the achievement unlocks. There’s a Car Meet directly outside the Horizon Festival Site:
|
||
 |
Track Day Set a lap time at a Time Attack Circuit while driving any Track Toy |
10 G |
First, you need a car that counts as a “Track Toy”. Go to Cars Menu > Buy New & Used Cars > Autoshow > press  to Filter > scroll down to “Track Toys” car type. Now buy any of these, the cheapest is the Mazda MX-5 CUP (2017) for 60,000 Credits. to Filter > scroll down to “Track Toys” car type. Now buy any of these, the cheapest is the Mazda MX-5 CUP (2017) for 60,000 Credits.
Now go to any Time Attack event and finish one lap. These get marked by blue icons on the map automatically as you increase your Horizon Festival Wristbands. On the map you can press |
||
 |
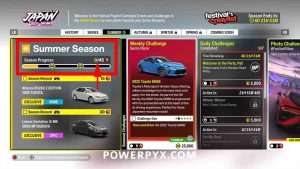
Played-List Earn all Festival Playlist points for a Season |
30 G |
| *Online Achievement*
After earning the Yellow Wristband you unlock the Festival Playlist. Go to Campaign > Festival Playlist (right side of menu). Each Season lasts 1 week real time (Summer, Autumn, Winter, Spring). When you scroll over the season, it shows how many total points you can get, indicated by the “Season Progress”. The red gem icon is the season points:
In the Seasons menu you can scroll to the right to see a list of objectives that give Season Points. You’ll need to do all of these for an entire Season (1 week). On the world map you can also press |
||
 |
Pin It! Discover 10 Landmarks |
10 G |
| This will come naturally as you drive around your map, will be one of your first few achievements, you’ll get it automatically while exploring the map and driving to events. You don’t need to interact with the Landmarks, just driving on the streets near certain points the game considers Landmarks will suffice as discovering them. This will be one of your first achievements, and there’s no way to miss it as you’ll have to drive around the map a lot to visit different race events. | ||
 |
In The Spotlight Earn the Purple Horizon Festival Wristband |
30 G |
| Automatic story-related achievement, cannot be missed. Unlocks after the sixth Horizon Festival “Launch Control”. | ||
 |
Horizon Legend Earn the Gold Horizon Festival Wristband and become a Horizon Legend |
50 G |
| Automatic story-related achievement, cannot be missed. Unlocks after the seventh Horizon Festival “Horizon Legend”. | ||
 |
What an Adventure! Earn the Purple Stamp in your Collection Journal |
30 G |
| See Master Explorer for getting the Gold Stamp in Collection Journal. | ||
 |
Master Explorer Earn the Gold Stamp and become a Master Explorer |
50 G |
| Collection Journal Stamps are different from the Horizon Festival Wristbands. You can view them under Campaign > Collection Journal > Discover Japan. You unlock one achievement at each Stamp level, there are 7 total: Yellow > Green > Blue > Pink > Orange > Purple > Gold.
The fastest way to increase the Stamp rating is from Street Races, Touge Races, Story Events (yellow icons on map), Jobs (big blue icon in Tokyo City), buying houses, destroying the 200 Mascots. You don’t need 100% completion for this, there is much more to do than required. Most content can actually be skipped, you only need a fraction of everything available in the “Discover Japan” menu. As you need all 81 Stars from Story Events anyway for Storyteller, it’s best to focus on that. Touge and Street Races also give a lot of progress toward the Stamps. Once you’ve unfogged the map you can fast travel from one Mascot to the next to destroy them all within a short time. You absolutely don’t need 3 stars in all the Street Races & Touge Battles, so don’t worry if you only get 1-2 stars, it’s more efficient to move on to the next event instead of repeating the same one for a better star rating. |
||
 |
The Boss Earn the maximum Promotion in a Job |
20 G |
| In the middle of Tokyo City go to the big blue icon “Tokyo City Food Delivery” and keep doing Food Deliveries until you reach Level 9. This is a bit grindy and takes a while, you’ll have to do many deliveries. Your level is increased by the total amount of money you’ve earned from deliveries. On each delivery you can get a rating from 1-3 stars, if you get 3 stars you earn a bigger payout. Each shift consists of 3 deliveries. Some deliveries are just for beating a specific time requirement, others require getting a certain drift score or skill score. You can see your progress by scrolling over the map icon, at the bottom it says “Job Promotions earned”. Level 9 is the maximum Job Promotion.
On the deliveries that only have a time limit you can use Autodrive with
|
||
 |
Treasure Hunter Discover and claim 9 Treasure Cars |
20 G |
| » Forza Horizon 6 All Treasure Car Locations | ||
 |
The Horizon Cartographer Reveal the entire Map |
50 G |
| This works similar to Racking Up The Miles for discovering all 10 regions.
On the map press |
||
 |
Feel the Rush Complete 3 Horizon Rush Events |
20 G |
| Automatic story-related achievement, cannot be missed. Unlocks after the sixth Horizon Festival “Launch Control”. | ||
 |
Maxed Out Earn 100 Levels in Horizon Play |
30 G |
| *Online Achievement*
Go to Online > Horizon Play > in the top left it shows your current online level, on the top right it shows your progress to the next level. You only earn XP from participating in Horizon Online races. This is separate from your level in Singleplayer. What you do in Singleplayer in the open world won’t count towards this. It’s by far the grindiest achievement in the game and will take potentially hundreds of hours. You do get some XP even if you lose, but gain more if you win, so the time it will take is also somewhat skill-dependent. |
||
 |
Historic Effort Earn a Series History Reward |
30 G |
| *Online Achievement*
After earning the Yellow Wristband you unlock the Festival Playlist. Go to Campaign > Festival Playlist (right side of menu) > History > Playlist History > check the total points required for the History Reward (red gem icon):
For example, the first History Reward costs 500 total Festival Playlist points. It will take multiple months to earn this. Each Series lasts 4 weeks, split into 4 x 1 week Seasons (Summer, Autumn, Winter, Spring). You should actively play each week to earn the maximum points in each Season. For example, the first Season/Week at the game’s launch has a cap of 45 points, but you can also earn 1 extra point a day from the Daily Challenges. Assuming you do the 45 points cap it would take 12 weeks (3 months) to earn this achievement (500 points / 45 per week = 11 weeks and 1 day). In the Seasons menu you can scroll to the right to see a list of objectives that give points. On the world map you can also press |
||
 |
Gotta Smash ‘Em All Smash 200 Regional Mascots |
30 G |
| » Forza Horizon 6 All Collectible Locations | ||
 |
A Few Splinters Is Nothing! Smash 200 Bonus Boards |
30 G |
| » Forza Horizon 6 All Collectible Locations | ||
 |
Racing Aficionado Win 57 Horizon Festival Race Events |
30 G |
| Horizon Festival Race events are the ones that give progress toward your Horizon Wristband. They are: Road Races, Dirt Races, Cross Country Races, Drag Races, Wristband Events.
There are more than the 57 required, allowing you to skip a few. At each new Wristband level more races unlock the map. By the time you reach the Gold Wristband you will have more than enough races available. Importantly, you must WIN them by placing 1st. You can make this very simple by playing on the easiest difficulty “Tourist” and using Autodrive ( |
||
 |
Storyteller Earn 81 Stars from Stories |
10 G |
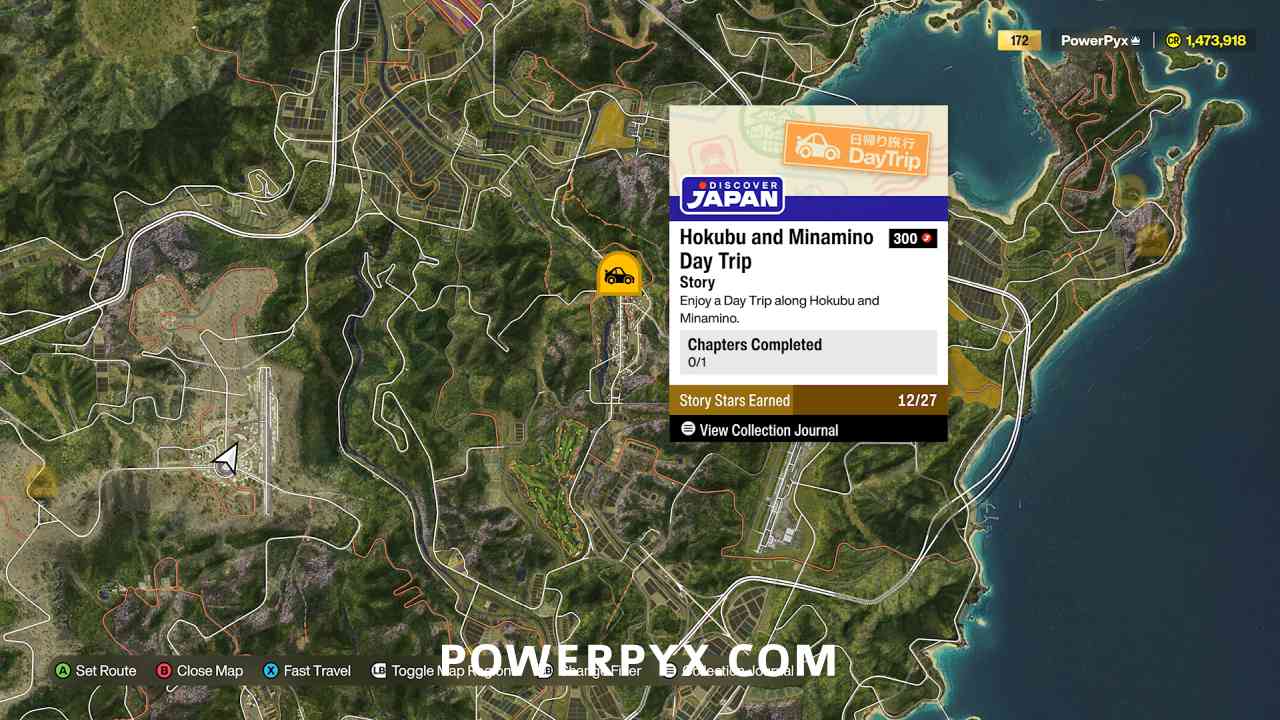
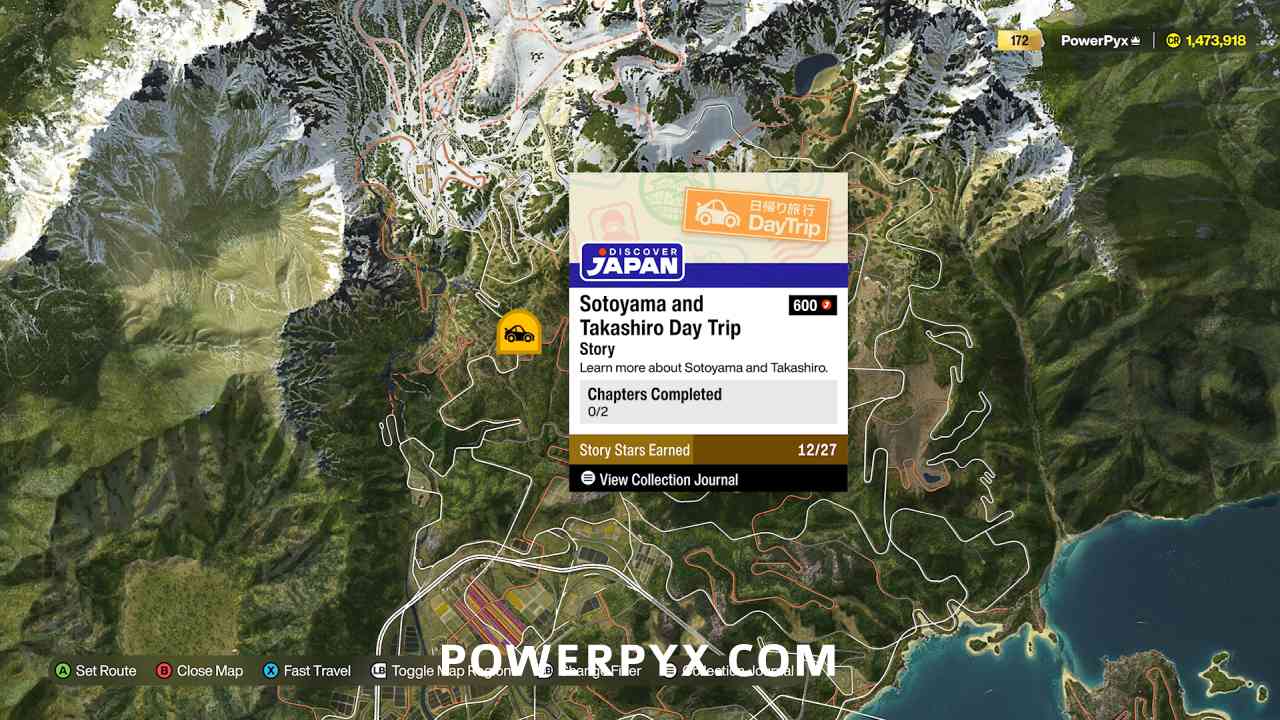
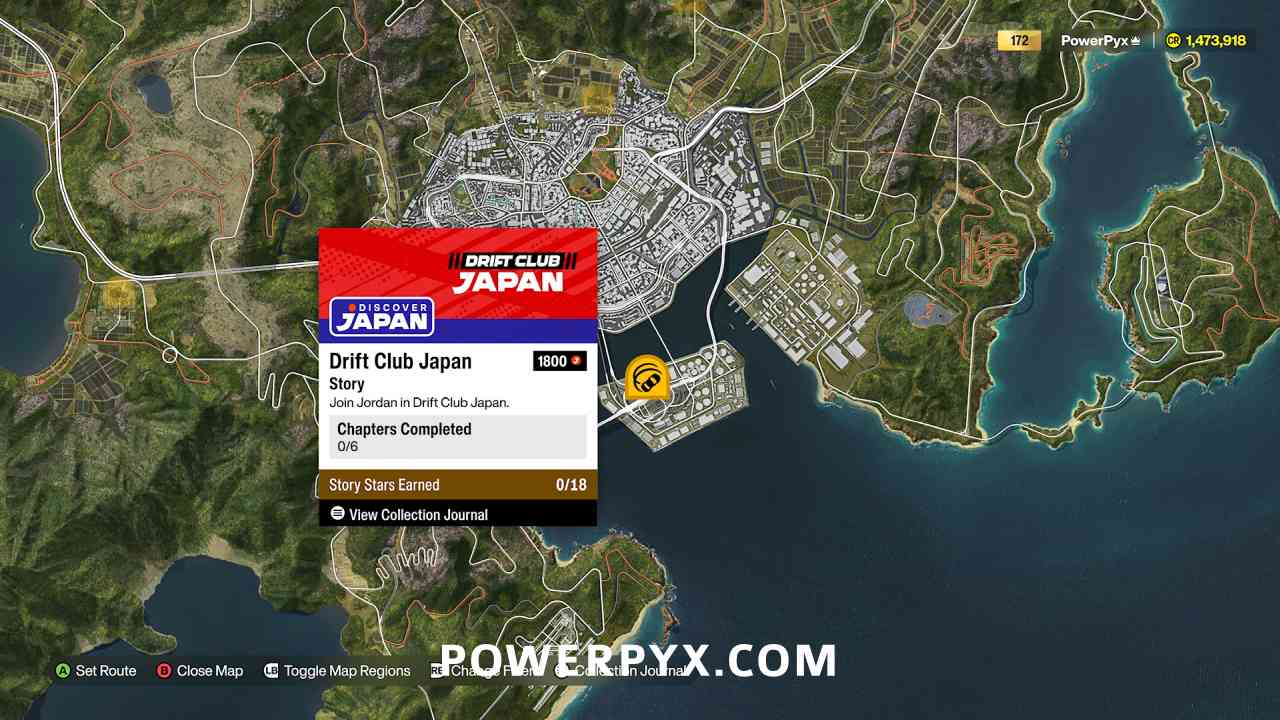
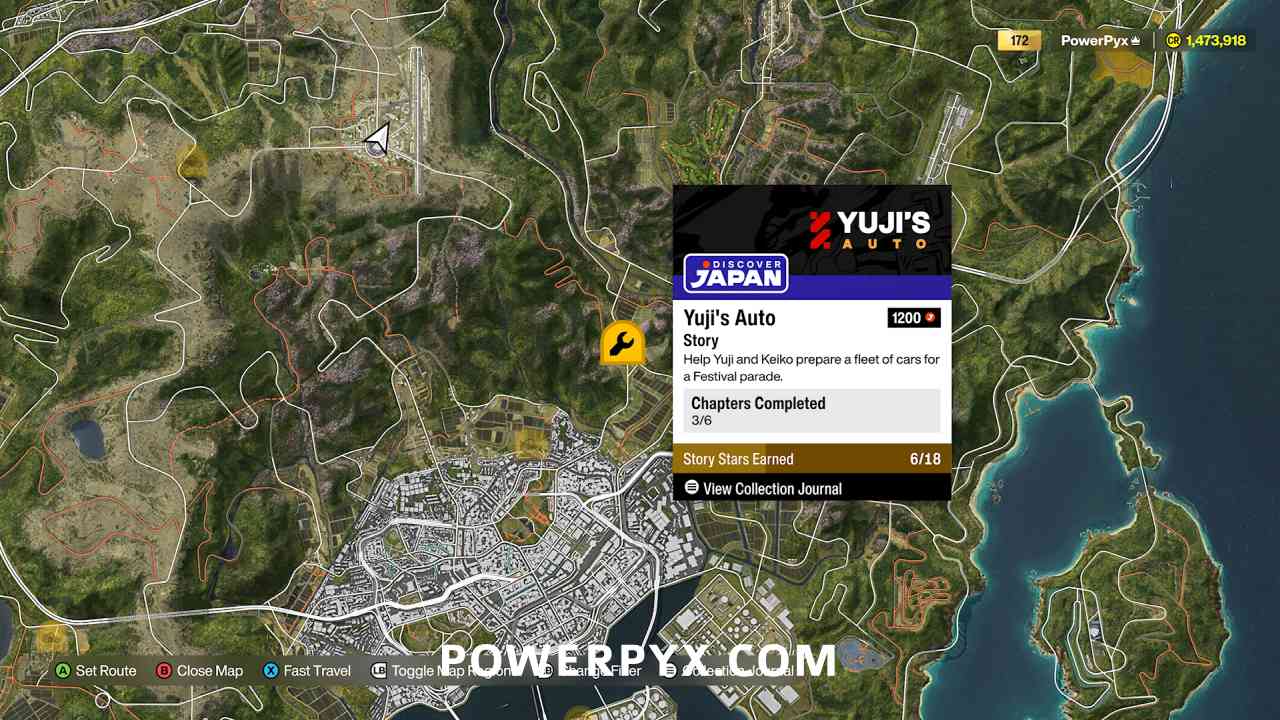
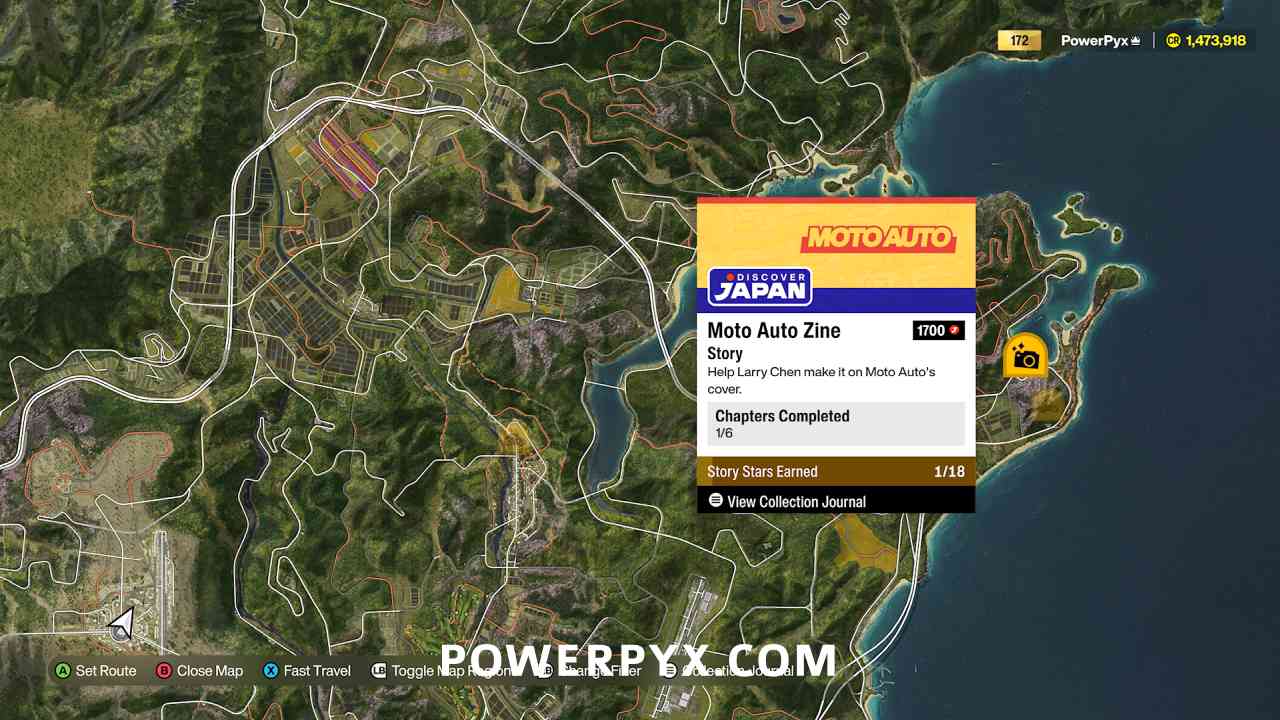
| Stories get marked with big yellow icons on the map. On the map you can press to filter for “Stories” specifically. There are different types: Day Trips (one per region, 27 Stars total), Drift Club (18 Stars), Yuji’s Auto (18 Stars), Moto Auto Zine (18 Stars).
There are 81 Stars total to be earned and you need all 81 for this achievement. This means you must get the maximum 3 stars on every single Story event. The star rating is based on how well you do. The requirements vary between events, they can be time requirements, maintaining an average speed, reaching a certain skill score etc. Each story event starts with a drive to the target where you switch into another car, followed by the portion that determines your star rating. What makes this a bit tricky is that you drive a predetermined car, so you can’t brute force it with your own supercars. If you want to make this very simple you can use the autodrive with Also remember you can use the Rewind feature with All Story Locations: Day Trips:
Drift Club:
Yuji’s Auto:
Moto Auto Zine:
|
||
 |
Welcome to Japan Complete The Opening Act |
10 G |
| Automatic story-related achievement, cannot be missed. This will be the first achievement you earn, after you complete your first street race, roughly 20 minutes into the game. | ||
 |
First of Many Complete your first Qualifier |
10 G |
| Automatic story-related achievement, cannot be missed. Complete any race after the Opening Act to unlock this. | ||


NoHeroes94 says
Maxed Out is one of the worst achievements I’ve ever seen to the point where I think they’ve either messed up the calculations or massively overlooked the XP during development. They’re pretty good with achievement usually; this is very odd and a massive change from 5’s Horizon Play system.
I have the completion for FH4 and FH5 (all DLC) and the equivalent in 5 took 5-10 hours. They’ve moved away from a flat XP mode to an exponential one and it increased by a ludicrous amount (hundreds of thousands of XP per level). Some people on TrueAchievements think 500 hours is for high level gamers and that 1000 hours for average to weak racers is more likely. You’d be able to get FH3, 4, 5 and all other achievements in 6 done before you’d be down with Maxed Out. It’s truly the 0.01% who will get this based on current projections.
I have made a support portal ticket; it’s got some engagement and the more vote and comments the more they may look at reducing the reps, hopefully significantly (need to sign up for Forza’s new support portal, free):
https://tinyurl.com/2arskutx
If they leave it alone, it’ll be amongst the worst achievements ever made.
Beerhatter says
I think you are overreacting.
I mean, Microsoft studios are no stranger for that kind of ultra grindy multiplayer stuff. Gears 3/4/5 – 1000+ h, Halo TMCC – 1000+h.
So nothing new here.
NoHeroes94 says
They aren’t really comparable examples IMO. Those lists are full of difficult, technical requirements including some grind. This is a ~60 hour completion with a 1K grind just tacked on, its peculiar. The same achievement in 5, as aforementioned, took a few hours. Game is amazing but kudos to anyone seriously considering going for it in its current state.
NoHeroes94 says
Playground Games finally confirmed that Maxed Out’s XP reqs weren’t intended and they’re investigating.
Mahin277 says
Thanks for the guide. When’s the PS5 version comes out?
AlexSobecki says
Late 2026 is all Microsoft has said so far
Anonymous says
Xbox hasn’t announced the exact PS5 release date yet, just that it will be this year (probably in a few months, maybe August or September to accommodate Gears of War: E-Day and Fable also releasing in 2026).
Alex says
Hey team. I don’t see it in the upcoming guides but will you cover Beast of Reincarnation and Metal Gear Solid Vol 2 both out in August?
PowerPyx says
Probably yes.
Darah says
Hundreds of hours ??? wtf is this, why does xbox HATE completionists that much ?
This is the same kind of stupid we saw with Gears Of War where it’s one of the only games where i feel bad for the people who got the platinum because of the hundred+ hours of mindnumbing boosting.
Icek says
I don’t mind grinding in SP part of any game, not even likes of Star Ocean. But online grind with hundreds of hours just for the kick of it? Especially if it’s skill based, where game basically punishes bad or average players with frustration and prolonged play-time comparing to good players?
I only hope that PS5 will auto-pop trophies upon loading the save transfer from Xbox, as doing everything twice…hell no!!!
Adravil says
Thank you for the guide!
One question though (you may not know for sure because it depends not on you, I understand, but at least based on what you know). If I play the game heavily on PC via Game Pass now, finish it and achieve many milestones that you’ve described in this guide, then buy this game for PS5, launch, log in into the same Microsoft account I’m using right now for Game Pass, will achievements, I’ve already completed on Xbox, automatically complete on PS5 as well? Win one more race to trigger “X races won” is not a problem. The problem is if I’ll have to replay the entire game, and even worse, if I’ll get soft-locked out of some achievements (save synced on which I’ve completed the game, but an achievement “start the game” did not pop up). What do you think, guys?
PowerPyx says
No way of knowing until PS5 version is out.
Forza Horizon 5 had no autopop, so I wouldn’t expect it for Forza Horizon 6 either.
NoHeroes94 says
Apparently Xbox to Steam does have auto-pop but didn’t for Forza Horizon 5. So there may be hope.
Haven’t tested it myself, but it’s mentioned here.
Icek says
FH5 wasn’t cross-save game, thus no auto-pop. Only your creative hub stuff and levels carried over.
Icek says
Achievement for visiting other players estate. I’ve tried what you wrote, and went though hundreds shared estates, not a single one had Visit option to choose from. Did something changed or am I just that much of a bad luck?
PowerPyx says
You must have Xbox Live/Gamepass subscription if you’re doing it on Xbox, since it’s an online-only feature. The option to visit player estates won’t appear if you don’t pay for online.
Some players may also adjust their settings to not allow visiting their estates, but most of the ones who share them usually allow visiting.
InnesJack says
Latest patch notes: Adjustments have been made to the amount of XP required between Level 26 and Level 100 in Horizon Play. This will significantly reduce the time required to earn the ‘Maxed Out’ Achievement.
Developer Notes:
Players who have already made significant progress in Horizon Play (Level 25 and above) will see their level jump significantly and unlock new Badges, and players who have already reached Level 32 will jump to Level 100, unlock Badges and the ‘Maxed Out’ Achievement.
Happy days!