
007 First Light contains 92 Collectible Locations (36 Cards, 23 Intel, 14 Mementos, 10 Postcards, 9 Legacy Items). Finding all Collectibles unlocks A collector’s habit trophy & achievement.
There is no collectible tracker by chapter, only by type when pressing Touchpad. Nothing is missable, everything can be collected through Chapter Select. All collectibles are saved instantly when picking them up. If you grab them in Chapter Select you can quit out immediately without reaching the next checkpoint. You can jump to any Checkpoint directly which makes it fast to clean up anything you missed.
In Chapter 4 you unlock the Q-Watch which highlights collectibles in yellow when pressing L1/LB near them. In Chapter 9 you unlock the Laser Strap gadget, always have it equipped! The laser lets you break certain locks and objects which is required to reach some collectibles. The recommended gadgets to reach all Collectibles are the Laser Strap (unlocked in Chapter 9) + Dart Phone (unlocked in Chapter 5), both are automatic story unlocks.
Items that count as Collectibles are indicated by a little gray bookmark icon next to their name when looking at them. After picking them up they will show a golden text on the right side “New Collectible”. There are many additional text items that don’t count as collectibles (photos, newspapers, text files etc). The Intel will show under a different name in the collectible menu after picking them up, both their names are listed here.
It’s most efficient to use this all-in-one guide for 100% completion to get everything in a single run. If you’re just cleaning up specific collectibles after the story, you can also refer to the by-type guides linked below.
Bug Warning: some players are having issues with collectible trophies not unlocking, this is rare but can happen. As a precaution, back up your save before collecting the last collectible of any type, if a trophy/achievement doesn’t unlock you can download the save, go offline and collect it again. The unlocks can be very delayed when playing online. Disconnecting from the internet and playing completely offline helps.
Collectibles by Type:
- 36 Cards (Playing Cards) – Casino Royale

- 23 Intel (MI6 Files) – For your eyes only
- 14 Mementos – Recovered assets
- 10 Postcards – The world is not enough
- 9 Legacy Items – A Legacy of spycraft

Video Guide

Chapter 1: Against the Odds
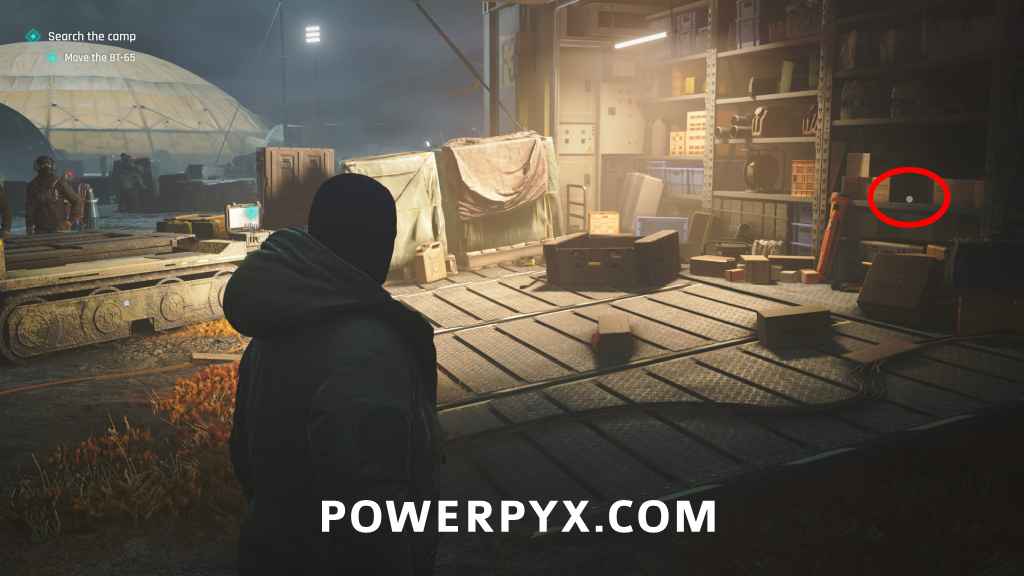
Card: 7 of Acorns
Checkpoint: 04 Deployment Camp
Objective: Move the BT-65
After watching the small scene of the 2 guys crashing the car and them asking you to move it, the collectible is on the shelves to the right of the remote.
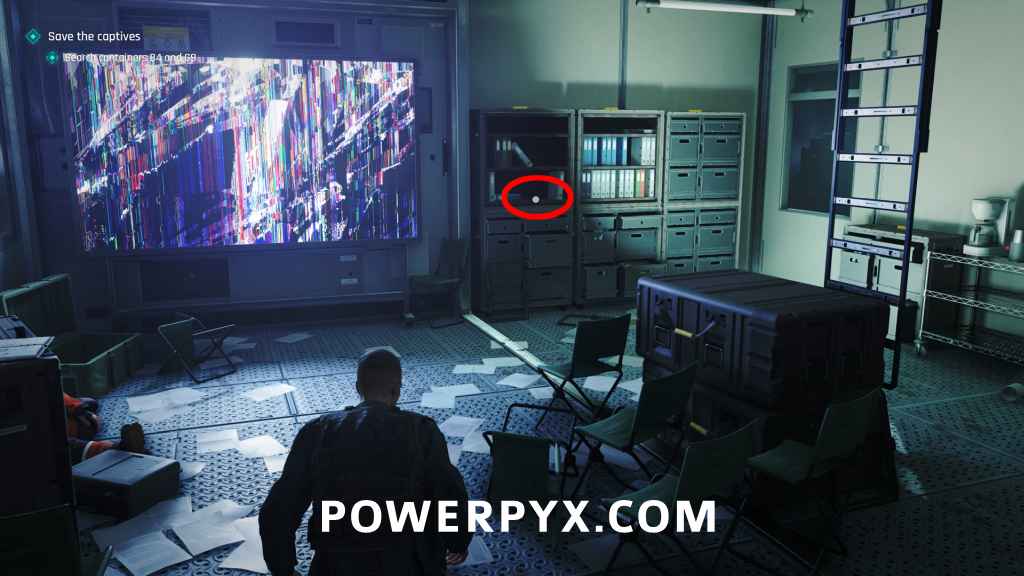
Legacy: Cruciform Key
Checkpoint: 06 Central Camp
Objective: Save the captives / Search containers B4 and G9
After jumping down into the enemy camp, enter the F8 container and the collectible is on a shelf.
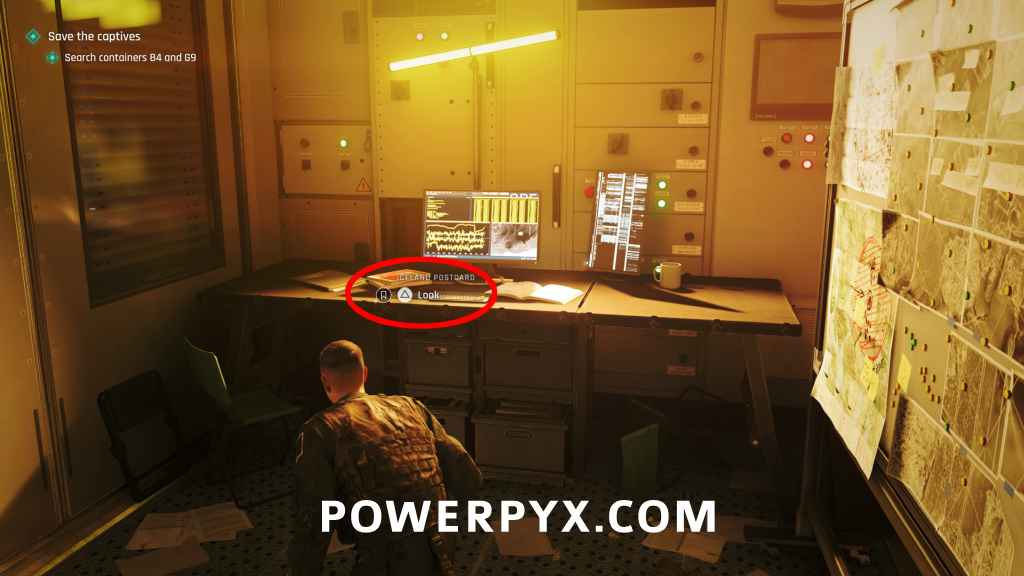
Postcard: Iceland Postcard
Checkpoint: 06 Central Camp
Objective: Save the captives / Search containers B4 and G9
From the F8 Container, look to the right and enter the B2 container. Take down the enemy at the desk and the collectible is on it.
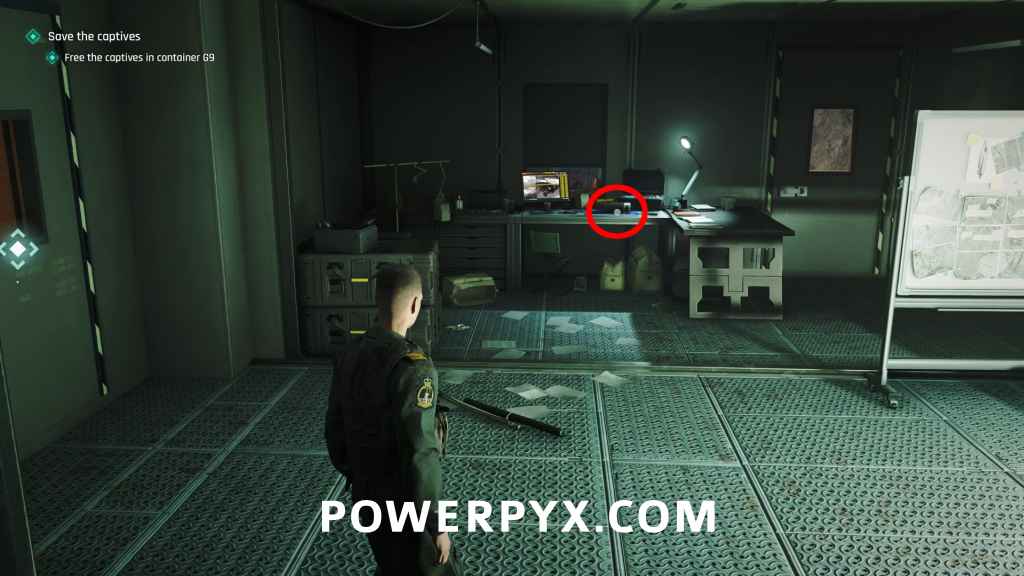
Memento: Satellite Part
Checkpoint: 06 Central Camp
Objective: Save the captives / Free the captives in container G9
As soon as you enter container G9 (story objective) this will be in front of you.
Chapter 2: In His Majesty’s Secret Service
No collectibles in this chapter.
Chapter 3: The Needle’s Eye
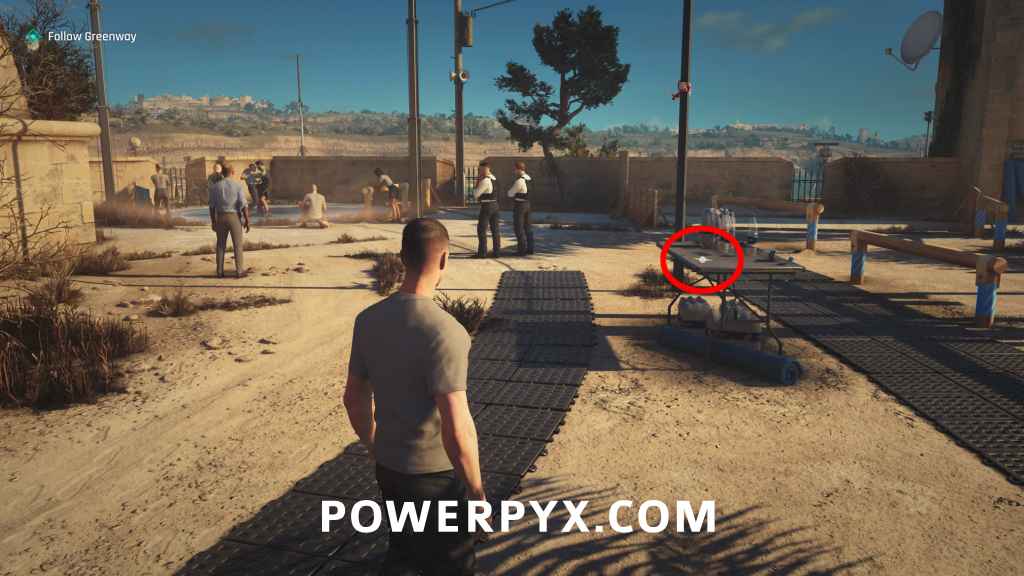
Postcard: Malta Postcard
Checkpoint: 01 Basic training
Objective: Follow Greenway
Once you regain control, walk straight ahead and you’ll see a small fold-out table with water bottles on it to the right near the training ground. The collectible will be on the table.
Chapter 4: The Heart of the Matter
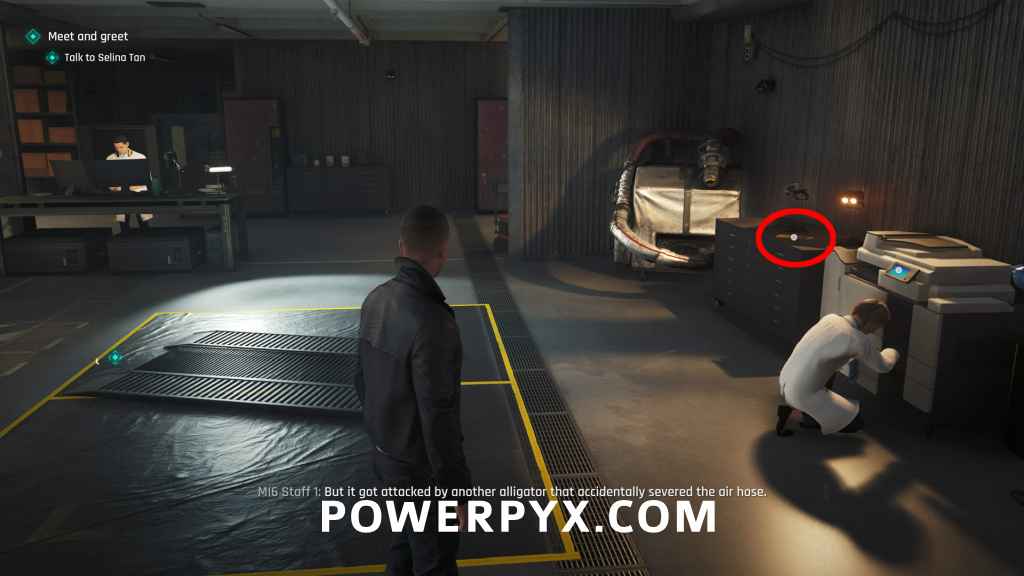
Intel: Workshop Notice (Selina Tan)
Checkpoint: 04 Q-Lab
Objective: Meet and greet
When you enter the Q-Lab where you need to talk to “Q” and Selina Tan, go to the back right corner to find this on the cupboard where two scientists are talking.
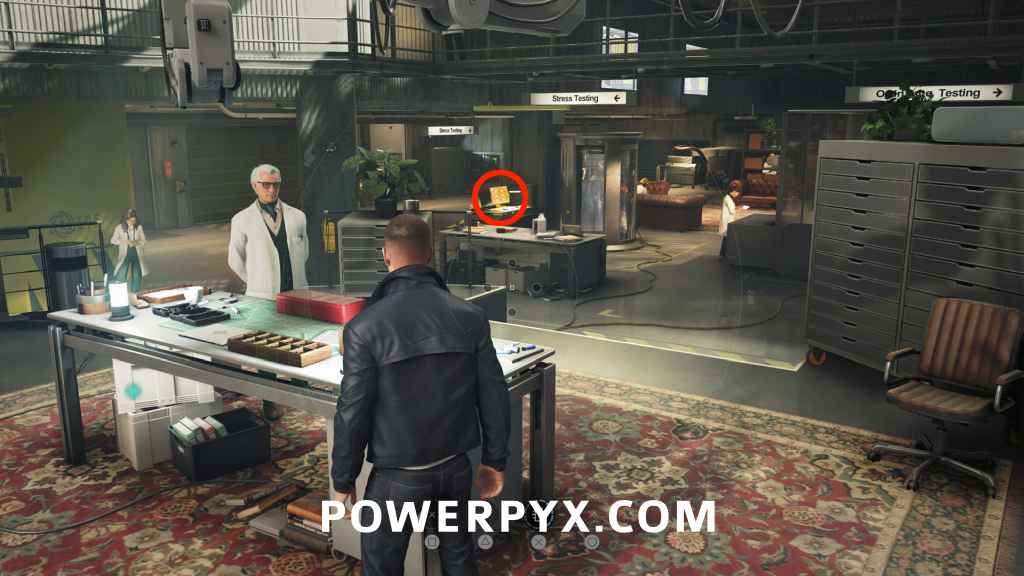
Intel: Recruit Stats (00 Recruits)
Checkpoint: 04 Q-Lab
Objective: Meet and greet
After talking to the character “Q” and going through the Q-Watch tutorial, check the screen behind where you first found Q. You can only interact with it AFTER talking to Q, not before. This is the same room as the previous collectible, roughly in the middle of the room next to the test chamber with the green Range Rover car. Note: you can now use the Q-Watch with  to scan for collectibles and other interactables, they will be highlighted yellow.
Chapter 5: A New Home
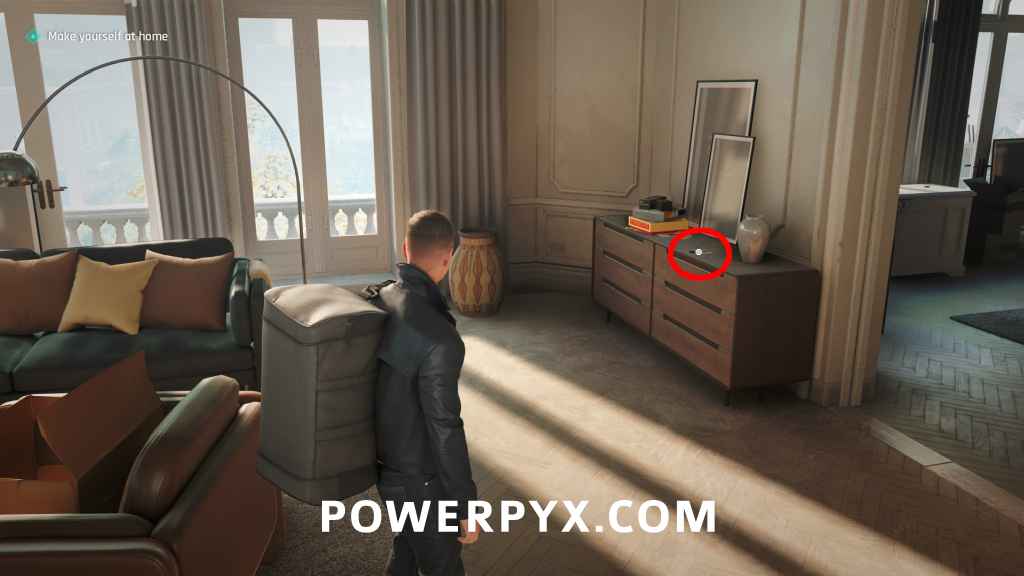
Intel: Family Photo (Lennox Monroe)
Checkpoint: 01 Home
Objective: Make yourself at home
As soon as you arrive at your new home, move straight forward to the living room. This will sit on the cupboard in the right corner.
Intel: Dress Box (Cressida Bright)
Checkpoint: 01 Home
Objective: See what Cressida wants
At the end of the hallway you will enter Cressida’s bedroom (main objective), check the gift box on her bed.
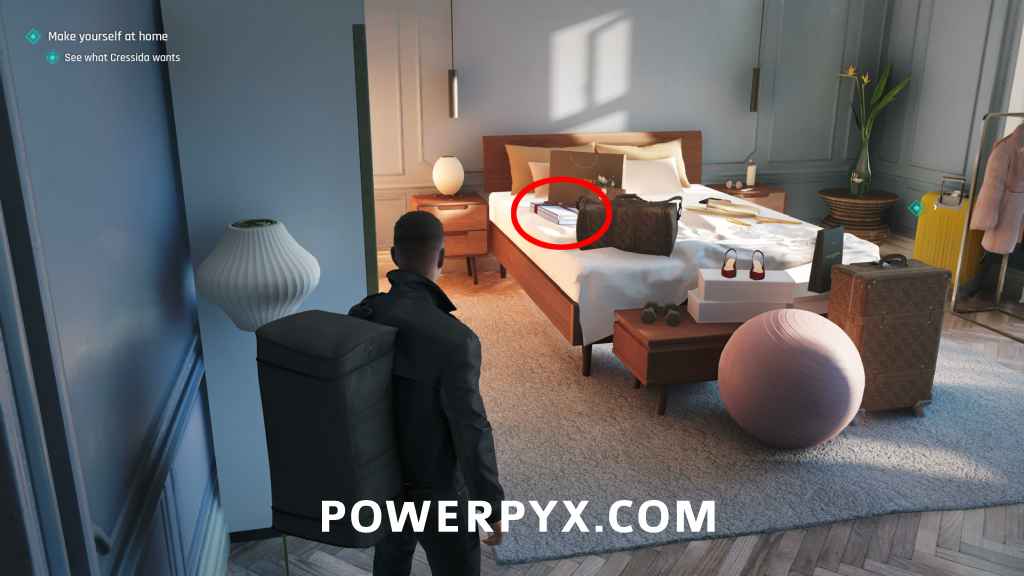
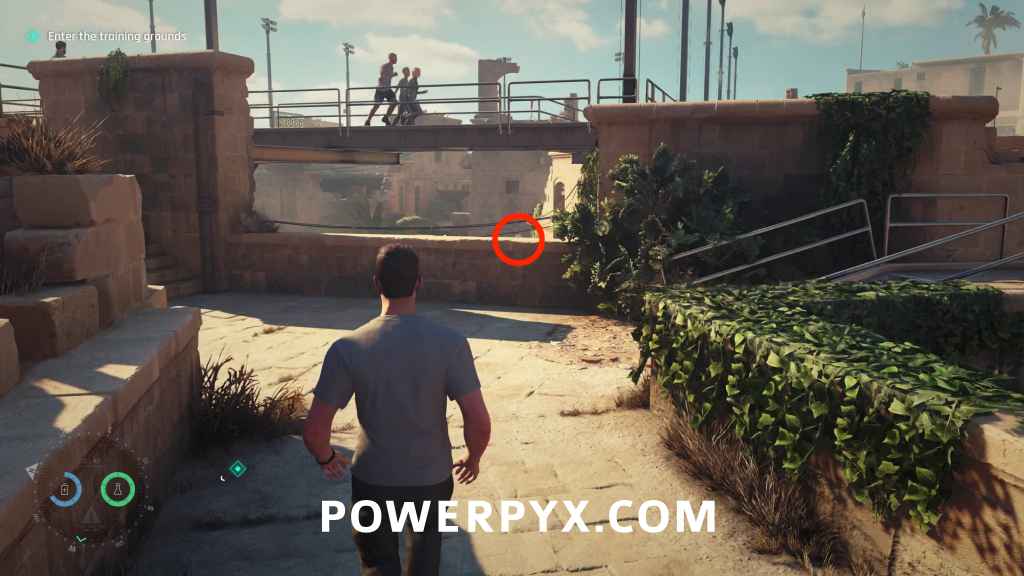
Card: Under of Acorns
Checkpoint: 02 Advanced Training
Objective: Enter the training grounds
At the start of the training area, proceed until the first gate you have to open by hacking it. Then turn around and backtrack to the start of the area, go up the stairs to the platform where Greenway explained the rules to you earlier. On the ledge straight ahead from the stairs you find the card. You can only reach it AFTER opening the first gate, before you can’t go up the stairs.
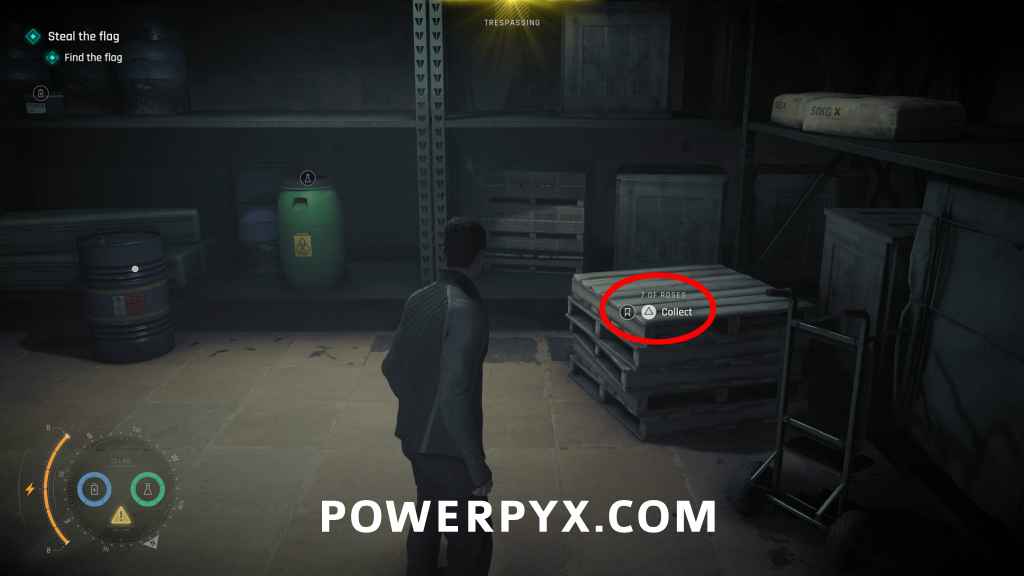
Card: 7 of Roses
Checkpoint: 10 Search the compound
Objective: Steal the flag
Go down to the pier area and there will be a giant double door by the stairs. You can either kick it in (alerting nearby enemies) or get the key from a nearby enemy on the stairs. After going through the door, the collectible is on a set of pallets in the room ahead with the 3 enemies.
Chapter 6: A Night Out
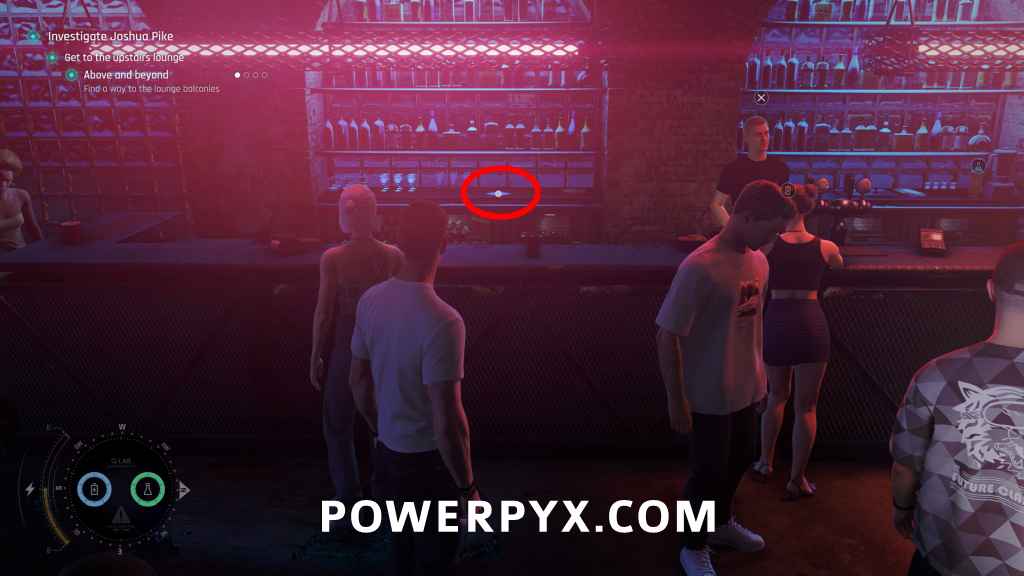
Memento: Cocktail Napkin
Checkpoint: 05 Get upstairs
Objective: Get to the upstairs lounge
On the counter behind the bar. You’ll go this way following the “Staff only” objective. You can simply walk in and use the “Bluff” prompt, or shoot the bartender with the Dartphone to make him sick and sneak in.
Card: Ober of Bells
Checkpoint: 05 Get upstairs
Objective: Get to the upstairs lounge
In the disco room go behind the stage and climb up the scaffolding backstage. Then climb across the pipes and the collectible will be on the ground right before jumping across to the second floor. You’ll go this way following the “Above and beyond” objective (you can press Touchpad to track specific objectives).
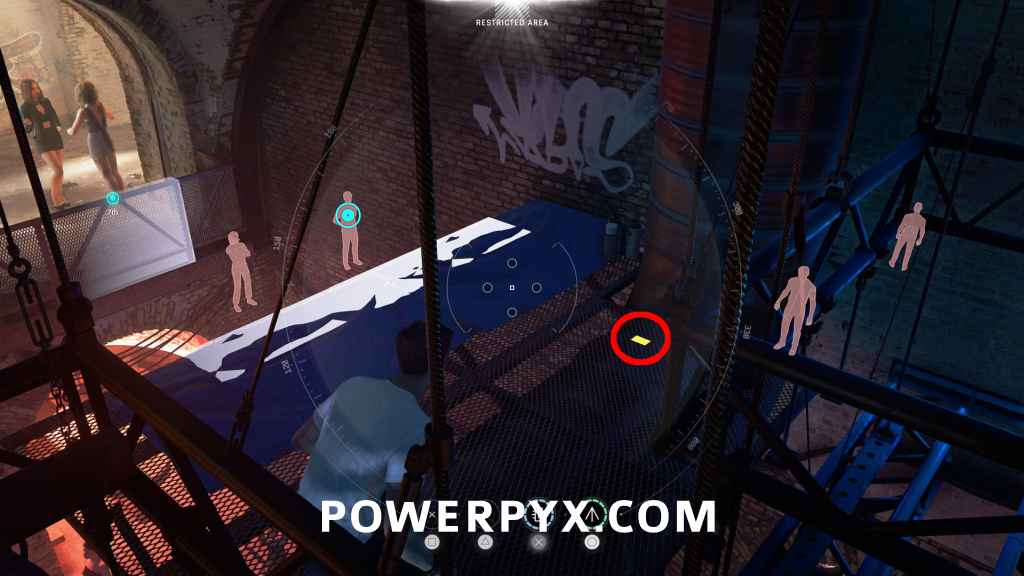
Chapter 7: A Matter of Considerable Delicacy
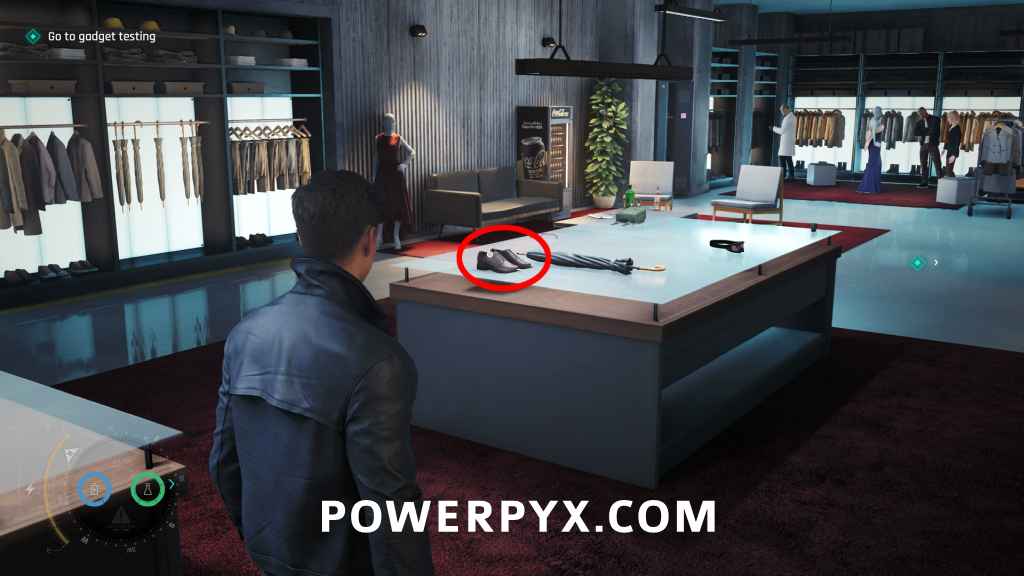
Legacy: Dagger Shoes
Checkpoint: 03 Field Equipment
Objective: Go to gadget testing
When you’re back in the Q-Lab, go right and enter Q-07 Wearables where you must talk to Q for the main objective. After the cutscene where you talk to Q, check the shoes on the table.
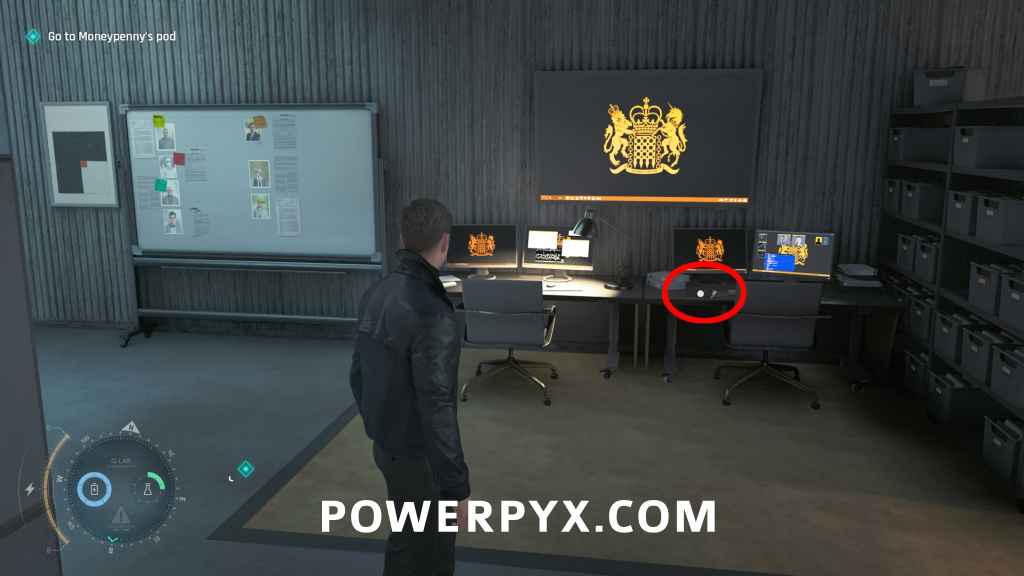
Intel: Arrowhead Report (Arrowhead)
Checkpoint: 07 Operations
Objective: Go to Moneypenny’s pod
After taking the elevator up to see Moneypenny, after exiting the elevator turn around and go in the direction opposite the objective. At the end of the floor you find this on the desk in the middle.
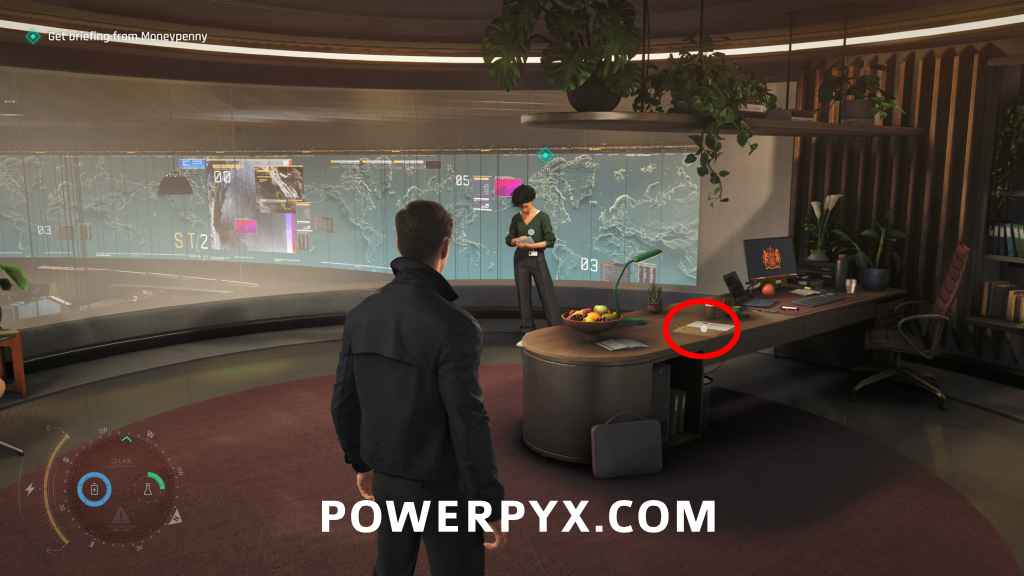
Intel: 009 Profile (009)
Checkpoint: 08 Master Manipulator
Objective: Get briefing from Moneypenny
When you arrive in Moneypenny’s office it’s on the desk.
Chapter 8: All the Time in the World
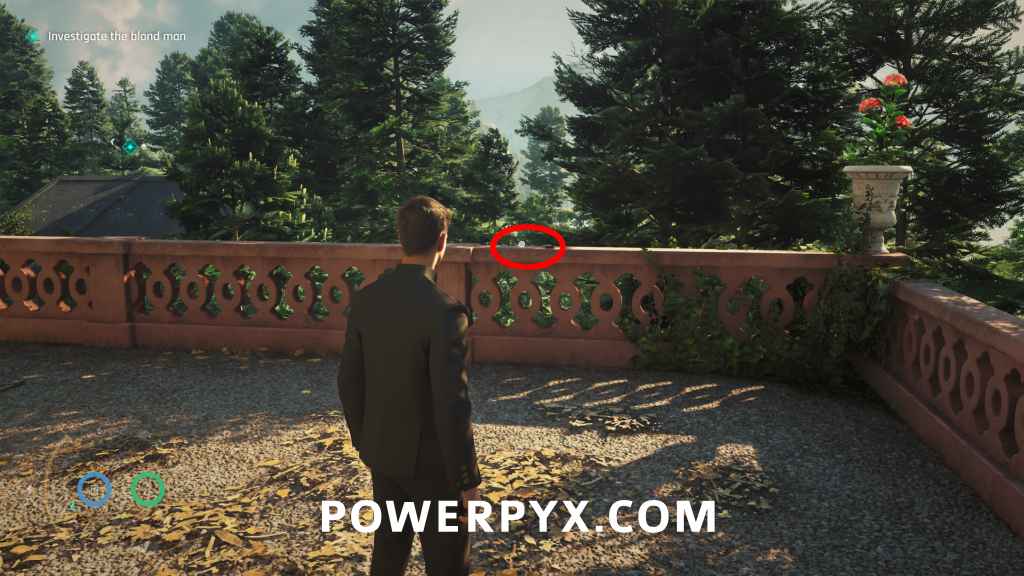
Card: Ace of Acorns
Checkpoint: 02 In Position
Objective: Investigate the blond man
After you parked the car and continue on foot, go up the stairs, then on the left go down the next stairs to find this on the railing.
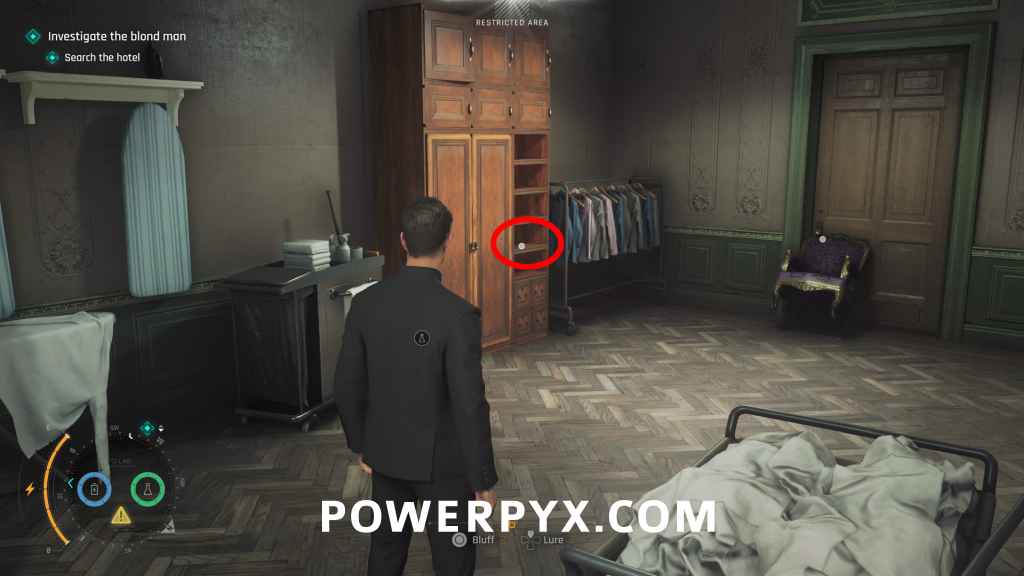
Memento: Pillow Mint
Checkpoint: 03 The game is on
Objective: Search the hotel
From the start of the checkpoint (where you enter a huge room with many guests), go left to find a “Staff Only” room, just before the stairs leading down. In front of it will be a Staffer walking around who has the “Pickpocket” prompt when near him. Use a gadget (i.e. Dart Phone) to distract him, or wait until he walks over to the stairs, then activate the vacuum at the top of the stairs, while he’s distracted loot the key. Use it to enter the “Staff Only” room to find this on the wooden cabinet next to a chair blocking a door.
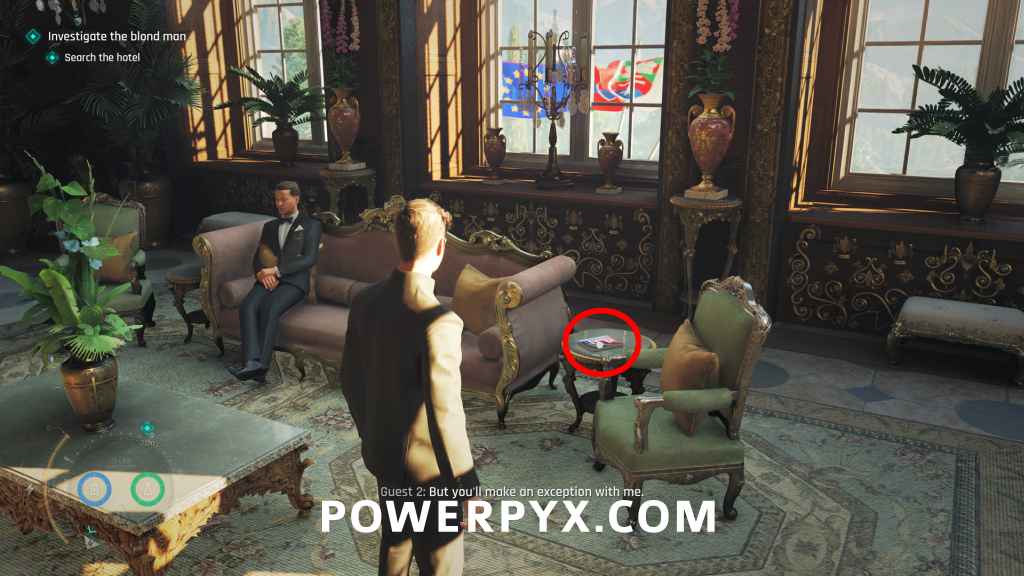
Legacy: Chess Biography
Checkpoint: 03 The game is on
Objective: Search the hotel
From the start of the checkpoint (where you enter a huge room with many guests), go down the stairs on the left. At the bottom of the stairs, take the next right and go to the end of the hallway (past an elderly woman you can eavesdrop). At the end of the floor you find a seating area with 2 guys talking about an Aston Martin and the book sitting on the small table.
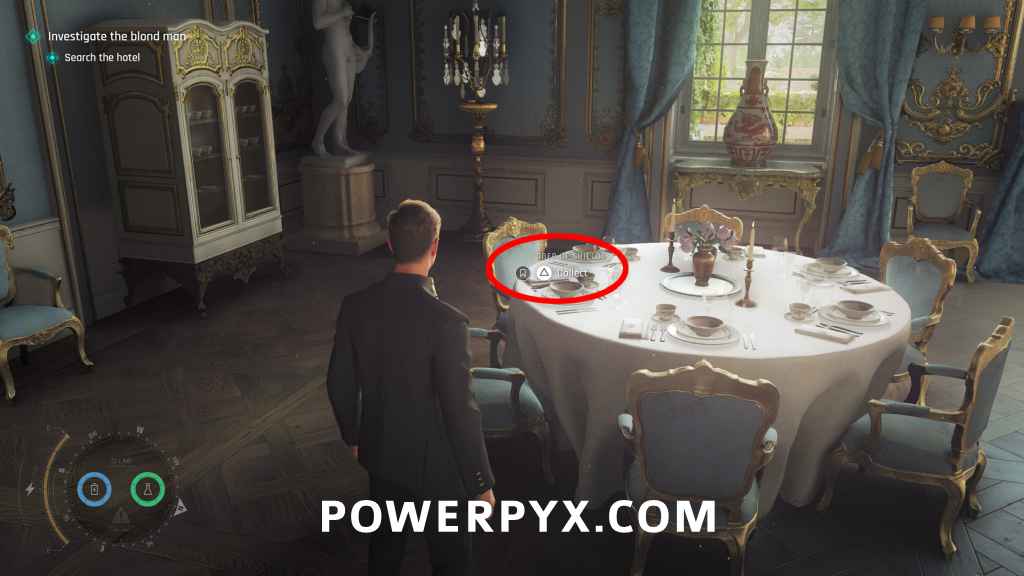
Card: Ober of Shields
Checkpoint: 03 The game is on
Objective: Search the hotel
From the Chess Biography, turn around and head into the big central hall where 2 people play chess on the stage. Go along the left side and enter the Dining Room (room with 7 round tables with white tablecloths on them). The collectible will be on a table in the front left corner from where you enter.
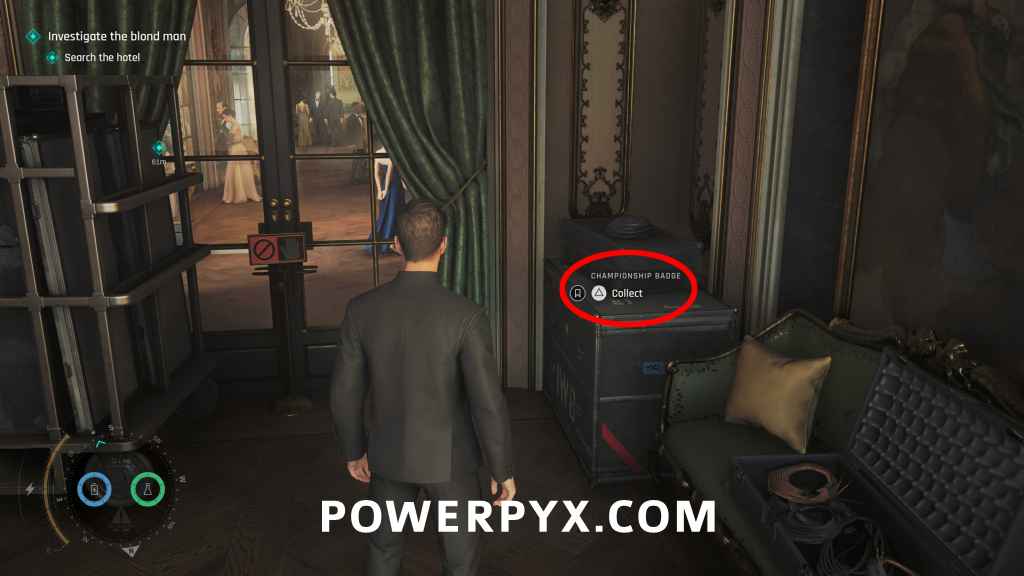
Memento: Championship Badge
Checkpoint: 03 The game is on
Objective: Search the hotel
From the previous collectible, exit back out into the hall where they play chess on stage, on the left squeeze through the gap in the boxes to the backstage area, then immediately turn left into a side corridor to find it on a big black crate.
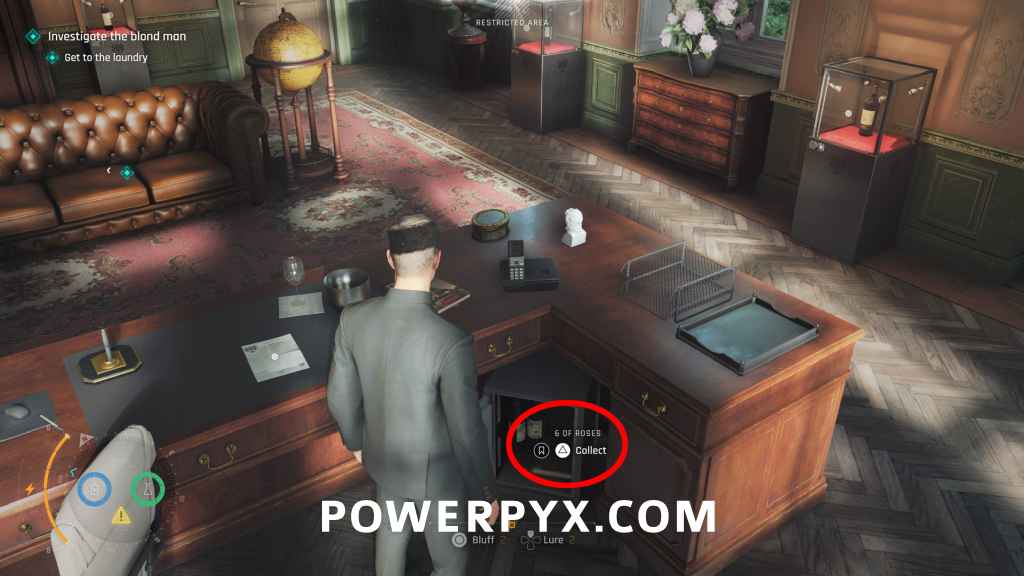
Card: 6 of Roses
Checkpoint: 03 The game is on
Objective: Search the hotel
Go downstairs to the reception. Directly behind the reception go through the white door. Then enter Manager’s Office in the back right corner of the restricted area, either by distracting the guard or going through the “Staff Only” room with 2 maids. In Manager’s Office check the safe under the desk and enter code 1952, collectible is in the safe (the code is the year of the middle wine bottle in the room).
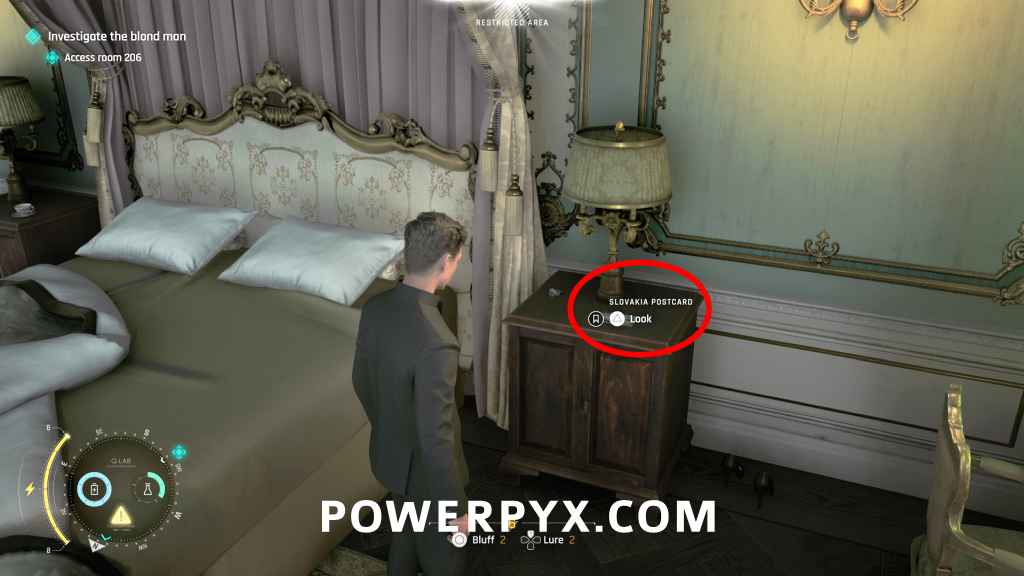
Postcard: Slovakia Postcard
Checkpoint: 07 Accessing Room 206
Objective: Access room 206
Once you reach the hallway outside of Room 206, there will be a maid pacing outside of Room 205. After eavesdropping on her, you can distract her by turning on the nearby vacuum or shooting her with a phone dart to be able to pickpocket the Room 205 Keycard off her. Afterwards, enter Room 205 and the collectible will be on the nightstand by the bed. You can also find the room 205 keycard in the “Staff Only” room where the Pillow Mint collectible was, if you already have it you can use it directly without pickpocketing the maid.
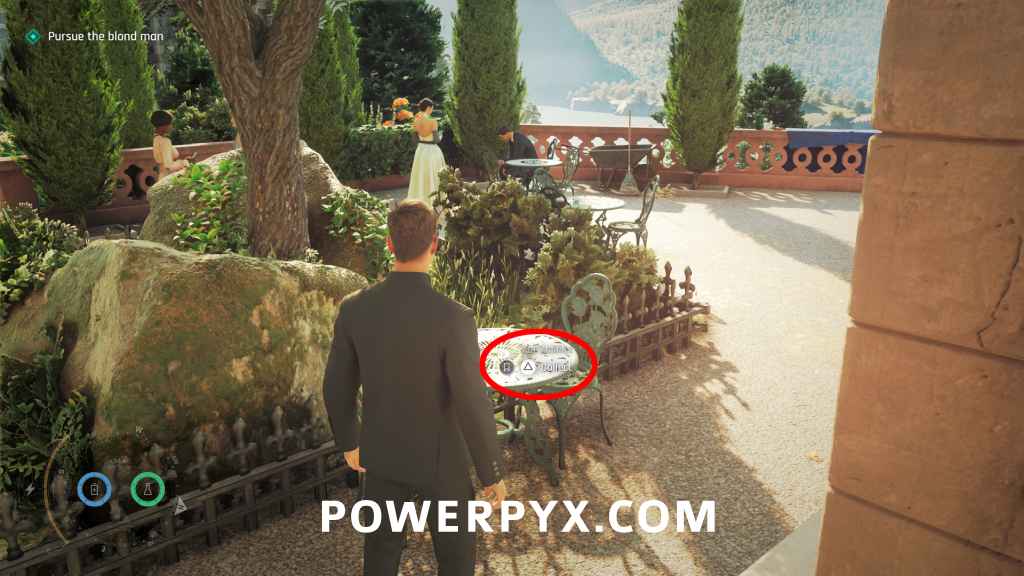
Card: 6 of Acorns
Checkpoint: 08 Delivery Area
Objective: Pursue the blond man
Later in the chapter after the story takes you through room 206, for the next objective you will enter a service corridor with a big blue power cable. At the end of the corridor go through the door and head left to the terrace, it’s on a table (the area is locked off until this objective).
Note: the code for dining room story puzzle is Lion > Snake > Goat
Card: 7 of Bells
Checkpoint: 10 The vanishing
Objective: Pursue the blond man
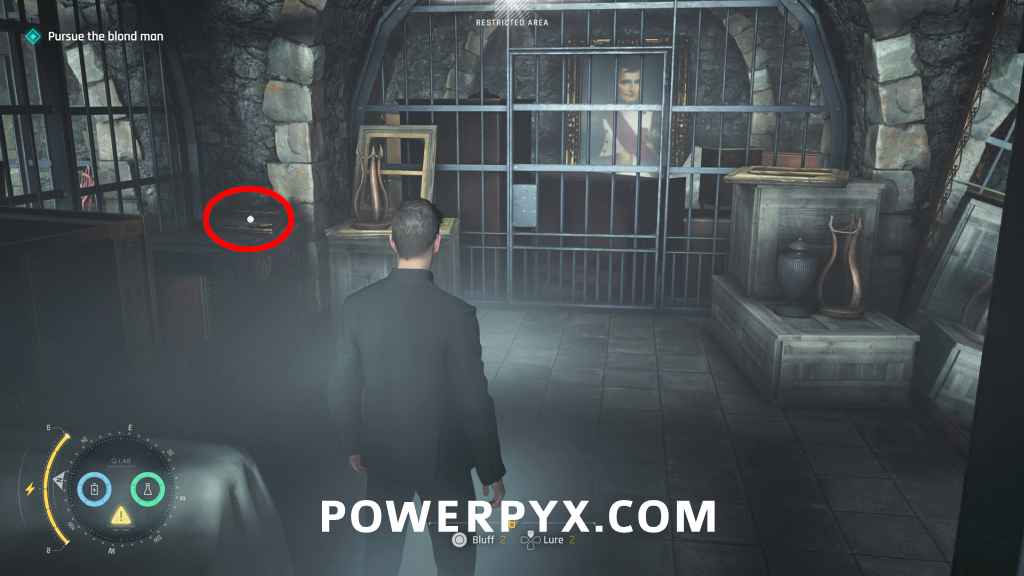
After solving the dining room puzzle (Lion > Snake > Goat), you enter a dark cellar. After vaulting over the first table, turn left to enter a room with prison bars to find it on the crate (before squeezing through a gap).
Chapter 9: Out of the Ashes
Important: When you reach the gadget table in Q-Lab (story objective), be sure to equip the new “Laser Strap”, it’s needed for a collectible in the next chapter!
Intel: Facial Composite (Niko and Tero Murto)
Checkpoint: 05 Talk to Moneypenny
Objective: Talk to Moneypenny
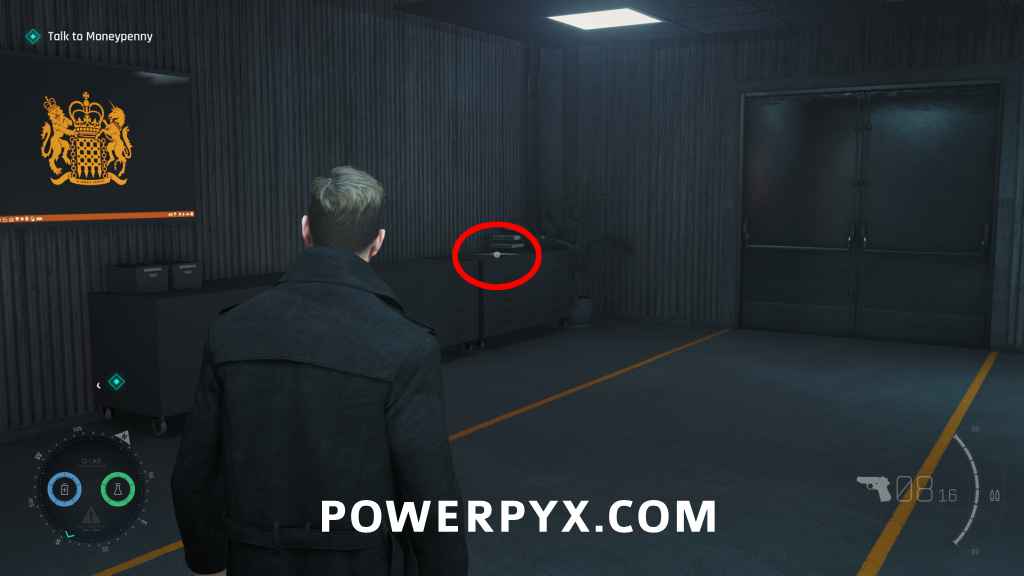
After taking the elevator up to Operations, go behind the elevator to find the collectible on the back left cabinet.
Chapter 10: The Past Never Dies
Important: Must have equipped gadget “Laser Strap” in previous chapter to get some collectibles.
Card: 6 of Bells
Checkpoint: 02 Arriving at Aleph
Objective: Follow Greenway
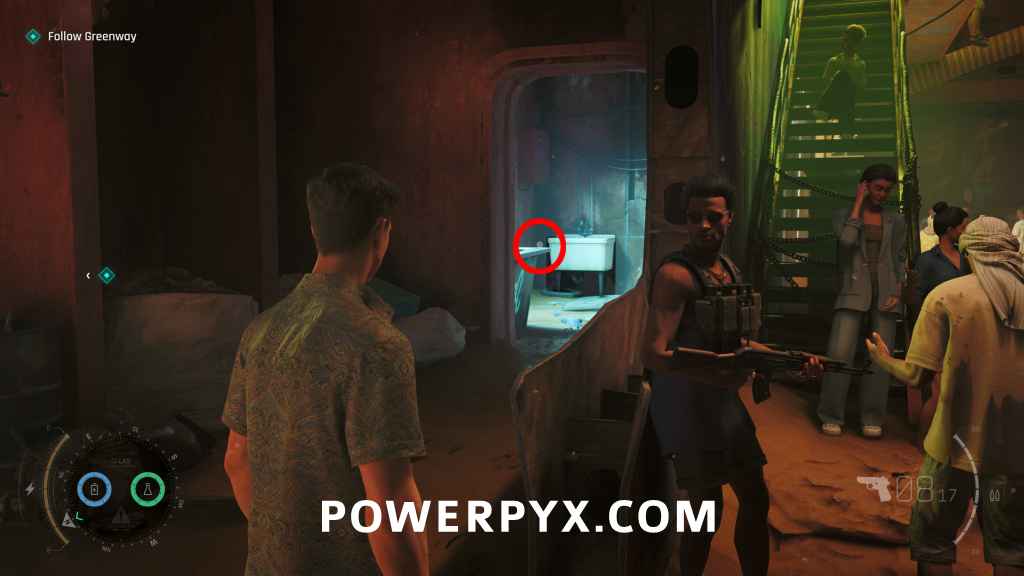
After you exit the car you continue on foot into a shipwreck with a market inside. Take the left path to find this in the bathroom.
Card: 9 of Acorns
Checkpoint: 03 Black Market
Objective: Obtain auction fee
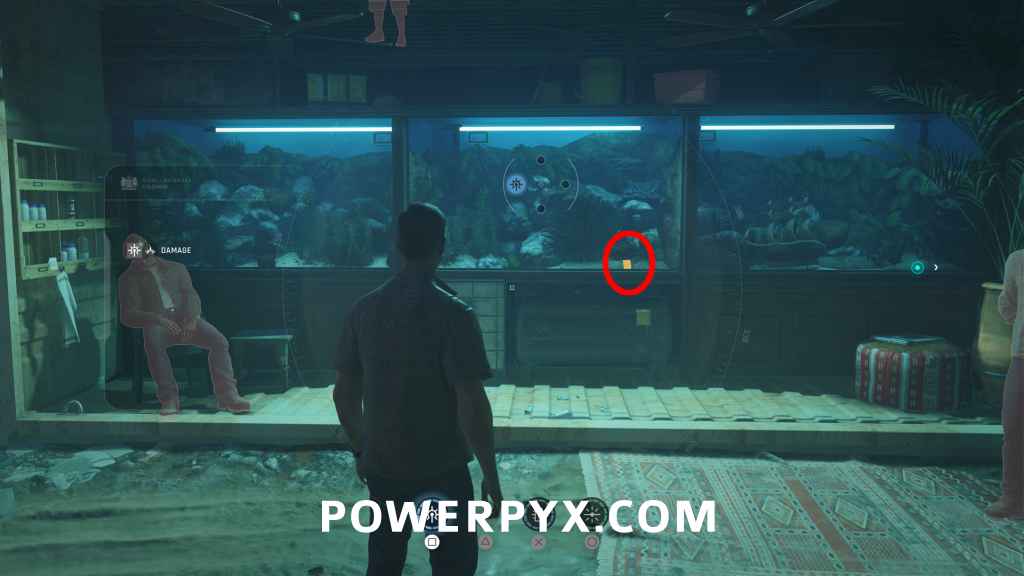
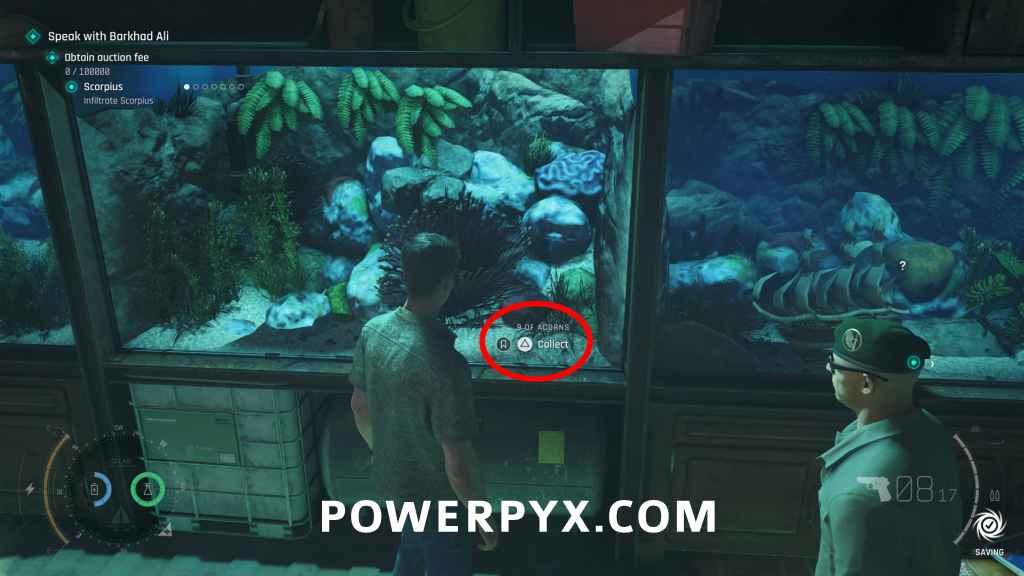
As soon as you get this objective, go downstairs to the market, then go right to an area with an eavesdrop opportunity on two guards. The card is inside the fish tank where the guards are. You must destroy the fish tank using the Laser gadget of your Q-Watch (must have equipped it in Chapter 9 in Q-Lab). If you use Chapter Select it will automatically equip you with different gadgets and you must replay from Chapter 9 onward.
Postcard: Mauritania Postcard
Checkpoint: 03 Black Market
Objective: Obtain auction fee
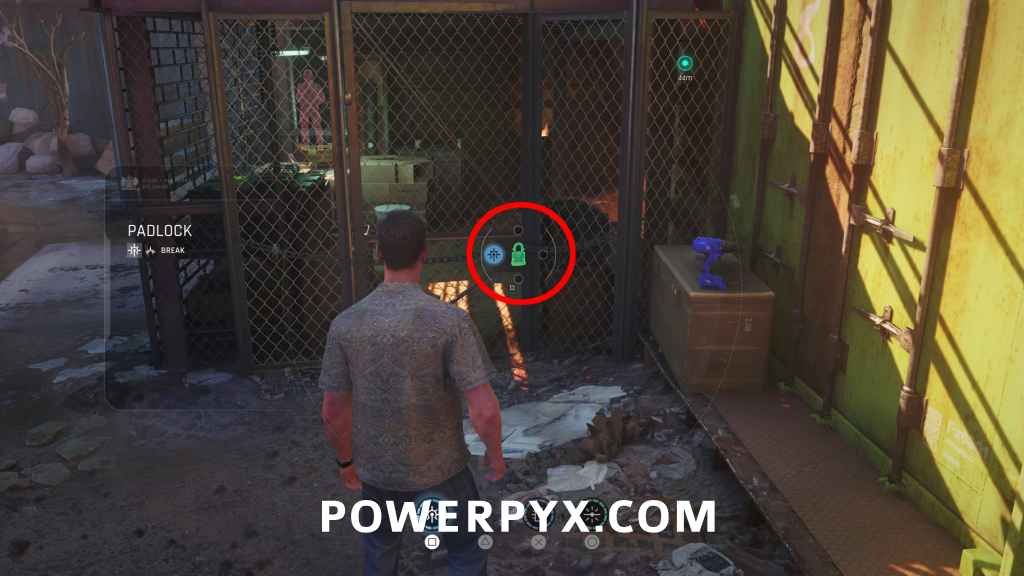
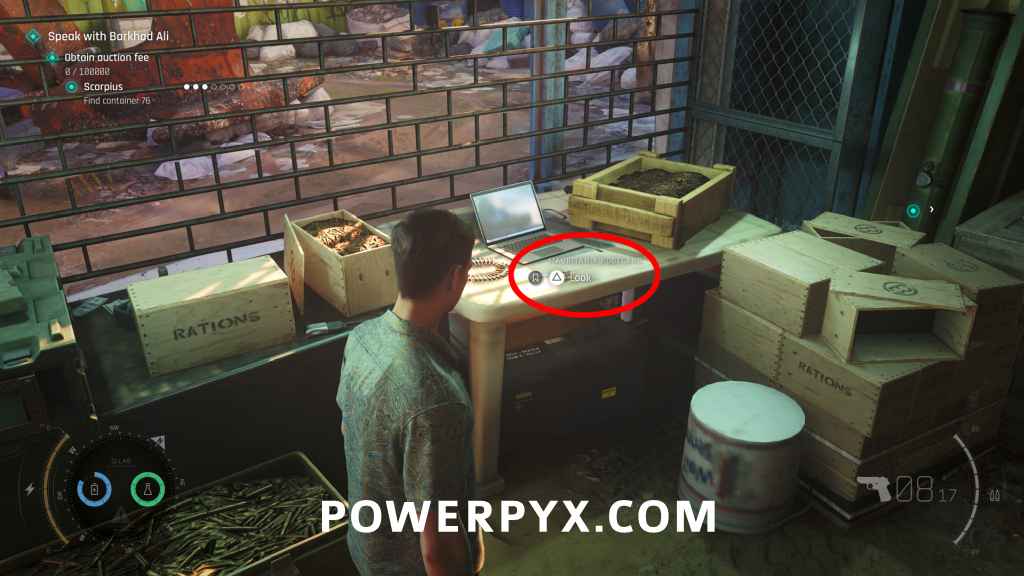
From where you entered the market, go to the left area where you see a big red anchor stuck in the ground. There’s a fenced-in area with a padlock on it. Shoot the padlock using the Laser gadget and go inside to find it on the table.
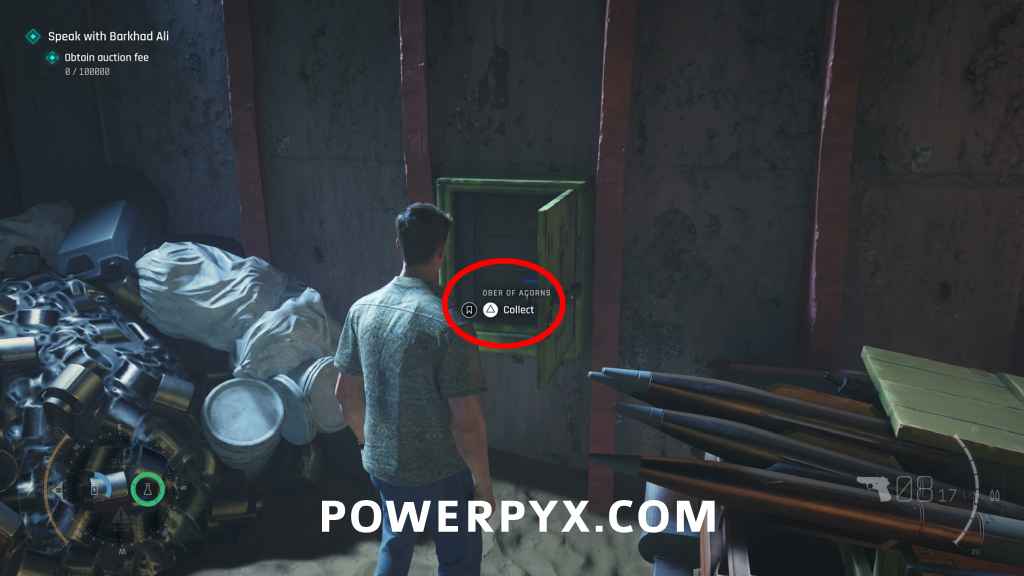
Card: Ober of Acorns
Checkpoint: 03 Black Market
Objective: Obtain auction fee
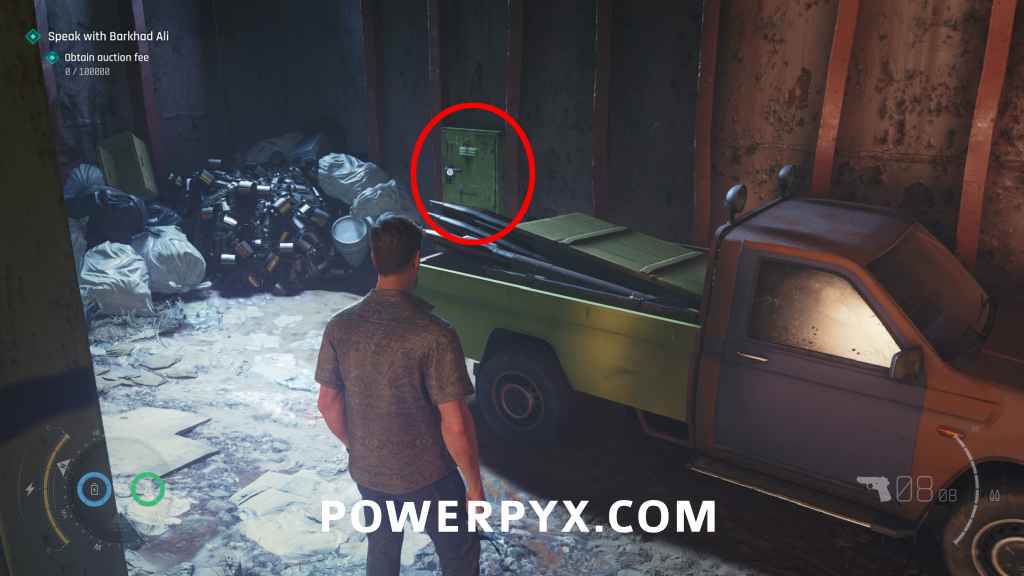
From the previous collectible, exit the room and go to the left. You’ll see a truck directly ahead of you. Go to the back of the truck and you’ll see a cabinet on the wall. Use the laser on the cabinet to open it and the collectible will be inside.
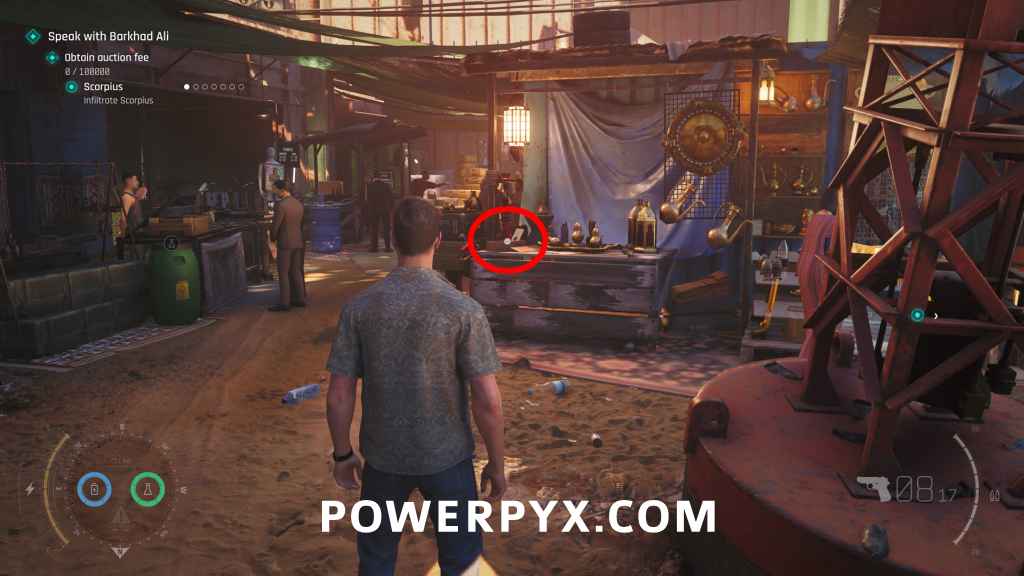
Intel: Delivery Box (Bawma)
Checkpoint: 03 Black Market
Objective: Obtain auction fee
From the previous collectible, go through the open path directly next to the truck and you’ll find it on the market stall directly left from the shooting range. From where you entered the market it’s in the back left corner of the market.
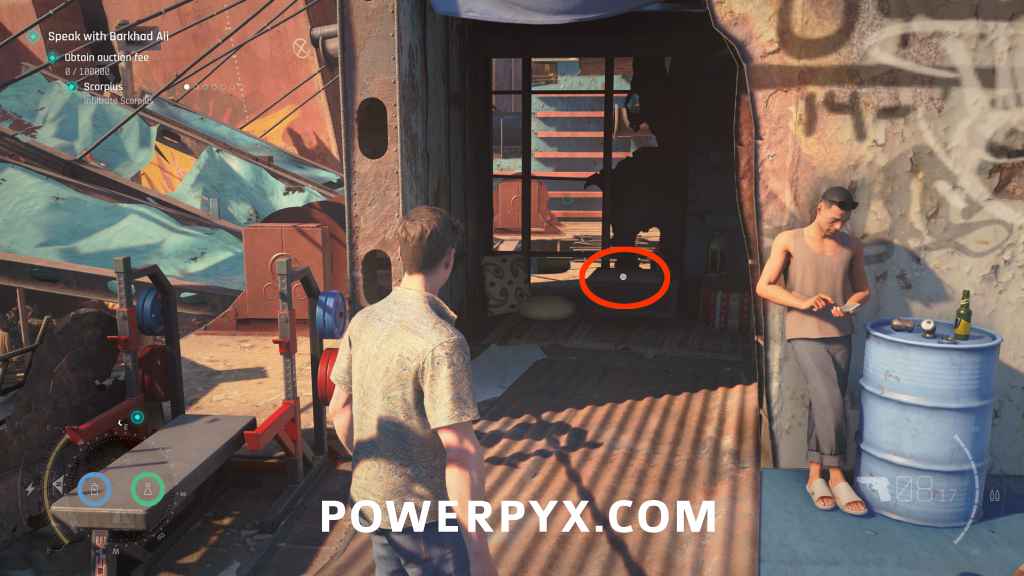
Card: Ace of Roses
Checkpoint: 03 Black Market
Objective: Obtain auction fee
Backtrack to the ramp where you entered the market, then go in a straight line through the market and enter the tunnel to reach the Fight Club. On the upper floor of the Fight Club, take the exit left of the bar to reach a roof with training equipment. There in the small corner room you find it on the box.
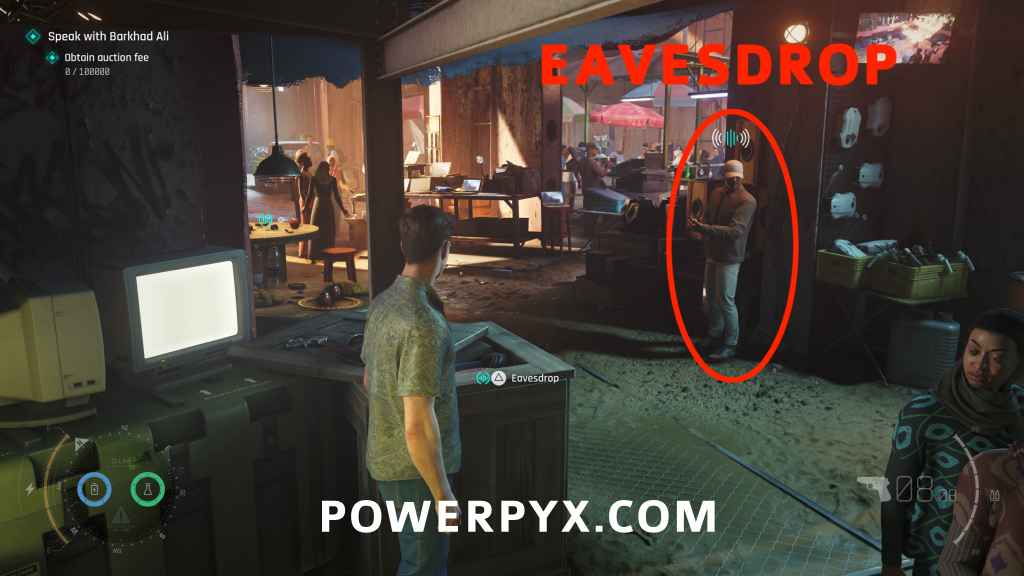
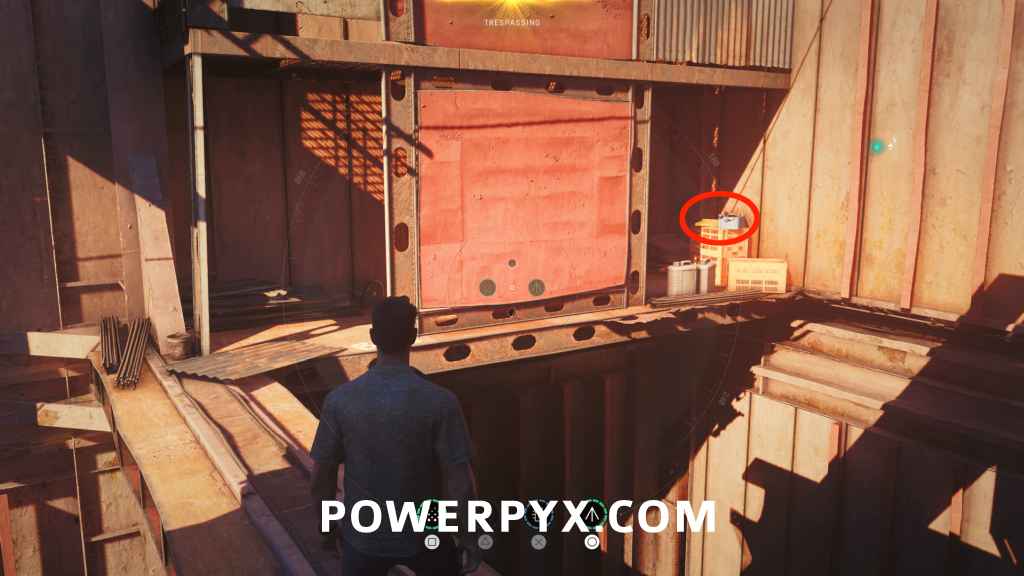
Legacy: ATAC Device
Checkpoint: 03 Black Market
Objective: Obtain the auction fee (reach antenna in the crypto wallet)
In one of the stalls across from the shooting range in the back of the market, do the eavesdrop opportunity where you can overhear a guy on the phone talking about a crypto wallet. Then track the objective “The crypto wallet” (press Touchpad to track). Follow the objectives until you leave the market and defeat a brute on a roof. Then you need to go to a signal tower (marked objective that gives $50k). Just below the signal tower drop down the ledges to a big metal beam. Follow the metal beam to the end to find this collectible on a crate.
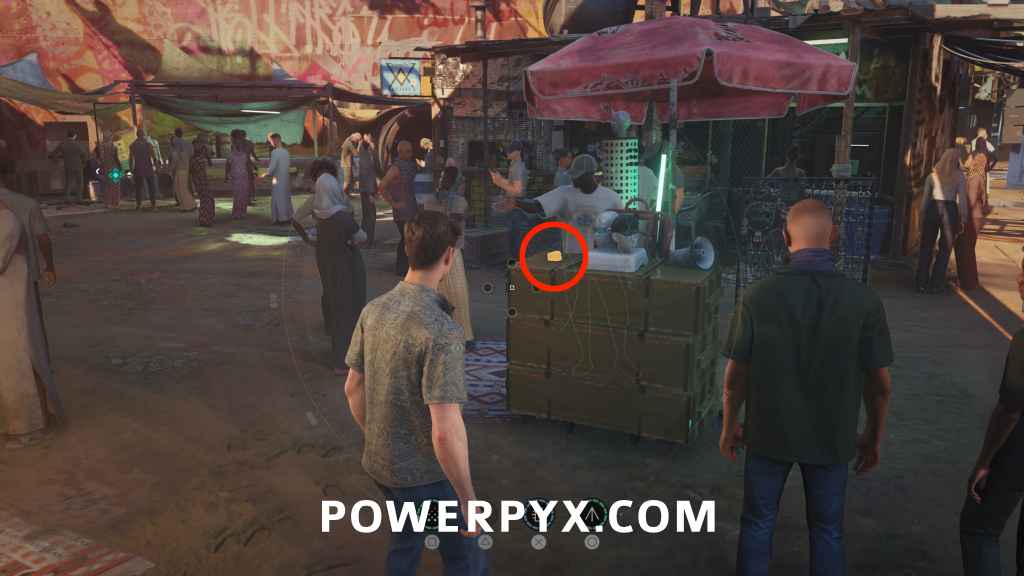
Memento: Pirate Grillz
Checkpoint: 03 Black Market
Objective: Speak to Barkhad Ali / Pay auction fee
After obtaining $100,000 for story progress, go back to the start of the market. Straight ahead from the ramp where you first entered the market, there will be a merchant wearing a white shirt under a red umbrella (to the right of the pawn shop). You can now interact with the collectible on the stand and you’ll automatically buy it from the merchant. This is only possible after getting $100k, you can’t interact with the collectible before then.
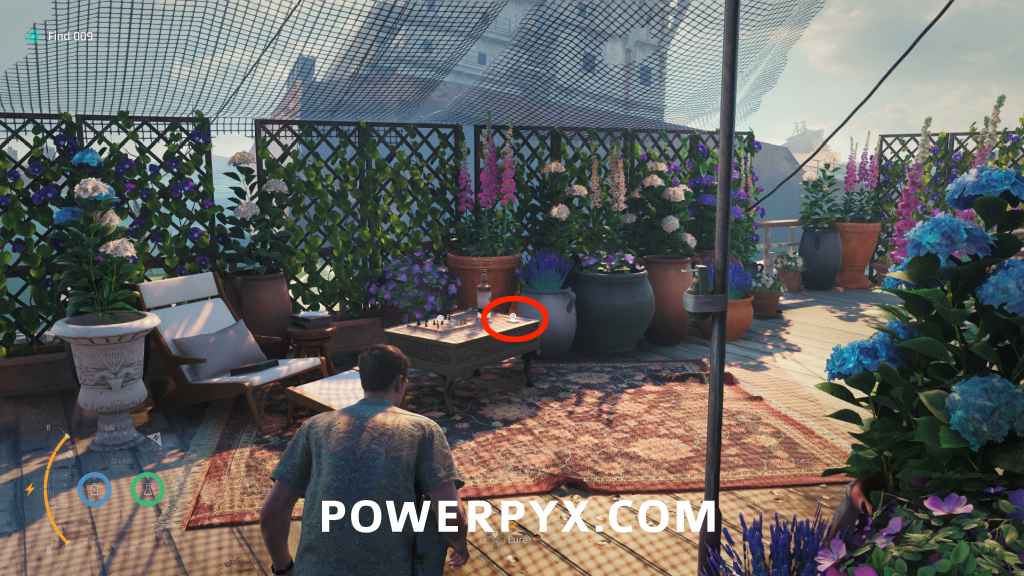
Card: Banner of Shields
Checkpoint: 07 Find 009
Objective: Find 009
When the story makes you disarm tripwires on a ship, go up the right staircase, then turn around to find this at the front of the upper deck.
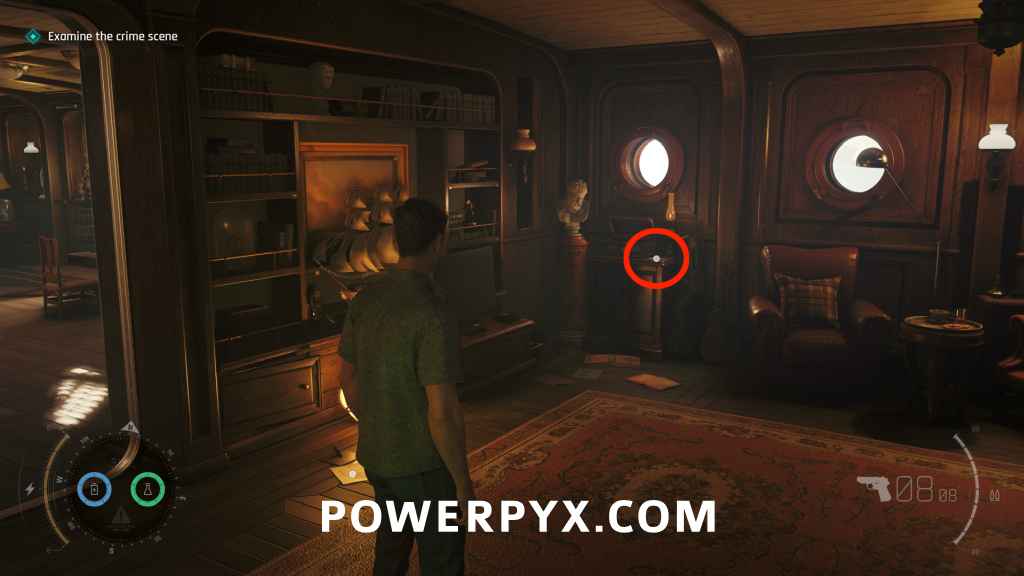
Intel: Photo of Greenway (John Greenway)
Checkpoint: 08 Examine the crime scene
Objective: Examine the crime scene
While investigating the crime scene, enter the room at the end and this will be on the left cupboard.
Memento: Crocodile Tooth
Checkpoint: 09 Leaving Aleph
Objective: Enter Land Rover
Behind the Land Rover, on the right side, on a crate.
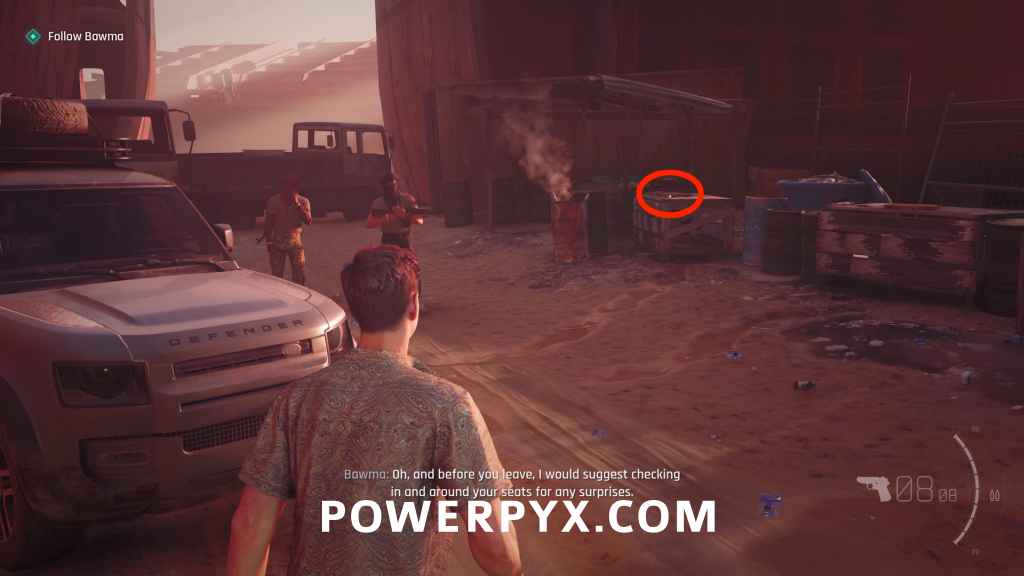
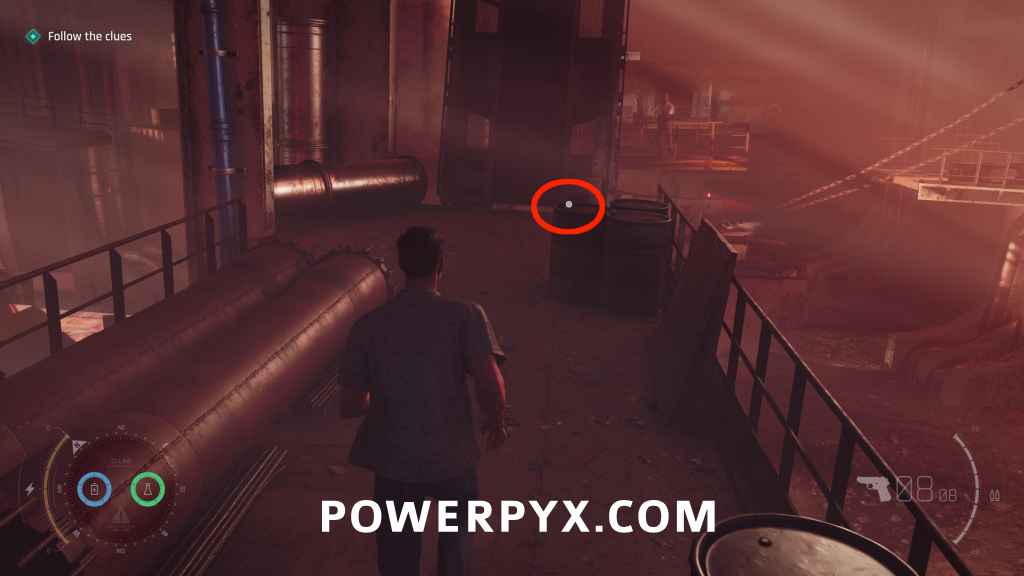
Card: 6 of Shields
Checkpoint: 10 Find a way inside the shipwreck
Objective: Follow the clues
Inside the shipwreck, after hoisting yourself up a chain and using a zipline to get to the other side, proceed forward and this will be on a barrel. In front of a blue pipe you need to climb to lower a drawbridge.
Chapter 11: Uninvited
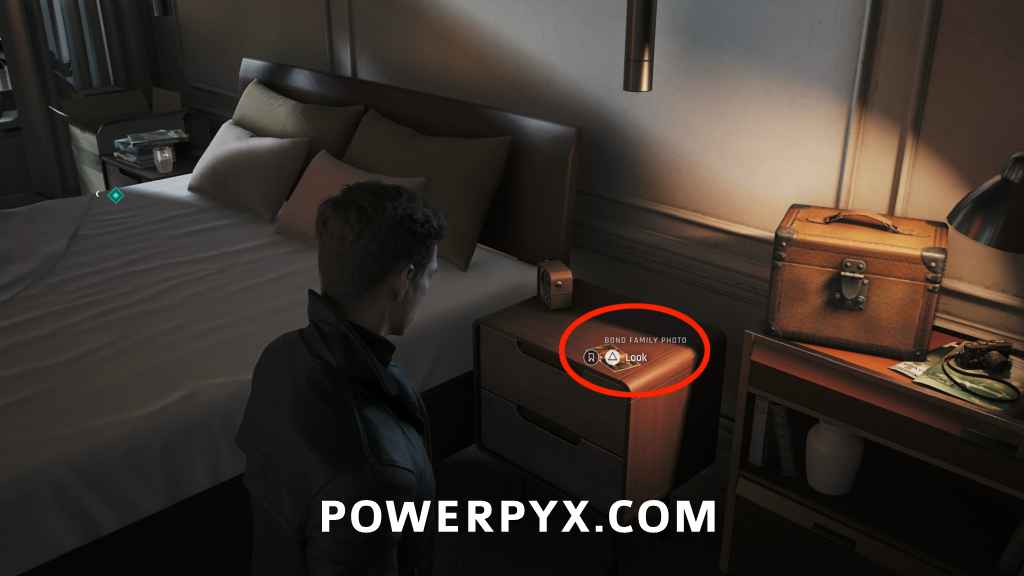
Intel: Bond Family Photo (James Bond)
Checkpoint: 02 Back home
Objective: Go to Bond’s room
Once you enter Bond’s room, the collectible will be on the nightstand to the right of the bed.
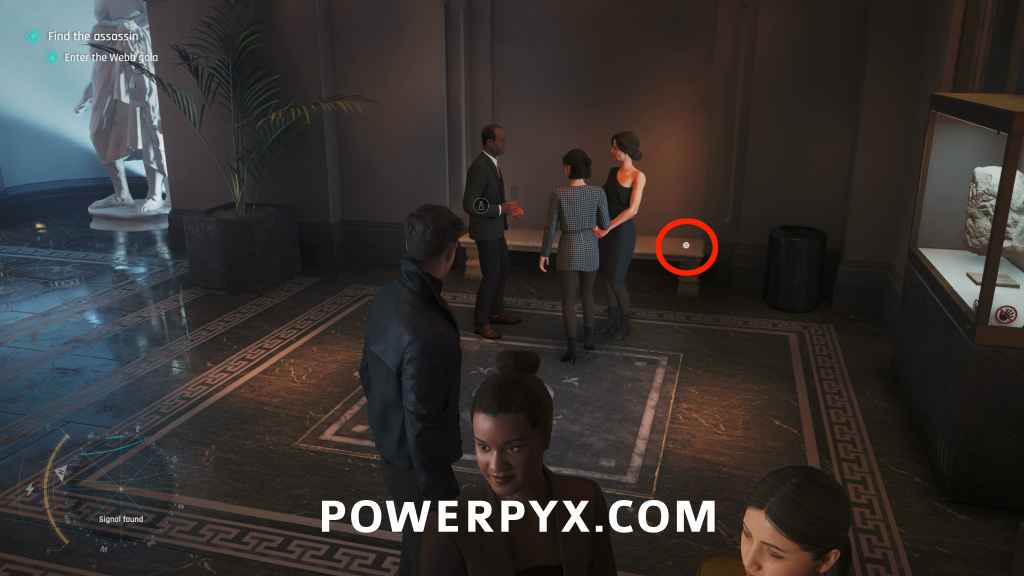
Card: 8 of Acorns
Checkpoint: 04 Gala Entrance
Objective: Enter the Webb gala
In the first hall of the Gala in the back right corner, to the right of the reception desk, on a stone bench.
Legacy: Concert Poster
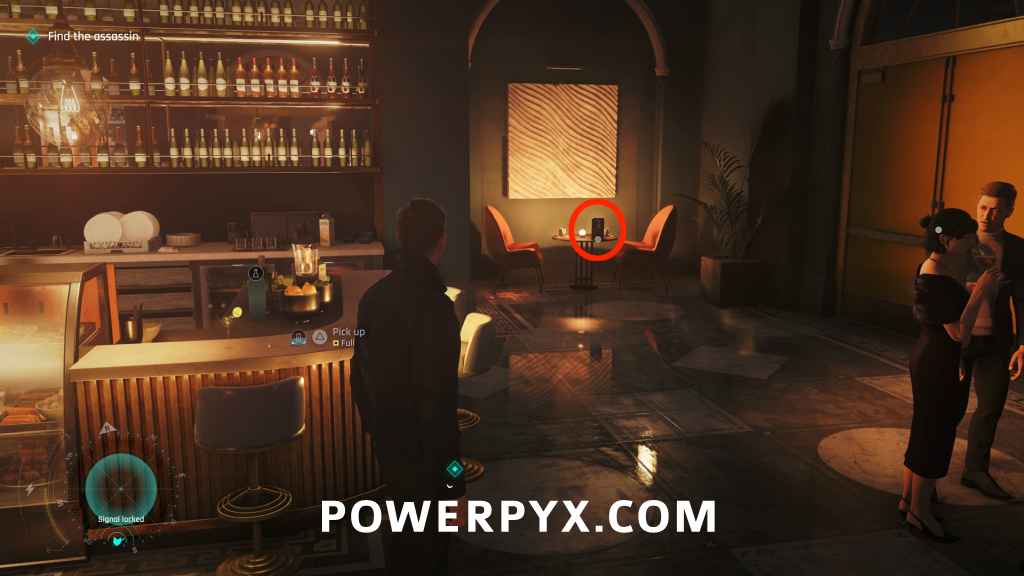
Checkpoint: 05 Get upstairs
Objective: Find the assassin
After using the invitation to enter the Gala room, go to the back left corner and enter the Cafe. Inside the Cafe you find this in the back right corner on the table.
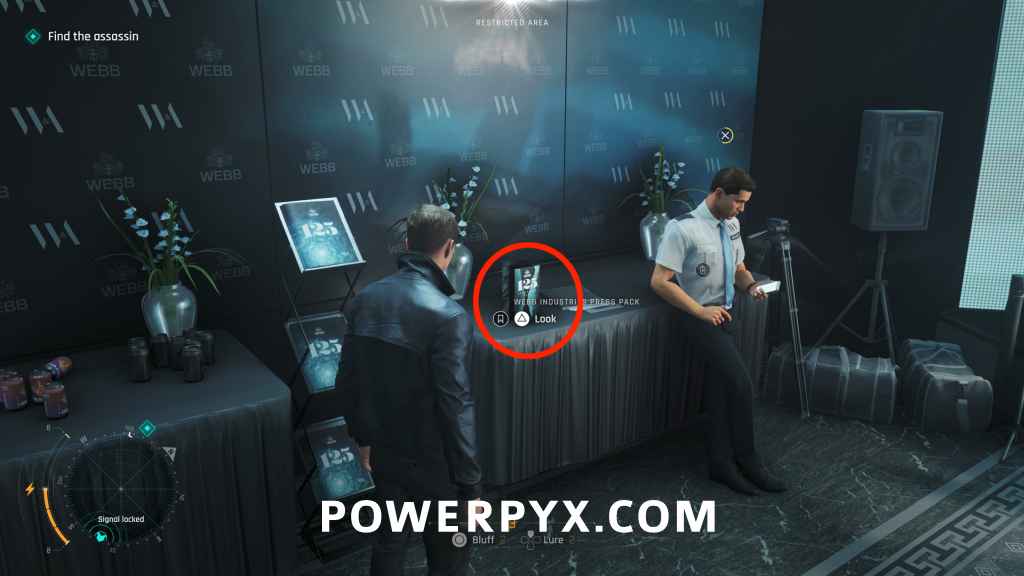
Intel: Webb Industries Press Pack (Webb Industries)
Checkpoint: 05 Get upstairs
Objective: Find the assassin
From the previous collectible, exit the Cafe back out to the hallway. Go to the other end of the hallway and enter the press room on the right side with a big screen and cameras. There will be a guarded section on the left. You can distract the guard by using the fusebox in the right corner of the room. Afterward you can walk in and bluff the woman. You can then pick up the collectible next to the guard.
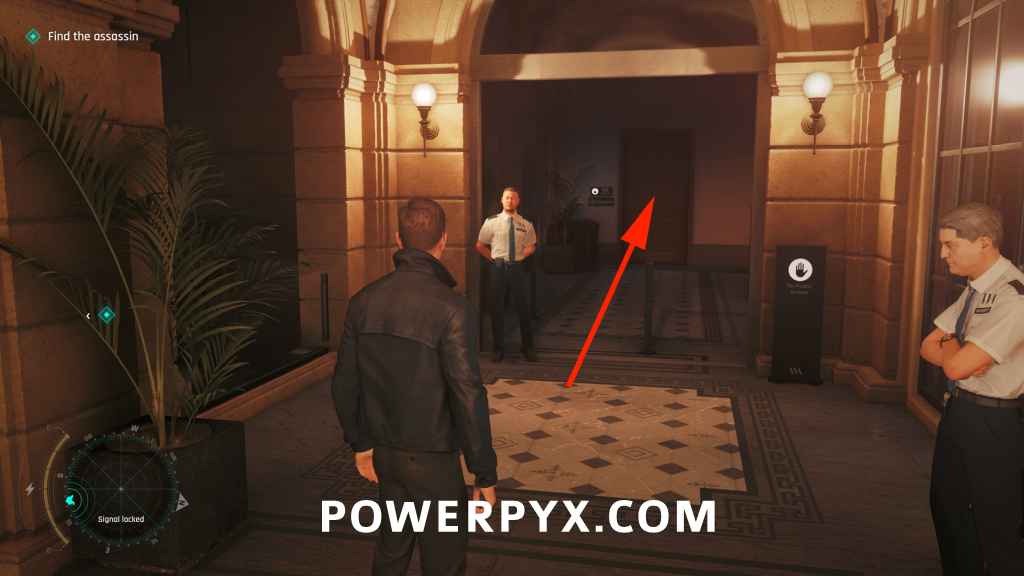
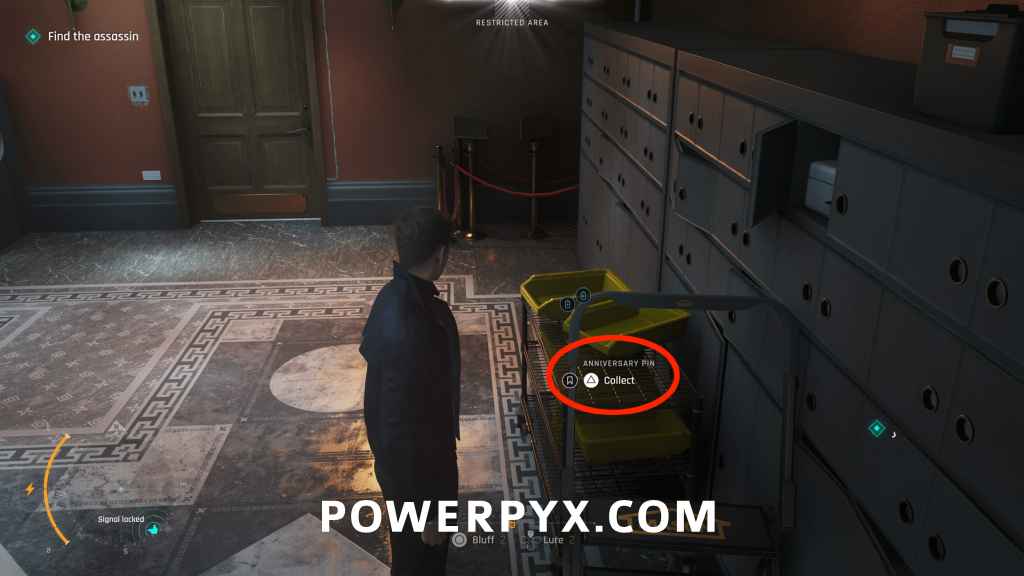
Memento: Anniversary Pin
Checkpoint: 05 Get upstairs
Objective: Find the assassin
From the previous collectible, leave the press room, as soon as you exit turn to your right. There’s a restricted area at the end of the corridor with a single guard. This is directly next to the press room (if facing the entrance of press room it’s to the left, looking back in the direction of the lobby). Use a gadget such as Dart Phone or Laser to distract the guard and quickly walk past him into the Cloakroom. Turn right, squeeze through the gap to find this on the shelf. It’s the room you could see earlier from the lobby.
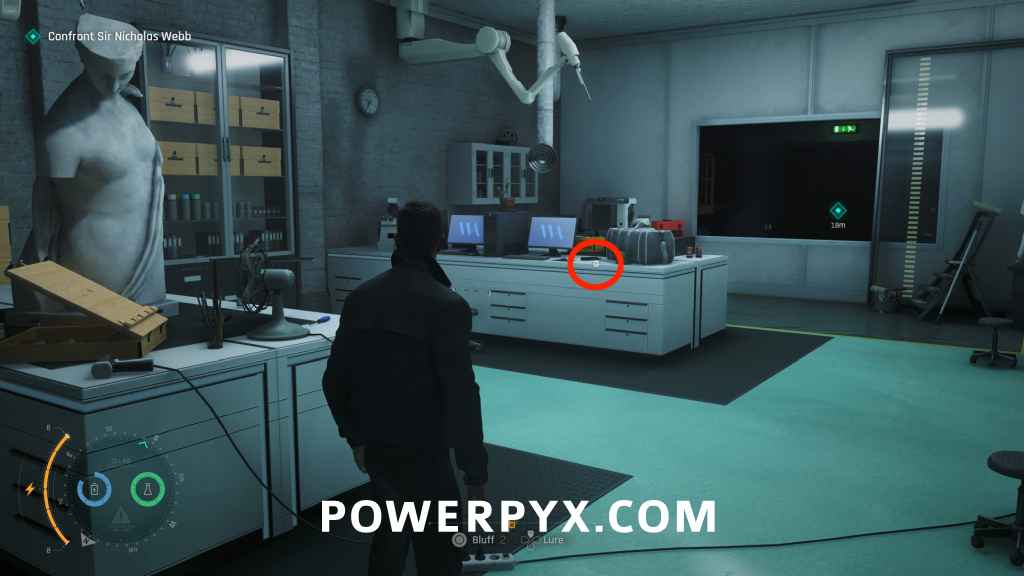
Card: Ober of Roses
Checkpoint: 05 Get upstairs
Objective: Find the assassin
Next to the previous collectible, you find a door you can kick down that leads to a hallway in the back. From there you can go upstairs to a room with enemies in it. Take out the enemies first. In the middle of this room you find the card on a white box. It can be hard to see as it blends in with the bright color of the box.
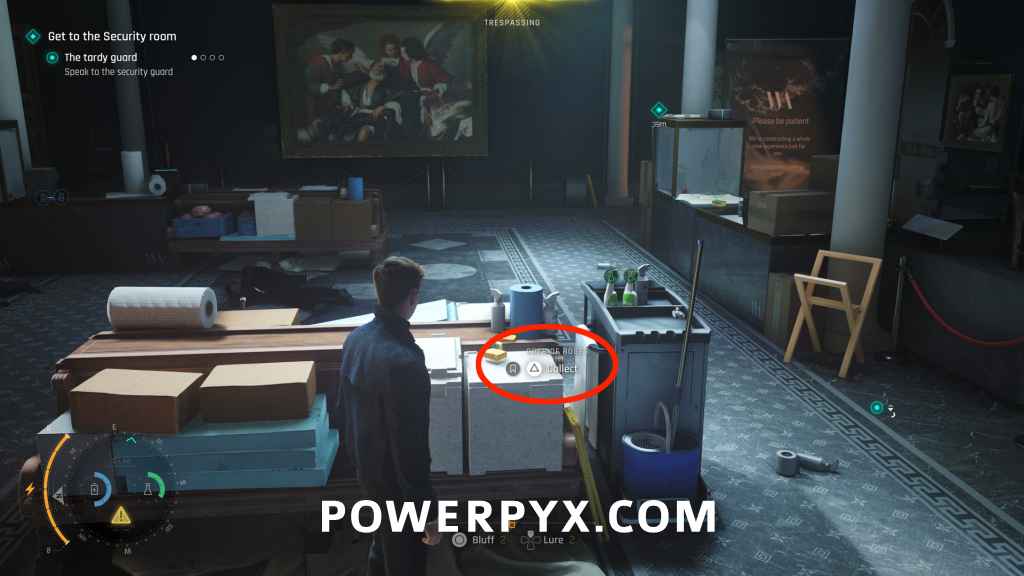
How to progress: Go into the bathroom on the right side of the gala and search the trash by the sink. To reach the security room, follow the eavesdrop opportunities at the gala.
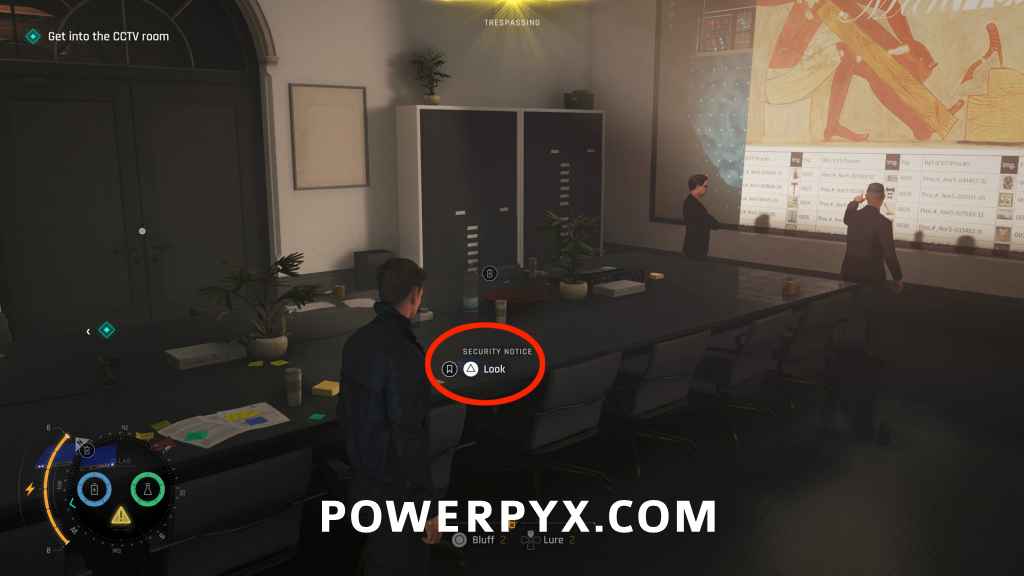
Intel: Security Notice (Stephen Bright)
Checkpoint: 06 Security Office
Objective: Get into the CCTV room
After entering the security room, enter the door at the front right of the area and the collectible will be on the table.
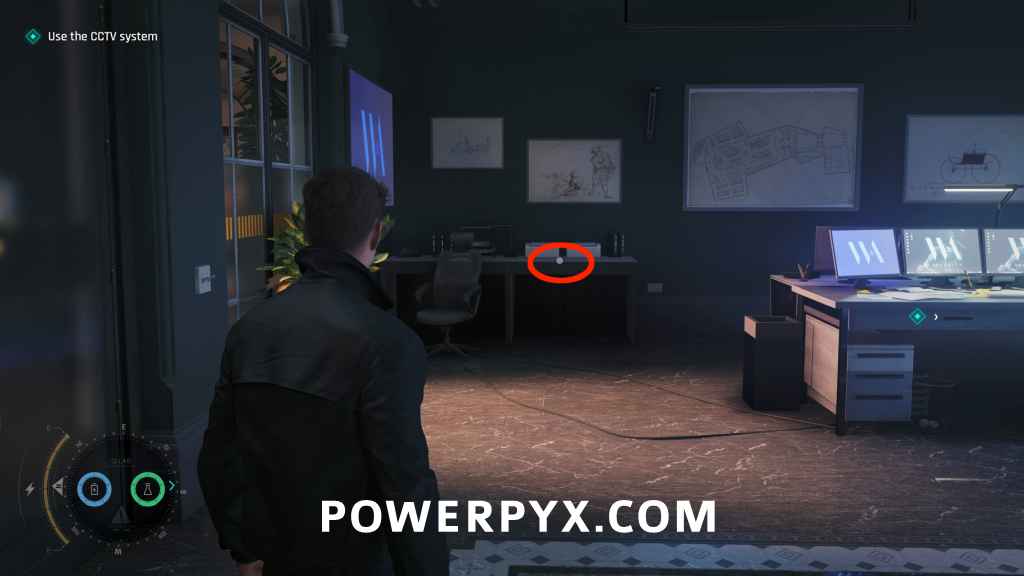
Postcard: Kensington Postcard
Checkpoint: 06 Security Office
Objective: Use the CCTV system
As soon as you enter the CCTV room, the collectible will be on a table to your left.
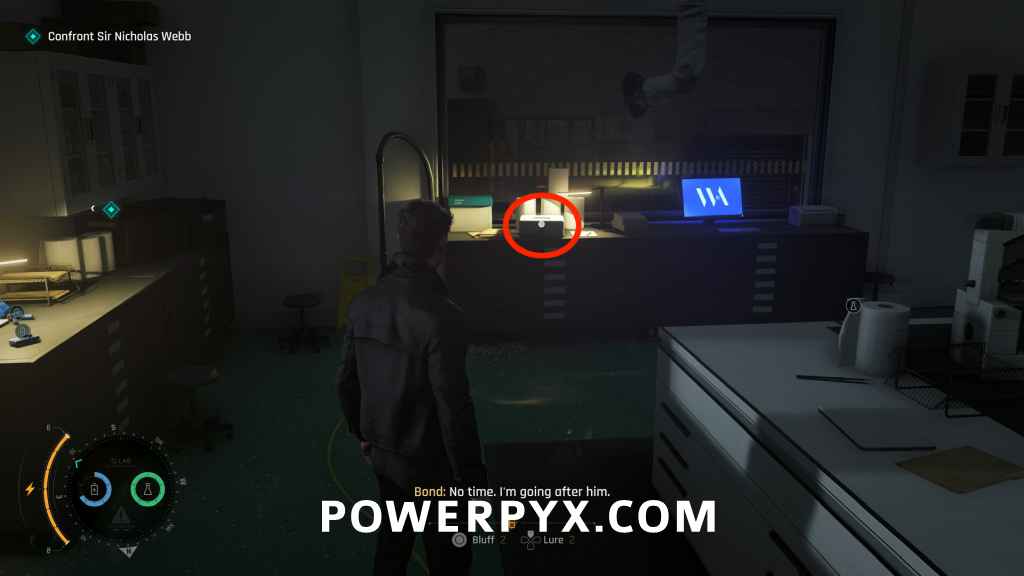
Memento: Tero Murto Locket
Checkpoint: 07 Basement
Objective: Confront Sir Nicholas Webb
After the Murto boss fight, leave the boss arena and in the next corridor enter the first room on the right labeled “Room 4 Restoration”, open the metal box for the “Restoration Room Keycard”. Use it directly across on “Room 3 Restoration”. You find it in there on the right table.
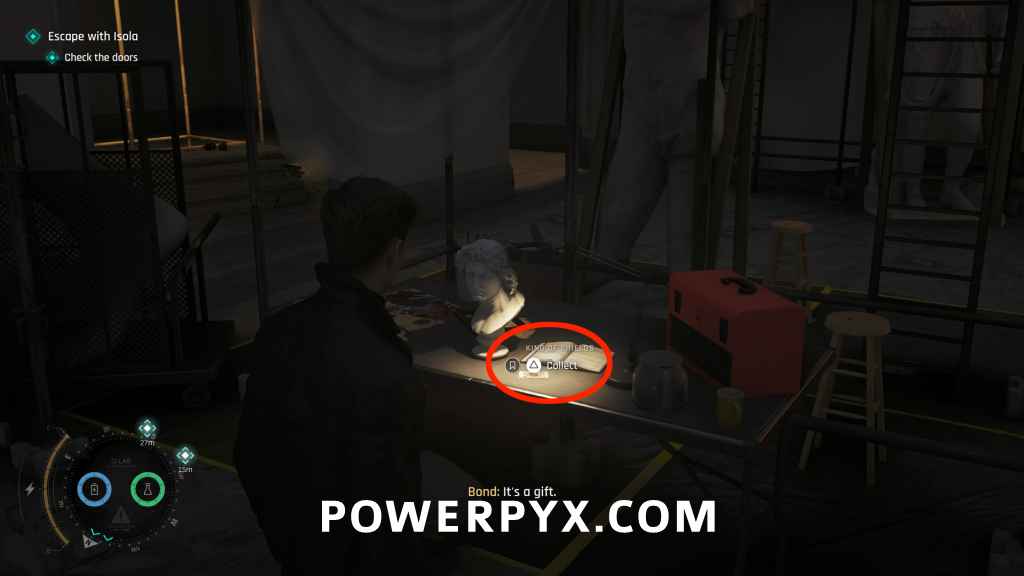
Card: King of Shields
Checkpoint: 09 Storage room
Objective: Escape with Isola (Check the doors)
After getting freed from the chair, turn around and the collectible is on top of the table.
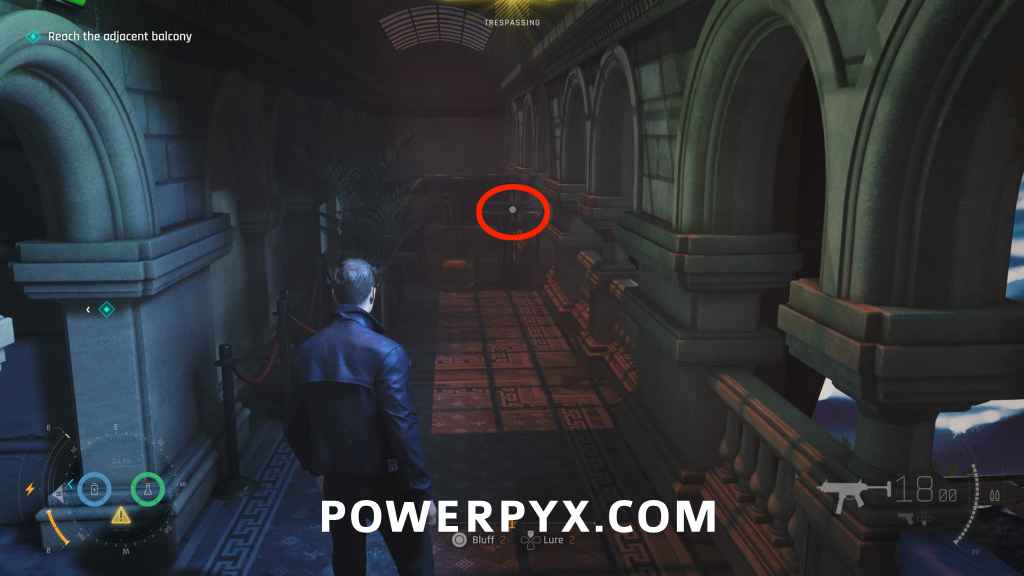
Card: 8 of Roses
Checkpoint: 09 Storage room
Objective: Reach the adjacent balcony
After jumping across the light rig to the other balcony, go to the right and the collectible is on a table.
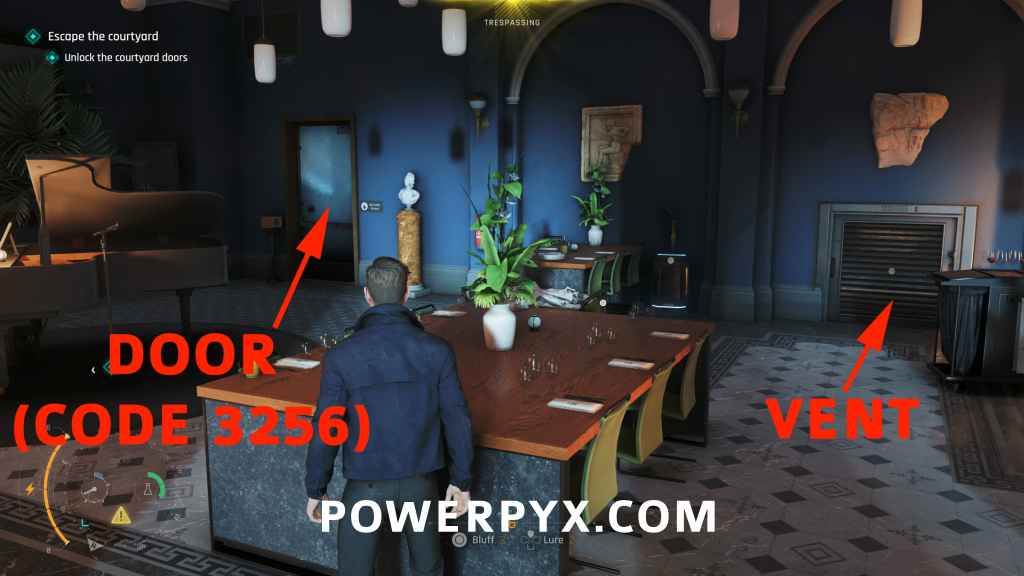
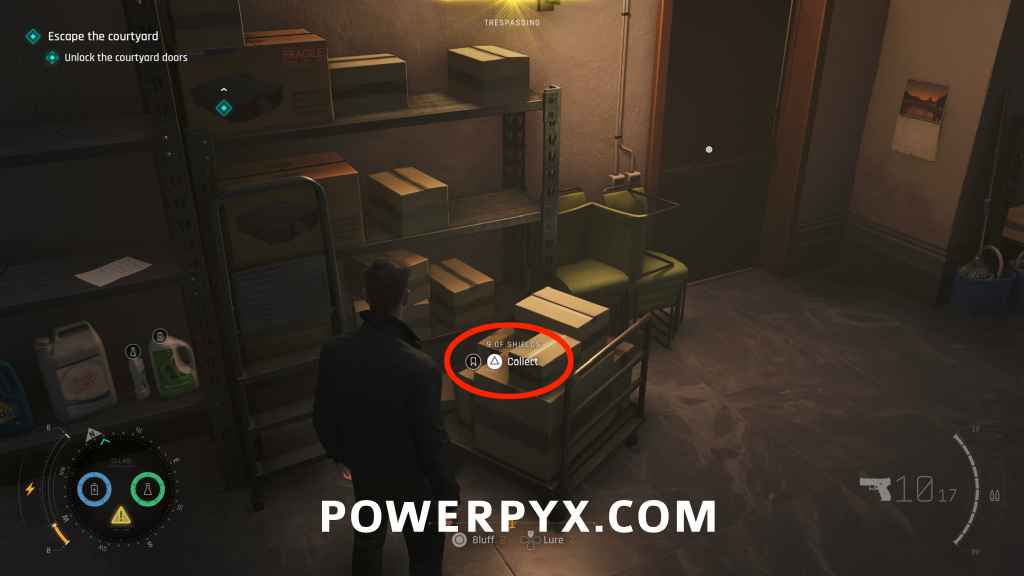
Card: 9 of Shields
Checkpoint: 10 The courtyard
Objective: Escape the courtyard
After dropping into the courtyard where many enemies are, go down to the ground floor to the dining hall (back right corner of where you started the area). There will be a vent near the piano where you can enter. Follow it and you can use the laser gadget to break the padlock to get into the maintenance room where the collectible is on a box. You can also put the code into the door to open it, which is 3256, which can be found on the laptop in the library.
Chapter 12: Knightfall
Important: Must have equipped gadget “Laser Strap” for collectibles.
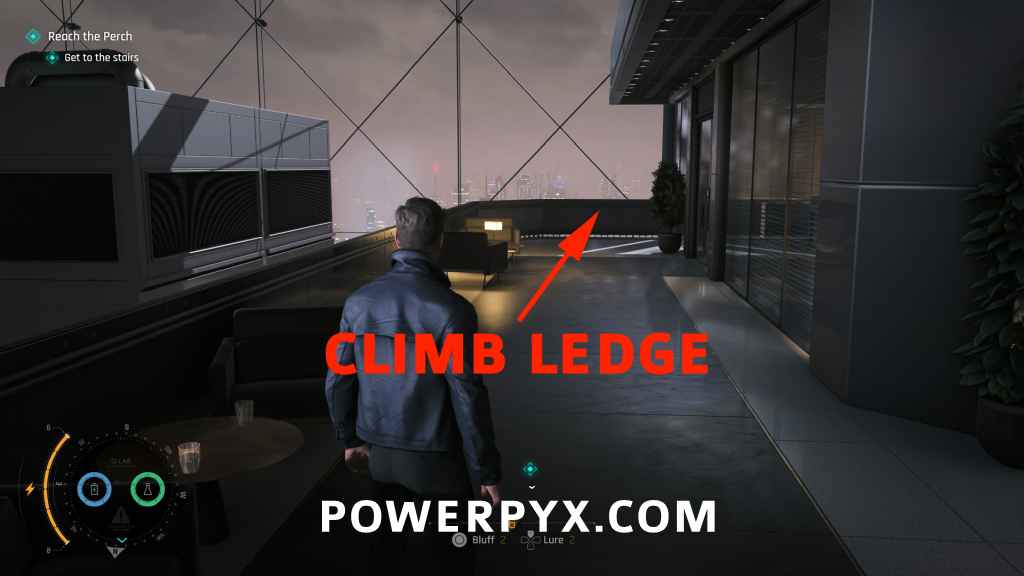
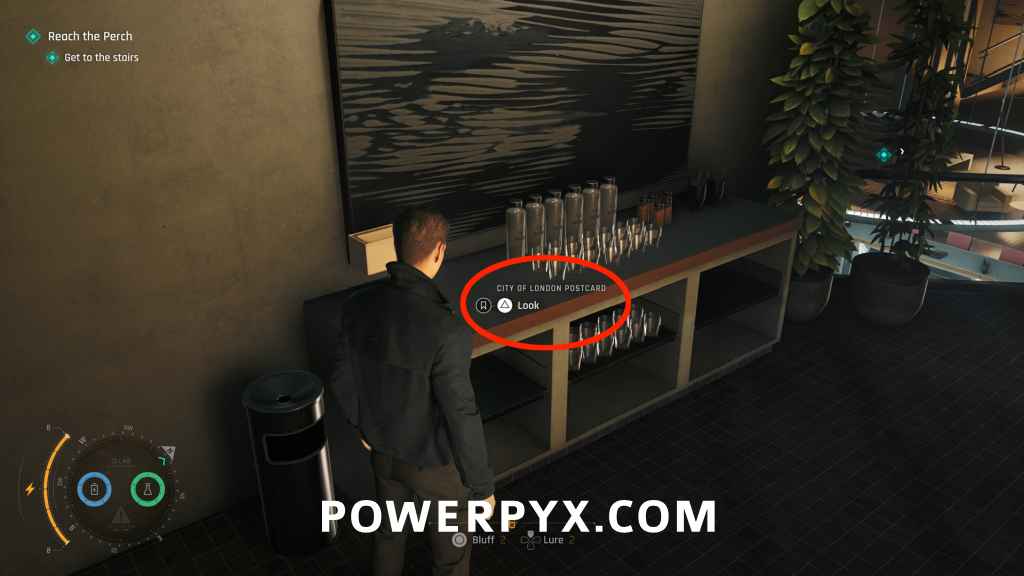
Postcard: City of London Postcard
Checkpoint: 02 Executive 1st Floor
Objective: Get to the stairs
After Greenway boosts you up to the statue, jump to the next balcony, follow it to the left and jump over the railing. Shimmy across the ledge and climb into the window. The collectible will be on the counter to the left.
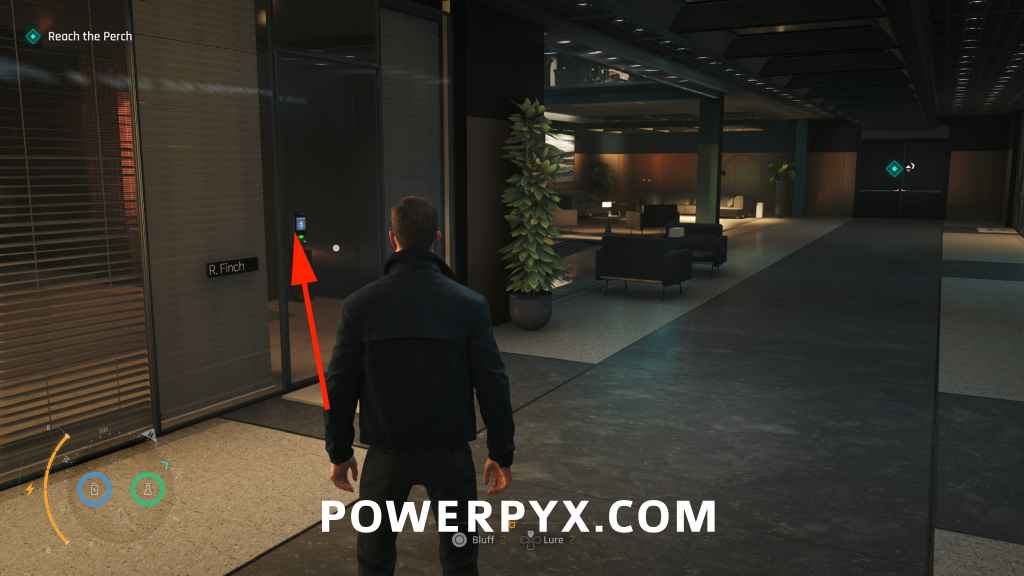
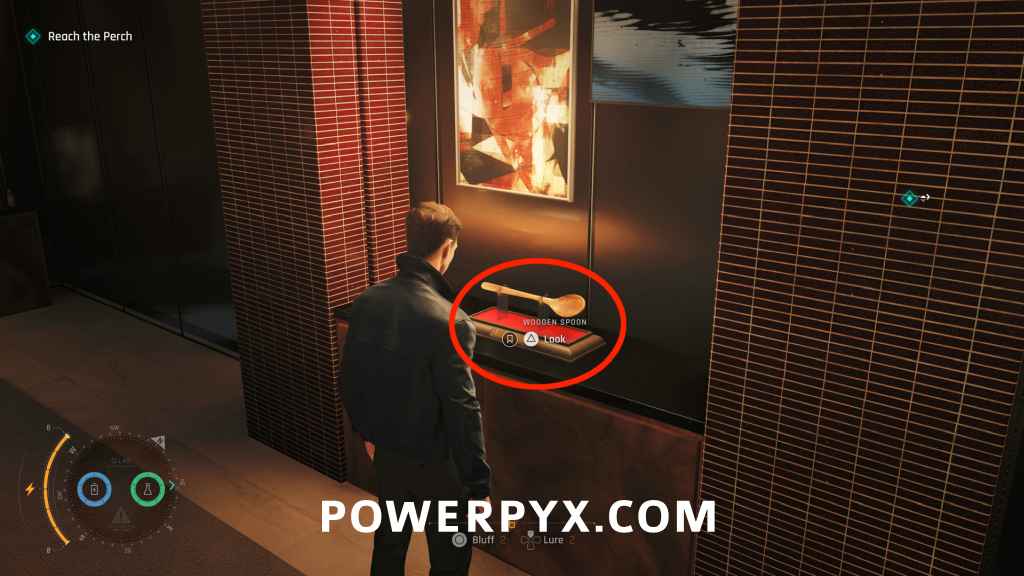
Intel: Wooden Spoon (Roger Finch)
Checkpoint: 02 Executive 1st Floor
Objective: Get to the stairs
From the previous collectible, go downstairs and enter the bathroom. Kick down the stall on the left and pick up the office key. Go back out towards the main objective and the locked door will open. Go through and enter the office labeled “R. Finch” on the left. The collectible will be on a stand on the right.
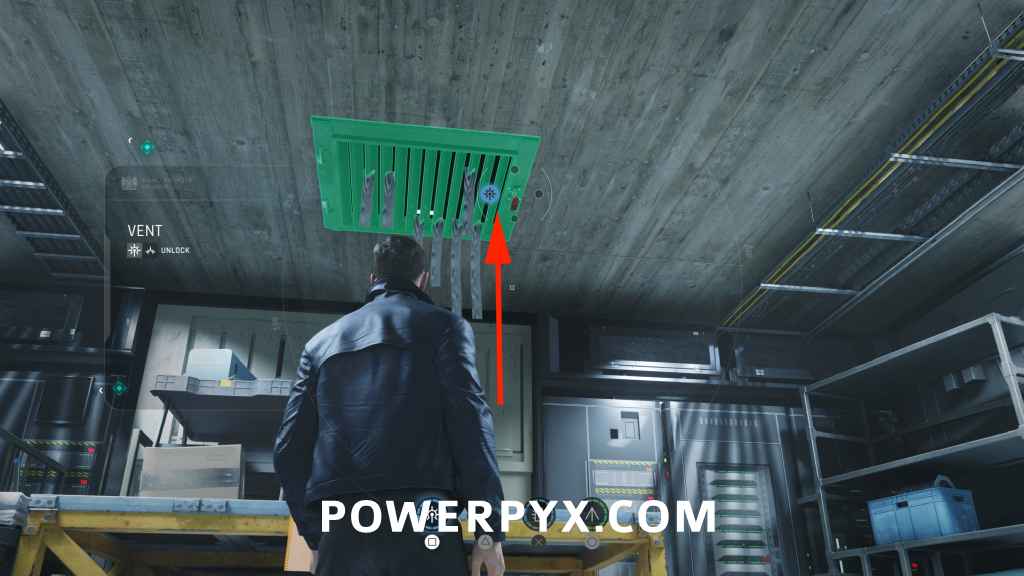
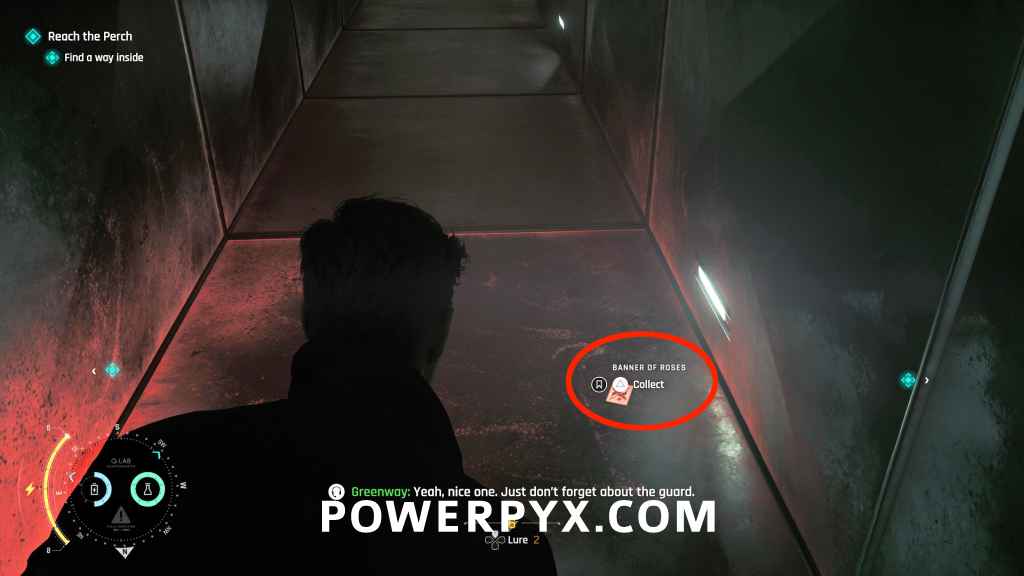
Card: Banner of Roses
Checkpoint: 02 Executive 1st Floor
Objective: Reach the Perch / Find a way inside
After you go through the next door with Greenway one floor up, you’ll be in a hallway. At the end of the hallway on the right enter the “Maintenance” room. On the ceiling open the vent using the Laser Strap. Climb into the vent and the collectible will be on the ground.
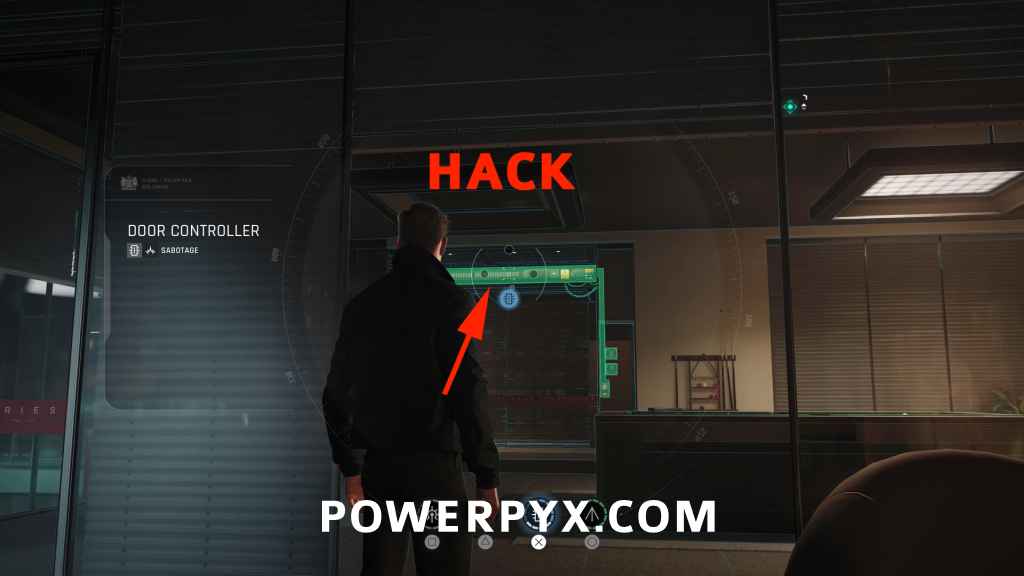
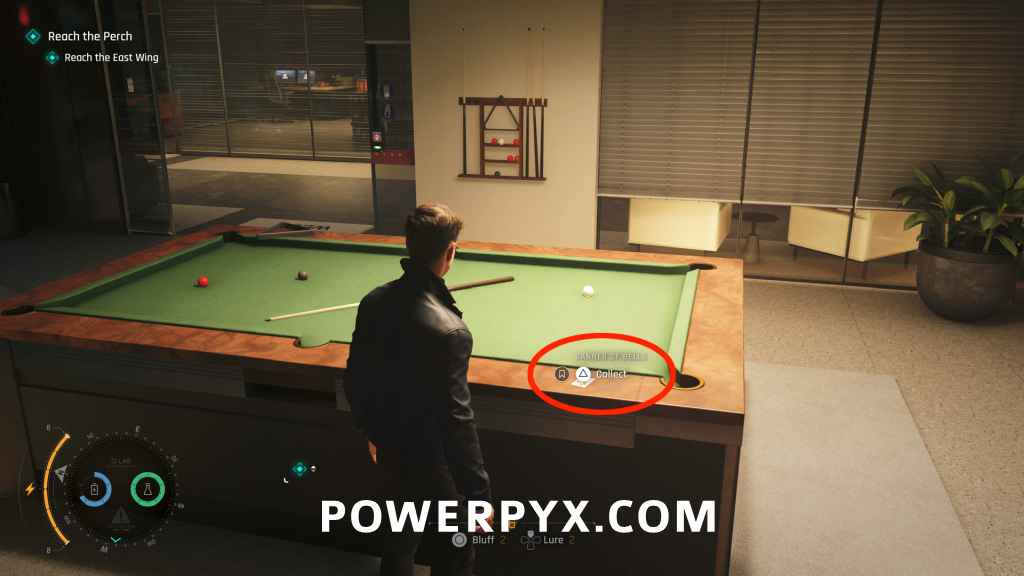
Card: Banner of Bells
Checkpoint: 02 Executive 1st Floor
Objective: Reach the east wing
After talking to Greenway at the railing in front of the two waterfalls, climb over the railing and use the ledge between the waterfalls to shimmy across to the other side. Immediately after climbing up, turn left and hack the door sensor inside the locked room. Wait for Greenway to open the door from the other side. The card is on the billiard table.
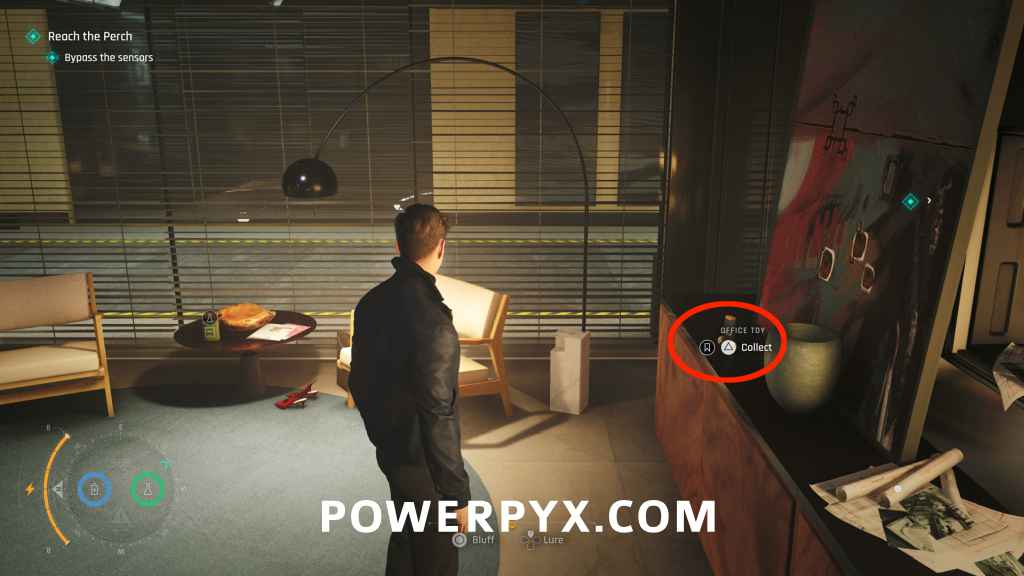
Memento: Office Toy
Checkpoint: 02 Executive 1st Floor
Objective: Bypass the sensors
Once you reach the hallway with the sensors, go down the right hallway and move the furniture out of the way with Greenway. Go through the vent and take the first exit on the left to enter an office. The collectible will be on the counter in the top right of the room.
(For story progress you must go out in the hallway and hack the door mechanism in the right room)
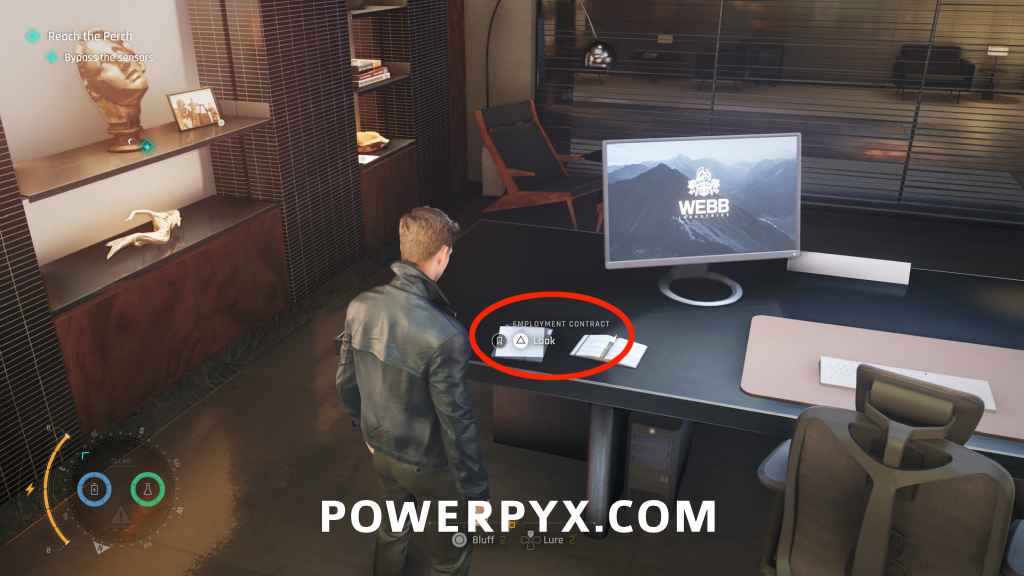
Intel: Employment Contract (Isola Vale)
Checkpoint: 02 Executive 1st Floor
Objective: Bypass the sensors
From the previous collectible, go back into the vent and take the other exit to another office. The collectible will be on the left side of the desk.
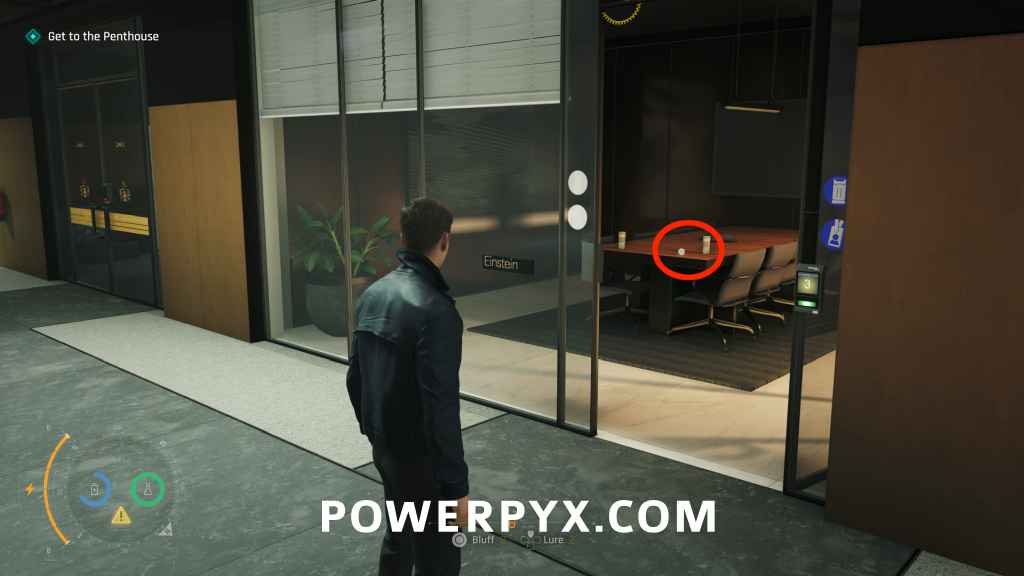
Card: 7 of Shields
Checkpoint: 02 Executive 1st Floor
Objective: Get to the Penthouse
After going up to the next floor with Greenway (Level 3). Near the end of the hallway on the left go into the office labeled “Bohr”. Turn left and hack the door of the office labeled “Einstein”. Now you can enter the Einstein office to find it on the desk.
How to progress: Enter the last office where you find a body. Then wait around 2 minutes until Greenway is done exploring the area and calls you over to the railing, he then points out a climbable bookshelf next to the tree without leaves. It leads to the other side of the locked door where you find the Security Access Key.
Card: King of Acorns
Checkpoint: 02 Executive 1st Floor
Objective: Get to the Penthouse
After getting the Security Access Key, go back to where you found the previous collectible in Einstein’s office. Instead of going into the office, backtrack toward the start of the hallway where you first entered Level 3. You can now open the side doors to the balcony using the Security Access Key. The card sits on the table there.
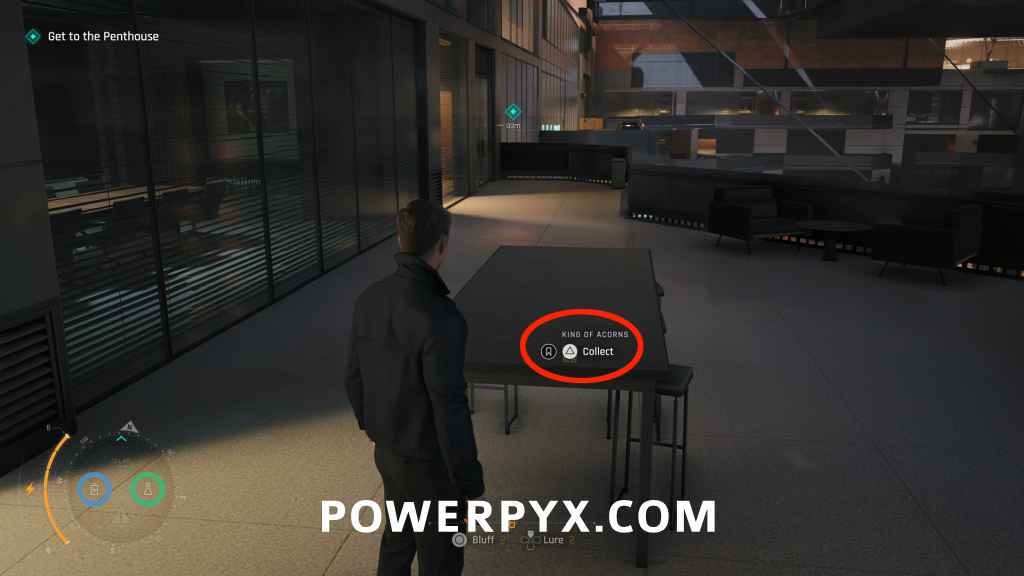
Legacy: Blades Club Badge
Checkpoint: 03 The Penthouse
Objective: Locate and open the safe
As soon as you enter the penthouse, turn right to find this on the bar table.
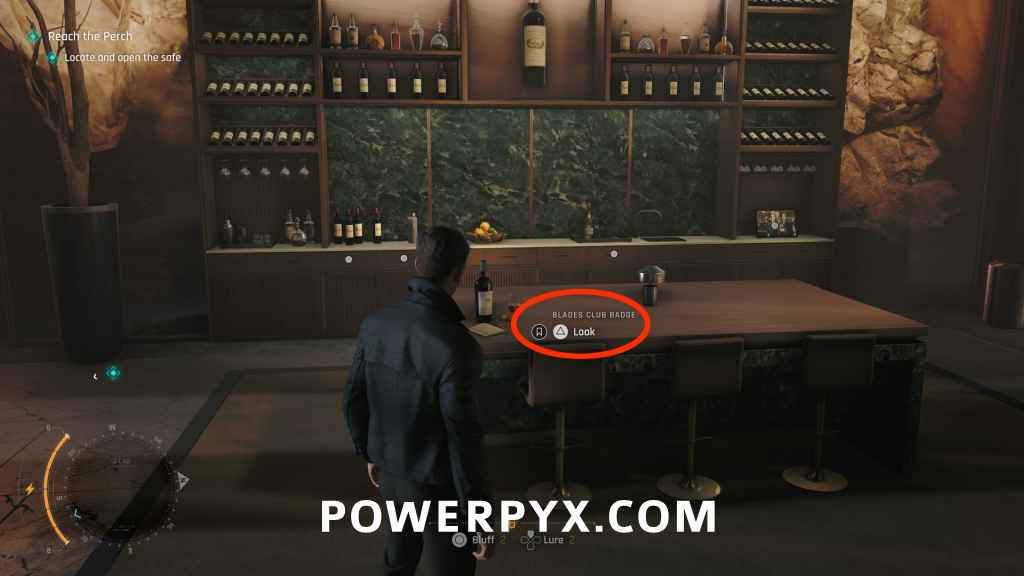
Intel: Psych Profile (Damien Webb)
Checkpoint: 03 The Penthouse
Objective: Locate and open the safe
In the back right corner of the penthouse on the shelf.
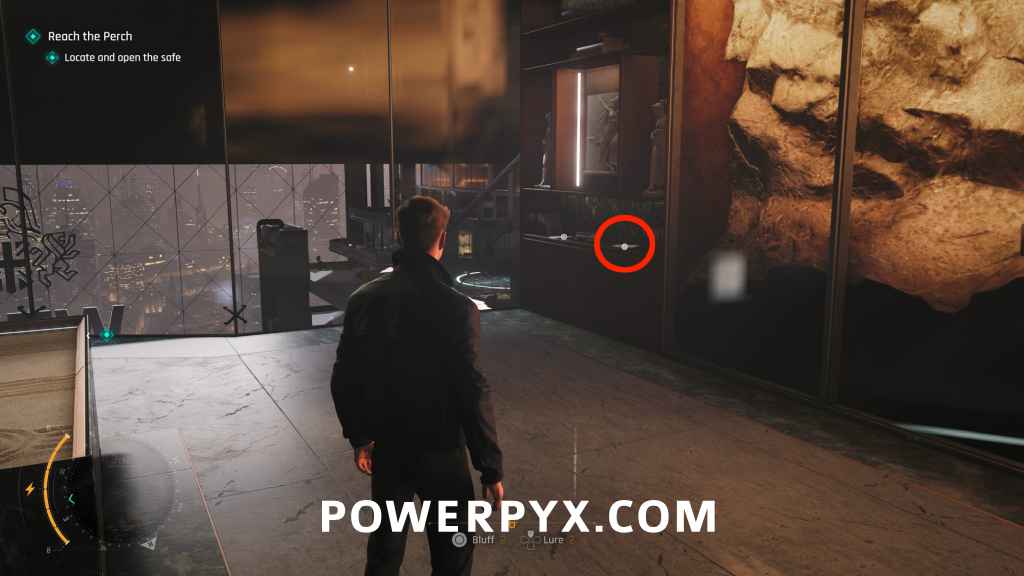
How to progress: the Safe Code is 1493. The code is gathered by looking at the diploma (1), painting (4), video game (9), and the scale model (3).
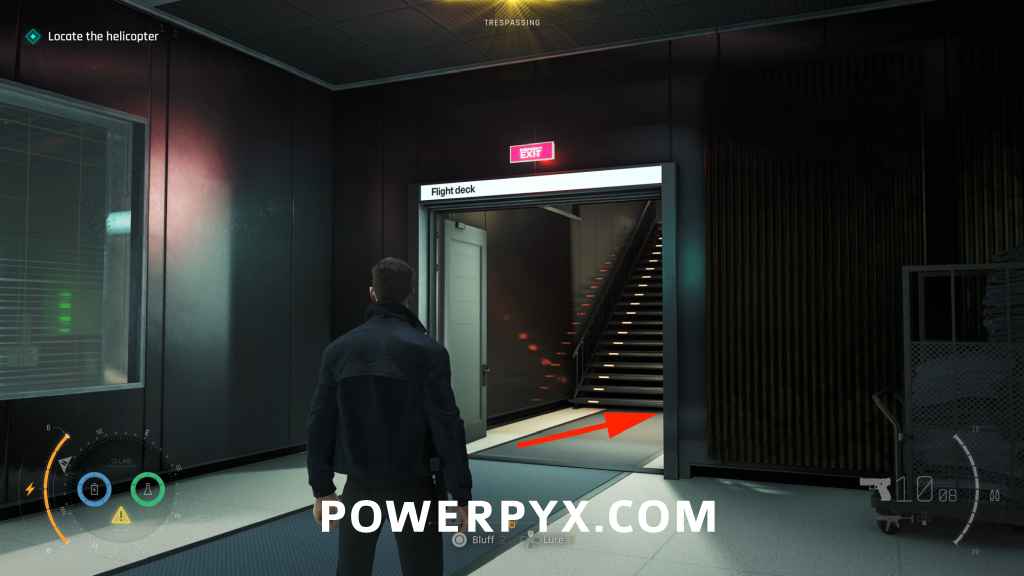
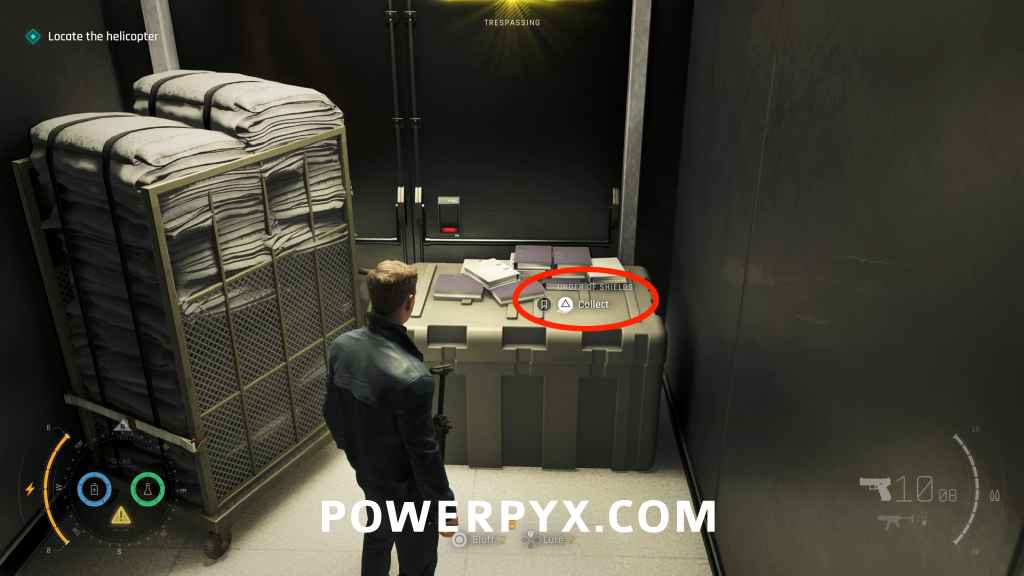
Card: Under of Shields
Checkpoint: 09 Cargo floor
Objective: Locate the helicopter
Once you reach the stairs leading to the flight deck, go down the stairs instead and the collectible will be on a crate.
Chapter 13: Going Old School
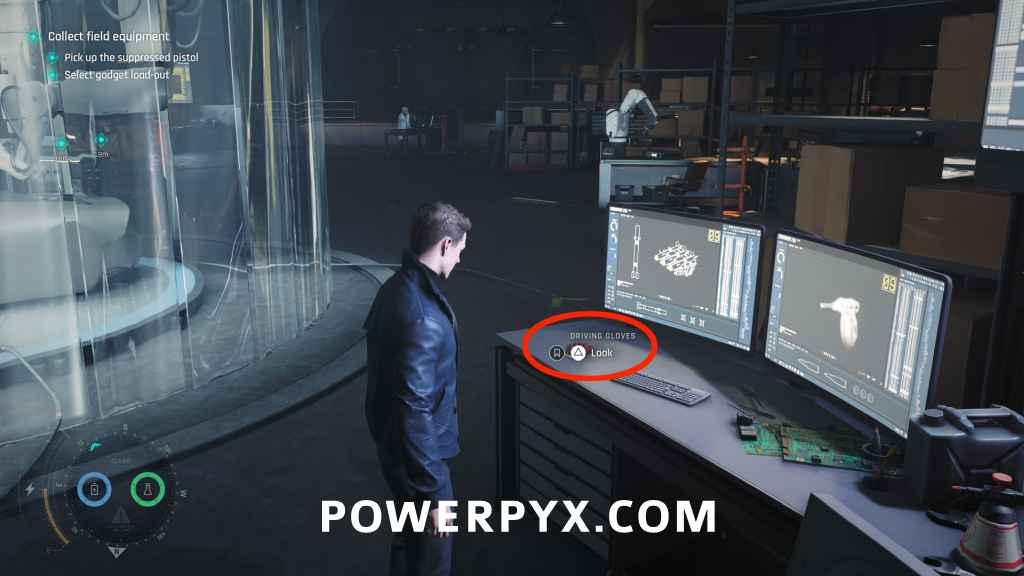
Intel: Driving Gloves (Q)
Checkpoint: 04 In the zone
Objective: Collect field equipment
Once you meet up with Q, the collectible will be on a desk on the right.
Chapter 14: Time to Die
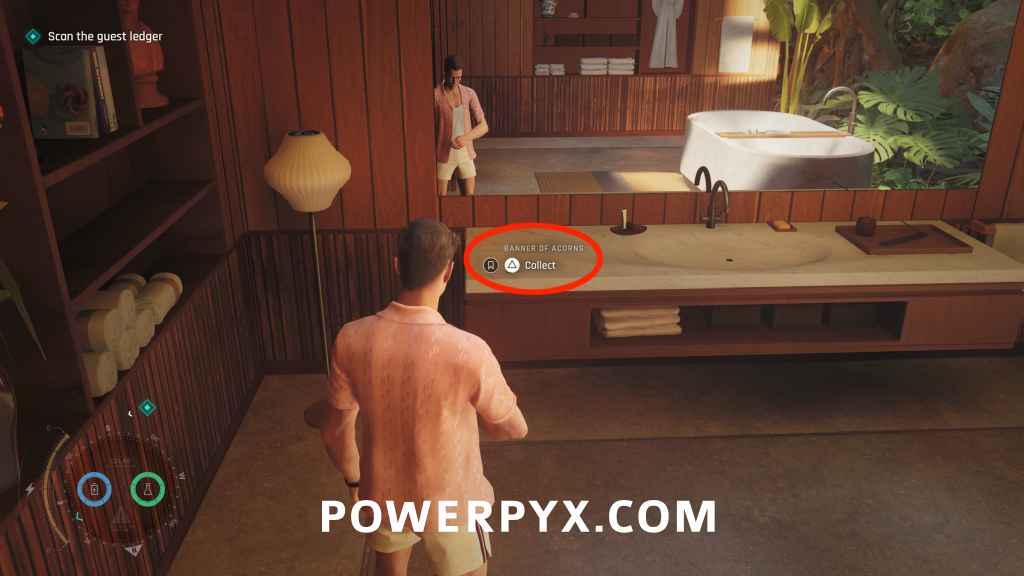
Card: Banner of Acorns
Checkpoint: 03 A Package from Q
Objective: Open package from Q
Once you get inside the villa, go up the stairs and go down the hallway on the right to enter the bathroom. The collectible will be on the sink counter.
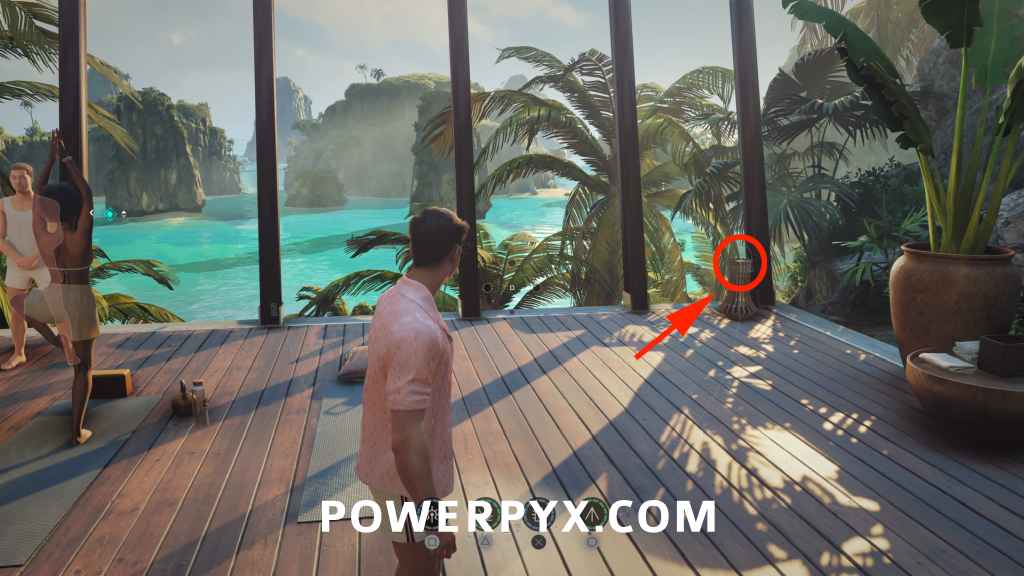
Card: 8 of Shields
Checkpoint: 05 The three targets
Objective: Plant Q-Traks
After visiting the reception, follow the signs until you reach the Tranquility platform (next to the Ocean View Bar), and the collectible will be on top of a lantern near the edge.
Card: 9 of Roses
Checkpoint: 05 The three targets
Objective: Plant Q-Traks
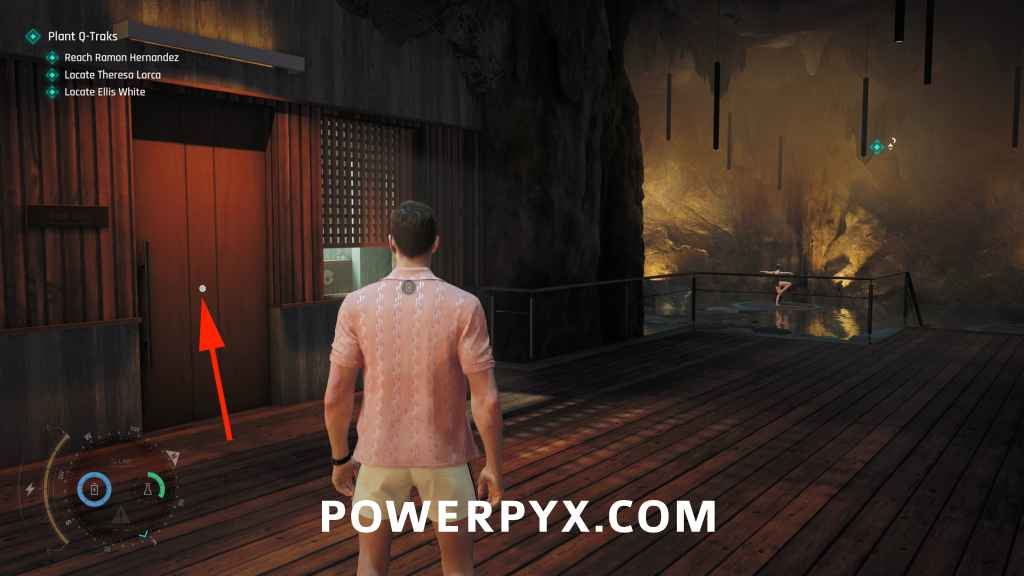
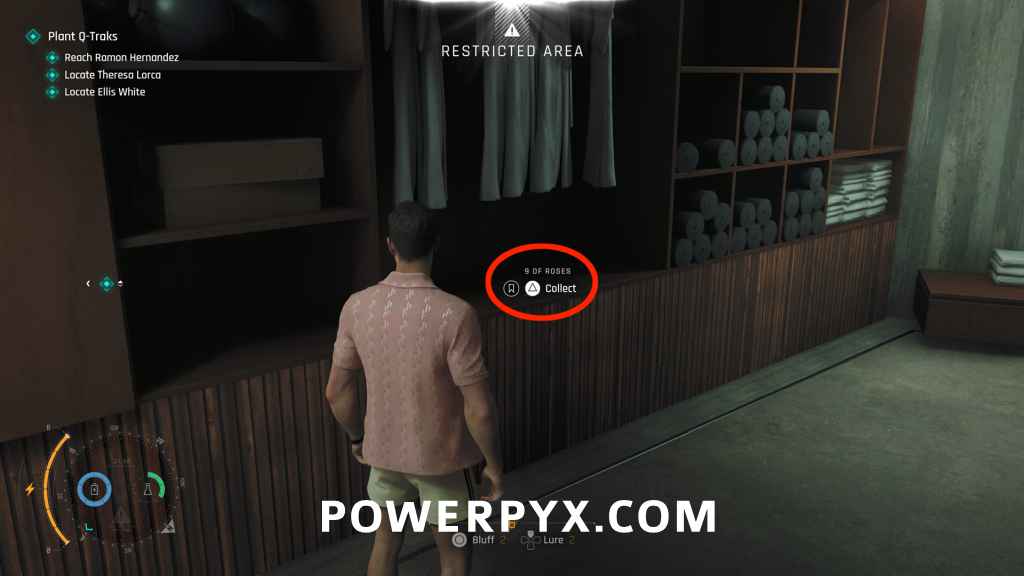
From the previous collectible, go down the stairs into the Tranquility Cave and towards the end you’ll see someone on the phone. After eavesdropping on his conversation, you can use the Dart Phone on him to pickpocket the Storage Key, and use it to unlock the nearby door. Go inside and the collectible will be on the shelf to the left.
Card: Under of Bells
Checkpoint: 05 The three targets
Objective: Reach Ramon Hernandez
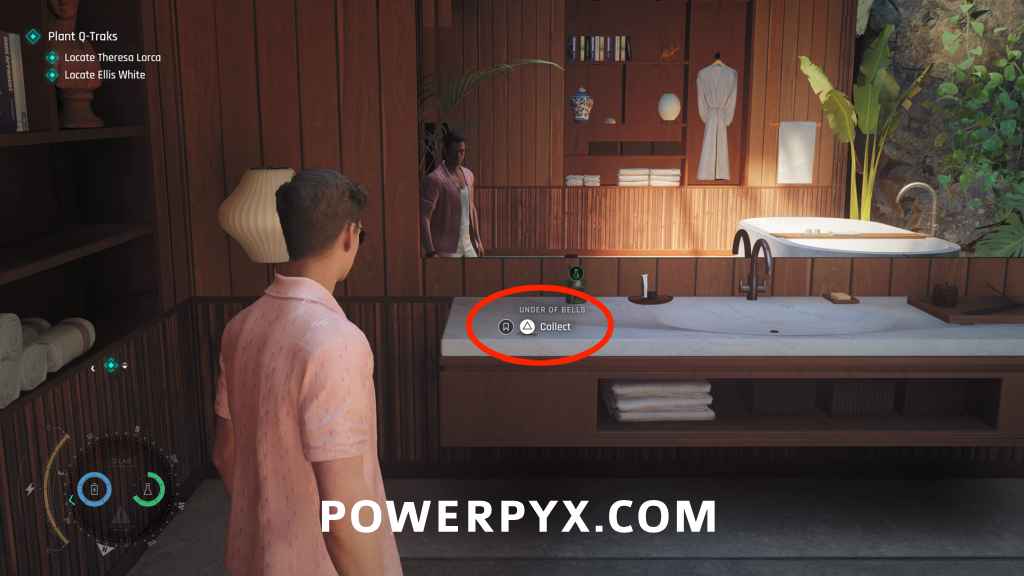
Once you get into the Hung Villa, go upstairs where you will talk to Ramon Hernandez (main objective). Then enter the bathroom to find the collectible on the sink counter (heavily recommended to use the Yoga disguise so you can walk around the area freely, which is found in room with previous collectible by reading the wall note and picking up the yoga mat).
Legacy: Tarot Deck
Checkpoint: 05 The three targets
Objective: Reach Ramon Hernandez
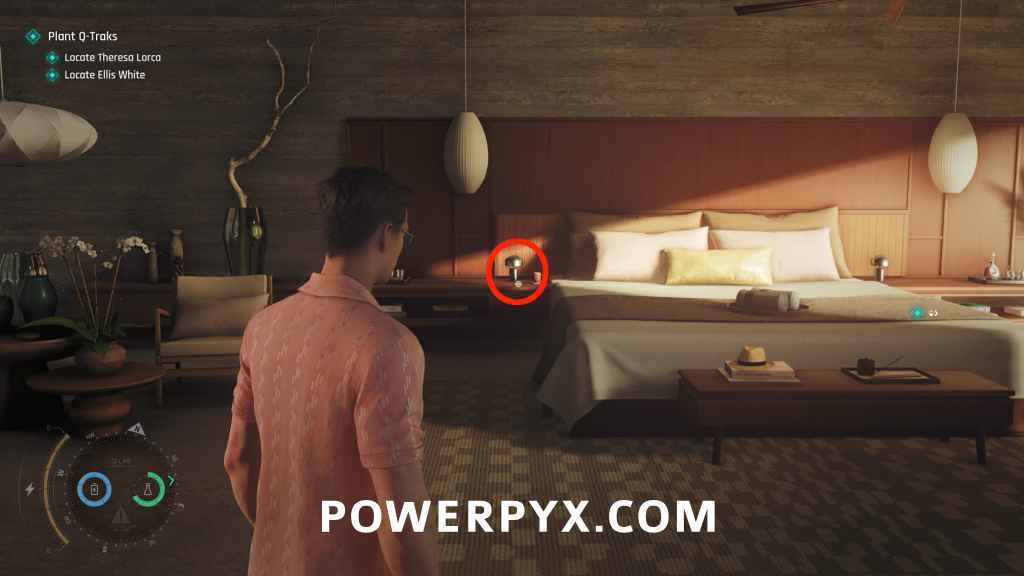
After talking with Ramon, head into the bedroom and the collectible will be on the nightstand to the left of the bed.
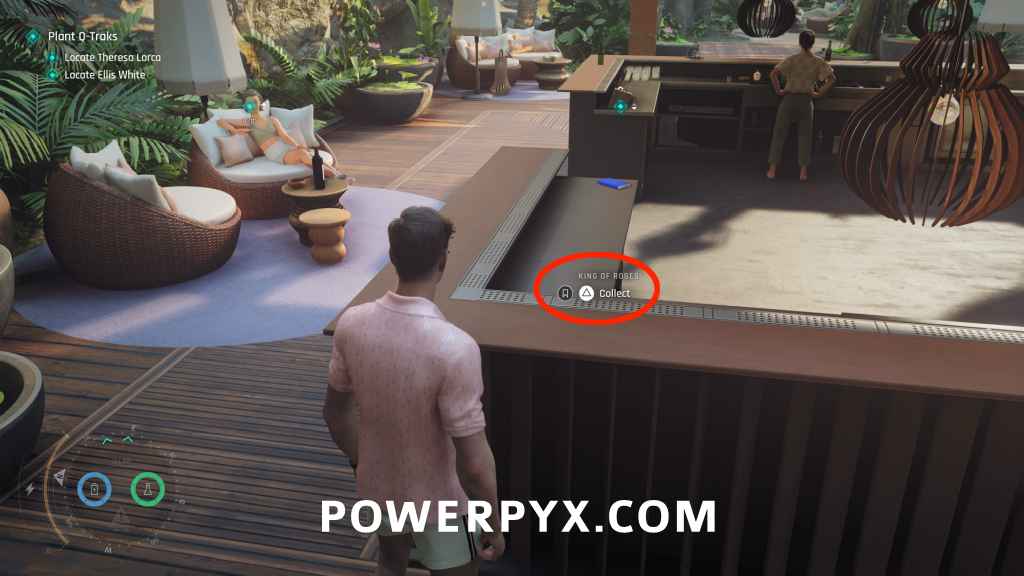
Card: King of Roses
Checkpoint: 05 The three targets
Objective: Plant Q-Traks
Follow the signs to Lotus Bar and this will be on the counter in the back of the bar. When you come out of Ramon’s villa go straight and take the next left.
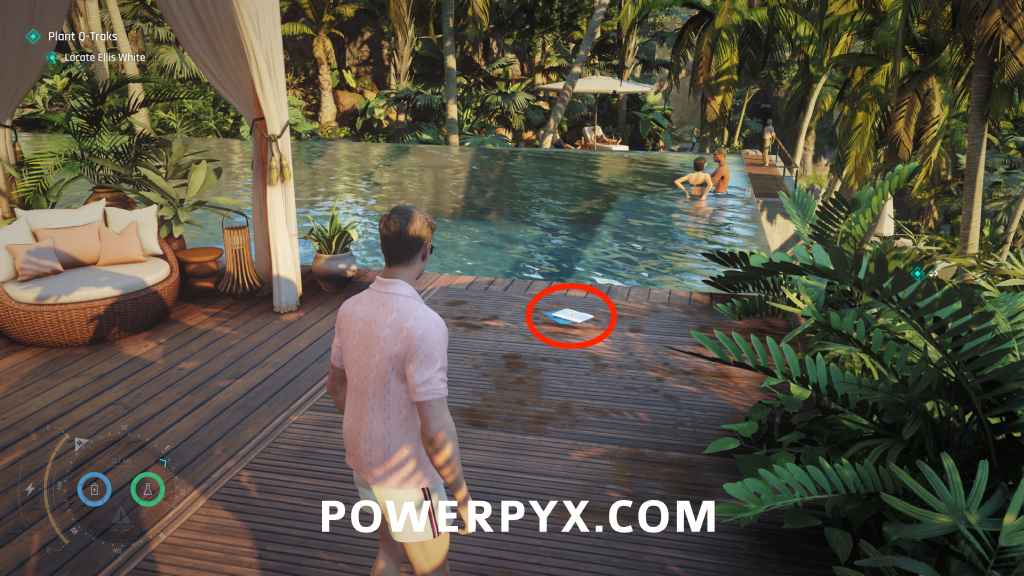
Intel: Keynote Presentation (Theresa Lorca)
Checkpoint: 05 The three targets
Objective: Reach Theresa Lorca
After the cutscene where you talk to Theresa Lorca (main objective), the collectible will be on the ground at your feet, in front of the pool.
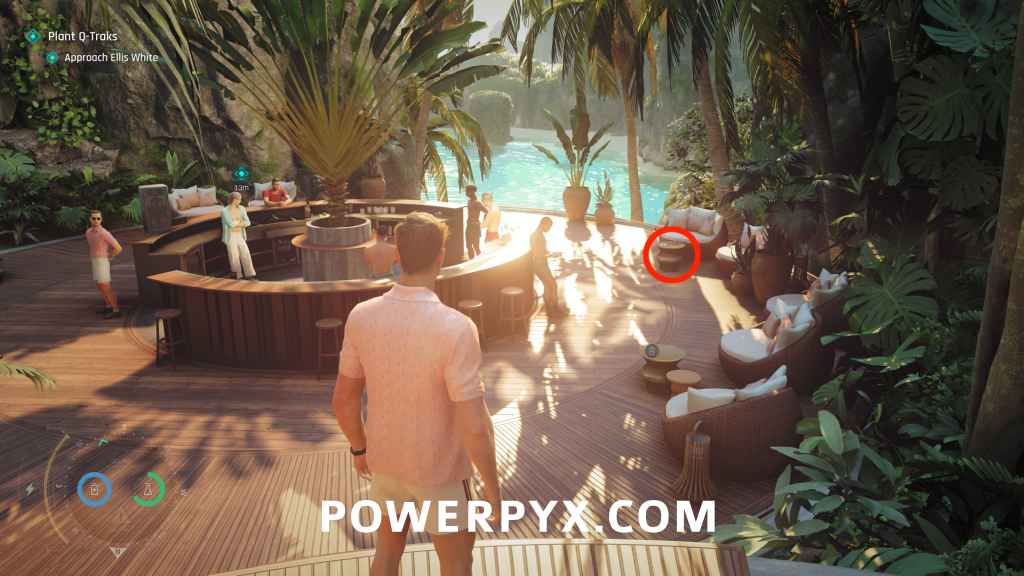
Postcard: Vietnam Postcard
Checkpoint: 05 The three targets
Objective: Approach Ellis White
Once you reach the Ocean View Bar where you talk to Ellis White (main objective), the collectible will be on one of the tables on the right side of the bar. You can get in by climbing over the railing to the left of the guards, or pickpocket the Party Flyer off the nearby girls who leave the area.
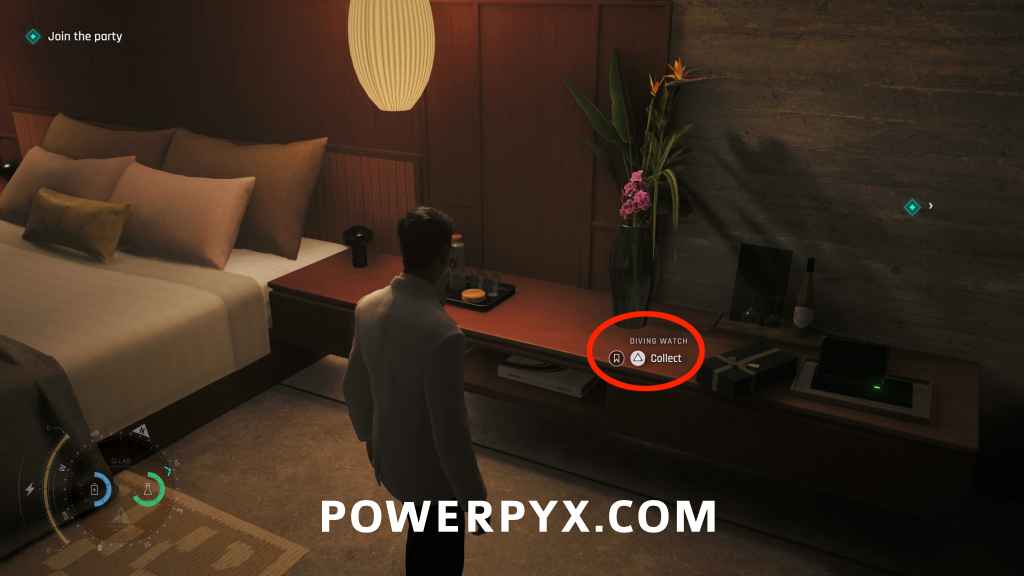
Memento: Diving Watch
Checkpoint: 07 Suit up
Objective: Join the party
After the QTE where you tie your bowtie, turn around and the collectible will be on the nightstand to the right of the bed.
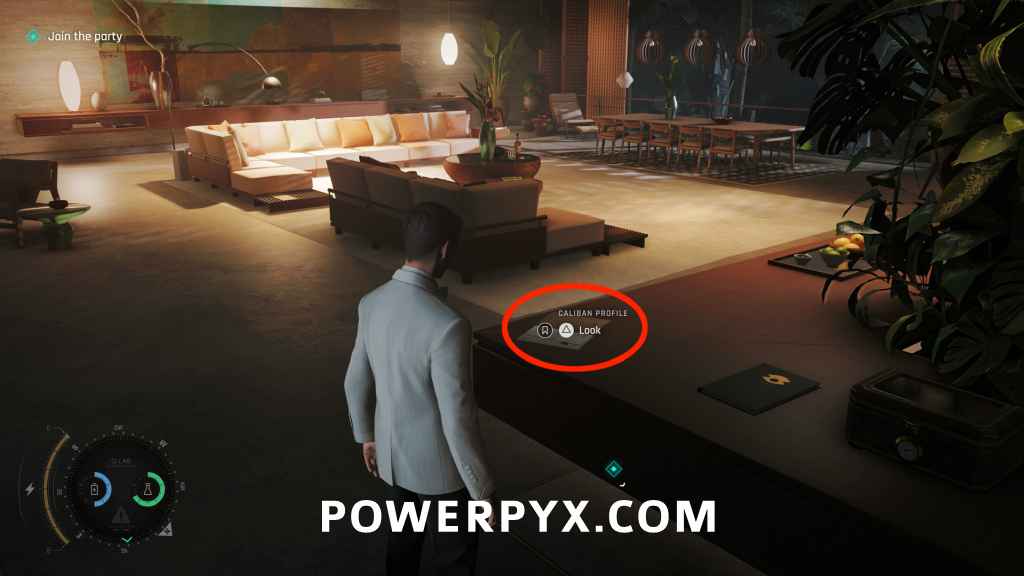
Intel: Caliban Profile (Caliban)
Checkpoint: 07 Suit up
Objective: Join the party
In the same room. From the previous collectible, turn around and go through the left hallway. The collectible will be on the counter as you enter the living room.
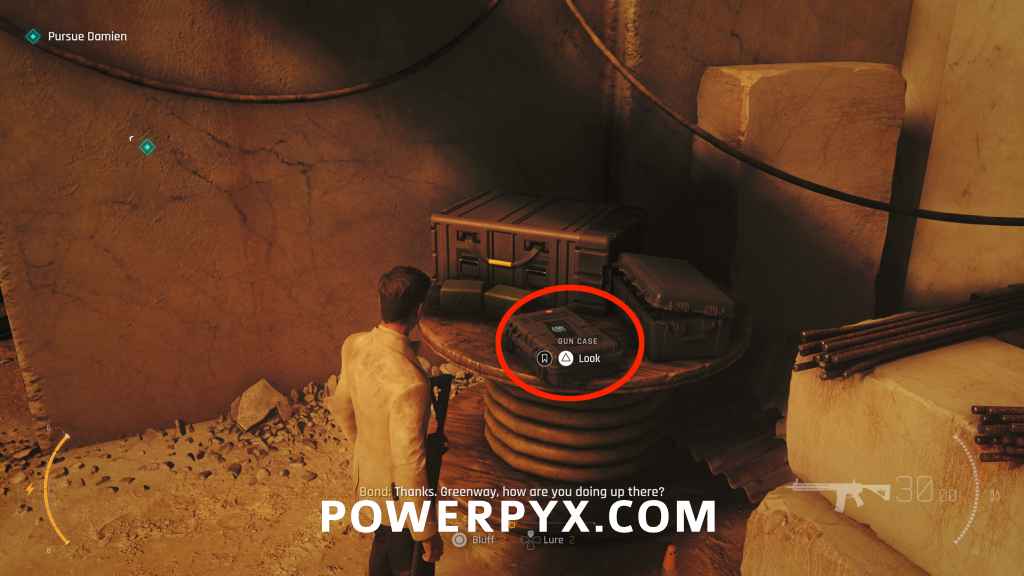
Intel: Gun Case (Riptide)
Checkpoint: 15 Tracking Damien
Objective: Pursue Damien
After getting freed from the handcuffs, the collectible will be on a wooden coil on the right.
Chapter 15: Man of the Hour
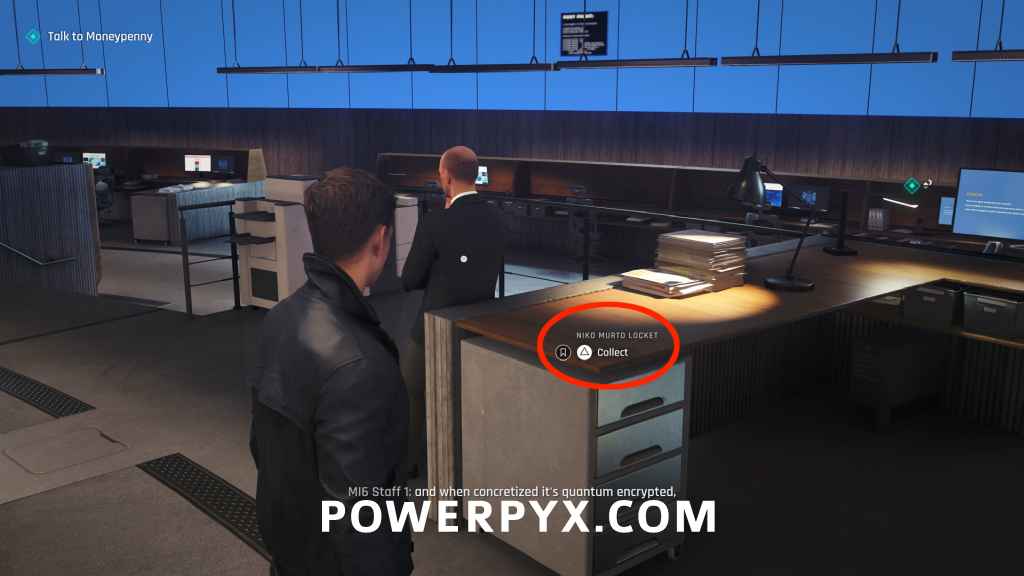
Memento: Niko Murto Locket
Checkpoint: 02 Stand down
Objective: Talk to Moneypenny
In the room where you start the objective, on a desk on the second lowest level where you can talk to Basil. From where you start it’s slightly to your left and down the short stairs.
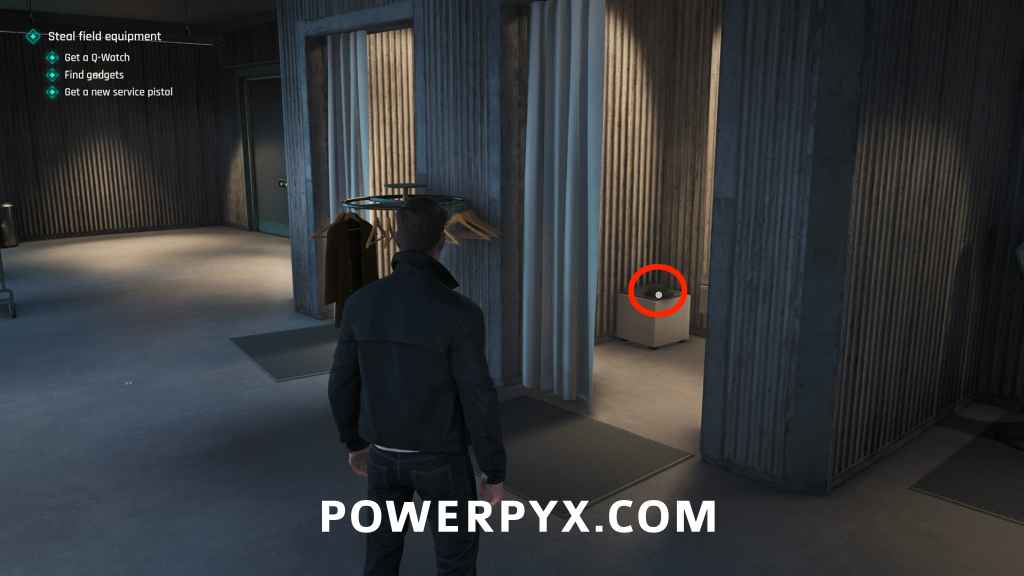
Legacy: Trilby Hat
Checkpoint: 04 The betrayal
Objective: Steal field equipment
Once in the Q lab, in the Q-07 Wearables section near the elevator. The hat will be in one of the changing rooms.
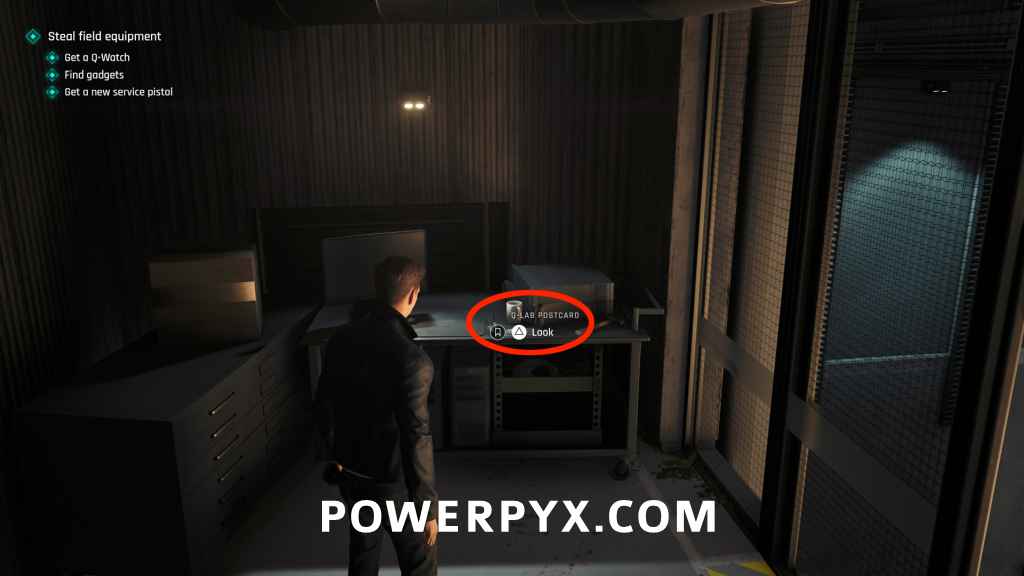
Postcard: Q-Lab Postcard
Checkpoint: 04 The betrayal
Objective: Steal field equipment
Head into the Q-01 Gym section and climb up the lockers. Jump across to the ledge and enter the hallway. The collectible will be at the end of the hallway on a table. Afterward climb down the ledge to equip gadgets (Laser Strap + Dart phone recommended).
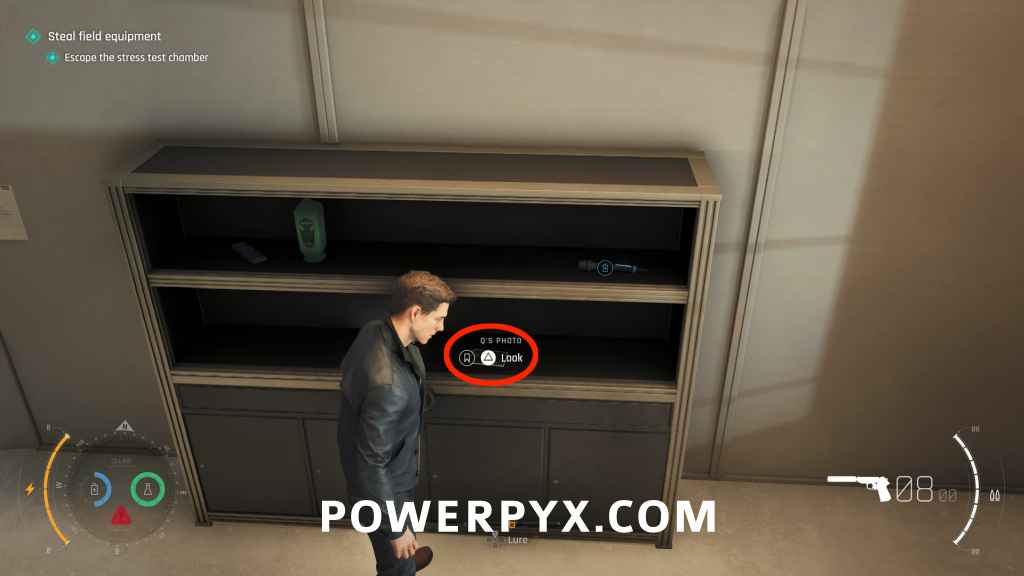
Intel: Q’s Photo (Rhys Beckett)
Checkpoint: 04 The betrayal
Objective: Steal field equipment
Enter Q-03 Stress Testing by using a Gadget on the fire extinguisher above the door scanner (such as Laser Strap). Inside, open the locked cabinet with code 4397. The code is obtained from the number plate of the car in the test chamber.
How to progress: The Gadgets are in the room down from previous collectible. The Q-Watch is in Q-03 Stress Testing (use gadget such as Laser strap on the fire extinguisher above the door scanner to open it. Inside you can use the furnace or the explosion chamber to create an escape path). The service pistol is in Q-08 Armoury (Code: 1324 from top of the shooting range leaderboard, or vault over shooting range and squeeze through the vent in the back).
Chapter 16: Wave of the Future
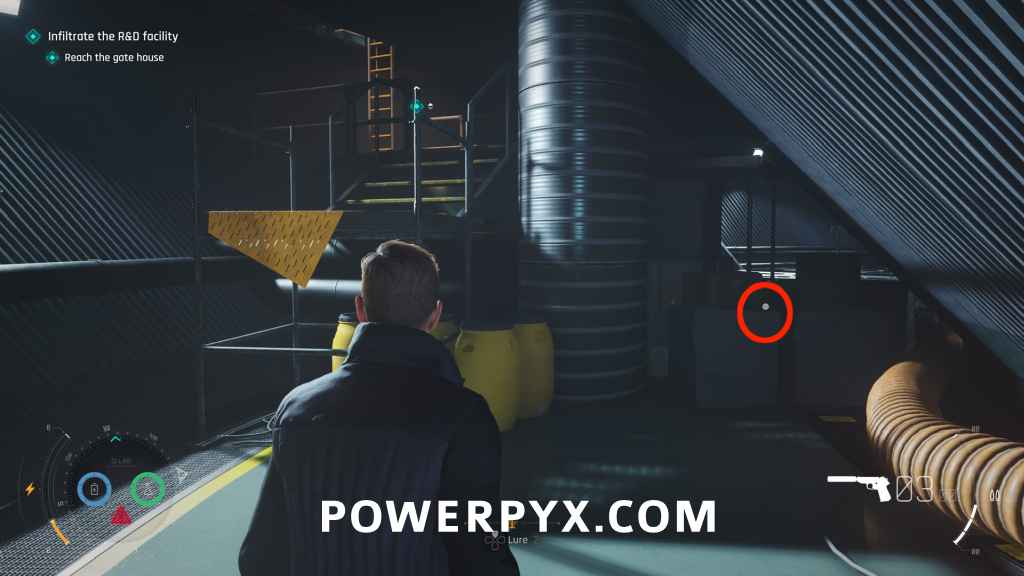
Card: Under of Roses
Checkpoint: 03 The gantries
Objective: Reach the gate house
After getting past the first set of enemies and entering the building, this will be at the end of the hallway, before climbing the yellow scaffolding.
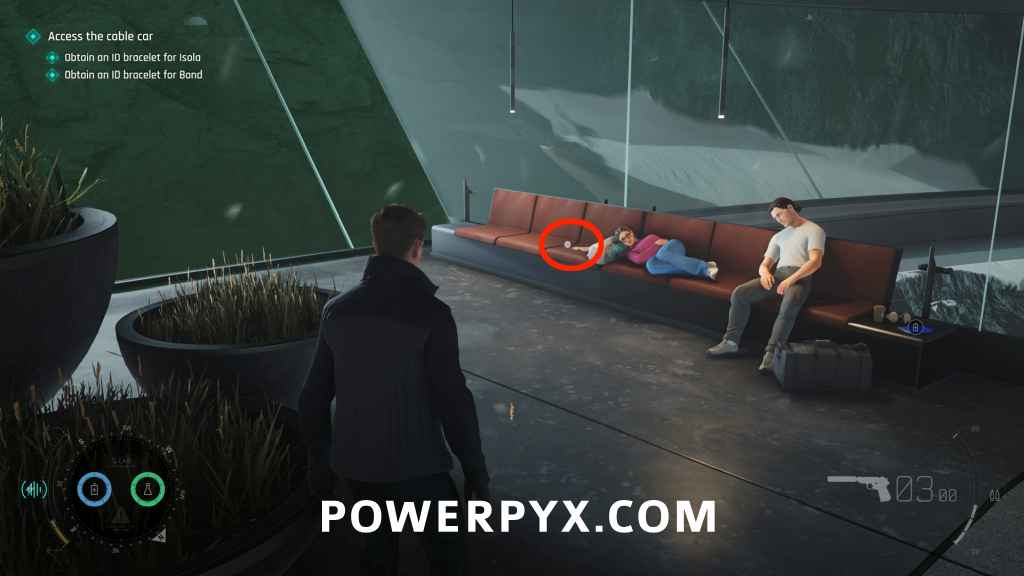
Card: Ace of Bells
Checkpoint: 04 The gate house
Objective: Access the cable car
After reaching the cable car, go up the stairs on the right side and then turn around at the top. The collectible will be on one of the couches on the left.
Memento: Snow Globe
Checkpoint: 04 The gate house
Objective: Access the cable car
From the previous collectible, turn back around and head towards the reception desk in the middle of the area. The collectible will be on the desk.
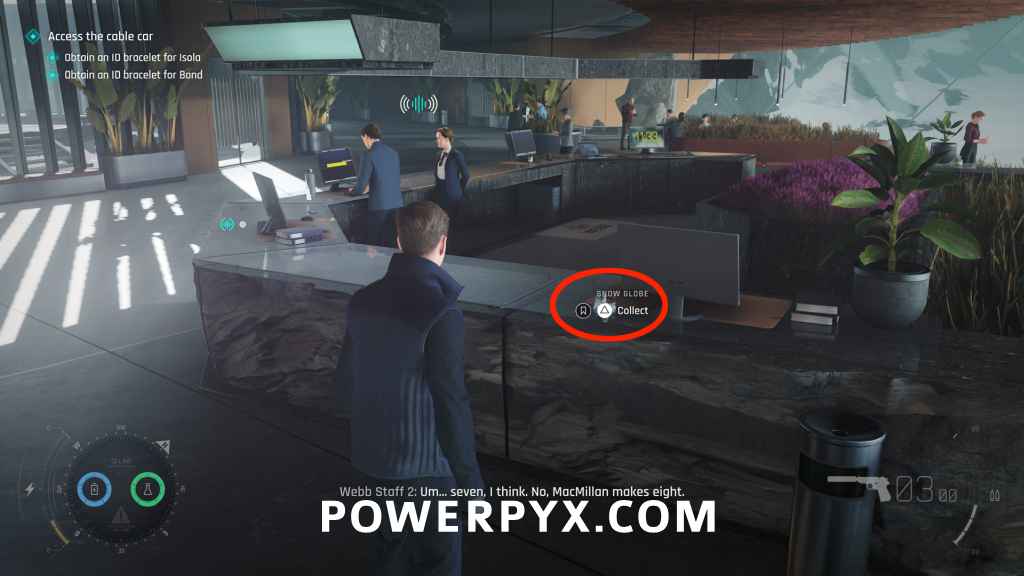
How to progress: To obtain the bracelet for St. Vincent, you find her sleeping in the room at the other end of the floor, distract the two bystanders with the objects in the room and loot it from her. To obtain the bracelet for Bond, eavesdrop on the HR. Manager at the stairs where you entered, then hack his phone using the Q-Watch, follow him. The hack will fail and you need to steal his phone when he walks to reception (can vault over the side and distract him). Then enter the bathroom and talk to the guy who locked himself into the stall, pick the blue dialogue and he gives you the ID. With both IDs enter the cable car, then enter Robotics. Shoot the electric panel with the E.S.P. (  to equip pistol,
  to aim,
  to shoot). This opens the door.
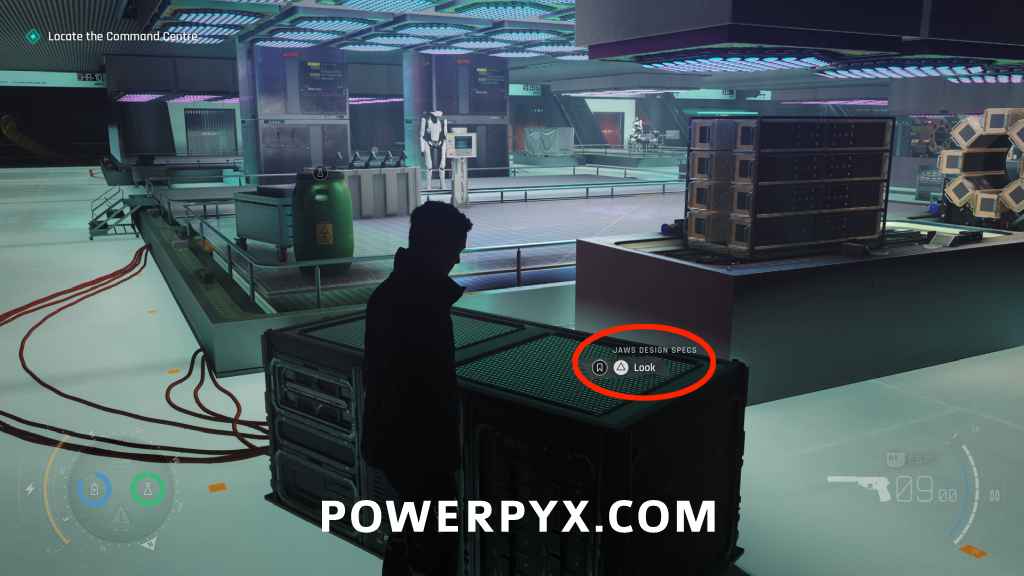
Legacy: Jaws Design Specs
Checkpoint: 08 Robotics Department
Objective: Locate the Command Centre
After the elevator ride you enter Robotics (huge room with robots being tested). From where you enter, head to the left end of the room. In the corner you find this on a crate.
Card: 9 of Bells
Checkpoint: 08 Robotics Department
Objective: Get into Utility
From the entrance of Robotics, go straight ahead to the Utility door, then go to the right. The collectible will be on a box.
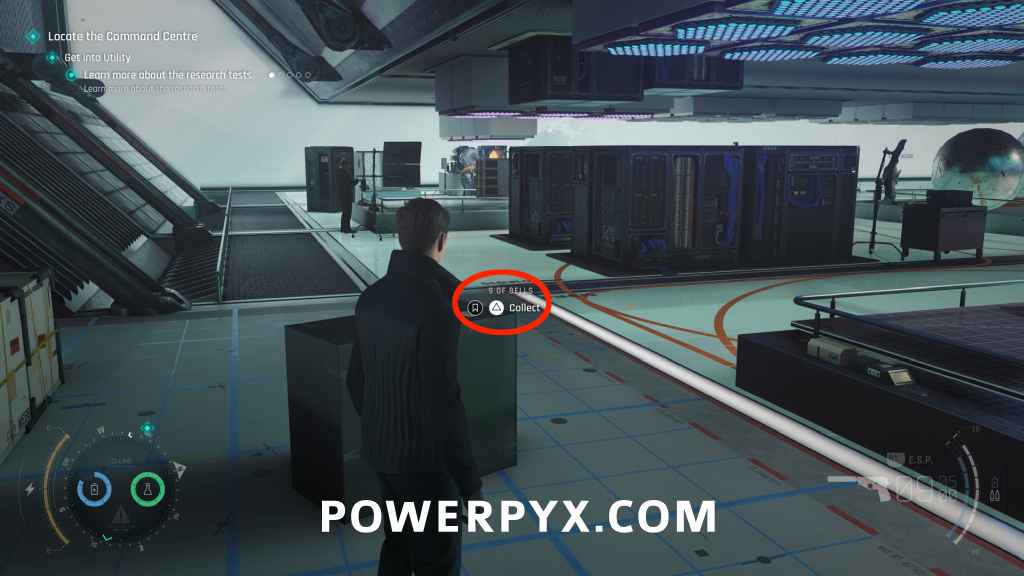
How to progress: To enter Utility, directly next to the 9 of Bells collectible there’s a girl doing Yoga on the platform. Distract the scientist at the laptop, then interact with the other laptop to heat the platform so the Yoga girl leaves. Then try to enter the Yoga platform, it will cool down but the scientist wants you to leave. Distract the scientist, then you can go on the Yoga platform and the robot by the window will mimic your movements. Move forward and punch so the robot will punch through the glass, go through there. In the corridor push the trolley and turn off the fusebox to open the door. Later when you need to access the Command Centre, you can enter code 1864 at the Archive door and go through the vent.
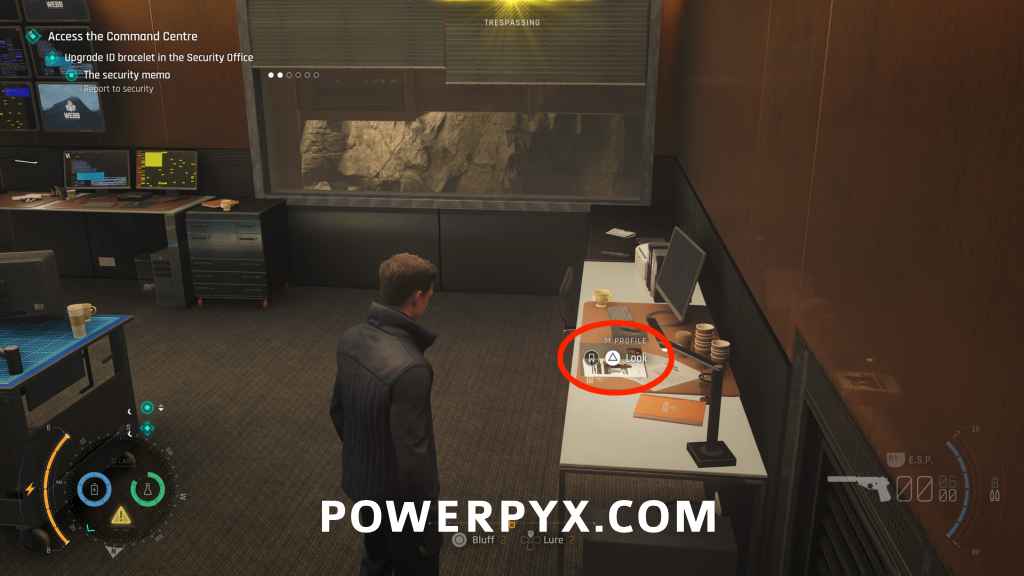
Intel: M Profile (M)
Checkpoint: 12 Operations Department
Objective: Upgrade ID bracelet in the Security Office
Once inside the Security Office where you upgrade your ID bracelet (main objective), the collectible will be on the desk.
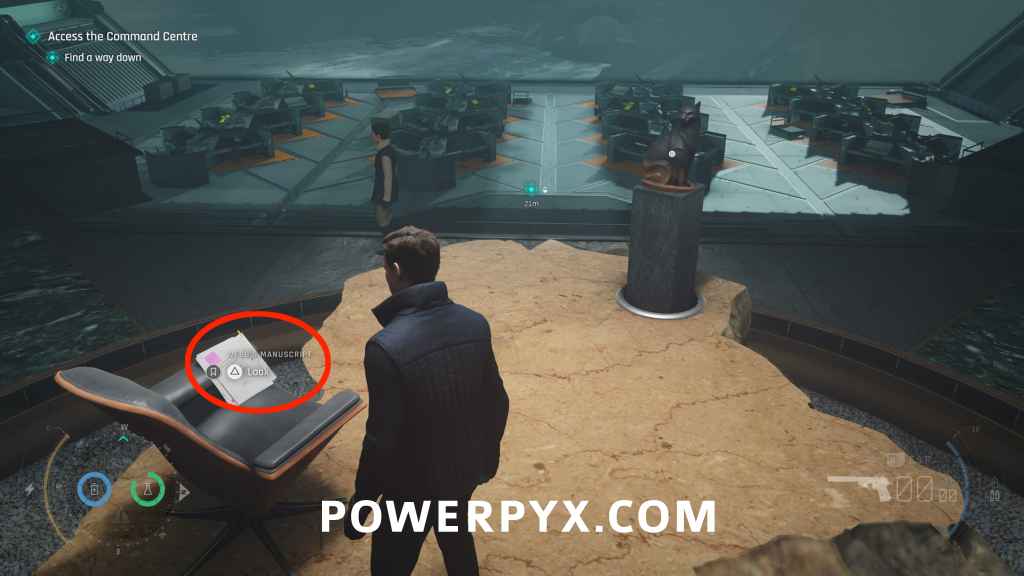
Intel: Webb’s Manuscript (Sir Nicholas Webb)
Checkpoint: 12 Operations Department
Objective: Access the Command Centre
The collectible will be on the chair on the rock, next to the cat statue you need to turn to advance.
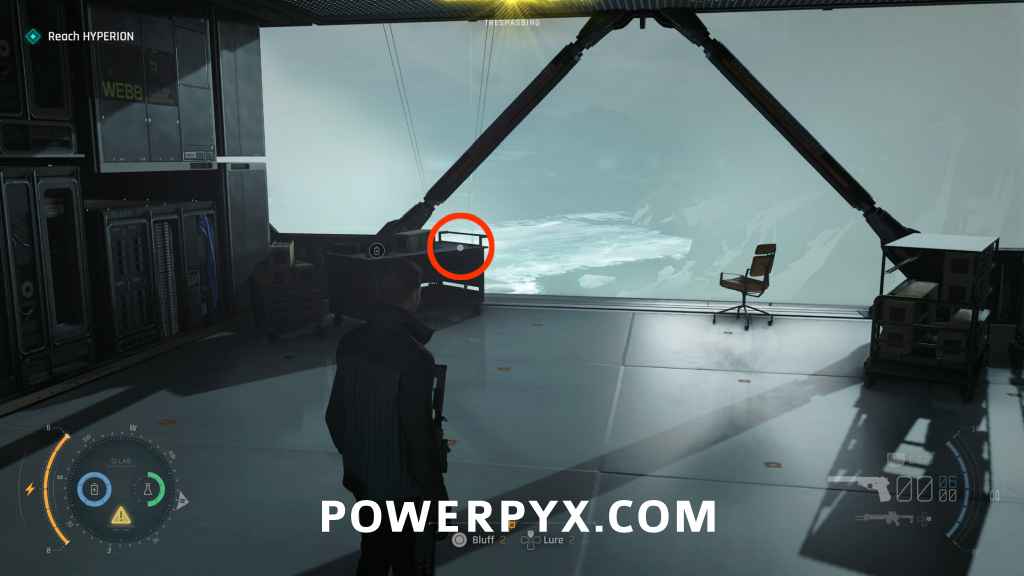
Postcard: Antarctica Postcard
Checkpoint: 16 Safety off
Objective: Reach HYPERION
After reaching the bottom of the lift, take out the Override Key and defeat the android (use Gadgets). Then insert the Override Key on the next door marked as a main objective, go through to the next area where you walk over a metal beam. Then the collectible is straight ahead on a trolley by the window.
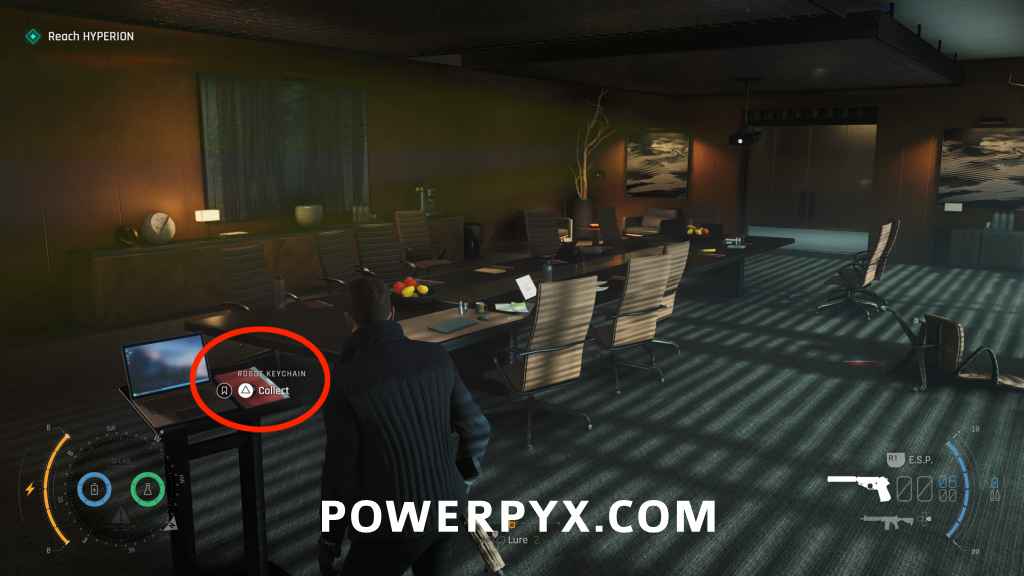
Memento: Robot Keychain
Checkpoint: 19 Silo entrance
Objective: Reach HYPERION
After a long climb down the reactor (silo), you will use a zipline to the bottom floor, then you crouch through an AC vent. After you drop out the vent into an office, the collectible is on a podium behind you.
Chapter 17: For England
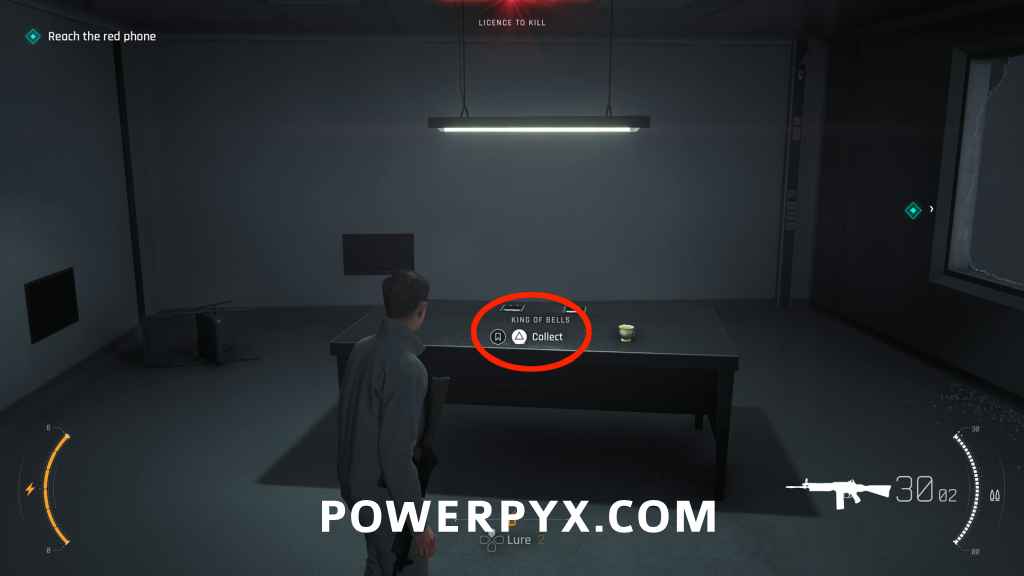
Card: King of Bells
Checkpoint: 03 Null Space
Objective: Reach the red phone
After speaking with the wounded lady, go through the door to the next area. Go into the room straight ahead and the collectible will be on the table.
Postcard: MI6 Postcard
Checkpoint: 06 Backstairs
Objective: Pick up the earpiece / Locate Moneypenny
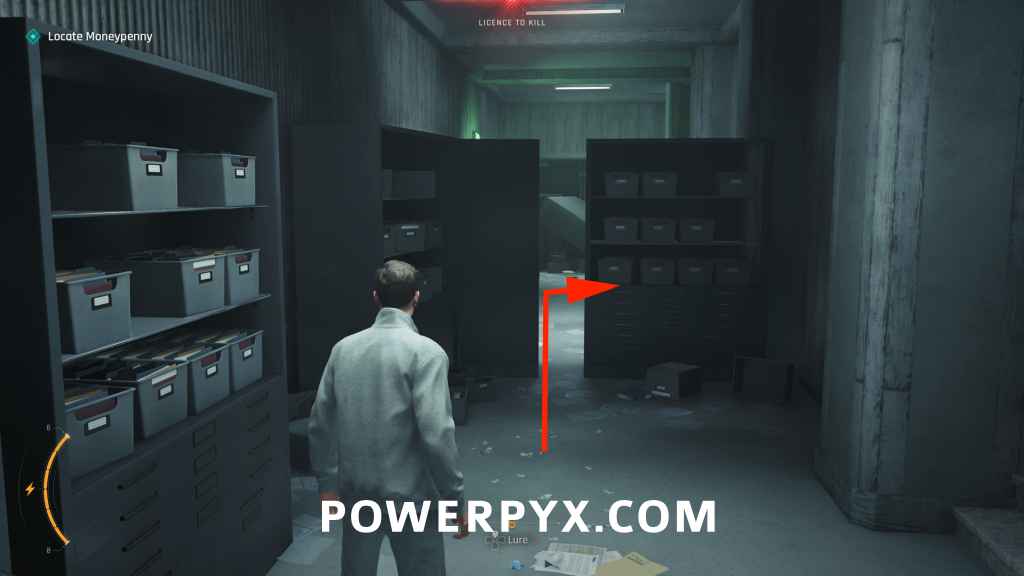
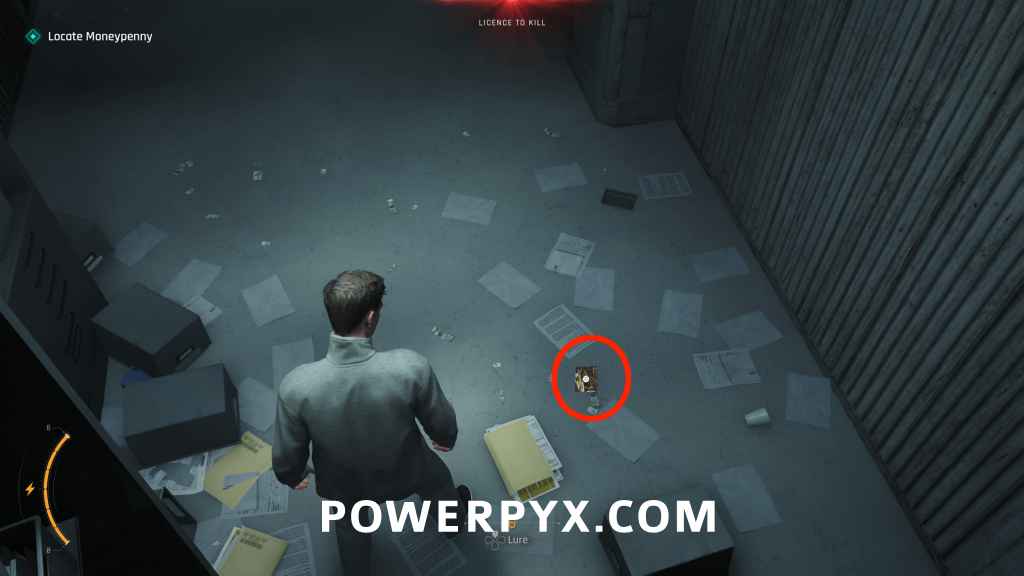
After answering the red phone and picking up the earpiece from the defeated enemy, go through the next door and squeeze past the shelves. As soon as you squeeze through the shelves, look down and the collectible will be on the ground.
Card: Ace of Shields
Checkpoint: 08 Moneypenny’s pod
Objective: Locate Moneypenny
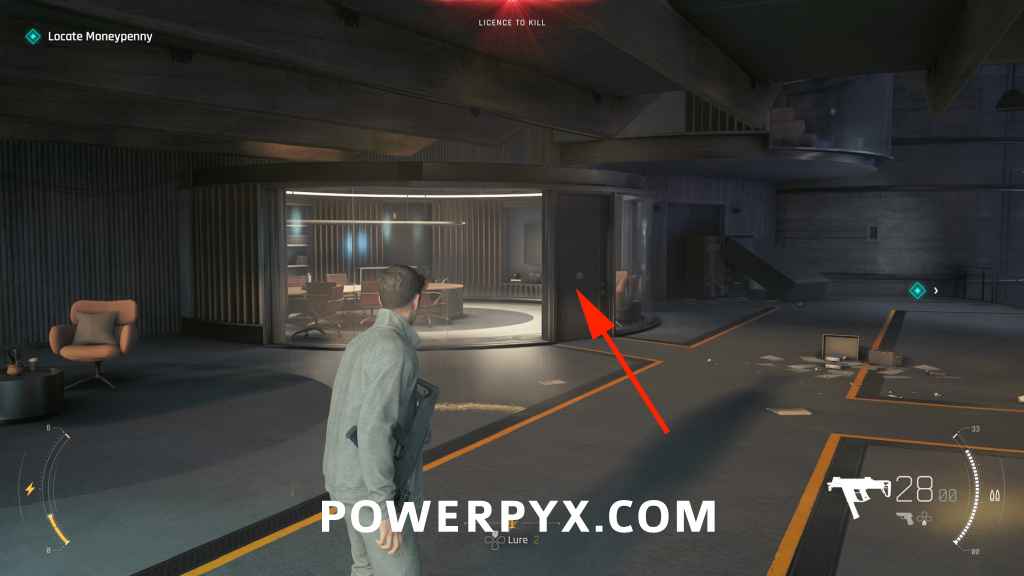
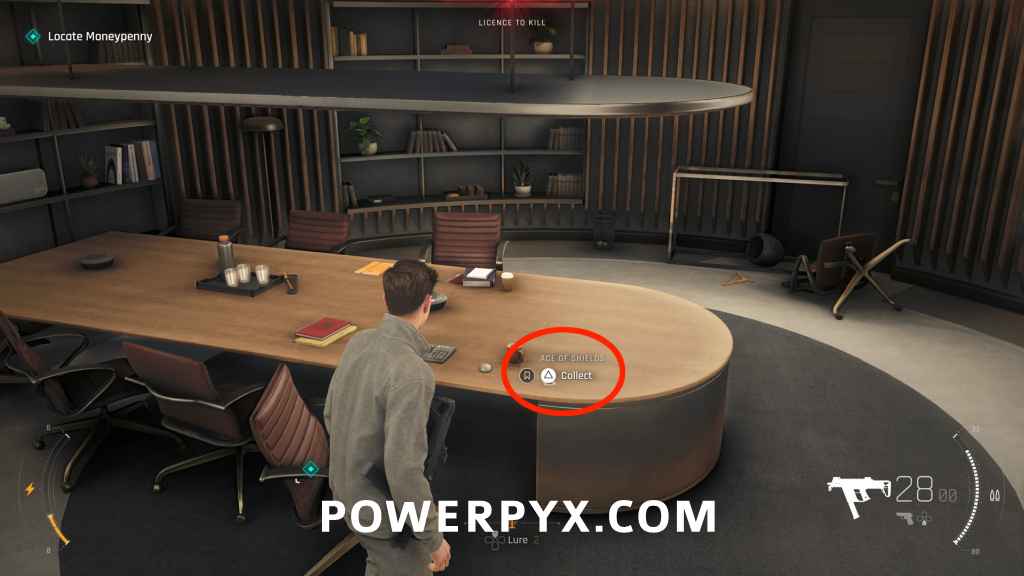
Once you get to where Moneypenny’s office is, kick down the door to the office on the left and the card is on the table.
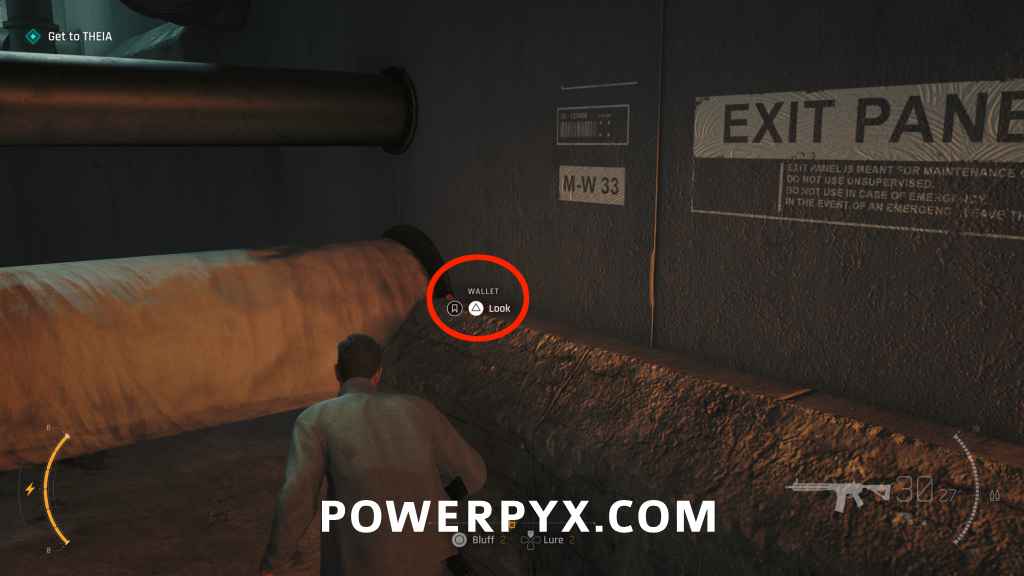
Intel: Wallet (Eve Moneypenny)
Checkpoint: 10 Utility tunnels I
Objective: Get to THEIA
A little while after defeating the two snipers, you enter a service tunnel where you must use a wall panel to turn off the fan. Then go through the fan and this item will be straight in front of you on the ledge. Before climbing down the ladder.
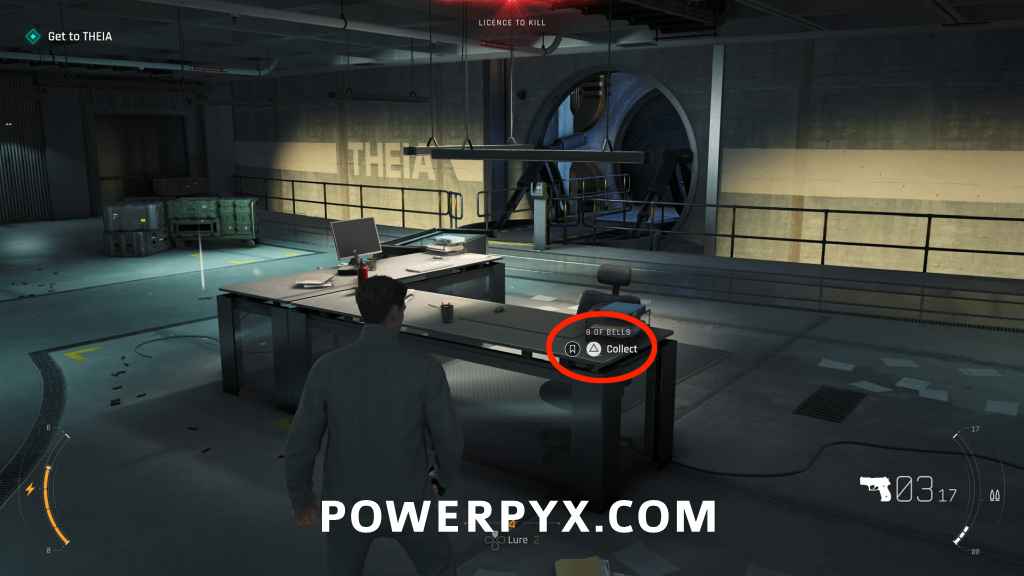
Card: 8 of Bells
Checkpoint: 12 THEIA
Objective: Get to THEIA
After dropping through the elevator and defeating the 3 enemies, the collectible will be on the desk to the right.
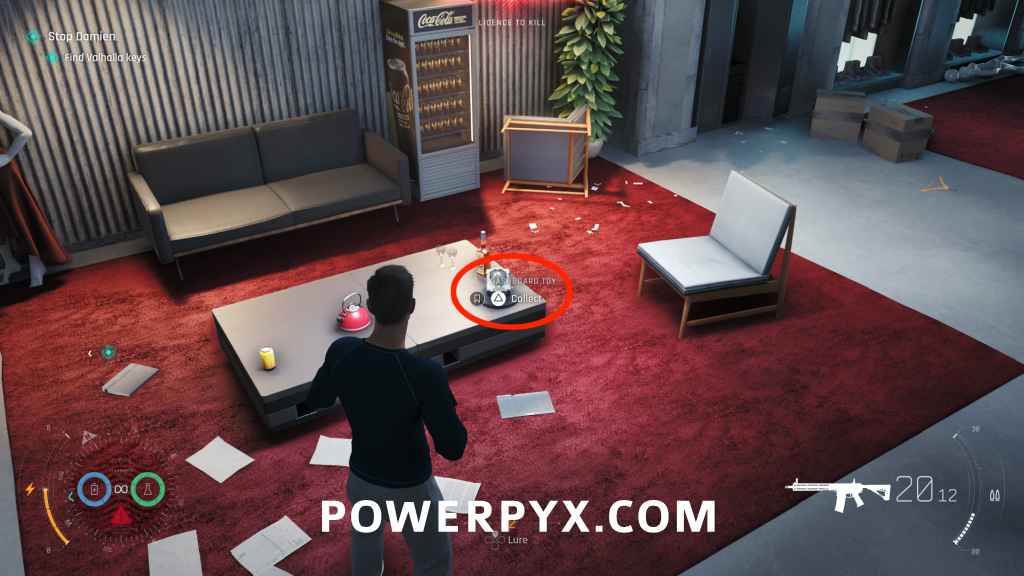
Memento: Dashboard Toy
Checkpoint: 14 Q Lab showdown
Objective: Find Valhalla keys
Once you reach the Q-Lab, head into the Q-07 Wearables section where the main objective is, the collectible will be on the small coffee table.
That’s all the Collectibles done! Special thanks to ObsiEez for helping with the search.
Arkonite says
Hey PowerPyx,
First of all, thanks for the guide — having it up so quickly after the embargo is seriously impressive!
I got a review code and finished the game yesterday. I was only missing a few collectibles, so your guide help me clean everything up really fast
The problem is: after completing two collections (Legacy Items and Mementos), the trophies still won’t pop. In-game, both collections are marked as complete, but the PS tracker still shows one missing item for each set (8/9 for Legacy Items and 13/14 for Mementos).
Any idea what could cause this? And how to force the PS tracker to update.
Thanks!
PowerPyx says
For me the collectible trophies popped fine. Try rebooting the game offline (disconnect console from internet). Try reinstalling the game, sometimes this helps. After reinstall also try picking up the last collectible again, though it might not update the tracker if it already counted as found in-game. If none of that works you’d probably have to start a new save and find them all again. If you still have an older save in PS+ Cloud before picking up the last few, you could redo them from there, but if you have autosync turned on it probably overwrote the cloud save already.
For others that I know it all popped fine without issues.
Arkonite says
I figured out the issue, here’s my interpretation if this could help other players.
When picking up the last item of a collection, you have to wait for the trophy to pop (few seconds). I tested it with two other collections and it worked fine.
For the previous trophies, I quit the game immediately after collecting the final item, and I think it broke the PS tracker.
Maybe you should warn players to wait a few seconds after picking up the last collectible until the trophy unlocks.
Immie says
I kind of have the same problem, but with Intel. I collected all the Intel, and my last one was “Born Family Photo” in Chapter 11. When I picked it up, it showed on the side of the screen like it counted, but the trophy didn’t pop. It’s still showing yellow, so it’s marked, but it’s not popping.
Tywerse says
The same problem, I collected all the collections, but the last collector’s trophy does not fall to me, although everything is collected
Kim says
Chapter 4 Meet and greet there is a newspaper on a table next to a coffee maker towards theim right side of the room.
PowerPyx says
It doesn’t count as a collectible, there are lots of items you can read that don’t actually count. Only the ones with a collectible icon on the left when looking at them count, they will show a golden “Collectible” text on the right after picking them up. Any that don’t have that aren’t counted toward collectibles. There are probably just as many extra text items you can interact with as there are ones that count as “collectibles”.
Kingseh says
On the mission ‘All The Time In The World’ from the checkpoint ‘Delivery Area’ once you come down from the terrace just before the kitchen entrance there is a chef and two security arguing. Behind the chef are some crates of apples, if you scan with the watch you can see a gold collectible in-front of them, it looks glitched and is not able to be collected.
I collected all the collectibles from your guide and replayed the mission to make sure it wasn’t a different collectible clipping through the ground and it is still there.
PowerPyx says
I saw that too, I think it’s just a visual bug. Doesn’t seem reachable. There are a few weird visual bugs like that. In Chapter 16 I also saw yellow objects through the floor under the reception. Then other times it doesn’t mark actual collectibles in yellow when you scan them.
Elliot says
How do you unlock the dart phone?
PowerPyx says
Automatic from story.
PowerPyx says
Already live and embedded here.
DanTheMan1999 says
It seems the collectible trophies only unlock after you collect the last one and then the game saves (the little icon will show in the bottom right)
DomiN says
Word of warning about Chapter 10 – once you collect $100k needed for the objective, the game locks you out of money making, so if you don’t do the ‘Crypto wallet’, you can miss the ATAC Device.
Justin says
Hey I’m not sure if you are aware of this but there is a kind of collectable tracker. If you look to your left in the tacsim hub there’s a wall of all the collectables you can look at. Not sure if it labels which you are missing as I already collected them all by the time I started the tacsim. Hope this helps!
Wortwahl says
Thank you. That was very helpful. Should have known it earlier. Then i wouldn’t have collected the last memento without saving.
Now the wall shows everything is collected, the memento trophy still doesn´t pop.
Very, very disappointing.
Justin says
I got everything but my momento trophy didn’t pop so therefore I didn’t get my platinum. I tried restarting checkpoint. Them restarting my game and then restarted my console but still didn’t pop the trophy. Again I have all collectables.
Nick says
My postcard trophy won’t pop. Ive collected 10 out of 10 but it won’t work. Weirdly enough the trophy for collecting all of the collectibles in the game popped.
Plz help haha
YnnMth says
Hey PowerPyx
Have been following your impressive job for more than a decade now ; I’ve been able to finally getting that Platinum because of a dozen collectibles missing!
Some of them were just in front of me but I must have been blind or something
Thanks again man for your hard work
Great games are coming out
Have you played the demo of “ The Eternal Life of Goldman” !? So damn good and the art style is amazing
Cheers !
Duke_Of_Devere says
Any ideas for what to do if you load up a chapter and don’t have the laser strap? I’m trying to pick up the last few collectibles, but I keep loading gup chapter 10 without it.
Am I just going to have to play on from chapter 9? Or is there another way around it
Ottó says
I have the same problem, it simply doesn’t give the laser strap after choosing the chapter. How did you finally solve it, did you do it from chapter nine to the end?
Martin says
is there anything you would suggest if say a playing card just wasn’t there at all??? im after the Ober of shields where you go in the dining room and its just not there at all, ive tried playing offline, ive reinstalled the game nothing!!!!