
Rally and Unite is the 5th main mission in Arknights Endfield. This walkthrough will guide you through all objectives of the Rally and Unite main quest.
- Starting Location: Valley IV > The Hub
- Quest Giver: Automatically given by Andre
- Chapter: Chapter 1 – Process 1
- Requirement: Finished Main Mission 4 – Valley Reboot
- Reward: 4 Origeometry, 1850 T-Creds, 14 Intermediate Combat Records, 11 Arms INSP Kits, 800 Operational XP
- Quest Description: There may be extensive repair work at the Originum Byproduct Processing Center. Go to the Core AIC Area and use AIC facilities to prepare the necessary materials.

Meet with Andre at the Core AIC Area
Immediately after Valley Reboot, you will find Andre (Owl Man) in front of you. Talk to him.


Gather Originium Ore from nearby mining spots
Andre wants you to make some Origocrusts, but first you must mine some Originium Ore – it’s the basic building material from which everything else ‘originates’.
Originium looks like big brownish crystals. They are directly behind Andre on the cliff, destroy the crystals with your basic attacks and pick up the ore that falls to the floor.

Return to the Core AIC Area and talk to Andre
Return to Andre.
Place a Refining Unit / Place an Electric Pylon to power the Refining Unit
Open the backpack, click on the Refining Unit and place it in the hotbar. Just like you did in the previous quest with the Relay Tower, open the hotbar, select the Refining Unit, place it in the outlined spot.

Next, place an Electric Pylon (again from backpack to hotbar, then build it). Every structure you build must be powered by a nearby Electric Pylon. The power radius of the Electric Pylon is outlined in a blue grid when placing it. Each of these can power multiple buildings, they just need to be close enough.

Check the Refining Unit control panel
Approach the structure and click the “Refining Unit” prompt that appears onscreen. Place the Originium in the Refining Unit -> it will turn into Origocrust. Remember this, it’s one of the basic building materials you’ll need a lot of in the future.
Talk to Andre
Return to Andre again.
(Optional) Use the ziplines for fast travel / Go to the Originium Byproduct Processing Center
After the talk, you spawn in front of a zipline.

Use it to jump from one zipline to the next to reach your destination quickly. A tutorial also explains that ziplines from other players can be used without powering them, but they decay over time unless repaired. Remember: placing ziplines in strategic locations allows you to dart around the map quickly, which will come in handy for your daily material farming routine (particularly to Recycling Stations). For now just head towards the objective marker.
Fix the gate to the of the Originium BPPC / Open the gate
The gate to the facility is broken. Approach it and click the “Repair” prompt that appears. Spend 5 Origocrust to do so. If you somehow discarded these, you can fast travel back to your base to grab more.
Use the terminal to the right of the gate to open it.
Enter the Originium BPPC to investigate / (Optional) Follow the footprints and investigate
You now have access to the Easy Tools button: R2 (PS5) / R (PC). This lets you use the Scan function which can mark items in your surroundings. Common interactables are marked blue and mission items are yellow.
To do the optional objective, use the scan to see yellow footprints on the floor and follow those. This leads to some extra clues, indicated by yellow triangle icons:
Left side on the floor, pick up the scribbled note. Then cross the road on the left and check the empty box.

Follow the road to the right and enter the lab-looking building where the footprints lead. Inside the lab pick up the 4 yellow marked objects.


This completes the optional objective. Now go through the busted gate into the facility.
Defeat the Landbreakers
Defeat the 2 groups of enemies throughout the area.
Talk to the trapped UWST crew mates
Where you fought the second enemy, interact with the floating crate. On PS5 you must press D-Pad Down to select “Activate Crate” and press Triangle. On PC use the Mousewheel and “F”. Drag the crate over to the objective marker to climb up the taller crates.

Leveling Up:
After talking to the crew mates, you get a tutorial on how to use EXP materials to level up your operators. You need to go to the Operator Menu, select an Operator, click the “Level Up” icon in the top right, manually spend Combat Records to gain XP. Combat Records come in 3 rarity types that give different amounts of XP. You can also use the Auto Fill option in bottom right corner to spend everything at once. Use this on your main character to reach Level 20. You can’t level up further right now, only later through so-called “Promotion Items” you can reach higher levels. Leveling up increases your stats.
Leave the Originium BPPC / Defeat the Landbreakers
More enemies arrive. Defeat them.
Deliver the documents and parts to Andre
Open the Map (Touchpad on PS5 / M on PC) and fast travel back to the PAC (the yellow tower on the map). Talk to Andre there. Give him the items.
Andre has good news for you: he prepared Portable Originium Rigs while you were aware. These are super handy to automatically mine Originium while you do other things. You get a little tutorial to place these now. These don’t need to be connected to electricity either.
Go to a nearby mining spot
Go to the cliff behind Andre where you destroyed crystals earlier.
Place the Portable Originium Rig
Open your backpack, select the 2 Portable Orinium Rigs, click on the details and place the rig.

View the Portable Orinium Rig Control Panel
Interact with the Rig. The mined ore will be stored in the cache until it’s full. Click “Claim All” to transfer the Ore to your backpack.
Return to the Core AIC Area / Produce Origocrusts with the Refining Unit and put them in the Backpack
Go back to the Refining Unit in your base, interact with it. The Control Panel will come up with your Backpack on the left and the Facility on the right. Click on the Ore in your Backpack to move it to the Facility. Click “Claim All” to get a total of 30 Origocrusts.
Talk to Andre
Give the 30 Origocrust to the Owl Man.
Use the PAC to construct a Shredding Unit
Enter the yellow area. Then a tutorial will guide you how to place the Shredding Unit. On PS5: D-Pad Left and click X on “Facility List” / On PC: Press “Z”. This opens the Facility List will all available buildings. Select the Shredding Unit and click “Open Construction Screen” and “Construct”.
Place it near the Electric Pylon to ensure it’s powered on.

View the Shredding Unit Control Panel / Produce Originium Powder with the Shredding Unit and place it in the backpack
Interact with your newly placed Shredding Unit. Press Touchpad (PS5) / click the Magnifying Glass icon at the bottom (PC) to view the available formulas. Shred Originium Ore into Originium Powder.
Wait until 10 pieces are produced and “Claim All” to put them in your backpack.
Go to the arsenal / Meet the Endfield Operator
The arsenal is far away. But you can fast travel there. Open the map, click on the yellow tower icon in the Hub Base.

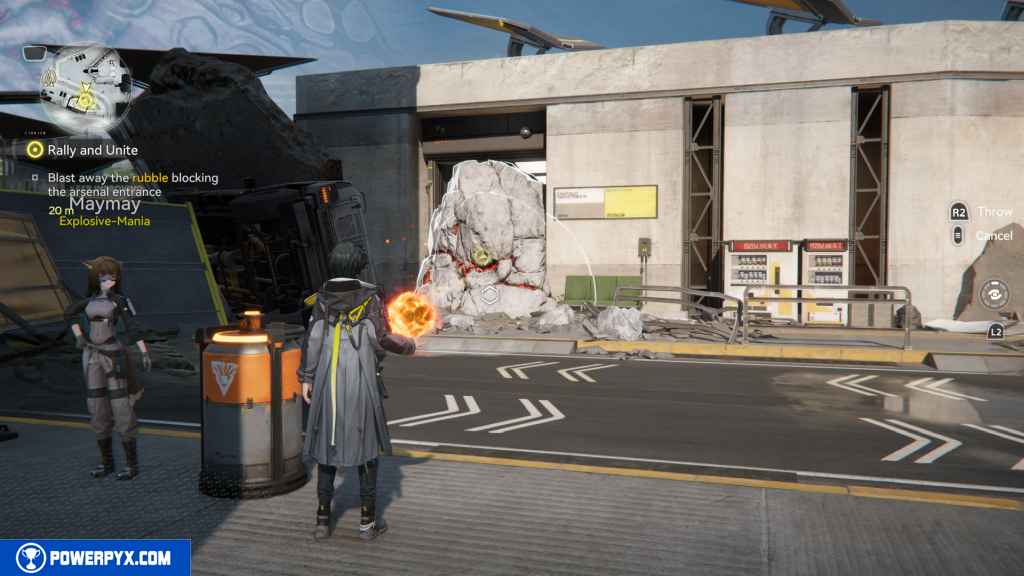
When you arrive, talk to Maymay at the objective, give her the powder. She teaches you about explosives – they are used to destroy certain obstacles (red walls etc) in the environment to reach new areas.
Blast away the rubble blocking the arsenal entrance
Interact with the barrel next to Maymay to grab an explosive, throw it at the red wall. For now you can only make “unstable explosives” that disappear after a while. Later, you can make portable explosive that remain in your backpack.
Find the missing arsenal engineer / Talk to the arsenal engineer
Go through the now-open wall, then melee attack the obstacle on your path.

In the next room talk to the engineer (Semyon) on the floor. He unlocks a weapons shop for you here. Spend some stock bills to buy a weapon.
Equipping & Leveling Weapons:
Open the operator menu and click on the Weapons tab (on right side, second from the top) > Cick “Switch” in bottom right > Click “switch weapon” and equip the new one. In the same screen you see the weapon stats and can level up the weapon. Click the Weapon Level in the top right. Just like character levels, you can spend materials to level up your weapon level. When it reaches the level cap, you will need weapon tuning materials to reach higher levels (Cast Die, Kalkonyx etc). Leveling increases weapon damage and improves the weapon-specific skills. You can use the “Auto Fill” option to raise it to Level 20 right away.
Read the message from Andre
You will be using the “Baker” for the first time, basically your phone where you receive text messages. This happens automatically, then click “End Chat”.
Go to the underground lab / Talk to Andre
Follow the objectives to the north of the Hub Base, go into the lab building and downstairs to meet Andre.


Return to the base and talk to Director Qin
You can fast travel back outside to the hub base, walk over to Qin inside the base. She’s happy with the progress you’ve made, but the comms node is still broken.
Fix the Hub Base comms node
Interact with the machine in front of you, it will bring up a circuit puzzle. You need to drag the component from the right side and place it like this:
Circuit Puzzle 1:

Circuit Puzzle 2:

This results in a cutscene and unlocks the Gear Assembly menu. Follow the onscreen prompts to craft your first piece of armor. You can always return to this menu later from the Protosync (the main menu). On PS5 press Options-Button / on PC press ESC -> on right side click Gear Assembly.
To equip armor, go to the operator menu, click the third menu from the top. Every operator can have 4 armor pieces: Body Armor, Gloves, 2 Kits. You can also equip 1 Tactical here (e.g. Buckflower Powder to automatically heal when health drops below 60%).
Remember to craft armor for your other operators too.
This finishes Rally and Unite main quest in Arknights Endfield. Your reward is 4 Origeometry, 1850 T-Creds, 14 Intermediate Combat Records, 11 Arms INSP Kits, 800 XP.
NEXT: Westward into the Vale
For all other Quests refer to Arknights Endfield Walkthrough.
Leave a Reply