
God of War 2018 Trophy Roadmap
- Estimated trophy difficulty: 4/10
- Approximate amount of time to platinum: 30-40 hours (with collectible guide)
- Offline Trophies: 37 (1
 , 5
, 5 , 9
, 9 , 22
, 22 )
) - Online Trophies: 0
- Hardest Trophy: Chooser of the Slain
- Number of missable trophies: 0 (can do everything after the story in free-roam)
- Glitched trophies: 0 (with latest patch)
- Does difficulty affect trophies?: No, can do everything on easy.
- Minimum Playthroughs: 1
 , 5
, 5 , 9
, 9 , 22
, 22 )
)Introduction
Welcome to the God of War 2018 Trophy Guide! This game marks a new beginning to the God of War franchise, with a completely new storyline. Even if you never played God of War it will be easy to understand. None of the trophies / collectibles are missable. You can get everything after the story in free-roam. So just enjoy the game and play it how you want, mop up all remaining trophies afterward. There aren’t any difficulty-related trophies either. You can jump between easy, normal, and hard at any time via the options menu. There are over 300 collectibles, but they are fast to collect and have a decent tracker on the map. In total you are looking at roughly 12-14 hours for the story and around 20 hours for the mop-up. Getting 100% takes roughly 35 hours.
Step 1: Play through the Story
Just enjoy the game. Play through the story how you want. The story takes roughly 12-14 hours. Don’t bother focusing on collectibles, most of them you can’t get during the story anyway because they require skills unlocked later in the game. You can of course pick up what you run into. Especially purple chests and Nornir chests (the ones sealed by 3 runes) provide you with helpful upgrades.
I recommend playing the game on normal for the best experience. For the sake of trophies you can play on easy, there are no difficulty-related trophies, nor is there any in-game benefit to playing on a higher difficulty.
Don’t worry about missables. After the story there’s free-roam and you can go back everywhere to mop up what you have left. Technically, there is one purple language cipher chest that you can’t go back to after the story, but you only need 8 of them and there are more than that (so missing out on it doesn’t affect anything).
Step 2: Collectibles / Favours
After the story, it’s time to go around the map and mop up any collectibles and favours (side quests). Simply follow the collectible guide, it contains 100% of all the collectibles area by area. This will unlock a total of 13 collectible-related trophies including dragons and valkyries.
Playlist:

Step 3: Muspelheim / Niflheim / Valkyrie Queen
This step ties in with the collectibles. You must open 8 purple chests that contain language ciphers (the purple chests with a face-lock on them that Atreus can open with his dagger). They are included in the collectible guide. These unlock the realms of Muspelheim and Niflheim. Each realm requires 4 ciphers (thus 8 total). They are bonus areas with some additional challenges in them. In Muspelheim you do the trials for trophy “Fire and Brimstone” and in Niflheim you must farm mist echoes to buy all the chests for trophy “Darkness and Fog”. After buying all chests, the only thing you may have left is beating the Valkyrie Queen. She can be found in the Council of Valkyries area (Midgard). You must place the heads of the other 8 valkyries on the thrones in that area to summon the Queen. She’s the hardest boss in the game so it’s best to keep her for last when you have the best armor unlocked.
Useful Links:
- God of War Wiki & Strategy Guide
- Collectibles Video Guide Playlist
- Collectibles Guide
- Wildwoods
- The River Pass
- Foothills
- The Mountain
- Volunder Mines
- Landsuther Mines
- Fafnir’s Storeroom
- Northri Stronghold
- Konunsgard
- Cliff of the Raven
- Lookout Tower
- Isle of Death
- Iron Cove
- Forgotten Cavern
- Light Elf Outpost
- Buri’s Storeroom
- Stone Falls
- Veithurgard
- Tyr’s Temple
- Thamur’s Corpse
- Shores of Nine
- Council of Valkyries
- Alfheim
- Helheim
- Muspelheim
- Niflheim
- Treasure Map Locations & Dig Sites
- Story Walkthrough – All Main Quests
- Favours Walkthrough – All Side Quests
- All Runic Attack Locations
- All Armor Sets, Their Stats, How to Get Them
- All Crafting Material Locations
- Complete Bestiary: All Monsters
- Fix: Game not Fullscreen / shows Black Bars
- How to Unlock Muspelheim Realm
- How to Unlock Niflheim Realm
God of War 2018 Trophy Guide
 |
Father and Son Obtain all other trophies |
 |
| Earn all other trophies in God of War (2018) to unlock platinum (DLC not required). | ||
 |
The Journey Begins Defend your home from The Stranger |
 |
| Automatic story-related trophy, cannot be missed. Unlocks when completing 1st main quest “The Marked Trees”. | ||
 |
A New Friend Survive the Witch’s Woods |
|
| Automatic story-related trophy, cannot be missed. Unlocks during 2nd main quest “Path to the Mountain”. | ||
 |
Feels Like Home Allow the Light Elves to return home |
|
| Automatic story-related trophy, cannot be missed. Unlocks during 4th main quest “The Light of Alfheim”. | ||
 |
Dragon Slayer Defeat the Dragon of the Mountain |
|
| Automatic story-related trophy, cannot be missed. Unlocks during 5th main quest “Inside the Mountain”, after defeating the big dragon boss “Hraezlyr”. | ||
 |
Troubling Consequences Defeat Magni and Modi |
|
| Automatic story-related trophy, cannot be missed. Unlocks during 7th main quest “The Magic Chisel”, after the Magni and Modi boss fight. | ||
 |
Hello, Old Friend Retrieve the Blades of Chaos |
|
| Automatic story-related trophy, cannot be missed. Unlocks during 9th main quest “The Sickness”, after obtaining the Blades of Chaos and defeating the first wave of enemies with them. | ||
 |
Promise Fulfilled Heal Atreus |
|
| Automatic story-related trophy, cannot be missed. Unlocks when completing 9th main quest “The Sickness”. | ||
 |
Round 2 Rescue Atreus |
|
| Automatic story-related trophy, cannot be missed. Unlocks when completing 11th main quest “Return to the Summit”. | ||
 |
Past Haunts Ride the ship out of Helheim |
|
| Automatic story-related trophy, cannot be missed. Unlocks when completing 12th main quest “Escape from Helheim”. | ||
 |
Twilight Beckons Defeat Baldur |
|
| Automatic story-related trophy, cannot be missed. Unlocks when completing 15th main quest “Jötunheim in Reach”, after defeating the “Baldur” boss. | ||
 |
Last Wish Spread the ashes |
 |
| Automatic story-related trophy, cannot be missed. Unlocks when completing 16th main quest “Mother’s Ashes” (completed the story). Congrats, you have now beaten the main story! If you want to see a hidden ending cutscene, return to your home in the Wildwoods. You can still free-roam after the story and mop up missing trophies. | ||
 |
Beneath the Surface Explore all the Lake of Nine has to offer |
|
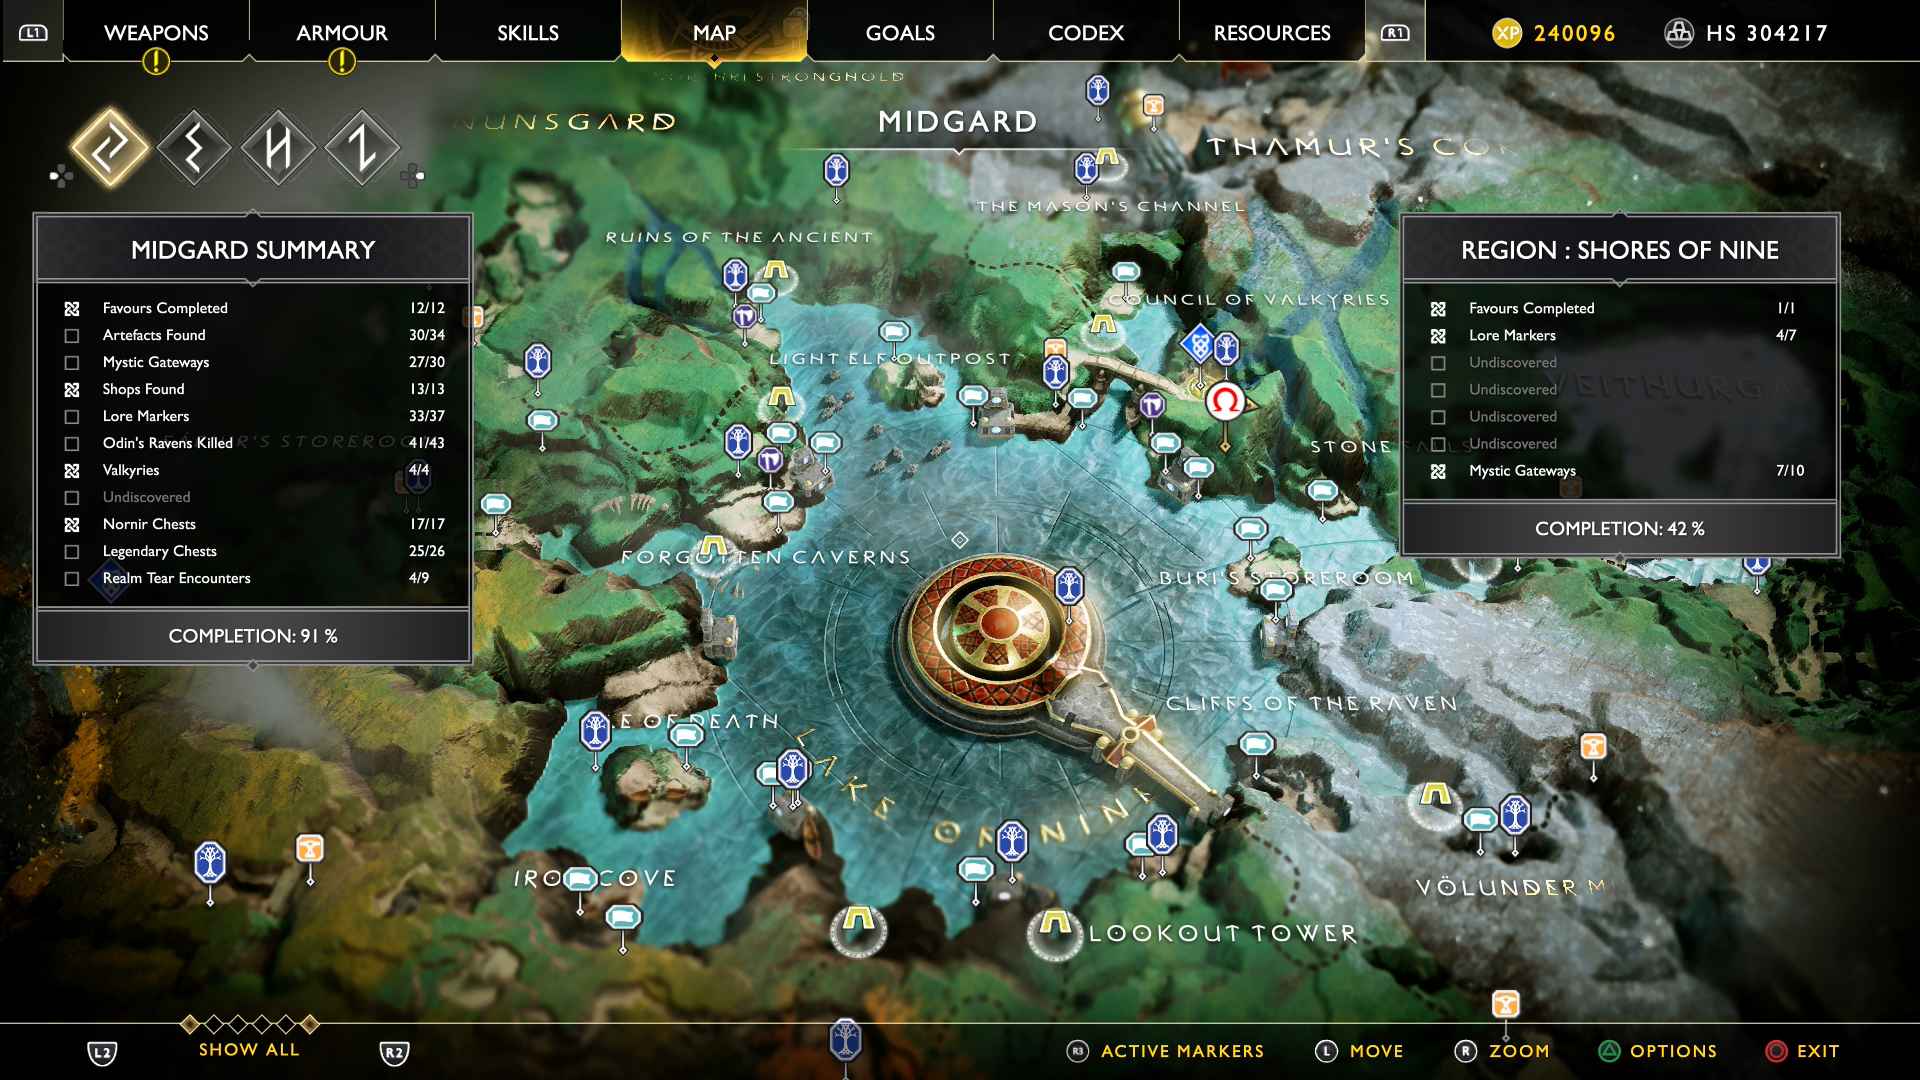
| This requires you to unfog the map around the Lake of Nine and visit each island once. Lake of Nine is the central area in Midgard. There are many named islands. You must explore until the fog has disappeared from the map. The trophy didn’t pop instantly for me, I had to fast travel through a mystic gate to get it to pop. When you follow the collectible guide you will get this trophy automatically along the way (because you must visit each area for the collectibles).
Below is a picture of what the full uncovered map looks like (area names are shown on the map).
The areas you need to discover are (in clockwise rotation, starting in the north -> east -> south -> west):
Just follow the God of War (2018) – All Collectible Guide and you’ll uncover every region. |
||
 |
Death Happened Here Fully explore Veithurgard |
|
|
Awarded for finding all collectibles in Veithurgard. Velthurgard is the area in the north-east corner of the “Lake of Nine” in Midgard. You can get there by boat. The area is sealed off by a huge golden gate which you can open at the top of the Stone Falls (the area across from the golden gate). To unlock the trophy you must find all collectibles in Veithurgard (except for freeing the dragon, it is not needed). There are 6 Artefacts, 1 Mystic Gate, 1 Favour (not needed), 1 Shop, 6 Lore Markers, 1 Legendary Chest, 1 Nornir Chest, 3 Odin’s Ravens. Simply follow the video above for everything or refer to the complete collectible guide below. |
||
 |
Trilingual Learn the languages of Muspelheim and Niflheim |
|
|
To unlock the languages of Muspelheim and Niflheim you must find purple “language cipher chests”. Those are the ones that have a floating white face-lock which Atreus can open with his dagger. You need 4 ciphers (4 purple chests) per language, so 8 in total. Luckily, there are more of those chests than you need. One is actually missable, inside the Serpent’s Belly at the end of the story. When you row your boat into the Sea Serpent to get Mimir’s second eye, there’s a purple chest next to the crate where you find his eye. You can’t go back to this place, but no worries, just find any of the other additional purple chests and you’re good. Unlike other collectibles, the purple chests aren’t tracked on the map and don’t count towards 100% completion. After having found 4 ciphers of each type it will unlock the respective realm (Muspelheim and the other one Niflheim). They are areas with hidden trials and some of the best gear in the game. After you have found 8 chests, the rest will simply contain upgrade materials instead of ciphers. You can pick up all the ciphers while you work on the other collectibles. They are included in the collectible guide / videos. For all the cipher locations, refer to the Collectible Guide, where they are marked as “Language Cipher Chests”: |
||
 |
Dwarven Ingenuity Upgrade a piece of armor |
|
Go to Brok’s or Sindri’s Shop (the blacksmiths). First, you must have crafted and equipped any piece of armor. In the shop menu press  to scroll to the “Upgrade” section > press to scroll to the “Upgrade” section > press  on your piece of armor > hold on your piece of armor > hold  to upgrade the armor. The upgrade process requires some Hacksilver (the game’s currency). Lower-tier armor can be upgraded very cheaply for about 1,000 Hacksilver. to upgrade the armor. The upgrade process requires some Hacksilver (the game’s currency). Lower-tier armor can be upgraded very cheaply for about 1,000 Hacksilver. |
||
 |
Nice Moves Obtain a Runic Attack Gem |
|
| Unmissable story-related trophy. You unlock this in Main Quest “Path to the Mountain”. There Atreus will point out a chest and you must open it to proceed. Runic Attack Gems are generally found in Chests, from Side Quests, and dropped by challenging monsters. | ||
 |
Iðunn’s Orchard Fully upgrade your Health |
 |
| There are 9 Health Upgrades in God of War.
You can find health upgrades (Idunn Apples) inside Nornir Chests. Those are the chests that have 3 rune-seals on them. To fully upgrade your health you need 9 of them (every set of 3 gives a health upgrade). Nornir Chests can also contain Horns of Blood Mead, which you need to upgrade Rage. So in total you must collect 18 Nornir Chests out of 21 available (9 Health Upgrades, 9 Rage Upgrades). None of them are missable, you can still get everything after the story in free-roam. Each area has a collectible tracker so you always know where you’re missing something. For all Nornir Chest locations, refer to the collectible guide: |
||
 |
Quick Tempered Fully upgrade your rage |
|
| There are 9 Rage Upgrades in God of War.
You can find rage upgrades (Horns of Blood Mead) inside Nornir Chests. Those are the chests that have 3 rune-seals on them. To fully upgrade your rage you need 9 of them (every set of 3 gives a rage upgrade). Nornir Chests can also contain Idunns Apples, which you need to upgrade Health. So in total you must collect 18 Nornir Chests out of 21 available (9 Health Upgrades, 9 Rage Upgrades). None of them are missable, you can still get everything after the story in free-roam. Each area has a collectible tracker so you always know where you’re missing something. For all Nornir Chest locations, refer to the collectible guide: |
||
 |
Best Dressed Craft an outfit for Atreus |
|
| Go to Brok’s or Sindri’s Shop (the blacksmiths). In the crafting menu choose “Atreus Armor” and buy any one of them. The cheapest Atreus Armor costs 10,000 Hacksilver (the game’s currency). You can reload the second last autosave to get your money back. | ||
 |
Enchanted Slot an Enchantment into your armor |
|
| First, you must upgrade a piece of armor to unlock an enchantment slot. See trophy “Dwarven Ingenuity” on how to do that. Alternatively, you can also craft a high-tier armor that already has an enchantment slot by default. Now open the menu > Armor > press on your upgraded armor to view enchantment sockets > place an enchantment in the free slot. You will first have to find an enchantment. Lots of these are dropped by boss enemies throughout the story. You can also buy them at Brok’s or Sindri’s shop (the blacksmiths) after making a little bit of story progress. |
||
 |
All Will Fall Kill 1,000 Enemies |
|
| Self-explanatory and will unlock automatically on your path to platinum. There is no need to farm this, you will kill plenty of enemies during the story, when searching for collectibles, and during trials.
If you want to farm kills, it can be done in the Muspelheim Trials. Press |
||
 |
Dangerous Skies Free all of the Dragons |
|
There are 3 Dragons in God of War. All of them are found in side areas of Midgard.
The dragons are tracked as “favours” (side quests) in their respective regions. You will free them all when you follow the collectible guide. Their quests consist of destroying 3 dragon shrines. Those are little stones with a blue rune on them. They are hidden around the area near the dragon, never in other regions. After destroying the 3 dragon shrines you can return to the dragon to break open its lock and free it. For their exact locations, refer to the collectible guide: |
||
 |
Like Oil and Water Complete all of Brok and Sindri’s Favors |
|
For this you must complete 5 favors (side quests) for Brok & Sindri in Midgard. They are the two shopkeepers / blacksmiths that you encounter numerous times throughout the story. You can’t miss them. Their favors become available gradually as you progress through the game. Then you can visit them at one of their many shops and press  to start the quest. to start the quest.
Brok has 2 favors and Sindri has 2 favors. After doing each of their favors they will be together in the Tyr’s temple and give you the 5th favor. The favors are:
Sindri’s favors in Niflheim are not needed for this, only the 5 in Midgard. You can still do all of them after the story! I didn’t trigger a single one during the story and did them all afterwards. After completing a favor you can talk to the quest giver again to get the next one (if it’s unavailable you need more story progress). Doing the favors is well worth your time. They unlock side areas that contain lots of collectibles needed for trophies. After the 5th favor you also unlock two really good level 6 armors in the shop. |
||
 |
Curator Collect all of the Artifacts |
|
| There are 45 Artefacts in God of War. They are shimmering collectibles on the ground.
None of them are missable, you can still get everything after the story in free-roam. Each area has a collectible tracker so you always know where you’re missing something. For all artefact locations, refer to the collectible guide: |
||
 |
Allfather Blinded Kill all of Odin’s Ravens |
|
| There are 51 Odin’s Ravens in God of War. They are green-colored ravens overlooking certain areas. They are the best hidden of all collectibles. When one is nearby they emit a metallic sound.
None of them are missable, you can still get everything after the story in free-roam. Each area has a collectible tracker so you always know where you’re missing something. For all raven locations, refer to the collectible guide: |
||
 |
The Best Moves Fully upgrade a Runic Attack |
|
| First, you’ll have to find a Runic Attack Gem (Trophy: Nice Moves). You get one automatically during the second main quest “Path to the Mountain”. They are often found in chests, dropped by bosses, and awarded in side quests. The first story-related one, called “He’l Touch” is the cheapest to fully upgrade (5000 XP total). Upgrades simply cost XP which you get from defeating enemies.
Each rune has 2 upgrades. To upgrade it, open the Menu > Weapons > (put a Rune in a free Slot if you haven’t already) > press You can make a manual save beforehand and reload it to get your XP back. |
||
 |
Worthy Fully upgrade the Leviathan Axe |
|
|
Awarded for upgrading the Axe to Level 6. The last upgrade is only possible after beating the story. The axe can be upgraded at any shop. It requires “Frozen Flames” to be upgraded. Those are dropped automatically by bosses in the story, cannot be missed. If you forgot to pick them up, they will be placed in the “Lost Items” section at the shop so nothing is missable. By just finishing the Story you can upgrade the Axe to level 5. For level 6 you must open the chest in the central chamber of in Niflheim that costs 5,000 Mist Echoes to get a Chilling Mist of Niflheim. You must farm echoes in the randomized Niflheim Labyrinth or sell loot to get the echoes. The trophy “Darkness and Fog” requires you to buy all those chests anyway (refer to that trophy for more farming tips). Now at the shop go to: Buy > Resources > Trade the Chilling Mist of Niflheim for Frozen Flame. Now you can fully upgrade the axe. Remember the last upgrade requires you to have beaten the story. To unlock the Realm of Niflheim in the realm travel room, you must first find 4 Niflheim Language Ciphers. They are found in the purple chests with a floating face-lock with Atreus opens with the dagger. For the locations of all purple cipher chests, refer to the collectible guide: |
||
 |
Why Fight It? Fully upgrade the Blades of Chaos |
|
|
Awarded for upgrading the Blades of Chaos to Level 5. The last upgrade is only possible after beating the story. The blades of chaos can be upgraded at any shop. It requires “Chaos Flames” to be upgraded. Those are dropped automatically by bosses in the story, cannot be missed. If you forgot to pick them up, they will be placed in the “Lost Items” section at the shop so nothing is missable. By just finishing the Story you can upgrade the Blades of Chaos to Level 4. For level 5 you must get a Raging Inferno of Muspelheim. This is dropped by the Valkyrie in the Muspelheim Realm. So just defeat the Valkyrie there. Now at the shop go to: Buy > Resources > Trade the Raging Inferno of Muspelheim for Chaos Flame. Now you can fully upgrade the Blades of Chaos. Remember the last upgrade requires you to have beaten the story. To unlock the Realm of Muspelheim in the realm travel room, you must first find 4 Muspelheim Language Ciphers. They are found in the purple chests with a floating face-lock with Atreus opens with the dagger. For the locations of all purple cipher chests, refer to the collectible guide: |
||
 |
Path of the Zealot Obtain Traveler armor set |
|
| For this you must craft the full Traveller Armor Set, consisting of 3 pieces: Chest, Wrist, Waist.
To craft it you need these materials:
Both of these are dropped by Travellers (enemies that look like knights with heavy armor and shield). After killing the first traveller you will unlock a special crafting labour called “The Road Less Travelled”. Hand a Traveller Shard to Brok or Sindri at one of their shops to unlock the armor in the crafting menu. Throughout the game you will encounter more than enough of these enemies to craft the full set. If you forgot to pick up the materials they will be placed in the “Lost Items” section at any shop and can be retrieved later. This way nothing is missable. It will take 4-5 Travellers to get enough materials. Here’s a selection of easy Traveller Locations (there are many more, these are just the easiest):
|
||
 |
Primordial Obtain Ancient armor set |
|
| For this you must craft the full Ancient Armor Set, consisting of 3 pieces: Chest, Wrist, Waist.
To craft it you need these materials:
Both of these are dropped by enemies called “Ancients” (big stone enemies that shoot energy at you from their chest). After killing the first Ancient you will unlock a special crafting labour called “Hearts of Stone”. Hand an Ancient’s Heart to Brok or Sindri at one of their shops to unlock the armor in the crafting menu. Throughout the game you will encounter more than enough of these enemies to craft the full set. If you forgot to pick up the materials they will be placed in the “Lost Items” section at any shop and can be retrieved later. This way nothing is missable. It will take 3-4 Ancients to get enough materials. Here’s a selection of Ancients Locations:
|
||
 |
Unfinished Business Assist all of the wayward spirits |
|
For this you must complete the 5 favors (side quests) for the wayward spirits (ghosts) in the realm of Midgard. They can be found around the Lake of Nine area:
|
||
 |
Treasure Hunter Use treasure maps to find all of the dig spots |
|
|
There are 12 Treasure Maps & Dig Spots in God of War. For their locations refer to this Treasure Guide: » God of War (2018) – All Treasure Map Locations & Dig Spots |
||
 |
The Truth Read all of the Jötnar shrines |
|
| There are 11 Jötnar Shrines in God of War. They are big wooden doors that can be opened. Then Atreus deciphers a story from it that provides you with more lore about the game.
Unlike other collectibles, these are not tracked on the map. But luckily, none of them are missable. You can still get everything after the story in free-roam. For all shrine locations, refer to the collectible guide: |
||
 |
Fire and Brimstone Complete all of the Trials of Muspelheim |
|
|
To unlock Muspelheim you must collect 4 Language Ciphers. They are found in purple chests (the ones with a floating white face-lock). All of those ciphers are included in the collectible guide. » God of War (2018) – All Collectible Locations There are 6 Trials in Muspelheim. Each one has 3 difficulty levels (normal, hard, impossible). On your first visit you must beat the normal and hard versions to advance to the next challenge. The “Impossible” version becomes available after defeating the Valkyrie in Muspelheim, she comes after the 5th trial. To play the 6th Trial you must collect 3 keys which you get by beating any of the Impossible-Difficulty Trials. Because you only need 3 keys (from the 5 available trials at this point), you can pick and choose which you find the easiest. You can put your game difficulty on easy in the game options for this. It’s recommended that you do this after the story when you have better gear. After collecting 3 keys and then beating the 6th trial for the first time, the trophy will pop. It is not necessary to beat every trial on impossible difficulty! Just pick the 3 that are easiest for you. Trials #2, #3, #5 are recommended, they are the easiest by far. If you have trouble, be sure to get level 6 or level 7 armor first (level 6 armor is from doing all of Brok’s and Sindri’s side quests, level 7 armor is from the Niflheim Realm). To put the numbers in perspective, you’ll have to play trials 1-5 two times each (their normal and hard version). This is to advance to the next challenge. Defeat 1 Valkyrie at the end. Then beat the “impossible” version of 3 trials to get the keys. Then beat the 6th challenge one time by getting 50 kills in less than 8 minutes. Trials:
|
||
 |
Darkness and Fog Retrieve all treasure from the Workshop’s center chamber |
|
|
The workshop’s center chamber is found in Niflheim, a bonus realm that is unlocked by collecting 4 Language Ciphers from the purple chests (same procedure as for Muspelheim). For this trophy you must clear everything in the central chamber, open the 5 chests and 3 realm tears. Also see How to Unlock Niflheim for the language cipher locations. Niflheim is basically just a randomized labyrinth area with a few death traps and randomized enemy spawns. This map features its own currency called “Mist Echoes”. You must use these Mist Echoes to buy all the chests and realm tears in the central room of Niflheim. There are a total of 5 treasures chests and 3 realm tears in the central chamber. Opening all of them costs 68,500 Mist Echoes. You can farm them by opening chests throughout the randomized labyrinth. Also required to open the Realm Tears are 3 “Anchors of Fog” (1 per Realm Tear). Those are found randomly from legendary (golden) chests in the fog, usually in an area in the north where the path ends (there’s often an ogre there). You can also sell resources for Mist Echoes! However, only resources that you find in Niflheim can be sold for Mist Echoes. This drastically decreases the grind. Go to Sindri’s shop in Niflheim > Sell > Resources. For example, the epic item “Break down Easirbane” gives 2500 Mist Echoes each. By selling these resources you save A LOT of time. It’s worth noting that you must exit the Mist alive (go back to Sindri’s Shop) for your Mist Echoes and Resources to be saved. If you die, it will revert to an autosave before you entered the mist and resets what you have earned in the meantime. The layout of the labyrinth is always the same. Also look out for Nornir Chests within the Labyrinth, those give the most Mist Echoes. Mist Echoes Farming Guide (15,000 – 20,000 per run)
Even though it seems grindy at first sight, it really is not. It only took me 4 full runs of the labyrinth (around 60 minutes total) to get 70,000 echoes. The general rule of thumb: the more chests you open per run, the more the next chest will give. At first it might only be 200 or so per chest, later it will be 1500+ per chest if you clear the entire labyrinth in one run. So the key to farming is really just to stay alive, pick up all materials dropped by enemies, and open all chests along the way. With the following strategy I got 15,000 – 20,000 Mist Echoes per run. Around 9000 from opening chests and around 5000-6000 from selling materials that the enemies dropped.
|
||
 |
Chooser of the Slain Defeat the nine Valkyries |
|
There are 9 Valkyries in the game. 8 of them are normal Valkyries and 1 is the Valkyrie Queen that can only be summoned after defeating all the others (and she’s the strongest boss in the game).
After having killed the 8 Valkyries, you must bring their heads to the Council of Valkyries Region in Midgard. It’s in the north of the Lake of Nine. Place the 8 heads on the thrones to summon the Queen. After you defeat her the trophy pops. The Valkyrie Queen is a tough boss to beat. She does many unblockable attacks (but they can be dodged). It’s highly recommended you put the difficulty down to easy or else she can one-hit you. Be sure to have fully maxed out your weapons and have high-end armor equipped. The armor “Sindri’s Royal Dwarven Set” from doing all of Brok’s & Sindri’s quests in Midgard is recommended for this fight, and that’s what I personally used. The chest piece of this set adds a protective barrier that renders you invulnerable when using Runic attacks. Sindri’s Set also reduces the cooldown of Runic Attacks. The trick is to just dodge and wait a few seconds for runic attacks to recharge, use them and repeat. Thanks to Sindri’s Set you’ll be invincible while using them. It’s highly recommended you buy “Berserker’s Resurrection Stone” from a shop. It will revive you with full rage. Recommended Character Build: Put everything in Cooldown Stat
Valkyrie Queen Boss Strategy (works for any other Valkyrie too):
To access Muspelheim and Niflheim you must find Language Ciphers from Purple Chests. For all of those, as well as all Valkyrie Locations, refer to the complete collectible guide: |
||
 button prompt shows up, this will kill them instantly.
 .
. strikes. Be sure to dodge though. While spartan rage is active your health regenerates quickly.
 Special Thanks / Credits
Massive thanks to the following people for sending tips:
Mr_PaNtsONh3aD = Tremendous help with the collectible hunt and treasure maps
Tidux = One of the Raven Locations
damonx21 = General info
DannAllenGaming = General info
LiquifySolid = Info about Language Cipher Chests
Magnestado0o0 = Extra info for “Darkness and Fog”
Chris says
Fantastic guide, I’ll be sure to use it after I finish the story. Keep up the awesome work & happy 10th year anniversary. Here’s to many more ‘pings’ in the years to come.
FierceViper82 says
Great guide powerpyx I did hear it takes between 25 too 30 hours too complete the story though another 20 for collectables?
PowerPyx says
If you do side quests and explore a lot then 25 hours is quite realistic. If you count only story missions without side tasks or exploration then around 12-14h. If you take 25h to beat the story you’ll probably have completed all side quests and most collectibles along the way so the mop-up will be shorter than 20h.
p789cs says
Nice work as usual!
Will you upload about treasure maps video:P
& Congrats for 10 years anniversary!
PowerPyx says
I’ll put it up now.
bravo team says
according to the trophies the game doesnt have any major boss like thor is that right or these bosses dont have trophies?
RzKetchup says
Probably dont have trophies, i’m maybe 20% into the story and so far trophies are related to major events and not to bosses!
diazau says
Silver trophy for unfinished business, helping ghosts didn’t pop for me.
Anyone else having issues??
PowerPyx says
There’s a hidden favor “Time Heals All”. You must pick up the lore scroll at the end of “Northri Stronghold” to initiate this quest. Then return to Fafnir’s storeroom to talk to the spirit there.
Sam varnaseri says
How scroll?
in the ship?!
PowerPyx says
It’s on the dock across from the ship, on the floor.
Hiscklif says
You say must complete the “Time Heals Wounds” favor for trophy but i dont complete this favor , i got trophy just after completed the “Time Heals All” favor.
diazau says
Thanks PP. I got it today.
Mersang says
Congratulations on 10th anniversary
I like your guide video very much
God of War Masterpiece says
Hey can I change from easy to normal diffiuclty in the game or have to start new game on diffiuclty?
I am on easy but I want change to Normal so can I change in gameplay that I am on now to hunt the boar with son so I m thinking to change from easy to normal. 🙂
PowerPyx says
Yes you can jump between difficulties at any time via game options. No need to start new game.
GOW Masterpiece says
Thank you Powerpyx. Also happy 10th anniversary. 🙂 🙂
Sorry posted same twice because I edit my spell for difficulty. 🙂
Look forward to your next guide is Detroit. :D
Quink says
You say refer to collectible guide for unfinished bussiness. but i cant find shit about it there. How about you write where to find all labors instead of forcing people to browse tons of videos hoping to find them……
PowerPyx says
It’s already in the trophy guide, updated it earlier (and additionally in the collectible guide, where they are clearly marked as Wayward Spirit Favors).
Still working on in-depth text walkthroughs for each side quest/favor, which will be added in later.
Steve says
Don’t be a prick.
Josh says
How about you get off your ass and do something useful in life instead of talking crap to someone who’s doing all the hard work for you?
PM says
You are following his guide for absolutely free and unread of being thankful you talk garbage. Shame on you!
Spring_27_ says
This guy puts in hours on end to make us guides you dirt bag, have some respect!
RzKetchup says
Can you sell the artefact for money at the shop without hindering something in the future ?
Like should i keep em or their only use is to sell for hacksilver ? 🙂
PowerPyx says
I think it’s okay to sell them, not 100% sure yet. Will test it and get back to you shortly.
Karl says
I’m confused every other site says you gotta do all trials for the trophy it even says is trophy description complete all trials so I don’t have to beat all trials on impossible difficulty just 3?
PowerPyx says
Just 3.
John says
Can anyone confirm doing only three impossible trials will still unlock the trophy fire and brimstone I keep hearing from ppl you must complete all trials
Jeppe says
Popped for me when I was just there farming mats after 3 impossible + challenge where valkyrie used to be
Kishor says
Any good armor for Valkyries queen?
Dead_Psycho_69 says
I did it with ivaldi deadly mist set and berserker stone 3rd time i beated her up felt so good.
nahcir says
Are you 100% sure that there are no missable trophies in this game? I just finished it and wanted to start with some of the collectibles and have found myself to be unable to return to the outside area of the Witches Hut. Am I missing some path that I could take or something?
nahcir says
Just figured it out myself, you can still use the well beneath the house :-)
PowerPyx says
Yes, 100% sure. I didn’t pick up a single thing until after the story. No side quests, no collectibles, nothing. Got it all after story.
You can get back to the witch’s cave by boat. To get back to her turtle house you must climb out the well in the cave (behind the elevator). I show the path in the collectible video for The River Pass region.
BlackWolfGunner says
Tip: For the impossible difficulty level of the 4th trial (enemies quickly regenerate health) in Muspelheim, you can easily complete it using bare-handed attacks and stun arrows. Just fill the stun meter of enemies until you get R3 prompts. They all die in one grab.
PowerPyx says
Hah, smart thinking! I’ll add that in, thank you for the tip 🙂
BlackWolfGunner says
You’re welcome dude! Been using your guides for quite some time now. Keep up the great work.
Kishor says
How to get anchors of the fog?
PowerPyx says
They are randomly found those golden chests in the mist-labyrinth. Usually, at the very end of the path (the one straight ahead, where an ogre often spawns). So it’s random but if you open every chest you should get one every 1-2 runs. I got 3 of them in about 15 minutes.
RzKetchup says
What would be your 2 best runic attacks (light and heavy?)
I love Hel’s touch for light, but quite unsure of the heavy ?
Which ones did you use as bread and butter ?
PowerPyx says
My go-to move is “Frost Giant’s Frenzy”. It does a ton of damage and you’re invincible while using it. Really good against Valkyries after you stunned them with Hel’s Touch, takes down 20-30% of their health.
Mehrshadlars says
Tnx i collected everything with your collectable guide
There’s only one problem
The trophy named beneath the surface
Glitched for me and the all of the map defogged except the konûnsgard
I 100% the konûnsgard all the ravens and chests and dragons everything but in the map this region is still in fog
Pls help me
Tnx
PowerPyx says
That sounds like a very unfortunate bug. I think you have to start a new playthrough or try on an older save game.
You can also try reinstalling the game before starting from scratch. Sometimes it helps with fixing bugs.
jvaferreira says
Cheers PP! Great work on the Trophy Guide as always.
For the trophy Darkness and Fog you say on the guide that you can get 15k to 20k per run on the Workshop but all I can get is about 8k. Can you check if drops have been nerfed?
PowerPyx says
I get 8k-10k from just opening the chests. Then usually (on average) they drop 1-2 of the materials that have 2500 resell value and 3-5 of the ones that have 1000 resell value. On a good run I got 10k from opening chests in labyrinth and 8k from selling the dropped materials. The material drops have not been nerfed, I just captured videos for this last night and it was roughly the same (15k-20k) 5 times in a row.
Sawas says
Guys you have done an amazing work. Best guide ever, i want one more ancient rubble for the last trophy with the armor, can you help me find an other ancient?
PowerPyx says
There are 3 more: In River Pass, in Veithurgard, in Ruins of the Ancient.
Will add it in more detail to the guide, thanks for your question!
Edit: updated in the guide, I explained the locations there with more directions in case anything is unclear.
jvaferreira says
I believe the ancient on the way to the summit is actually missable. I did encounter it but I had to flee, and now in post game free roam it doesn’t spawn. Maybe it’s a glitch because there is a marker for it.
JakeP says
Hey! I unlocked every area you said for the Beanath the Surface, but the trophy did not unlock. Any suggestions?
JakeP says
Nevermind found it. It was the Lookout tower. I explored it when it was first unlocked but it seems that you have to go there again after the water level lowers.
Aladan says
I have just finished the game. Apparently I miss a frost flame which I do not get on the menu of the blacksmith. I have the flame from Niflheim. The trophy was unfortunately not triggered and so no platin for me :-(
PixarAnimated says
I have 29/30 Mystic gateways in Midgard the one missing I have narrowed down to Upper witchs cave which I belive is gone because the water has now dropped. Will this effect the trophies or does everyones say 29/30? Thanks
PowerPyx says
Mystic Gateways don’t affect trophies. But I can assure you all 30 are available after the story. They may become unavailable during certain parts within the story, but after the story all 30 can be revisited.
PixarAnimated says
Thank you; what am I missing then? How do I get to Upper wotchs cave gateway? I am pulling my hair out. Many thanks.
PixarAnimated says
I did get the platinum trophy wth help from your guide but still not 100% game completion. Thanks again 🙂
Hidden one says
So on my ps4 trophies it says u have to kill 2000 enemies, is that after patch thing or is my trophy just glitching somehow??
PowerPyx says
It’s a glitch in your list. A friend of mine had this too but trophy popped after 1,000 kills. Just a weird glitch.
James Kearle says
Have 7/8 ancient rubble for my last armour item, but i’ve killed 2 ancients in a row and it hasn’t dropped me any rubble at all??
PowerPyx says
Sounds buggy. Do you have a manual save from earlier to kill them again?
If you still have a few ancients left don’t worry. There are enough in the game.
James Kearle says
Also, it’s definitely not in my lost items I checked after the shop both times.
James Kearle says
It still isn’t working, the ones I’m trying is the one in the Ruins and the one by Wildwoods.
Gustavo Cyrilo says
I’ve completed 100% of the game, but my axe still lvl 5. I made the trade with Sindri to put it to lvl 5 but the last one I “lost”. It isn’t in lost items.
Just missing the trophy “worthy” to platinum.
Anyone knows how to solve it?
Ronald Diaz says
I completed all the treasure maps and dig spots quest and no trophy popped up. I even tried reloading a previous saved game and same thing. Completely frustrating as this is the only outstanding trophy for the platinum. Any ideas?
Chris says
Hey thanks for the guide i think I do have a glitch though. I’m midgrad i was sitting on 8 out of 9 rift tears and finally was able to unlock the secret one at the top of muspelheim tower and closed it and it still says 8 out of 9 rift tears for me for midgard. Is there something I am missing.
Dan says
The valkerie queen emerges from a tear
Nick says
I have access to Muspelheim and Niflheim, and I have the Muspelheim trophy as well. I noticed that Trilingual hasn’t popped for me yet. Shouldn’t I have gotten it the moment I was able to access both worlds? I have all needed cipher chests, are the additional ones needed as well? I hope I’m not locked out of a plat :\
Milton says
Why my game is asking 6 hearts and 30 rubble of ancients
Alex Teige says
Hi, I counted up 36 trophies but still dosen´t unlock the platinum! Any suggestions?
saeed says
Thank you so much! great job!
Angrod says
I don’t get this. I went though the guides and collected everything in Midgar. I double checked, and everywhere is 100%. Yet Midgar still says 99% and I can’t get the trophy. Is there something I am missing?
adnan abdullah says
I really want to thank you that was the bestr guidence ive ever seen thanks again!
Ron says
Kinda late, but the DEATH HAPPENED HERE trophy does not require full completion. I have it and only have 85% completion of Veithurgard, I am missing 1 artifact and have 2 undiscovered things #3 and #7 I don’t know what they are, but I got the trophy.
Christian says
Hello, please if someone can tell me if I port my saves from my ps4 to my ps5 (for god of war), will I be able to play a new NG+ run right away or still I need to do the story one more time? also, if I can start a NG+ run right away, will I be able to get all trophies, I mean platinum, in this run? For example, if I am at max health and rage from beggining, how I can get these 2 trophies for maxing out health and rage ? etc. If anyone can help me
Novaronus says
I just did all the walkthrough videos for the lore markers. Apparently the trophy didnt pop. I checked and double checked all the areas and named ones and they are all 100% completion please help me with this Bullshit
Maria Fernandes says
Hi thank you for the roadmap one more platinum for my collection ?
SlayFN says
Hello, thank you so much for the guide bro. You really are great!
Bodoque says
Man, despite i’ve followed your guides since long ago vía other trophy pages, i’m so grateful to your works. They have had me completed many games before.
I don’t know if you have a real idea of what means your guides to whom can’t play all they want by the lack of time, like me hahaha
Many, many thanks.
E1_Bodo_P1
Bodoque says
In Muspelheim, when starting the trials (without having reached the top / valkyrie yet), I remember doing trials to avoid being touched (there were 20 enemies, not 15), buying time by killing enemies and killing enemies within the golden rings , etc. Weren’t those on “Impossible” difficulty? Because I feel a kind of déja vu …
Sorry the double post
QuakeSRK says
Great guide, but normally when I beat the game, I want to play something else so I’ll probably do all the extras now.
LamboGamez says
Just wanted to drop a huge shoutout and say a massive thanks for your awesome guides on “God of War.” I just nailed the Platinum trophy, and honestly, couldn’t have done it without your help. Your guides were on point – clear, detailed, and super helpful every step of the way.