
Marvel’s Wolverine contains 102 Collectible Locations (68 Material Crates, 20 Whisky Bottles, 14 Nightmare Doors). This collectible guide also includes all miscellaneous trophies to obtain Platinum in one playthrough. Finding all collectibles unlocks the following trophies:
 Crate Collector – Collect all Material Crates
- Full Barrel – Collect all Whisky Bottles
- Pathways of the Mind – Discover all Nightmare Doors
 Repressed Memories – Unlock the hidden memory in Nightmare Trials
- Adamantium Armory – Craft enough suits to fully upgrade your Health (Suits are all automatic story unlocks, collect all Material Crates to craft them)
Nothing is missable, you can still find everything through chapter select after the story. Chapter Select is unlocked after finding the second Nightmare Door. It can then be accessed from the Title Screen by clicking on “Nightmare Cabin” and interacting with the bed. All collectibles carry over in chapter select. The Nightmare Trials can also be replayed from the Nightmare Cabin.
There’s a collectible tracker for each chapter individually, it can be seen in the pause menu, and also in Chapter Select in the Nightmare Cabin. Total progress can be tracked through the trophy progress counter in the trophy list.
Collectibles are easy to find in this game because of their visual indicators. Material Crates have a big blue sphere around them from far away, they give materials to craft new suits, which increases your total health. Whisky Bottles are indicated by a blue scent line on the ground, they raise your Adaptation Level to equip more passive skills. Nightmare Doors are indicated by purple vines on the ground and they’re all in plain sight, they also reward you with Adaptation Levels.
To make collectibles even easier to see, you can enable the accessibility setting under Settings > Visuals > Collectibles and Interact Shader. This will outline all collectibles in a color of your choice. You can also equip the Adaptations “Crate Finder” and “Whisky Finder” to mark collectibles from a great distance and through walls.
A 100% completion playthrough will take around 15-20 hours. There are no difficulty related requirements, you can play on the easiest setting. In Nightmare Trials you should get at least bronze rating to count them as “completed”, but getting the highest rating “Adamantium” isn’t necessary.
Also try to destroy any 100 XP Caches throughout the game, there are far more than needed and you can farm them through mission replay, so it’s not necessary to find all of them. Destroying the ones you find on the story path will be more than enough.
By Chapter
Telambang
- Mission 1: Back in Action (No Collectibles)
- Mission 2: A Debt Repaid (No Collectibles)
- Mission 3: Last Meal (No Collectibles)
Canada
- Mission 4: Homecoming (1 Nightmare Door / 2 Material Crates / 1 Whisky Bottles)
- Mission 5: The One That Got Away (1 Nightmare Door / 4 Material Crates / 1 Whisky Bottles)
- Mission 6: Raise Some Hell (1 Nightmare Door / 4 Material Crates / 1 Whisky Bottles)
- Mission 7: Strays (1 Material Crates / 1 Whisky Bottles)
- Mission 8: Something Much Stronger (1 Nightmare Door / 4 Material Crates / 1 Whisky Bottles)
Madripoor
- Mission 9: Knock Knock (2 Material Crates / 1 Whisky Bottles)
- Mission 10: Mutant Detected (1 Nightmare Door / 4 Material Crates / 1 Whisky Bottles)
- Mission 11: For Our Future (No Collectibles)
- Mission 12: One Last Mission (1 Nightmare Door / 3 Material Crates / 1 Whisky Bottles)
Japan
- Mission 13: Jetlag (No Collectibles)
- Mission 14: Get Angry (1 Nightmare Door / 5 Material Crates / 1 Whisky Bottles)
- Mission 15: Bad Blood (1 Nightmare Door / 4 Material Crates / 1 Whisky Bottles)
- Mission 16: In the Shadows (7 Material Crates / 2 Whisky Bottles)
- Mission 17: Death Comes to Death (1 Nightmare Door / 3 Material Crates / 1 Whisky Bottles)
- Mission 18: We Were Wrong (5 Material Crates / 1 Whisky Bottles)
- Mission 19: Hell Followed With Him (4 Material Crates / 1 Whisky Bottles)
- Mission 20: Death’s Match (No Collectibles)
- Mission 21: Sinister Tidings (1 Nightmare Door / 1 Material Crates)
Madripoor 2
- Mission 22: Way Down Low (1 Nightmare Door / 4 Material Crates / 2 Whisky Bottles)
- Mission 23: Roll The Dice (1 Nightmare Door / 1 Material Crates / 1 Whisky Bottles)
- Mission 24: Field Test (2 Material Crates / 1 Whisky Bottles)
- Mission 25: Red Right Hand (No Collectibles)
- Mission 26: Don’t Go Gentle (No Collectibles)
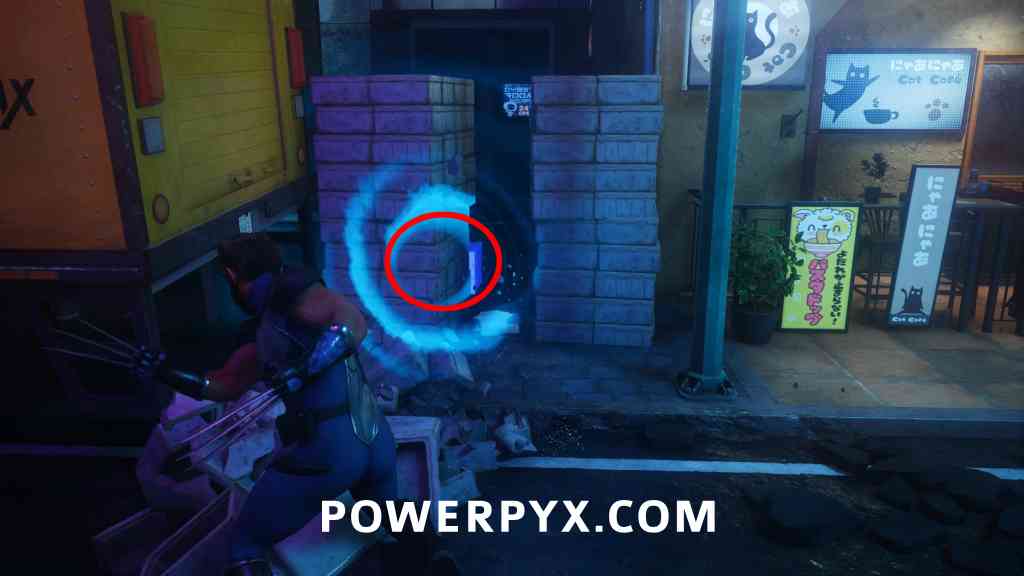
- Mission 27: I’m Still Here (1 Nightmare Door / 5 Material Crates / 1 Whisky Bottles)
- Mission 28: This Was The Dream (1 Nightmare Door / 3 Material Crates)
- Mission 29: No Coming Back (No Collectibles)
- Mission 30: Brave New World (No Collectibles)
Post-Story – Nightmare Cabin
By Type
All-in-One Collectible Guide
Telambang
Back in Action
No Collectibles in this Mission!
A Debt Repaid
No Collectibles in this Mission!
Last Meal
No Collectibles in this Mission!
Canada
Homecoming

- Nightmare Doors: 1
- Material Crates: 2
- Whisky Bottles: 1
All collectibles are obtained via story progress in this level.
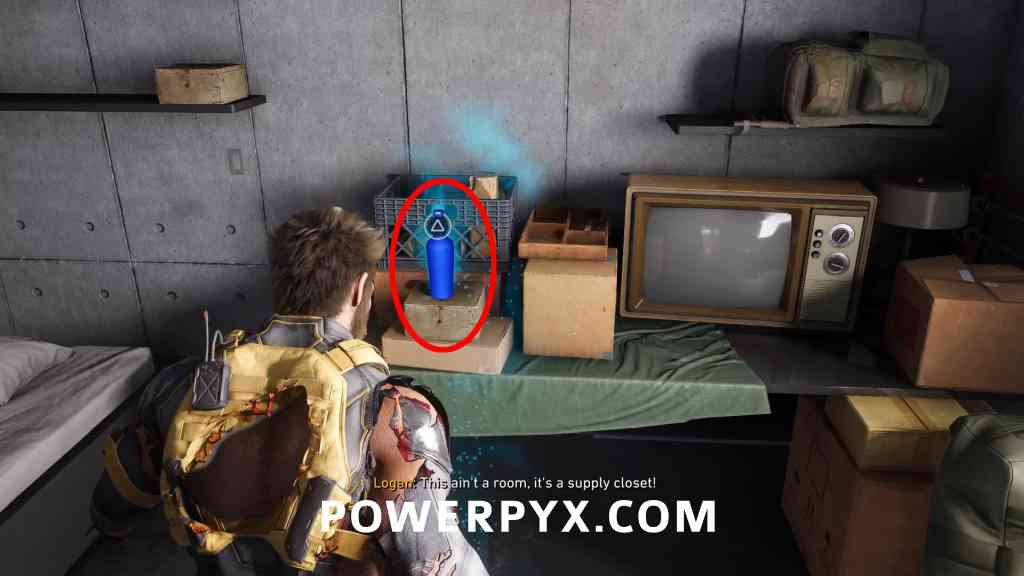
Whisky Bottle #1 – Uncanny Whisky
Objective: Investigate the Scent
This is unmissable and required for story progression. When you go to your room, you will be told your stuff has been moved, follow the scent to the next objective marker to find the bottle.
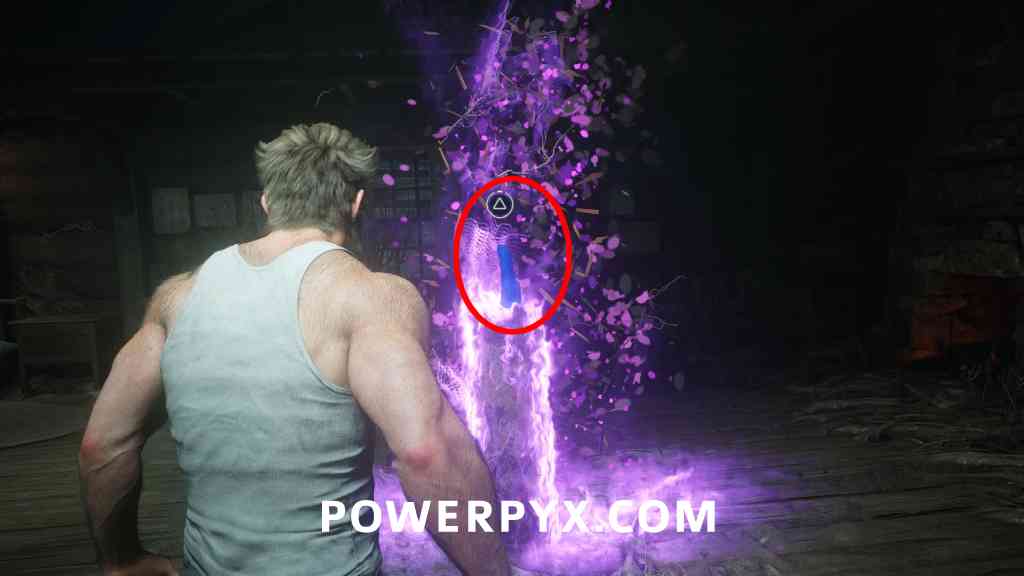
Nightmare Door #1 – The Enemy of My Enemy
Objective: Recover your lost memories
Unmissable and required for story progression. You’ll automatically enter this door after a cutscene with Essex.
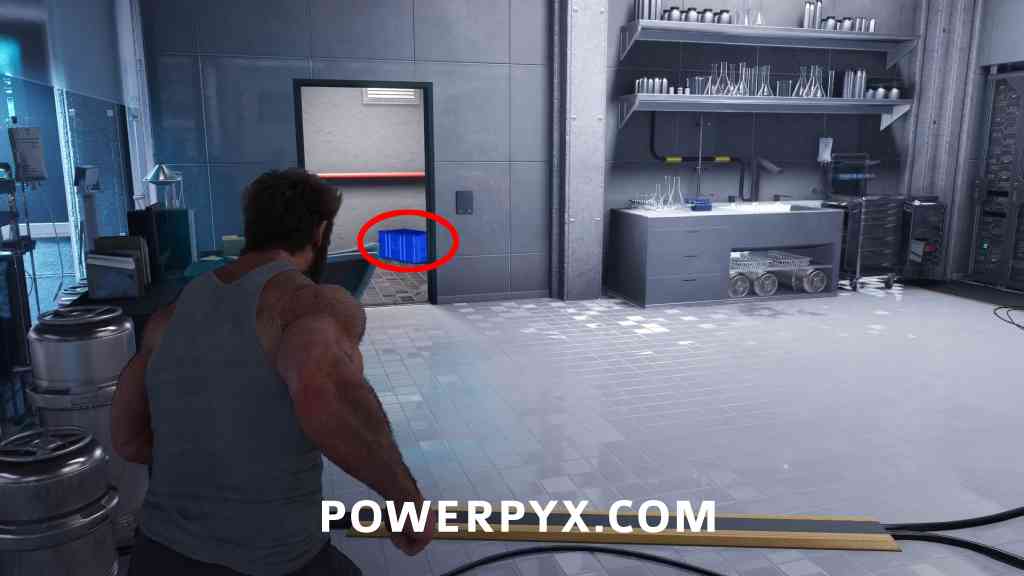
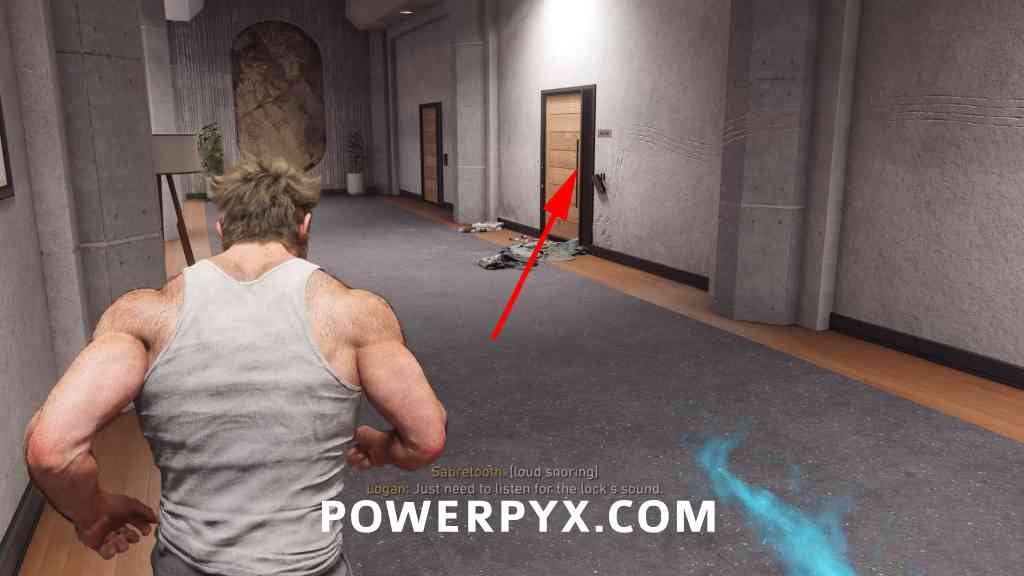
Material Crate #1-2
Objective: Bring the supply crates to Walter
Unmissable and required for story progression. You will be tasked with bringing the supply crates to Walter. The first one is behind him, in a storage room in the lab. Give it to Walter, then you find the second one in Victor’s room upstairs by following the scent.
The One That Got Away
- Nightmare Doors: 1
- Material Crates: 4
- Whisky Bottles: 1
Trophy: Greased
Objective: Track the red-haired mutant
When you slide down a pole from the roof of the building, go forward to the end of the industrial park to see some wood panels that say “Do not enter” on them, break these with your claws, go inside and read the diary on the table on your right.
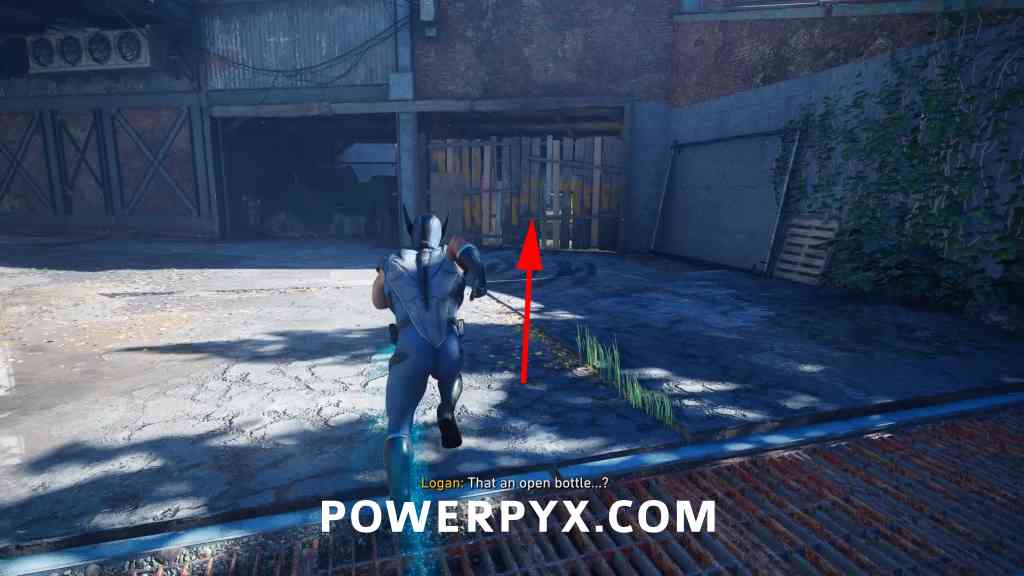
Whisky Bottle #2 – Incredible 181
Objective: Track the red-haired mutant
In the same room as the journal for the “Greased” trophy.
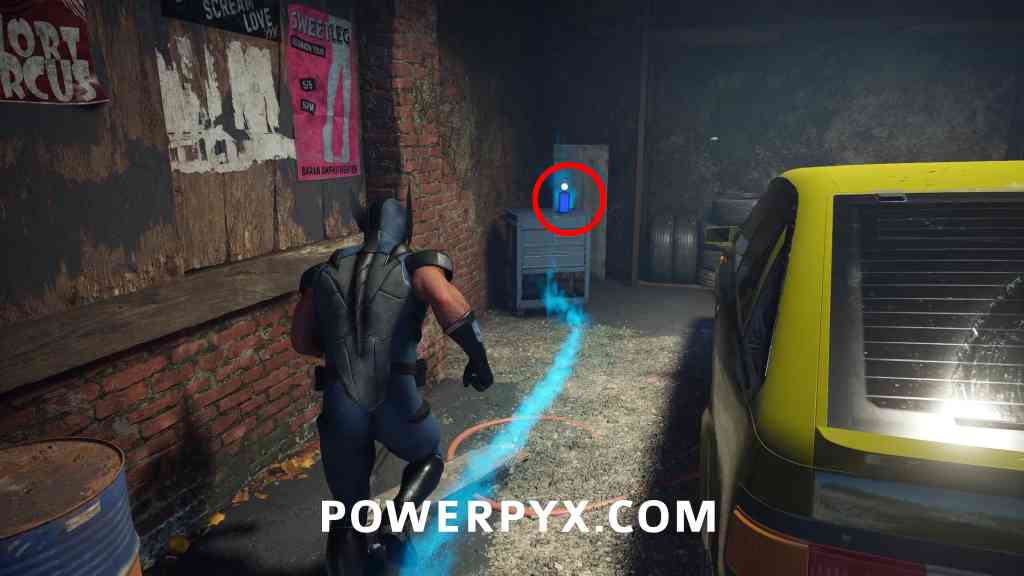
Material Crate #3
Objective: Track the red-haired mutant
After riding the zipline and fighting 2 reavers, turn around and go back to the fence you ziplinned over, next to the gate you’ll see some stacks of wood, the crate is hidden between them.
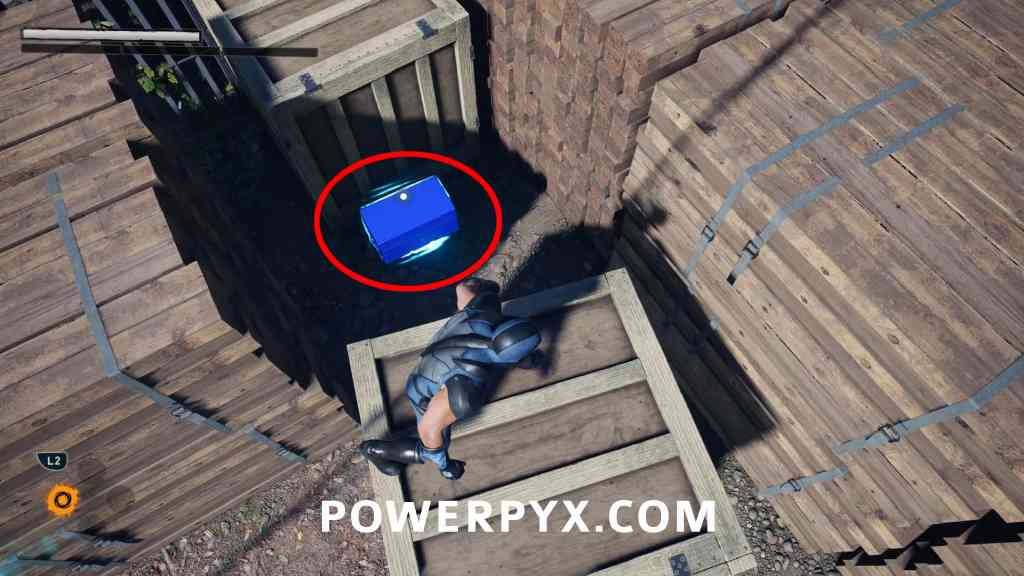
Material Crate #4
Objective: Track the red-haired mutant
Shortly after the previous crate, keep going until you climb to another building with a lone reaver below. Smash through the glass, drop down to ground level to see a small boat, next to the boat you will find this crate in a short tunnel.
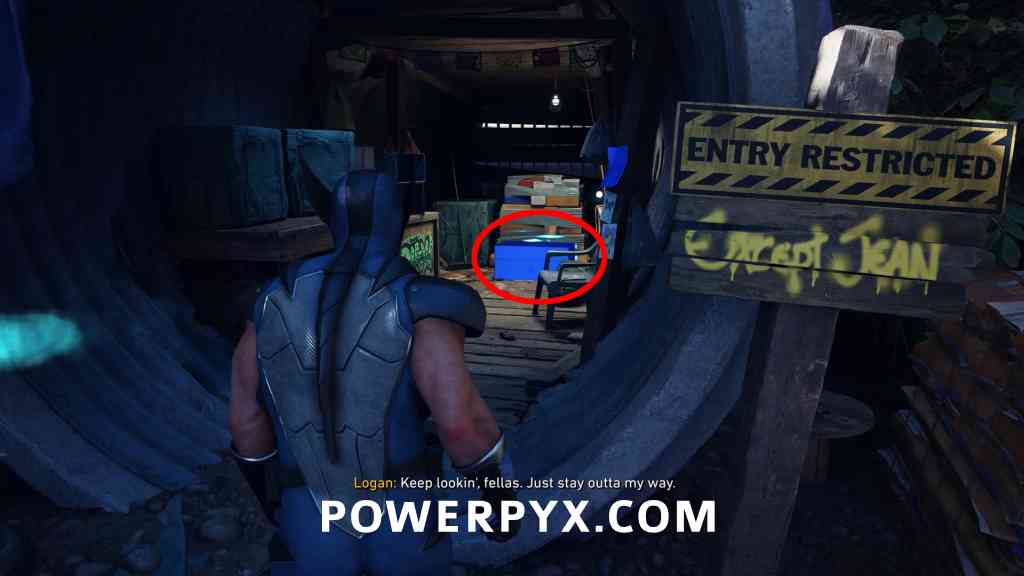
Nightmare Door #2 – Can’t Outrun the Past
Objective: Track the red-haired mutant
Unmissable, after fighting through a few more groups of reavers you will come across this one automatically when you reach a small river.
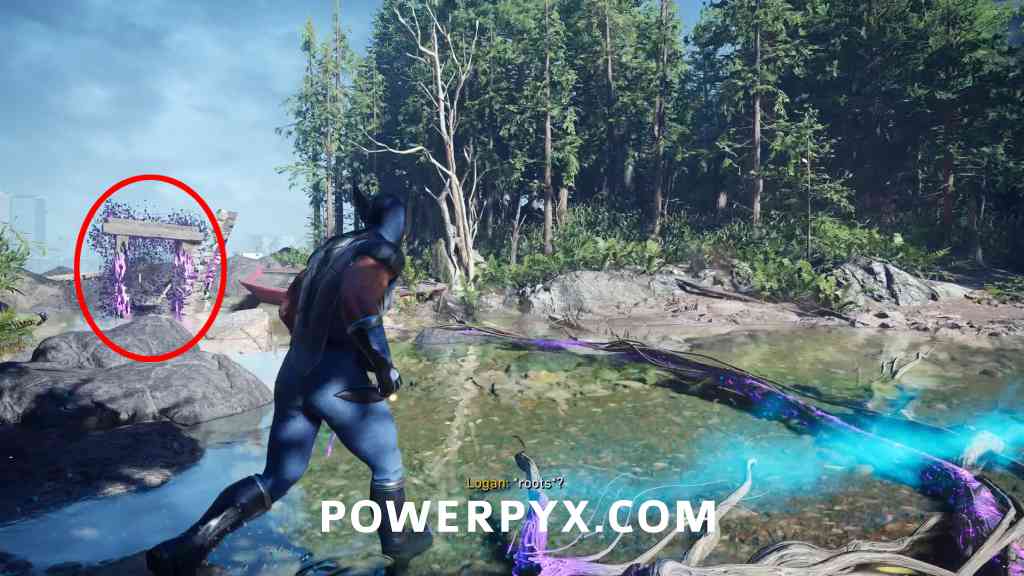
Material Crate #5
Objective: Track the red-haired mutant
At the other end of the river from the nightmare door, on the right side, you will see it pulsing in the distance.
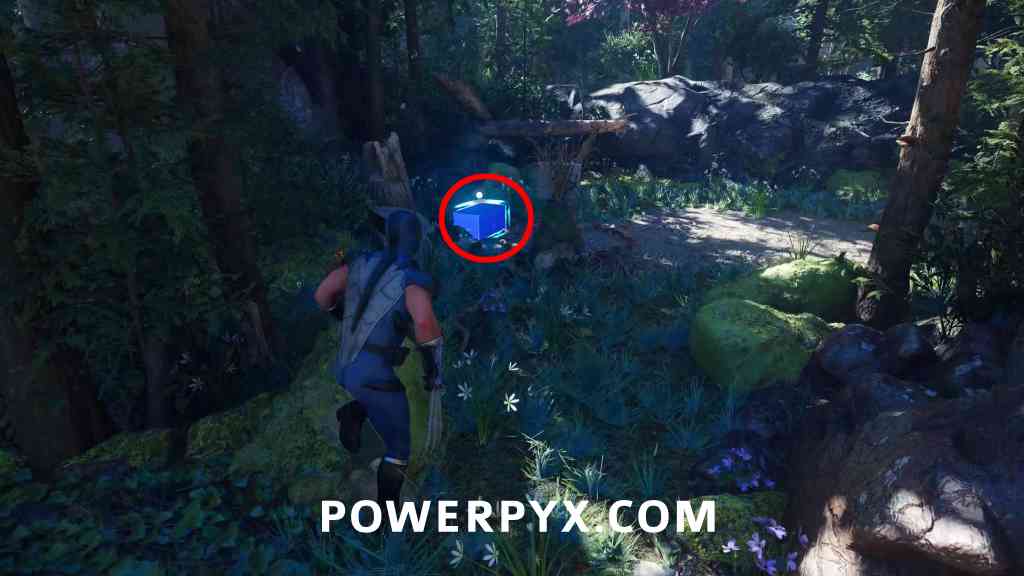
Material Crate #6
Objective: Search the trucks for mutants
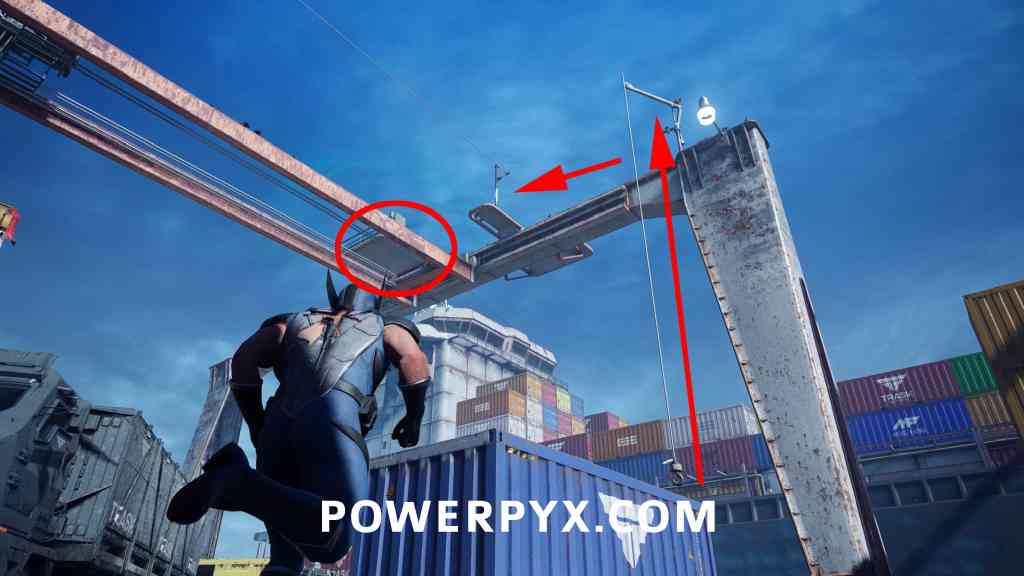
Before opening the 2nd container in the docks area, next to it is a blue container and a hook you can ride up to find the crate.
Raise Some Hell
- Nightmare Doors: 1
- Material Crates: 4
- Whisky Bottles: 1
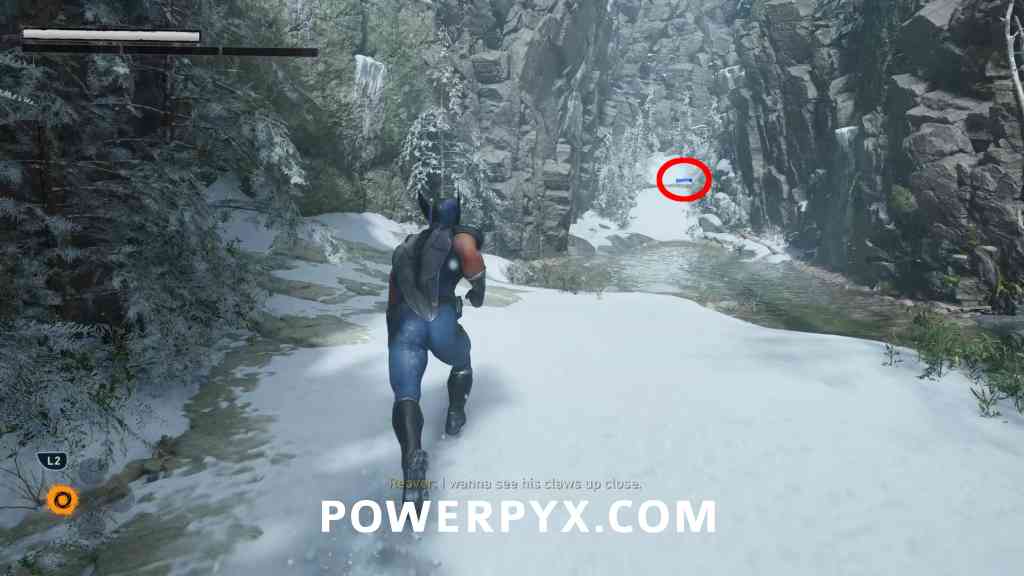
Material Crate #7
Objective: Get to the refinery to find the mutants
Early in the level, with the section with 3 snipers, this is on the left after jumping down.
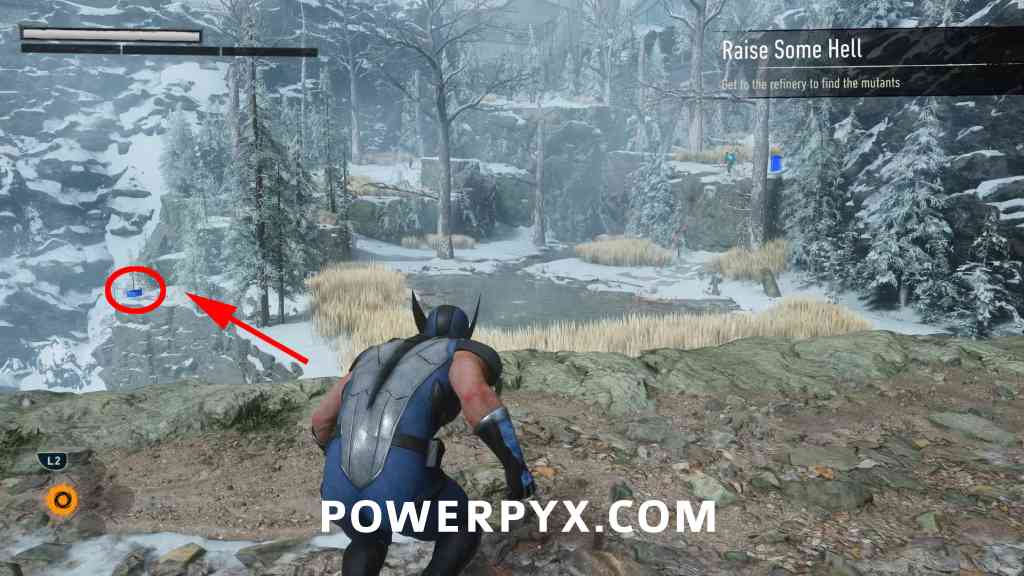
Material Crate #8
Objective: Get to the refinery to find the mutants
In the same area, close by to the crate you just found, go up the stream to find this at the end.
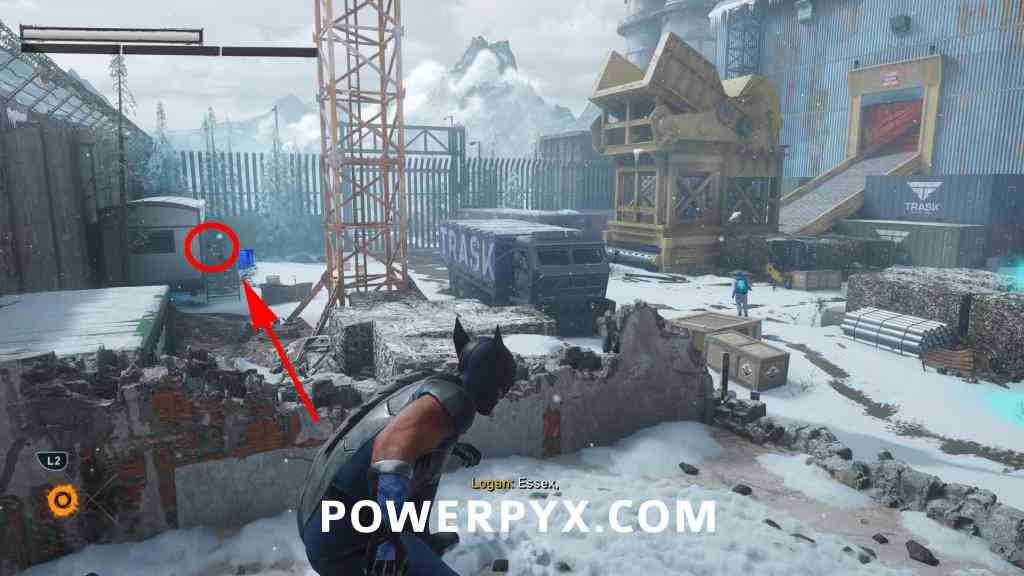
Material Crate #9
Objective: Get to the refinery to find the mutants
In the next area with reavers (construction yard), it’s in the back left corner from where you entered the area, next to some huts.
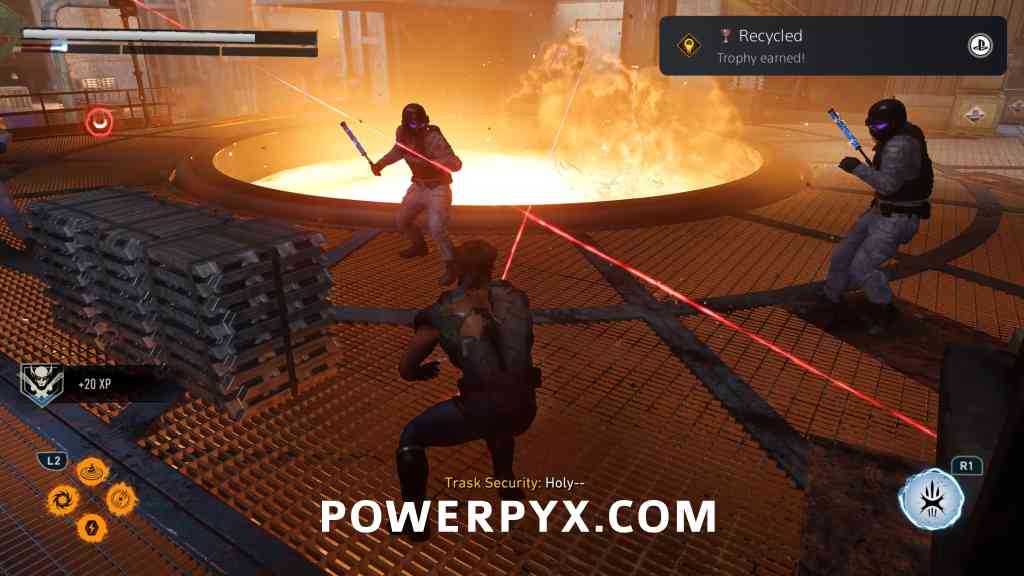
Trophy: Recycled
Objective: Track the captured mutants
When you enter the refinery, towards the back there will be a large open vat filled with molten metal. Alert the enemies so you are engaged in combat, then kick any of the reavers (enemies with blue blades) into the vat by holding  .
.
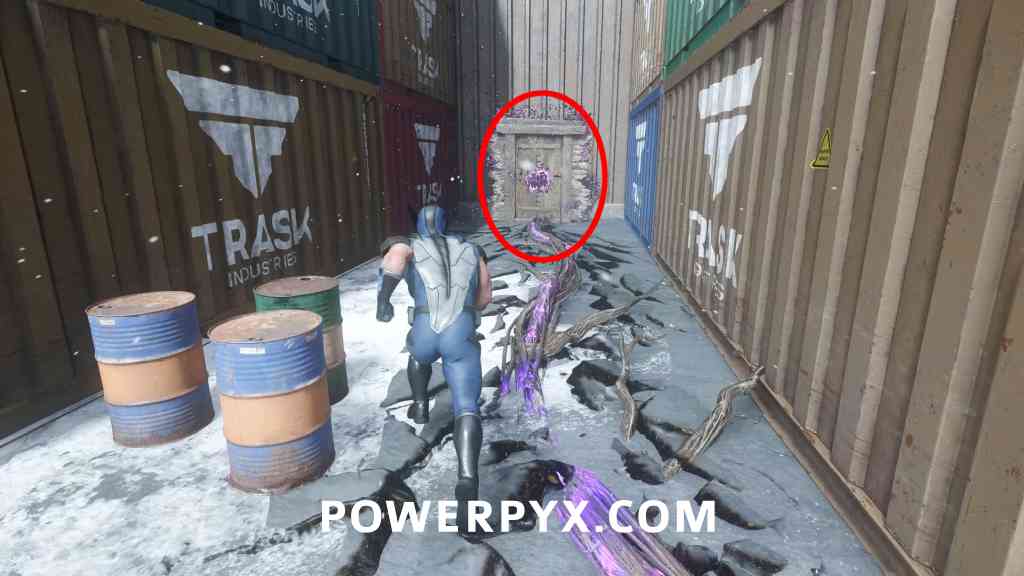
Nightmare Door #3 – Hunting the Hunter
Objective: Track the captured mutants
After the furnace building and coming outside to an area with many containers, drop down and follow the purple roots on the floor to this door.
Material Crate #10
Objective: Track the captured mutants
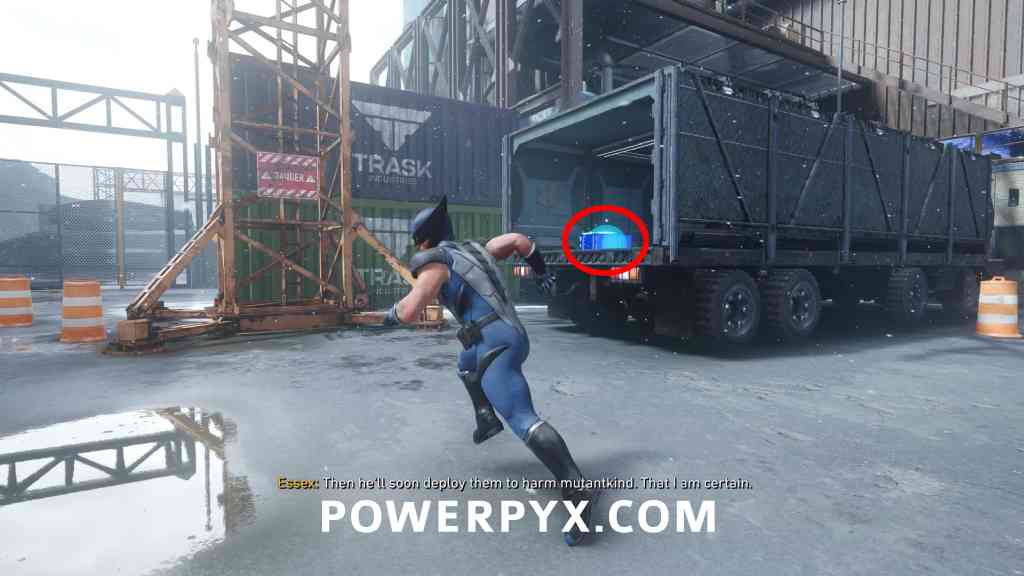
After exiting the nightmare door, in the back of a truck just ahead, you will see it pulsing.
Whisky Bottle #3 – Cold Lake
Objective: Track the captured mutants
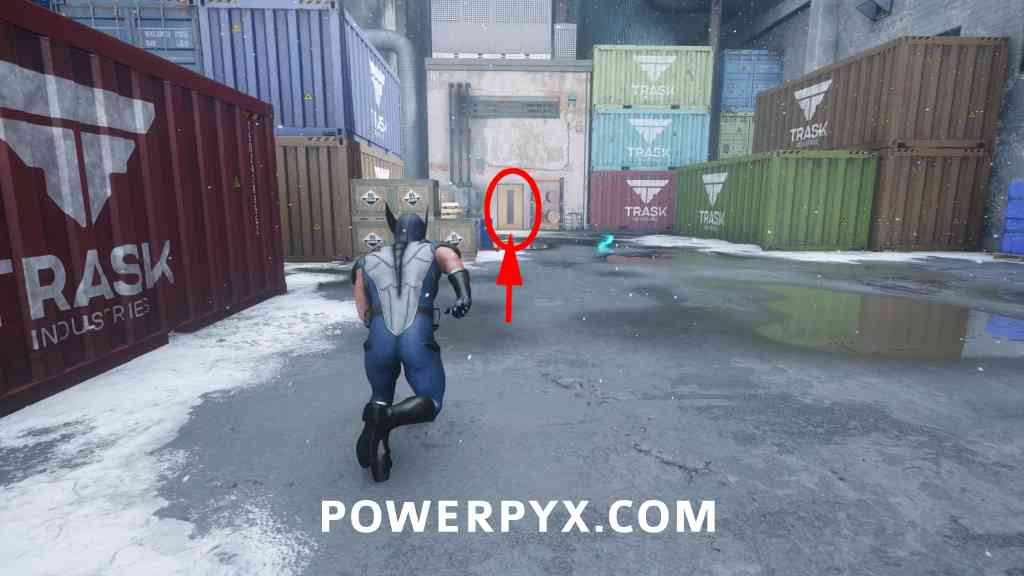
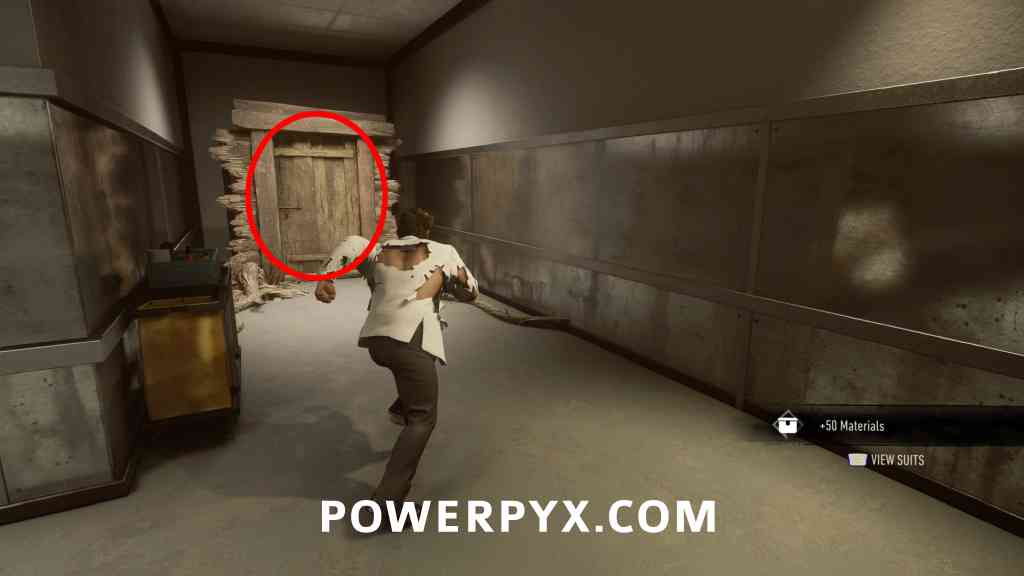
In the same area as the material crate, in the corner of the area smash through the yellow door to find the bottle. From where you exited the nightmare door it’s forward and to the left. Can see a blue scent line near it.
Strays
- Material Crates: 1
- Whisky Bottles: 1
Whisky Bottle #4 – Blood Debt
Objective: Follow Leech’s scent to find his drawings.
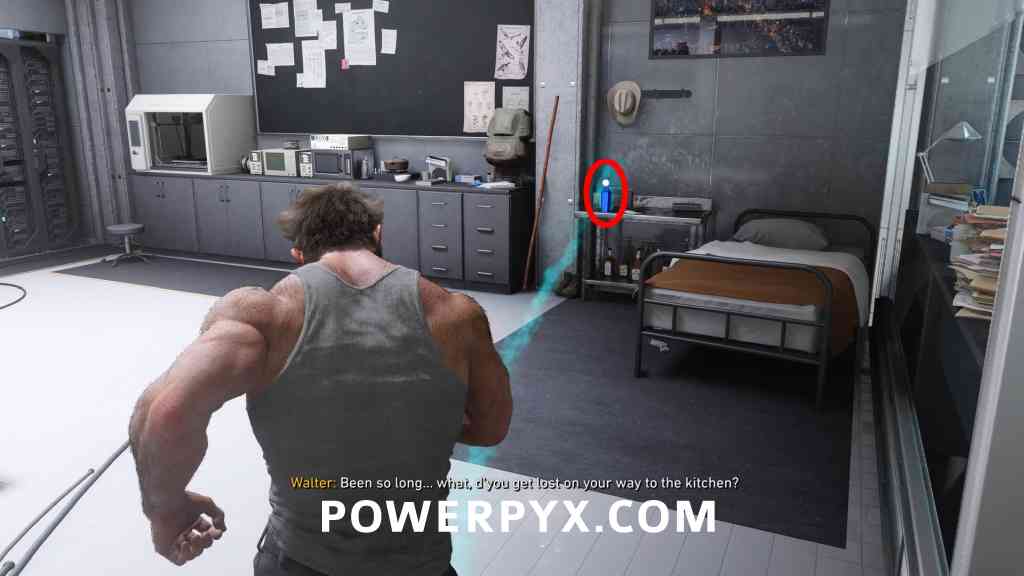
After being tasked with finding the 4 drawings for Leech, go into the lab to find this in the back.
Material Crate #11
Objective: Follow Leech’s scent to find his drawings.
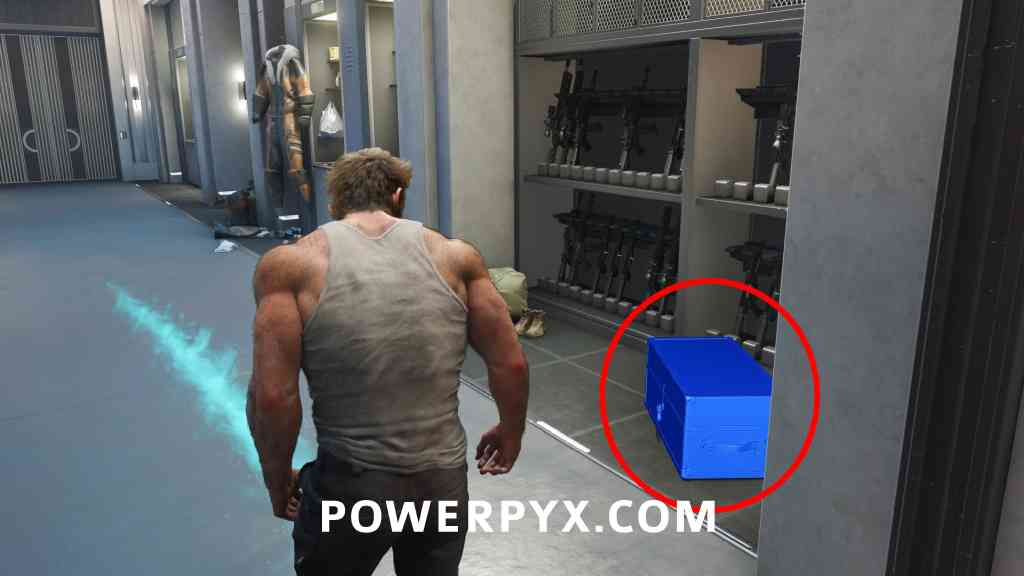
Leave the lab and go into the armoury (room at end of hallway), it’s right next to the door.
Something Much Stronger
- Nightmare Doors: 1
- Material Crates: 4
- Whisky Bottles: 1
Material Crate #12
Objective: Get to the cabin
Moving down the area at the start, when you come to a stream look to your right for a tree to climb, then jump up the wall next to it to find a crate here.
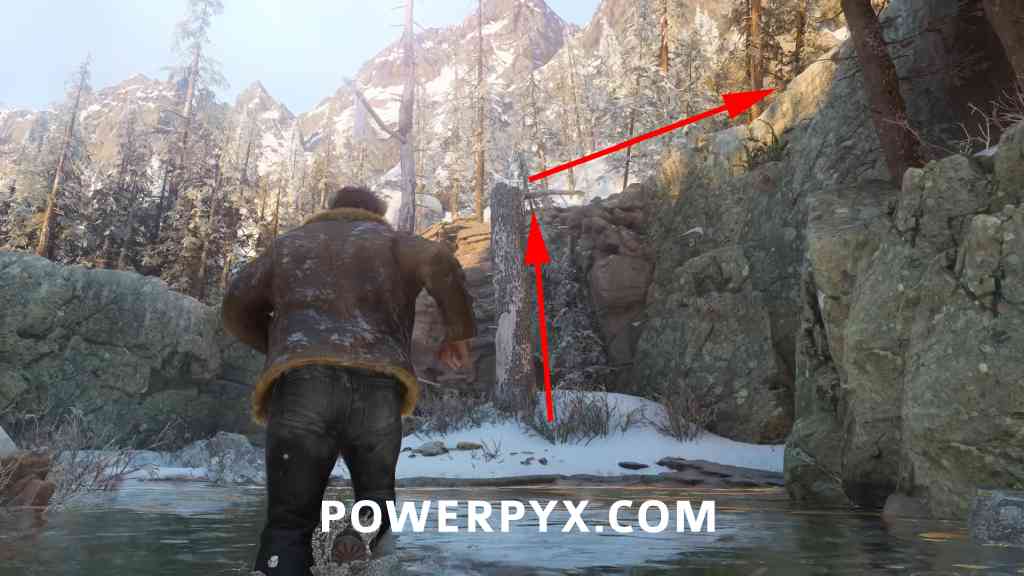
Whisky Bottle #5 – Not Dead Yet
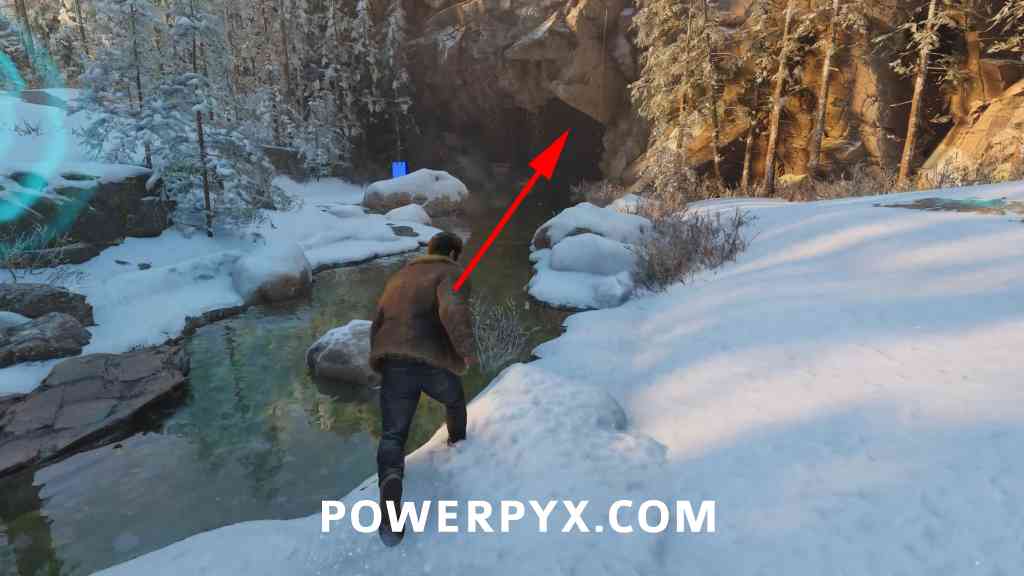
Objective: Find the injured animal
Right after the crate, you’ll come to another stream leading into a cave on the right, climb up to find the bottle in here.
Nightmare Door #4 – Fallen on Hard Times
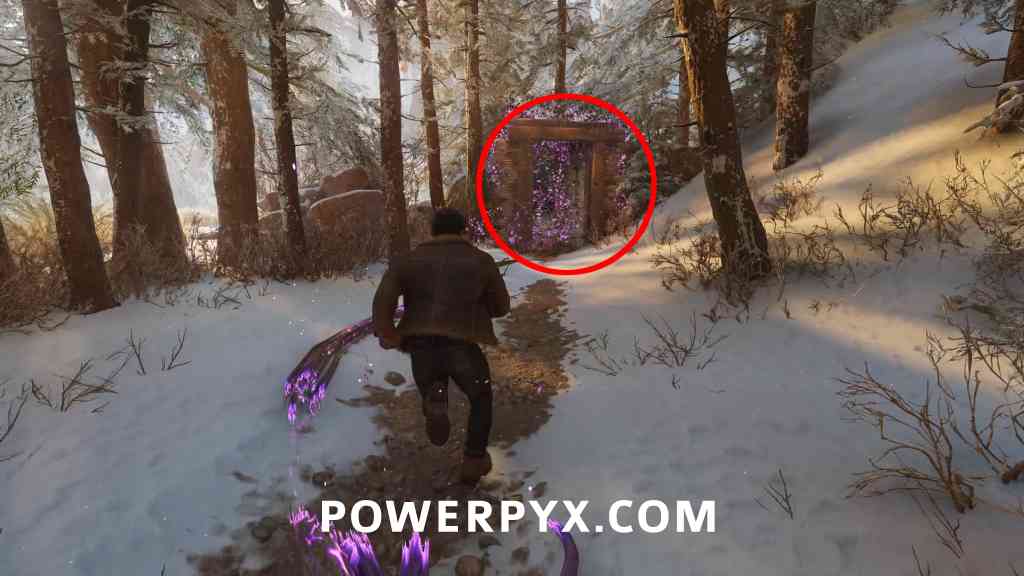
Objective: Get to the cabin
After freeing the wolf from the branches, you’ll come across some roots leading to a nightmare door.
Material Crate #13
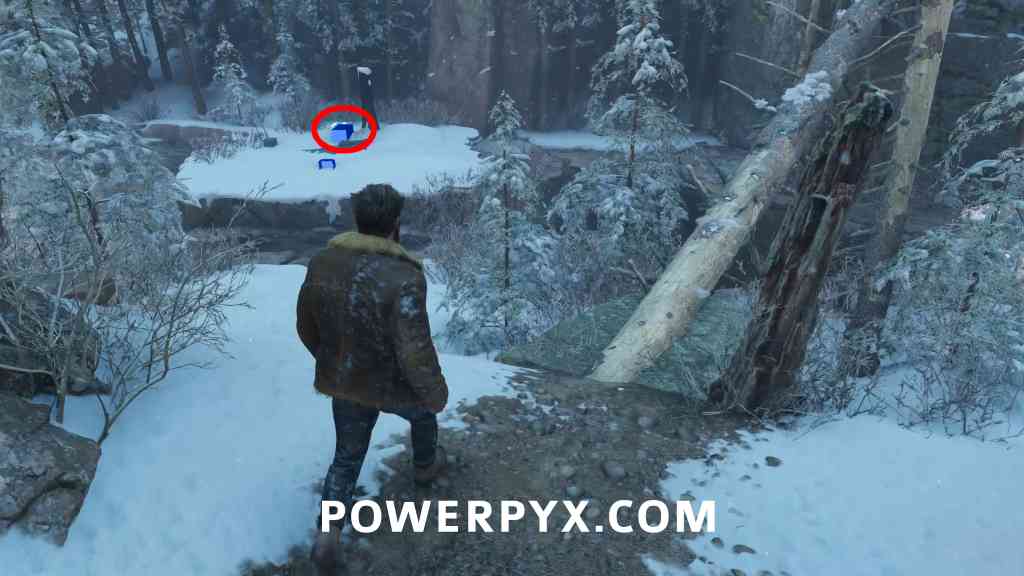
Objective: Get to the cabin
Follow the main path and you will see this on the left, before running up a fallen tree, almost impossible to miss.
Material Crate #14
Objective: Get to the cabin
Shortly after the previous crate you will come to a split path, take the right path and you will see this in front of a fishing hut.
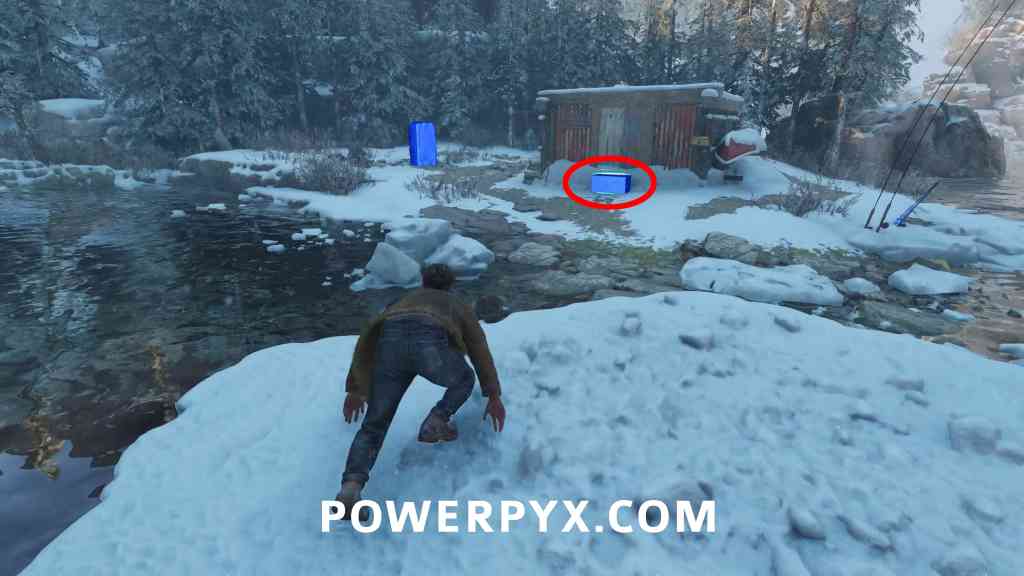
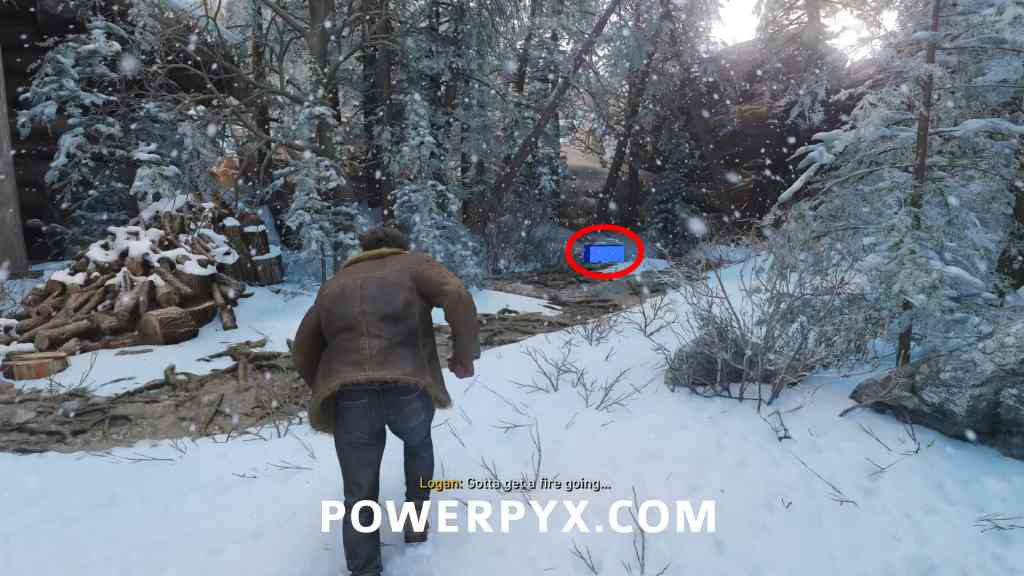
Material Crate #15
Objective: Enter the cabin
Once you climb up a cliff and the cabin is in front of you, the crate is to your right.
Madripoor
Knock Knock
- Material Crates: 2
- Whisky Bottles: 1
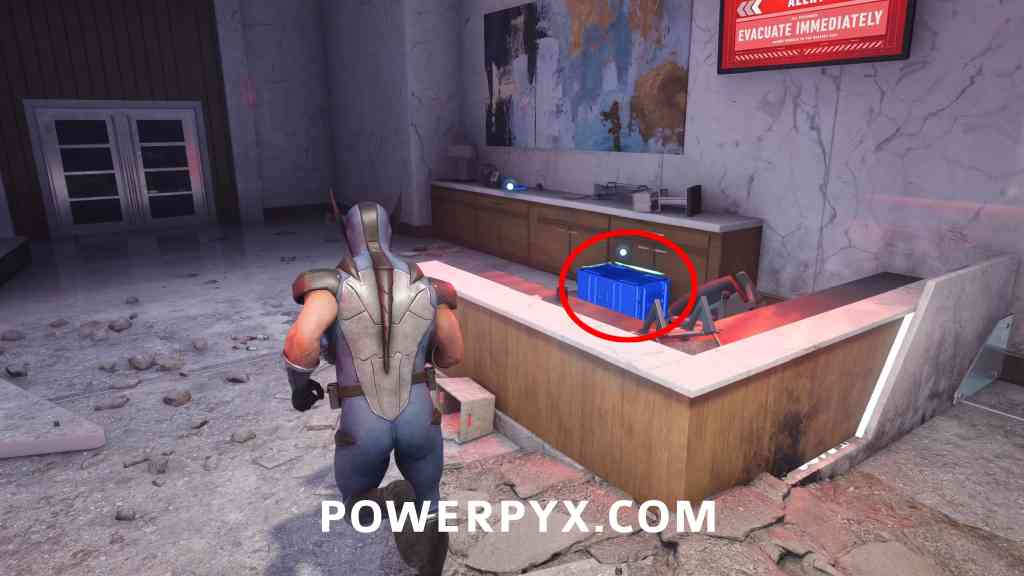
Material Crate #16
Objective: Destroy the power station core
After destroying the vehicle with the laser turret and entering the power station, it’s right in front of you behind a counter.
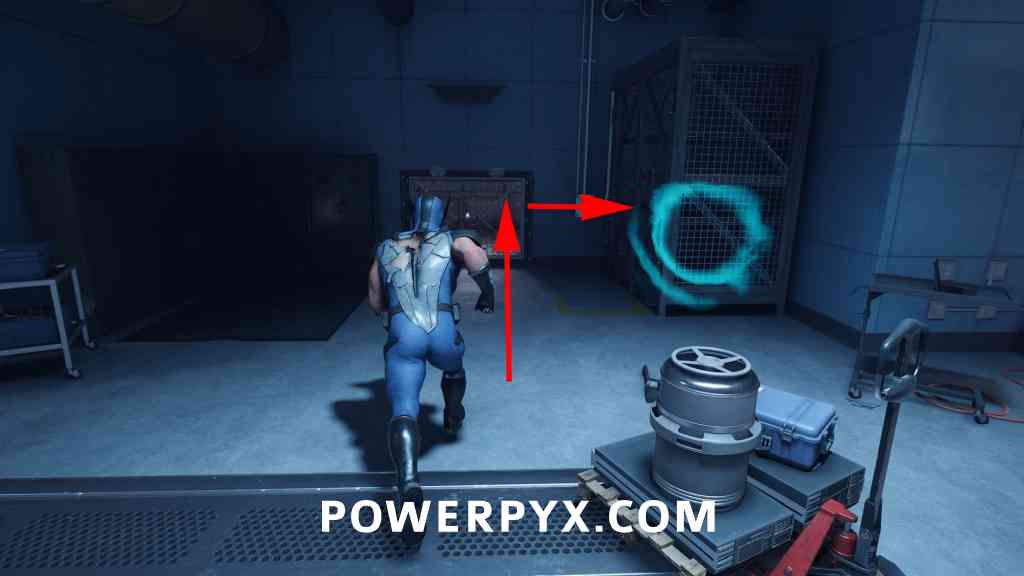
Material Crate #17
Objective: Destroy the power station core
You’ll come to a server room where you fight a bunch of reavers, after the fight climb up to the next level and you’ll see a vent grate right in front of you, the crate is through here.
Whisky Bottle #6 – Tenth Man
Objective: Reach Trask Tower
As soon as Victor frees you from the rubble after destroying the relay tower you will see a scent you can follow, this leads into the building right next to you with the bottle inside.
Mutant Detected
- Nightmare Doors: 1
- Material Crates: 4
- Whisky Bottles: 1
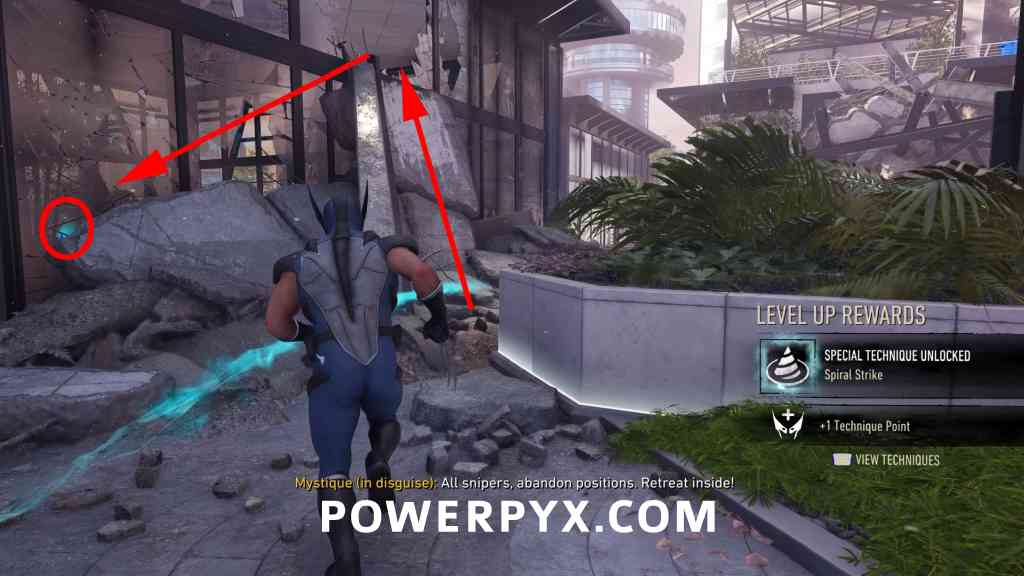
Material Crate #18
Objective: Find Trask’s secret facility
Immediately ahead of you at the start of the level, there’s a crate behind the reception desk.
Note: the door code is 0514, the fingerprints will glow blue on the keypad.
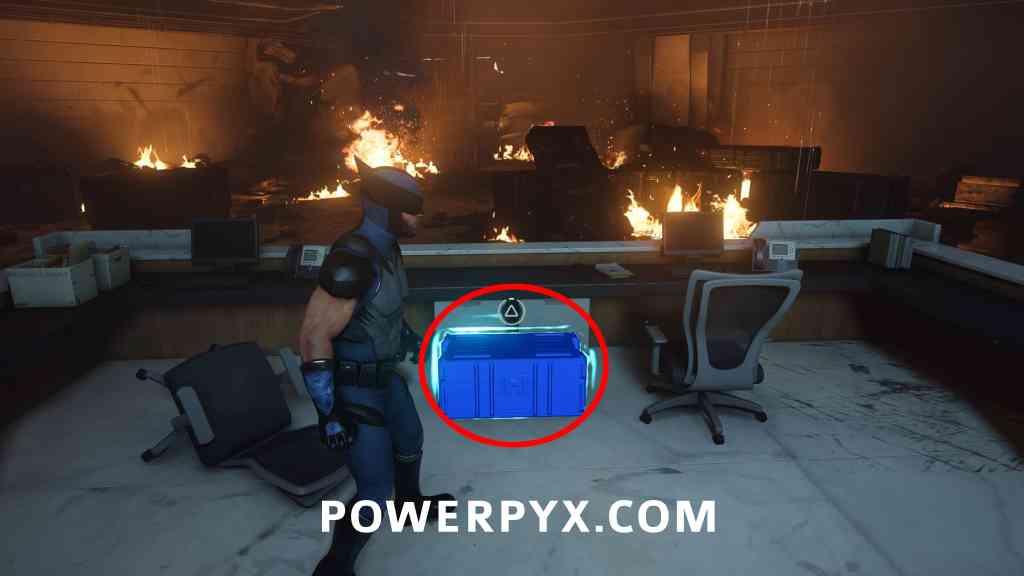
Material Crate #19
Objective: Get to the bottom floor to find Bay 7
After a cutscene with Trask, Mystique will open a door for you, go through here and you’ll find this crate on the right.
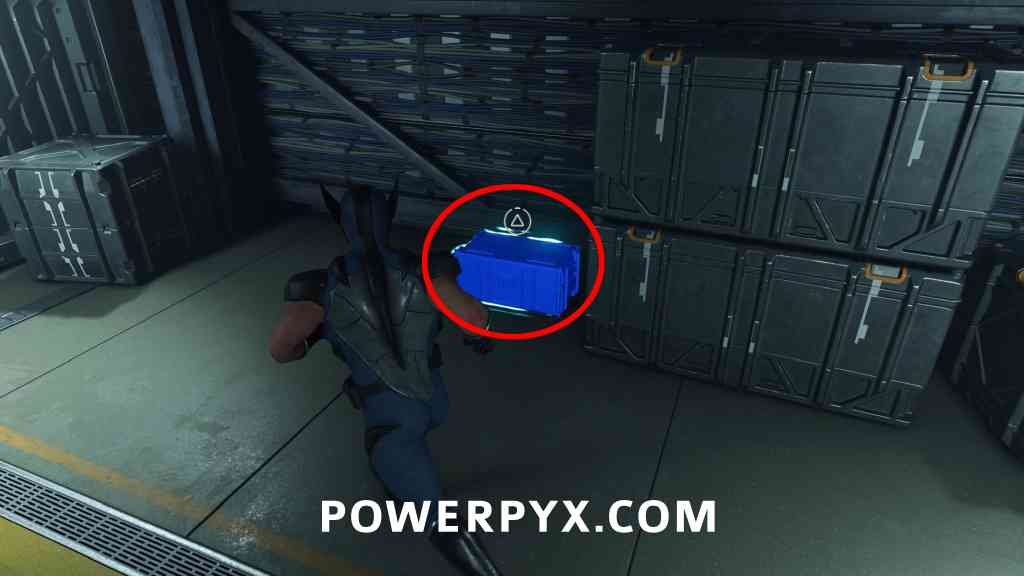
Material Crate #20
Objective: Find and kill Trask
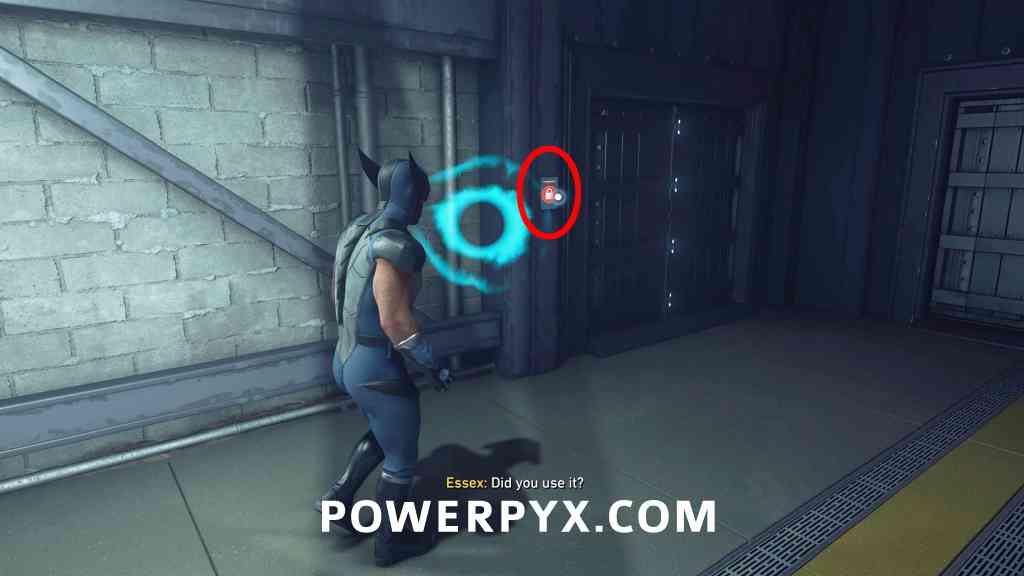
Much later in the chapter, after exploring Bay 7, Mystique will transform into Wolverine and break a door open. Go through here and go left at your first opportunity to find a locked door, the code is 0291 and the crate is inside.
Material Crate #21
Objective: Track and kill Trask
After going through the portal and the sequence in the jet engine, walk forward and past the fire, this is just to your left.
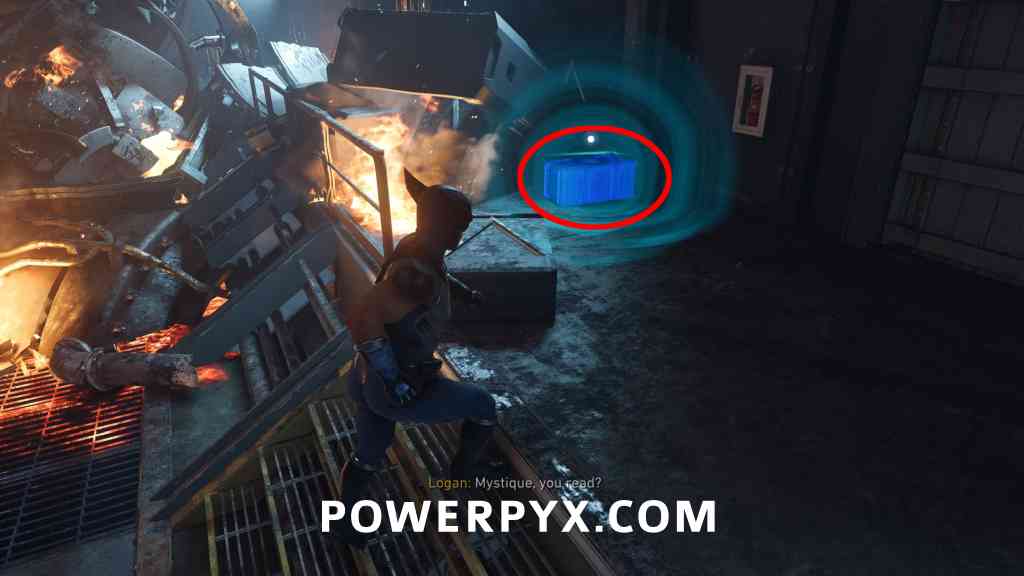
Nightmare Door #5 – Bad Inhibitions
Objective: Track and kill Trask
Right after the previous crate, go through the door and look left to see another door you can go through, at the end of this corridor is a nightmare door.
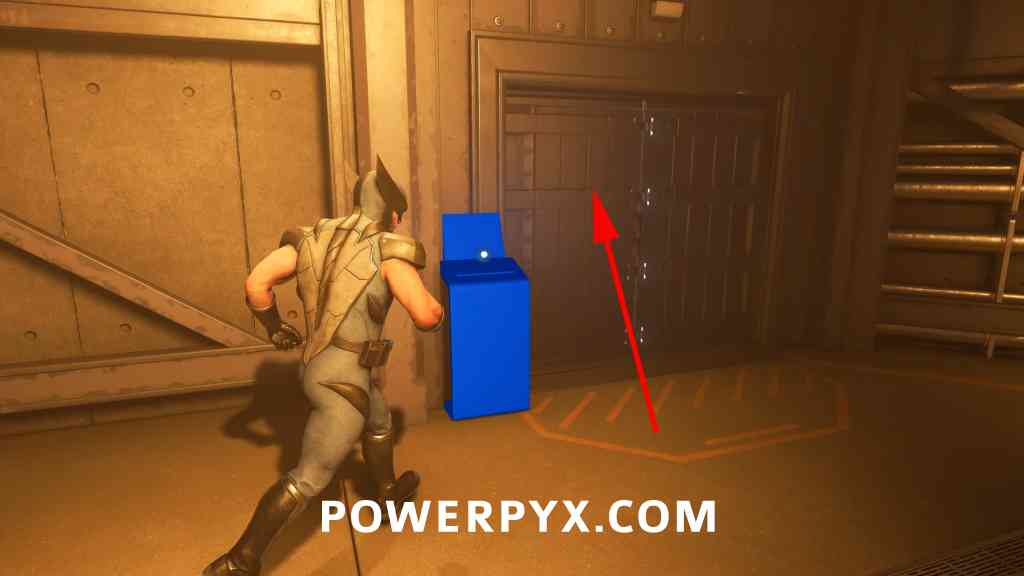
Whisky Bottle #7 – Fist of Legend
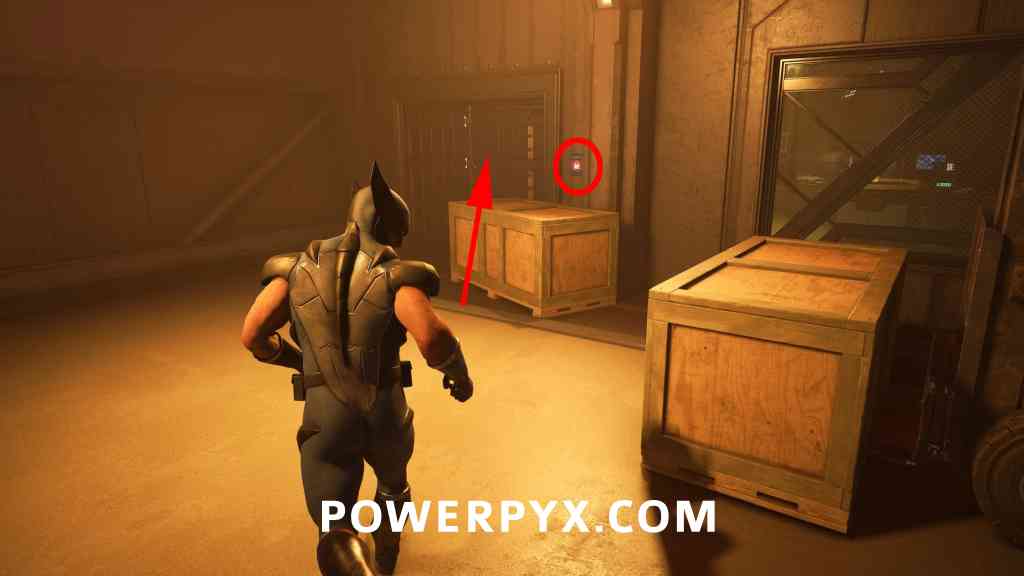
Objective: Track and kill Trask
Just after the previous door, go into the next room, immediately go left and into the corner where there is another locked door, destroy the crate in front of the door panel and enter code 5413. In here is a vent you can go through, leading to another room, the bottle is in here on a table.
For Our Future
No Collectibles in this Mission (this mission is just a boss fight)!
One Last Mission
- Nightmare Doors: 1
- Material Crates: 3
- Whisky Bottles: 1
Material Crate #22
Objective: Talk to Raven, Talk to Victor, Talk to Walter
At the start of the mission, this crate is through a doorway behind the bar.
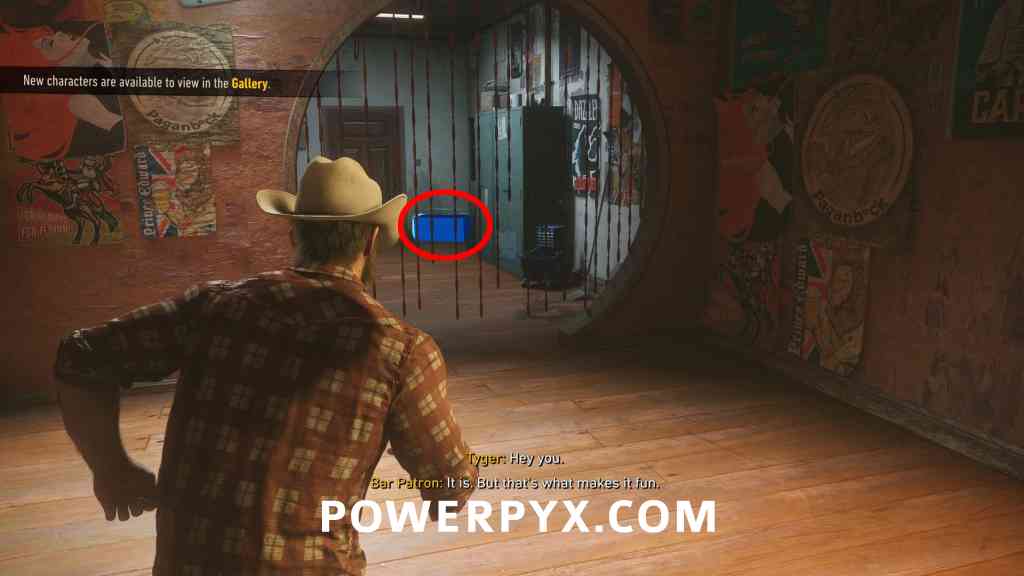
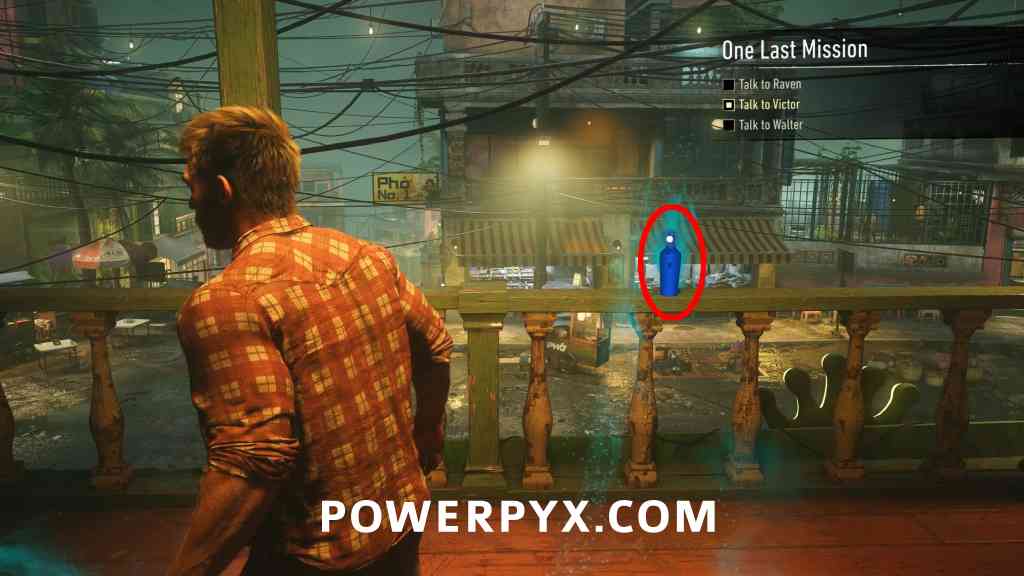
Whisky Bottle #8 – The Old Man
Objective: Talk to Raven, Talk to Victor, Talk to Walter
After talking to Victor, turn around and pick up the bottle that Logan just put down.
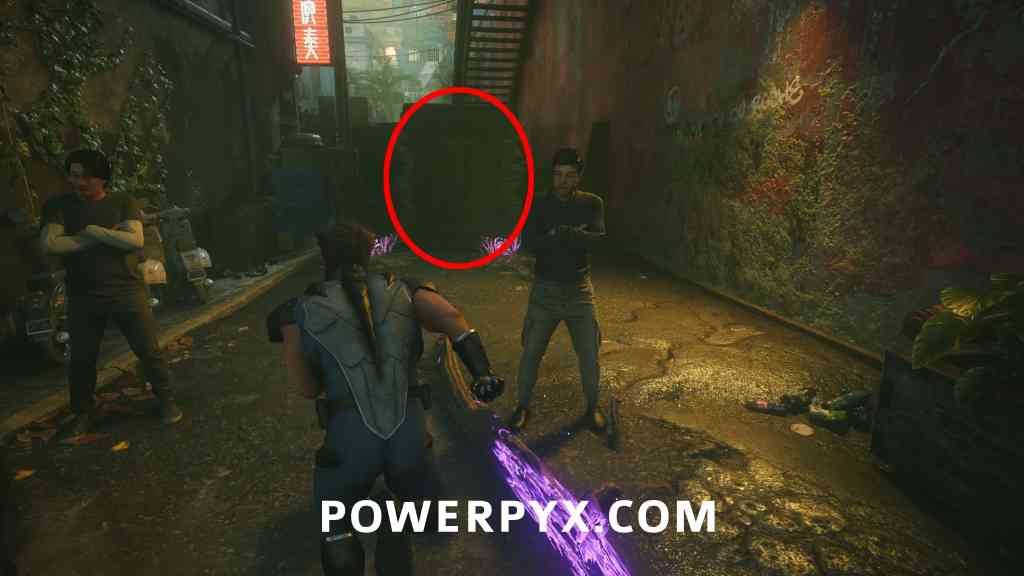
Nightmare Door #6 – Last Stand at Cold Pines
Objective: Track down Jean
Once you leave the bar, follow the main path, you’ll see some roots leading to the door close by. This is a multi-wave gauntlet fight, if you play on The Man you can’t die, after reaching the required points you can raise the difficulty in gameplay settings so you can die to end the challenge.
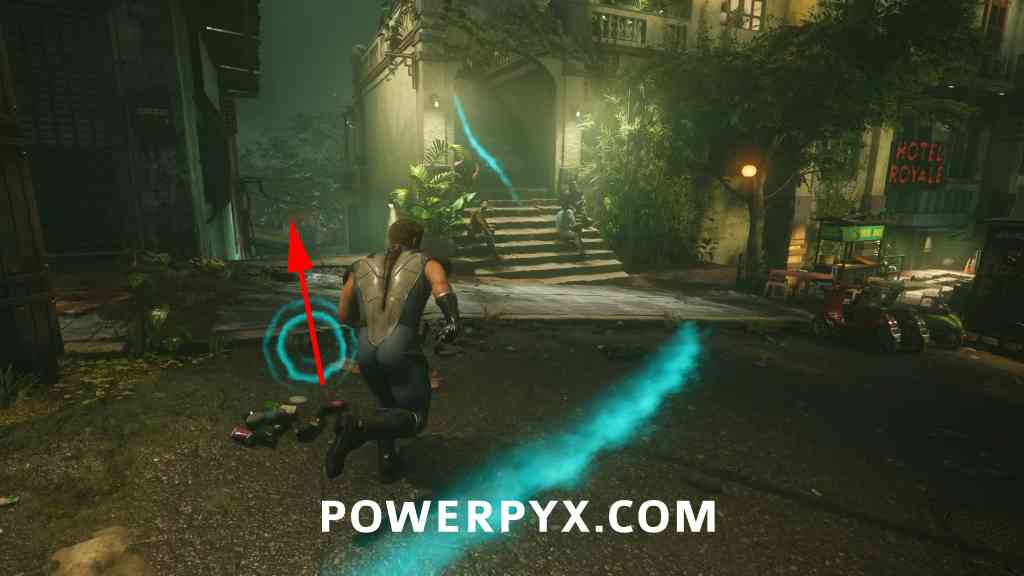
Material Crate #23
Objective: Track down Jean
A bit further on you will come to some stairs leading up, instead take the left side stairs heading down to find the crate.
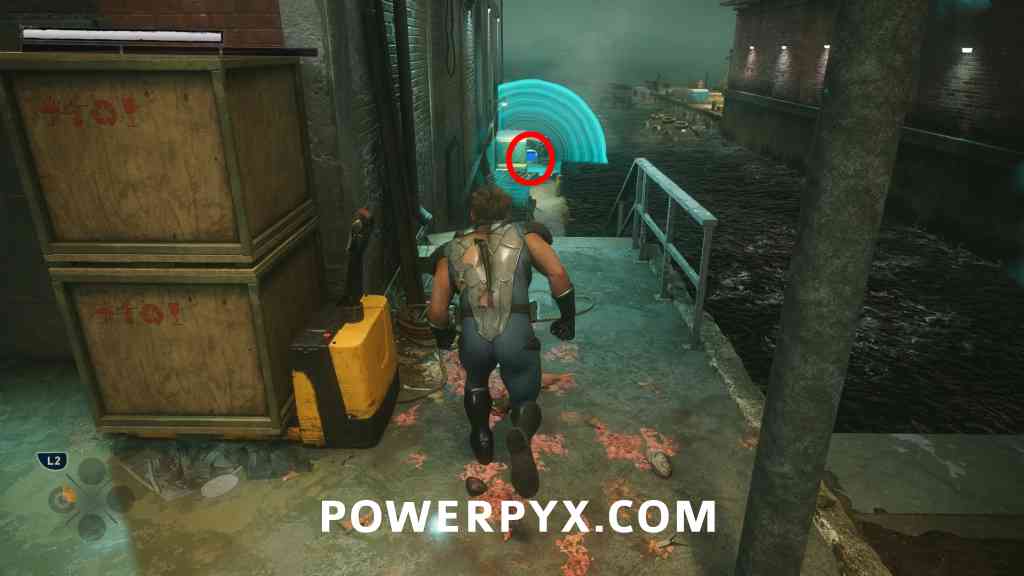
Material Crate #24
Objective: Pick up Walter’s trail
After the rooftop chase, you will get a tutorial about being impaled by weapons while fighting a group of The Hand ninjas (one impales you with a sword). After the fight, go down the pier on the left side to find the crate at the end.
Japan
Jetlag
Trophy: Ground Control
Objective: Finish off the Hand
After the first fight in the plane you get tossed outside and have to climb back in. Then you fight more enemies inside the plane. During this, hit enemies close to the holes in the wall and they will get sucked out by the wind. Almost unmissable.
Get Angry
- Nightmare Doors: 1
- Material Crates: 5
- Whisky Bottles: 1
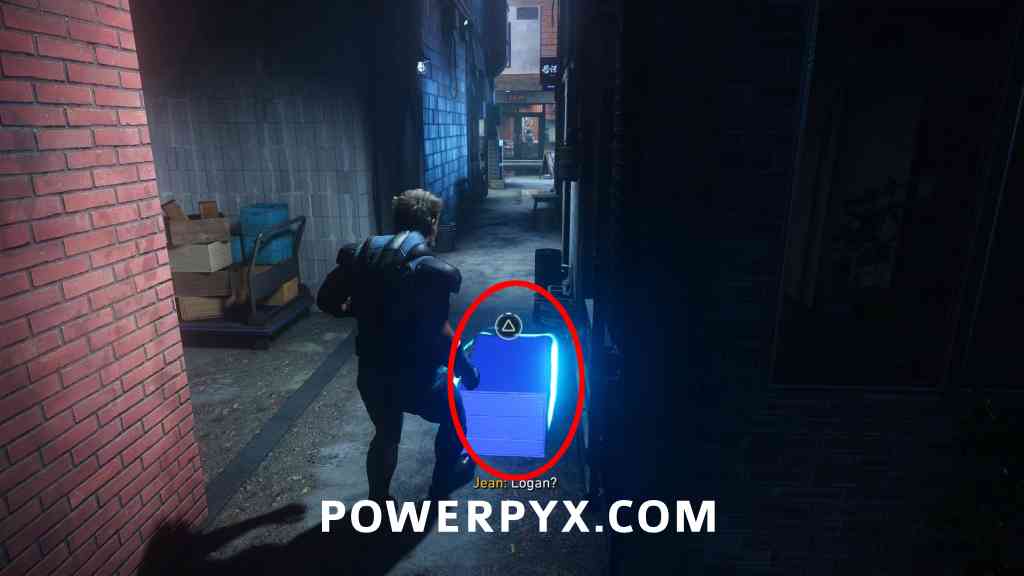
Material Crate #25
Objective: Locate the arcade where Jean previously was
When you have to go to 3 arcades to find Jean, to the right of this one is an alleyway, you’ll find the crate here.
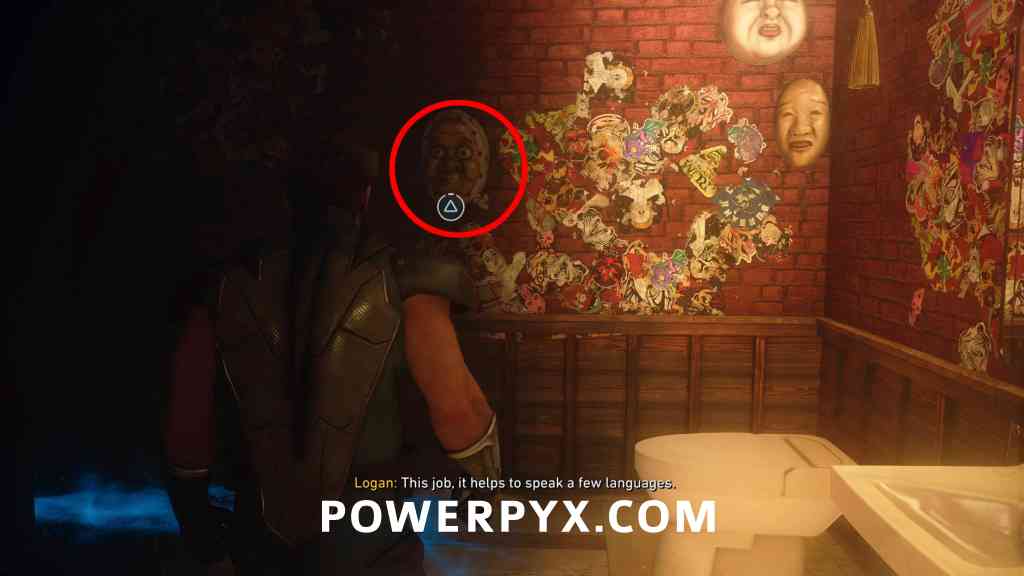
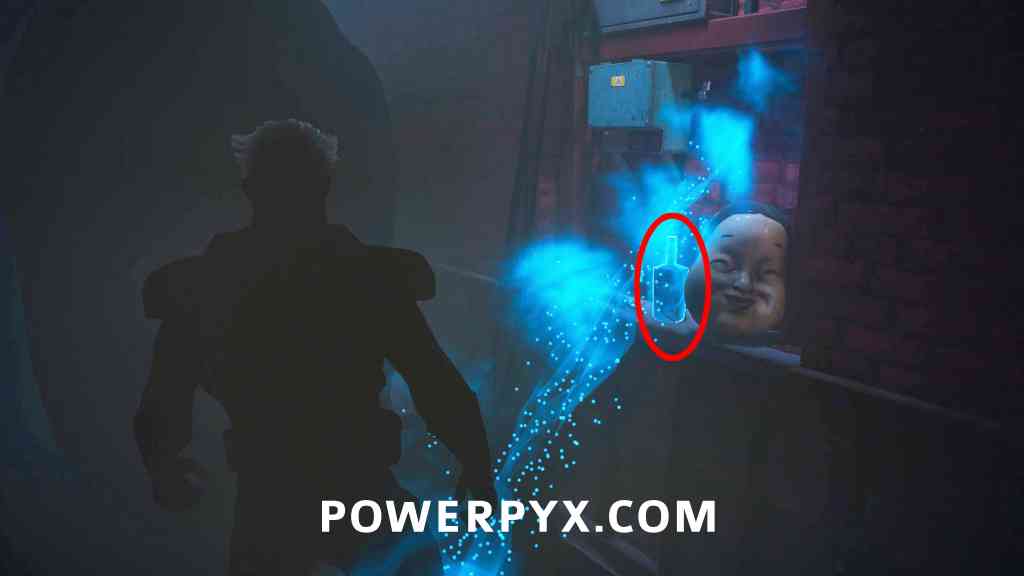
Trophy: Poseidon’s Kiss + Whisky Bottle #9 – Patch
Objective: Locate the bar from Jean’s vision
Much later, after a big fight against the snipers in the plaza, you will enter the Sleepy Kiss bar (story path). Go downstairs and right into the bathroom, interact with the face on the wall which will activate the kissing toilet, once it’s moved back and out of the way you will see a bottle. Also unlocks Poseidon’s Kiss trophy.
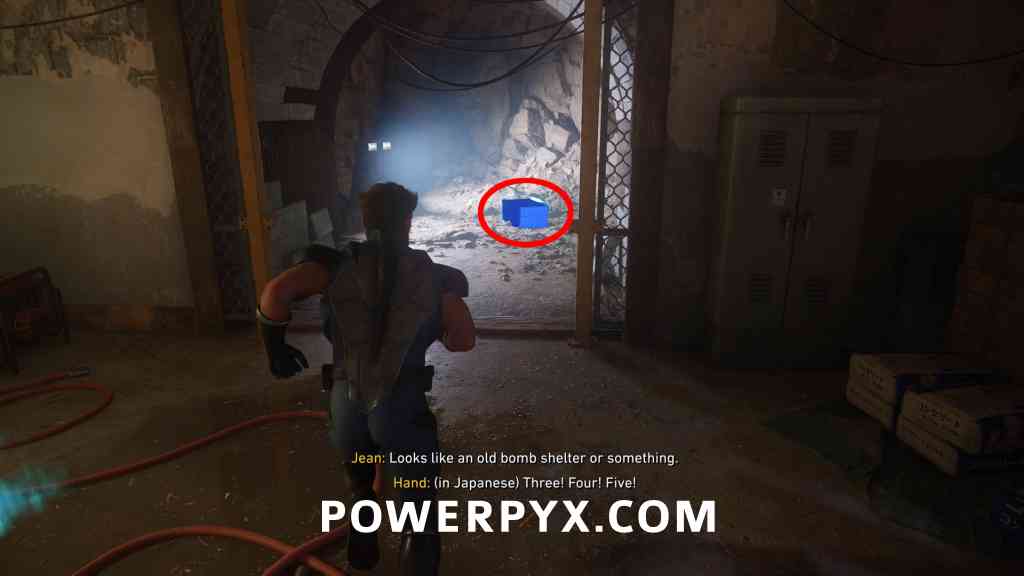
Material Crate #26
Objective: Explore deeper
You’ll go down an elevator in the bar, at the bottom look right to see this crate.
Material Crate #27
Objective: Find way forward
Once you break the first three incense burners, exit the room and this will be down a short corridor on your right, hidden by other crates.
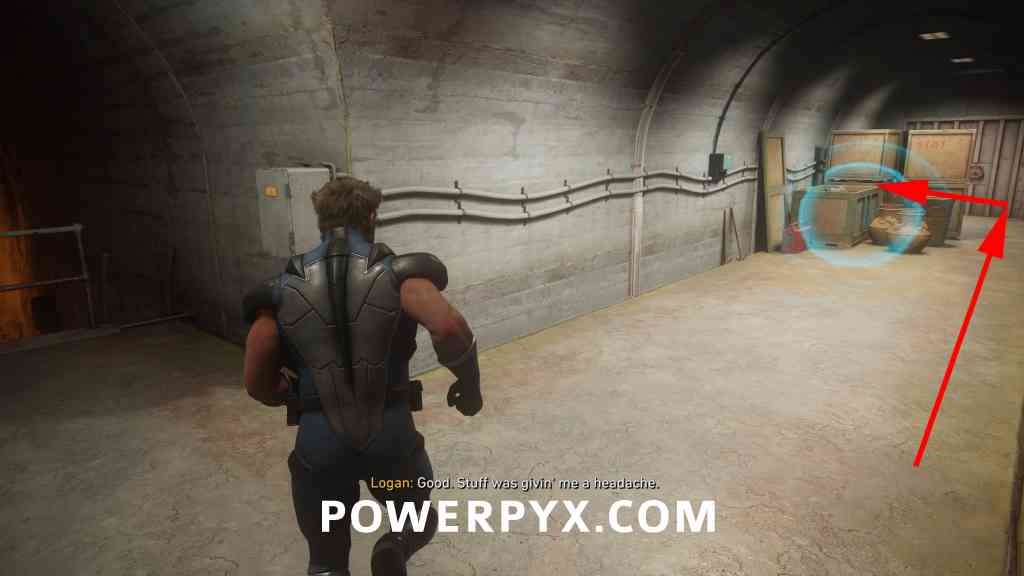
Material Crate #28
Objective: Find where The Hand is keeping Walter
After a cutscene in a cave, you’ll swing across multiple poles in a row, once you climb up to the top turn around to find the material crate at the other end.
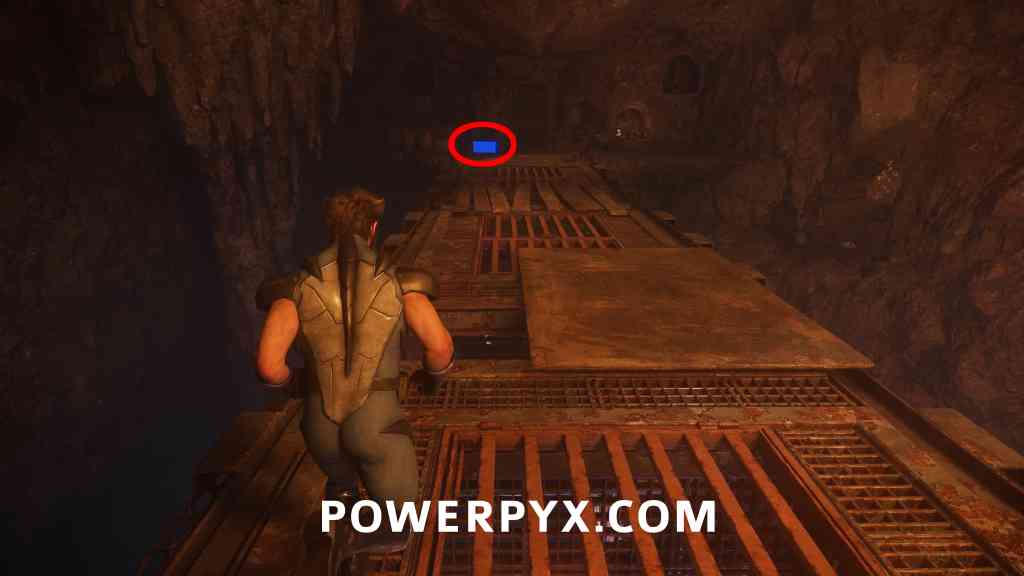
Nightmare Door #7 – Death By 1000 Cuts
Objective: Look for signs of Walter
Once you finish the hallucination sequence, you’ll end up in another cave, the door is right here in front of you, impossible to miss. In the trial you must defeat 3 enemies with Critical Strikes, which you perform by pressing  +
+  . When enemies use yellow attacks, they will impale you with a sword, then you can use + to use the sword to impale one of them. Alternatively you can reach Rage Tier 3 to do Critical Attacks, equipping the Adaptations that increase Rage gain rate is helpful.
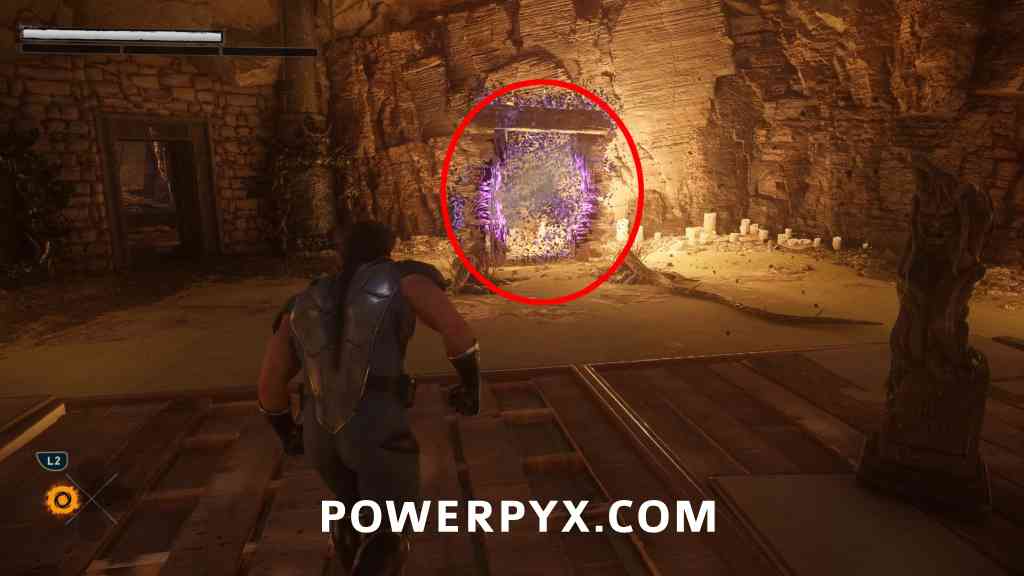
Material Crate #29
Objective: Look for signs of Walter
After using an elevator you reach a storage room, this will be on the right side.
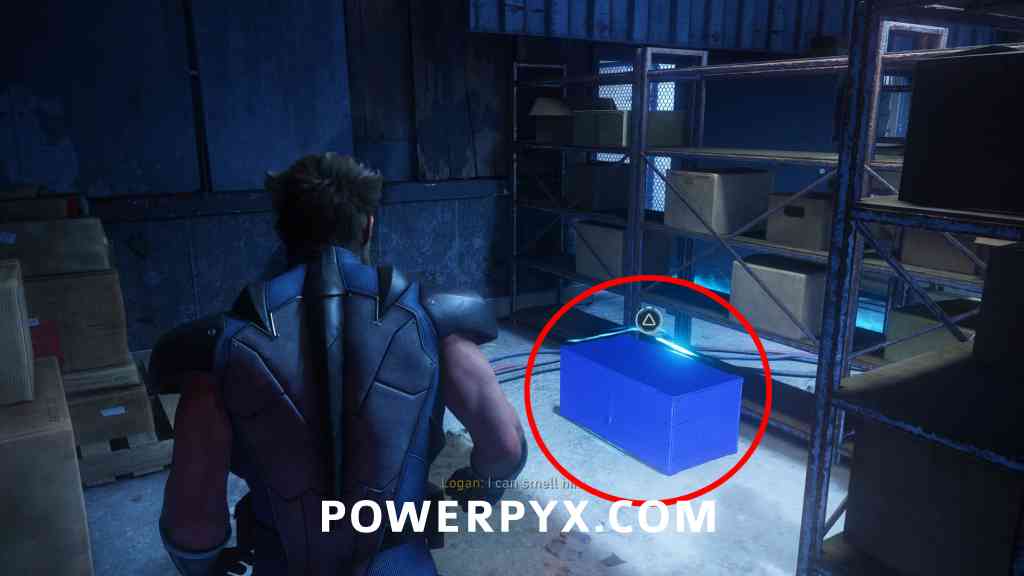
Bad Blood
- Nightmare Doors: 1
- Material Crates: 4
- Whisky Bottles: 1
Material Crate #30
Objective: Head to Shiro’s
Shortly after the start, you use a rope lift to go up a building. Afterward use the zipline and the chest will be on the next building behind breakable boxes.
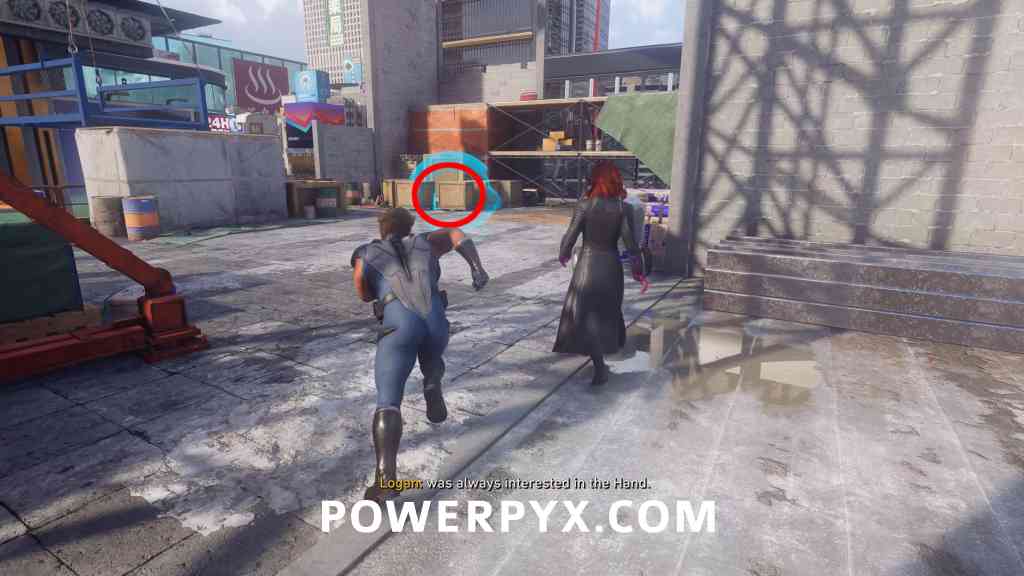
Nightmare Door #8 – Shinjuku Shuffle
Objective: Meet Jean outside Shiro’s building
After fighting a bunch of enemies you will be on the street again, some roots appear immediately in front of you, follow these up the building to the door.
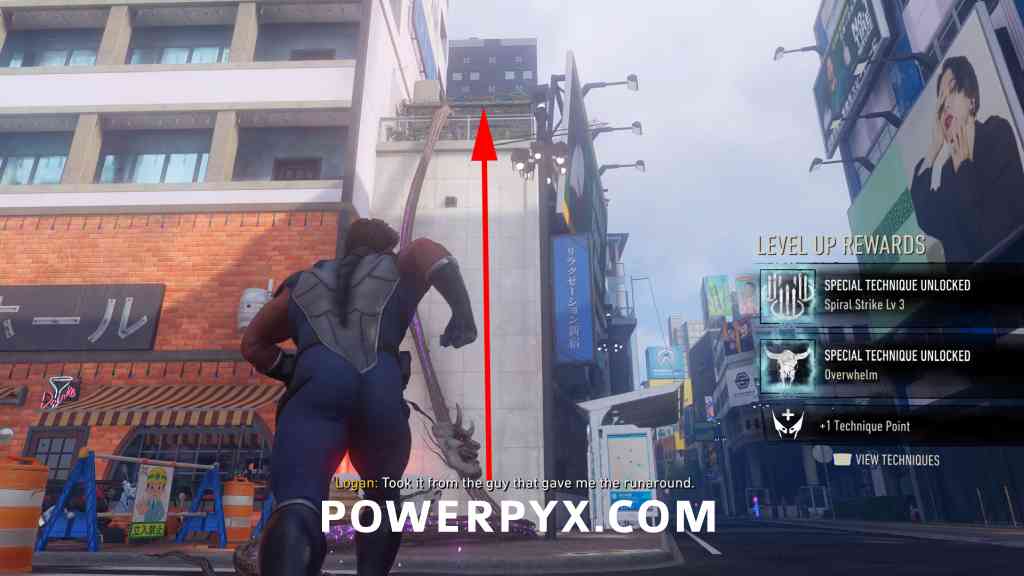
Material Crate #31
Objective: Climb to Shiro’s penthouse
Once you meet Jean outside Shiro’s building, this crate is at the top of the scaffolding you need to climb.
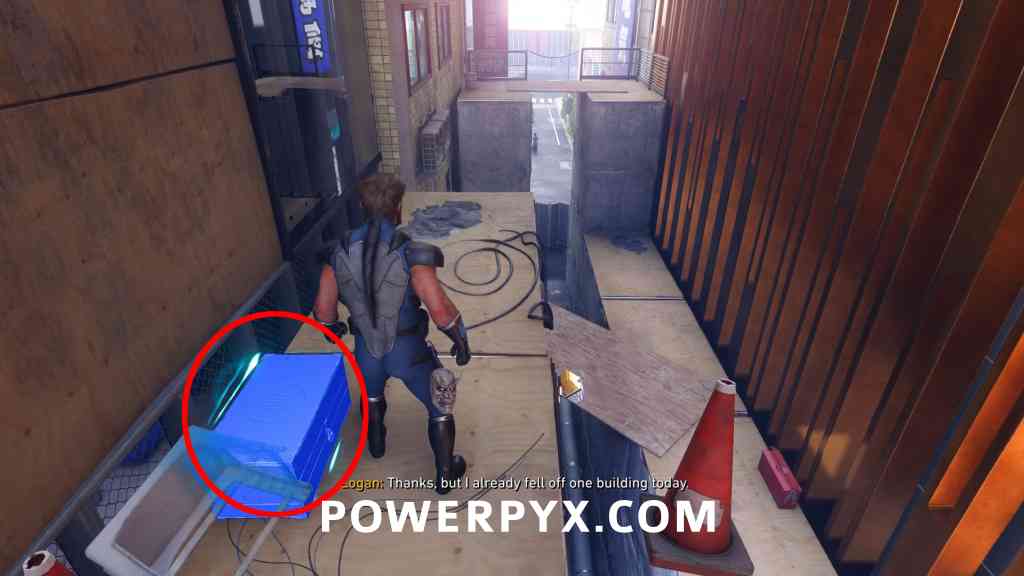
Material Crate #32
Objective: Climb to Shiro’s penthouse
Shortly after the previous crate, climb through the next building, you can go left where Jean is hovering above a blue lift, or drop down to the right, drop down to find the crate.
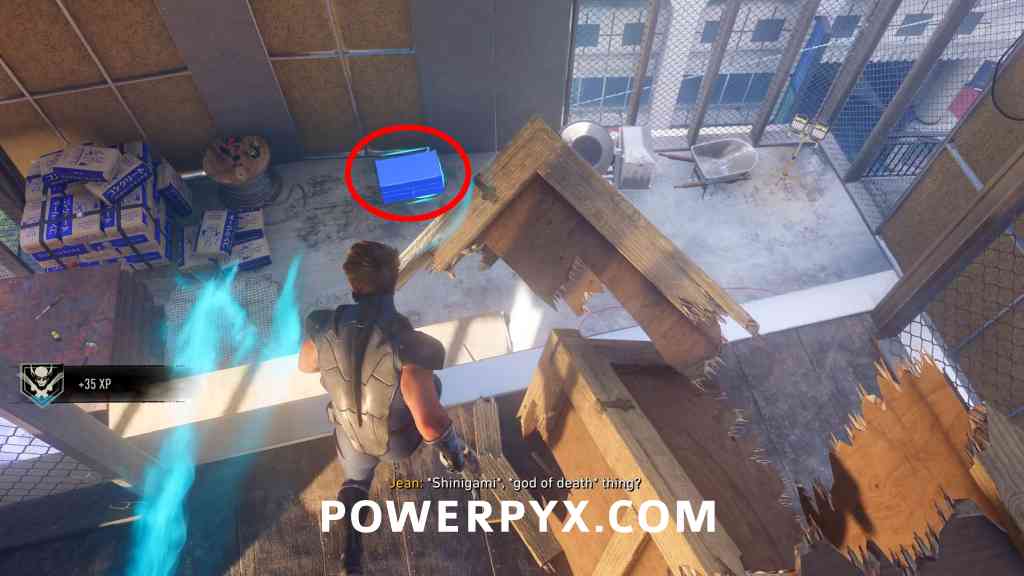
Whisky Bottle #10 – Fatal Attractions
Objective: Climb to Shiro’s penthouse
After the previous crate, turn around and you should see a scent trail leading behind, follow this and climb the wall to find the bottle.
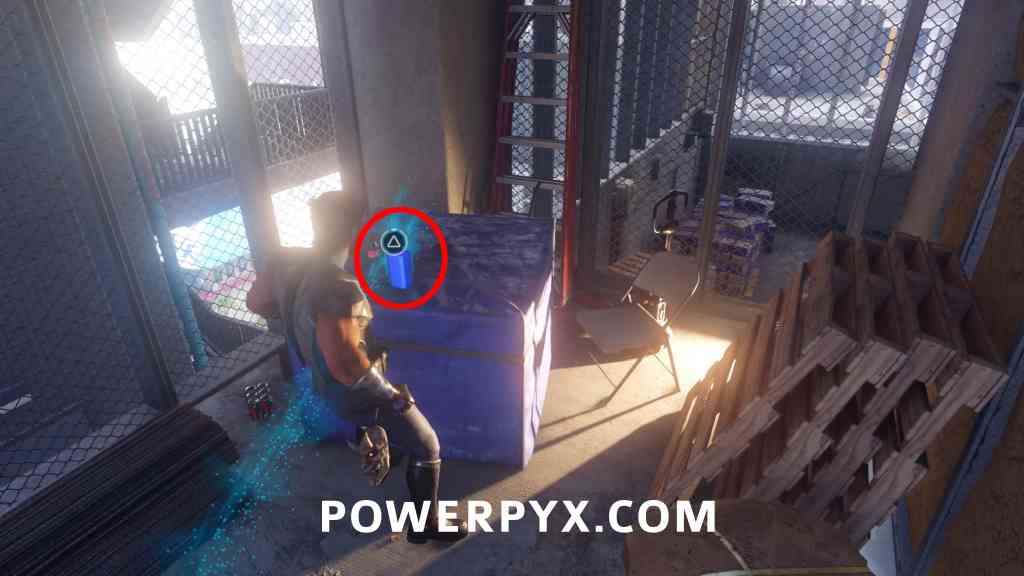
Material Crate #33
Objective: Climb to Shiro’s penthouse
Just after the previous 2 collectibles, jump on the lift and Jean will move it to another building. Instead of climbing up ahead, turn around and jump down to a different building. Turn right to find this crate through a doorway.
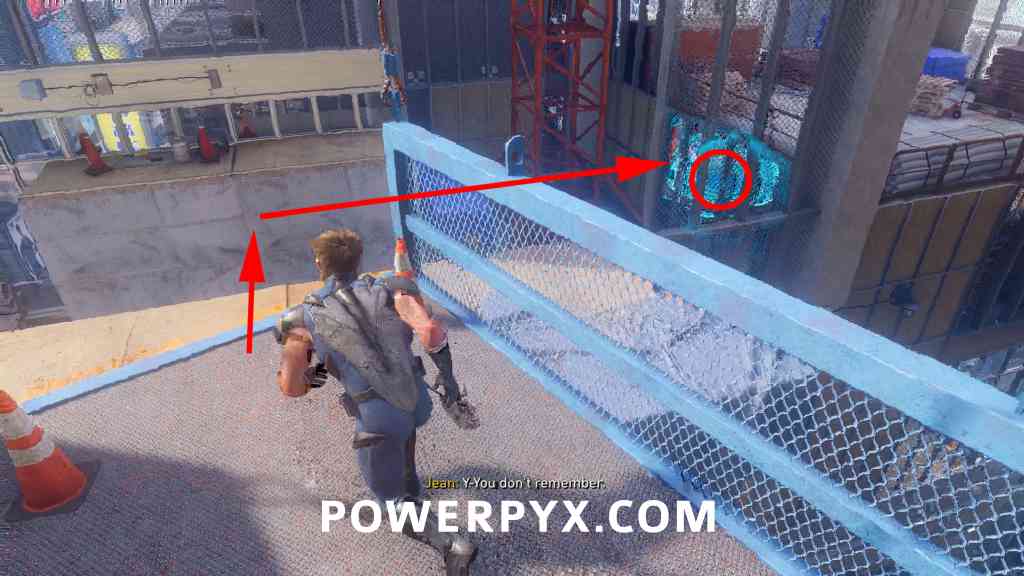
Penthouse Keypad Code = 1924 (the 4 middle books on the shelf that stick out further than the other books).
In the Shadows
- Material Crates: 7
- Whisky Bottles: 2
Material Crate #34
Objective: Investigate the arcade
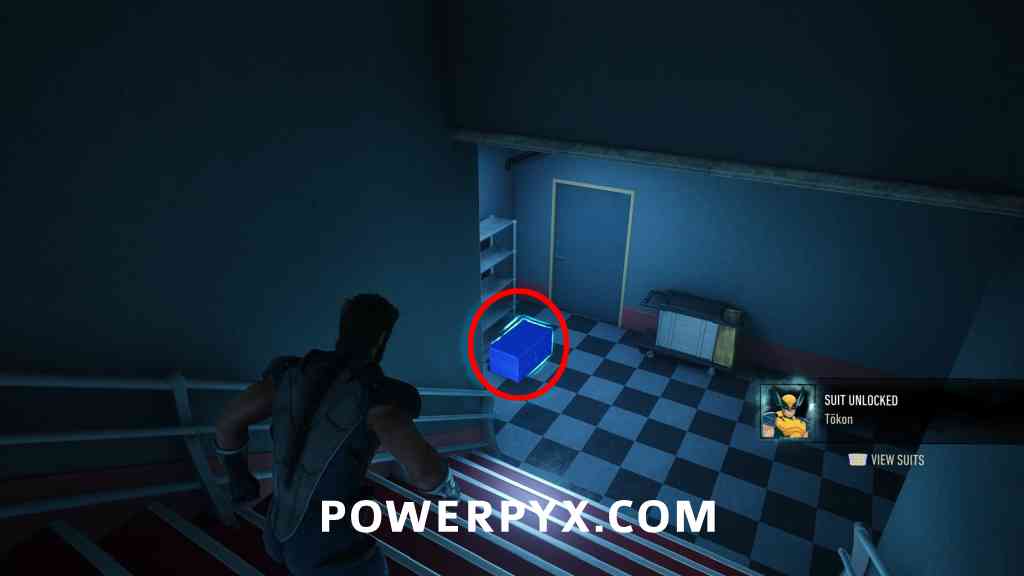
Once you enter the arcade, don’t go through the main doors yet, instead turn around and go down the stairs to find a crate.
Trophy – That’s Cheating
Objective: Return to the street
Interact with the machine in the back of the arcade to find a hidden room, investigate the objects there, then a fight starts in the arcade. During or after the fight, destroy all claw machines inside the arcade.
Material Crate #35
Objective: Destroy more detectors
When you run around the streets to destroy 3 detectors (power boxes on walls), proceed until you reach the third detector on a rooftop. When standing in front of the third detector and looking at it, turn left and go to the next roof to find this crate.
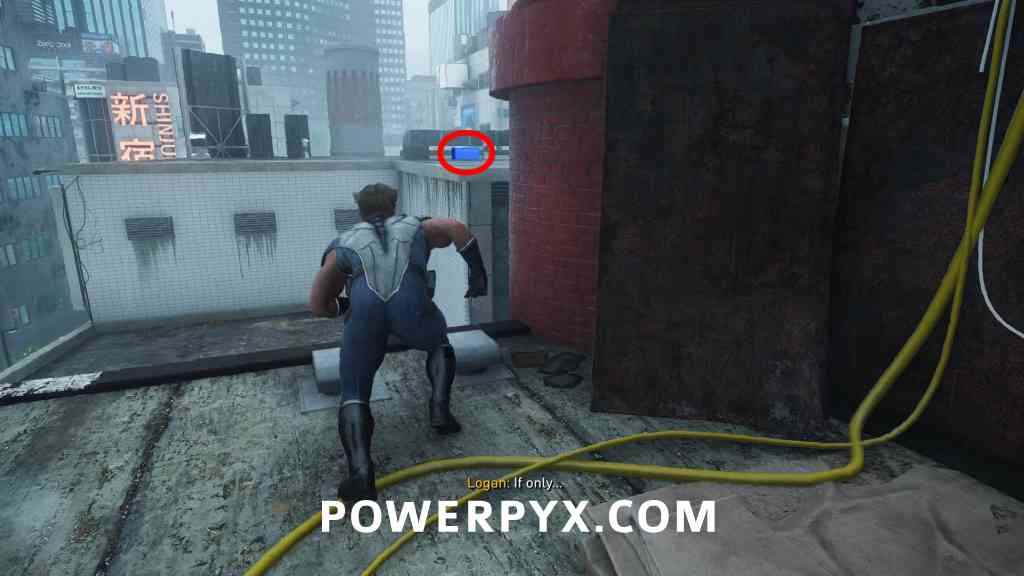
Whisky Bottle #11 – Best There Is
Objective: Destroy more detectors
From the prior material crate, turn around and jump back to the roof where the third detector was. In front of you will be a pole you can swing across, below this pole on the roof is the blue scent line that leads to the bottle.
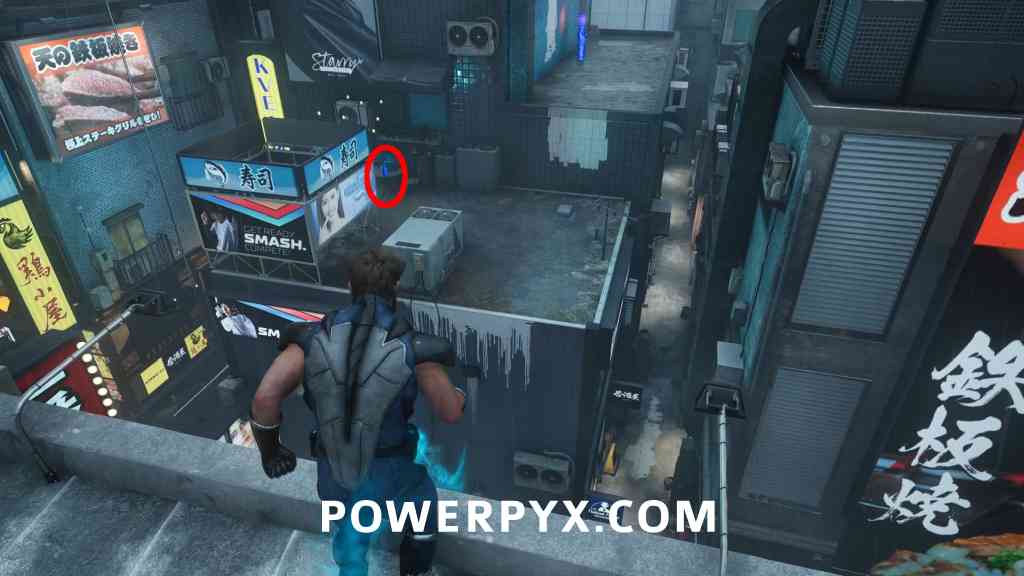
Material Crate #36
Objective: Destroy more detectors
Climb to the rooftop directly above the Whisky Bottle, then jump off the ramp to the next roof. Check the right corner on the rooftop.
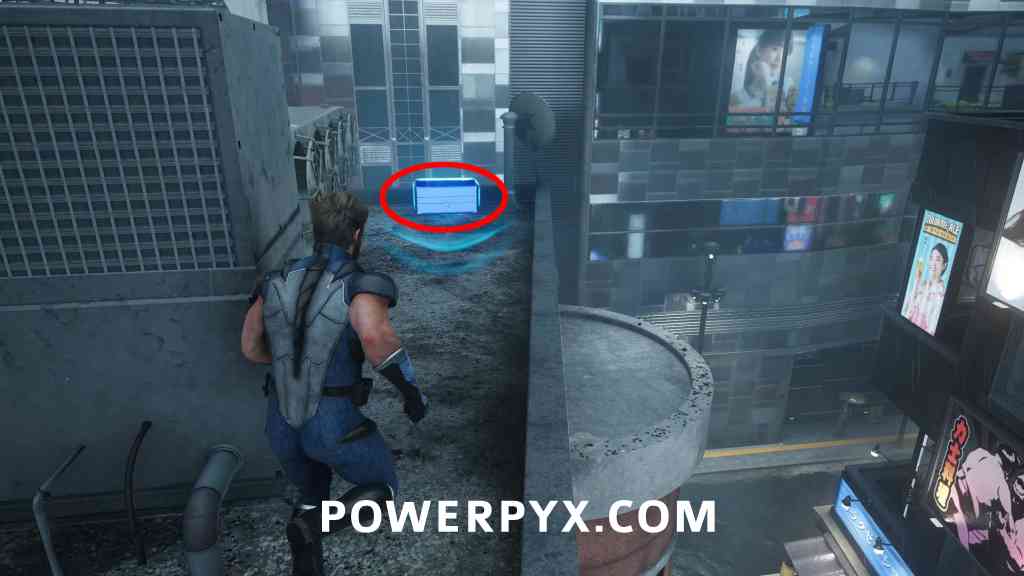
Material Crate #37
Objective: Destroy more detectors
On the same roof, climb the big pipe to the top, use the zipline to the next roof to find this crate. Right next to the fourth detector.
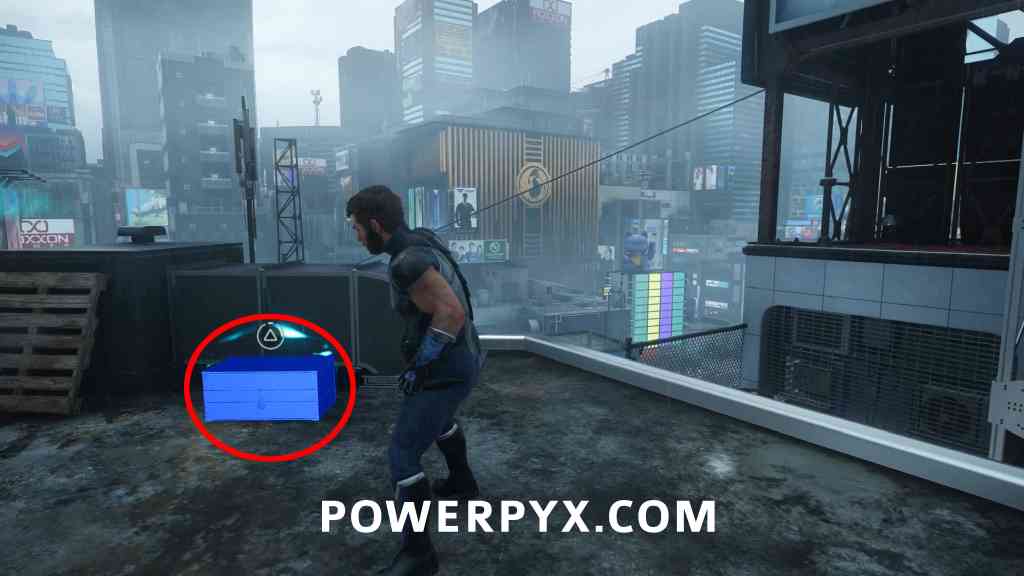
Material Crate #38
Objective: Eliminate the Hand defending the hideout
After the noodle truck drives you to the construction site, go left and around the corner to find this crate next to a digger.
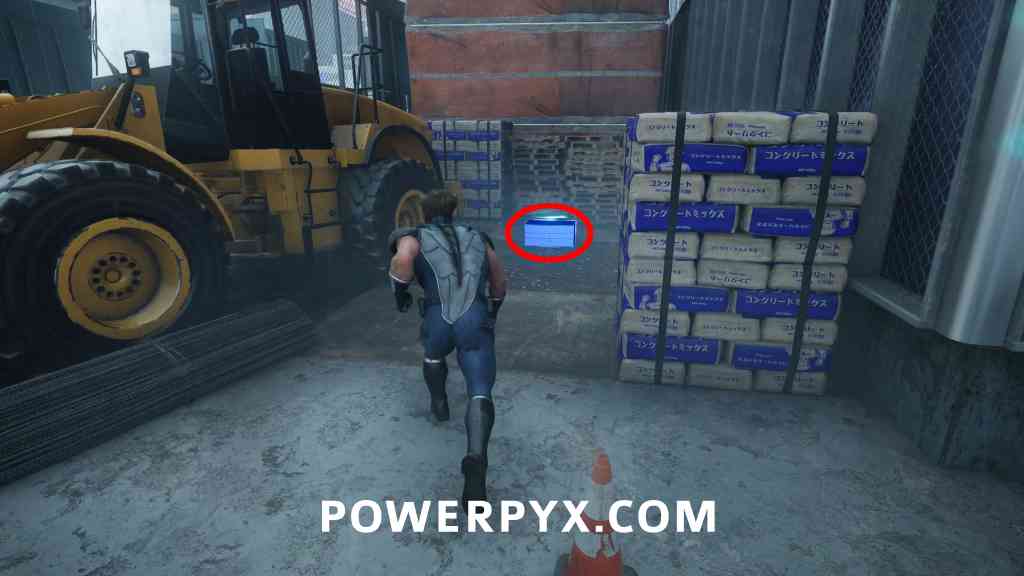
Whisky Bottle #12 – Berserker Brew
Objective: Speak to The Chosen
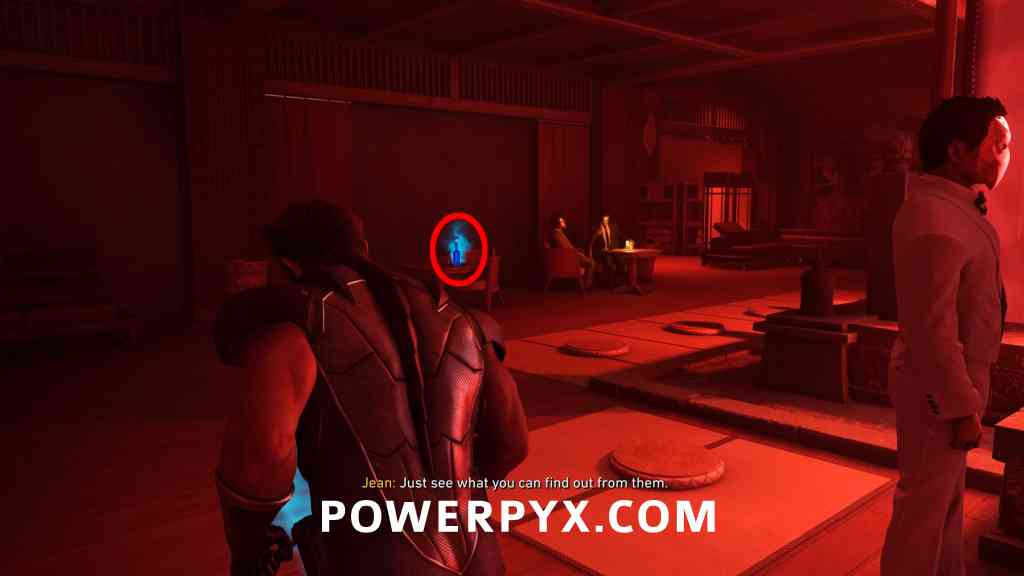
After you meet up with Jean in The Hand hideout (short cutscene where you meet Jean), there is a bottle on a table in the back left corner of The Hand hideout. It’s the red-lit room where you speak with the 3 chosen for story objectives.
Material Crate #39
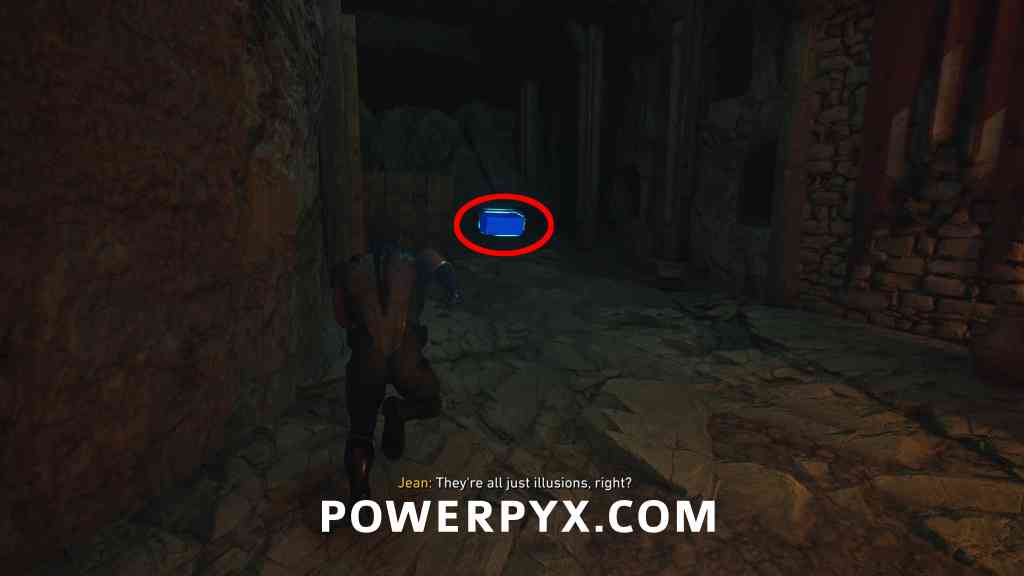
Objective: Catch up to Walter
After you’ve spoken with the chosen and go through a secret door, go down the corridor and then left to find a crate in the corner.
Material Crate #40
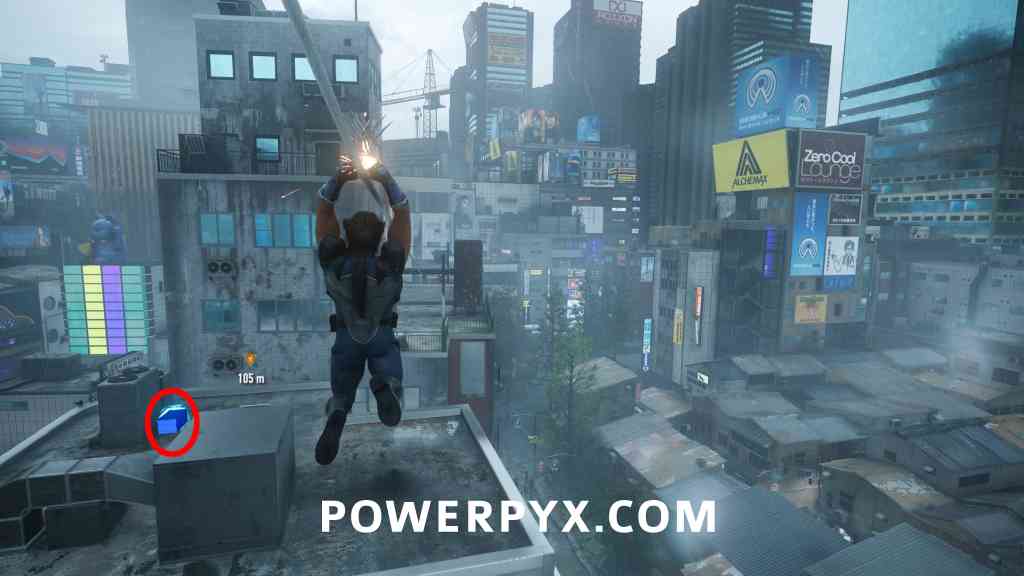
Objective: Return to Shiro’s apartment
After the big fight against the “Fist” (new enemy with purple magic) you’ll end up on a rooftop, ride the zipline right in front of you and jump off half way to see a crate on your left.
Death Comes to Death
- Nightmare Doors: 1
- Material Crates: 3
- Whisky Bottles: 1
Material Crate #41
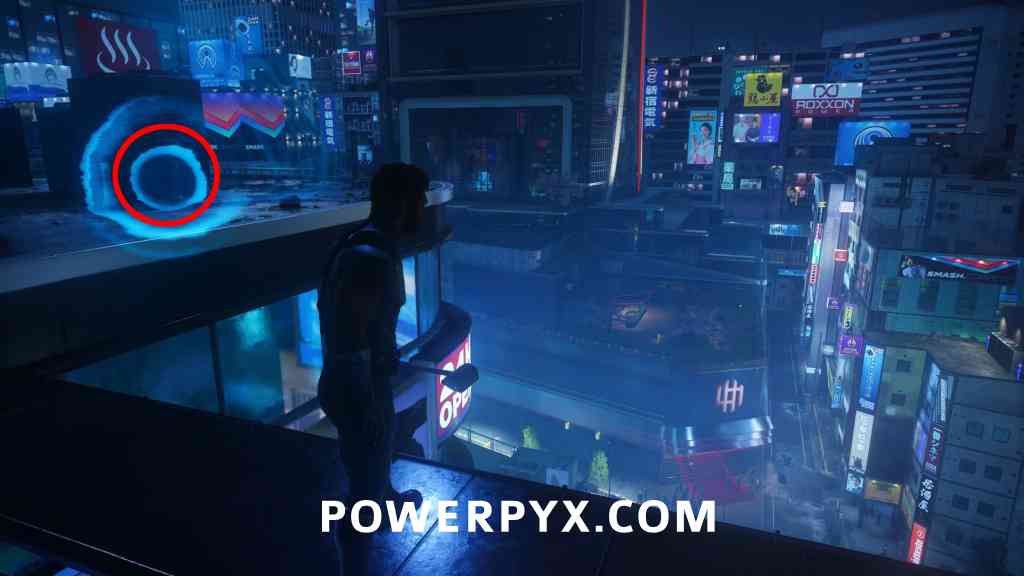
Objective: Get to Harada Garden Tower
At the very start of the mission, before jumping down, go left to find this behind some metal vents.
Whisky Bottle #13 – Hand of God
Objective: Find the Hand discussing Jean
This is in your direct path after fighting some enemies in the restaurant near the start of the level, impossible to miss.
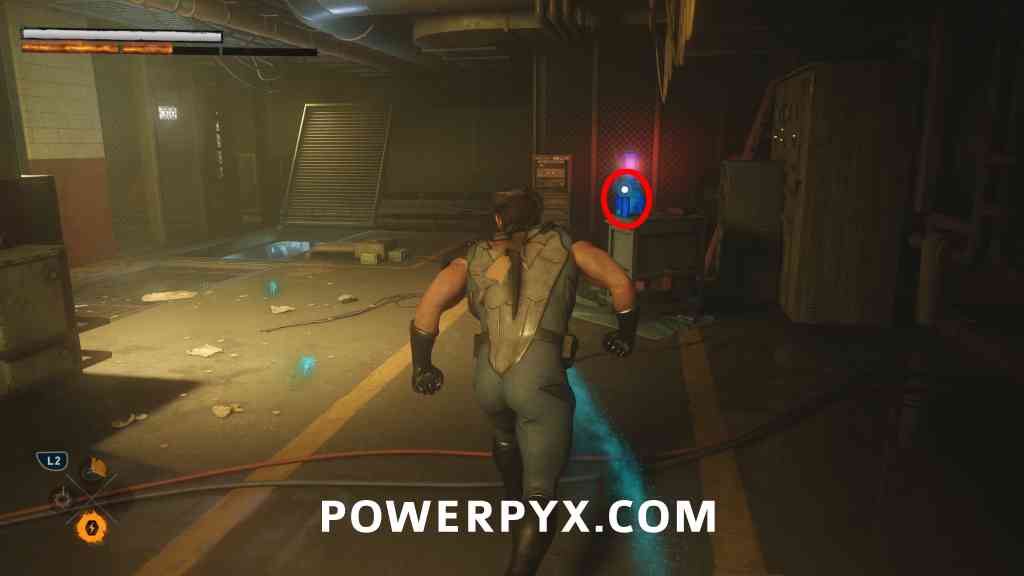
Material Crate #42
Objective: Locate the Helix Engine
After checking the security, you will come to a room with pipes, as soon as you enter go right and under a pipe to find the crate.
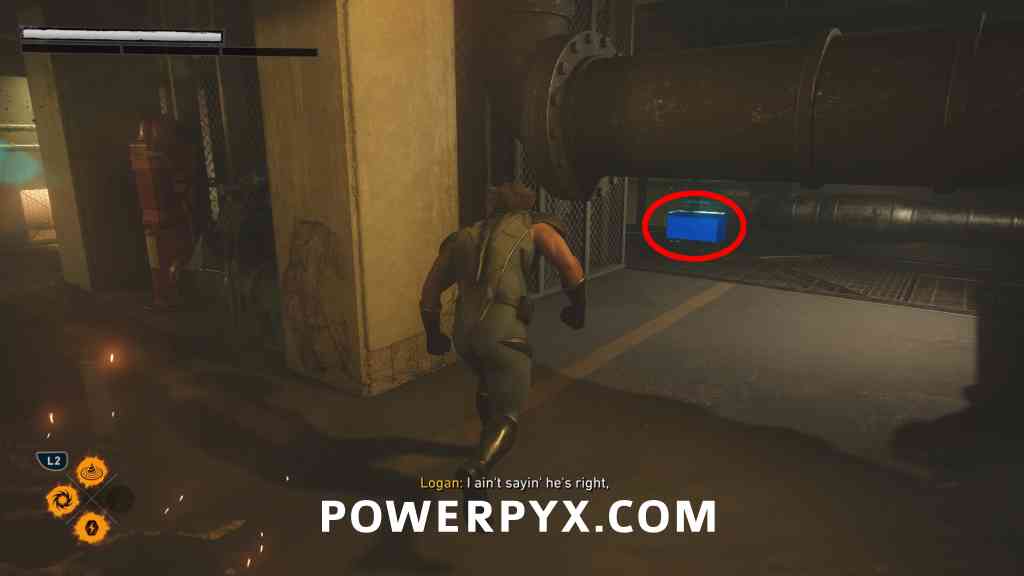
Nightmare Door #9 – Rockbottom Blues
Objective: Locate the Helix Engine
In the same room, follow the roots to the door. For this trial you just need to reach the exit in 47 seconds.
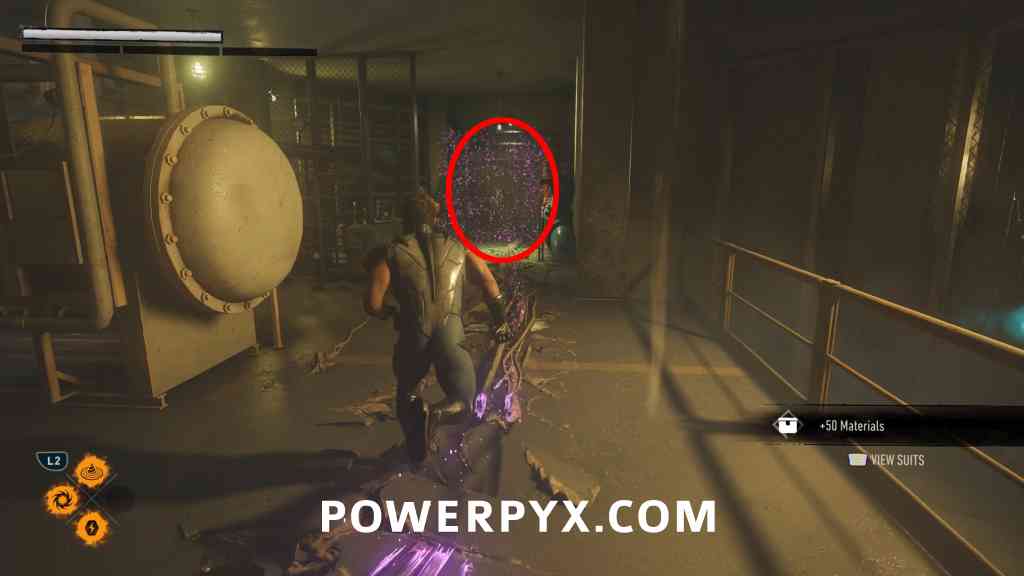
Material Crate #43
Objective: Track down the Helix Engine
You’ll come to an elevator after following some drag marks, it’s just to the right before the elevator.
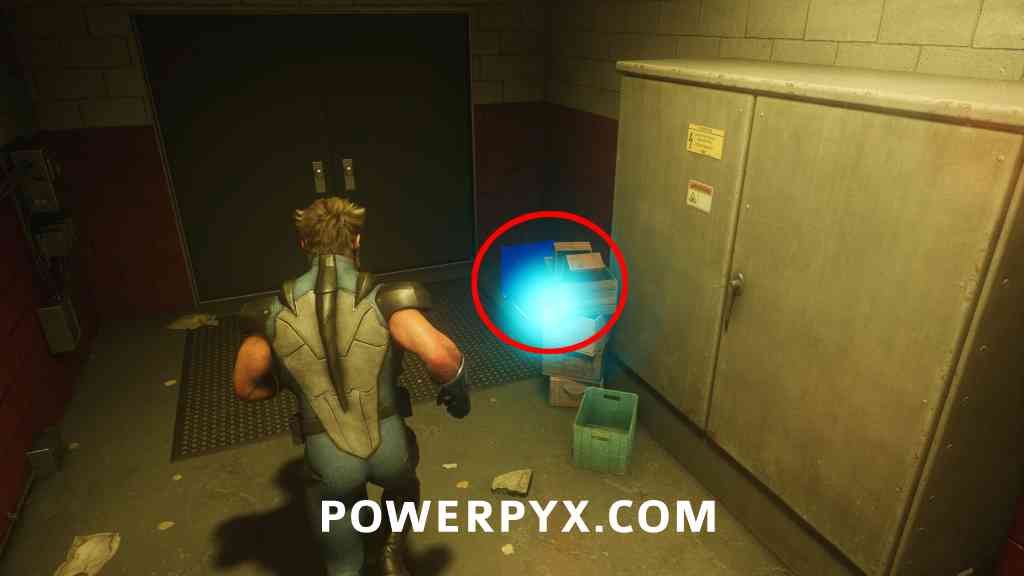
We Were Wrong
- Material Crates: 5
- Whisky Bottles: 1
Material Crate #44
Objective: Track the Helix Engine
While following the drag marks at the start of the level, you’ll come to a truck that says “Alchemax” on it, it’s behind the truck hidden among some boxes.
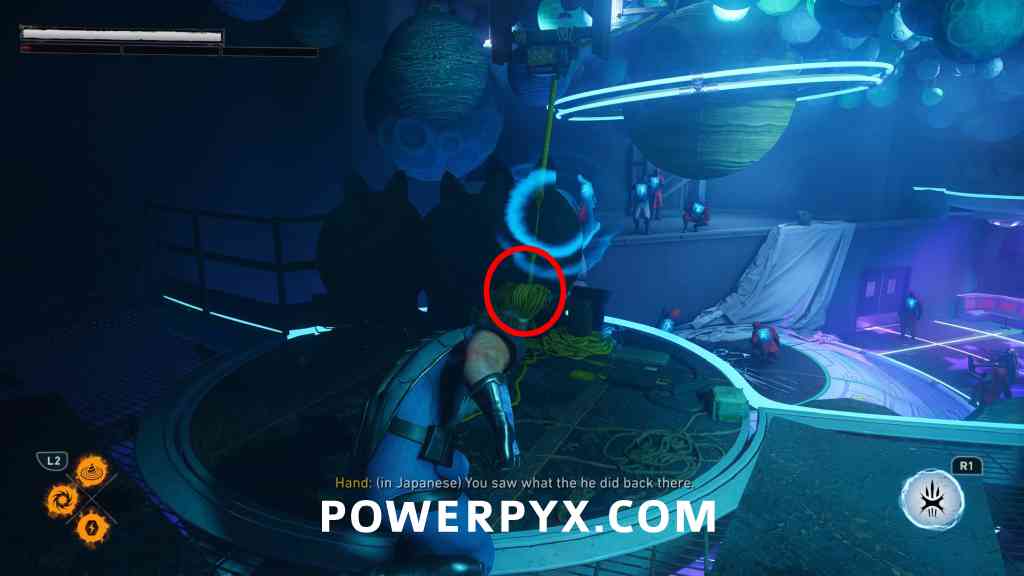
Trophy: Saturn Slam (drop Saturn onto The Hand in Japan)
Objective: Track the Helix Engine
When you climb into the next building for story progression, you will be in a room with planets hanging from the ceiling. Stealth-kill the enemy on the left and attack the rope that’s tied to the Saturn planet. It will fall down and crush the enemies standing underneath it.
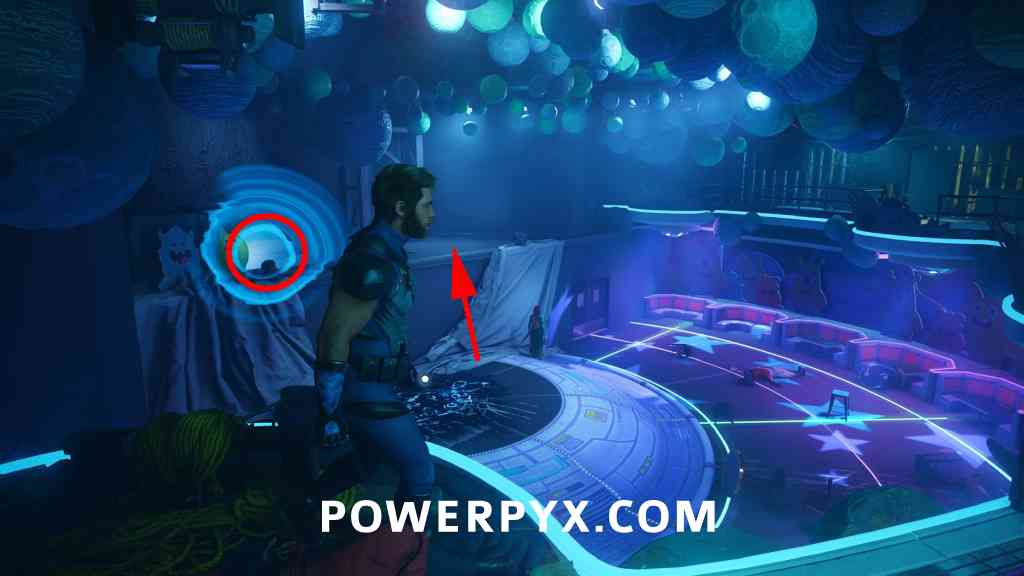
Material Crate #45
Objective: Investigate the restaurant
In the same room where you get the “Saturn Slam” trophy, after defeating the enemies climb up where the archers were.
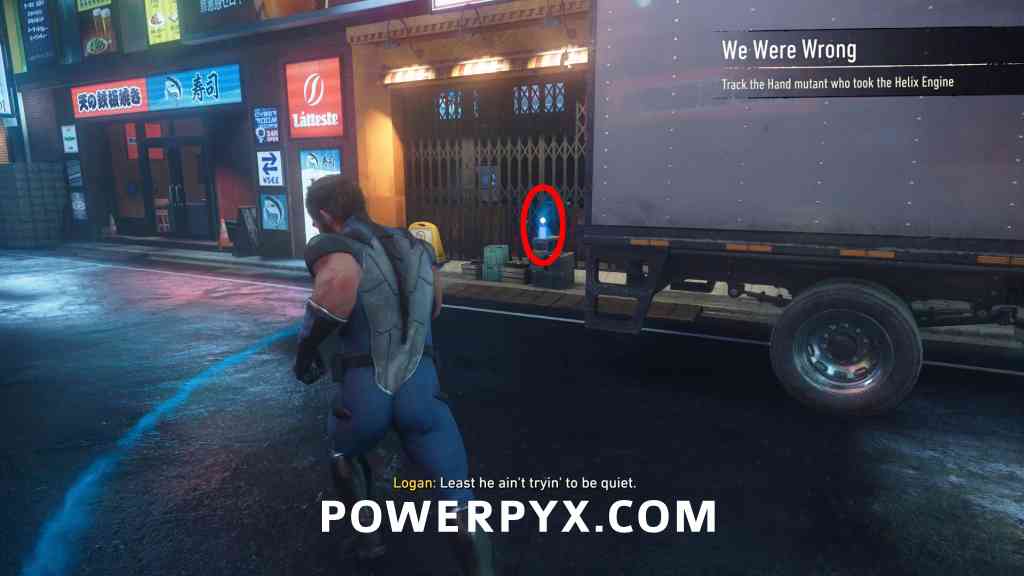
Whisky Bottle #14 – Revolto
Objective: Track the Hand mutant who took the Helix Engine
Once you get back outside and start tracking the footprints, you’ll come to a split path with a truck to the left, the bottle is behind it.
Material Crate #46
Objective: Track the Hand mutant who took the Helix Engine
A little further on from the above bottle, you’ll fight a group of enemies. Then you come to an overturned car, go left of the car to the end of the road and look right to see the crate.
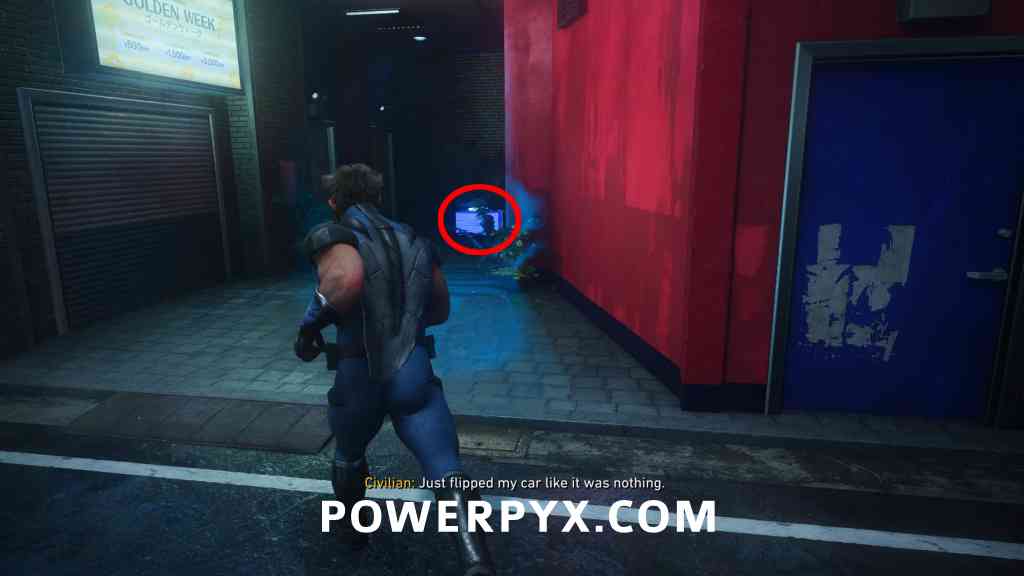
Material Crate #47
Objective: Track the Hand mutant who took the Helix Engine
Continue tracking the footprints, after the next fight, you’ll go through a broken wall to a new area with some shipping containers, look left to see a truck, the crate is behind it.
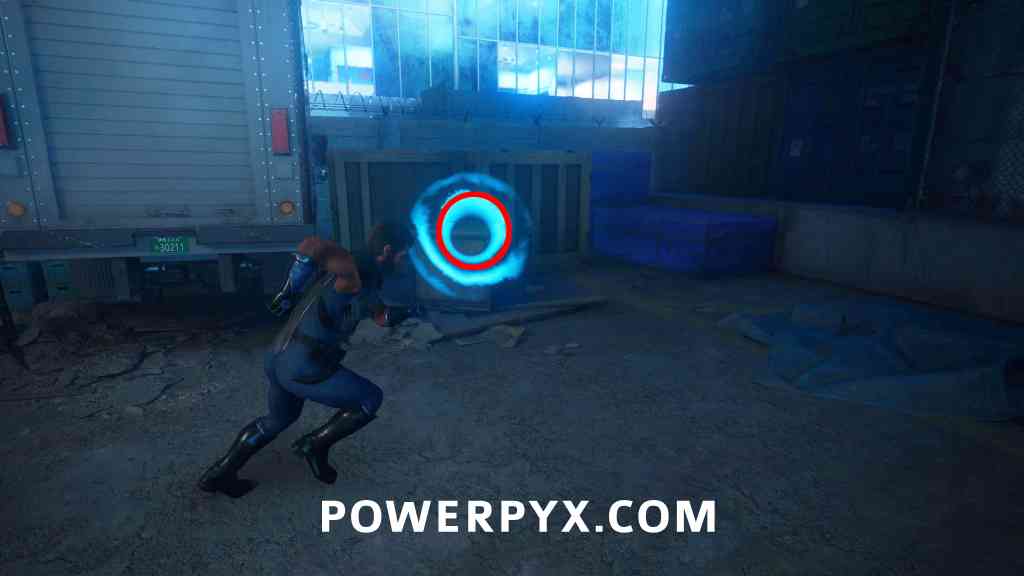
Material Crate #48
Objective: Recover the Helix Engine
After the big fight in the warehouse, you will tear open a gate and go downstairs. At the bottom of the stairs turn left to find the crate.
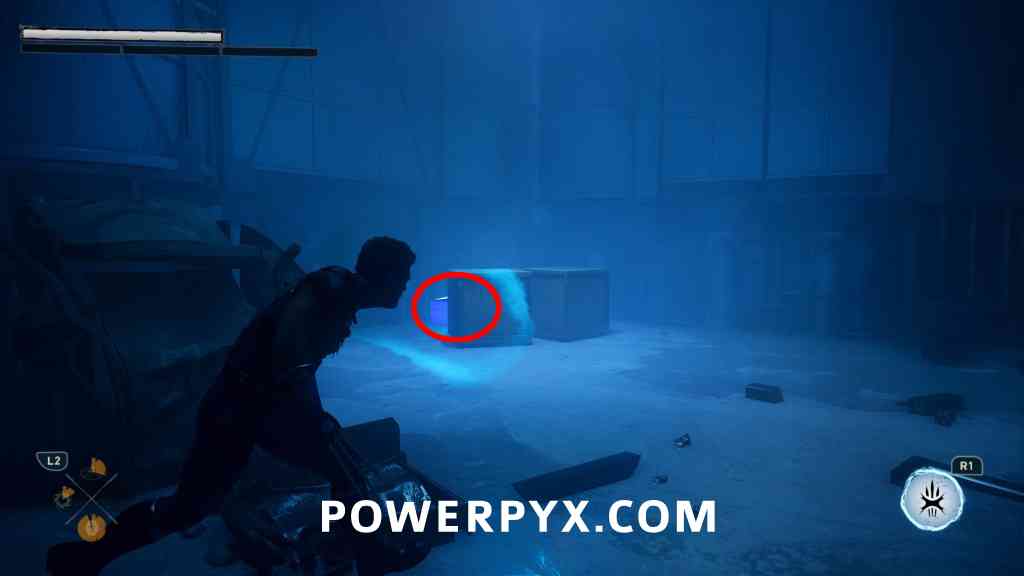
Hell Followed With Him
- Material Crates: 4
- Whisky Bottles: 1
Material Crate #49
Objective: It’s empty; look around
Right at the start of the level, go forward and Jean will be looking at a weapons rack, go left and around the corner to find the crate.
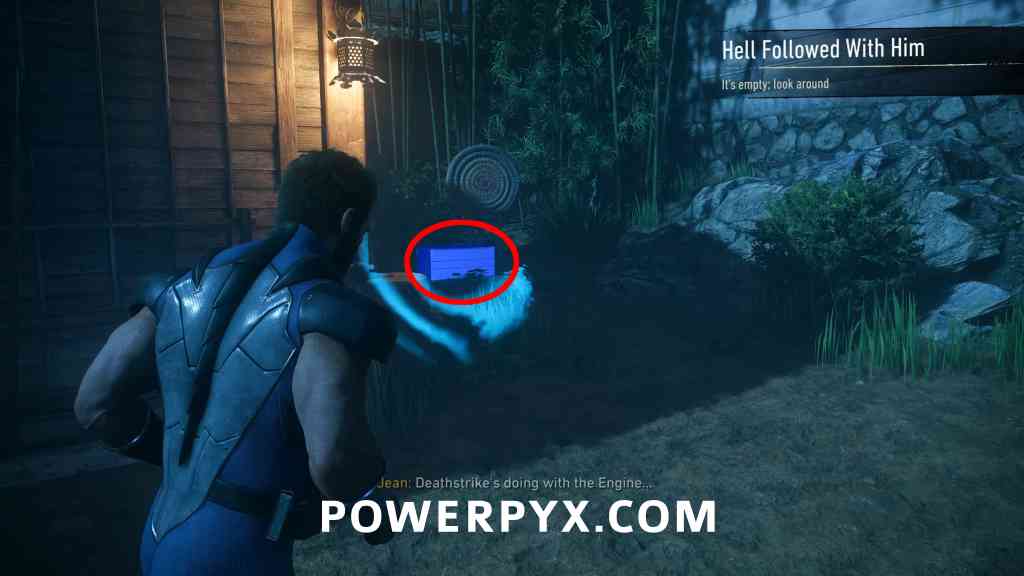
Material Crate #50
Objective: It’s empty;look around
In the back right of this area are some stairs leading to a training area, the crate is in the left corner.
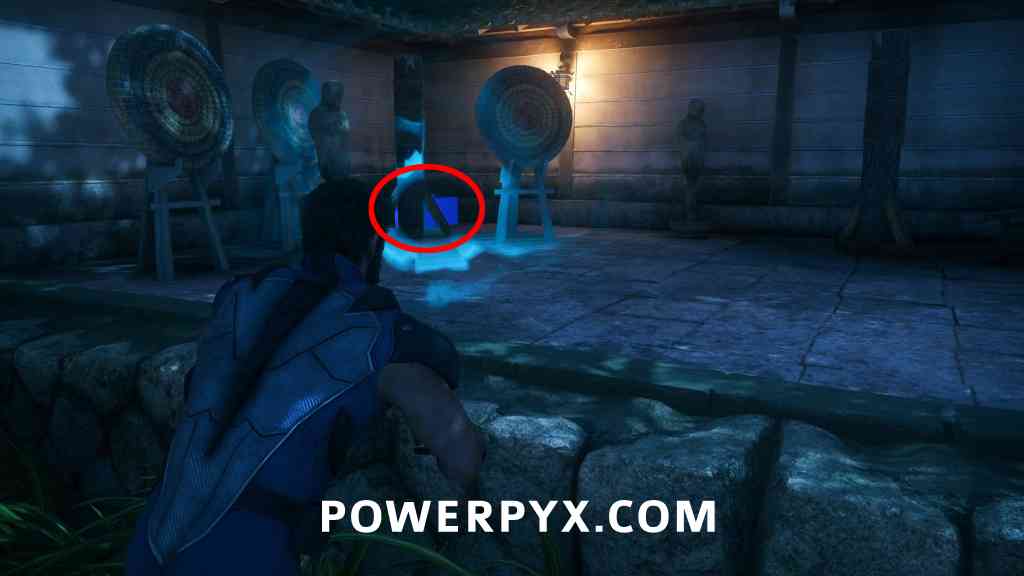
Material Crate #51
Objective: Take out the Hand guarding the stronghold
In the forest area with many enemies, stick to the right side of the area and you will come across the crate as you move further up.
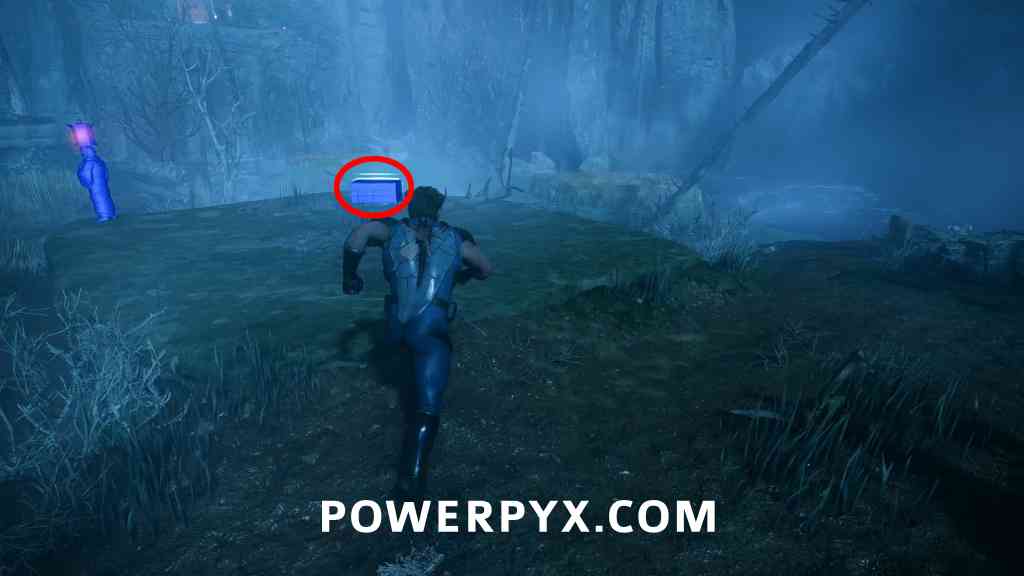
Whisky Bottle #15 – The Itsu Single Malt
Objective: Scale the cliff; more Hand to kill up top
After Jean suspends two rocks to help you climb up, drop down from this small hut to see the bottle right here.
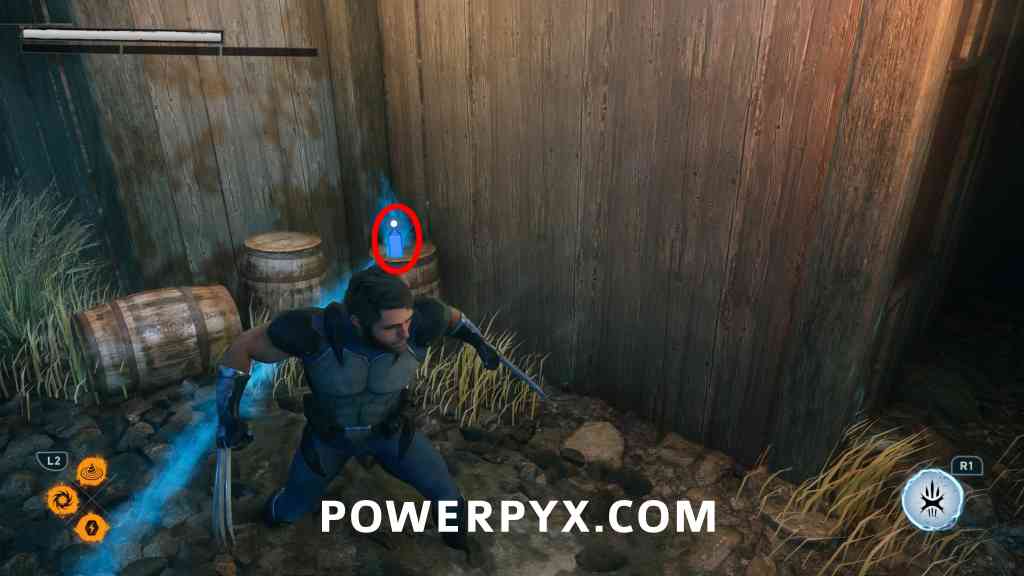
Material Crate #52
Objective: Tail Deathstrike / Investigate the shrine
After opening the huge doors to the shrine, find this immediately to your left.
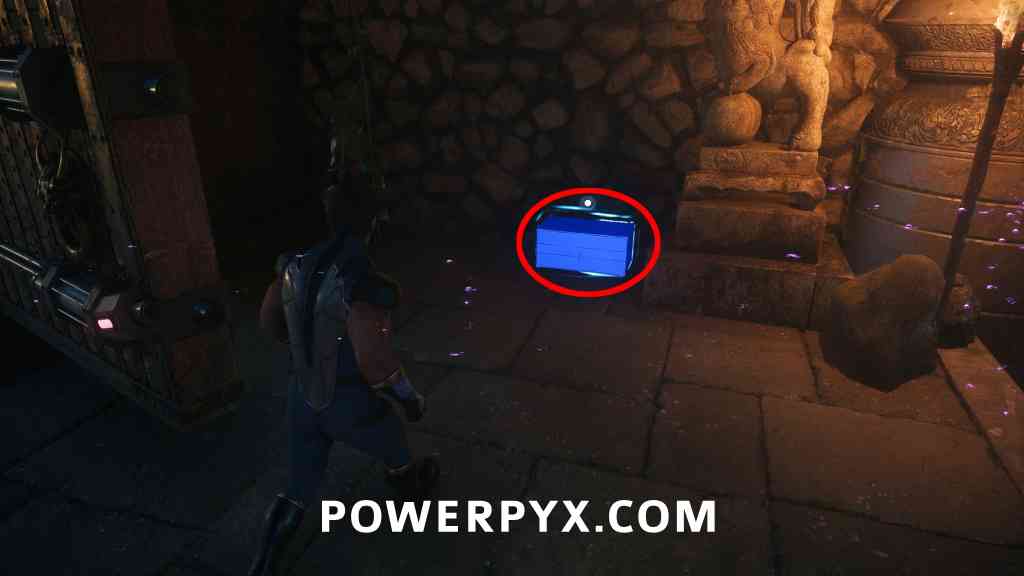
Death’s Match
No Collectibles in this Mission (this mission is just a boss fight)!
Sinister Tidings
- Nightmare Doors: 1
- Material Crates: 1
Material Crate #53
Objective: Maybe there’s something in the kitchen…
After interacting with the sink in the bathroom, you find this in Shiro’s hidden room upstairs, the same room you accessed as part of the story in “Bad Blood”.
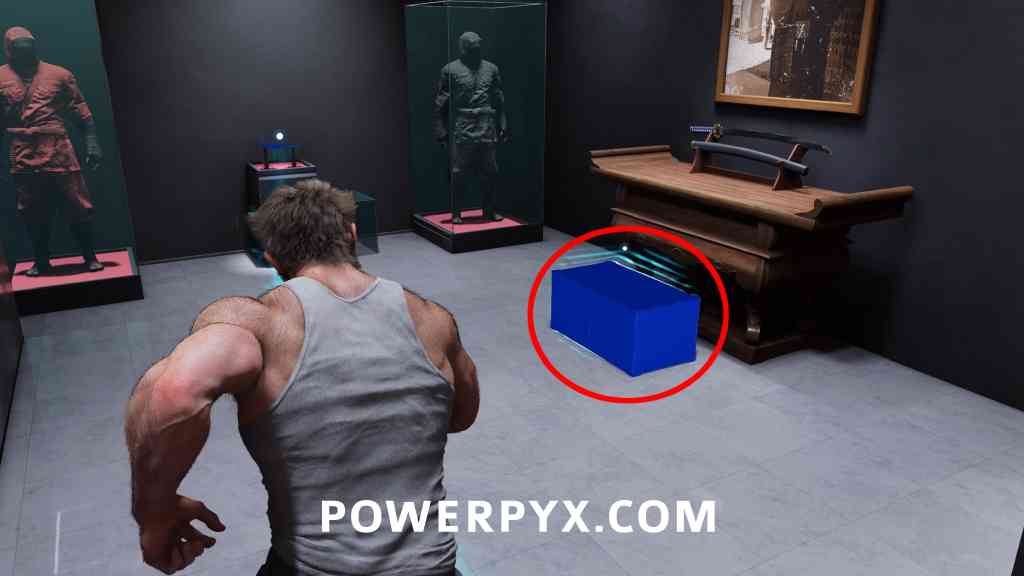
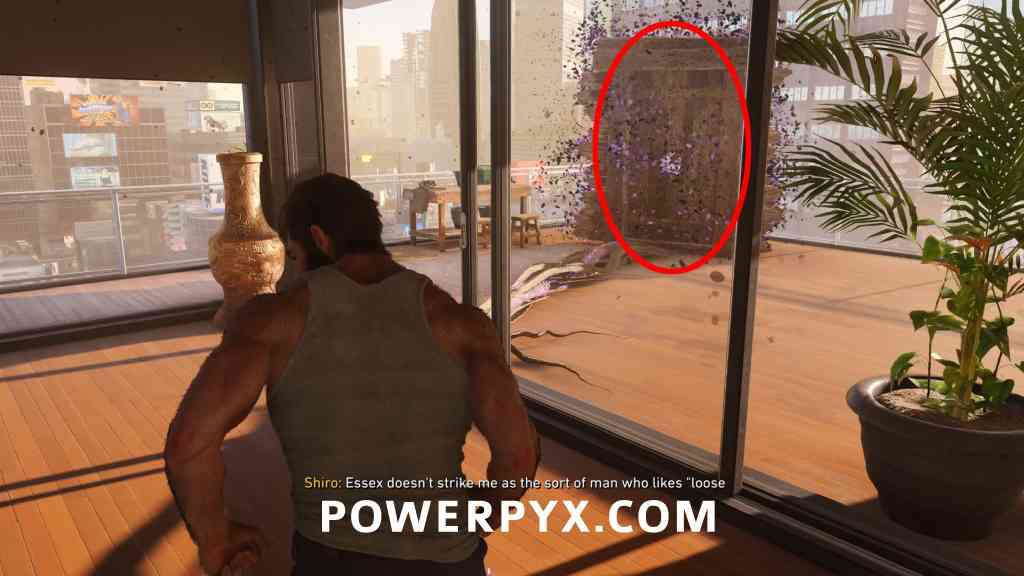
Nightmare Door #10 – Crucible of Tears
Objective: Maybe there’s something in the kitchen…
The door is outside on the balcony upstairs.
Madripoor 2
Way Down Low
- Nightmare Doors: 1
- Material Crates: 4
- Whisky Bottles: 2
Material Crate #54
Objective: Regroup with Jean
After freeing the civilians from the truck at the checkpoint, it’s in the back of the same truck.
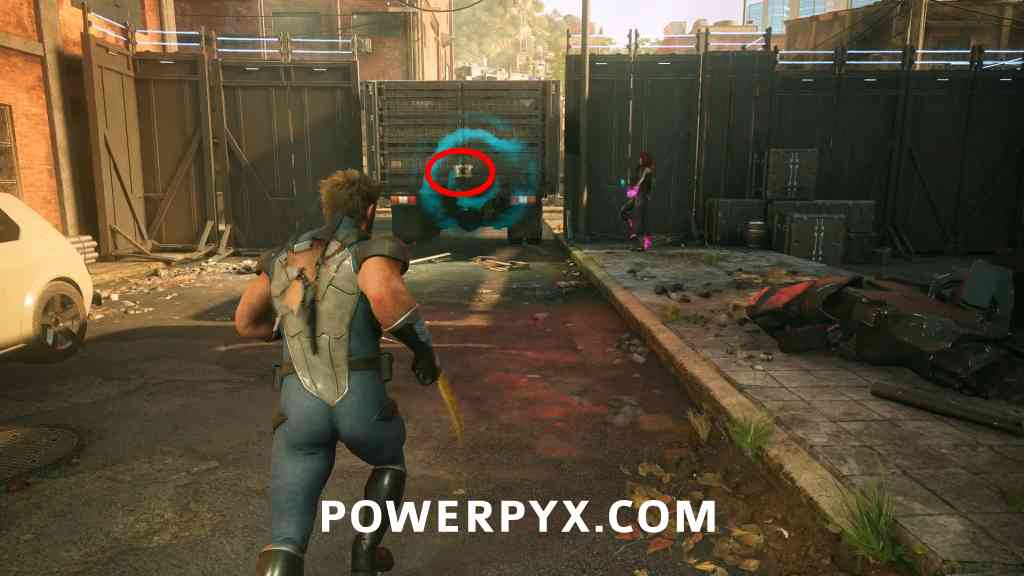
Material Crate #55
Objective: Meet Jean at the clocktower
Just ahead at the next checkpoint, there is another truck with civilians to free with a crate inside.
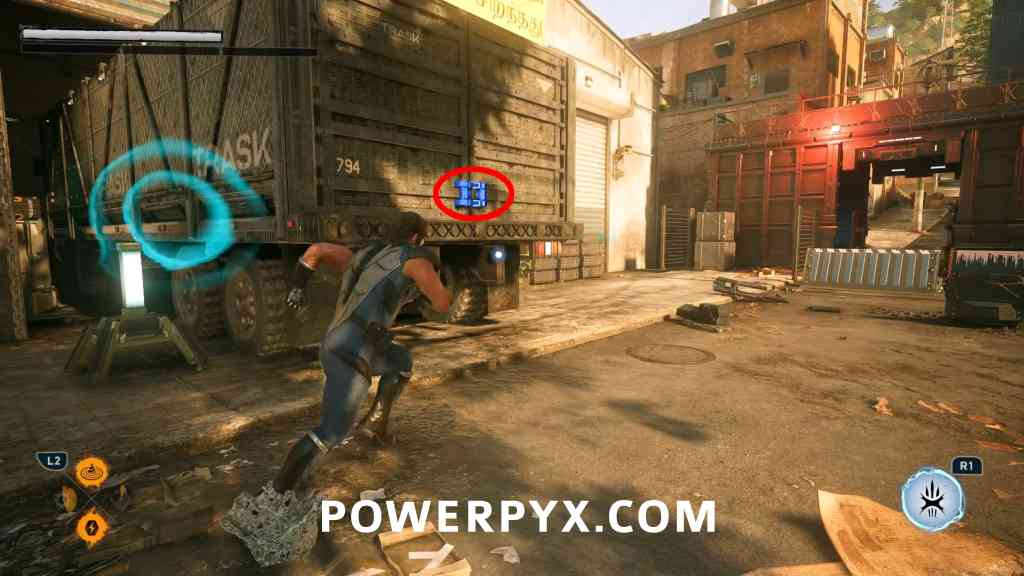
Material Crate #56
Objective: Meet Jean at the clocktower
Backtrack slightly and you can see another road going to the side. Go to the end of this road to find another checkpoint and truck with civilians, there is a crate inside.
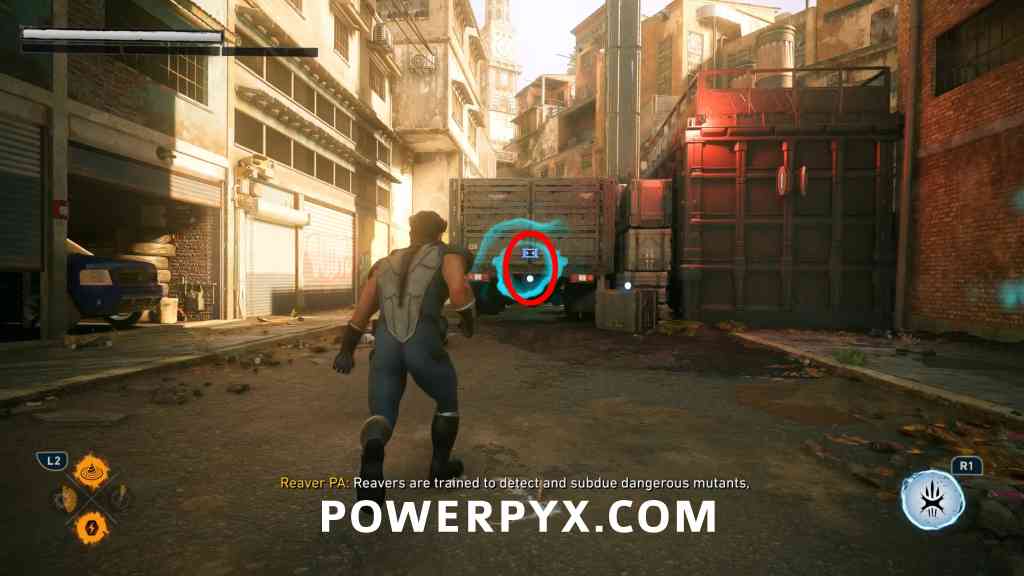
Whisky Bottle #16 – Wild Canadian Whisky
Objective: Follow Jean
After the section finding the reaver key, once you climb up the building using the hook, turn around and look left, follow the short path around to find the bottle.
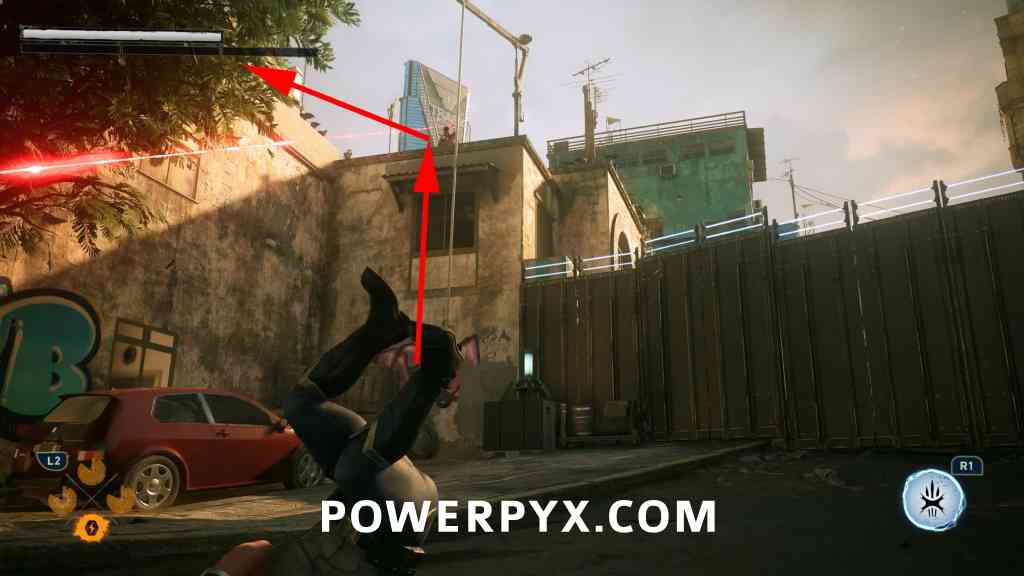
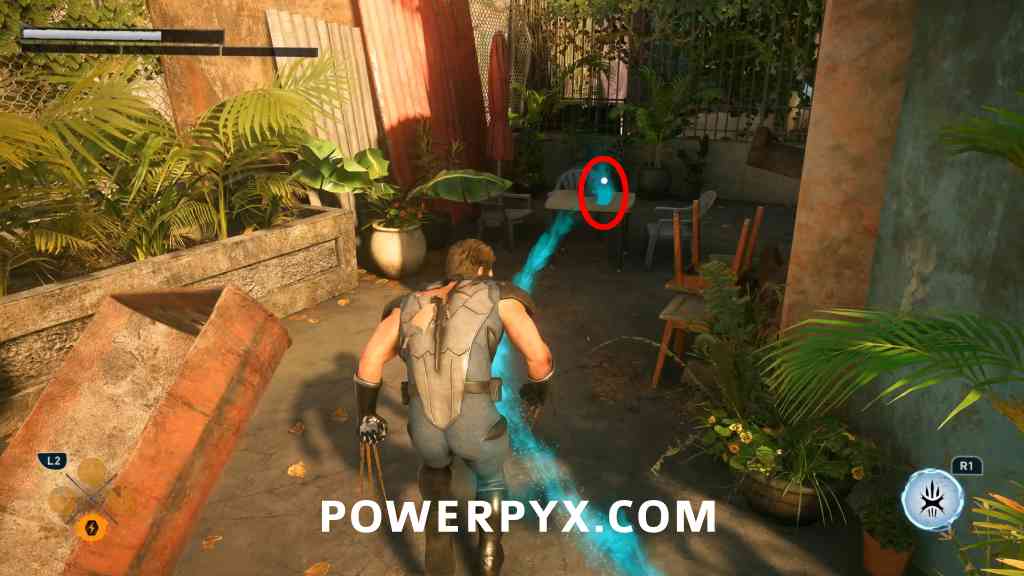
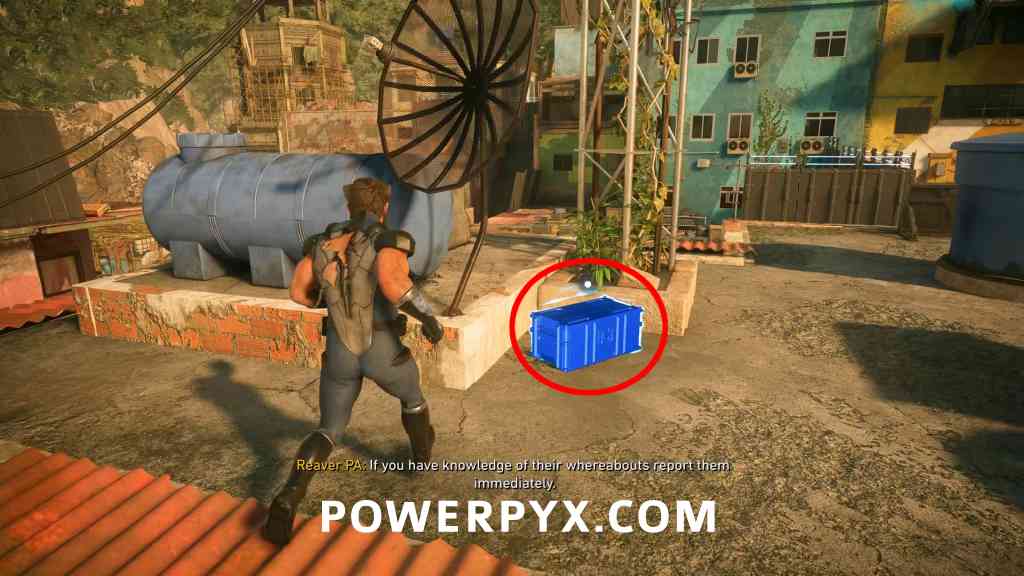
Material Crate #57
Objective: Follow Jean
Just after the previous bottle, proceed a bit further on, when you see the radio tower, look right to see a rooftop with some satellite dishes, there is a crate here.
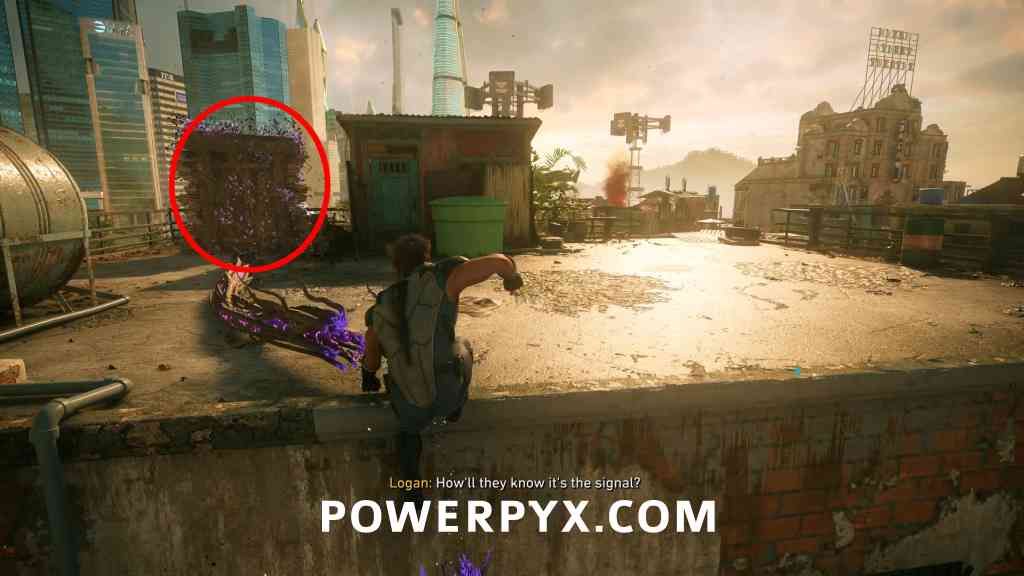
Nightmare Door #11 – Blood in the Jungle
Objective: Meet Jean at the Arsenal
Immediately after the radio tower you’ll ride down a zipline, follow the roots that appear to the door, impossible to miss.
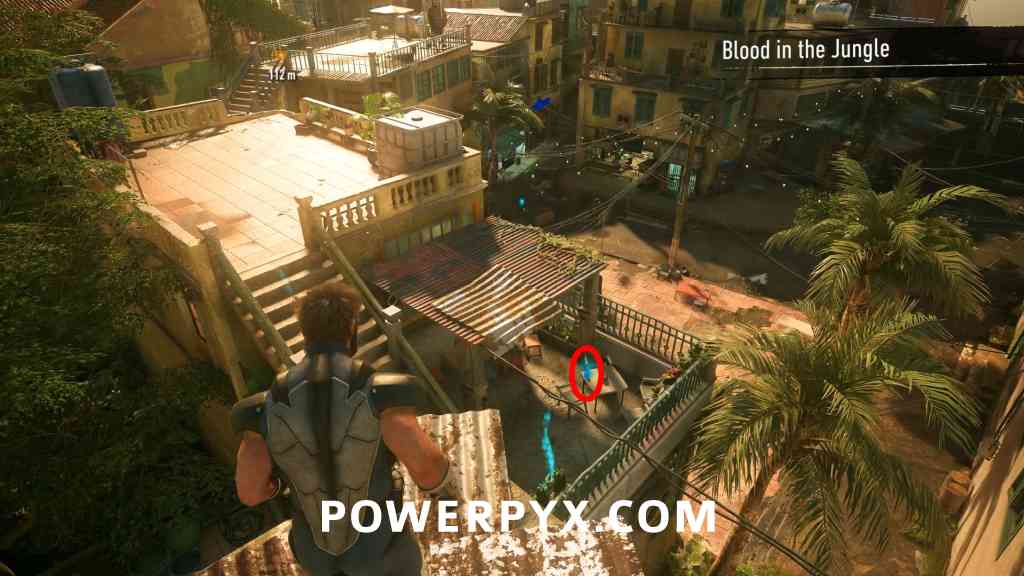
Whisky Bottle #17 – Little Uncle
Objective Meet Jean at the Arsenal
Right after the door, jump down to the building below to see the bottle, hard to miss.
Roll The Dice
- Nightmare Doors: 1
- Material Crates: 1
- Whisky Bottles: 1
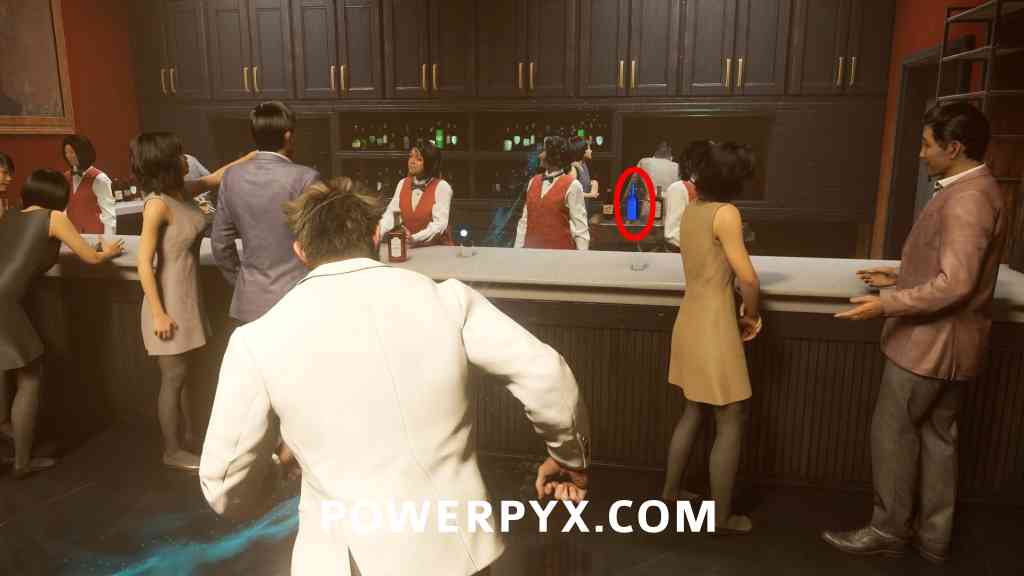
Whisky Bottle #18 – Blood and Bourbon
Objective: Hit the dance floor
As soon as you enter the casino, head up to the bar on the 2nd floor. Interact with the bartender to get the bottle.
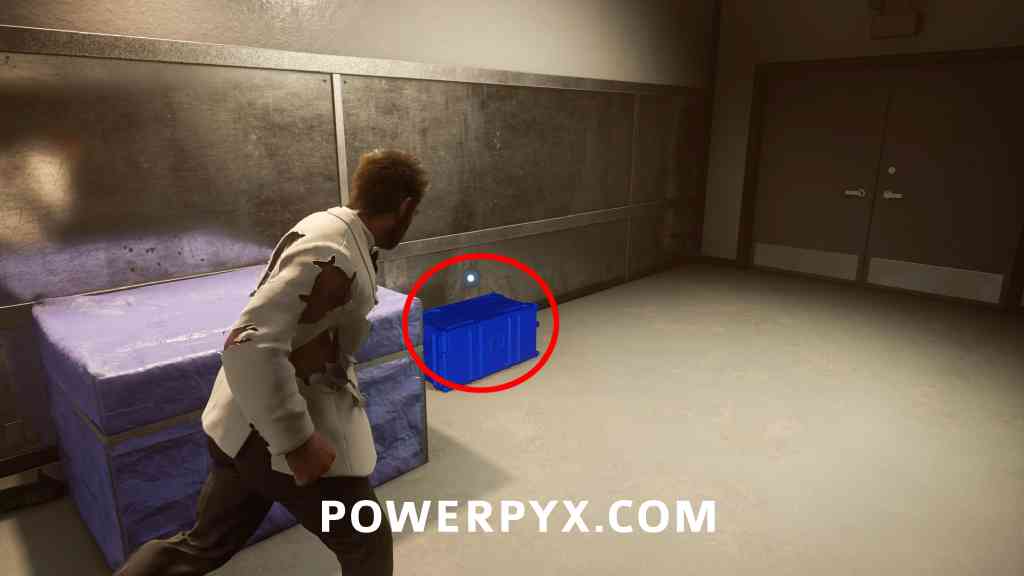
Material Crate #58
Objective: Service elevator, going up
After fighting all the reavers in the casino backroom, before using the elevator look right to see the crate.
Nightmare Door #12 – Run the Tables
Objective: Service elevator, going up
Same location as above, but left of the elevator, follow the roots.
Field Test
- Material Crates: 2
- Whisky Bottles: 1
Whisky Bottle #19 – Captain Terror
Objective: Get to the fish market
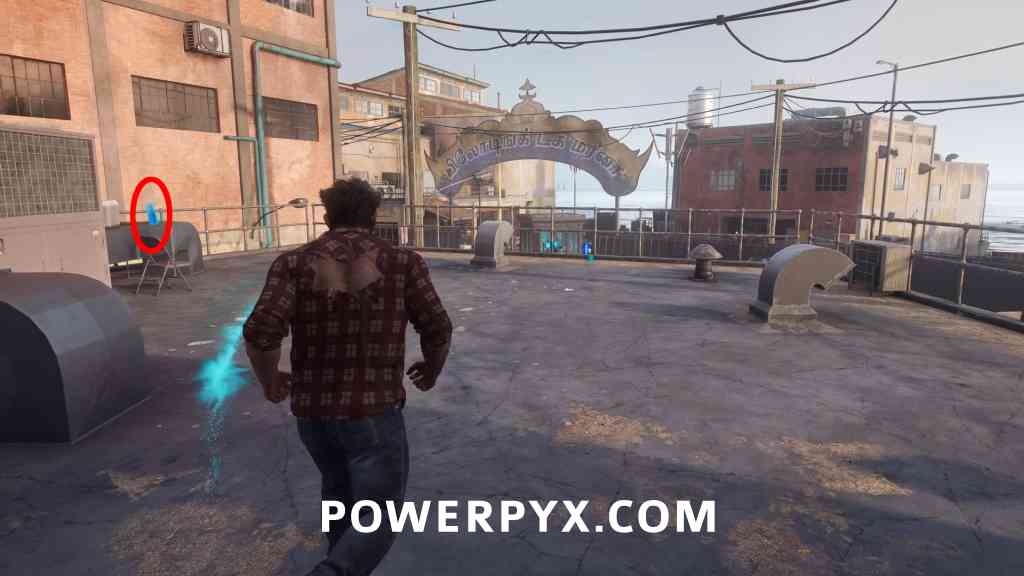
After the third fight in this mission, against a group of sentinels (robots) inside a warehouse, when you leave the warehouse the bottle will be straight in front of you.
Material Crate #59
Objective: Meet Jean at the Dream Street Theater
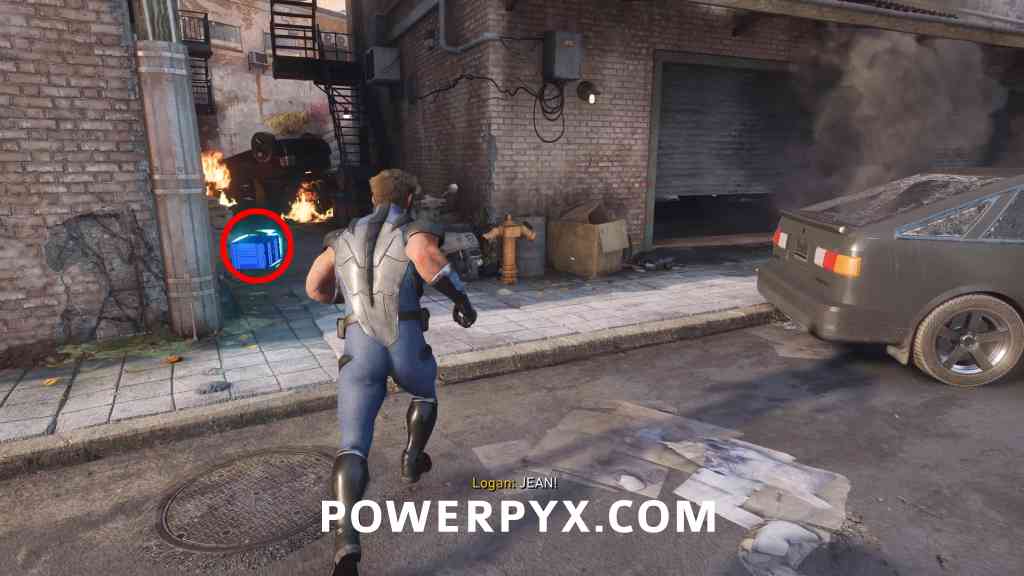
Once you’ve freed the civilians, proceed down the street following the main path, when you see a red car in the road go left to see the crate.
Material Crate #60
Objective: Objective: Meet Jean at the Dream Street Theatre
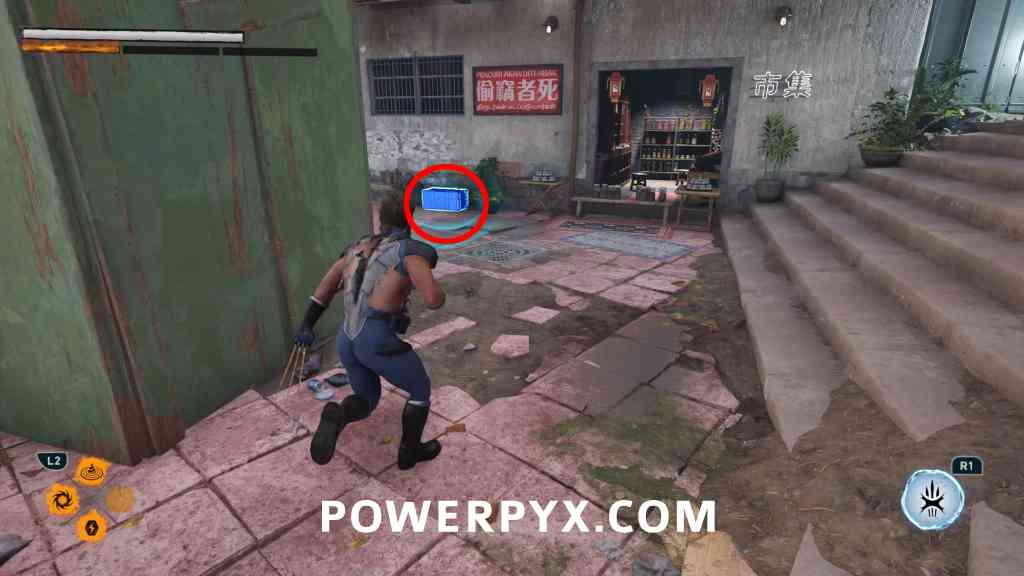
After fighting a few enemies and destroying a turret vehicle, just ahead you’ll be attacked by a lone sentinel, the crate will be on the left side of the area, near some market stalls.
Red Right Hand
Trophy: Harmer’s Market (destroy all vendor stalls during the Sabretooth boss fight)
At the start of the Sabretooth boss fight, you will be in a market area. Slash all the market stalls here.
Don’t Go Gentle
No Collectibles in this Mission!
I’m Still Here
- Nightmare Doors: 1
- Material Crates: 5
- Whisky Bottles: 1
Material Crate #61
Objective: Learn what happened to Jean
After beating the big purple sentinel (robot), you will slash away some debris. Then you can go left or right, go right and follow the path to the end, the crate is in a building here.
Whisky Bottle #20 – Ol’ Canucklehead
Objective: Learn what happened to Jean
From the split path described above, this time go left, this is the main path. Take care of the next sentinel and go left back into Tyger’s bar, the bottle is upstairs on a table.
Material Crate #62
Objective: Learn what happened to Jean
From the bottle follow the main path, after slashing away more debris and dealing with another sentinel, instead of going left go right, the crate is at the end of the path.
Material Crate #63
Objective: Look for clues in the noodle bar
Before going through the door on the bottom floor of the noodle bar, turn around and climb up to another room with the crate.
Material Crate #64
Objective: Take out all of the Sentinels
After leaving the noodle bar you will be in an area with several sentinels patrolling, the crate is in a destroyed building, below from where you enter the area.
Nightmare Door #13 – Edge of a Knife
Objective: Find Jean
Follow the main path, some roots will appear right in front of you, leading you to the door.
Material Crate #65
Objective: Follow Jean into the power plant
After the next cutscene where you see Jean in the distance, jump down and you will see 2 reavers ahead, the crate is close to them, next to a car.
This Was The Dream
- Nightmare Doors: 1
- Material Crates: 3
Nightmare Door #14 – Savage Showdown
Objective: Get to the top
After falling down and fighting some reavers, the door will appear in this room, impossible to miss.
Material Crate #66
Objective: Get to the top
When you ride the bell up the tower and Jean kills 2 reavers, it’s just to the right of the doorway when you go outside.
Material Crate #67
Objective: Essex, what did you do?
You will have a sequence back in Tyger’s bar involving Essex, then you get teleported to a facility. After smashing the window, the crate is down here to your left.
Material Crate #68
Objective: Essex, what did you do?
Following another sequence with Essex, this time back in the Team X hideout, you will end up in a new room, the crate is up the stairs to your left as you enter.
Japan 2
No Coming Back
No Collectibles in this Mission!
Brave New World
No Collectibles in this Mission!
Epilogue After Story – Nightmare Cabin
Nightmare Trial #15 – Best There Is
Unlocks in the Nightmare Cabin after the story. It’s the bottom right figurine on the shelf. Click through the figurines until it shows the “Best There Is” challenge and beat it with at least bronze score to count it as completed, then you can unlock the hidden memory.
Repressed Memories  (unlock the hidden memory in Nightmare Trials)
After finishing the “Best There Is” Nightmare Trial with at least bronze score, exit the Nightmare Cabin in the Epilogue and follow the scent line. You will reach a cutscene at the end which unlocks the trophy.
Cleanup
If you don’t already have all trophies, you can interact with the bed in the Nightmare Cabin to replay any mission. You can now craft all Suits to unlock Adamantium Armory (craft enough suits to fully upgrade your Health). You might be missing some XP to reach Level 36 for Ultimate Predator  , simply replay some of the later missions that contain many enemies, your XP carry over in mission select. There is also a New Game+ mode but this isn’t needed for any trophy.
If you have anything else left refer to the Marvel’s Wolverine Trophy Guide & Roadmap.
Leave a Reply