
Metal Gear Solid 4: Guns of the Patriots (PS5 Master Collection 2) Trophy Roadmap
- Estimated trophy difficulty: 7/10
- Approximate amount of time to platinum: 60-70 hours
- Offline Trophies: 35 (1
 , 5
, 5 , 9
, 9 , 20
, 20 )
) - Online Trophies: 0
- Number of missable trophies: technically most of them, but you need to do 8 playthroughs for platinum anyway so you have many opportunities to retry missed trophies
- Glitched trophies: 0
- Does difficulty affect trophies?: Yes, one playthrough has to be done on Boss Extreme difficulty, every other can be done on Liquid Easy
- Hardest Trophy: Sounds of the Battlefield (requires getting all 40 Emblems to unlock one of the iPod songs)
- Minimum Playthroughs: 8 to get all Emblems (needed for one of the iPod songs)
- PS4/PS5 Autopop, Save Transfer, Crossbuy: No PS4 Version
- Free-Roam / Level Select after Story?: No
- New Game+ Mode?: Yes and it is required to ALWAYS keep playing on the next NG+ cycle
- Supports Manual Saves?: Yes, you can save anytime but you have to move to a different area to save the progress
- Release Date: August 27, 2026
 , 5
, 5 , 20
, 20 )
)Introduction
Welcome to the Metal Gear Solid 4 (PS5 Master Collection 2) Trophy Guide! This is a PS5 version released in August 2026 as part of the Metal Gear Solid Master Collection Volume 2. The trophy list is identical to the PS3 version except for one additional trophy which asks you to read (or skip through) the complete Screenplay Book of hundreds of pages of text, just like every other game in the MGS collections does.
Metal Gear Solid 4 Platinum is notorious for being an endurance test as it requires a minimum of 8 playthroughs. The reason for that is  Sounds of the Battlefield, which asks you to unlock every single iPod Song in the game. One of them unlocks after obtaining all 40 emblems which are unlocked at the end of every playthrough. There are many of them that require you to finish the game with a certain amount of Alerts, Kills and Continues and because the requirements often completely contradict each other (e.g. finish the game with more than 250 kills or finish the game with fewer than 250 kills), you will have to finish the game at least 8 times to be able to unlock them all.
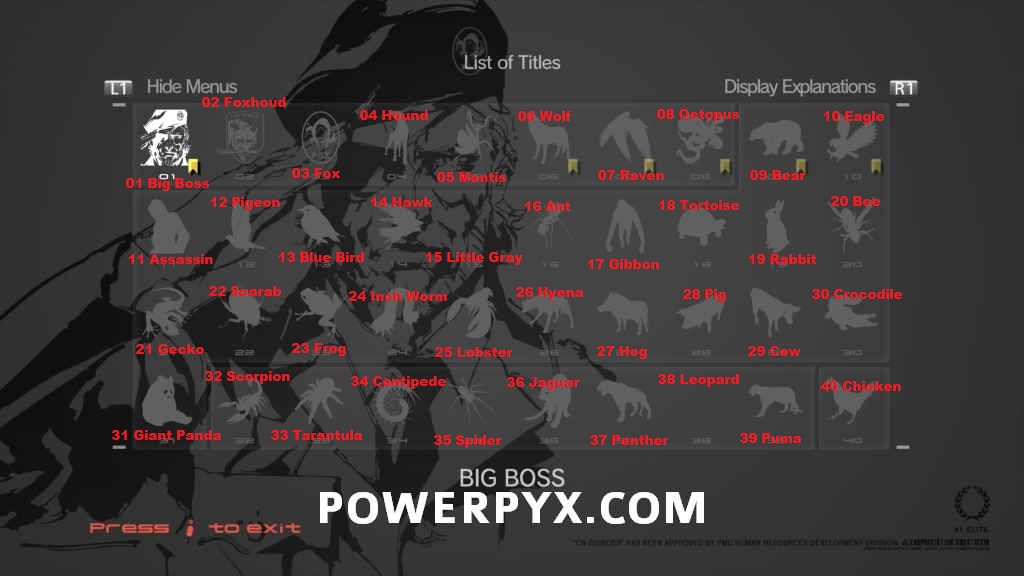
Every step of the roadmap will be for one of the 8 playthroughs and will tell you what you should be doing in each run (what to pick up, where to farm for certain stuff etc.). Feel free to change the order of those 6 playthroughs however you like but make sure to not leave the Big Boss playthrough for your last one.
General Tips and Info
- Farming Kills: Has to be done in either Act 1 or Act 2 due to lack of infinite spawns or human enemies in later acts. Ideally, you should farm kills in Act 1 Downtown. Shortly after the cutscene with Johnny you can find a spot on the left where militia will jump down from a wall. They will spawn infinitely here for you to farm kills and alerts. Another spot is right after you crawl to the next area. You will see some militia behind a barricade and they will keep coming to that barricade from the alley to the right. It’s also a great spot if you want to combine farming kills, rations, alerts and weapon pickups at the same time. You can grab defeated enemies to have another chance for a Ration drop as well.
- Farming “Continues”: Can be done best in either Act 3 during the Raging Raven fight by rolling out of the windown behind you, in Act 4 by dropping into the hole in the ground in the last area with the small robots just before the Vamp fight.
- Zero Alerts (Chaff Grenades): Chaff Grenades are very important for a zero alert playthrough, which also includes the Big Boss Emblem. They are very limited though. You can find 4 sets of 2 Grenades per playthrough, or you can farm them from one spot by leaving the area they are in by 2 additional rooms and coming back. This will only work on the easiest difficulty. You want to have some spare ones to be able to finish 2 playthroughs without being seen. The easiest spot they can be found is in Act 4 in the middle of the helipad at the very start of Shadow Moses. Just grab them at every opportunity. Other locations are: Confinement Facility in Act 2 in the middle house there, on the left side at a market stall just before the final Gecko at the very end of Act 2, north of the sewers searchlight area of Act 3 (not worth getting those, too out of the way to be worth picking up), and you can also get 2 Chaffs each playthrough starting from your second playthrough in the Advent Palace in Act 1 – Johnny will give you ammo to whatever weapon you have equipped).
- Farming Holdungs/CQC: You can farm holdups and CQC by coming back to previous areas to perform it on respawning enemies there. Especially good areas are the ones around Power Plant in Act 2.
Step 1: CHICKEN Emblem Playthrough (ideally 20/40 Emblems done)
In this playthrough you want to focus on Emblem #40: Chicken.
40 Chicken – Finish the game while getting more than 500 kills, more than 150 alerts, more than 50 continues and using more than 50 recovery items with a playtime higher than 35 hours.
The game basically wants you to play like you never played a stealth game. The game is not even remotely 35 hours long. In this playthrough you will want to get rid of all the movement, action and time-based emblems as well. Additionally since you need to accumulate more than 35 hours you will be watching all the cutscenes in the game and get all Flashbacks required for Flashback Mania (refer to the trophy for full list). Additionally, use this time to collect all the weapons and iPod songs that have to be picked up (refer to Sounds of the Battlefield). Just to make it clear, this playthrough will include a lot of idling to accumulate time. You should aim for the following emblems in this playthrough:
28 Pig + 29 Cow + 30 Crocodile + 31 Giant Panda + 39 Puma – all those will be unlocked automatically since they are partial requirements (kills, alerts, playtime, recovery items used) which are all covered by the 40 Chicken emblem.
18 Tortoise – Spend more than an hour in the cardboard box or the drum barrel – Equip the cardboard box, hide somewhere and let the game idle for more than 1 hour.
21 Gecko + 25 Lobster – Stand against the Wall for more than 1 hour + crouch for more than 2.5 hours – You can combine those 2. Simply press  to hug a wall and press
  to crouch. Let it idle for more than 2.5 hours.
22 Scarab – Perform more than 100 side rolls – While on the ground unequip your weapon, then hold  , press either left or right and to perform a roll. You have to perform 100 individual rolls, holding left or right while Snake keeps rolling will only count as one no matter how long you keep rolling.
24 Inch Worm – Crawl for more than 1 hour – get into the crawling position and just idle for 1 hour.
23 Frog – Perform more than 200 forward rolls – press while running 200 or more times.
19 Rabbit – “Read” 100 Pages of Playboy Magazine – Equip a Playboy as your weapon, hold and  , switch to first person view with and keep pressing
  more than 100 times to change the page of the magazine.
09 Bear – Grab 100 enemies with CQC – Hold without any directional input to grab an enemy, can performed on the same soldier 100 times by just letting them go again.
17 Gibbon – Perform 50 Holdups – Get behind an enemy without getting noticed and aim at them with . Snake will tell them to freeze. Can be combined with the emblems below.
16 Ant – Search 50 enemies for items – once you hold up an enemy you can press on them to search them for items.
20 Bee – Inject 50 enemies with the Syringe – after obtaining the Syringe you can use it to tranquilize enemies. Grab them with and while having the Syringe equipped as your active item, you can press to inject the enemy with it. You can do it 50 times on the same enemy if you wish to do so.
26 Hyena – Pick up 400 weapons – while farming kills make sure to pick up the weapons from defeated enemies so they automatically get sold to Drebin.
10 Eagle – Perform 150 headshots – while farming kills make sure to aim for the head.
27 Hog – Achieve 10 Combat Highs – while farming kills make sure to use a fast-firing weapon like an assault rifle. During an Alert firing 100 bullets quickly will activate a Combat High. Repeat 10 times.
That’s all the emblems you should aim for during this playthrough.
Step 2: Assassin + Tarantula Emblems (22/40 Emblems done)
On your second playthrough and with some obtained knowledge of the game’s CQC mechanics you can focus on the following emblems for your second playthrough:
11 Assassin – Finish the game with more than 50 knife kills, more than 50 CQC holds and fewer than 25 alerts
33 Tarantula – Finish the game with more than 250 kills, fewer than 25 continues and fewer than 75 alerts
Those 2 emblems go well together since their alert and kill requirements go in a similar direction. You want to sneak up on enemies, grab them by holding and slit their throat by pressing (do not equip the Syringe since it overwrites the knife kill by using the Syringe instead). Some places to farm the kills: first few areas of the game, areas around the Power Plant in Act 2 since you can go back to the Power Plant / Confinement Facility areas to farm respawning patrols, soldiers in Act 3 since you can very easily sneak up on them while wearing one of the BB corps face camo. If you mess up the Assassin emblems you can also combine it with the next emblem.
Step 3: Centipede (23/40 Emblems achieved) + Obtaining Stealth Camouflage
In this run you will aim for:
34 Centipede – Finish the game with fewer than 250 kills, fewer than 75 alerts and more than 25 continues
If you messed up Assassin in your previous run you can also get it in this runs since the requirements are similar but it would be better to focus on obtaining the Stealth Camouflage in this playthrough since it makes the remaining ones more convenient. To obtain Stealth you are not allowed to trigger a single alert during the entire game. To farm the 25 continues without getting an alert, either roll out of the window during the Raging Raven bossfight, drop into the hole in the small room with little robots just before Vamp boss fight or shoot the unconsious Meryl in the Head during the Screaming Mantis boss fight.
Step 4: 3 out of 4 of the following Playthroughs – Spider, Jaguar, Leopard, Panther (28/40 Emblems done) – Getting Bandana
It is completely up to you which run you go for next. They are all pretty similar but make sure to leave one of the runs for your 8th playthrough for a reason that will be explained in Step 6. Also make sure to gift 50 recovery items to Militia or Rebels in Act 1 or Act 2 and get praised by them by shooting enemies with tranq ammo while being close to friendly rebels. Since the previous runs weren’t particularly combat-heavy, you should have accumulated some spare Rations from previous playthroughs, enough to gift to militia. You can also use either Jaguar or Leopard playthrough to obtain the Bandana by not killing anyone during your playthrough.
35 Spider – Finish the game with more than 250 kills, fewer than 75 alerts, more than 25 continues
36 Jaguar – Finish the game with fewer than 250 kills, more than 75 alerts, fewer than 25 continues
37 Panther – Finish the game with more than 250 kills, more than 75 alerts, fewer than 25 continues
38 Leopard – Finish the game with fewer than 250 kills, more than 75 alerts, more than 25 continues
13 Blue Bird – Gift 50 recovery items to Militia/Rebels – You can gift them Rations, Noodles or Regain. You can gift 50 to the same person.
14 Hawk – Get praised by friendly Rebels/Militia 25 times – while standing close to friendlies, shoot enemy soldiers with a tranquilizer gun to hear praise like “Nice Shot” and similar 25 times.
Finish 3 of the 4 mentioned above and leave the fourth one for your last run AFTER the Big Boss Emblem run.
Step 5: Big Boss Emblem (38/40 Emblems achieved)
Time for the big one, the Big Boss emblem. Your main objective is:
01 Big Boss – Finish the game on Boss Extreme Difficulty in under 5 hours, without triggering an alert, without killing a single human enemy, without continues, without using recovery items and without using any special items like Bandana or Stealth
Emblems 02 Foxhoud, 03 Fox, 04 Hound, 05 Mantis, 06 Wolf, 07 Raven, 08 Octopus, 12 Pigeon, 32 Scorpion are all partial requirements for the Big Boss emblems so you don’t need to worry about those individually. You might have even unlocked some of them without trying on your previous runs.
Recommended items for your Boss Extreme playthrough:
- Solar Gun – can be obtained by defeating Frog Unit and all 4 BB Corps non-lethally and picking up their dolls after the fights.
- Chaff Grenades – grenades that glitch out electronic devices, extremely helpful in Act 4 of the game
- Any BB corps face camo – very helpful in Act 3 of the game
- Grenade Launcher with stun grenades – makes quick work of Crying Wolf boss fight
- Twin Barrel Shotgun with non-lethal rounds – helpful for forced fights if you are running low on tranquilizer ammo or Solar Gun
- Smoke Grenades – needed for Crying Wolf quick kill
- Middle East camouflage – can be found in a locker inside the Militia underground compound in Act 1
Tips for Boss Extreme playthough:
- Save very often.
- You can recover Snake’s health by lying on the ground for a while. You can get back to full health without using any recovery items that way.
- In Act 1 of the game once you get to places with Milita, equip the Middle East costume so they ignore you, saves time that you would have spent by sneaking around them.
- Solar Gun is very strong against the Frog Unit battle. Since some of the rooms get sunlight you can also recharge the gun during the short breaks in the gunfight by aiming with and holding by standing in the sunlight.
- Should you run low on tranquilizer ammo you can hold up an enemy and search them for ammo. When low on tranqs, the chances are good the enemy will drop some while getting searched.
- For every BB corps boss fight you can use lethal weapons for the first phase of the fight. You are only required to take out the non-armored phase of each fight non-lethally. To prevent the girls from dodging your bullets keep a bit of distance, lie down on the floor and press a few times to switch your lying position. This causes the girls to get on the floor and crawl in your direction without being able to dodge your shots. Saves both time and ammo.
- You can save time in Act 3 by following the resistance member until he reaches the transition to next area, waiting for him to run into the next sector while yourself staying in the same area. Once he is gone to the next area, save the game, leave the game and reload your savefile. The resistance member will be in the second area, while you are at the beginning of the first one. This will save you time spent on following him, since you can just run straight up to the next area he went to, without having to follow him. Saving after he changes the area does NOT add any time to your total playtime since it only refreshes your in-game game after you yourself switch the region. You can do that for every single tailing area and have each of them only add up a minute to your total playtime instead of 5-10 minutes each.
- In Act 3 you can basically become invisible by switching your face camo to one of the BB core girls. As long as you only walk and not run near the resistance, he will not get alerted and will only get charmed by you when you get too close. The enemy soldiers will not alert about you at all with the face camo.
- During the bike chase, save after every room. Should you get low on health, you can change your console’s date by 1 week into the future which will replenish your health completely. This will allow you to start each of the section during the notoriously random bike chase with full health. This will make it easier, but will still remain one of the harder parts of the game.
- In Act 4 you can use Chaff grenades on all the small enemies so you can just run past all of them and you only have to worry about dodging the Gekkos.
- To defeat Crying Wolf quickly, as soon as the fight starts equip the Night Vision Goggles and head left. Tranquilize any frogs you run into and try to reach Wolf without being noticed by her. Get close enough to throw a Smoke Grenade right at her and when she starts coughing blast her with Stun Grenades with your Grenade Launcher, killing her in seconds. You can also do the same with Smoke Grenades + regular Stun Grenades but you will have to throw a few more Smokes in between Stuns to have her in the coughing animation all the time.
- Shoot Vamp once with fully charged Solar Gun shot and he will go down in one shot. Grab him afterwards to inject him.
- For Ocelot fight in Act 5, in phase 1 knock him out once and then hold and tap once to break his block after he gets up and hit him again with to knock him down again. You can semi-loop him like this in phase 1. In phase 2 keep your distance and wait for his charged punch – after he does it, dash up to him for a single strong punch. In phase 3 just beat him up with full combos and occasionally press . Phase 4 make sure to land your punches before he does since you can still fail if he hits you too often.
Step 6: Your final Playthrough (40/40 Emblems achieved)
You want to leave one of the 4 playthroughs mentioned in Step 4 for your last because you will unlock some weapons after finishing the Big Boss emblem, needed for the 15 Little Gray emblem. This emblem wants you to finish the game after obtaning all 69 weapons and this can be only done after either finishing Big Boss emblem or using cheat codes. But since you will have to do 8 runs anyway using the codes is not needed at all.
Useful Tips, Tricks and Guides:
Metal Gear Solid 4: Guns of the Patriots (PS5 Master Collection 2) Trophy Guide


 to take control of Mk 2. There are way more than 5 spots for ghost pictures but you do not need all of them. Below is a list of some of the known ghost sightings (not all available locations but more than enough):


gamesarebad says
Eight playthrough lol. No platinum it is! I’ll get it when it’s dirt cheap
Cat says
There are a lot of shovelware games for you to try. This is clearly not a game for you if that’s the only thing guiding your decision about buying or not a game.
Alex says
What an asinine comment. In a world where trophies and achievement set lists are now too easy and brain dead, you’re complaining about this
oak says
Yeah, this trophy list doesn’t seem fun at all. I’ll just get Peace Walker’s plat and leave it at that.
BKW says
8 playthroughs to get a collectible. The last time I played a game 8 times was Elden Ring, but that was for fun. Good luck to anyone attempting this madness.
Shawn says
From what I recall doing this on ps3 2x(once prior to trophies being added, than again for the trophies), it’s really not that bad. About 3/4 of my time was doing just Chicken and big Boss extreme. The rest became pathetically easy, especially with the stealth time equipped for some of the other run. So it seems excessive but it’s really not that bad.
Alex says
I don’t get people complaining. Lately majority of video games have too easy trophy lists. Brain dead really.
x says
That’s because you play games with easy lists, that is not the case and you’re generalizing. This list sucks, 8 playthroughs is insane
Flex says
Such a bummer reading all these requirements to get the plat for this game. Literally 8 playthroughs, including extreme difficulty!? Look, I got platinum on all the games in the 1st collection, but this is gonna be one where I’ll just enjoy the experience & move on without getting the plat. I’ve got too many games on the backlog to be spending so much time replaying a single game over and over again just to obtain a platinum trophy.
CarrieAnnie says
You may want to add that the Raven figure is only obtainable during the Beauty fight. If you don’t grab it then you’ll miss it as after that is all cutscenes until the end of the chapter.
Liquidocelot says
Fun to see people complaining about the 8 runs, but guys except the chicken and big boss ones, runs are like 2h longs, I mean this game is not that more long or complicated to platinum compared to the first 3 games…
And on another topic, the facecamo trophy is not glitched, they just made a mistake discribing it, on the PS3 version of the game, it’s 10 camos needed, and it’s the same here since all the trophies are the sames, weird to have change the description is the trophy works differently but hey, it’s ok
Steve says
For the gibbon emblem, it says 100 hold ups. Is this correct as other websites say 50 are required
PowerPyx says
50 is correct. Thanks for flagging it, has been updated.
Joe says
Is it true your emblem progression carries over with each “continue”? All your kills, all your rations used, all your gifts to rebels? Etc
Predator says
Hello, can you use the big boss mask in the game in big boss extreme?
Doug says
Is there a place somewhere towards the end of the game where you can make a strategic save to get many of the different emblems? i.e. the best place towards the end of the game where close to 250 kills, 25 continues and 75 alerts?
Rodolfo HB says
In act 1 flashback.
– When Akiba/Johnny gets stomach pain and drops down to his knees when seeing Liquid
should be corrected, as this part Akiba is speaking with Old Snake.
PowerPyx says
Fixed, thank you!
dare says
Technically, you can also get the Little Gray Emblem during one of the earlier playthroughs when collecting the weapons with the camera. However, this doesn’t actually save you a playthrough, since you still need to complete Spider, Jaguar, Leopard, and Panther in a separate playthrough.