
Reanimal contains 110 Collectible Locations (47 Secrets, 18 Masks, 20 Posters, 5 Hidden Statues, 5 Critters, 5 Coffins, 10 Rest Your Legs). However, there are only 63 items that you actually pick up because each Collectible automatically counts as a Secret.
Finding all collectibles unlocks the following trophies / achievements:
- 47 Secrets –
 Hidden among the pines, Hidden among rats, Hidden in rubble
 - 18 Masks –
 Beneath the Mask
 - 20 Posters – A Proper Gander
- 5 Hidden Statues – Prayer for the Dying
- 5 Critters – Critter Kill Hit
- 5 Coffins for Secret Ending – Friends Reunited
- 10 Rest Your Legs (Chairs, Couches) – Take a Load Off
 Hidden among the pines,
  Beneath the Mask
Missables Warning: The 5 Coffins and 5 Hidden Statues must be found within a single playthrough! Getting the 5 Coffins through chapter select will not unlock the secret ending. Getting the Hidden Statues through chapter select will not light up the final Hidden Statue in Chapter 7 and voids the Sheep Mask you get as a reward. Meaning, one Mask tied to Hidden Statues is also missable. If you miss one, start a New Game and collect them all again.
Other than Coffins and Hidden Statues you can still find other collectibles via Chapter Select. Click on New Game, pick an empty Profile Slot, then select from which chapter to replay. If you want to be safe, back up your save game to PS+ Cloud at the start of each chapter. If you miss something, redownload your cloud save and replay from there. You can keep track of all collectible progress through the percentage tracker in the trophy list and compare it after each chapter to make sure you didn’t miss anything.
This collectible guide also contains all trophies & achievements chronologically. By following this you will unlock Platinum / 1000 Gamerscore in a single playthrough.
Video Guide
Chapter 1: Dead in the Water
Mask 1 (Secret 1)
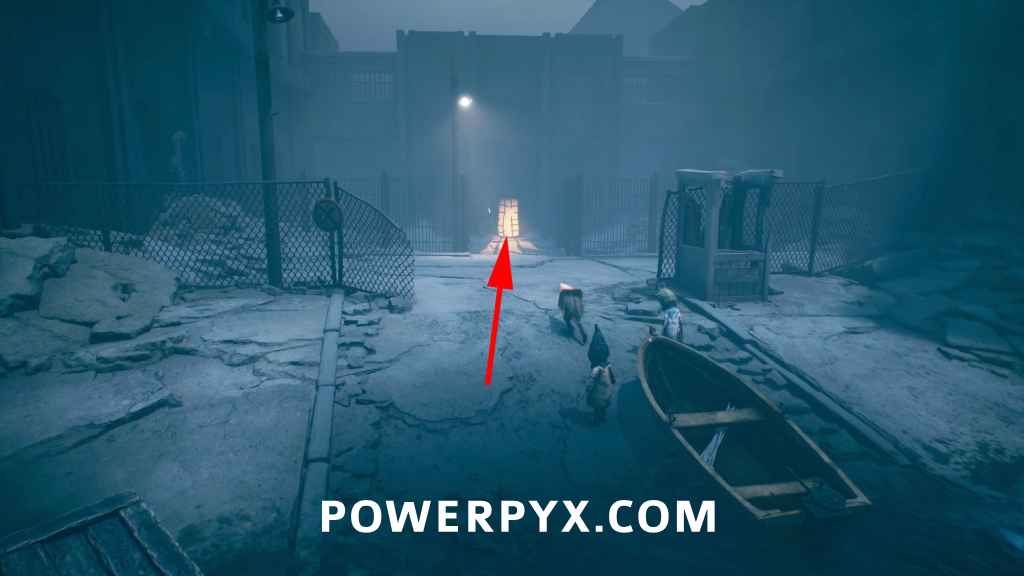
After climbing up the first ladder in the game, you will see a gate being closed by someone. After that, you have to climb up a wall to the left of the gate, then another ladder for story purposes. Here, turn left and go up and around the corner until the end. Go outside through the door. Now, squeeze through the opening in the wall to find the mask in a box.
Rest Your Legs 1
Shortly after Mask 1, you will reach a big pipe you are supposed to cross. To do that, you have to turn on the power. The chair is in the same room as the power switch, right next to a computer.
Mask 2 (Secret 2)
After passing the big pipe, you enter a room with some lockers. Here, open the locker straight opposite the door you entered the room. Enter the locker to find a hidden room with the mask under the sink.


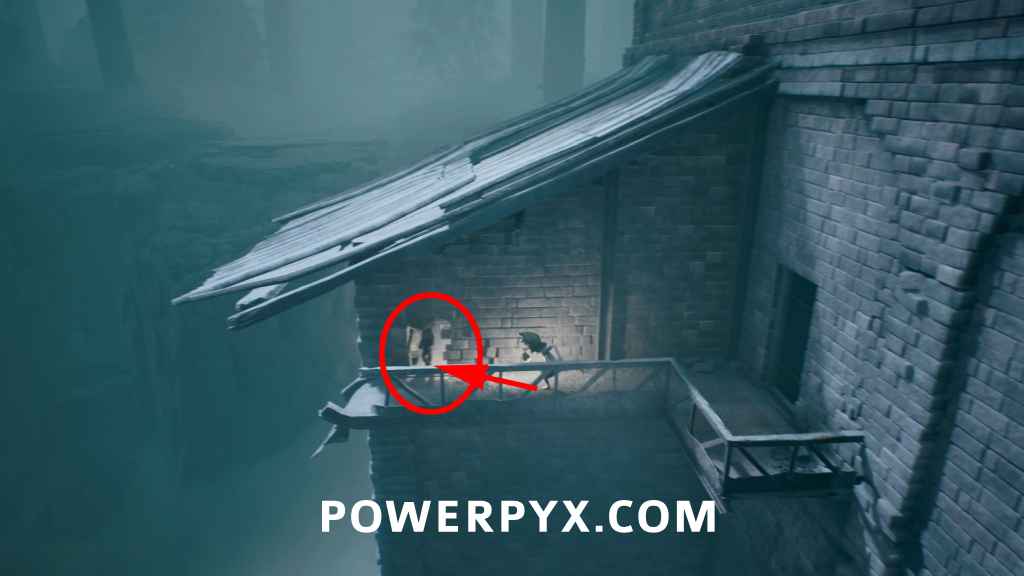
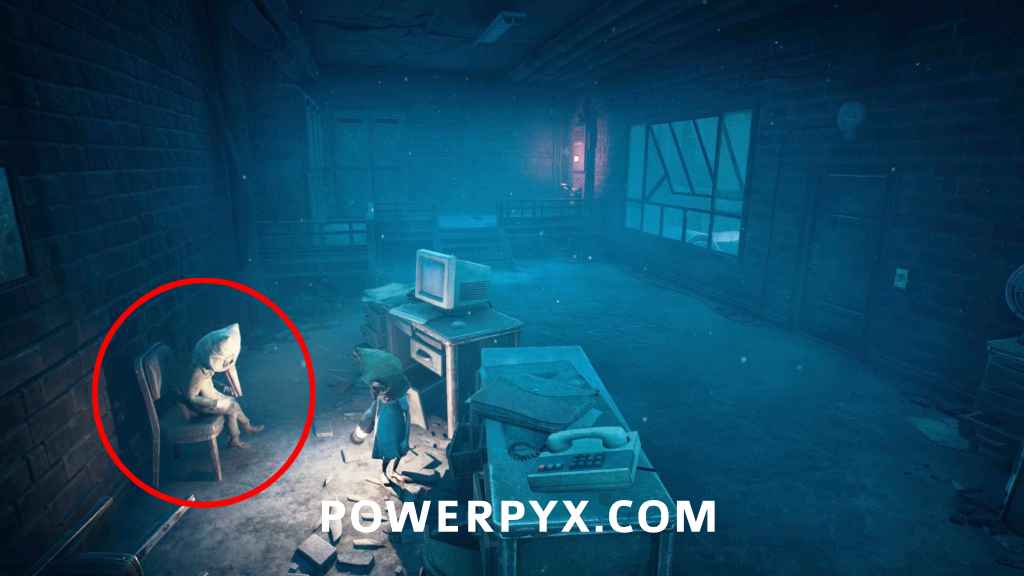
Trophy “Dark Tourism” + Rest Your Legs 2 + Poster 1 (Secret 3)
Soon after the second mask, you will be outside and climb up another ladder. You will see a man walk away into an alley. Before following him into the alley, pass the two rails and go around the corner. You will find two chairs, kick down the one with the man sitting on it to unlock the trophy. And sit on the other one. Behind the two chairs, there is a poster on the wall which also counts as a secret.

Poster 2 (Secret 4)
After the previous collectibles, you will reach a courtyard with a minecart and three doors. One to the left and two to the right. After you enter the upper door to the right (the one with light above it), you will see the man go through another door. The poster is to the left of that door.

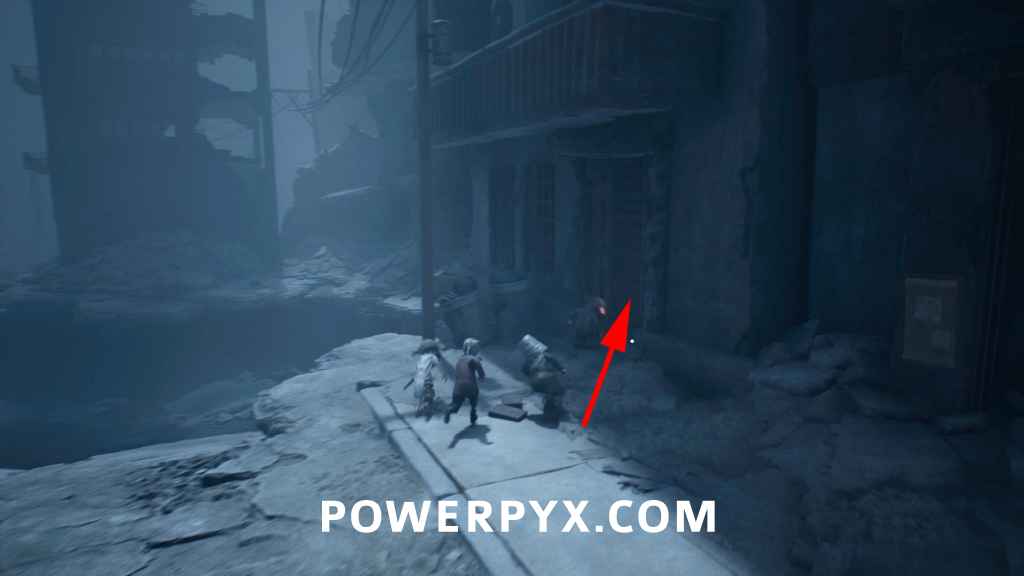
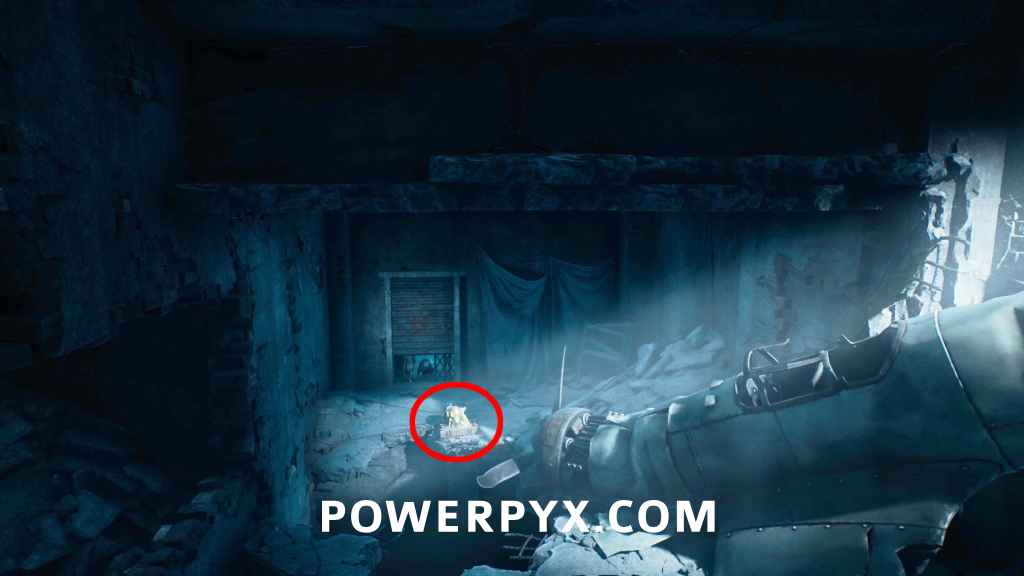
Mask 3 (Secret 5)
From the poster, go through the crack in the wall. Grab the plunger next to the body and use it on the lit toilet in the middle to get a key. After you got the key, get outside to the courtyard and enter the second door below the one you just exited. There is NO light above that door. Follow the path inside into a room with bombs, the mask is below the table with the bomb.

Rest Your Legs 3
Now go back outside to the courtyard and open the door on the left with the key. After you jump over a gap, you will see the chair in front of you.

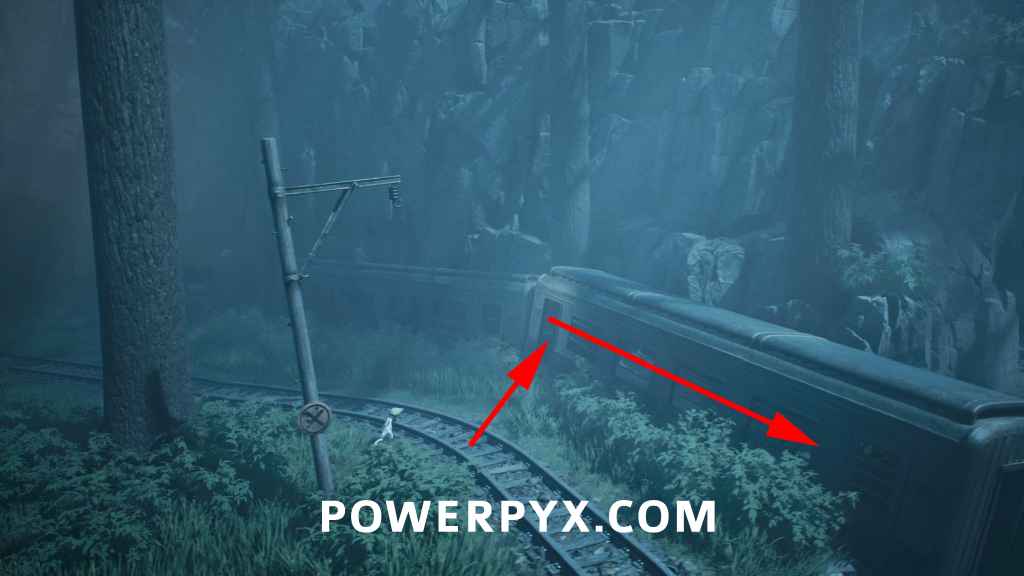
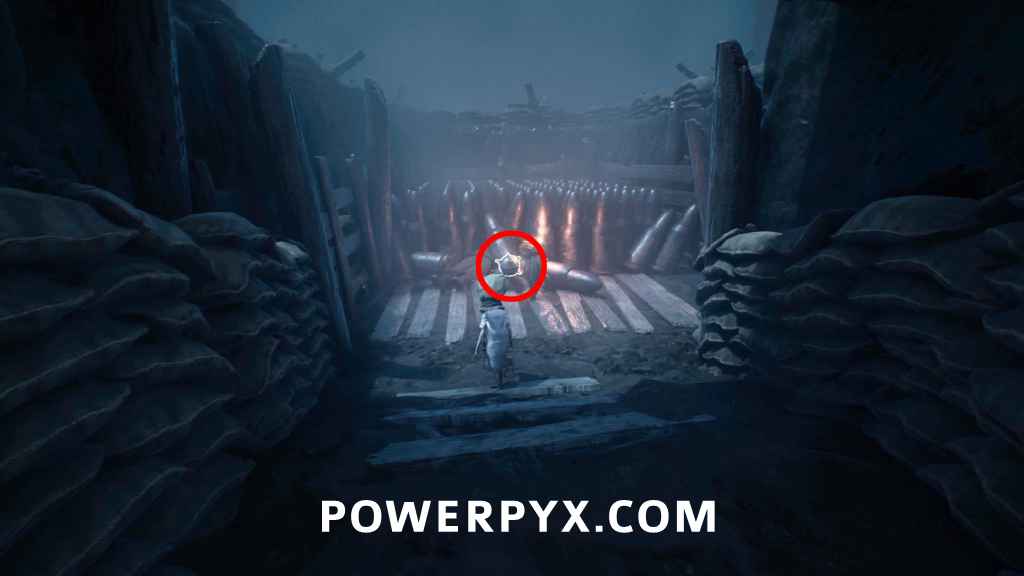
Coffin 1 (Secret 6)
Right after you use the minecart to cross the bridge, you will reach a crossing with the minecart, get off the cart, and follow the train track to the right. You will see two train wrecks, enter them and follow the path through the wrecks and leave it on the other side and you will see the coffin which you need to open.
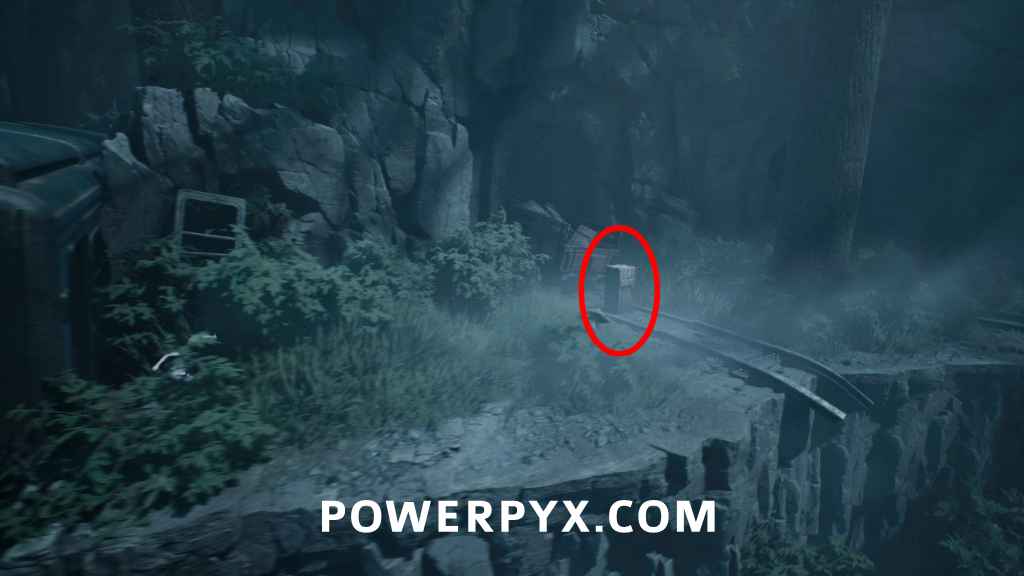
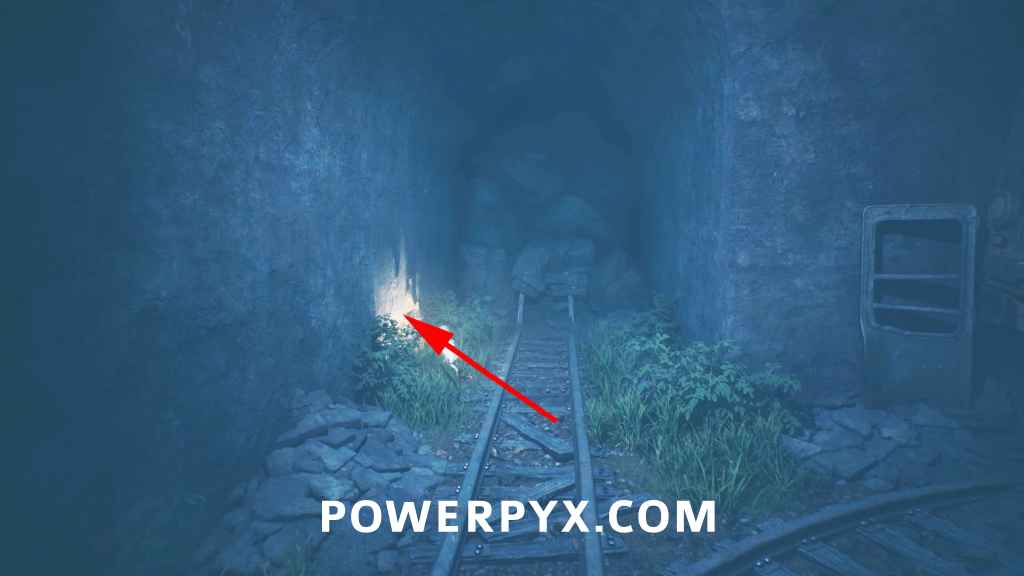
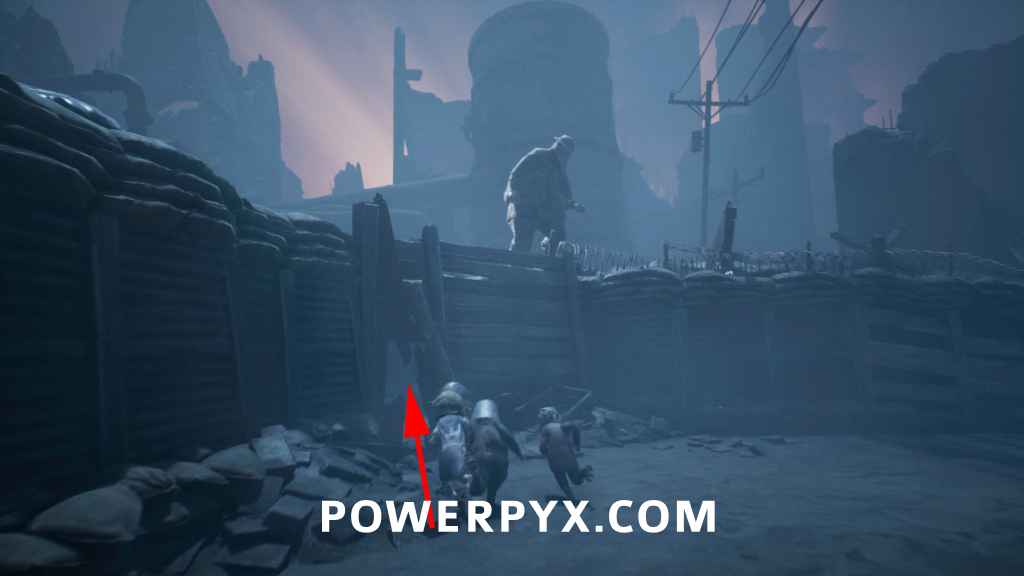
Hidden Statue 1 (Secret 7)
After the coffin, get back to the minecart and drive it to the end of the tunnel. Here you will see a crack in the wall on the left side, go through it, and you will find the hidden statue, interact with it to light a candle.

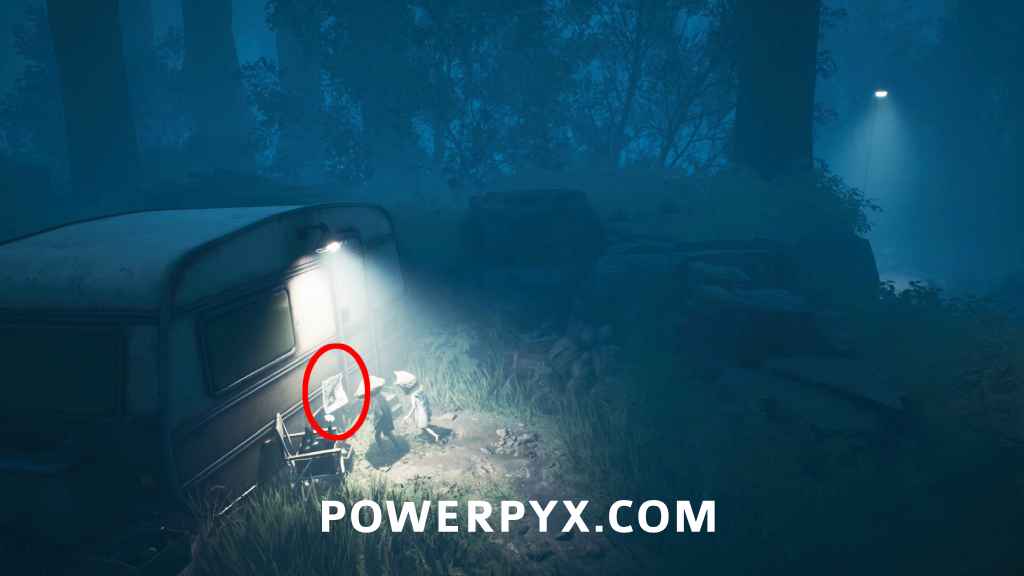
Poster 3 (Secret 8)
Much later in the chapter (about 10 minutes later), after using a saw to cut through a tree, you will run away from a car. After running away from the car, you automatically jump down a little cliff. Now go all the way to the left, the poster is on a camping trailer.
Trophy “Home From Home”
Automatic story unlock at the end of the chapter.
Chapter 2: The Cleaning House
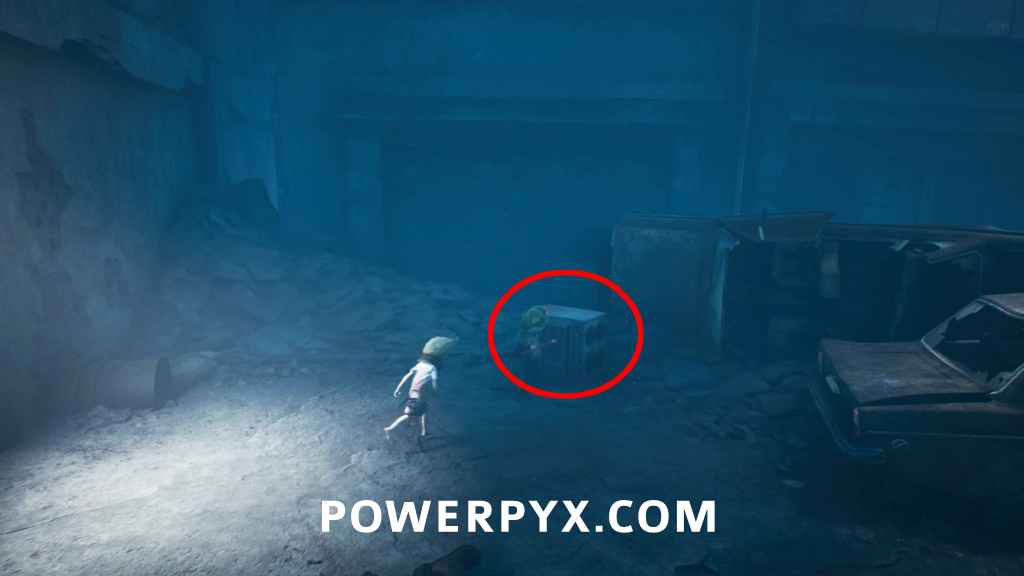
Mask 4 (Secret 9)
Very early in Chapter 2, you will lift a shutter door and enter a room with mannequins. On the left side, go behind the counter and squeeze through the hole in the wall to find a secret room with the pig mask.

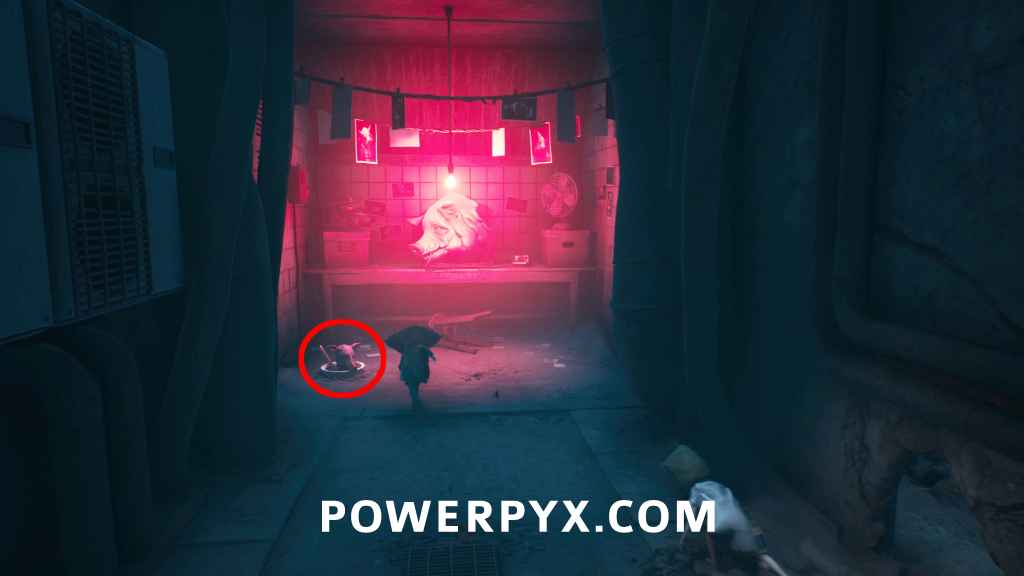
Poster 4 (Secret 10)
As soon as you enter the cinema, move to the bottom right corner of the screen, the poster is on the right side. Jump up on the shelf to reach it. If you’re holding the bolt cutter you must put it down by pressing  /
/  before you can interact with anything here. Grab the post before using the bolt cutter on the chained door in the cinema.
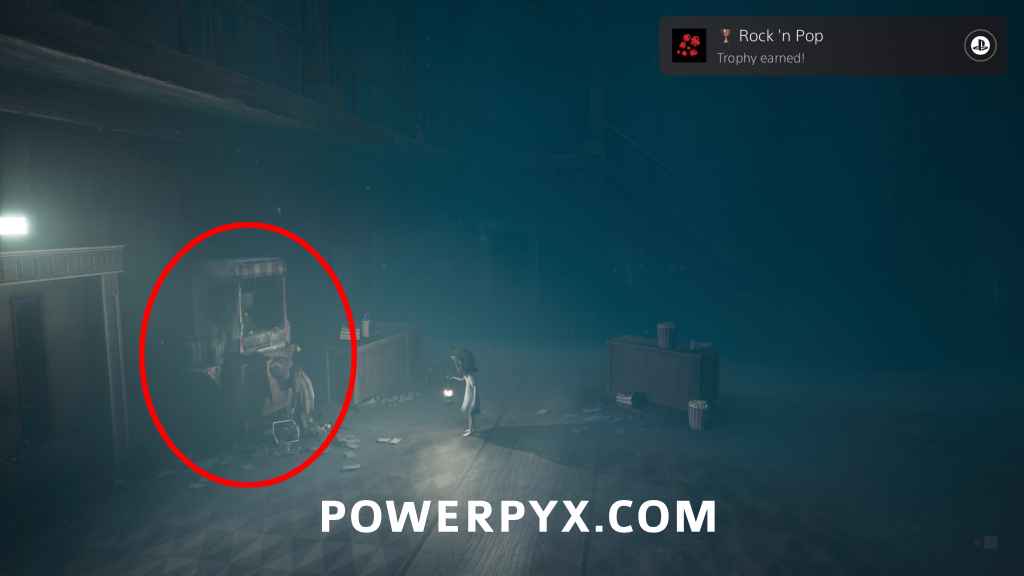
Trophy “Rock ‘n Pop”
In the same room as the poster, next to the door where you enter the cinema is a rock on the floor, grab it and throw it at the popcorn machine on the left side of the room.
Rest Your Legs 4
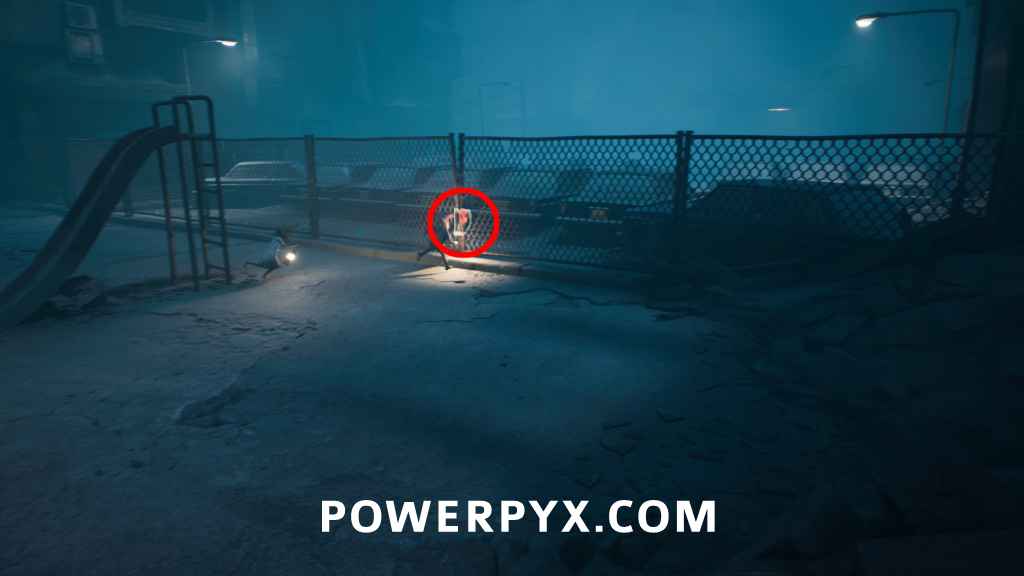
After leaving the cinema, you will go through another house, then you will be outside in a playground area. In the middle of the playground you will see a couch, sit on it. Note: you can also sit on other objects in the playground but they won’t count toward the trophy if you already sat on the couch.

Poster 5 (Secret 11)
To the right of the couch, on the fence behind the slide.
Rest Your Legs 5
After a sneaking part where you hide away from the man, you will enter a corridor with prison cells. The chair is on the left side. Next to the cell where you get the crowbar from. Note: there’s also a toilet at the end of the same hallway where you can sit but it doesn’t count towards the trophy if you already sat on the chair here.

Rest Your Legs 6
When you are back in the cinema, and you open the door with the crowbar, you will see a toilet in front of you.

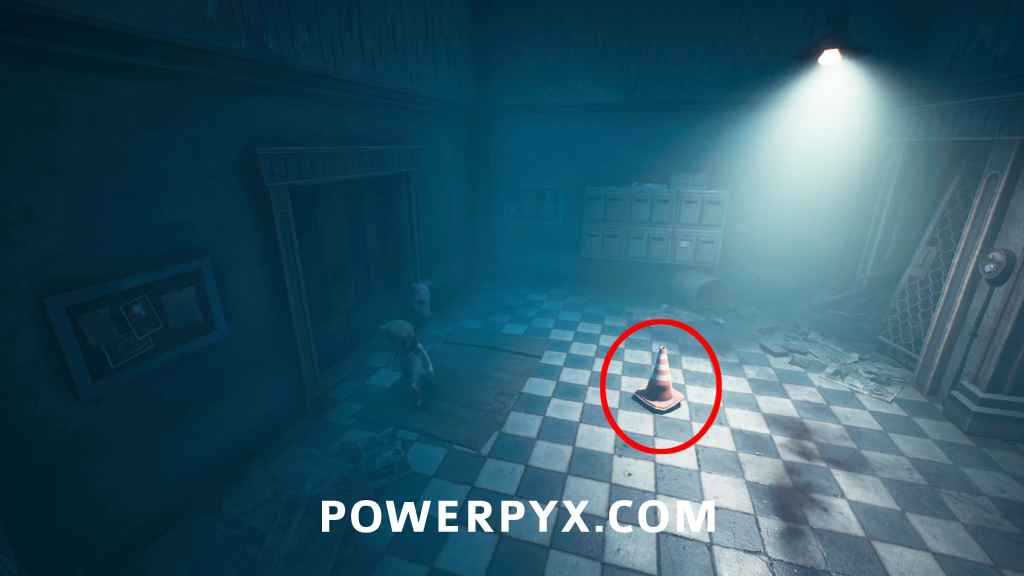
Critter 1 + Mask 5 (Secret 12)
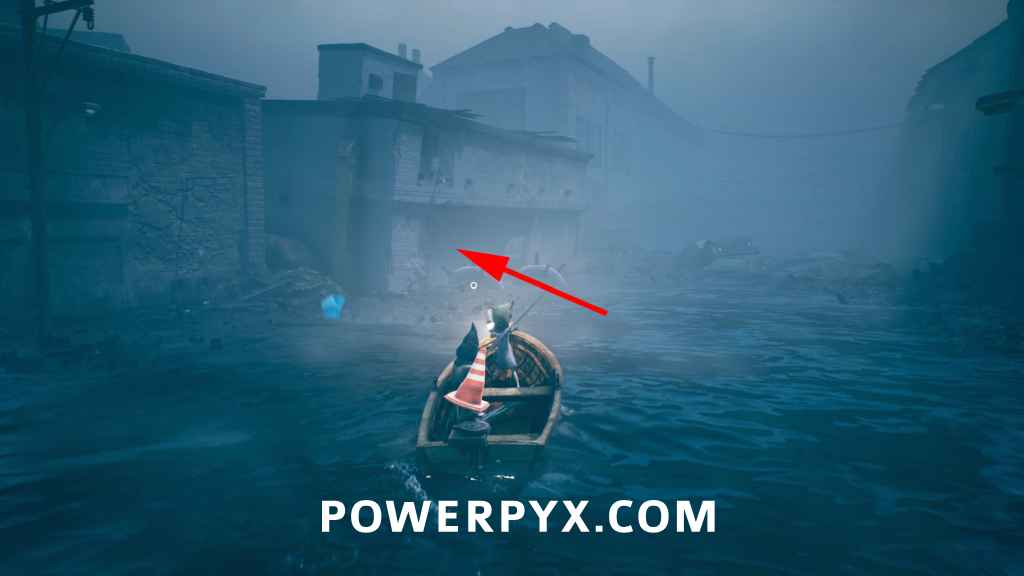
After you exit the cinema again, go to the broken building on the right side and a Critter under an orange cone will run away. Follow it down to the bottom right side of the area, where you see a door with wooden barriers. Open it and defeat the critter underneath the orange cone, then grab the cone from the corpse.

Trophy “Save Our Skins”
Automatic story unlock at end of chapter.
Chapter 3: After the Flood
Poster 6 (Secret 13)
A few minutes into the chapter, after opening the dam you will drive the boat for a while. After you drive the boat away from some enemies that chase you, you will enter a flooded town and must park the boat on the beach for the main story path. Right after you get off the boat, this poster is on the left side on a wall.

Trophy “Naval Blazing” (Clear 20 naval mines in one playthrough)
Remember to destroy any sea mines you see during the rest of Chapter 3 and later in Chapter 6. After getting the harpoon, you can use the harpoon while driving the boat with  +
+  /
/  +
+  . You will need to destroy 20 total throughout the game, but Chapter 3 won’t have enough to finish this yet. Just remember it going forward.
Coffin 2 (Secret 14)
After you get the harpoon and blow up a mine, you will soon reach a hotel in front of you. BEFORE entering the hotel, take the flooded city path to your right. Here you will see two mines on the left side, blow them up with the harpoon. Drive the boat to the end of the area and enter the building in front of you through the hole. Just follow the path downstairs and you see the coffin.
Coffin 3 (Secret 15)
After exiting the hotel section, you will reach a big open sea area with a huge cannon on the central island. Drive the boat around that cannon through the right side. Behind the cannon on the back left side of the sea, you will see some mountains and an alcove where you can drive through. At the end you will find the coffin.
Critter 2 + Mask 6 (Secret 16)
After the previous Coffin, get back on the boat and park it on the beach on the far right side of the sea (to the right of the island with the huge cannon). Beat up the seagulls and climb the long ladder (story path) to reach a field of flowers. Here move forward and stick to the left side, and you will see a scarecrow. Hit the scarecrow to make a Critter appear and kill it. After that you can pick up the mask.

Hidden Statue 2 (Secret 17)
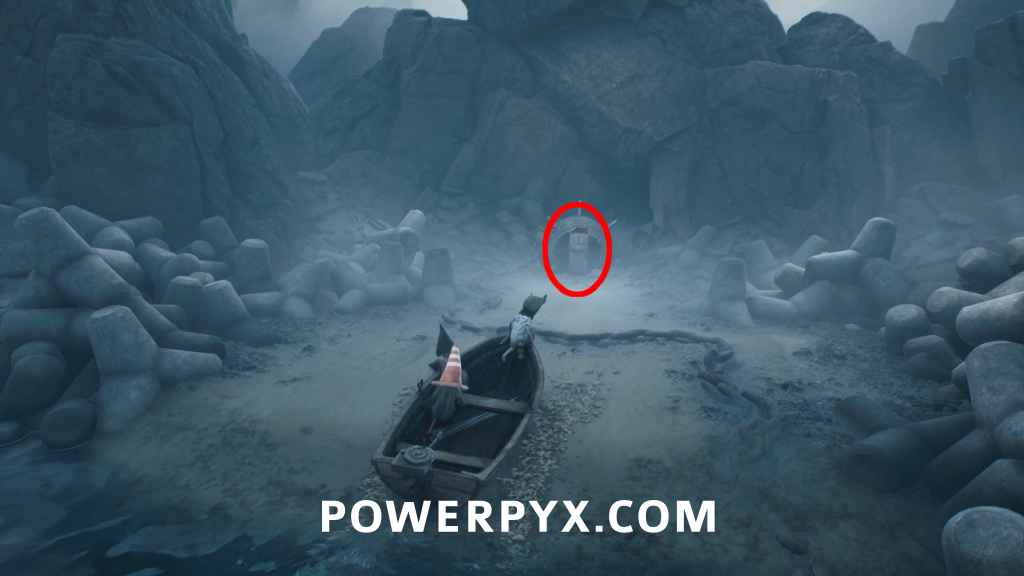
Shortly after the mask and critter, you will enter a big barn with pigs inside. As soon as you enter, take the right path to find the statue at the end. Interact to light the candle. (Before squeezing through the pigs)

Poster 7 (Secret 18)
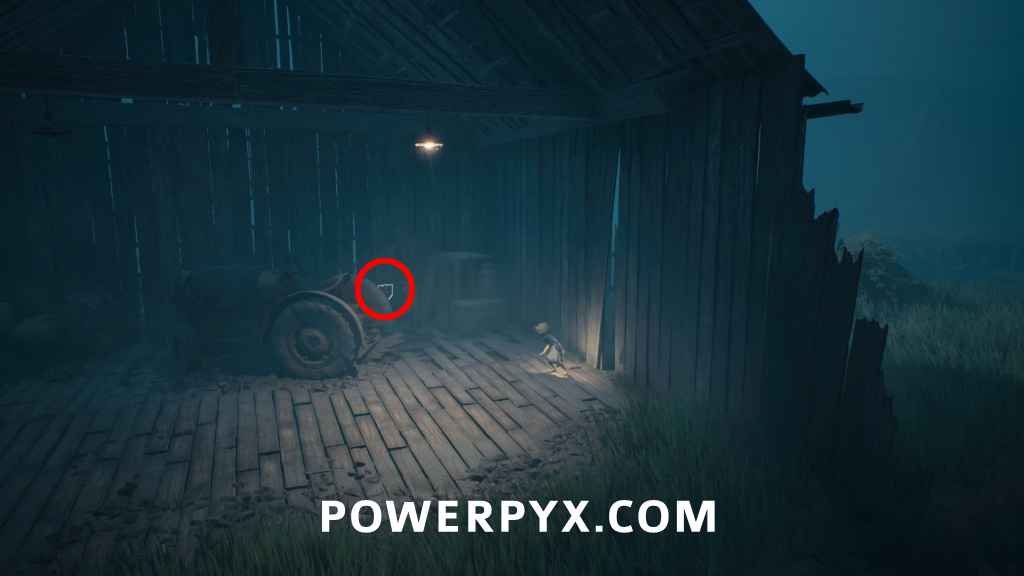
After you leave the barn with the pigs, you will enter a small cabin with a tractor. Poster is behind the tractor on the wall.
Poster 8 (Secret 19)
After you run away from a big bird, you will go back through the pig barn and exit it on the other side. Then you walk forward and reach a small bus station. To the right of the bus station, the poster is on the second pylon. Pick it up BEFORE sitting on the bench in the bus station and entering the yellow bus.
Rest Your Legs 7
Sit on a bench in the bus station to progress the story, this counts for the trophy too. Afterward, enter the yellow bus and interact with any seat. This will end the chapter.

Chapter 4: No Shelter
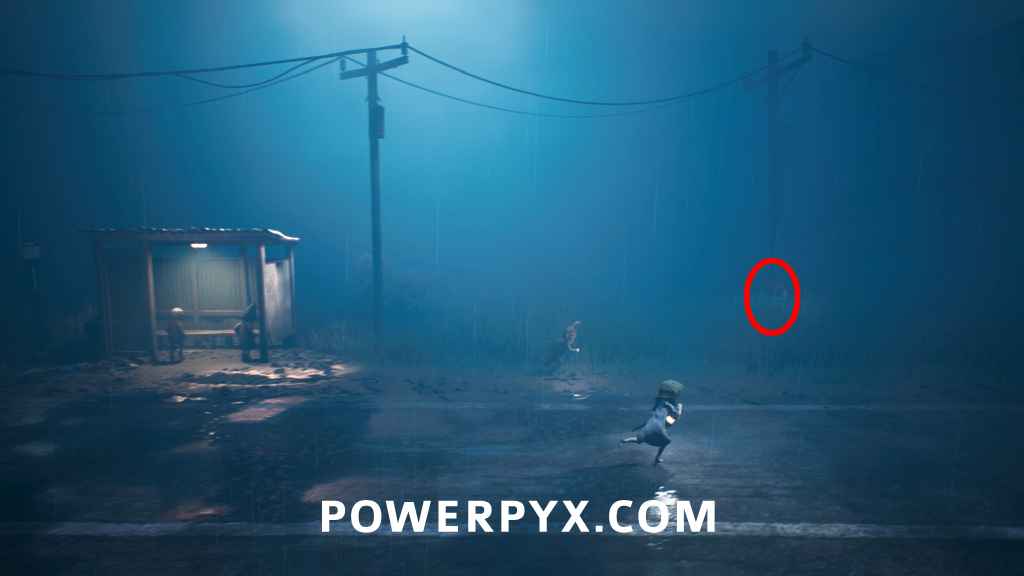
Poster 9 (Secret 20)
As soon as you exit the bus, walk on the far left side of the yard and look for a pylon, the poster is on the pylon.

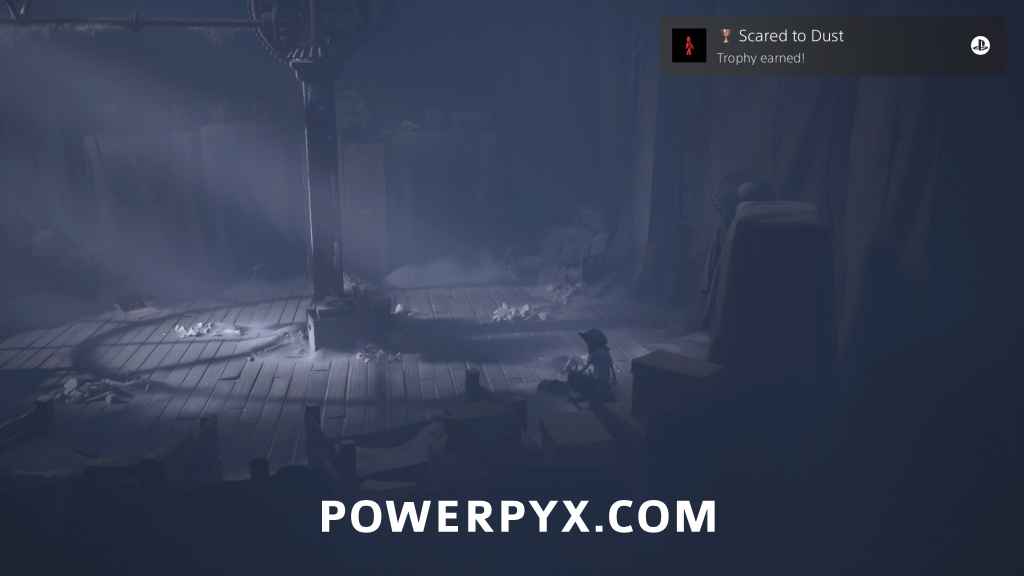
Trophy “Scared to Dust”
In the room right when you enter the clock tower, destroy all 13 petrified kid statues to unlock the trophy. Some of these are hard to see, turn up the volume and listen to the “breaking” sound when you attack with the crowbar. 2 are leaned against the left side in the shadow (hard to see), 2 are leaned against the cardboard boxes in the bottom right of the screen (just before a clothes hanger, hard to see), 3 in middle sitting on floor leaned against boxes, 1 sitting on floor at the center top of the room (leaned against wardrobe), 5 standing around the middle of the room in plain sight (easy to see).
Rest Your Legs 8
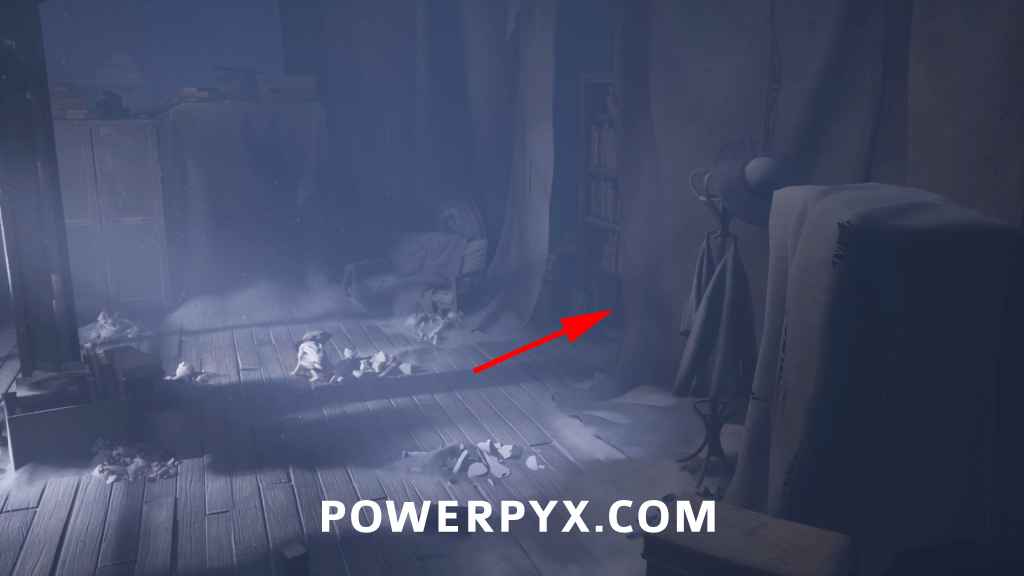
Same room, in the upper right corner, sit on the couch.

Poster 10 (Secret 21)
Same room, on the far right side go through the hole in the wall to reach a secret room. Go to the bottom right corner of the room to find the poster on the wall. A critter will run away from you.

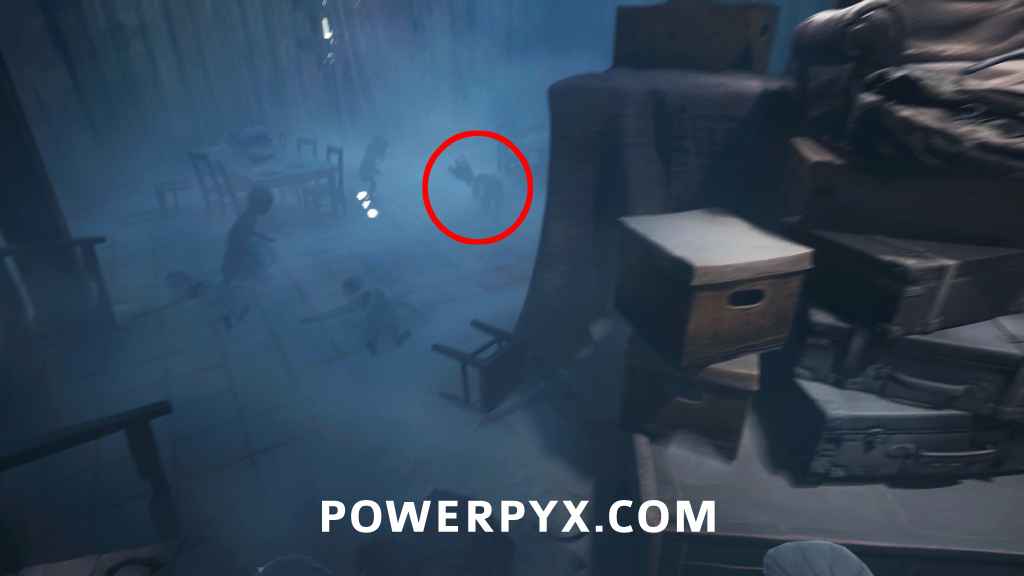
Critter 3 + Mask 7 (Secret 22)
Go back to the previous room where the petrified kid statues were, the Critter will now be there and you can kill it.

Trophy “Survival Instinct”
Go through the wardrobe and open the hatch to drop down to the next area. Here, destroy the barrier, and you will see three enemies. Let them attack your friend until he dies.

Hidden Statue 3 (Secret 23)
Right after you get the trophy, go to the very end of the same corridor and squeeze through the gap on the back wall (DON’T go through the vent on the left wall yet). This leads to a secret room with the statue, light the candle on it.

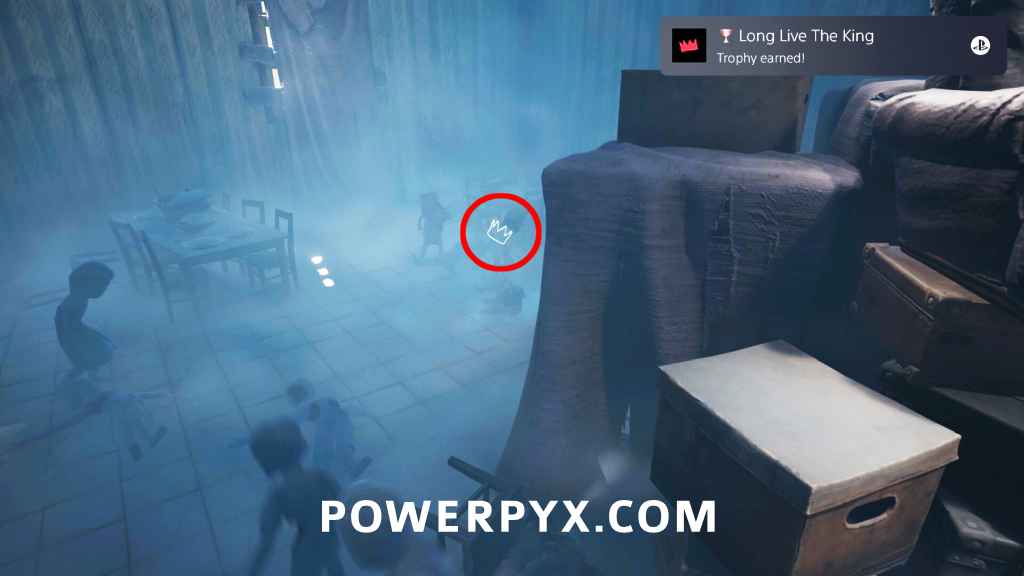
Trophy “Long Live The King” + Mask 8 (Secret 24)
After you get the hidden statue, enter the vent on the left wall of the corridor. You will enter a room full of enemies. You will see a king sitting on the throne. Defeat the other enemies until the king climbs down the throne, he will then disappear behind the throne. Then he tries to sneak from behind the throne to the top right corner of the area towards the wall. Quickly kill him while he walks behind the throne before he disappears. You can’t hit him while he’s on the throne nor while he’s climbing down. Only after he “disappeared” behind the throne he will start walking on the floor. He’s hard to see because the camera hides him behind the throne. He looks just like the other kid enemies, except he has a crown on his head. After defeating him, pick up his crown which counts as a mask and secret! If you’re not fast enough he will leave the room and you need to restart the checkpoint. Don’t finish the fight until you got this (leave one other enemy alive).
Rest Your Legs 9
After the room with the king, go upstairs and cross the room that looks like a theater stage with a big pig on a rope, then go through the door in the bottom left. Here you will see the couch in front of you, immediately when you enter the room.

Poster 11 (Secret 25)
From the last spot, in the same corridor pull a lever on a wall and enter another room on the left for story progress. Cross the room, defeat the two kid enemies and you will see the poster in front of you on the wall before leaving the room.

Mask 9 (Secret 26)
After getting the previous poster, enter the next area and you’ll fight waves of enemies. After defeating them, squeeze through the next gap and go through the door. You will arrive in a corridor with broken floorboards. Move downward towards the bottom edge of the screen to find a wall you can squeeze through. Interact with the plant on the ground to pull out the mask.
Coffin 4 (Secret 27)
After you sneak through a dark room with sleeping enemies, you will soon enter another room with 3 kid enemies that attack you, and a big hole with a rope in the middle of the room. Immediately after killing the enemies, go through the door in the bottom left corner to find the coffin. Grab this BEFORE interacting with the body on the rope which will end the chapter!

Chapter 5: Down in a Hole
Trophy “Creature Comforts”
Shortly after the start of the chapter, you light up some lamps and come to a broken path where you must stay close to your partner to not fall down (you’re roped together). Then you meet a friendly NPC who puts down a wooden plank for you to cross over a gap. Right after this, a pig will run across the screen. Follow the pig to the left and press  to interact with it to pop the trophy.

Poster 12 (Secret 28)
Right after the previous trophy, you will get chased by a big spider enemy. In the next room after you escape from the spider, go to the right and pry open the wardrobe. Then interact with the wardrobe ( ) to squeeze through a hidden gap. This leads to a secret room with the poster.


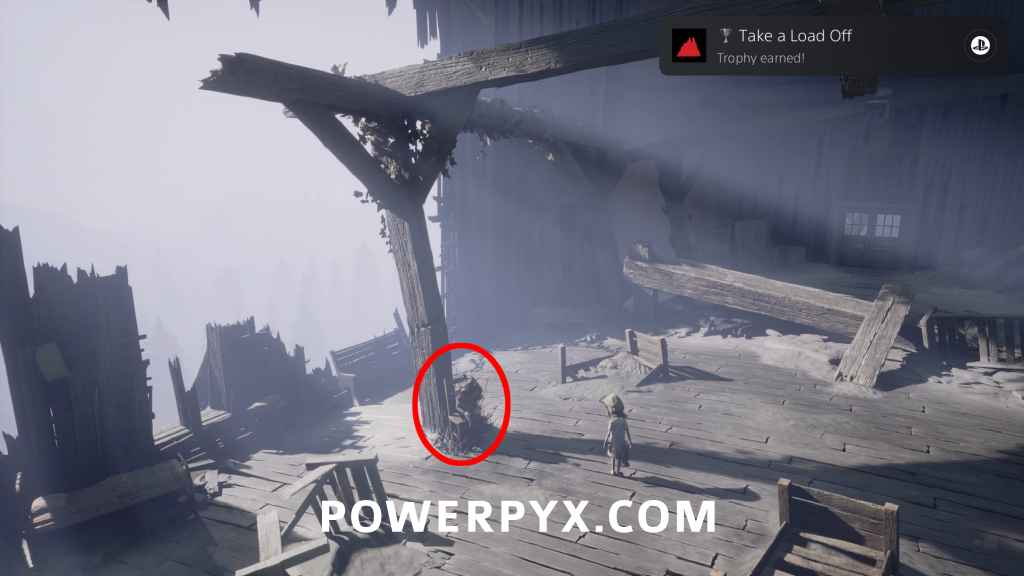
Rest Your Legs 10
Return to the previous room and sit on either the chair in the middle or the couch on the left side. If you got all Rest Your Leg opportunities till now, you will unlock the trophy here and don’t need to interact with any seating opportunities going forward. If you missed any, there will be more opportunities throughout the rest of the game and you can still earn the trophy.
Trophy “Lullabye”
Exit the previous room, you will come to a corridor with a small piano on the left side before the stairs. Interact with the piano 3 times in a row to pop the trophy.

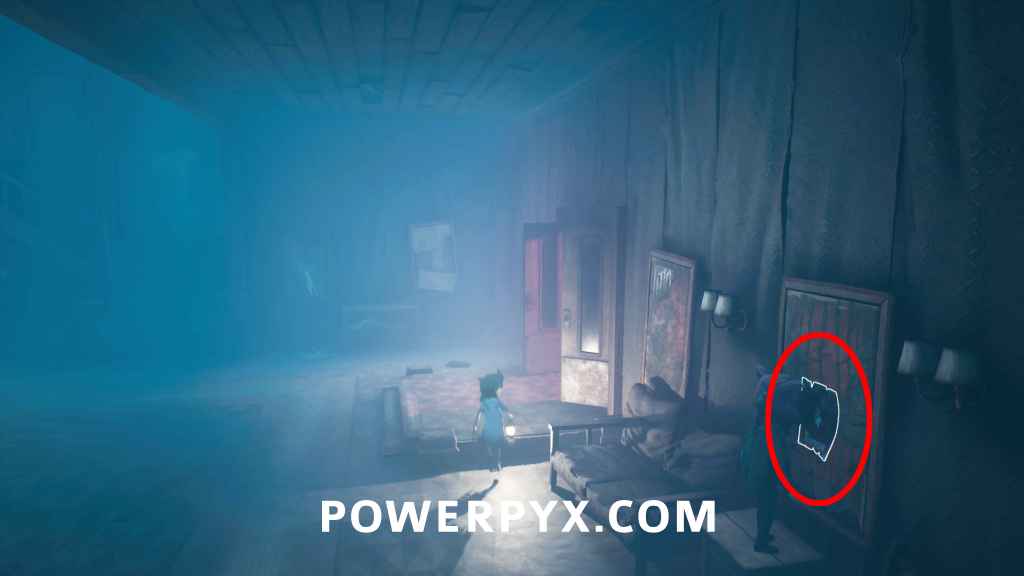
Poster 13 (Secret 29)
From the piano go upstairs, enter the door on the left to reach a balcony with the poster.

If you forget a “Rest Your Legs” opportunity, there will be another chair on the next outdoor balcony you cross for story purposes.
Trophy “Shot Through the Heart”
Later in the chapter, you sneak away from the spider, then get chased by the spider, then you fight the spider by throwing spears at it. During the spider boss fight, kids will appear and throw spears at you. Defeat 10 of the kid enemies by throwing spears back at them. DON’T throw spears at the spider until you got this trophy. If you defeat the spider the other enemies stop spawning, but you can quickly “restart checkpoint” if you miss the trophy to retry the fight from the start. Each time the spider disappears there will be 2-3 kids throwing spears at you, pick up one spear, then after the spider disappears use that spear to immediately throw it at the next group of kid enemies. Rinse and repeat 10 times. You will only have enough time to throw 1 spear per round. The spider can only spawn from 2 spots: if it spawns from the front center, stay on the far left & if it spawns from the left stay on the far right. Then it can’t hit you. After defeating the spider you must follow it into its cave and climb in its mouth.
Chapter 6: Nobody Left Behind
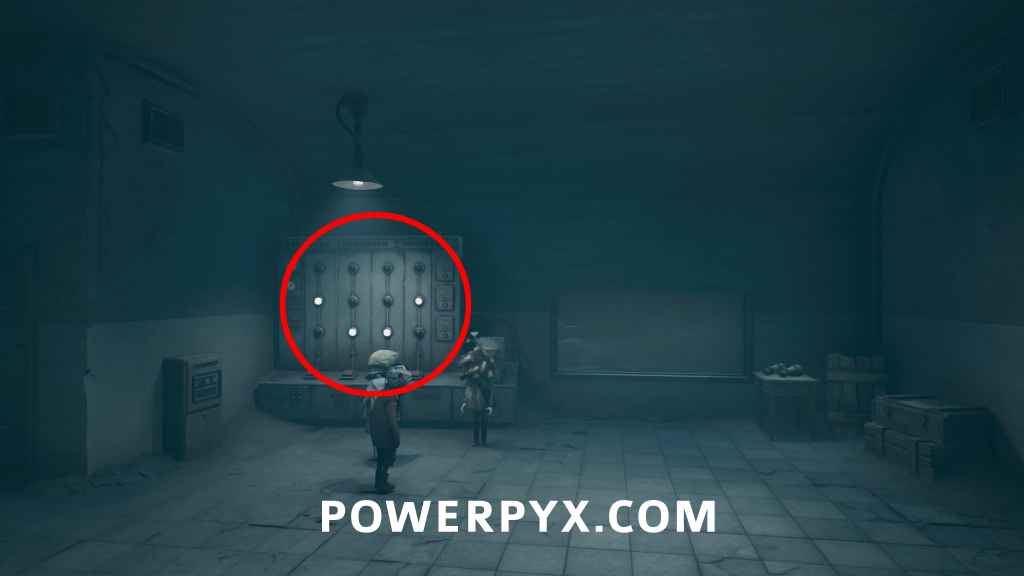
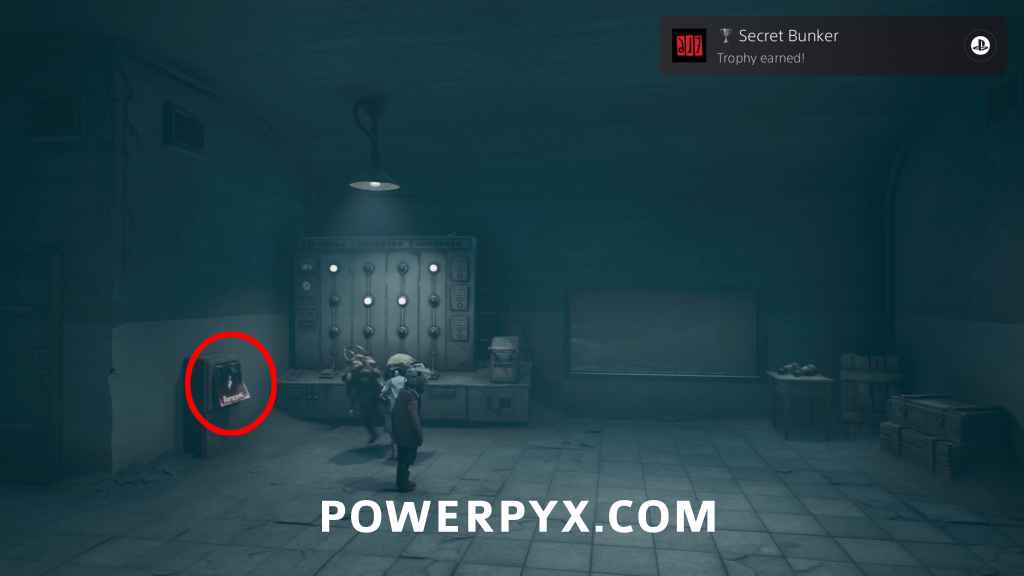
Trophy “Secret Bunker”
From the start of the chapter go through the tunnel on the right and through the next door to reach a lab. Exit through the door on the right, kick down the crate (needed for next Mask), pull the lever on the generator to turn on the power. Now head back inside the lab. On the left side is a console with 4 glowing dots. You must enter this sequence from left to right: 2-3-3-2 (dot in middle – dot at bottom – dot at bottom – dot in middle). Then pull the lever on the right to pop the trophy. This also makes a secret poster collectible appear to the left of the console.
Poster 14 (Secret 30)
After you did the steps for the “Secret Bunker” trophy, pick on the poster on the left side of the room.
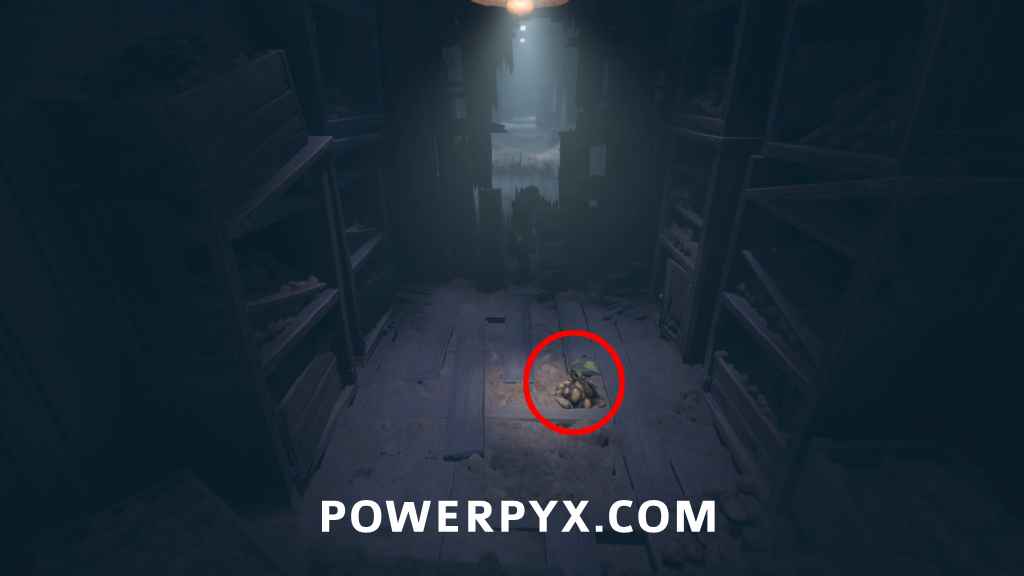
Critter 4 + Mask 10 (Secret 31)
In the same room, look through the binoculars at the bunker window to spot a crate on the beach with white dots drawn on it, this will be the code you need to enter on the console (for me this was 1-3-2-1 but it might differ). Then squeeze through the gap on the left side of the room and climb down to the beach. Move to the top of the beach to find this critter, beat it up and loot the mask. Remember you must have kicked down the crate outside the bunker where you activated the generator.


Sea Mines: Remember to shoot all sea mines for “Naval Blazing” trophy. Go down the beach and defeat the seagulls at your boat. Get on your boat, then immediately drive to the right to find cliffs with 3 sea mines behind them, at the edge of the area.
Trophy “Non-Cannonical”
For this you must use the big cannon to shoot the bunker. Drive the boat to the central island with the big cannon on it. Grab a cannon shell from the red glowing crate on the island. Carry the shell inside and load it into the cannon – you interact with the little wheel on the back on the cannon to hold the door and your partner will put in the shell. Then press the glowing button on the wall to the right of the cannon by the entrance, this opens the window. Use the big wheel to spin the cannon toward the bunker from where you came. Interact with the two switches to shoot the cannon, thus destroying the bunker and popping this trophy.

Mask 11 (Secret 32)
Rotate the cannon toward the big sea monster, grab another shell from the crate and load it into the cannon, shoot the big sea monster with it. Now drive down the path behind the sea monster, destroy the next set of sea mines, then drive all the way to the right, follow the cliffs until you reach the edge of the area with a small beach. Park the boat on the beach and pick up the mask in the middle of the sand.

Sea Mines: Get back on your boat and destroy the sea mines in the back left area in the sea. To the far left of the big shipwreck.
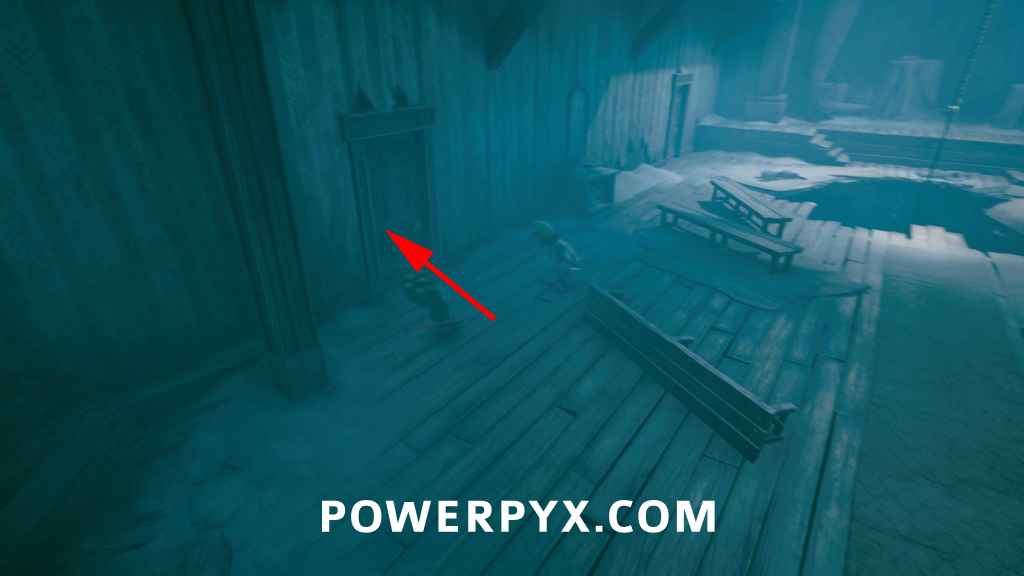
Poster 15 (Secret 33)
Drive your boat to the little beach at the huge shipwreck. At the beach go left, defeat the seagulls and interact with the cliff to have your companion help you up. Then climb the anchor chain of the ship. Inside the ship drop down and go left to find this poster on a buoy.

Mask 12 (Secret 34) + Mask 13 (Secret 35)
A couple minutes later, after you took the eye from the underwater creature and brought it back up the elevator, you will insert the eye into a whale. Then you automatically unequip your diving suits. Interact with both of the diving helmets in front of the whale, each of them counts as separate masks and secrets (two in the same spot).
Hidden Statue 4 (Secret 36)
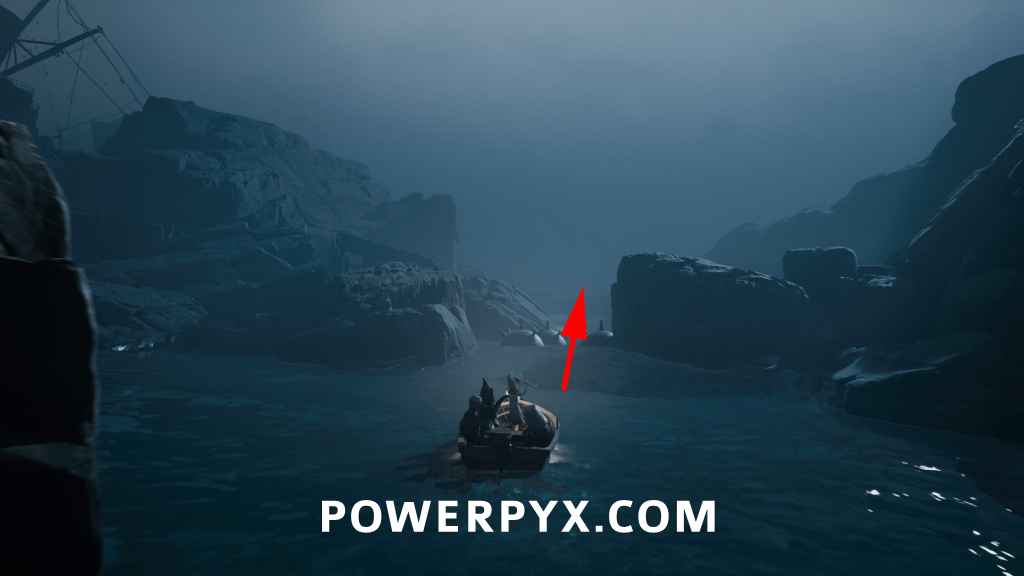
From the masks, squeeze through the gap on the right to go back outside to your boat on the beach. Drive your boat through the now-open path to the right of the shipwreck. Clear out the sea mines along the way. After you drive under a bridge where 2 enemies jump down into the water, you reach a dark tunnel entrance with several sea mines in front of it. BEFORE driving into the tunnel, turn right to find a path between the cliffs. Drive your boat through it and exit on the beach at the end to find a hidden statue.


Trophy “Naval Blazing”
Get back on your boat and blow up the sea mines at the tunnel entrance. This should be your last sea mines and the trophy should unlock here if you destroyed all sea mines in Chapter 4 and Chapter 6 with the harpoon. If you don’t get the trophy, drive back and check you destroyed everything here. There are also 4 more mines after driving through the tunnel, so if you missed any you have some extra sea mines, there are more than needed for the trophy, allowing you to have missed 4 total.
Trophy “Lost at Sea”
This trophy is for driving a long distance with the boat. Check the % progress in your trophy list on this. If you haven’t unlocked it yet, drive the boat back and forth until it unlocks. This is the last time you use the boat. This tracks across multiple playthroughs and you could also do it right at the start of a new game, so no problem if you miss it here.
Chapter 7: The Spoils
Poster 16 (Secret 37)
The chapter starts after you carry the wounded girl and follow a sheep. When you enter a tunnel where the sheep climbs through a cracked wall on the right, climb after it, then you get a short mini cutscene where your group takes a break and you can’t move for a few seconds. This marks the start of Chapter 7. In this first area of Chapter 7, move forward into the next area and check the wall on the left for a poster (just before going down to the trenches).

Mask 14 (Secret 38)
To the right of the poster, interact with the door on the right wall and crouch under it. Directly behind the door you find the mask on the ground in front of you.
Mask 15 (Secret 39)
Backtrack to the previous area with the poster. Now go down to the trenches straight ahead. Along the way you will come across 3 soldiers who eliminate themselves. After the third soldier, stick to the right side and you’ll see a wall you can squeeze through. Behind this wall is the mask between artillery shells. This is just before a soldier who detonates a grenade.

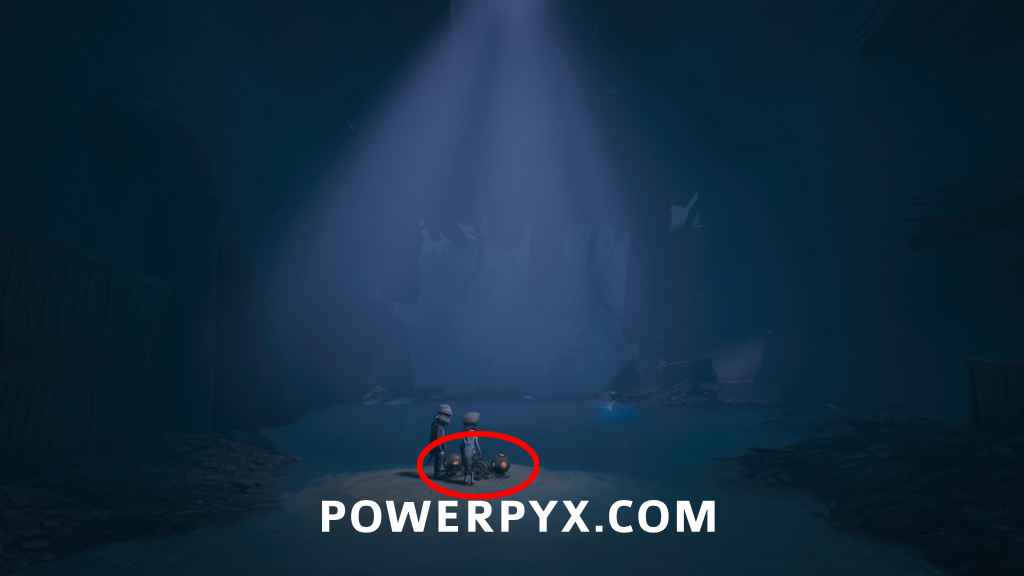
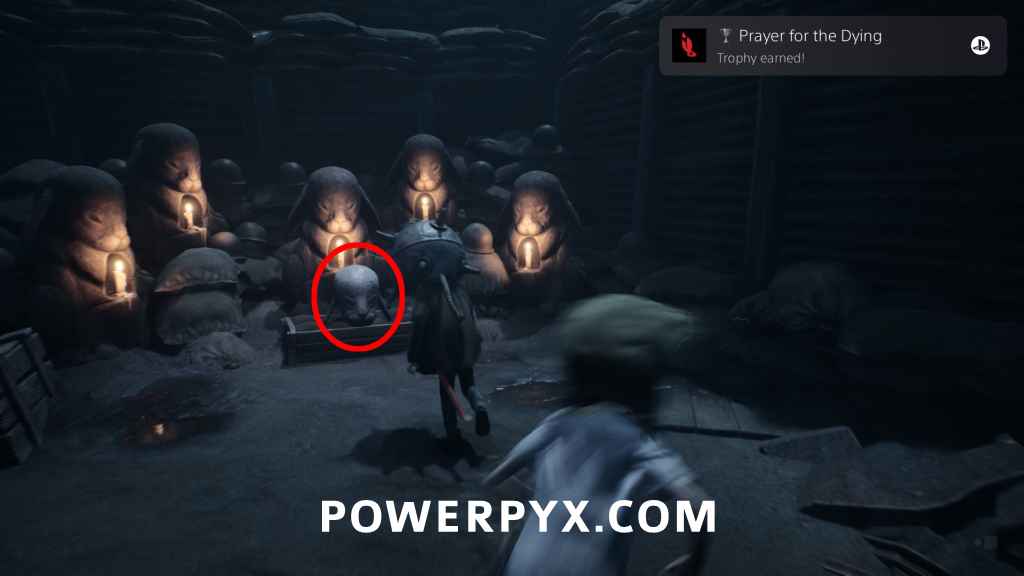
Hidden Statue 5 + Mask 16 (Secret 40)
From the previous mask, go forward in the trench until a soldier detonates a grenade (run backward to avoid getting killed by this). After the grenade explosion go forward until you reach an opening on the left with a big guy standing above it. Squeeze through the opening to reach the shrine + mask. The mask is in front of the statue. This is just before climbing up a ladder. This is just before climbing up a ladder.  Prayer for the Dying will unlock here if you got all Hidden Statues. The Mask will only be there if you found all 5 Hidden Statues within the same playthrough. Getting the missed Statues through chapter select won’t light the final statue and won’t give the mask, you’d need to replay everything in a New Game if you missed a Statue.
Note: both of these combined count as a single secret (not two secrets). Unlike previous hidden statues this one doesn’t count as a secret and you don’t have to light a candle on it, as it’s already lit.
Poster 17 (Secret 41)
After running away from a big sheep you arrive in a bunker. In the next room you climb down a long ladder. When you exit the ladder, move to the bottom of the screen (toward the camera) to find this poster at the end of the path.

Mask 17 (Secret 42)
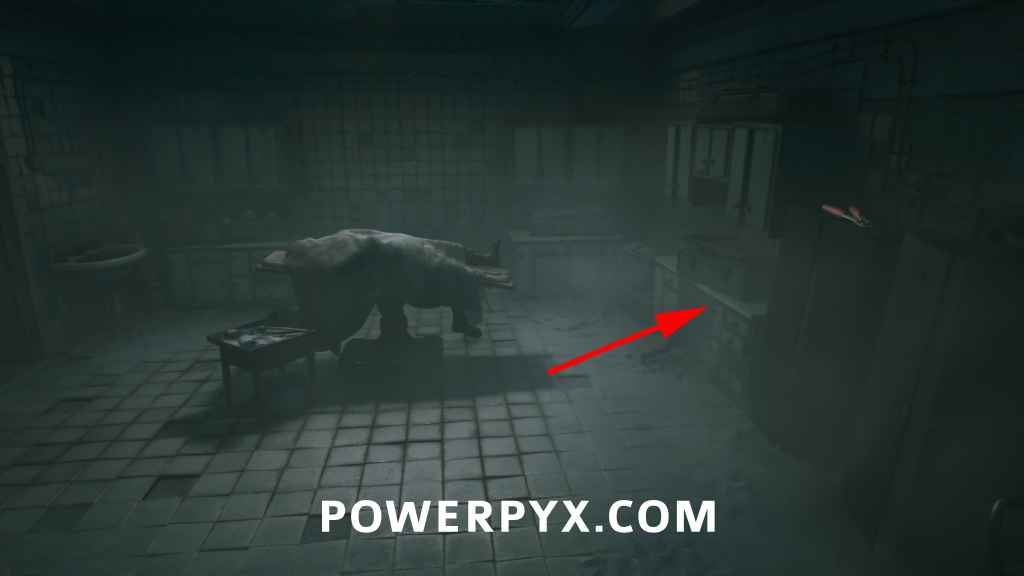
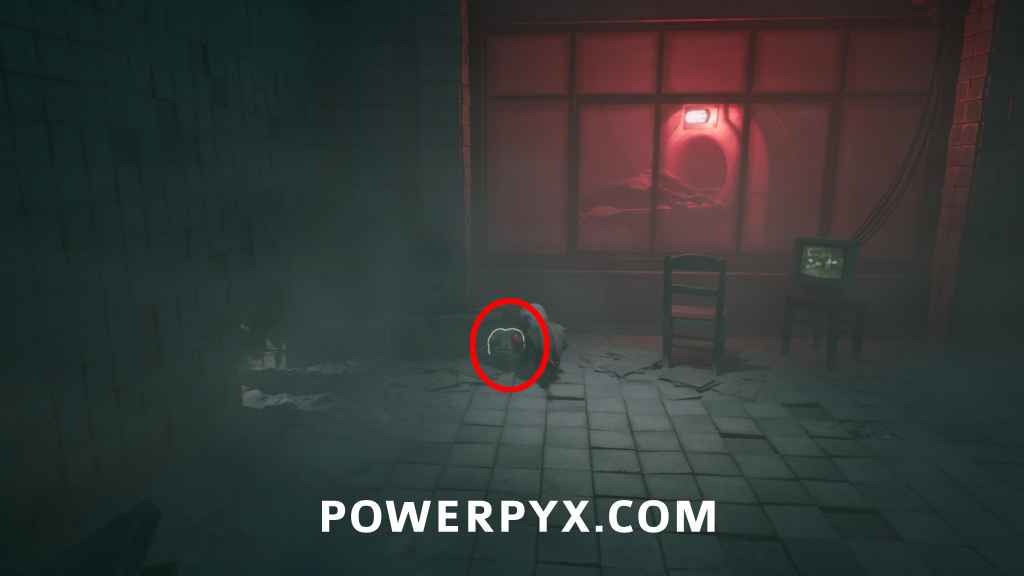
Shortly after the poster you will enter an elevator. Ride the elevator to the top and exit it. Then enter the next room on the right (operating room), on the far right side crouch under the table to reach a hidden room. Pick up the mask there.
Coffin 5 (Secret 43)
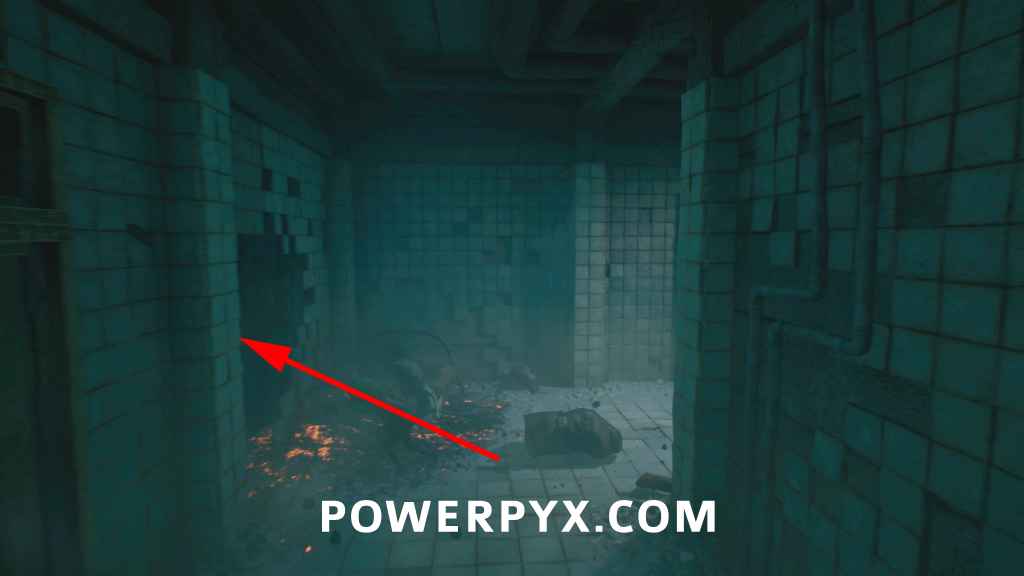
After grabbing the bolt cutters from the operating room, use them to open the door in the corridor, then go through the room with exploding soldiers. You must wait till a soldier in the back right corner explodes to blow a hole in the wall. In the next corridor, run forward past the explosive soldiers on the beds until you take a right turn. As soon as you take a right turn, a wall behind you explodes and a wheelchair gets pushed behind you. TURN AROUND and enter the wall that exploded behind you. You will reach a secret room with a big wheel. Turn the wheel to reveal a ladder, climb down to find the coffin. If you found all 5 coffins you will unlock the secret ending at the end of the game (the trophy doesn’t unlock here yet).

Chapter 8: The Watcher
Poster 18 (Secret 44)
The chapter starts after a cutscene with the sheep. Afterward continue until you enter a house where a sniper gets shot. Enter the room left of the sniper, go upstairs and enter the next left room to find the poster on the wall. Just before hiding from the sniper.

Poster 19 (Secret 45)
From the previous poster go all the way to the right while hiding behind the walls to avoid the sniper’s shots. When you reach an interactable wall where you’re supposed to climb up with your partner, DON’T climb up yet. Instead, go around the wall further right to find the poster hidden behind it. If you climbed up the wall you can still jump down. If you reached a usable door you went too far.

Trophy “Friends Like These”
When you reach a shooting range, where you have to pick up a gun for story purposes, shoot your AI companion with one of the guns. Normally you are supposed to shoot a practice dummy for story progression, but for the trophy you must fire at your AI buddy instead. You can shoot multiple times if you miss.
Critter 5 + Mask 18 (Secret 46)
Now use the gun to shoot the third practice dummy from the left so it drops a key. Pick up the key, open the door in the right corner of the shooting range. You enter an alley, interact with the oven above you directly after going through the door. A critter will run out of the oven. Follow it back into the shooting range, use a gun to shoot it, pick up the mask it drops. This is the final mask and final critter, you should get two trophies for these if you didn’t miss any.
Poster 20 (Secret 47)
Proceed through the alley and sneak past the big sheep. After you escape the sheep and climb a wall, you will go through a door into a building. On the left side open the elevator door to find the final poster inside. This is also the final Secret and final Collectible. You should unlock two trophies here if you didn’t miss anything.

Trophy “Just Making Sure”
A little bit later you will automatically shoot a rocket launcher at a sniper in a clock tower, this is story-related. Afterward, go forward and enter the rubble on the right side of the path below the clocktower where the sniper fell down. Kick the body of the sniper to get the trophy.

Chapter 9: All-Consuming Past
Trophy “Destruction Derby”
The chapter starts when you start driving the tank. While driving the tank, drive it over a total of 24 car wrecks to flatten them. There are more than you need, so missing just a few is fine.
Trophy “Friends Reunited” (Secret Ending)
If you found all 5 Coffins, you will get the secret ending at the end of the chapter and earn both ending trophies shortly after each other  All is Well + Friends Reunited. You should earn the Platinum after the endings too
  Nothing Lasts Forever. If you forgot anything you can grab it via Chapter Select.
Leave a Reply