
This step-by-step walkthrough guide explains how to solve the Ashes of the Damned main Easter Egg in Call of Duty Black Ops 7 Zombies. It unlocks the Dust To Dust and I Heard You Like Upgrades trophy & achievement. There are no special prerequisites and you can do this at any time. This guide is based on Standard Mode. The order of steps may be different in Directed Mode. The trophies/achievements will also unlock in Directed Mode which makes them easier.
General Tips before you start:
- The area names are displayed in yellow letters at the top of the screen! The area names will be used throughout the guide here. This is how you’ll know you’re in the correct area. It’s very helpful to have some prior map knowledge, play at least one match where you drive around the map to learn the main area names and to know where the Perk Machines are.
- For exact map locations, also check the minimap in the top left of the screenshots and the compass at the top of the screen.
- An easy way to survive rounds is to drive back and forth with the car near the garage to kill zombies. If the car is nearly destroyed, park it in the garage and run laps around it. The car will immediately start to repair, rinse and repeat. Try to not let the car be fully destroyed as it costs salvage to repair (use the salvage to craft quick revive and killstreaks, or upgrade your weapon rarity).
- You will need a throwable Combat Axe and Molotov. You can find a Molotov for free at the Garage in Ashwood, and a Combat Axe in the Exit 115 Diner. DON’T waste these throwables until you need them for the easter egg. Alternatively, you can buy them at crafting tables buy they require Player Level 26 for Molotovs and Level 52 for Combat Axe. If you are a high enough level and play with multiple people, each of you should equip one of these items so you don’t need to find them during the match.
- All players should equip Aether Shroud Field Upgrade. In the final boss fight you must repair the car frequently and being invisible makes this much easier. It also makes revives easy.
- Try to complete the steps in as few rounds as possible to make the endboss easier.
- This is one of the longest easter eggs in COD history with many convoluted steps. It’s best to attempt it with a team, have one person dedicated to running around with zombies at the end of each round while the others work on the easter egg steps. Send this guide to your team or read it out to your team so you all know what to look for.
- It’s good for all teammates to read the boss fight section before beginning the easter egg run. So you know what to expect and how to prepare.
Step 1: Turn on the Power & Pack-a-Punch
Follow the yellow objective markers to turn on the power and build the pack-a-punch machine. If you already know how to unlock the pack-a-punch machine, skip to Step 2.
- In the starting area you enter the building and melee the floor to find the T.E.D.D.’S HEAD key item. Use it on the car in the starting area.
- Drive to the second area, shoot the growth on the power generator. Flip the switch in the barn.
- Drive to the third area, go up the zipline and buy the doors. Shoot the growth on the generator at the top of the area and flip the switch.
- In the same area, go down to the garage, park the car inside, interact with the crafting table in the garage to build the pack-a-punch. It will be installed on the back of the vehicle.
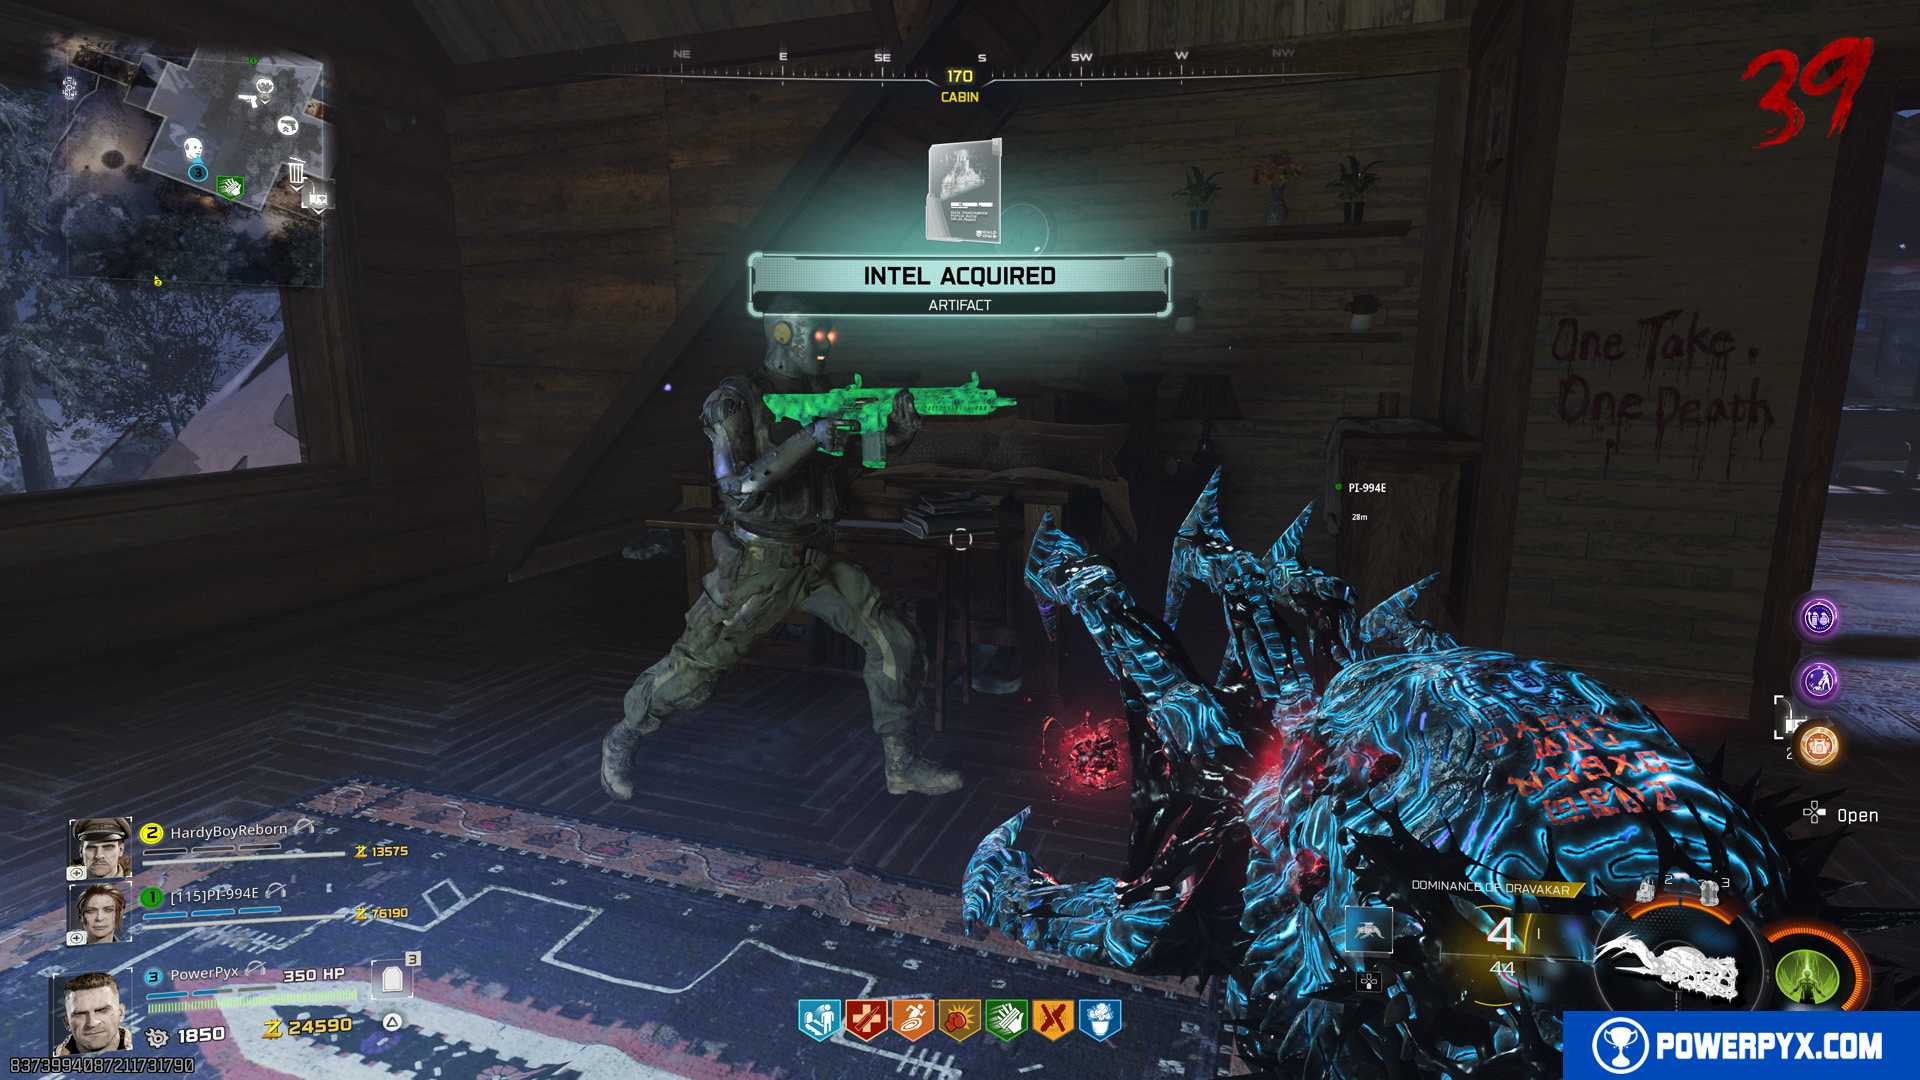
Step 2: Exit 115 Diner – Get 3 Key Items
Go to the Exit 115 area in the south-west of the map (the diner area, see yellow area name at top of screen). Buy the doors to Reba’s Diner. There are 3 key items to get in the diner:
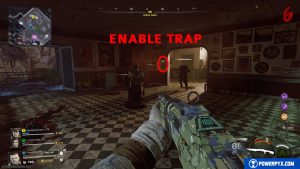
- Ravager Eyes – During a Ravager round, kill Ravagers using the Saw Blade Trap. You activate this trap for 2000 points inside Reba’s Diner. Let the Ravagers run into the trap and they’ll drop the golden item on the floor. Ravagers are the small fast running monsters that appear every 5 rounds or so instead of regular zombies. Typically the first wave is in Round 5-6.
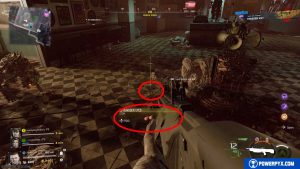
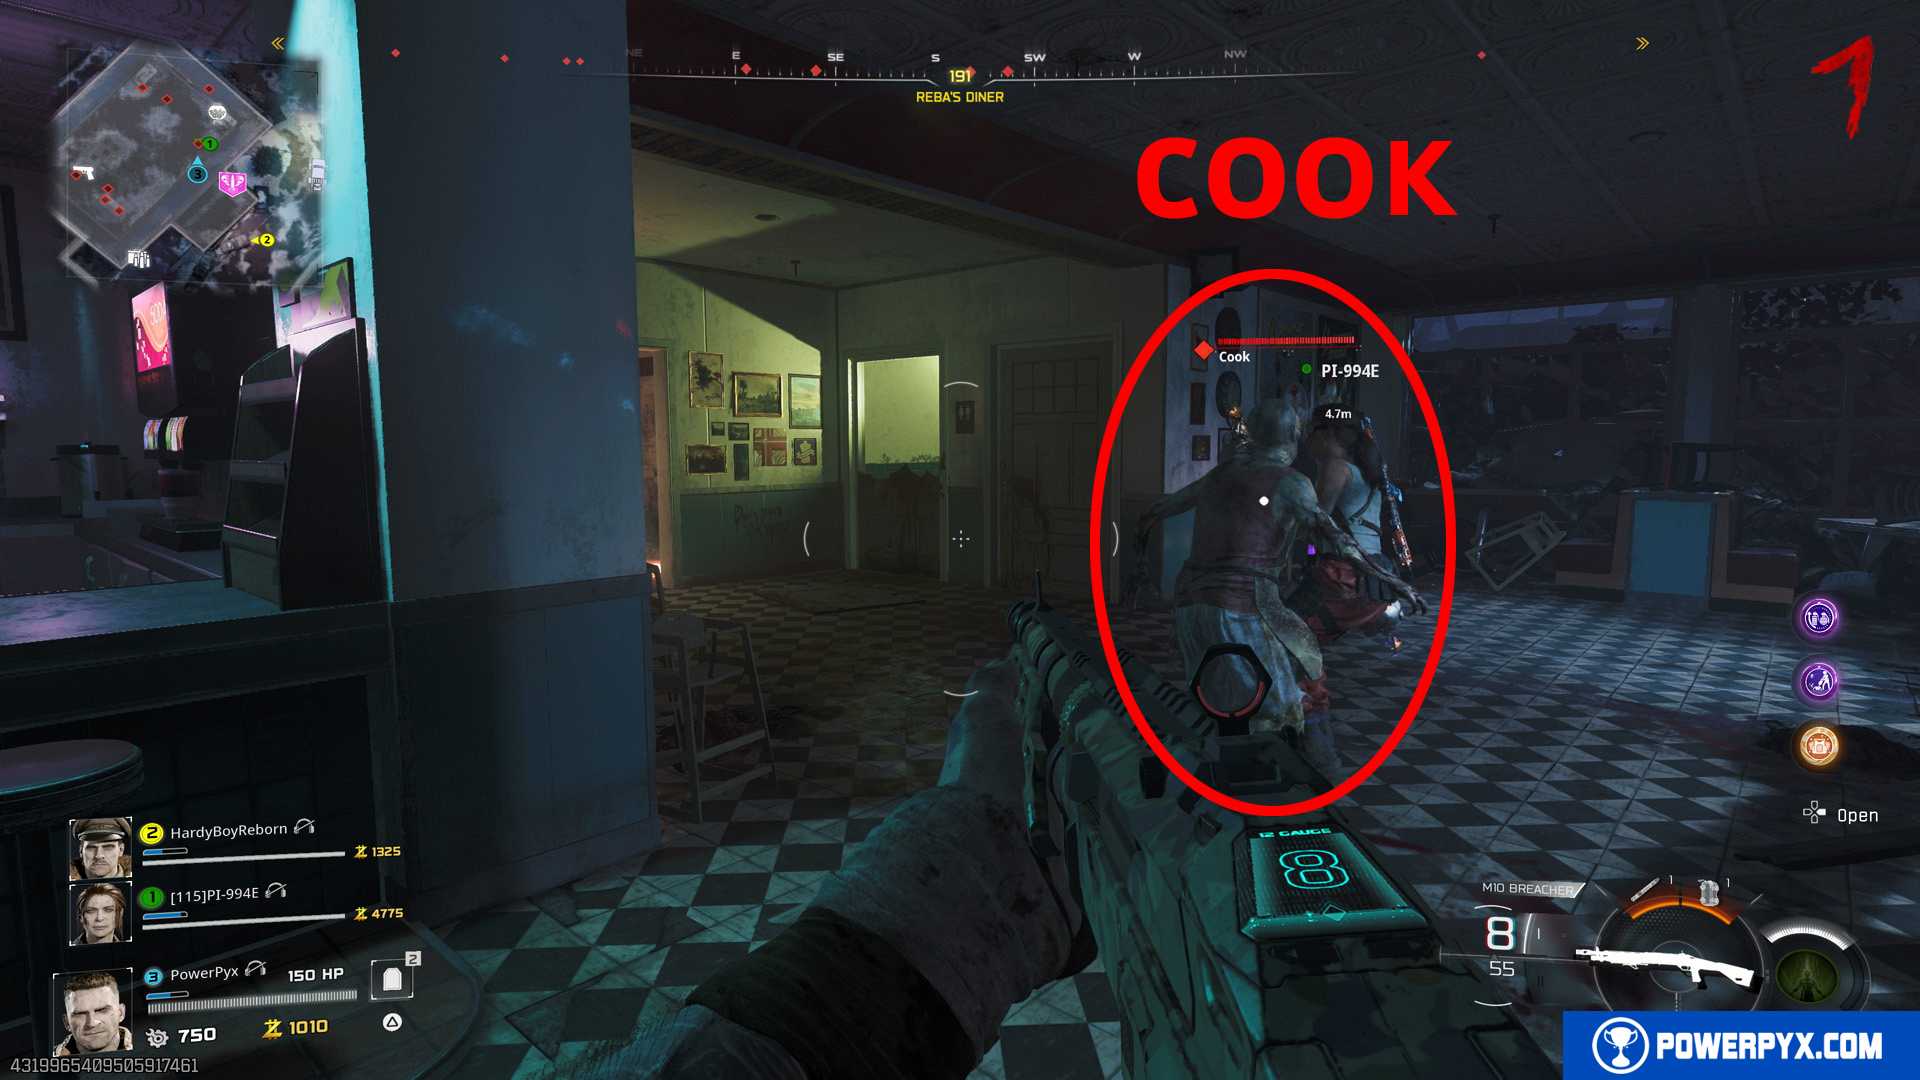
- Freezer Key – dropped by the Cook zombie. Stay inside Reba’s diner until he spawns, kill him and he’ll drop the golden key on the ground. He can spawn from Round 5 onward.

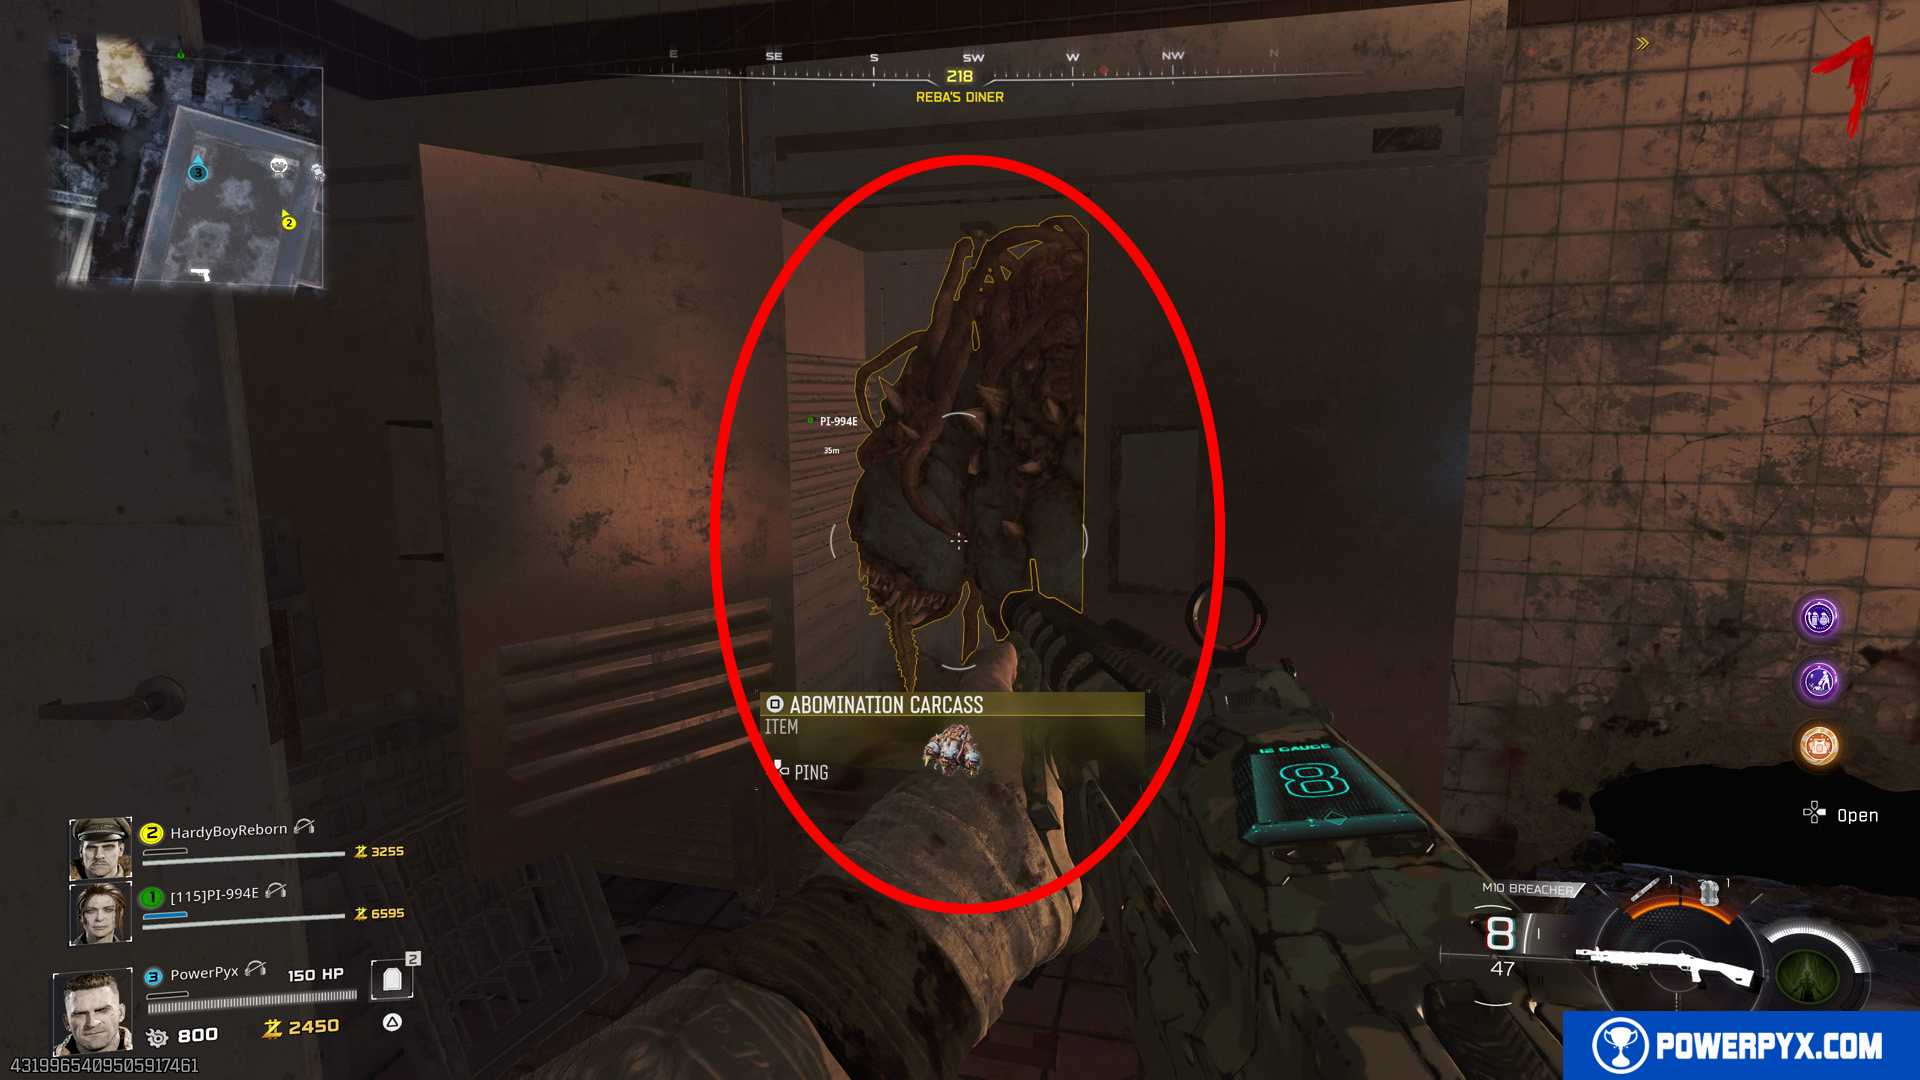
- Abomination Carcass – with the Freezer Key, you can open the Freezer locker in the south-west corner of the diner (see compass at top of screen). Hold
 (PS) /
  (XB) on the freezer and it will open. This only works after you got the Freezer Key. Inside the Freezer loot the Abomination Carcass.


You should aim to reach the diner before the first Ravager Round.
Step 3: Ashwood – Upgrade the car with Beam Attack
Drive the car back to the garage in Ashwood (area with 2nd power switch). Park it in the garage and interact with the crafting table in the garage. This upgrades the car with a Beam Attack, you use it with  /
/  and you’ll see 3 heads on the front of the car that shoot lasers. This is the head you found in the freezer.
Step 4: Get Hoard Husk Chunks
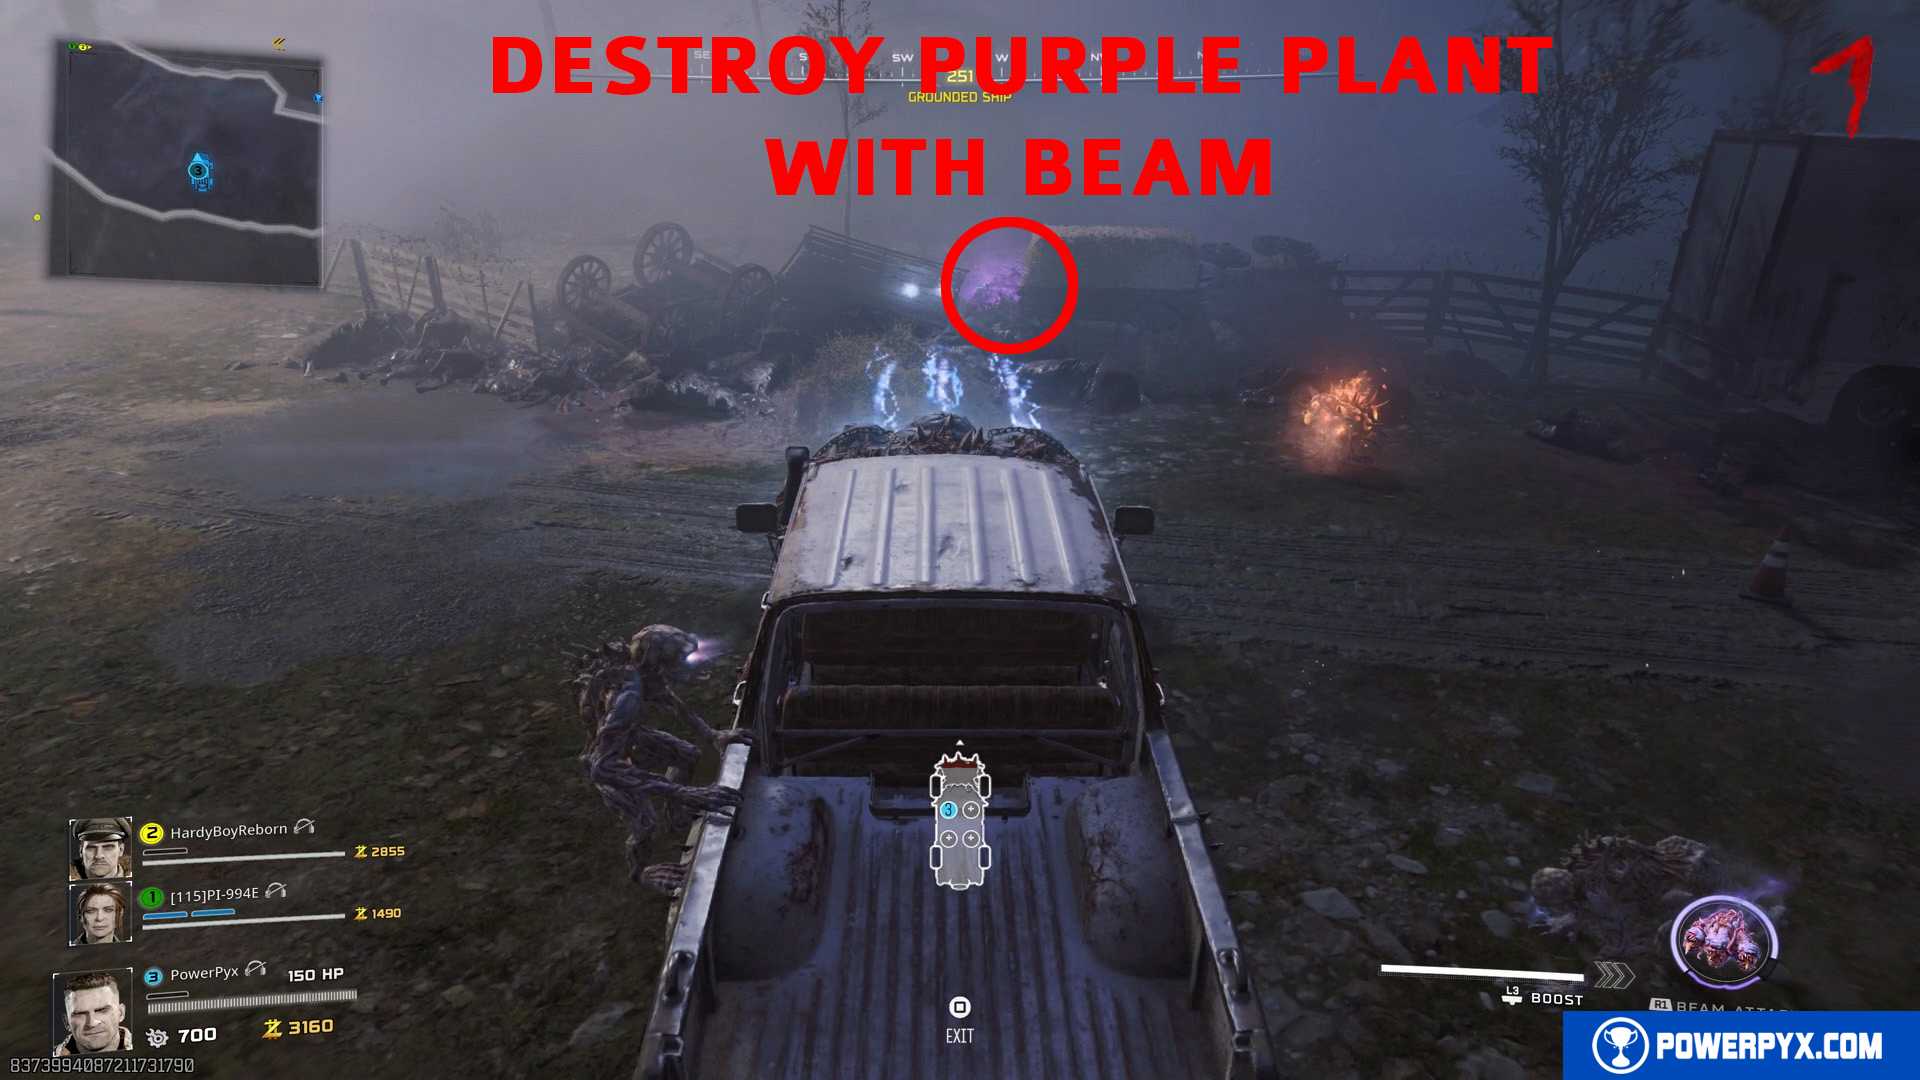
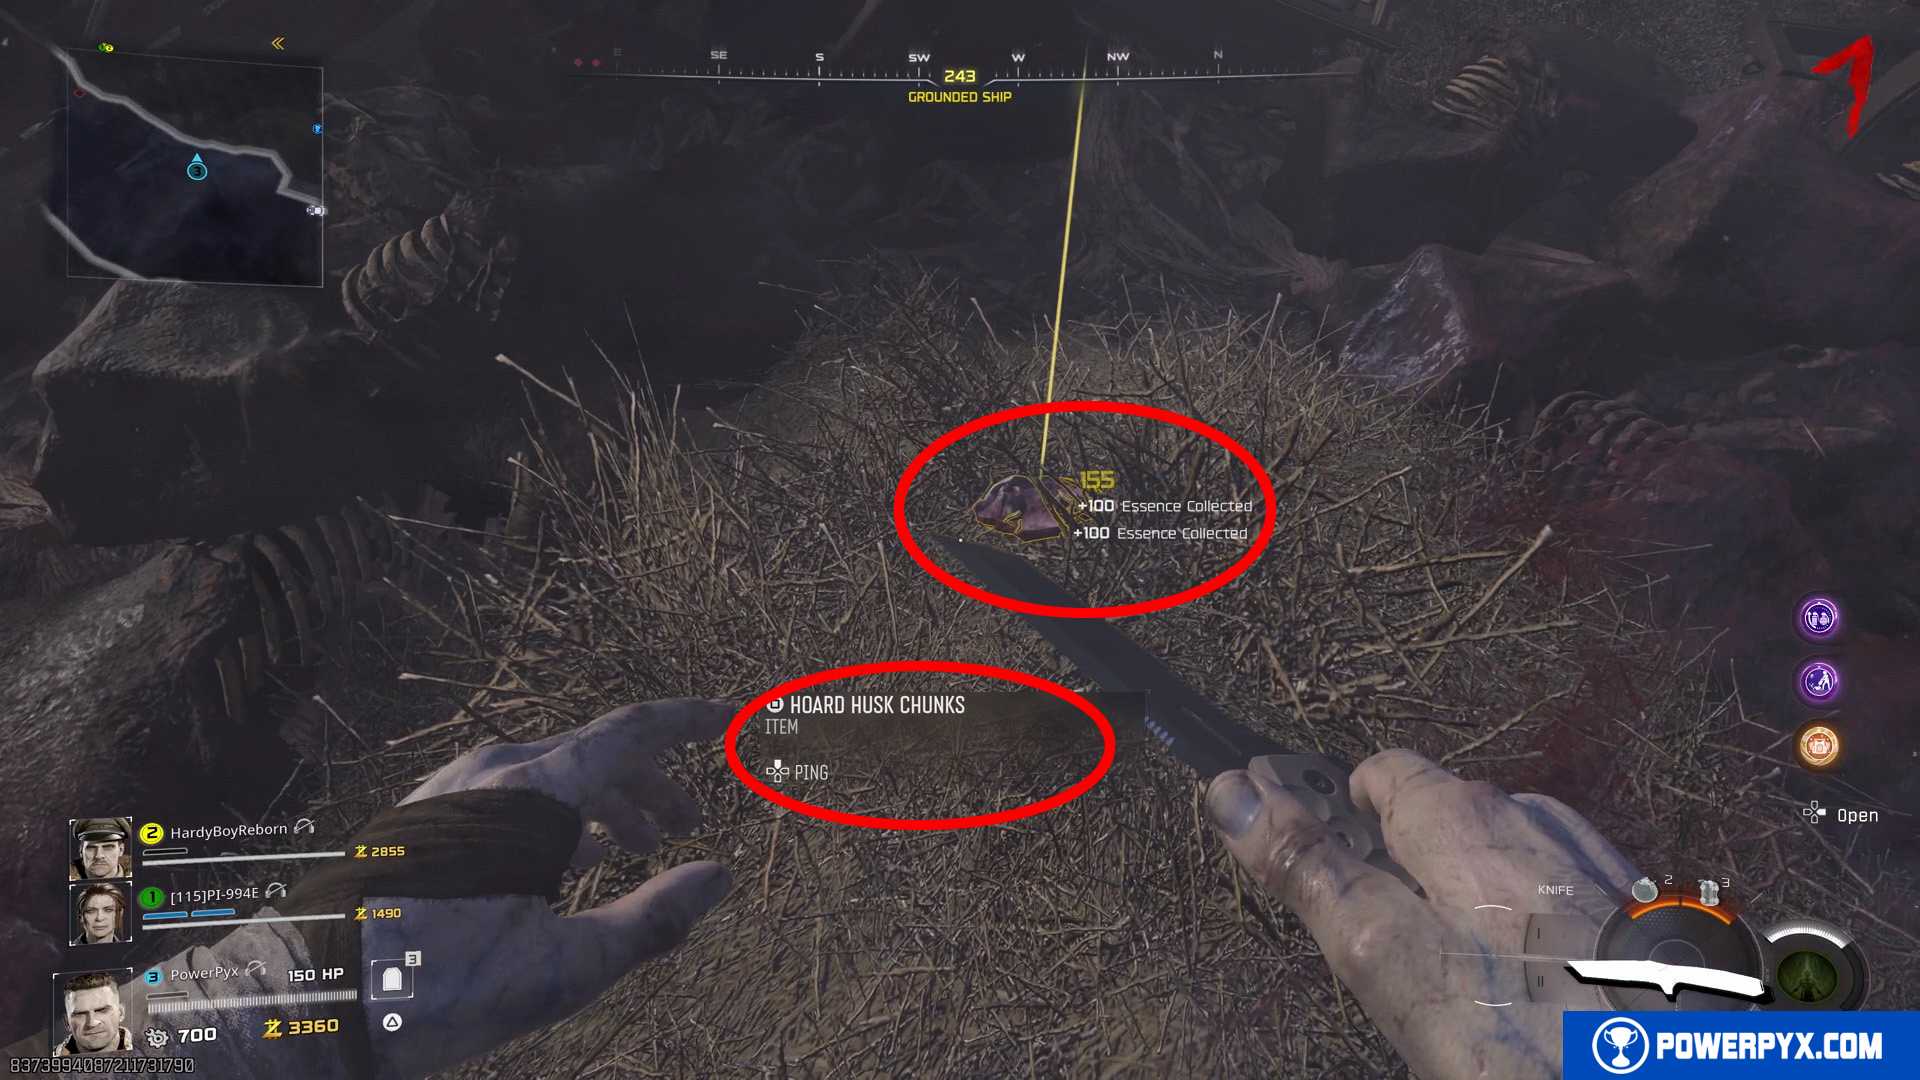
Drive between areas to find purple glowing plants. Shoot one of these with the car’s beam attack ( / ). One of the purple glowing plants will drop the Hoard Husk Chunks (golden key item). You can find the purple plants across the map along the paths that connect the main areas (where fast running zombies are). An easy one is typically between Vandorn Farm & Ashwood on the side of the road (area between first and second power switch). You only need to get one of these plants to drop you the Hoard Husk Chunks! As soon as you have this item you’re good. No need to shoot all of the purple plants.
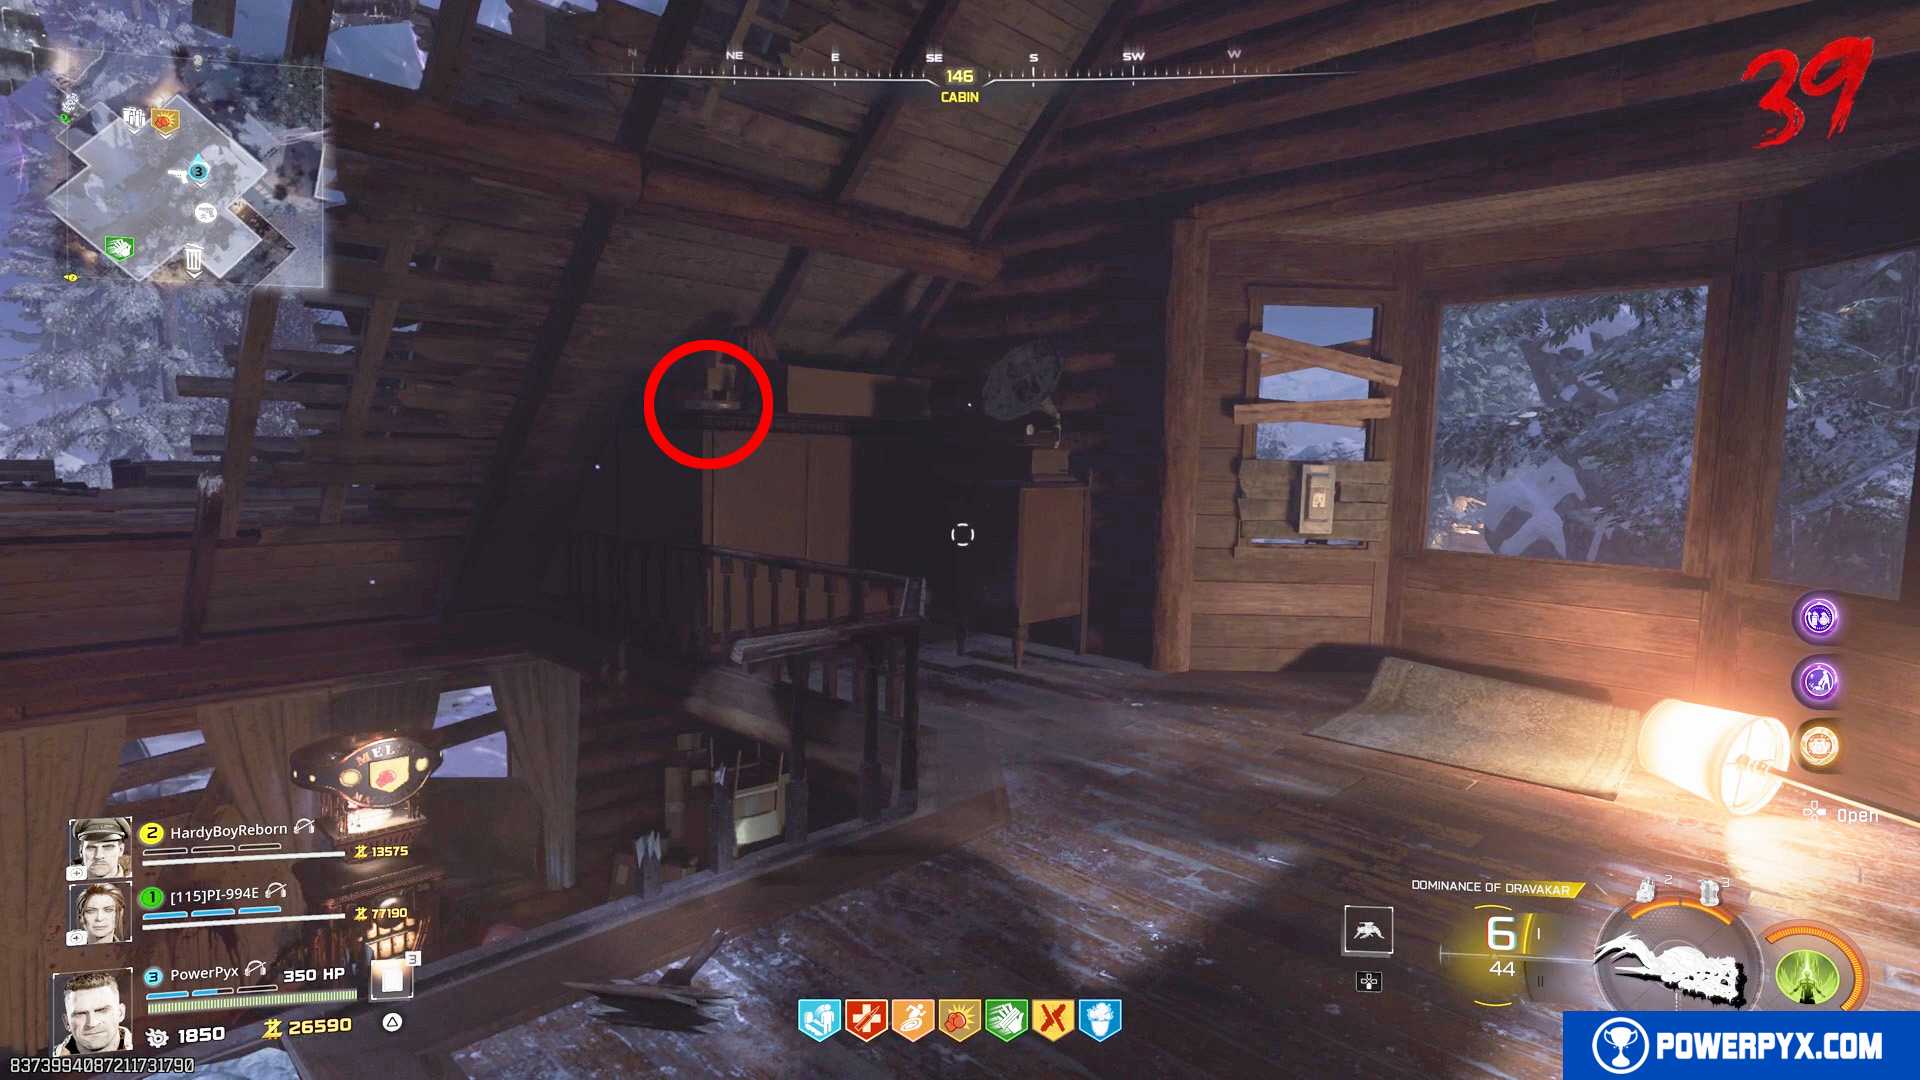
Step 5: Blackwater – Get Jar of Spores
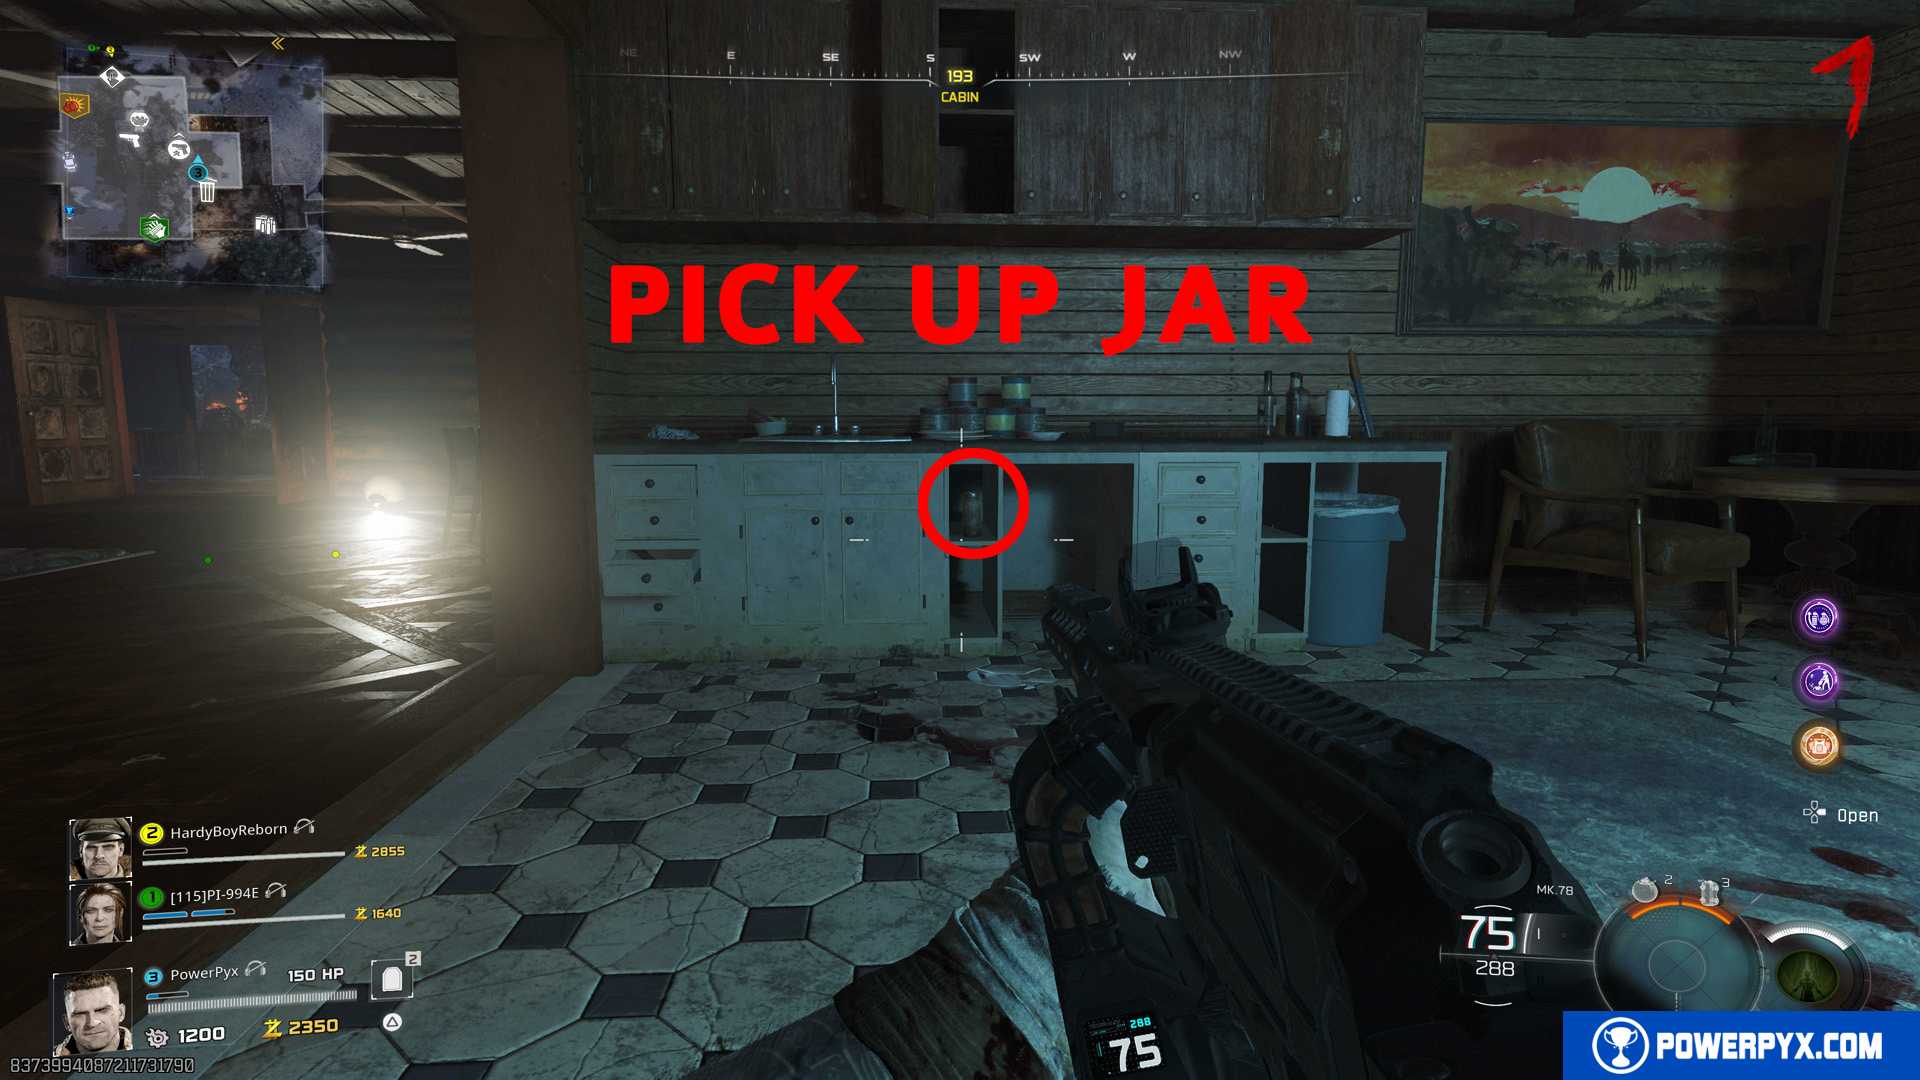
Go to Blackwater area and open the Cabin. It’s the area in the north-west, you get there from the garage. In the Cabin’s kitchen area on the ground floor, pick up the Jar that’s sitting in the side shelf. Hold / to interact with it.
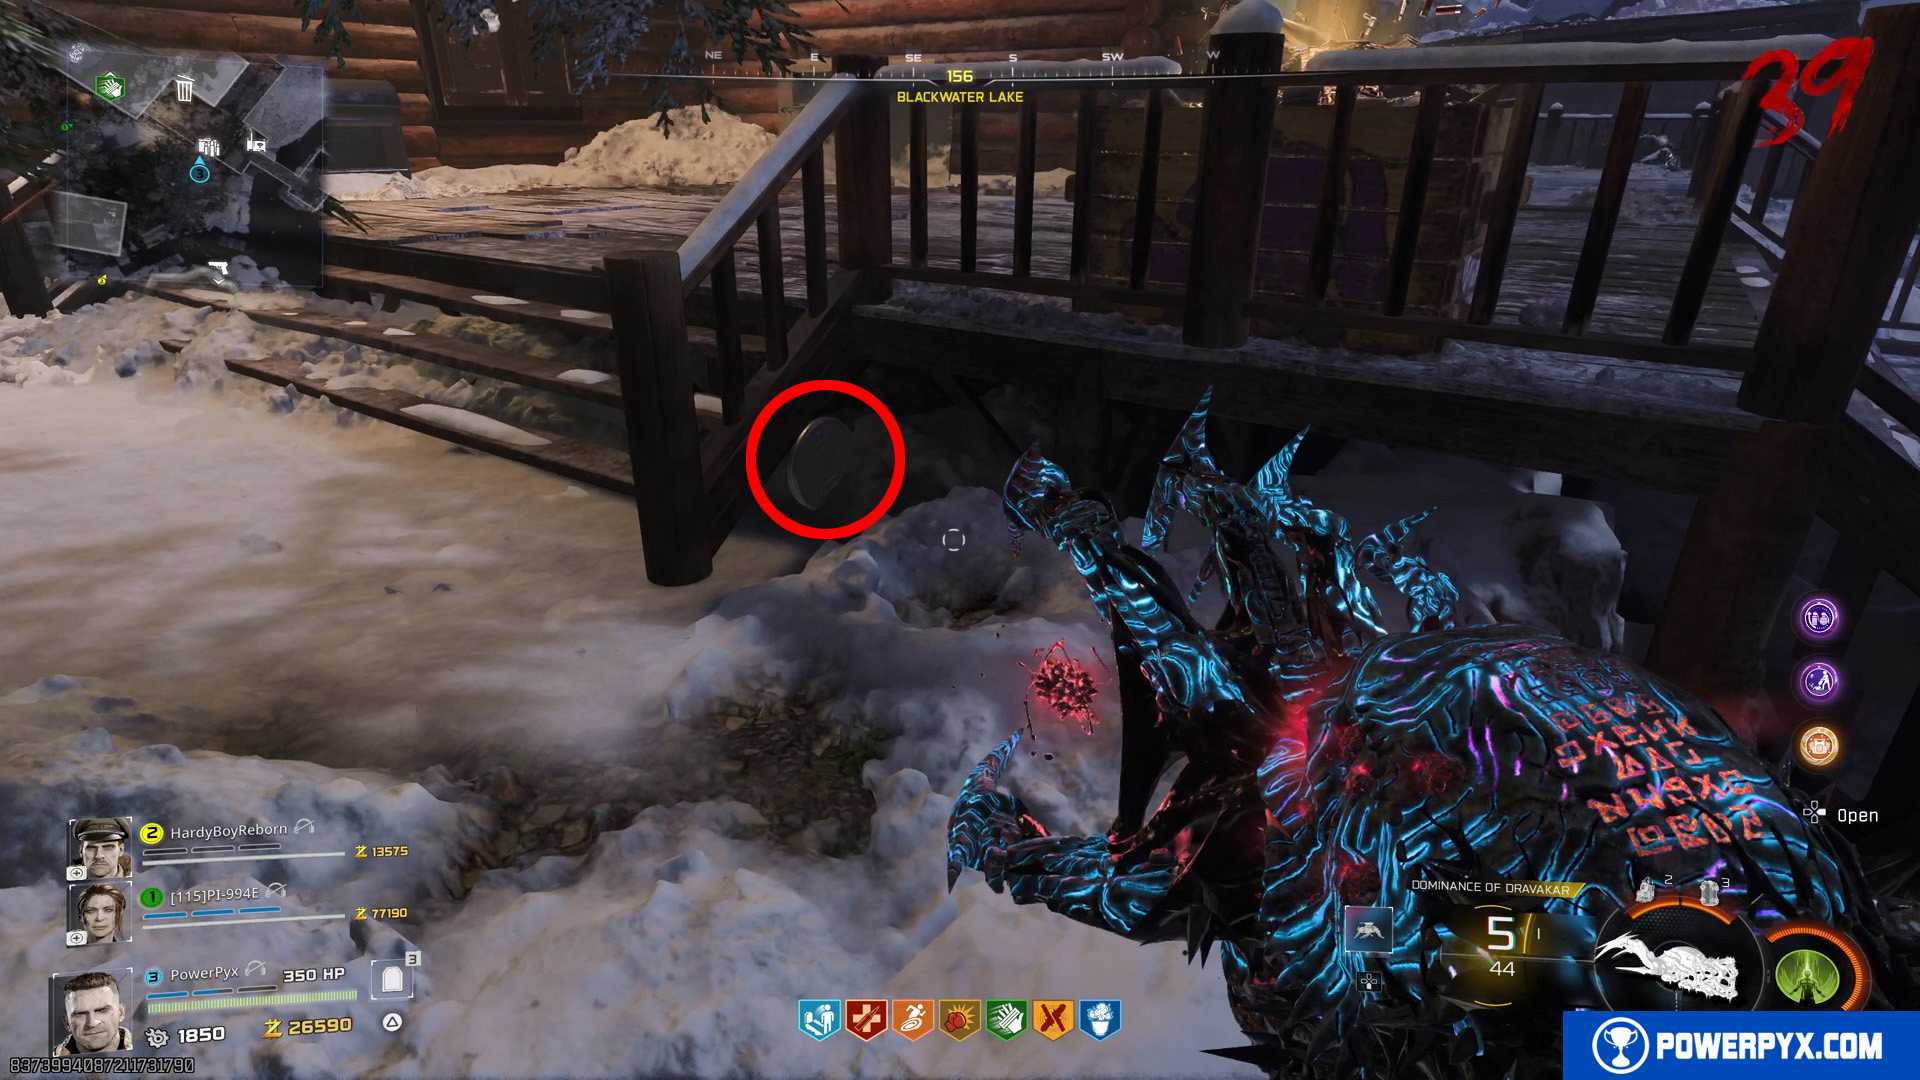
Step 6: Vandorn Farm – Place Jar of Spores on Cow Carcass to get Widow’s Lantern
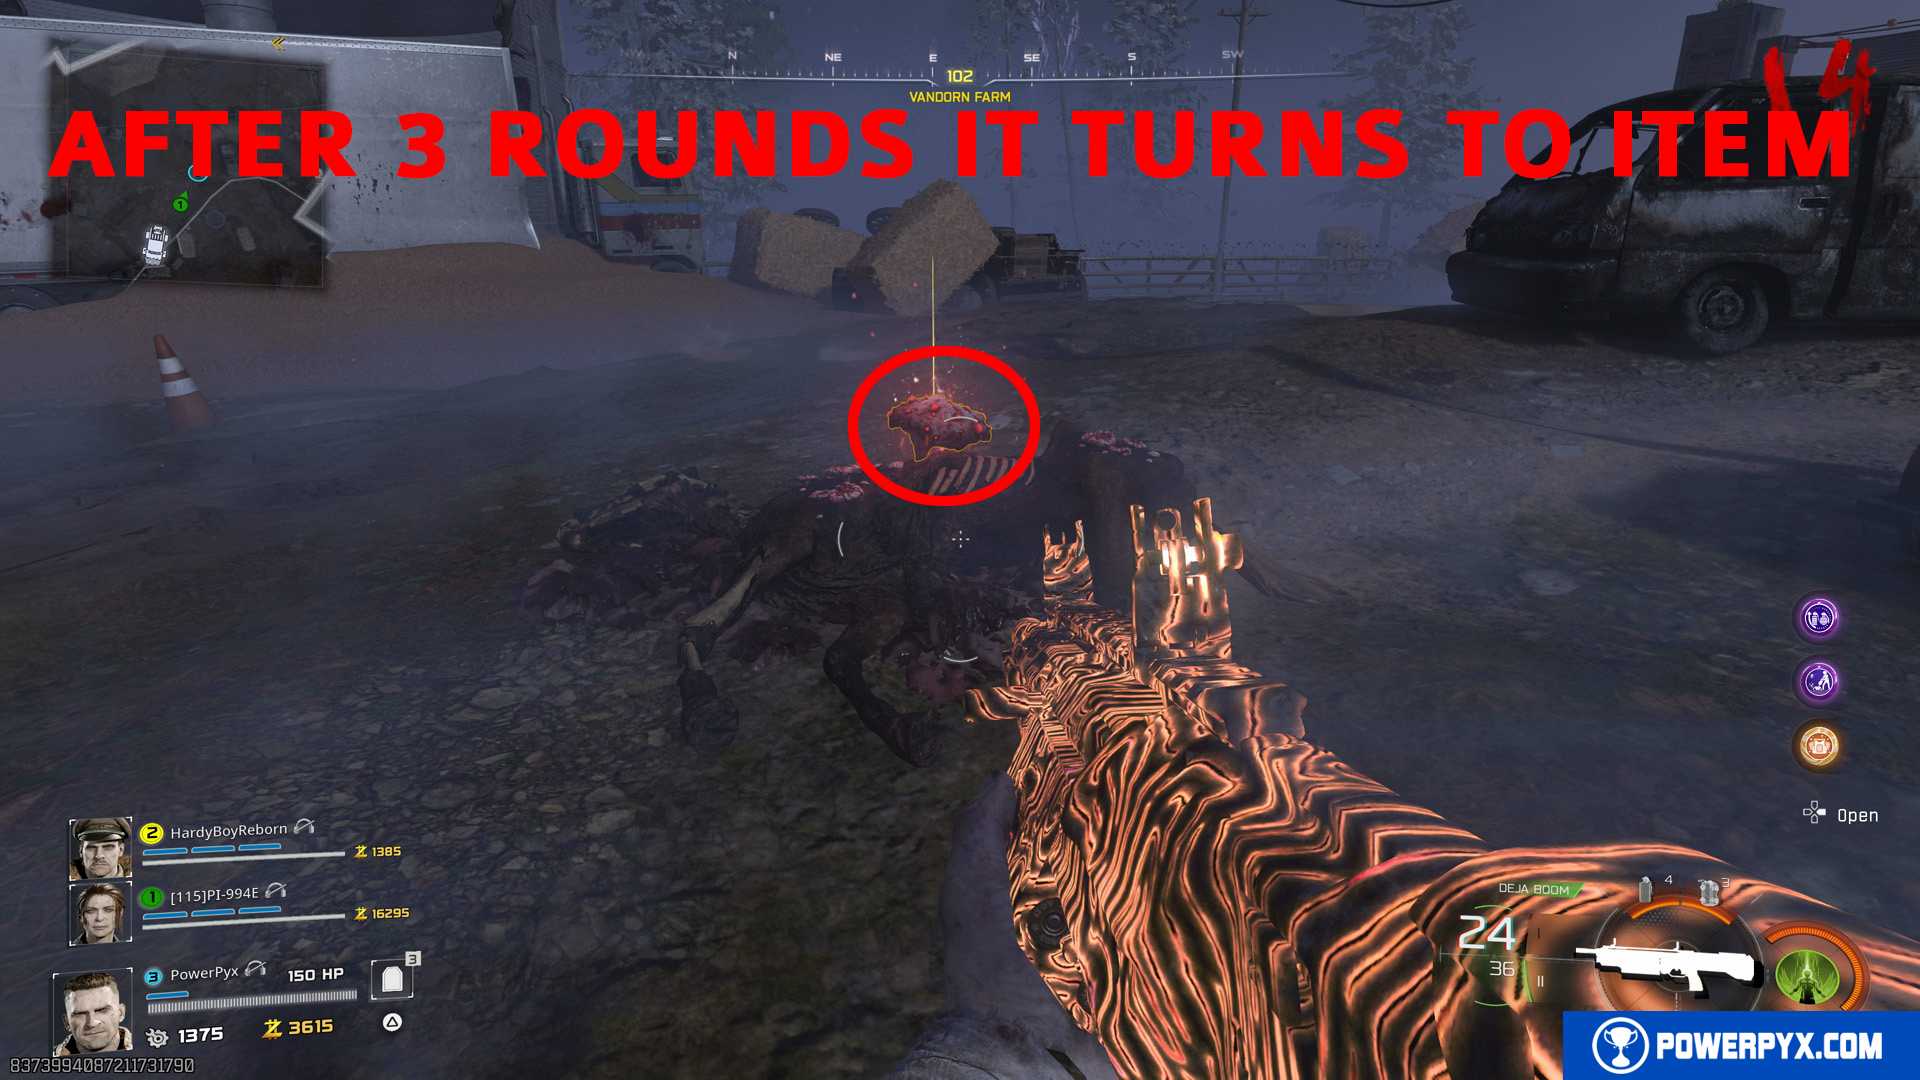
Go to Vandorn Farm (area with first power switch). On the road in front of the farm gate, there’s a dead cow carcass with red spores on it. Interact with it to place the Jar you just found. It will take 3 turns to fill the jar which turns it into the Widow’s Lantern key item. While you wait for this, you should work on the next steps already. Just remember to go back to the cow carcass in 3 rounds.

Step 7: Vandorn Farm – Get Human Bones in Barn
In Vandorn Farm enter the Barn. There are dead bodies hanging from the ceiling. Check for the lowest hanging body furthest towards the back. You must throw a Combat Axe (Tomahawk) at the left foot of this hanging body. Then the foot falls to the floor.
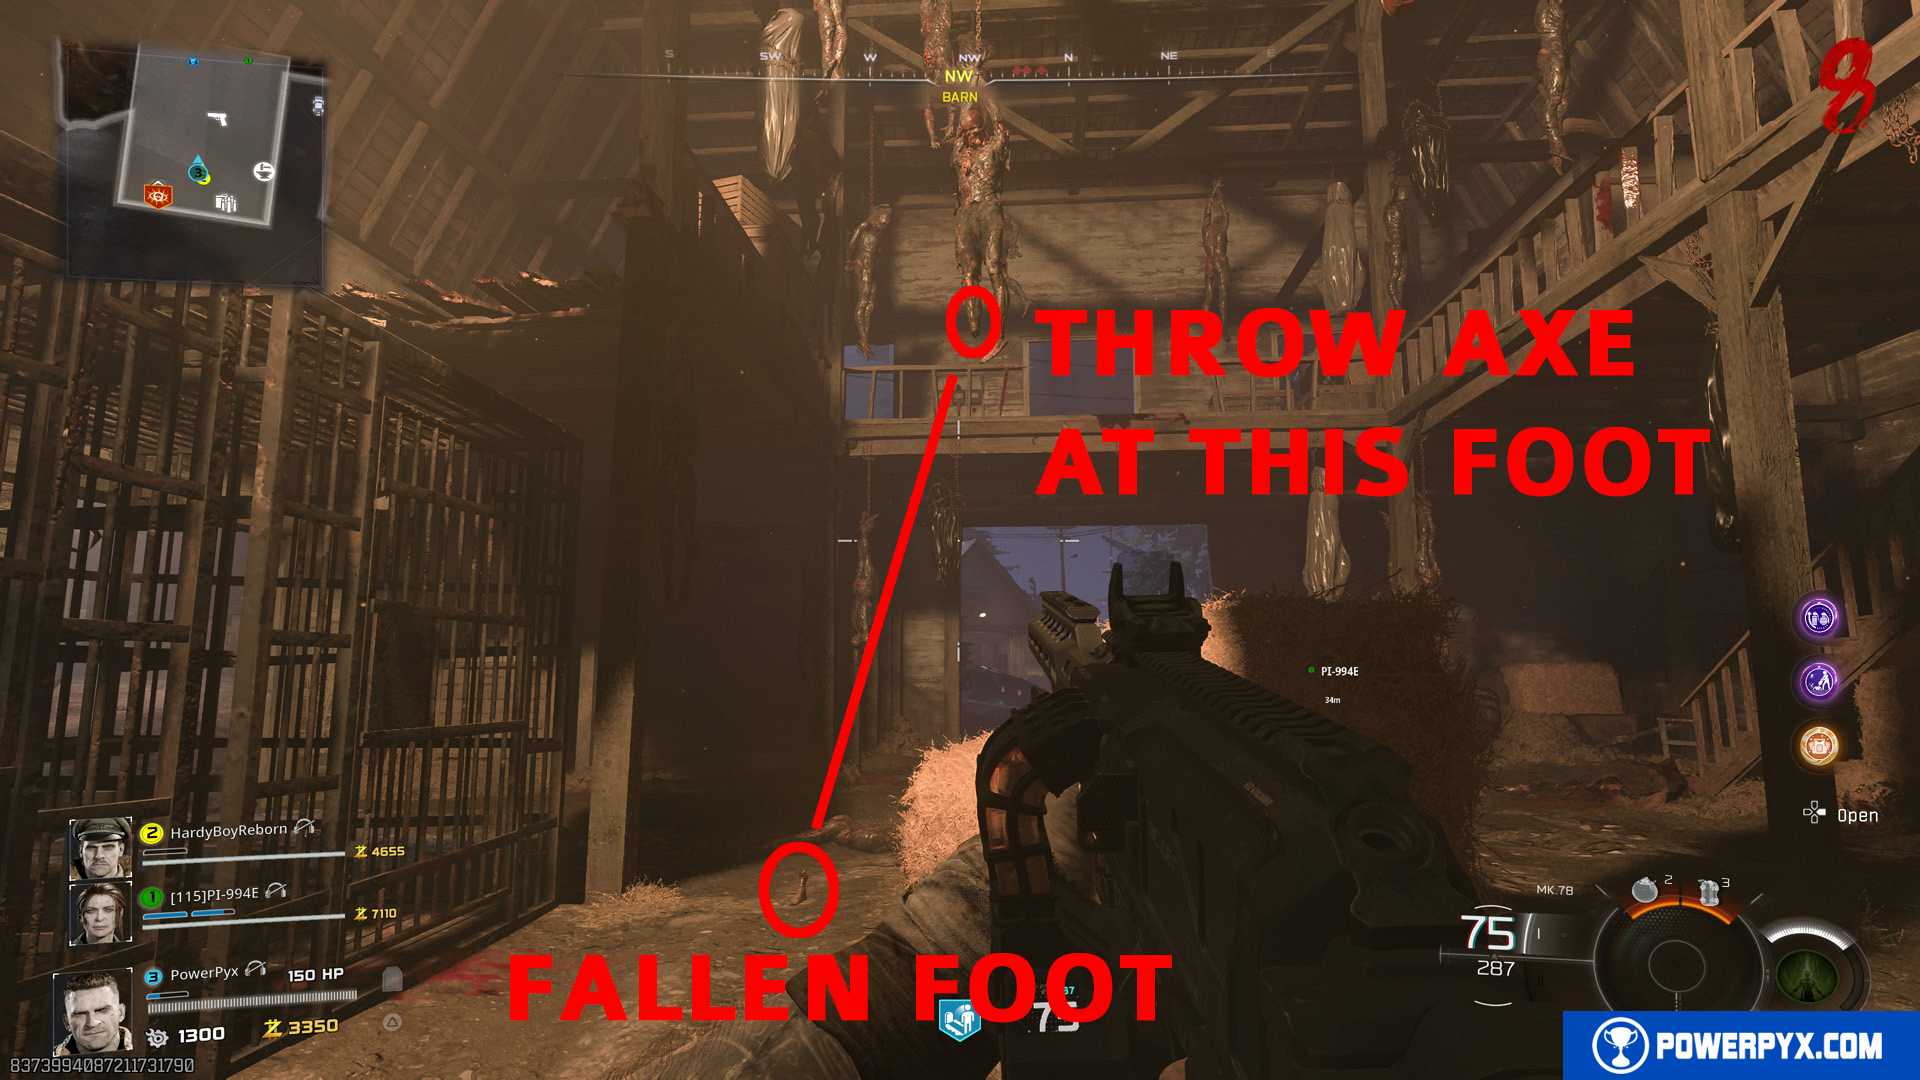
You can find a Combat Axe in the Exit 115 Diner, in the kitchen, or buy it at the crafting table (unlocked at Level 52). If you miss the throw you can pick up your axe again as many times you need.
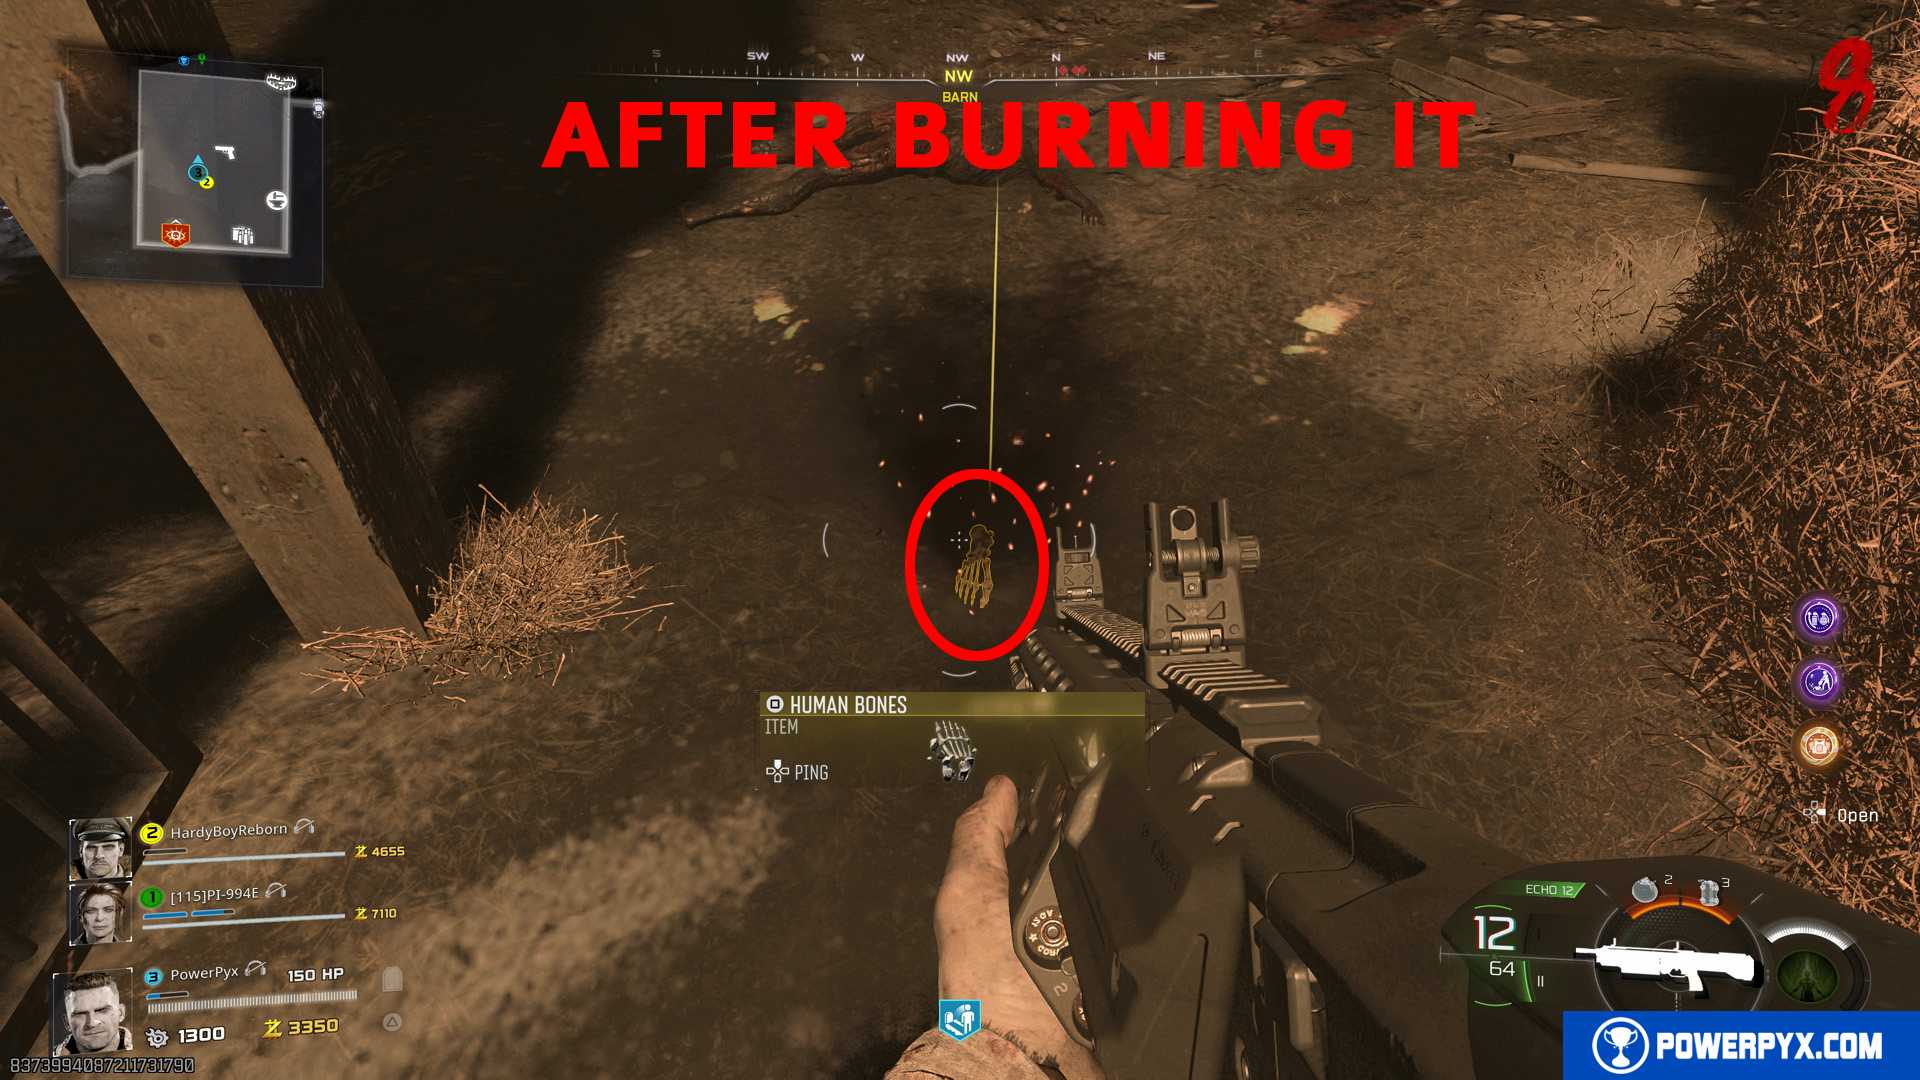
Now throw a Molotov at the foot on the floor. Wait for the fire to stop burning. Then you can pick up the foot for the Human Bones key item.

You can find a Molotov in front of the Garage in Ashwood, or buy it at the crafting table (unlocked at Level 26).
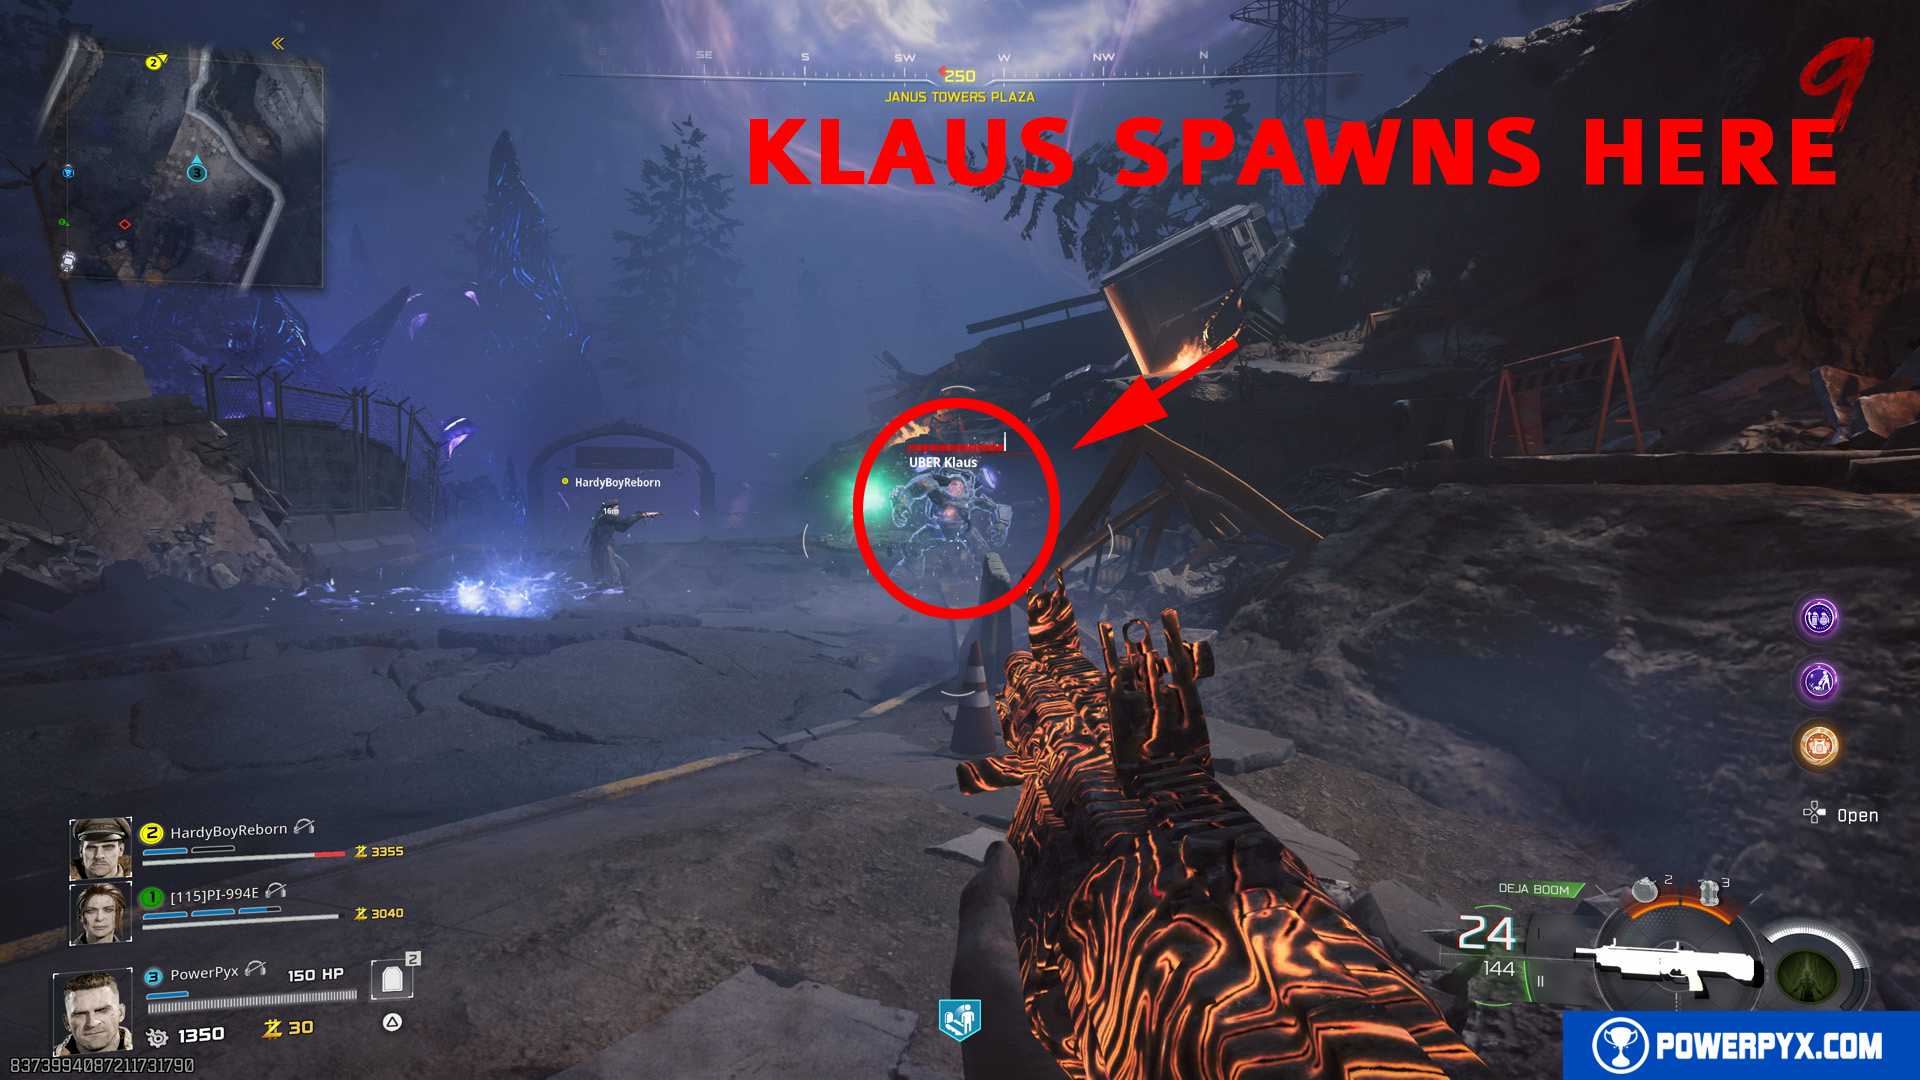
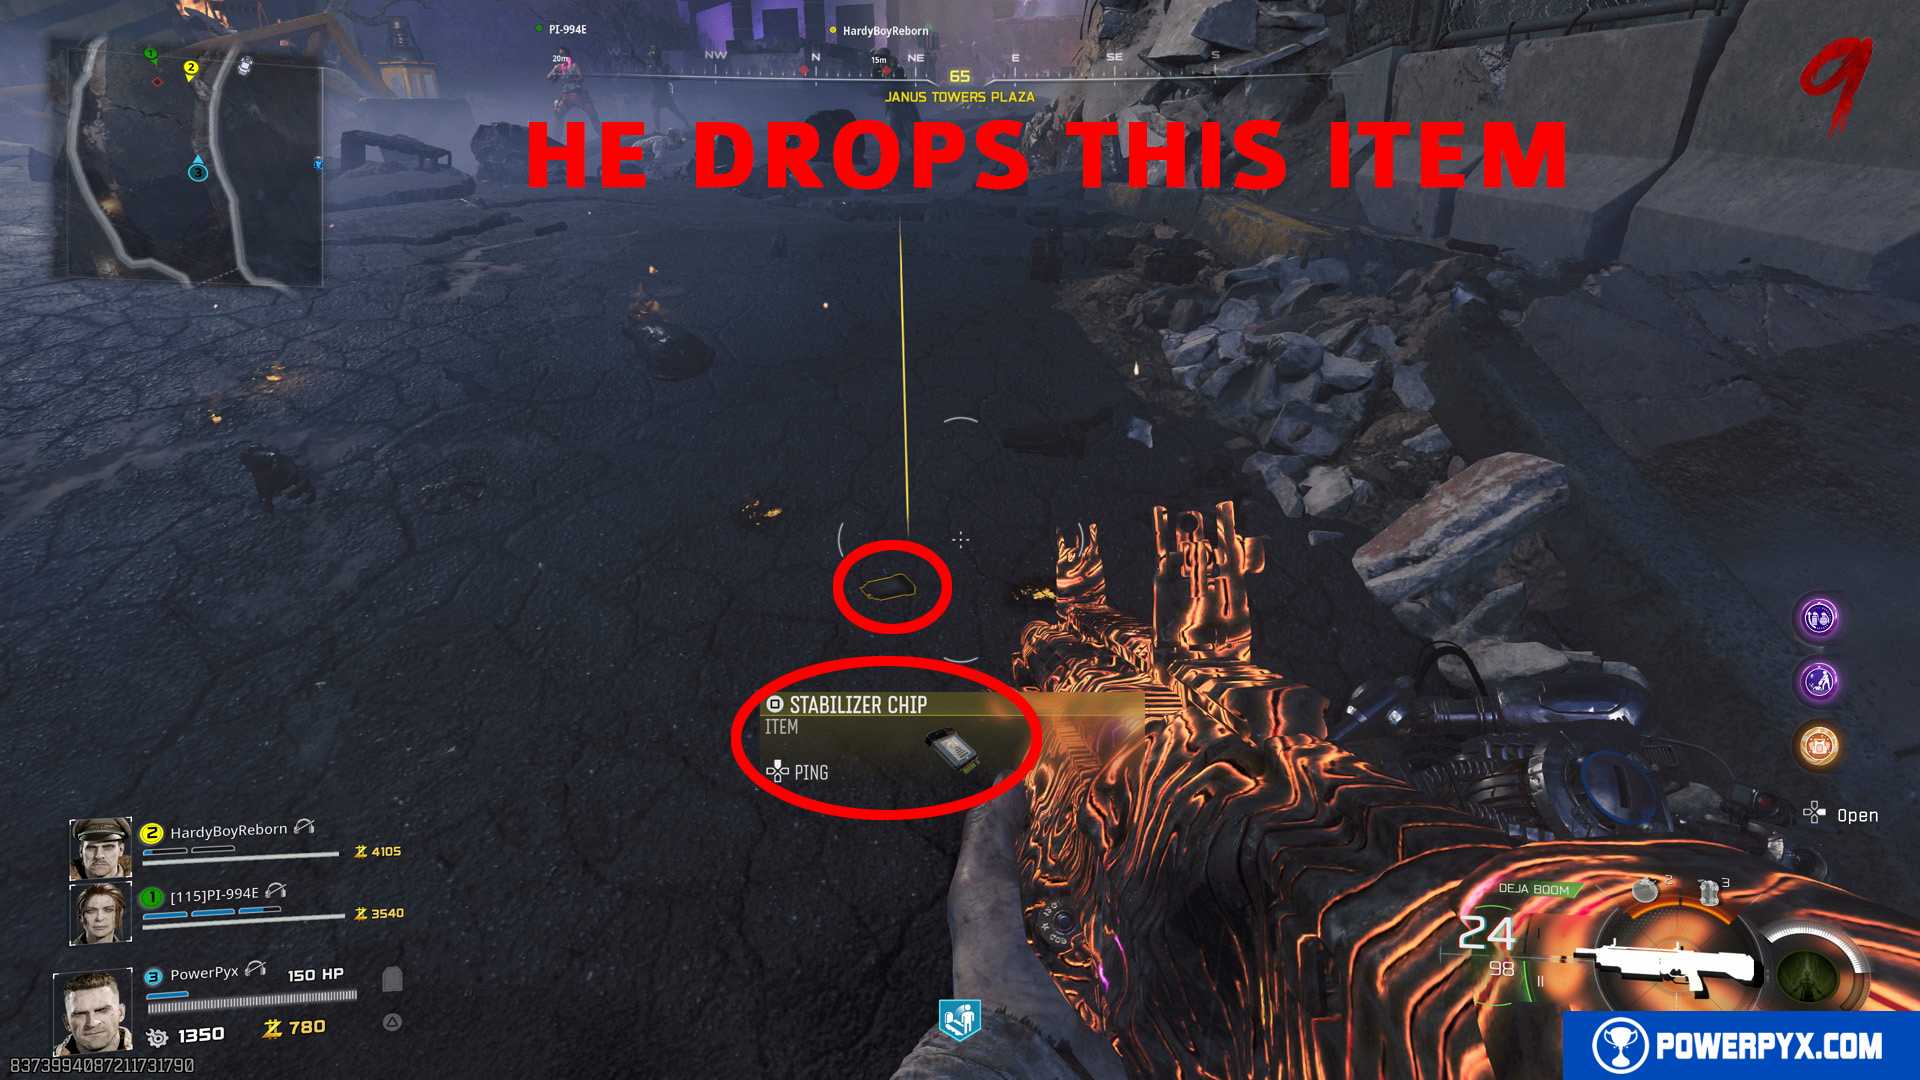
Step 8: Janus Towers Plaza – Defeat UBER Klaus for Stabilizer Chip
At Round 8 or higher, go back to the starting area Janus Towers Plaza. At the west exit of the area, go to the burning truck on the top of the cliffs at the roadside. A boss will spawn here called UBER Klaus, defeat him and pick up the Stabilizer Chip that he drops.
Step 9: Ashwood – Use Stun Grenade to Activate Klaus
Go to Ashwood (garage), use the left zipline and buy the door to the back left house to reach Ashwood Sheriff’s Office. Inside you will see Klaus sitting on a chair in the prison cell. First, look at the panel on the cell and you should see the install prompt / to install the chip you just got. After this, you have to throw a Stun Grenade into the prison cell slightly in front of Klaus to the left. If done correctly, you will see a stun icon over his head and he flies through the roof to escape the cell.
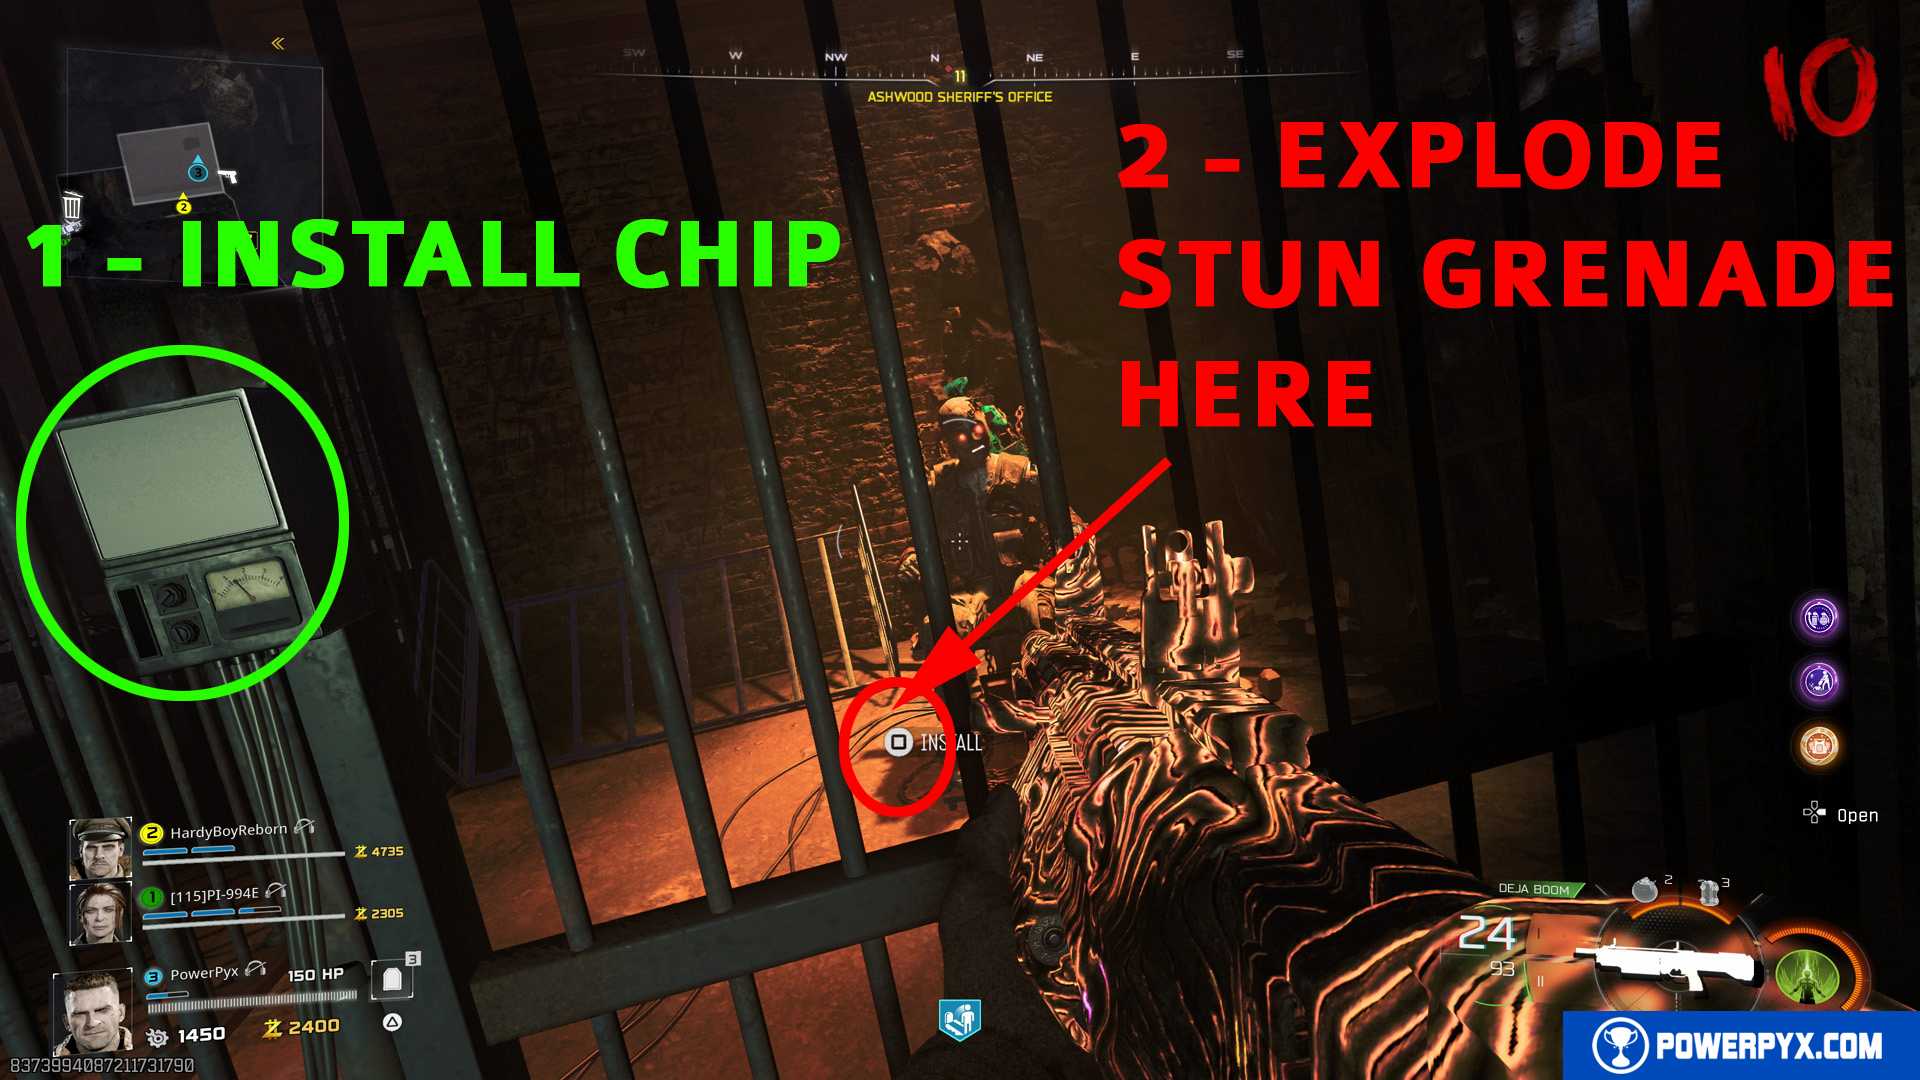
This step is very tricky and can take many tries! Sometimes the stun grenades bounce off and land too far away. The game is very particular with where the stun grenade must explode. What worked for me was to have it explode less than a meter to the left of Klaus (to your left when facing him), slightly in front of him. Throwing it in the back right corner didn’t work. It also helps if multiple players throw stun grenades at the same time.
You can craft Stun Grenades at the Crafting Table. There’s one on the other side of Ashwood area, you can see it on your Tac-Map.
Step 10: Cosmodrome – Have Klaus use the console, defend the red circle
Go to Cosmodrome, the area in the south-east where the rocket is. One of the players should be able to command Klaus by holding  /
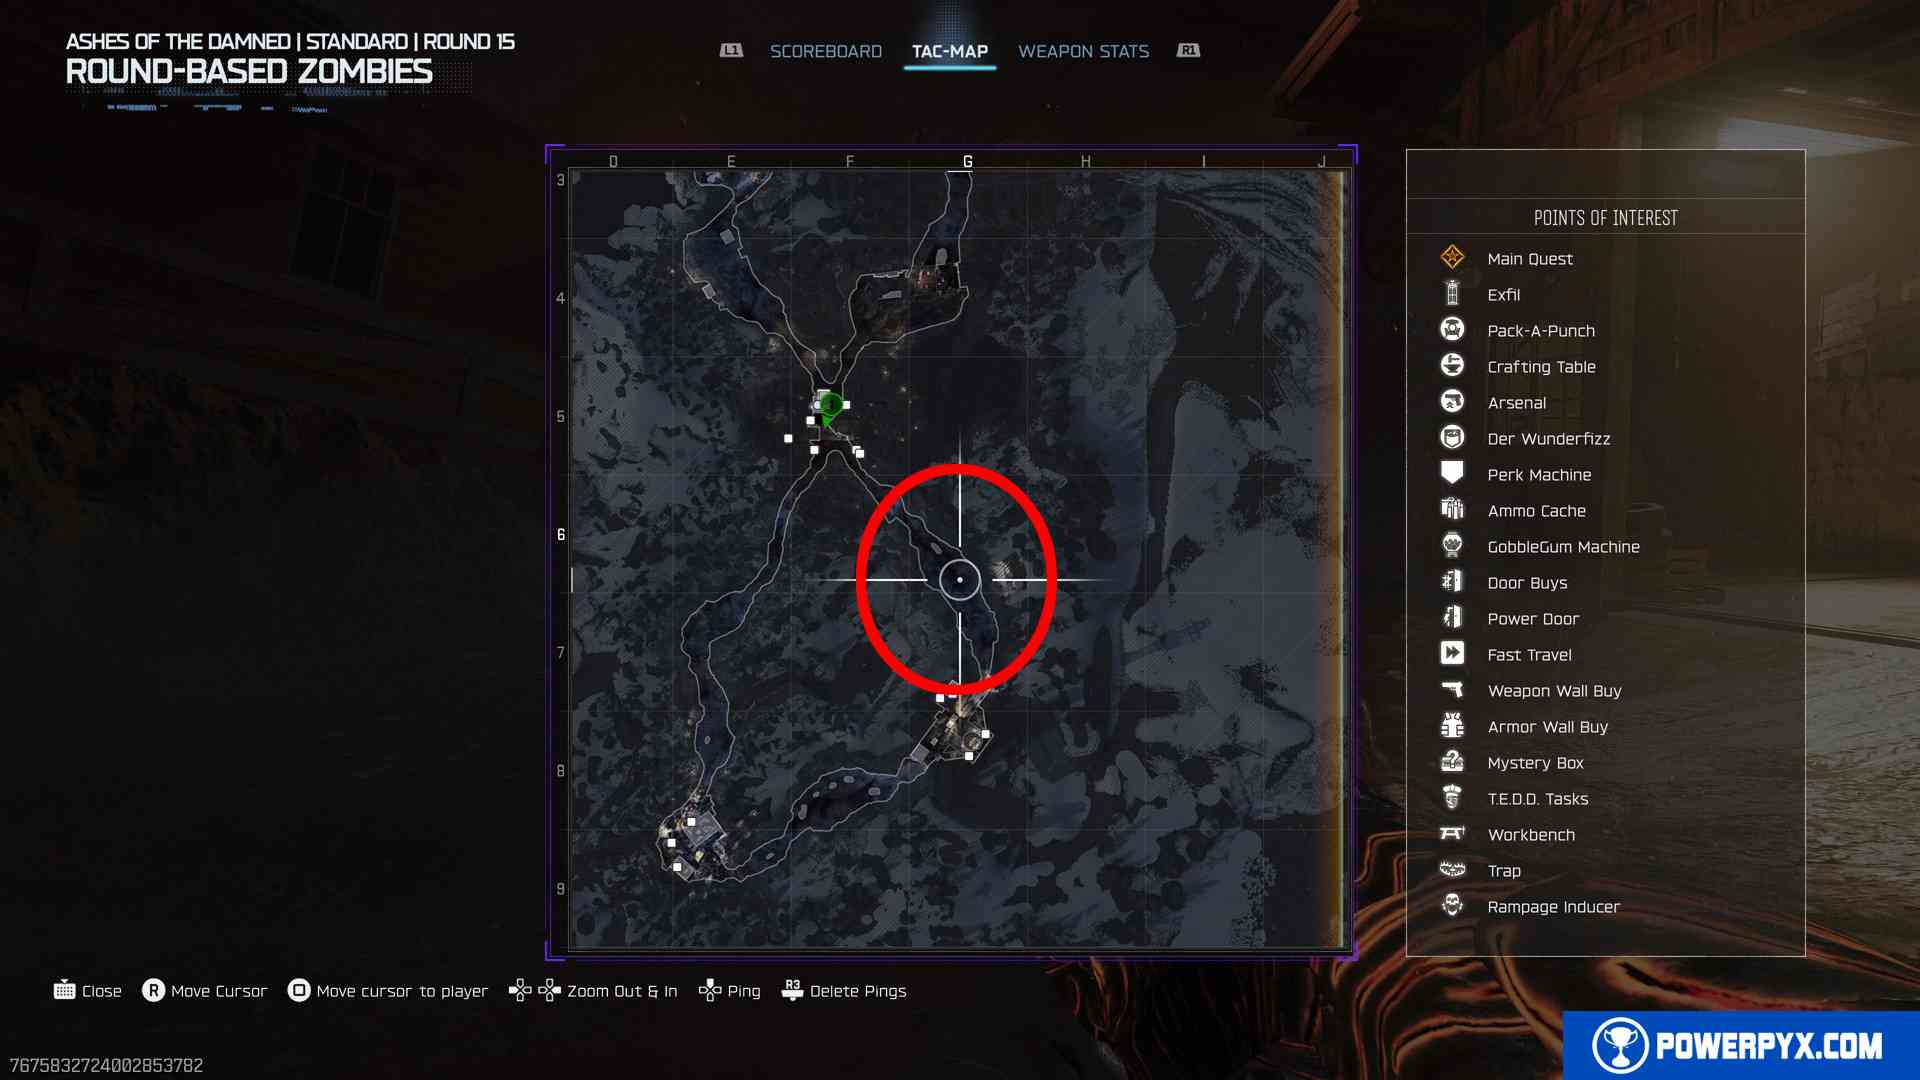
/  . He will follow you around. After a while he disappears. If you can’t command him or he disappeared, use the small radios that now spawn across the map to summon him again. For example, one such radio is at Cosmodrome in the upper area to the right of Wisp Tea perk, you can see it on the Tac-Map.
You must buy the path that leads downstairs. Then command Klaus to stand in front of the computer console. He will stomp on the ground which activates the console. The glass panel on the wall will come down and a red circle appears on the ground in front of it. If not, try holding (PS) / (XB) on that same console to flip the light from green to red. Then a camera above the console will beam a red circle on the ground.
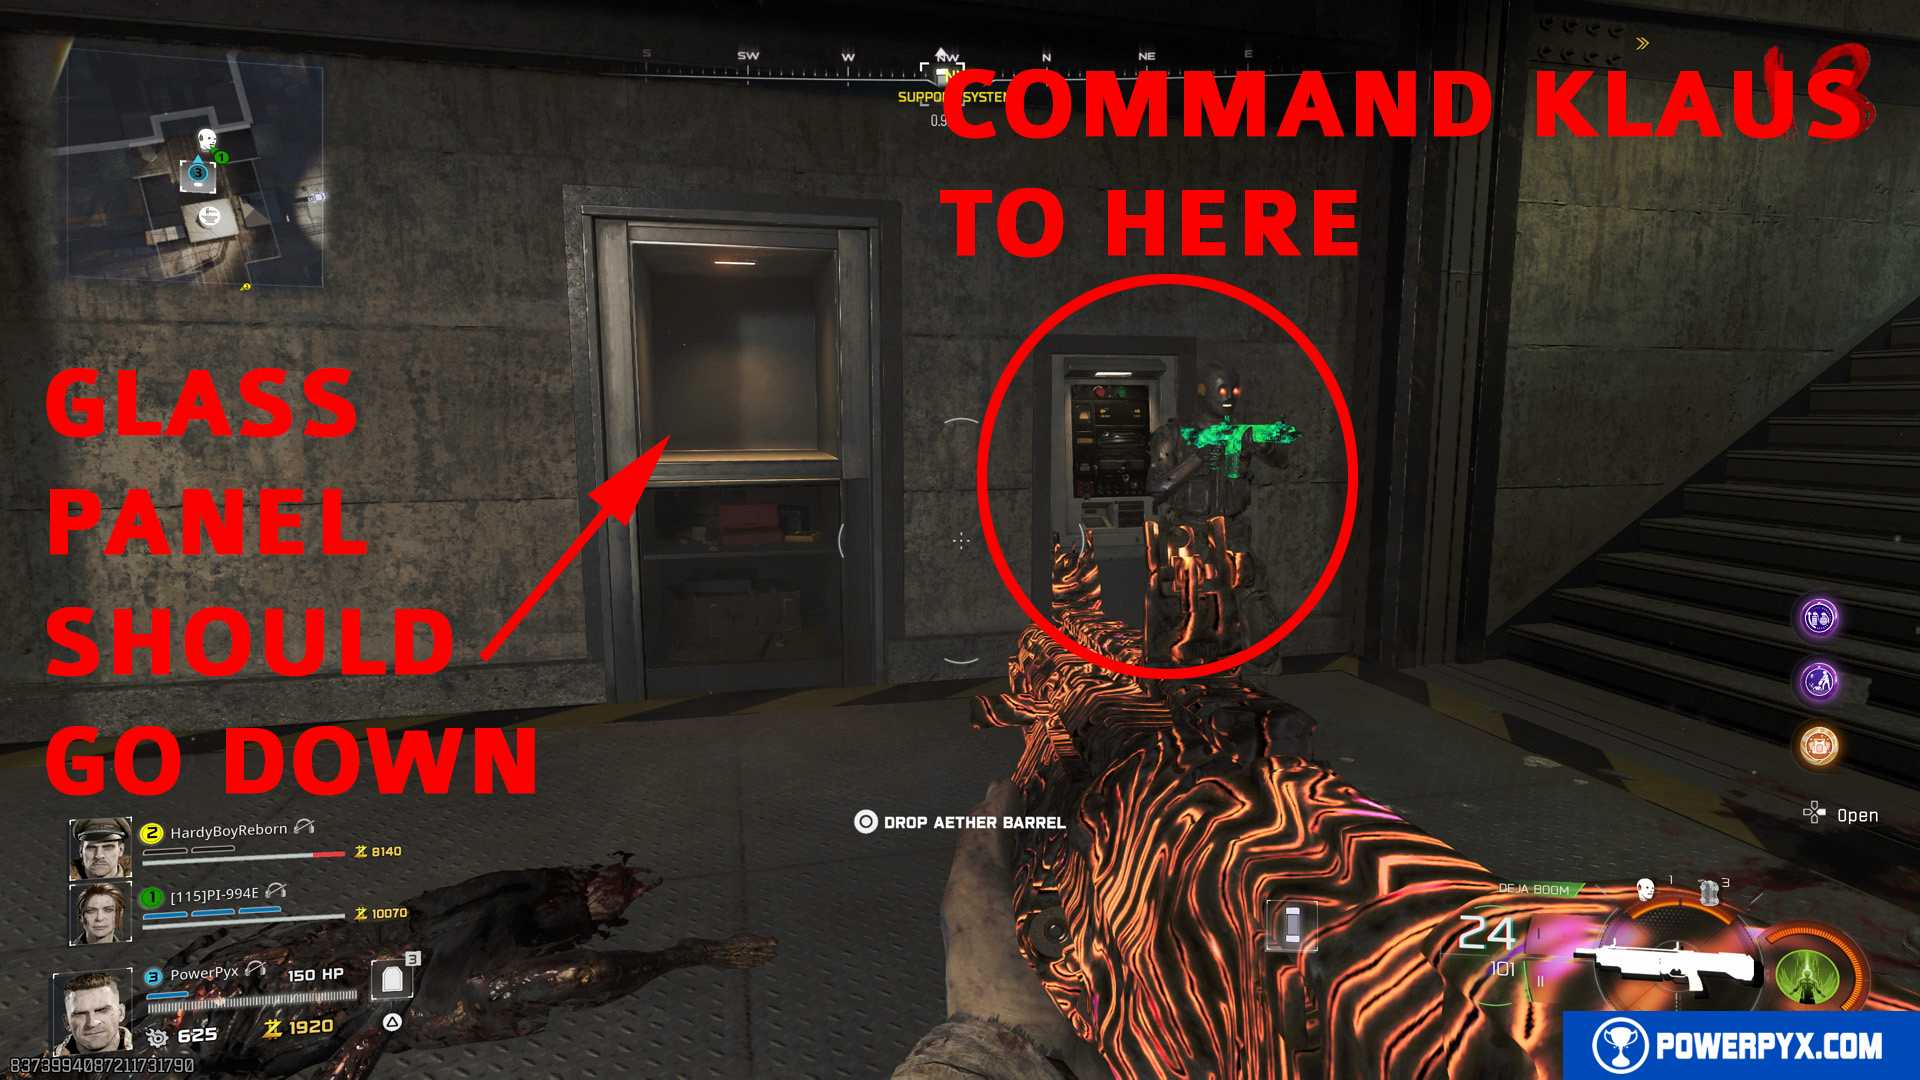
One player must stand in the red circle and defend it from the purple-eyed Zombies that spawn. After defending for long enough, you can take the Aether Barrel from behind the glass panel by holding / on it. Only ONE player should stand in the red circle, the others should stay outside of it and defend the player in the circle. If multiple players stand in the red circle it may not work. If the red circle disappears and you can’t take the Aether Barrel, then you must retry it next round, but you don’t need to call Klaus again for it, just interact with the green/red light on the console and it should spawn the red circle again.
Step 11: Charge Aether Barrel
You must now carry the Aether Barrel and charge it at all 3 power generators. These are the ones where you shot the growth to turn on the power switches earlier. The only optional one you might not have activated yet is in Blackwater.
- In Blackwater (the cabin in the north-west)
- In Ashwood
- In Vandorn Farm
Each time the player carrying the Aether Barrel must hold / on the slot on the front of the power generator. Then the Aether Barrel goes into the power generator, in the top left you’ll see the charge progress “Refined Energy Extraction“. When fully charged, take it out of the Aether Barrel and bring it to the next generator. This step is time-sensitive! You must be quick to bring it to the next power generator, a timer will go down in the top left corner. If you take too long the Barrel will discharge and you must charge it again! Use the car to get around quickly. The player with the Barrel will walk slowly.
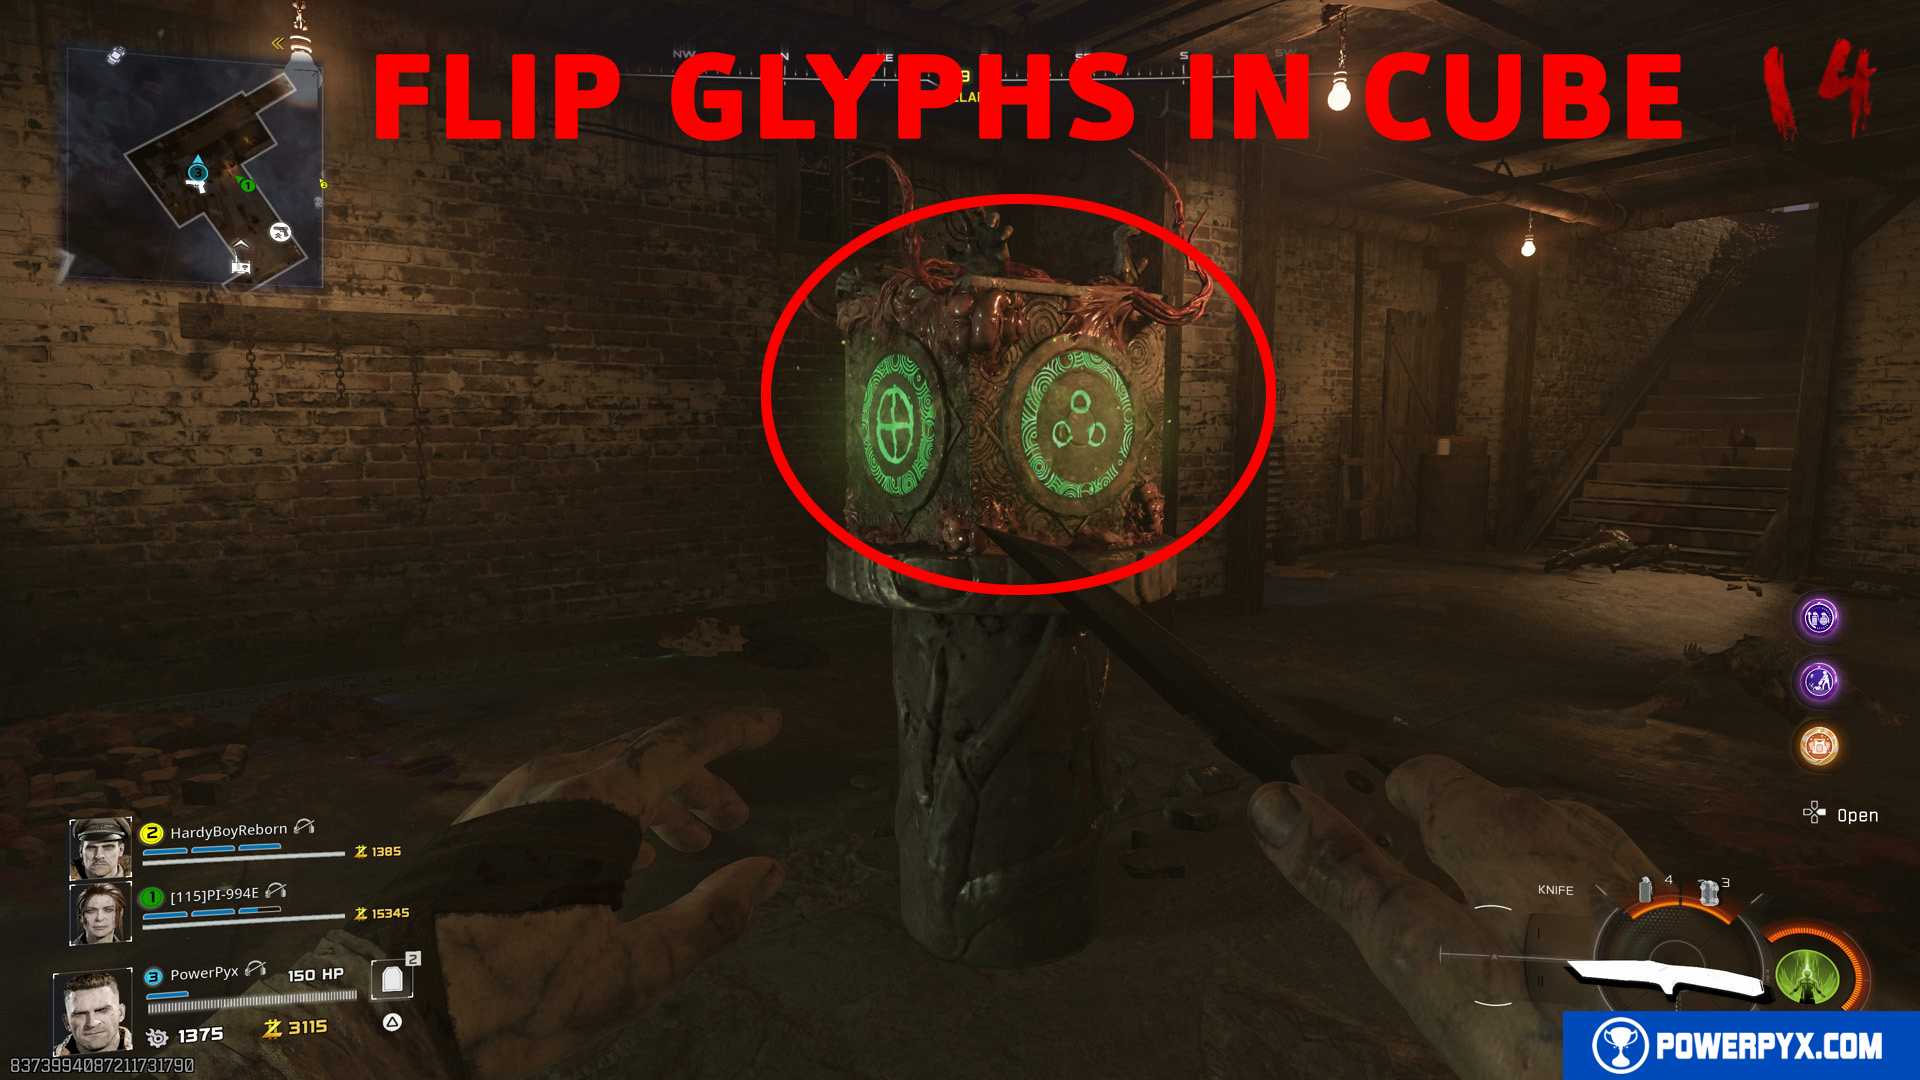
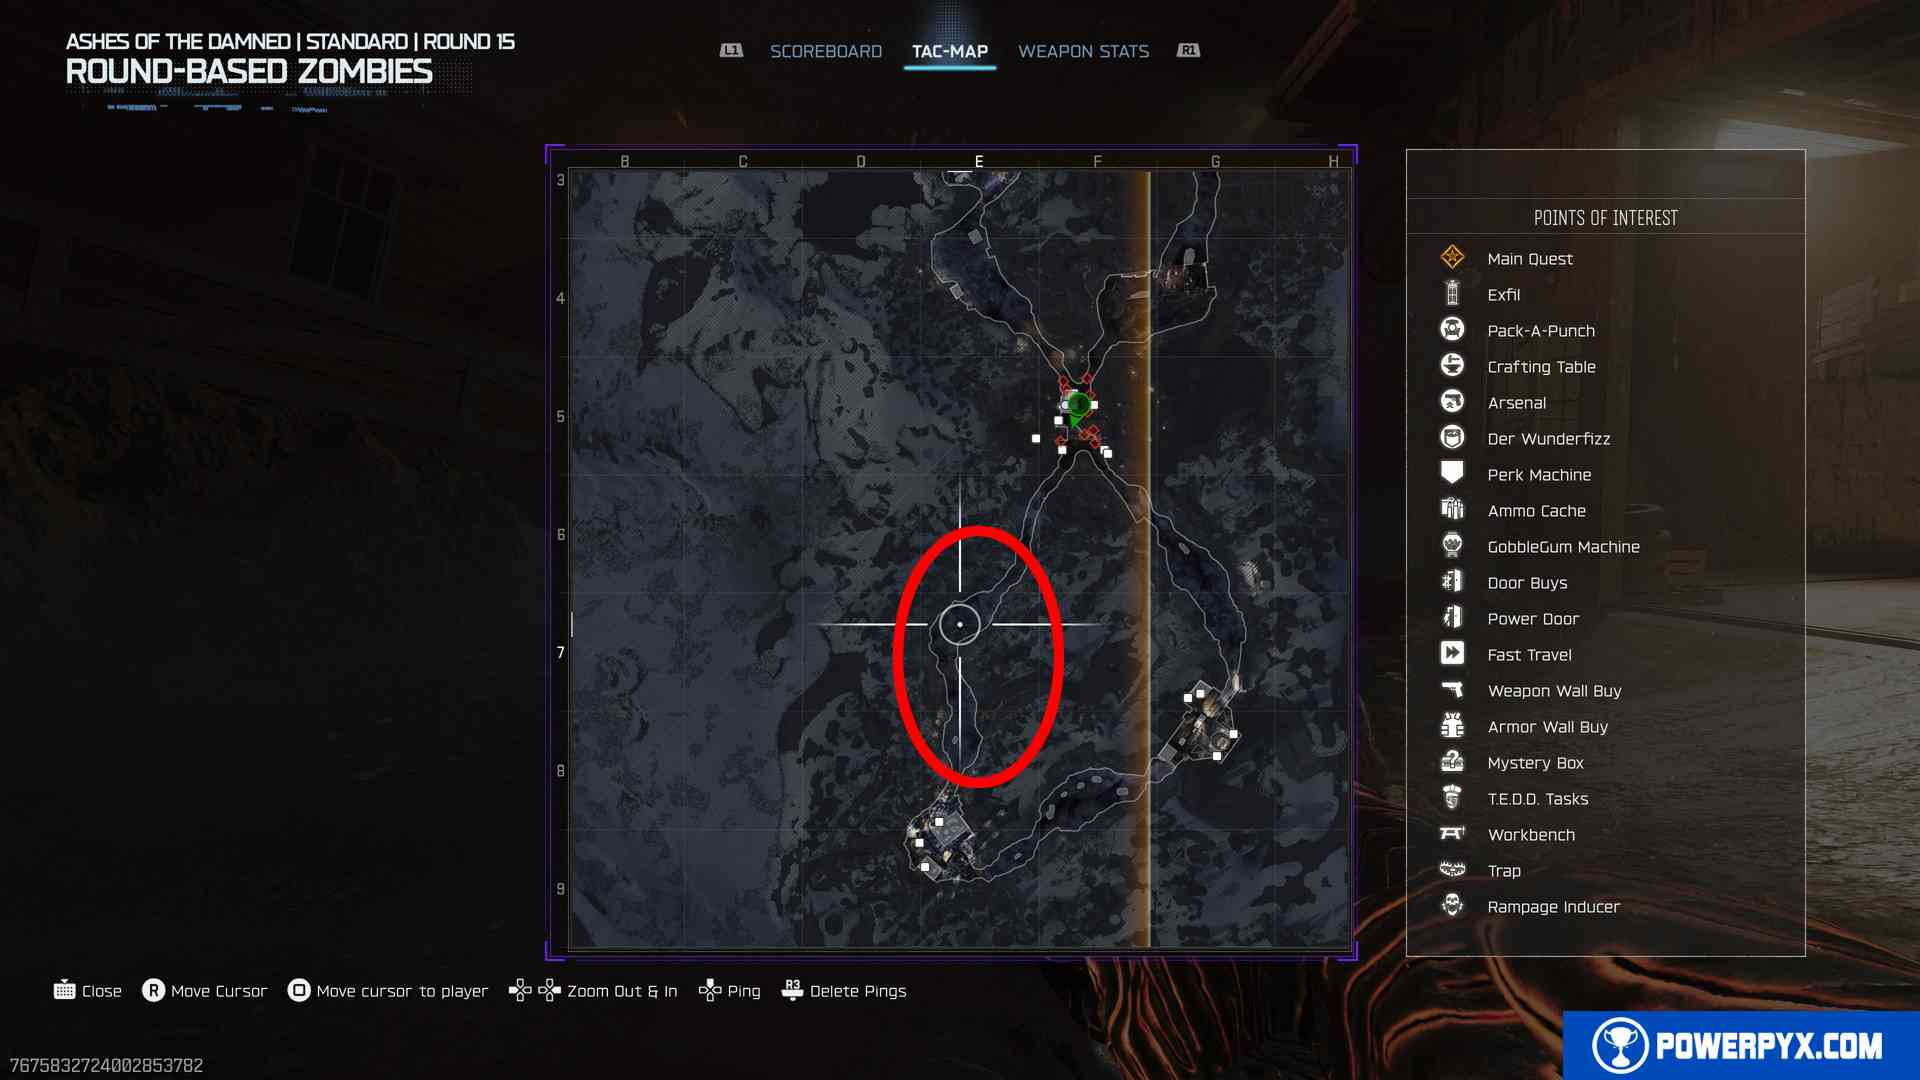
Step 12: Vandorn Farm – Bring charged Aether Barrel to Wonder Weapon Cube
In Vandorn Farm enter the cellar (below the barn/house). There is a cube here, you must deliver the fully charged Aether Barrel to it within 1:45 minutes of fully charging it. Drop the Aether Barrel in front of the eye on the cube. The cube then activates and shows glowing green icons.

Step 13: Vandorn Farm – Insert correct Glyph Icons into Wonder Weapon Cube
You must now input the 3 correct icons in the wonder weapon cube from the previous step. The correct icons will be different every game! You find the correct icons by using the Jump Pad from Vandorn Farm to Janus Towers Plaza (the green pad near the front gates). While in midair, look at the rooftops of Vandorn Farm and save a video clip of screenshots of it or try to remember them (on PS5 you can press share button, save last 30 seconds and watch it back). You will see 3 red glyph icons on the farm rooftops. These are the icons you must insert into the cube.
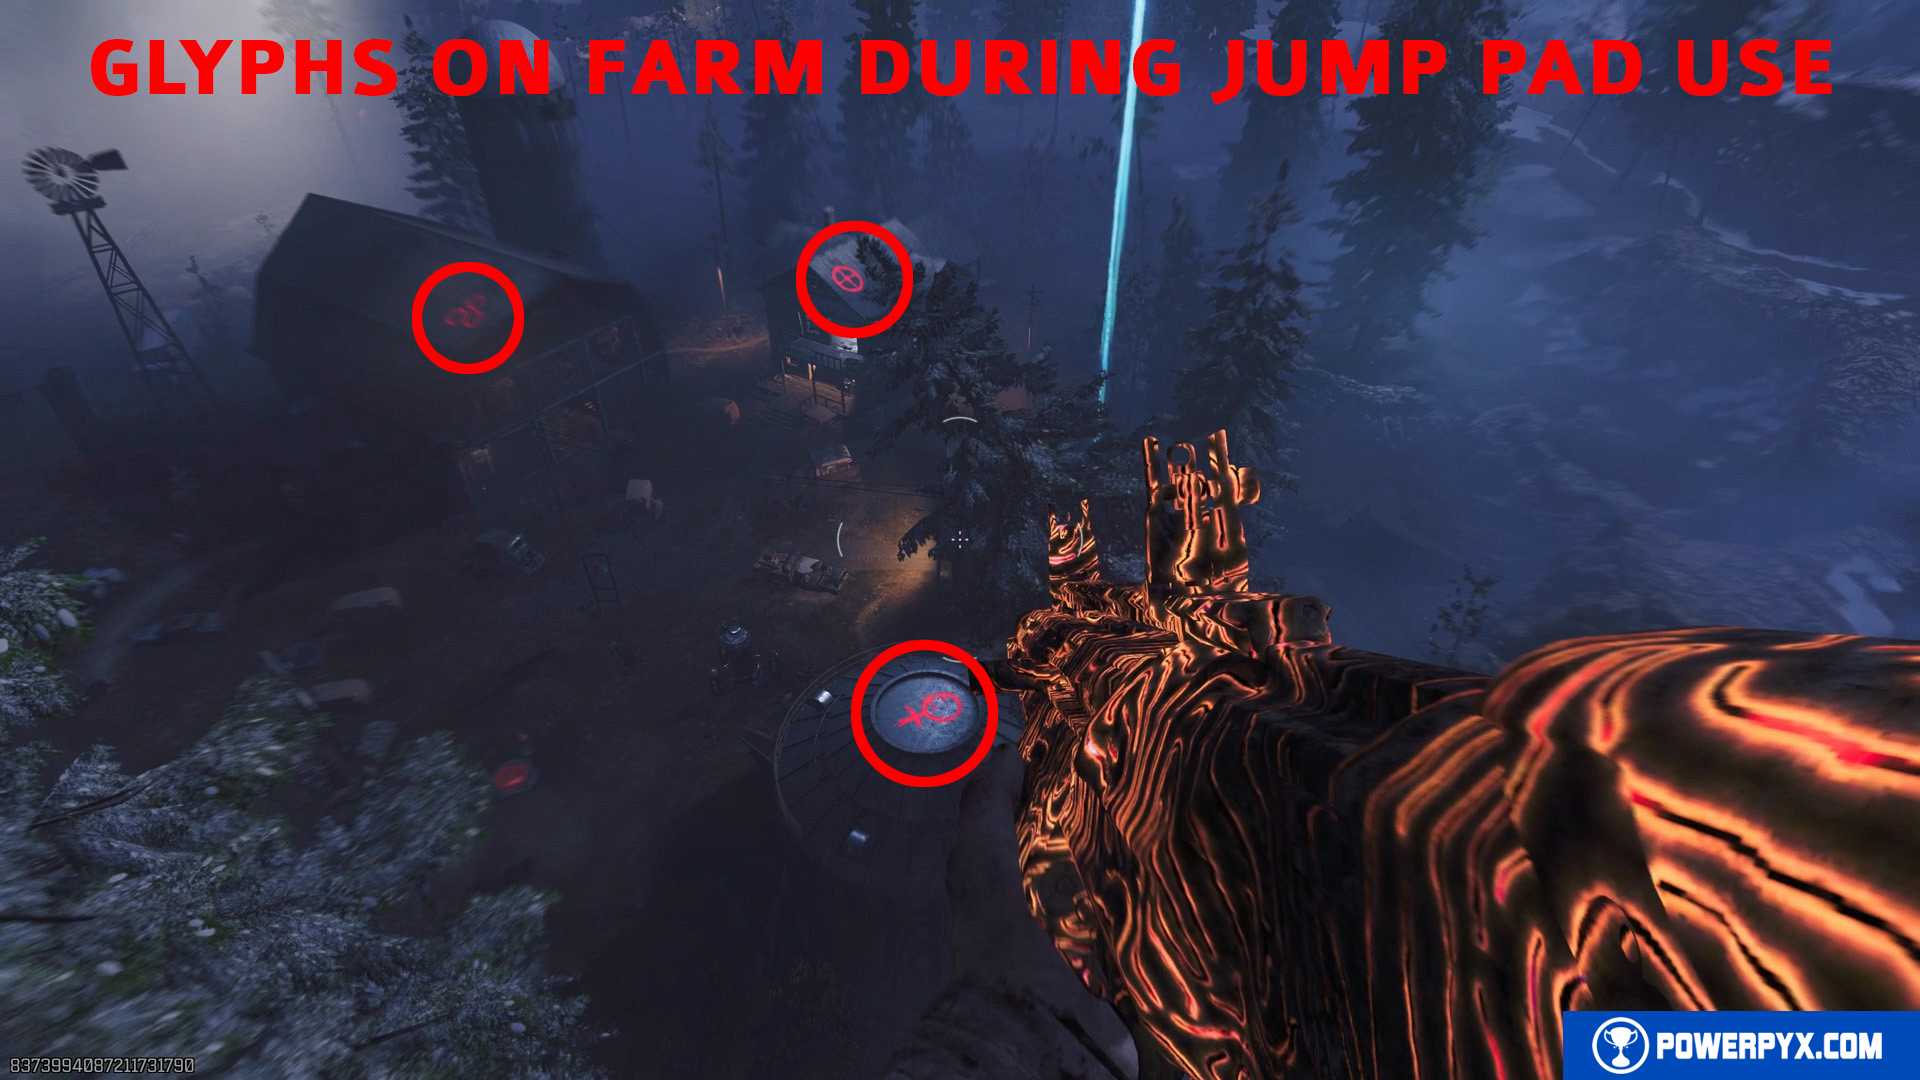
Flip through the icons on the cube until you get the correct 3. If you don’t remember the icons you can use the jump pad again. Then interact with the eye on the cube and the Necrofluid Gauntlet (Wonder Weapon) will come out of it. Pick it up.
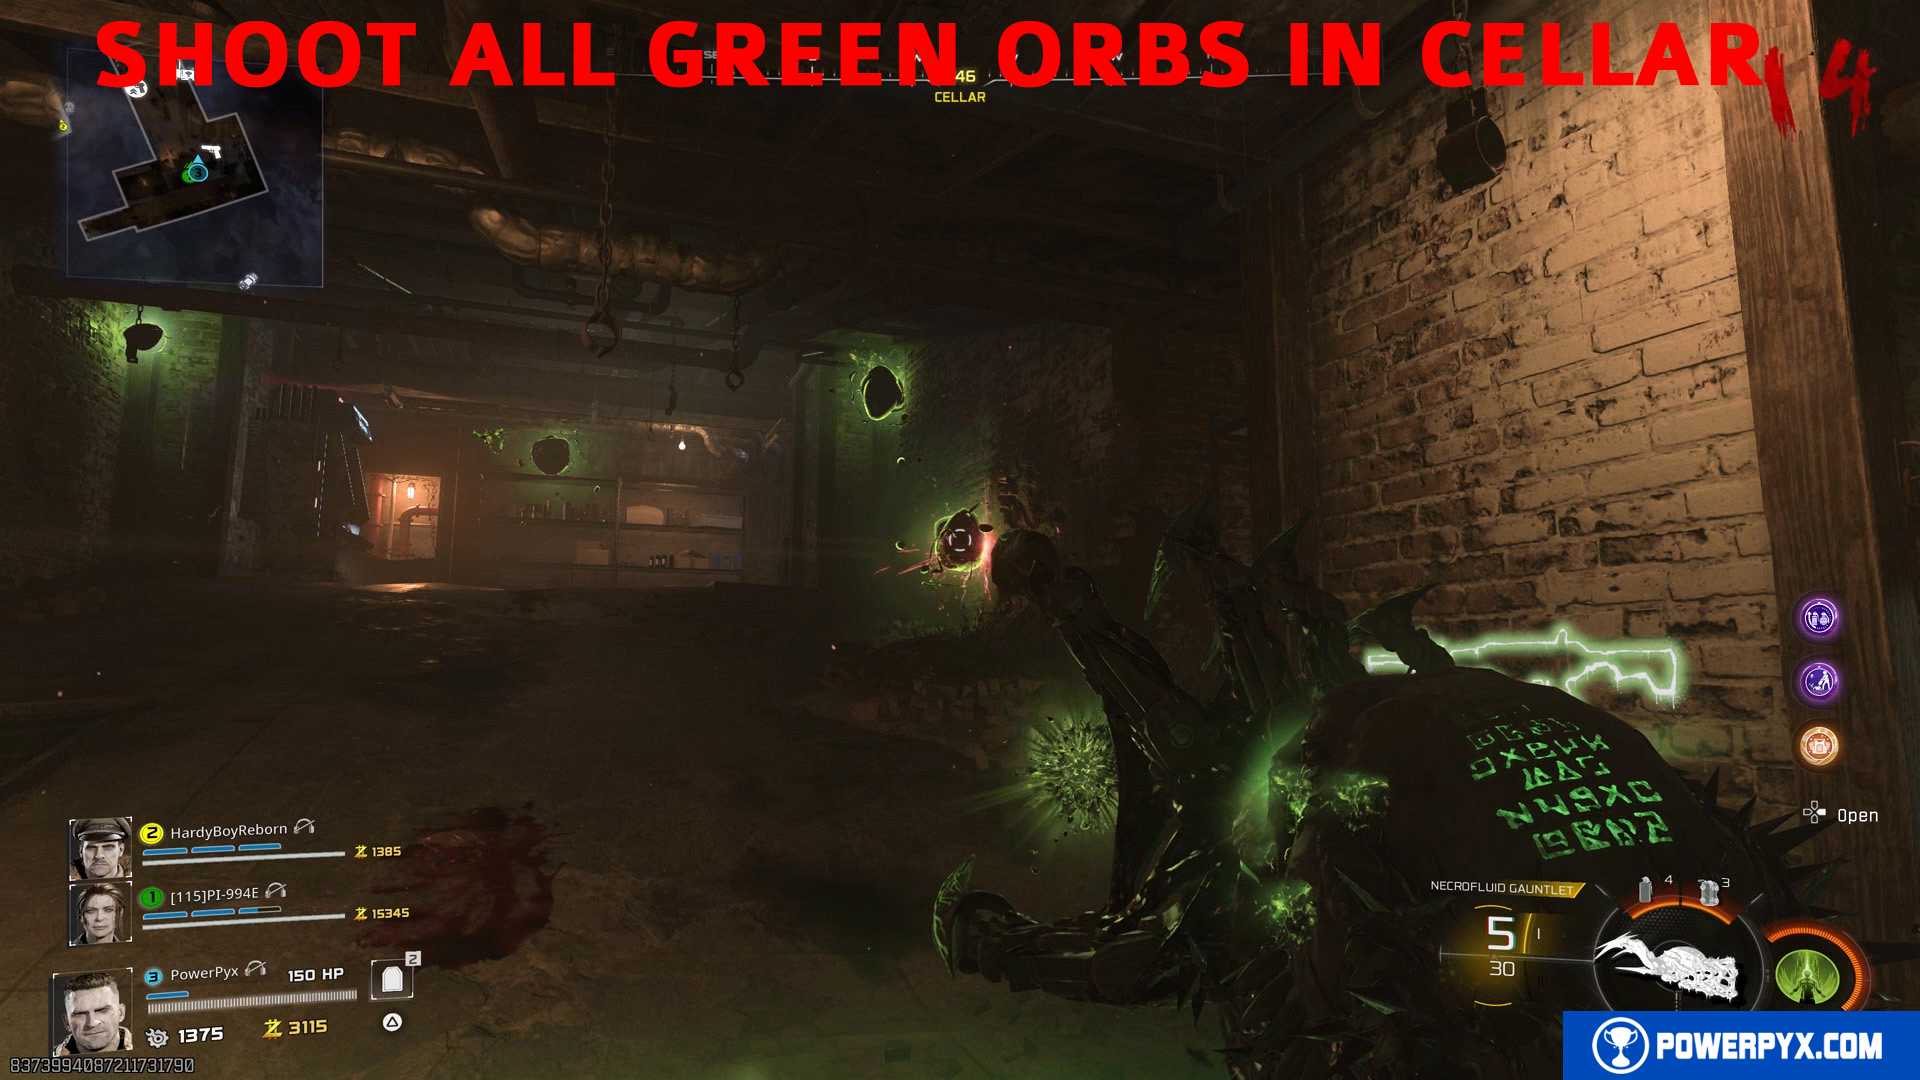
Step 14: Vandorn Farm – Shoot Green Orbs with Necrofluid Gauntlet in Cellar
Immediately after grabbing the Necrofluid Gauntlet, green orbs will appear in the cellar. Shoot them with the Necrofluid Gauntlet, then reload with / to suck them in. You must destroy all green orbs this way.
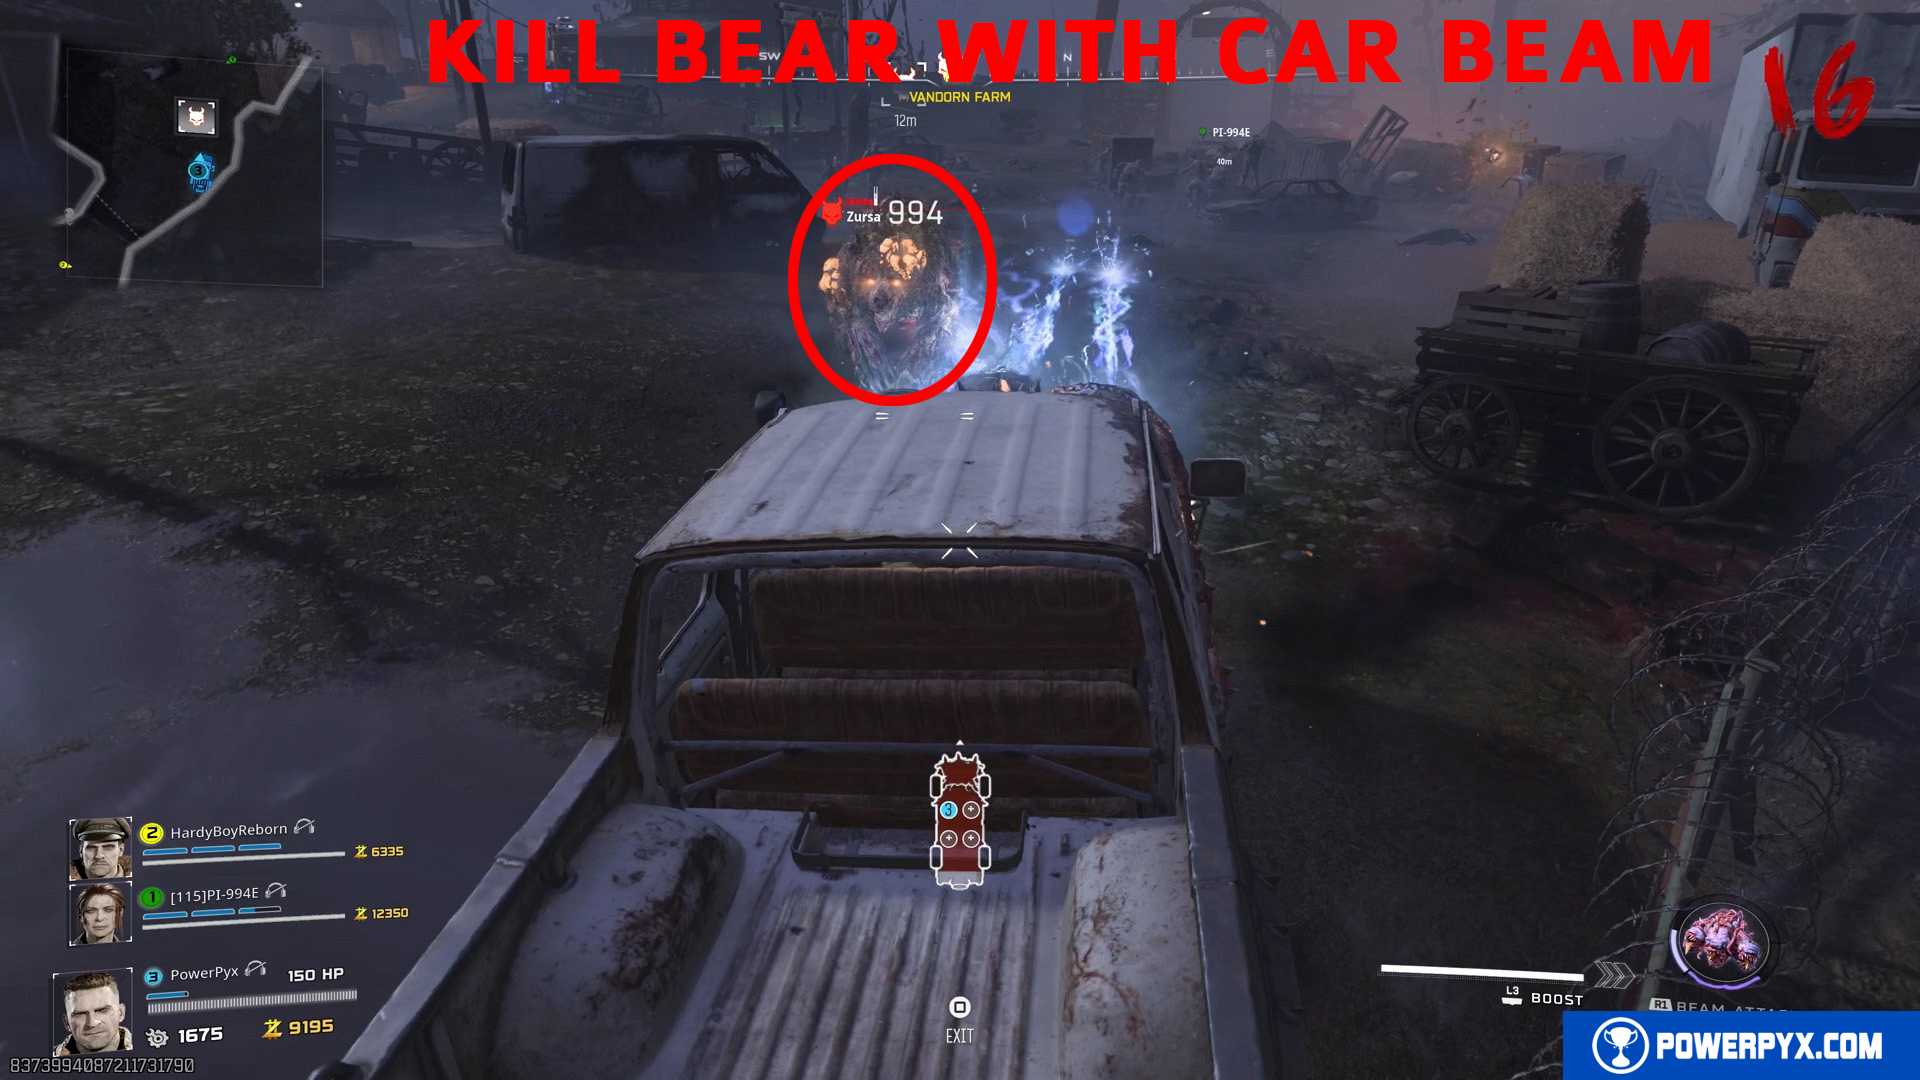
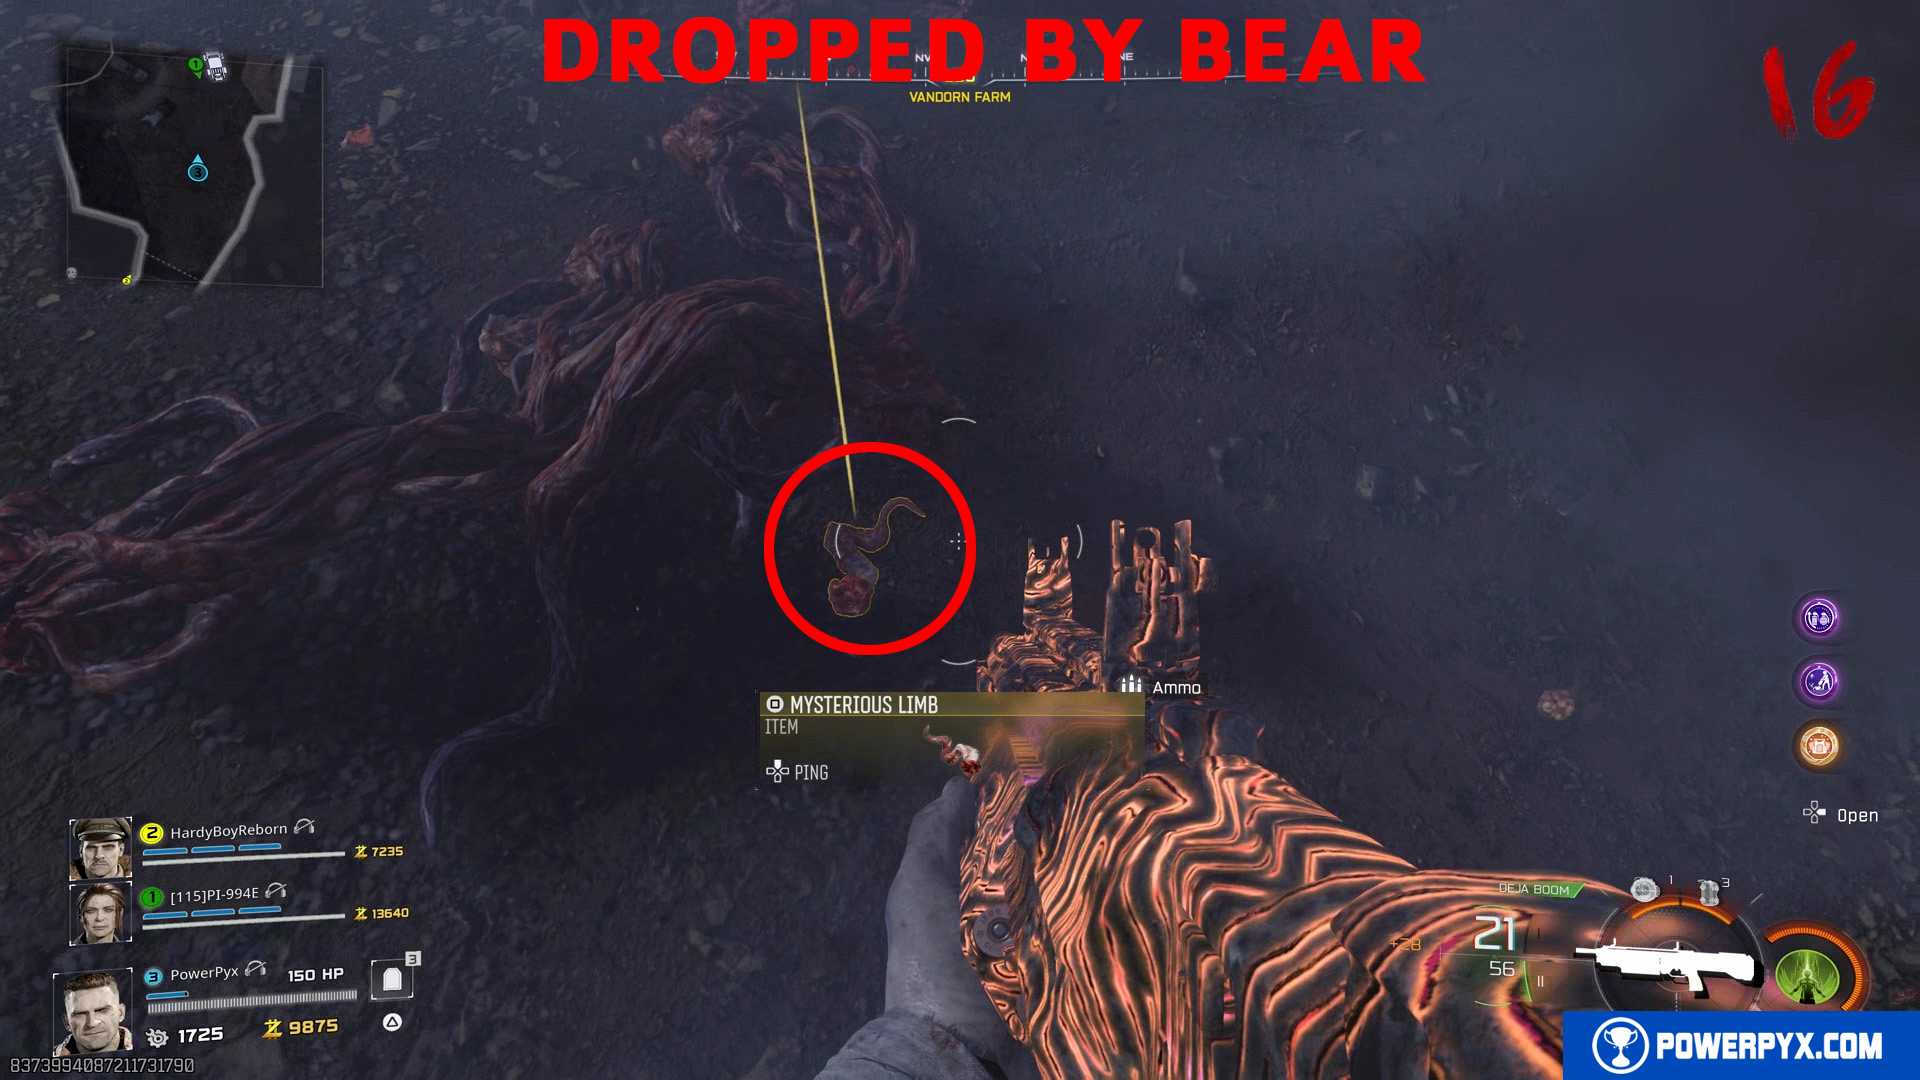
Step 15: Vandorn Farm – Kill Bear in Round 16 with the Car’s Beam Attack
Play to Round 16, then a bear spawns on the road at Vendorn Farm. You must use the car’s / Beam Attack to kill the bear. Then it drops the Mysterious Limb key item, pick it up.
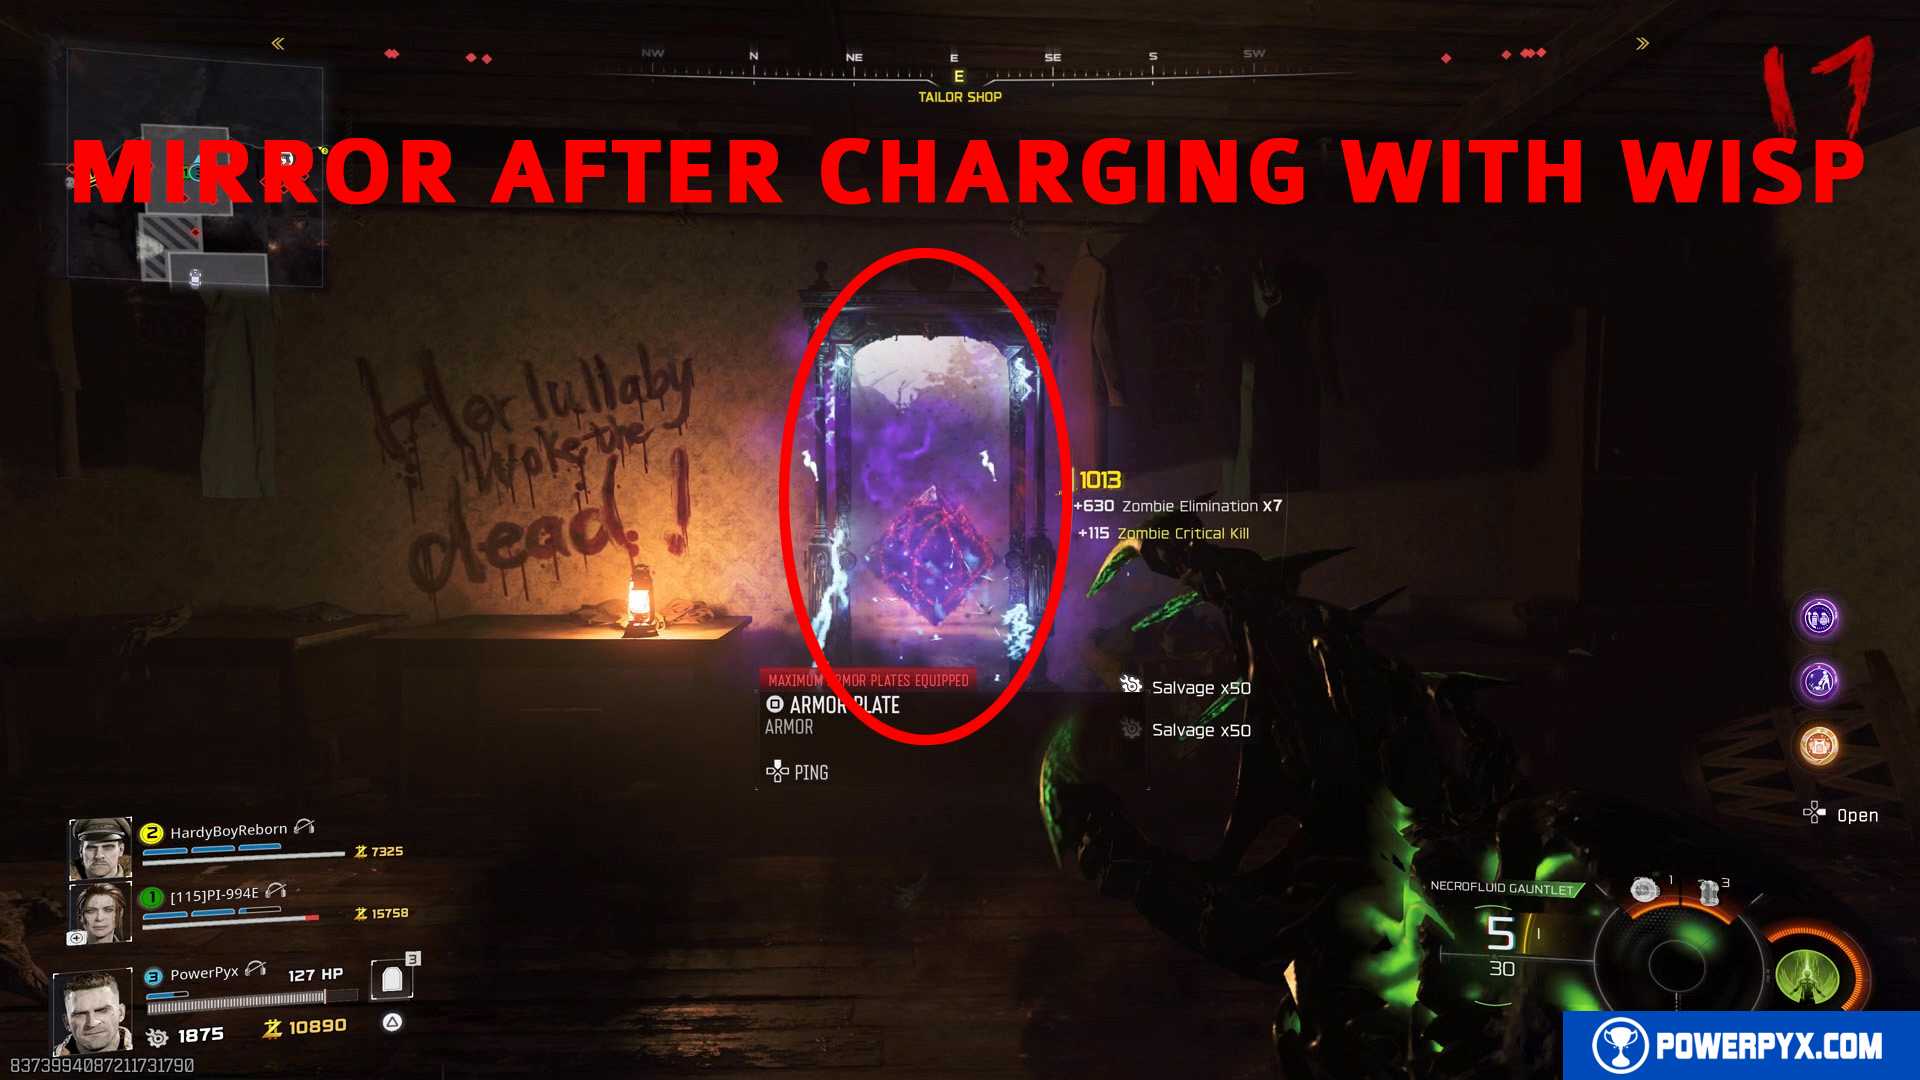
Step 16: Ashwood – Break the Mirror
For this step you will need the Wisp Tea Perk. You buy it from the Perk Machine in Cosmodrome area (the rocket in south-east).
Once you have it, go to Ashwood, use the ascender zipline on the left side and enter the Tailor Shop. There’s a mirror in the left corner of this building that will cause you damage when standing in front of it. You have to kill Zombies near the mirror until you trigger the Wisp Tea Perk.
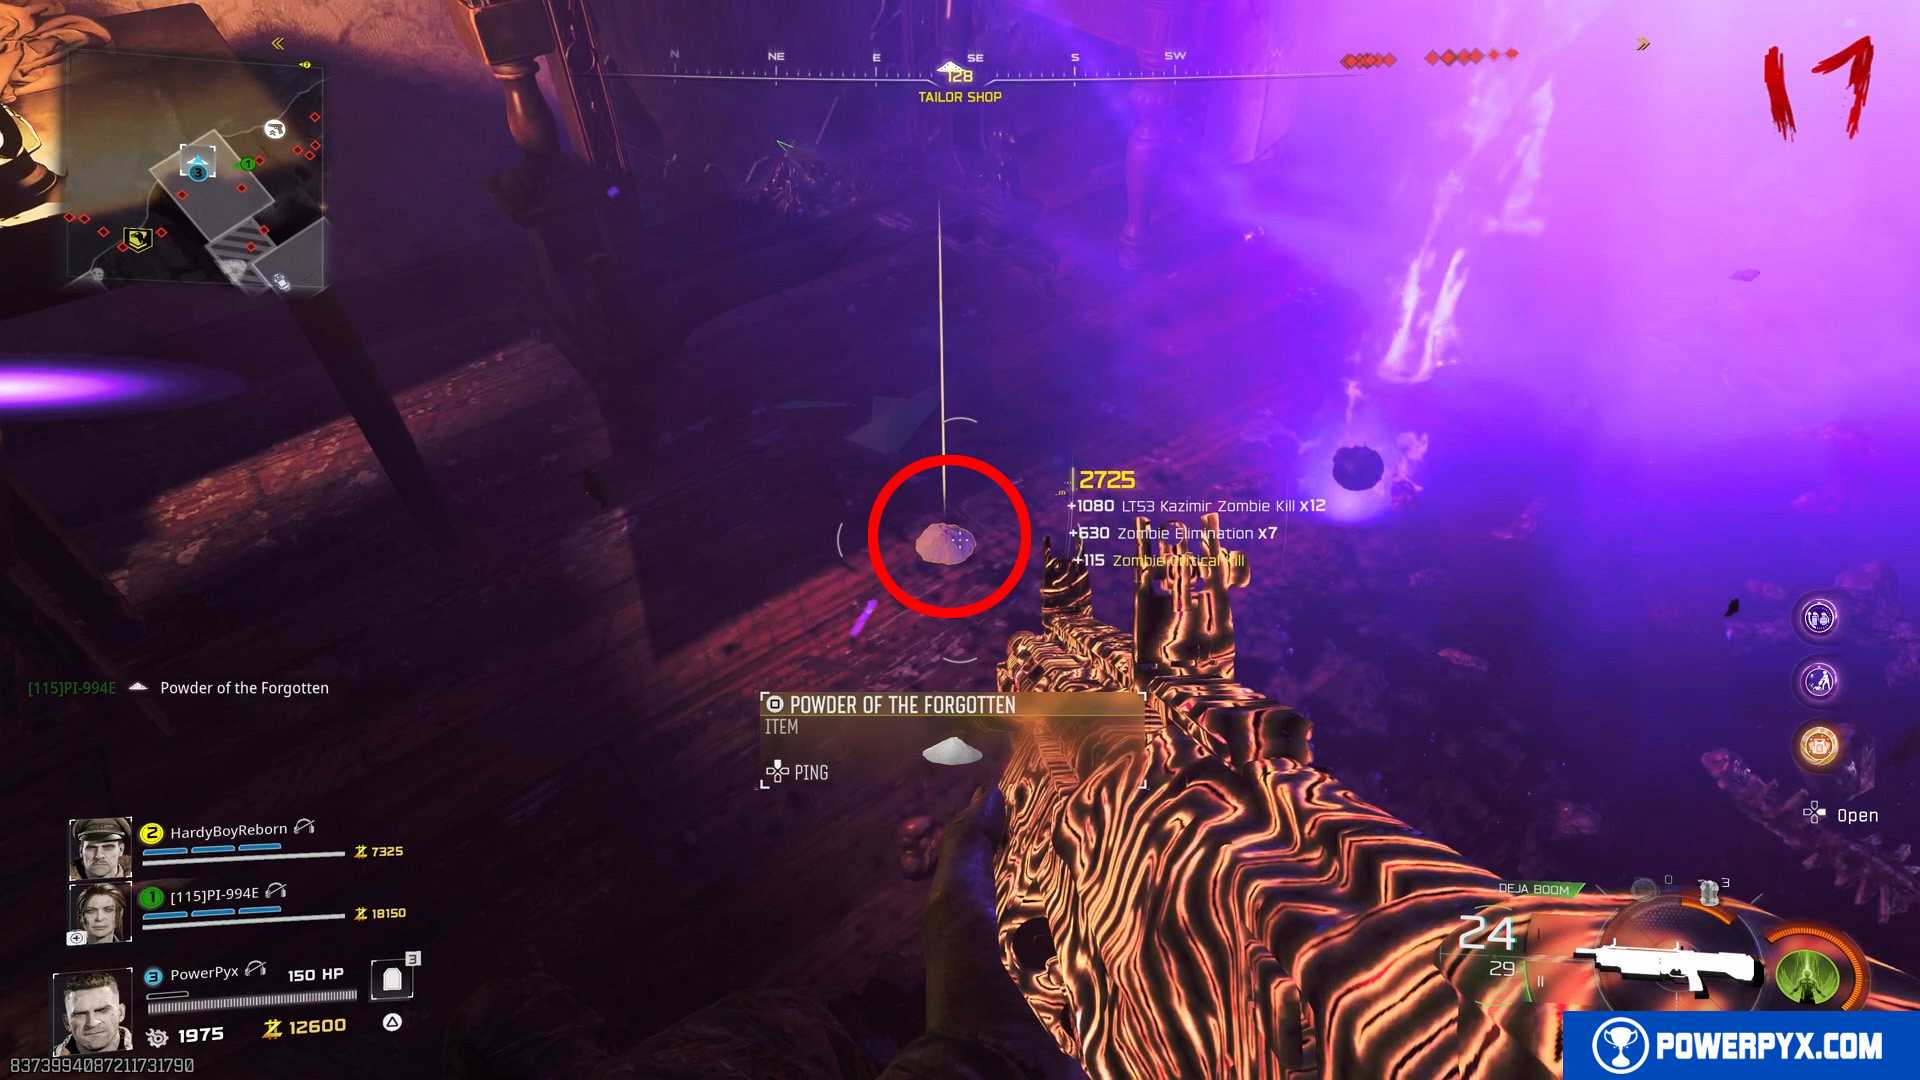
The mirror then changes to show an image. Shoot the mirror with the Necrofluid Gauntlet. The mirror will break and it drops the Powder of the Forgotten on the floor, pick it up.
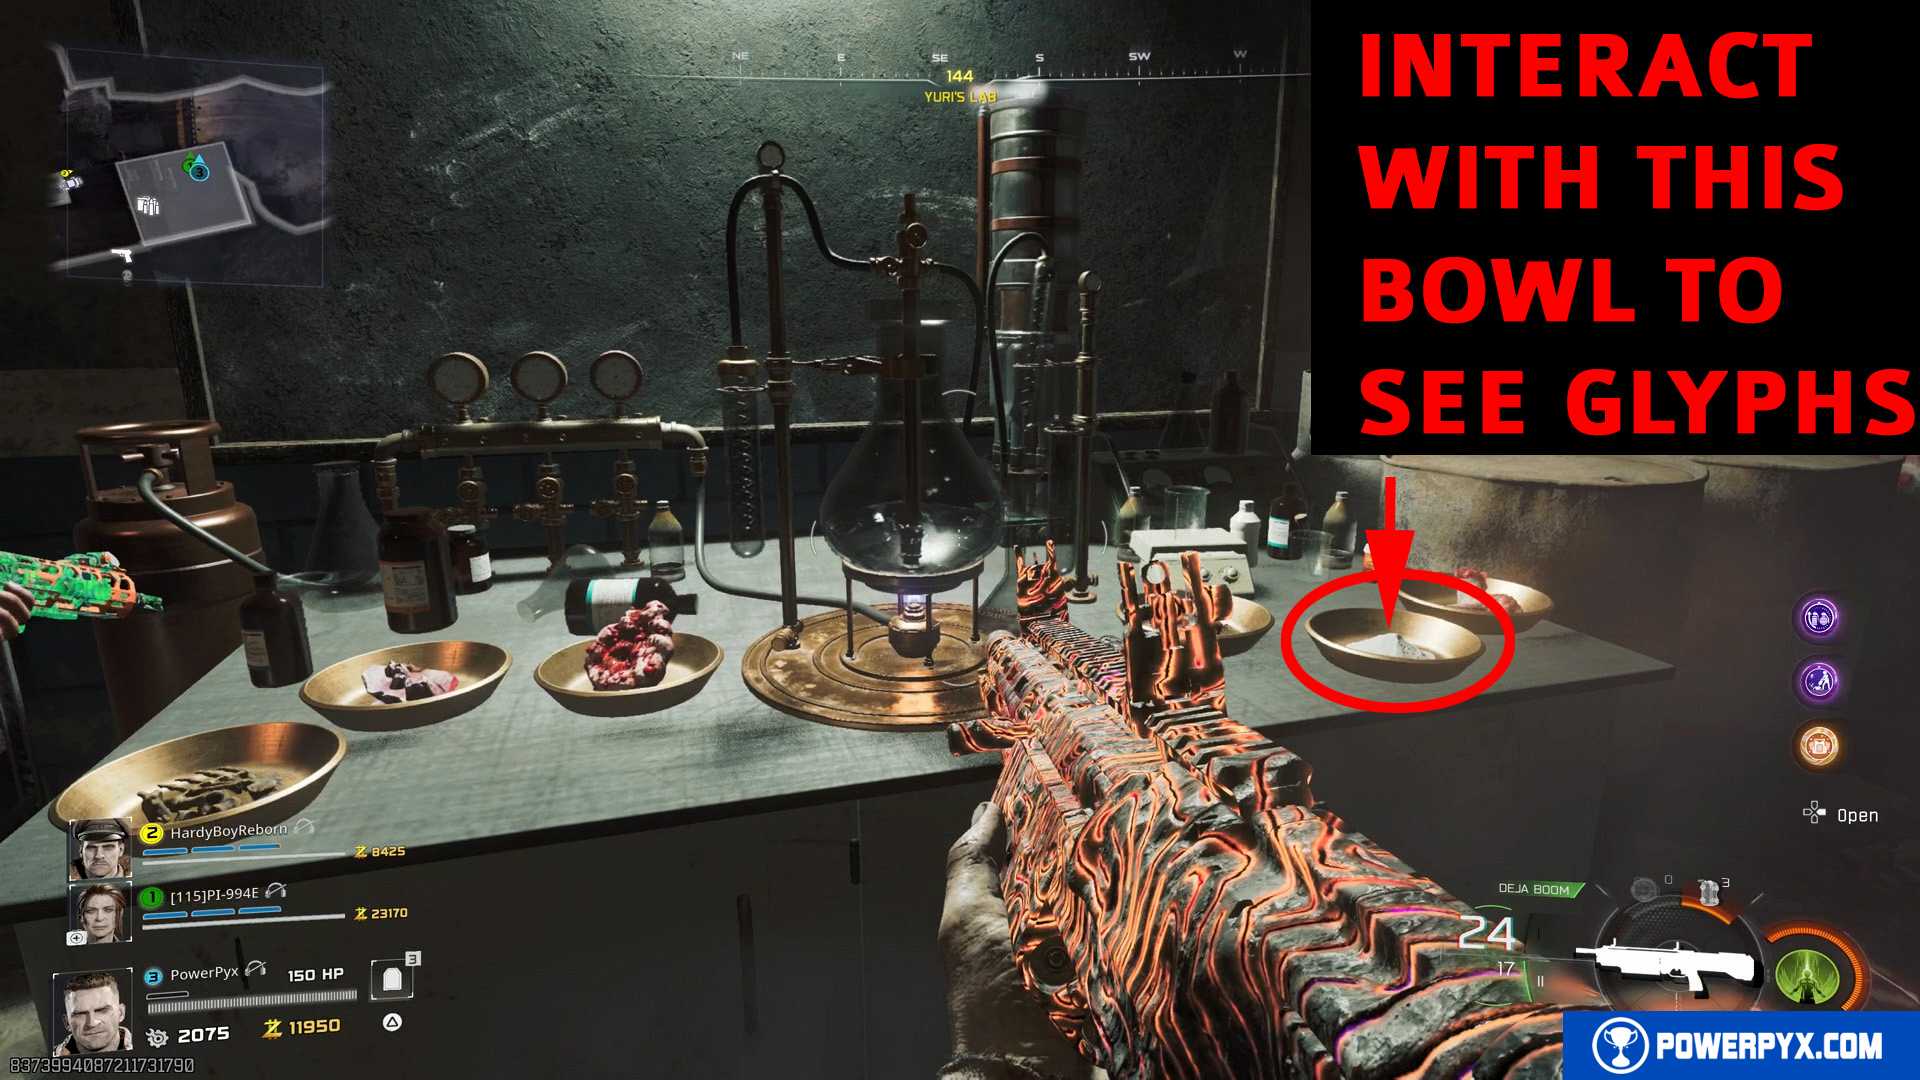
Step 17: Cosmodrome – Solve Glyph Puzzle in Yuri’s Lab, Survive Lockdown
Make sure you’re well equipped before this step! It’s highly advisable to bring some monkey bombs (can be crafted at crafting tables).
Go to Cosmodrome area (rocket in south-east) and buy the door to Yuri’s Lab. In the corner you will see a table with a chemistry setup and 6 golden bowls on the table. All the ingredients you collected will be in the golden bowls. Interact with the Powder of the Forgotten that came out of the mirror (the white powder), it’s the 2nd bowl from the right. DON’T INTERACT WITH THE OTHER BOWLS YET!
Upon doing this, 3 lines of glyphs will appear on the chalk board behind the chemistry table.
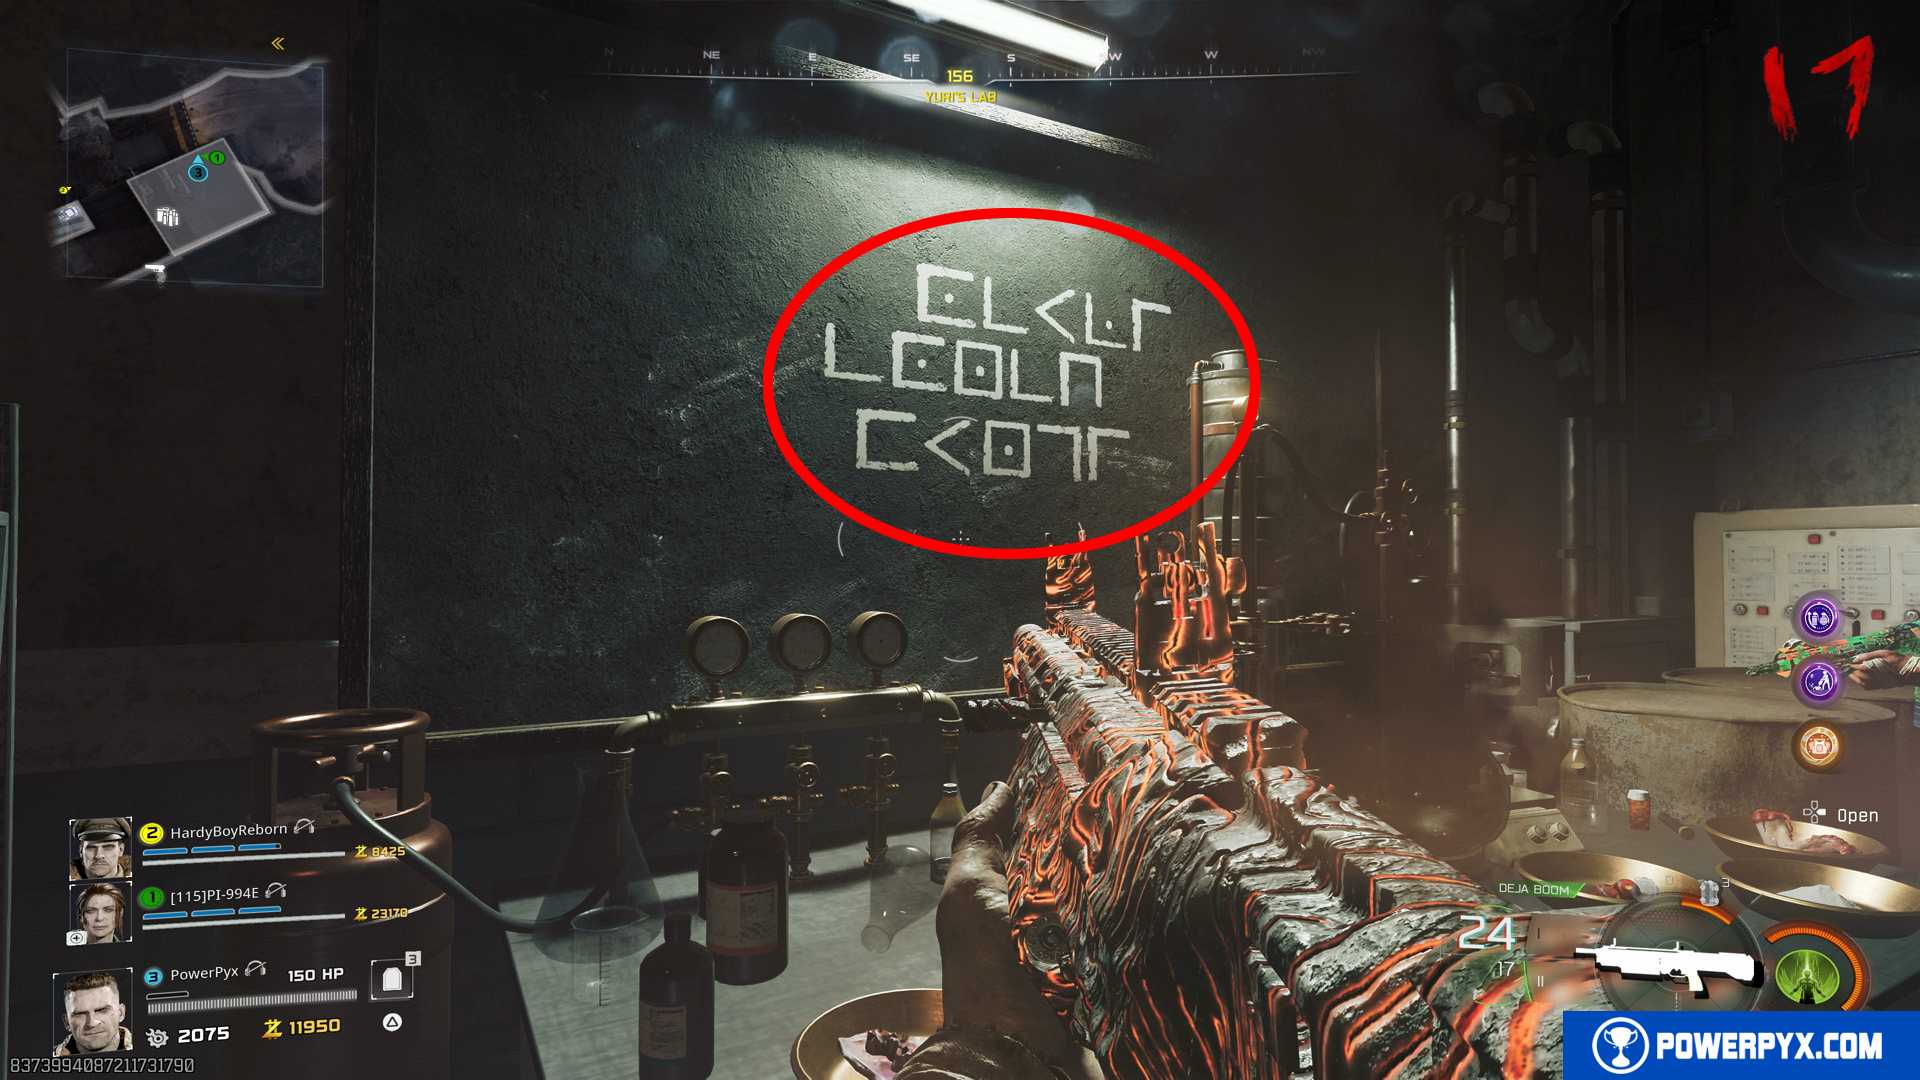
The chalk board glyphs tell you in which order you must interact with the golden bowls on the table. If you interact with them in the wrong order, the step is failed and you must play to the next round to retry it.
Each ingredient in the bowl references one glyph. This will be different in every match, so you must figure out the solution that applies to you.
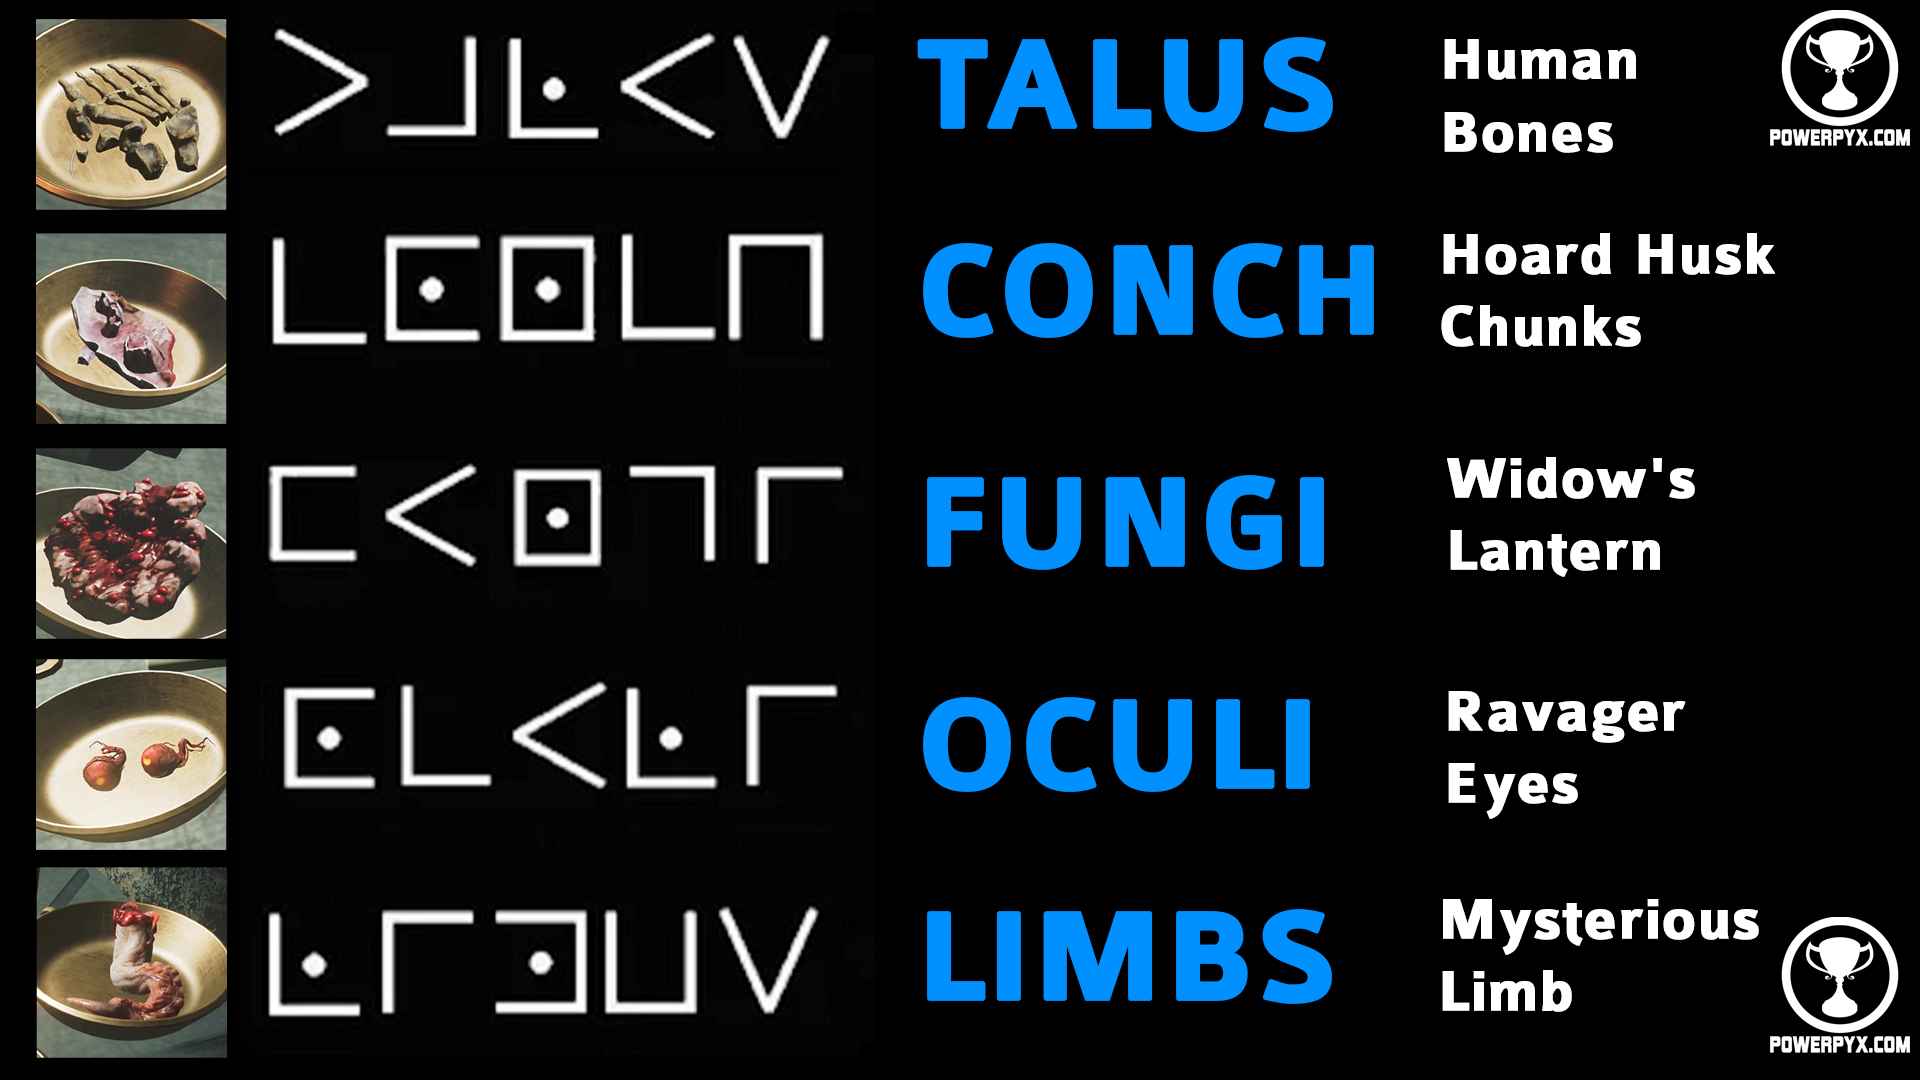
- Leftmost Bowl (Human Bones) = TALUS
- 2nd from left Bowl (Hoard Husk Chunks) = CONCH
- 3rd from left Bowl (Widow’s Lantern) = FUNGI
- 4th from left Bowl (Ravager Eyes) = OCULI
- 5th from left Bowl (Powder of the Forgotten) = no meaning, this is only used to make the glyphs appear on the chalk board, don’t interact with this again
- 6th from left Bowl (Mysterious Limb) = LIMB
TRANSLATION OF GLYPHS:
After interacting with the 3 items in the correct order, the chemistry glass will have a red mist around it. Interact with it to donate blood from your hand. Then the lockdown begins, all players will be teleported into Yuri’s Lab. During the lockdown, your health won’t regenerate, but you can use new armor plates, or shoot/reload with Necrofluid Gauntlet to regain some health. The player who donated the blood isn’t allowed to go down during the lockdown! If this player goes down, the step is failed and must be redone in a new round!
It’s best that all players stand in the same corner by the table and toss their monkey bombs one by one to distract all zombies. Coordinate this so you can spread out your monkey bombs over time. Decoy Grenades are good too! The player who donated blood should use Aether Shroud if health gets dangerously low to stay safe. The lockdown goes on for a few minutes and endless purple eyed zombies rush the room. This is one of the hardest steps in the easter egg. After you survived for a few minutes, the lockdown is lifted. You’ve done it correctly when a thick purple mist fills the room.
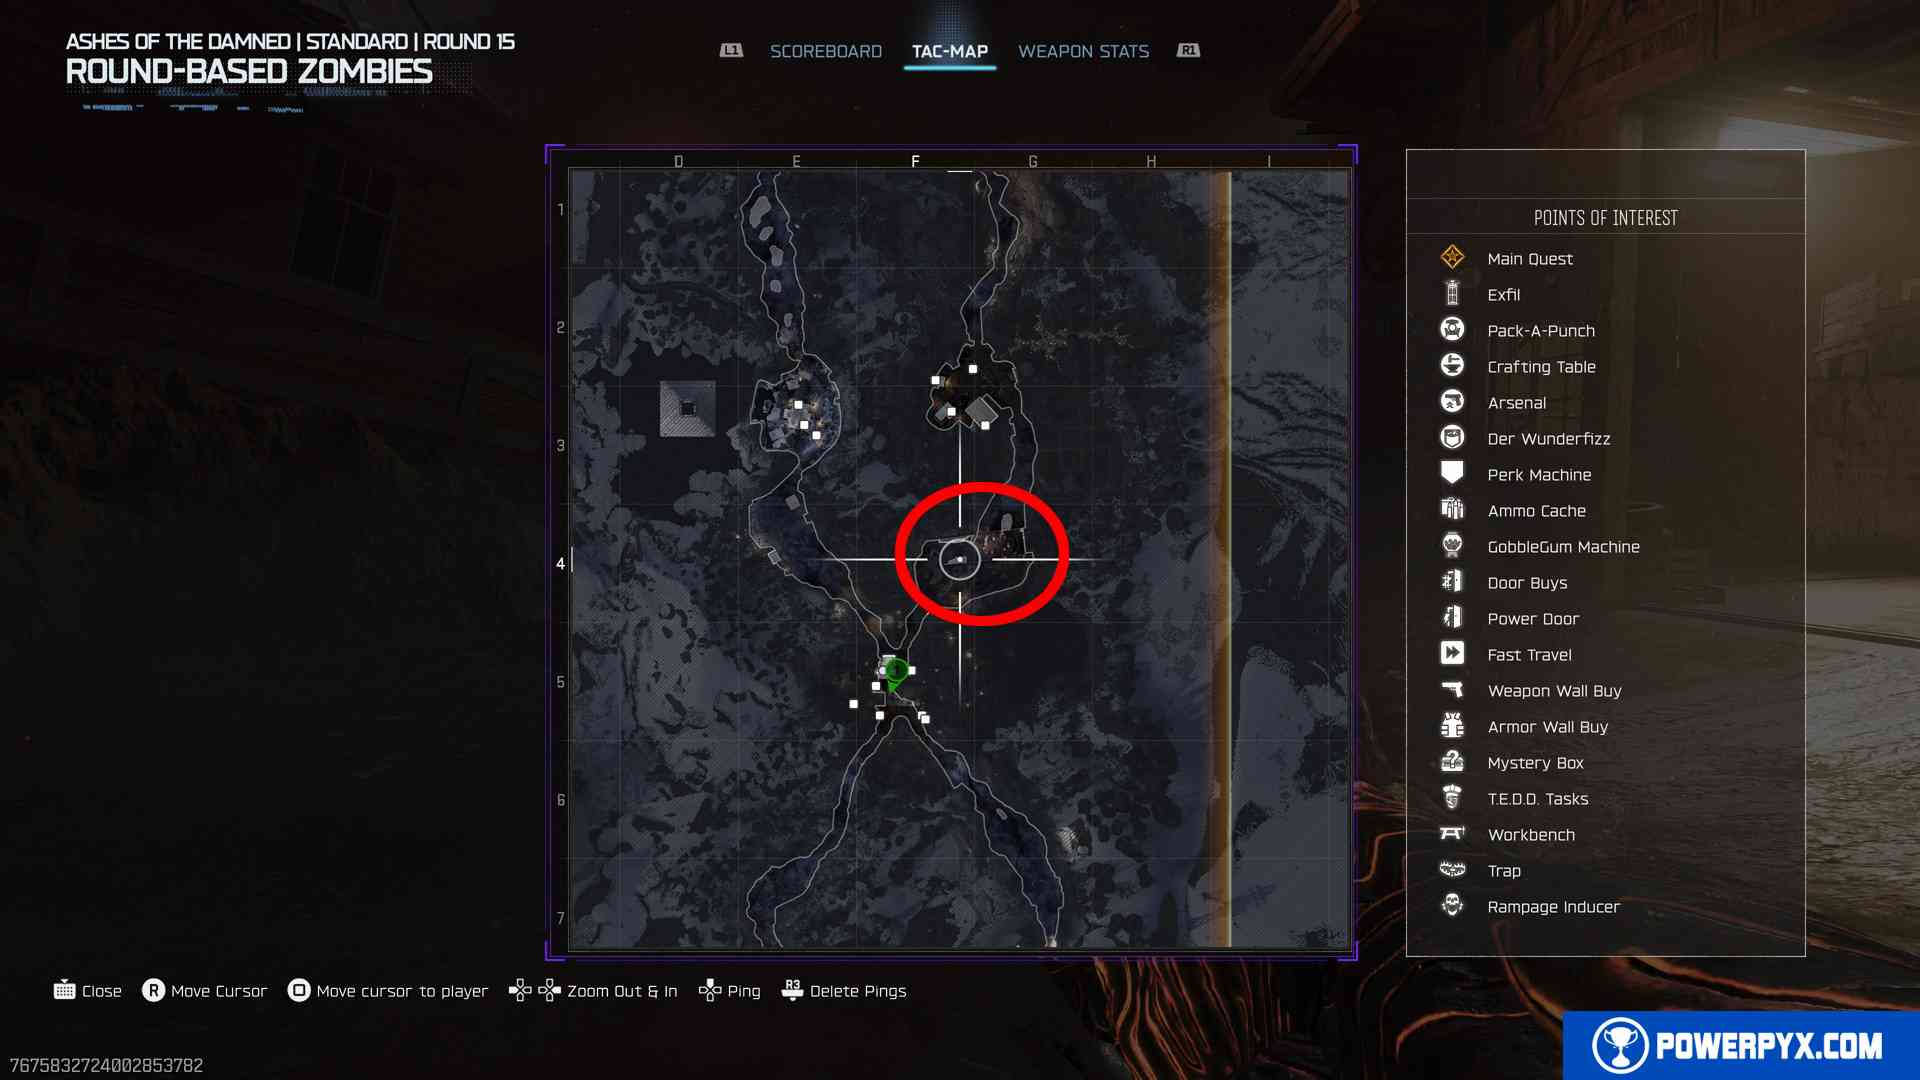
Step 18: Find the 3 Keys (Red, Green, Yellow)
You must now suck in 3 keys with the Necrofluid Gauntlet and bring them to the triangular rock in Ashwood, in the upper area called Rabbit Alley.
DELIVER KEYS HERE:
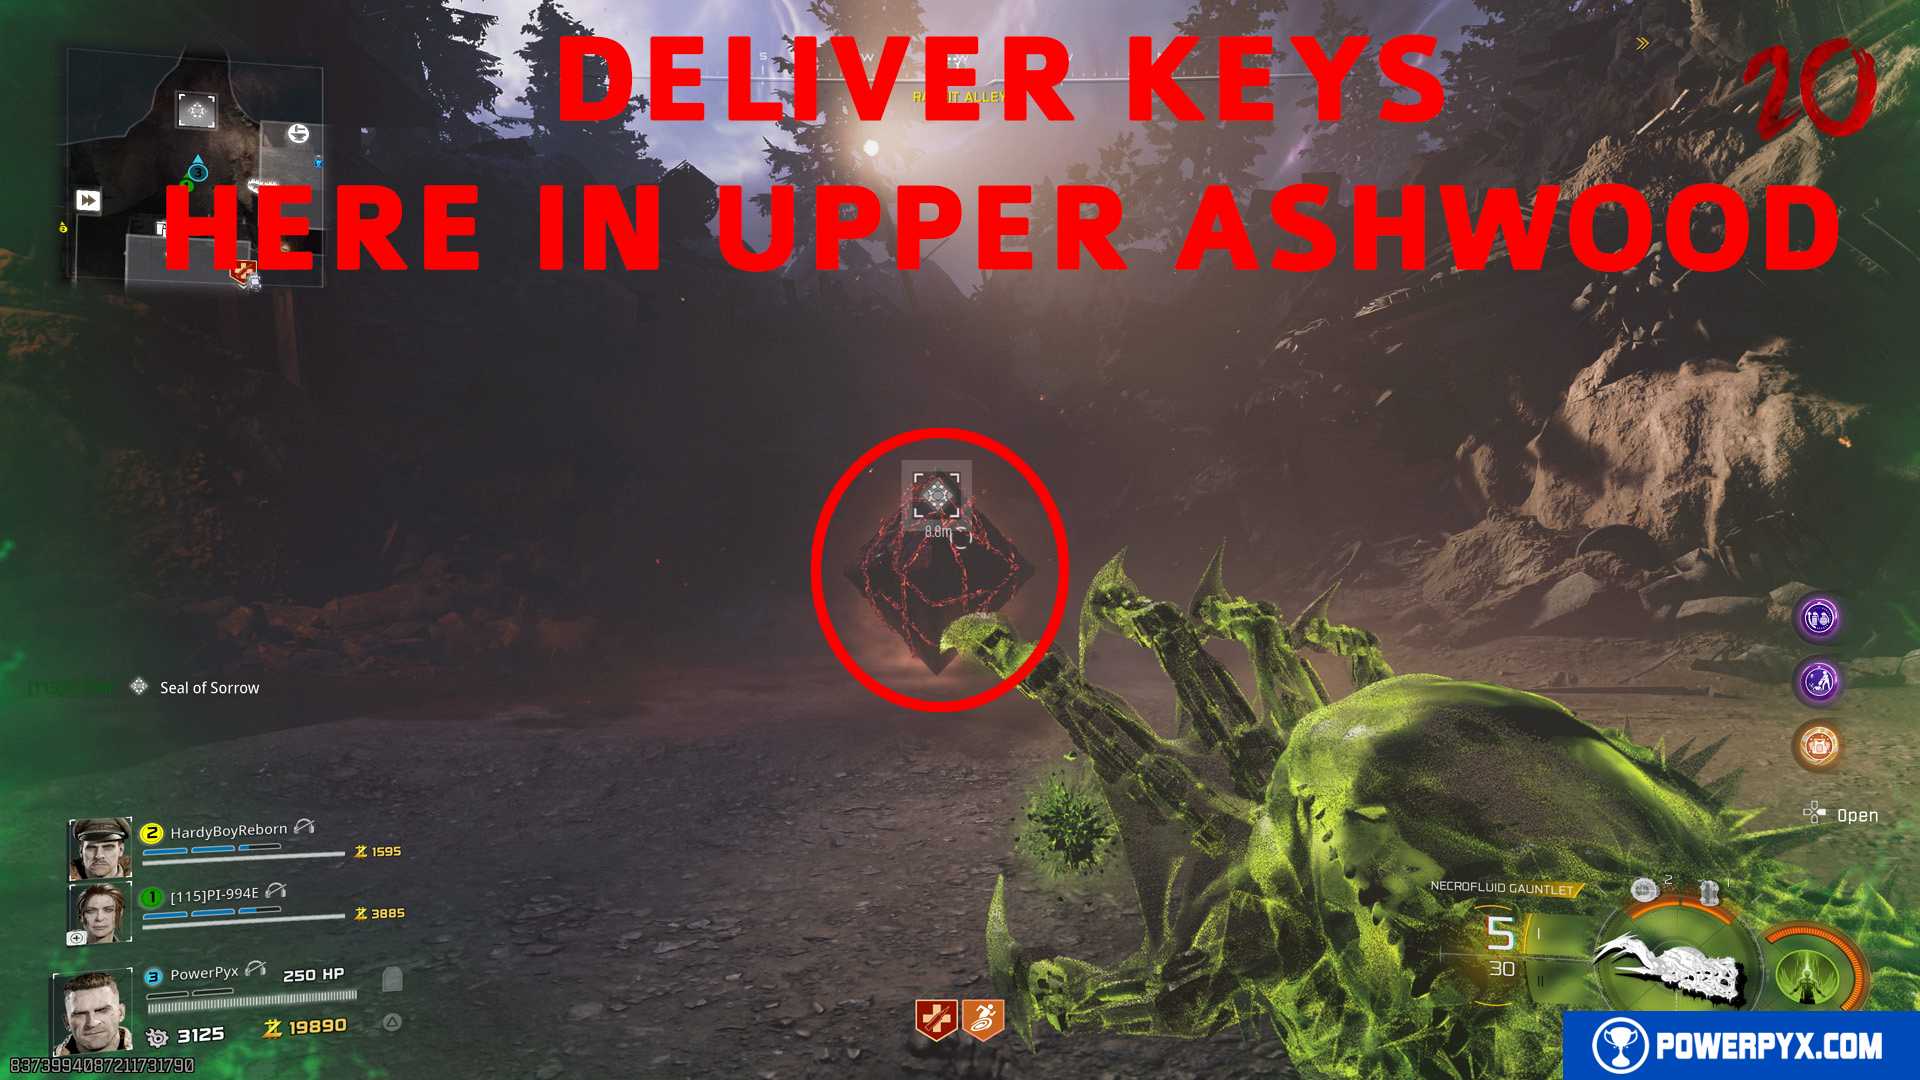
Shoot each key with the Necrofluid Gauntlet, then reload with / to suck in the key. This will drop the key on the floor, pick it up, quickly get in your car and deliver it to the triangular rock in Ashwood. Each key will release a chain from the rock. Each key gives you a negative buff while holding the key, this goes away after delivering the key.
The key locations will be different in every match! They will always be in 1 of 3 possible locations within their dedicated area.
Note that reloading the Necrofluid Gauntlet will automatically recharge its ammo too, so you don’t need to worry about running out of ammo. You can also grab the 3 keys in any order you want.
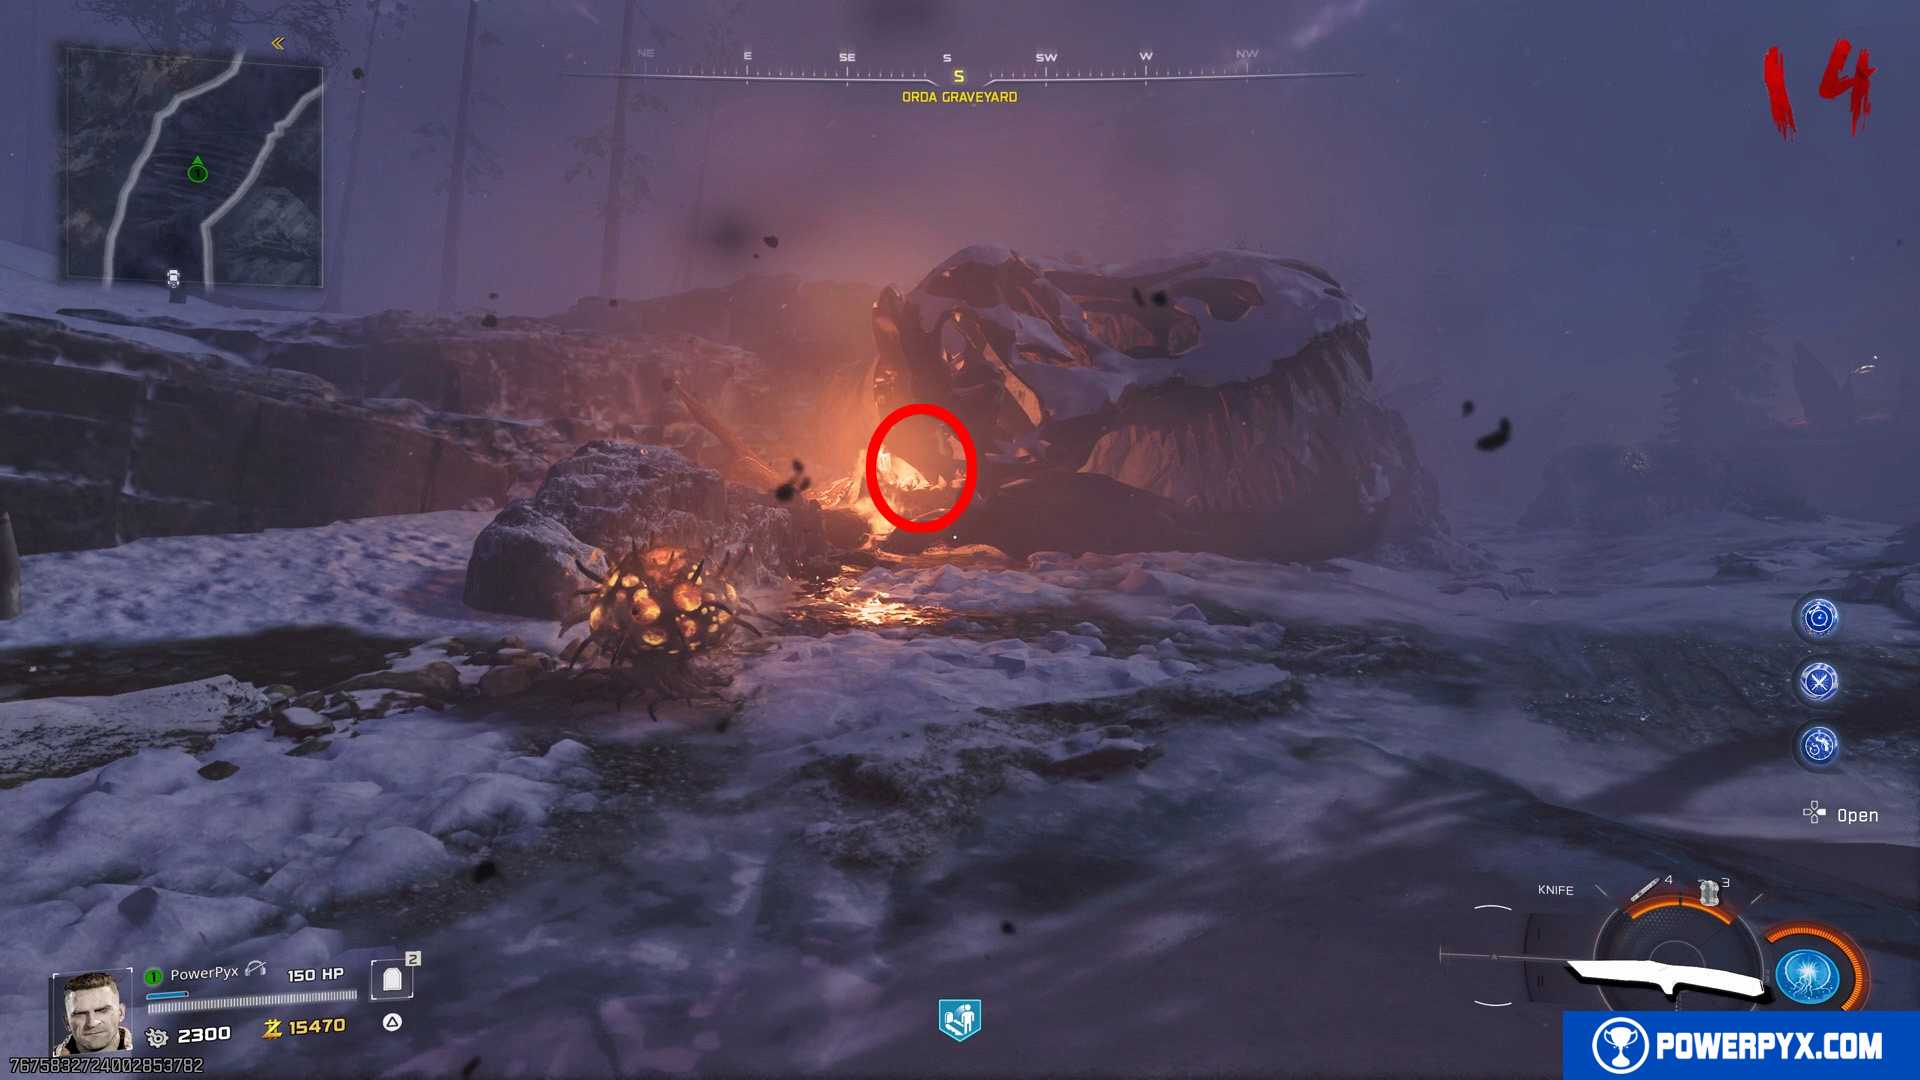
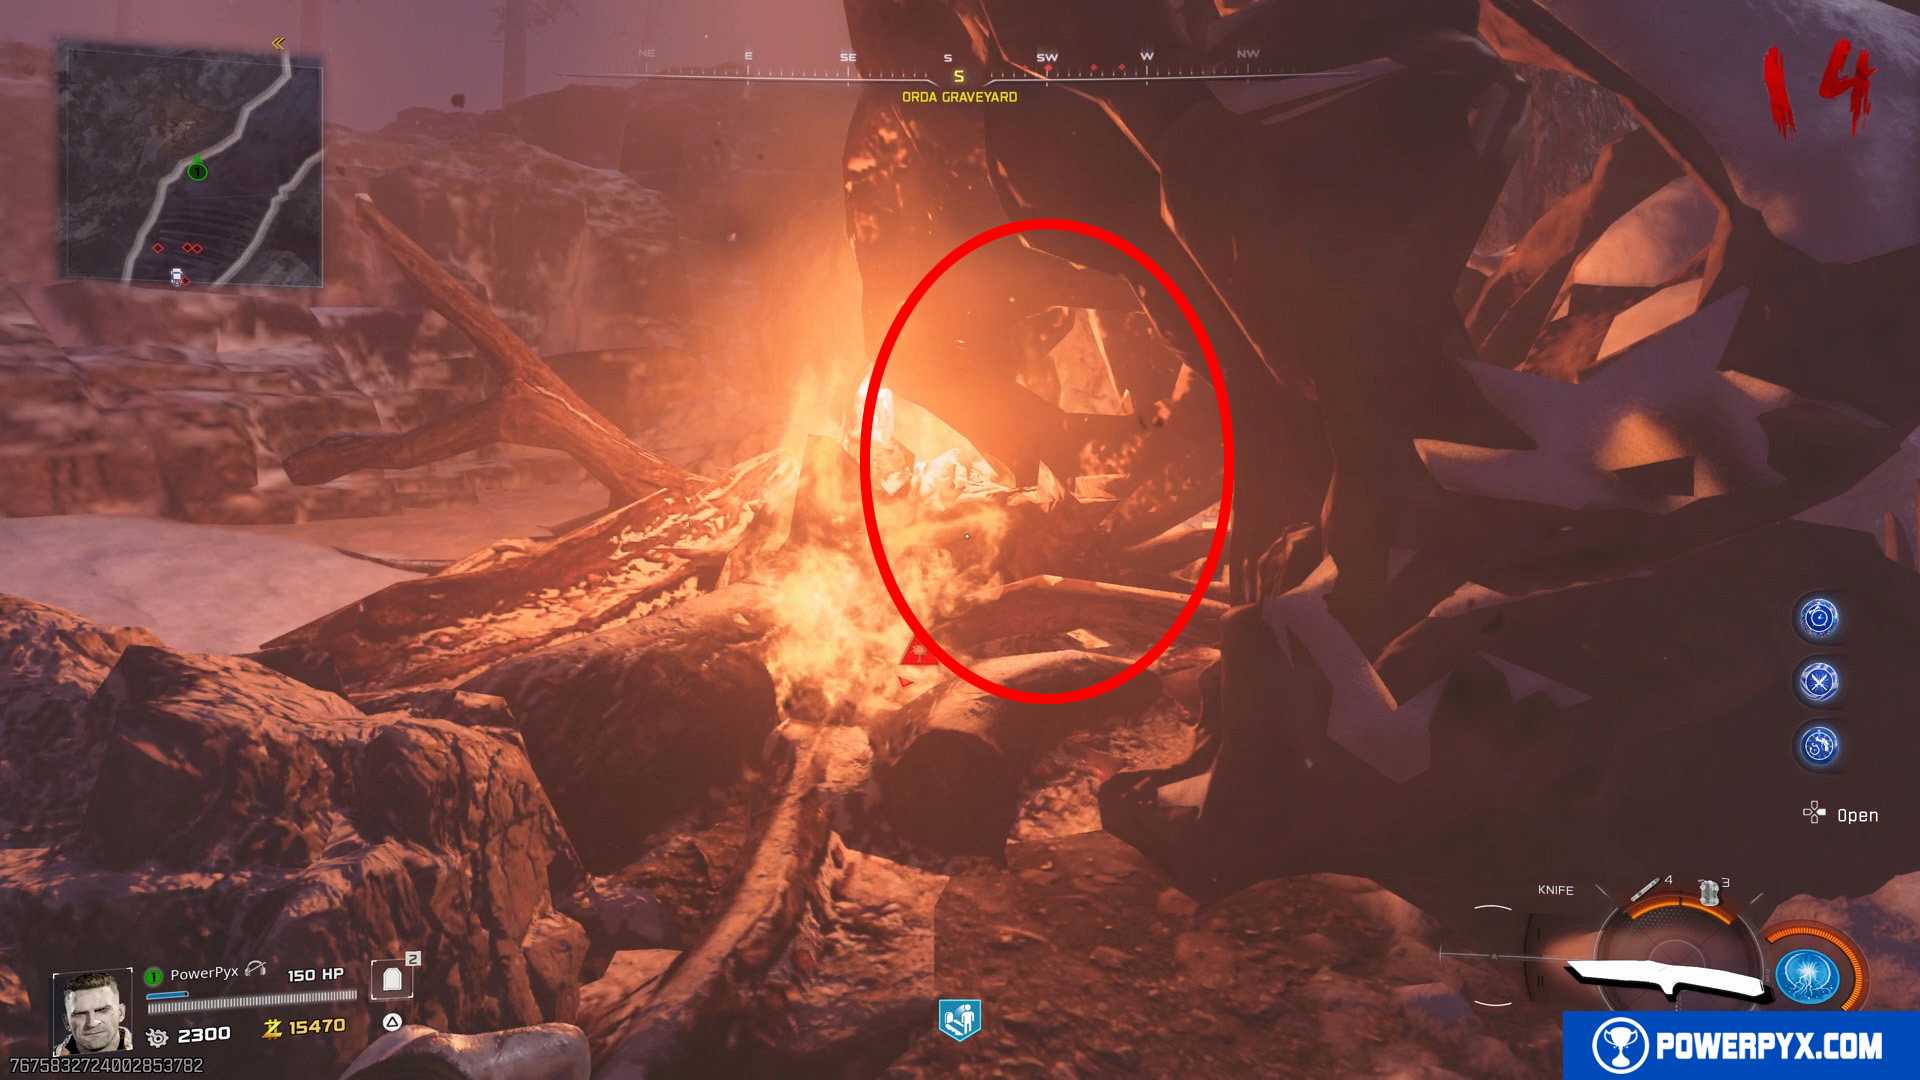
Red Key
Red Key is always in Orda Graveyard (path between Ashwood -> Exit 115). You won’t be able to recharge health while holding this key! Run away fast and use armor plates to stay alive!
It will spawn in 1 of 3 possible locations within that area (changes each game) – player with Necrofluid Gauntlet must shoot it with  /
/  and suck it in with / :
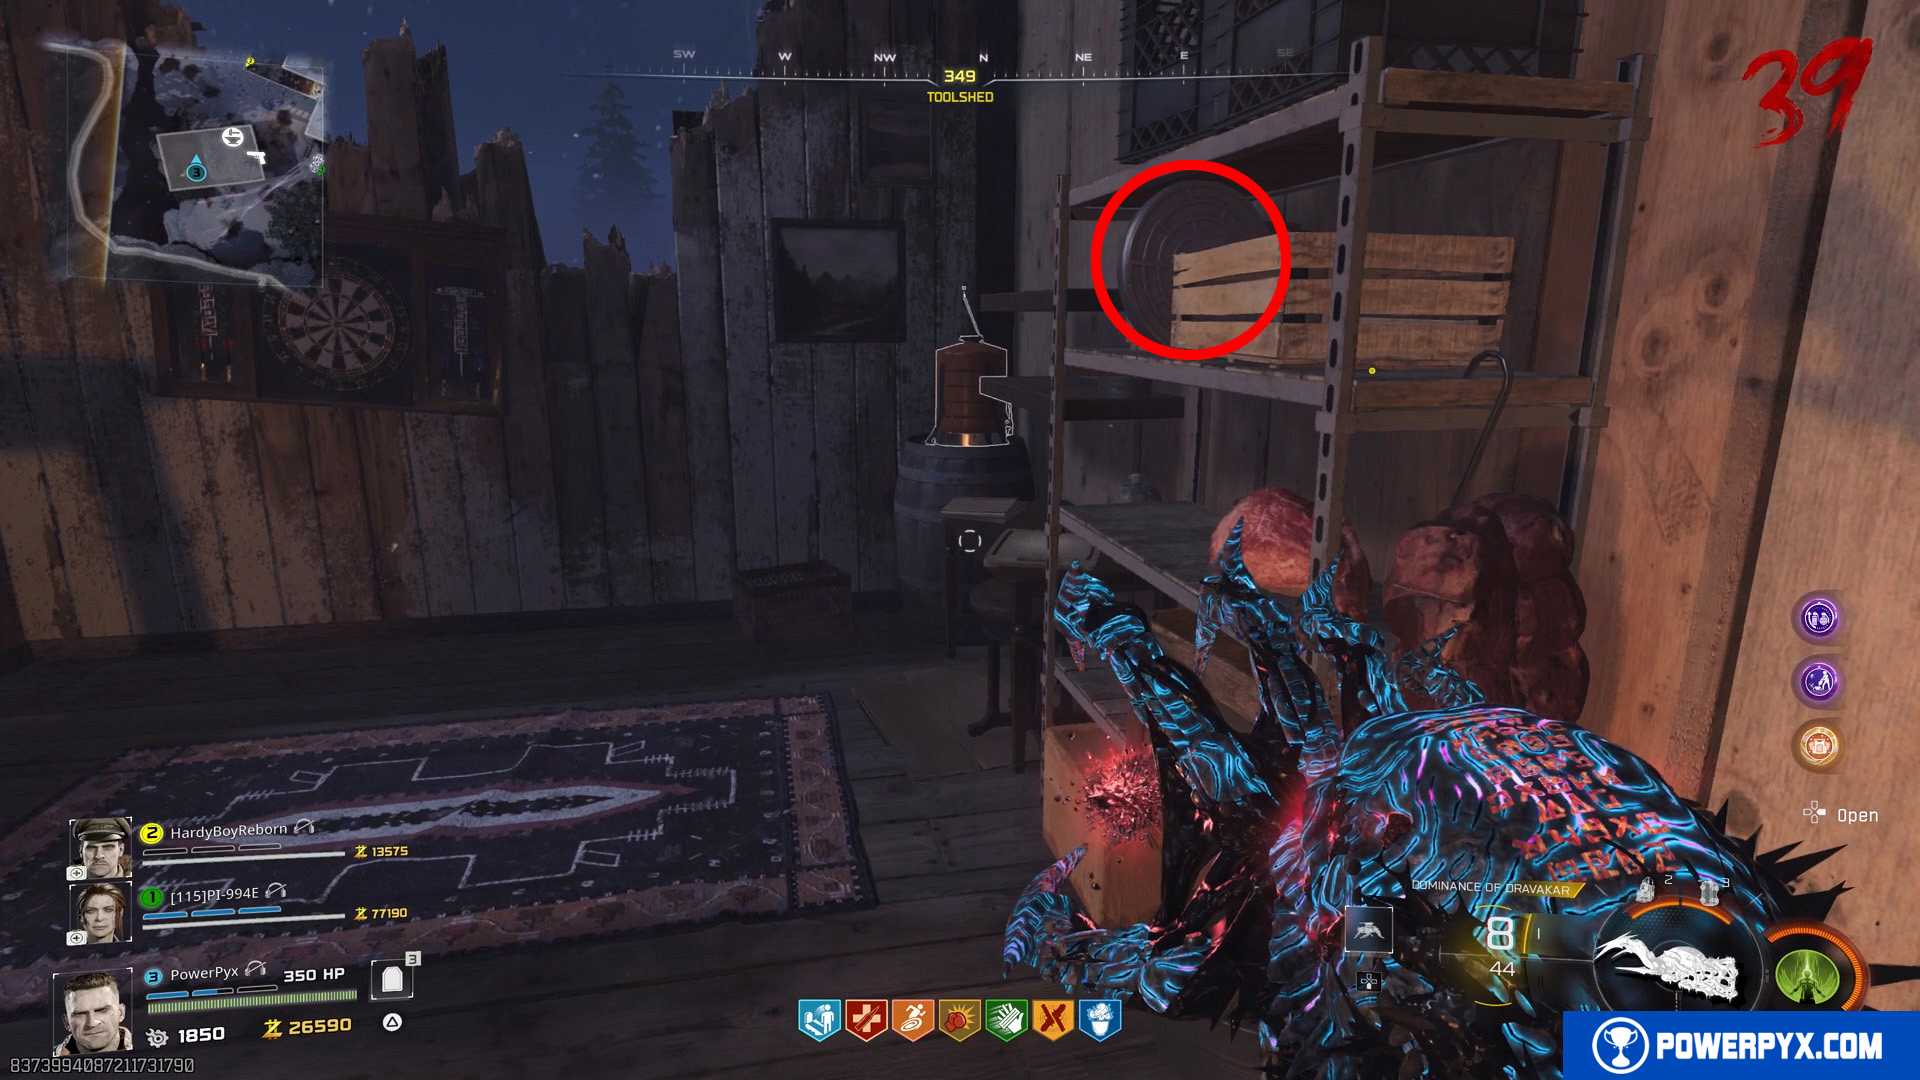
#1 – In the corner behind a vehicle, just before the entrance to Exit 115 on the left side.
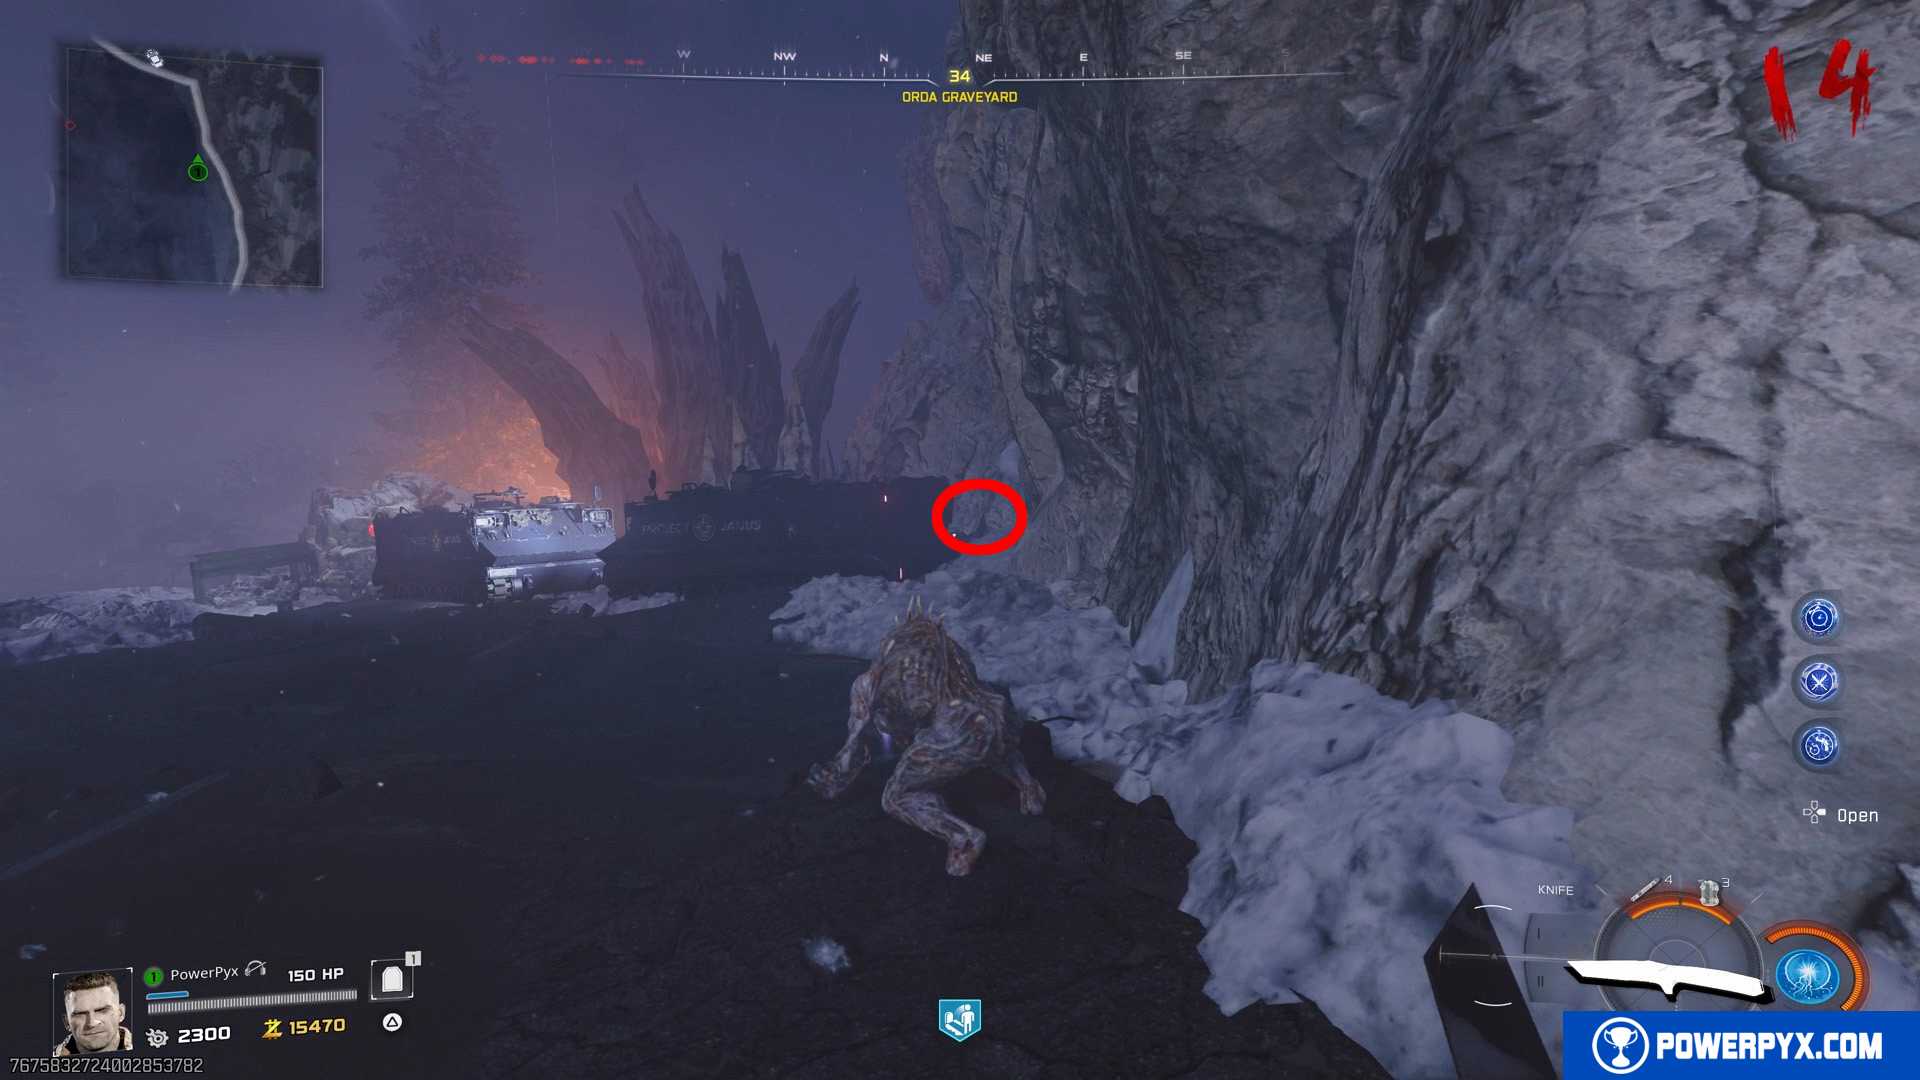
#2 – Up in a dinosaur skull.
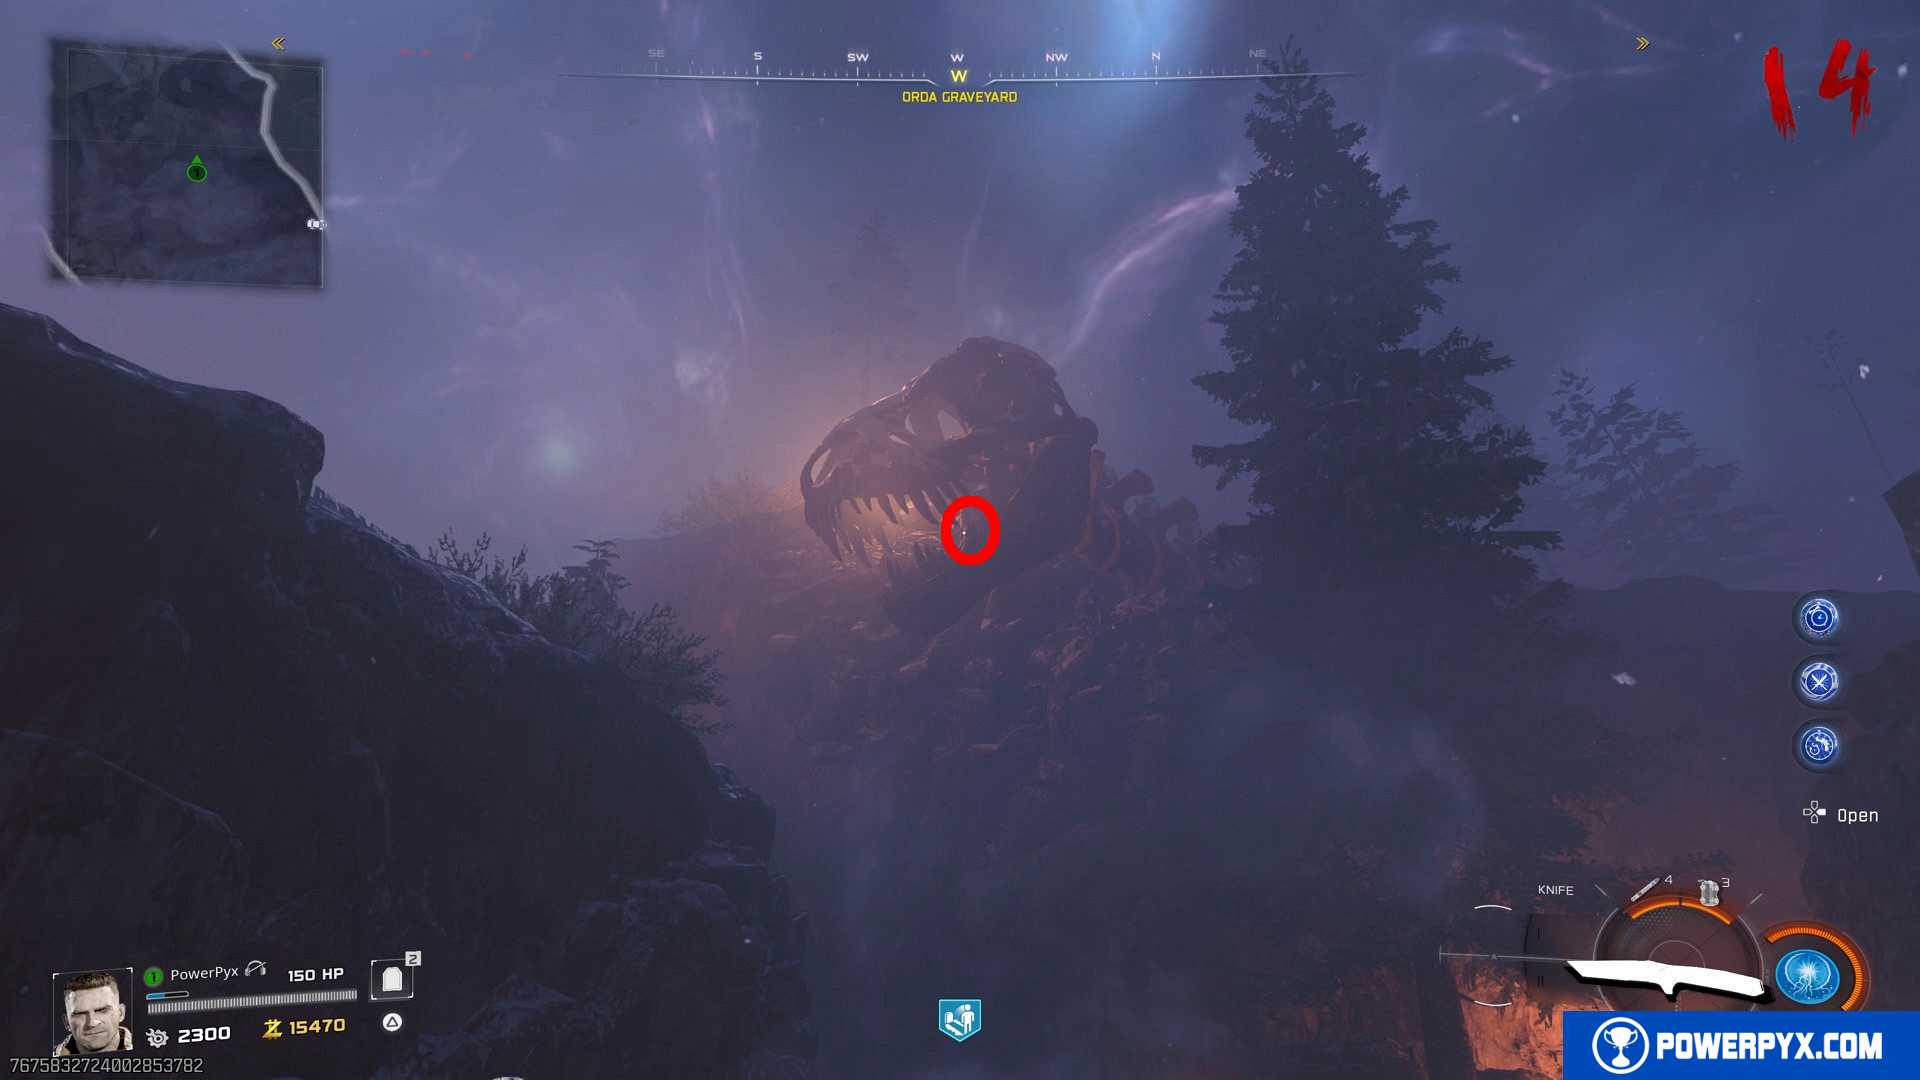
#3 – Inside a dinosaur skull on the ground. This one is extremely hard to see. If the key isn’t in the first two locations, it has to be here. It’s on the neck bone at the back of the skull, on the ground. You can either shoot through the front of the skull and hit the bottom area, or stand to the left side of the skull and shoot it from there. You practically can’t see this key because it blends in with the environment. Just shoot a couple times and reload until you get it, if it wasn’t in the first two locations.
Remember you must insert the key in the triangular stone at the top of Ashwood area before you grab the next key.
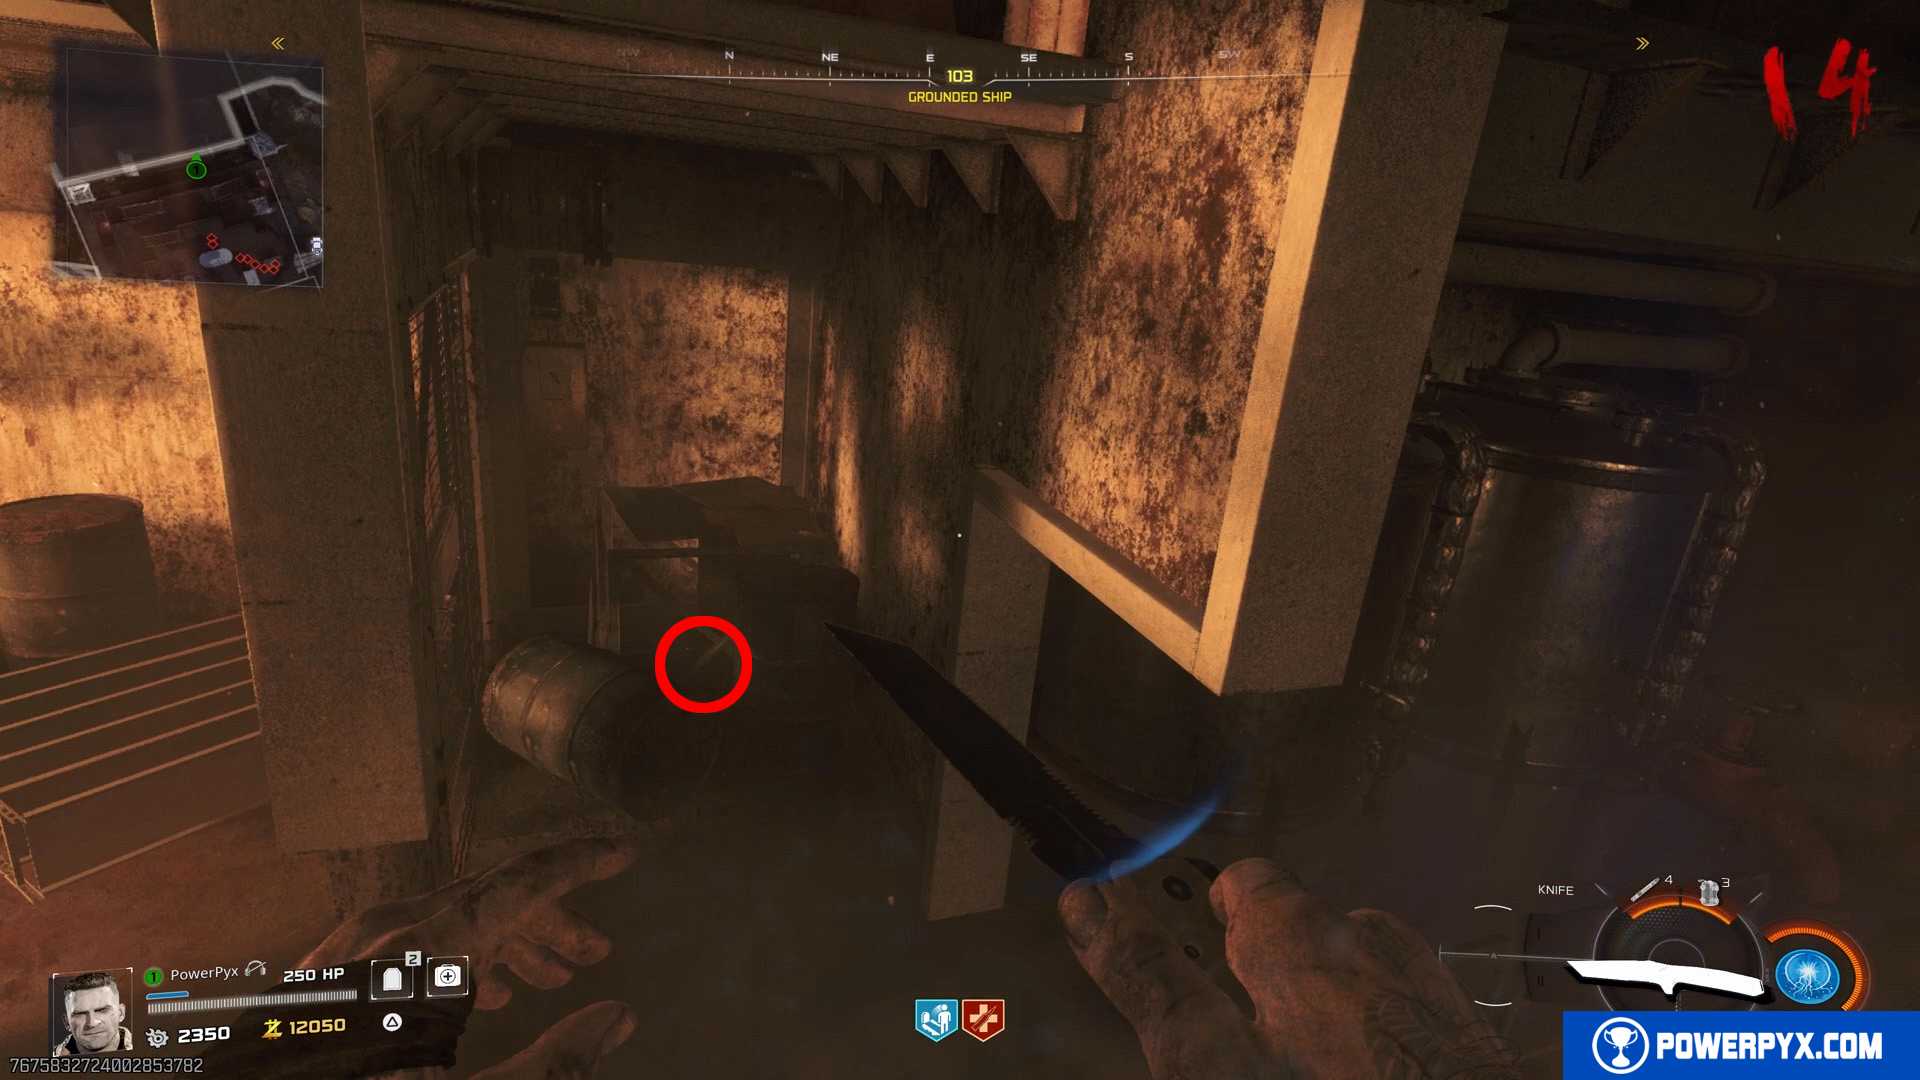
Green Key
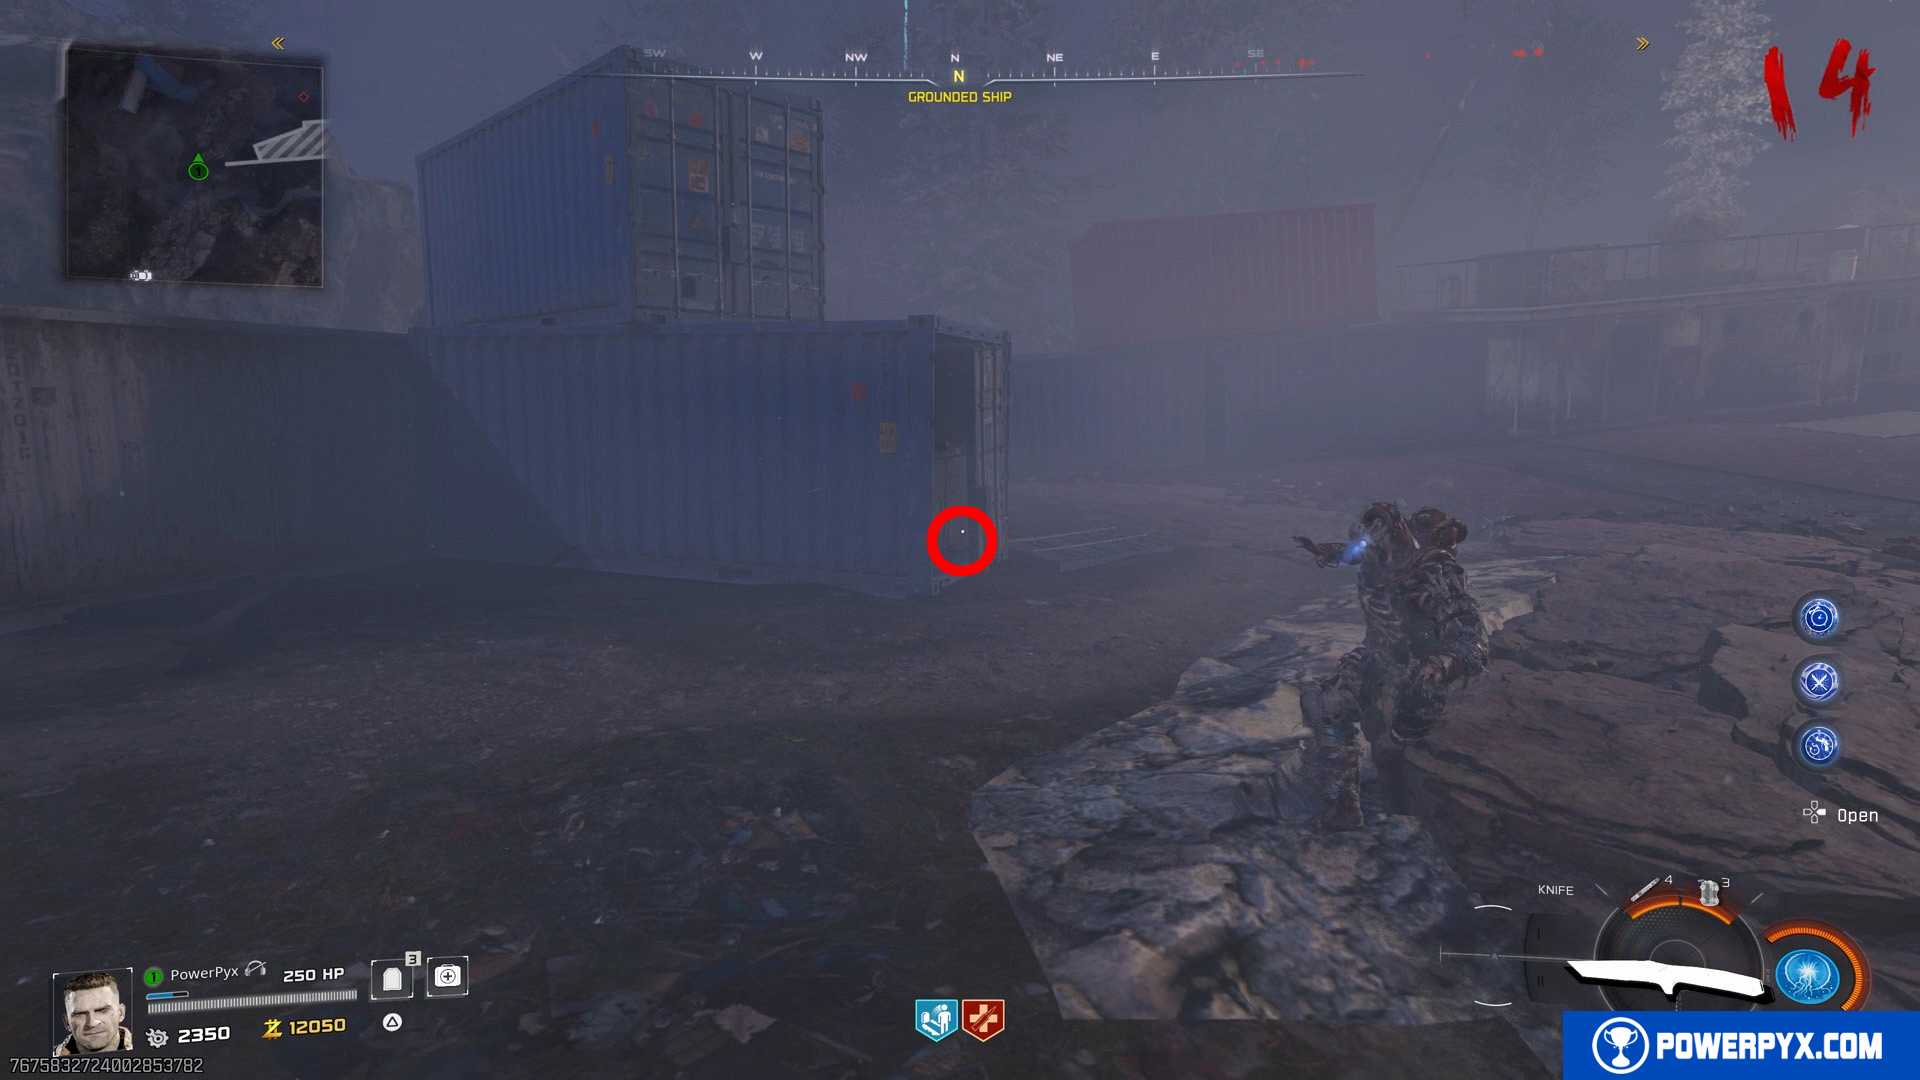
Green Key is always in Grounded Ship (path between Vandorn Farm -> Ashwood). You won’t be able to run while holding this key! Park the car right next to the key to quickly get away!
It will spawn in 1 of 3 possible locations within that area (changes each game) – player with Necrofluid Gauntlet must shoot it with / and suck it in with / :
#1 – In the area on top of the ship. Inside the blue container at the west edge on top of the ship (next to a red container and another blue container on top). It’s behind the blue door of the container, you must stand to the left of it to look through the open door at an angle, aim at the ground.

#2 – In the area on top of the ship. Inside the ship’s cabin that’s in the middle on top of the ship, by looking through the window. You can see it through the window on the shelf.
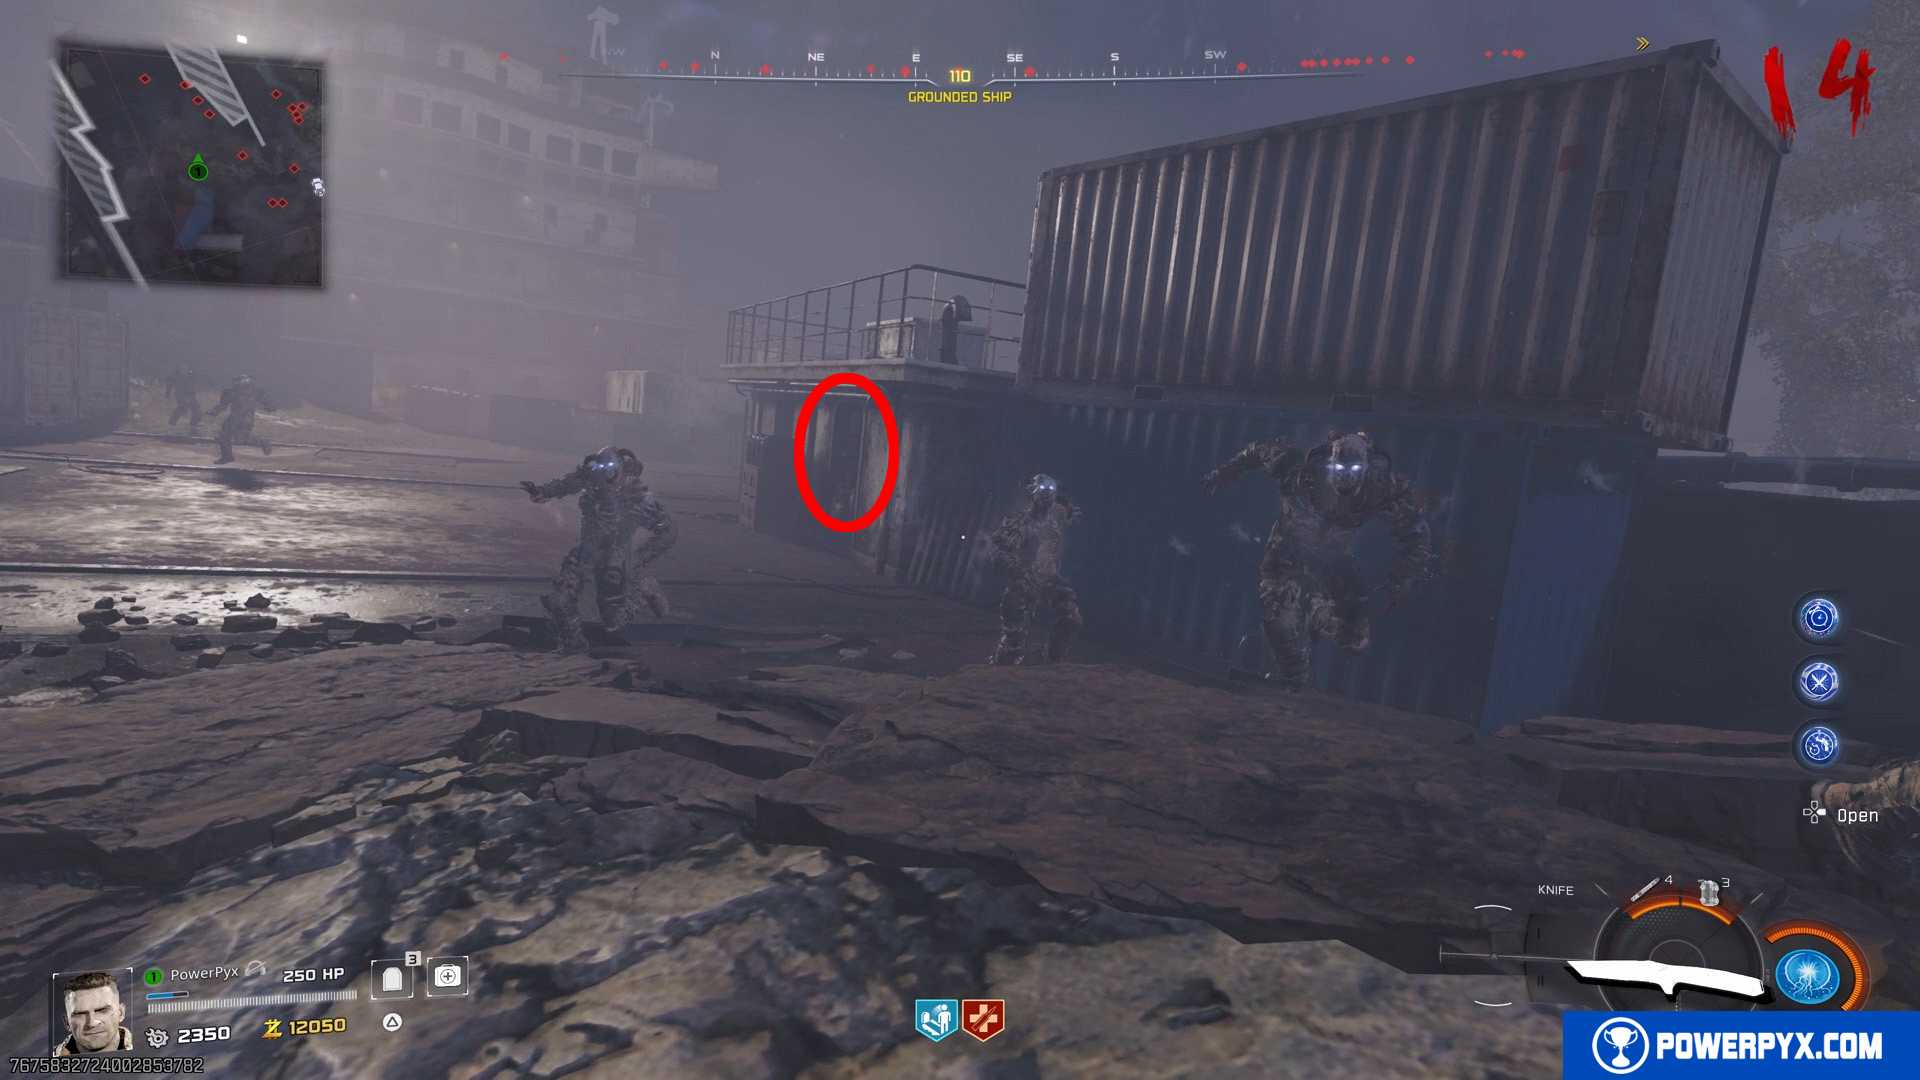
#3 – In the area at the bottom of the ship (inside the ship). Under the ship facing north, you will see a yellow-lit area with an unreachable staircase going up. When looking at this area, jump up and check the floor between two barrels, to the right of the unreachable staircase. This is the worst of the 3 possible spots, you’ll want to shoot it mid-jump and it’s hard to see.
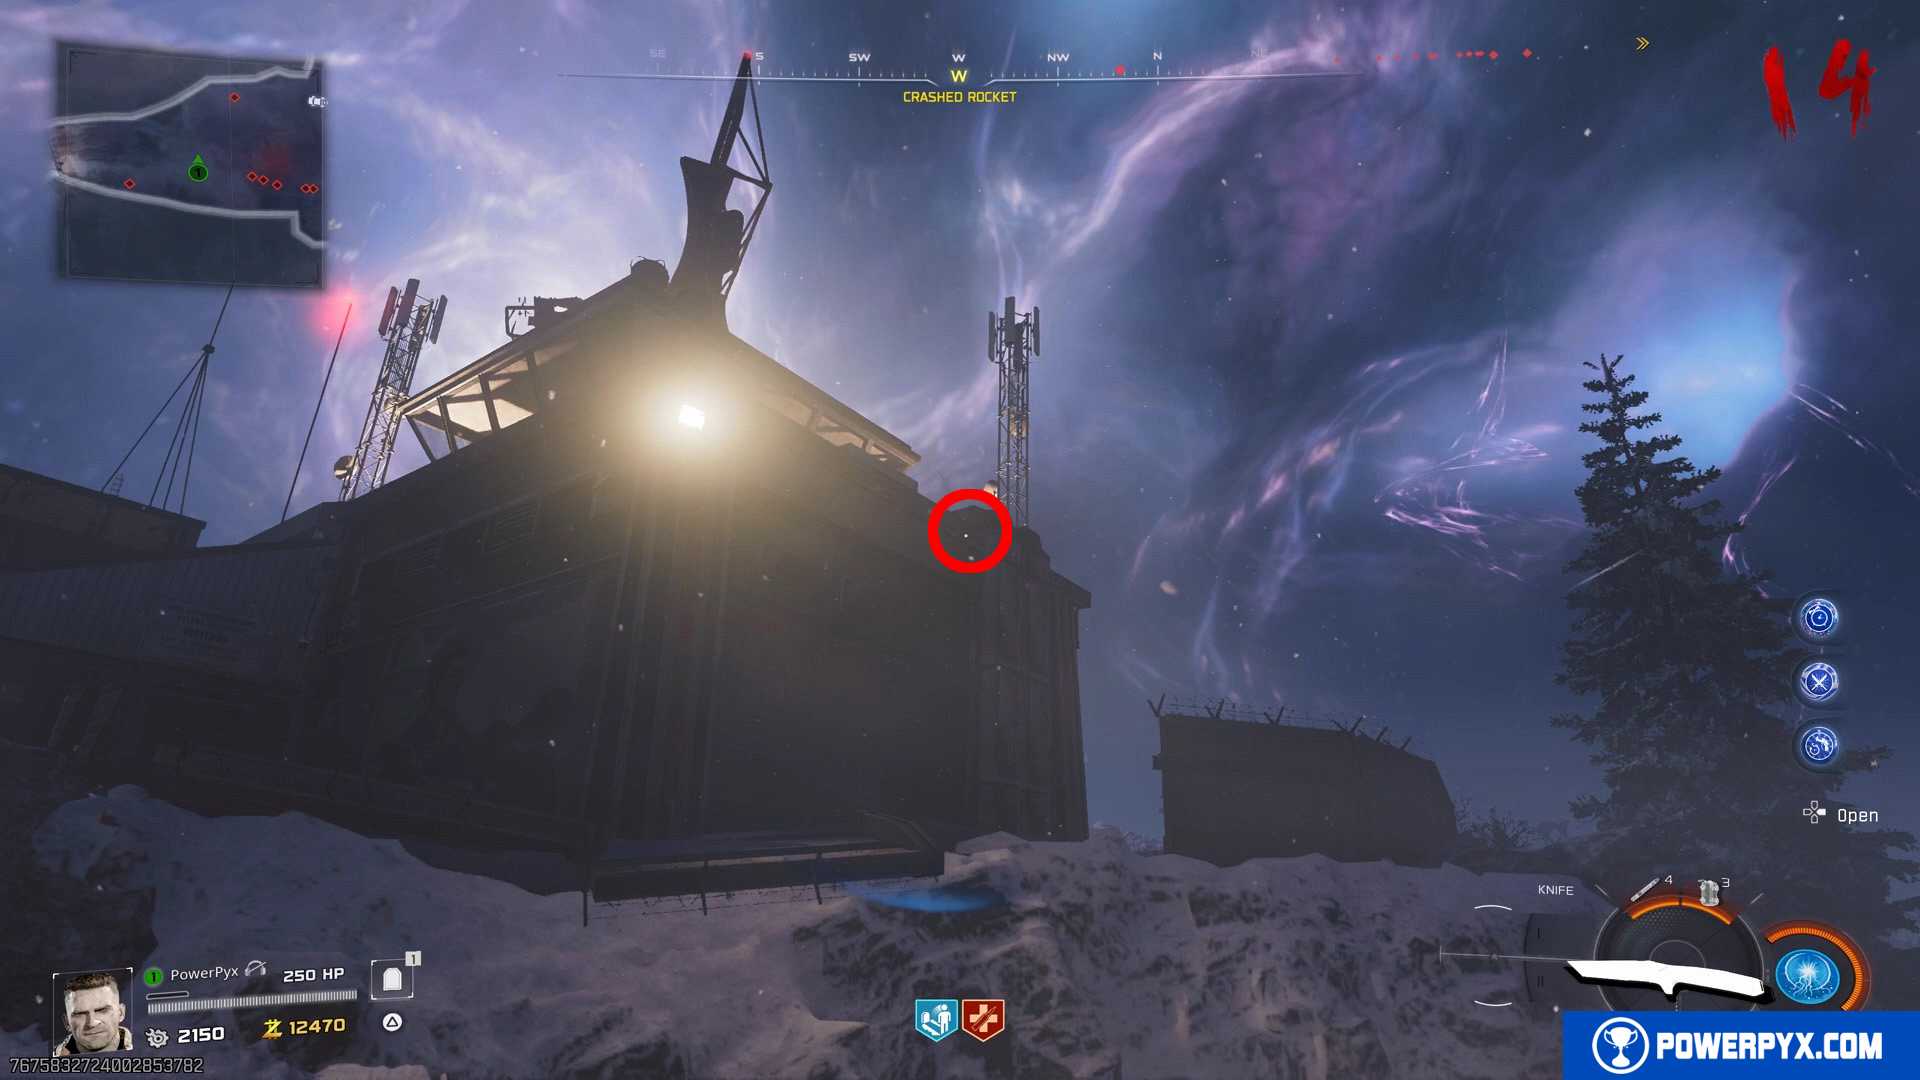
Yellow Key
Yellow Key is always in Crashed Rocket (path between Ashwood -> Cosmodrome). You can only use melee attacks while holding this key!
It will spawn in 1 of 3 possible locations within that area (changes each game) – player with Necrofluid Gauntlet must shoot it with / and suck it in with / :
#1 – Take the exit from Ashwood toward Cosmodrome and immediately after going through the exit gate of Ashwood turn left and look up to the cliff. This spot is on top of the cliff, if the key spawns here it will have a visible glow. Easiest spot to see.
#2 – Halfway through the path, on top of the fallen red pylon that lies above the area between the mountains.
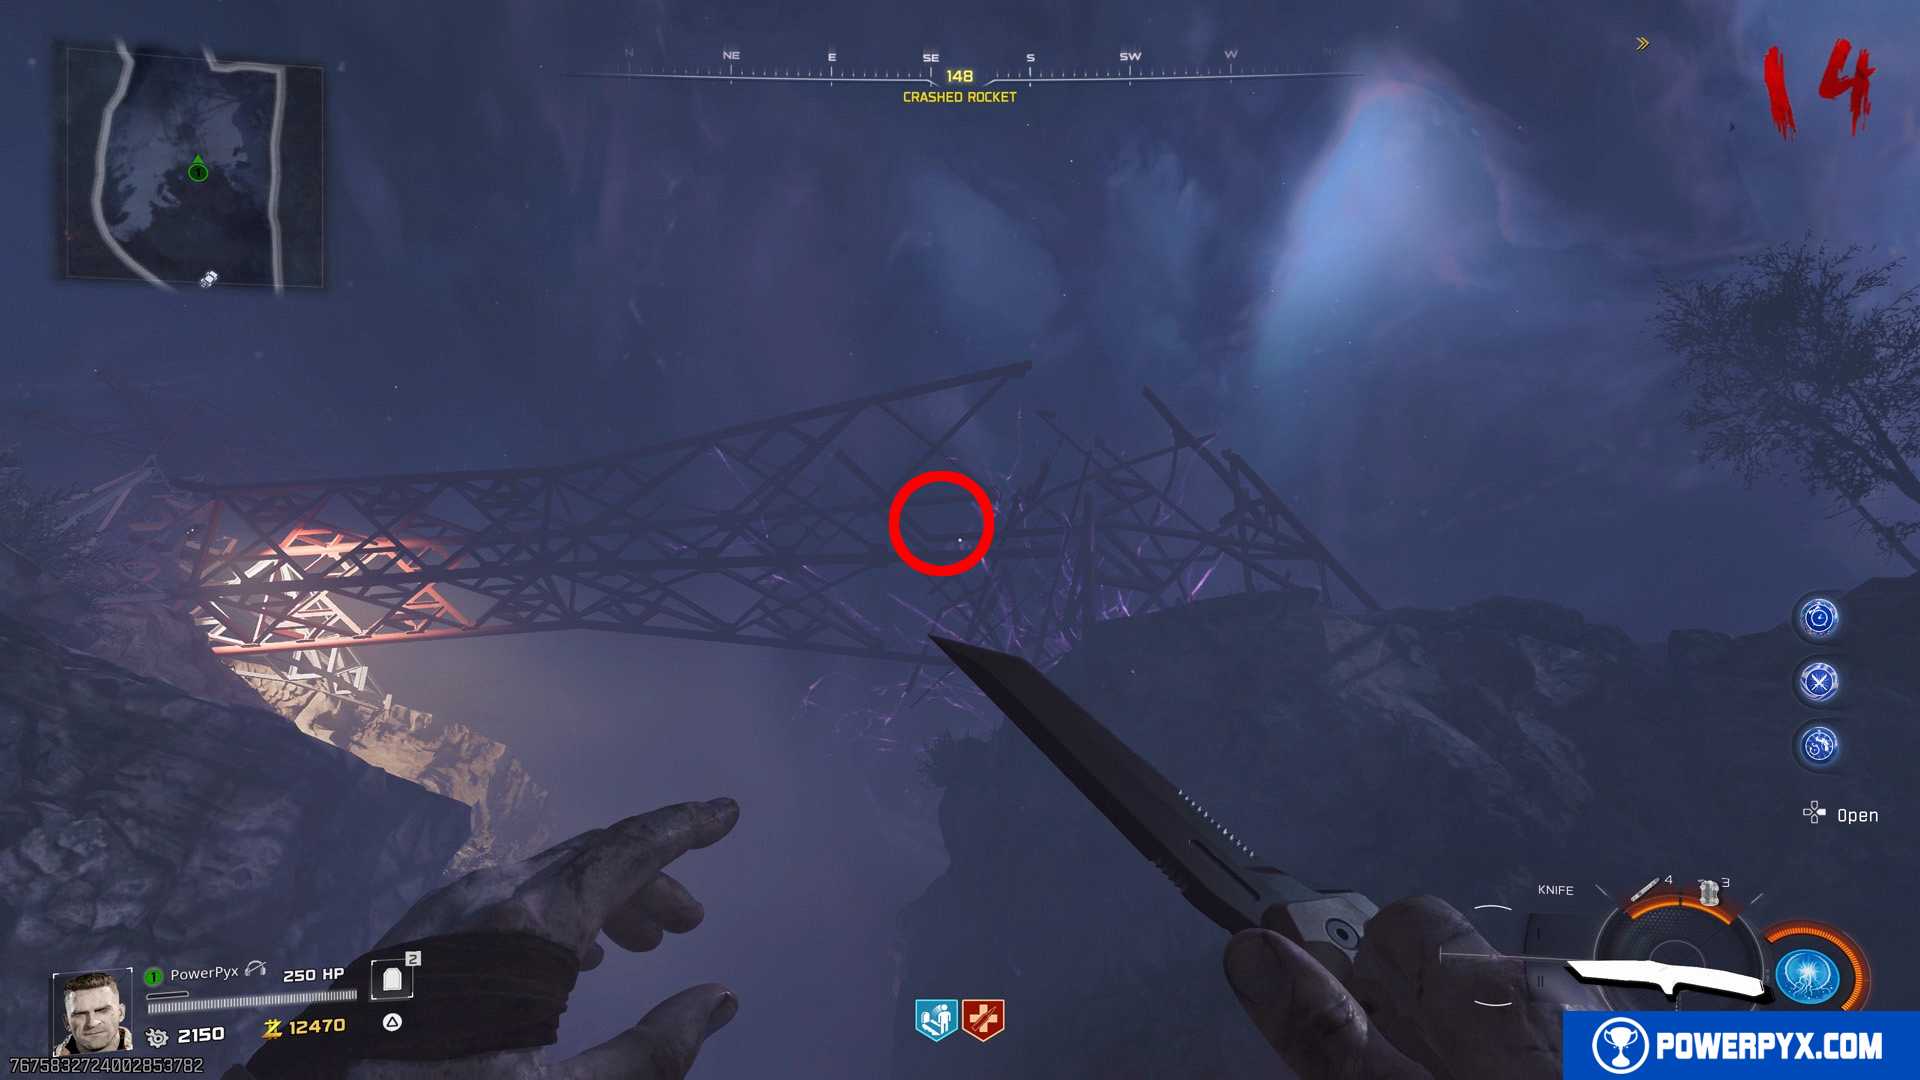
#3 – At the end of the path just before reaching Cosmodrome, on the building with the spinning radar dish.
Step 19: Fully upgrade the car with DG-2 Turret Barrel
After bringing all 3 keys back to the triangular stone on top of Ashwood area, you will get a cutscene. Afterward, the triangular stone will be gone and left behind the DG-2 Turret Barrel.

Pick it up, park the car in the garage, interact with the crafting table in the garage to install this final car upgrade part. This also unlocks  I Heard You Like Upgrades (fully upgrade Ol’ Tessie).
The car now has a tesla cannon that automatically shoots at enemies. You can also use it manually by switching seats while in the car.
Step 20: Ashwood & Exit 115 – Lure 3 People into the Lightning
This step can only be done during rounds where you see lightning strikes on the rooftops of Exit 115! Read the full step carefully, everything in this step is time sensitive, so do a practice run through the locations first. Also, you will need Melee Machiato Perk for this step (bought from Perk Machine in Blackwater)!
Every 2 rounds, you will see 3 lightning strikes hit the rooftops of Exit 115 (the diner area). There will be a red, yellow, blue lightning strike. If you don’t see the lightning, proceed to the next round and you should get it.
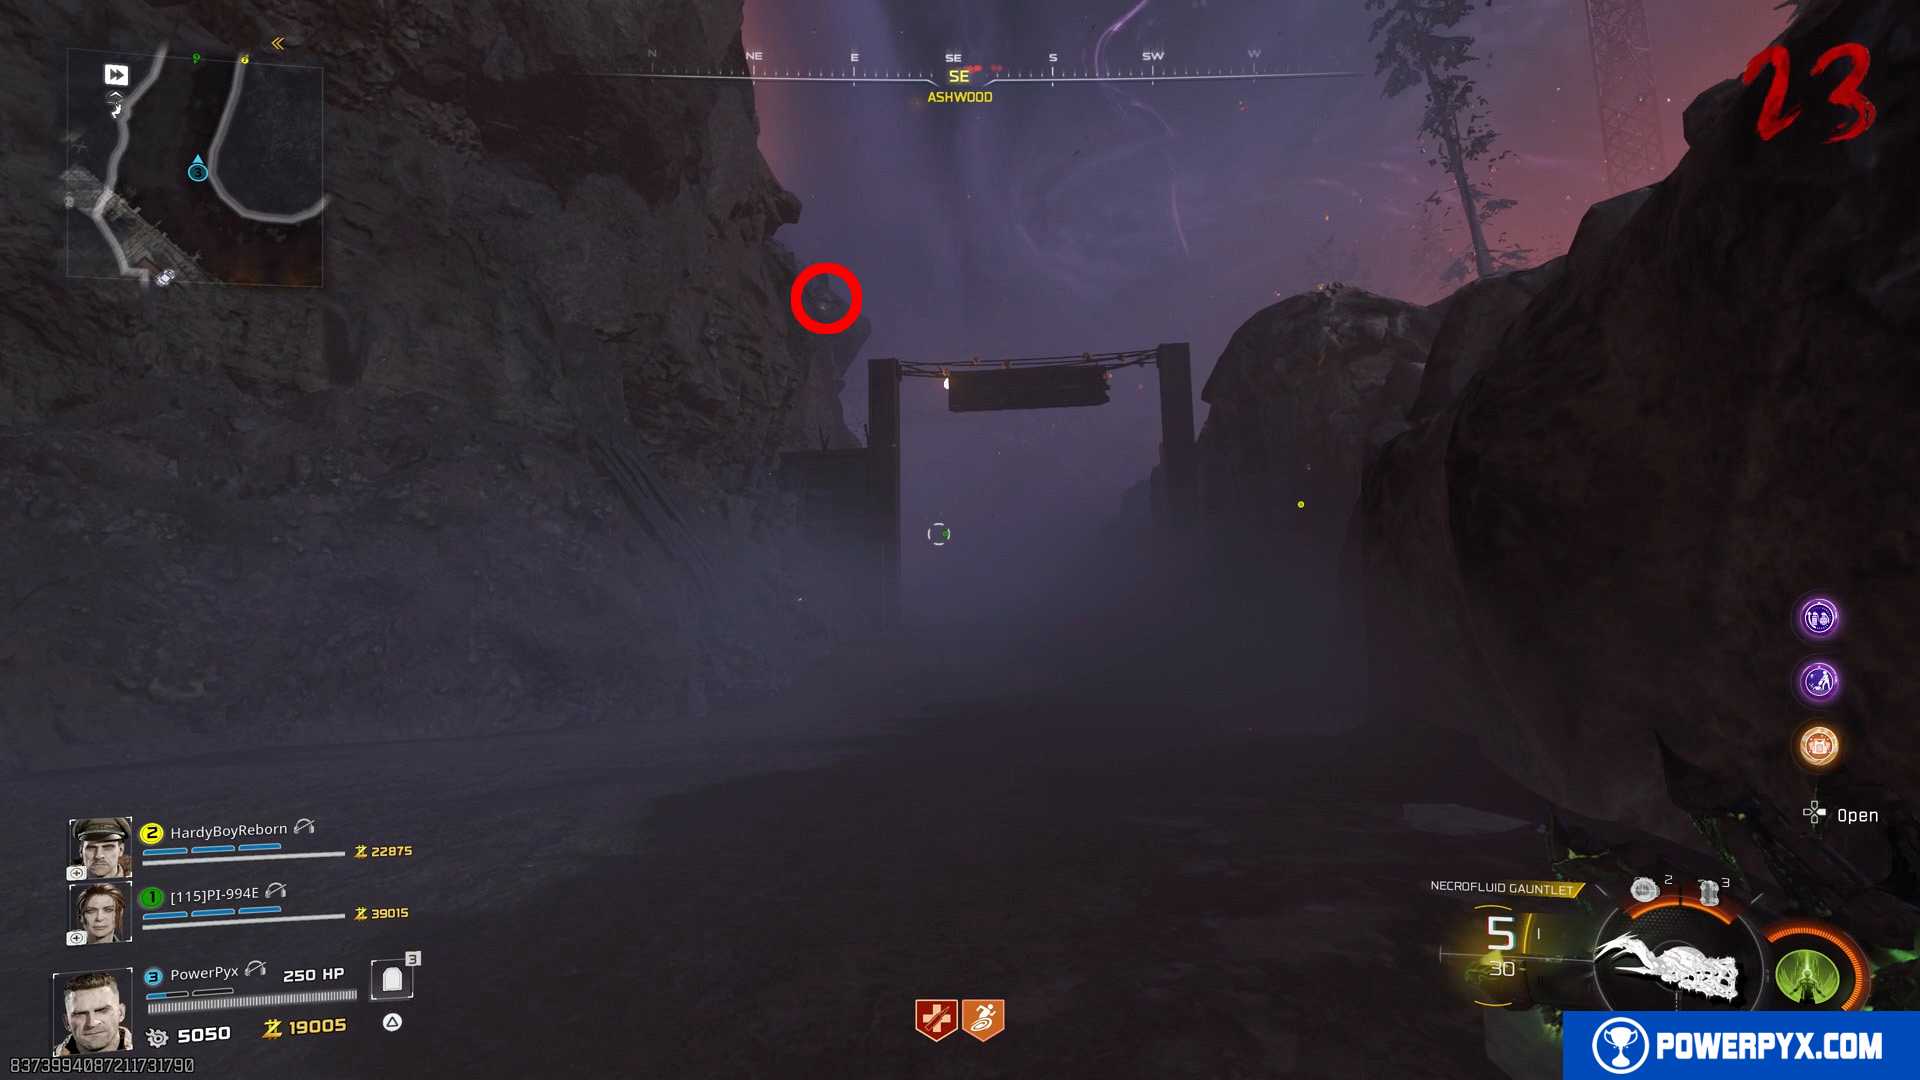
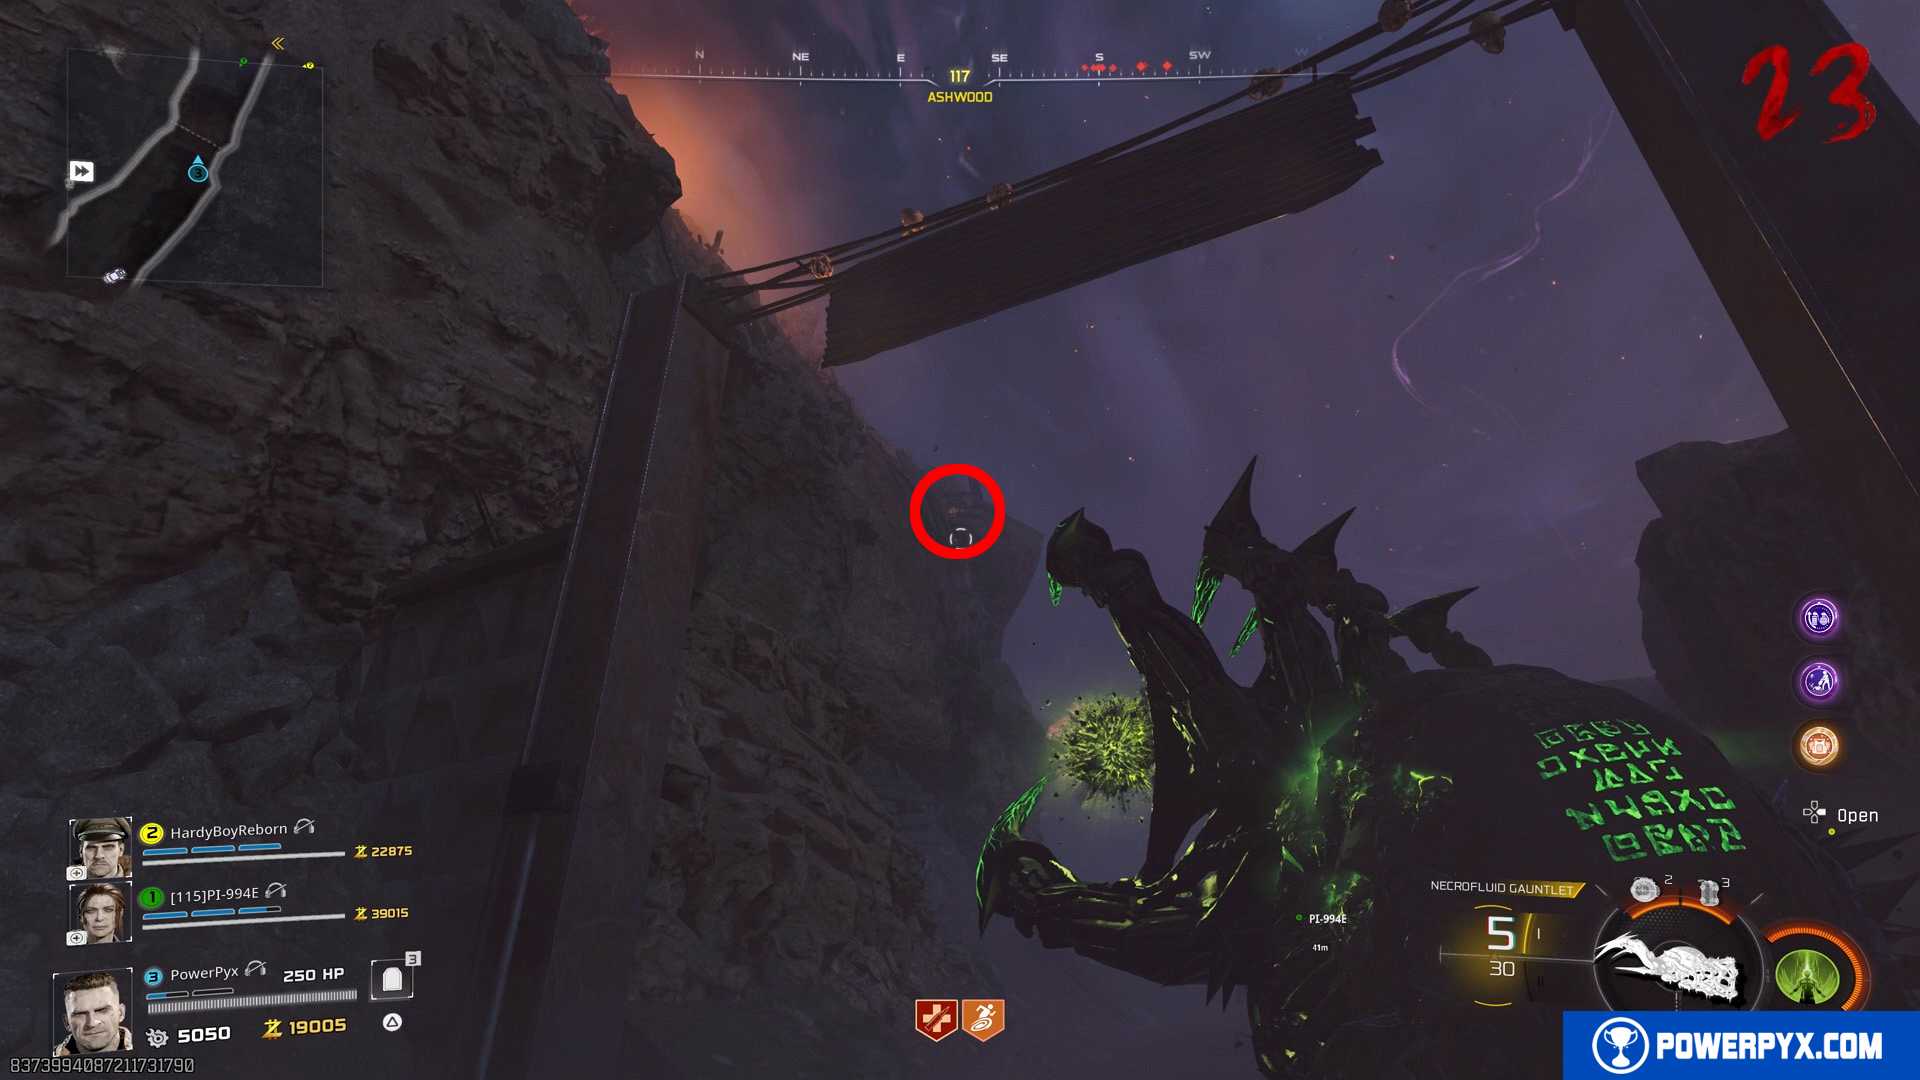
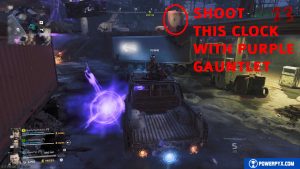
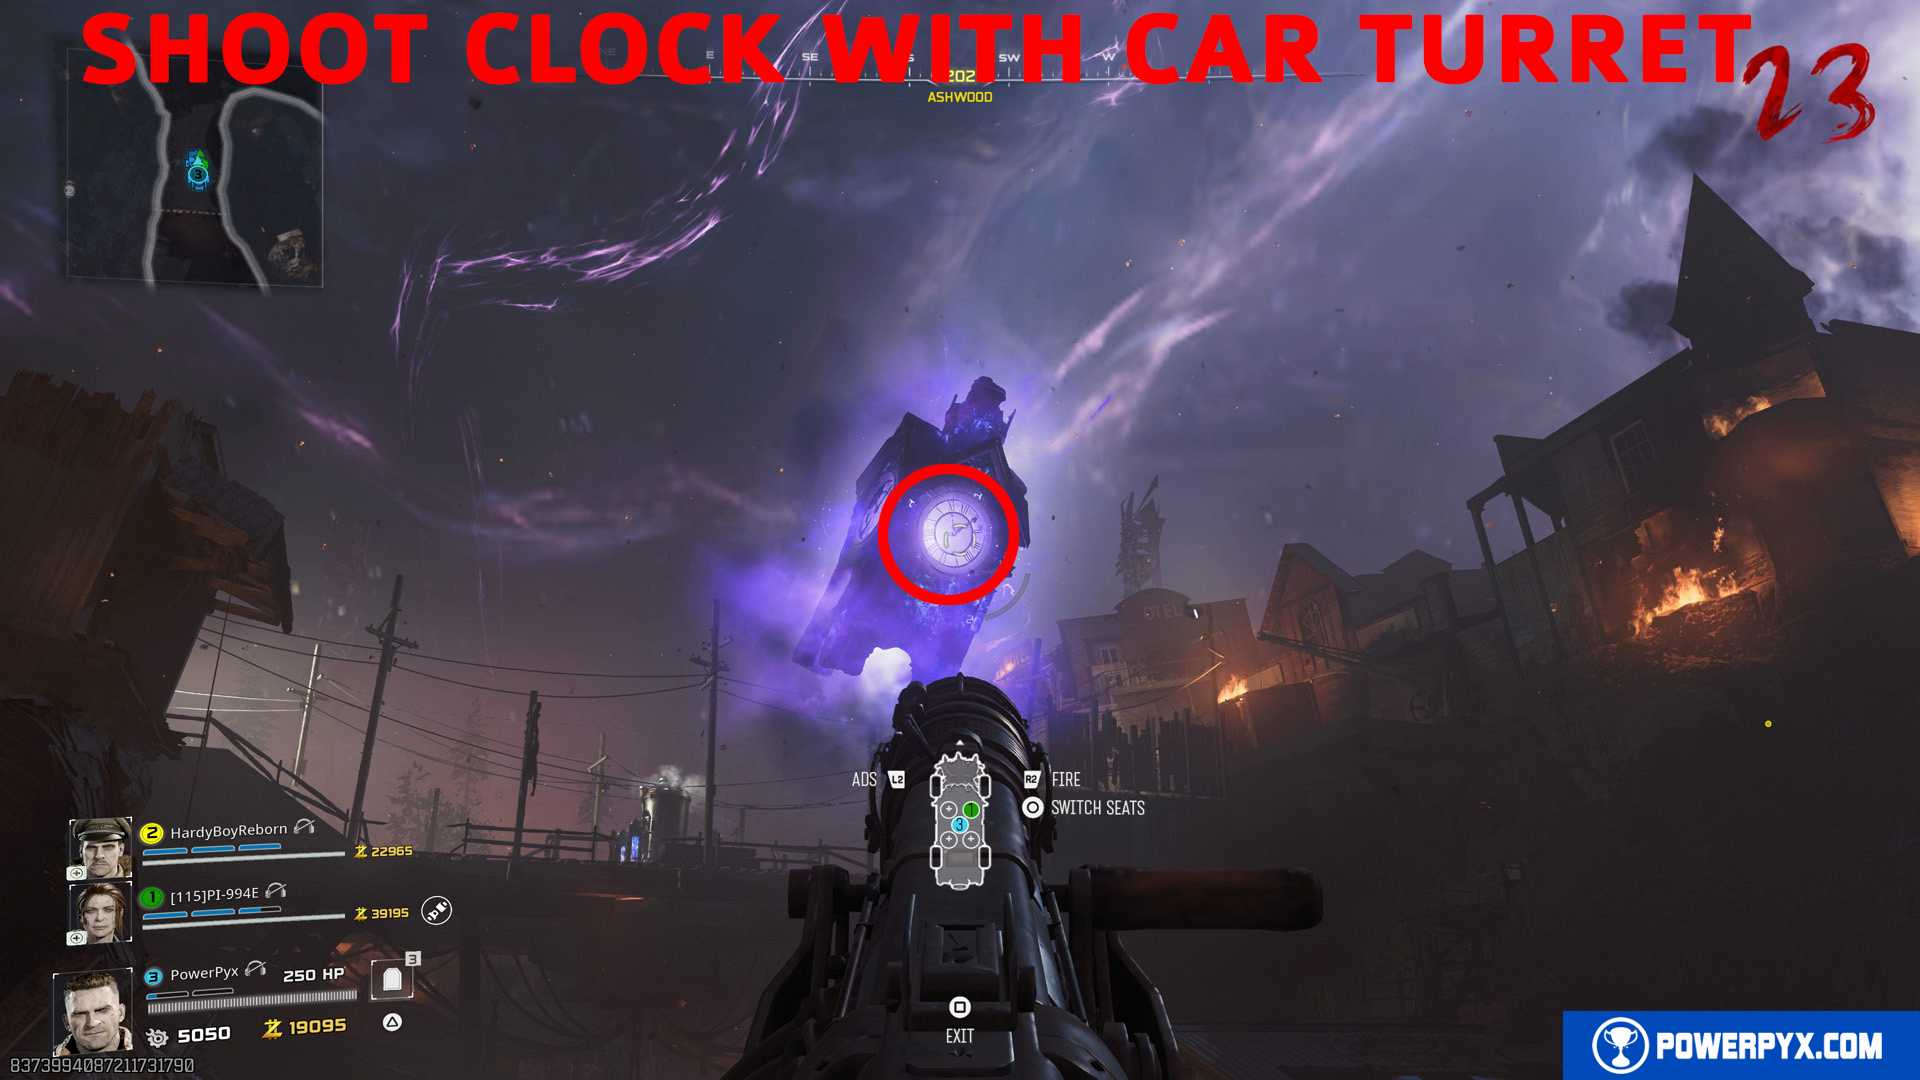
- You can now see a purple glowing clocktower floating above Ashwood area, above the garage. You must shoot it with the car’s turret, then the clock tower glows dark purple.

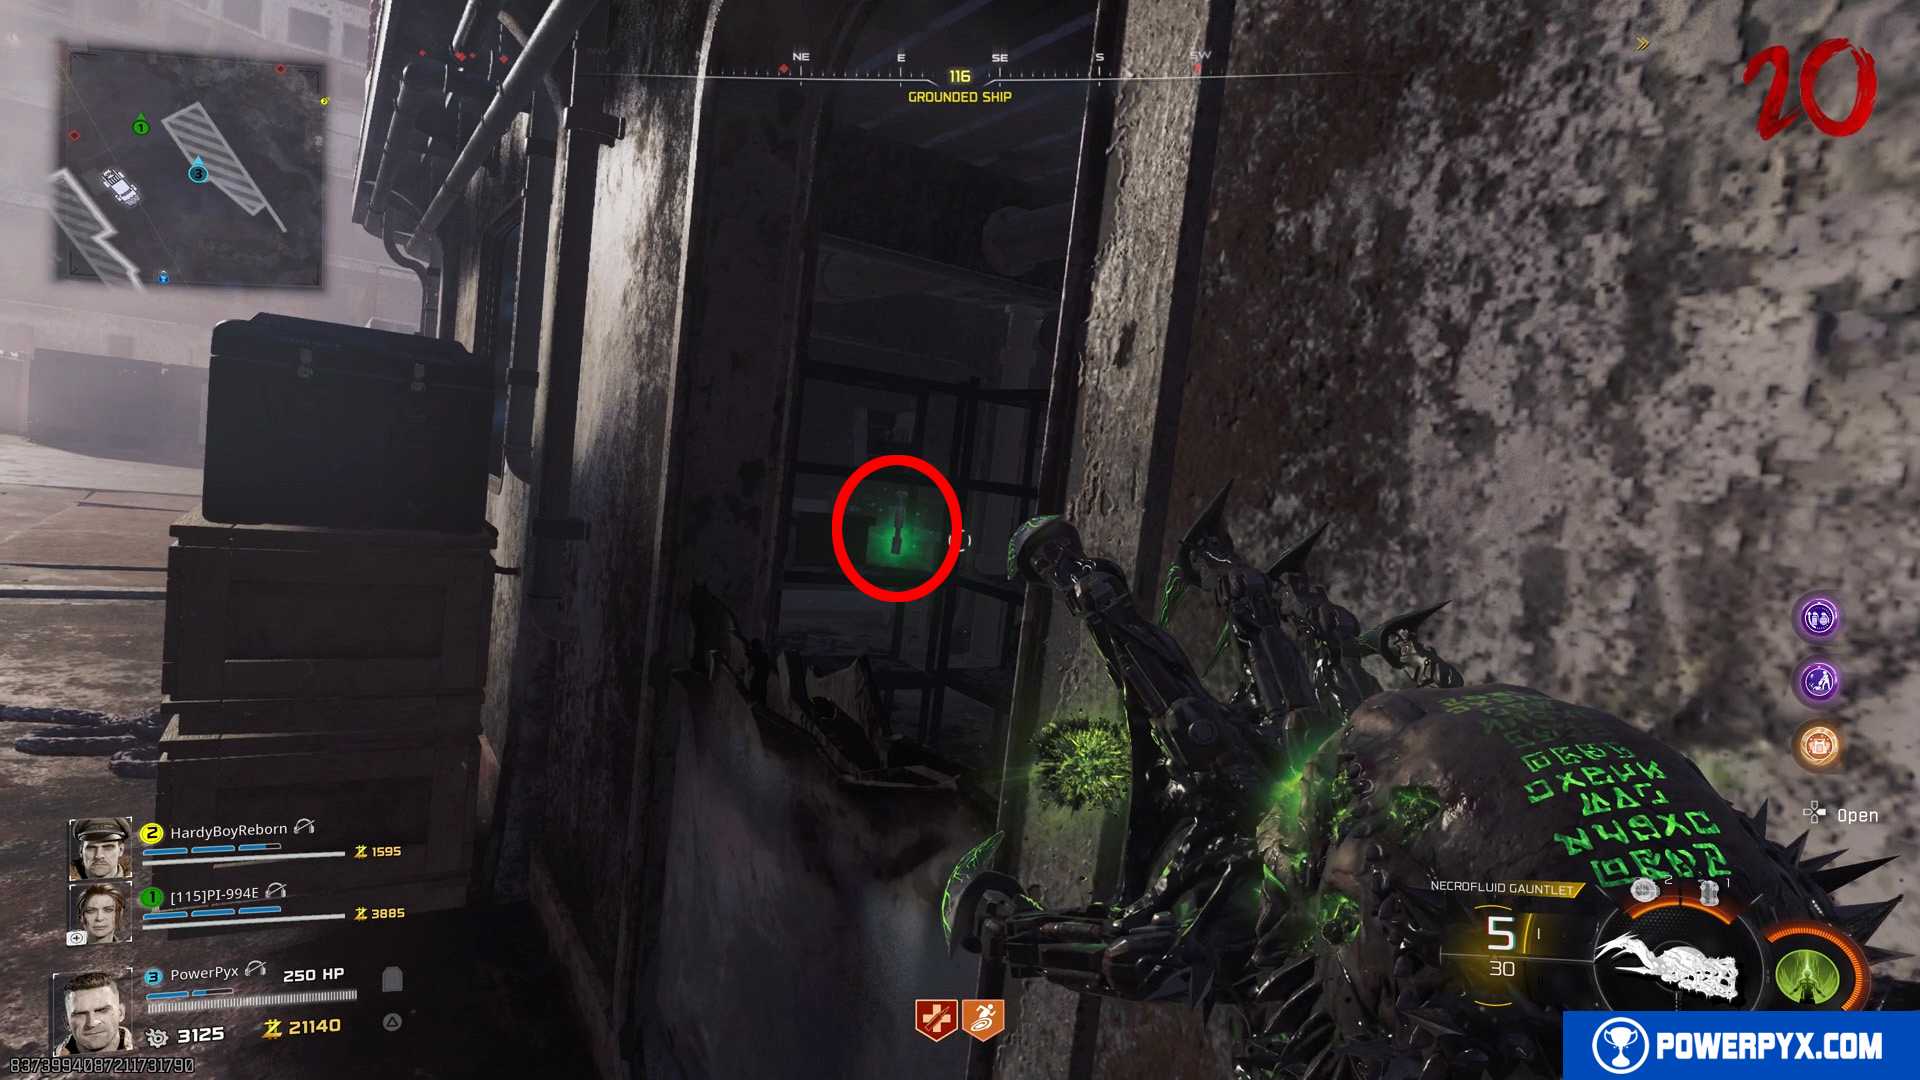
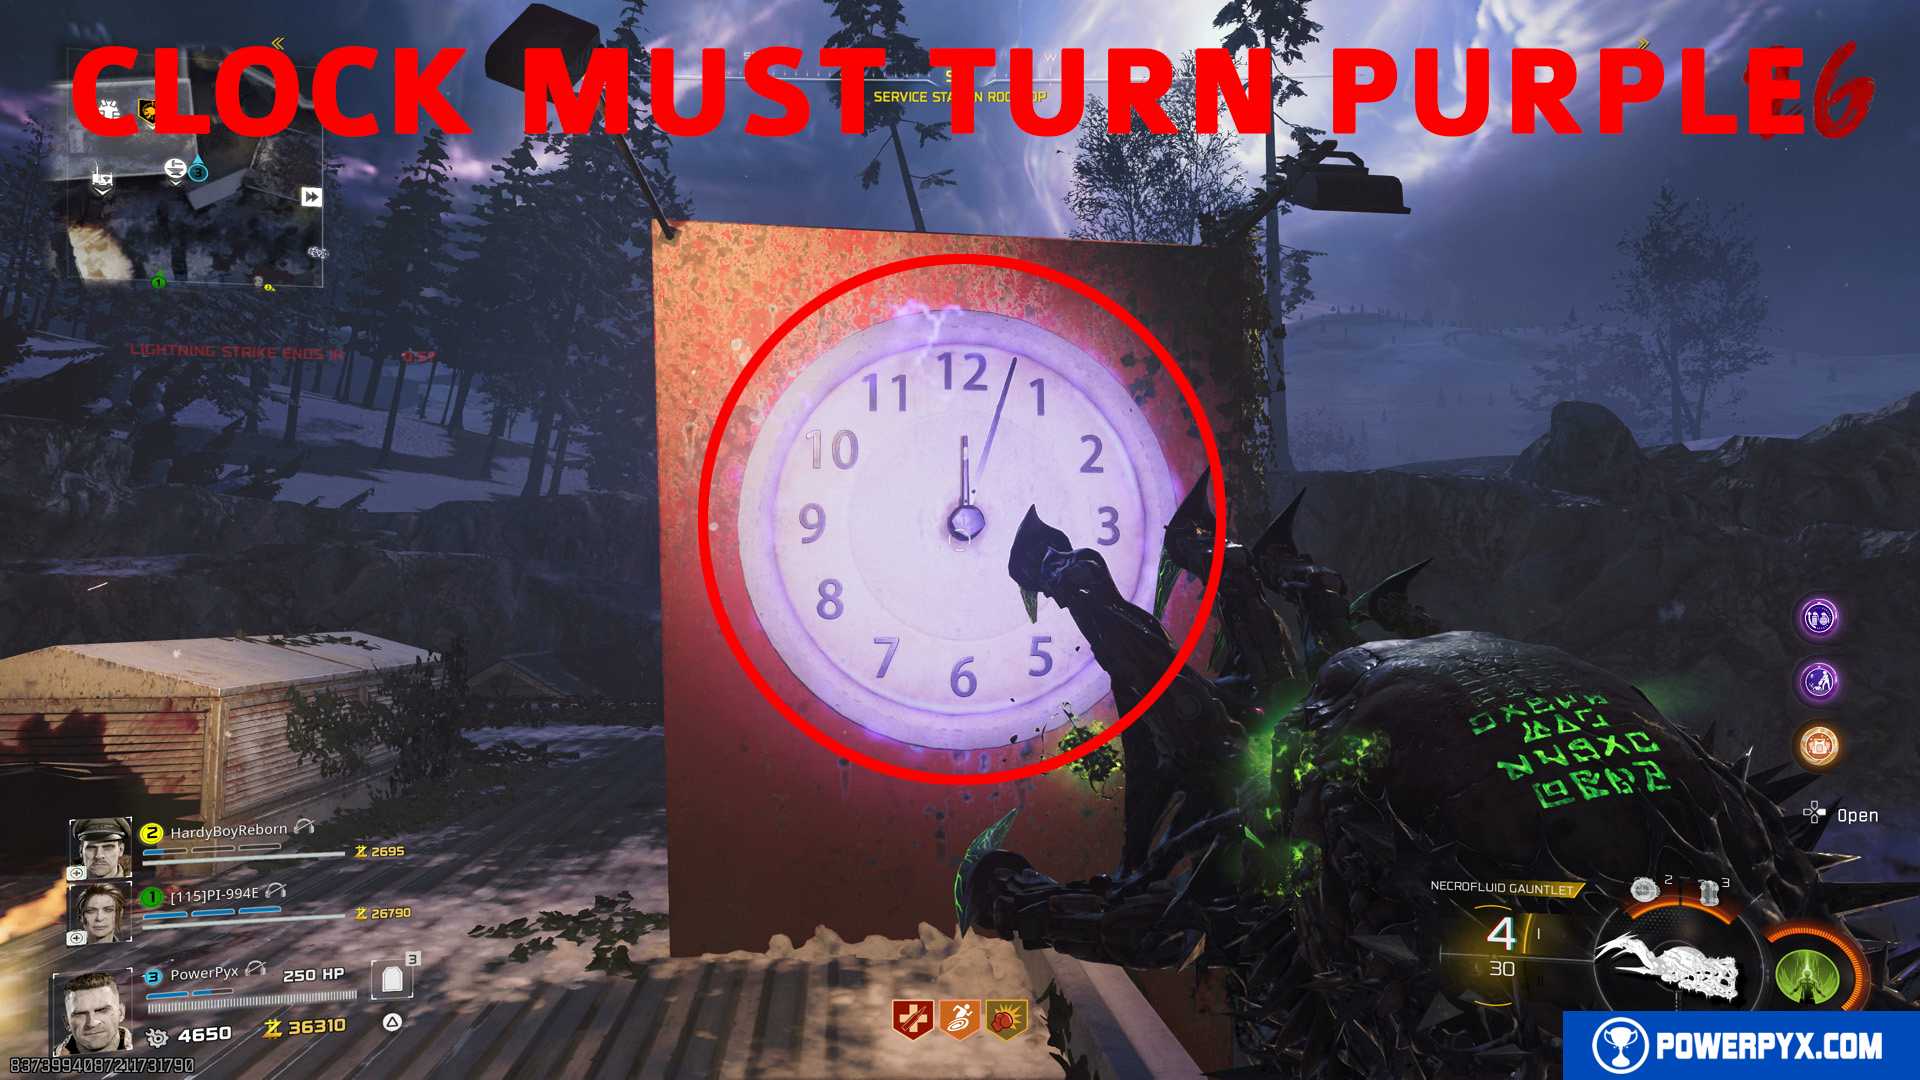
- With the Necrofluid Gauntlet shoot any 1 of the clock hands with / and suck in your shot with / to turn yourself purple for 1 minute (you will see your character/weapon turning purple).
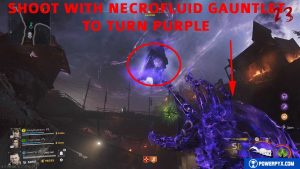
- While you are purple, quickly go to Exit 115 (diner area), climb to the Service Station Rooftop and shoot the clock there to discharge the purple energy from your Necrofluid Gauntlet into this clock. If done correctly this clock will start glowing purple. It will last for only 1 minute, during which you must complete the rest of the step.


NOTE: The clock hand you’ve shot in Ashwood will start spinning to indicate you’ve used it for that round. You can turn purple once per clock hand per round, except the one clock hand that doesn’t work (= 3 tries per round). If you run out of clock hands to turn yourself purple, you must advance to the next round to use all 3 again. You can also use the jump pad in Ashwood to quickly get to Exit 115 before time runs out.
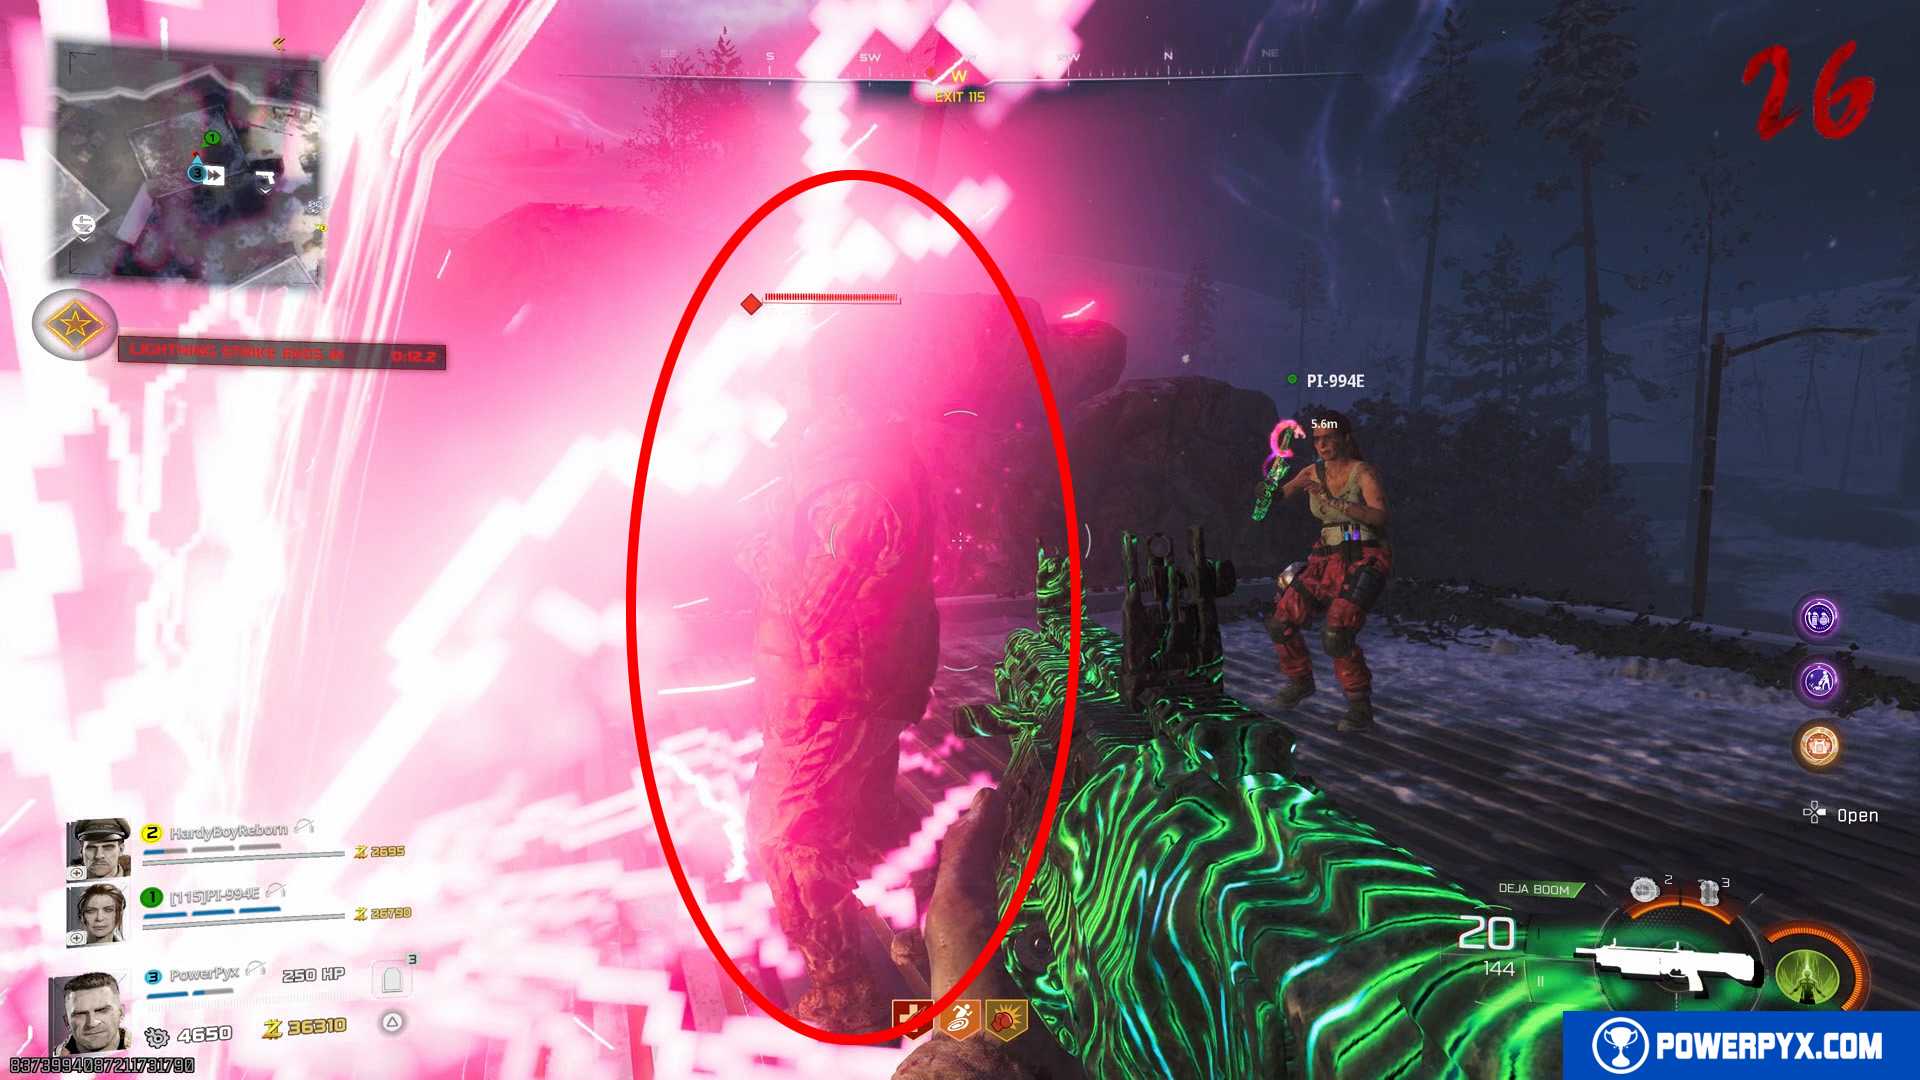
After shooting the clock in Exit 115, you have 1 minute to revive 3 people in Exit 115 and lure them to the correct color of lightning. If you’re in co-op you’ll want to have each player work on a different one so you can ideally do all 3 in the same round. You CAN do these one by one across multiple rounds too (solo you will have to), but you’d need to play another 2 rounds until lightning appears again. When you’ve completed one you don’t need to do the completed one again on the next try.
DON’T kill the people you revive. You have to bring them to the lightning and they have to stand in the lightning (alive) until the timer runs out. Tell your teammates to not shoot any zombies during this step just to be safe.
3 People to revive:
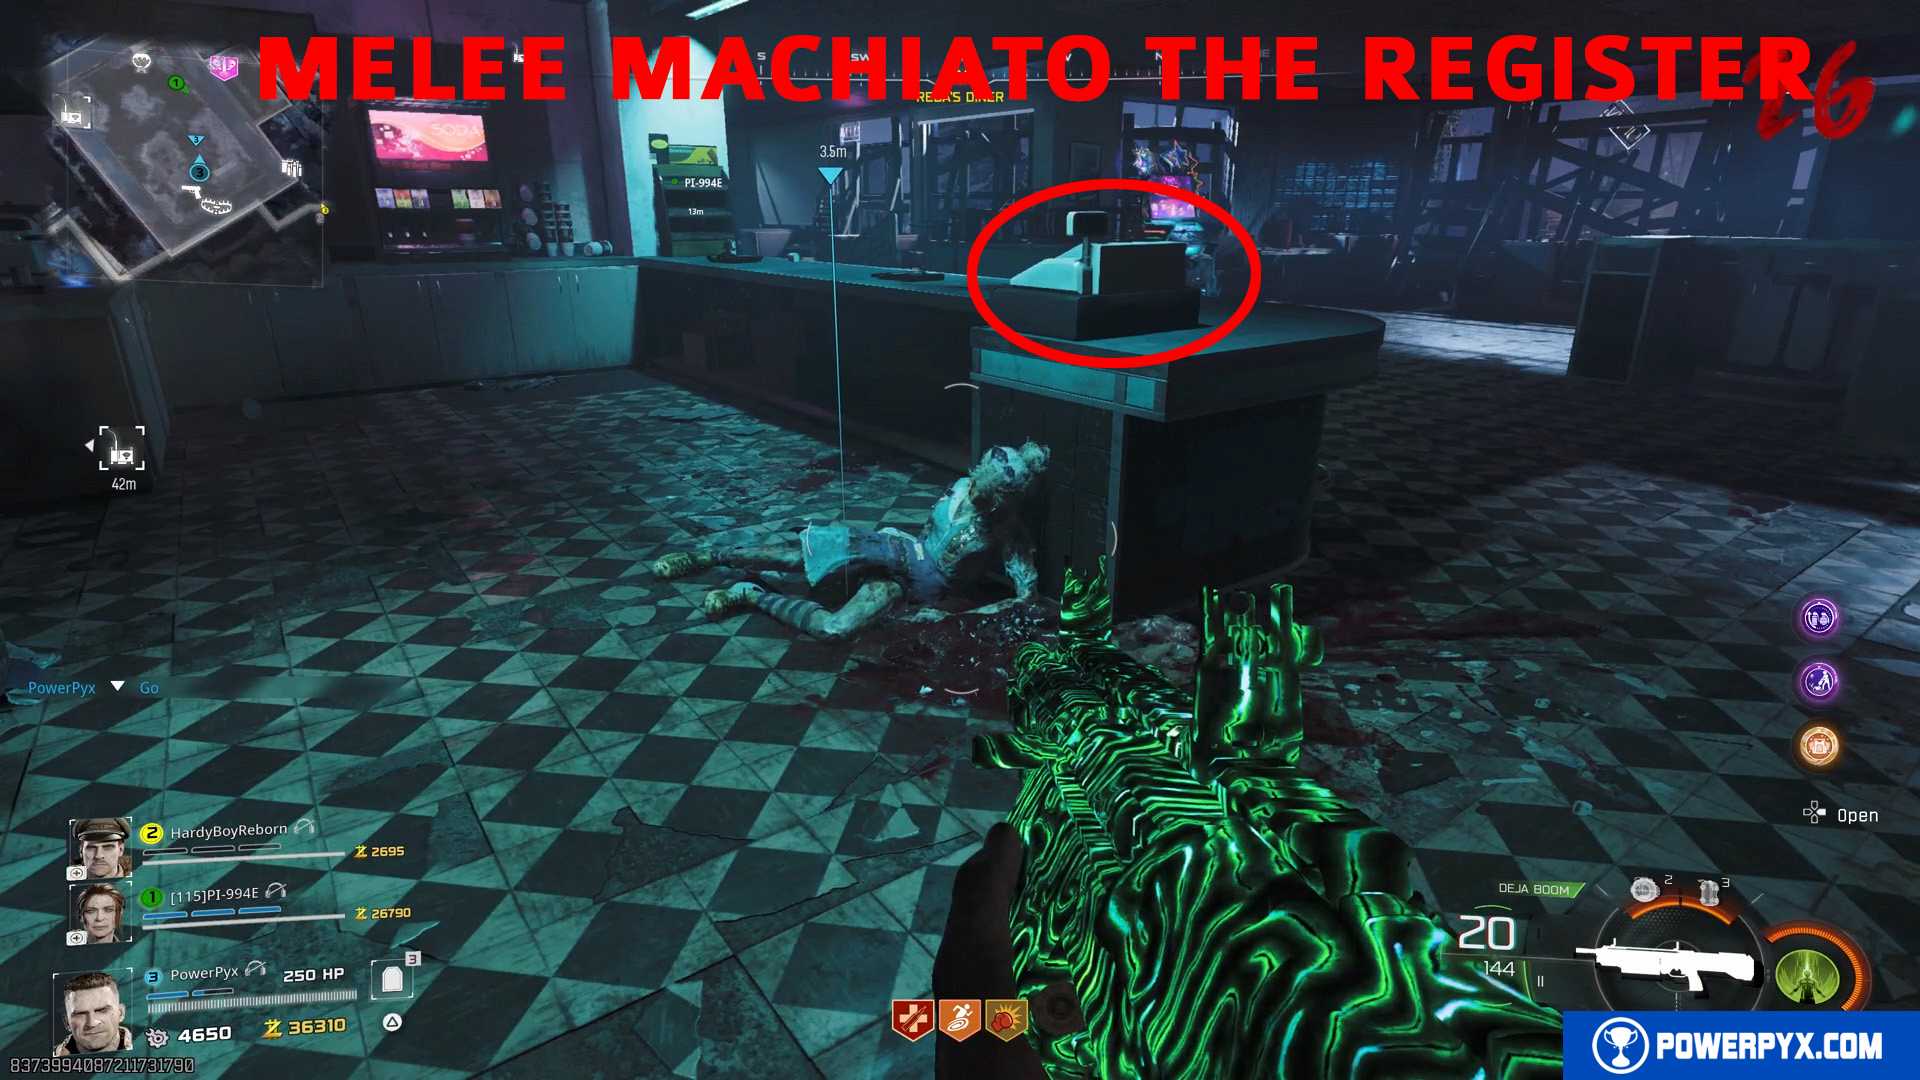
#1 – Inside the diner is a female corpse at the cash register. You must hit the cash register with a melee attack (Right Stick /  ) WHILE HAVING MELEE MACHIATO PERK (bought at Blackwater)! This will revive the woman. Lure her to the BLUE LIGHTNING.
#2 – Ram the back of the red trailer truck with your car. The red trailer is parked against the side of the diner. A zombie will fall out to the left of the trailer. Lure him to the RED LIGHTNING.


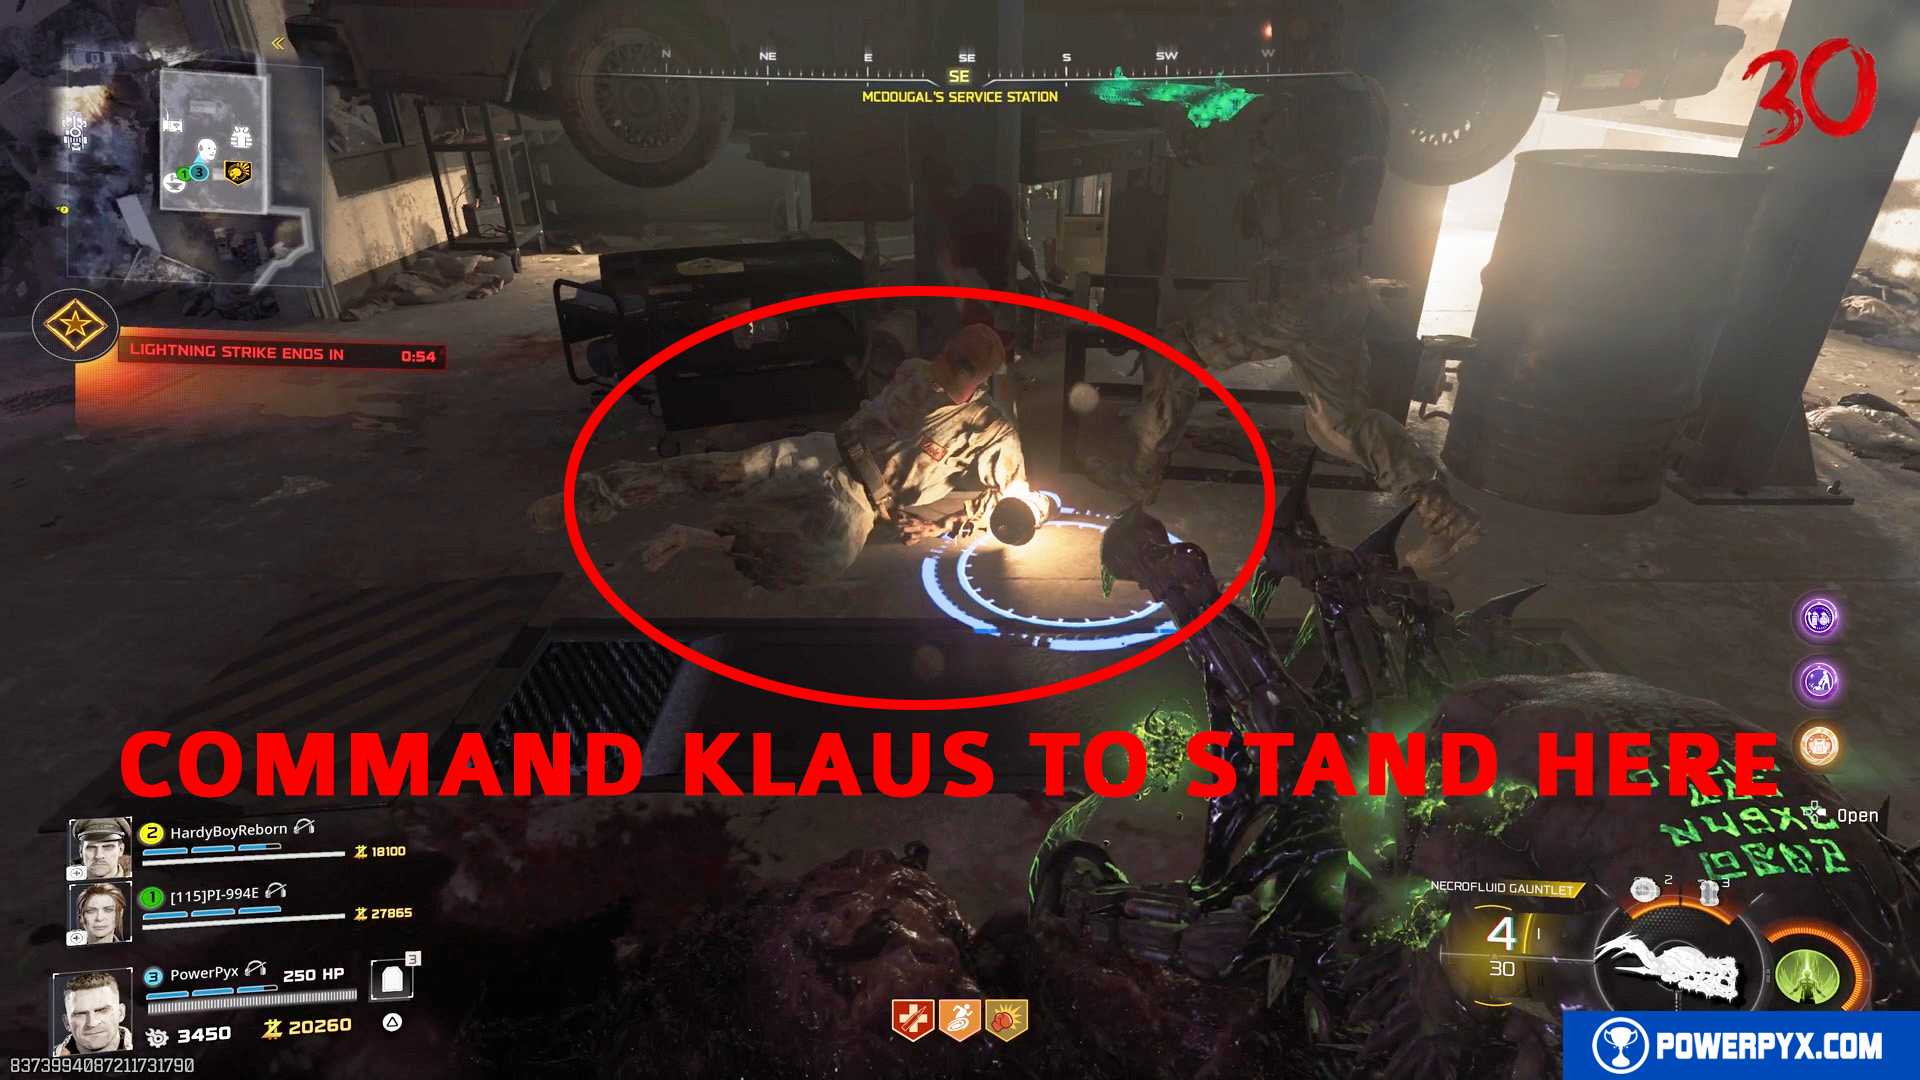
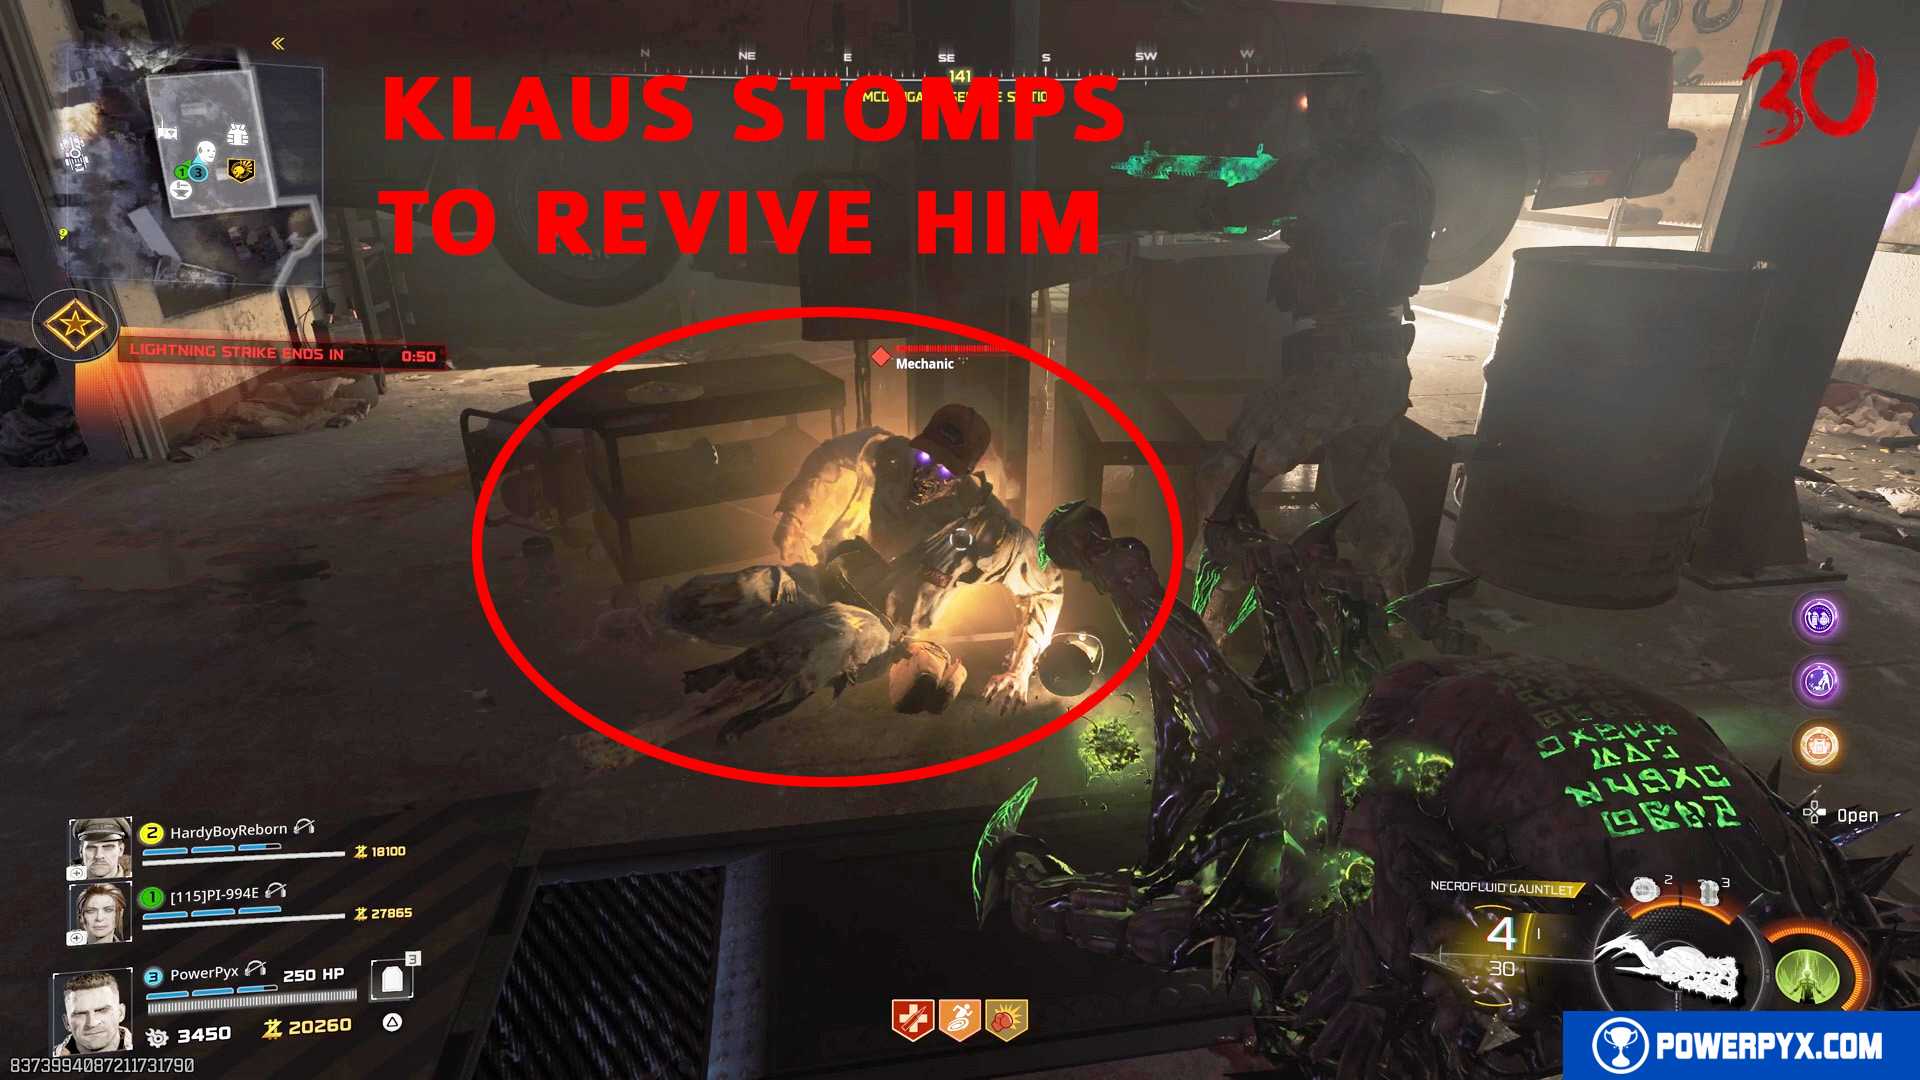
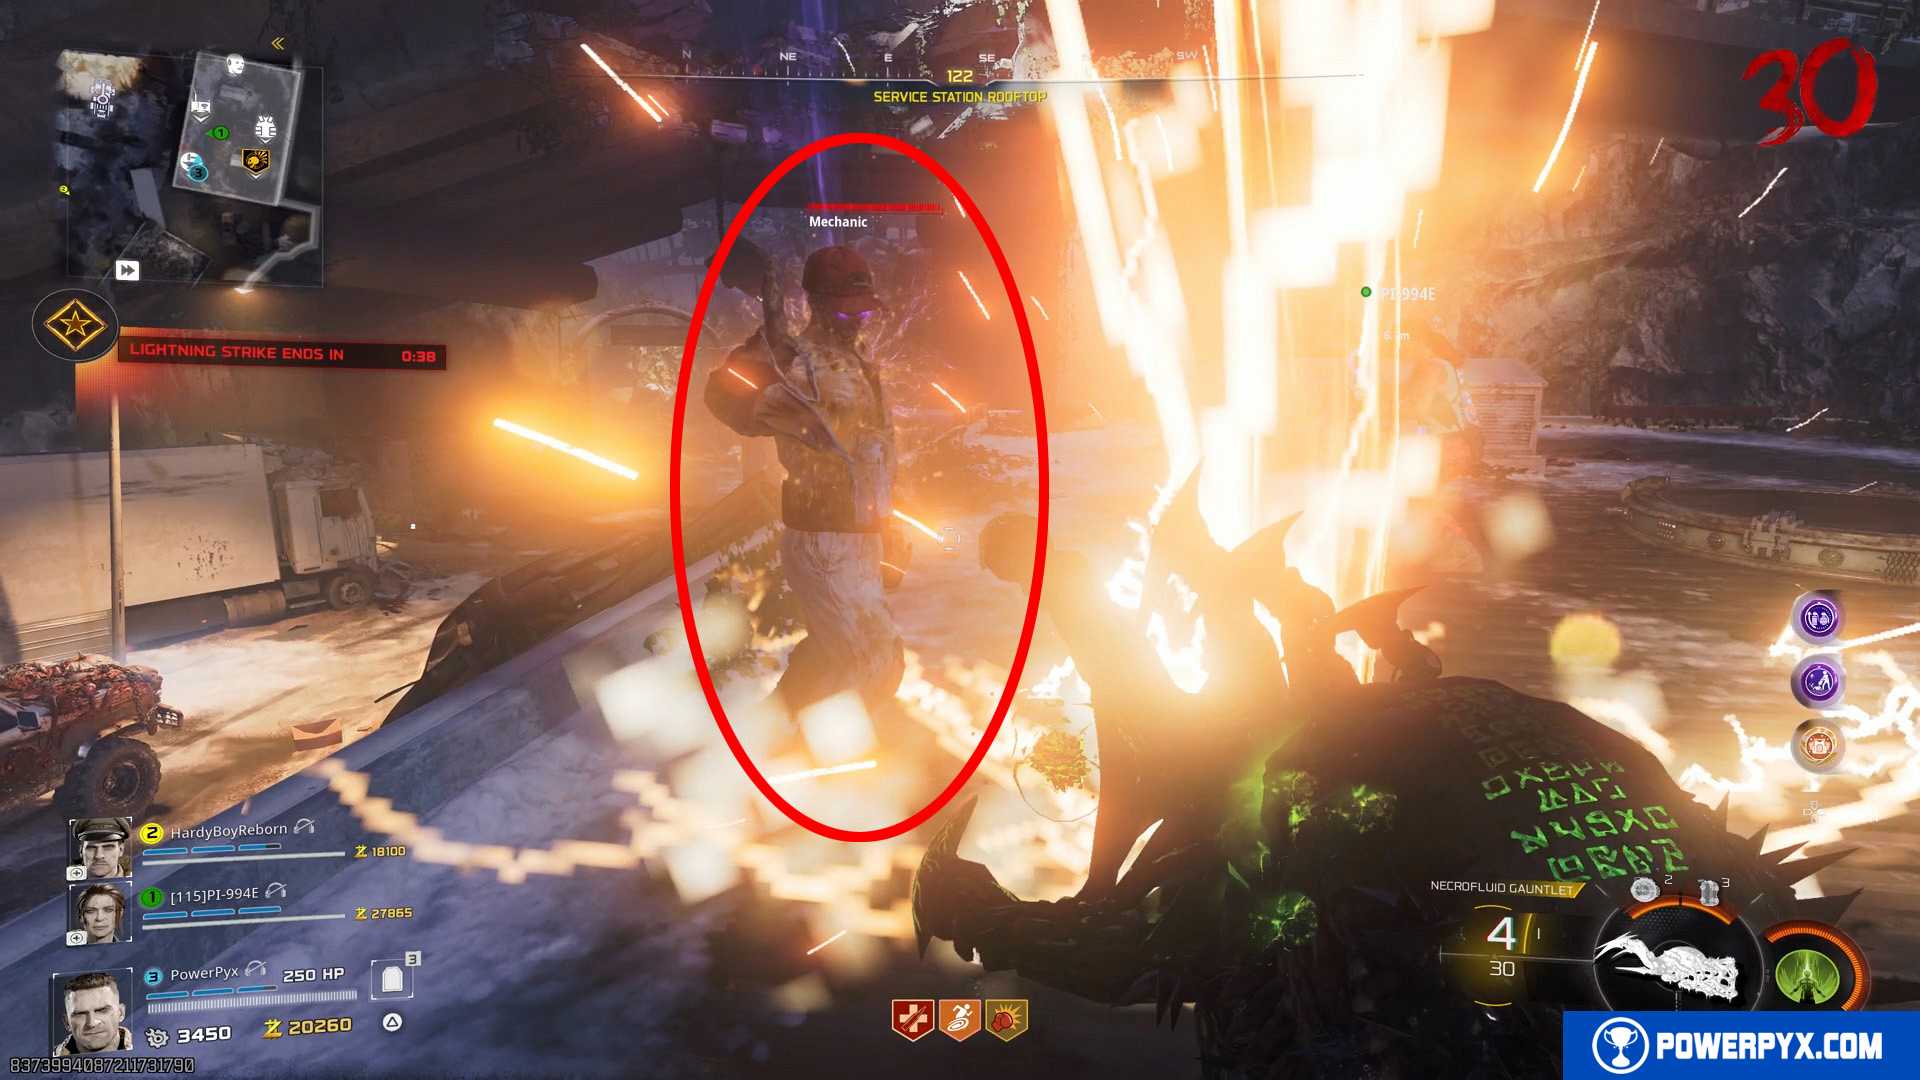
#3 – Inside McDougal’s Service Station (where Deadshot Daiquiri Perk is), there’s a dead mechanic on the floor below the carlift. You must summon KLAUS by using the radio in the corner of this room for 2000 points. Then command KLAUS with to stand in front of the dead mechanic. KLAUS will stomp the ground to revive the mechanic. Lure him to the YELLOW LIGHTNING. Note that KLAUS takes about 15 seconds to spawn in and he needs more time to stand in front of the guy and stomp him, so it’ll eat up quite a lot of the 1 minute timer.
If you play with 3+ teammates and everyone knows what to do, you may be able to do them all in the same round. If not, don’t worry and do it after 2 rounds when the next lightning appears. You always need to turn purple first (shoot clock tower in Ashwood with car turret > suck it in with Necrofluid Gauntlet > quickly discharge it on clock on Exit 115 roof > quickly revive the people and lure them to their lightning color).
Step 21: Ashwood & Cosmodrome – Freeze Cosmodrome Radar Dishes & Solve Computer Code Puzzle
Just like in the previous step, you will need to shoot the clock tower above Ashwood garage with car turret, suck it in with Necrofluid Gauntlet to turn purple. Then quickly go to Cosmodrome and shoot the two rotating radar dishes to slow them. They will turn purple when done correctly.
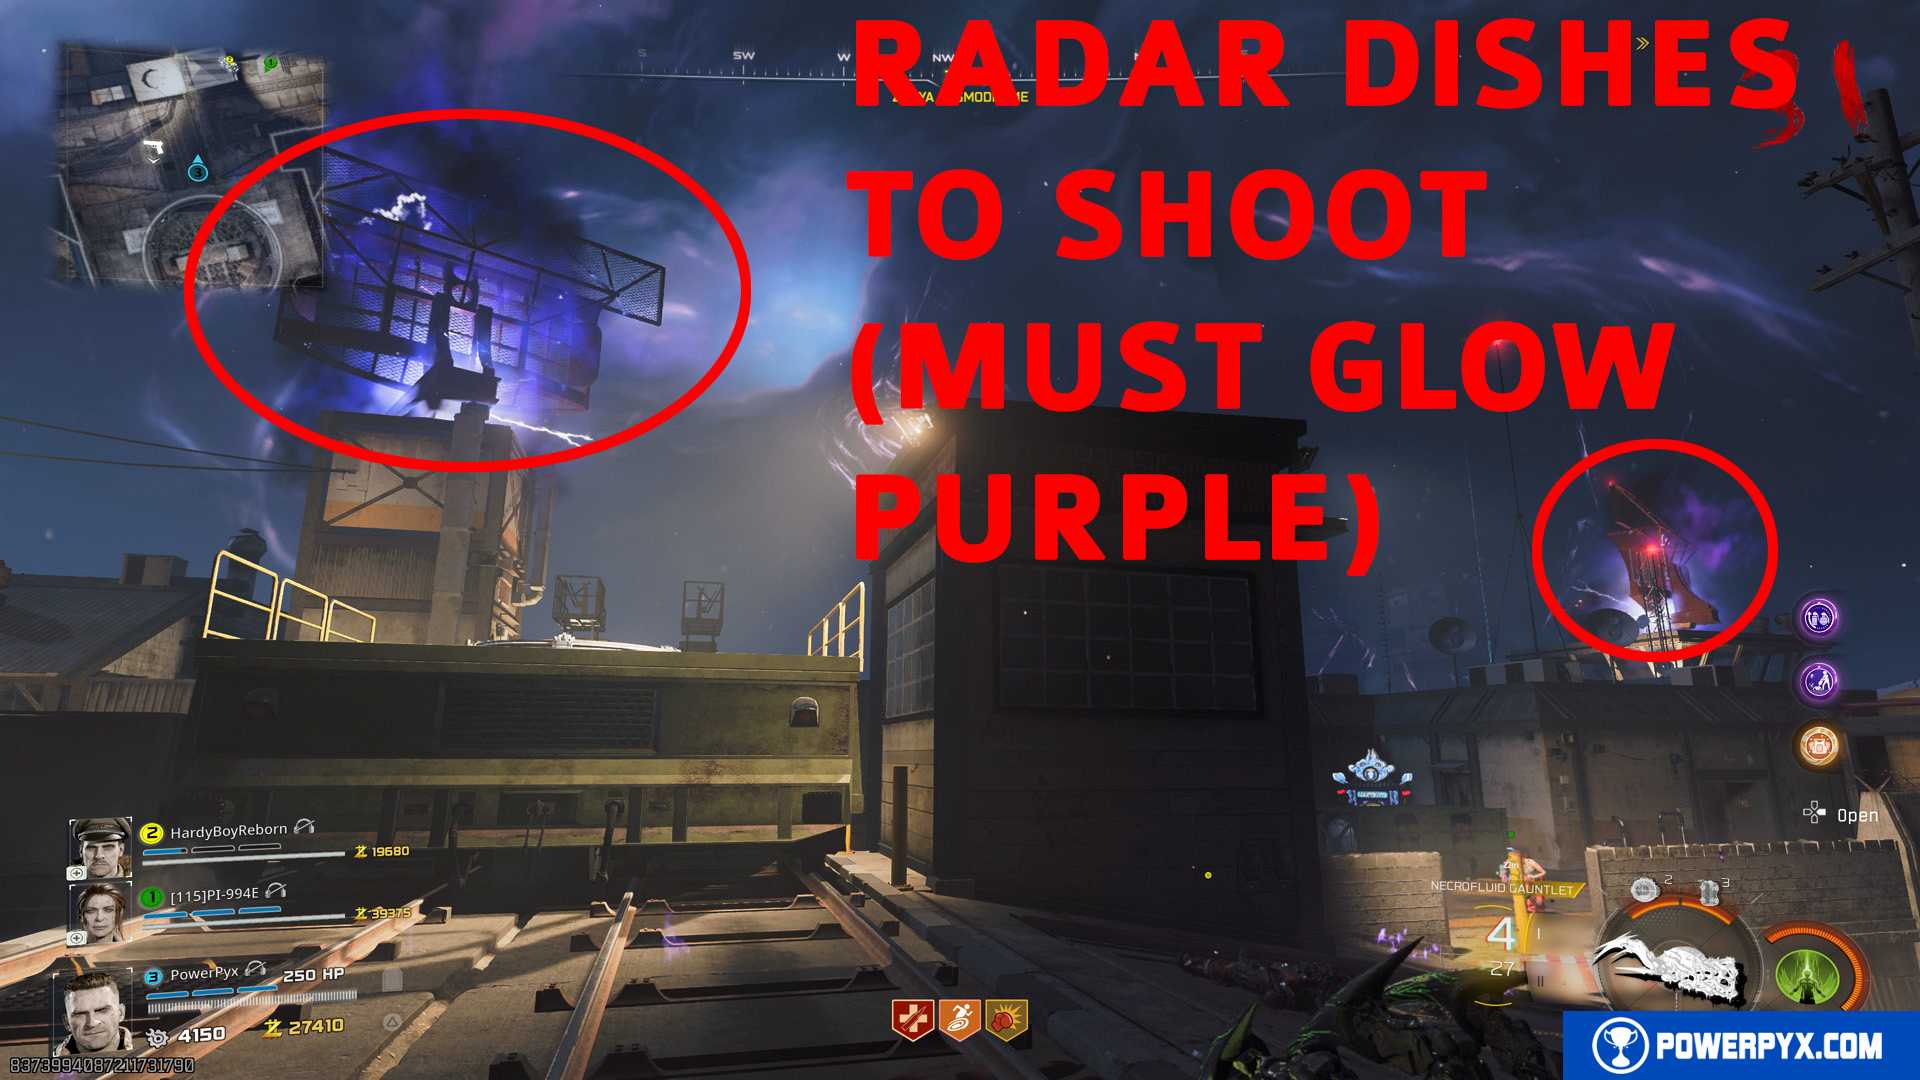
You must do this for one radar dish at a time. After you shoot one radar dish, go back to the floating clock tower in Ashwood and turn purple again. You can use the Jump Pad in the upper part of Ashwood to instantly jump to Cosmodrome.
After both radar dishes are purple, you must enter the Control Room in Cosmodrome (room next to Wisp Tea perk). In this room you see many green computer screens with flashing numbers on them.
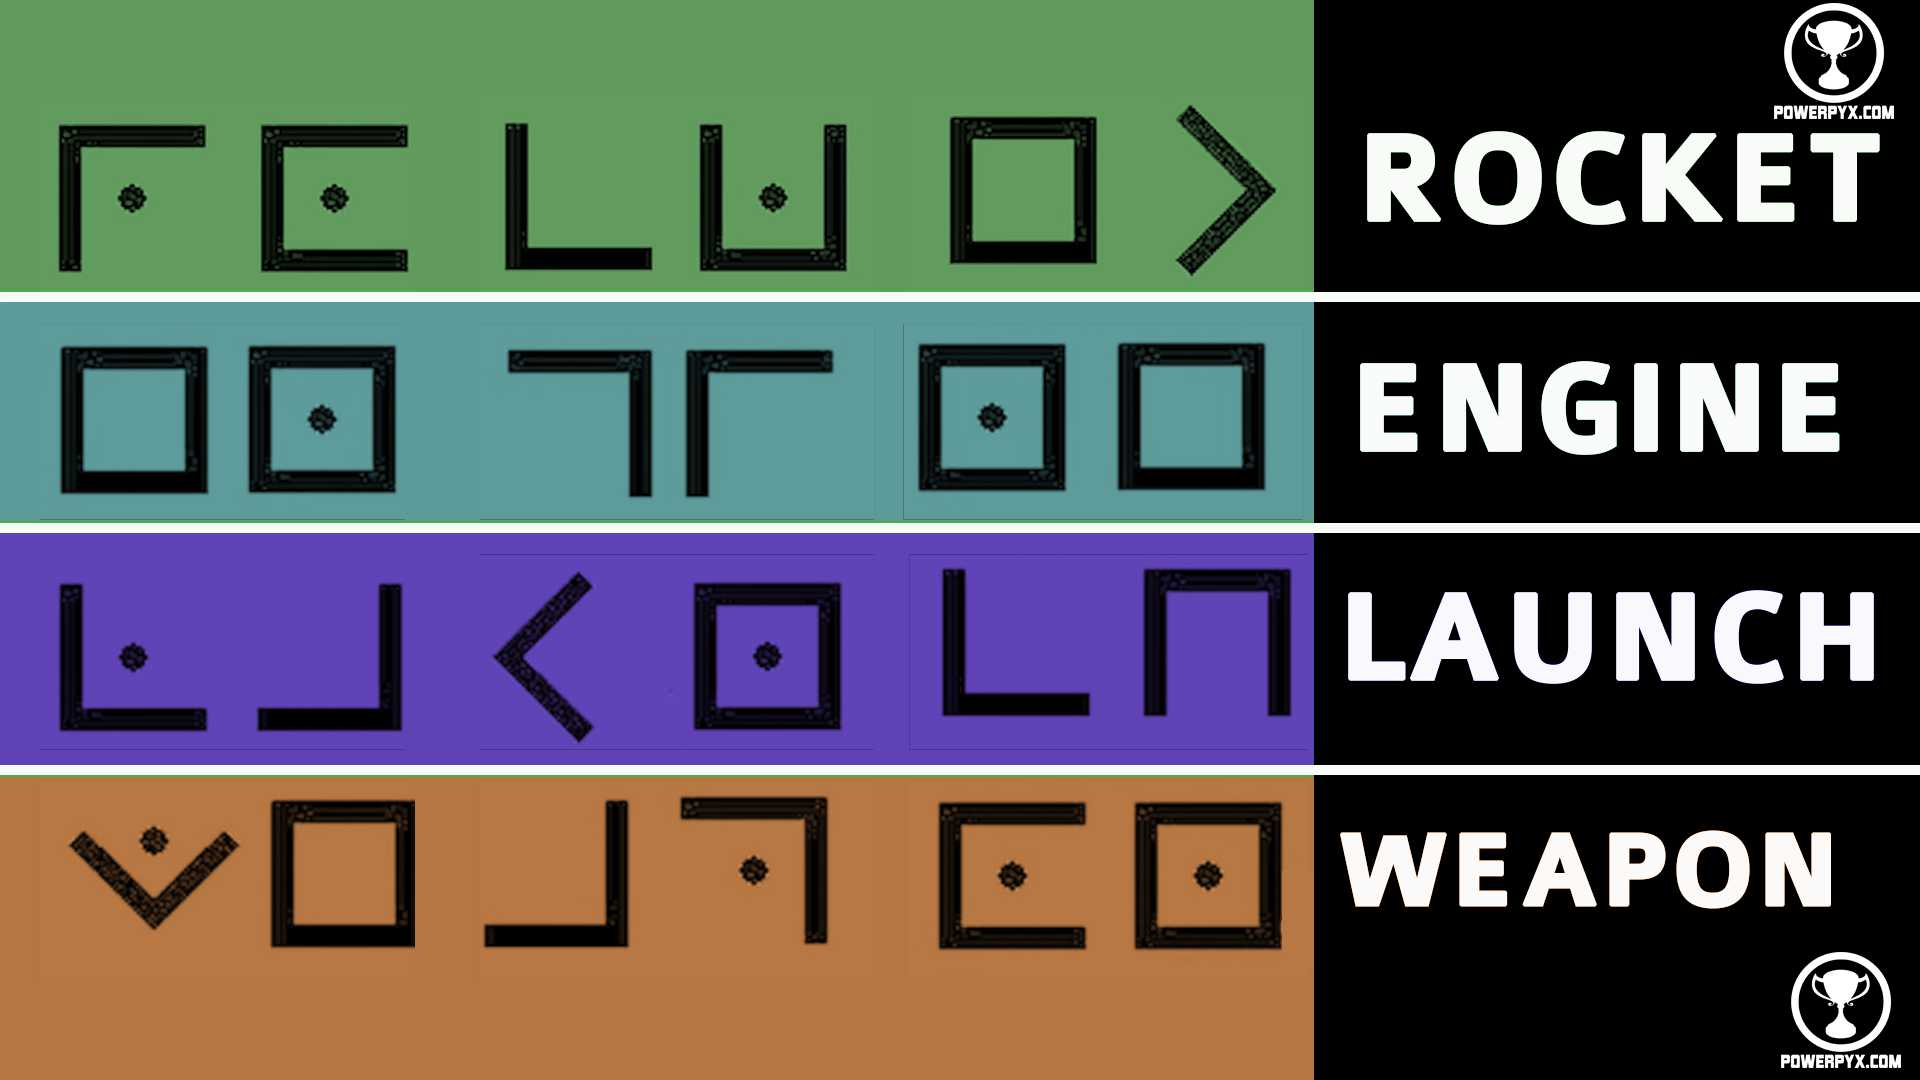
The two screens on the right show glyph combinations that translate to 4 possible words: ROCKET / ENGINE / LAUNCH / WEAPON.
This will be different in every match! You always get 1 of 4 possible words.
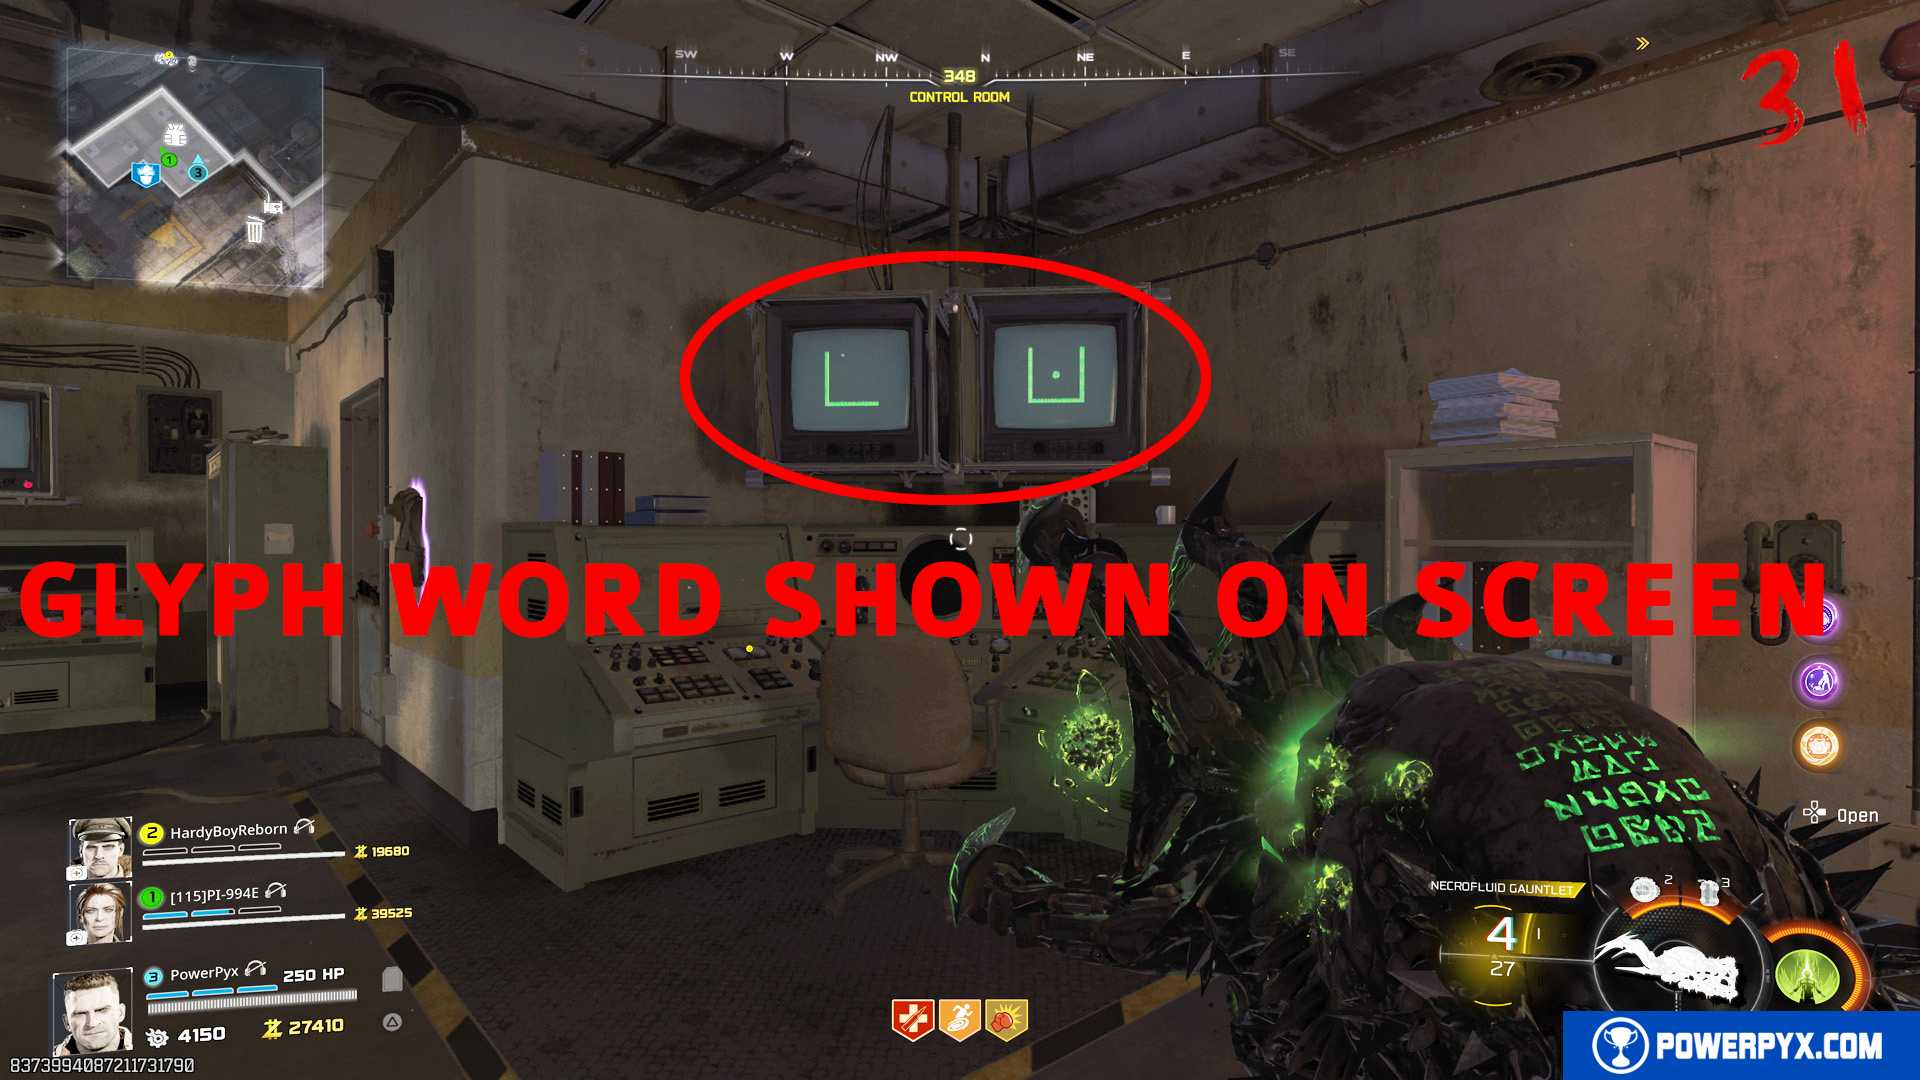
Glyph Translation:
Check the glyphs you get in your game and compare against the below graphic until you’re sure you figured out your correct word.
Inputting the Glyph into Computers:
In the same room, you will see computer screens with flashing numbers. You must shoot the red button on the screens from LEFT TO RIGHT when they show the numbers that correspond to your word:
- ROCKET = 17-14-02-10-04-19
- ENGINE = 04-13-06-08-13-04
- LAUNCH = 11-00-20-13-02-07
- WEAPON = 20-04-00-15-14-13
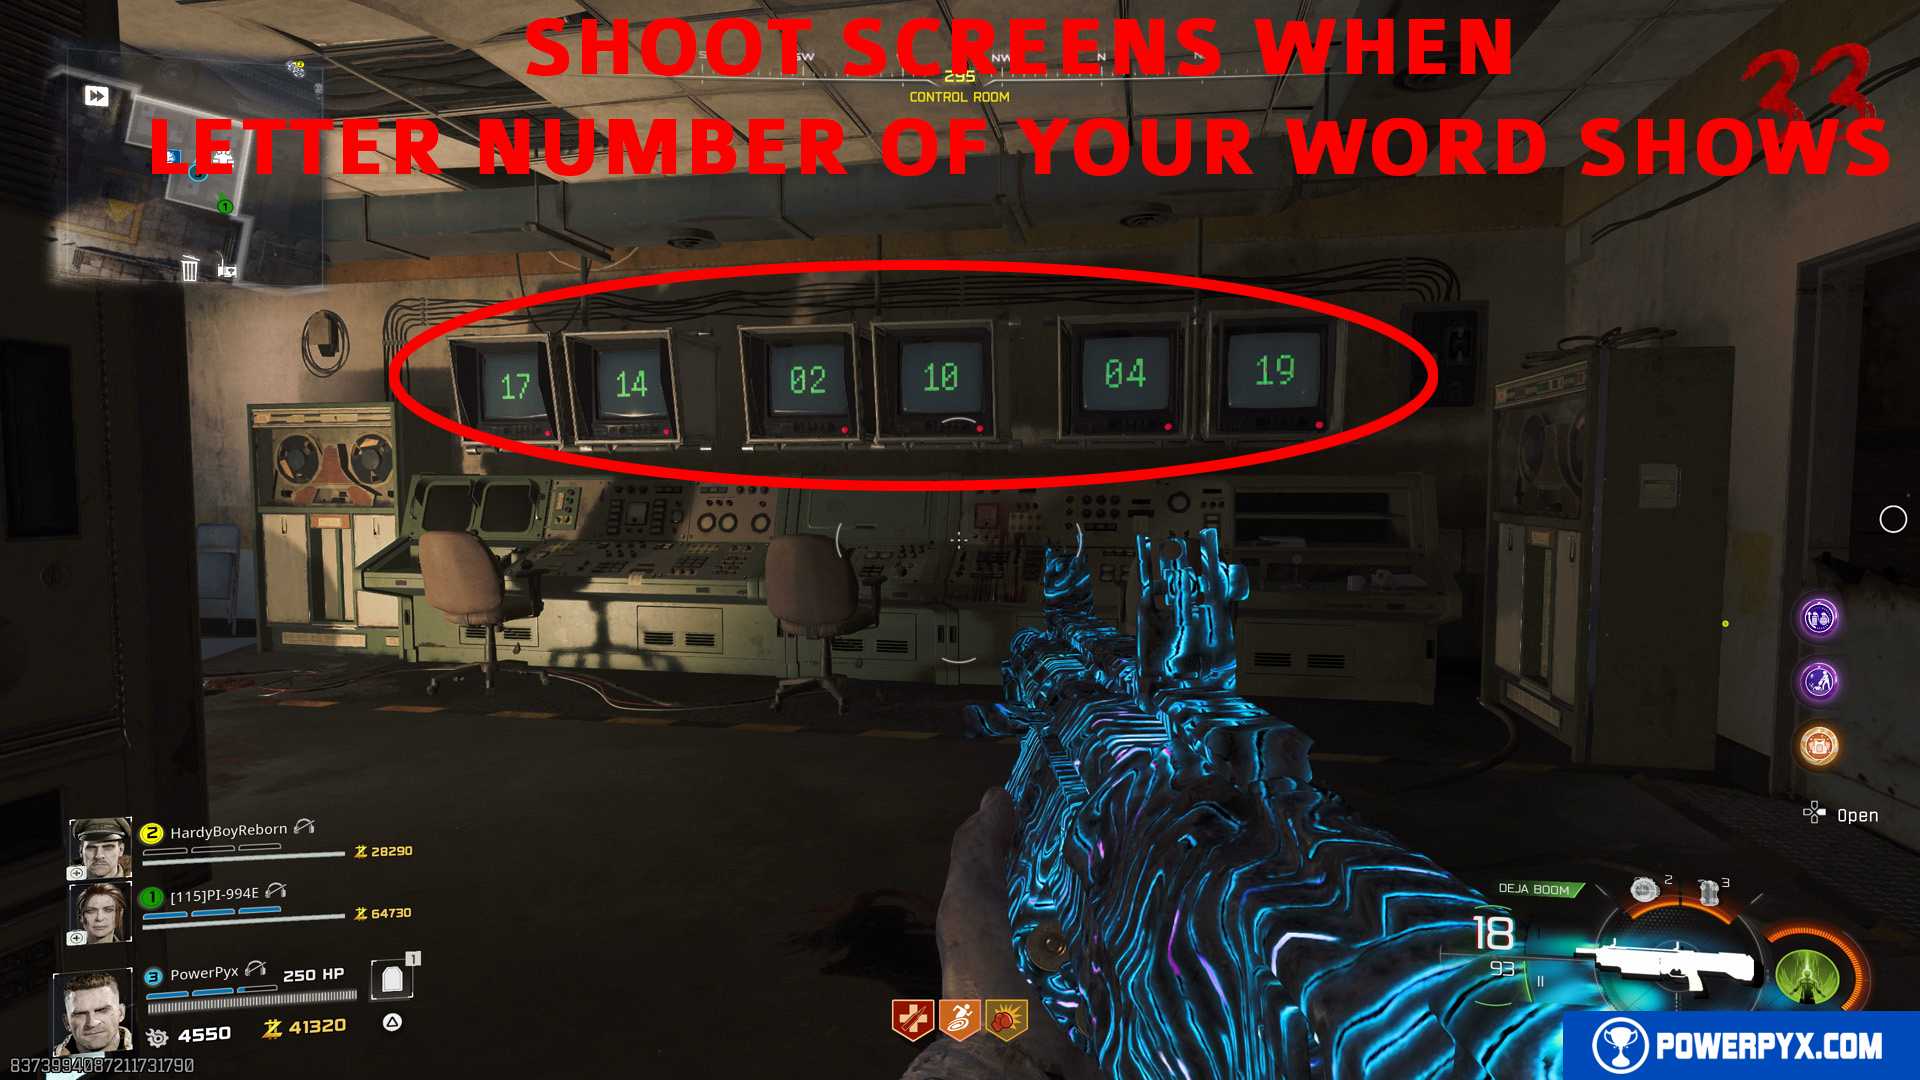
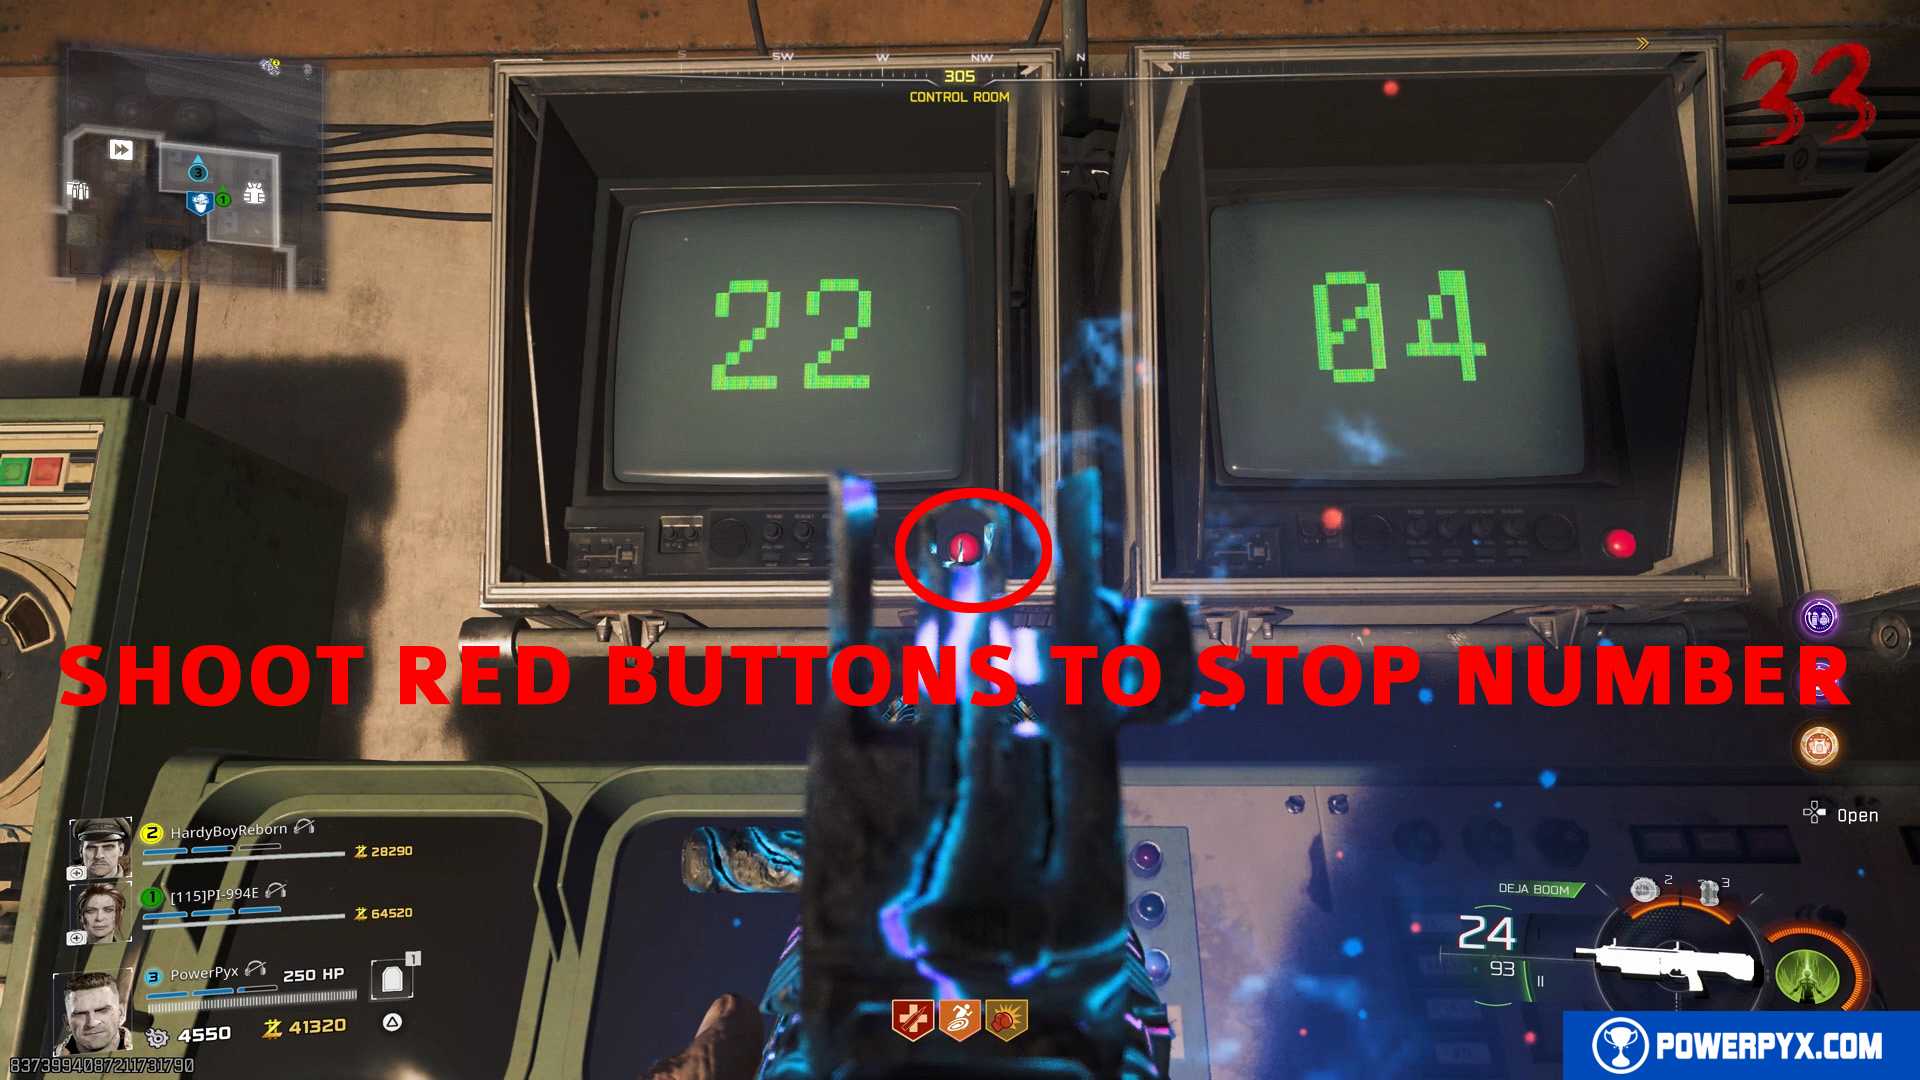
If you shoot at the correct time, the number onscreen will stop. If you mess it up, it will show the wrong number and the step is failed. Then you need to advance to the next round and repeat the entire step including freezing the radar dishes. You also have to be relatively quick and can’t take minutes or else the code input will fail. But you don’t have to rush it either, the time is quite lenient.
When done correctly, the rocket will launch in the air.
Tip: let the numbers on the screens run through once and remember what number it shows BEFORE your correct number. Then AS SOON AS THE SCREEN FLIPS TO YOUR NUMBER SHOOT THE RED BUTTON ON THE MONITOR! If you’re too slow, it may flip to the next number already. Best to watch each monitor once-twice before shooting to remember the timing. You can also watch the monitors in quiet before you start shooting the first one.
Step 22: Ashwood & Vandorn Farm – Clock Puzzle
Again, you need to go to Ashwood > shoot clock tower with car turret > use Necrofluid Gauntlet on clock to turn purple. Use the jump pad in Ashwood to jump to Vandorn Farm. Enter the house in the farm to see skeletons sitting at the dining table. Check the clock on the wall behind the father zombie sitting at the head of the table (clock on wall left of kitchen). It will show 6:00 or 9:00 or 12:00 (different every match).
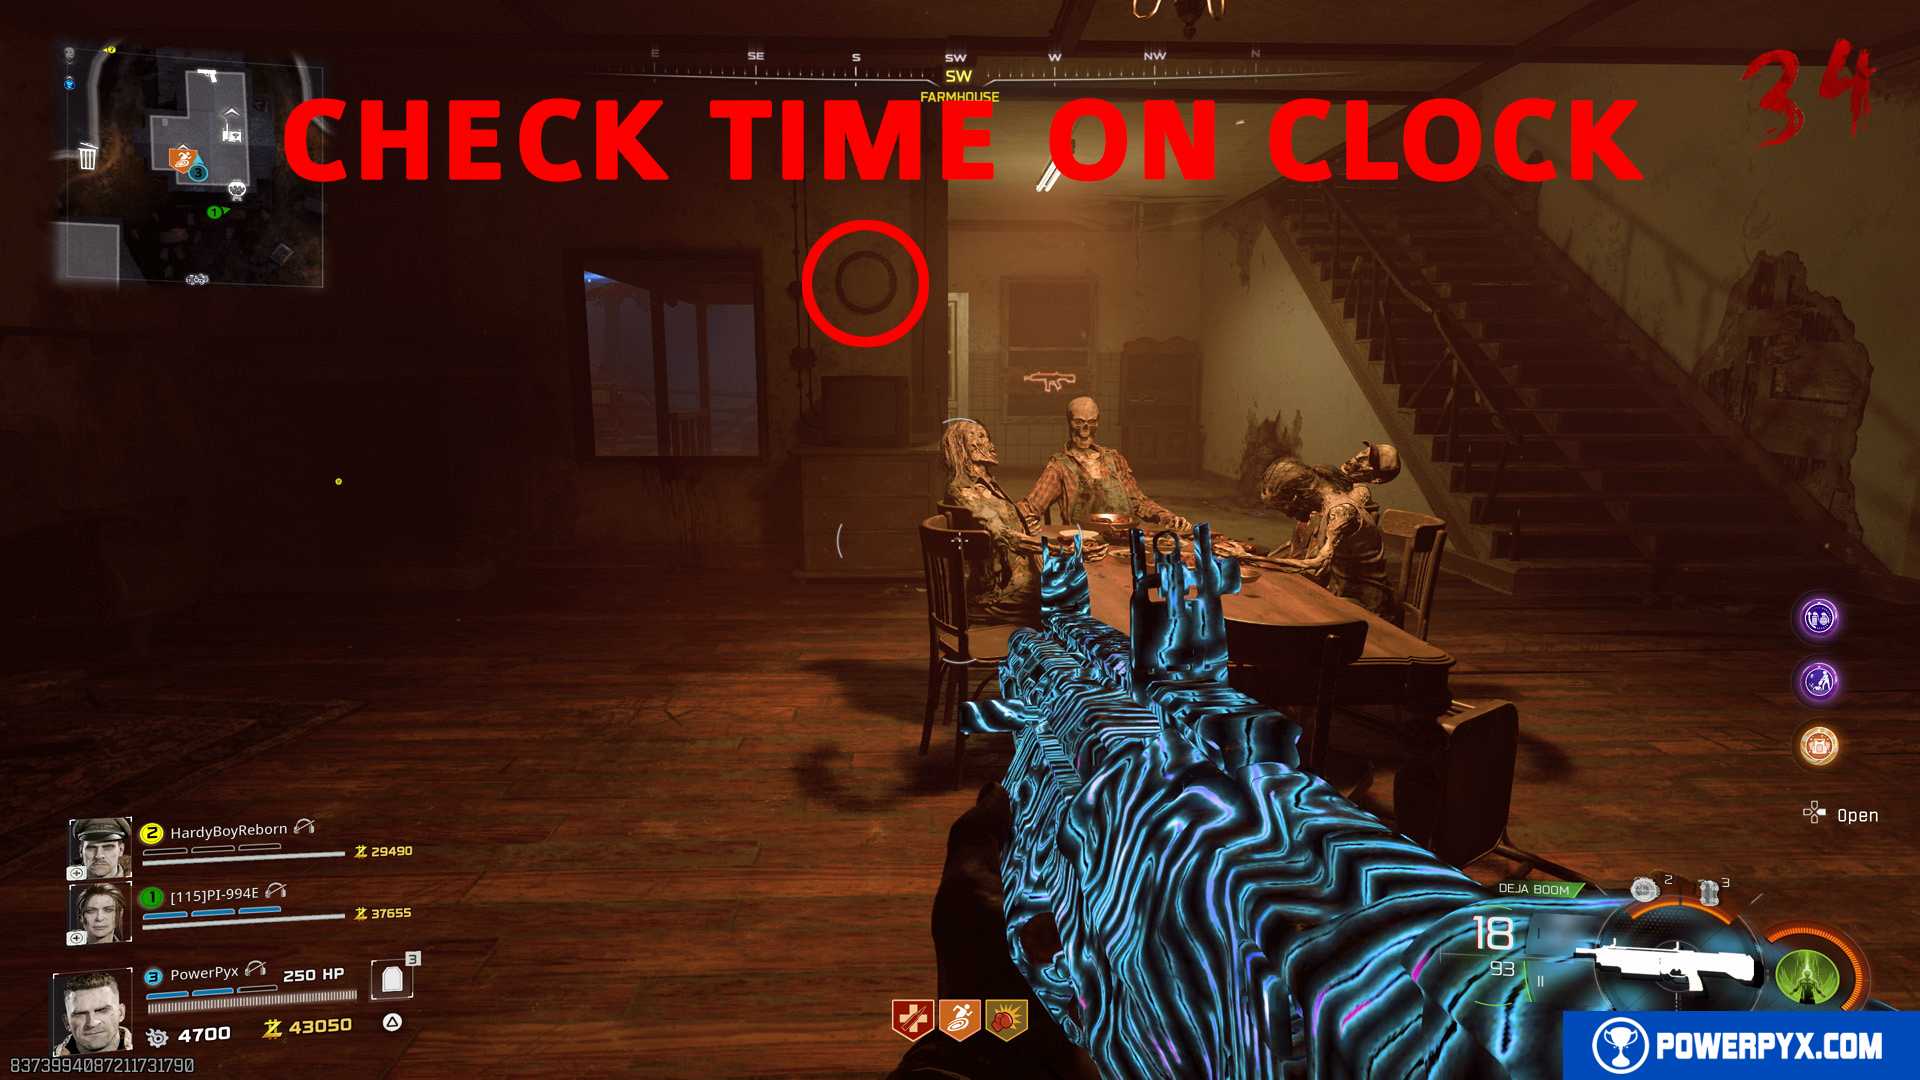
In the same room you see numbers scratched in the floor.
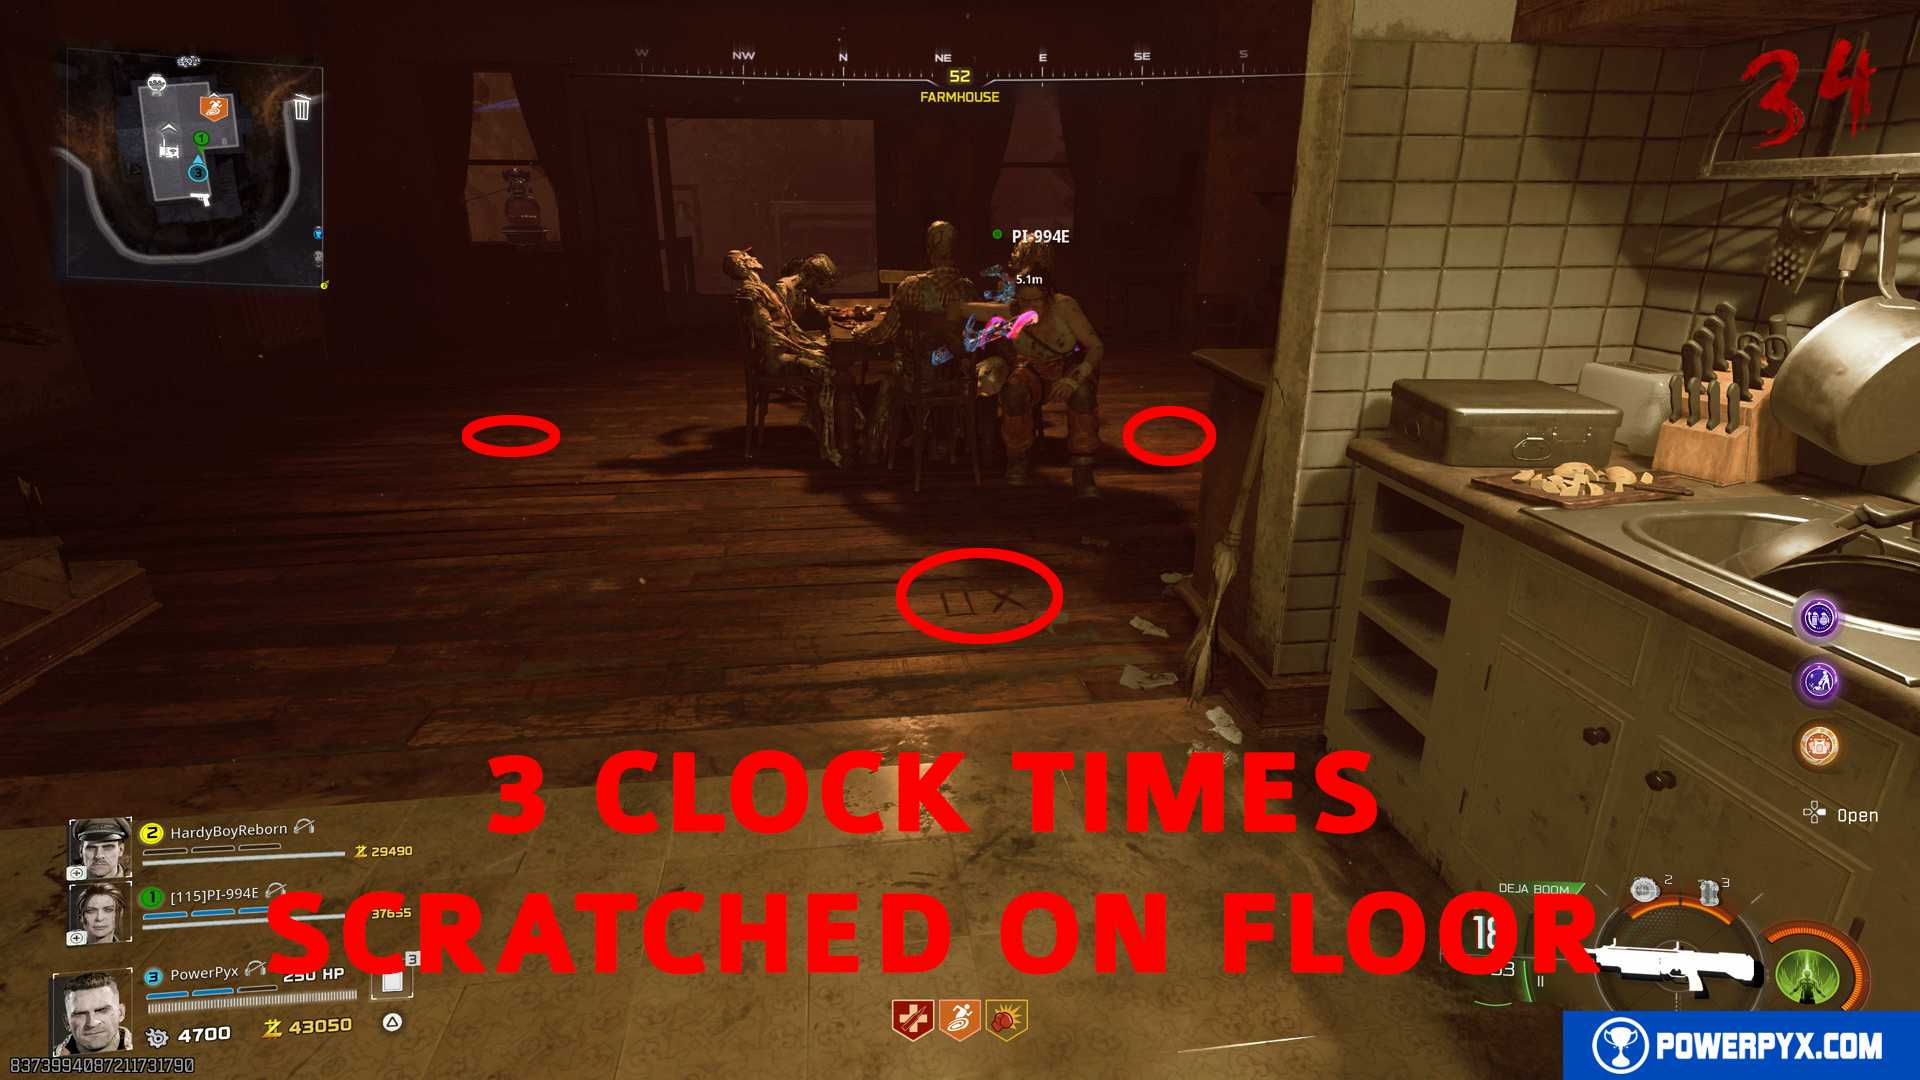
You need to stand on the number corresponding to the time the clock shows WHILE YOU’RE PURPLE. Then the head of the father zombie will turn towards you. When his head is fully turned his eyes glow red. Then shoot the purple Necrofluid Gauntlet at him.
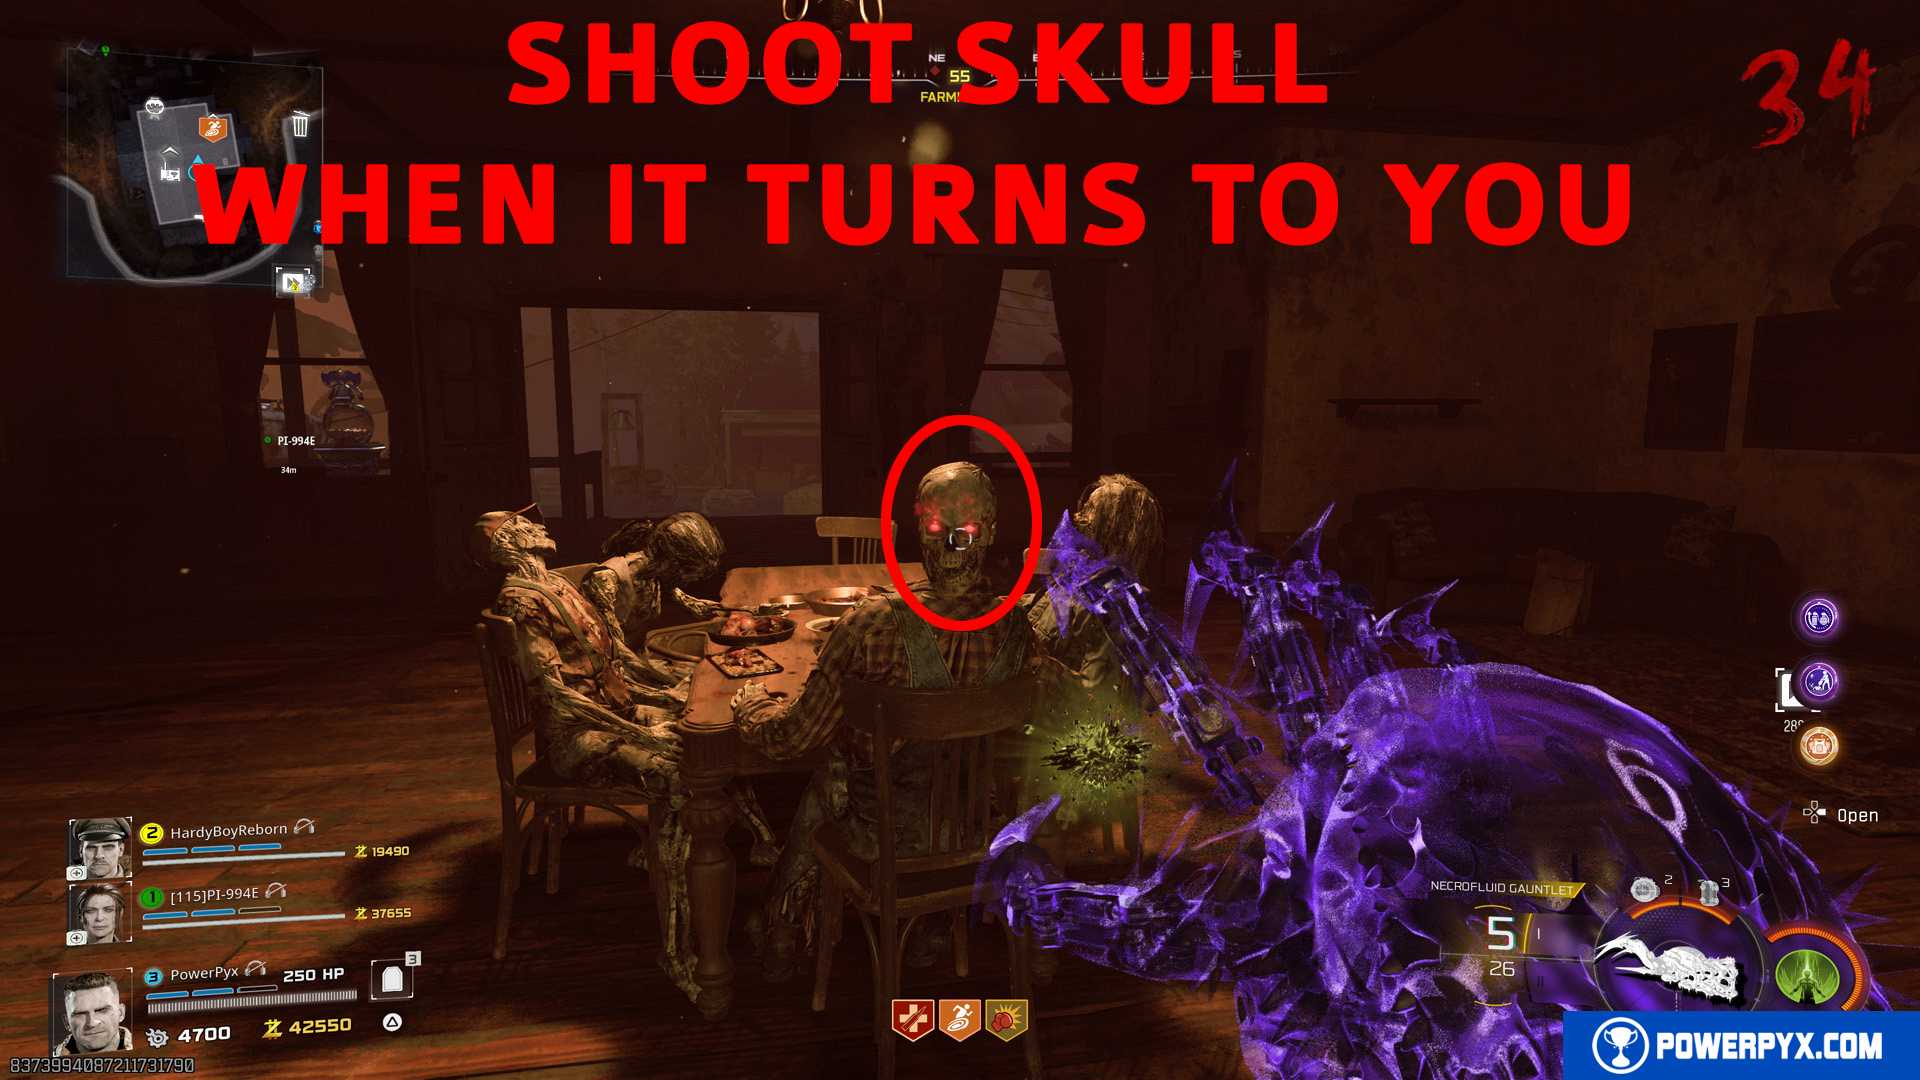
His head must look electrified (blue glow), then you’ve done it correctly and can find the 4 ritual items.

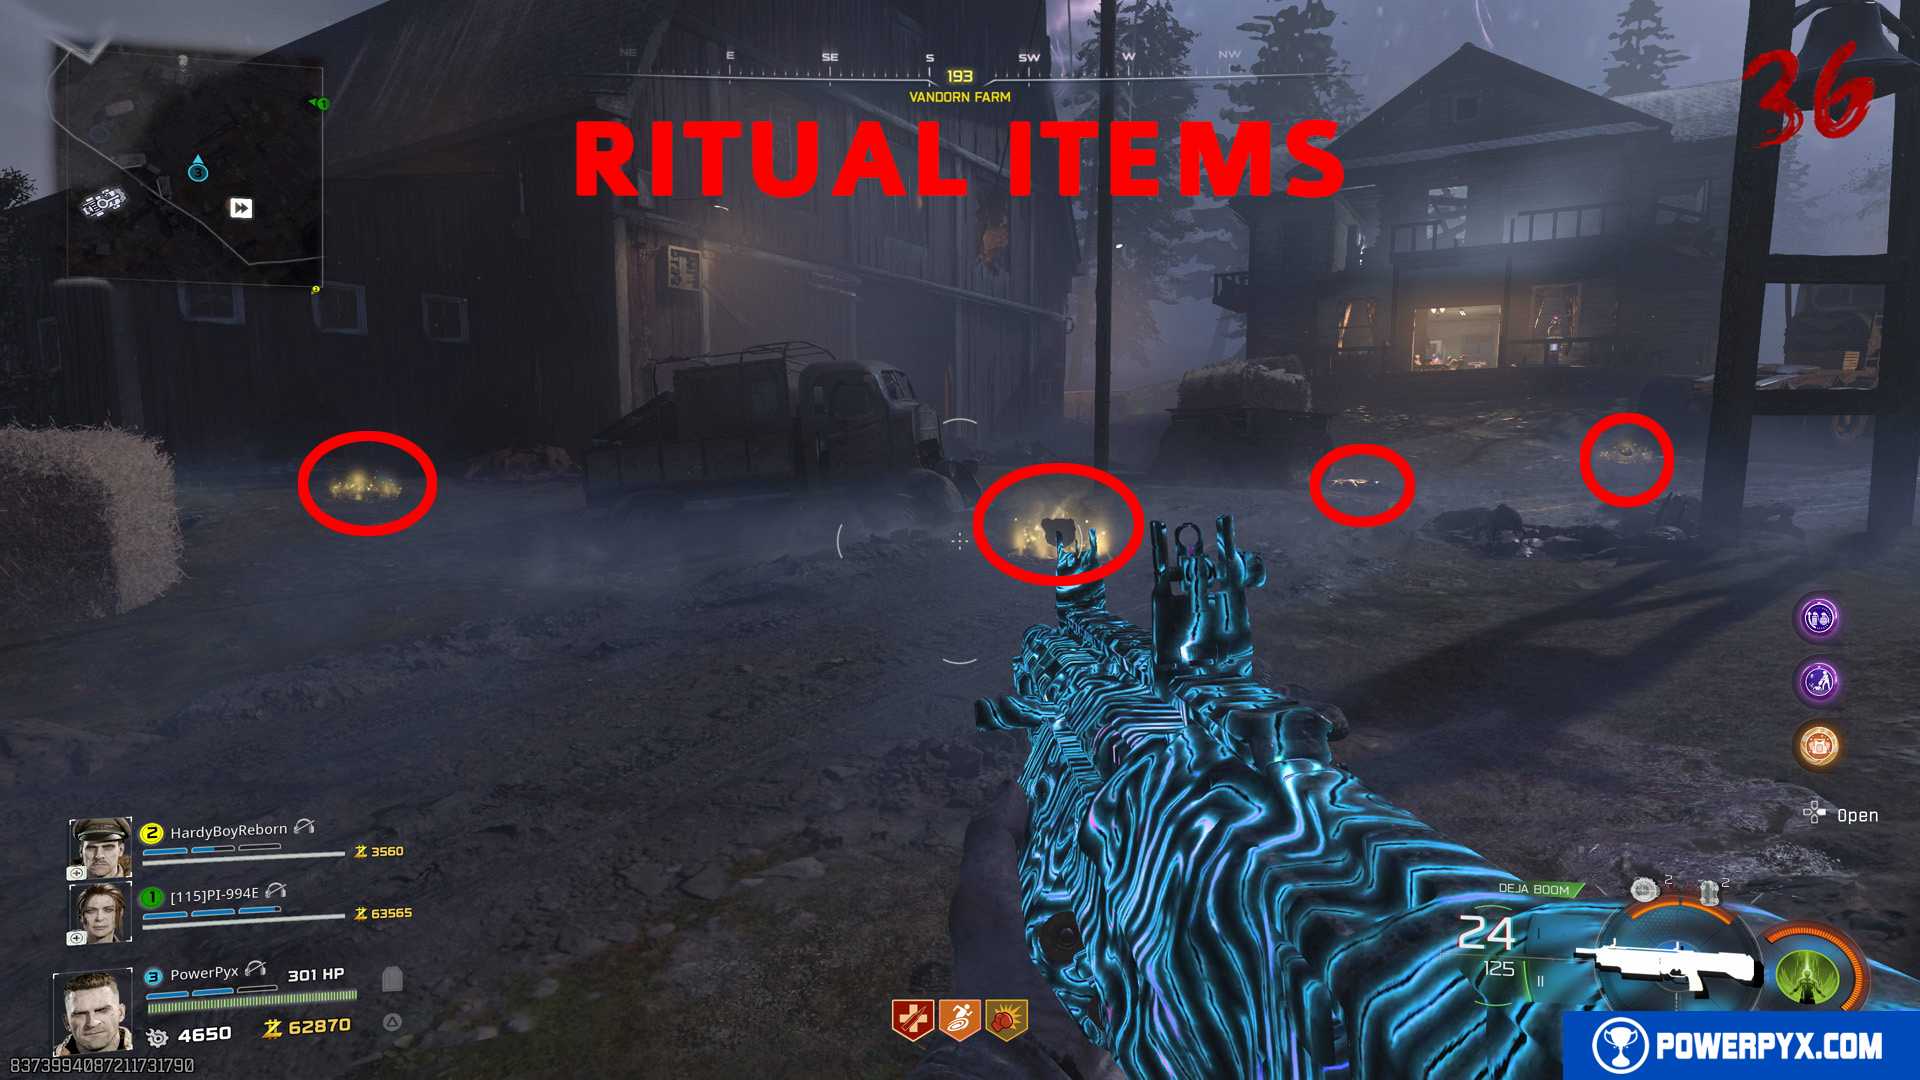
Step 23: Vandorn Farm – Collect 4 Ritual Items
All 4 ritual items are at Vandorn Farm.
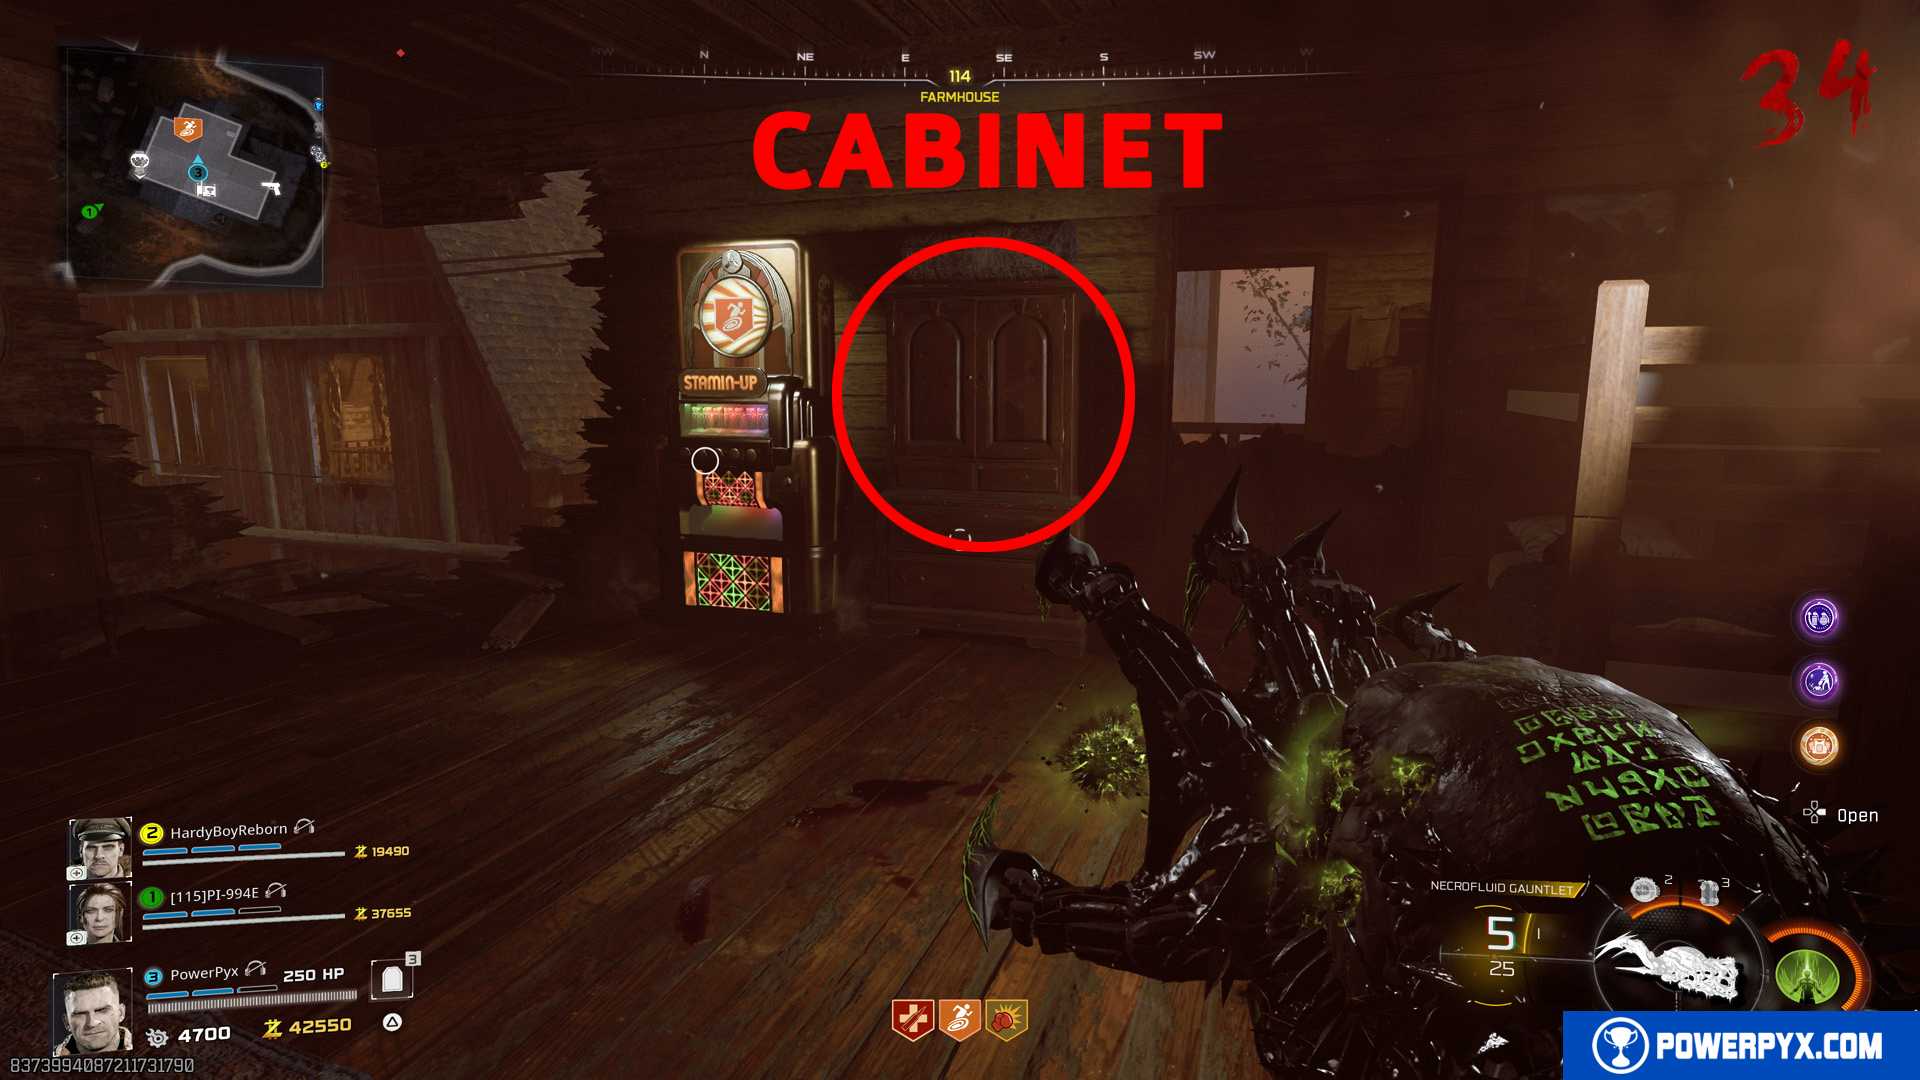
- Tasty-Face: In the house upstairs, interact with the cabinet to the immediate right of the Stamin-Up Perk (hold / :x1).

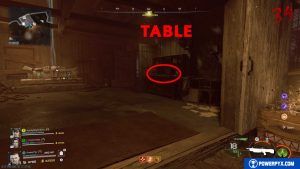
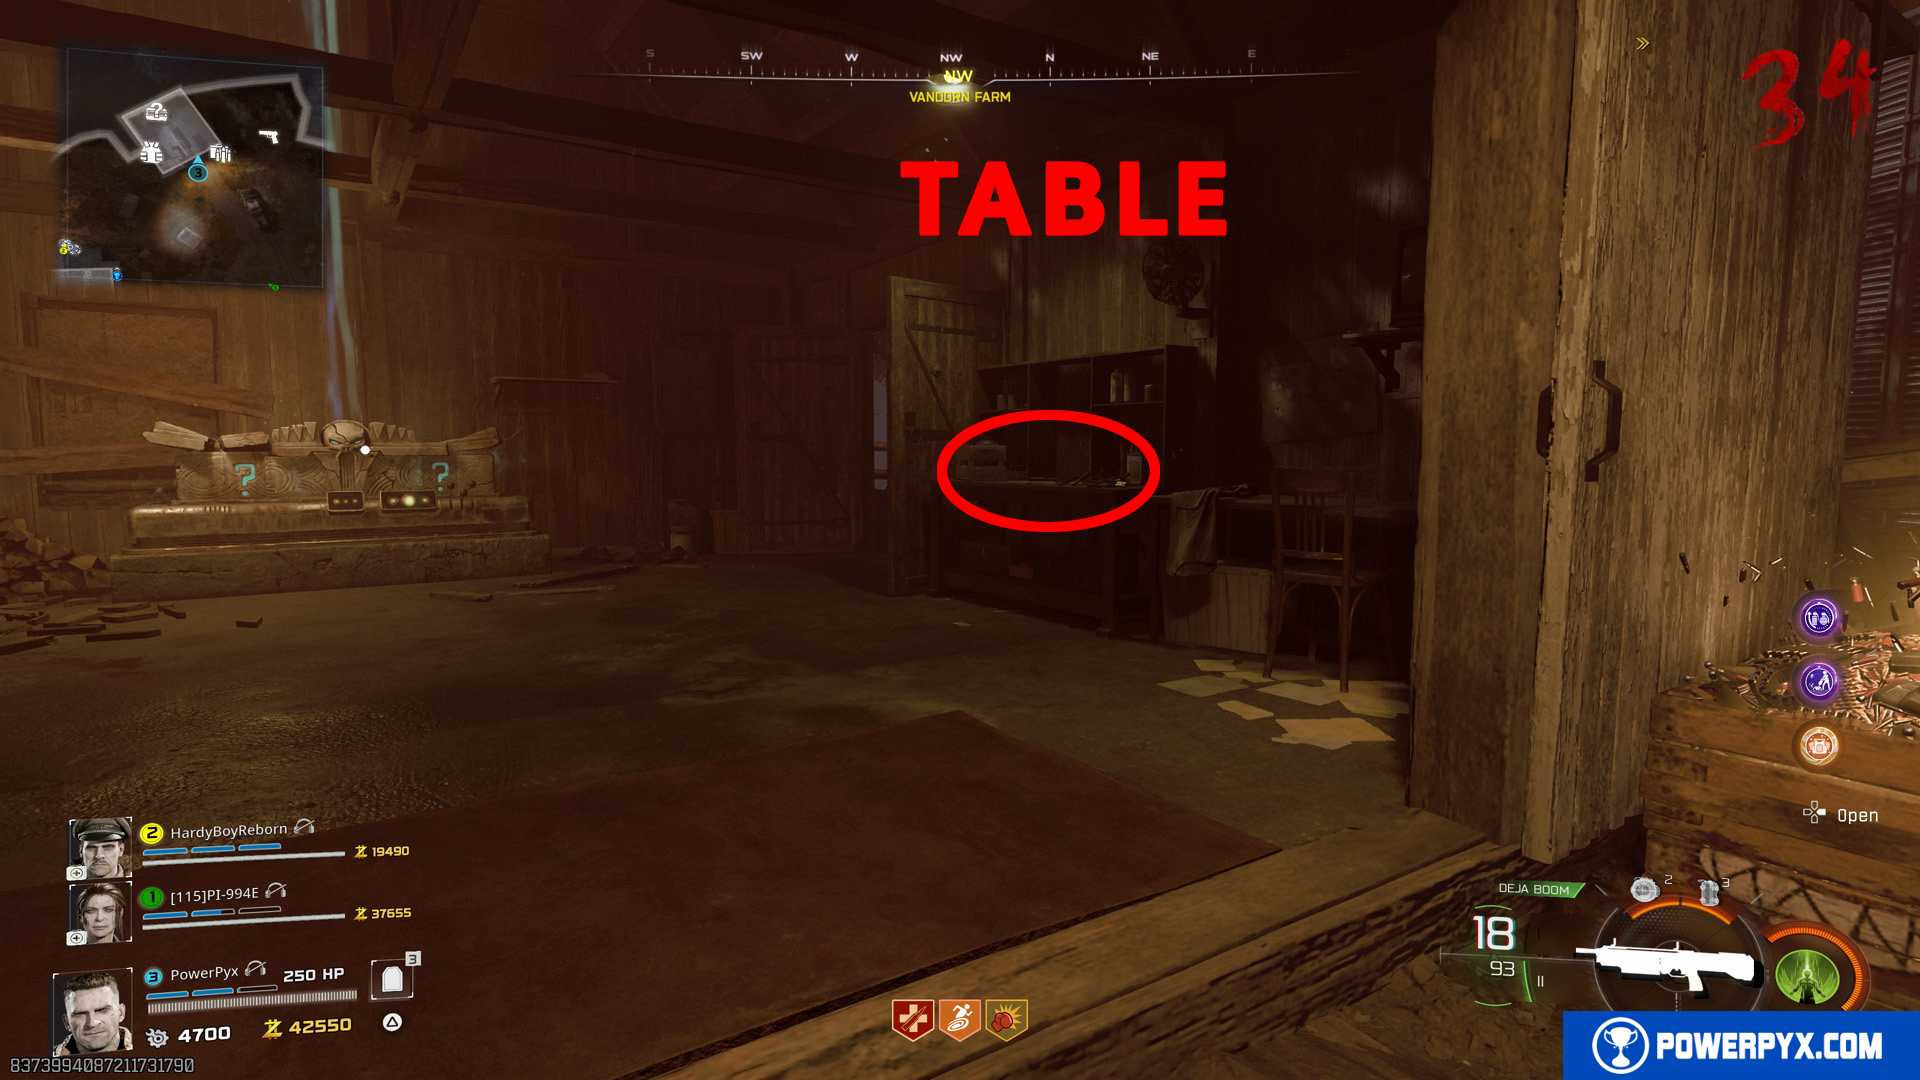
- Pa’s Pigsticker: In the garage interact with the table.
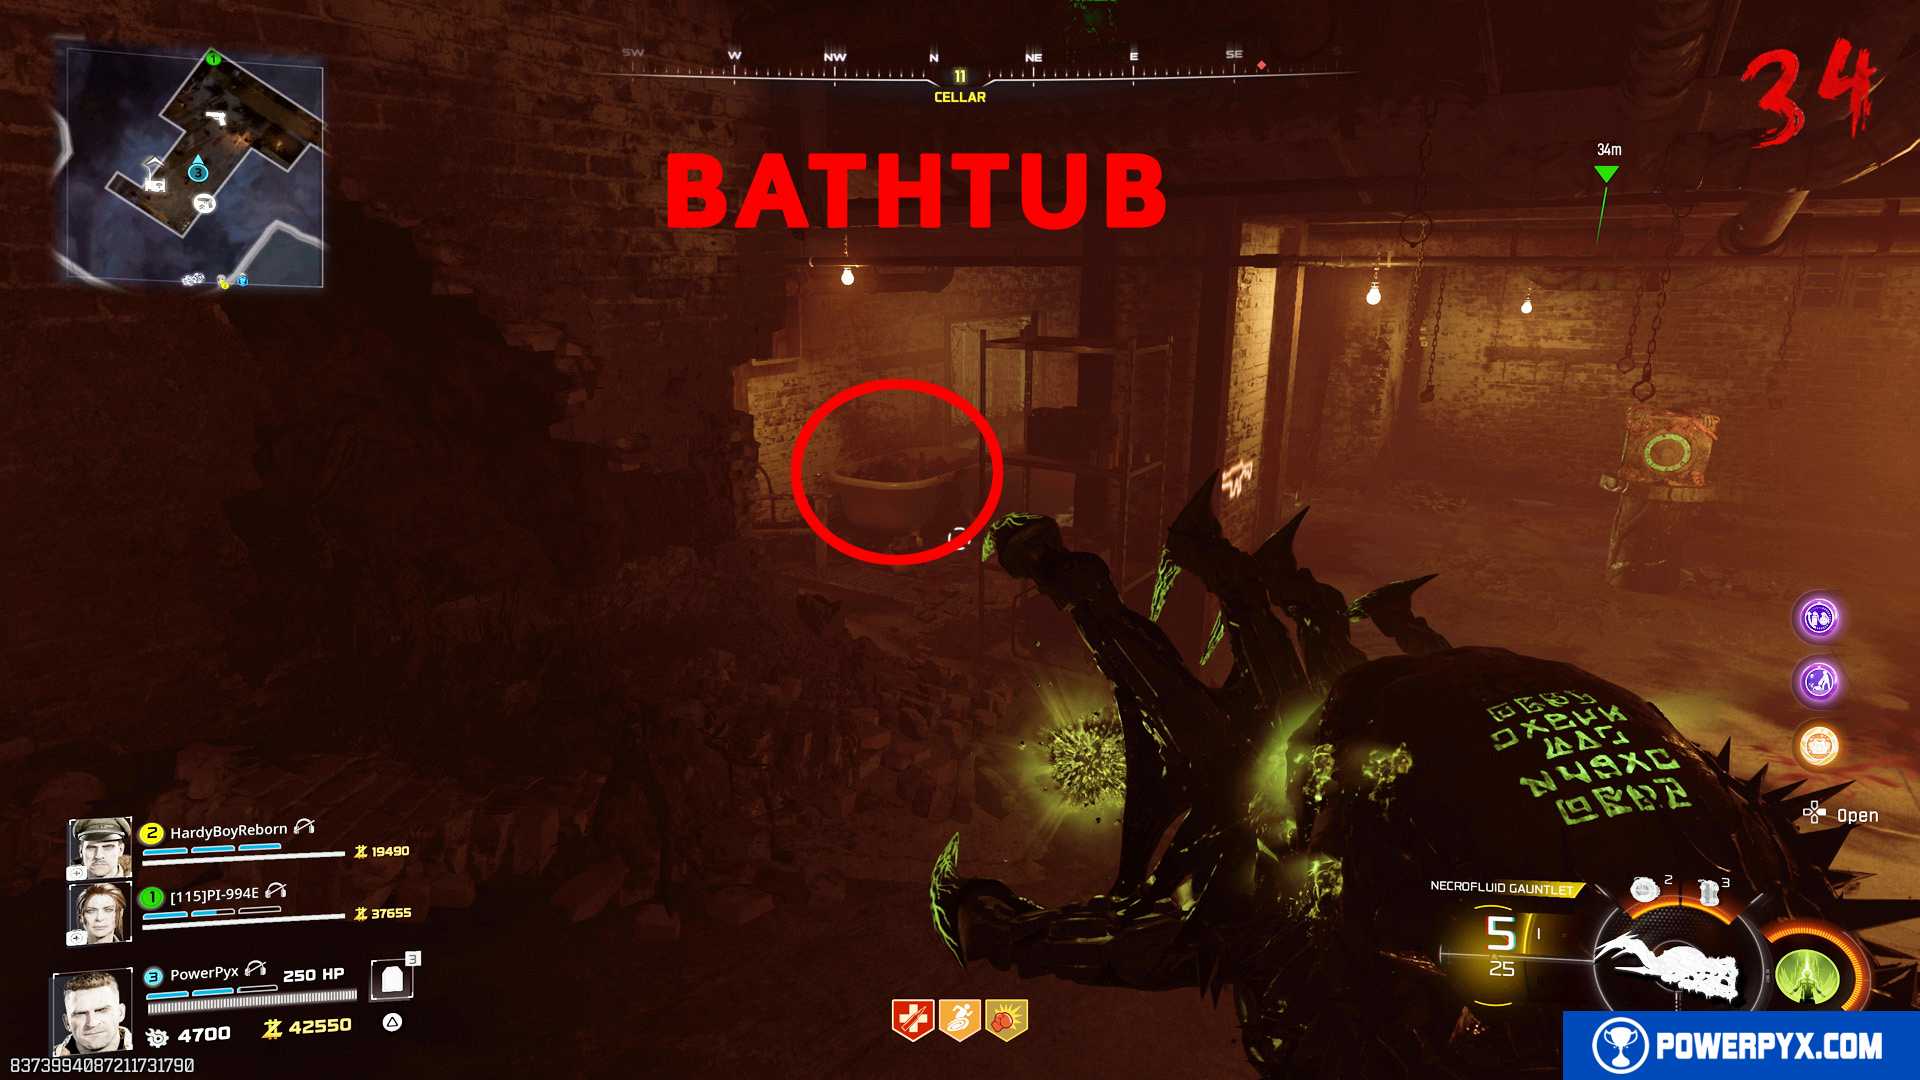
- Ma’s Chalice: In the cellar underground, interact with the bathttub.

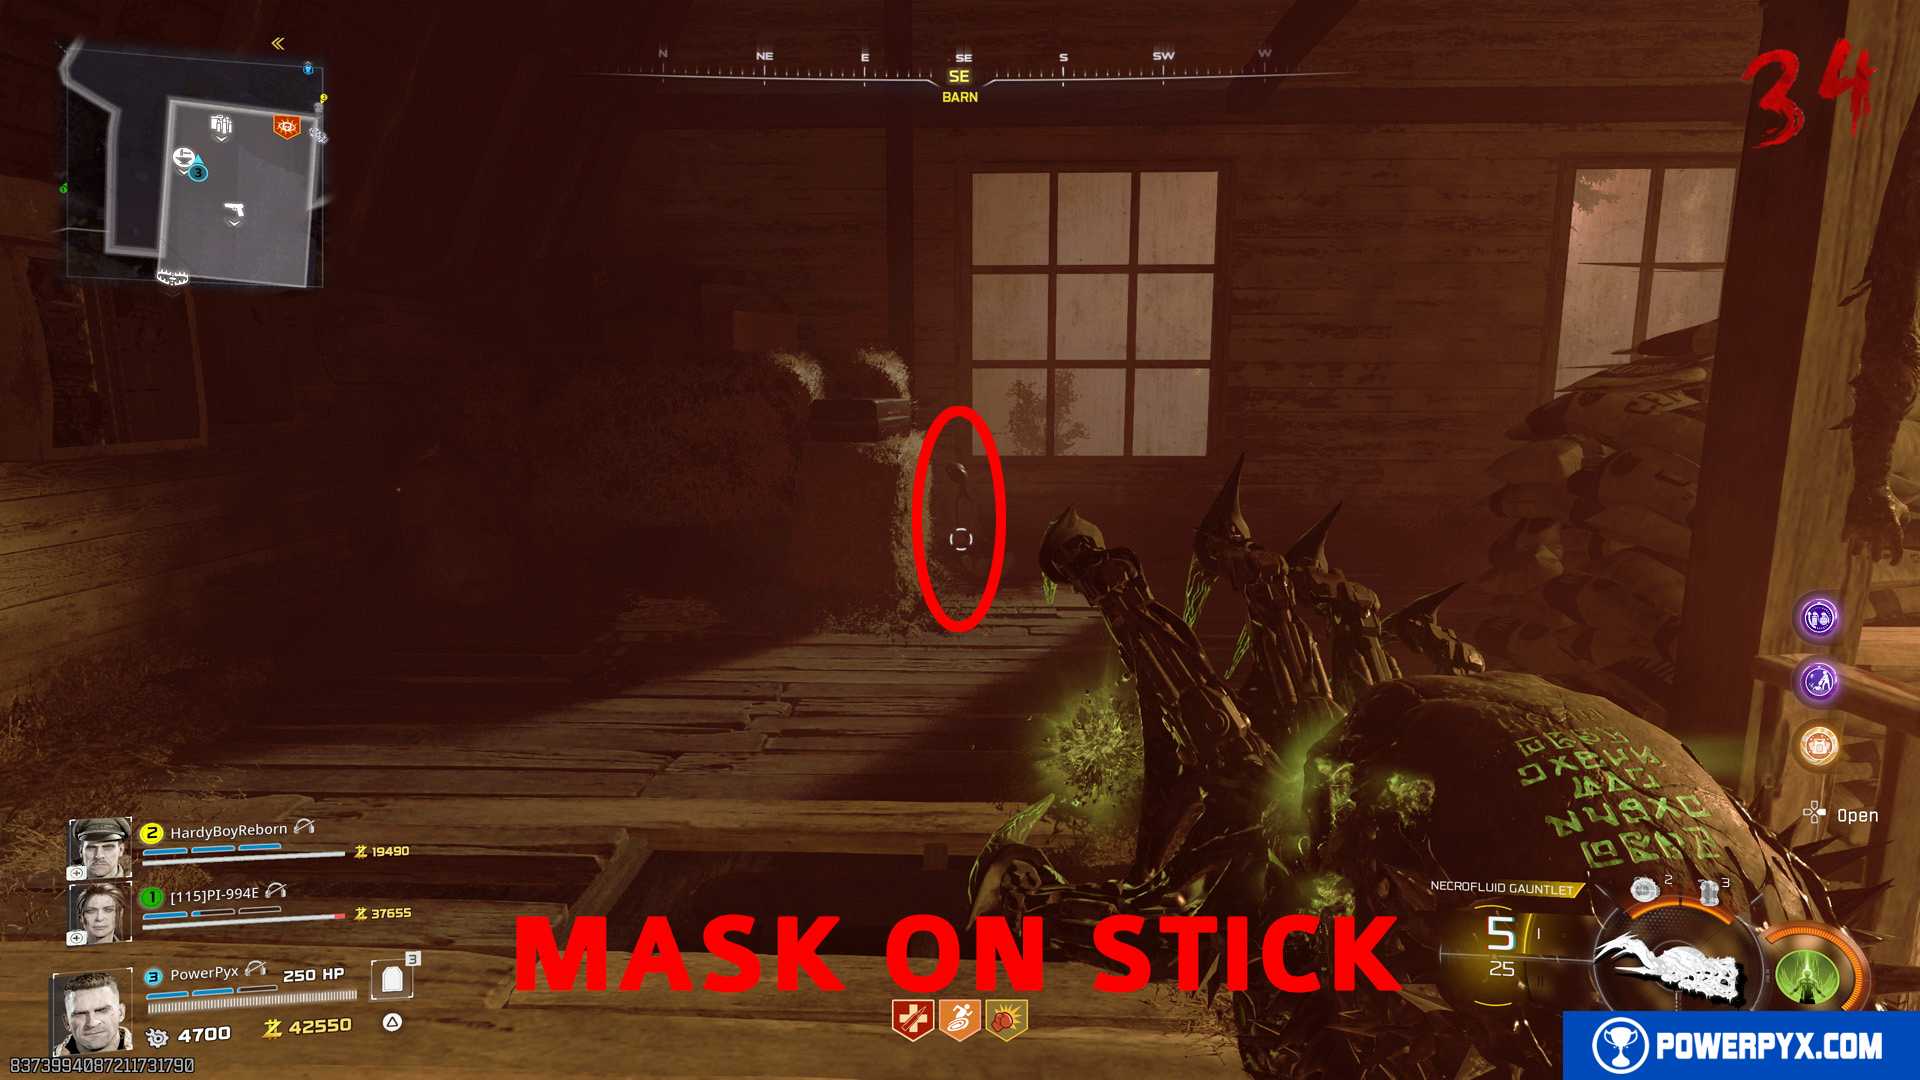
- Junior’s Fun-Face: In the barn upstairs in the corner left of Death Perception perk, interact with the mask on a stick next to the haystacks by the window.

Step 24: Vandorn Farm – Perform the Ritual
Before this step you should craft monkey bombs to distract the zombies!
In the middle of Vandorn Farm in the outside area, you will now see 4 red circles on the floor. Interact with each one to place the items you just picked up. They will then glow golden.
When all 4 are placed, waves of zombies come to attack the ritual items. You must defend the 4 items from the attacking zombies! Make use of monkey bombs if you have them, and also activate the trap for 2000 points. If the zombies destroy the ritual items, the ritual will fail, but can be retried next round. If successful the screen fades to white.
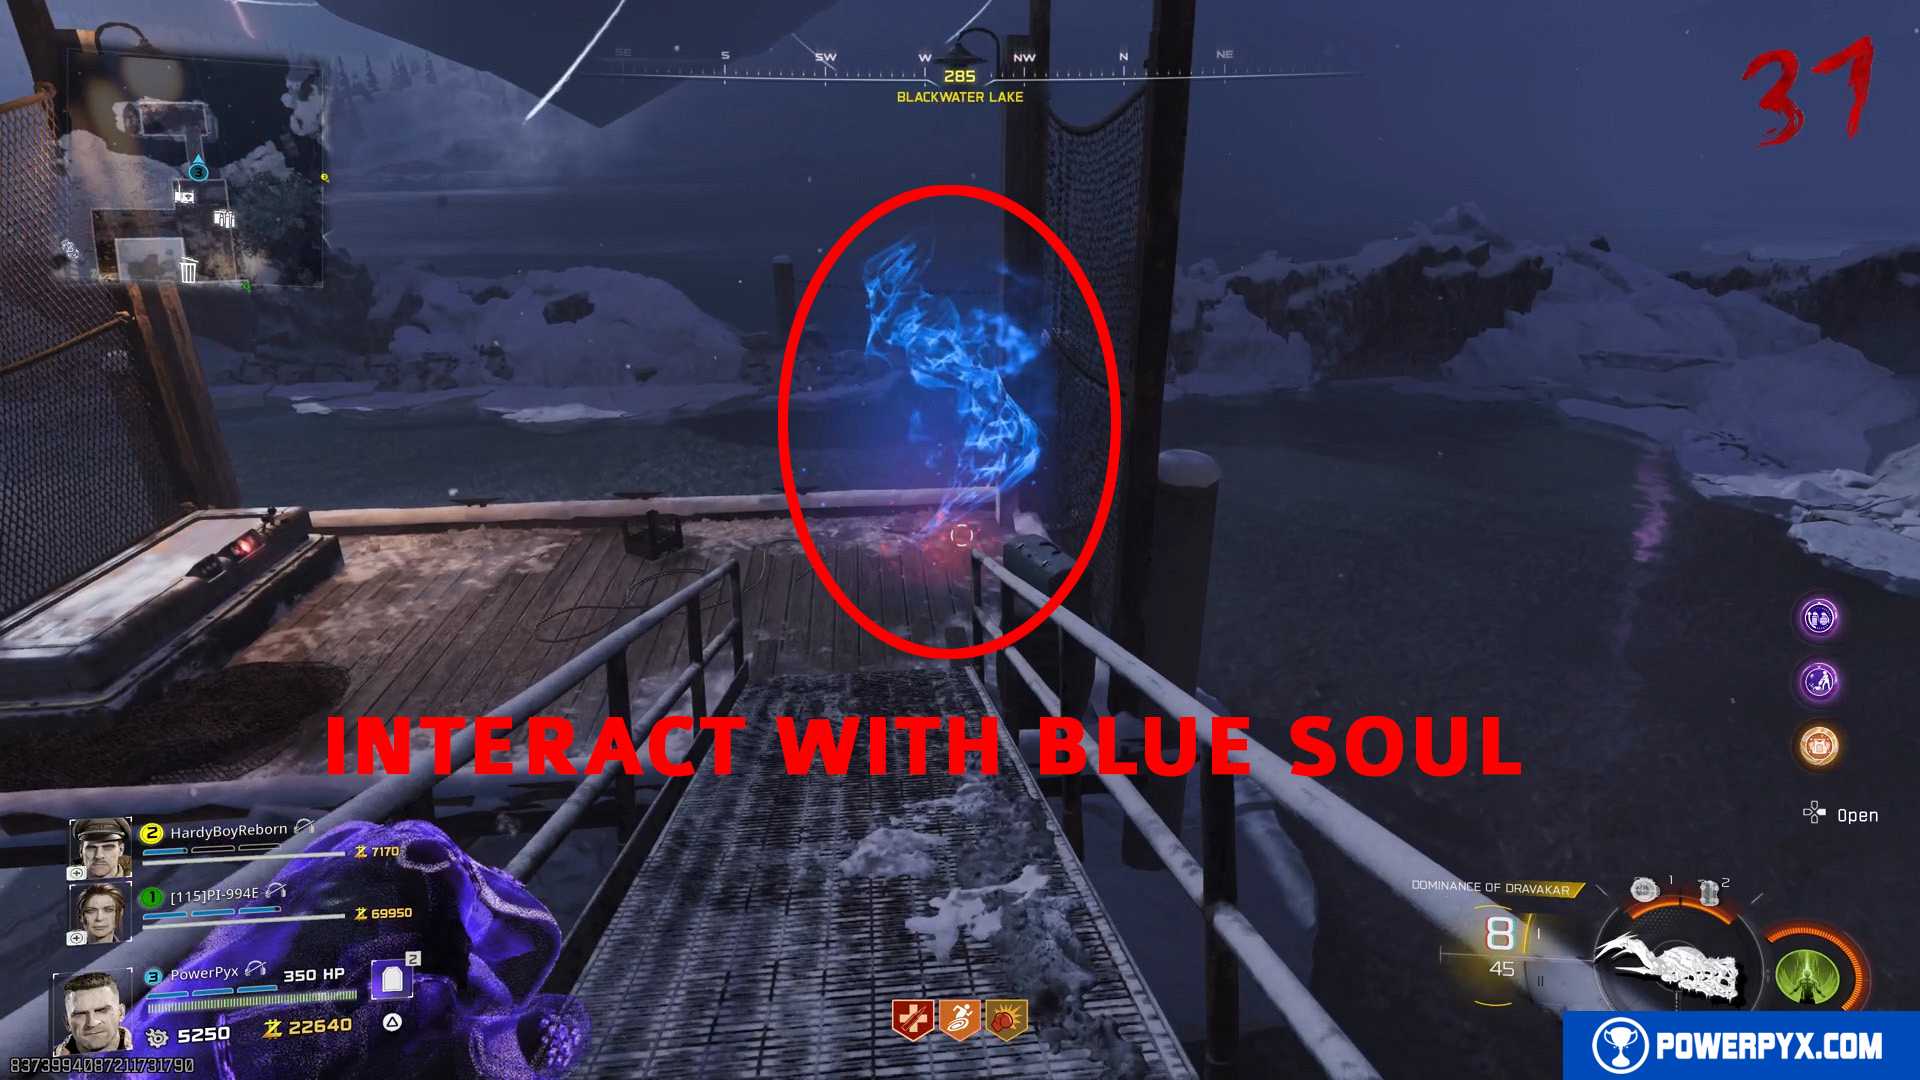
Step 25: Ashwood & Blackwater – Projector Puzzle
Again, you need to go to Ashwood > shoot clock tower with car turret > use Necrofluid Gauntlet on clock to turn purple. Use the jump pad in Ashwood to jump to Blackwater (the cabin area in north-west).
Go behind the cabin to the docks above the frozen lake. There will be a blue glowing flame, interact with it (hold / ). A soul will float up to the pyramid.
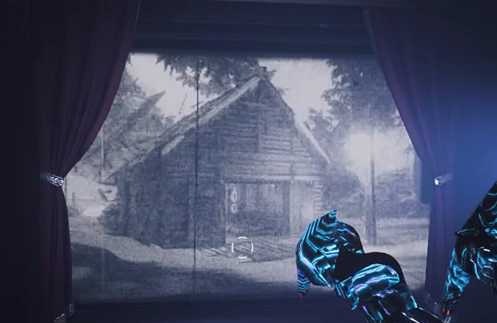
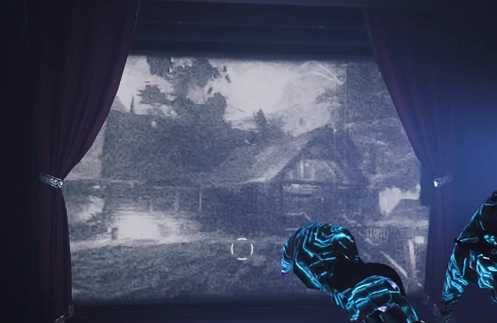
Quickly go into the cabin, enter the projector room on the ground floor. Where the movie projector is casting an image on the screen. You must shoot the PROJECTOR with the Necrofluid Gauntlet WHILE YOU ARE PURPLE. The Projector will show 4 images in quick succession. THE ORDER IS RANDOM EVERY MATCH! SAVE A VIDEO CLIP OR TAKE SCREENSHOTS OF THESE (on PS5 you can press share-button to save last 30 seconds and watch it back). You can also try to remember them. If you don’t remember them or didn’t record them, you’ll need to redo this step. The images only appear briefly for 3 seconds each.
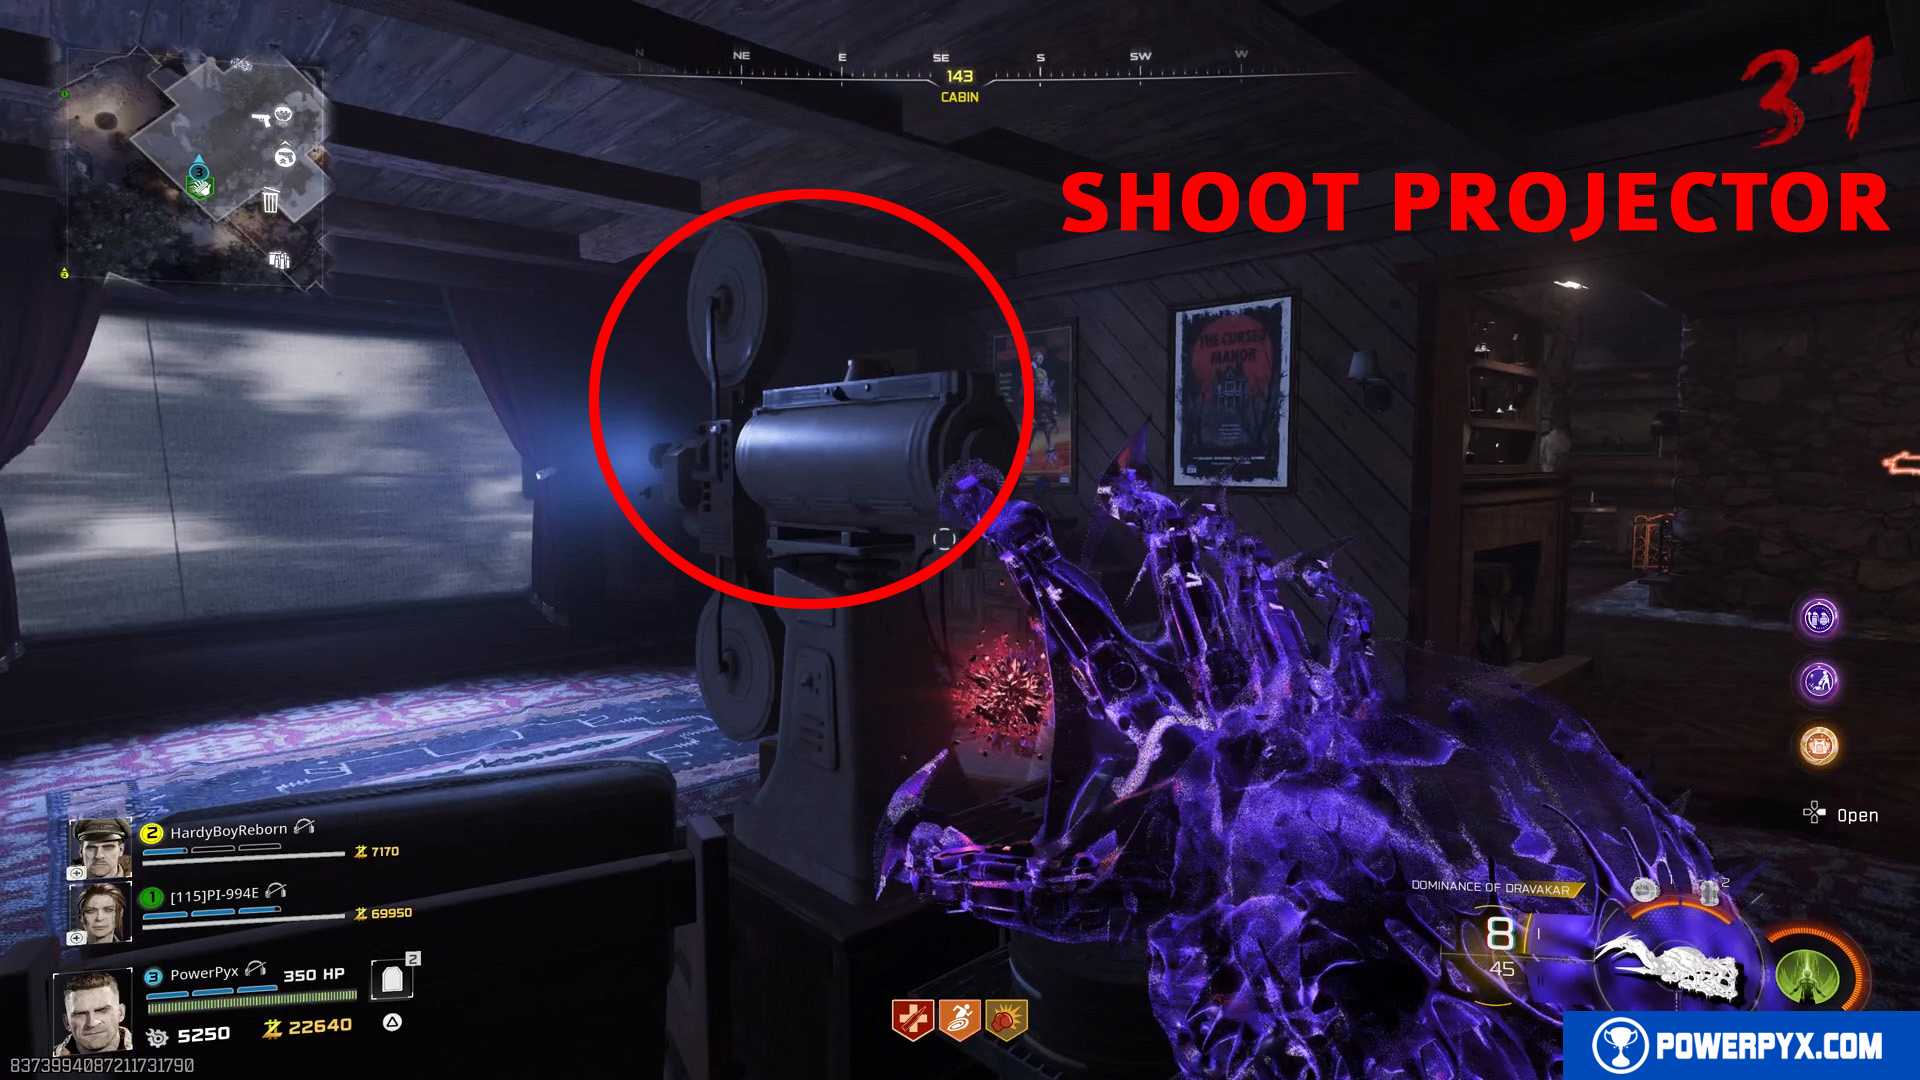
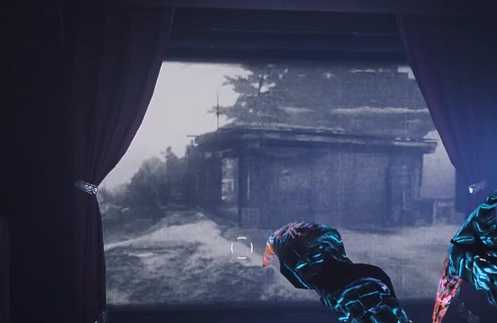
You must shoot 4 movie reels with the Necrofluid Gauntlet in the order of buildings the projector showed you. Only shoot each once with / . All these buildings are in Blackwater area. Below are the 4 projector images, what location they correspond to, and where the movie reels are found:
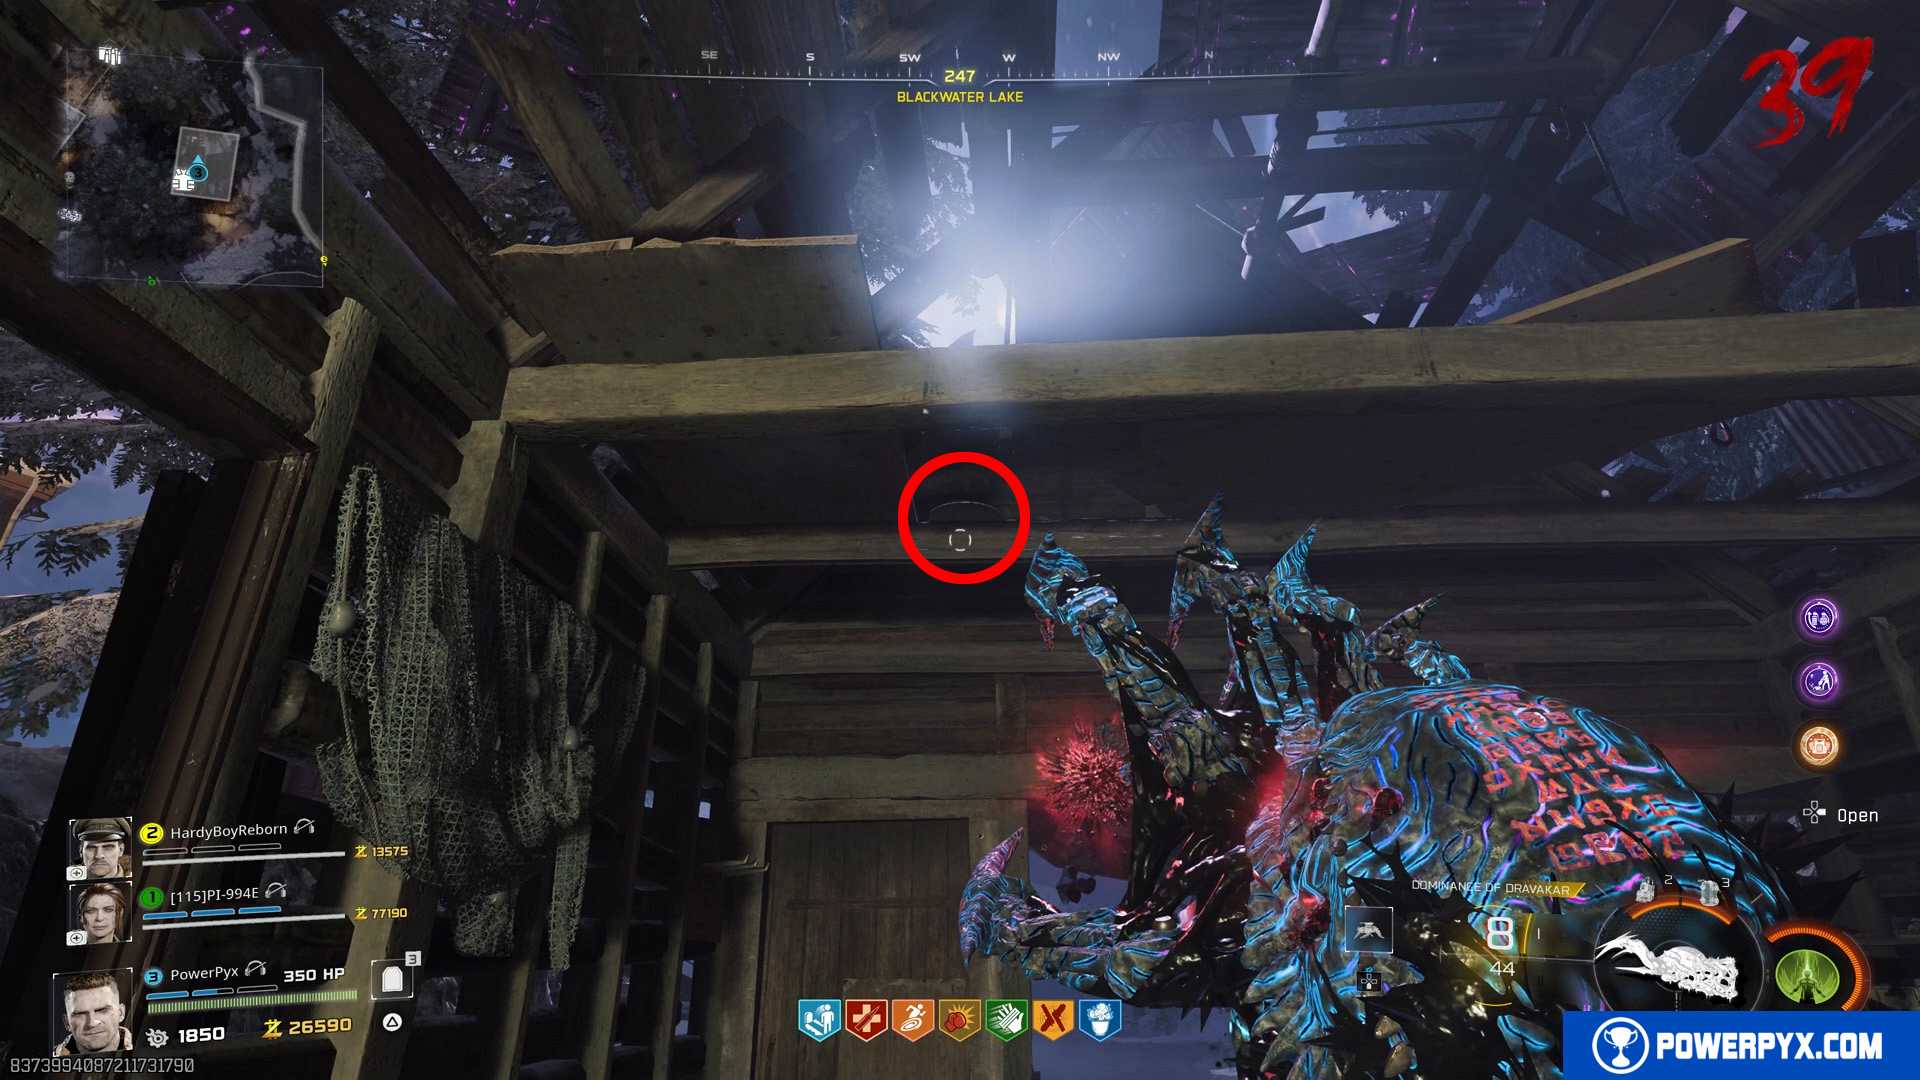
TOOL SHED (LEFT OF CABIN) – enter the little shed on the left side behind the cabin, where a workbench is inside. Enter the little side room to the left of the workbench to find the reel on the aluminium shelf.
BOAT SHED (TO RIGHT OF CABIN) – enter the broken building to the right of the cabin, inside look up to see the reel on the rafters above (the hardest of the 4 to see). When you shoot it, the spike ammo of the Necrofluid Gauntlet will fall down but this is fine, it doesn’t need to stick to the reel.
FRONT OF CABIN – enter the front of the cabin, turn right, go up the stairs, turn left to find the reel on the cupboard. When looking at the Melee Machiato perk machine from upstairs, it’s to the right of the machine.
BACK OF CABIN – go behind the cabin, between the docks and the projector room. Directly behind the ammo crate this is in the snow on the ground, in corner before small wooden stairs going up to the veranda.
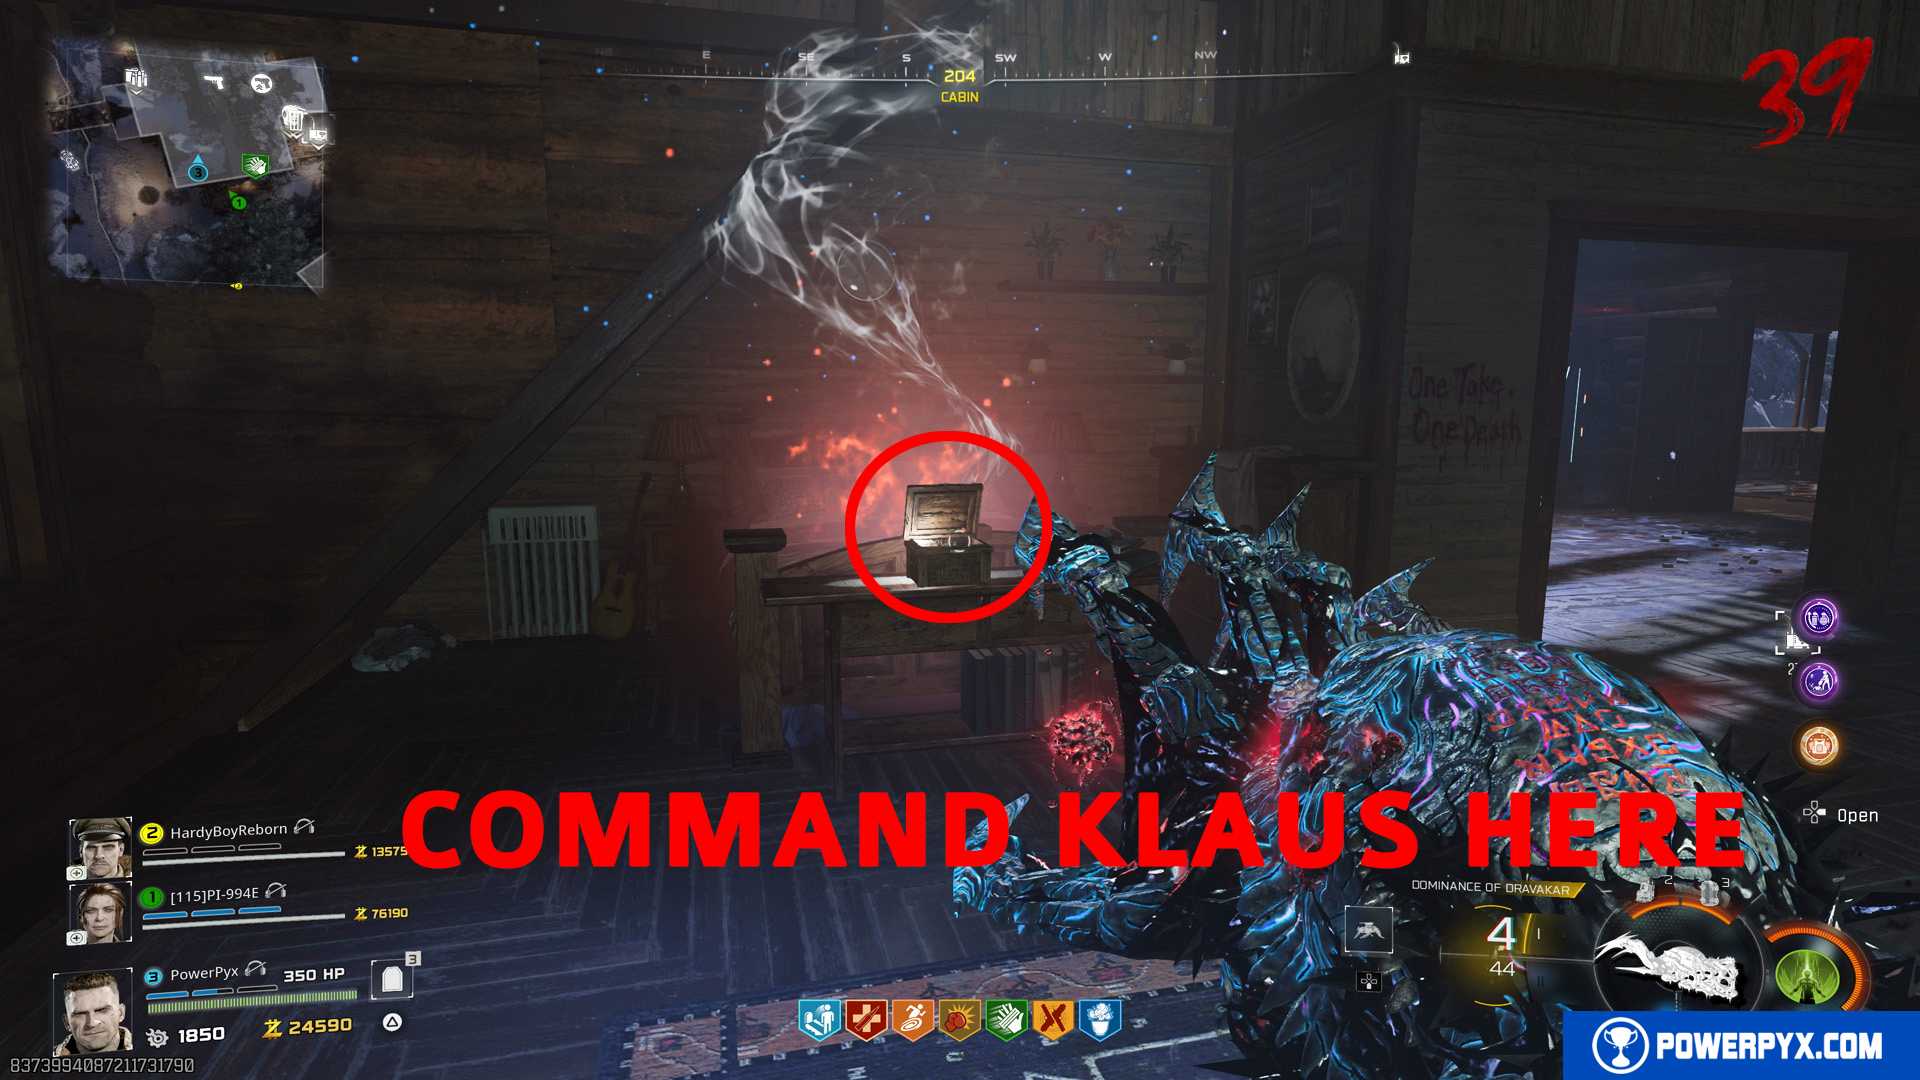
After shooting all 4 reels in correct order, a red glowing box appears on the upper floor of the cabin in front of the bed. Call KLAUS for 2000 points via the radio (marked on Tac-Map), command him with / to stand in front of the red glowing box. He will pick up an item from the box.
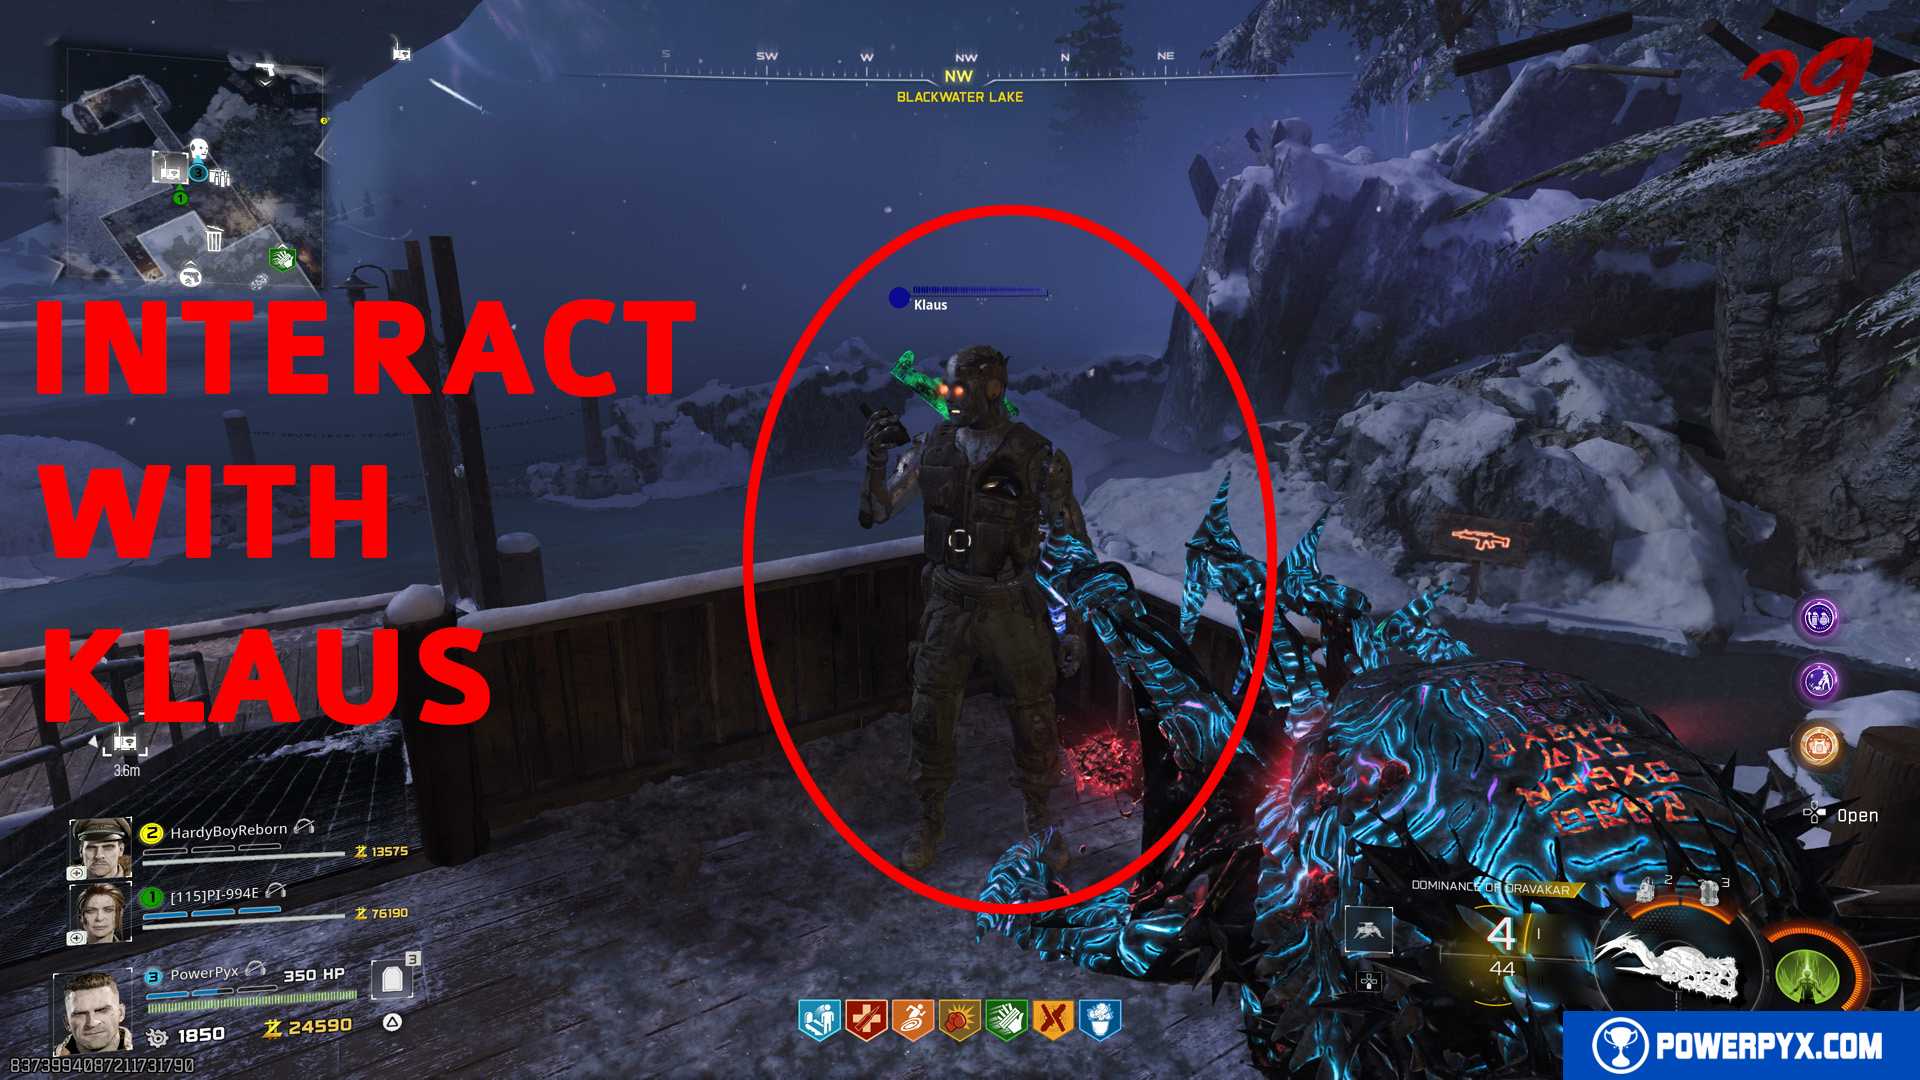
Step 26: Blackwater – Interact with Klaus at the docks to start the Easter Egg Boss Fight
The Easter Egg steps are now complete. All that remains is to initiate the final boss fight. Read all remaining steps carefully before proceeding. If you have pause timer left now is a good time to use it. You won’t get any break after you interact with Klaus. Make sure you have all the perks and items/upgrades you want.
IMPORTANT: Make sure your car is standing in Blackwater and that it’s fully repaired! It’s also helpful if each player brings monkey bombs, this will distract the zombies to repair the car during the final boss.
When you are ready, interact with Klaus at the docks behind the Blackwater cabin. All players must confirm with  that they wish to start the Final Encounter.
Step 27: Drive through the Souls with your car
After interacting with Klaus, get in the car. On the paths that connect the main areas you must drive over 3 red glowing souls with white mist over them. THERE ARE 3 PER AREA. In total there 4 areas, with 3 red glowing souls EACH = 12 TOTAL. When you drive over them you hear a sound, a white soul follows behind your car and gets sucked into the pack-a-punch machine.
YOU HAVE TO DRIVE OVER 3 RED GLOWING SOULS IN EACH AREA BEFORE EXITING TO THE NEXT AREA. IF YOU MISS ONE, YOU HEAR A LOUD GONG AND THE STEP IS FAILED! IF THIS HAPPENS YOU MUST TALK TO KLAUS AGAIN NEXT ROUND TO RETRY IT.
You don’t have to rush this step too much. Some of the red souls are straight in your path, but some are harder to see. So if you reach the exit of an area and haven’t driven over 3 souls, drive backward and take another look. Example: in Monolith Forest, don’t exit to Janus Towers Plaza until you drove over all 3 red souls. You should also take great care that the car doesn’t explode. Drive over the green plants and avoid the orange explosive plants. There are no red souls in the main areas, only in the connecting paths between areas.
WHAT THE RED SOULS LOOK LIKE – unlike red explosives these look more transparent and have a white mist over them:
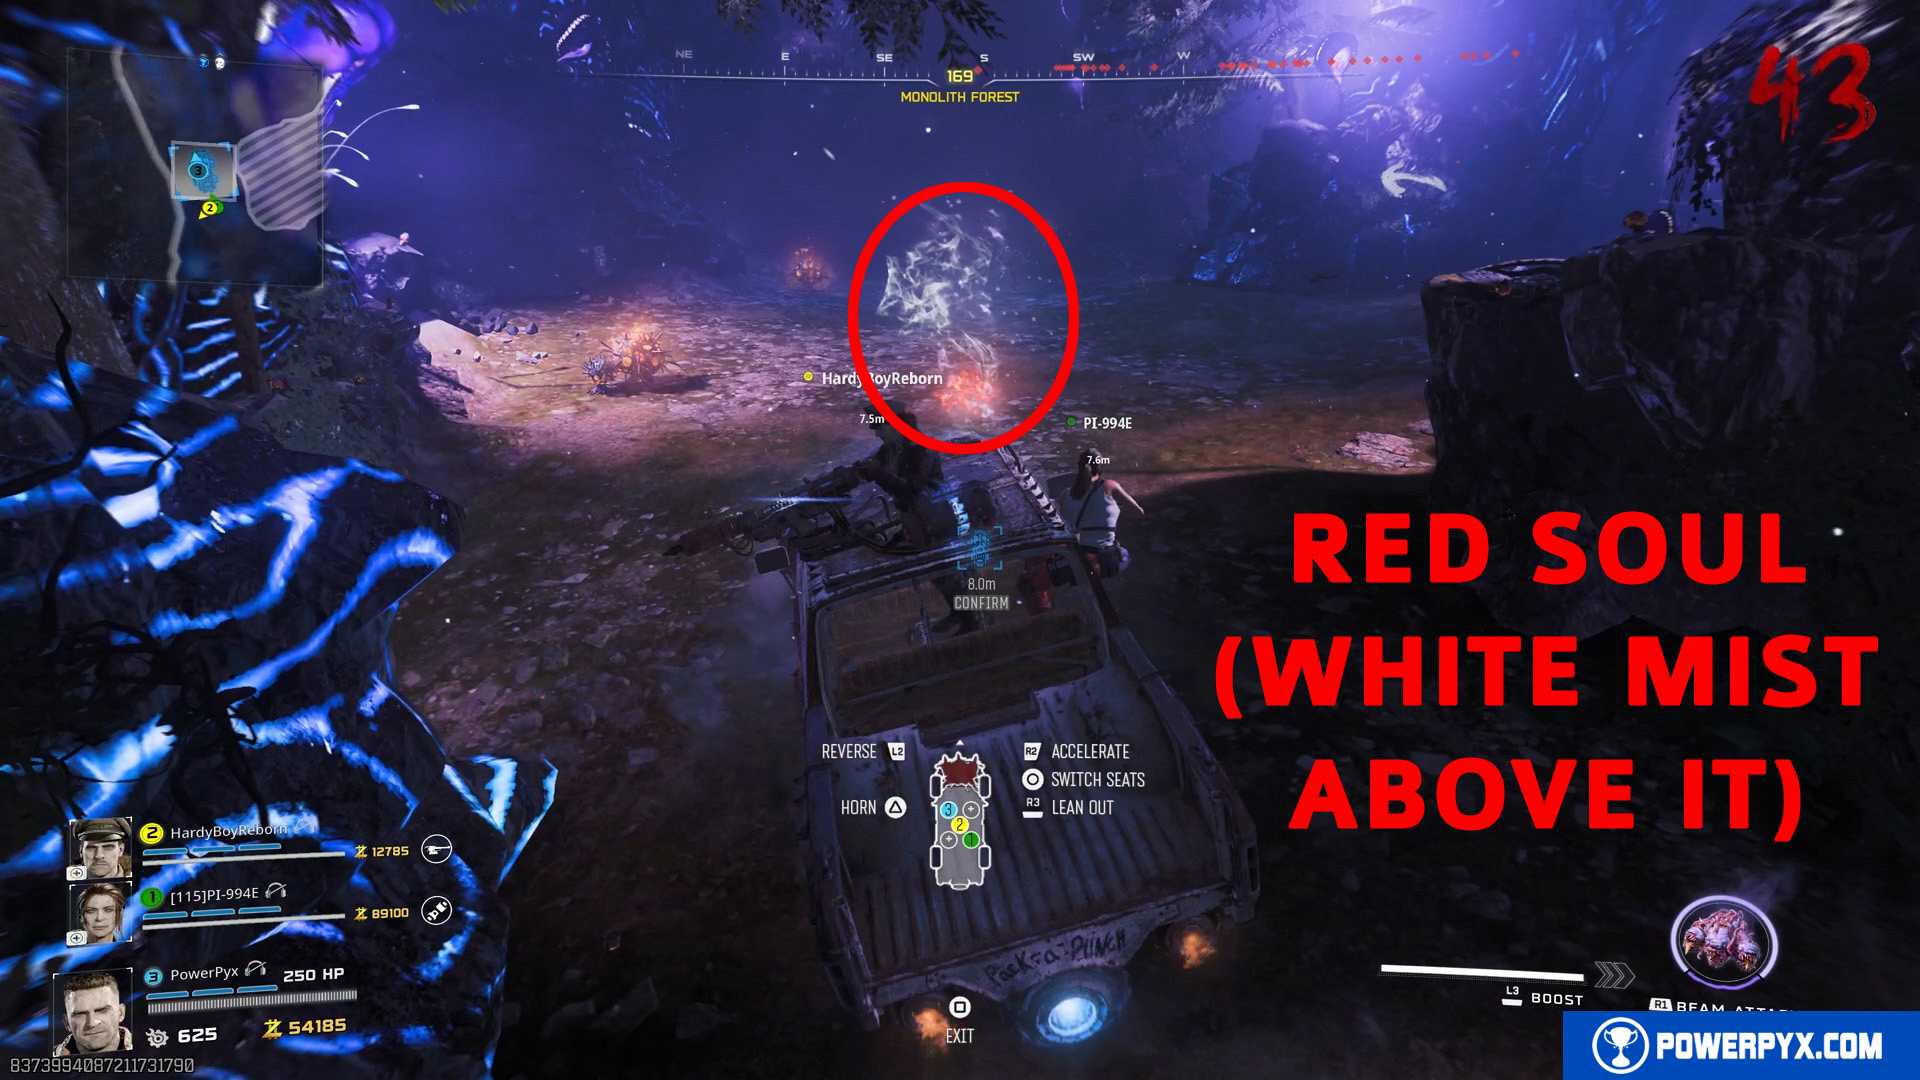
4 AREAS WITH RED SOULS:
- Monolith Forest (Blackwater -> Janus Towers Plaza) = 3 red souls
- Collapsed Tower (Janus Towers Plaza -> Vandorn Farm) = 3 red souls
- Grounded Ship (Vandorn Farm -> Ashwood) = 3 red souls
- Lost Cabins (Ashwood -> Blackwater) = 3 red souls
When you drive over the 12th souls, the screen immediately goes white and you’re teleported into the boss fight.
So basically you do one full lap from Blackwater and circle back to Blackwater by the end. The two areas leading to Cosmodrome & Exit 115 are skipped.
Step 28: Easter Egg Boss Fight – Veytharion

The final boss is Veytharion. This fight relies a lot on using the vehicle.
BOSS FIGHT TIPS:
- 1 Player should be driving the vehicle.
- The other players should be running in circles around the area, focus on reviving, dealing damage to the boss, and repairing the car when it gets destroyed.
- You start the fight with everyone in the vehicle. Decide upfront which player will be the driver and who will run outside. As soon as the fight starts, have the runners exit the car. Don’t have everyone stay in the car or your entire team will get wiped when the car explodes!
- Aether Shroud field upgrade is helpful for repairing the car so zombies don’t attack you.
- Each player should bring 2 monkey bombs to distract zombies so you can repair the car.
- In the edges of the arena behind the pillars, there’s a teleporter that instantly teleports you to the car (if it’s repaired), and an ammo crate on the opposite side. So you can refill ammo as much as you want here.
- If you run out of options to repair the car, it will start to autorepair after a minute. But as soon as it starts repairing, the boss will come to grab it, he throws it around and destroys it again. So get into the car as soon as it starts repairing (green aura on it). You can drive over green plants to repair the car.
- The boss will frequently shoot missiles (orange glowing circles on floor). DON’T DRIVE IN A STRAIGHT LINE INTO THEM. Try to drive in a circle off to the side. Sometimes it’s just impossible to avoid as he constantly focuses on the car. If a missile hits the car it will likely blow up and kill the driver. The runners should quickly revive the driver. Ideally, one of the runners should always have an Aether Shroud charged up to revive + repair the car. Repairing the car costs 150 salvage.
BOSS PHASES:
- In the first phase the boss is vulnerable to damage. When there are orange glowing spots on the mouths, the driver should boost into them (press
 / left stick to boost). Use the stairs in the middle of the arena as a ramp to jump into the boss. The running players should shoot those weakspots.
 - The boss will become invincible when he starts a blue spinning attack. The runners should stop shooting. The only way to knock him out of this is to boost-jump into him with the car. Then he drops a blue light beam somewhere in the arena, drive through the light beam, then quickly boost-ram the boss again. Then his invincibility ends (only after you picked up the light beam with car).
- When his invincibility ends, he has a golden glowing weakspot on his underside. Deal as much damage on it as possible before it closes.
- As his health drops, he will start shooting more missiles. Eventually he will just fire missiles everywhere, for the driver this is practically impossible to evade. Runners can try to hide in the alcoves on the arena side where the teleporter/ammo crate are. He will go in and out of his blue spinning invincibility attack. Rinse and repeat ramming him with car > collecting blue beam > ramming again.
- When he is at low health he starts shooting a blue beam. Hide behind the pillars around the arena to evade this.
Beating the boss finishes the easter egg.
Shitty Zombies Player says
Any more tips for getting the red key? I shot all around for each of the three spawn locations you showed but got no keys when I reloaded at any of them. Also I was using monkey bombs to survive outside of the truck, but the second I’m out of monkeys its almost impossible to stay out there. Any other tips to survive out there?