
Nioh 3 contains 20 main boss fights and several side bosses. This Nioh 3 Boss Guide will walk you through the best tactics to defeat all main bosses in the game. They are listed in chronological order below. The three secret “Demon” bosses are covered at the end and are best done after the story. There are various other side bosses but they are just repeat bosses from previous games (see Nioh 1 Boss Guide & Nioh 2 Boss Guide).
General Tips:
- Get 100% Collectibles in every region! Reaching Exploration Level 2 in each region gives you permanent increases to your Attack and Defense, and the collectibles offer useful rewards to make you stronger. You will also level up naturally along the way. Most useful are the Kodama, they give you more Elixirs on respawn which lets you heal more often during boss fights.
- Summon Benevolent Graves (blue graves). This gives you an AI companion to aid in battle. To summon them you must first defeat Revenants from red graves to get the required cups.
- You can also summon visitors (other human players) at Shrines in exchange for cups. They will help you out until they die or leave your game.
- When reaching a new boss, do a test round where you just block and dodge without even attacking. Memorize their attack pattern and after which attacks they are slow to recover, giving you an opportunity to counter-attack.
- The same basic strategy works in all fights: play the new Ninja style with the 3 Ninjutsu “Shuriken”, “Uncanny Flame”, “Shrapnel Bomb”. For weapon use Dual Ninja Swords. In Ninja style you consume less Ki (stamina) and with the Dual Swords you can attack very fast to recharge your Ninjutsu. Dodge behind the enemy, land attacks from behind to deal increased critical damage. Each hit charges your Ninjutsu. Do a fast combo with a heavy attack finisher: 3 x
 > press
  . With Dual Ninja Swords this does a spinning jump attack during which enemies can’t damage you, making you effectively invincible during your attacks. Throw a Shuriken after each combo, your Ki (stamina) recharges while throwing Ninjutsu! This lets you do combos infinitely which can keep enemies stunlocked the entire time. When your Ninjutsu is fully charged, run away and throw everything at the boss. Also use Summoning Seals from Soul Cores, these will summon a monster to fight alongside you. Spam this together with Ninjutsu from a safe distance. When you run out of Ninjutsu do melee attacks from behind again to recharge. Rinse and repeat.
 - See Nioh 3 Collectible Guide to complete all regions.
Recommended Build:
First of all, every weapon can defeat any boss. Pick what weapon feels the most natural to you, whatever you like best. However, there is a very beginner-friendly setup and if you have trouble early on just give this a try:
- Recommended Weapon: Dual Ninja Swords (Ninja Style) – they attack extremely fast, each hit interrupts enemies, keeping them effectively stunlocked the entire time. Following a quick attack with a heavy attack renders you invincible during the attack animation. It’s also the most agile weapon, is great for dodging and depleting the Ki (stamina) of bosses. When enemies start to block, you can also do jump attacks with
 and press to land behind enemies and deal splash damage.
 - Attributes: Start by bringing all attributes to level 10 for a solid all-rounder (Strength can be ignored with Dual Ninja Swords). Then put everything in Heart and Skill for more damage with Dual Ninja Swords and Ninjutsu. When you get to the point that even light armor pieces increase your weight above 30%, put more points into Stamina to stay below 30% weight for faster dodges and less Ki consumption.
- Armor: Stick with low weight armor, below 30% total equipment weight (blue percentage in stats). It vastly increases your Ki recovery speed so you can run, dodge and attack more. Your dodges are also faster.
- Guardian Spirits: Nekomata is good for Ninja style and available early on, increases your Ki recovery speed and makes you deal more Ki damage to enemies. This makes you more agile and you can stun enemies more easily.
- Skills: The only must-have for the final region is “Summoning Basics” which you get from finishing the Onmyo Magic Veteran Missions, available after reaching the final era “Bakumatsu”. It doubles your number of summoning seals, allowing you to summon Yokai helpers from a safe distance that damage the enemies for you while you hang back and throw Ninjutsu. For the early to mid game use whatever skills passively increases your stats, they are equipped at shrines under Skill Management. Unlocking/Customizing Martial Arts isn’t really necessary with the Dual Ninja Swords, just keep the default Martial Arts and don’t bother with unlocking other ones as they can break your combos and cause more problems than it’s worth.
- Summoning Seals: Scampuss is great early on, it constantly attacks your enemies in quick succession and drains their Ki fast. In the 2nd main region Heian you can also unlock “Ibaraki Doji” which does a lot of damage and is great for depleting boss Ki fast.
Boss #1 – Yamagata Masakage (Prologue Encounter)
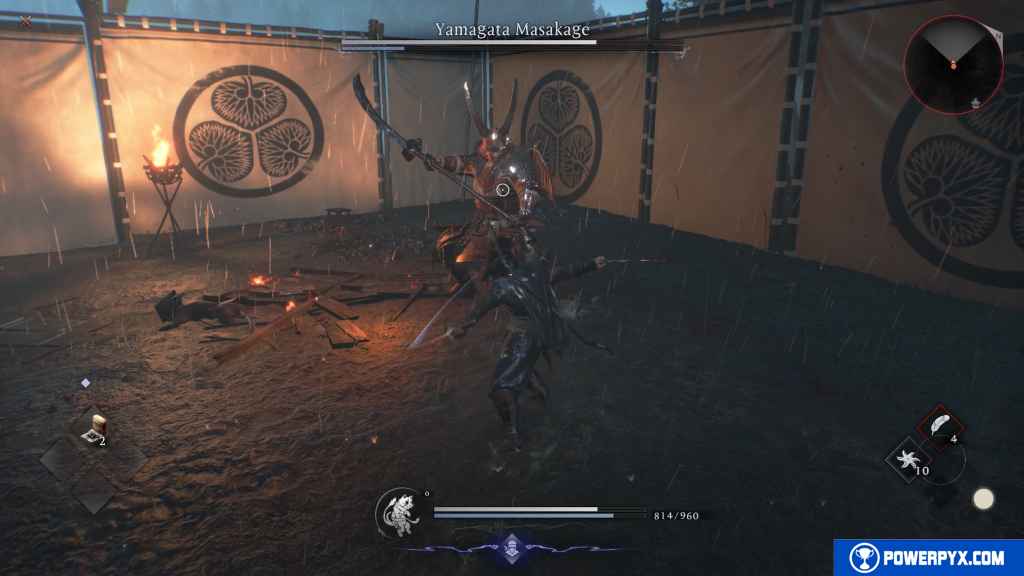
- Main Mission: Escape from Hitokoto Slope
- Mission Level: 1
- Recommended Weapon: Dual Ninja Swords (Ninja Style)
- Difficulty: 7.5/10
As usual with Nioh, the first few bosses are the hardest. The first boss is a big human wielding an Odachi. He can kill you in 3-4 hits. He can stab, grapple, do spinning attacks, and splash damage. The trick is to focus on depleting his Ki (the blue bar below his health). Then he gets stunned and you can do a heavy attack ( ) for massive damage. Remember to heal (  ) if your healthbar drops below 35%. Also remember to use your Ninjutsu (
  + / ) to use ranged attacks from a safe distance. At this point in the game you don’t have access to your 3 Stances in Samurai style yet, so using the faster Ninja Style with dual swords is generally easier for now.
At the start he always likes to do a long combo. Run towards him (  ) to bait him into attacking you, then run backward to get out of his range. Let him miss his combo, then run toward him and land a combo of your own. Rinse and repeat. Remember that you can run during boss fights and can even attack while running. This method works for most bosses, running close enough where they will start to attack, then backing off while they waste their combo and deplete their Ki, then attacking to deplete their Ki further.
The Dual Ninja Swords are good for this fight, they are the best weapon for fast dodges. While they do little damage, the quick attacks are great at depleting his Ki. When his Ki is depeleted, get behind him to land some quick attacks (you deal more damage from behind), then do a heavy attack.
When you attack him, try to land a full quick attack combo. Sometimes he stops attacking while you deal damage, but sometimes not. If he attacks while you attack him, dodge away! Only attack him when you are near full Ki (the blue stamina bar below your health). If you are below 50% Ki, don’t engage. If you run out of Ki mid-combo you become a standing target. This fight is largely about Ki Management: keeping your own Ki near full, while constantly whittling down the boss’s Ki.
When the boss drops to about 35% health, you can summon your Guardian Spirit ( +  ), then do quick and heavy attacks. You don’t take damage while in Spirit Form. This phase should be enough to nearly kill him. Afterward do what you did before, keep safe distance, run away from his combos, only attack after he missed his combo and you are near full Ki.

Boss #2 – Yakotsu-baba
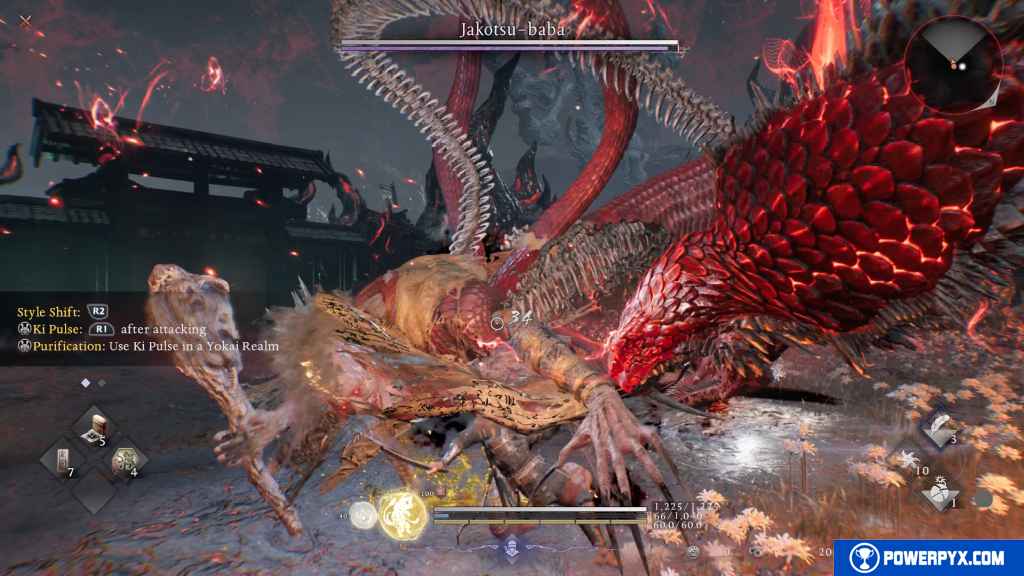
- Main Mission: Crucible Manifested
- Mission Level: 14
- Recommended Weapon: Dual Ninja Swords (Ninja Style)
- Difficulty: 7.5/10
This boss is a huge monster. First of all, you should have gathered all possible collectibles in the first 3 sub-regions. Not only do you gain lots of Amrita for leveling up while doing this, they also give helpful buffs. Especially the Kodama are important to increase the number of Elixirs you respawn with. You also get lots of Ninja Points & Samurai Points for buying more skills. You should also have defeated the Crucible Wraith in this mission to unlock the potential of your Soul Cores. If you collected everything so far you should be Level 20+. Having at least 10 points in Heart (more Ki) and 10 in Constitution (more health) is highly recommended, and equip Level 14 lightweight gear that has below 30% encumberance so you can dodge fast with low Ki expenditure. Also equip a Soul Core in Yang position at a shrine to use summoning magic from the shortcut menu.
Now for the fight itself, you’ll always want to dodge behind the boss and attack him from behind. You deal vastly more damage from behind. The Dual Swords in Ninja Style are the most agile weapon and the best for fast movements and dodges. While you don’t do huge damage from the front, Ninja Style gives a big bonus to your damage from behind. You should have enough Ki (stamina) to do 2 full combos. Then you can dodge to a safe distance and use your Ninjutsu while Ki recharges, throwing Shuriken and whatever other Ninjutsu & Onmyo Magic you unlocked. This lets you deal damage while waiting for Ki to recharge.
While he does a frontal attack, dodge behind him and land your combos. Some of his spinning attacks or stomps can still hit you but these don’t do much damage. When he finishes his combo and you’re behind him, retreat or dodge his next combo. Then again bait him into attacking from the front, dodge behind him to attack, repeat.
His most dangerous attack is when he tries to grapple you, this deals massive damage. He will sometimes shoot his “head” at you from his metallic spine. Remember this move, whenever he does it you want to dodge toward and behind him. Don’t dodge sideways, he will home in on you and can still grab you if your dodge timing is off. But he can’t redirect his head backward after shooting it, so you’re safe behind him and can deal lots of damage while he’s vulnerable. You could also spend some time before the fight to build up a full Spirit Force Gauge, then when the boss approaches 35% health unleash your Spirit Guardian and it might be enough to finish him off. If you feel like you deal too little damage and take too much damage, spend some time leveling up and it’ll get easier, or summon the blue graves to help you.
Boss #3 – Baba Nobuharu
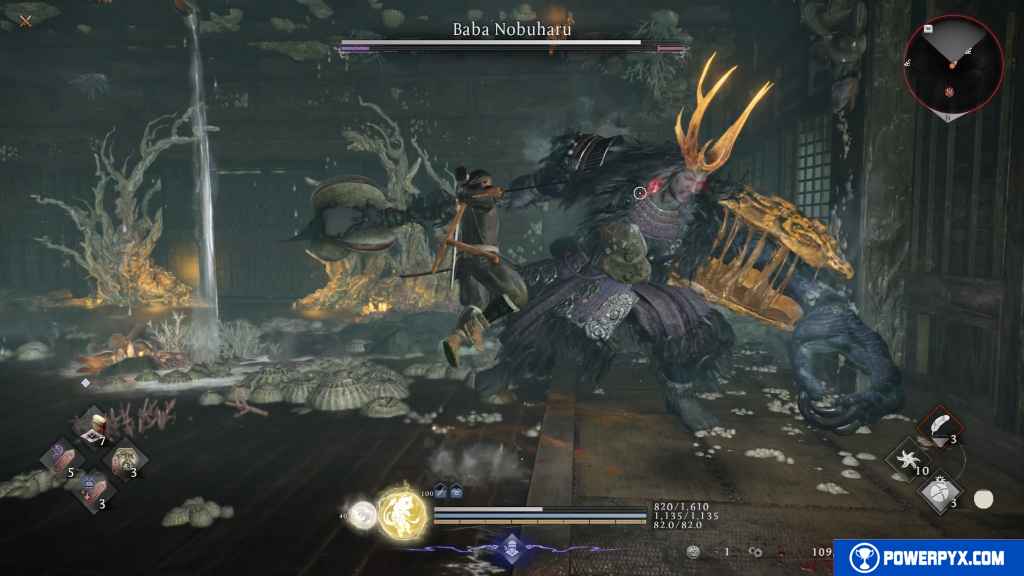
- Main Mission: Mirage Fortress
- Mission Level: 39
- Recommended Weapon: Dual Ninja Swords (Ninja Style)
- Difficulty: 7/10 (at Level 45-50)
Preparation before the fight: First, make sure you cleaned out all collectibles in all regions. This will give you huge boosts to your attack and defense stats. Each region gives +2 Attack and +2 Defense, and a bonus +5 to each stat from raising all regions to exploration level 2. This will make a huge difference. While cleaning out collectibles and myths you should already have reached around Level 50. Craft high level weapon/armor at the blacksmith if you don’t already have any. Using Ninja Style is recommended. Because this boss has a phase where he does a lot of ranged water attacks, you’ll want to keep your distance and just throw Ninjutsu and Magic at him. This makes the fight much more manageable. Equip the Ninjutsu: Shrapnel Bomb + Shuriken + Uncanny Flame. Put at least 10+ points in Skill to do more Ninjutsu damage. Having at least 15+ Constitution and 15+ Heart is also advisable to have enough health and Ki. Wear light armor below 30% weight to dodge quickly without consuming so much Ki. If his grapple instakills you, you’re too underleveled and should invest more points in Constitution and get level 40+ armor. Using Dual Ninja Swords is preferable because of their fast attack speed to build up Ninjutsu quickly.
Fight Strategy: the method is simple: deal damage from a safe distance with Ninjutsu. The only reason you want to attack with melee is to charge up your Ninjutsu. When you run out of Ninjutsu, dash forward-left to get behind the boss. Dodge his combo, land some quick hits. Repeat a few times till Ninjutsu is fully charged. Then dash back to the other edge of the arena, he can’t hit you there. Then you spam all your Ninjutsu, go back in for melee, rinse and repeat. Because you are out of his danger zone for most of the fight it keep things simple and predictable. There is still a little bit of a learning curve with recognizing his attack pattern, and sometimes he tailwhips you when you’re behind him. Always stay away from his grapples and his red glowing attacks.
At some points in the fight he switches into a Yokai Realm state (room turns gray) and he starts using water magic. His most dangerous move is when the entire floor becomes water, it does huge damage. This is why you want to stay at the other edge of the room during this phase and only use Ninjutsu. Let him do his water magic till he turns back to his normal form. It’s best not to engage in melee during this phase and just wait it out. The only thing he can hit you with at distance is when he throws water in a straight line, however it’s a slow projectile that’s easy to dodge. Also use your summoning seal magic during this phase to keep dealing damage. He will transition in and out of his two phases throughout the fight but he doesn’t learn any new moves. He only has one healthbar.
Boss #4 – Yagamata Masakage (Horse Version)
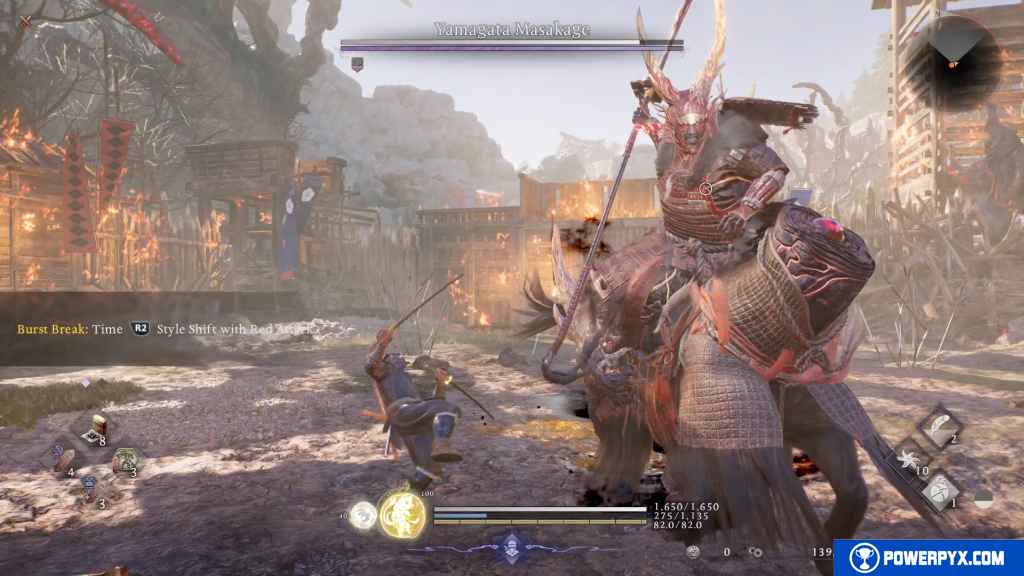
- Main Mission: A Fiery Invasion
- Mission Level: 43
- Recommended Weapon: Dual Ninja Swords (Ninja Style)
- Difficulty: 5/10 (at Level 50+)
This boss is a human riding a horse, he uses a big sword to attack as well as a bow for ranged attacks, and uses fire attacks. He only has 1 healthbar. He transitions between his normal phase and a fire phase where he uses exclusively fire attacks. It’s recommended to equip these Ninjutsu: Shuriken + Shrapnel Bomb, Uncanny Bubble (he’s weak to water). Having 15+ points in Skill is good for more Ninjutsu damage.
Because this boss rides around a lot and can use ranged attacks, he can be annoying to hit with Ninjutsu. During his normal phase you’ll want to dodge forward-left to get behind him, then attack him from behind with a combo, throw 1-2 Shuriken Ninjutsu between your combos to allow your Ki to recharge. Never let your Ki run out completely so you can always dodge when he attacks. Always dodge forward-left on his melee attacks, this way you constantly stay behind him and are out of his hitbox. He doesn’t attack from the back. When he does his grapple attack also dodge forward-left to get behind him.
When he starts his fire phase the screen turns gray and he starts burning. He will leave behind a fire trail wherever he rides. Stay out of the fire. He will often do jump attacks that create a “ring of fire” that’s spreading out. His melee attacks all inflict burn damage now and his moveset gets harder to predict. When he shoots arrows he will shoot multiple at a time now. His arrows are easy to dodge sideways. During this phase, toss all your Ninjutsu at him that you built up during the prior phase. Only shoot Ninjutsu when he comes straight at you, not when he rides sideways as you’d miss him. Always dodge backward during this phase and stay as far away from him as possible. Then he can’t hit you with anything except his arrows which are easy to dodge. Focus more on surviving this phase and taking minimal damage. Don’t do any melee attacks during this phase, it’s too risky. After about a minute he turns normal again and his moveset is the same as it was at the start of the fight. Keep attacking him with melee during his normal phase.
This way you always use his normal phase to deal melee damage and build up Ninjutsu, then his fire phase is exclusively for shoot Ninjutsu/Magic at him and just dodging his attacks.
Boss #5 – Takeda Shingen (Human Form)
- Main Mission: A Fiery Invasion
- Mission Level: 43
- Recommended Weapon: Dual Ninja Swords (Ninja Style)
- Difficulty: 2/10
Very simple: buy the Ninja martial art “Footstool Jump” for 1 Ninja Point. Be in Ninja Style, then do double jumps onto the boss to jump over him and do a heavy mid-air attack with to land behind him. You will completely avoid his blocks and deal him critical damage when you land behind him. He usually can’t hit you while you’re in midair, and you quickly deplete his Ki with this. Just spam this one move. Works well against any human bosses that block a lot.
Boss #6 – Takeda Shingen (Monster Form)
- Main Mission: Tiger’s Cause
- Mission Level: 50
- Recommended Weapon: Dual Ninja Swords (Ninja Style)
- Difficulty: 5.5/10
Just like with previous monster bosses, you’ll want to dodge forward-left to get behind the boss, land some melee attacks from behind during his starting phase to build up Ninjutsu uses, when he turns throw Ninjutsu/Magic at him until he turns back to normal.
This is a big monster boss with a wild moveset, he has 1 healthbar. He does a lot of ground slams that create a shockwave and deal damage in a radius around him. Playing in Ninja Style is good here again so you can adopt a hit-and-run strategy. Land a few hits from behind while keeping Ki high for emergency dodges. Then dodge away and throw your Ninjutsu at him, rinse and repeat.
When he enters his second phase he will start burning and frequently shoots big fire orbs. Stay far away from him on the other side of the arena, keep throwing all of your Ninjutsu + Magic. Wait for this phase to cool off, when he turns back to normal you continue attacking.
Having completed all region collectibles makes a huge difference here for the stat boosts, especially having all Kodama so you start with minimum 8 Elixirs on respawn.
Boss #7 – Great Tengu
- Main Mission: Sacred Mountain Defiled
- Mission Level: 53
- Recommended Weapon: Dual Ninja Swords (Ninja Style)
- Difficulty: 6/10
Great Tengu is a bird monster, with some similar moves to regular Tengu monsters. He has one healthbar, uses melee attacks and some wind magic. To get some good high level gear, fast travel to the Eternal Rift and talk to everyone there to get the Adept side missions, do those for some Level 62 equipment.
Dodge forward-left to get behind him, land 1-2 combos (throw shuriken between combos to let Ki recharge). Then back away, throw Ninjutsu at him, rinse and repeat. When he starts his second phase he’ll use a lot more wind attacks. As usual you’ll want to stay away from him, throw your magic and Ninjutsu at him from safe distance.
His two dangerous moves are his grapple and when he glows red and comes flying towards you. These can be hard to evade. Dodge timing matters a lot here or he’ll home in on you and hit you. When he does his flying grapple move always dodge sideways. Sometimes he will fly up and casts wind magic at the ground. If you’re behind him and he flies up, dodge away to avoid this. He’s a very “jumpy” boss that moves around a lot and is annoying to fight.
Boss #8 – Otoroshi
- Main Mission: Black Feather Sanctuary
- Mission Level: 69
- Recommended Weapon: Dual Ninja Swords (Ninja Style)
- Difficulty: 2.5/10
This is a big monster boss that attacks with its claws and uses ice attacks, sometimes using two giant icicles to hit the ground. This one is quite slow and it’s easy to dodge and stay behind the boss.
Just like with previous bosses, an easy strategy to exploit is to hit him with Ninjutsu. Dodge his attacks and attack from behind to recharge your Ninjutsu fully, then use your summoning seal and all of your Ninjutsu from a safe distance, rinse and repeat. This keeps you out of the danger zone most of the fight. You can also go into the higher level areas of Heian to get better gear and level up fast, then this fight becomes trivial when you have level 90 gear.
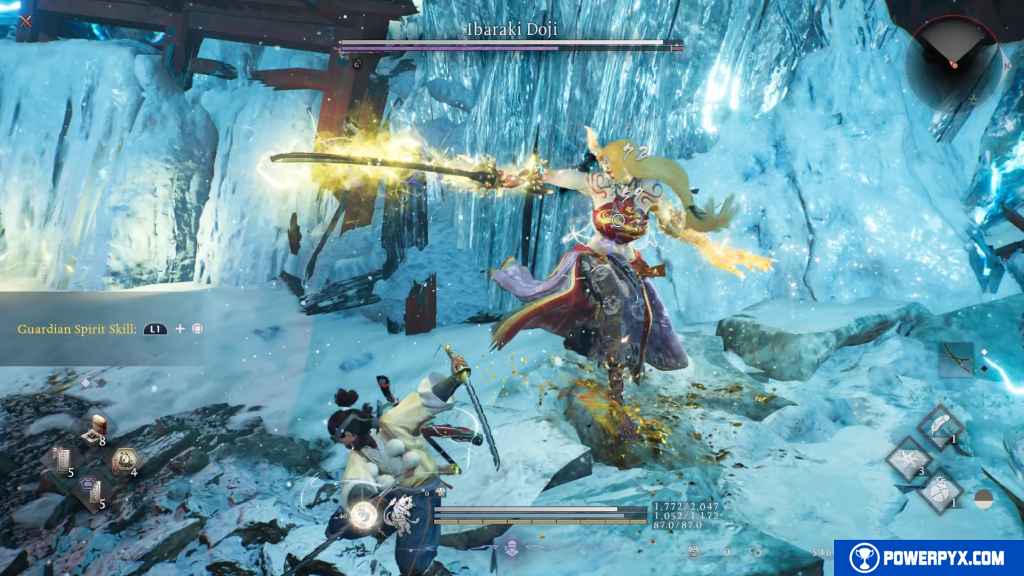
Boss #9 – Ibaraki Doji
- Main Mission: The Oni of the Rajomon
- Mission Level: 80
- Recommended Weapon: Dual Ninja Swords (Ninja Style)
- Difficulty: 5.5/10 (at Level 80+)
This boss is a female yokai monster wielding a blade and using electric magic. She attacks relatively fast with her blade. As usual, make sure you cleared out all collectibles to get stat boosts and level up. You should be around level 90+ if you cleaned out all collectibles. Having the following Ninjutsu is recommended: Shuriken + Uncanny Flame + Shrapnel Bomb. The last two set her on fire fast, then use Shuriken from behind for critical damage and mix in some melee combos. The next boss is actually easier while being a higher level, so you may want to do them out of order and finish the higher level Rokuhara region first for better gear.
The same strategy as with previous bosses still works: dodge forward-left under her sword attacks, land hits from behind to fill up your Ninjutsu. After all your Ninjutsu are filled, back away and toss it all at her and use your summoning seal. Her only dangerous ranged attack is when she spins back and then shoots two electric arcs at you. This move is very predictable however, as she will always do a backspin before it and there’s a long delay before she shoots the projectiles. Just double-dodge to the side to evade this.
The tricky part is recharging your Ninjutsu here with attacks. Her moveset can get quite wild and is sometimes hard to predict as she likes to mix in various electric moves. Learn to dodge under her attacks just a moment before she hits. Between her more powerful attacks she sometimes takes a longer break, this is when you can land significant hits from behind. When she transforms to her electric phase she will also stand still for a few seconds so you can land free damage.
When she transform into her electric phase, her sword attacks remain largely the same, but she will learn some new electric moves that deal lots of damage and can cover a wide area. She will shoot lots of ranged projectiles during this phase. Just stay at the other edge of the arena and wait for her to turn back normal, dodge her projectiles. Dodging also recharges your Ninjutsu so you can keep throwing stuff at her while you focus on dodging at a safe distance. When she turns normal again her moveset is the same as at the start. Keep your Guardian Spirit transformation till she’s at 15% health, then you can use that to finish her off.
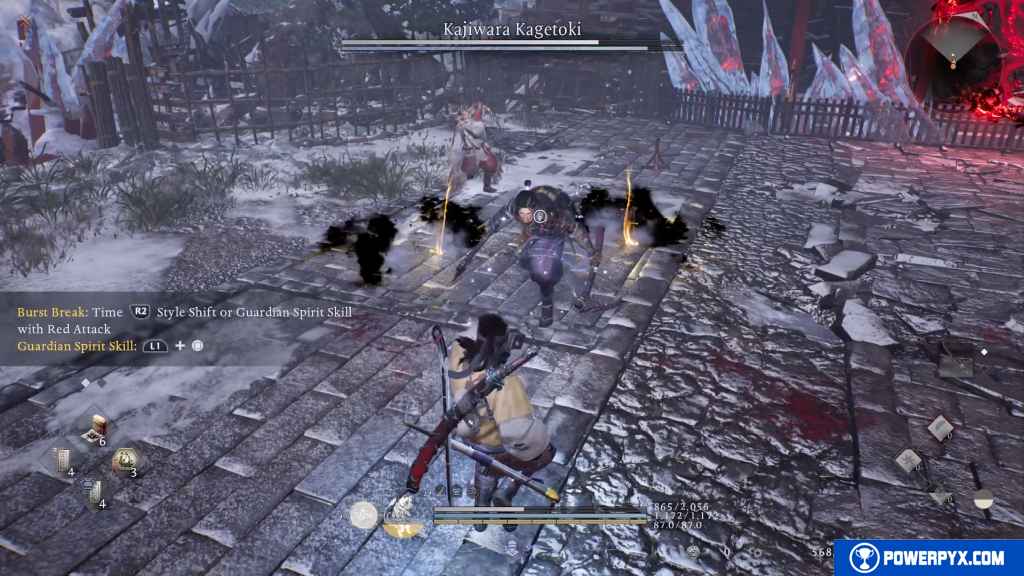
Boss #10 – Kaiwara Kagetoki
- Main Mission: Subterfuge at the Abandoned Shrine
- Mission Level: 83
- Recommended Weapon: Dual Ninja Swords (Ninja Style)
- Difficulty: 4/10 (at Level 80+)
This is a human boss, he wields 2 axes and uses a lot of summoning seals to briefly call Yokai for help. His melee attacks don’t deal much damage. You are also aided by an AI companion during this fight and he can’t die. So technically, you could hang back and wait for the AI to kill the boss, but this would take a very long time. He also blocks a lot which makes this a slow and annoying fight, but his moves are quite predictable.
Tossing Ninjutsu at him works well again here: Shuriken + Uncanny Flame + Shrapnel Bomb to set him on fire.
When he uses summoning seals he will toss golden orbs on the floor. Get far away from him, it’s entirely random which summon he will use, but it’s limited to 4 possibilities: a wolf that slashes forward, flies that cause stench damage, a bunny monster that shoots projectiles, a big yokai that charges forward. While you shoot Ninjutsu at him, the only other thing to watch for is when he throws axes. They can reach quite far and deal more damage than his melee axe attacks.
The annoying part here is charging up your Ninjutsu because he blocks so much. Bait him into attacking, then land a combo, throw a shuriken, keep attacking until your Ninjutsu is full. When he starts blocking, wait for him to attack again which makes him vulnerable.
Boss #11 – Minamoto no Yoritomo
- Main Mission: Frozen City, Blazing Tree
- Mission Level: 86
- Recommended Weapon: Dual Ninja Swords (Ninja Style)
- Difficulty: 4.5/10 (at Level 90+)
This is a winged yokai monster boss, he wields a sword and uses wind magic. His attack pattern is somewhat similar to Great Tengu from earlier. Our Ninjutsu strategy is working again here. Use Dual Ninja Swords to land quick hits from behind to build up your Ninjutsu. Equip the Ninjutsu: Shuriken + Uncanny Flame + Shrapnel Bomb. Make sure you grabbed all possible collectibles for the passive stat boosts from region completion, it adds up to a lot.
Dodge forward-left to get behind him, land 1-2 combos to build up Ninjutsu, back away and use all your Ninjutsu + Summoning Seal. You’ll want most of your points in Heart, Skill, Magic for damage and 20+ Constitution for health. Use light armor below 30% weight for fast dodges.
His grapple move is surprisingly easy to evade, unlike other bosses. Just dodge forward-left to avoid it. He will shoot wind projectiles quite often, but they are easy to dodge to the side. When he enters his second phase, he will shoot more projectiles and follows up with a wind shockwave on the ground, so keep dodging till he’s done with that. After he misses his wind projectiles is typically a good time to sprint forward and land some melee damage. And whenever he transforms between his phases you can land plenty of critical damage from behind. Your Ninjutsu Uncanny Flame + Shrapnel Bomb will set him on fire pretty quick and it deals good persistent damage.
His most dangerous move is when he glows red, then he rushes forward twice in a row and homes in one you. This does huge damage. So either learn the dodge timing for this or use your spirit skill with + to counter it, or do a style shift with  , whichever you are most skilled at.
Boss #12 – Kusanagi
- Main Mission: The Spirit Tree Village
- Mission Level: 89
- Recommended Weapon: Dual Ninja Swords (Ninja Style)
- Difficulty: 4/10 (at Level 95+)
This is a double boss, sort of. Kusanagi is a big monster. There is a sorceress in this fight but she has very little health and doesn’t do much. You can ignore her, she will just autorevive if you defeat her, and she also shrouds herself in a protective bubble which makes her annoying to fight. You just need to defeat the Kusanagi main boss, then the sorceress will automatically be defeated too.
By this point you should be around Level 100 if you thoroughly cleaned out all previous regions and did all Myths. Having equipment in the level 95+ range is highly recommended, which you can also craft at the Forge if needed. Then this fight isn’t too bad at all.
Our old strategy of throwing Ninjutsu works brilliantly here. Kusanagi takes a lot of fire damage from Shrapnel Bomb + Uncanny Flame, put at least 30 points into Skill for more Ninjutsu damage. As usual, dodge forward-left to get behind Kusanagi, land some hits till your Ninjutsu is full, back off and throw everything you got. Also cast your summoning seals when you are using your Ninjutsu. Remember that you unlocked 2 summoning slots from story progress already, so you can assign 2 different ones to the shortcuts and keep spamming them alongside your Ninjutsu. This way you can fight from a safe distance most of the time and just focus on dodging.
Boss #13 – Hiruko
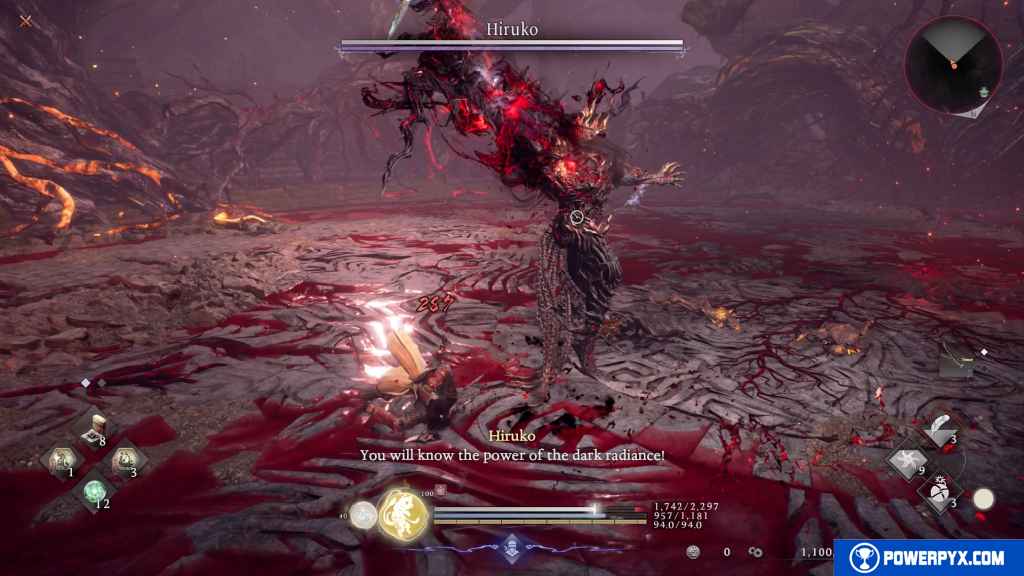
- Main Mission: Dark Roots
- Mission Level: 93
- Recommended Weapon: Dual Ninja Swords (Ninja Style)
- Difficulty: 5/10
This is the first boss with 2 proper phases and 1.5 healthbars. After getting him to half health, he transforms and gets a full healthbar back. You should be Level 100+ for this and have Level 90+ equipment.
Our Ninjutsu strategy with Dual Ninja Swords works again. However, he doesn’t take much damage from Ninjutsu, but critical damage from behind will rip through his health super fast, especially if you have a Crucible weapon. By now you’ve got the gist of the boss design in this game. Dodge forward-left to get behind the boss, dodge his combo in Ninja Style for fast Ki recovery, then do combos from behind for massive critical damage. Throw a Shuriken between each of your combos to let your Ki recharge a bit, and Shuriken also does good crit damage from behind.
For summoning seals, equip a Scampuss Soul Core and Ibaraki Doji Soul Core, which you should have gotten automatically by this point. Ibaraki summon deals massive Ki damage, use it when he’s around half Ki and you’ll stagger him (keep it for his 2nd phase). Then attack him from behind with combos with a finisher each time, throw shuriken, repeat. This will tear through half his health within seconds. Then keep spamming Scampuss summoning seal while you keep attacking from behind. The scampusses stay around for relatively long and are good for depleting his Ki. Focus primarily on depleting his Ki, then dealing crit damage from behind.
Boss #14 – Tokugawa Kunimatsu
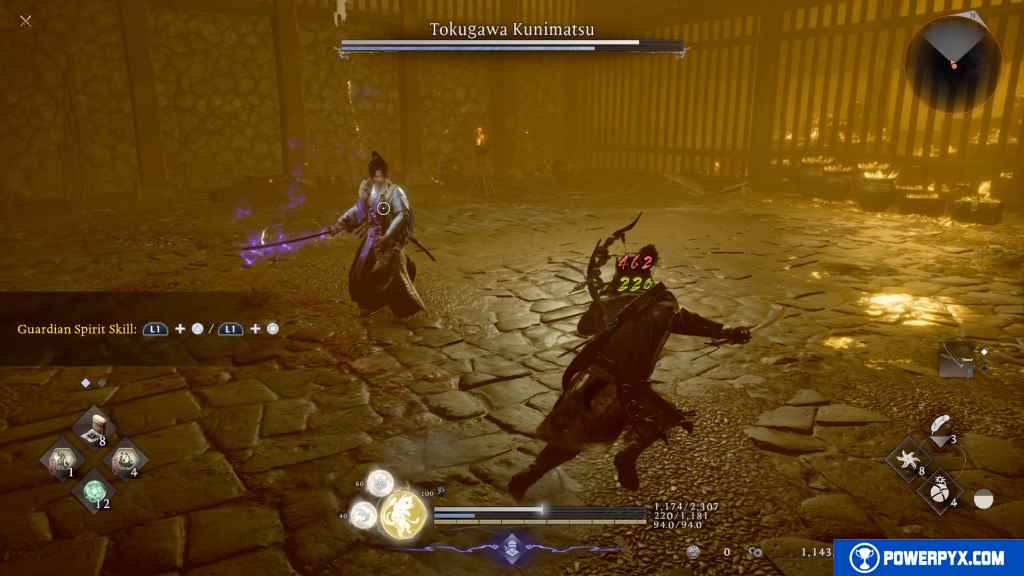
- Main Mission: Light of Hope
- Mission Level: 97
- Recommended Weapon: Dual Ninja Swords (Ninja Style)
- Difficulty: 8/10
One of the hardest bosses in the game. He is the prologue boss but you fight him again now at level 100.
He is a human wielding a sword (dual swords in second phase) and uses electric & wind magic. He has a lot of health but only 1 healthbar. What makes him an annoying and lengthy fight is that it’s hard to stay behind him for critical damage. He constantly spins with his words and turns away from you. He also blocks your Ninjutsu which makes it largely ineffective, except when he’s attacking or you’re behind him.
He also summons a wind creature with different move, the most dangerous one is when it rushes forward in a straight line. It can also create whirlwinds, and a wind that covers the floor, but these moves are slow and easily avoided.
At the start, get behind him and throw some shuriken in his back, afterward land a melee combo on his back. For this fight you mostly want to use melee and focus on dodging his attacks. Learning his moveset and the correct dodge timing is the key to victory here. Luckily, his sword attacks don’t reach far and are easy avoided by dodging backwards. Unlike other bosses where you typically want to dodge forward to get behind their back, this time it’s better to dodge backward and let him finish his sword strikes. After he does a long combo or one of his magic moves, he sometimes stands around for a few seconds and you can run/dodge behind his back to land critical hits. Focus mostly on dodging correctly and wait for when he slows down to land damage. Use your strongest summoning seals early on to whittle down his health before he starts his second phase. When he makes the floor glow with electricity, dodge out and wait for the electric charge, then land some attacks while he’s vulnerable. When he shoots electric orbs, dodge sideways, but not too early or you’ll get hit. If you can’t land damage from behind, do a combo from the front anyway to deal consistent damage after each of his sword combos.
When he starts his second phase, he uses more elemental attacks. His most dangerous move is when he rushes forward in a straight line with his wind swords, then a trail of wind explodes behind him after a few seconds. This is very hard to dodge, and you want to stay out of the path he takes to not get hit by the wind detonation afterward. Whenever he does this move, remember to stay away from him until the wind trail has detonated, it takes half your health otherwise. If you see him briefly disappear from the arena, he is about to fall from the sky with an electric attack that deals damage in a wide area, run sideways when he disappears and you’ll always avoid it. His sword moves also change during this phase, but the dodge timing is similar to his first phase. Again focus on dodging backward out of his danger zone, when he missed his combo and stands still you rush in to land a combo, retreat and repeat. It’s a slow process, but slow and steady wins the fight here.
His second phase takes much longer than other bosses. He will transform back to normal eventually, but you’ll want to keep dealing damage throughout or the fight will go on for too long. Be careful with using Ninjutsu/Magic during his second phase, he often uses this opportunity to stab you or shoot you with projectiles. Only use Ninjutsu when he’s busy doing sword combos and you dodged out of the danger zone. Importantly, keep your Guardian Spirit for when he drops to 10% health to finish him off safely.
Overall this is the most skillful fight thus far due to his large amount of health, wild moveset, his constant blocking, he’s hard to hit from behind, and you can’t exploit it with only Ninjutsu.
Boss #15 – Takasugi Shinsaku
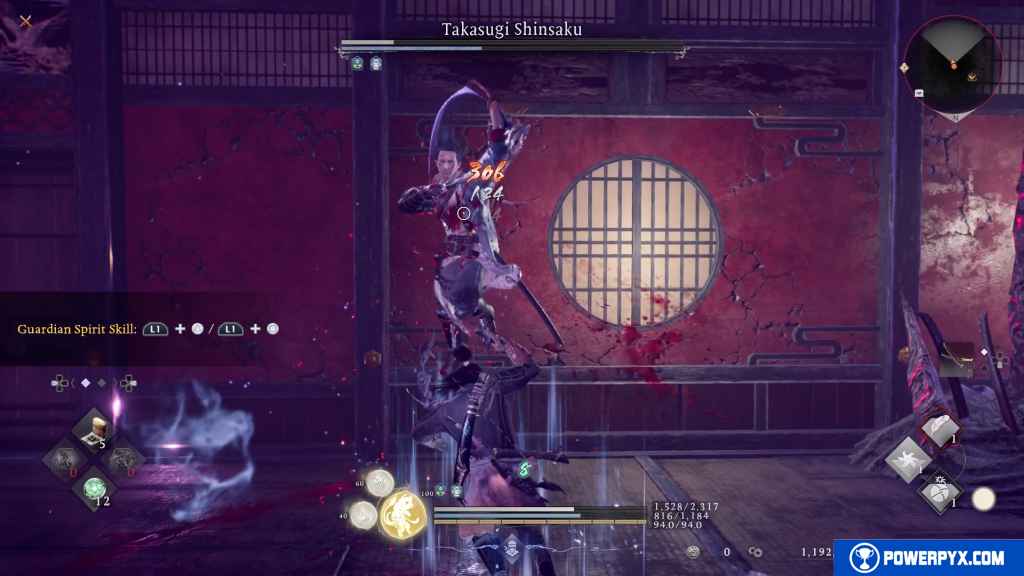
- Main Mission: The Sweet Sound of Strings
- Mission Level: 100
- Recommended Weapon: Dual Ninja Swords (Ninja Style)
- Difficulty: 4/10
This is a human boss that uses pistols and a katana. His moves are similar to revenants (red grave enemies). Using Ninjutsu on him works well again, and he’s weak to fire, so equip Shrapnel Bomb + Uncanny Flame + Shuriken. You can often stunlock him by throwing Shuriken > do quick attack with a heavy attack finisher > throw another shuriken and repeat. If he blocks or starts an attack, dodge behind him, let your Ki recharge a bit and repeat. When you Ninjutsu is full back away and throw it all at him. You should also do the 3 Veteran missions available in the Eternal Rift (talk to the NPCs with “!” icons and play their mission via Battle Scroll at shrine). The Onmyo Veteran mission gives the skills text “Summoning Basics” which doubles your summoning seal uses. This is one of the best skills in the game, be sure to equip it and select your strongest summoning seals (Ibaraki Doji and whatever else you got).
As soon as the fight starts, use your Ibaraki Doji summoning seal, it will deal a lot of damage and depletes his Ki fast. Follow up with quick attack combos and Shuriken to deplete his Ki. Then keep spamming your summoning seals, Ninjutsu, and quick attacks with a Shuriken in between. Try to make him burn by using your fire Ninjutsu in quick succession. You will tear through his health super fast. After using all your summoning seals he won’t have much health left.
Boss #16 – Enenra
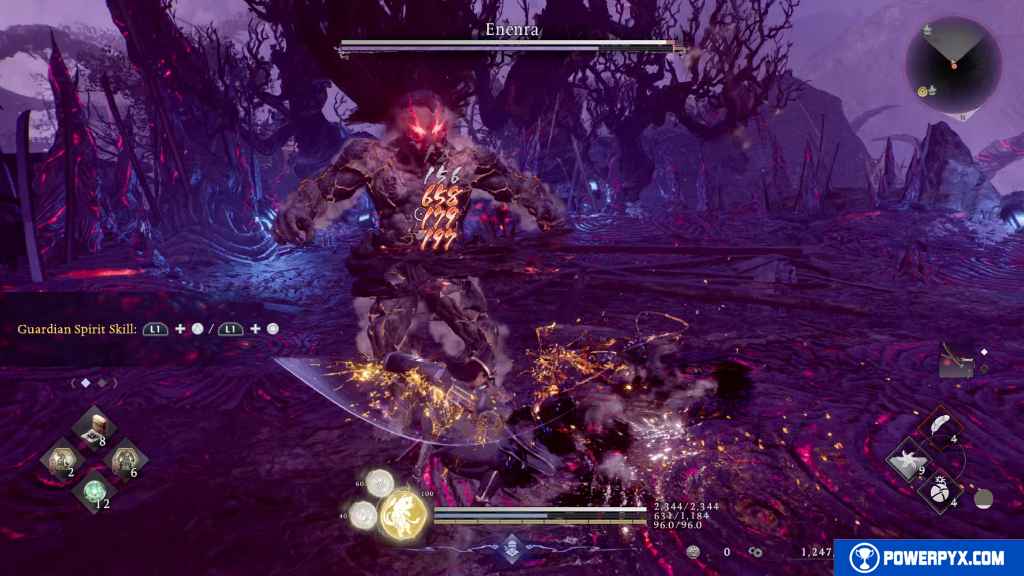
- Main Mission: Those Left Behind
- Mission Level: 108
- Recommended Weapon: Dual Ninja Swords (Ninja Style)
- Difficulty: 2/10
This is a boss that was already in Nioh 2. While he’s a mandatory boss on the main path, he’s more of a miniboss at this point. Charge up your Ninjutsu, then use Ibaraki Doji summoning seal to deplete his Ki fast. Then attack him from behind, throw a shuriken between each combo to let your Ki recharge, rinse and repeat. Then keep spamming your summoning seals and Ninjutsu at him to deplete his Ki and keep him stunlocked. You can stay out of his danger zone most of the fight. He does have quite a lot of health but with your summoning seals and critical damage from behind you’ll tear through him fast.
Boss #17 – Nuribotoke
- Main Mission: Accursed Temple
- Mission Level: 112
- Recommended Weapon: Dual Ninja Swords (Ninja Style)
- Difficulty: 2/10 (at Level 110+)
A big monster yokai boss. He is very slow and if you stay out of his range he can’t do much. At the start of the fight use your Ibaraki Doji summoning seal and follow up with a barrage of melee attacks and your other summoning seal to quickly drain his Ki. Then get behind him and keep doing combos, throw shuriken between combos to let Ki recharge. You will tear through his health super fast. When he transforms, you can either wait out this phase until he turns back to normal, or use another Ibaraki Doji right now to drain his Ki and keep him stunlocked.
Like the previous bosses, the key to a swift victory is equipping the “Summoning Basics” skill (from Onmyo Veteran mission in Eternal Rift) to double your summoning seal uses. Ibaraki Doji pretty much depletes any boss’s Ki and you can keep them stunlocked with critical attacks from behind. Then keep using your other summoning seals and Ninjutsu. This boss also takes heavy damage from Shrapnel bombs.
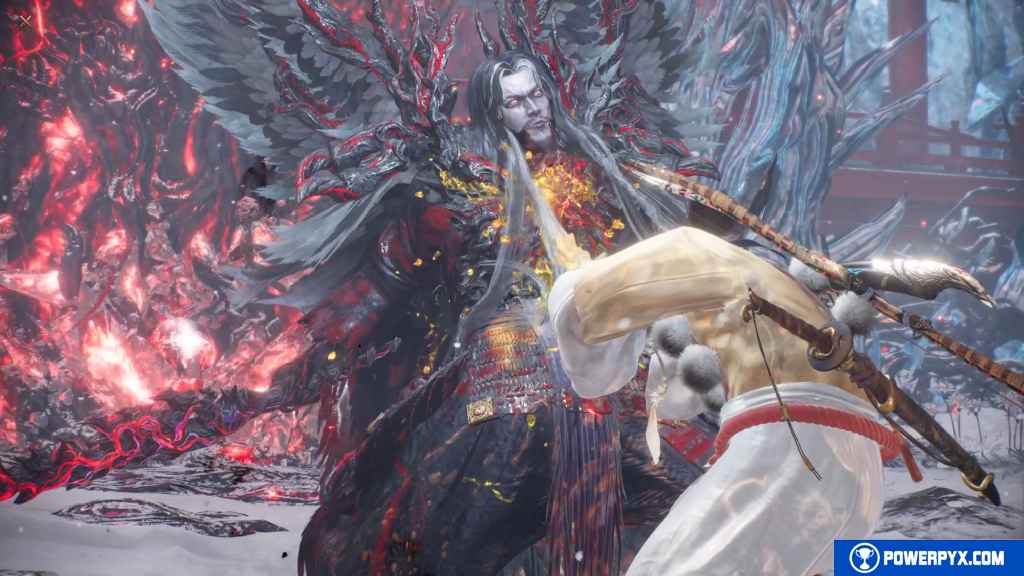
Boss #18 – Okita Soji & Tokugawa Yoshinobu
- Main Mission: Scion of the Gods
- Mission Level: 131
- Recommended Weapon: Dual Ninja Swords (Ninja Style)
- Difficulty: 8/10 (at Level 120+)
This is the one and only proper 2 phase boss in the game with 2 full healthbars and a complete transformation after the first healthbar.
Note: if you want to make this vastly easier, completing the available sub missions will turn it into a one phase boss so you don’t need to fight Okita and Tokugawa back to back. Specifically, Sub Mission “Peerless Katana” seems to be required.
Equipment:
- Armor = Ninja Style with Light Armor (30% weight or less), Samurai Style with heaviest armor possible.
- Skills = At shrine go to Skill Management > Common Skills > equip Summoning Basics to double your summoning seals (it’s unlocked from the Onmyo Veteran mission in Eternal Rift, talk to mage there and play it from shrine battle scrolls)
- Weapon = For weapon use Dual Ninja Swords in Ninja style. For Samurai use whatever weapon has highest Block value, typically spears.
- Summoning Seals = Ibaraki Doji (automatic story unlock from main boss in Heian) + whatever else you have that deals the most damage. I had Nuribotoke which is good but anything with 1-2 uses is good (2-4 uses with Summoning Basics skill)
- Talismans = Life Leech is extremely helpful, for example from Mermad Soul Core which you can farm in Bakumatsu region from Mermaid enemies. Then every hit you land restores your health which conserves your Elixirs. For other talismans it doesn’t reall matter what you pick, but Lightning Familiar is good if you have it for the second boss to deplete his Ki fast and deal extra damage (from Raiju Soul Core). Steel & Power Talisman is also good to buff yourself with more attack and defense before entering the boss fight, and refresh it during the second boss. But you can pick whatever you have that you like. The important one is just Life Leech, by far the best one to conserve your Elixirs!
- Ninjutsu = Shuriken, Shrapnel Bomb, Uncanny Flame.
Okita Soji – Phase 1 (till he drops to 50% health):
This phase is all about conserving your Elixirs and summoning seals – so don’t use any. As soon as the fight stars he will do a forward stab. Dodge left-forward to get behind him and immediately cast Life Leech on him (from Mermaid Soul Core, if you have it). Then you will heal back on each hit and don’t need any Elixirs. You can keep him stunlocked the entire time with Dual Ninja Swords. Do 3 light attacks followed by a heavy attack which makes you jump and evades his attacks. Each hit will stagger him. If he blocks, wait for him to attack and then start attacking him, or throw Ninjutsu at him and attack again when he stops blocking. You only need to dodge when he does a grappling move (gray misty glow on his hands -> dodge backwards or sideways) and when he does a long stab attack forward (dodge forward to dodge through this attack). But as long as you keep attacking he is constantly interrupted and can’t do anything. Even when he runs forward and you hit him with a Ninjutsu his attacks are always interrupted. In this phase he behaves similar to a typical Remnant. He hits hard but is easily overwhelmed by your attacks.
Okita Soji – Phase 2 (when he drops to 50% health):
At 50% health he will drink an elixir and starts glowing yellow. His attacks can no longer be interrupted so easily and he’ll just keep attacking when you land hits. He does several long instakill combos now, if he hits you with a full combo you are dead. He does lots of fast stab attacks that can hit you from any range. His stabs are by far the most dangerous move. When he glows red, he will do two stabs in a row, if both hit you, you’re likely dead. There are 3 ways to deal with this: learn to burst break by switching styles (R2) when he uses a red glow attack, or dodge (requires perfect timing), or the simple option is to switch to Samurai style and just block with your heavy armor and spear. At full Ki you can fully block his two stabs. Then quickly switch back to Ninja style and keep dodging.
As soon as he starts glowing yellow he will do two very long and strong combos in a row (with a short break after the first long combo). He always does this. Do not attack during this, only focus on dodging and surviving. Only his stabs are dangerous. Everything else is easily avoided by keeping your distance, running sideways in a big circle and dodging as soon as he winds up an attack.
After he did his first two combos, keep your distance and spam him with your summoning seals and Ninjutsu. Ideally, this will be enough to finish him off if the Summoning Seals hit him fully and your Magic is strong enough (25+ skill points in Magic). At least, it should take out 40% or so of his health. You really don’t want to deal with him up close during this phase, he hits extremely fast and hard and it’s too risky. Also you must keep your Elixirs for the second boss, so try not to use more than 2-3 Elixirs total for this entire fight to have 5-6 left for the second fight. Better to spend your Summoning Seals here and conserve healing. If your summoning seals aren’t enough to kill him, wait for him to slow down between combos and land the same combos as you did in the first phase and dodge quickly when he starts an attack. Also don’t waste your Life Leech spells during this phase, just try to kill him as fast as possible to conserve your health.
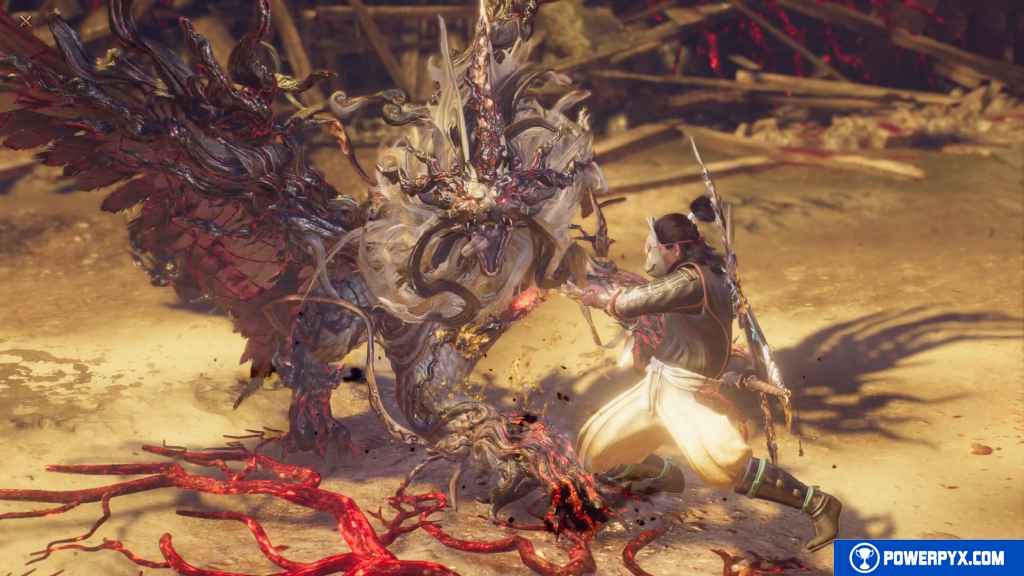
Tokugawa Yoshinobu:
You should go into this fight with 5-6 Elixirs left and 4 Life Leech spells left. Your summoning seals should be used up from Okita’s second phase.
This boss behaves like the typical monster bosses so far. He transforms in and out of his aggro phase when you deplete his Ki. But his aggro phase is relatively forgiving and his moveset doesn’t change terribly much. He uses water magic, sometimes shooting arcs of water at you but this is very slow and extremely easy to dodge. If you keep your distance he doesn’t pose much of a threat. Sometimes he’ll rush towards you but just dodge sideways and you’re safe. He also takes quite hefty damage from Ninjutsu.
As soon as the fight starts, get some distance and cast Life Leech on him. If you have Lightning Familiar Talisman (from Raiju Soul Core), or anything else with Lightning to deplete his Ki quickly that’d be ideal. Then dodge behind him and attack from the back. Each hit will restore your health thanks to Life Leech. If you have any lightning element active his Ki will drain super fast, then keep landing critical damage from behind until he transforms. When he transforms into his aggro phase, just keep your distance, dodge everything and throw Ninjutsu from safe distance. Wait for him to turn back normal, his aggro phase only lasts 30 seconds or so and is easy to dodge. Use Elixirs if you fall below 50% health. When he uses his grapple attack (gray misty glow on his face), run sideways and dodge sideways just before he hits. It’s not too hard to avoid this but if he hits it does hefty damage, though at full health you’ll survive.
Keep casting Life Leech whenever it runs out and keep melee attacking him from behind. If you take 1 or 2 hits while you attack it’s fine, as long as you don’t drop below 50% health you can keep attacking and it’ll heal you back. You primarily want to deal damage with Ninjutsu here (especially Shrapnel Bomb), the melee is just to dish out damage when the opportunity presents itself and to restore your Ninjutsu. Mastering the Okita Soji boss is the key here to go into the second fight with lots of healing left, then this fight is no worse than any of the other monster bosses so far.
Boss #19 – Death Veil
- Main Mission: A Sinister End
- Mission Level: 134
- Recommended Weapon: Dual Ninja Swords (Ninja Style)
- Difficulty: 1/10
This “boss” is just a series of Lesser Crucibles. They are just a bunch of enemies like you’ve been fighting so far, nothing special. After each Lesser Crucible, the Death Veil’s health will decrease a bit. The last Lesser Crucible will shoot fire at you from a distance, but you can stay behind the wall to avoid this, and the fire will also damage the enemies for you. If you die, you don’t need to redo the Lesser Crucibles that you finished in the previous life, they remain completed. You can simply spam your summoning seals in each Lesser Crucible, respawn, repeat at the next one.
Boss #20 – Hiruko (Final Story Boss)
- Main Mission: A Sinister End
- Mission Level: 134
- Recommended Weapon: Dual Ninja Swords (Ninja Style)
- Difficulty: 4/10
This is the final boss, and he is surprisingly easy, doesn’t have much health, and only 1 healthbar. Just attack him from behind. Cast Life Leech talisman on him, if you have it. Then you can keep attacking while automatically leeching his health.
When he transforms into his Yokai Realm phase, spam your Summoning Seals on him, especially Ibaraki Doji to deplete his Ki fast, and spam your Ninjutsu till he’s out of Ki. When his Ki is gone you can keep him stunlocked and spam your melee attacks on him, throw Shuriken between each combo to allow your Ki to recharge. When he turns back to normal, use your remaining summoning seals, cast Life Leech again, attack from behind with melee to recharge Ninjutsu and then spam your Ninjutsu from safe distance. He will switch between different elemental attacks, but when you keep your distance you are mostly safe from it. His melee attacks are slow and easy to dodge.
That’s all the story bosses done. Now all that remains is to clean up the 3 Demon side bosses, each of which gives a trophy and is needed for the Platinum trophy.
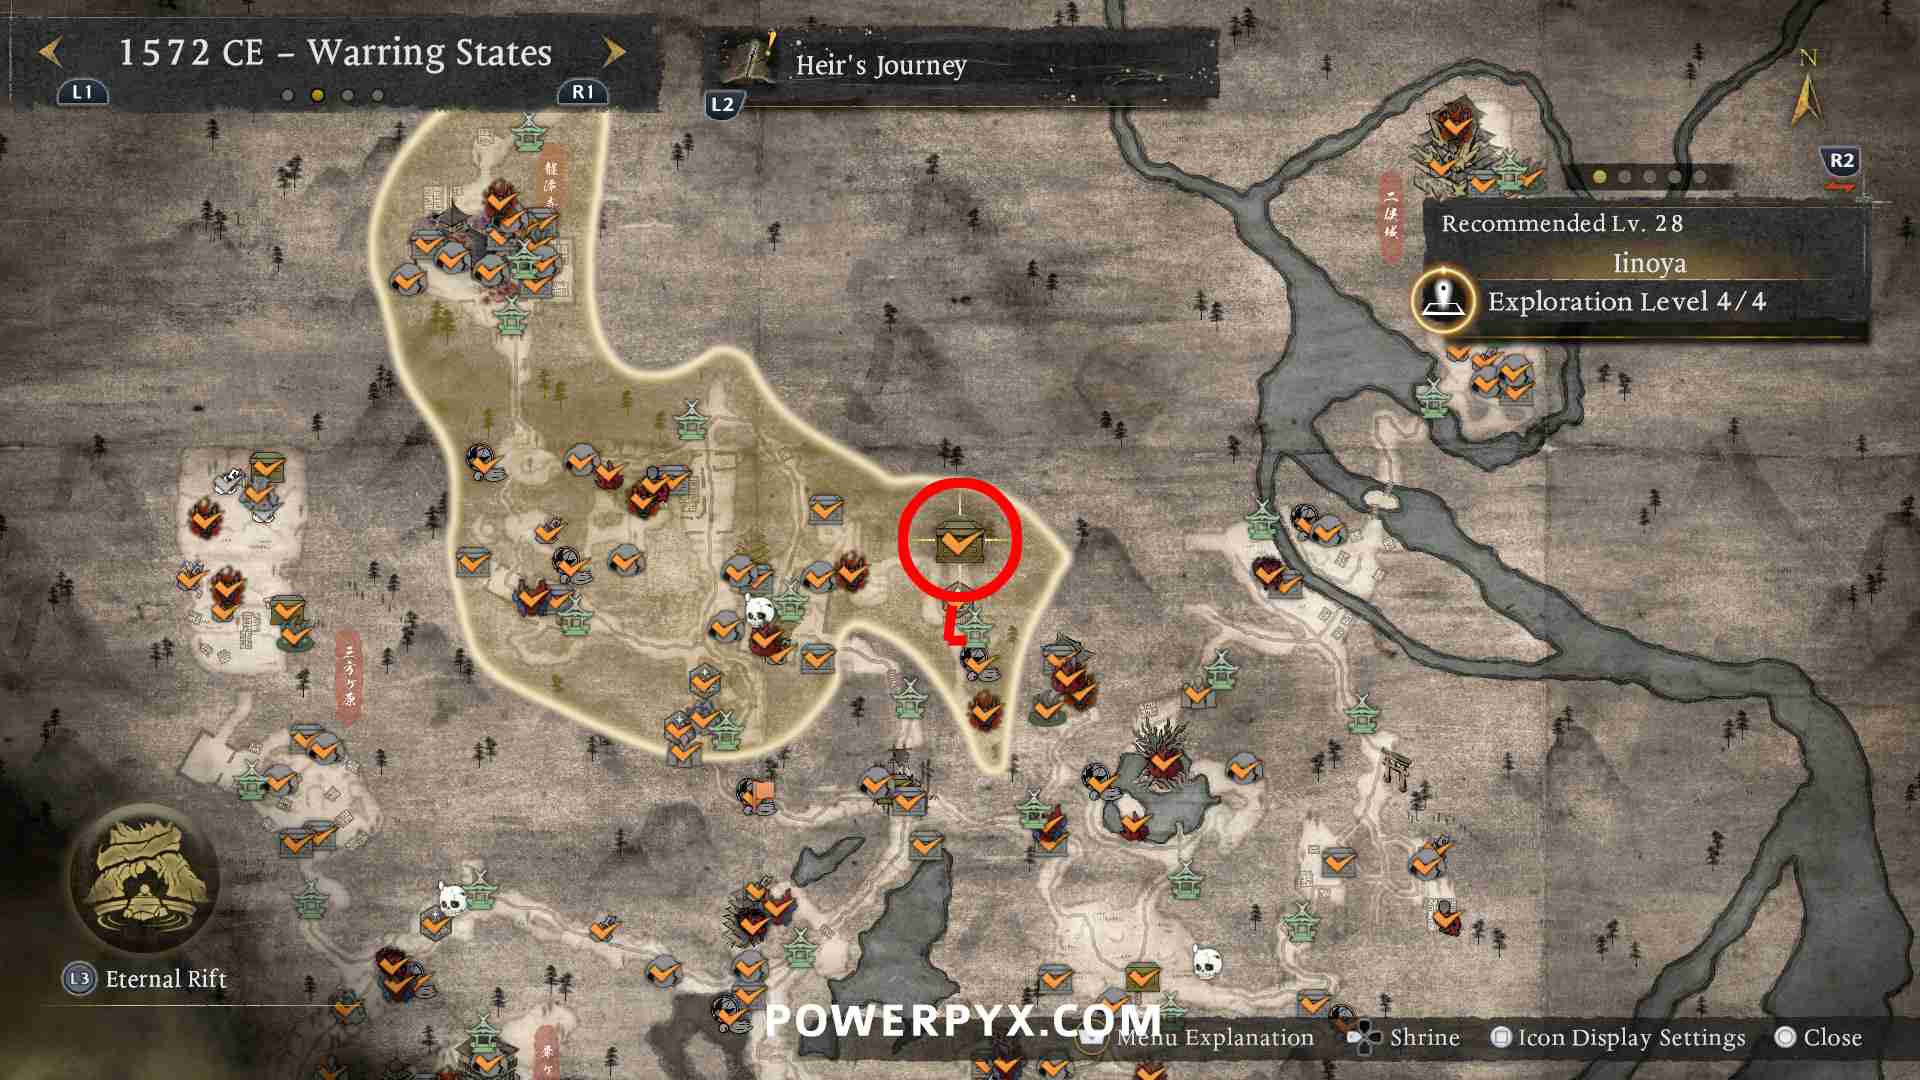
Boss #21 – Demon of Pride
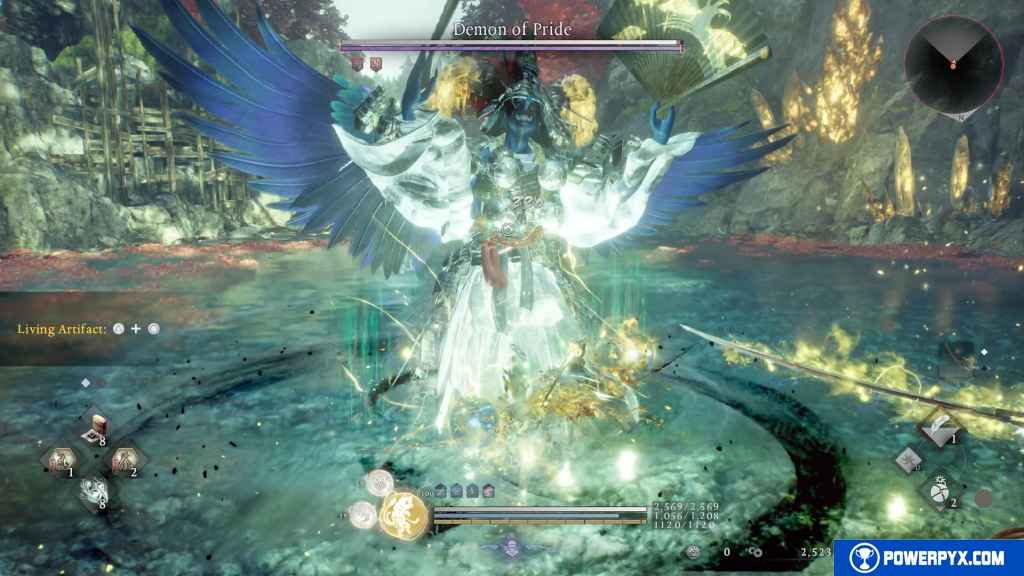
- Location: Warring States > Iinoya > Sengan Waterfall (golden chest icon near this shrine)

- Recommended Weapon: Dual Ninja Swords (Ninja Style)
- Difficulty: 1/10 if done after story when you’re Level 130+, significantly harder if trying it earlier
The 3 trophy-related demon bosses are a bit hidden and have golden chest icons on the map. They are quite difficult if you try them at the first opportunity during the story because you’ll be underleveled. Since they’re optional, easiest option is to keep them for after the story. Then you’ll kill them in a few seconds. Just spam you most powerful Summoning Seals (especially Ibaraki Doji) with “Summoning Basics” skill equipped (from Onmyo Magic Veteran mission, from talking to mage in Eternal Rift and then playing it from Shrine’s Battle Scrolls). Then you can use each summon twice as much. Pump your points into Magic stat and you’ll almost instakill the demon bosses.
Boss #22 – Demon of Envy
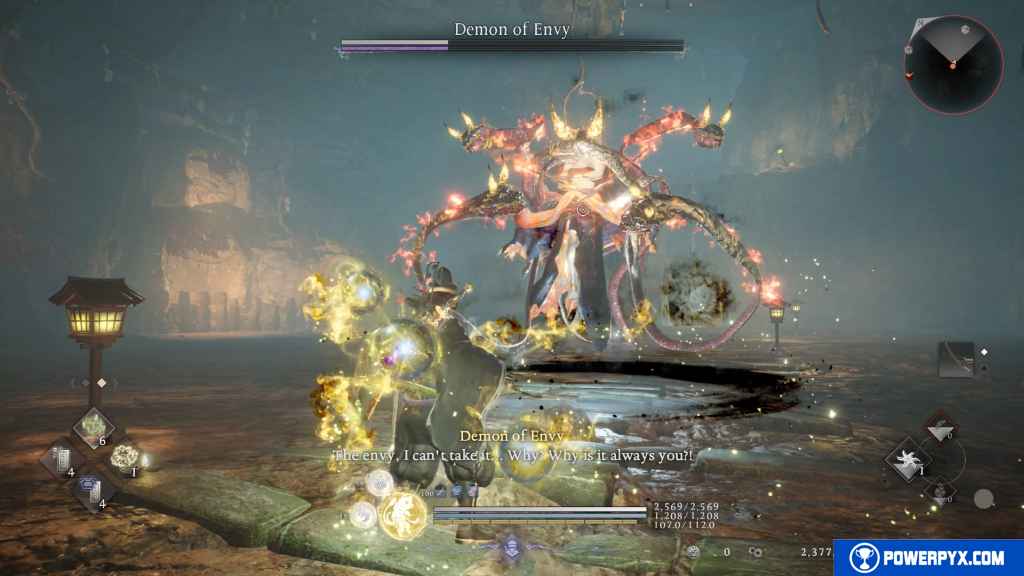
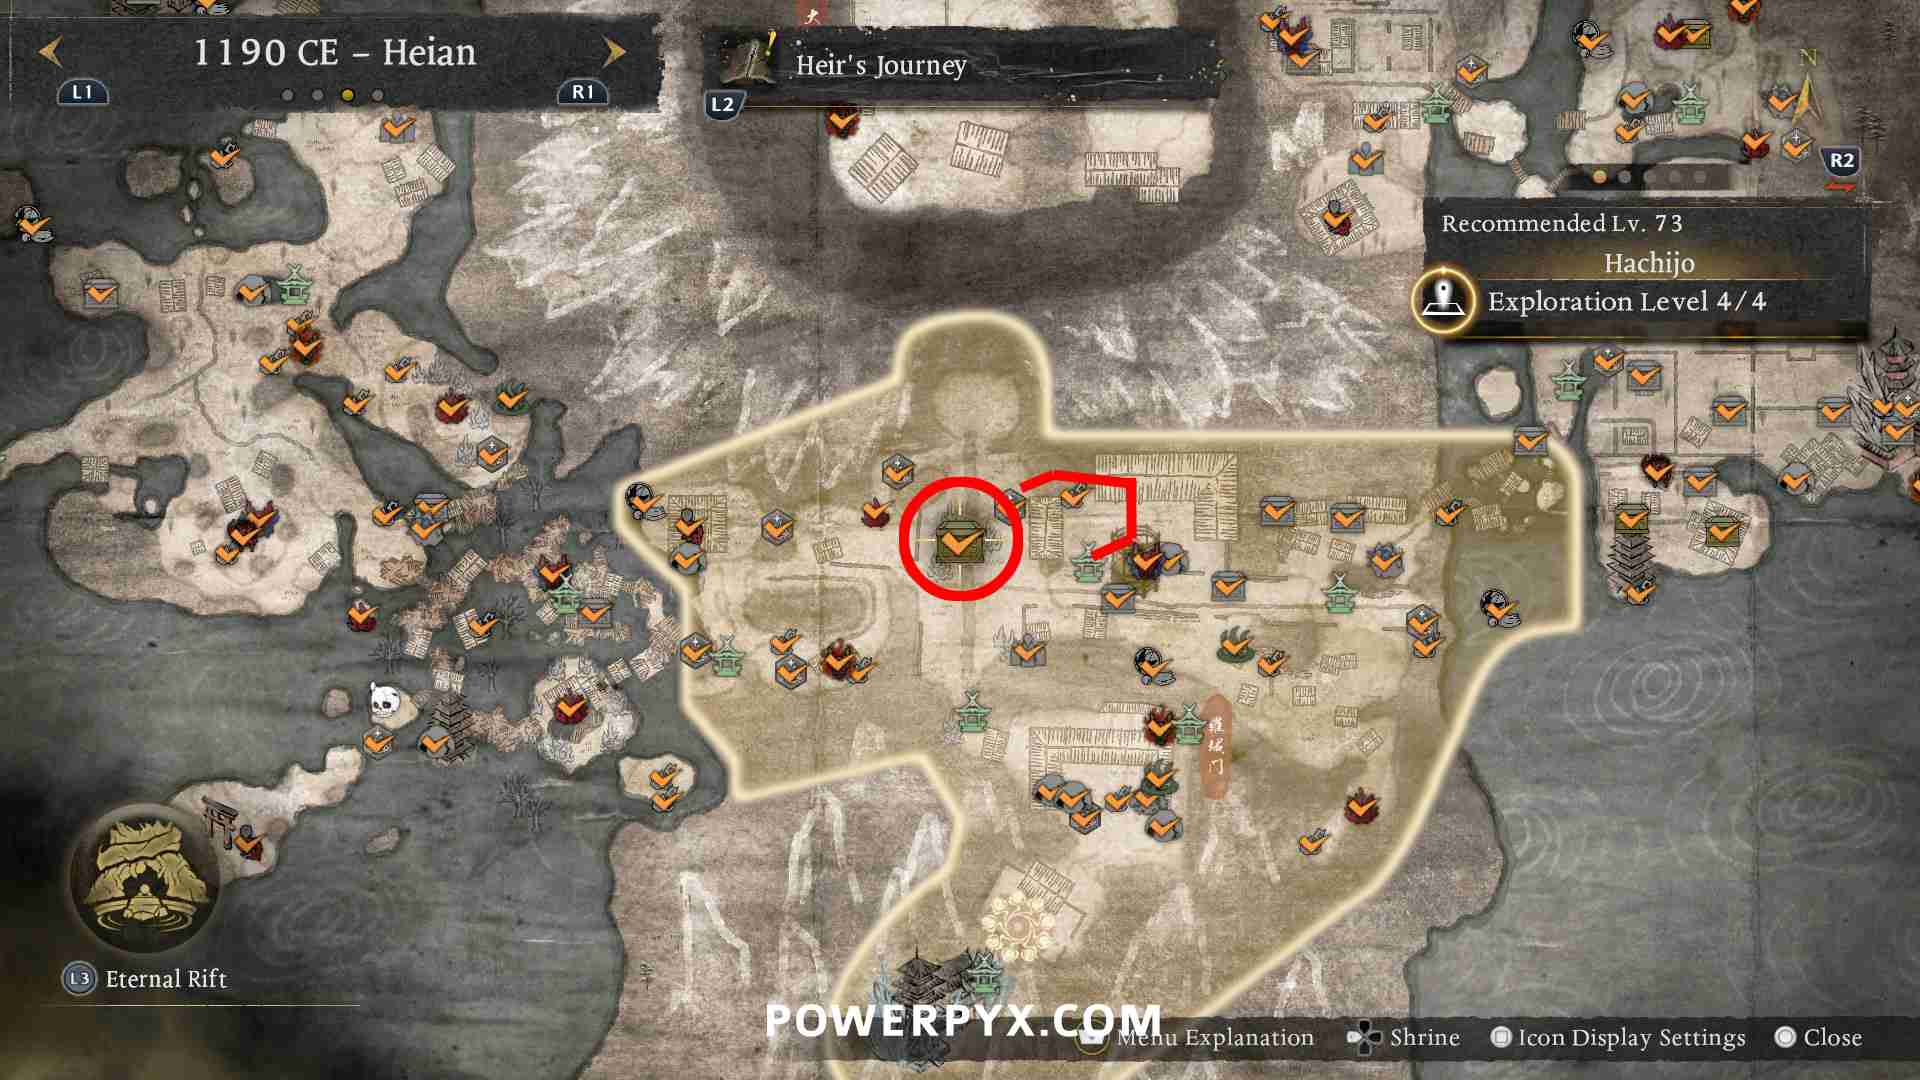
- Location: Heian > Hachijo > Anneibo Temple > when facing the shrine turn left and climb up the scaffolding, then you can drop into a slightly hidden cave with this boss at the end. Has a golden chest icon on map and there’s a spirit vein on the way too.
- Recommended Weapon: Dual Ninja Swords (Ninja Style)
- Difficulty: 1/10 if done after story when you’re Level 130+, significantly harder if trying it earlier
Same strategy as Demon of Envy.
Boss #23 – Demon of Obsession
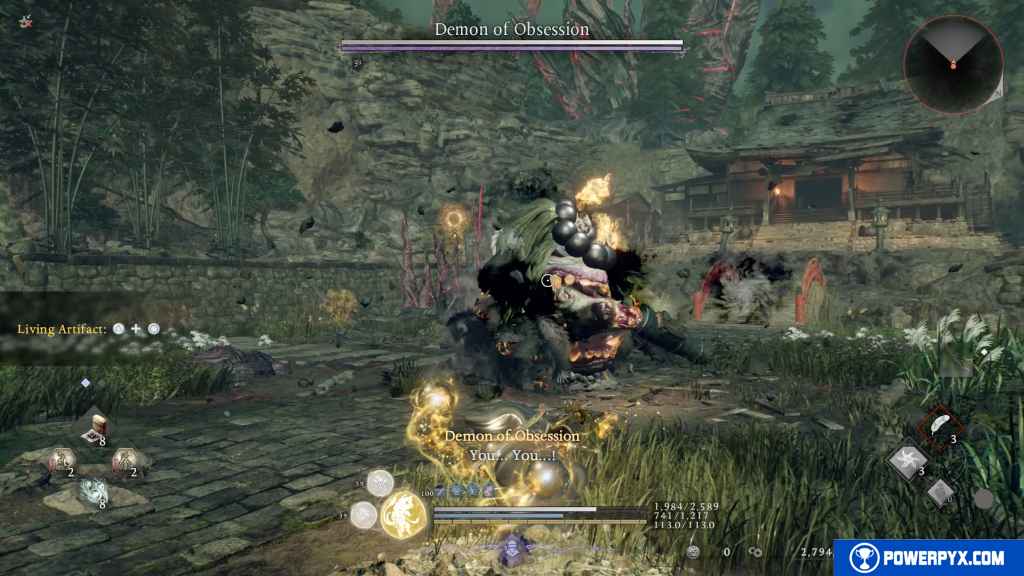
- Location: Bakumatsu > Nijo Castle > Mibu Temple – Main Gate > the golden chest in the north-west corner. Drop down from Shrine: Mibu Temple – Main Gate (from the hill to the south of the golden chest icon).

- Recommended Weapon: Dual Ninja Swords (Ninja Style)
- Difficulty: 1/10 if done after story when you’re Level 130+, significantly harder if trying it earlier

Same strategy as Demon of Envy.
That’s all of the main bosses in Nioh 3. For everything else refer to the Nioh 3 Wiki.
mati11120 says
For the Okita and Tokugawa fight
You do not need to fight them back to back
I defeated Okita Oji in different solo fight then entering that boss arena I fighted instantly with that fish riding boss
PowerPyx says
They must’ve changed that with the launch patch. When I played the game you definitely had to fight them back to back, was on patch 1.01.
mati11120 says
Actually its true and played updated version
To not fight Okita and Tokugawa back to back you need to finish all side missions available and finish mibu castle
In mibu castle you meet okita soji boss fight if you finish him there you will not encounter him in crucible alongside Tokugawa
PowerPyx says
Interesting, that would explain it. I hadn’t done the side missions before the boss fight.
sushirod says
Yep can confirm If you complete the peerless katana mission and then head to Mibu temple you fight Okita there and kill him. Then you only have to kill Tokugawa in the crucible. Now if you don’t complete the side quest maybe you still have to fight them both at the same time??
PowerPyx says
Thanks, I’ve added a note at the start of the boss description about this 🙂
LB says
The final fight with Hiruko is NOT a 3/10 lmao. He’s the hardest boss in the game by far.
PowerPyx says
Was one of the easiest for me and I was underleveled, he goes down pretty fast.
Ambruzzi says
I struggled with him too. His elemental attacks would kill me in 2-3 hits. And if he caught a character, they died in one fell swoop. Plus, his very long attack range and his charge across half the map 🙂