
Tormented Souls Trophy Roadmap
- Estimated trophy difficulty: 4/10
- Approximate amount of time to platinum: 15-20 hours
- Offline Trophies: 30 (1
 , 5
, 5 , 11
, 11 , 13
, 13 )
) - Online Trophies: 0
- Number of missable trophies: 3: Amnesia
 , Anxiety , Untouchable . For everything else you can backtrack through the entire game at any point, except from the final save point in Graveyard
 - Glitched trophies: 0 as of Patch 1.03 (prior to patch 1.03, Remorse
 was unobtainable)
 - Does difficulty affect trophies?: No difficulty options
- Minimum Playthroughs: 2, but 3 recommended
- Free-Roam / Level Select after Story?: No, can only reload previous saves
- Release Date: August 27, 2021
 , 5
, 5 , 11
, 11 , 13
, 13 )
)Introduction
Welcome to the Tormented Souls Trophy Guide! Tormented Souls is an old-school survival horror, inspired by the likes of Resident Evil and Silent Hill. This shows through the level design and puzzles abound. This game is very puzzle-heavy and your initial playthrough can take 10-12 hours without a guide, or around 4-6 hours with the walkthrough / puzzle guide. Subsequent playthroughs shouldn’t take any longer than 3 hours, so you can expect to be done with the platinum in roughly 15-20 hours.
Depending on which patch you play this game on, you may find that certain sections of this guide do not match. That is because some items were moved around, and even some rooms changed entirely, in the early patches. This is especially noticeable between 1.00 and 1.01. This guide is accurate as of patch 1.03 (for PS5). The PS4 version of the game has all updates in patch 1.00.
The platinum is obtainable from patch 1.03 onwards (PS5), however if you do not have the game updated you will be unable to earn the Remorse trophy.
Step 1: Complete the Game, get all Collectibles and Adoption Ending
Many of the trophies in Tormented Souls are related to the story and Collectibles, you should be able to get the majority in this first playthrough. Take your time exploring the map and enjoying the game, making sure to grab the collectibles (diaries). See Tormented Souls All Diary Locations.
There are a few miscellaneous trophies you can work on during this run too if you so desire, then you don’t have to deal with them on the next playthroughs. In order to get the Adoption Ending, you will need to go through the Infinite Room, which is an optional room about two thirds through the game. See Sisters for details. Keep this in mind while you are playing.
At any point in the game you will be able to backtrack if you miss anything, however you will not be able to backtrack from the final save point in the Graveyard as this is just past the point of no return, so keep this in mind if you need to backtrack at all.
Here’s an all-in-one Walkthrough that includes all Collectibles, Key Items, and Trophies: Tormented Souls Walkthrough.
Step 2: Speedrun under 3 Hours, Without Healing, Remorse Ending
It’s recommended you do both No Healing and Speedrun in one run, as the 3 hours is very lenient and this allows you to save frequently in the event you either take damage or get lost/waste time. After one playthrough you should be quite familiar with the game already. Doing the Bad Ending on this playthrough is advised as it will not only save a few minutes, but allows you to avoid 4 enemies. See Remorse for details. You don’t have to combine these trophies in one run if you don’t mind doing extra playthroughs, but you may find that you’ll get both while only going for one anyway.
During this step you may find the Puzzle Guide helpful for a quick overview of all story-related Puzzles. This will save you some time: Tormented Souls Puzzle Solutions.
Step 3: Complete the game without saving
Lastly you’ll have to complete the game without saving. With several playthroughs under your belt and no other stipulations, this should be very manageable. Take out enemies and stock up on healing supplies as needed. Thankfully the game isn’t too long when you know what you’re doing and isn’t prone to crashing, so it shouldn’t be too much of an imposition to get this done. If you have any miscellaneous or missed trophies left, this is a good time to go for them, otherwise you should have platinum after this playthrough.
Useful Tips, Tricks and Guides:
- Tormented Souls Walkthrough
- Tormented Souls All Diary Entry Locations
- Tormented Souls Puzzle Solutions
Tormented Souls Trophy Guide
 |
Tormented Souls Unlock all trophies |
 |
| Earn all other trophies in Tormented Souls to unlock Platinum (DLC not required). | ||
 |
Sisters Escape with Anna |
 |
| This is for getting the Adoption Ending. In order to get this ending, you will need the Antidote after the Infinite Room, see Loop for details.
Once you reach the Sacrifice Room where you fight 4 Hammers, use the Antidote on the Monster. This will reveal a pair of Bolt Cutters. Continue and fight the boss, until you return to the mansion. In the Meeting Hall, use VHS Tape (Experiment Room) to return to the past and use the bolt cutters on Anna’s cell. Now simply use the Cross Key on the front door of the mansion to escape. |
||
 |
Nostalgia Complete the game |
 |
| Complete the game with any of the three ending to unlock this. | ||
 |
Love Collect all of Maria’s diary entries |
|
Maria’s Diary has 8 entries available to collect. These can all be found in the mansion proper during the first half of the game.
|
||
 |
Dedication Collect all of William’s diary entries |
|
William’s Diary has 8 entries available to collect. There are actually 9 entries, however one is a duplicate and either can be collected for the trophy. The majority of these can be found in the mansion proper during the first half of the game.
|
||
 |
Redemption Collect all of Bertram’s diary entries |
|
Bertram’s Diary has 8 entries available to collect. There are actually 9 entries, however one is a duplicate and either can be collected for the trophy. These are all found underground towards the end of the game.
|
||
 |
Suffering Collect all of Anna’s diary entries |
|
Anna’s Diary has 8 entries available to collect. The majority of these are found in the Sewers near the end of the game.
|
||
 |
Untouchable Complete the game without using any health items |
|
| Missable.
This sounds daunting, but it is very manageable. After 1-2 playthroughs you will be very familiar with enemy locations. It’s advised that you don’t combine this with the No Save playthrough as it can be quite easy to make a mistake and take a hit, and without heals you can take about 4-6 hits the entire game, depending on the enemy. I was able to complete this with 3 hits, with all hits being very avoidable. Below are several tips to hopefully make your time easier:
|
||
 |
Death Let the shadows consume you |
 |
| In order to unlock this, you will need to die to the shadows. Many rooms throughout the game have dark areas where if you don’t have your lighter equipped, you will quickly die. The earliest example of this is immediately after leaving the bathroom you start the game in, you can walk down the corridor in front of you. | ||
 |
Journey Travel to the past |
|
| Automatic story-related trophy, cannot be missed.
Once you gain access to the Morgue, you’ll need to move a cabinet to reveal the entrance to the Experiment Room. In here you’ll have a skeleton with buttons on it, as well as a plaque with a riddle, Press the buttons in the following order: Head, Stomach, Hand, Throat, Heart, Throat.
This will open a secret passage, where you’ll find a VHS tape. Head back to the Meeting Room (there’s conveniently a ladder to it in the Morgue), and use it on the projector. |
||
 |
Master Key Solve all the combination key puzzles. |
|
| Automatic story-related trophy, cannot be missed.
Before you can solve the combination key puzzles, you first need the key and the fragment. The fragment can be found inside the Boiler Room, whereas the key can be found inside the prison cell hidden in the Experiment Room.
|
||
 |
Escape Escape from the bathroom |
|
| Automatic story-related trophy, cannot be missed.
This is the first trophy you will get, as this is the very first room. Open the left cabinet next to the door to receive a pocket watch which shows the time 12:35. Now interact with the padlock and input 1235 as the code. Take the wrench from within the cabinet and interact with the head to open it once. Finally, use the wrench on the door to act as a handle and open the door. |
||
 |
Loop Escape the infinite room |
|
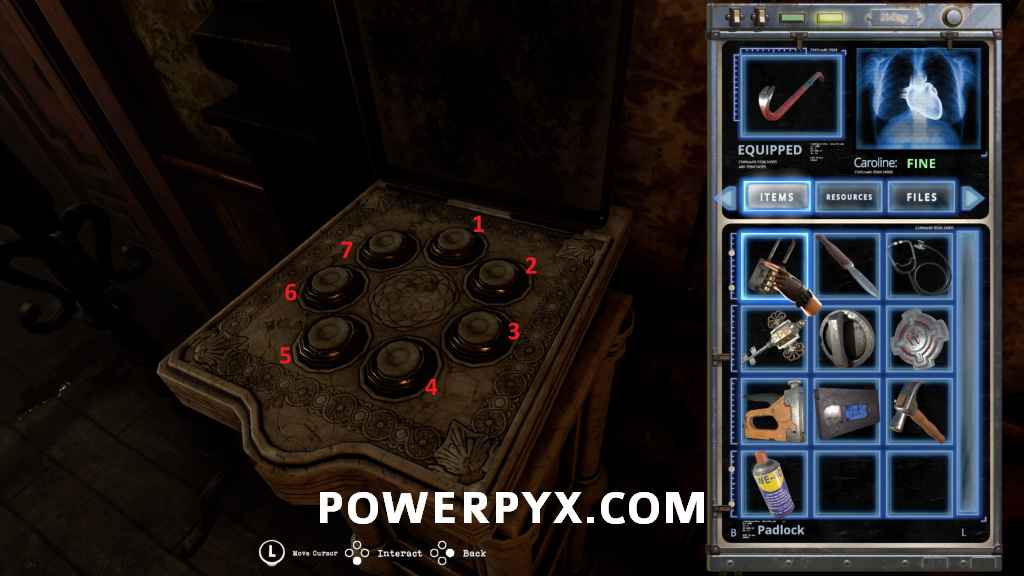
Once you unlock the door under the hall stairs, you’ll find yourself in a crypt. One of the doors in here will have a save image outside the door, indicating that you might want to save before entering. This room is the Infinite Room, a room with 4 doors, 4 plinths and 4 directions. There is a plaque in the corner that tells a story, and you need to go through the right door for it to progress, else it resets. With every correct step of the puzzle, a candle in the chandelier will light up. Below are the correct steps to escape:
Completing this will award you your trophy and lead you through to a room where you can get the Antidote, which is needed for the Adoption Ending. |
||
 |
Anxiety Complete the game in under three hours |
|
| Missable.
It’s recommended to do this after at least one playthrough so you have a good understanding of the world layout and puzzles. Three hours is very lenient once you know where to go. I did this in about 1 hour 50 minutes, combined with the No Healing playthrough. Do note that the timer continues even when paused and in menus, so if you ever need a break or want to check the route or puzzles, try and do so while moving or after saving if you’re not combining this with No Save playthrough. Below are several tips to hopefully make your time easier:
|
||
 |
Crucifixion Kill an enemy using a trap |
|
| There are three locations to do this, two in the mansion with Suits of Armor, and one in the Bunker with Spike Traps. However the easiest place to do this is in the Hallway Dining Room in E-F2. Here you’ll find a Wheelchair enemy, as well as pair of knights whose swords will slash down when you stand near them. Weaken the Wheelchair, then lure him under the knights. When he is close, trigger them by running through and it should kill the Wheelchair. | ||
 |
Amnesia Complete the game without saving |
|
| Missable.
For this you’ll want to play a bit more cautiously than the No Heals and Speedrun playthrough(s), simply as a big mistake can set you back hours if it’s late-game. Fortunately there are lots of healing items throughout the game, so grab as many as you can and deal with enemies as safely as you see fit. Some enemies are safer to avoid until you have the Shotgun (like Wheelchairs), and others are easier to avoid altogether (like Hammers). The biggest imposition for this trophy is having to do it all in one go, but fortunately the game isn’t prone to crashing so you can pause the game or suspend your console if you need a break without fear of losing your progress. |
||
 |
Registry Save the game |
|
| There are several save rooms spread through the game where you can save on recording devices. For these you will need recording tape, which can often be found in the same room or nearby. | ||
 |
Gunsmith Create the shotgun |
|
In order to create the shotgun, you will need to get two parts. Once you have both parts, combine them to receive the shotgun.
|
||
 |
Relief Pick up five first aid kits |
|
There are seven first aid kits available throughout the game, usually in medical cabinets. Most of these are easily found so with a little searching you should get this without too much issue.
|
||
 |
Remorse Save only yourself |
|
| Obtainable with Patch 1.03. If you have an earlier version, then this will not unlock.
This trophy is for getting the Remorse Ending. In order to get this ending, you cannot interact with the Monster in the Sacrifice Room near the end of the game. Do not use the Antidote on her, simply finish the game regularly. |
||
 |
Electricity Start the generator |
|
| Automatic story-related trophy, cannot be missed.
After meeting the Priest in the X-Ray Room, you’ll move into the Generator Room where you need to start the generator. Grab the valave from next to the generator and read the note on the generator to see the requirement to start it: 10 kg/cm. Now head back to the generator panel downstairs and use the valve on the bottom left pipe, and turn on the valves so it reads 11 kg/cm:
Once you start the generator, it will go back to 10kg/cm and turn on. |
||
 |
Remembrance Find your old hiding place |
|
| Automatic story-related trophy, cannot be missed.
After lowering the water in the Sewer, you’ll be able to grab a TV Dial on the ground. Grab this and head through the Sewer to enter the Sewer Storage Room. Go through the mirror to Caroline’s Bedroom. Use the TV Dial on the TV and you’ll be able to cycle through 12 channels, 5 of which will show an image. You need to cycle between the 5 images in a particular order, much like a combination lock. Do note that if you over-rotate the dial at all, it will reset the puzzle. Simply turn the TV off and on to try it again. The solution is:
|
||
 |
Sacrifice Open the vault |
|
| Automatic story-related trophy, cannot be missed.
After finding your old hiding place (see Remembrance), grab the fishing hook next to the music box. Head back into the Office and you’ll be prompted to press a button on the desk, which reveals a new VHS Tape. Grab it and go to the Meeting Room to play it and enter the past. Now in the Dentist Room, head to the Public Bathroom where you started the game and get your own eye. Combine the eye with the fishing hook, and finally head to the vault in Sewer where you lowered the water and use both retina scanners to open the vault. |
||
 |
Mind Activate the door to the operation area |
|
| Automatic story-related trophy, cannot be missed.
After meeting the Priest for the second time in the Dining Room, he’ll give you you a metal bolt. Use this in Reception Room on the fusebox to open the West Wing Corridor. Now, you’ll need to use the elevator in here to go back down to W-F1. Grab the trolley directly outside the elevator and push it in so that the door doesn’t close, as the elevator can only be called from Floor 2. Return to the fusebox in Reception Room via the Main Hall, and take the metal bolt out, then head back to the elevator and go up to W-F2. Finally, use the metal bolt in the fusebox next to the Clean Hallway to open it. |
||
 |
Surgery Reattach a limb |
|
| Automatic story-related trophy, cannot be missed.
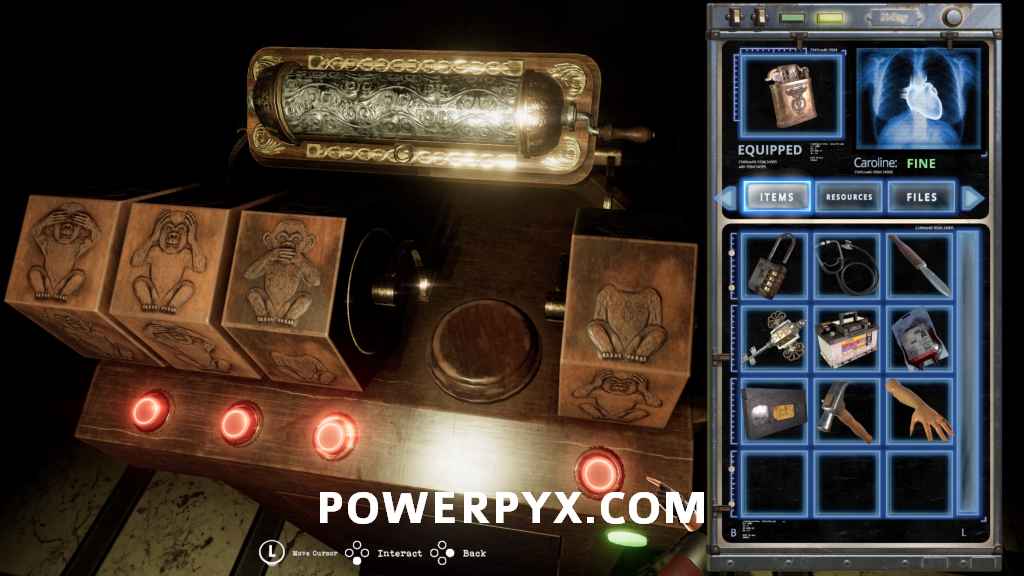
After opening the Intensive Care Corridor with the combination key, you’ll find the Priest in Room 2B. Head into Bathroom AB and light the candles near the mirror to enter it. Head into Room 2D to find a guillotine, use your scalpel to cut the rope and get the Parchment Scroll. Now head into Bathroom CD to find a hammer on a crate, then into Room 2C and open a chest to get the Mannequin Arm. Now return back through the mirror in Bathroom AB, and head to where the guillotine was in Room 2D. You’ll now find a judge’s podium here with several rotating dials. Place the Parchment Scroll in the indent, then rotate the dials to the following positions: Hands on Eyes, Hands on Ears, Hands on Mouth, Headless. Use the hammer on the gavel space to get the Staple Gun. Finally, head back through the mirror in Bathroom AB and use both the Mannequin Arm and Staple Gun on the mannequin in Room 2D.
|
||
 |
Water Start the pump |
|
| Automatic story-related trophy, cannot be missed.
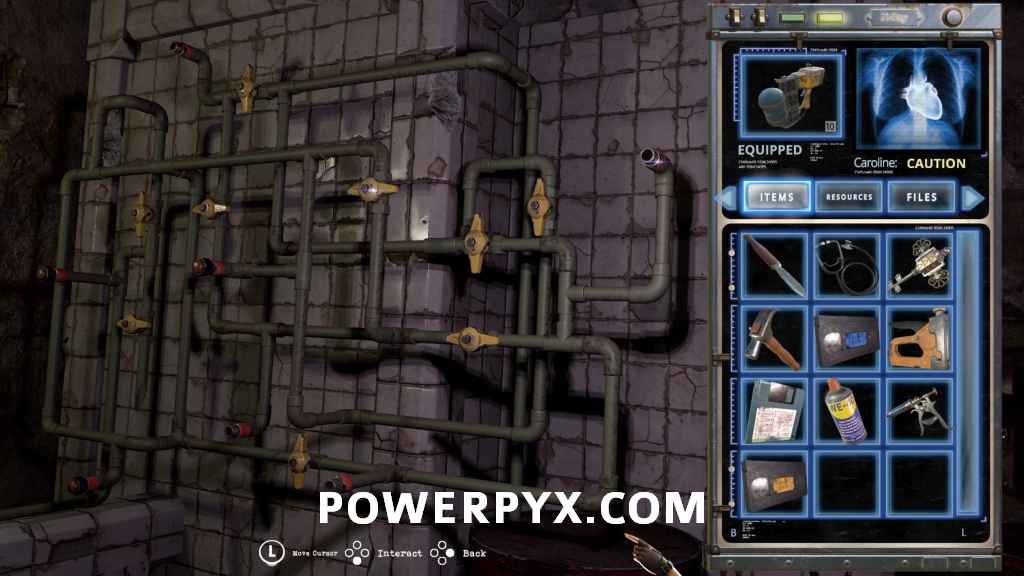
In Bunker 1-2B you’ll find a series of pipes with a pump and plenty of valves on it. Before you can use this, you’ll need to get 3 pipe caps, one can be found in Bunker 1A, one in Bunker 2A and one in Bunker 3B. Lastly you’ll also need a Gas Canister which can be found in the Prison right at the end of the Bunker. With these items, you’ll now be able to solve the puzzle to pump the gasoline. Valves that are parallel to the pipe are open, and valves that are perpendicular are closed. Below shows the valves to open/close, as well as the pipes to cap:
Now with the filled Gas Canister in hand, head all the way down in Bunker Stairs to the water pump and put the gasoline in it to start it. |
||
 |
Frustration Locate Anna |
|
| Automatic story-related trophy, cannot be missed.
Immediately after traveling to the past through the projector, complete the skeleton puzzle again and go through the secret tunnel to locate Anna. |
||
 |
Obsession Unlock the door under the hall stairs |
|
| Automatic story-related trophy, cannot be missed.
For this you’ll need to get 3 items and place them into the indents under the staircase in Main Hall
|
||
 |
Serial Killer Kill 40 enemies |
|
| This should come naturally unless you actively avoid enemies, as there are more than enough enemies (and ammunition) in one playthrough to get this with ease. It’s entirely possible to kill every single enemy in one playthrough and there are about 80 enemies in a run. | ||
 |
Killer Kill 20 enemies |
|
| See Serial Killer. | ||
 , which can be helpful when trying to put down an enemy and they get too close.
 and
and  simultaneously), the enemy will take massive damage. This will instantly kill any enemy in the game, so can be very useful for dealing with stronger enemies.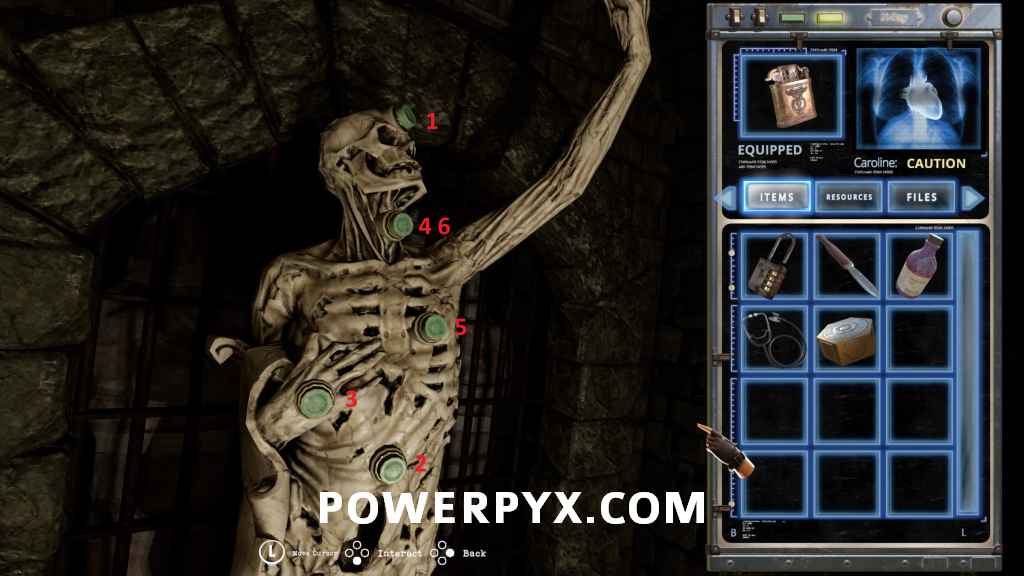


jake2by4 says
Wow didn’t think you would do a guide for this. Did you enjoy the game>
Archavia says
If you’re a fan of old school survival horror like the original Resident Evil and Silent Hill games, then you’ll probably have a good time with the game. It has some issues, but overall it’s an enjoyable experience.
Benyamin says
Hey thanks for the great works
Any plans for psyconauts2?
PowerPyx says
Nothing planned for that game.
Dogbert says
This game is fantastic!
As long as it keeps up the quality for the demo, I think this will do very well.
Thanks for the guide, PP.
Also, can you please do a guide for Left Alive? Lol…
Dogbert says
One last thing, is the MAP system similar to modern Resident Evil games?
Does a RED room mean you missed an item/key item?
Does it automatically update if you visited a room?
Archavia says
The map doesn’t update to reflect anything you do, and I’m not entirely sure what the significance is of the green/red rooms.
Lacek84 says
Red = rooms
Green = corridors
Thats it. 🙂
Adam says
When do you think the remorse trophy will be un bugged for the ps5 mate. What a nightmare aye
Archavia says
Hard to say. The devs are aware of the issue but there may be other issues that have priority like audio/visual glitches etc. Hopefully soon though, I’ll be checking after every patch whether it’s fixed.
Lacek84 says
Happened today.
Dogbert says
@Archavia
Thanks for keep us all in the loop.
Appreciate it!
I haven’t started my run yet… keep getting sidetracked, but hopefully when I do, things are 90% ironed out.
epic_oreo17 says
I know the Remorse ending trophy is glitched, but the Sisters trophy is glitched too, at least me for me. Playing on PS5, the trophy popped up on screen as I saved Anna in the end and my PS5 even took a screenshot of when the trophy appeared on screen. However, when looking at my actual trophy list for the game, it states that the trophy has not been unlocked (I even tried restarting my PS5 but that didn’t solve the issue). I don’t know if this happened to anyone else, and I’m not sure if it’s a bug with the game or the PS5 but if it happened to me, it could happen to anyone else so I just wanted to share this.
Dogbert says
Good to know, thanks.
Make sure to let the Developrs know, too. They might not be aware that it is a common issue for that particular trophy.
Kevin Roy Myrvang says
As of patch 1003.000 on ps5 the remorse trophy is no longer bugged. just got it now! great game!
Kevin Roy Myrvang says
1.003.000
Keith says
Not sure if the clock is messed up but I was able to get the 3-hour speedrun with a time of about 3:54. Maybe the trophy does not take into account the total time (including pauses) or just the active time? Either way, it worked out great for me
TidusTheGame says
DOUBLE DAMAGE GLITCH:
If you fire your shotgun and pause the game just as the shot goes off it does double damage which effectively kills any normal enemy in the game in one shot.
You can also do this with the crowbar when you pause just as the crowbar hits. This can make it do 2-3 hits in one swing.
Wayne Gafford says
Your roadmap says 0 missabke trophies but I used healing and I saved so doesnt that count as missable
Archavia says
Technically yes, I have changed the full playthrough trophies to be missable.
Mat says
Really liked this one. Thanks for the guide PP.
Luke85 says
Do the Game have Auto Pop Trophys via PS4 to PS5?
him77 says
platinum auto pop from ps4 version to ps5 ?
AsPaRrOn says
The ps4 version is almost unplayable now if you’re unlucky and the no save trophy can get very frustrating, the game randomly freezes when switching maps.