
Unlocking 3 Relics in Ashes of the Damned Zombies in Call of Duty Black Ops 7 unlocks the Expert Curator trophy & achievement. There are 9 relics total but you only need the first 3.
Relics can only be unlocked in Cursed Mode on Ashes of the Damned map. These are not available in Standard/Survival, you have to select the “Cursed” option before starting the match. In this mode it will show how many Relics you have.
You can get the 3 Relics in the same match, or do it across separate matches. Once a relic has been unlocked it’s available permanently in the Relic Select before starting a Cursed Mode match.
Each Relic requires doing some specific tasks, then completing a trial. The first 3 relics are the easiest to do for the trophy. If you play with others, then dying during the trial is fine. As long as the other players in the match finish it, this will still unlock the relic for you and is confirmed to count towards the trophy.
Relic #1: Lawyers Pen
Step 1: Play to Round 20.
Step 2: Equip Ammo Mod “Napal Burst” on a weapon. You can buy it for salvage at any arsenal.
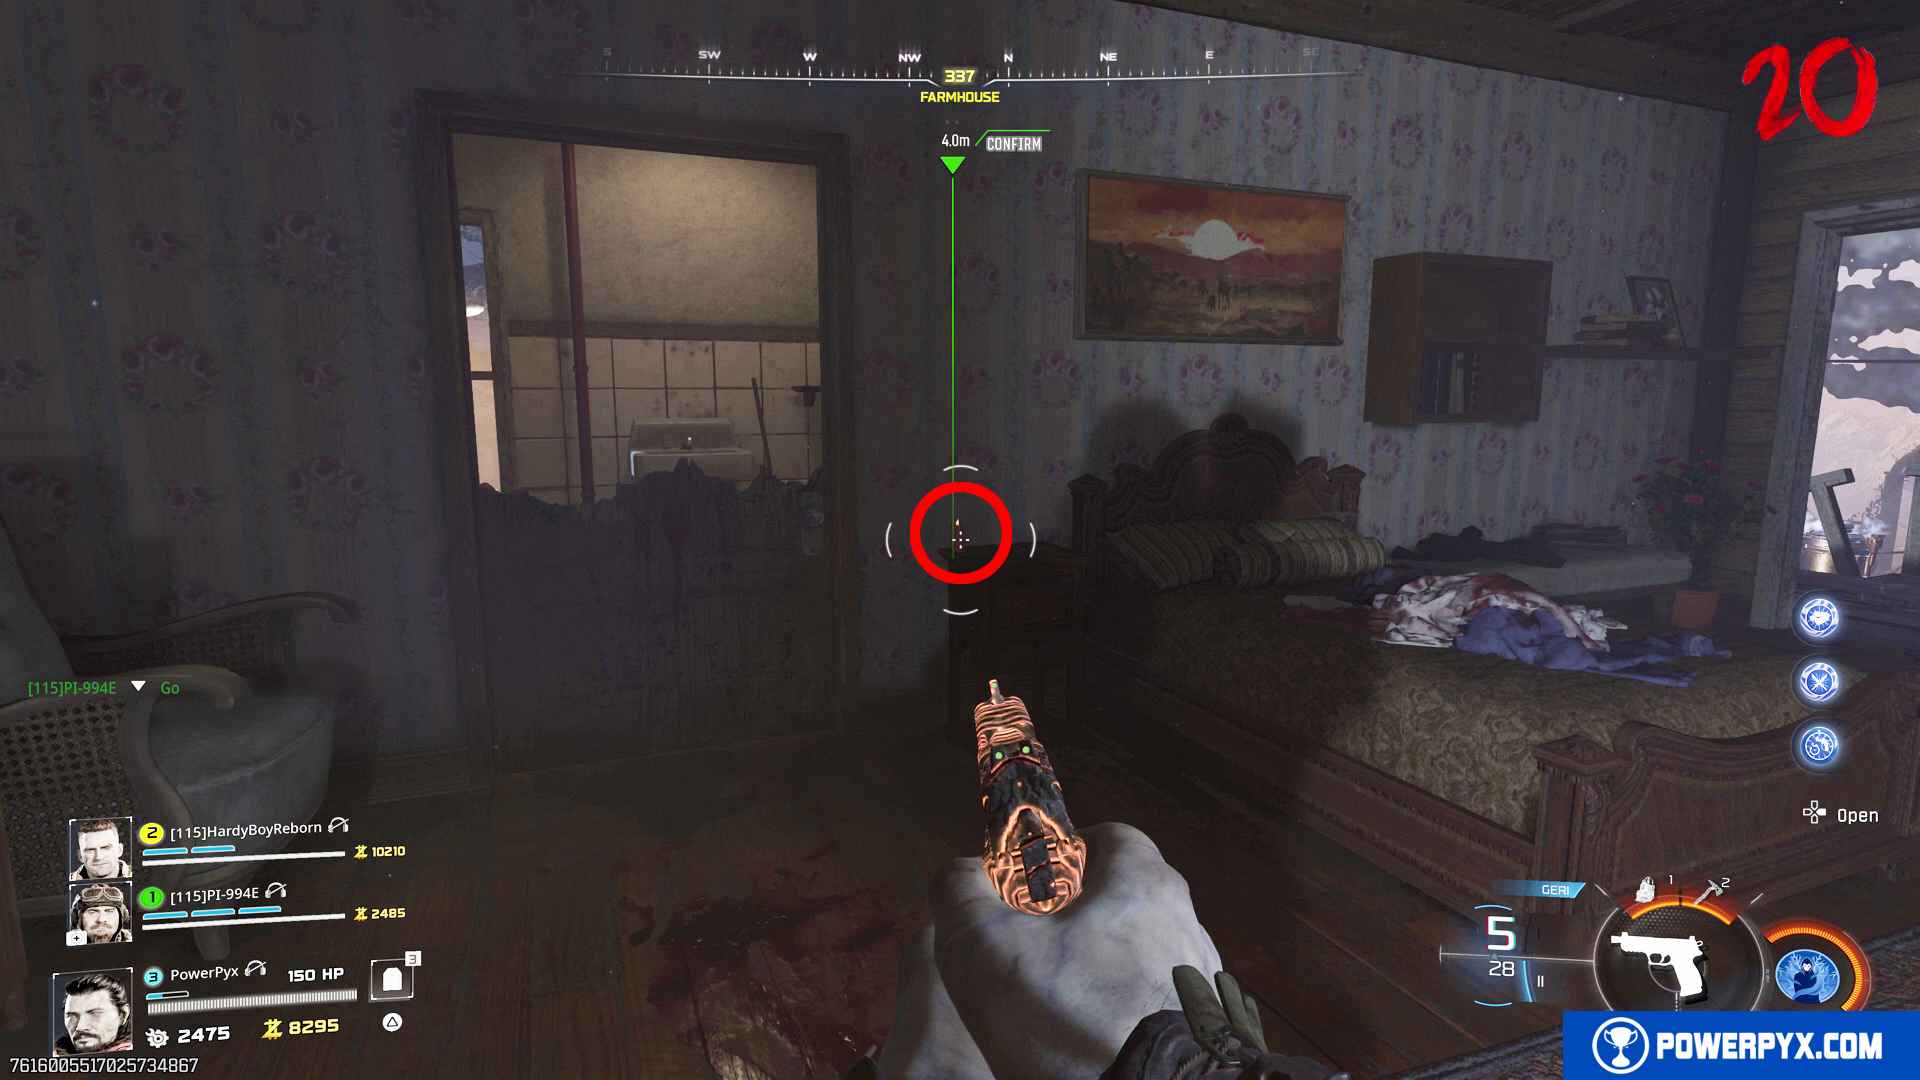
Step 3: Shoot the 3 hidden candles with your Napal Burst weapon. Then the candles light up.
Candle 1 – Vandorn Farm > Farmhouse: Inside the farmhouse upstairs next to the bed on the nightstand.
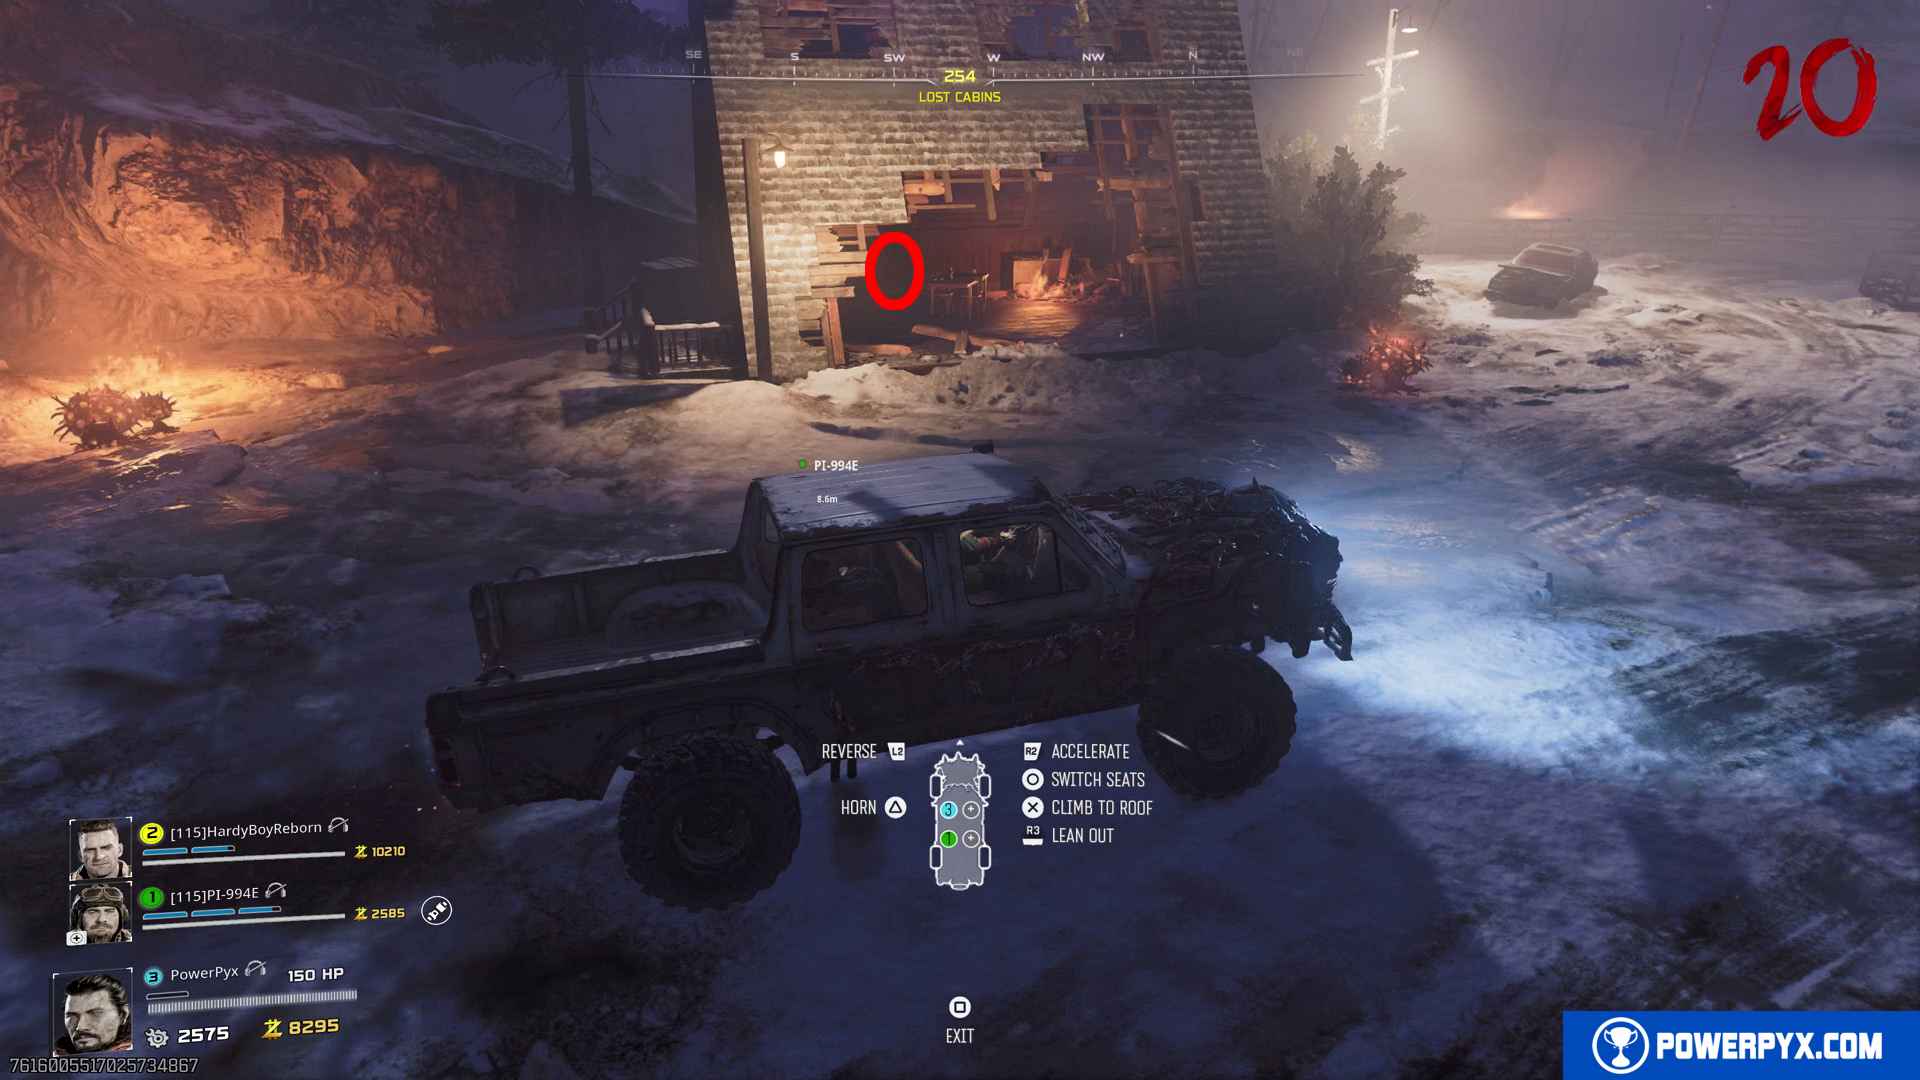
Candle 2 – Lost Cabins (area between Ashwood & Blackwater): In the destroyed house, next to the cabinet. It’s quite dark and hard to see and the enemies will run after you.

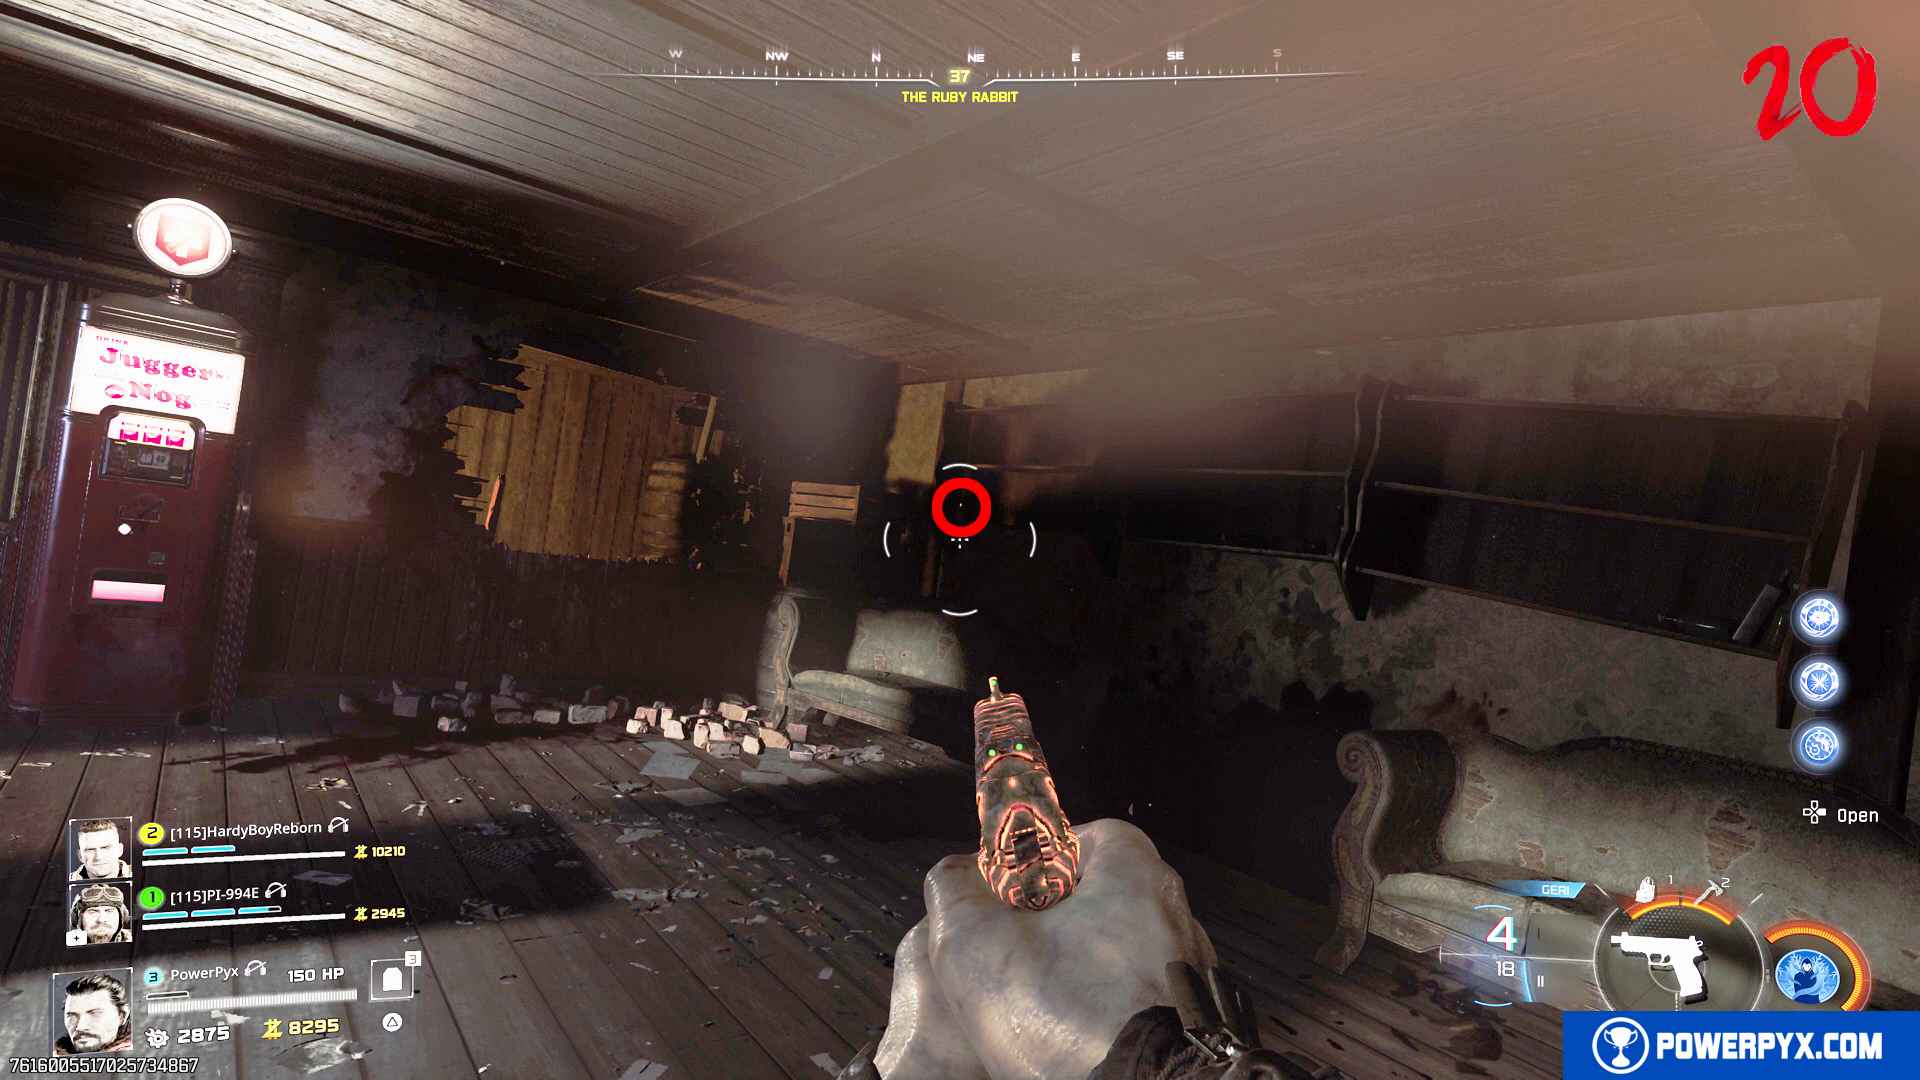
Candle 3 – Ashwood > The Ruby Rabbit: In the upper area of Ashwood, to the immediate right of the Juggernog Perk-a-Cola machine, at the end of the shelf. It’s pitchblack dark and very hard to see, so just shoot the end of the shelf a bunch of times until you see the candle light up.
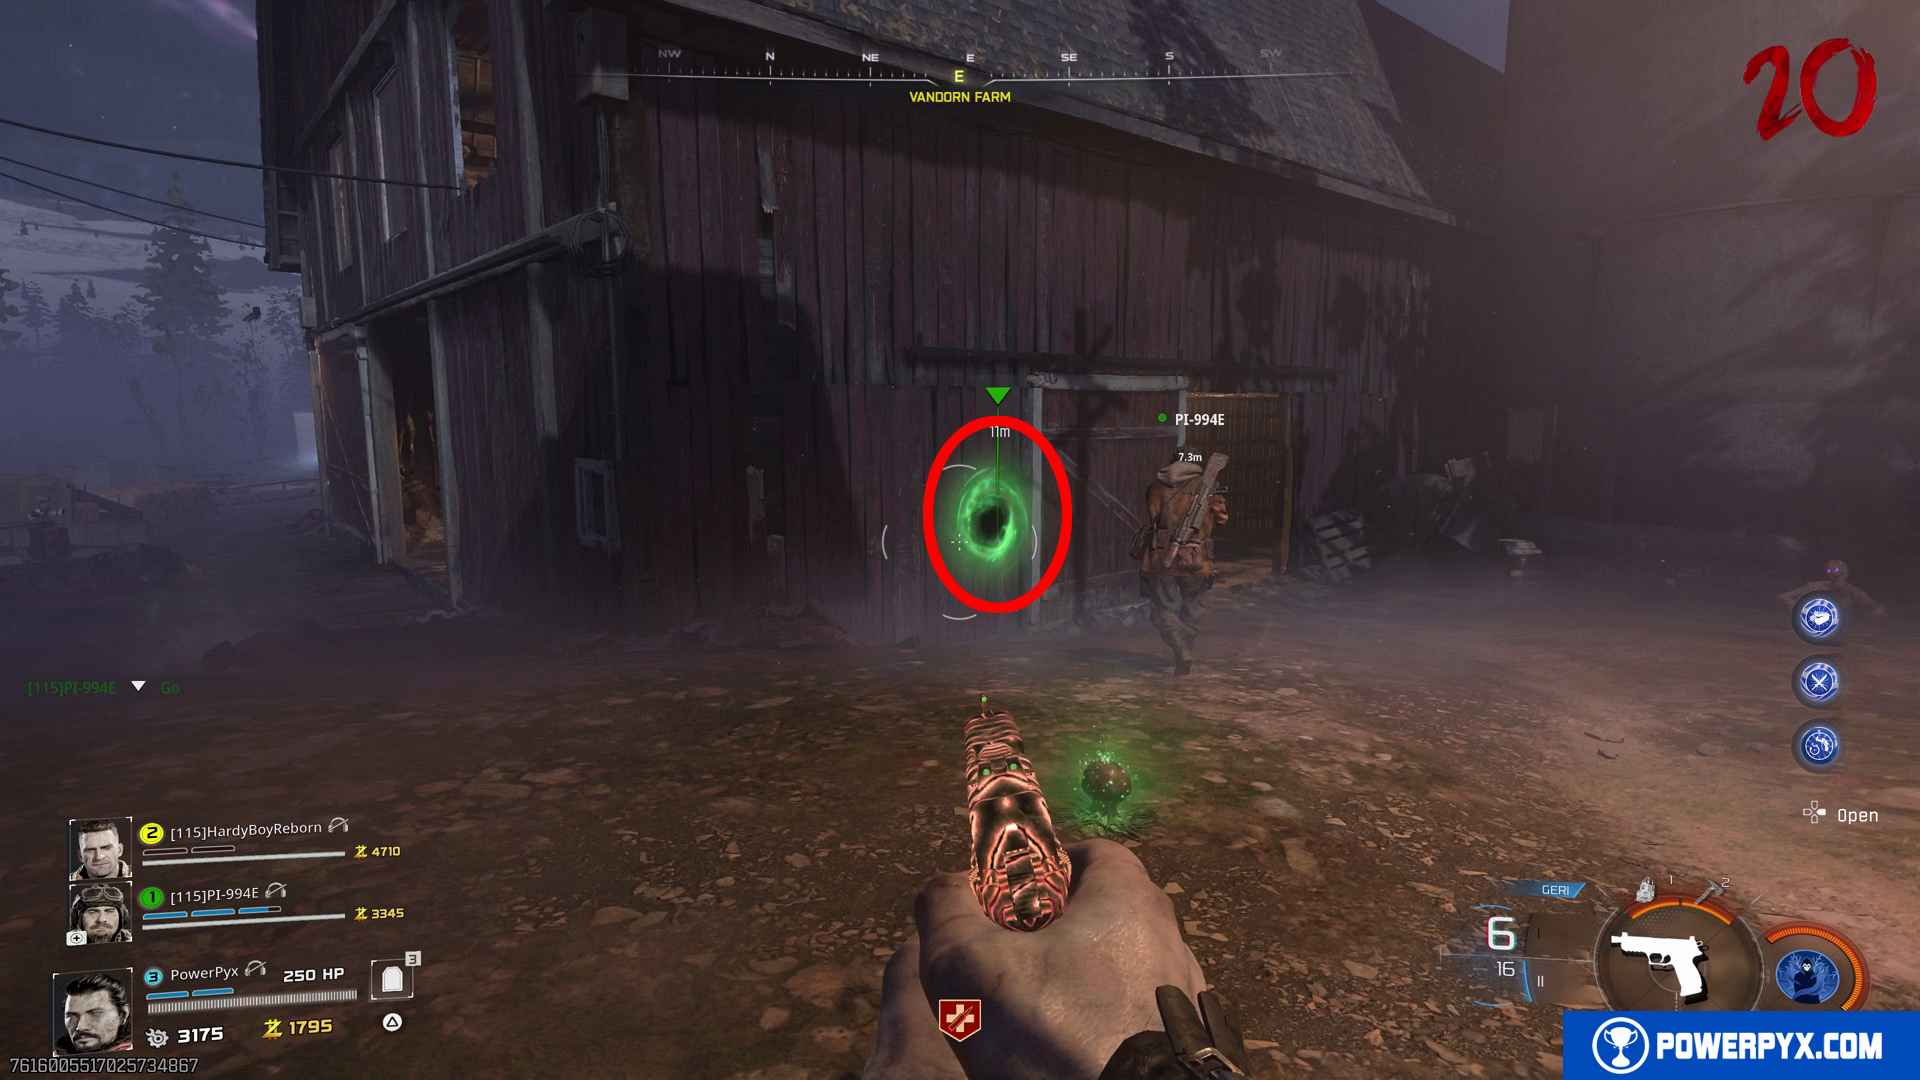
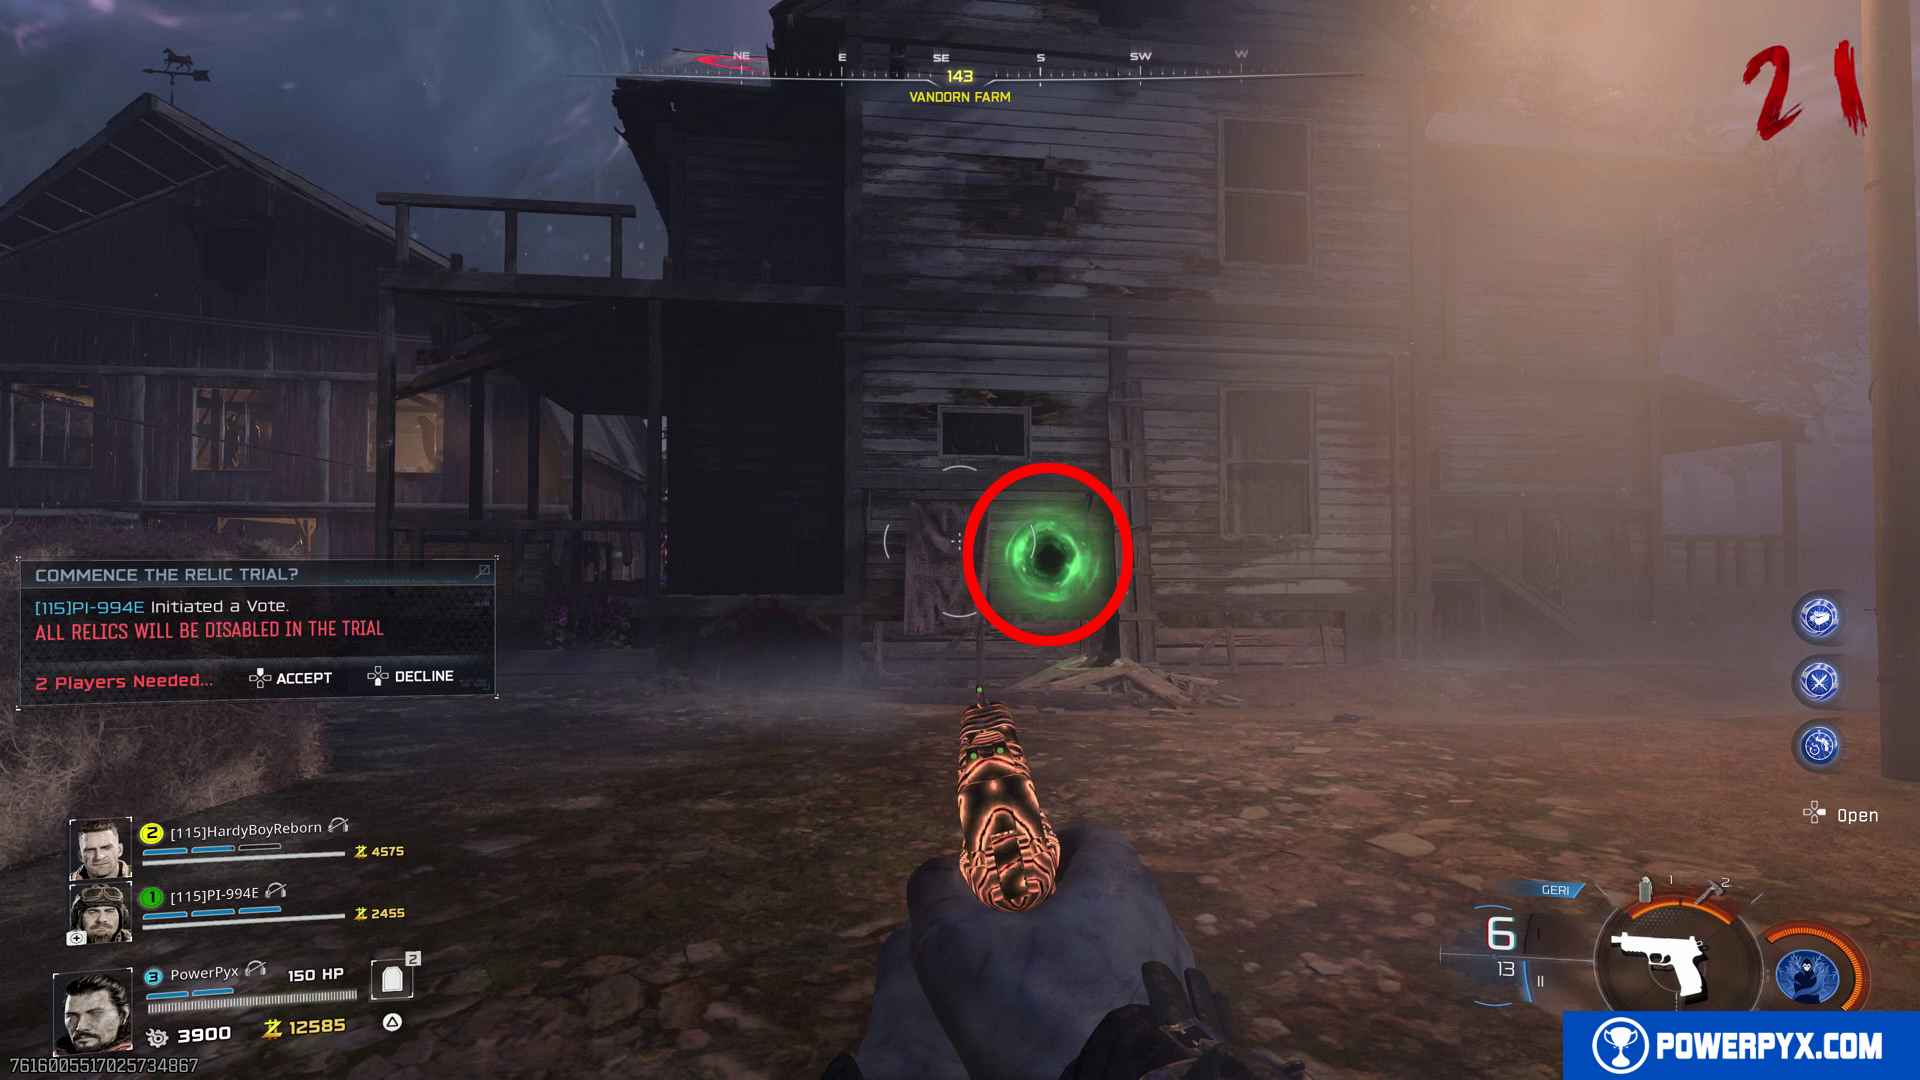
Step 4: Go to Vandorn Farm and interact with the green portal on the back of the barn to start the trial.
Step 5: Defeat 4 rounds of Shock Mimics. Wave 1 you have to kill enemies to fill the progress bar on the left. Wave 2 you only need to defeat the HVT (target with red head and objective marker). Wave 3 defeat all Shock Mimics again. Wave 4 you only need to kill the HVTs.
After the trial you are teleported back to the normal world and you will see the “Trial Complete – Lawyers Pen” at the top of the screen.
Relic #2: Dragon Wings
Step 1: Play to Round 20.
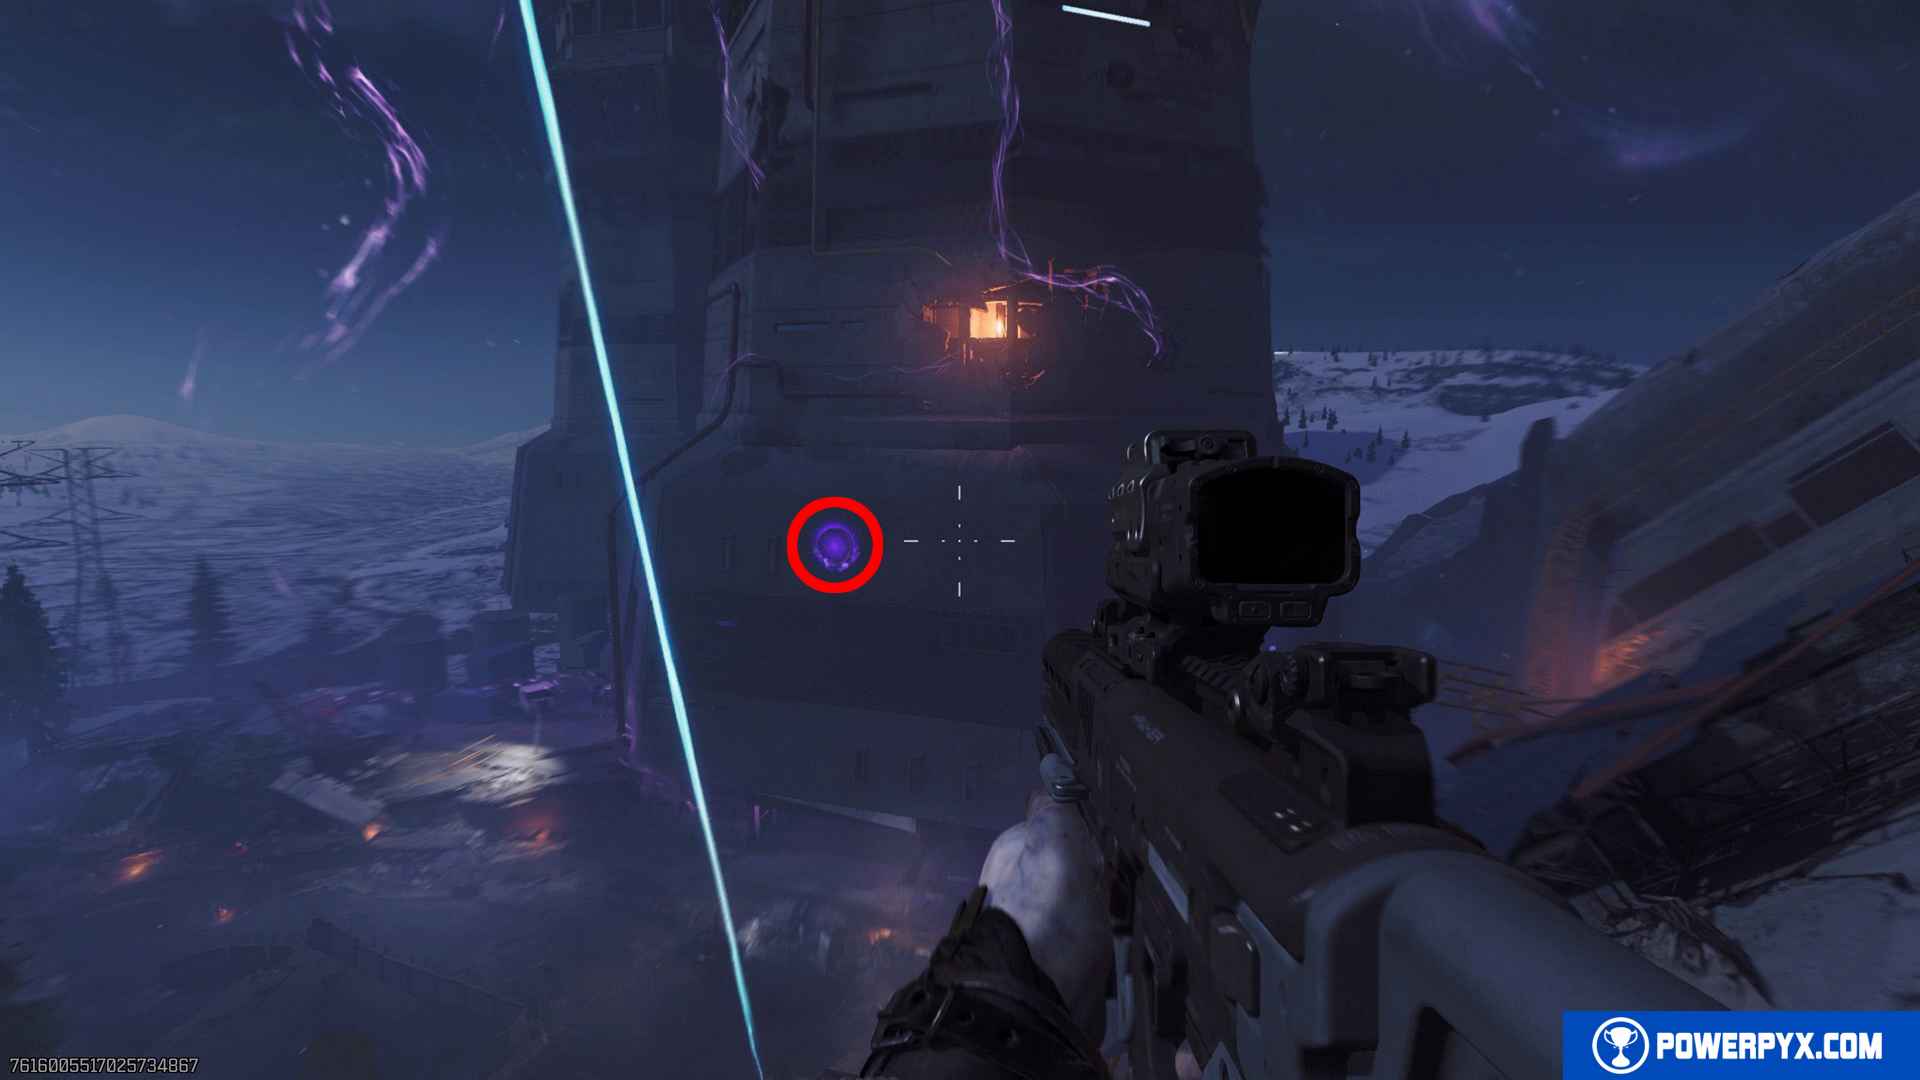
Step 2: Use the Jump Pad from Vandorn Farm to Janus Towers Plaza. DURING THE JUMP face toward Janus Tower Plaza and shoot the 3 purple glowing orbs. You only have a few seconds to do this, use a long-range weapon that can hit far enough (rifles & MGs work well).
Orb 1 – On the left on a pylon.
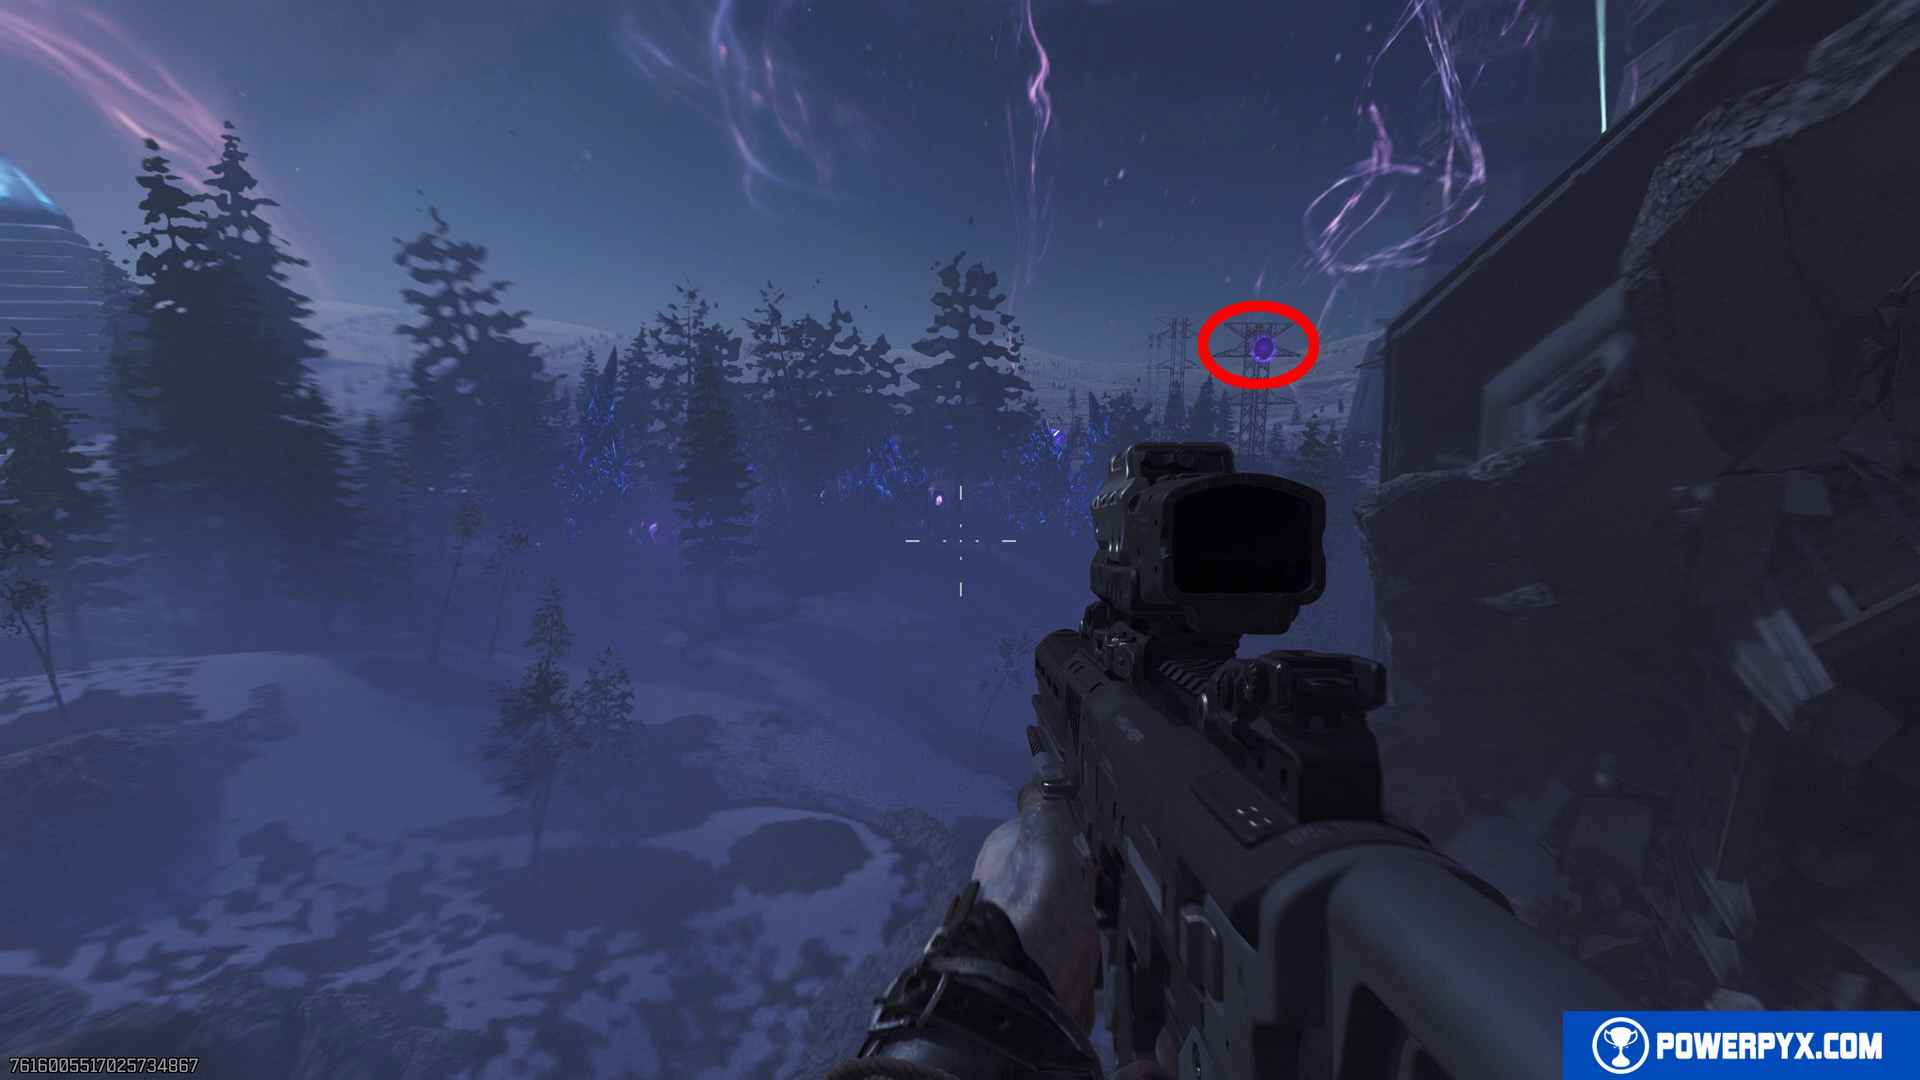
Orb 2 – On the right, slightly below you on the destroyed bridge.
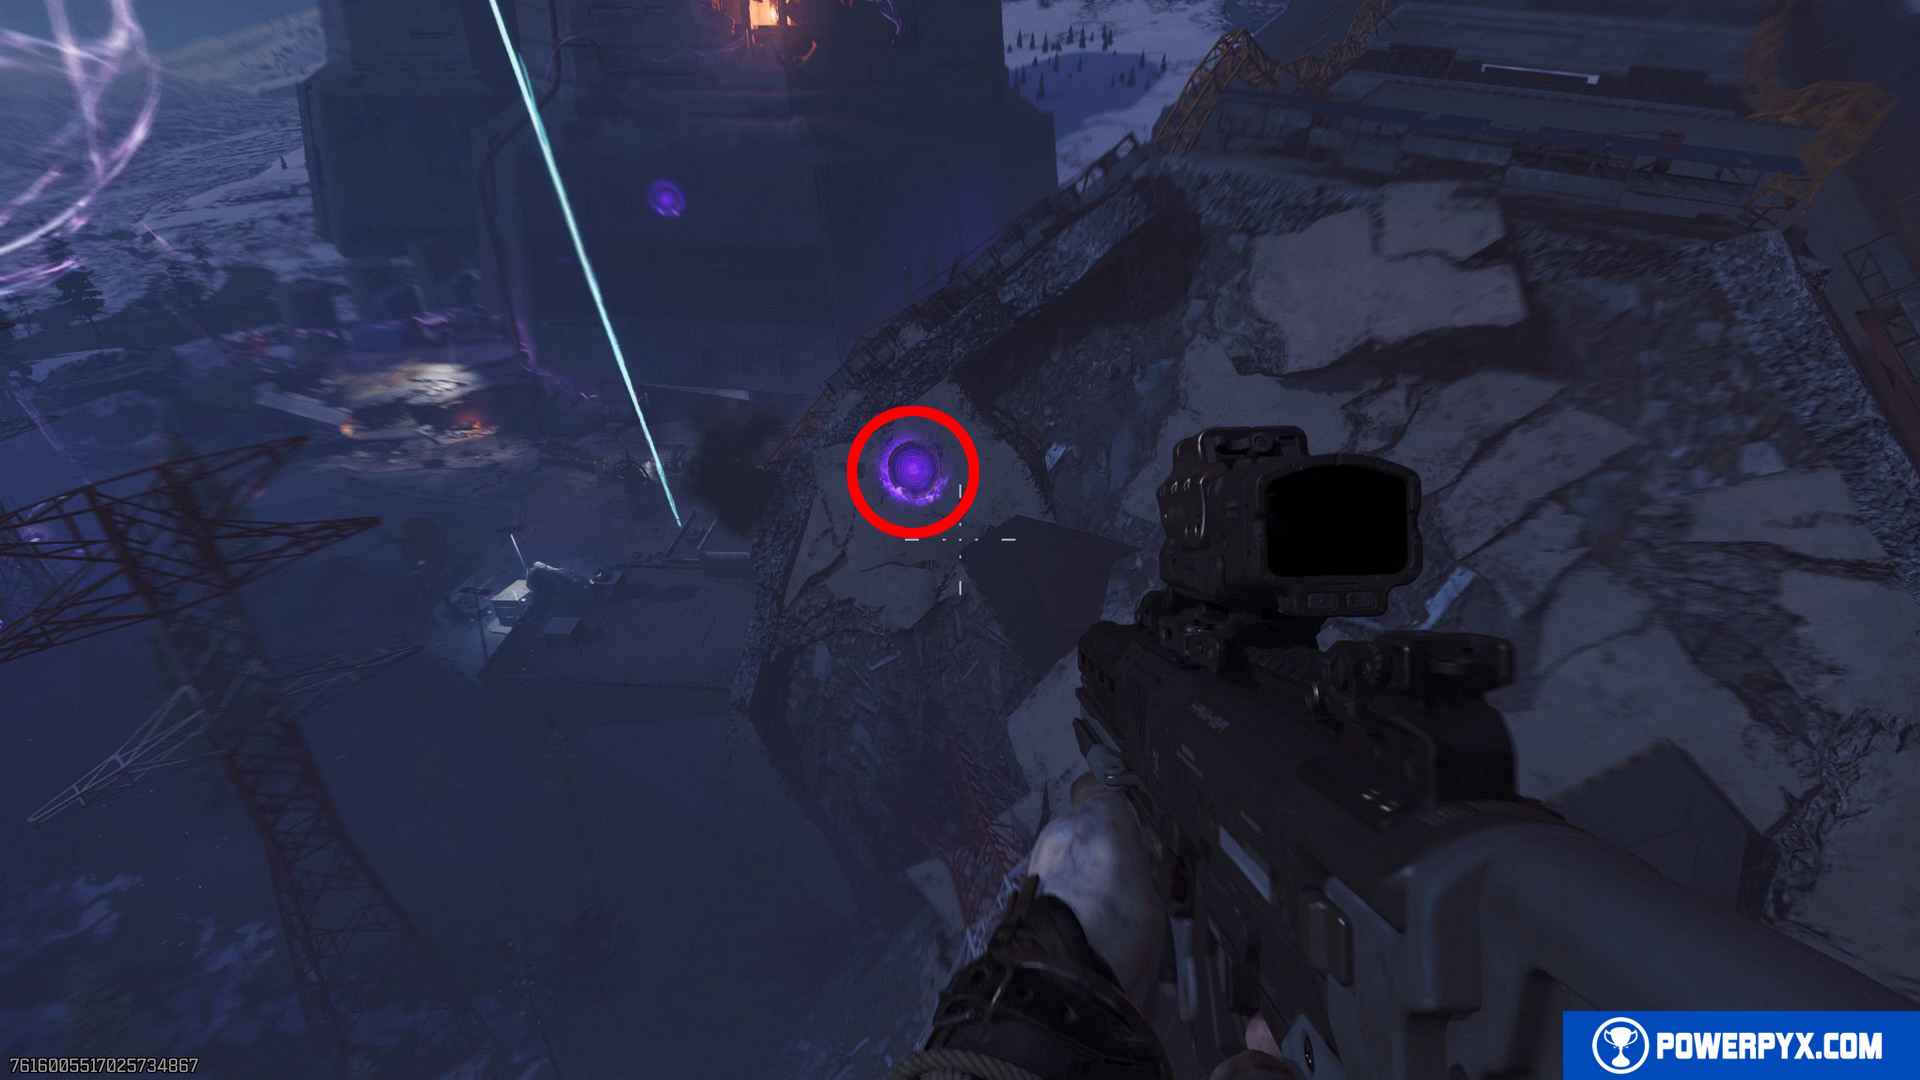
Orb 3 – Straight ahead on the wall of the tower building, above where you started the match.
Step 3: Go to Vandorn Farm and interact with the green portal on the side of the farmhouse to start the trial.
Step 4: Defeat 4 rounds of zombies BUT DON’T PICK UP THE POWER-UPS. The Power-Ups are all fake and will deal you a lot of damage when you touch them, and none of them trigger the actual power-up effect. They are traps, so don’t interact with any of the green power-up items! Wave 1 you have to kill enemies to fill the progress bar on the left. Wave 2 you only need to defeat the HVT (target with objective marker). Wave 3 defeat all zombies again. Wave 4 you only need to kill the HVTs. You don’t necessarily have to kill all the special zombies that spawn, you can kill the regular zombies instead to fill the progress bar.
After the trial you are teleported back to the normal world and you will see the “Trial Complete – Dragon Wings” at the top of the screen.
Relic #3: Teddy Bear
Prerequisite: You MUST have Aether Shroud field upgrade equipped (unlocks at Player Level 48). You should also equip its second and third augment “Group Shroud” + “Extra Charge“. If you haven’t unlocked these, select it in the augment research before a match and play to Round 40 and you should get it. If you don’t have Extra Charge this relic will be extremely tedious. It will be most efficient if you play with 4 people and everyone in the match has this unlocked, so each player can trigger their Aether Shroud to have it activate for everyone else too (specifically, for the player who grabs the Necrofluid Gauntlet). The player who gets the Necrofluid Gauntlet must shoot 10 Teddies WHILE AETHER SHROUD IS ACTIVE. The Teddies can’t be seen or grabbed if Aether Shroud isn’t active. Because the Field Upgrade normally takes quite a while to recharge, having 4 players with 2 charges and group shroud will make this much more efficient. Also bring the Gobblegums POWER KEG (Blue) + ARSENAL ACCELERATOR (Blue). The first immediately fully refills your Field Upgrade (gives you another 2 Aether Shroud charges) and the second makes your Field Upgrade recharge faster from killing zombies.
Summary of Equipment:
- Field Upgrade = Aether Shroud –> Augments = Group Shroud + Extra Charge
- Gobblegums = Power Keg + Arsenal Accelerator (bringing a Kill Joy Gobblegum for the trial is good too, for the other 2 use whatever you want)
Step 1: Craft the Wonder Weapon “Necrofluid Gauntlet”. This is part of the main easter egg. Refer to Ashes of the Damned Easter Egg Guide and complete it up to Step 14. You need this weapon to shoot the 10 Teddy Bears.
Step 2: The player with the Necrofluid Gauntlet must now shoot 10 Teddies WHILE AETHER SHROUD IS ACTIVE! The Teddies cannot be seen otherwise. Equip Necrofluid Gauntlet, aim at the Teddy, trigger Aether Shroud, shoot Teddy with  /
/  then
then  (PS) /
  (XB) to suck your ammo back in. If you hit the teddy, you will see the gauntlet suck it in (watch the gauntlet while it sucks in the ammo to see if it sucked in the teddy). One Aether Shroud activation lasts long enough to shoot and reload 2-3 times. If you don’t get a Teddy on the first attempt, use Aether Shroud again (can be done in same round), and try shooting it from a slighty different angle. Tip: on tricky ones I had more success when shooting it 3-4 times before sucking the ammo back in, as long as one shot hit it, you will suck in the teddy with your ammo. So instead of doing one shot at a time try multiple shots before reloading but remember you have to suck the teddy in before Aether Shroud ends. If you’ve never done this, it can be a bit hard to see if you sucked in the teddy or not, you can have a 2nd player watch you from the side too, to see if it flew into your Necrofluid Gauntlet.
This is what it looks like when you suck in the Teddy:
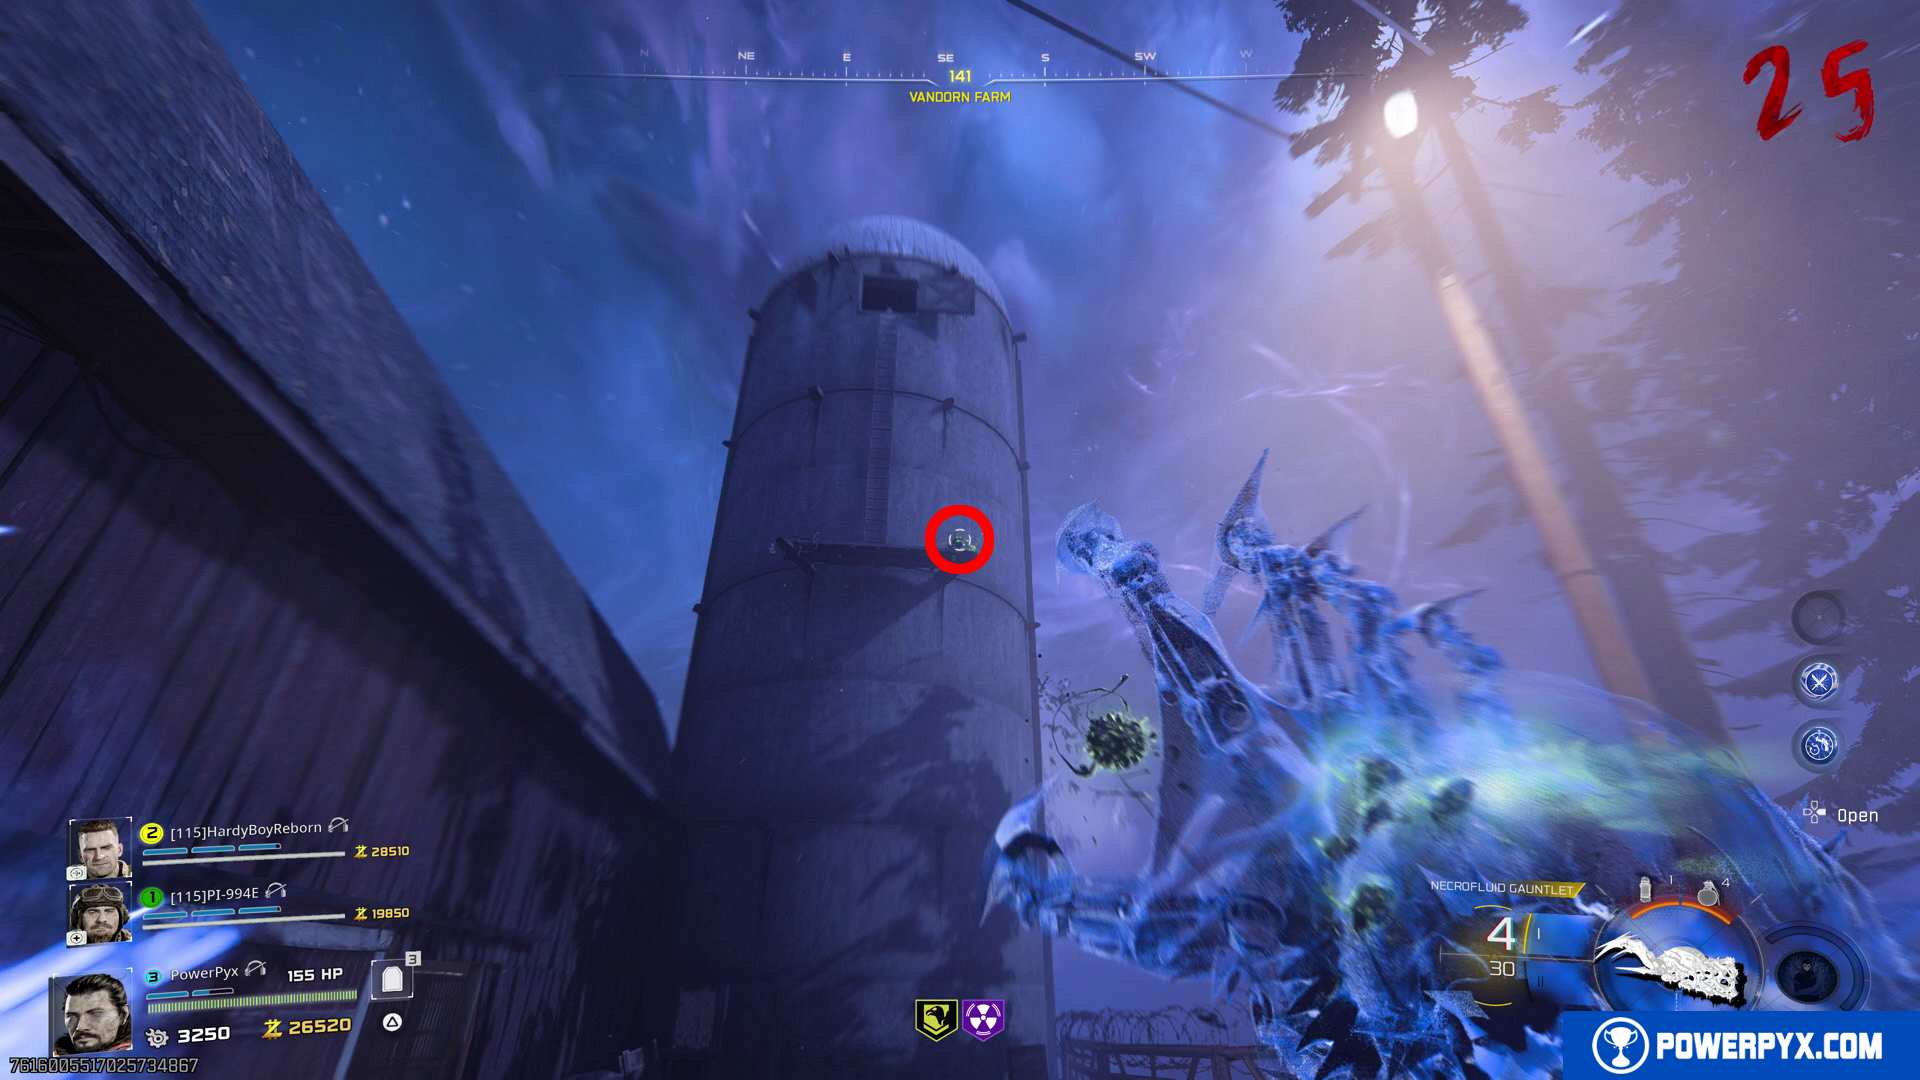
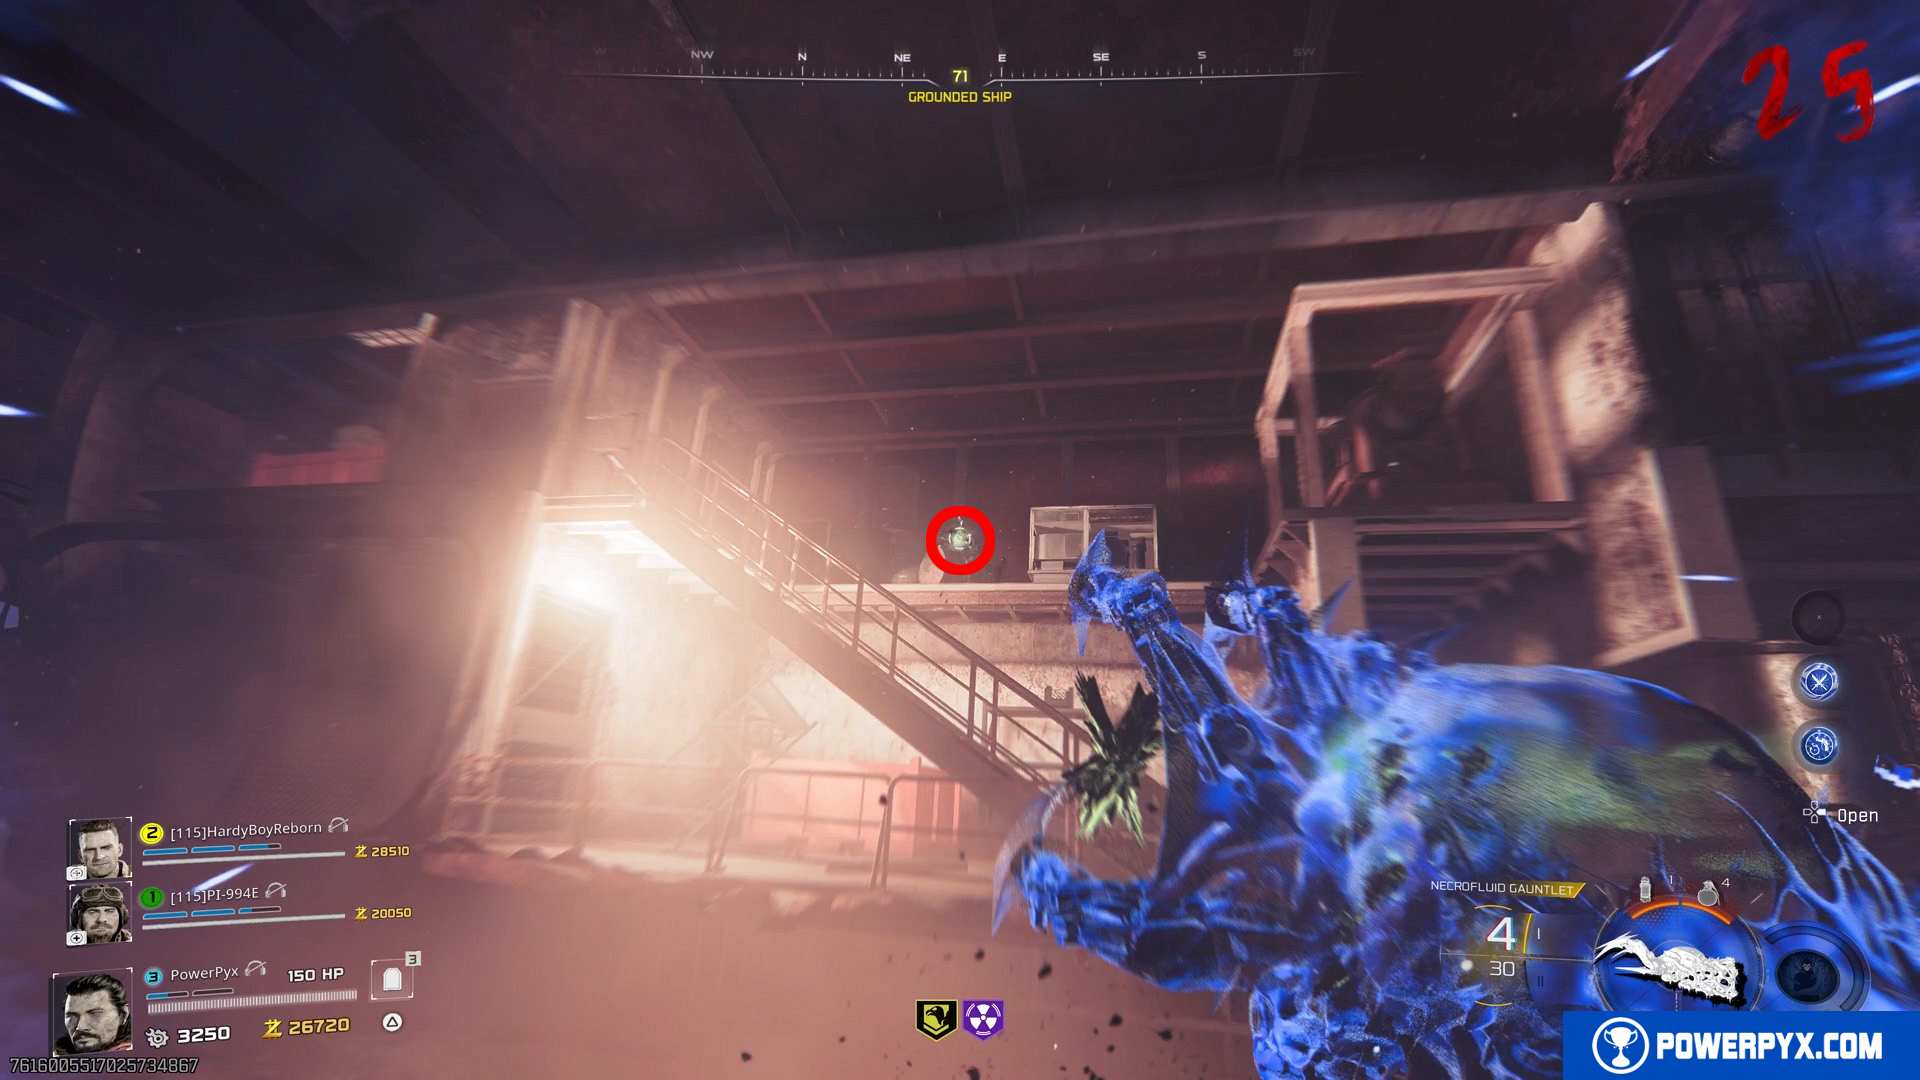
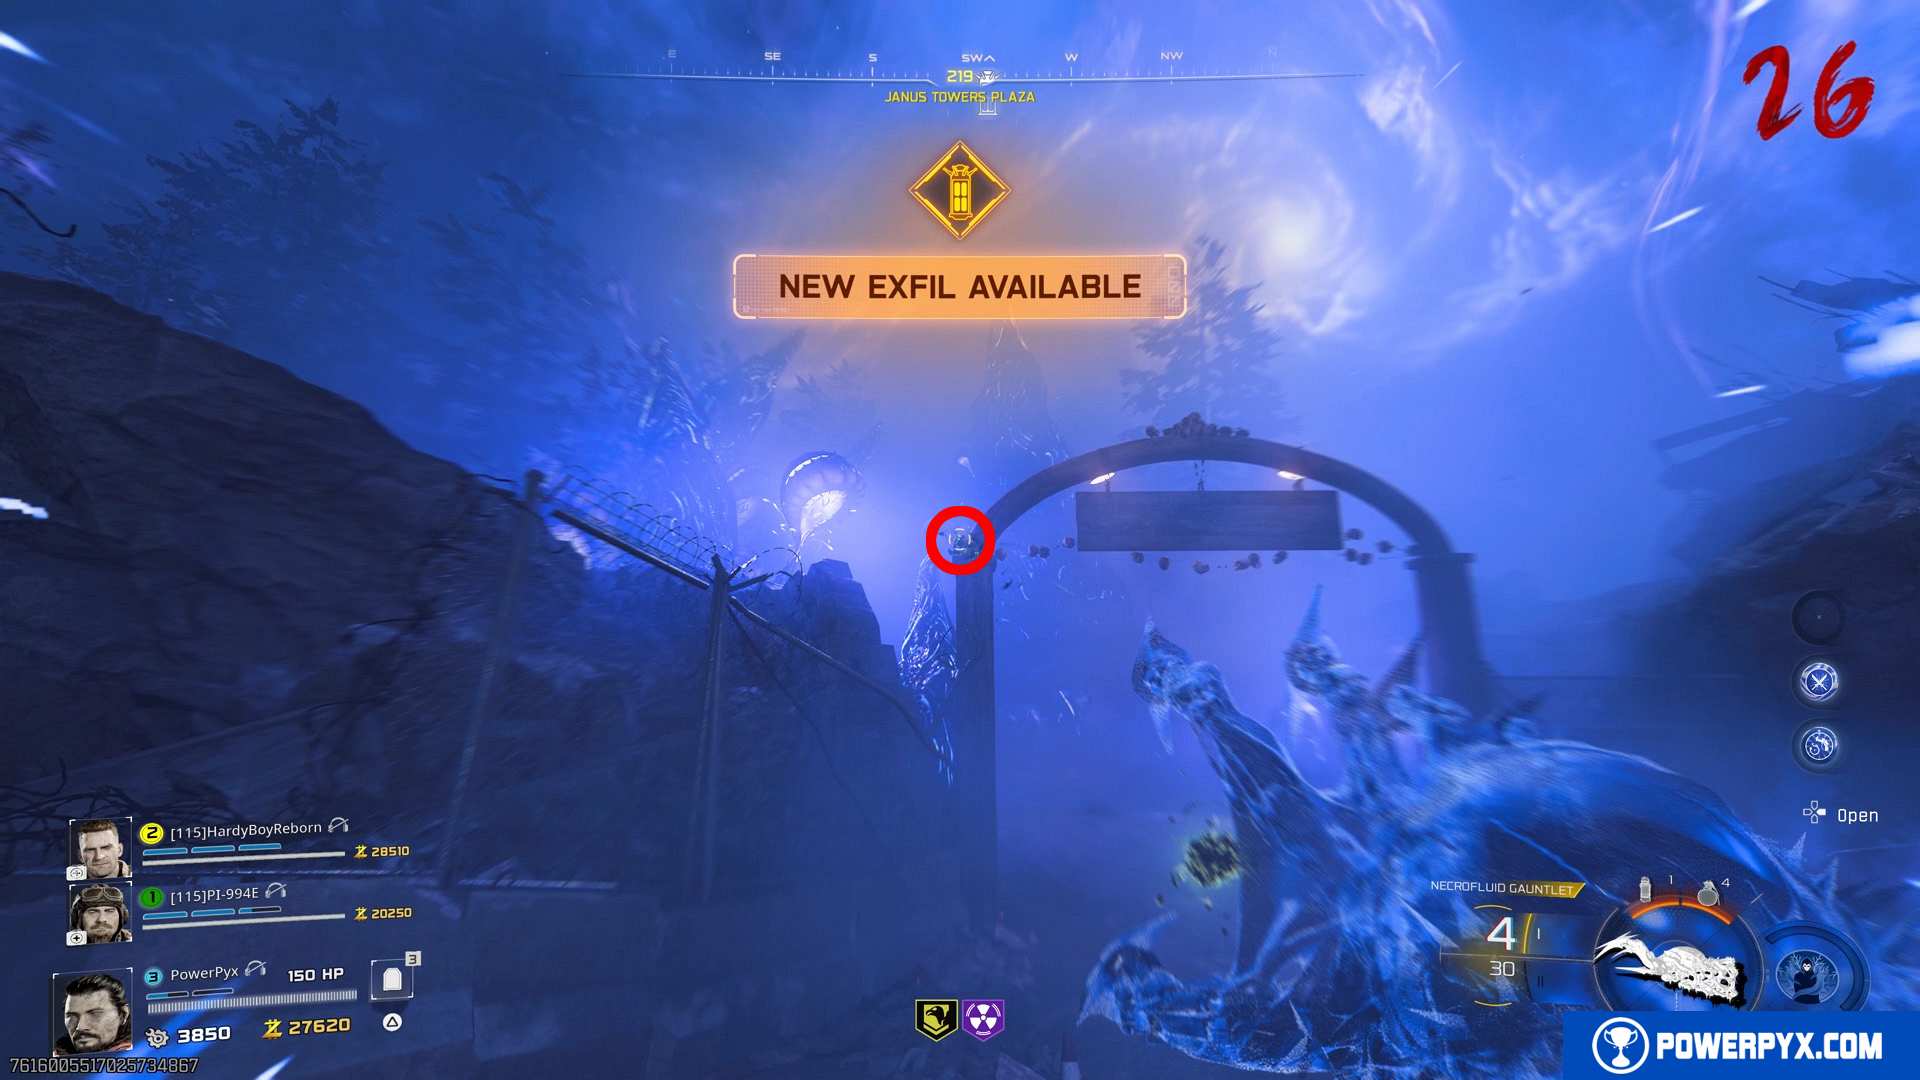
All 10 Teddies are below – only visible during Aether Shroud – AIM EXACTLY WHERE THE WHITE AIM DOT IS IN THE IMAGES:
Teddy 1 – Vandorn Farm: On the silo behind the barn. Sitting on the right edge of the wooden “balcony” below the ladder. If it doesn’t grab the teddy, try standing further back (sometimes doesn’t grab it if you’re too close and the angle isn’t right).
Teddy 2 – Grounded Ship (Area between Vandorn Farm & Ashwood): Inside the Grounded Ship (in the bottom area, not on top of the ship). Look north where an orange-lit area is, with an unreachable staircase leading up. It’s on top of a barrel over the middle of the staircase.
Teddy 3 – Janus Towers Plaza: From where you started the match, look to the right on top of the arched gate that leads to Blackwater Lake.
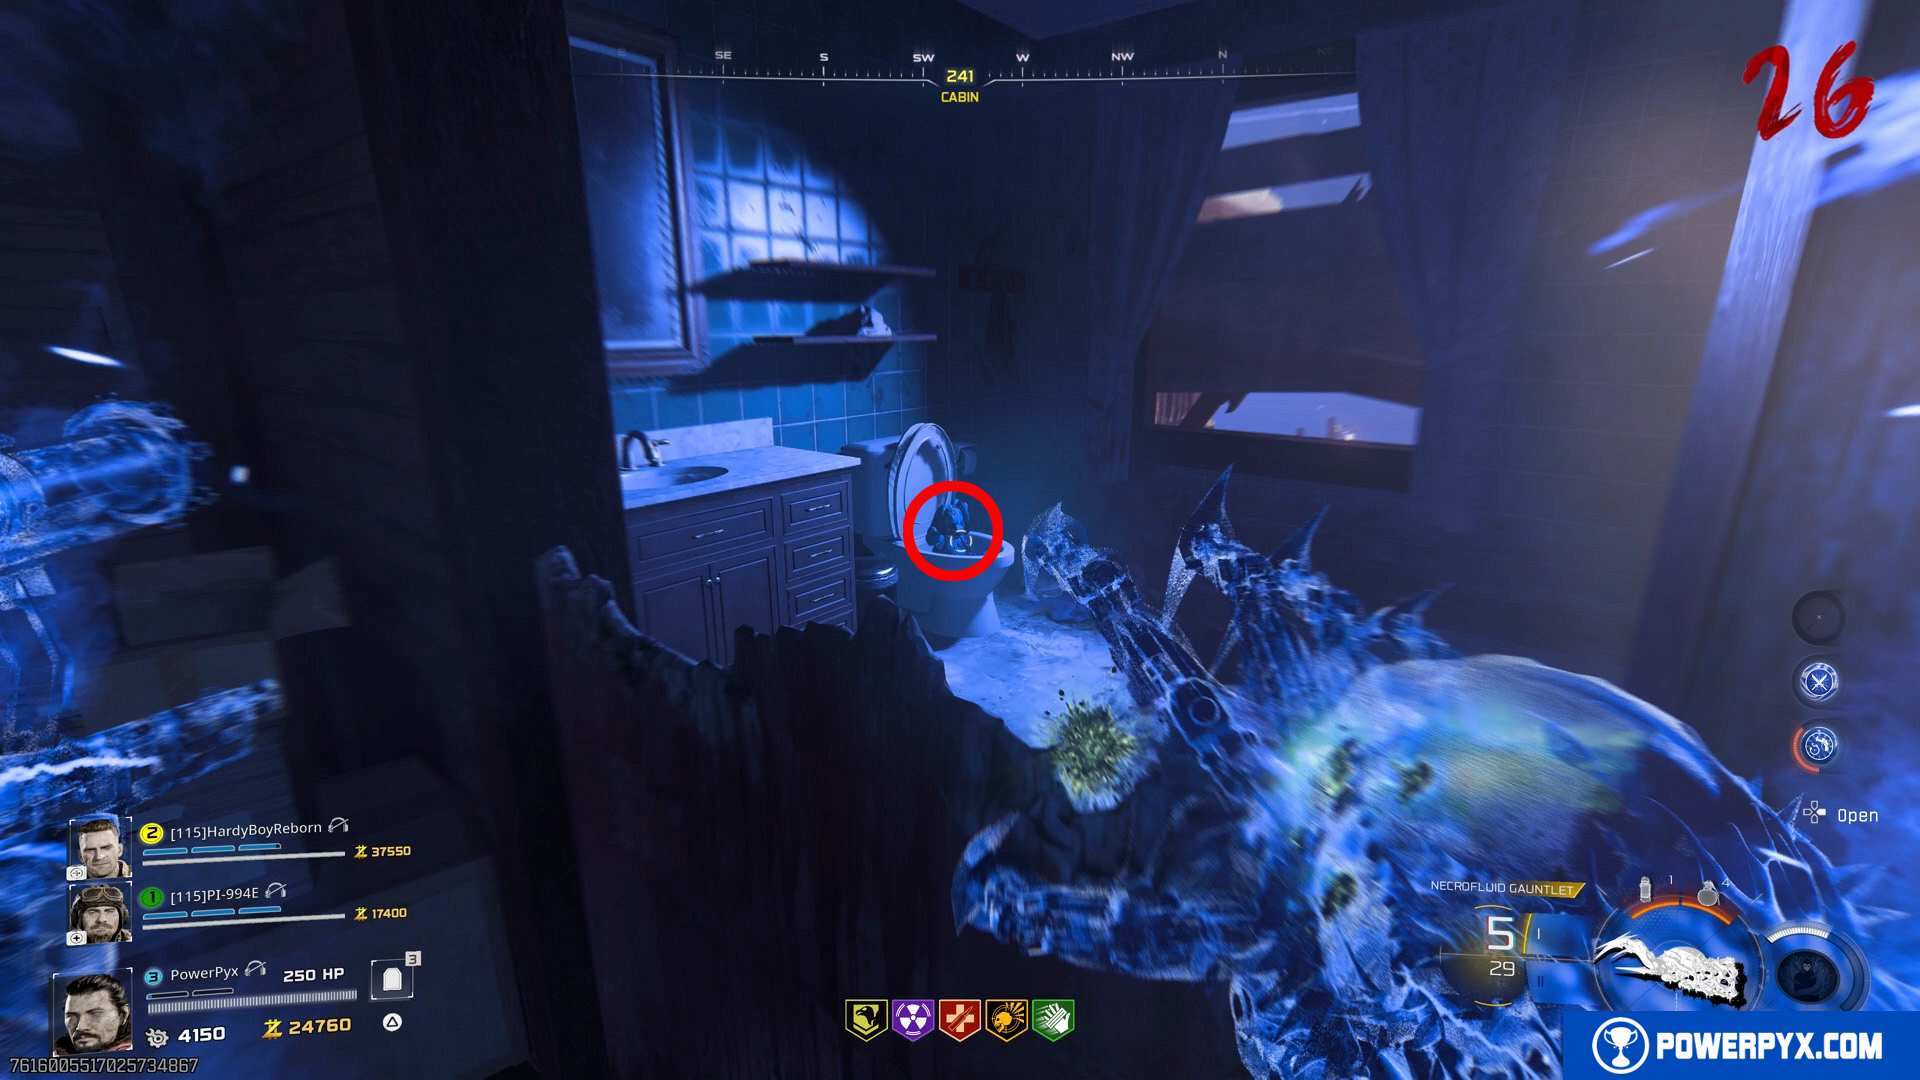
Teddy 4 – Blackwater Lake > Cabin: Upstairs inside the cabin, in the bathroom, in the toilet. You can see it through the window to the immediate left of Speed Cola perk.
Teddy 5 – Lost Cabins (Area between Blackwater Lake & Ashwood): On the roof of the small hut, sitting at the edge. Shoot the edge slightly below it so your ammo sticks to the edge (don’t shoot through the teddy).

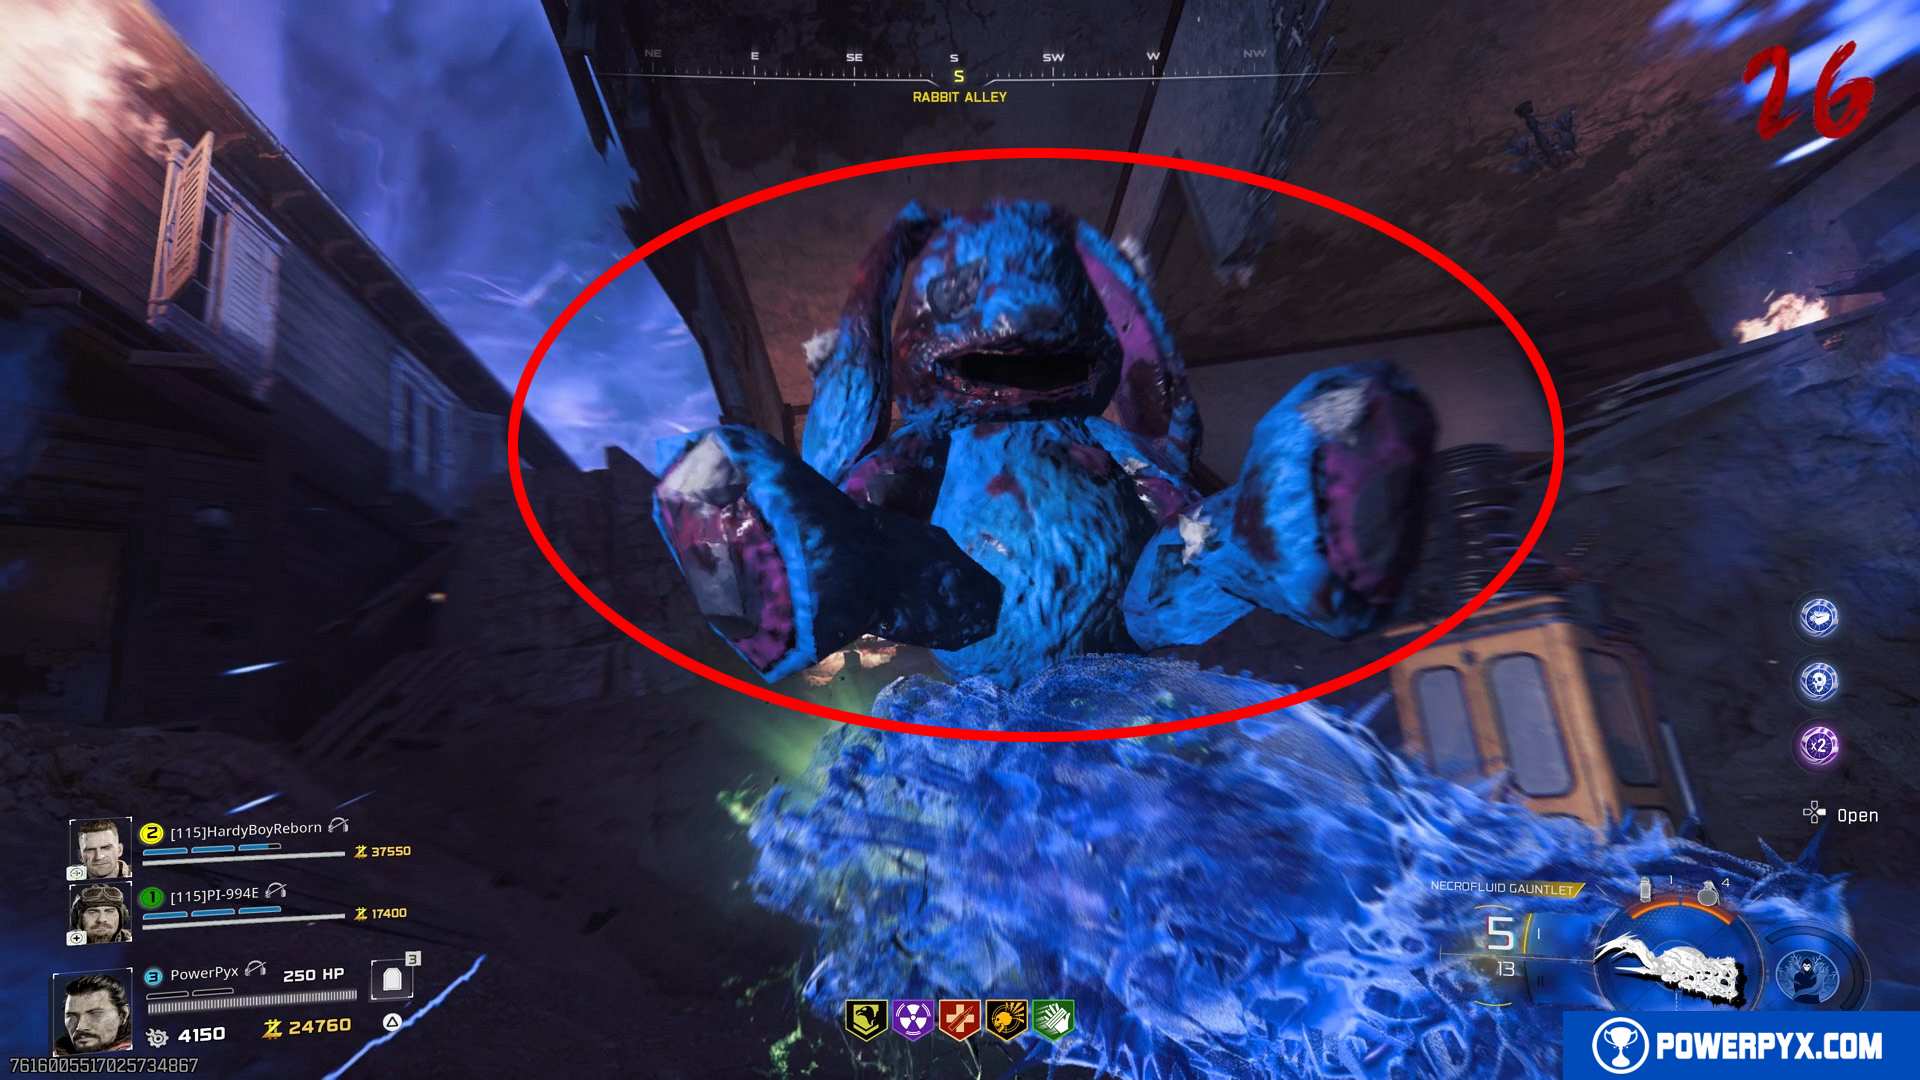
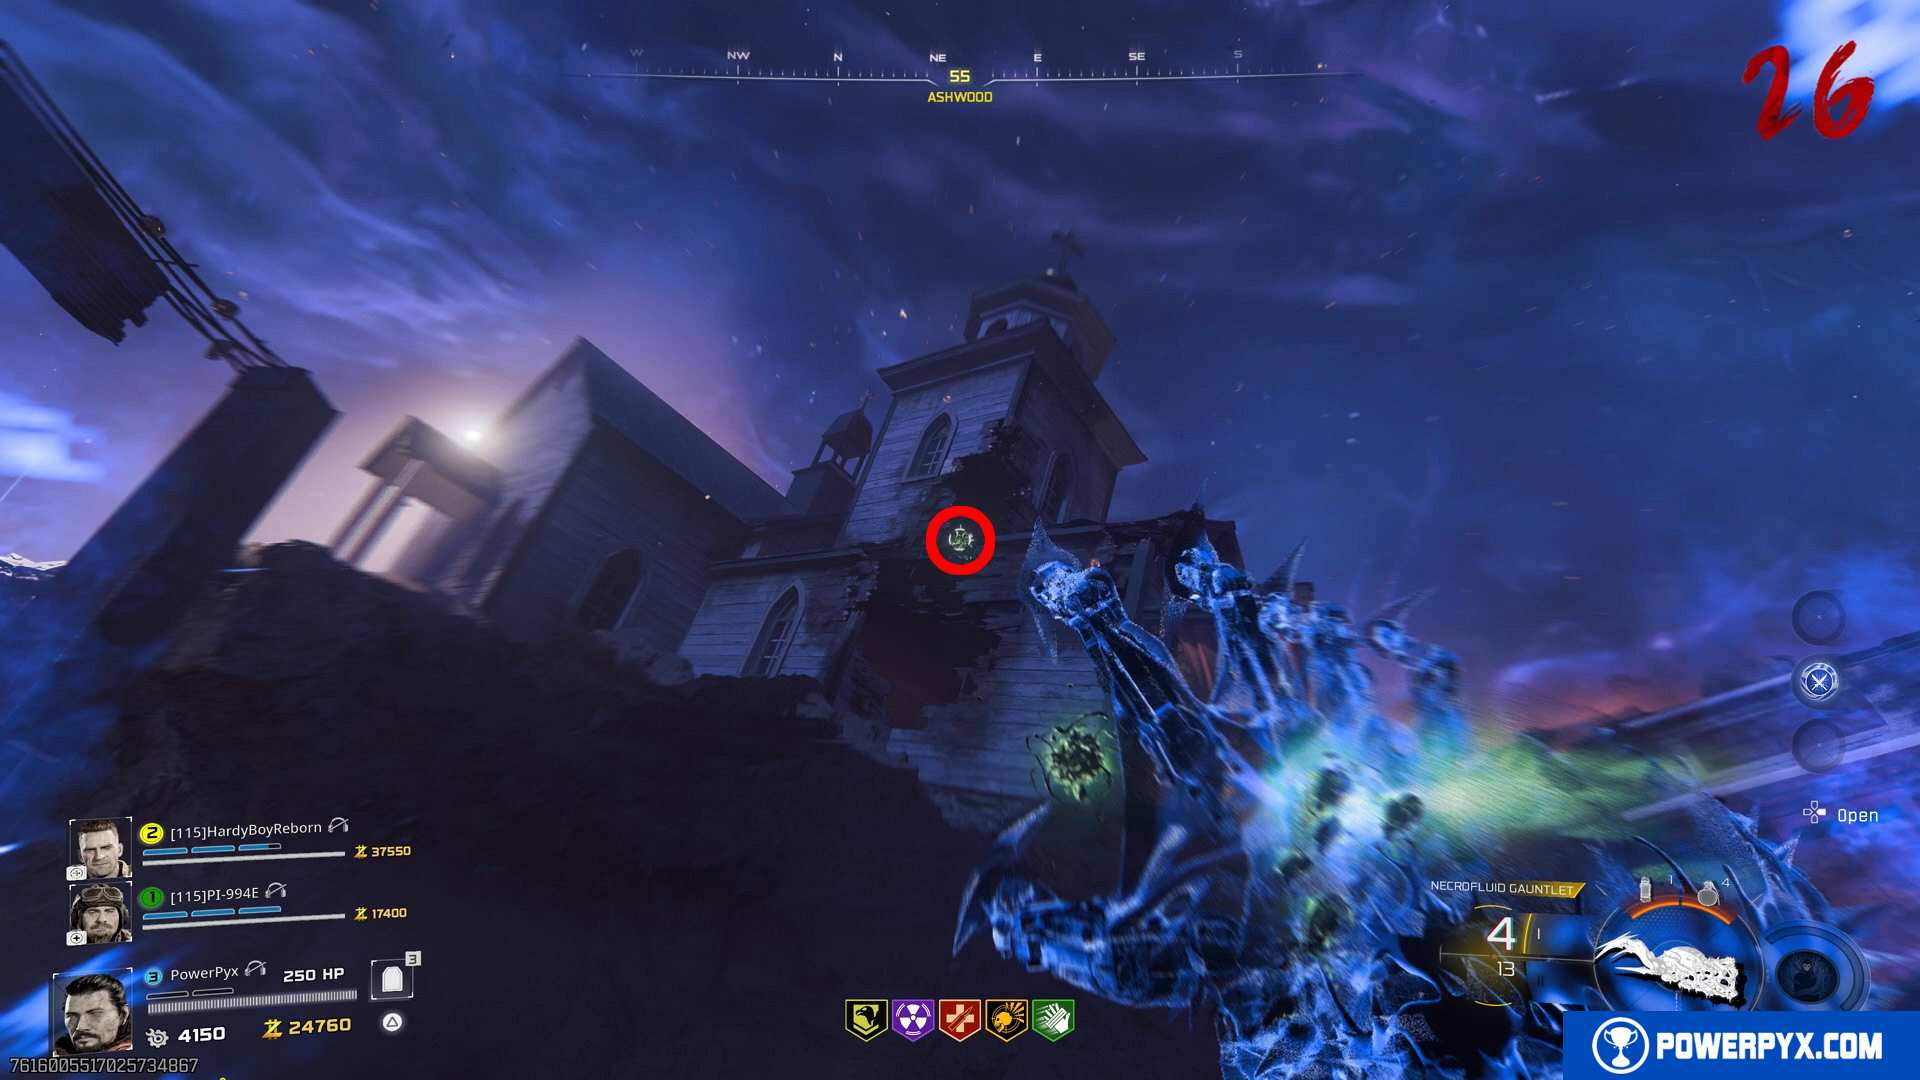
Teddy 6 – Ashwood: In the pitchblack dark church at the entrance to Ashwood area (between the exits to Ashwood & Blackwater Lake).
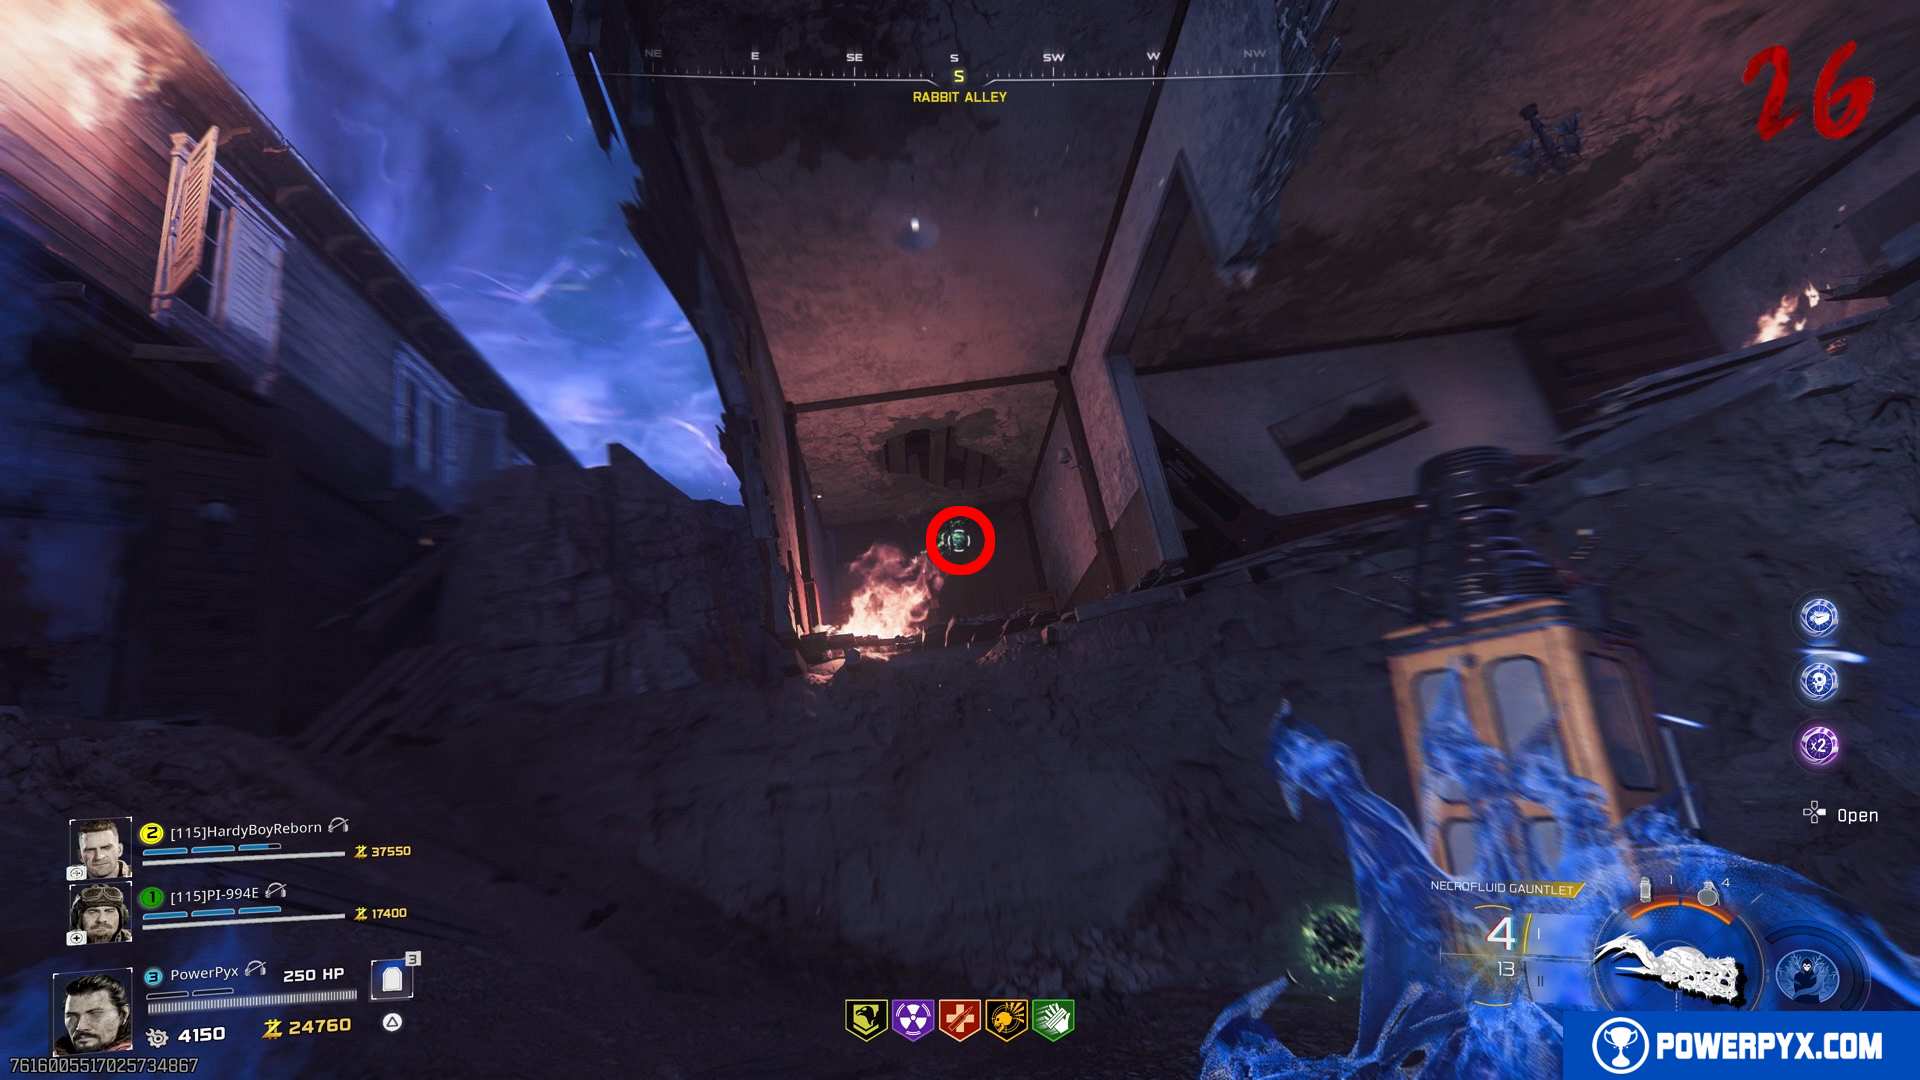
Teddy 7 – Ashwood > Rabbit Alley: In the upper area of Ashwood, in a house between the Jump Pad and a yellow Exfil Phone Booth. On the stairs of the house, very dark and hard to see.
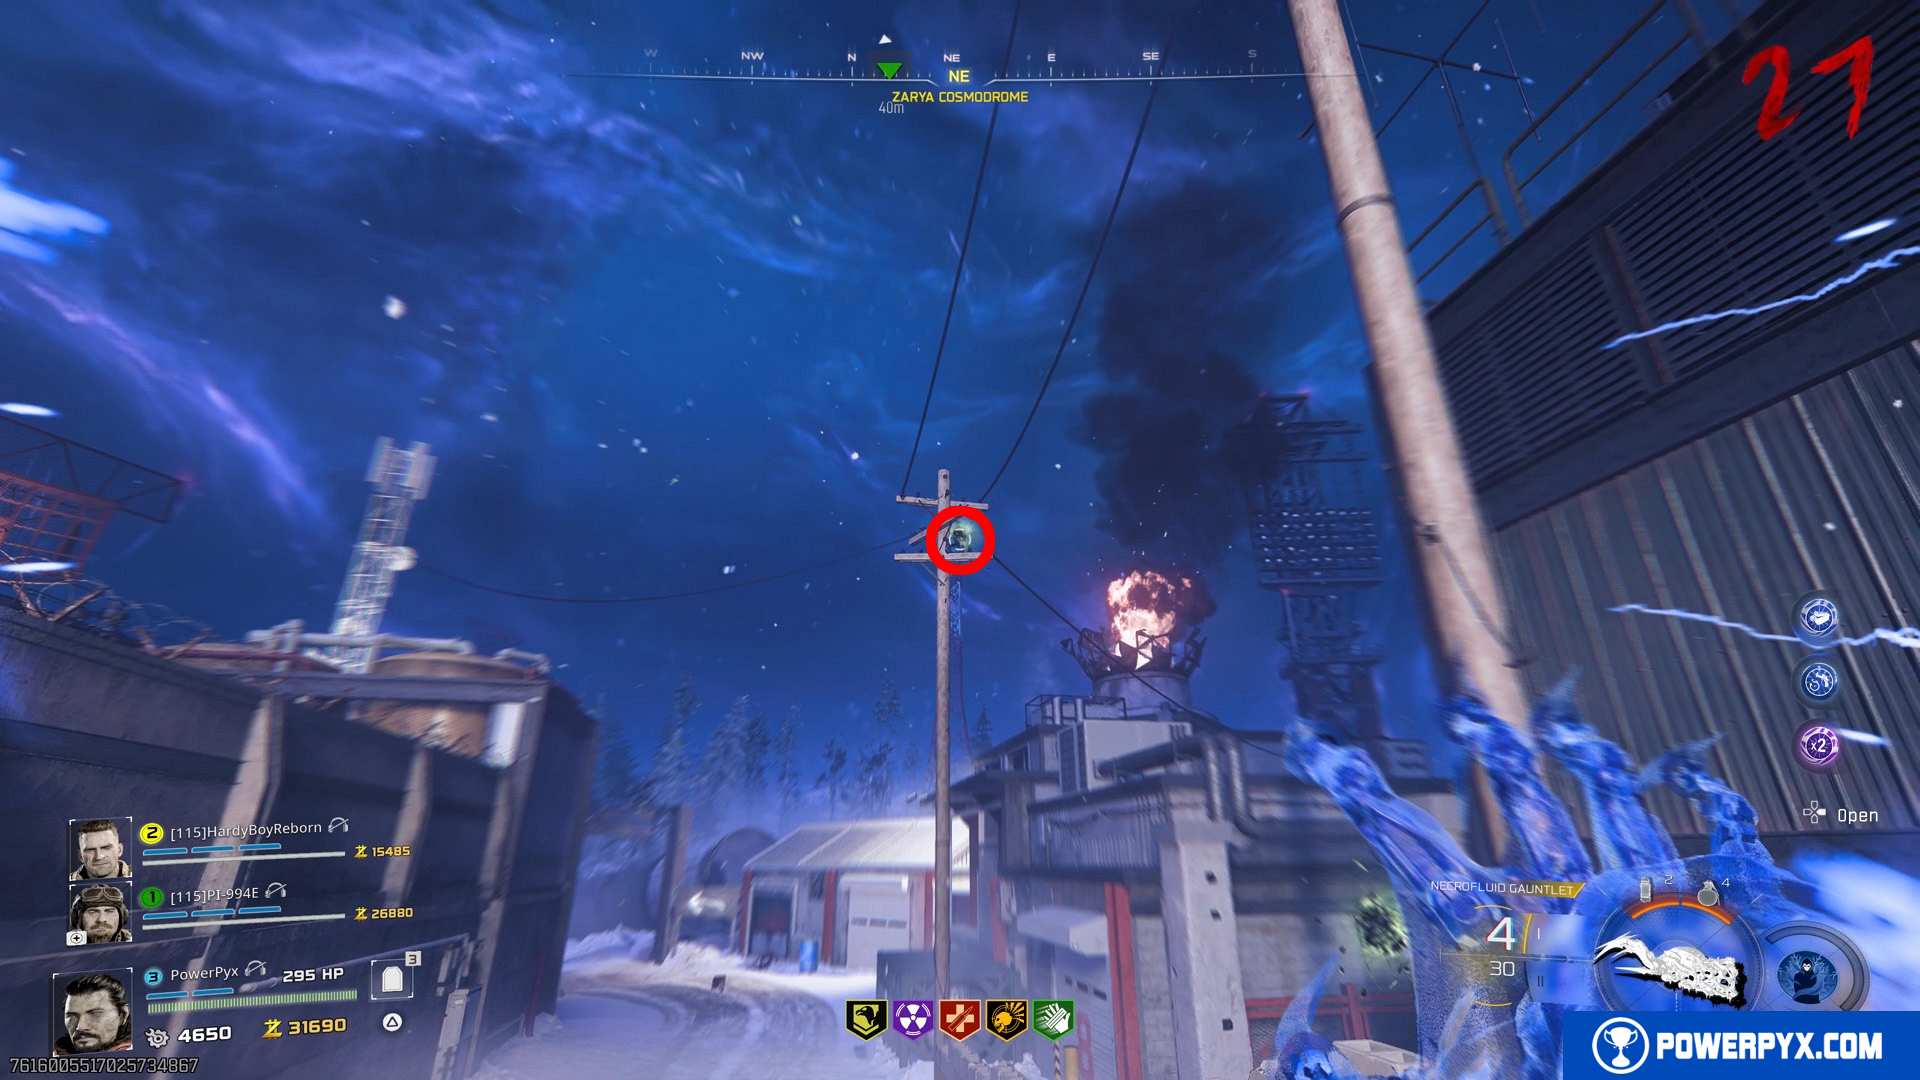
Teddy 8 – Zarya Cosmodrome: On the first electricity pole (first one when coming from Ashwood).
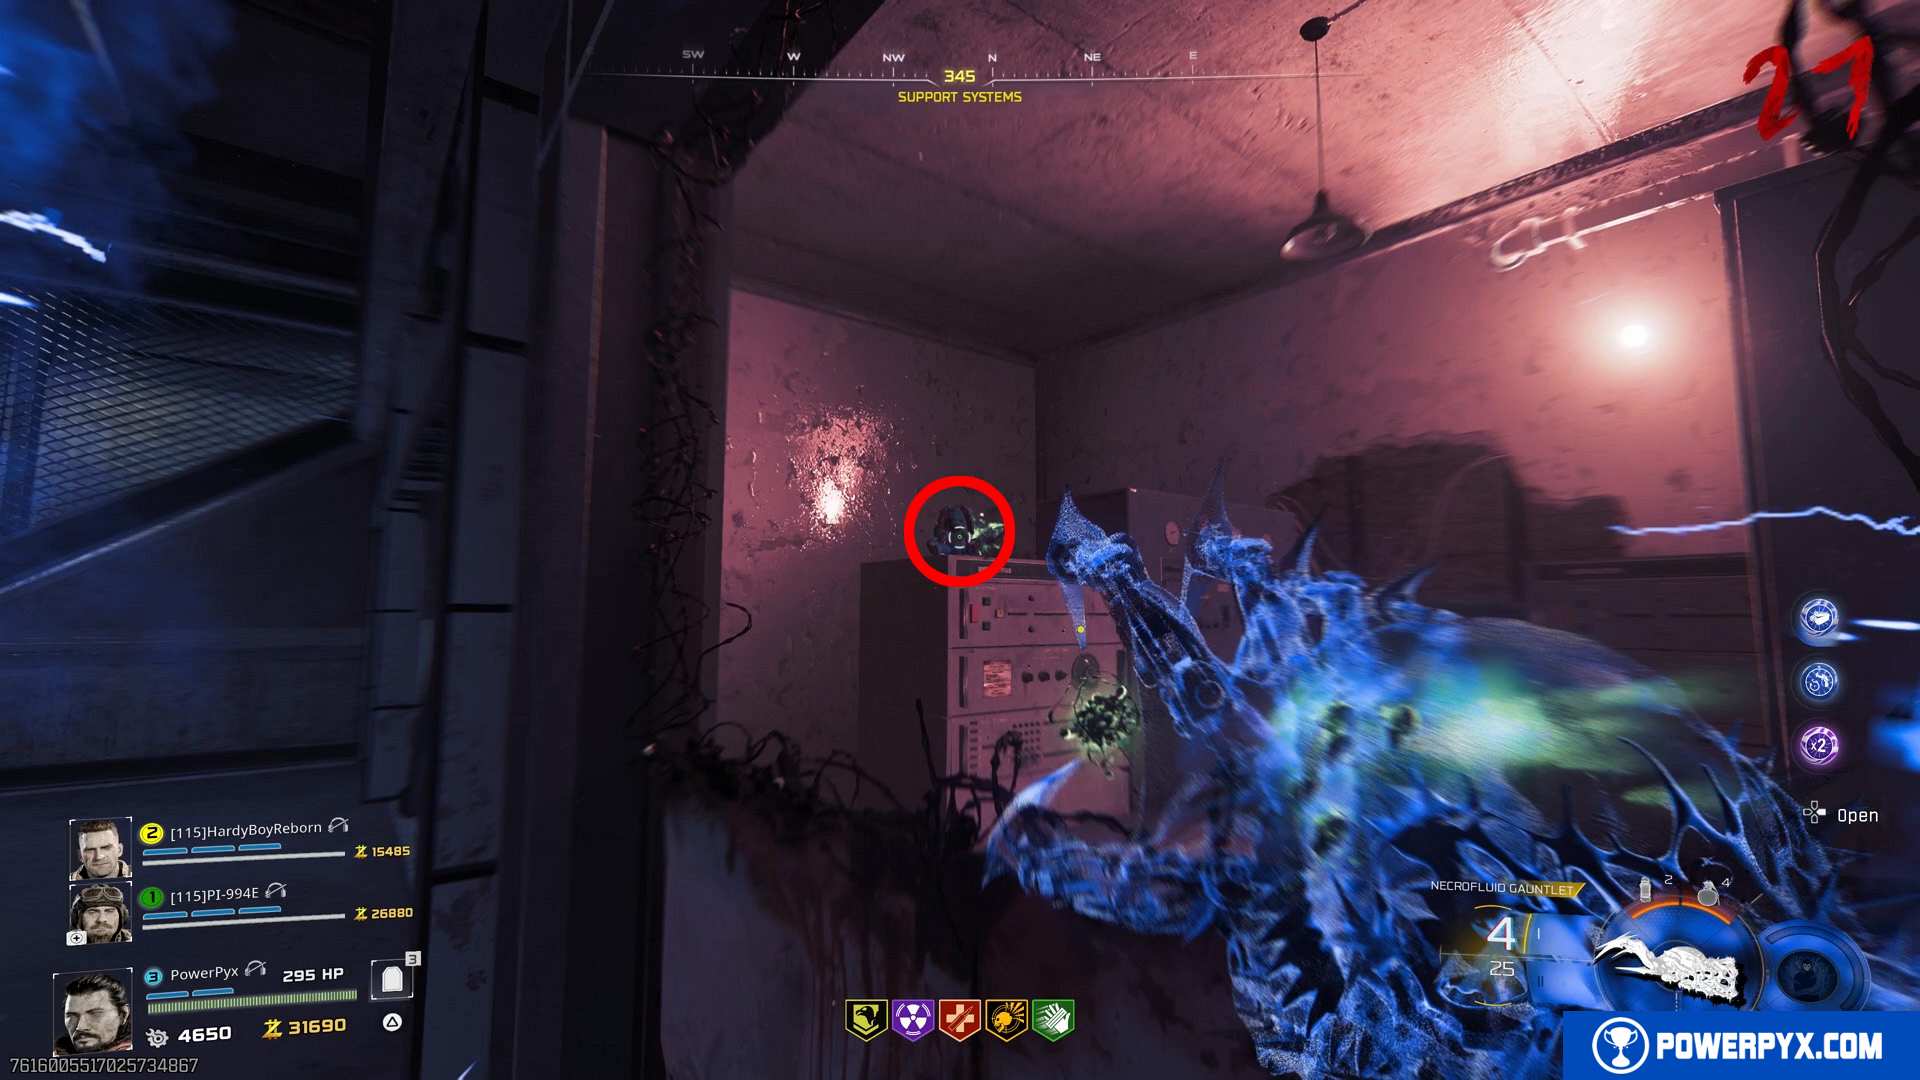
Teddy 9 – Zarya Cosmodrome > Support Systems: In Cosmodrome go downstairs to the lower area. Stand in front of the workbench, then look through the first window on the left to see it sitting on a computer console.
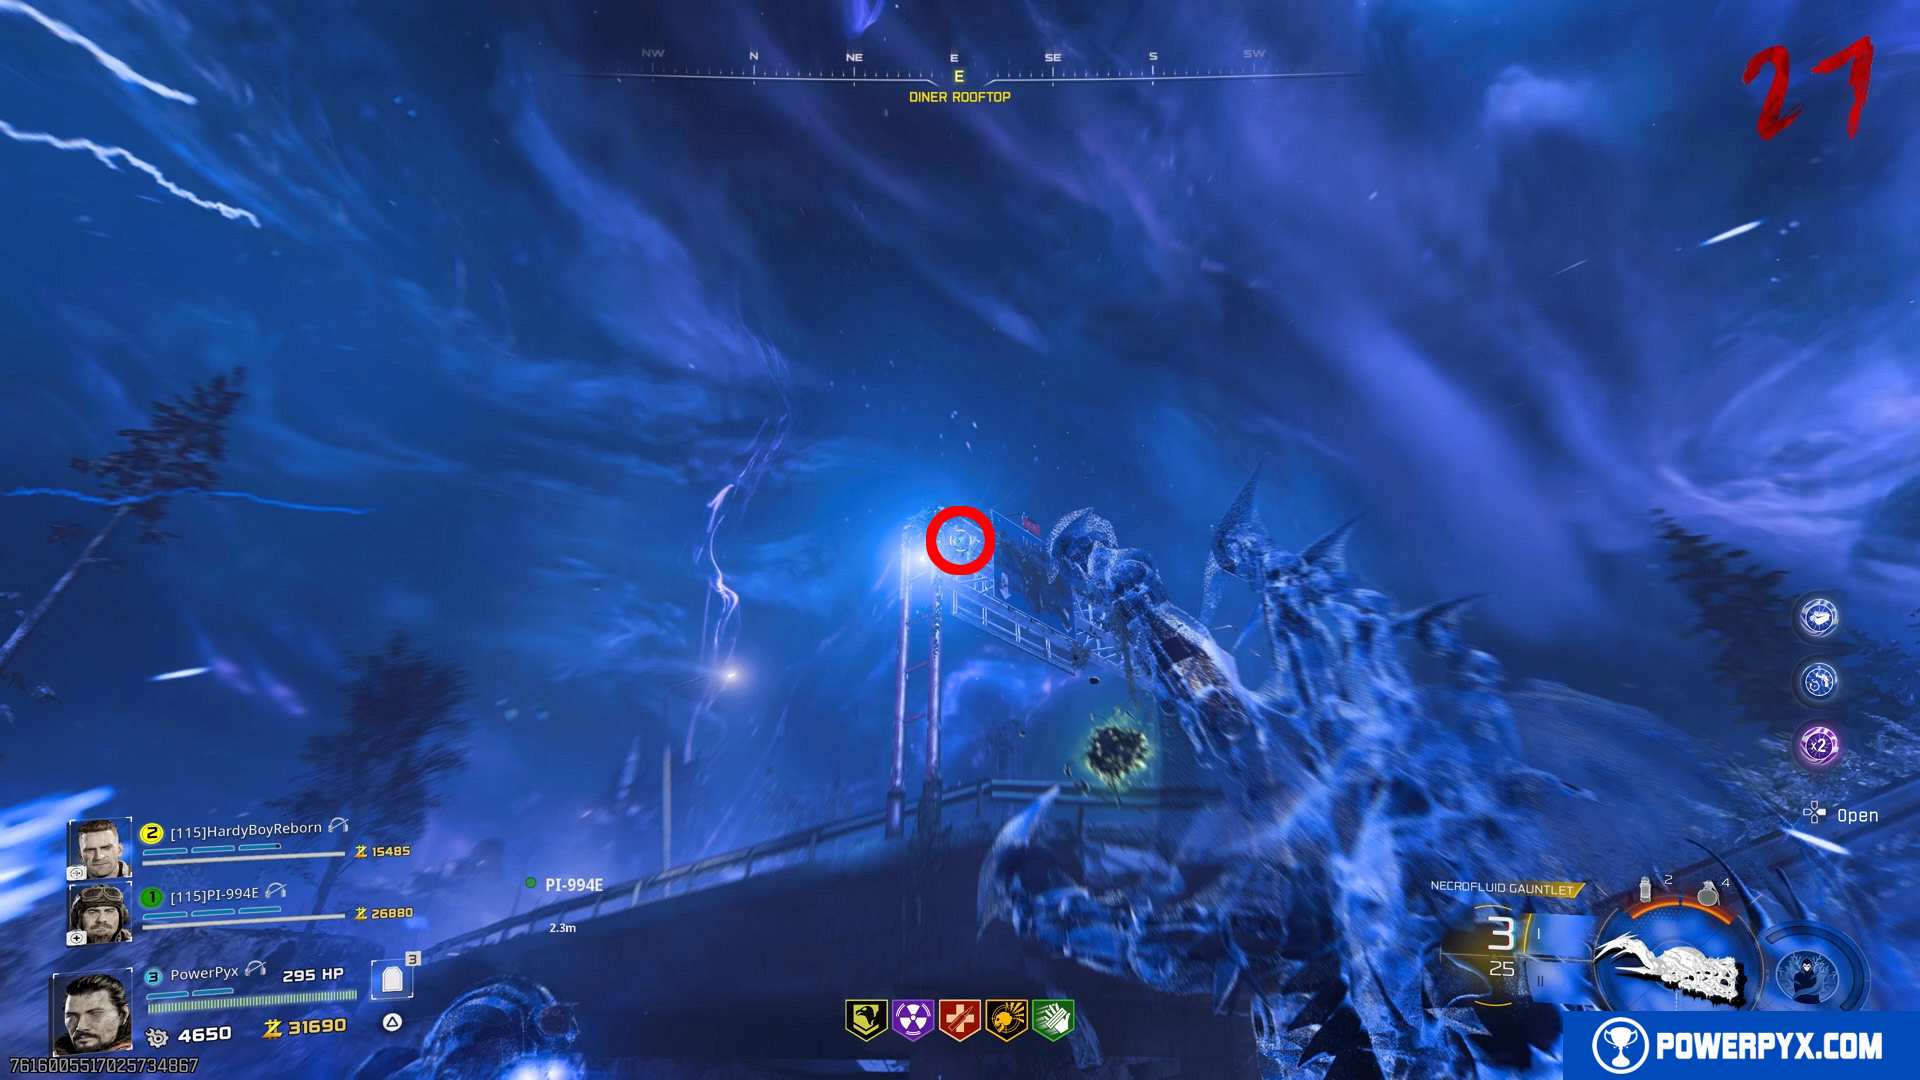
Teddy 10 – Exit 115 > Diner Rooftop: Climb to the roof of the diner (can climb the red trailer truck on the outer wall of the diner). Stand at the edge of the roof and shoot at the roadsign above the highway.
Step 3: Go to Vandorn Farm and interact with the green portal on the side of the shed where the mystery box and armor wallbuy are. IMPORTANT: DURING THE TRIAL EVERY SHOT COSTS 100 ESSENCE! Avoid using weapons with high fire rate. Go into the trial with plenty of money. Bring Kill Joy (instakill) gobblegum. For the lethal grenade, craft 2 Point Turrets before the trial, these work well in combo with instakill as they don’t consume money on shots. For weapons bring something like a fully pack-a-punched M10 Breacher Shotgun or Ray Gun, or fully pack-a-punched Necrofluid Gauntlet. These do 1 shot kills. Also craft 2 Monkey Bombs as tactical grenades. When you’re fully geared up you can enter the trial.
Step 4: Defeat the 4 rounds of zombies. In Wave 1 kill enough zombies to fill the progress in the top left corner. In Wave 2 kill the HVT, in Wave 3 kill zombies again, Wave 4 is HVTs again. During Wave 1 & 3 it’s best to ignore the special zombies as they take too much ammo to kill. Better to kill the regular zombies. Use your Instakill Gobblegum, put your 2 turret ‘grenades’ on the ground to have them kill everything. Note that you can’t use scorestreaks during the trial (meaning, Sentry Turret scorestreak or DAWG won’t work here).
After the trial you are teleported back to the normal world and you will see the “Trial Complete – Teddy Bear” at the top of the screen.
After you unlocked all 3 relics, the trophy will unlock immediately after exiting the third trial.
Tim L says
Can anyone help with Relics please! PSN Riot715