
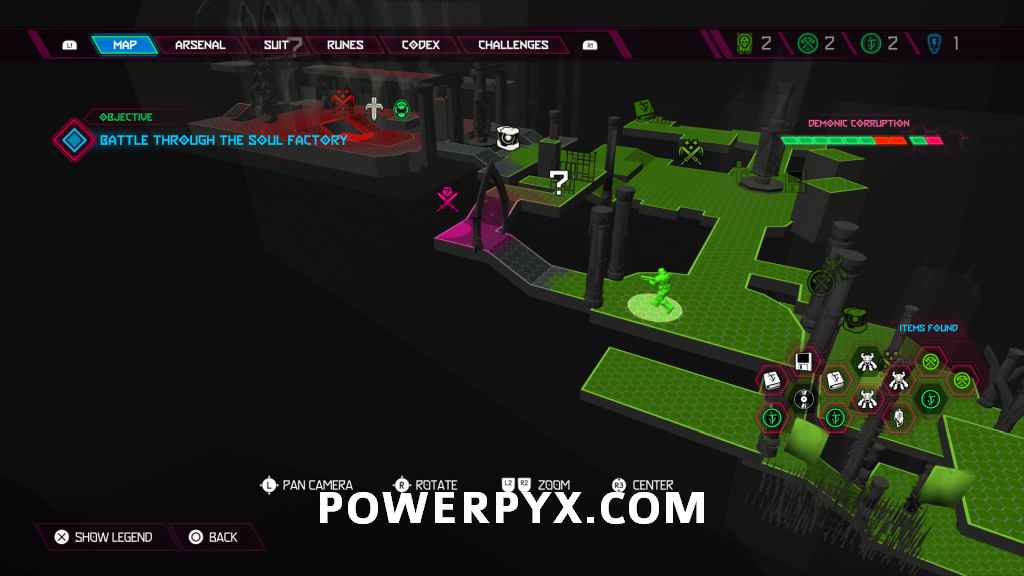
Nekravol is the 10th mission in Doom Eternal and contains 18 collectible locations (3 Toys, 2 Mastery tokens, 2 Codex pages, 1 Cheat code, 1 Sentinal crystal, 1 Albums, 3 Praetor Suit tokens, 2 Secret encounters, 3 Extra Lives). This walkthrough will guide you to all Nekravol collectibles in Doom Eternal. If you missed something you can get it via mission select.
- Toys: 3
- Mastery tokens: 2
- Codex pages: 2
- Cheat codes: 1
- Sentinel crystal: 1
- Albums: 1
- Praetor suit tokens: 3
- Secret encounters: 2
- Extra Lives: 3
All collectibles in this chapter are listed in chronological order. If you miss anything you can use fast travel when it unlocks at the end of the mission to go back everywhere.
Sentinel Crystal #1 – In the first area where you can go left or right through the wall cannons, go to the left to find this crystal.
 |
 |
Codex #1 (Nekravol – Part I) – When you enter the building and kill the group of enemies, jump across the upper platforms instead of dropping down to find this codex.
 |
 |
Extra Life #1 – In the first encounter area open the large door by standing on the button after killing the enemies in the area. Do not go through the big door yet. Instead, use the bars to jump over to where the open window is on the left tower and grab onto the wall next to it. From the wall climb up and jump inside to reach this.
 |
 |
Toy #1 (Baron of Hell) – Drop down the hole in the floor from the above pickup.
 |
 |
Praetor Suit Token #1 – After killing Kalibas, go right in the next room to find this token.
 |
 |
Mastery Token #1 – In the room with the crusher trap, will be on the opposite side from where you enter.
 |
 |
Praetor Suit Token #2 – Follow the path out of the trap room, right in the open.
 |
 |
Automap Station – Drop down to the right of the above token.
 |
 |
Secret Encounter #1 – Immediately after the last Praetor Suit Token you’re supposed to jump across a gap in a wide room (it has people in cages everywhere). From the ledge near the Praetor Suit Token, you can drop down and turn around to find a gap to dash to (opposite direction of where you’re supposed to jump for story progress). Once in that gap you can’t mis the Secret Encounter.
This encounter spawns a Soldier to the right and a Hell Knight to the left, and you only have 10 seconds to kill both. If you have the Unmakyr at this point it’s a very good choice for the Hell Knight, or just put whatever strong weapon you have into it.
 |
 |
Toy #2 (Gladiator) – Just up and around the corner from the Secret Encounter location.
 |
 |
Extra Life #2 – After the fourth encounter room where you have to then jump around a corner to grab a wall, go left down the hallway to find this.
 |
 |
Toy #3 (Doom Hunter), Mastery Token #2 – Before the fifth encounter room you walk under two crusher traps. On the right wall under the first trap you can break through to find this item. The Mastery Token is sitting immediately next to it.
 |
 |
Cheat Code #1 (Famine Mode) – After using the first switch on the left and going through the second set of crusher traps on the right, drop down the hole in the room that follows (cages moving upwards).
 |
 |
Codex #2 (Fuel the Eternal Flame – Part I) – Instead of going left to activate the second skull switch, go around the corner to the right.
 |
 |
Secret Encounter #2 – After activating both green skull switches to open the door to progress, go back two rooms before Toy #3 & Mastery Token #2. Now the gate going to this Secret Encounter point will now be open. It’s similar to the prior encounter, except it spawns a Baron of Hell to your right and two Zombies behind and you have 30 seconds. Pump whatever you can into the Baron as fast as possible, then clean up the Zombies quickly after.
 |
 |
Album #1 (KEEN – You’ve Got to Eat Your Vegetables) – Up the stairs around the corner from the Secret Encounter start point.
 |
 |
Extra Life #3 – In the final encounter room, use the bars on the side of the middle area to jump to the platform at the back, then over to the platform with this pickup.
 |
 |
Praetor Suit Token #3 – Directly in your path, before you punch the statue down to get to the end of the level, can’t overlook it.
 |
 |
That’s 100% of the collectibles you can find in Nekravol of Doom Eternal.
Next Up: Nekravol – Part II
For all other Missions, check out the complete Doom Eternal Collectibles Guide.
Leave a Reply