
Final Fantasy VII Remake INTERmission Yuffie DLC Trophy Roadmap
- Estimated trophy difficulty: 6.5/10
- Approximate amount of time to 100%: 15-20 hours
- Offline Trophies: 9 (4
 , 5
, 5 )
) - Online Trophies: 0
- Number of missable trophies: 0 (there’s Chapter Select after the story, can go back everywhere)
- Glitched trophies: Nothing Yet
- Does difficulty affect trophies?: Yes, must beat the game on Hard Difficulty (unlocked after finishing the story on any difficulty)
- Minimum Playthroughs: 2 (Easy difficulty, Hard difficulty)
- Free-Roam / Level Select after Story?: Yes there is Chapter Select but there’s no traditional Free Roam (Chapters are linear and disconnected from each other). You can go back everywhere and get all missing collectibles and trophies through Chapter Select. All your progress, equipment, collectibles and character level carries over into Hard Mode.
- Release Date: June 10, 2021
 , 5
, 5 )
)Introduction
Welcome to the Final Fantasy VII Remake INTERmission Yuffie DLC Trophy Guide! This is the first expansion for Final Fantasy 7 Remake Part 1. It consists of 2 Chapters that take around 5-6 hours to beat including side content. Nothing is missable, there is Chapter Select after the story, just like in the main game. Hard Mode isn’t available from the start, you must beat the story one time on any difficulty (Easy or Normal) to unlock Hard. That’s why 2 playthroughs are necessary. After your first playthrough you should grind XP in the Combat Simulator to reach Level 50 which takes 1-2 hours. Then your hard playthrough will take around 4 hours if you skip cutscenes. The 2 Combat Simulator bosses Weiss & Mk 0.5 are the hardest challenge, they can take a few hours of trial and error and are comparable to the hardest bosses in the main game.
Step 1: Easy Difficulty Playthrough – Collectibles (Happy Turtle Flyers), becoming Fort Condor Grandmaster
After installing the DLC you must press  in the title screen to start it. Play through the 2 Yuffie Chapters on easy. Playing on easy is recommended to make the Fort Condor minigame easier. Along the way do the following trophies in this order:
- Chapter 1 –
 Turtle-tastic
 - Chapter 1 – Game, Set, Master
- Chapter 2 – Materia Maven
The Chapter 1 trophies take place in the Residential Area. One is for beating all 7 opponents in the minigame “Fort Condor“, the other is for finding all 6 Happy Turtle Flyers in the town. The Chapter 2 trophy is for beating the Shinra Box Buster Challenge.
If you like (optional), you can also follow the Yuffie Intermission DLC Collectible Guide. The Collectibles aren’t needed for trophies (except Turtle Flyers) but being fully geared up with all Weapons and Materia is good preparation for the hard playthrough.
Step 2: Chapter Select to Chapter 2 and grind XP / AP in Combat Simulator to reach Level 50
After the story you unlock Chapter Select (System > Chapter Selection). Load up Chapter 2, in the first hallway a new Combat Simulator will now be available. Replay the first Challenge for 1-2 hours to reach Level 50. Also use the Weapon with the most Materia Slots available, buy additional slots from the weapon upgrade menu, and slot in as many Materia as you can. This allows you to level up Materia at the same time (especially HP Up, MP Up, Magic Up, Healing, Barrier, Elemental). Without this you wouldn’t stand a chance in hard mode.
Step 3: Hard Difficulty Playthrough, Hard exclusive Trophies
Now that you’re Level 50 replay both chapters via Chapter Select (System > Chapter Selection). Also beat all Fort Condor players again on hard!
Step 4: Pride and Joy Mk 0.5 & Weiss Bosses in Combat Simulator
At this point you only have two trophies left for beating Pride and Joy Mk 0.5 & Weiss.
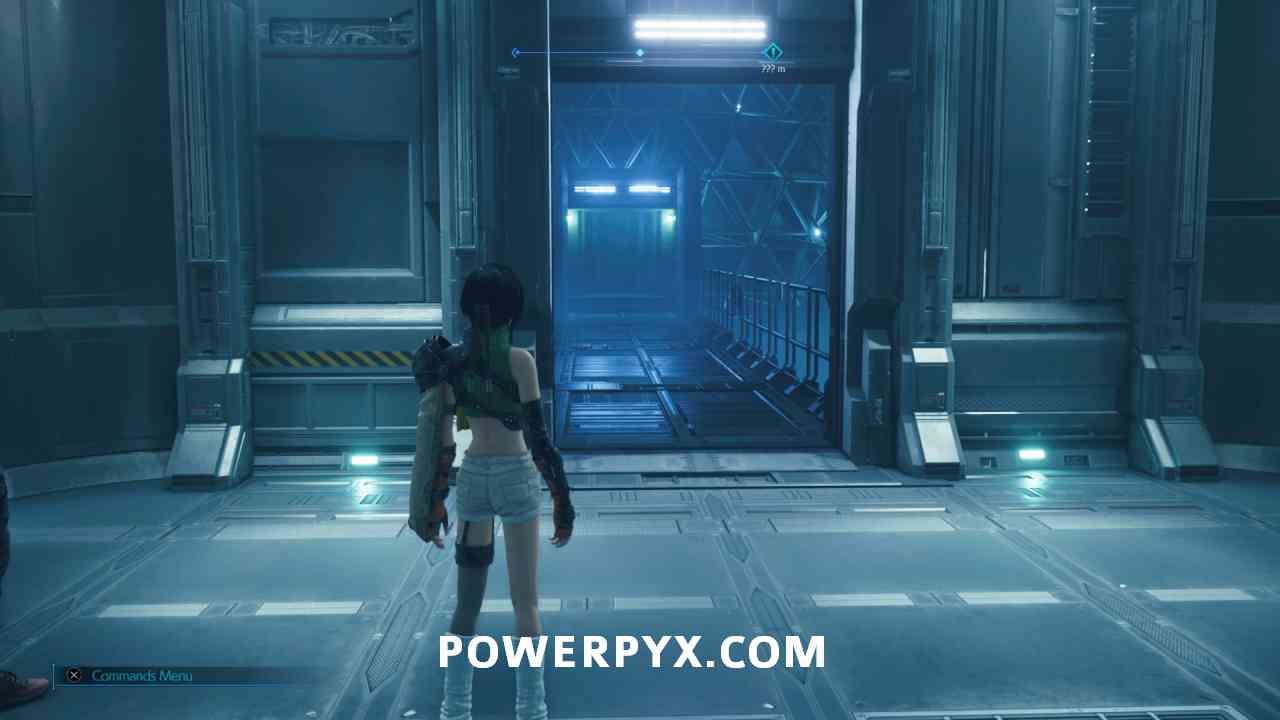
Pride and Joy Mk 0.5 is found in Yuffie Chapter 2 Combat Simulator (in the first hallway where the chapter starts).
Weiss is found in Remake Part 1, Chapter 17 Combat Simulator (in the main game, not in the Yuffie DLC). You will fight him with Cloud / Tifa / Aerith (not with Yuffie).
Tips, Tricks and Guides:
- Yuffie – Collectibles Guide
- Yuffie – Happy Turtle Flyer Locations
- Yuffie – Fort Condor Minigame Guide
- Yuffie – Shinra Box Buster Challenge Guide
- Yuffie – Chapter 1 Walkthrough
- Yuffie – Chapter 2 Walkthrough
- Yuffie – Weiss Boss Guide
Final Fantasy VII Remake INTERmission Yuffie DLC Trophy Guide
For Main Game Trophy Guide see:
» Final Fantasy VII Remake (Main Game) Trophy Guide & Roadmap
 |
Takes Two IDs to Tango Complete Chapter 1 of INTERmission. |
 |
| Automatic story-related trophy, cannot be missed. | ||
 |
Out of Darkness’s Clutches Complete Chapter 2 of INTERmission. |
|
| Automatic story-related trophy, cannot be missed. | ||
 |
The Road to Revenge Complete both chapters of INTERmission on Hard difficulty. |
 |
| After beating the Yuffie Intermission DLC for the first time (2 Chapters), you will unlock Hard Difficulty. It doesn’t matter on what difficulty you beat it first, Easy is enough.
Then after the story go to System > Chapter Selection and replay the chapters on hard. You keep all your progress. Before attempting this, it is highly recommended you grind to Level 50 in the Combat Simulator at the start of Chapter 2. It’s in the first hallway where Chapter 2 starts, wasn’t available on your first playthrough (only available after beating the story). Keep grinding the first Combat Challenge for 1-2 hours to reach Level 50. You also earn AP in the process for upgrading your Materia. Be sure to equip HP Up / MP Up / Magic Up Materia as well as other useful ones. This will level them up along the way. You can always come back and grind more if you need. When you’ve leveled up enough beat both Chapters again on hard. You can use Chapter Selection right away when you’re done grinding, no need to play to the end of Chapter 2 again. You can jump between Chapters any time without losing progress. The difficult sections are the bosses, the normal enemies aren’t too much trouble. Just conserve your MP during the chapter, because sleeping at benches does not refill your MP! To heal it’s better to use Chakra & Prayer Materia in between enemies. See the Yuffie Collectibles Guide for all Materia, Armor, Accessory Locations. General Loadout for enemies between bosses:
Boss #1 – Gigantipede
With Yuffie constantly cast/refresh Haste (Time Materia) on both characters. Use Sonon to heal with Curaga and refresh Barrier (halves physical damage) on Yuffie. Sonon plays support/healer here. Also cast Chakra and Prayer when possible to heal up, they don’t cost any MP. With Yuffie you’ll want to attack the tail to stay out of harm’s way, Sonon will usually focus on the head by himself. When the boss stops for a moment to put his head down, attack the head with Yuffie too. The head is the weakspot and you deal more damage to it, but you will also get hit more often from it. When the boss shoots homing rockets, make sure you cast Barrier on Yuffie to half all physical damage. Destroy the little drones summoned by the boss as quick as possible, then focus on his head and summon Ramuh when he’s ready. Once Ramuh is summoned use his 2ATB summon ability constantly, it deals good damage. Boss #2 – The Crimson Mare (Scarlet)
Try to conserve as much MP as possible here. Only cast Haste (Time Materia) with Yuffie, it doesn’t cost much MP and you regain some MP over time. You will need all your MP for the 2nd boss “Nero” in this chapter, he is much harder. The Crimson Mare is easy in comparison. Start by destroying the turrets around the room with Yuffie. Then target Scarlet with abilities, Windstorm is good as it can hit from afar and deals AOE damage (thus also damaging The Crimson Mare). With Yuffie you’ll want to keep your distance, playing at close range will only get you hit. So use Ninjutsu with Yuffie (throw Shuriken Boss #3 – Nero
Nero is the hardest boss. He starts out easy but gets more punishing in his 2nd phase. If you conserved your MP during the Crimson Mare boss you should have an easier time though. Yuffie should constantly spam Windstorm on him. First |
||
 |
Turtle-tastic Collect all the Happy Turtle flyers. |
|
| Turtle Flyers can be found during Chapter 1. Talking to the quest giver “Old Snapper” is a main objective, so you will activate the quest for it automatically.
» Final Fantasy VII Remake (Yuffie DLC) – All Happy Turtle Flyer Locations |
||
 |
Game, Set, Master Become the Fort Condor grandmaster. |
|
| Fort Condor is a minigame that requires you to defeat 7 NPC players during Chapter 1. See the guide below for their locations & tactics to win:
» Final Fantasy VII Remake (Yuffie DLC) – Fort Condor Guide (Player Locations & Best Strategies) |
||
 |
Condor Queen Become the Fort Condor grandmaster on Hard difficulty. |
|
| After beating the Yuffie Intermission DLC for the first time (2 Chapters), you will unlock hard difficulty. Go to System > Chapter Selection > select Chapter 1 to replay it. After you meet Polk, the boy who plays the tutorial match with you, there will now be Rank 5 Opponents on the map. They are the same people as before but are now Rank 5 instead of Rank 1.
The rules on hard are a bit different: On Hard mode, opponents will use modified boards that give them more of an advantage, and victory conditions will also be more difficult to meet. On Hard mode, you only win if you destroy the opponent’s headquarters; any outposts destroyed don’t count. Sudden Death will also be limited to 1 minute and if you do not destroy the opponent’s headquarters in that time, you will lose the match. Beating Hard Mode players will reward you with Manuscripts to upgrade your weapons and unlock new skills. See the guide below for recommended decks, videos and best strategies: » Final Fantasy VII Remake (Yuffie DLC) – Fort Condor Guide (Player Locations & Best Strategies) |
||
 |
Materia Maven Obtain all materia available from Shinra Box Buster challenges. |
|
| » Final Fantasy VII Remake (Yuffie DLC) – Shinra Box Buster Challenge Guide | ||
 |
Ultimate Weapon 2.0 Defeat the Pride and Joy Mk 0.5. |
|

Pride and Joy Mk 0.5 is the boss in the Chapter 2 Combat Simulator in the Yuffie Intermission DLC. The Combat Simulator unlocks after beating the DLC for the first time on any difficulty (beating it on easy is enough). Then you unlock Chapter Select under System > Chapter Selection. Load up Chapter 2 and the Combat Simulator will be in the first hallway where you start:
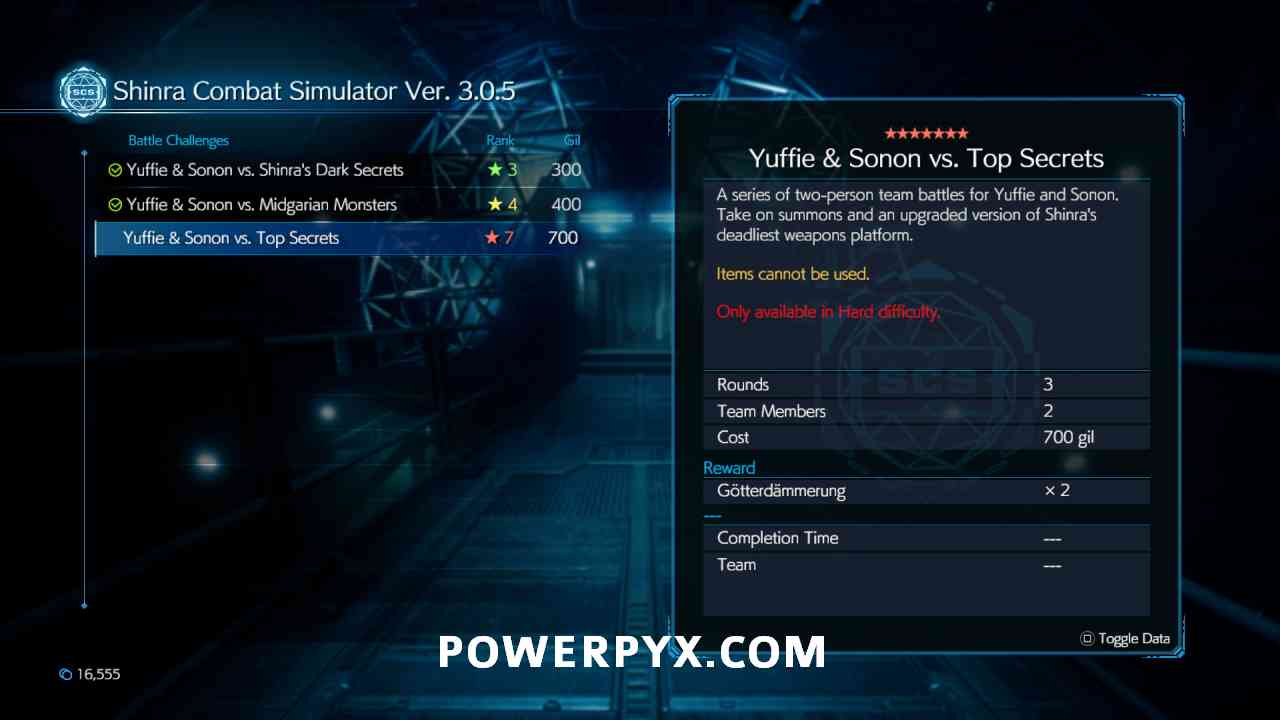
You must beat the first two challenges to unlock the 7-star challenge called “Yuffie & Sonon vs. Top Secrets”. This Challenge has no Easy/Normal option, there’s only one Hard version. It’s quite challenging. You should first grind to level 50 by replaying the first challenge for 1-2 hours. This also earns you AP to level up your Materia. Also become the Fort Condor Champion on hard difficulty first, doing so rewards you with several Manuscripts to fully level up your weapons and buy their skills, which makes it a bit easier. See the Yuffie Collectibles Guide for all Materia, Armor, Accessory Locations. Recommended Loadout:
Do NOT assign Auto-Cure Materia to Sonon, it would constantly drain his ATB charges. You need all of Sonon’s ATB to spam Synergized Art of War ability. For the 1st and 3rd round you should always be Round 1: Bahamut & Ifrit Bahamut will have a countdown from 5 to 1 and then casts Megaflare which deals 9999 damage and can kill you in 1 hit. But having the Reprieve weapon skill or casting Manawall (Barrier Materia) will let you survive this. If you’re quick you can finish Bahamut before he uses Megaflare (see video). At half health he will summon Ifrit. When he does this, focus only on Ifrit until he’s dead (he doesn’t have much health). That’s also why you should equip Elemental-Ice on Yuffie, because Ifrit is weak to Ice. If you finished the Pride and Joy boss in the main game you’ll already be familiar with this, it’s the same fight. Start by casting Haste (Time Materia) on both characters. Press When Ifrit spawns you use the same attack strategy on him. Don’t worry too much about getting hit, you have to be very aggressive to kill Ifrit quickly. Apply Manawall on Yuffie just before Bahamut reaches half-health, thus you only take half damage. Always refresh Haste when it runs out. Also summon Ramuh when Ifrit spawns. Keep doing Synergized Art of War on Ifrit and/or Limit Breaks to kill him quickly. Then finish off Bahamut with the same tactic as before. If Bahamut has finished his “One” countdown it means he’ll use the Megaflare (9999 damage) soon. If you can’t kill him before then, focus only on reapplying Manawall on Yuffie and keeping her at full health (evade attacks in the meantime). Sonon will get killed by the Megaflare, so Yuffie must use Raise (Revival Materia) if that happens. Round 2: Ramuh Ramuh doesn’t have much health, but he has some very aggressive attacks. Worst of all are the electric spikes he puts on the floor, if you accidentally touch them or even dodge into them you get stunned and he will likely kill you thereafter When he teleports to you, he often follows up with 3 melee attacks, to avoid these spam He is weak against Yuffie’s Windstorm ability. I found it better here to not synergize with Sonon, the reason being that the Synergized Windstorm only works at close range. The solo variant is much better – do one It’s also good to practice Ramuh in the Chapter 1 VR Mission on Hard a few times. Better to replay the first 10 minutes of the first Chapter than failing here repeatedly and having to replay Bahamut 20 times. Round 3: Pride and Joy MK 0.5 Like Pride and Joy in the other Combat Simulator Challenge, this is the easiest of the 3 bosses. He will start by grabbing Sonon. Focus on MK’s hand (use left stick to change target) and do After Sonon is free from the hand, you will want to Synergize with him for the rest of the fight. Apply Haste to both characters and use Synergized Art of War whenever both characters have 1 ATB bar ready. Keep healing if you fall below 3000 health and unleash your Limit Breaks when they are charged. |
||
 |
Corrupter of the Immaculate Defeat Weiss. |
|
| » Final Fantasy VII Remake (Yuffie DLC) – Weiss Boss Guide | ||
 and then press
  for Ninjutsu). Sonon plays healer here. Always save his 2ATB to cast Prayer. With Yuffie you switch between using the abilities Chakra to self-heal and casting Windstorm to damage Scarlet. Once Scarlet’s health is down, The Crimson Mare will be stunned and you can unleash your attacks. The Crimson Mare will switch its loadout throughout the fight, it will use ranged laser attacks at one point and then a shield/sword. When it uses lasers get close to it and try to dodge behind it. When it uses a shield-rush try to block it. If you run really low on health, it’s okay to cast a Curaga (Healing Materia) with Sonon, but remember to conserve as much MP as possible for the next boss (1-2 Curage are fine here). Once Ramuh is ready to be summoned your Limit Breaks should also be ready, this should quickly take down any health The Crimson Mare has left.
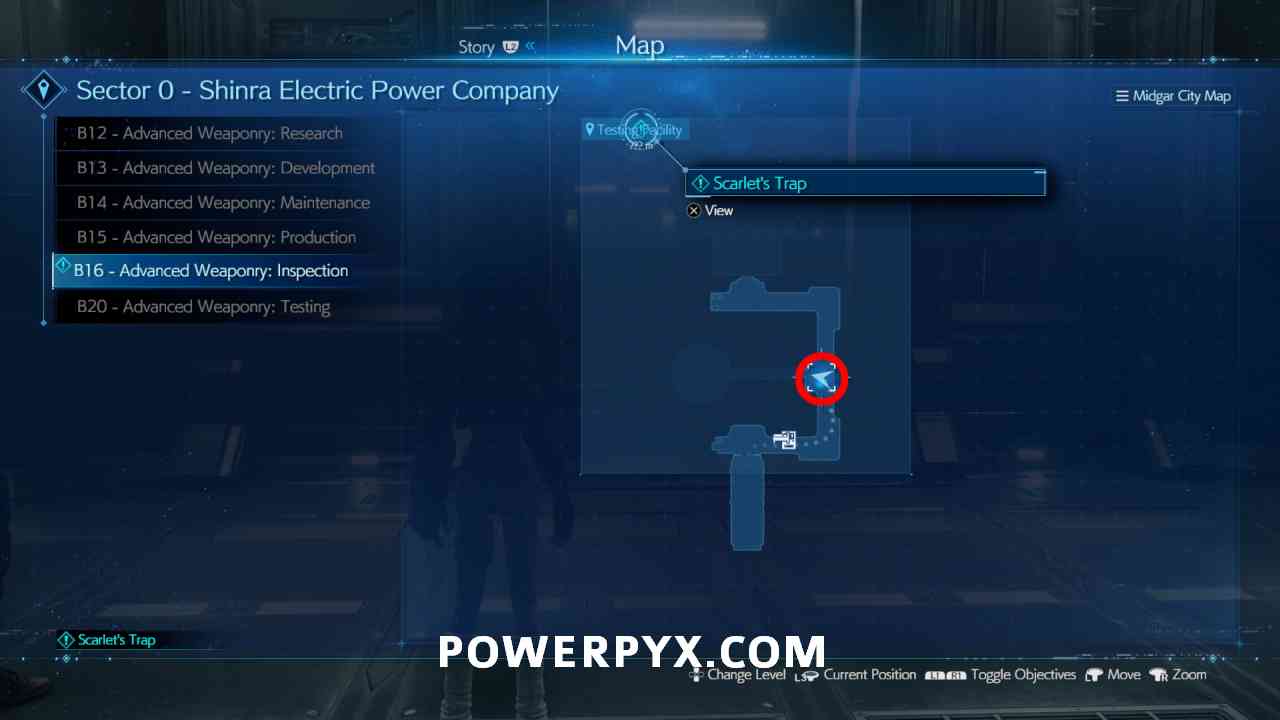
 + press
  to evade attacks more easily).
 Synergized to Sonon.
Main Game Trophy Guide:
» Final Fantasy VII Remake (Main Game) Trophy Guide & Roadmap
Dince says
For Condor Queen (Fort Condor Grandmaster on Hard), what worked for me was putting a barracks at one gap, then a shock trooper at the other. When the shock trooper gets to an outpost, put a guard dog in the middle, as far up as you can, he should go straight to the headquarters. Then just spam shock troopers and guard dogs and use thunder on headquarters.
PowerPyx says
Good tip, this worked for me too on the first try!
Sayed Aboalhassan says
Simulation is pretty hard, I defeated bahamut twice in like 15-20 tries but as soon as I reach Ramuh Im low on MP and he wipes me out with his ultimate before I could stagger him.
Im gonna try a different approach later, i’ll stay tuned for when you drop the guide on this.
Sayed Aboalhassan says
Just finished the pride and joy 0.5 trophy man its pretty hard but with practice everything is achievable.
Matthew says
Hey! So how difficult did you find Weiss and Pride and Joy MK 0.5? Hoping the Fort Condor mini game isn’t to grueling… especially on hard but can’t wait to get to this and Rift Apart after Biomutant!
PowerPyx says
Haven’t beaten them yet, that’s why the difficulty is still pending. I gotta grind out a few more AP & Manuscripts, then will finish my hard run, then the last 2 bosses. The Mk 0.5 boss has a Bahamut again leading up to it, but this time you gotta kill it with only 2 chars in your party (Yuffie & Sonon) and not 3 characters.
They both seem pretty hard, in line with the hardest bosses from the main game.
Apple Jinx says
Is the shinra box challenge any different on hard mode? Do I get anything special like exclusive gear or manuscripts from it?
Red says
Nope, it will stay the same way you left it in normal mode.
ronald says
I can’t find one on PS4? FF7R available for PS4?
PowerPyx says
It’s a PS5 exclusive. The DLC isn’t available on PS4. Only on PS5 with Intergrade edition.
Sepheroithisgod says
Pro tip for fighting Weiss, use the Carbuncle Summon the moment he casts Imaculate End. It will raise your party when you die.
cenbarter says
sorry if i’m off-topic.
do i still get free platinum once i download my platinum save file even if i unlocked some of the main game trophies trough intermission dlc??
thanks!
PowerPyx says
Yes.
I started the DLC first and unlocked some main game combat trophy in the first Yuffie enemy encounter. Then I synced my main game save later and it popped the platinum just fine 🙂
Shoog says
For Pride & Joy I’d recommend elemental+fire on Yuffie’s armor instead. You can basically ignore Ifrit after he’s been summoned and continue working on Bahamut. And you can use Ice Ninjutsu to attack Ifrit anyways.
Not to mention if you get the elemental materia leveled up all the way Ifrit will heal you. As will the fire patches on the ground during the Pride & Joy fight.
BodyChipper says
Is the standalone DLC pack available yet for purchase, or does it only show up in the store once you have upgraded to the PS5 version of the game? I have not installed FFVIIR on my PS5 but do own the full digital PS4 version. I just didn’t see a way to buy the DLC by itself for the supposed $19.99 yet in the store online.
Dazman says
Nope, you have to d/l the upgraded PS5 version of the game and then you’ll ne able to buy the DLC 🙂
BodyChipper says
nm, it comes right up in the menu once you install and upgrade on the PS5. sorry, but I did not see it in the PSN store by itself when searching online prior to that, I should have known it would be in the game menu.
Looking forward to starting this tonight.
BodyChipper says
For AP grinding:
Yuffie’s Ninja Gauntlet doubles the AP for any materia slotted, so with an AP boost linked too you will get triple the normal AP while you can get double on the 3rd slot, and yet another with your other AP boost slotted in your weapon.
The first sim gives you 82 AP, so that’s 246 AP on whatever you triple boost (preferably elemental) per run and with first strike maxed and windstorm you can easily do a run in a minute w load times.
I maxed most materia this way at the 11 hour mark as prep for Pride and Joy Mk .5.
BodyChipper says
I take it back on the 3x boost, it seems to still be only doubled even with AP boost added, or at least is not consistent. But this does still mean you can get 2x the AP on 5 materia at once, 3 on the gauntlet, 2 w AP boost linked.
Hawkwind666 says
I’m having a lot of trouble beating Nero on Hard. He does a move called Soul Erosion which seems to be an instant kill. I haven’t found a way to interrupt it or dodge it. He uses it twice in a row sometimes as well. How do you deal with it.
PowerPyx says
Equip weapon with Reprieve skill, which lets your survive killing hits with 1 HP.
Or try casting Manawall/Manaward (Barrier Materia), which halves the damage taken (have full HP before his attack).
Dina says
Also, use Brutal Form to evade that attack, or try and interrupt it by getting Sonon to use an ability (Not Twirling Lunge, the other one).
anonymous says
Revival earring + reprieve
Berzerkgod313 says
Everywhere I read about the the Pride and Joy MK 0.5 fight they say Pride and Joy is the easiest part, but I can’t for the life of me beat him, can’t even get close. I’ve beaten Bahamut and Ramuh at least a dozen times each, but can’t get anywhere with Pride and Joy, really don’t get how people are saying its the easiest part of the fight, it’s kind of annoying to be honest.
phillip says
When pride and joy kills one of your people use arise immediately . Rinse and repeat he is slow and will eventually go down.
Tev says
Manuscripts? Everywhere says only 14 but the game playlog says there is 28. Im confused
KiryuChanKawaii says
Will you guys update the guide when the PS5 patch drops next week? If Streamlined Progression (the ability to keep HP and MP topped up, and always hit for 9,999 damage) doesn’t affect trophies, then it trivialises the platinum.