
A Shadow in the Void is the 159th main mission in Crimson Desert. This walkthrough will guide you through all objectives of the A Shadow in the Void main quest.
- Starting Location: The Abyss (Sky Map)
- Chapter: 12 – The Abyss
- Sub-Chapter: The Void
- Requirement: Finished previous main quest Forbidden Gate
- Reward: Twisted Verdict (Weapon – Two-Handed Sword)
- Quest Description: Caliburn vanished along with the Abyss gate created by Grundir. Move to the Abyss and go after Caliburn, who must be somewhere within.
Objectives:
- Head to the Abyss
- Pursue Caliburn
Head to the Abyss
Note: before starting the quest, load up on 200+ Grilled Meat and 5+ Palmer Pills for the next bosses.
At the end of the previous quest, Caliburn will have disappeared to the Abyss, but there’s no direct portal to follow him. This can be confusing, the quest marker points to the sky but the game doesn’t show how to reach him.
To reach Caliburn, you’ll have to solve the Monolith Crown abyss puzzle, then you can use the skybridge in Crescent Skybridge. We’ll go through it step by step. If you’ve already repaired Monolith Crown, you can skip to Step 7.
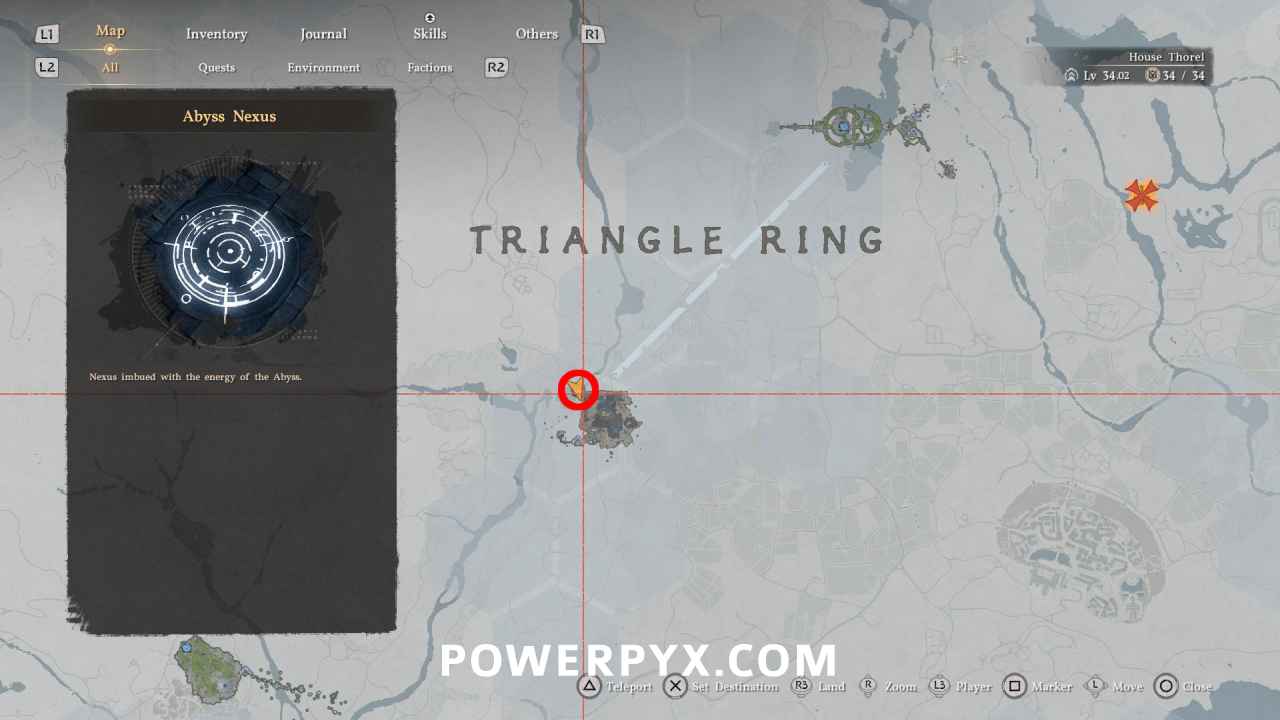
Step 1: Open the map, press  / Mouse Wheel to open the sky map, locate Triangle Ring in the middle of the map, travel to Crow’s Nest where you fought the Crowcaller boss at end of Chapter 5.
Step 2: From the Crow’s Nest fast travel point, go forward past the tree and to the right to find a skybridge. Activate it (shoot Axiom Force  / TAB key at it and turn it until it glows blue). Enter the teleporter at the end of the path. This teleports you to Monolith Crown.


Step 3: When you arrive in Monolith Crown, do 3 midair Force Palm (jump and / Mouse Wheel) and glide over the wind turbines. Activate the fast travel point. MAKE A MANUAL SAVE HERE (to reload if you make a mistake in the puzzle).

Step 4: In the back left corner of Monolith Crown, drop down to the small floating island. While standing on this island look up and use Axiom Force on the (hold / TAB key) glowing ring in the floating cube. This starts the puzzle.


Step 5: The view will switch to a big cube with lasers on it. To solve the puzzle all lasers must hit one of the orange buttons on the walls. Each time you move the cube up/down the lasers will shift down unless you spin the cube fast enough.
The quickest solution is: UP (let lasers fall) > UP (let lasers fall) > UP (let lasers fall) > LEFT > LEFT > UP (fast, don’t let lasers fall) > UP (let lasers fall).
So: UP > UP > UP > LEFT > LEFT > UP (fast) > UP.
If you make a wrong move the puzzle will get fumbled up, just reload your manual save (or autosave) to redo it.

Step 6: When all cube lasers hit the buttons you automatically quit out of the cube view. Jump back up and use a jumping force palm on the big cog on the floor. This completes the Abyss repair (you get an artifact).

Step 7: Follow the now-open path behind Monolith Crown through the Skybridge. Go over the floating platforms until you reach the teleporter, it will bring you to Crescent Skybridge. Go to the east end where the two blue skybridges are marked on the map (use jumping force palm to get over the gap). Now you can activate the northern skybridge, repairing the Monolith Crown activated it.


Step 8: Platforms will appear through the skybridge. Follow them and enter the Abyss Gate at the top. It teleports you to a new area called Dimensional Bonds.
Step 9: In this new area, glide over the platforms, then stick to the right side and hit the big cog on the wall with Force Palm ( / Mouse Wheel). This activates the teleporter in front of it. Step inside and you will arrive where Caliburn is.


Step 10: Where the teleporter drops you off, interact with the big front gate to enter the boss fight.

Warning: before stepping through the gate, keep a manual save and make sure you are very well prepared. Bring 200+ Grilled Meat, 5+ Palmer Pills for revives, have your gear upgraded as far as possible, and upgrade health stat to at least level 10. You will have multiple boss fights in a row. If you quit out after the first boss, it will spawn you far away and you can’t enter the gate again. If you get stuck you’ll have to reload your manual save and redo the first boss “Corrupted Caliburn” as well.
Pursue Caliburn
After entering the gate you will see Caliburn in front of you. Approach him to start the boss fight.
Corrupted Caliburn Boss Fight
Corrupted Caliburn is a human boss with 3 healthbars. He will often summon shadow copies of himself to attack you with sword slashes and stab attacks.
Most of the fight will be spent dodging the shadow copies that attack you. Whenever these aren’t attacking you, focus on dealing damage to Caliburn. He will do some sword slashes himself, and sometimes he floats in the air to shoot you with a bow. Sometimes he disappears and drops explosives on the floor but those are easy to dodge.
Whenever he stands still, it’s best to dodge behind him, land a heavy attack combo and follow up with light attacks. Dodge his next wave of shadow copies, rinse and repeat. In his 2nd and 3rd phase he still uses the same attacks, but he will spam the shadow copies much more frequently and you have less time to attack him. As long as you’re always dodging till he stands still, you can tank through his melee damage by healing while dealing him damage. His most damaging move is a jumping sword attack which takes most of your health in one hit, but if you’ve invested time into refining your equipment and upgrading your health stat this fight isn’t too bad. Bring 100 grilled meat as usual.
This finishes A Shadow in the Void in Crimson Desert.
For all other Quests refer to Crimson Desert Walkthrough.
Leave a Reply