
Horizon Forbidden West (HZFW) has 15 Melee Pit Challenges. This walkthrough will guide you through each challenge. Winning all Melee Pit Challenges is required to fight the Tenakth melee master known as the Enduring. Defeating the melee master also unlocks “The Enduring” trophy.
The 15 Challenges are scattered across 4 different Melee Pit Locations. Each Pit has between 3-5 challenges. The last challenge at each is always to defeat the Pit Master, which unlocks after doing all other challenges at the Pit. Each Pit Master gives you a medal, once you defeated all 4 Pit Masters you can track the Errand “The Enduring” to get a waypoint to the melee master. That’s like a secret boss for having mastered all Melee Pits. The pit challenges are little melee combo tutorials where the game teaches you how to connect basic attacks into longer combos.
None of the Melee Pits are missable. You can still find all of them after the story in free-roam. They get marked by a “two crossed spears” icon on the map once discovered. Talk to the Pit Master to start the challenges. There is a timer for each challenge but if you take too long you can retry immediately, it doesn’t cost anything. Playing on Story difficulty makes the time requirement on these challenges easier to beat.
Warning: The Melee Pits require having unlocked the combos in the “Warrior Skill Tree”. You should prioritize buying those skills. If you’re missing a melee skill the challenges won’t be playable! If you need more skill points, play side quests or complete other points of interest marked on the map.
Melee Pit: Chainscrape


Challenge #1: Block Breaker
For this you must have the Block Breaker skill unlocked in the Warrior skill tree.
Simply press 
 repeatedly to perform the Block Breaker Combo until the enemy’s health is depleted.
Challenge #2: Resonator Blast
Keep hitting the enemy until your spear glows blue. Then do any heavy attack to energize the enemy, switch to the bow, shoot the blue energy point on the enemy for a Resonator Blast.
Challenge #3: Pit Master Challenge
Defeat the Pit Master any way you like. The easiest method is to spam the combo from the first challenge.
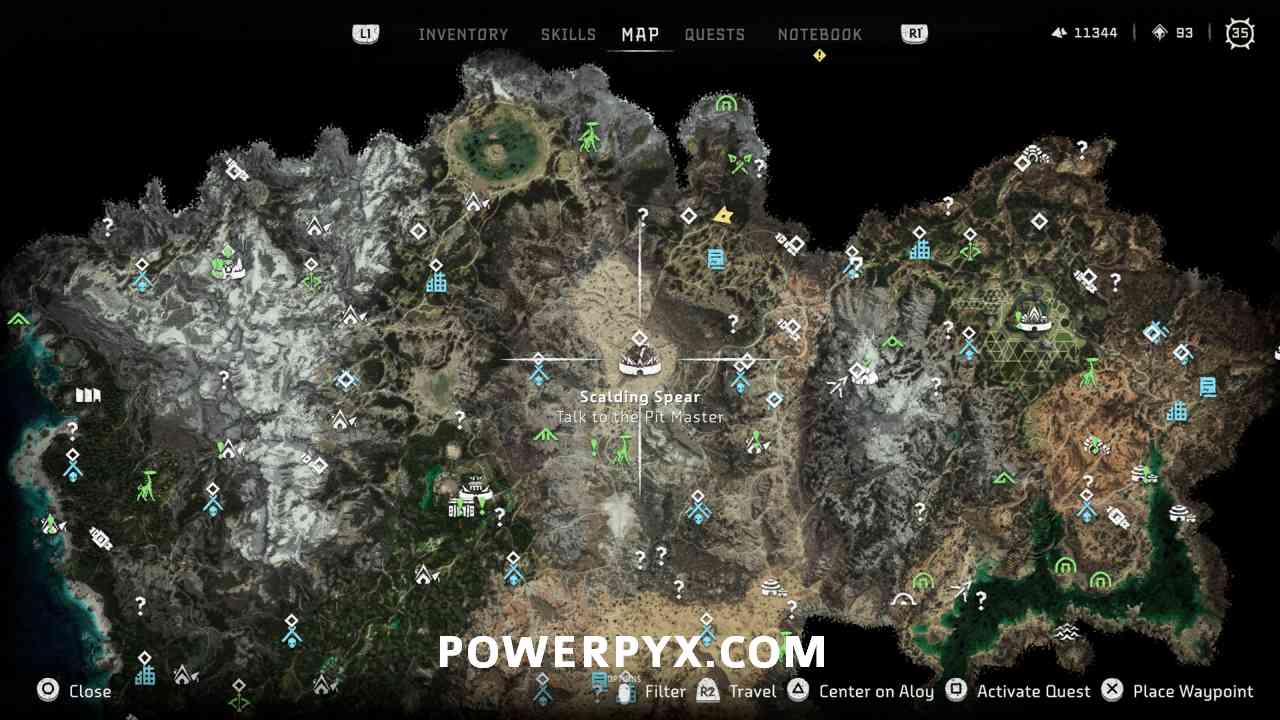
Melee Pit: Scalding Spear

Challenge #4: Warrior’s Wrath
Press > Hold for Heavy Attack > do a Resonator Blast (aim bow and shoot the blue glowing part on the opponent).
Challenge #5: Aerial Punisher
Press > Then aim your bow and shoot it at the blue glowing part on the opponent.
Challenge #6: Pit Master Challenge
Simply spam to defeat the Pit Master.
Melee Pit: The Bulwark


Challenge #7: Jump-Off and Shoot
Dodge an attack  > immediately do a combo with hold > then aim your bow
  and shoot the enemy . You don’t necessarily have to shoot the enemy in midair, it’s okay to land on the ground and quickly shoot him, just gotta be quick and not let too much time pass.
Challenge #8: Seek and Strike
Do one light attack, hold  + hold to jump over enemy > press while falling to land a slam attack on the second opponent.
Challenge #9: Sustained Breaker
Do a Block Breaker > hold then release , hold > shoot the opponent with bow.
Challenge #10: Pit Master Challenge
Defeat the two enemies any way you wish. You can spam simple breaker combos and use your bow when an enemy glows blue.
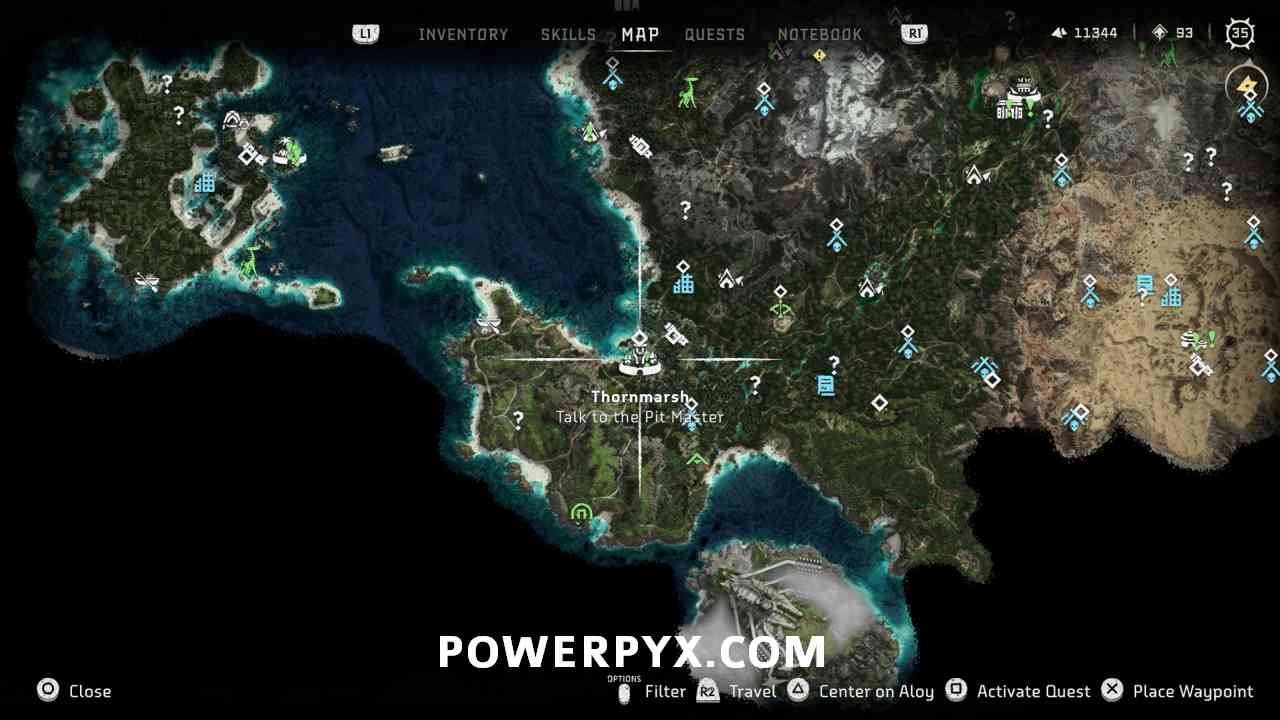
Melee Pit: Thornmarsh

Challenge #11: Destroyer Chain
Hold to land one heavy attack. Then in a new combo: – Pause – – after you finish the combo shoot the enemy quickly with your bow.
Challenge #12: Reap and Clear
Press , wait half a second, press , pull forward in direction of opponent + in a new button press hold and release it, then hold .
Challenge #13: Energy Surge Chain
– wait 2 seconds – hold – hold .
Challenge #14: Power Rush
Hold for a Heavy Attack. Let the animation finish, then hold and release > press (only need to do 2 more quick attacks to finish this combo) > shoot the enemy with bow.
Challenge #15: Pit Master Challenge
Simply defeat the Pit Master any way you wish. You can spam combos on him repeatedly until his shield breaks.
The Enduring Location
After defeating all 4 Melee Pit Masters, the last step is to find and defeat the Tenakth melee master known as “The Enduring”. You can track the Errand “The Enduring” and it will show you a search area in the north of the map, north of Scalding Spear. Look for a tent with black smoke coming from it, there you’ll find the Enduring. See the exact location below:


Talk to the Enduring, follow her to the fight pit and win the match. This completes “The Enduring” side quest and also unlocks “The Enduring” trophy. Additionally, your Spear will now do more melee damage.
That’s all of the Melee Pit Challenges in Horizon 2: Forbidden West (HZFW).
For anything else needed to 100% completion, check out the full Horizon Forbidden West Wiki & Strategy Guide.
adam says
Honestly, this games combo system is REALLy bad. horrizon should have stuck to what it was good at, being a ranged combat system. In melee you can’t control who she targets half the time, combo inputs are hit or miss and often the game doesn’t register them correctly.
I appreciate your effort trying to explain how it’s intended, but problem is it doesn’t work as intended.
nemec says
lol here here, the combo sys is woefull
PhantomFear94 says
This might be a platinum blocker for me. I’ve been an hour and I’m only on the 2nd one I. thornmarsh. These are harder than the MK11 tutorials in my opinion.
PhantomFear94 says
I did it by literally ignoring the on screen prompts. Without overreacting, they are objectively wrong.
Your guide here is super helpful once you realise you need to “blend combos”, as it were. Jesus! Prompts are so unclear for Thornmarsh.
storm says
i agree the fighting pit where not fun, after having to start over because of auto targeting wrong npc or not getting pause right then having to start the hole sequence over again i just drop the quest. would have been better if you only had to do those moves in any order in the time limit. by the way how long is a pause. 1 second, 2, 3,4. as they are now fighting pit are a waste of time.
Adrian says
Having the same issue. Can’t absolve the training when a combo contains “pause”
SublimeHawk says
The second challenge in Thornmarch is driving me insane. Every time I attempt a jump over, it fails the challenge.
Noel says
These are driving me insane. Only thing left to do for platinum, but for the life of me I can’t get the combos to work. Beyond frustrating.
Sam says
I can confirm that Chainscrape is not needed for the trophy.I’ve got it without even talking to the pit master.
mr castle says
i beat this game on very hard difficulty. i have done all the side quests. i am level 50 and i cant get this trophy. these combos are so stupid, the melee combat system in the first game was barebones. in this game the melee combat doesn’t even function properly. may the lord above help me get this trophy before i break my freaking controller
aro52 says
Ooof the last one at The Bulwark, and now Thornmarsh, are rough. I’m not a fighting game person, and these seem to be clunky inclusions of fighting game combos. Came here looking for a way to cheese em, but looks like it’s a power through and “git gud” moment :*(
Harley says
Ah the melee fighting pits the death of a otherwise great game .what a broken mess
I have a blister from climbing says
Combos went out with flares!, whole game is glitchy, the orange tinge to the environments gave me a constant headache, the climbing was putrid. The future looks grim
Tom says
I absolutely hate this melee input system for the challenges, takes away from the fun of the game, feels broken, feels like a waste of time that your forced to do over and over and over and over and over and over, hate….hate this so stupid!!!
Fishcake66 says
I’m so struggling with the last 2 it’s making me want to quit the game
Nirettzy says
PS5 here. Hello all. To those that have been having issues I finally got it to work. Basically, the last hit is the first hit of the second part etc. for example; Thornmarsh energy surge
R1, R1, R1, pause, HOLD R1, HOLD R2.
The prompts on the screen are just Incorrect. You basically chain the attacks. The last hit of the first combo is the first hit of the second combo etc. To put in it perspective Energy Surge prompts are;
R1, R1, R1, pause, R1
Press and hold R1
R1 then hold R2
Skeet says
Figured it out guys. Basically, time your hits for when aloy actually hits an enemy. For example, the reap and clear challenge:
Press R1 (hit enemy) Press R1 (hit enemy)
Wait a moment
Press R1 (hit enemy) Press R1 +hold (hit enemy)
Reposition If needed
Release R1 then hold R2
Give it a few minutes and you should get it. Don’t try and game the system like above or you’ll get stuck.
Mack says
Skeet you are a God! Got it first try after reading this. Thank you!
Thedane says
They need to not put these in the next game, waste of time and pointless. The hit combo system is literally pointless for any other part of the game.
James Behr says
Does anyone use any of these combos in actual fights outside the pits? I’ve used the Nora warrior and the breaker but none of the rest. Struggling through the challenges for something I never use elsewhere in the game seems pointless.
Stevo says
Really struggling with this spent at least 3 hrs on thornmarsh did as skeet described and still no joy I can never time the hits right when aloys spear flashes and sounds. Is there something I’m doing wrong
Calvin says
I’m at The Enduring, but before i’m even halway down my health bar, Aloy gives up and yeilds. Doing my head in. SOmetime even when she has full health annd nowhere near beaten….yeilding every time.
Eric says
Hate this melee system. The challenges weren’t bad once I figured out you need to wait until she hits to start the next button(which is annoying and sucks) but the pit masters dealing insane damage is beyond aggravating. I’m at the last pit master before enduring and I’m done wasting time betting 1 combo killed from full health. Does better armor help?
Whatever, F this. Set game to story mode, beat pit master, moving on. Will not be remembering melee in this game fondly.
Arthur Dent says
I was having a ton of trouble with these melee pit challenges too, until I realized something: DO NOT HOLD THE JOYSTICK DOWN. Let go of the stick when doing the combos that require a pause in the middle. Also, I think having the blue glow around your spear might interfere sometimes too.