PowerPyx.com

PowerPyx

  • Trophy Guides
  • Game Guides
  • Wikis
  • Trophy Lists
  • Next Guides
  • Contact
Show SearchHide Search
Home » Game Guides » Horizon Forbidden West » Horizon Forbidden West Relic Ruins: No Man’s Land Guide

Horizon Forbidden West Relic Ruins: No Man’s Land Guide

February 17, 2022 by PowerPyx 1 Comment

Relic Ruins: No Man’s Land is a collectible in Horizon Forbidden West. This walkthrough will guide you through all steps of No Man’s Land Relic Ruins.

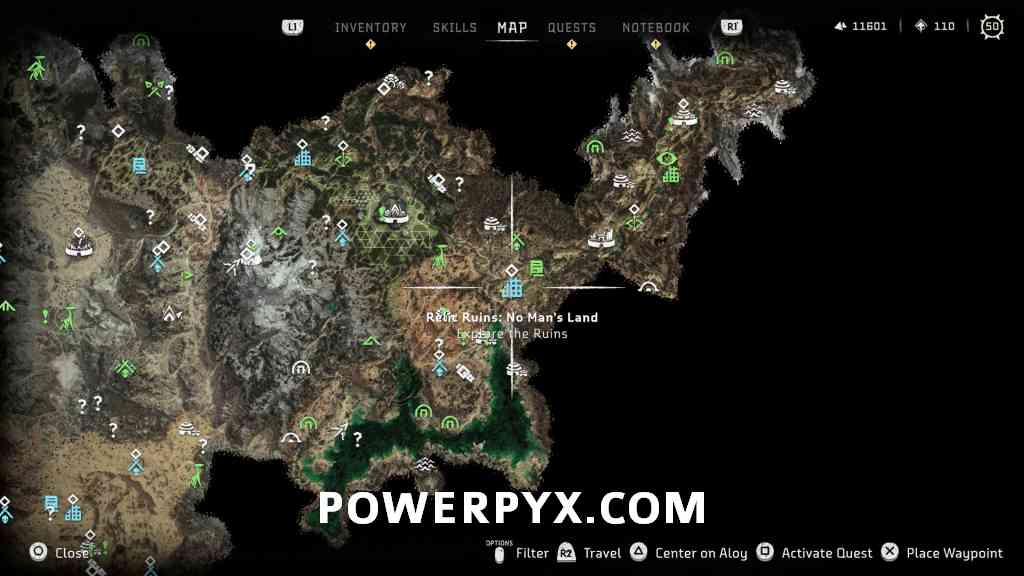
Location – Relic Ruins: No Man’s Land


Walkthrough – Relic Ruins: No Man’s Land

Step 1: Start in the south of the ruins, there’s a crate you can push (or pull it with pullcaster :l2: + :triangle: > hold :r2: ). Push it to the opposite side to a yellow climbing point. Then climb from crate to the climbing point.


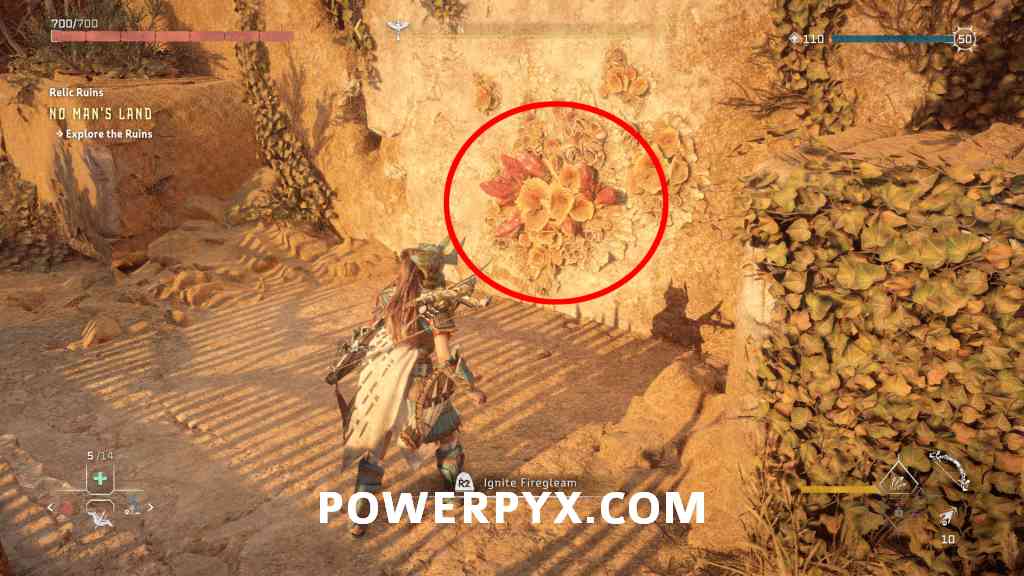
Step 2: After pulling yourself up, head left. There’s a Firegleam (red crystals on wall). Ignite the firegleam to blow up the wall. The ability to do this unlocks in Main Quest 5: Death’s Door.


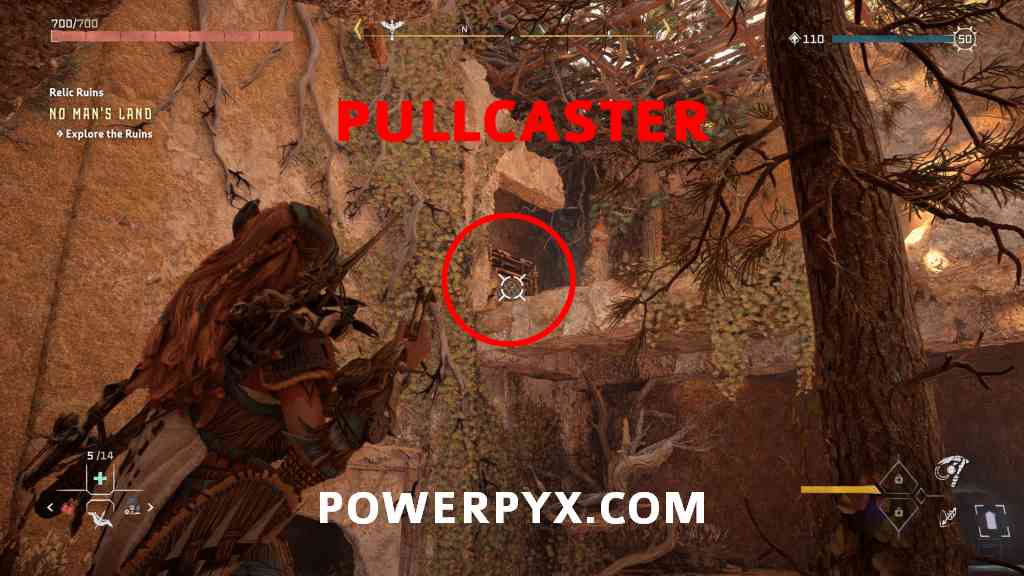
Step 3: Head through the wall and immediately turn left. Don’t drop down yet! In the left room you can use the pullcaster to pull another crate towards you. It will get stuck at a metal grind that’s blocking the way but that’s okay, we need it there for Step 8 later.

Step 4: Now drop down to the bottom floor, which is partially flooded. On the left side is a breakable wall, you must use Pullcaster on the blue grappling point of the wall.

Step 5: Go through the now broken wall, follow the path behind it, leading back outside the north exit of the ruins. There you find another firegleam, blow it up.


Step 6: Behind you find a battery, pick it up.

Step 7: Bring battery back to the partially flooded room (where Step 4 took place). Insert battery in charger station.

Step 8: Now we need the crate from Step 3. Stand a few steps away from the battery charger and use pullcaster on the crate above. Walk around until you find the right distance where your pullcaster can reach it and stand slightly right of it. Sometimes the crate gets stuck behind the wall, just keep pulling on it until it drops down into the partially flooded room.

Step 9: Push crate in the water, place it next to battery charger station. Take out the battery and drop it onto the crate in the water with :triangle: .


Step 10: Now with the battery on top the crate, push the crate through the water to the other side. This way the battery doesn’t get wet (if it touches water it loses its charge).

Step 11: On the other side you can take the battery from the crate and insert it in the wall socket to power up the door above.

Step 12: Also scan the datapoint next to the wall socket, it contains the door code 2204.


Step 13: Push the same crate below the yellow ledges, next to the wall socket. Then from the crate climb up the ledges, at the top ledge press :circle: to jump backward. You’ll land at the locked door.

Step 14: At door panel, enter code 2204. This opens the door and reveals the Ornament relic behind it.


This finishes Relic Ruins: No Man’s Land in Horizon Forbidden West.

For all other Collectibles and Quests, check out the full Horizon Forbidden West 100% Completion Wiki.

« PrevHorizon Forbidden West Relic Ruins: The Daunt GuideNext »Horizon Forbidden West Relic Ruins: Restless Weald Guide
Share
Tweet
Shares 0

Filed Under: Game Guides, Horizon Forbidden West

Comments

  1. B says

    March 1, 2022 at 3:09 am

    What about the crate outside on the ledge. I can’t seem to reach it

    Reply

Leave a Reply Cancel reply

Your email address will not be published. Required fields are marked *

Youtube 1,170,000Subscriber
Facebook 10,006Fans
Twitter 0Followers

Latest Trophy Guides

Clair Obscur: Expedition 33 Trophy Guide

Doom: The Dark Ages Trophy Guide

Forza Horizon 5 Trophy Guide

The Elder Scrolls IV: Oblivion Remastered Trophy Guide

Assassin's Creed Shadows Trophy Guide

Kingdom Come Deliverance 2 Trophy Guide

Red Dead Redemption 2 Trophy Guide

Latest Game Wikis

Assassin's Creed Shadows Wiki

Kingdom Come Deliverance 2 Wiki

Black Myth: Wukong Wiki

Elden Ring Wiki

Hogwarts Legacy Wiki

God of War Ragnarok Wiki

Cyberpunk 2077 Wiki

Red Dead Redemption 2 Wiki

Recent Posts

  • Clair Obscur: Expedition 33 Trophy Guide & Roadmap
  • Clair Obscur: Expedition 33 All Collectible Locations Guide
  • Clair Obscur: Expedition 33 Prologue Collectible Locations
  • Clair Obscur: Expedition 33 Act 1 Collectible Locations
  • Clair Obscur: Expedition 33 Act 2 Collectible Locations

Horizon Forbidden West Wiki

  • Wiki Home
  • Walkthrough
    • Reach for the Stars
    • The Point of the Lance
    • To The Brink
    • The Embassy
    • Death’s Door
    • The Dying Lands
    • The Eye of the Earth
    • The Broken Sky
    • The Kulrut
    • Cradle of Echoes
    • The Sea of Sands
    • Seeds of the Past
    • Faro’s Tomb
    • Gemini
    • All That Remains
    • The Wings of the Ten
    • Singularity
  • Side Quests & Errands
    • Deep Trouble
    • The Twilight Path
    • The Bristlebacks
    • Learning Machine Strike
    • The Enduring
    • A Dash of Courage
    • A Bigger Boom
    • Shadow from the Past
    • Shadow in the West
    • Signals of the Sun
    • The Burning Blooms
    • Need to Know
    • A Tribe Apart
    • Drowned Hopes
    • The Promontory
    • The Roots that Bind
    • The Oldgrowth
    • The Music in Metal
    • The Second Verse
    • What Was Lost
    • Forbidden Legacy
    • Shining Example
    • Thirst for the Hunt
    • The Wound in The Sand
    • The Gate of the Vanquished
    • Burden of Command
    • In Bloom
    • Signal Spike
    • Breaking Even
    • Broken Locks
    • The Deluge
    • The Taste of Victory
    • Sons of Prometheus Data
    • Lofty Ambitions
    • Nights of Lights
    • Boom or Bust
    • Blood for Blood
    • The Valley of the Fallen
    • Supply Drop
    • Call and Response
    • First to Fly
    • A Soldier’s March
    • A Hunt to Remember
    • Tides of Justice
    • In the Fog
    • The Blood Choke
    • The Way Home
    • The Souvenir
  • Machines
    • Grazer
    • Burrower
    • Scrounger
    • Leaplasher
    • Scrapper
    • Spikesnout
    • Skydrifter
    • Plowhorn
    • Charger
    • Lancehorn
    • Longleg
    • Bristleback
    • Fanghorn
    • Redeye Watcher
    • Widemaw
    • Clawstrider
    • Corruptor
    • Bellowback
    • Glinthawk
    • Shell-Walker
    • Stalker
    • Grimhorn
    • Ravager
    • Snapmaw
    • Sunwing
    • Clamberjaw
    • Rollerback
    • Rockbreaker
    • Behemoth
    • Dreadwing
    • Tideripper
    • Shellsnapper
    • Stormbird
    • Thunderjaw
    • Frostclaw
    • Scorcher
    • Slitherfang
    • Tremortusk
    • Fireclaw
    • Slaughterspine
    • Tallneck
    • Specter
    • Specter Prime
  • Weapons
  • Outfits
  • 100% Completion Checklist
  • Tallnecks
  • Hunting Ground Trials
  • Melee Pits
  • Cauldrons
  • Rebel Camps
  • Rebel Outposts
  • Gauntlet Runs
  • Relic Ruins
    • Relic Ruins: The Daunt
    • Relic Ruins: No Man’s Land
    • Relic Ruins: Restless Weald
    • Relic Ruins: The Dry Yearn
    • Relic Ruins: The Stillsands
    • Relic Ruins: Runner’s Wild
    • Relic Ruins: The Long Coast
    • Relic Ruins: Isle of Spires
  • Vista Points
  • Black Boxes
  • War Totems
  • Signal Towers
  • Survey Drones
  • Dyers
  • Salvage Contractors
  • Skills
  • Door Codes
  • How to Get Mount
  • How to Get Flying Mount
  • World Map
  • Trophy List
  • Trophy Guide
  • New Game+ DLC Trophy Guide
  • Terms of Service
  • Privacy Policy
  • Cookie Policy
  • YouTube
  • Facebook
  • Twitter

© 2008-2025 PowerPyx.com, all rights reserved.