PowerPyx.com

PowerPyx

  • Trophy Guides
  • Game Guides
  • Wikis
  • Trophy Lists
  • Next Guides
  • Contact
Show SearchHide Search
Home » Game Guides » Horizon Forbidden West » Horizon Forbidden West Relic Ruins: The Stillsands Guide

Horizon Forbidden West Relic Ruins: The Stillsands Guide

February 17, 2022 by PowerPyx 3 Comments

Relic Ruins: The Stillsands is a collectible in Horizon Forbidden West. This walkthrough will guide you through all steps of The Stillsands Relic Ruins.

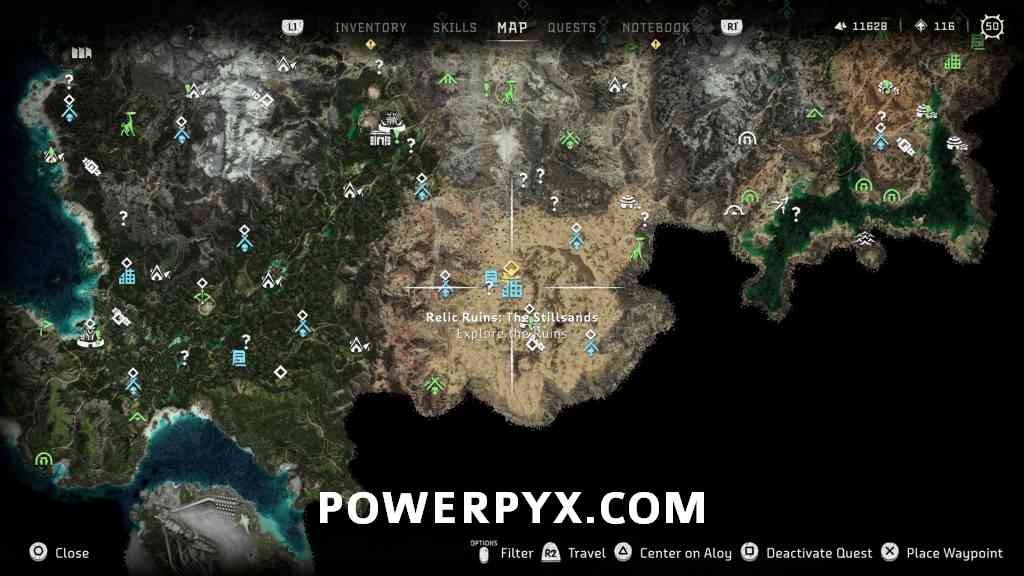
Location – Relic Ruins: The Stillsands


Walkthrough – Relic Ruins: The Stillsands

Step 1: Start in the north of the ruins and enter the broken wall of the ruins. You can use the rubble around the ruins to climb up. Drop to the bottom of the ruins, can use paraglider to avoid falling damage.


Step 2: In the north-west corner of the ruins is a firegleam, destroy it. Behind it you find a crate.


Step 3: Push the crate under the yellow ledge. Climb up.

Step 4: Use the yellow valve. This will cause water to flow in from the pipe but it’s going in the drain. To plug the drain you must push the crate in front of it. Then the water level will rise.


Step 5: Swim to the south-east corner of the ruins, there you find the Key Module for the storage room, pick it up.


Step 6: Use the key module to open the storage room in the north of the ruins. This reveals a second crate.


Step 7: Push the second crate out of the storage room and drop it in the water. Your goal is to get it to the opposite side of the ruins (south side), then you can climb the crate in the water and from there jump to a yellow ledge that lets you climb up to the relic. Getting the crate over there requires using the pullcaster to pull it from one point to the next ( :l2: + :triangle: > hold :r2: ).


Step 8: First, stand at the bottom of the climbable pillar, straight ahead of the storage room. Pull the crate there. You can’t push the crate in the water, you can only pull it while standing on solid ground outside the water.


Step 9: Second, swim to the next pillar (south) and pull the crate there. It sometimes gets stuck behind the first pillar, just try a few times until it gets unstuck.


Step 10: Third, switch over to the other side and pull the crate there.


Step 11: Fourth, go all the way back in the corner at the south-end of the ruins and pull the crate towards the yellow climbable ledge at the end of the path.


Step 12: Now you can climb the crate and from there jump to the yellow ledge, climb up and you’ll find the relic ornament.


This finishes Relic Ruins: The Stillsands in Horizon Forbidden West.

For all other Collectibles and Quests, check out the full Horizon Forbidden West 100% Completion Wiki.

« PrevHorizon Forbidden West Relic Ruins: The Dry Yearn GuideNext »Horizon Forbidden West Relic Ruins: Runner’s Wild Guide
Share
Tweet
Shares 0

Filed Under: Game Guides, Horizon Forbidden West

Comments

  1. Bigfoot141967 says

    June 21, 2022 at 4:17 pm

    There is no crate for me behind the red gleam wall.

    Reply
    • Bigfoot141967 says

      June 21, 2022 at 5:12 pm

      edit : There is however a crate up the slightly curved staircase that I could drag into the room to block the drain. Thankfully the crate behind the key door was there to use in getting the relic. Maybe they changed the location of the crate in a patch.

  2. Alexander says

    August 29, 2022 at 10:18 pm

    Spent more than an hour trying here was no way to do this, could not get pullcaster to attach for the final pull. So i ended up removing the first crate to drain the water, then placed the second crate where it was needed, then flooding the place again.

    Reply

Leave a Reply Cancel reply

Your email address will not be published. Required fields are marked *

Youtube 1,210,000Subscriber
Facebook 15,000Fans
Twitter 19,200Followers

Latest Trophy Guides

Code Vein 2 Trophy Guide

Red Dead Redemption Remaster Trophy Guide

The Outer Worlds 2 Trophy Guide

Tormented Souls 2 Trophy Guide

Ninja Gaiden 4 Trophy Guide

Battlefield 6 Trophy Guide

Ghost of Yotei Trophy Guide

Silent Hill f Trophy Guide

Dying Light: The Beast Trophy Guide

Borderlands 4 Trophy Guide

Metal Gear Solid 3 Delta Trophy Guide

Mafia The Old Country Trophy Guide

Kingdom Come Deliverance 2 Trophy Guide

Red Dead Redemption 2 Trophy Guide

Latest Game Wikis

Pokemon Legends Z-A Wiki

Ghost of Yotei Wiki

Borderlands 4 Wiki

Kingdom Come Deliverance 2 Wiki

Elden Ring Wiki

Hogwarts Legacy Wiki

God of War Ragnarok Wiki

Cyberpunk 2077 Wiki

Red Dead Redemption 2 Wiki

Recent Posts

  • Code Vein 2 Trophy Guide & Roadmap
  • Code Vein 2 All Requests (Side Quests) Guide
  • Code Vein 2 All Golden Nectar Locations
  • Code Vein 2 All Golden Blood Bead Locations
  • Code Vein 2 All Endings Guide

Horizon Forbidden West Wiki

  • Wiki Home
  • Walkthrough
    • Reach for the Stars
    • The Point of the Lance
    • To The Brink
    • The Embassy
    • Death’s Door
    • The Dying Lands
    • The Eye of the Earth
    • The Broken Sky
    • The Kulrut
    • Cradle of Echoes
    • The Sea of Sands
    • Seeds of the Past
    • Faro’s Tomb
    • Gemini
    • All That Remains
    • The Wings of the Ten
    • Singularity
  • Side Quests & Errands
    • Deep Trouble
    • The Twilight Path
    • The Bristlebacks
    • Learning Machine Strike
    • The Enduring
    • A Dash of Courage
    • A Bigger Boom
    • Shadow from the Past
    • Shadow in the West
    • Signals of the Sun
    • The Burning Blooms
    • Need to Know
    • A Tribe Apart
    • Drowned Hopes
    • The Promontory
    • The Roots that Bind
    • The Oldgrowth
    • The Music in Metal
    • The Second Verse
    • What Was Lost
    • Forbidden Legacy
    • Shining Example
    • Thirst for the Hunt
    • The Wound in The Sand
    • The Gate of the Vanquished
    • Burden of Command
    • In Bloom
    • Signal Spike
    • Breaking Even
    • Broken Locks
    • The Deluge
    • The Taste of Victory
    • Sons of Prometheus Data
    • Lofty Ambitions
    • Nights of Lights
    • Boom or Bust
    • Blood for Blood
    • The Valley of the Fallen
    • Supply Drop
    • Call and Response
    • First to Fly
    • A Soldier’s March
    • A Hunt to Remember
    • Tides of Justice
    • In the Fog
    • The Blood Choke
    • The Way Home
    • The Souvenir
  • Machines
    • Grazer
    • Burrower
    • Scrounger
    • Leaplasher
    • Scrapper
    • Spikesnout
    • Skydrifter
    • Plowhorn
    • Charger
    • Lancehorn
    • Longleg
    • Bristleback
    • Fanghorn
    • Redeye Watcher
    • Widemaw
    • Clawstrider
    • Corruptor
    • Bellowback
    • Glinthawk
    • Shell-Walker
    • Stalker
    • Grimhorn
    • Ravager
    • Snapmaw
    • Sunwing
    • Clamberjaw
    • Rollerback
    • Rockbreaker
    • Behemoth
    • Dreadwing
    • Tideripper
    • Shellsnapper
    • Stormbird
    • Thunderjaw
    • Frostclaw
    • Scorcher
    • Slitherfang
    • Tremortusk
    • Fireclaw
    • Slaughterspine
    • Tallneck
    • Specter
    • Specter Prime
  • Weapons
  • Outfits
  • 100% Completion Checklist
  • Tallnecks
  • Hunting Ground Trials
  • Melee Pits
  • Cauldrons
  • Rebel Camps
  • Rebel Outposts
  • Gauntlet Runs
  • Relic Ruins
    • Relic Ruins: The Daunt
    • Relic Ruins: No Man’s Land
    • Relic Ruins: Restless Weald
    • Relic Ruins: The Dry Yearn
    • Relic Ruins: The Stillsands
    • Relic Ruins: Runner’s Wild
    • Relic Ruins: The Long Coast
    • Relic Ruins: Isle of Spires
  • Vista Points
  • Black Boxes
  • War Totems
  • Signal Towers
  • Survey Drones
  • Dyers
  • Salvage Contractors
  • Skills
  • Door Codes
  • How to Get Mount
  • How to Get Flying Mount
  • World Map
  • Trophy List
  • Trophy Guide
  • New Game+ DLC Trophy Guide
  • Terms of Service
  • Privacy Policy
  • Cookie Policy
  • YouTube
  • Facebook
  • Twitter

© 2008-2025 PowerPyx.com, all rights reserved.